Community Brag Posts

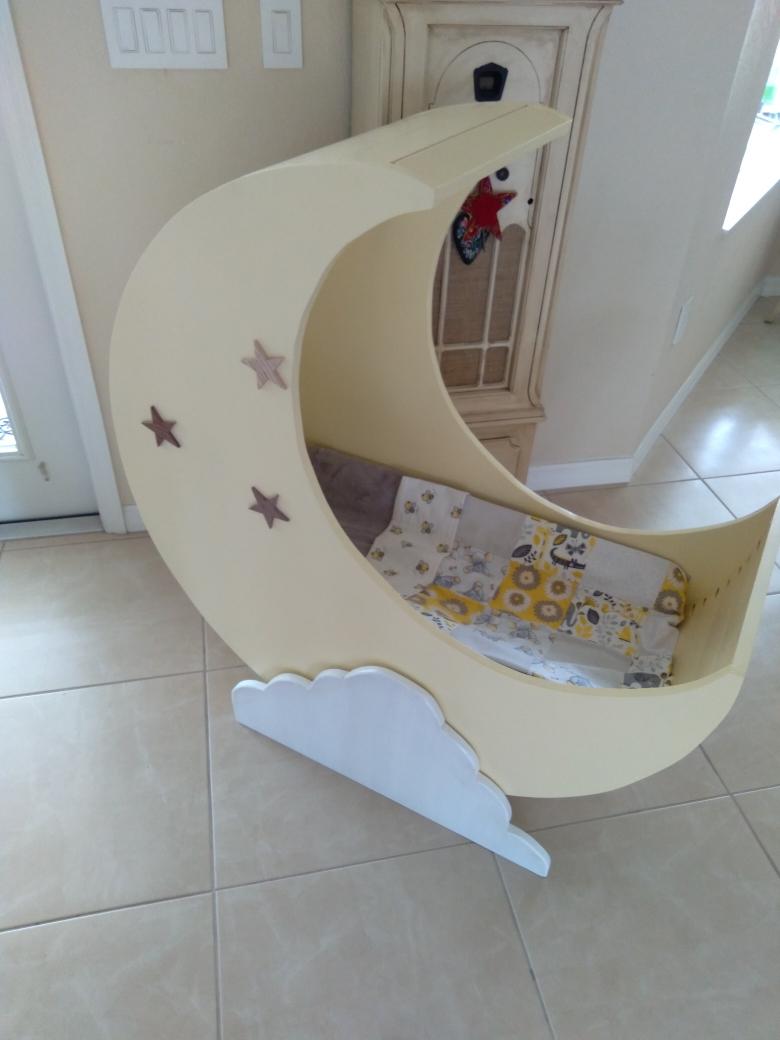
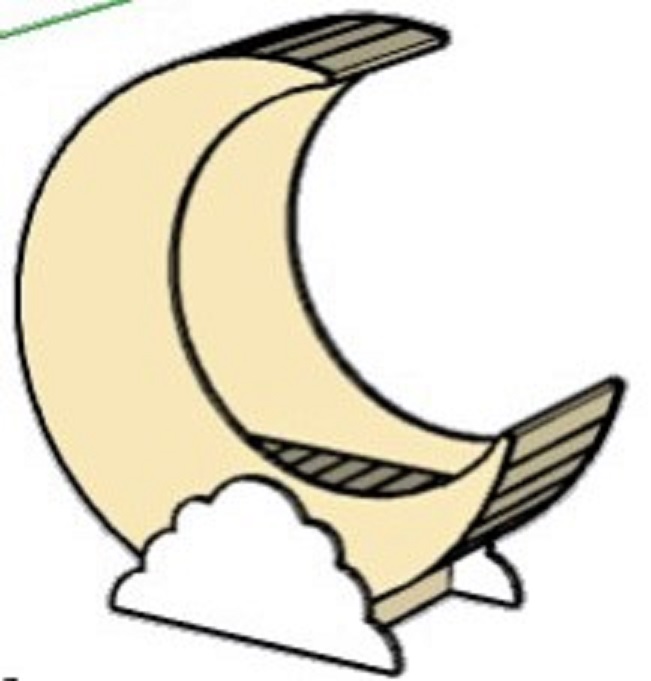
Half Moon Baby Cradle

Submitted by calcowoods on Thu, 12/31/2020 - 10:40

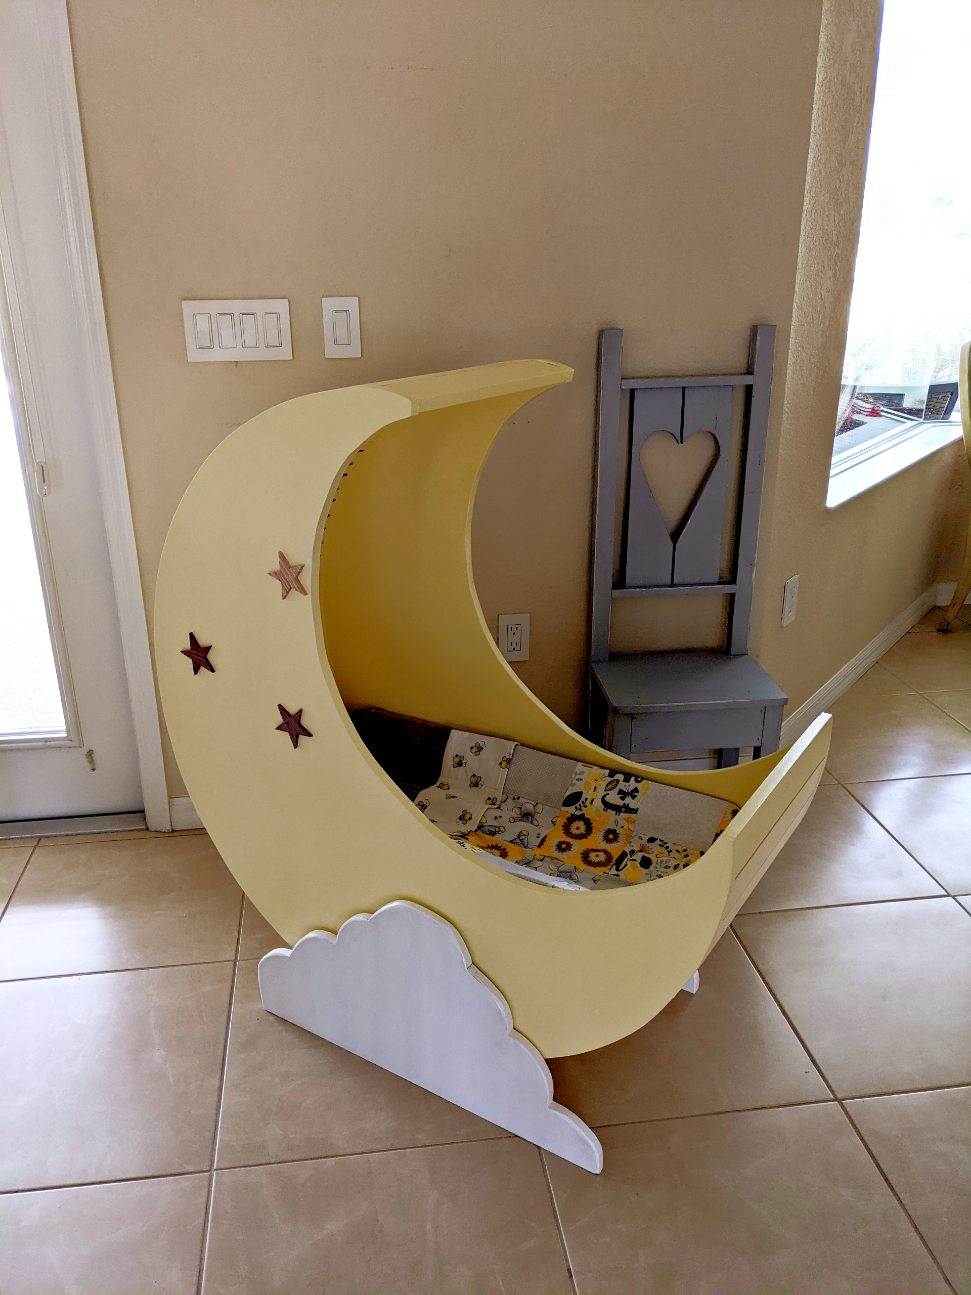
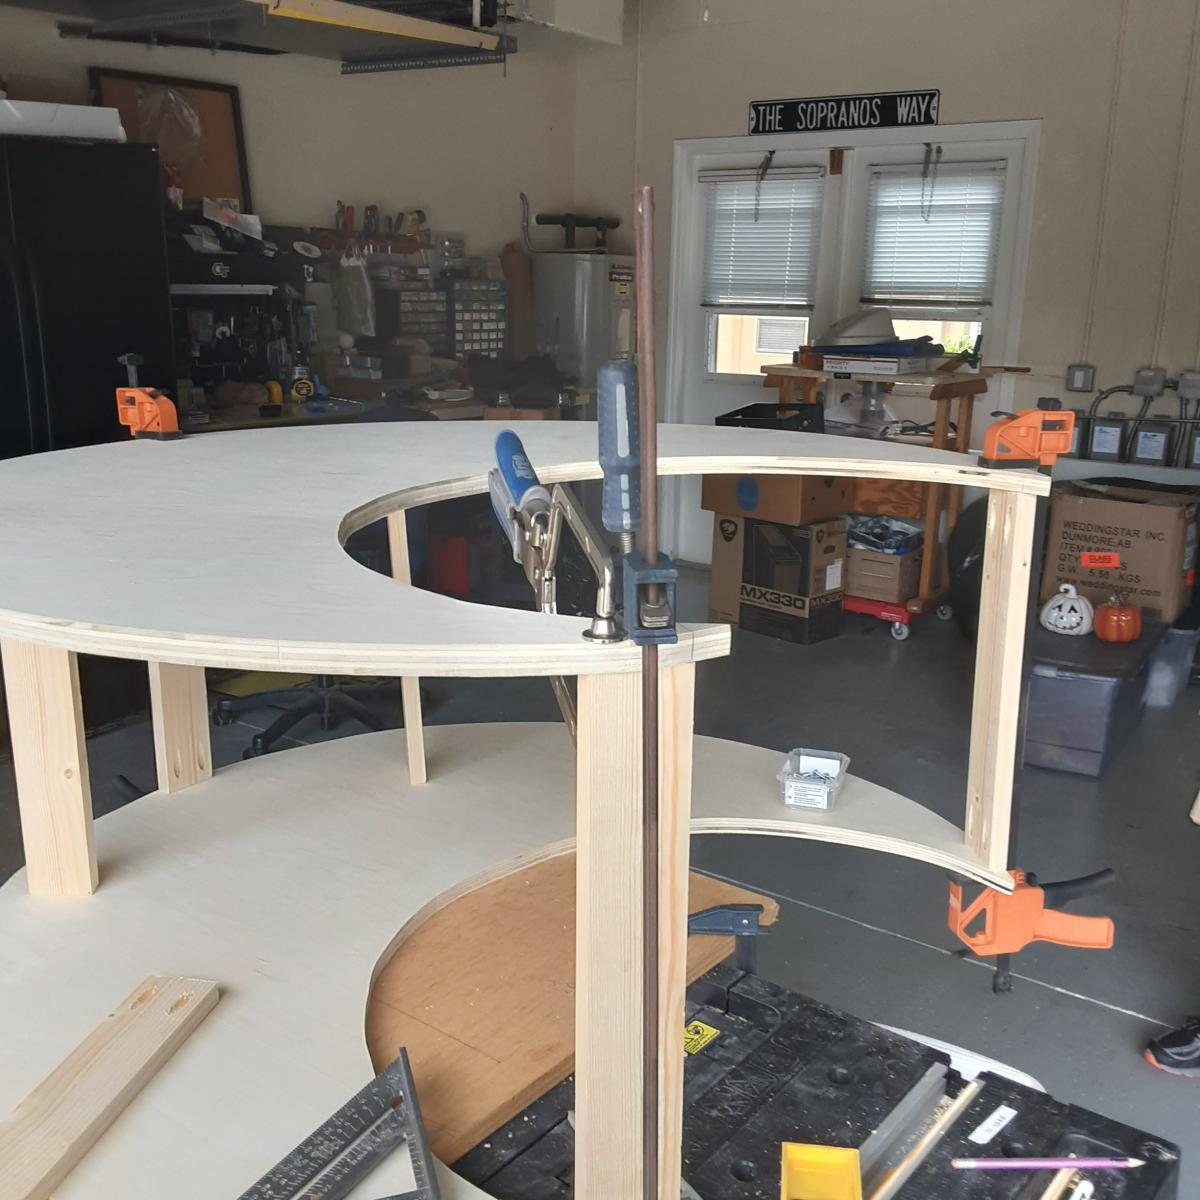
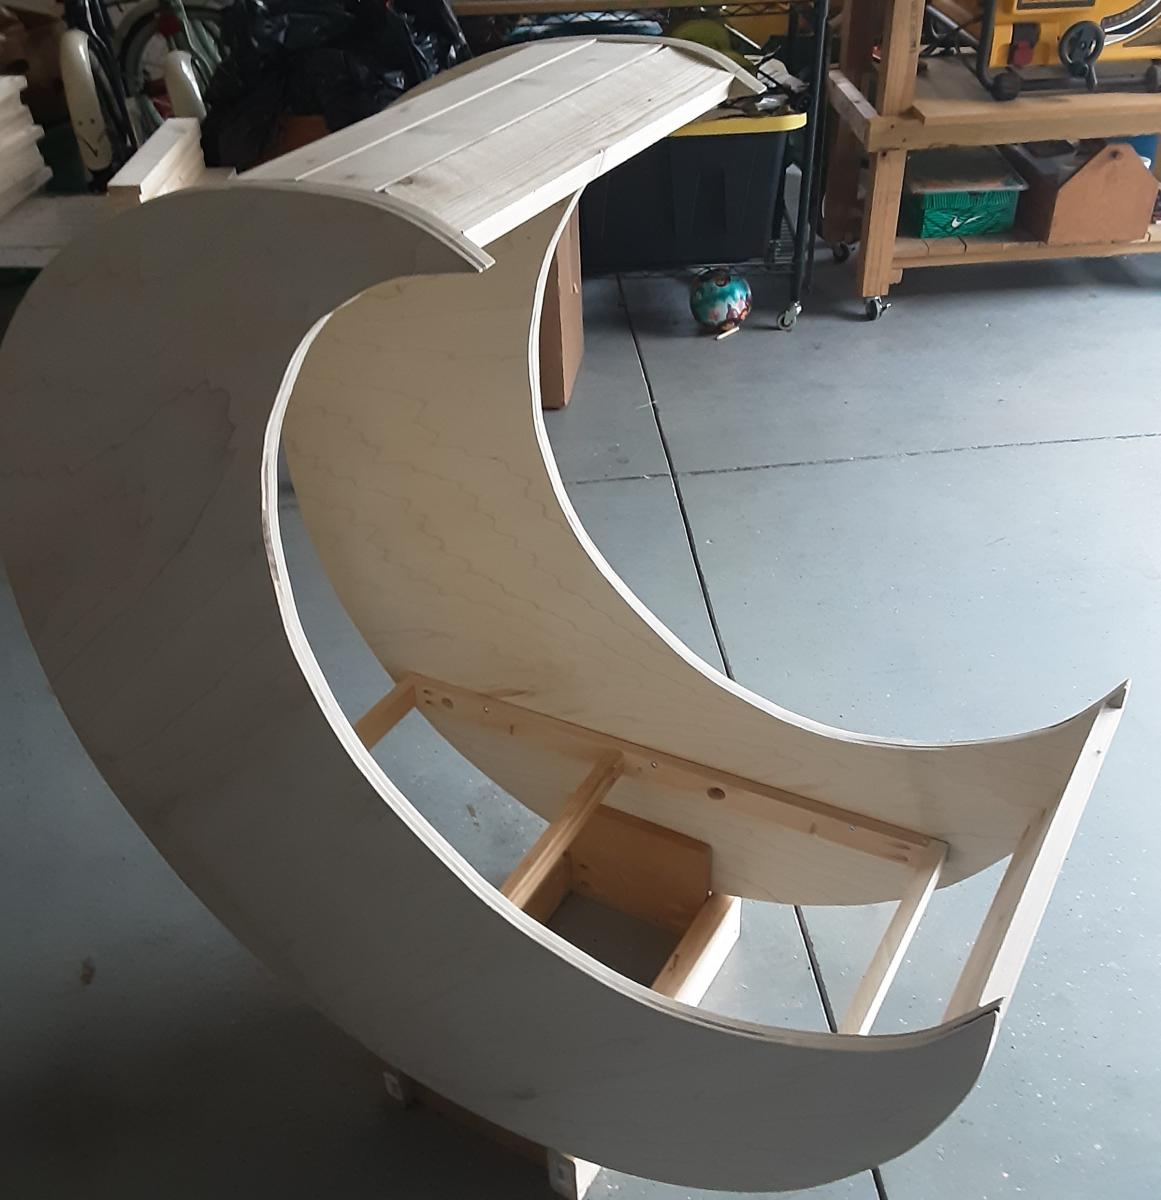
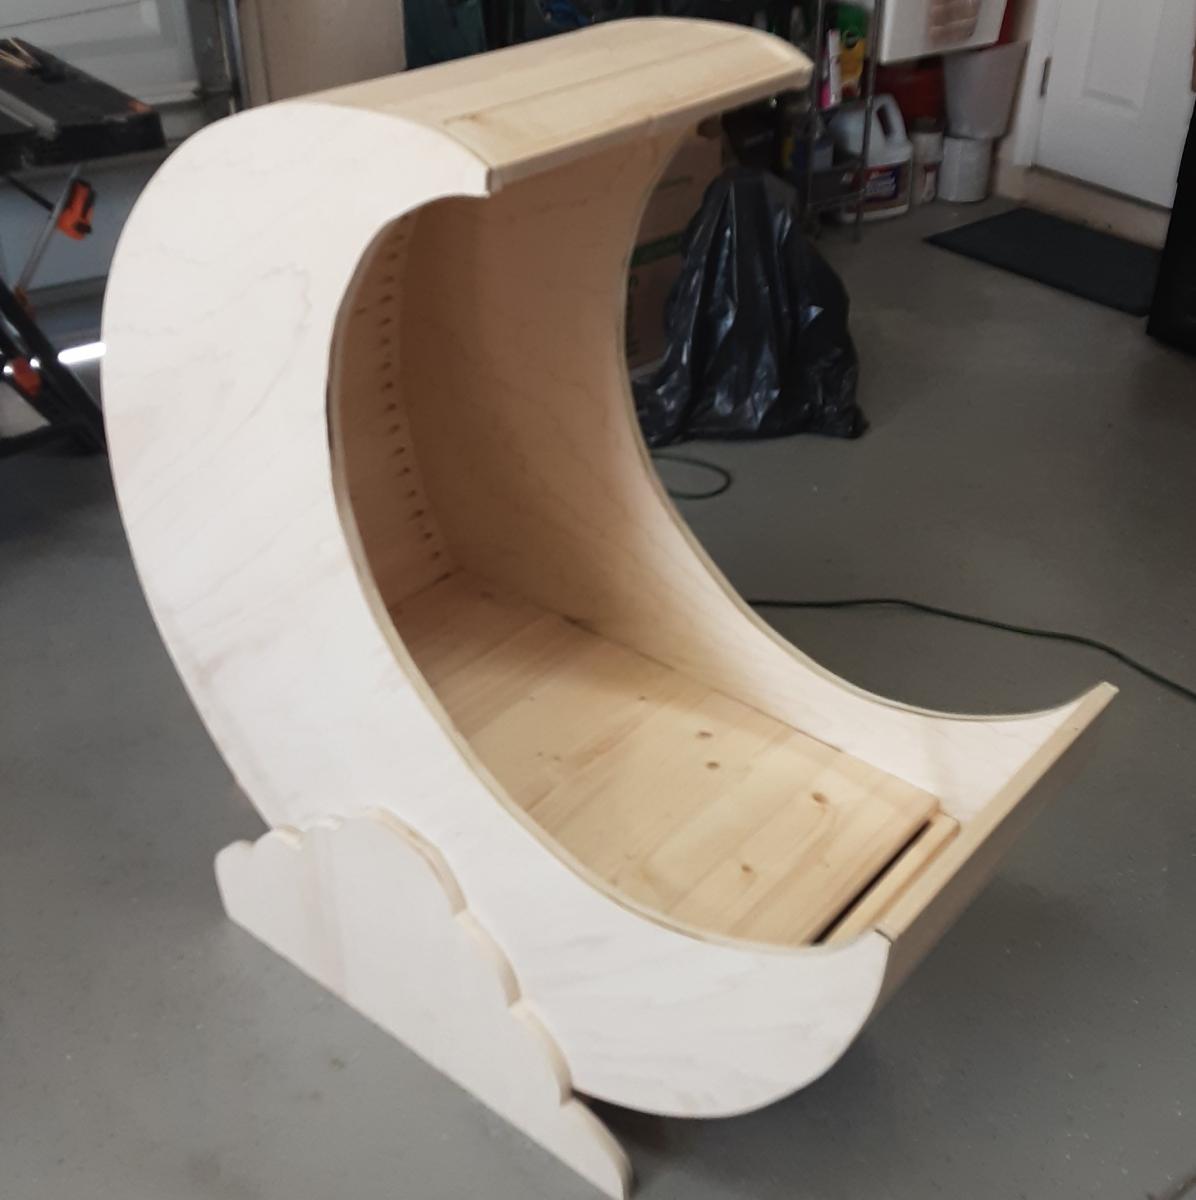
Built for my first Grandson Lucas. Made of pure bond poplar plywood and white pine. Templates were made of cardboard for a circle (20" radius) and a circle (14.5" radius). Placed small circle inside the larger circle to create a half moon shape. Identical sides were cut from the plywood. Extensive use of Kreg pocket holes to attach (25) 16" boards to the plywood sides. Each board requires 2 pocket holes (1 1/4) on each side. Added a base to the cradle for stability and attached plywood cloud shapes to cover base and add a decorative touch. Frame installed and attached rails to the inside supporting 30" by 16" infant mattress.

Estimated Cost
$100
Estimated Time Investment
Week Long Project (20 Hours or More)
Finish Used
Behr Vanilla Ice Cream; White for clouds
Recommended Skill Level
Intermediate

Comments

Paulamclaw

Tue, 03/29/2022 - 15:31

Hi,
Where do I find the plans for this? My daughter just told us she is pregnant and I want my husband to start making this 🥰
Thank you so much,

Farmhouse Table, Bench, and Extensions

Submitted by lphair on Tue, 02/05/2013 - 00:11

My second farmhouse table, and much easier this time around! Like the first one I built, this one was modified from Tommy's plans (see link below) which was modified from Ana's plans on this site.

Before I put everything together, I used a 1/2" round-over bit on a trim router to round the edges of each piece individually, then sanded each piece individually. After everything was routed and sanded, I joined it all together--it kind of reminds me of Lincoln Logs now!

One other thing I did differently with this table, is I filled in the cracks with a darker wood putty. I love that it has the plank lines without the crevice for crumbs, etc. to fall into.

I finished with Rust-oleum Early American stain and Rust-oleum poly in semi-gloss.

I'm having trouble linking the plans, so again--these are modified from the Farmhouse Table Update Pocket Hole plans on this site, and also from this site: http://tommyandellie.com/?p=2582

Estimated Cost
$150
Estimated Time Investment
Weekend Project (10-20 Hours)
Finish Used
Rust-oleum Early American and Rust-oleum semi-gloss poly
Recommended Skill Level
Beginner

Ornament

Submitted by spiceylg on Tue, 12/09/2014 - 06:28

I will be getting together with my girl's group and exchanging ornaments, which are supposed to be handmade. I was determined to use only what I had on-hand. I didn't use a plan and this is what I came up with. I did have to go buy the bling, sparkles and a hook but I had everything else. I'm pretty happy with it. By the way those pedals are made from wood biscuits! Not sure why this is uploading sideways as its not sideways in my file.

Estimated Cost
Minimal.
Estimated Time Investment
An Hour or Two (0-2 Hours)
Finish Used
Valspar sample paint jar for background, sorry don't know color. Sharpie paint pens in red and silver for lettering.
Recommended Skill Level
Beginner

Industrial Closet Organizer

Submitted by jvos on Sun, 03/12/2017 - 13:16

I originally built this for a small closet in an old home.  When I moved, I took it with me and was able to rearrange it to fit in a traditional closet.  The center section is a modification of a toy storage plan that I use to store folded clothes.

Estimated Cost
I used 1/2" galvanized pipe and that alone was $80. The lumber was probably $20-$30 more.
Estimated Time Investment
Afternoon Project (3-6 Hours)
Finish Used
unfinished
Recommended Skill Level
Beginner

Twin over full bunk bed with stairs

Submitted by Anonymous (not verified) on Sun, 01/03/2021 - 10:00

Liked the plan took way longer to sand and get everything cleaned up than it took to build.

1x3 slats for under the bed.

Made it extra high just full 8’ boards for the posts and added extra railing and dropped a 12” twin in.

It’s super sturdy, used scraps to add a headboard where the stairs are.

Turned out well

Comments

Rustic Table and Bench

I basically stuck to the plans, but I shortened the length of the table just a touch, and lengthened the bench to fit just inside the legs. I also used 2x4s for the legs, tapered them for aesthetics (similar to some other posters), and reinforced them with "L" brackets to reduce the wobble. We finished it with Semigloss white paint, Minwax Honey stain, and Minwax Gloss Polyurethane.

If I can make this table, just about anyone can.

Estimated Cost
150.00 for lumber,
Estimated Time Investment
Afternoon Project (3-6 Hours)
Finish Used
Minwax Honey Stain, Minwax Gloss Polyurethane, and Semigloss White Paint
Recommended Skill Level
Beginner

Comments

shelbyautumn

Mon, 11/07/2016 - 11:29

Your table is beautiful!

Do you remember how you tapered your legs? I'm trying to figure out if I can do it without a table saw.

Thank you!

We made 4 snowflakes

I really loved these my son 13 and me made 4 to hang on our fence they turned out so great! The nieghbors thanked me becuse they get see them everyday!

Built from Plan(s)
Estimated Time Investment
Day Project (6-9 Hours)
Recommended Skill Level
Beginner

Comments

Corner Bookshelf

Submitted by Anonymous (not verified) on Tue, 03/14/2017 - 11:41

I took the plans loosely from what I saw here, but adjusted the size to fit my needs. I had a bunch of old wood that worked great for a rustic look (nail holes and all), so my only costs on this project were the hardware and some nails for my nailgun. I finished it off with some paint and stain I had laying around, to give it a little character. Great project for under $15 (for me, at least).

Built from Plan(s)
Estimated Cost
$15
Estimated Time Investment
Day Project (6-9 Hours)
Finish Used
Gloss white paint (oil-based), dark walnut stain for antique effect. After the paint dried, I rough-sanded some of the edges, then followed that with the stain. I wiped into the edges that were sanded, and in most of the corners, then followed up with a dry rag to wipe away any extra. Kept the stain pretty light for the most part.
Recommended Skill Level
Beginner

Farmhouse Indoor Playhouse - I May have gone a little overboard...

Submitted by Anonymous (not verified) on Fri, 01/08/2021 - 19:38

Thanks for your amazing Farmhouse Indoor Playhouse plans!
So easy to follow your directions! I may have gone a little overboard.
I used some scrap wood from recent Renos and wood from an old boxspring my parents had.
The kitchen was originally from Ikea with some updates.
The shrubs are silk plants from Ikea and scrap wood.
The only real cost was Paint $30 ish.

Built from Plan(s)
Estimated Cost
50
Estimated Time Investment
Weekend Project (10-20 Hours)
Recommended Skill Level
Beginner

Comments

Seasonal And Holiday

Firewood shed

Submitted by Nowak on Sat, 02/09/2013 - 15:53

Build this firewood shed over one weekend and stained it the following weekend. This was my first project and I only received a little help from my boyfriend. Can't wait to start my next project.

Built from Plan(s)
Estimated Time Investment
Weekend Project (10-20 Hours)
Recommended Skill Level
Beginner

pirate ship teeter totter

Submitted by Grammi Nat on Mon, 12/15/2014 - 12:26

I have 3 Grandson's that love to be pirates so I decided to make them a pirate ship teeter totter. After searching the Web for plans and finding nothing I was looking for I decided to just go for it and see what I could come up with. This pirate ship is heavy duty. I use 2x8's, 2x10's and 2x12's for the frame and seats and 1x10's and 1x12's for the inside foot platform. It's 5ft long, 3ft wide and 3ft high. I had to put some stop blocks on it or it would of been a catapult instead of a teeter totter. (I know this because I climbed on and took it for a ride) Everything is connected using pocket holes and pocket hole screws (Thanks to my Kreg jig) I added a pole up the center and added a pirates flag and puts some swords on the sides. The kids sure have fun on it and so do I.

Estimated Cost
$200.00
Estimated Time Investment
Week Long Project (20 Hours or More)
Finish Used
Red, white and black exterior paint and poly finish
Recommended Skill Level
Beginner

Comments

Microwave stand/wine rack

Submitted by lacroix19 on Wed, 01/13/2021 - 15:29

Definitely not perfect and it took me a little while! But so glad I found these plans and was able to add my little personal touch to it!

Estimated Time Investment
Week Long Project (20 Hours or More)

Comments

Natural Rustic X End Table

Submitted by aleeman27 on Mon, 02/11/2013 - 22:15

This project was taken from the Rustic X End Table plan. This is my second big project that I have attempted and I am still learning from my mistakes made from making the Rustic X Coffee Table. Hope you enjoy!

Built from Plan(s)
Estimated Time Investment
Week Long Project (20 Hours or More)
Finish Used
I used an ebony wood filler to fill any cracks around the knots. Then I used Cabots "natural" wood stain just like I did on my Rustic X Coffee Table. Followed by 3-5 coats of Cabots glossy poly. Make sure you use a finishing sponge or sandpaper between each coat! Once it set for a day I added the wrought iron corner pieces and hammered iron clavos.
Recommended Skill Level
Intermediate

Comments

aleeman27

Mon, 02/11/2013 - 22:25

Working around my work schedule and dry times of the poly these 2 end tables took me quite sometime! But I am super happy with the result! They go so perfect with my Rustic X Coffee Table!

Wounded Marine

Tue, 02/12/2013 - 07:01

Table looks good. I like the natural wood color with the black add ons. I noticed the one "X" is a little off. You might want to check the squareness of your chop saw. If the fence is perfectly square to your blade when set at 90 degrees it will throw everything off. You are off to a good start though.

Chevron Wood Headboard

Submitted by kowalsme on Wed, 12/17/2014 - 08:27

Took the general dimensions from these reclaimed wood plans and modified them to include a chevron back. The most difficult aspect was determining the cut marks for each chevron piece and rounding the edges to bring out the details.

Finished the headboard with a satin-finish, oil-based enamel paint.

Additional pictures and information available on my website.

Estimated Cost
$80-$100
Estimated Time Investment
Weekend Project (10-20 Hours)
Finish Used
Benjamin Moore Satin Impervo color matched to Martha Stewart "Plumage"
Recommended Skill Level
Beginner

6 cube bookshelf

Submitted by Anonymous (not verified) on Sun, 03/19/2017 - 15:49

This is one of my first projects. Thanks for the great plans. My daughter loves her new toy storage.

Estimated Cost
$75
Estimated Time Investment
Weekend Project (10-20 Hours)
Finish Used
White and gray stain.
Recommended Skill Level
Beginner

Settlers of Catan board

I took an edge glued round board and chisled out the profile of a Catan game board. Then I torched it, added some polyurethane and lined the bottom with felt.

Estimated Cost
$30.00
Estimated Time Investment
Day Project (6-9 Hours)
Finish Used
Propane torched and polyurethane
Recommended Skill Level
Beginner

Comments

Kentwood Book Shelf

This was my first major build with plans from Ana. I actually found this bookcase via Shanty2Chic. It went smoothly and all in all took me a few evenings about an hour at a time. I have 3 kids so it did take me a little longer to finish. I am so impressed with myself and so is my husband. I used a 10" chopsaw for most of the cuts. I also used my KregJig. Thanks Ana!

Estimated Cost
$100
Estimated Time Investment
Day Project (6-9 Hours)
Finish Used
Minwax Special Walnut followed by Annie Sloan Chalk Paint Dark Wax Finish.
Recommended Skill Level
Intermediate

Comments

BIG Storage Cabinet

Submitted by LHeath on Sat, 12/20/2014 - 21:30

I desperately needed storage in our 1910 house that was not in the basement.  I wanted a place to keep my sewing machine and accessories, at-home school supplies, and other odds and ends.  We had an alcove in the kitchen that was about 74 inches wide and 17 inches deep, so I decided to build something to fit that space.  I really liked the Simplest Armoire plan but I also really liked the Kentwood Bookshelf, so I ended up somewhat combining the two.  Since I had a fairly large space, I made the cabinet about 6 ft X 6 ft.  The hardest part was getting it into the house.  This project was my first big DIY building project without my dad's help.  I did call him a few times during the project however, and he helped me hang the doors.  I really enjoyed using the Kreg Jig and I appreciated having all of the Kreg Jig instructions for the Kentwood Bookshelf.  It was a huge help, as I had only used the Kreg Jig a little and with my dad in the past.  My husband has been a great support as I have ventured into building furniture.  He works from home, but any time that I needed him to help hold a large sheet of plywood he was quick to help.  This was definitely a big project for a beginner, but I enjoy a challenge when it comes to fixing things and creating things. Fortunately, this one worked out in the end!  Now what should I build next summer...

Estimated Time Investment
Week Long Project (20 Hours or More)
Finish Used
paint - Behr Premium Plus Ultra Raw Cinnabar; I added conditioner. 2-3 coats
Recommended Skill Level
Beginner

Comments

TheRealMcGaughey

Sun, 05/31/2020 - 13:27

This is so great, and I can't wait to try my hand at emulating it. I'm buying a place so old there's no record of a date. Still has adobe bricks with straw sticking out stored up in the attic. Not a closet in the whole darn place, so I'll probably end up making more than one, and probably using one as a clothes closet and another as a pantry. Thanks so much for sharing this!

Craft paper holder

Submitted by Anonymous (not verified) on Tue, 03/21/2017 - 17:29

Followed simple instructions, but  added my own twist.  Do it yourself craft paper holder. 

Estimated Cost
25.00 with paper
Estimated Time Investment
An Hour or Two (0-2 Hours)
Recommended Skill Level
Beginner

Garage "Mudroom" Organizer

Submitted by leoguy09 on Thu, 01/21/2021 - 06:39

My home doesn't have a mudroom. When guests come to visit, there is no convenient place for them to take off their shoes or to hang wet coats. I saw this plan in a Family Handyman project book and thought it looked like the perfect solution.

The build was easy and straightforward. The hardest part of the entire project was mounting it on the garage wall. When I tried to use a stud finder, I realized that there was a layer of osb between the drywall and the studs, rendering the stud finder useless (even on the "Deep Scan" setting). I ended up having to carefully measure stud locations on the opposite wall (inside the house) and transfer those locations onto the garage wall. It worked out okay, but took a long time!

I carefully positioned this project so that I would have plenty of room for my next project, on the same wall - Ana's Ultimate Roll-Away Workbench and a set of shop cabinets!

Estimated Cost
$222
Estimated Time Investment
Weekend Project (10-20 Hours)
Finish Used
Valspar Pre-Tinted Canyon Brown Transparent Exterior Stain and Sealer (Lowe's)

This was the easiest finish I have ever used. No odor, one coat application. It doesn't provide a smooth or easy to clean surface, but the color is nice, and it seals the wood from moisture. This product is intended for decks and outdoor furniture.
Recommended Skill Level
Beginner

Comments