Community Brag Posts
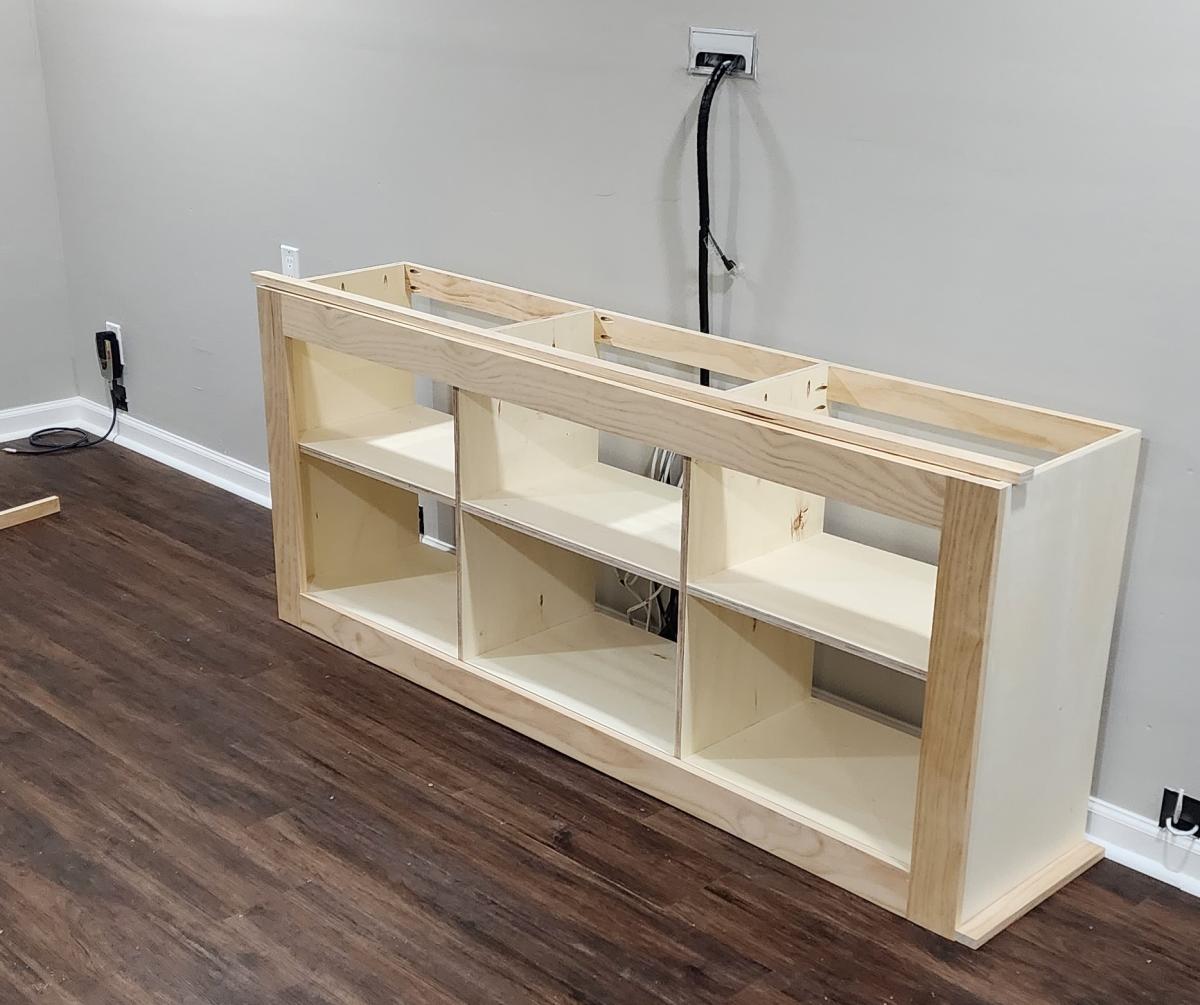
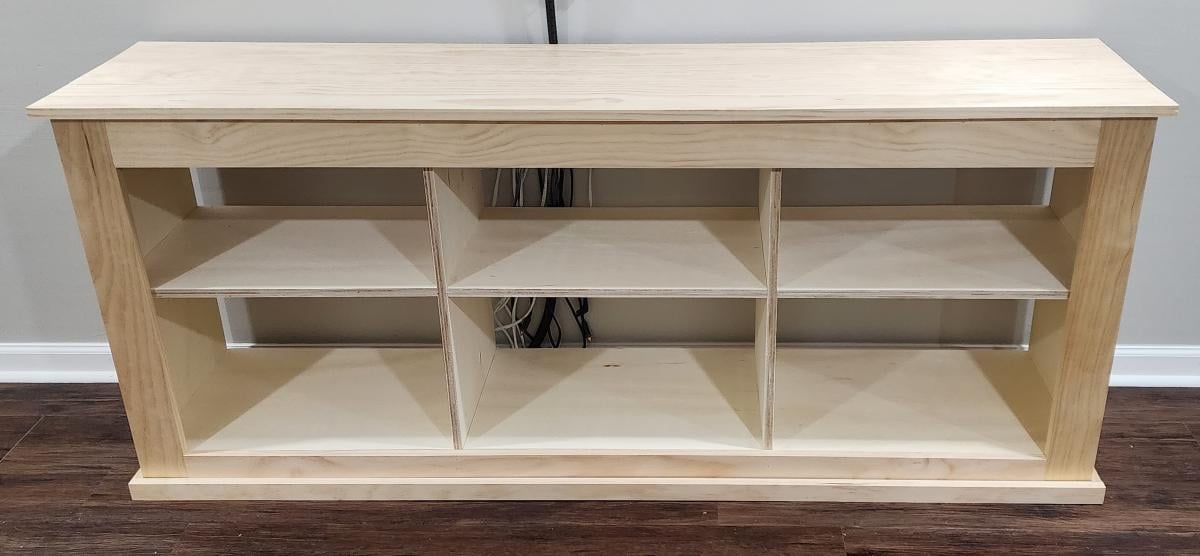
Tv console
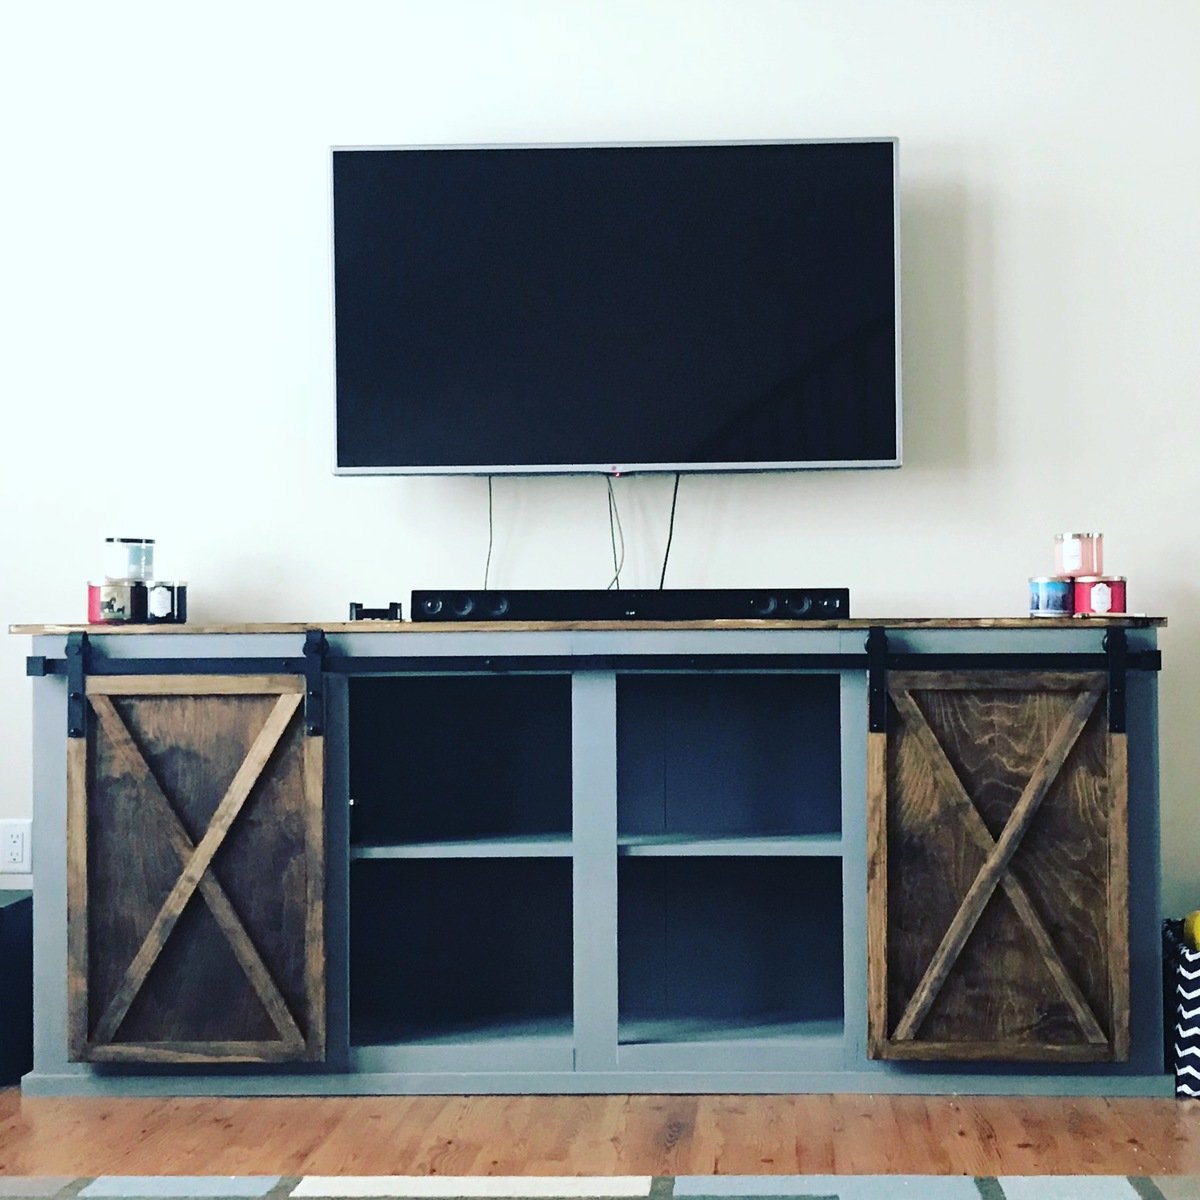
This project was fun. The hardest part was trying to find barn door hardware. I did end up finding one on amazon but it was still too long and had to cut it down. Very doable in a weekend.
Built from Plan(s)
Estimated Time Investment
Weekend Project (10-20 Hours)
Finish Used
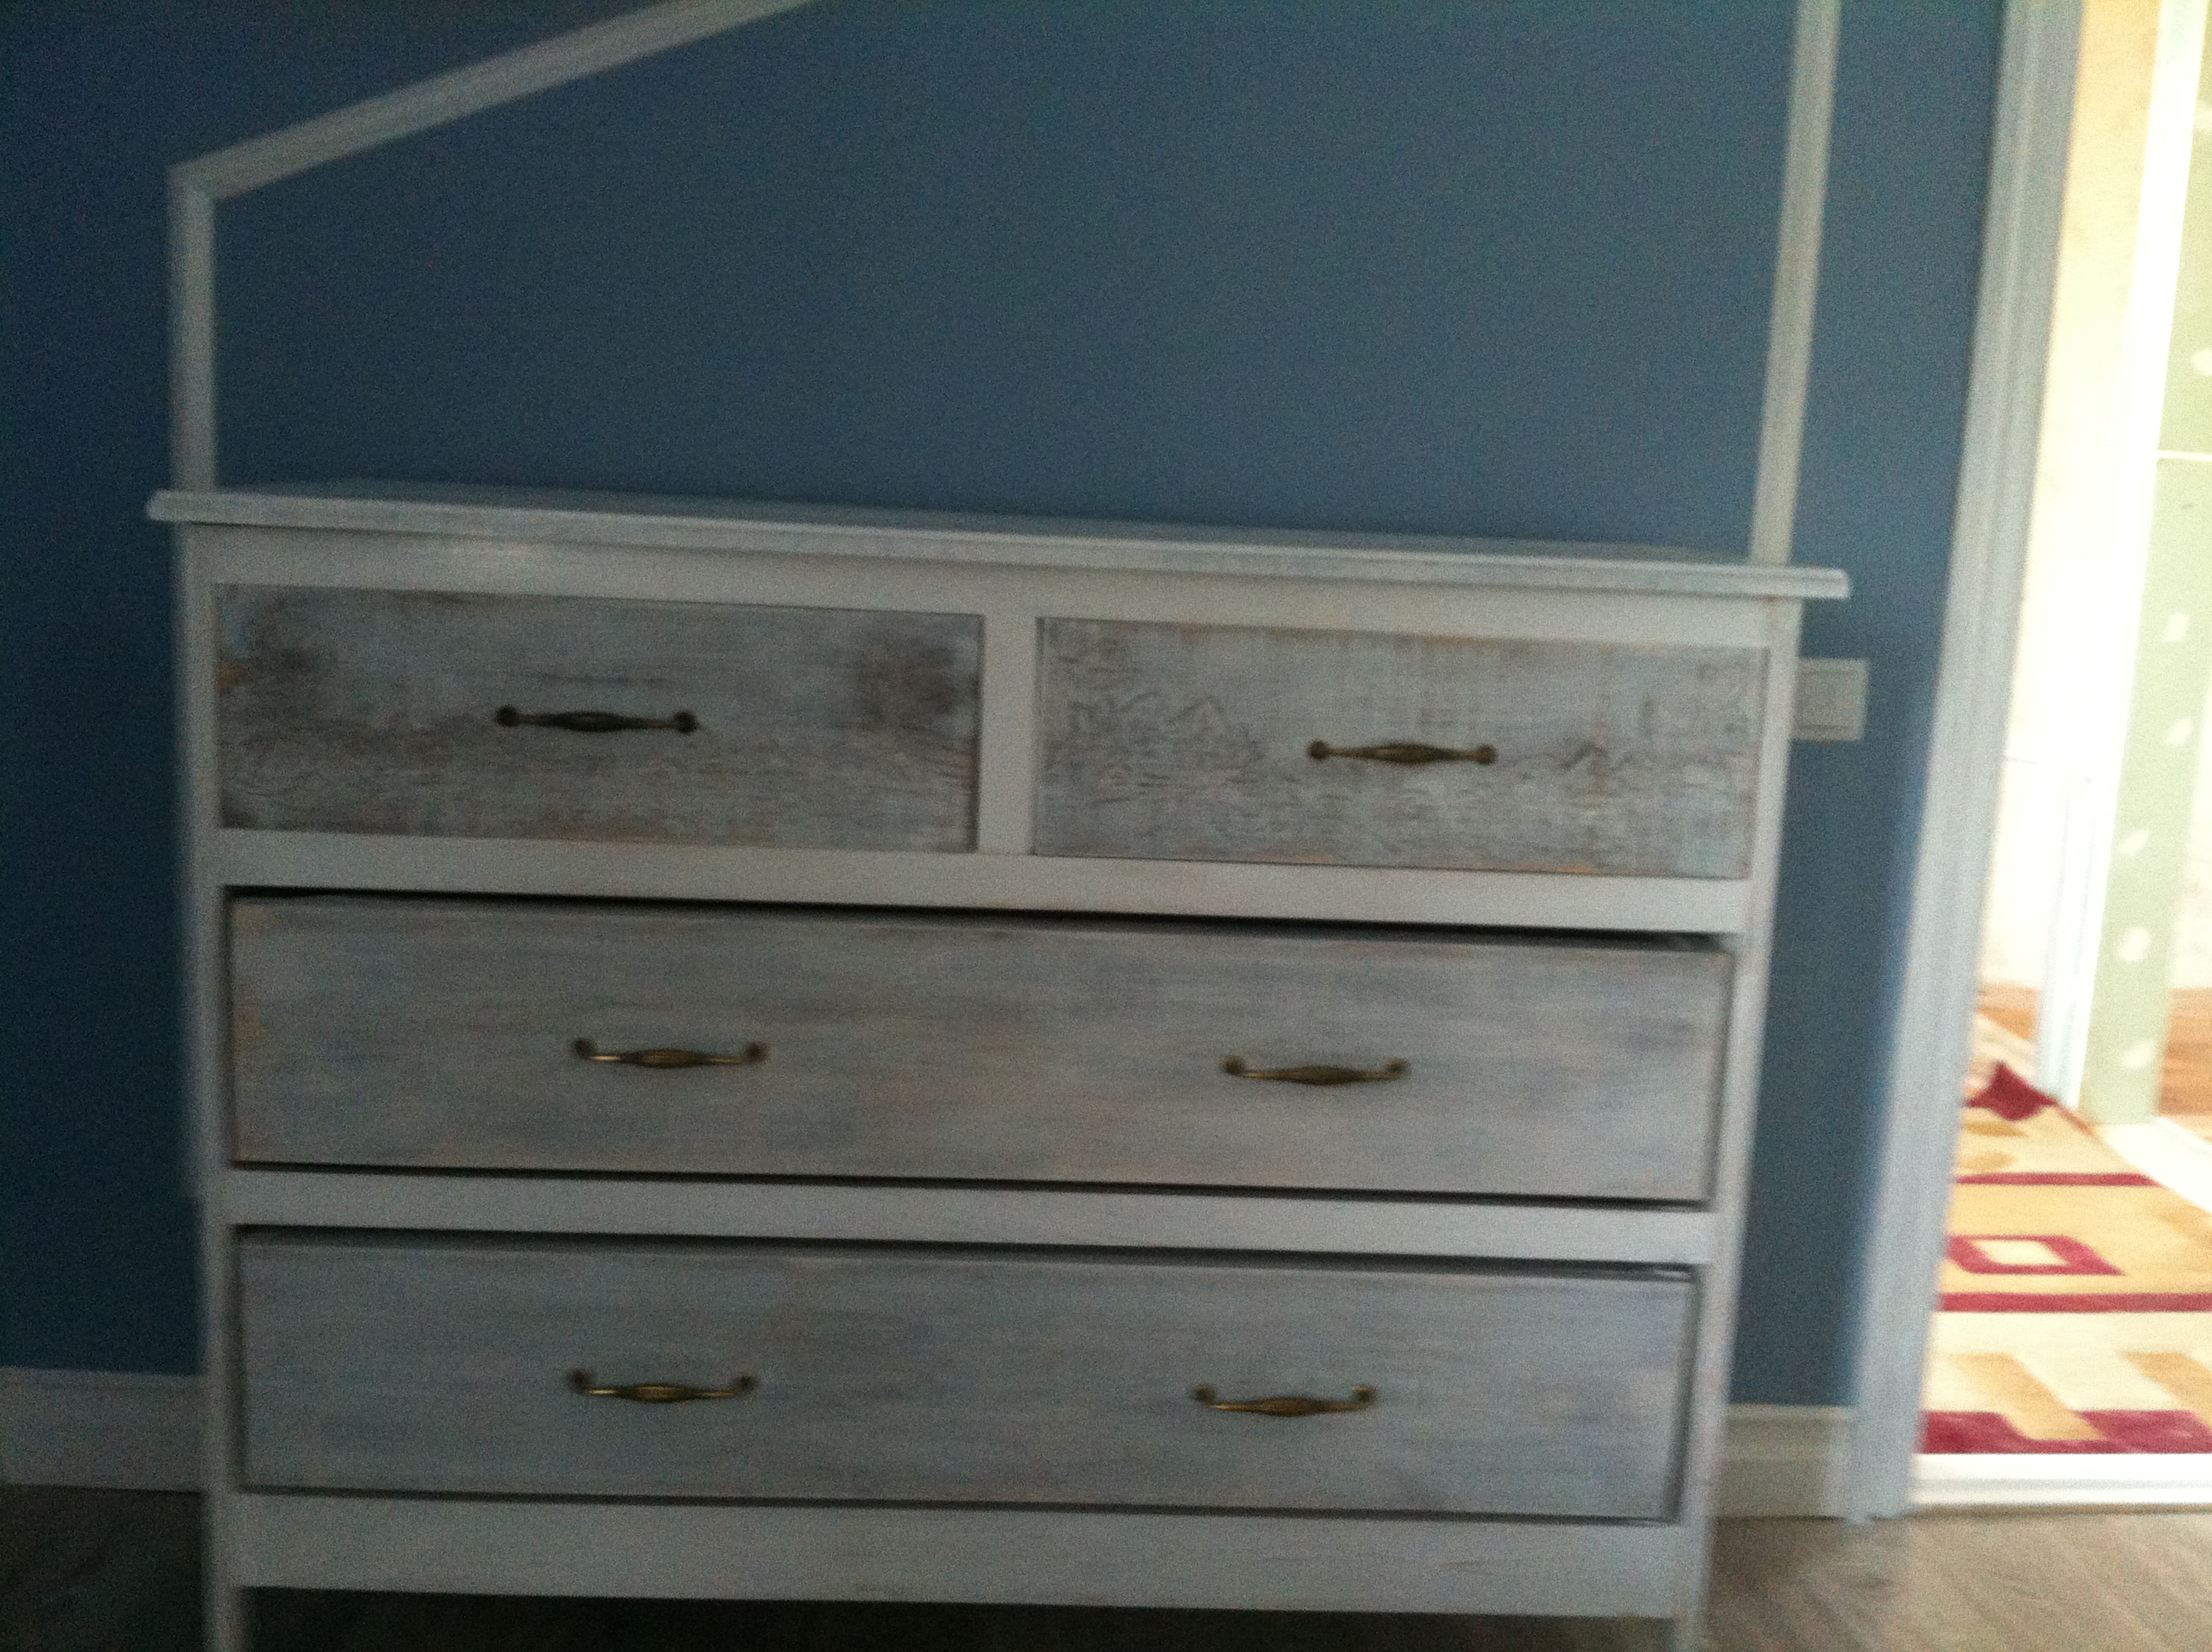
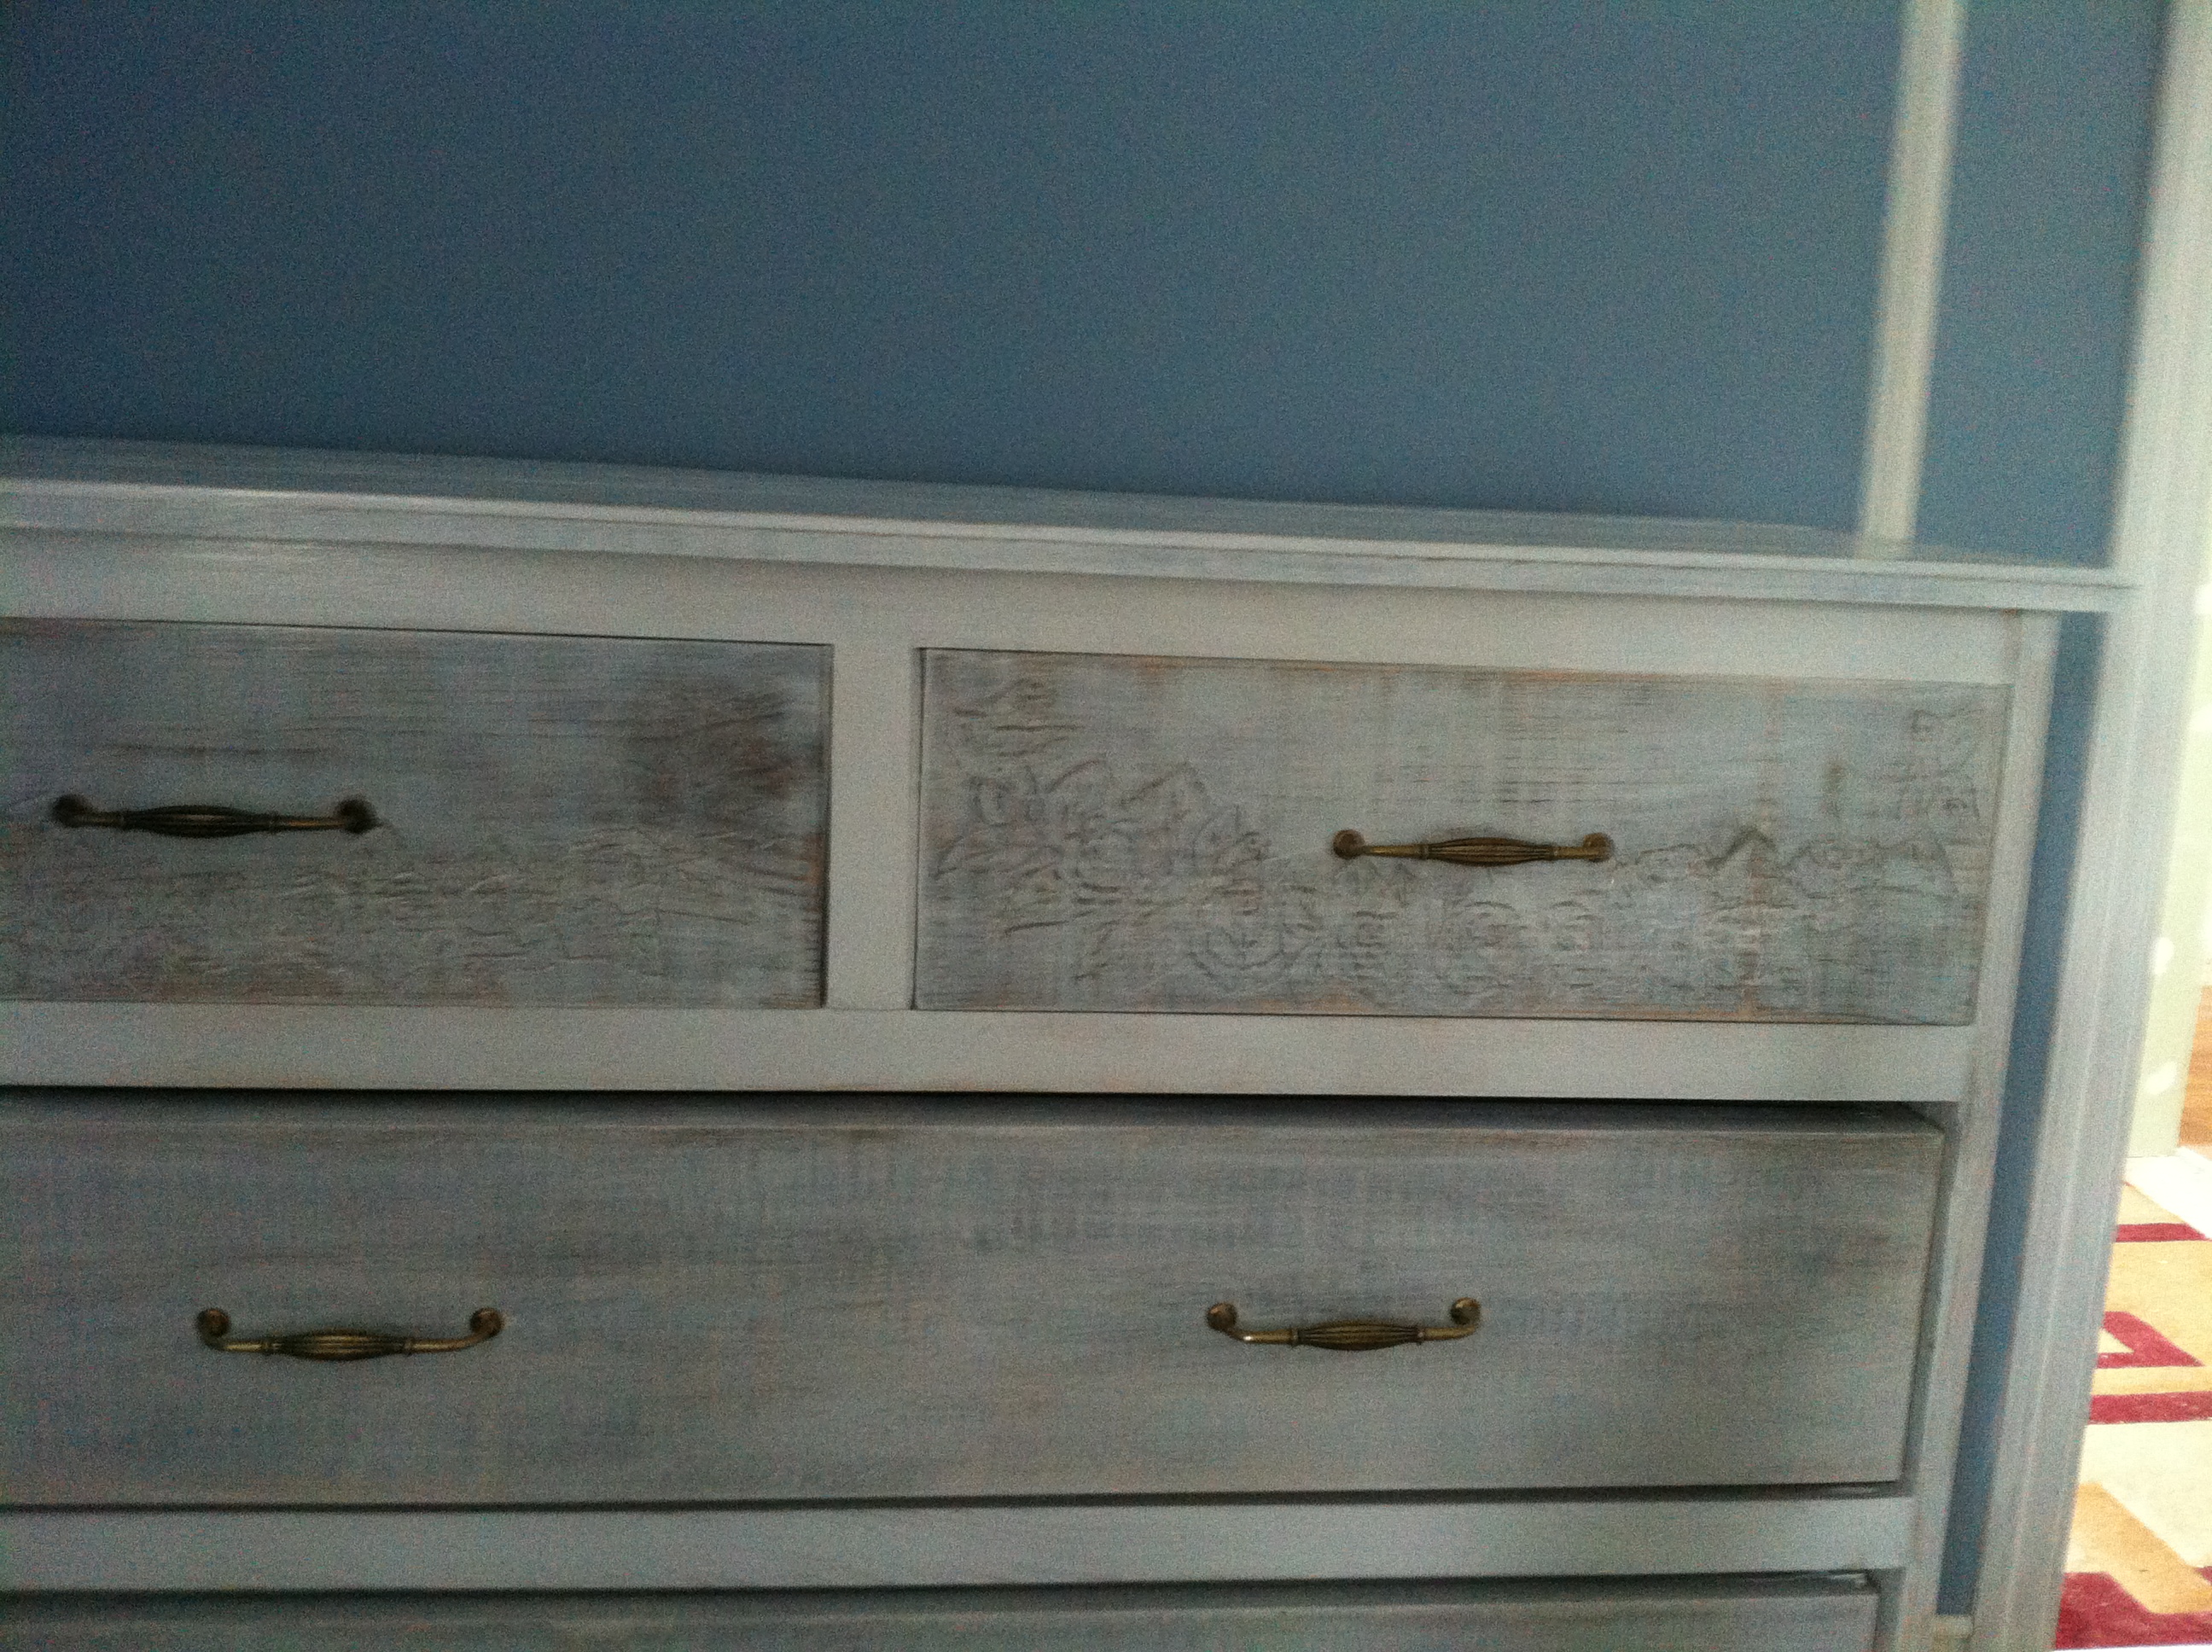
Mission oak gloss
Rust-Oleum gray chalk paint
Rust-Oleum gray chalk paint
Recommended Skill Level
Intermediate
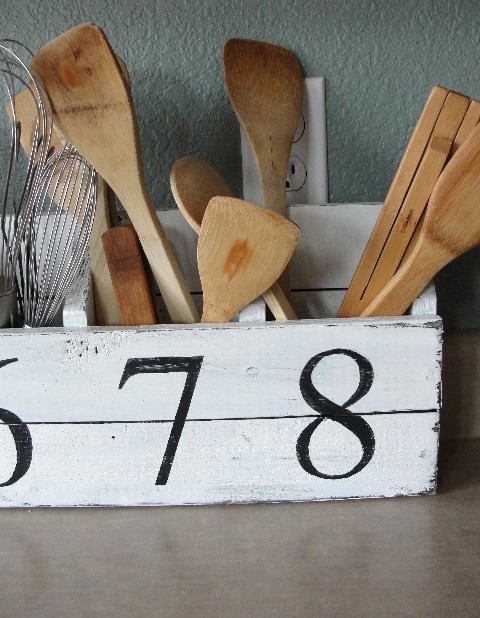
Numbered Cubbies
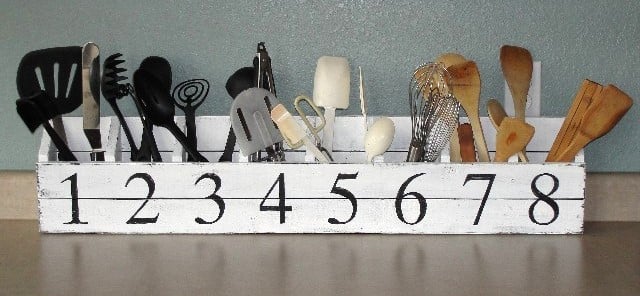
Like so many others, I saw this and had to have one of my own. It was cute and quick - perfect! I had the same height issues that others had. The center supports are too tall for the 1x2 and 1x3 on the front. I wound up using all 1x3's, 2 on the front and 3 on the back. Because the cubbies came out a bit deeper, I thought I would try it as a utensil holder in the kitchen. Cute, huh.
Built from Plan(s)
Estimated Cost
less than $10
Estimated Time Investment
Afternoon Project (3-6 Hours)
Finish Used
I tried Ana's antique finish. The first layer I spray painted black. I didn't know if Ana sprayed or brushed on the white, but I brushed on mine. Painted the numbers on, then distressed it a bit.
Recommended Skill Level
Beginner
Comments

Mon, 08/29/2011 - 11:01
What a great use for the
What a great use for the cubbies! I never would have thought of that!
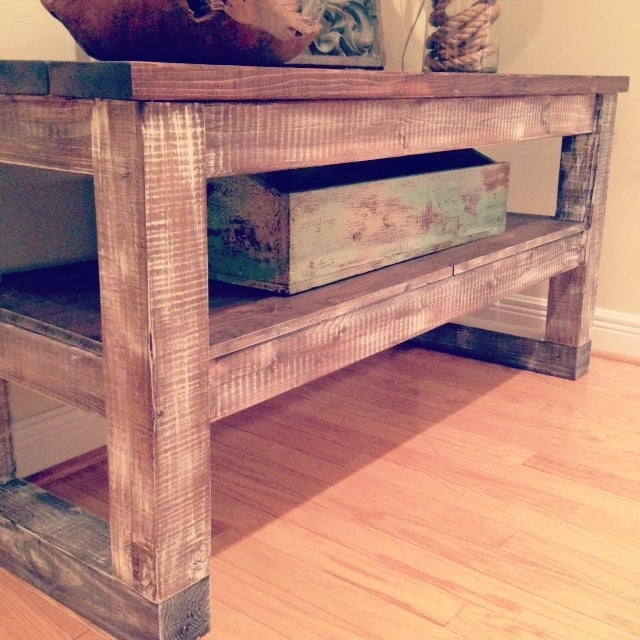
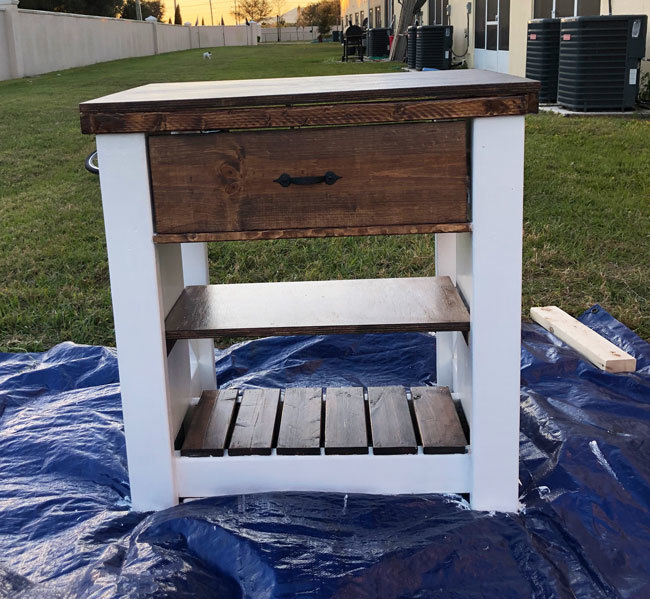
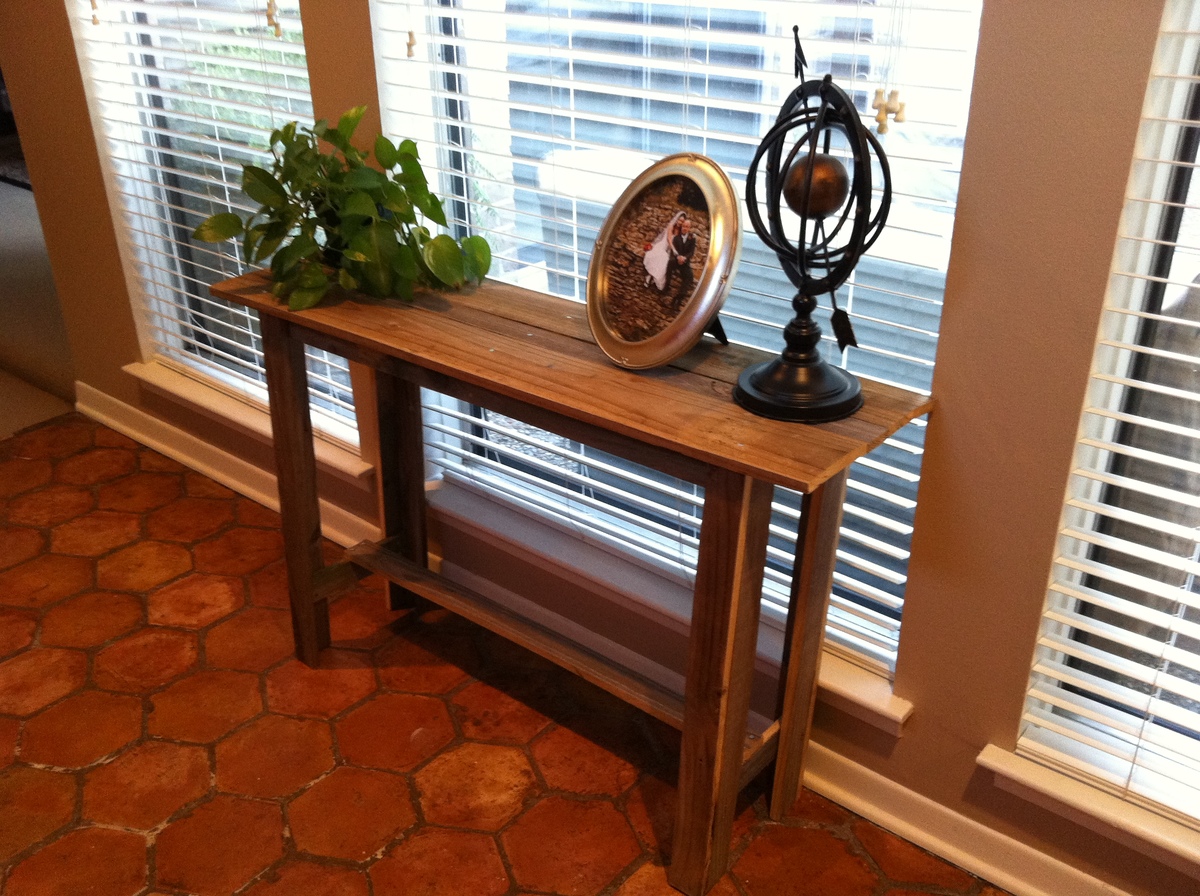
Taylors console
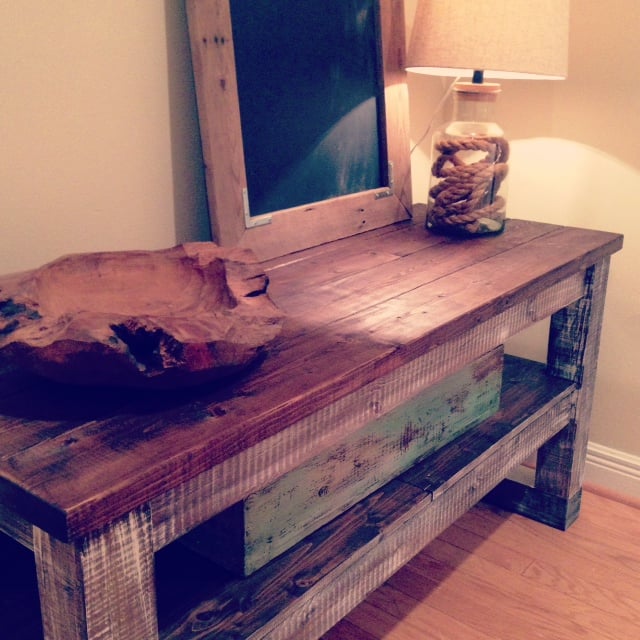
Loved working on this table. An easy build for sure. Couldn't find wheel casters that I liked so had to use another 4x4 to give it height. Will be building another one soon :)
Thank you so much for sharing the plans.
Built from Plan(s)
Estimated Time Investment
Weekend Project (10-20 Hours)
Finish Used
Stain and wry brushing
Recommended Skill Level
Starter Project
Comments

Sat, 09/21/2013 - 08:15
Unique Finish!
I love how you finished your project!
And the 2x4's across the bottom really make it look solid.
Val
artsybuildinglady
Mon, 09/23/2013 - 05:40
Love the finish, could you elaborate
Love the finish, would it be possible to elaborate on how you got it to look so AWESOME!!! Did you just brush on the stain and the use a wire brush????
Mon, 12/30/2013 - 19:28
Hi! What color stain did you
Hi! What color stain did you use and technique? It looks beautiful! Would love to make something similar!
Classic Bunk Beds for our boys!
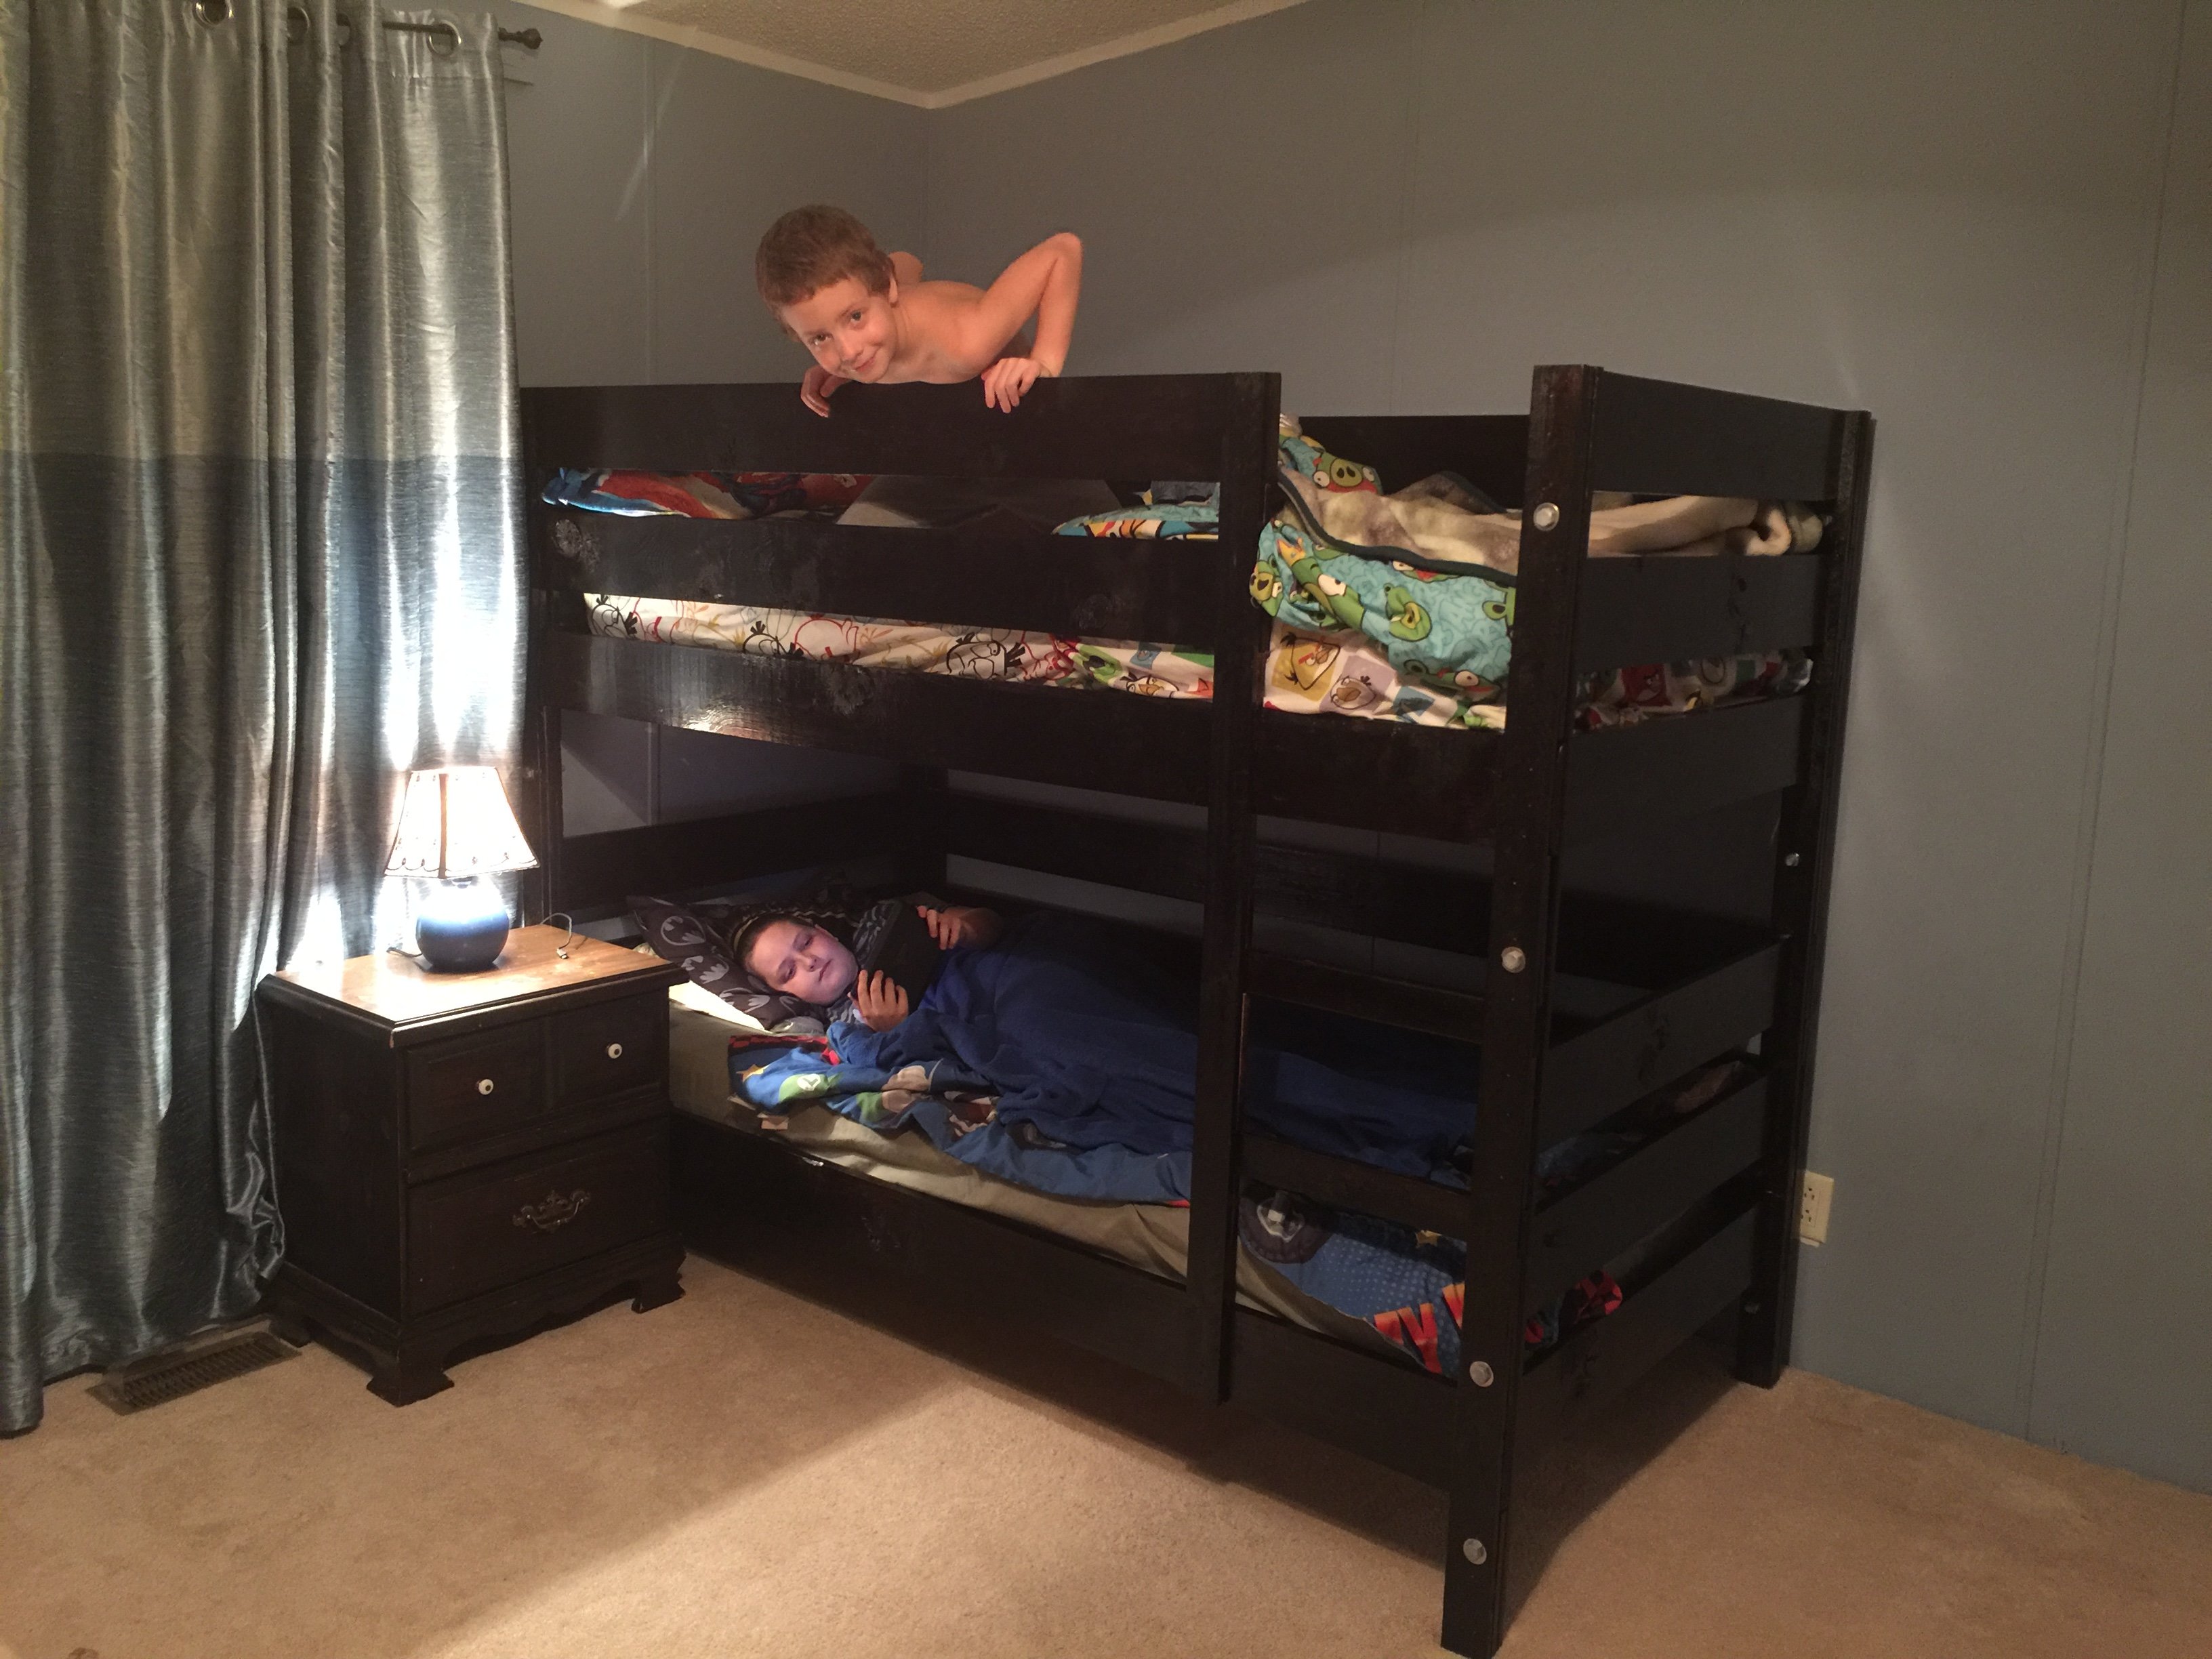
We found the plans for the Classic Bunk Bed look and we loved it. Since our boys share a room this bunk bed design was the perfect match for us. We used Red Mahogany stain with a polyurethane clear coat to give it a good shine. I made a little revision to the slats but adding a 1X6 crossbea, across the bottom and top bunk to give added support for the boys as they get older but other than that the beds are directly from the plans. Now onto the same design for our girls!
Built from Plan(s)
Estimated Time Investment
Week Long Project (20 Hours or More)
Finish Used
Red Mahogany and Polyurethane Clear Coat
Recommended Skill Level
Beginner
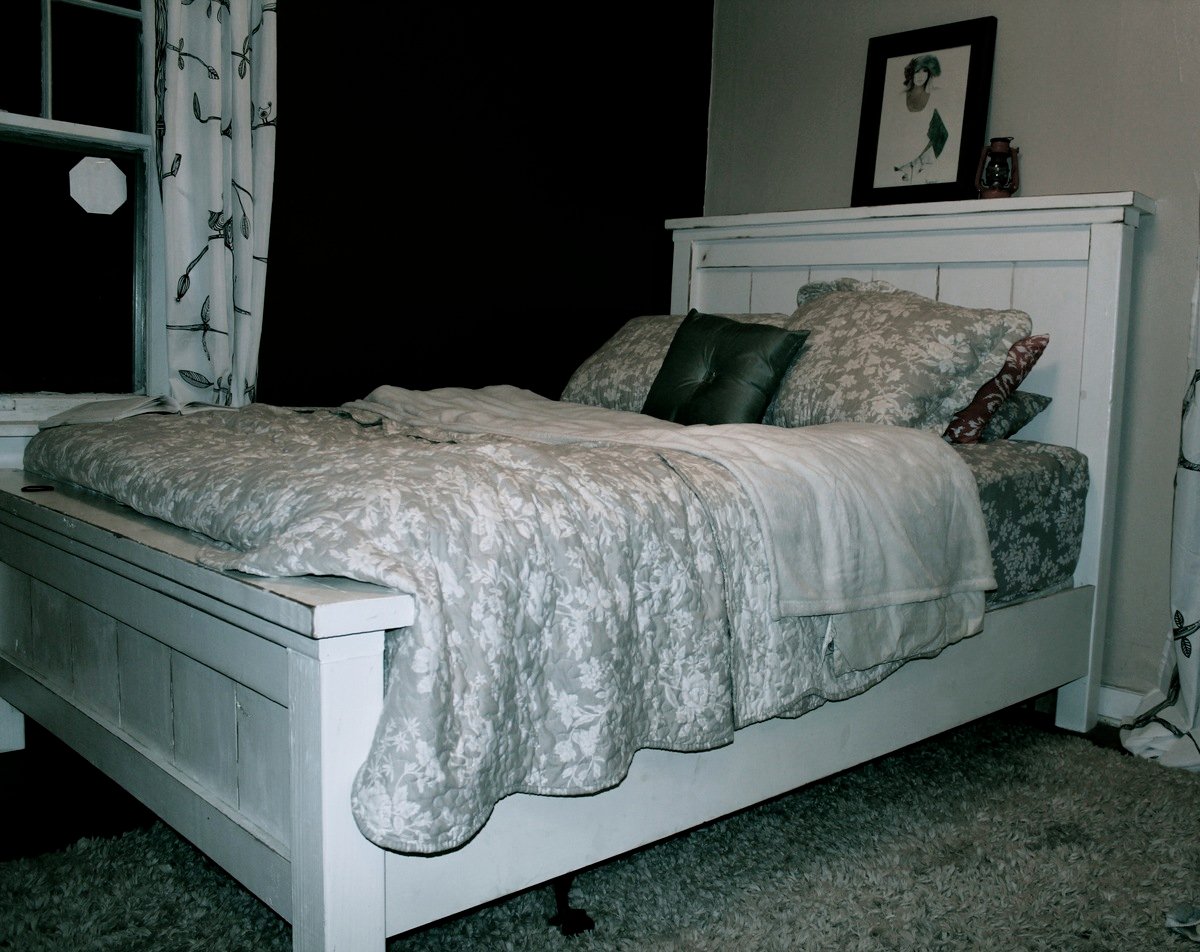
Farm house bed king
Easy to follow plans. This was only my second woodworking project so any beginner can do it. Thank you, Anna!
Built from Plan(s)
Comments
Thu, 11/17/2022 - 08:13
Beautiful bed!
WOW, this looks amazing and I love the color choice! Thanks for sharing.
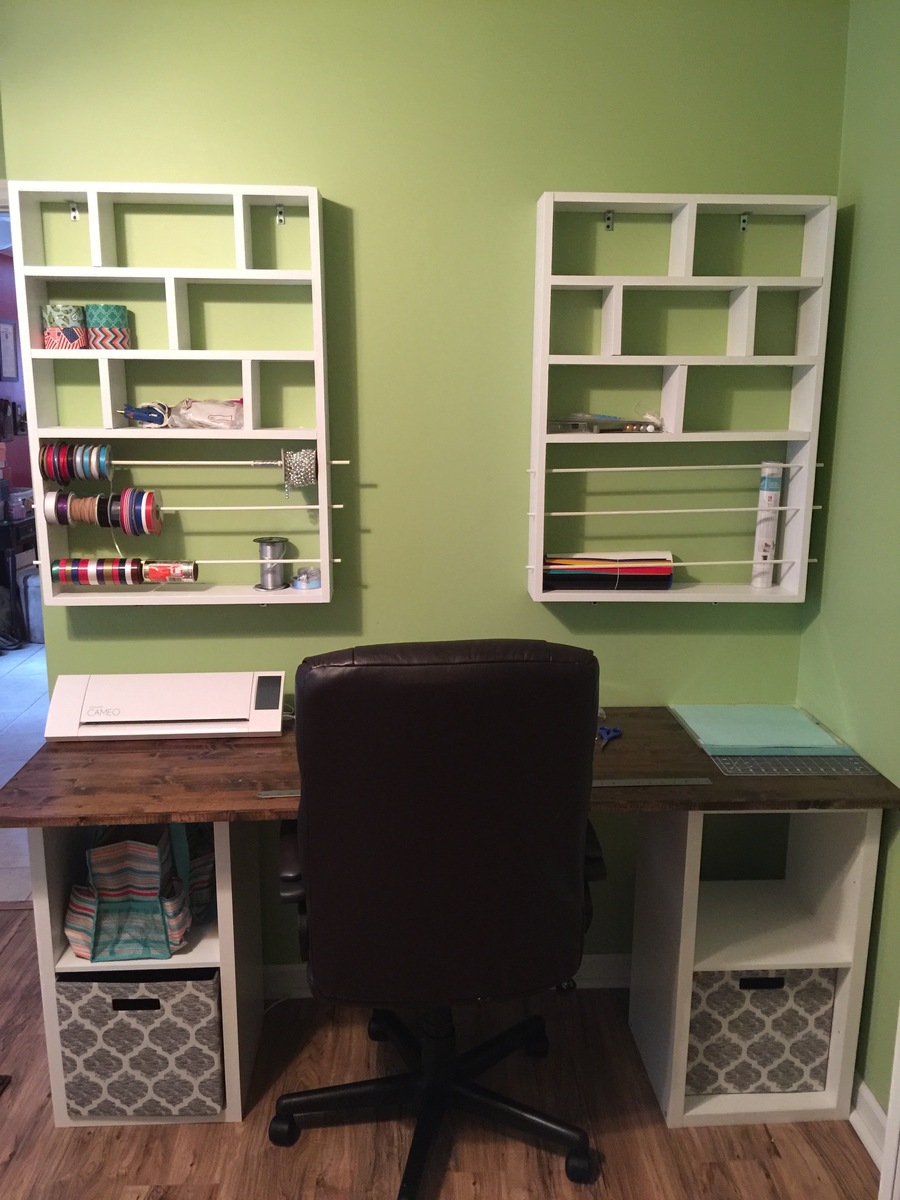
Classic Storage System Desk
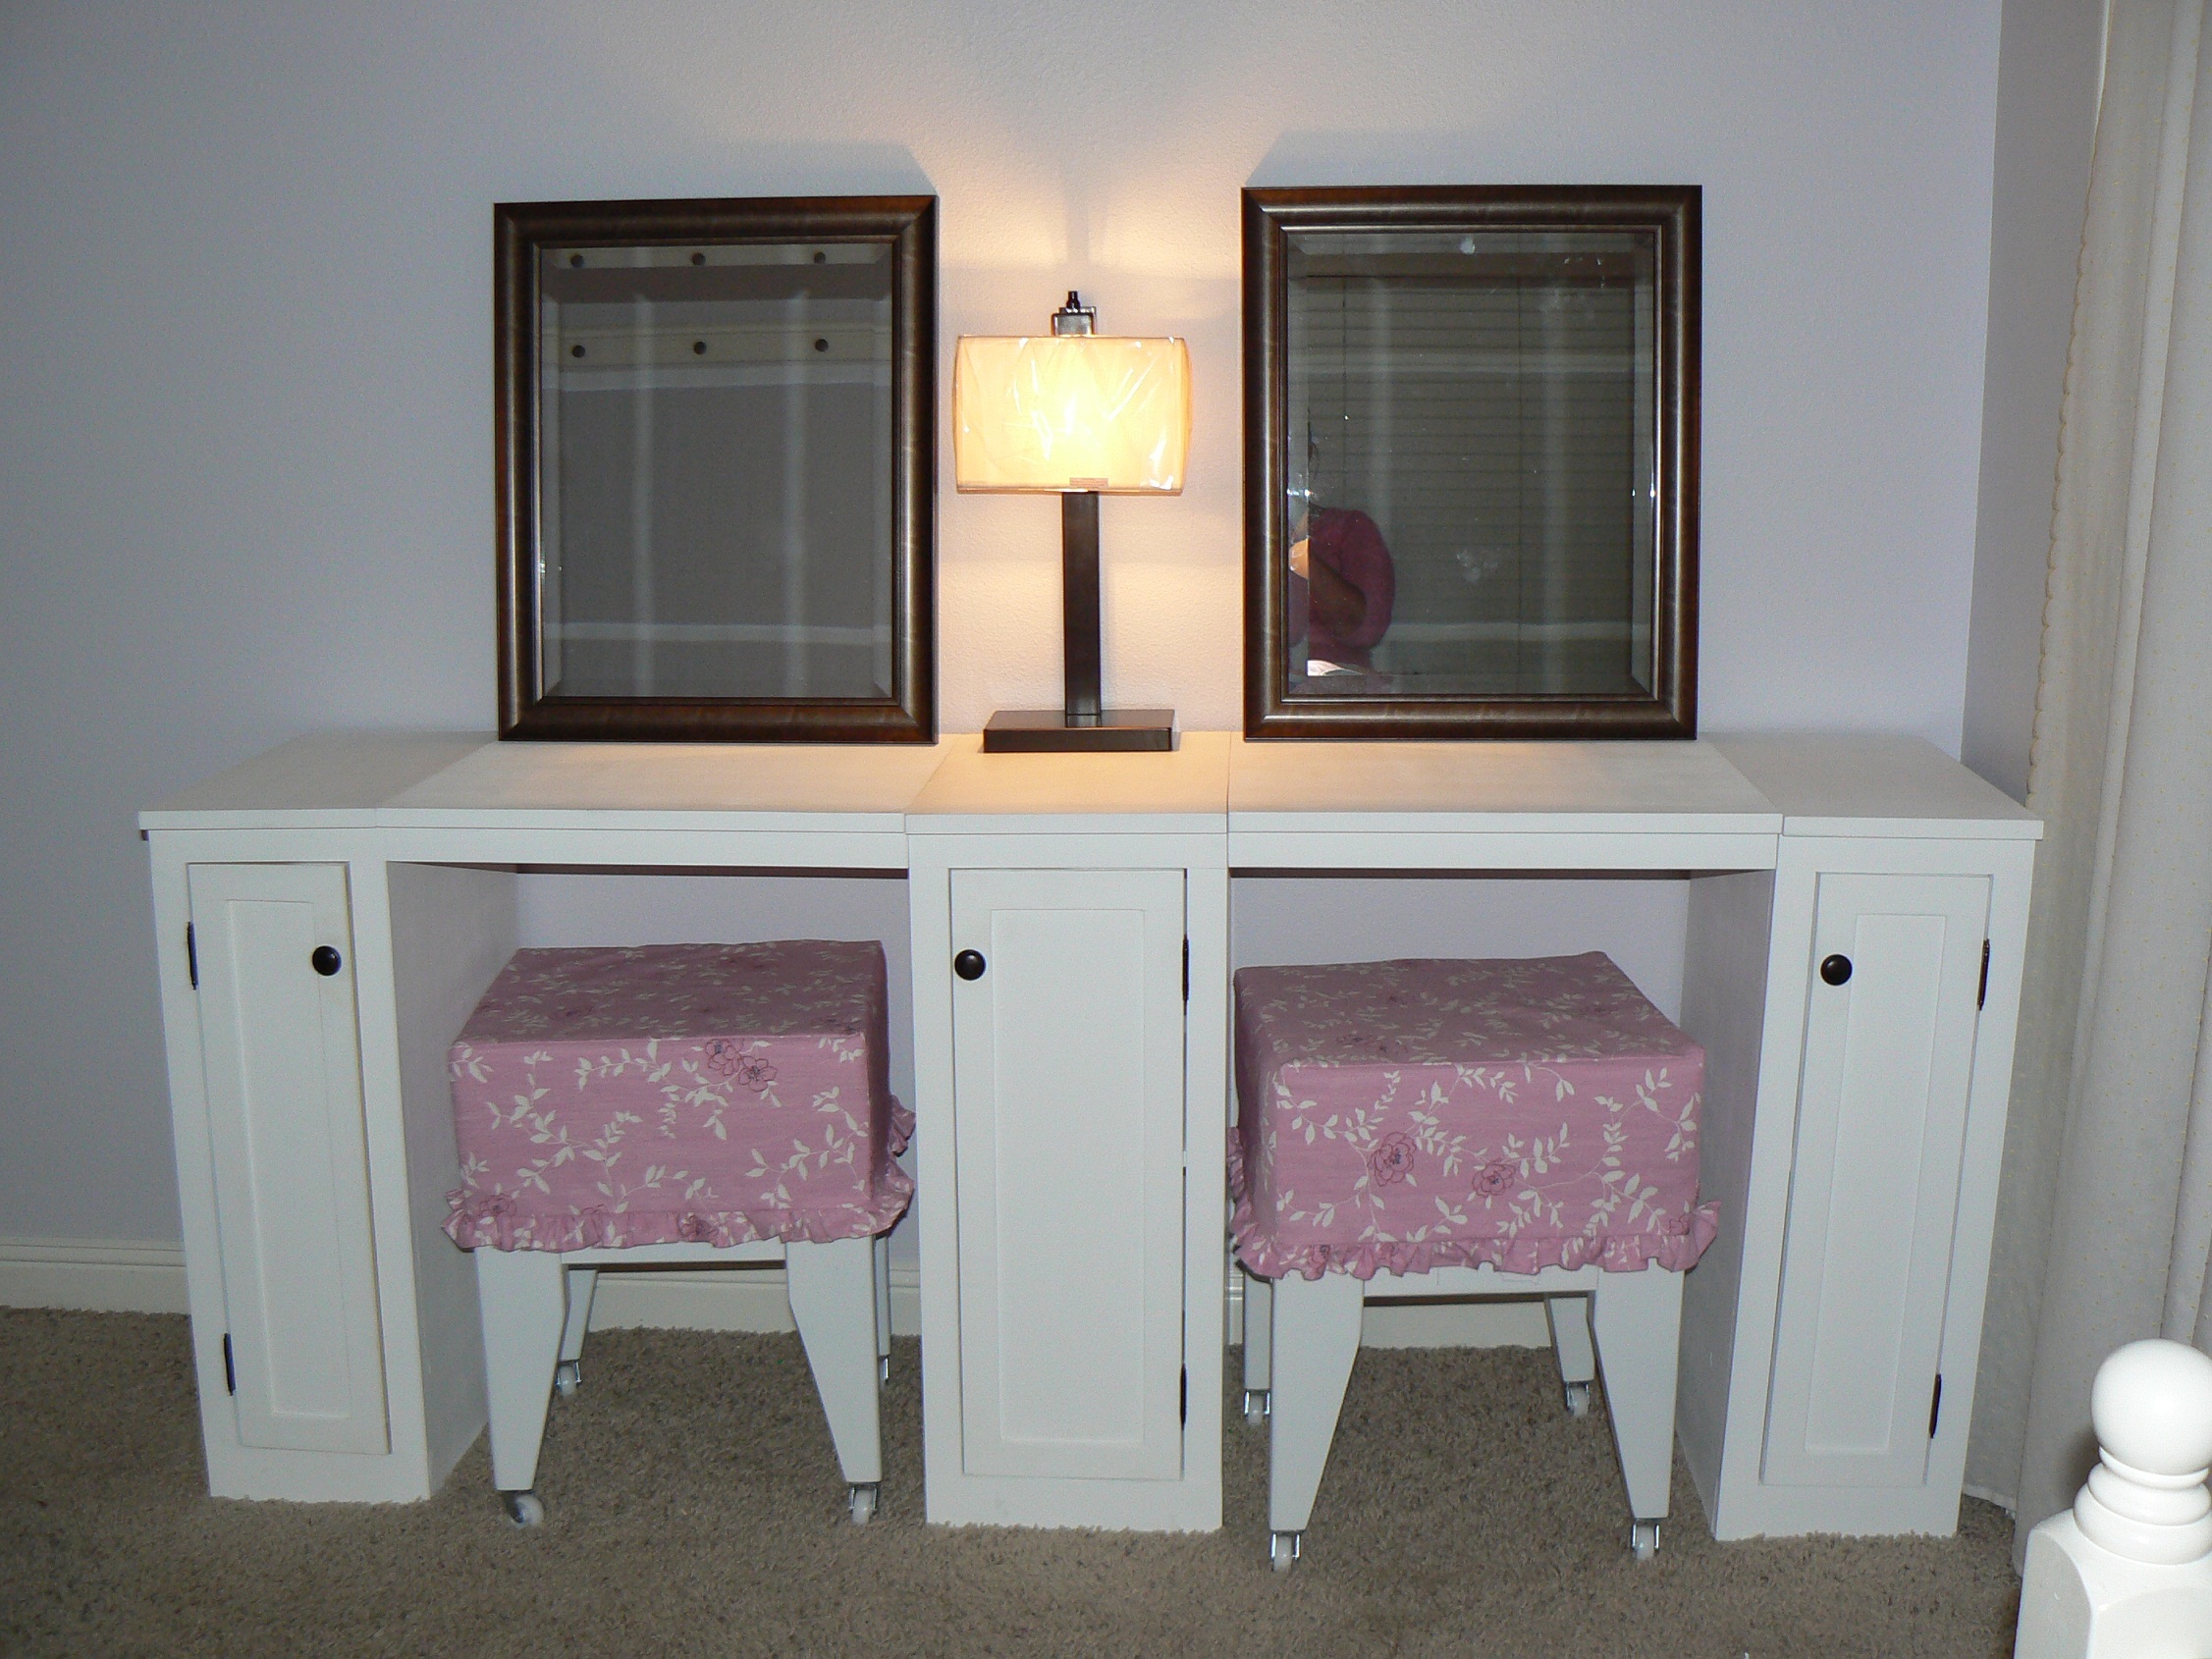
This was my first furniture project. I made this desk/vanity for my twin daughters' 9th birthday. I sized them to fit the space and added doors rather than drawers. I also made the stools using the plans for the upholstered bench - just resized. It was a fun project and I can't wait to start another! You can read more on my blog: http://karlakroese.blogspot.com/2011/08/new-hobby.html
Built from Plan(s)
Estimated Cost
$150
Estimated Time Investment
Week Long Project (20 Hours or More)
Finish Used
Paint. This phase of the building process is what took the longest. Aaargh! Building is fun, but sanding, priming, sanding, painting, sanding...stinks!! All that hard work, though, paid off. Sanding is key to a good paint finish.
Recommended Skill Level
Intermediate
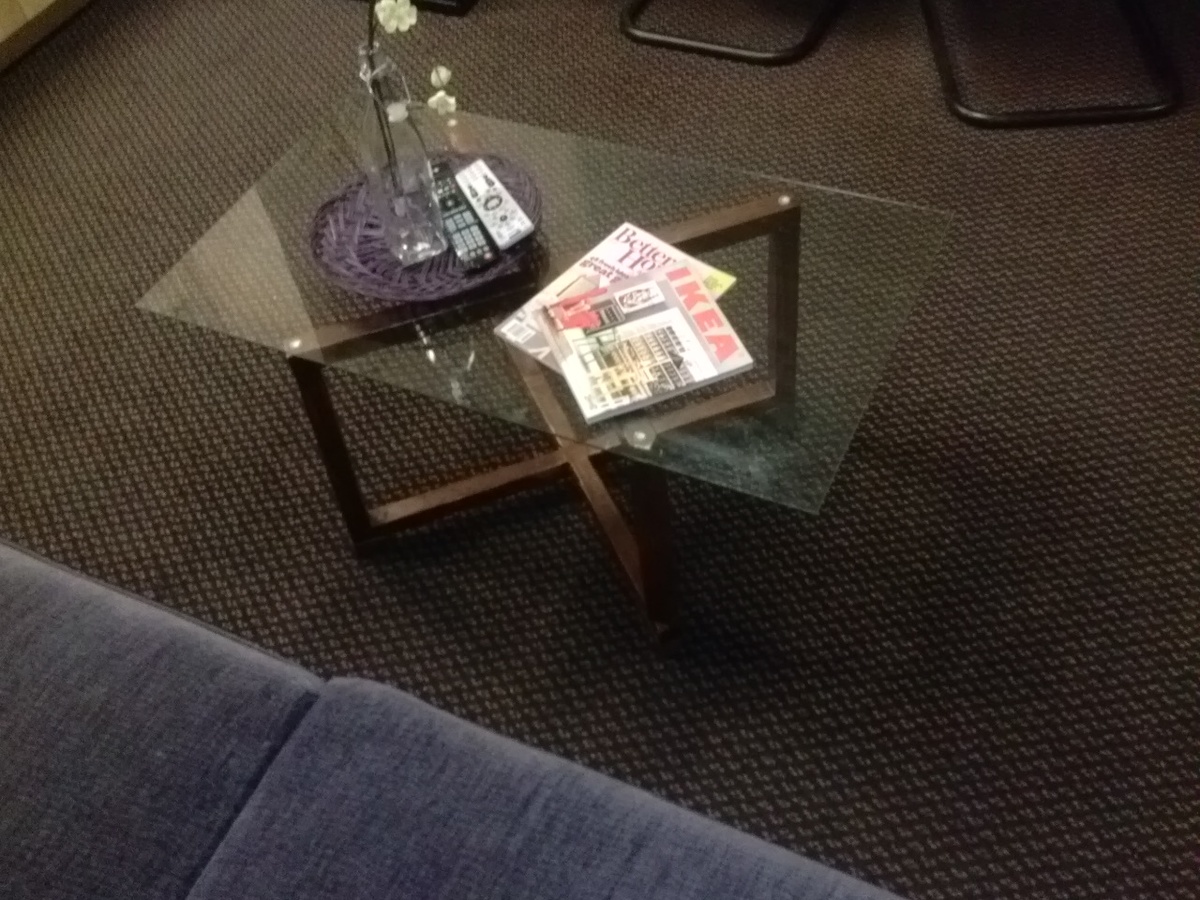
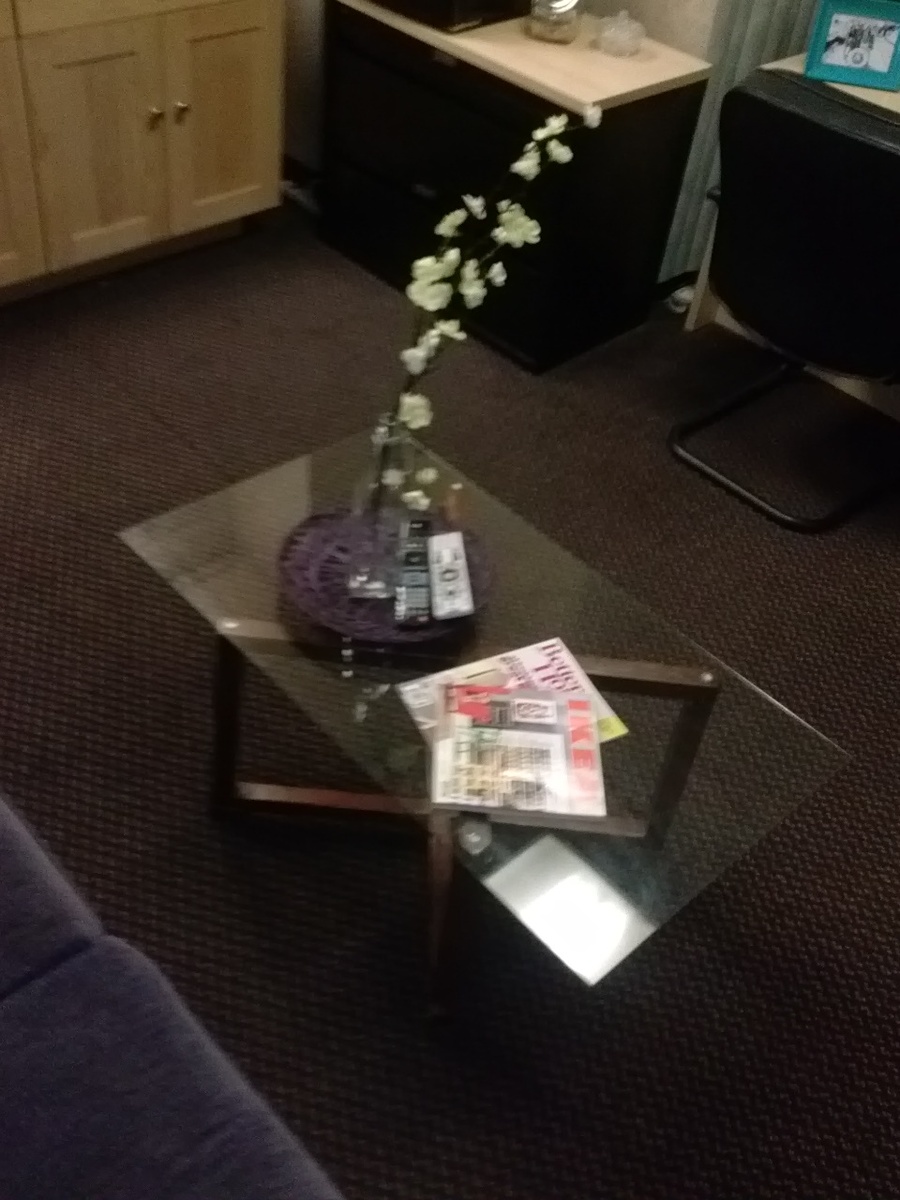
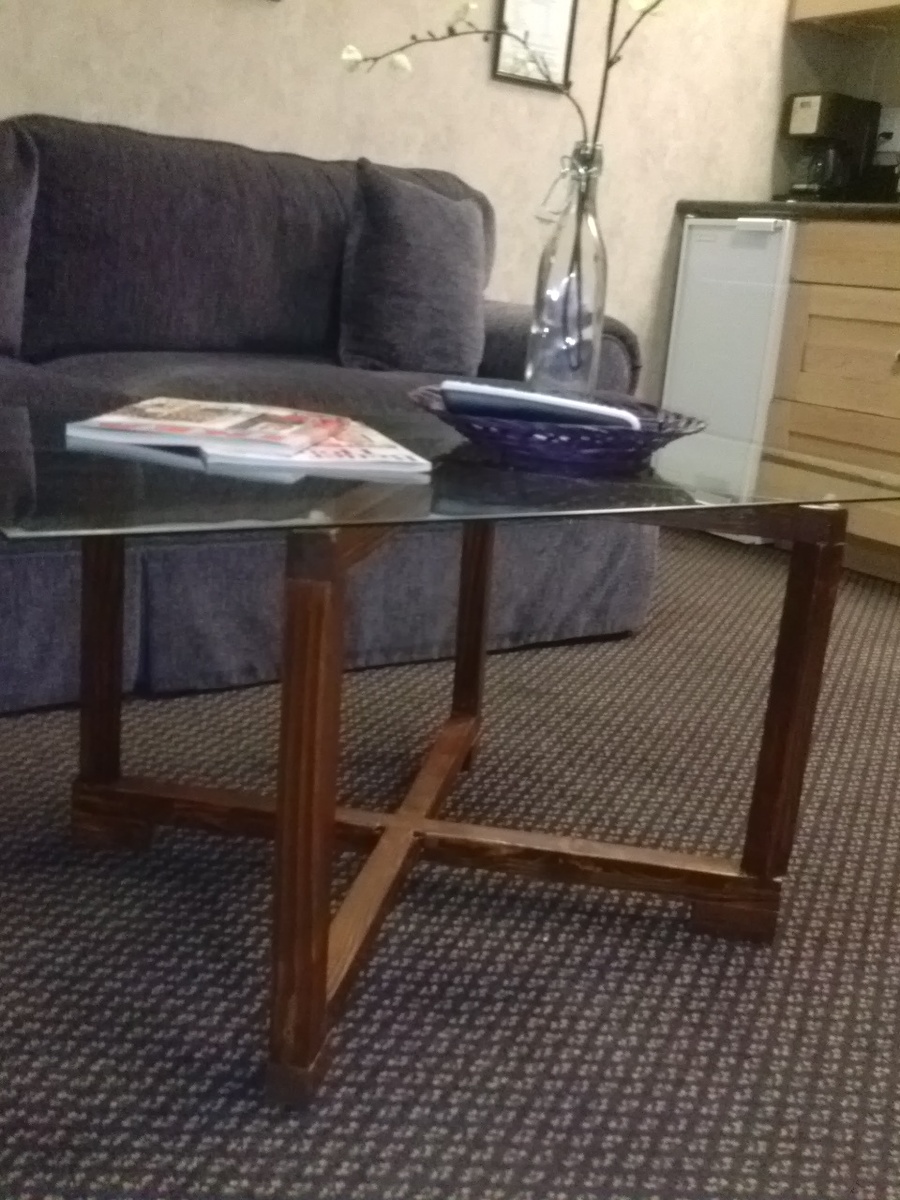
Lisette Coffee Table
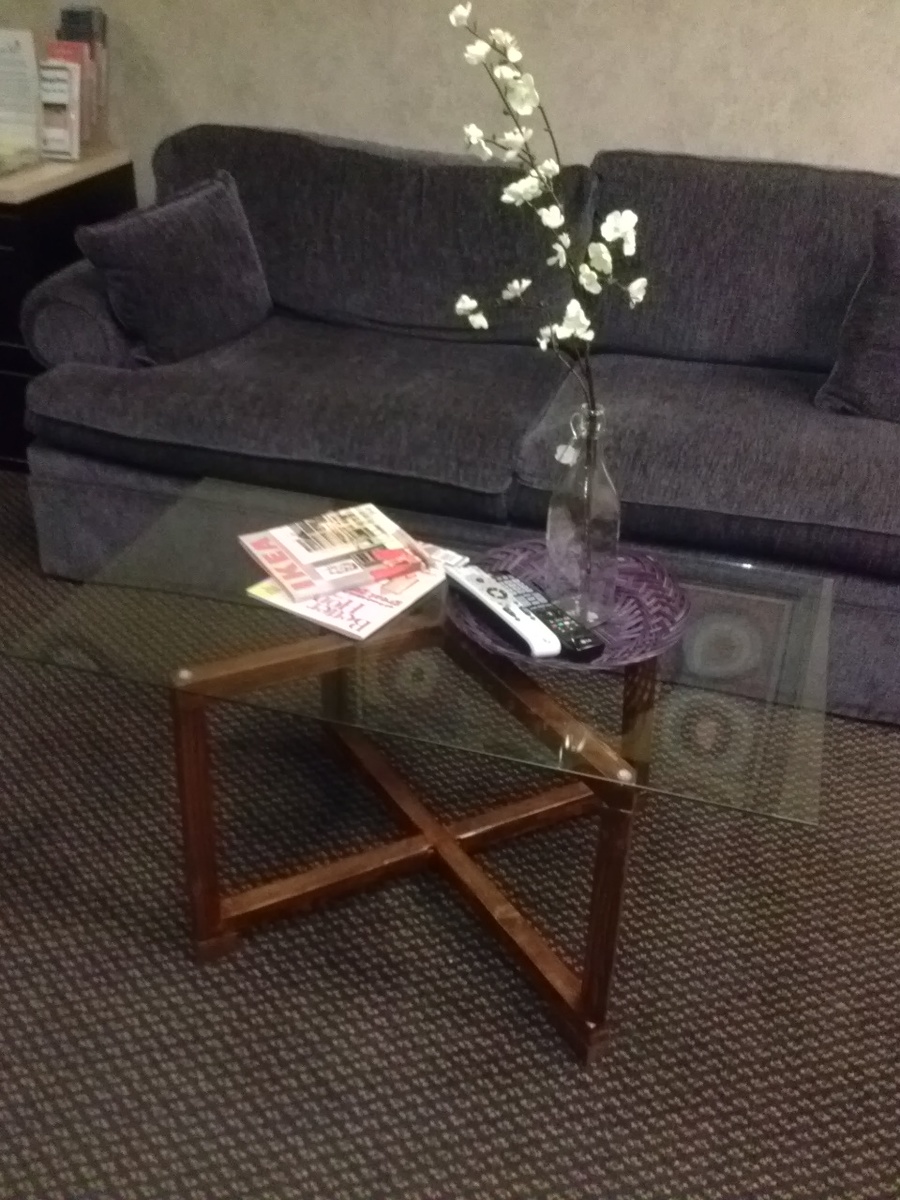
My friend "Lisette" asked for a small modern coffee table. For her small studio apartment. So I came up with this modern-ish table. Made of 2x2's and a 20"x40" glass top.I found it on the side of the road with a FREE sign on it in Pacific Beach. Oh how I love beach people and all the free stuff they leave around :)
Estimated Time Investment
Afternoon Project (3-6 Hours)
Finish Used
Minwax Chestnut Stain (3 coats) and semigloss poly spray (5 light coats)
Recommended Skill Level
Starter Project
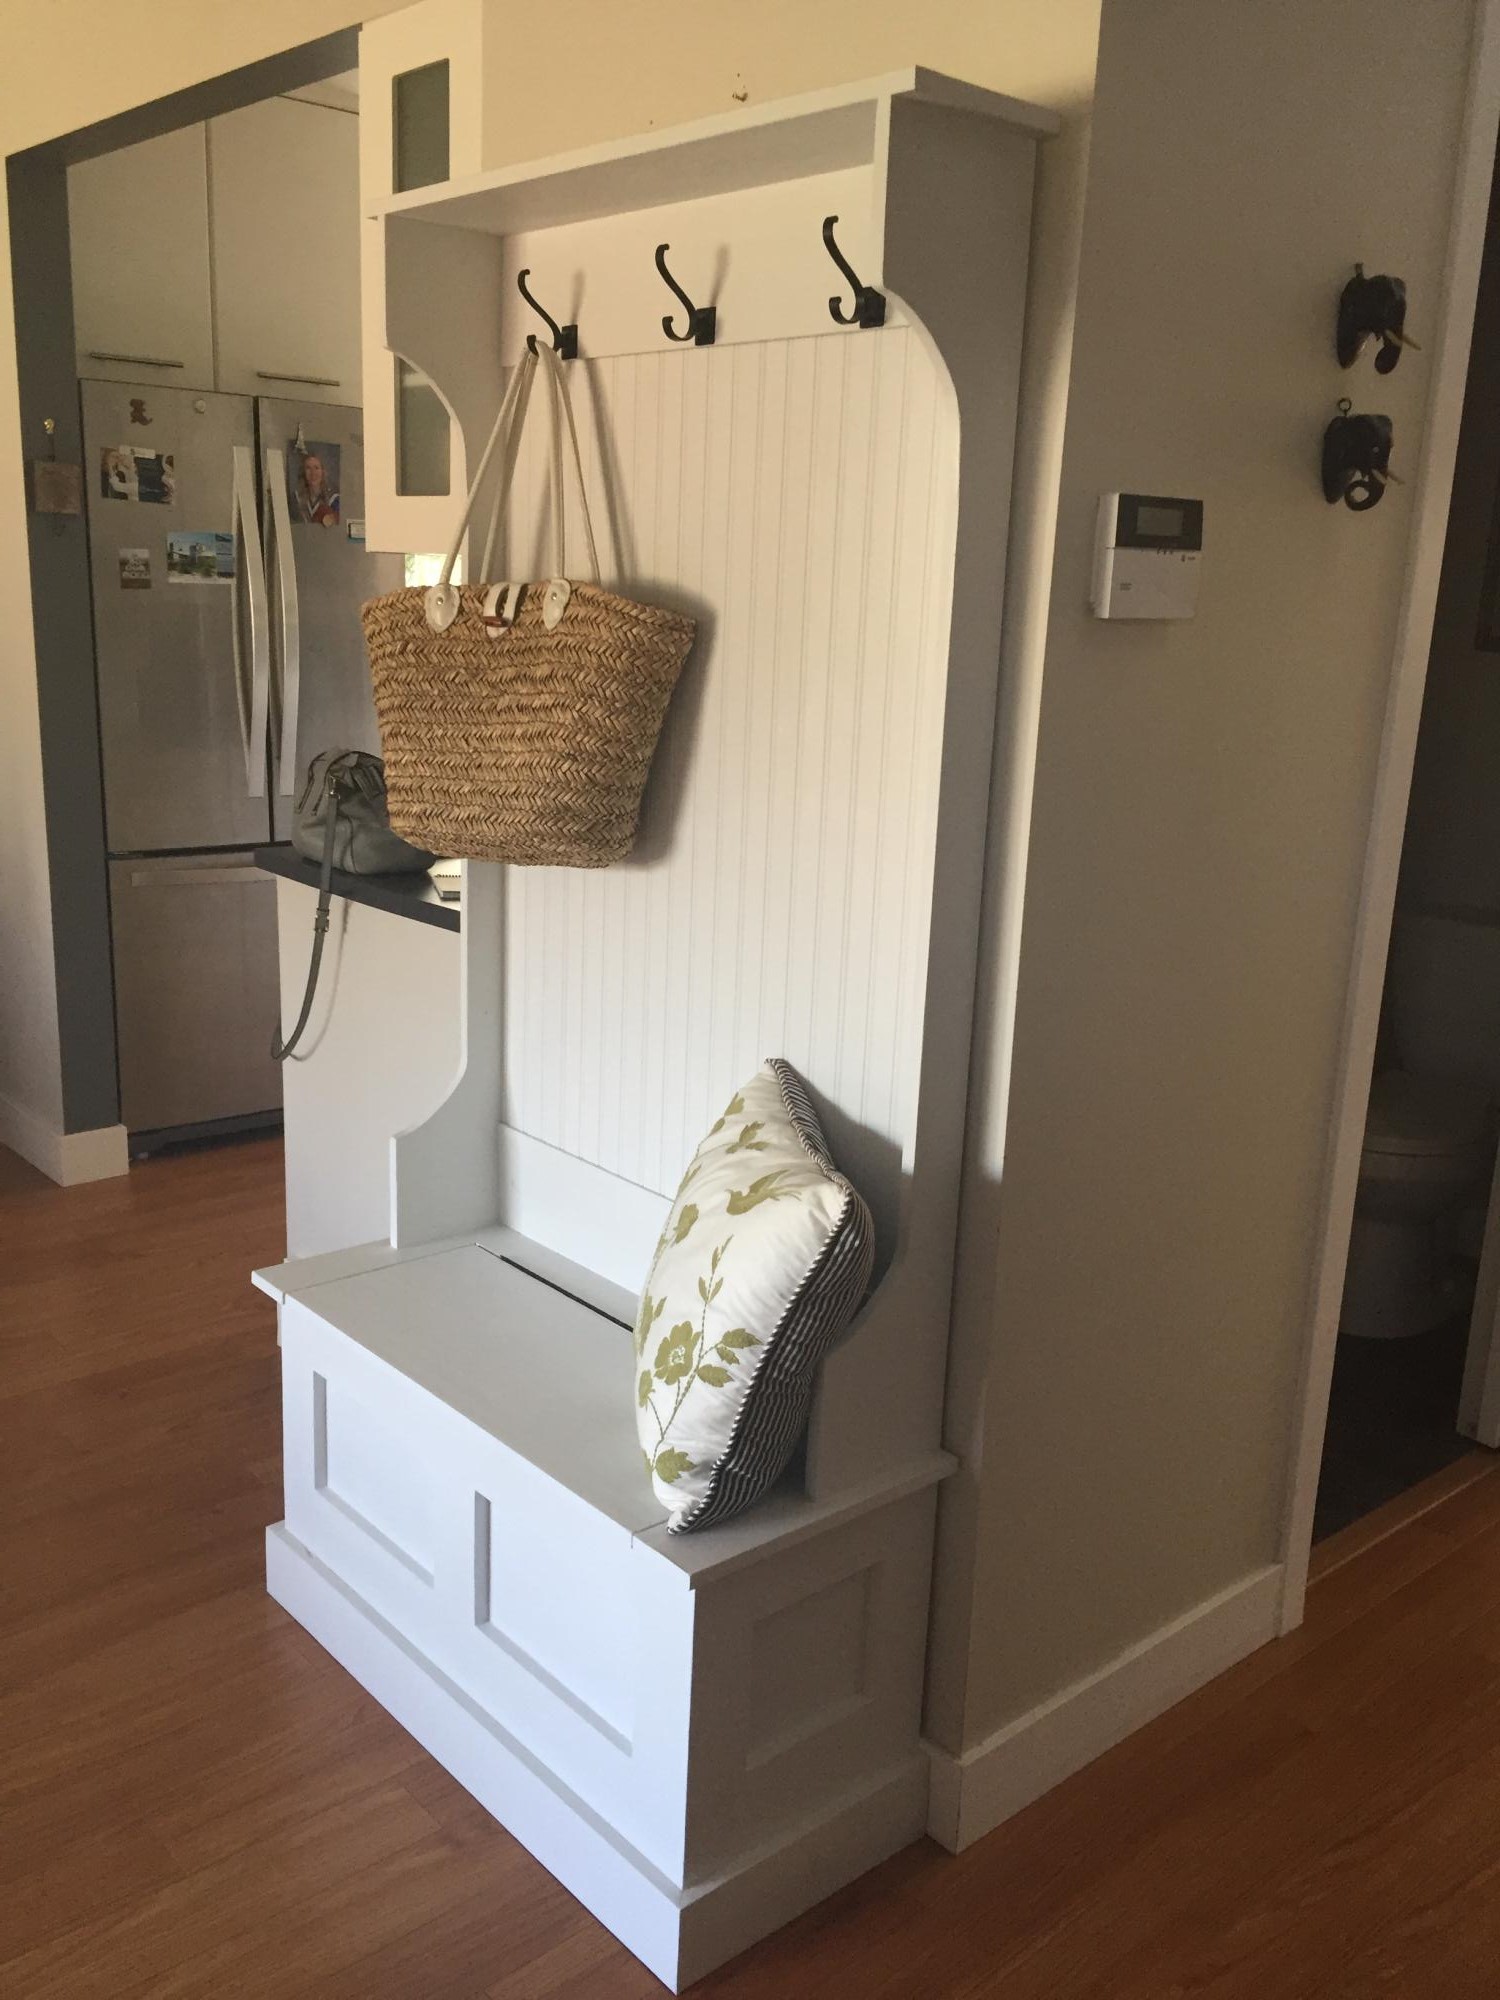
Hall tree
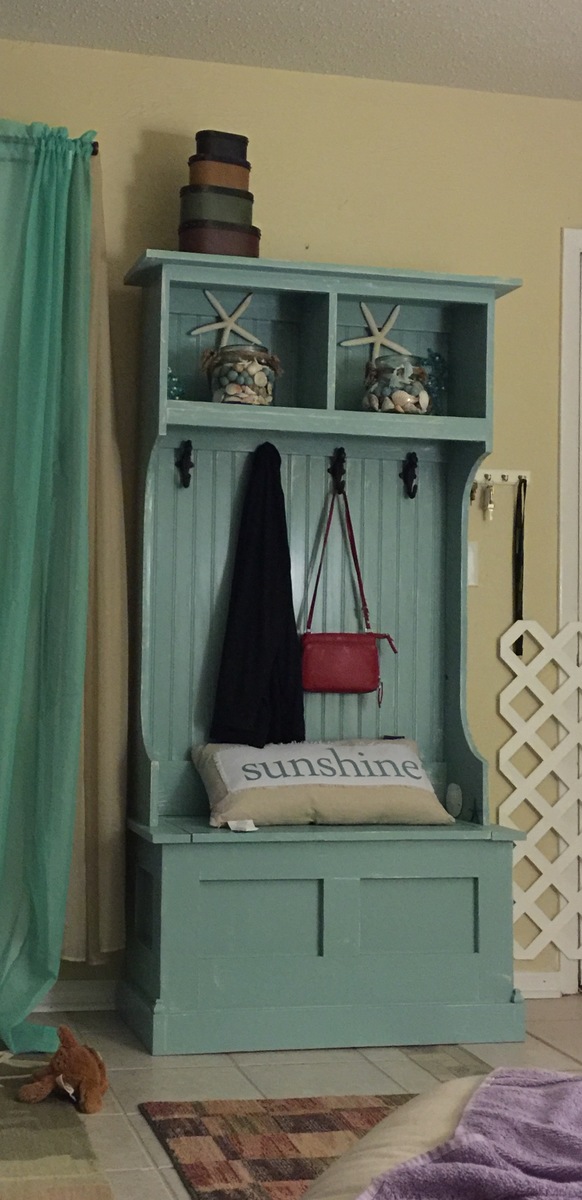
We had a great time building this
We did the bottom half one weekday, and the top piece another day. Primer, painting, and sanding in all took us 6 days.
It look fantastic
Recommended Skill Level
Intermediate
Comments
Thu, 12/03/2015 - 10:18
Fantastic!
Thanks for sharing your awesome project, posted to our Facebook page today!
Handmade by the Ensmingers
Had a lot of fun making this! Followed plans exactly!
Built from Plan(s)
Estimated Cost
100
Estimated Time Investment
Day Project (6-9 Hours)
Finish Used
White paint and red oak stain
Recommended Skill Level
Intermediate
Hallstand
Just a fun plan free build from leftover wood
Comments
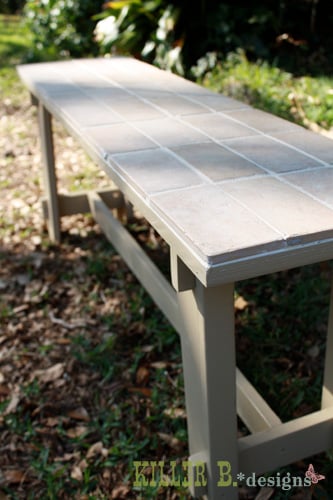
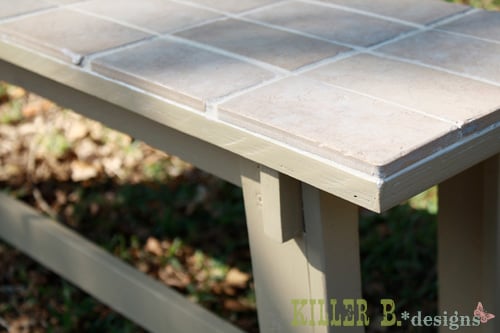
Tiled Rustic Bench
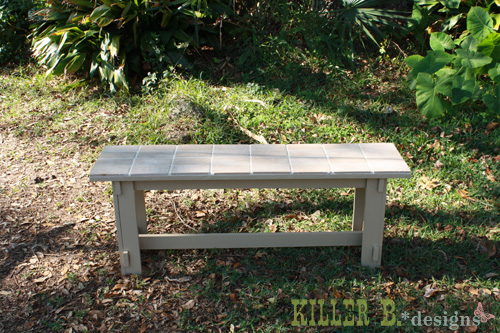
I used the Rustic Bench plans, but adjusted the length to make it smaller, since my plywood top was a bit wider and shorter than the top on the plan. It was the last remnant from our incredibly versatile plywood sheet. I also had to cut out the two cross supports, because 1) they’re too difficult for me to figure out (they’re not right in either of my benches) and 2) I didn’t feel like buying a board just for those. I had just the right amount of spare lumber lying around, and I was going to maximize it!
At first, I wanted to just build a bench for my sister for Christmas, and paint it like our island. But after visiting my parents over Thanksgiving and taking home some reclaimed tile from their old outdoor bar, I knew this bench had a better destiny than mere paint. When I laid down the tile scraps and they fit perfectly, I knew serendipity had spoken.
This was the first time I’d ever worked with tile. I did a little research (aka grilling my husband’s best friend, who is a tile guru), and discovered I didn’t really need any fancy materials to lay the tile down on. As it’s just a bench, and in no need for mold-prevention or cement board like bathroom walls, all I needed to do was rough up the plywood top with my grinder and a steel-wool like disk. With the bench already sanded and painted, I started the tiling process. I bought a bucket of tile adhesive and grout all-in-one, and went to town. I didn’t have a trowel, so I made do with my putty spatula. I just had to make the grooves in the adhesive one-by-one as opposed to one quick stroke. I spread the adhesive, laid the tiles, carefully washed off any overspread on the sides, and let it sit for 24 hours. Then I spread in the grout (it’s all the same stuff, just different application), washed the overspread off again, and let it sit for another 24 hours. Then I had a gorgeous top!
Built from Plan(s)
Estimated Cost
$20
Estimated Time Investment
Weekend Project (10-20 Hours)
Finish Used
Marble Tile, Valspar Harvest Brown satin latex paint
Recommended Skill Level
Beginner
Comments
Craft Table
Project was rather simple. Just wanted to create a space that my wife could work her projects rather than always working on our dinning room table. Took the concept of the plans and made the table work for the space we had available.
Built from Plan(s)
Estimated Cost
$150
Estimated Time Investment
Weekend Project (10-20 Hours)
Finish Used
White Paint and Dark Maple Finish
Recommended Skill Level
Beginner
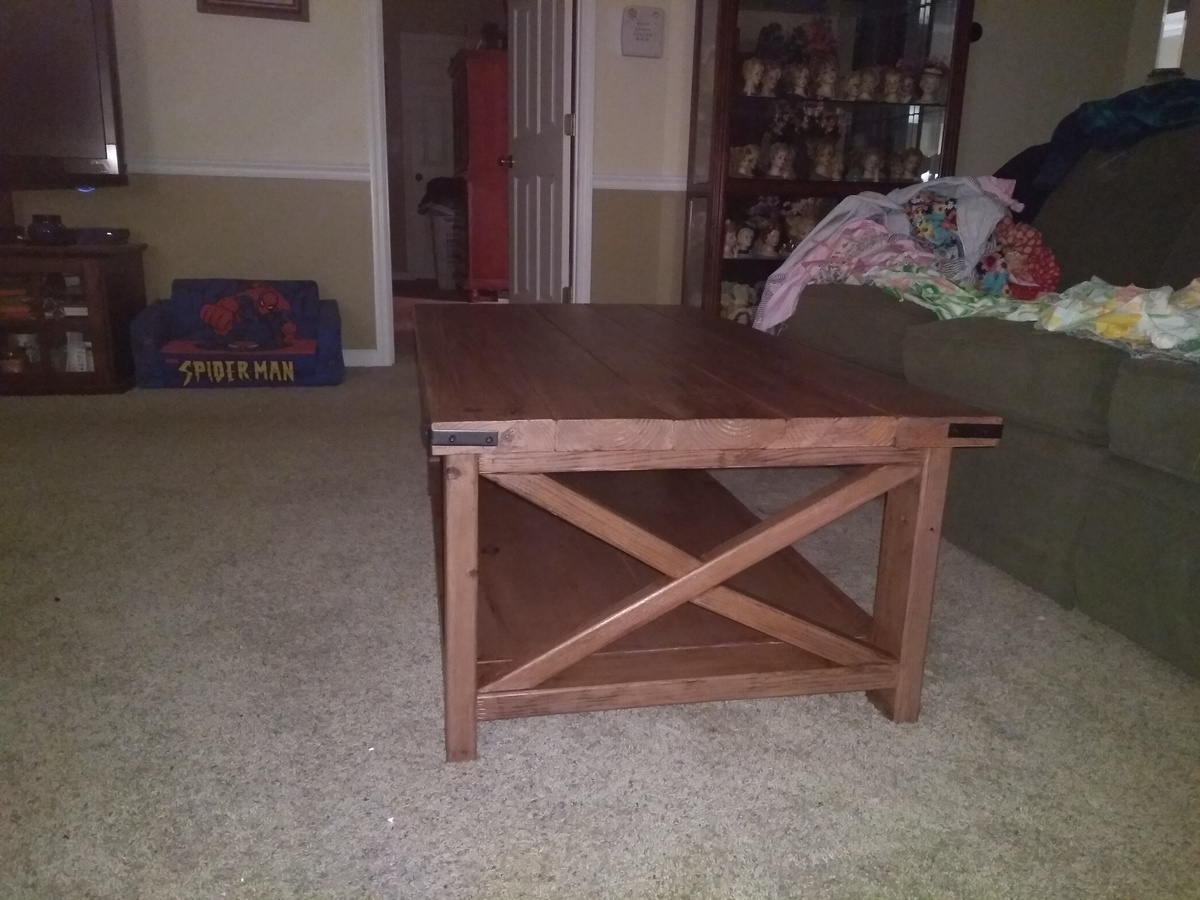
Coffee Table Finished
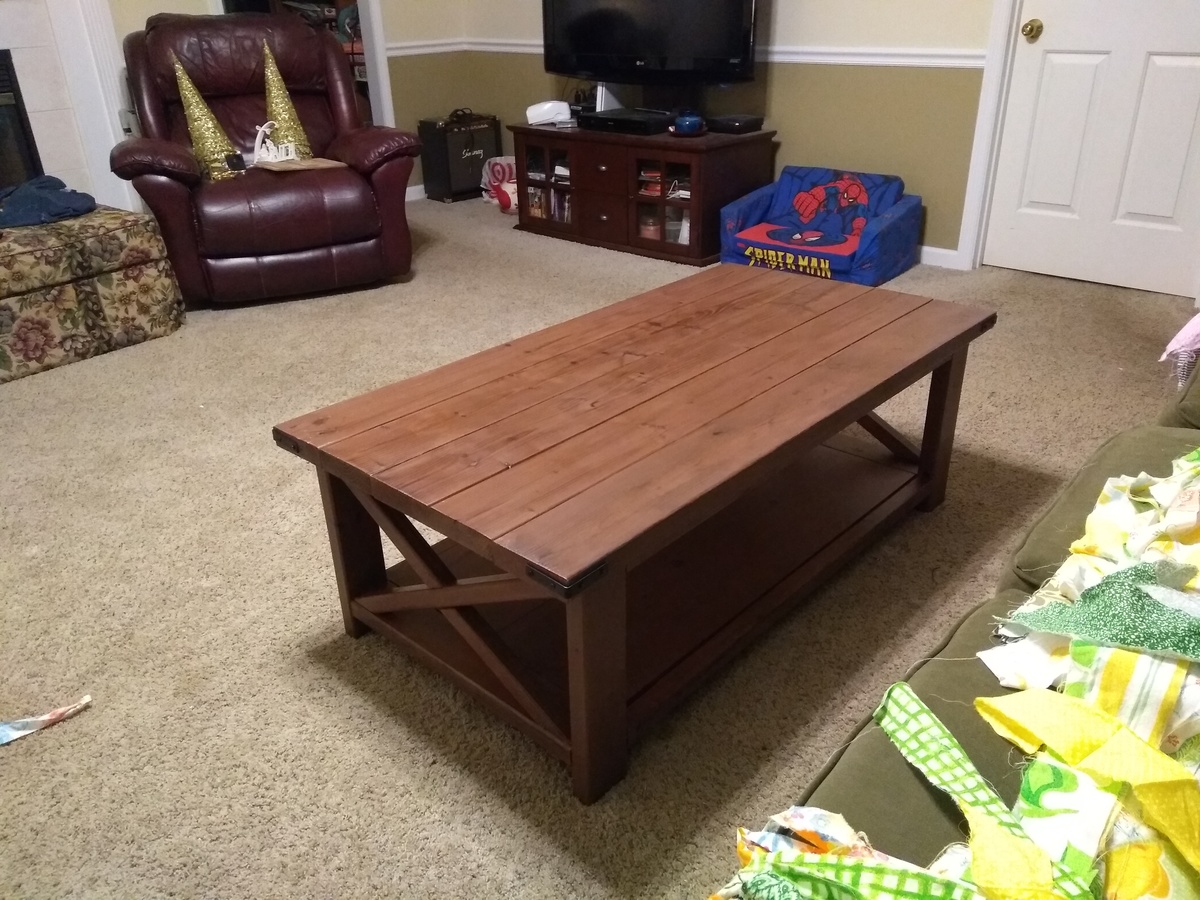
Glad to finish this build. Completed the matching end table over a year ago. Finally got around to find this table. I enjoy Ana's plans and look forward to selecting my next project. Thanks for the free plans!
Built from Plan(s)
Estimated Cost
$75 for lumber. Already had PH screws, wood glue, and necessary tools.
Estimated Time Investment
Week Long Project (20 Hours or More)
Finish Used
Vinegar and steel wool stain
Recommended Skill Level
Intermediate
Stool
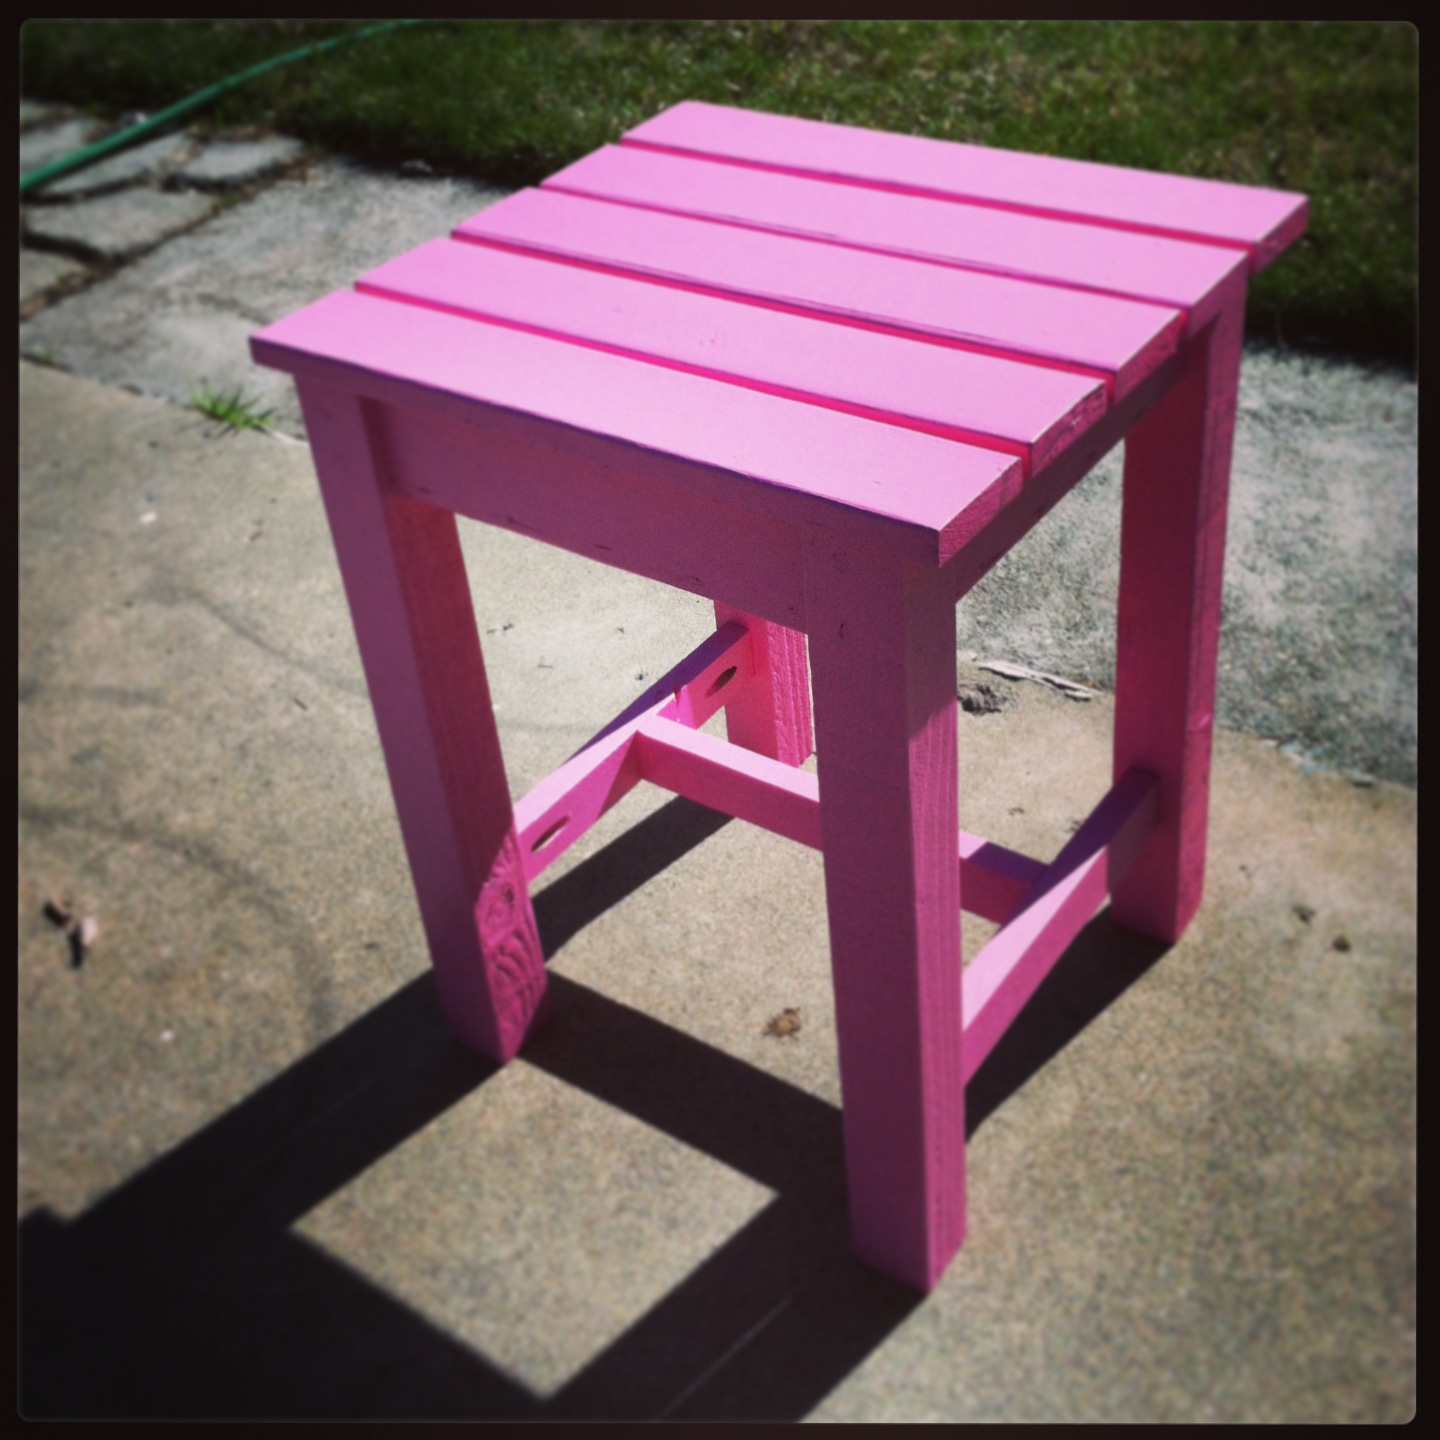
First woodworking project!
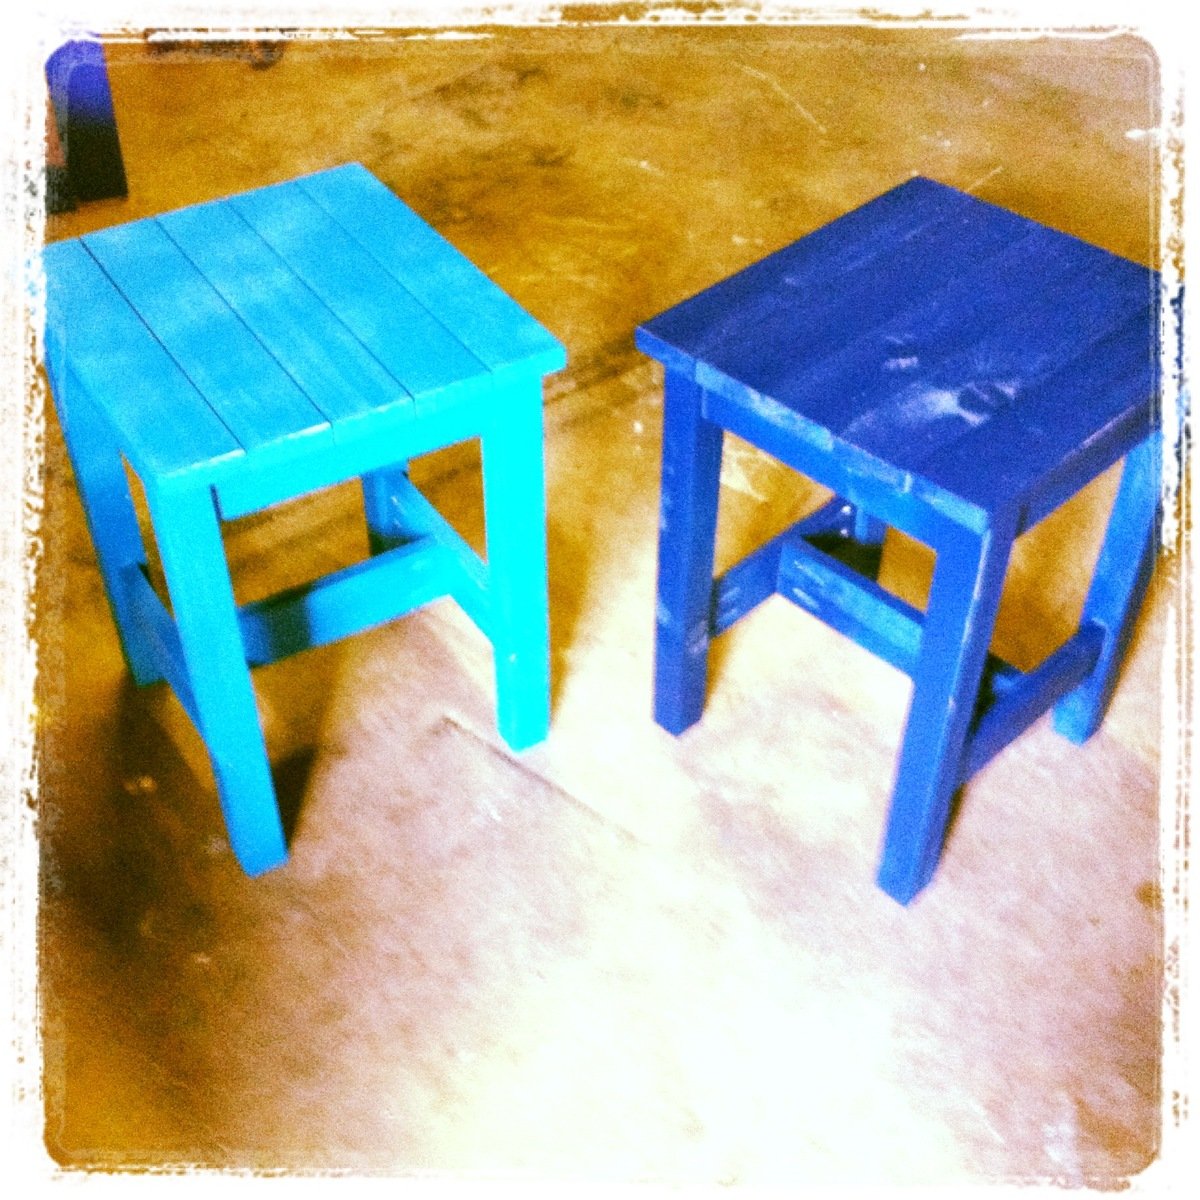
Built from Plan(s)
Estimated Time Investment
Afternoon Project (3-6 Hours)
Finish Used
paint
Recommended Skill Level
Starter Project
Parsons Style Bookcase Turned Headboard
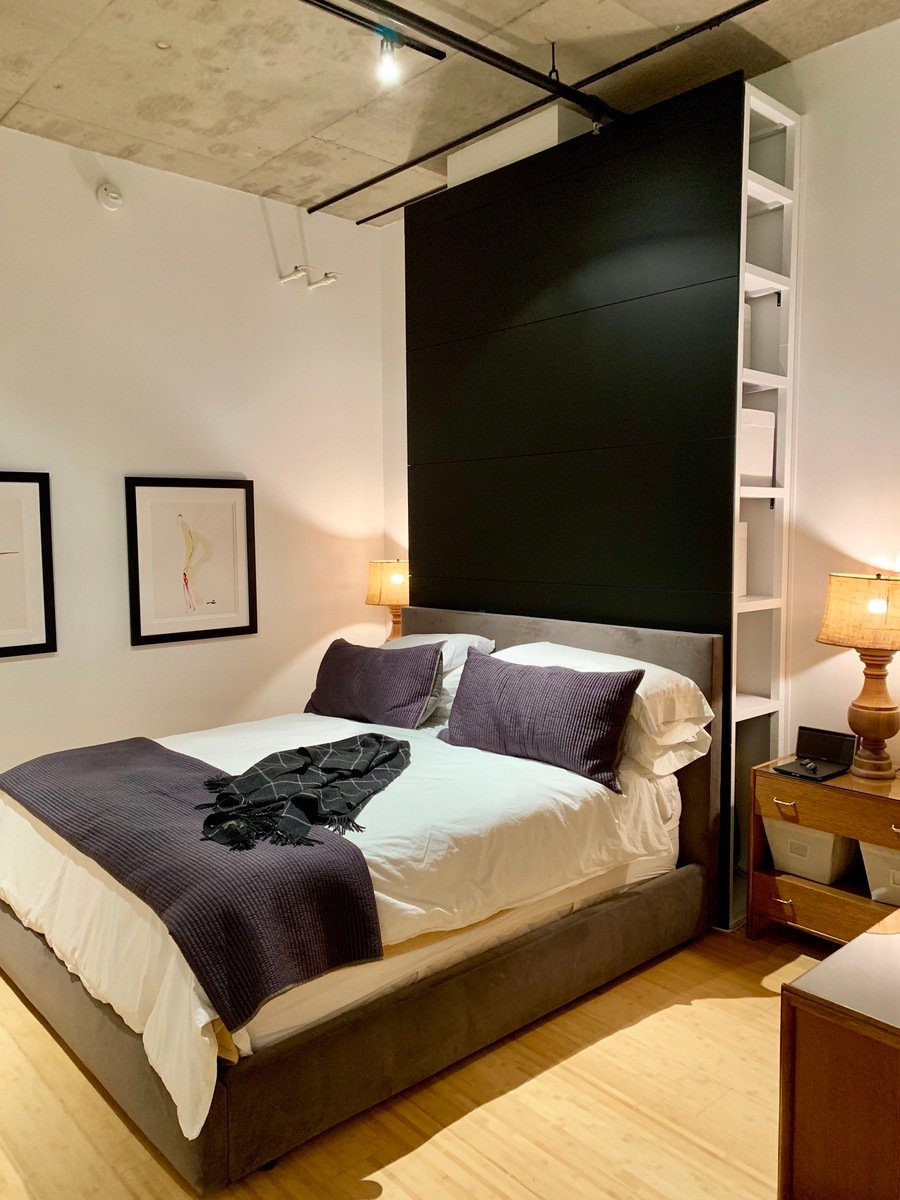
This was my first woodworking project, so it’s very easy to build. I made a huge Parsons bookcase, anchored to the wall, and affixed plywood and Ikea kitchen cover panels to the front to create a headboard with storage. Thanks, Ana, for the easy plans!

Built from Plan(s)
Estimated Time Investment
Week Long Project (20 Hours or More)
Finish Used
Cabinet Cover paint
Recommended Skill Level
Beginner
Comments
Modified, modified 72" barn door console
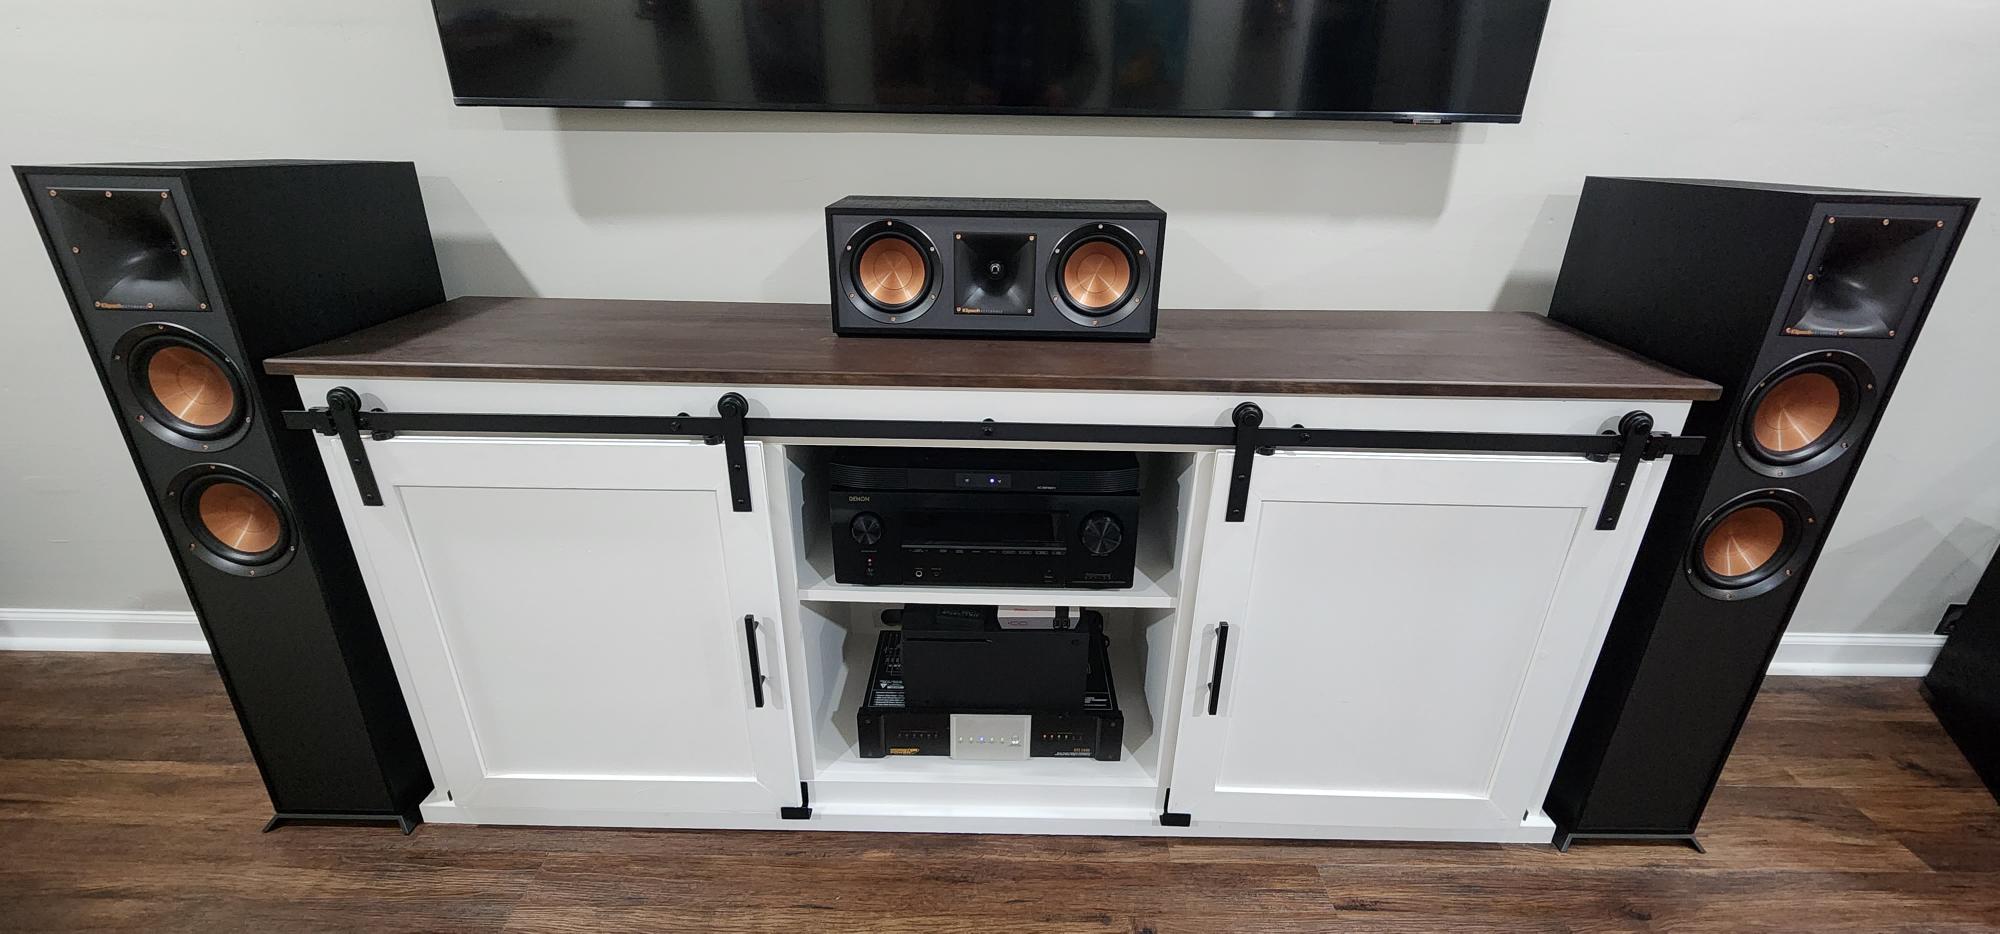
I didn't really like the modified 6' console plans, so I modified the 8' version. This gave me the center opening for my home theater equipment, power station, and gaming console. Besides reconfiguring the dimensions, the only other things changed were aesthetic. With the right tools, this console was pretty easy to build!
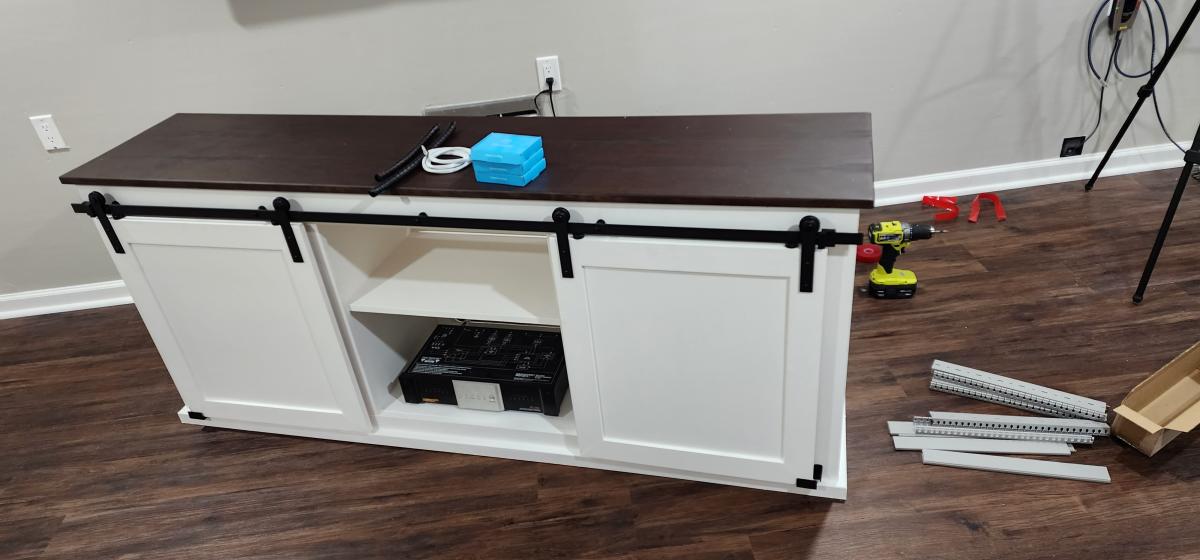
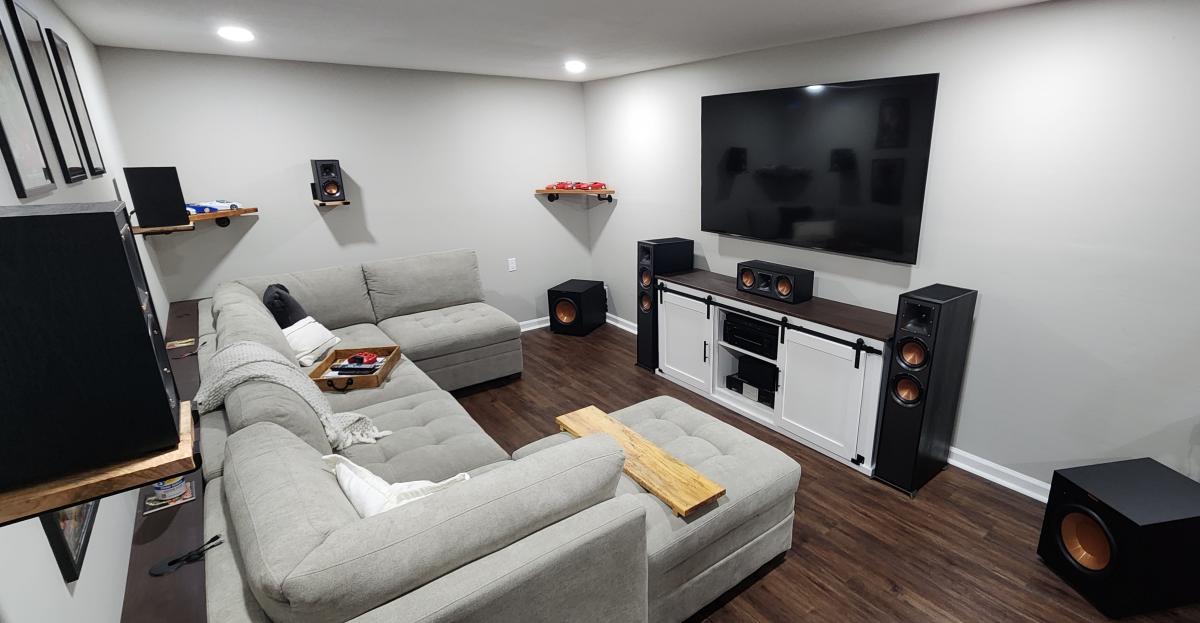
Built from Plan(s)
Comments
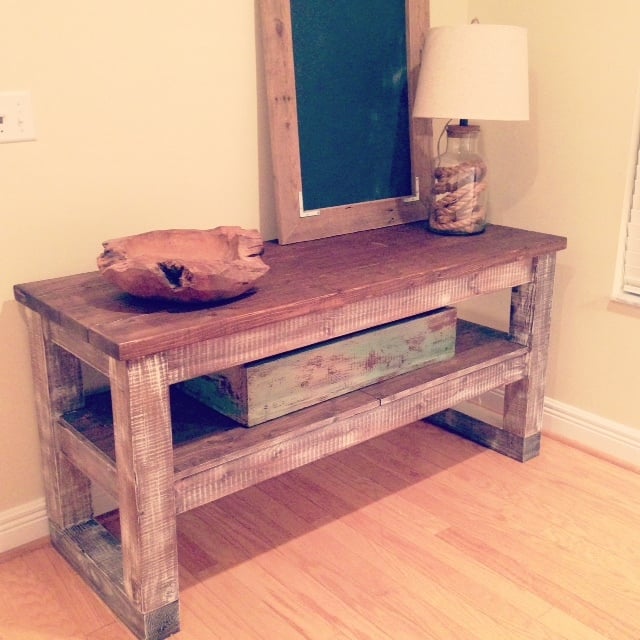
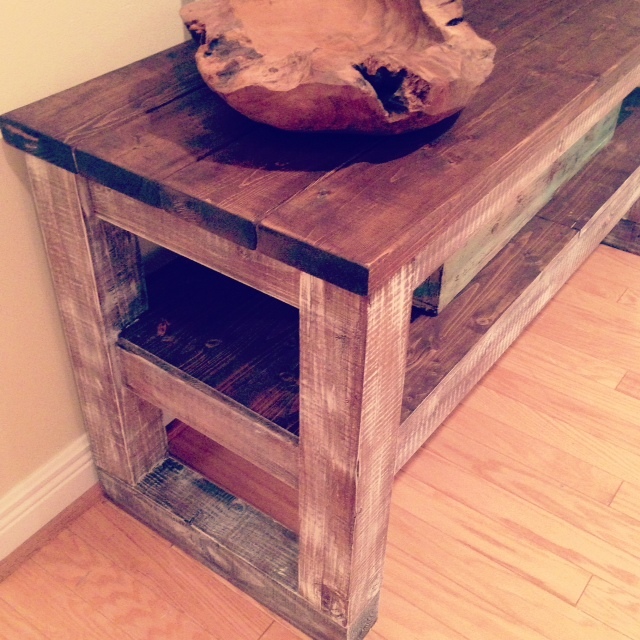
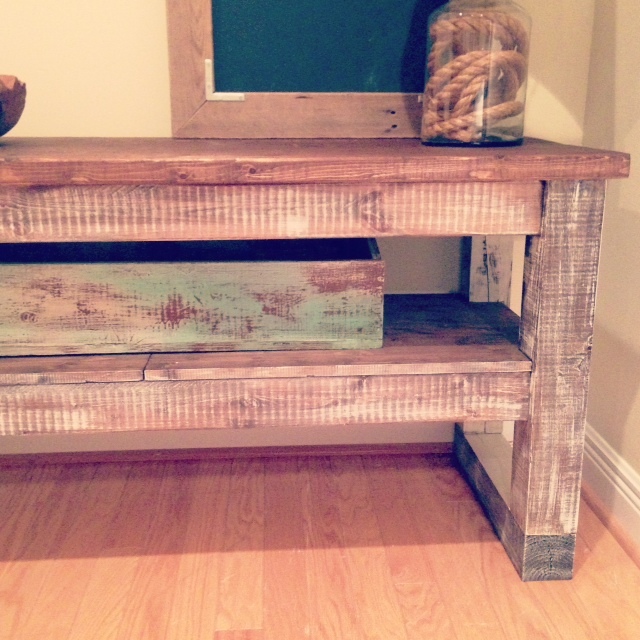
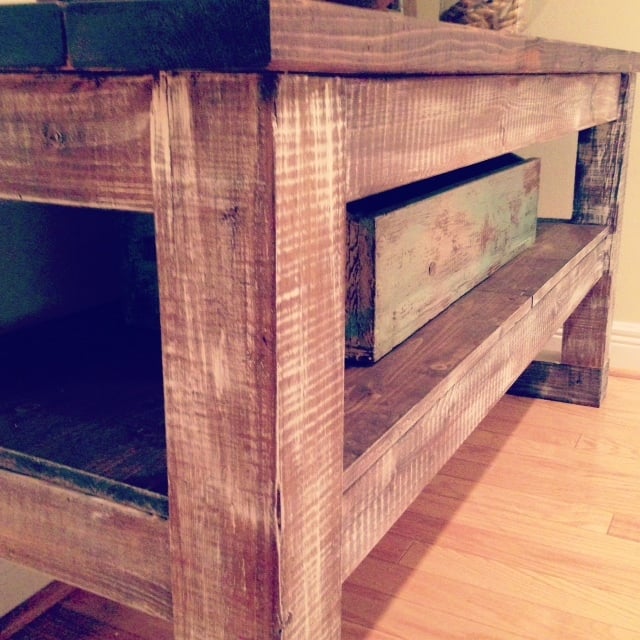
Simple, cheap, easy and FREE console table
My husband and I wanted to try something relatively simple before attempting to make a dining room table.
We used some old fence boards that were very weathered, so we expected that the end result wouldn’t be perfect.
It is definitely rustic, but I think it is charming!
We modified the stretcher and the table top, but otherwise followed the plans.
It was easier than I expected... I think I am hooked!
Built from Plan(s)
Estimated Cost
Free
Estimated Time Investment
Afternoon Project (3-6 Hours)
Finish Used
none
Recommended Skill Level
Starter Project
Comments
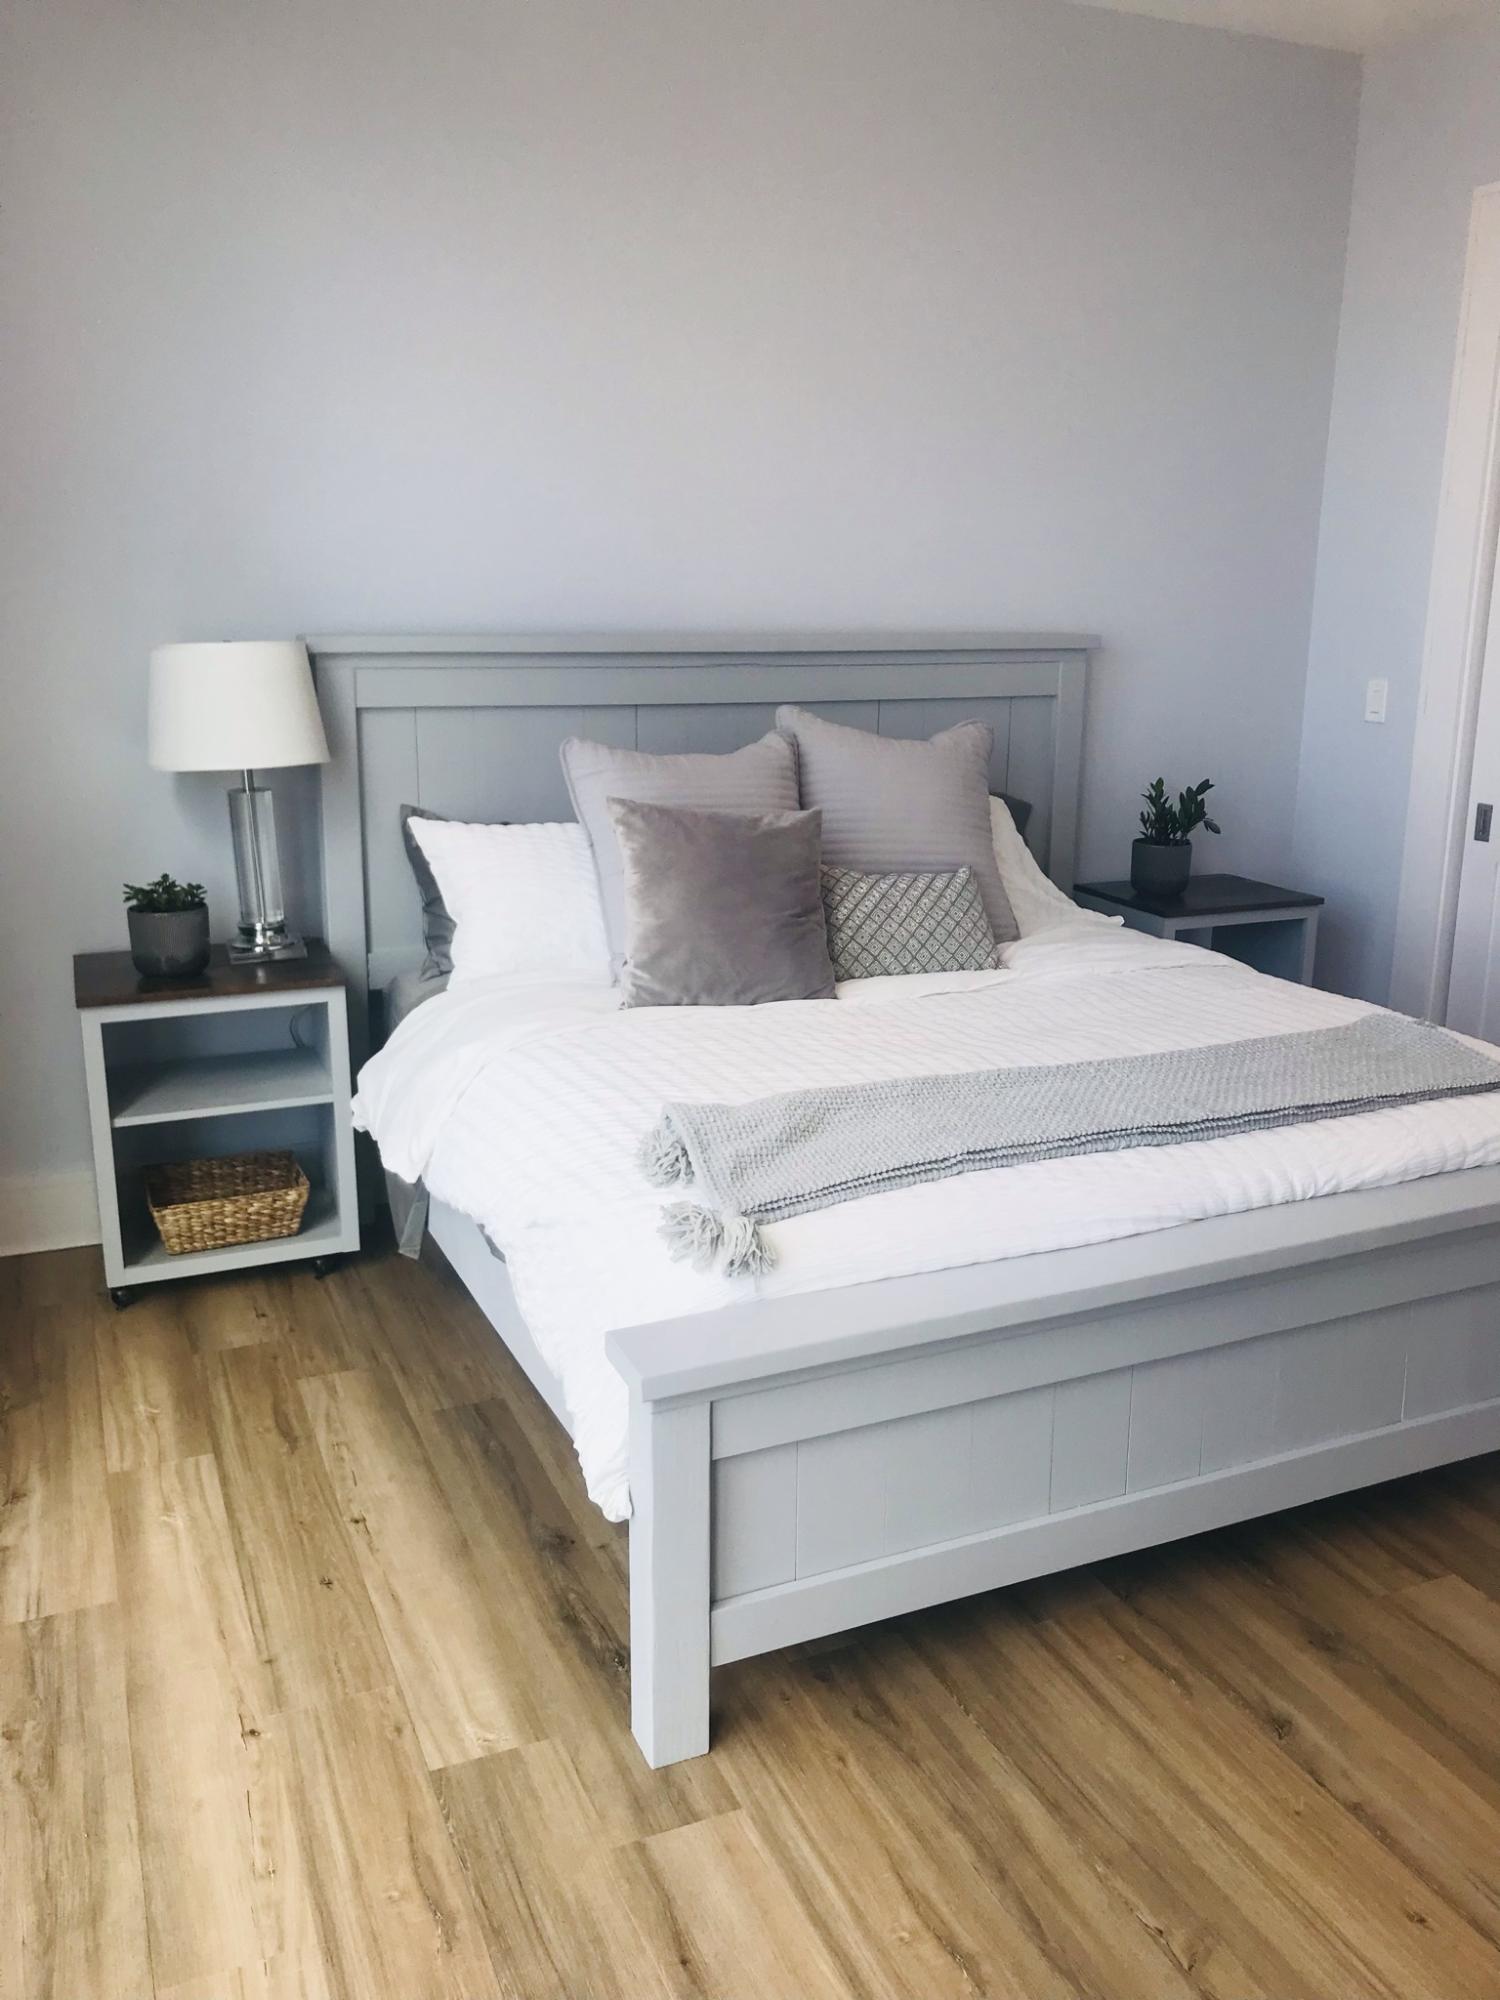
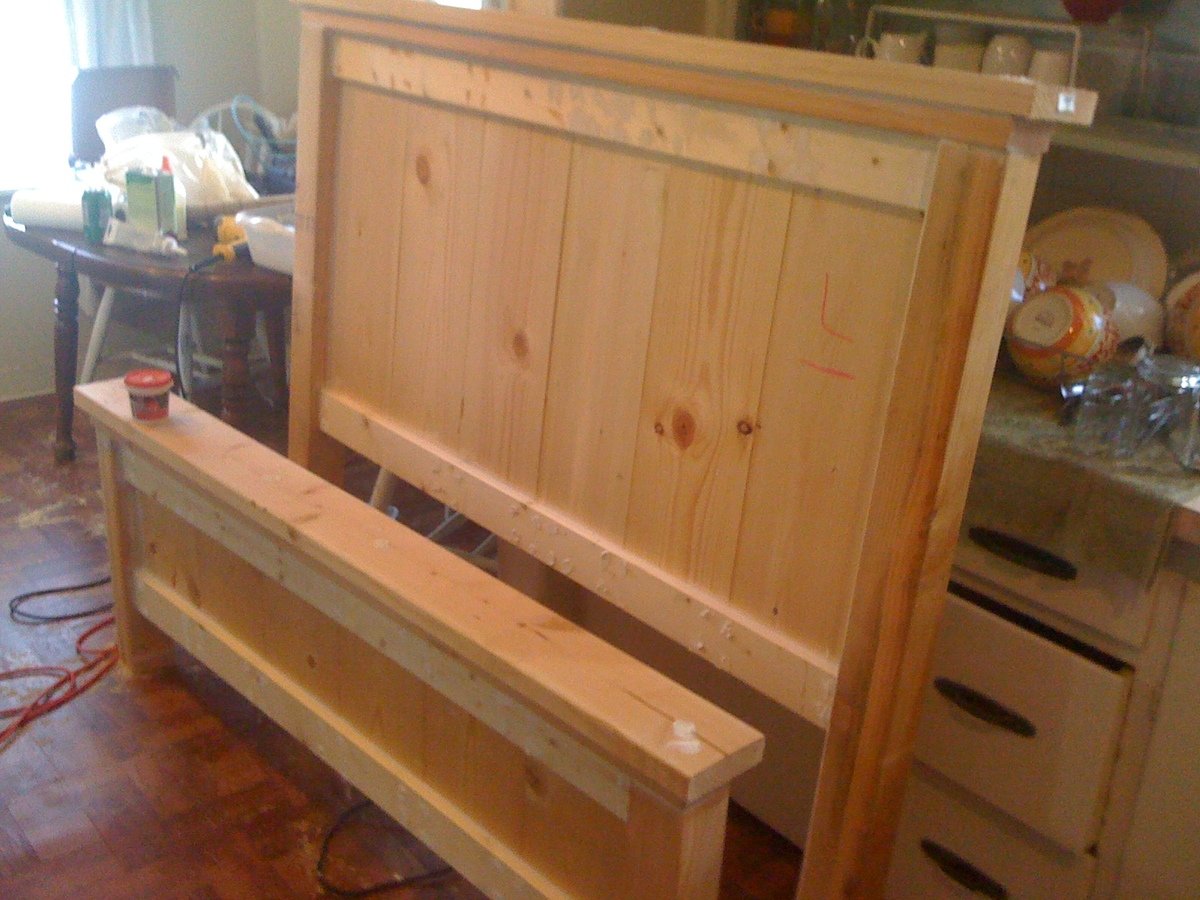
Birthday Farmhouse Queen sized Bed
We built this bed way back in April for my birthday, but hadn't gotten the bedding quite right until now. We love this thing and it is sooo sturdy. I wish I would have taken more time on finish work to get the paint just right. I will probably repaint it in the future but for now it is a beautiful and necessary addition to our bedroom.
Thanks so much for the plans Ana, this was our first furniture project besides shelves and boxes. It definitely gave us the confidence to continue building and even to start creating our own plans and furniture designs.
** updated photos on 11/21
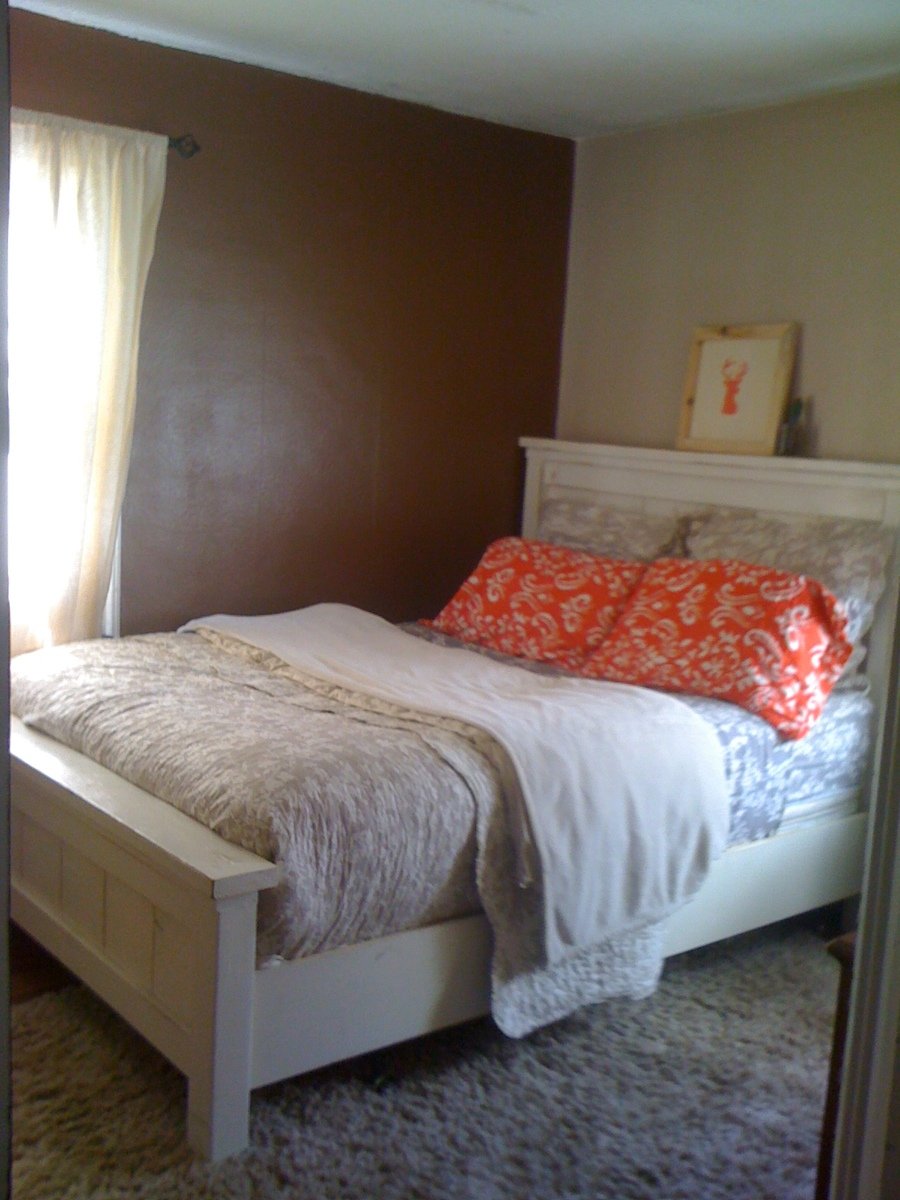
Built from Plan(s)
Estimated Time Investment
Weekend Project (10-20 Hours)
Finish Used
Antique white paint in semi-gloss and distressed with Early American Stain.
Recommended Skill Level
Starter Project
Toddler SIzed Easel
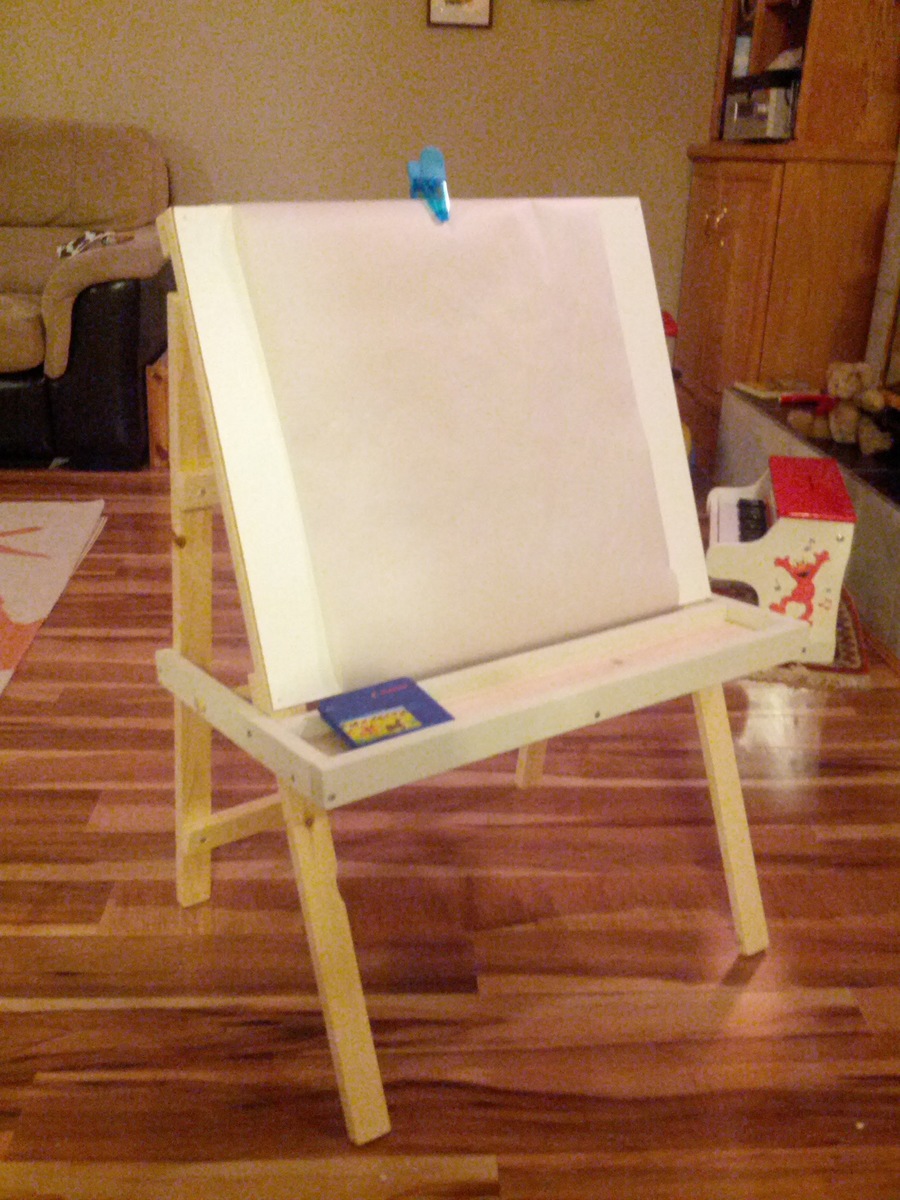
We opted to make this a regular easel (no chalkboard) and just used a sheet of paneling as the background. It's perfect, our toddler loves it. Thanks Ana!
Built from Plan(s)
Estimated Cost
$10
Estimated Time Investment
Afternoon Project (3-6 Hours)
Finish Used
unfinished
tray painted with milk paint
tray painted with milk paint
Recommended Skill Level
Beginner
Comments
kandre05
Wed, 11/30/2016 - 10:39
Chest
Thank You!