Community Brag Posts
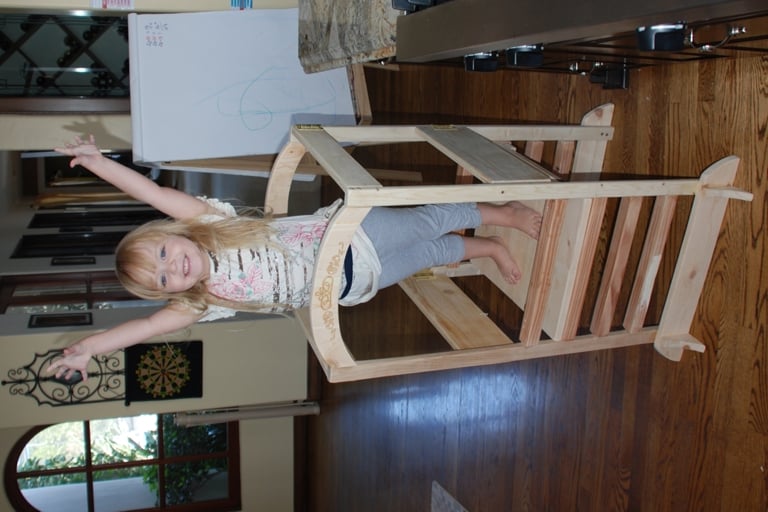
Man cave

We made these chairs following easy instructions from AnaWhite!
Built from Plan(s)
Comments
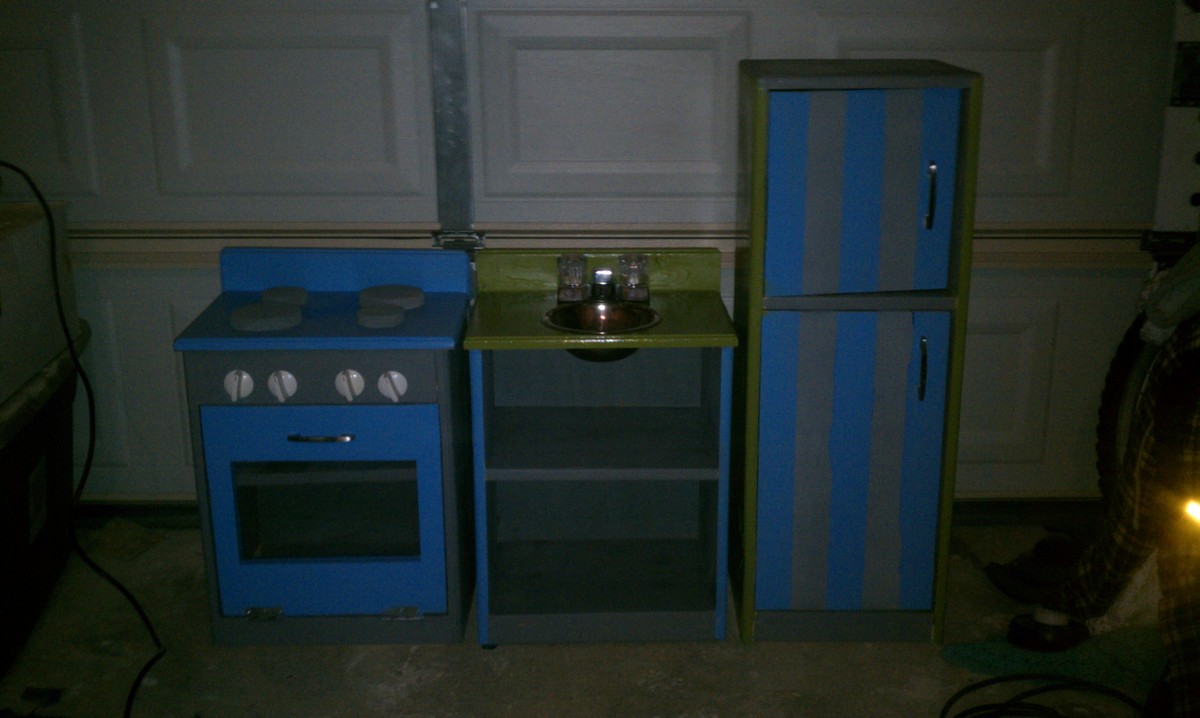
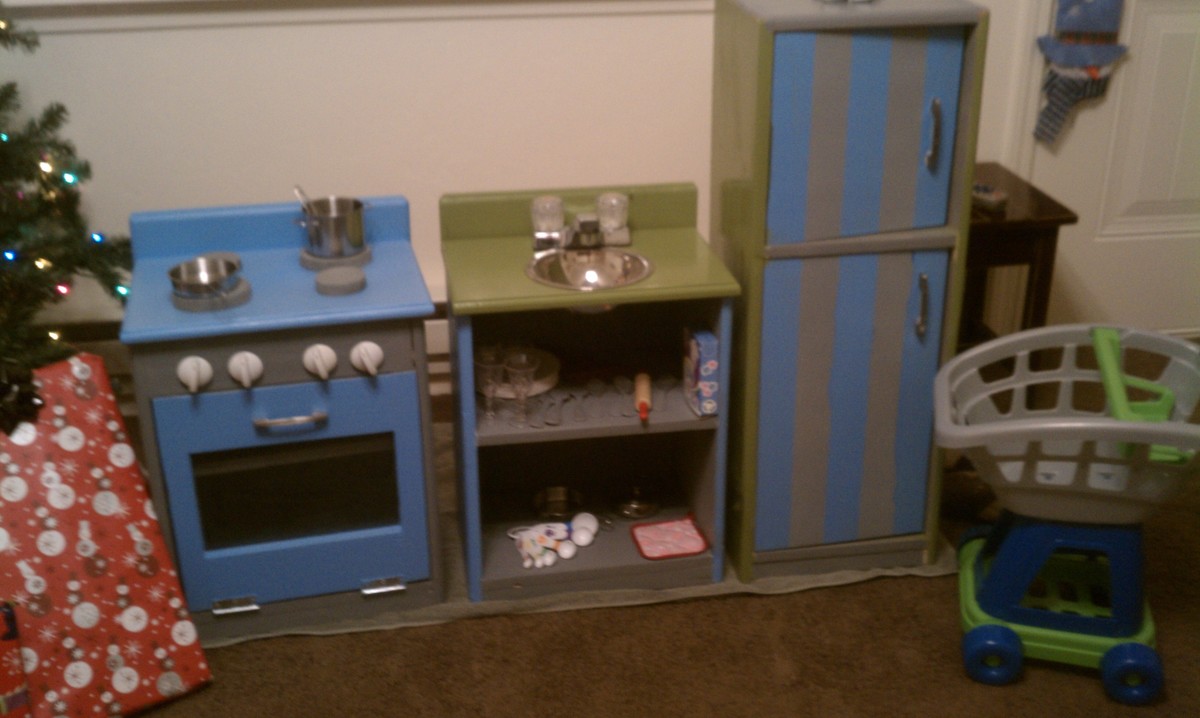
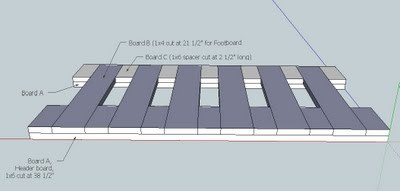
Boy Kitchen

My almost 3 year old son was getting really into playing pretend and would always bring me and my husband little toys and he would say "here's your pancakes I made you". So when I seen Grace's kitchen I knew I needed to make my boys one. I had limited time to work on it as I work full-time and it's winter here so the garage isnt the funnest place for them to hang out. It was so fun and easy (Thanks to your plans) to build and they love it! I made the burners out of wood with my jig saw as I couldn't find anything else I liked. The sink is just an old mixing bowl that fit perfectly. The faucet is from the Orange store and was only $10. I had the hardest time with hinges I initially went with the ones that Anna had done. I found that my littlest guy (1.5 years old) was having a hard time pulling the doors open though so I switched to regular hinges and a cheap magnetic closer. I saved the other hinges though so when he gets a bit older I can switch back. One of the best parts of my build is my husband bought me a ROUTER!

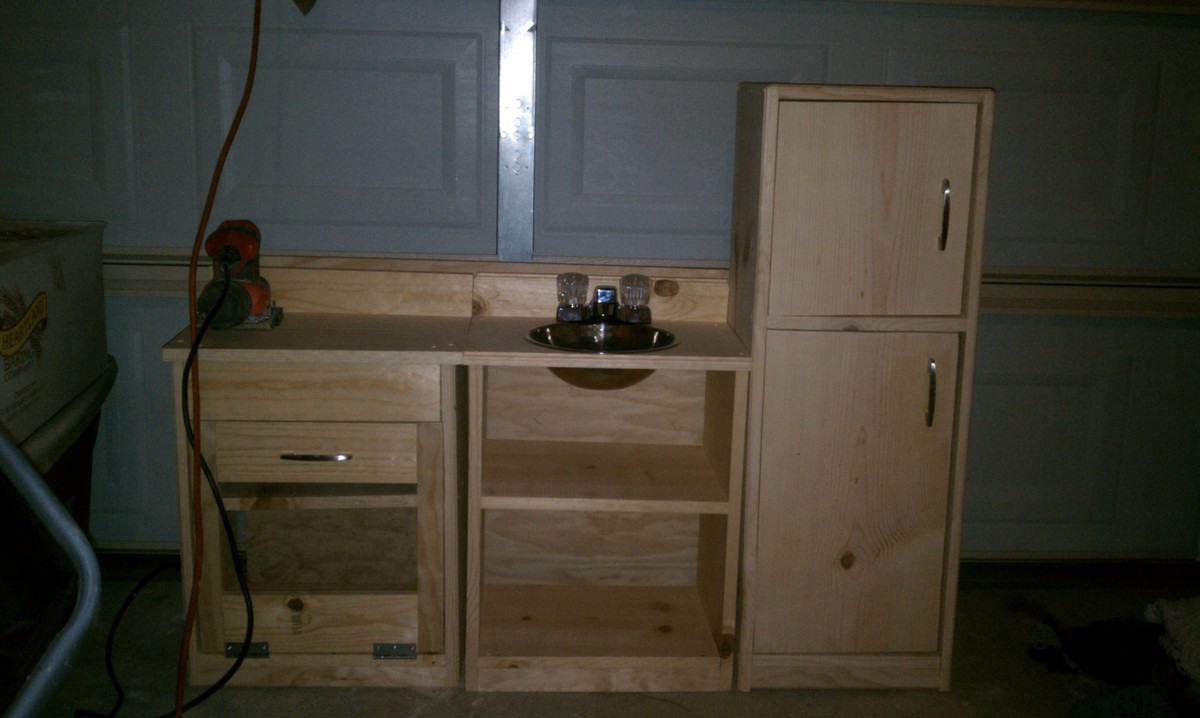

Built from Plan(s)
Estimated Cost
$100... It was about $70 for wood and then paint, handles, and hinges
Estimated Time Investment
Weekend Project (10-20 Hours)
Finish Used
Just several coats of paint and magnetic paint for the fridge.
Recommended Skill Level
Beginner
Comments
Wed, 01/04/2012 - 05:49
Cool and cute!
That's cute! Not to mention, cool too! So your son can actually cook there? If you all play it right, he may just develop the aptitude and love for cooking, and grow up to be a chef someday!
Wed, 01/04/2012 - 08:48
Great job!
I got my youngest son a kitchen set (purchased, never even thought about making one my self!) long ago because he played "cooking" too. He and his brother loved it, and the the youngest did become a chef!
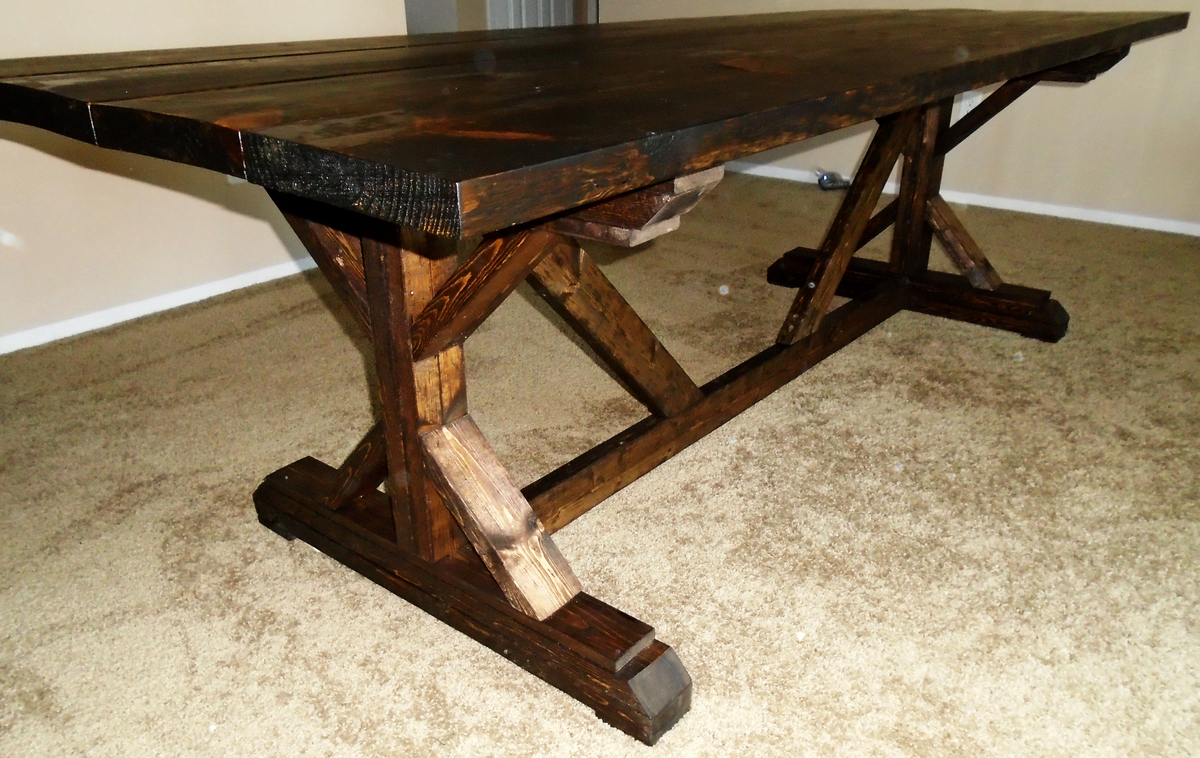
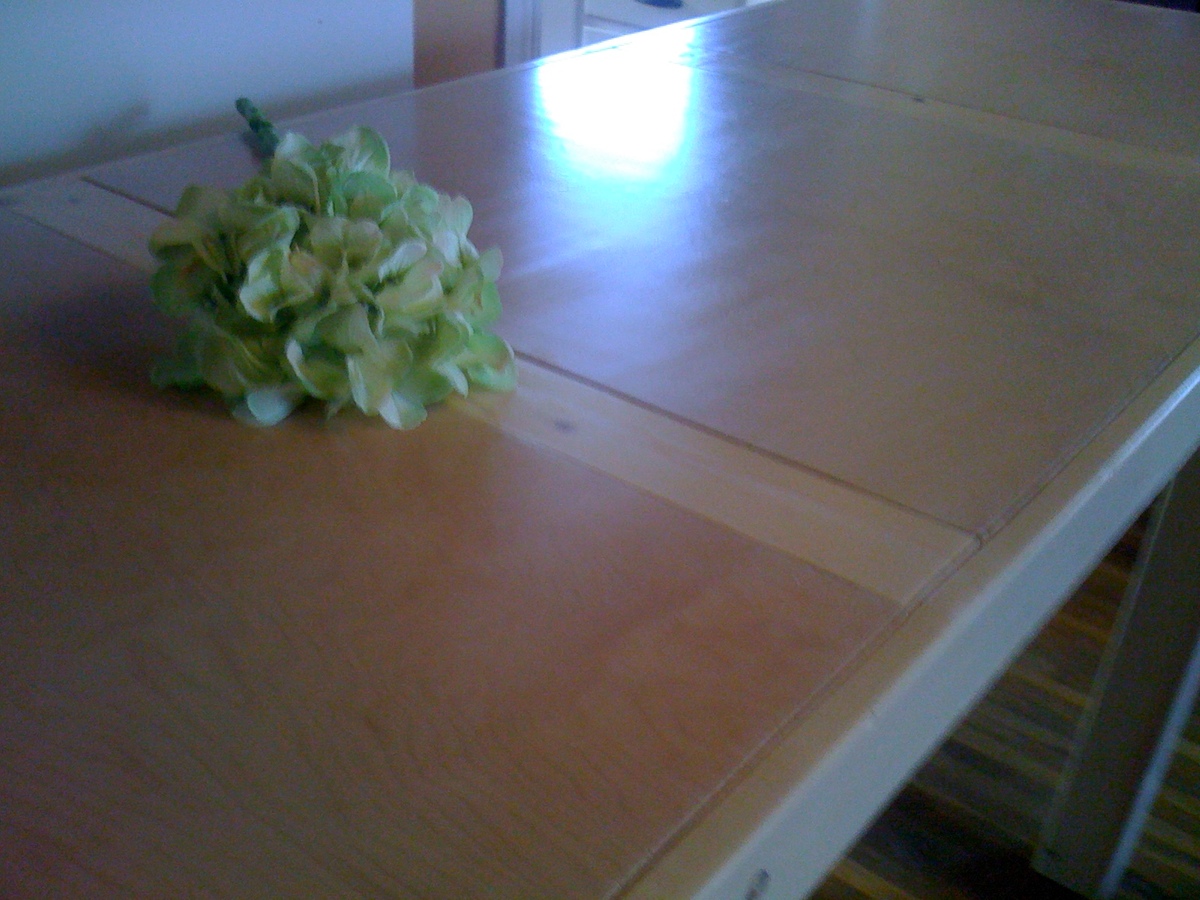
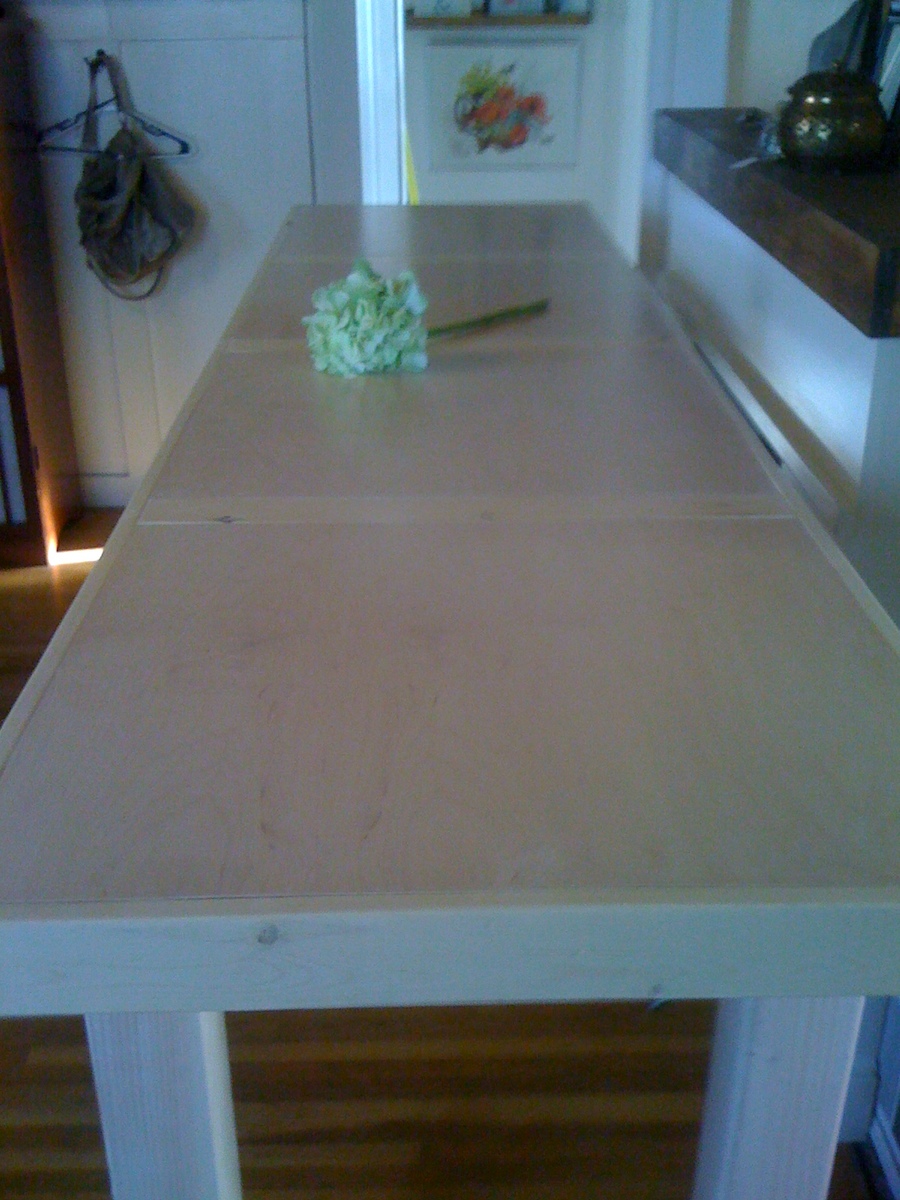
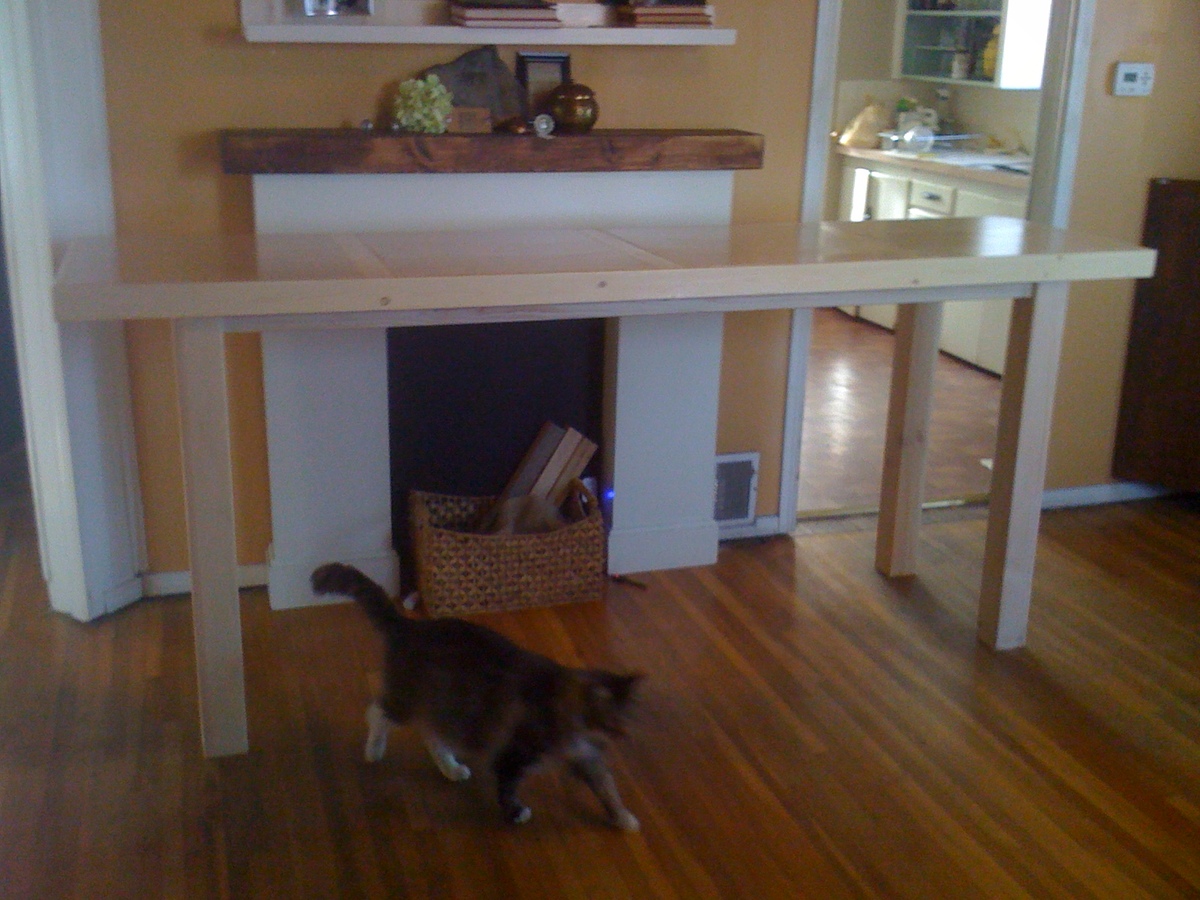
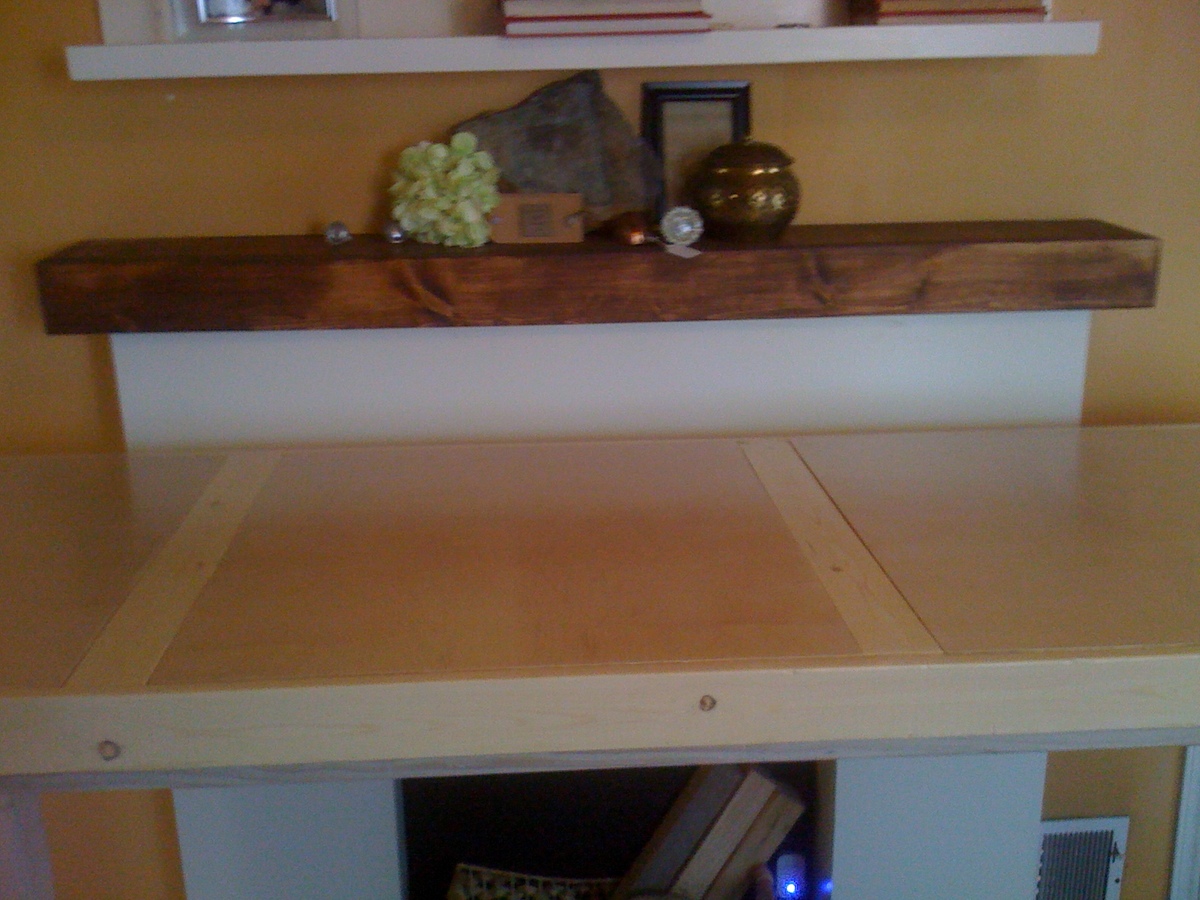
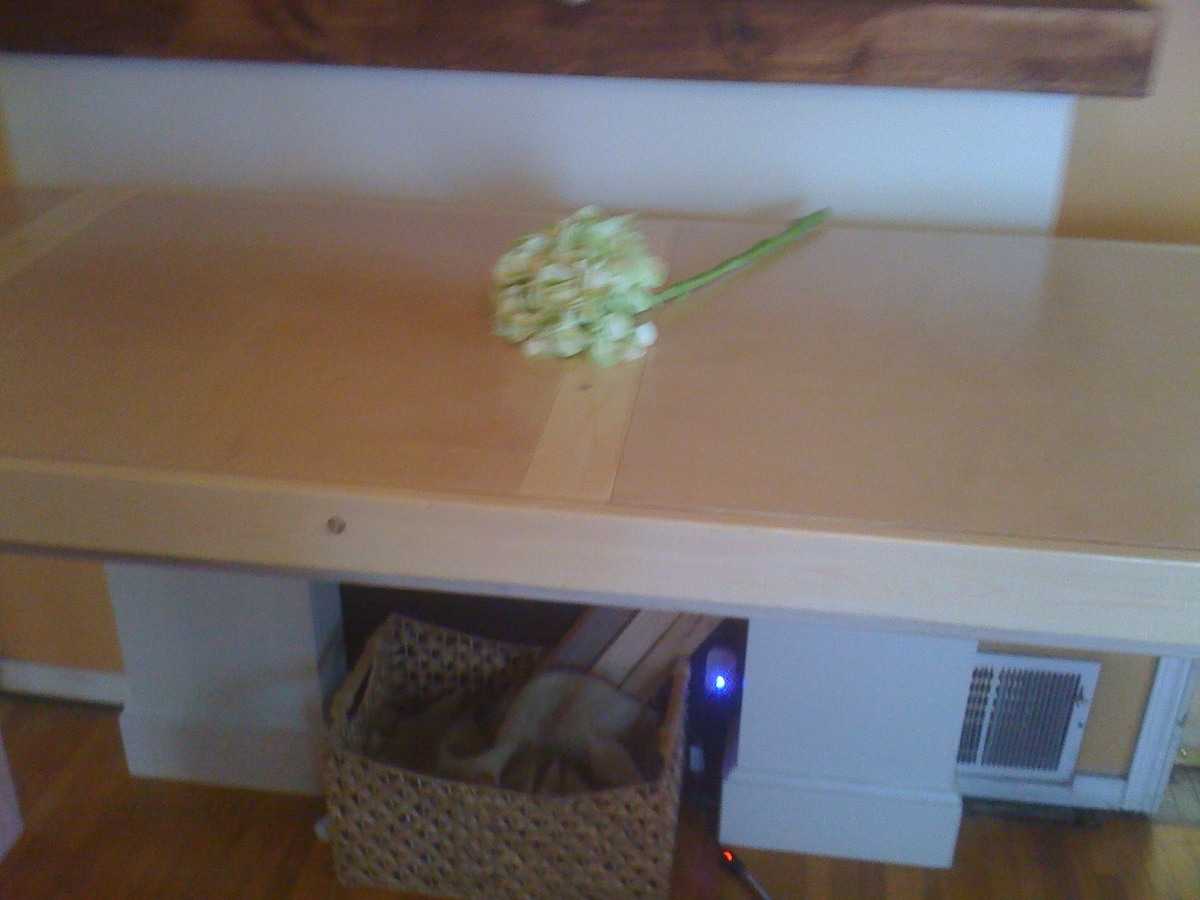
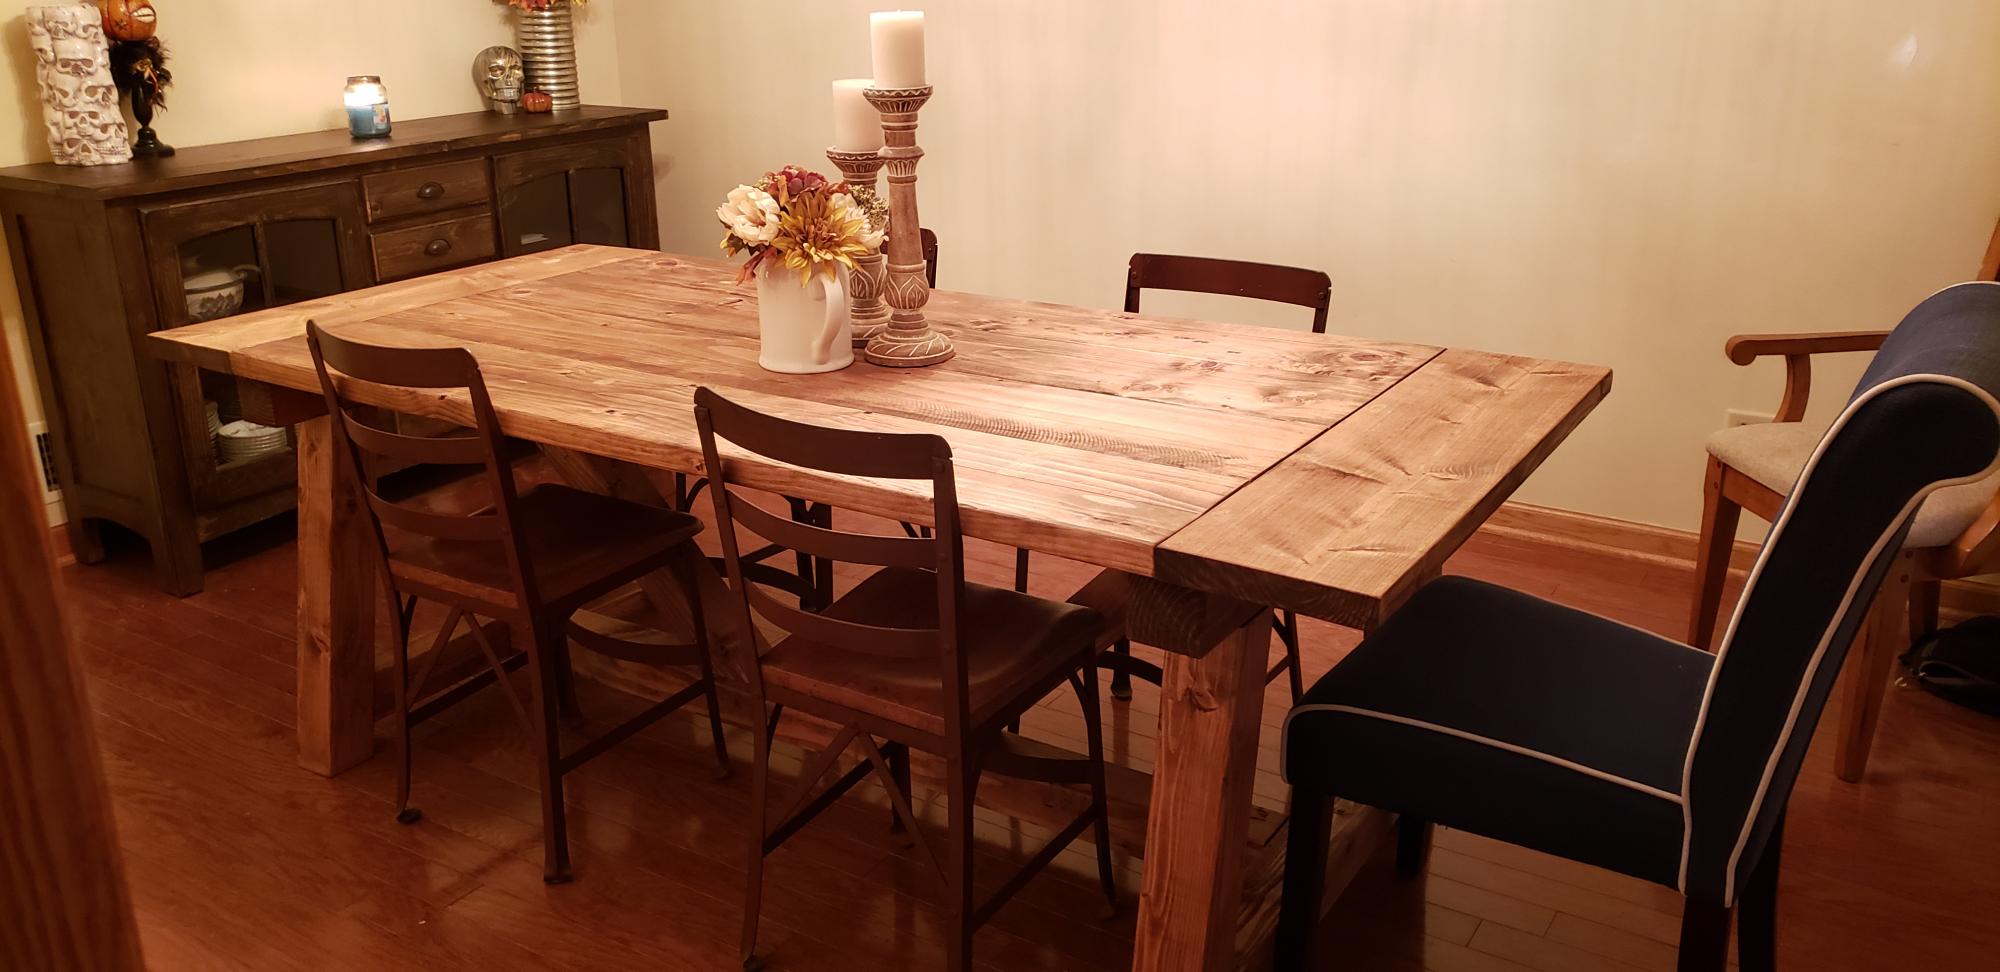
Dinning room table
Needed something I could put together between work in a few weeks to serve thanksgiving on. The base of the table is modified from Ana's build and the table top is a frame I built and filled with log slices and clear epoxy resin
Built from Plan(s)
Estimated Cost
100 for lumber.
Estimated Time Investment
Weekend Project (10-20 Hours)
Finish Used
Dark walnut then red oak
Recommended Skill Level
Intermediate
Comments

Farmhouse Table for Thanksgiving
My husband and I bought our first house back in October and wanted to build a table so we could host Thanksgiving dinner at our new place. With the help of my dad and his collection of tools, we were able to use the farmhouse table plans from Ana-White which turned out nicely. We used a dark walnut stain and a couple coats of MInwax Helmsman Spur Urethane.
Estimated Cost
$130
Estimated Time Investment
Weekend Project (10-20 Hours)
Finish Used
Dark Walnut Stain
Minwax Helmsman Spur Urethane
Minwax Helmsman Spur Urethane
Recommended Skill Level
Intermediate
Side Table
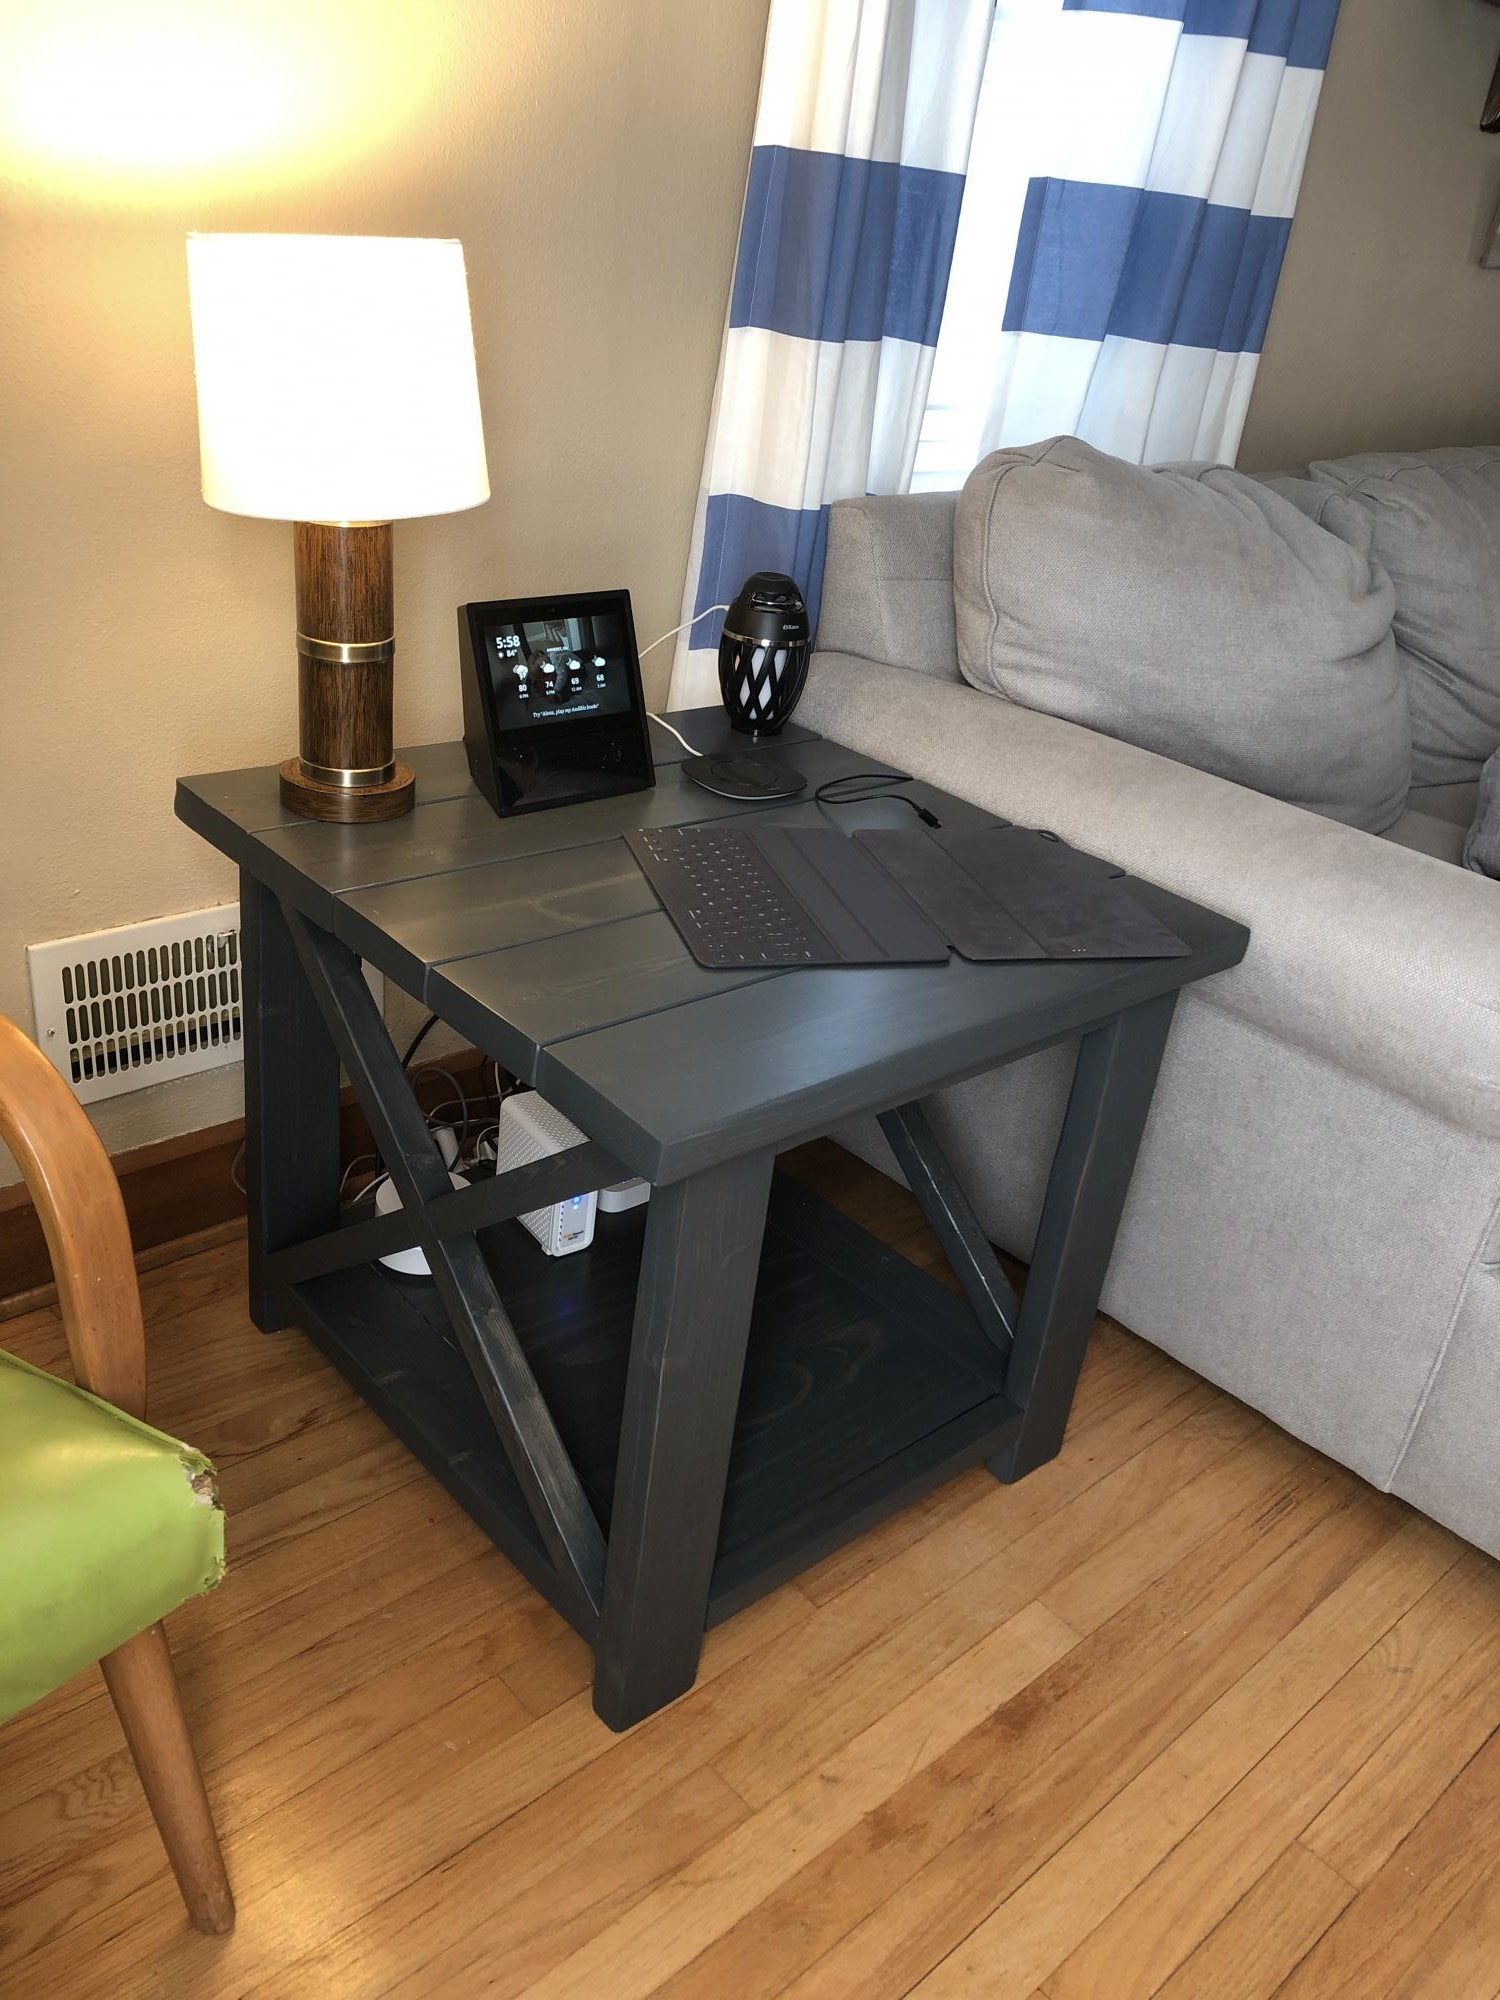
First thing my husband has ever attempted to build and I love it! Thanks Ana!!
Built from Plan(s)
Comments

Sat, 08/31/2019 - 11:20
What a beautiful first…
What a beautiful first project. I love the dark stain or paint? It's gorgeous!
Can't wait to see more projects from you!
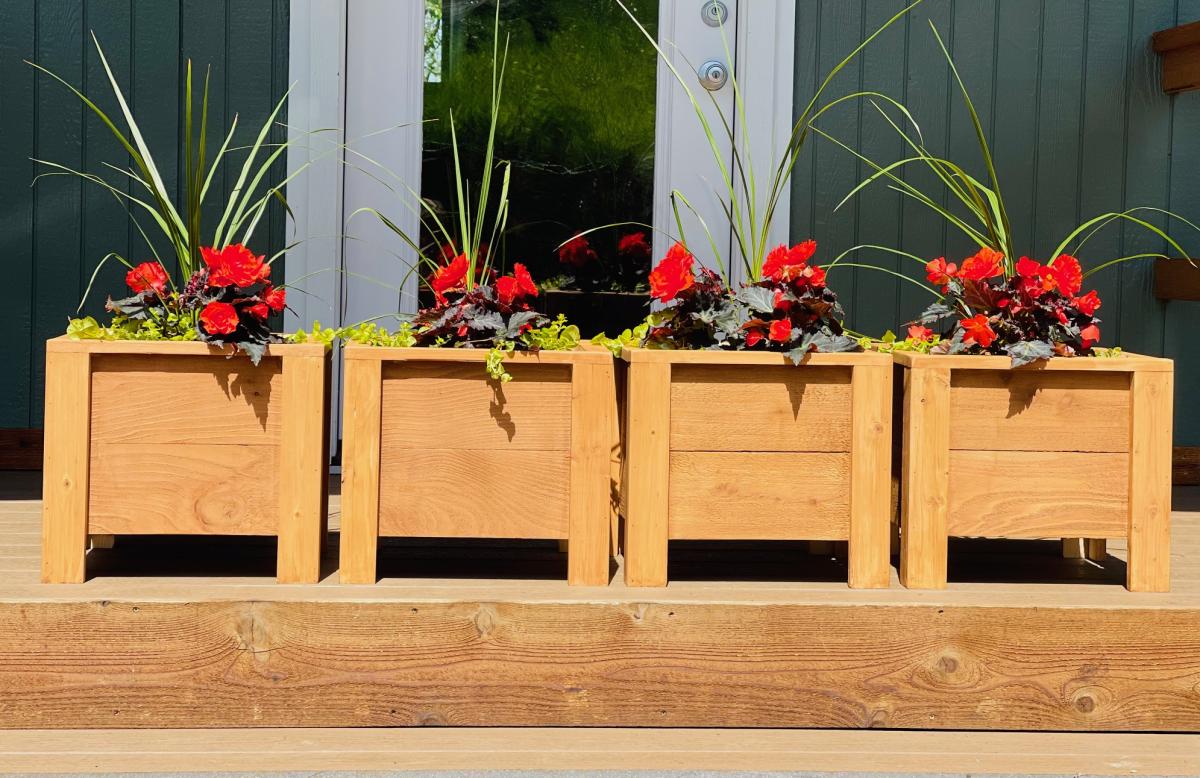
Easy Build Fence Picket Planters
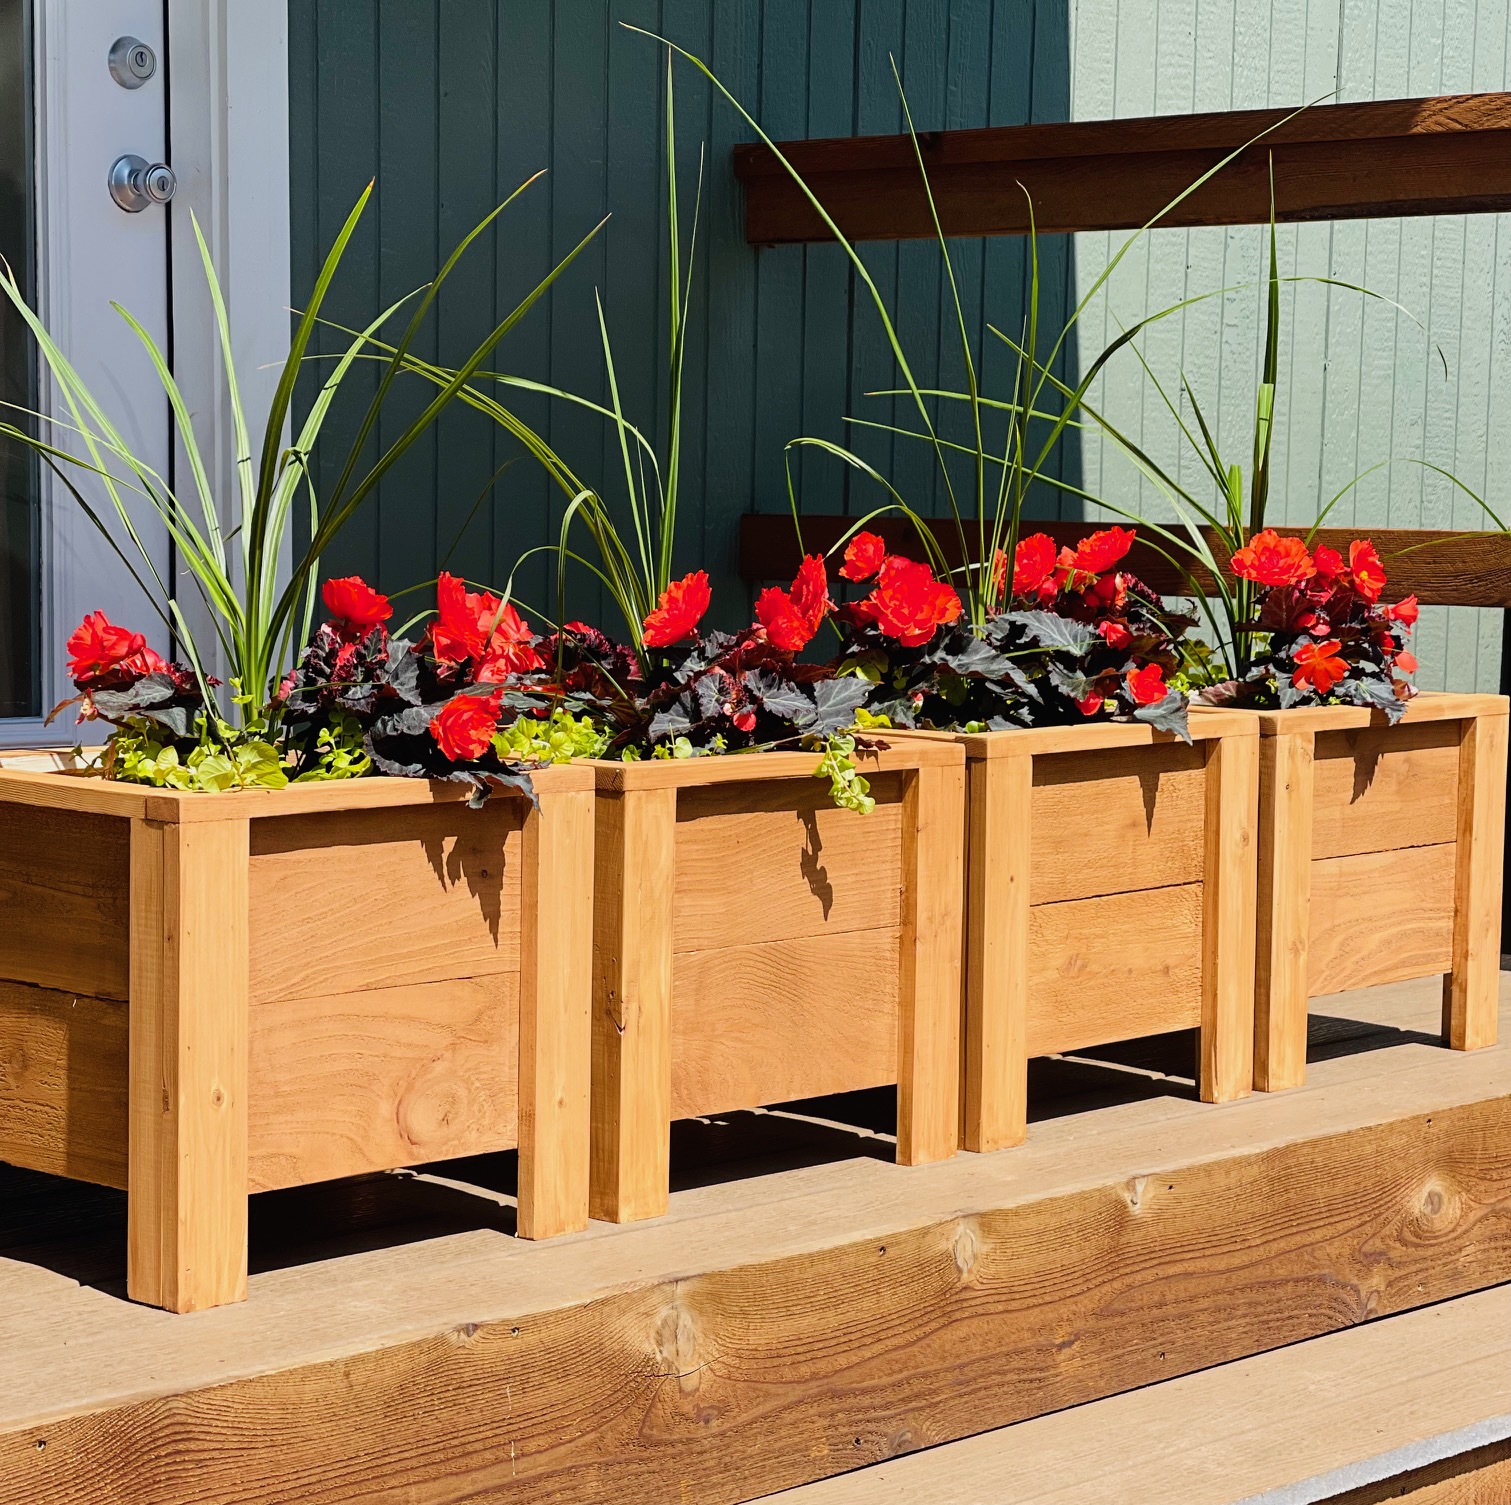
I've been wanting to build this plan for quite some time! Took me about 2 hours to build and 1 hour to finish. Giving these as gifts for Mother's Day! Total cost was about $15 per planter. I scaled down the design after I found the plants I wanted to put in them. Ana has the best and easiest plans!

Built from Plan(s)
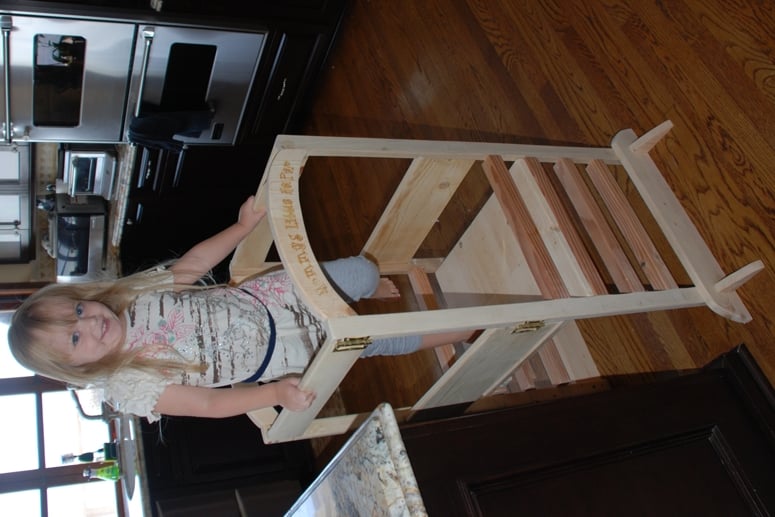
Helper Tower
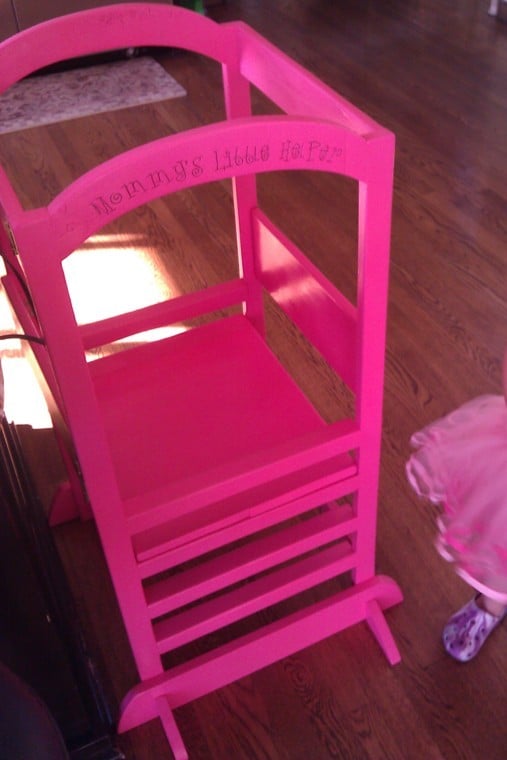
I saw a stand like this in a catalog for over $250 and knew I could build it instead for way less! I used the hinges so it collapses and both my daughter and I LOVE this stand :-) It is sturdy enough that my 4 yr old daughter and her 7 old brother can both be on it at the same time, wiggling and giggling.
Built from Plan(s)
Estimated Time Investment
Afternoon Project (3-6 Hours)
Finish Used
Bright pink first rolled on and then sprayed additional coats through my HPLV sprayer. 2 coats of clear top coat.
Recommended Skill Level
Beginner
Comments
Fri, 06/29/2012 - 00:24
I LOVE the idea! It's really
I LOVE the idea! It's really beautiful Helper Tower :)!!
In reply to I LOVE the idea! It's really by Eve (not verified)
Sat, 09/15/2012 - 13:07
thanks!
My daughter is almost 5 and she still uses it all the time. She just loves it! Even her 8 year old brother likes to get on it sometimes :-)
8 Foot Standing work table for trade
We built this 8 foot long standing work table in trade for a friend. It turned out great! We had some scrap 2'x2' pieces of white maple plywood that we used for the top and framed them out with 1x3's. Then we made a simple base of 4x4s and 2x4s. It is a super simple table but it's so pretty!
I've been eyeing Rustoleum's new wood stain called "Willow" so I decided to give it a try for this project. It is sooo pretty. It lightens the wood almost like a white wash but it has this pearlescent quality to it and I'm swooning for it! Then we put 2 coats of satin poly over the top and legs. I prefer to use wax but he is using the table as a work surface and needed something a little stronger.

Estimated Time Investment
Day Project (6-9 Hours)
Finish Used
Rustoleum "Willow" and minwax satin Poly
Recommended Skill Level
Intermediate
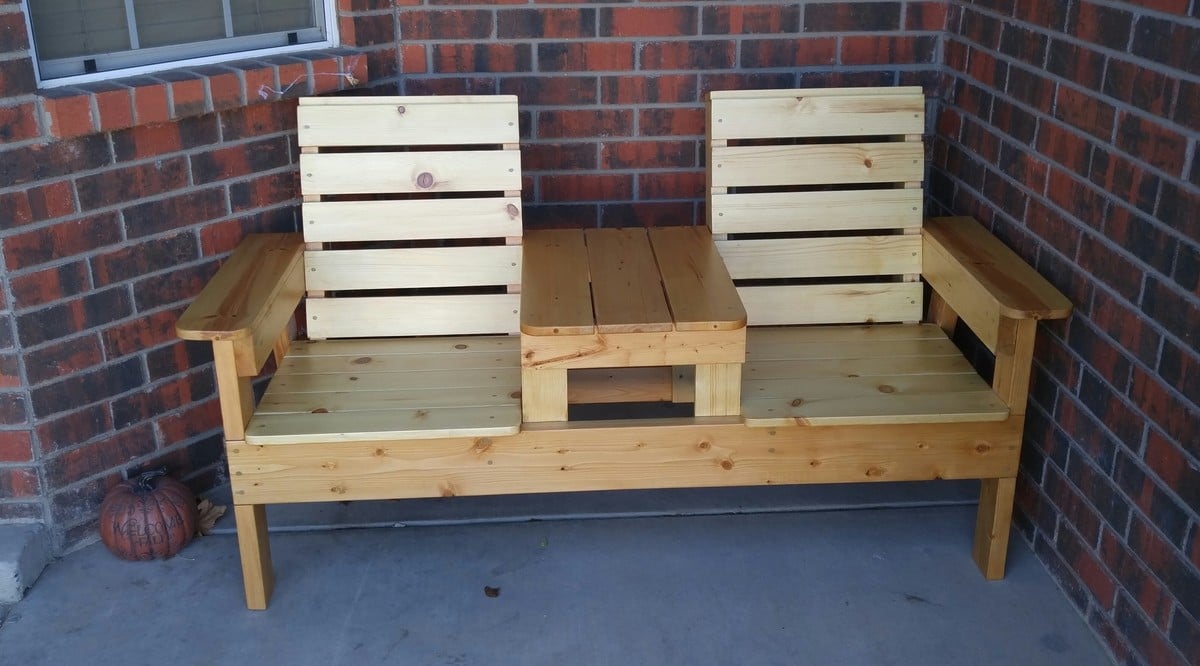
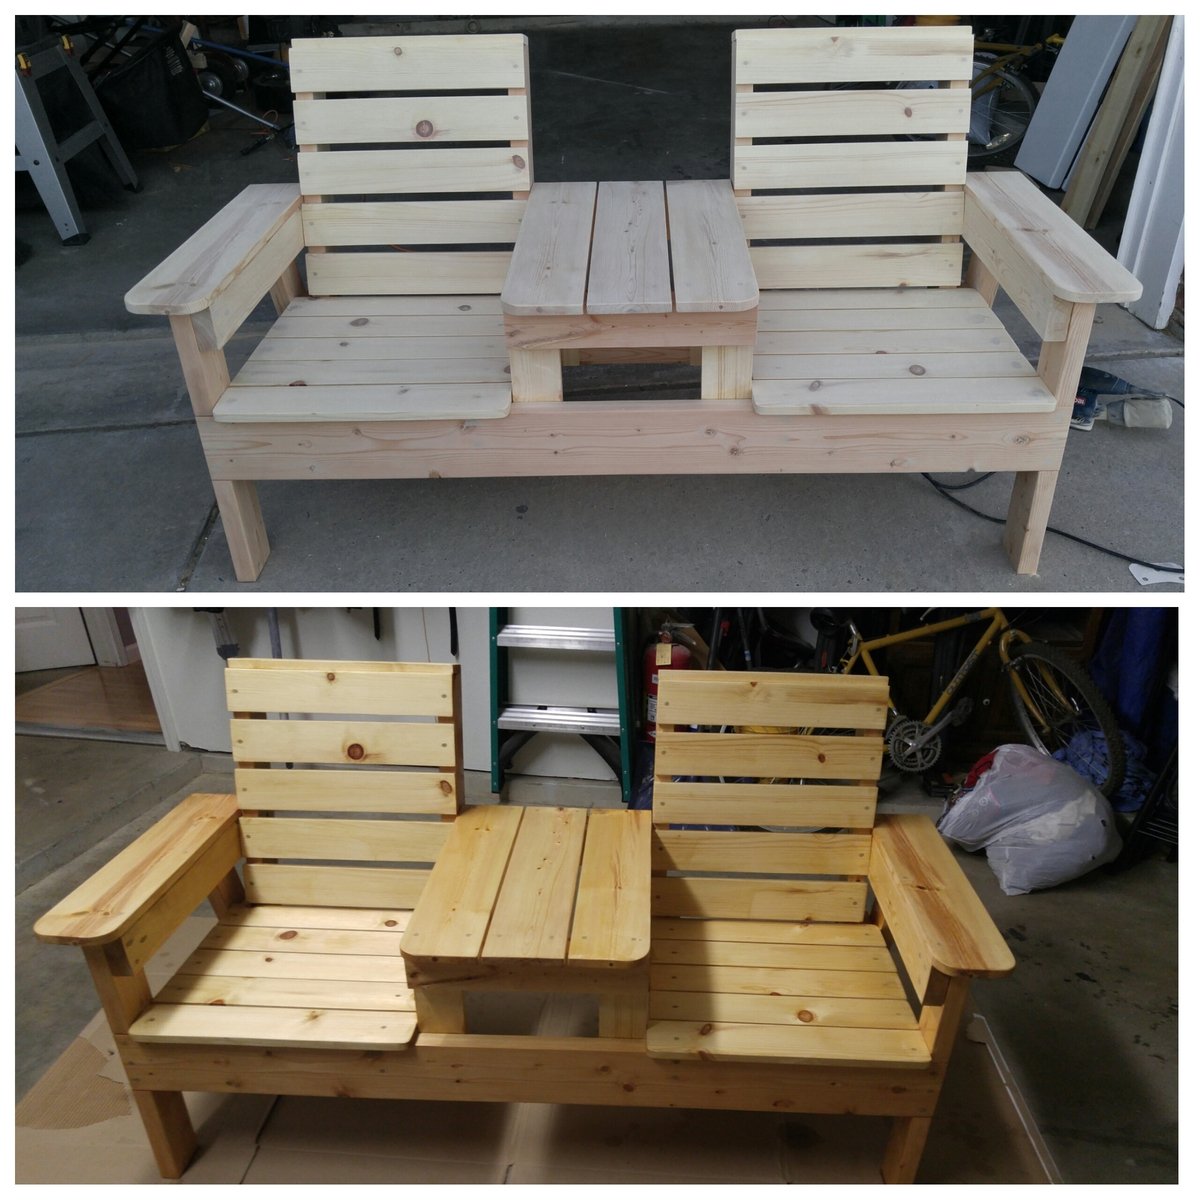
Double Chair with Table
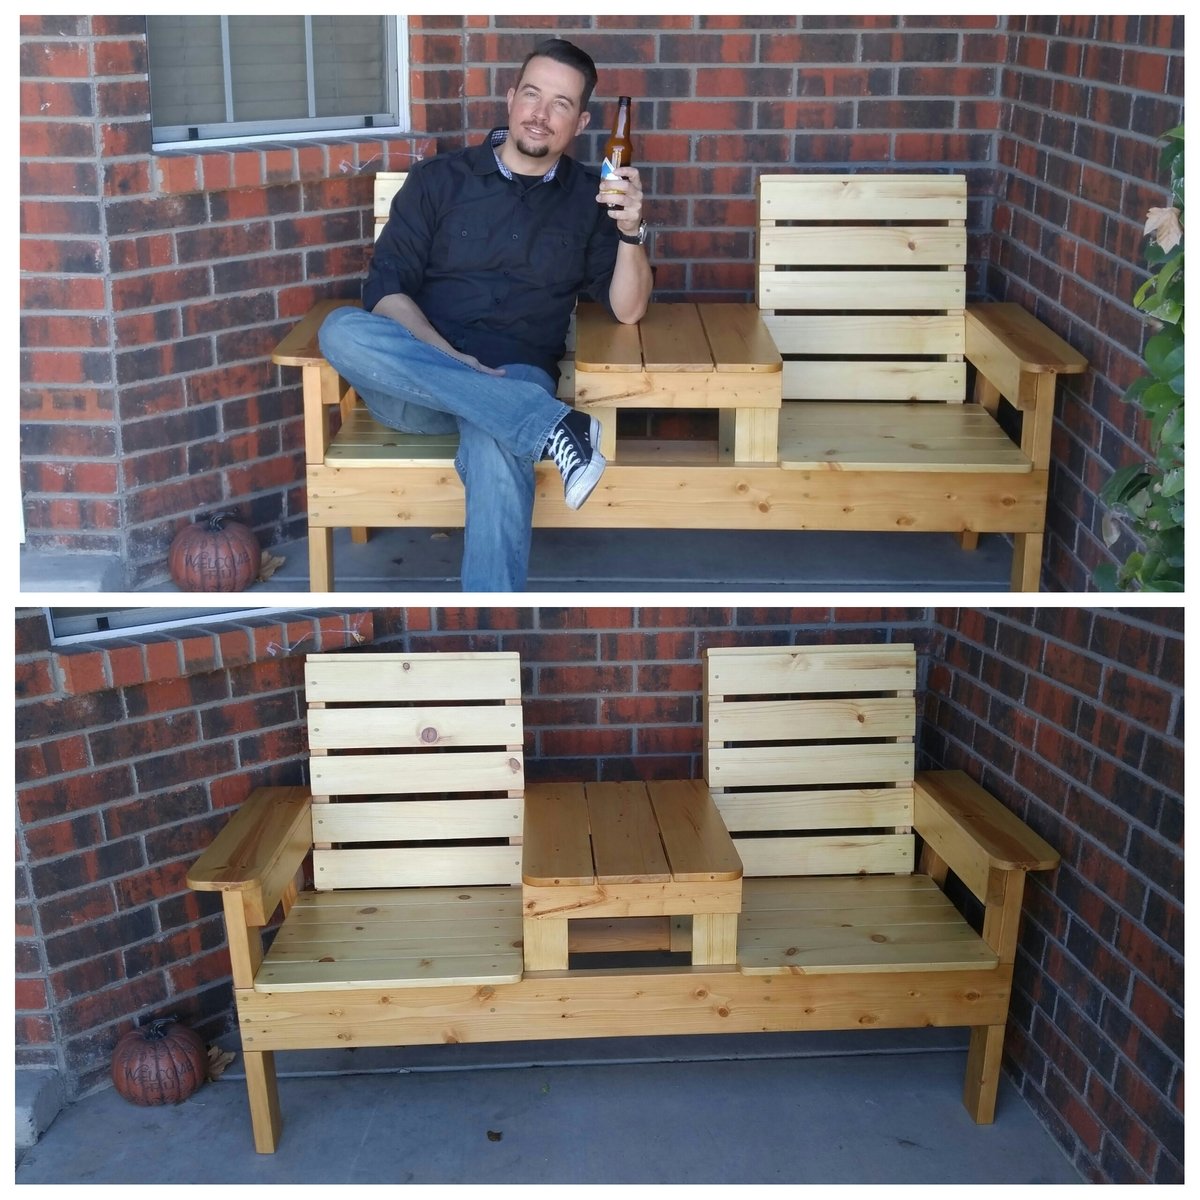
This was a fun project for me and my son. Total time was probably a weekend, including finish. I used Douglas Fur, and spent around $100 including finish and nails ect.
Built from Plan(s)
Estimated Cost
$125 including conditioner, finish and hardware
Estimated Time Investment
Weekend Project (10-20 Hours)
Finish Used
Conditioner and Spar Urethane (2 coats)
Recommended Skill Level
Beginner
Comments
Kids Adirondack chairs
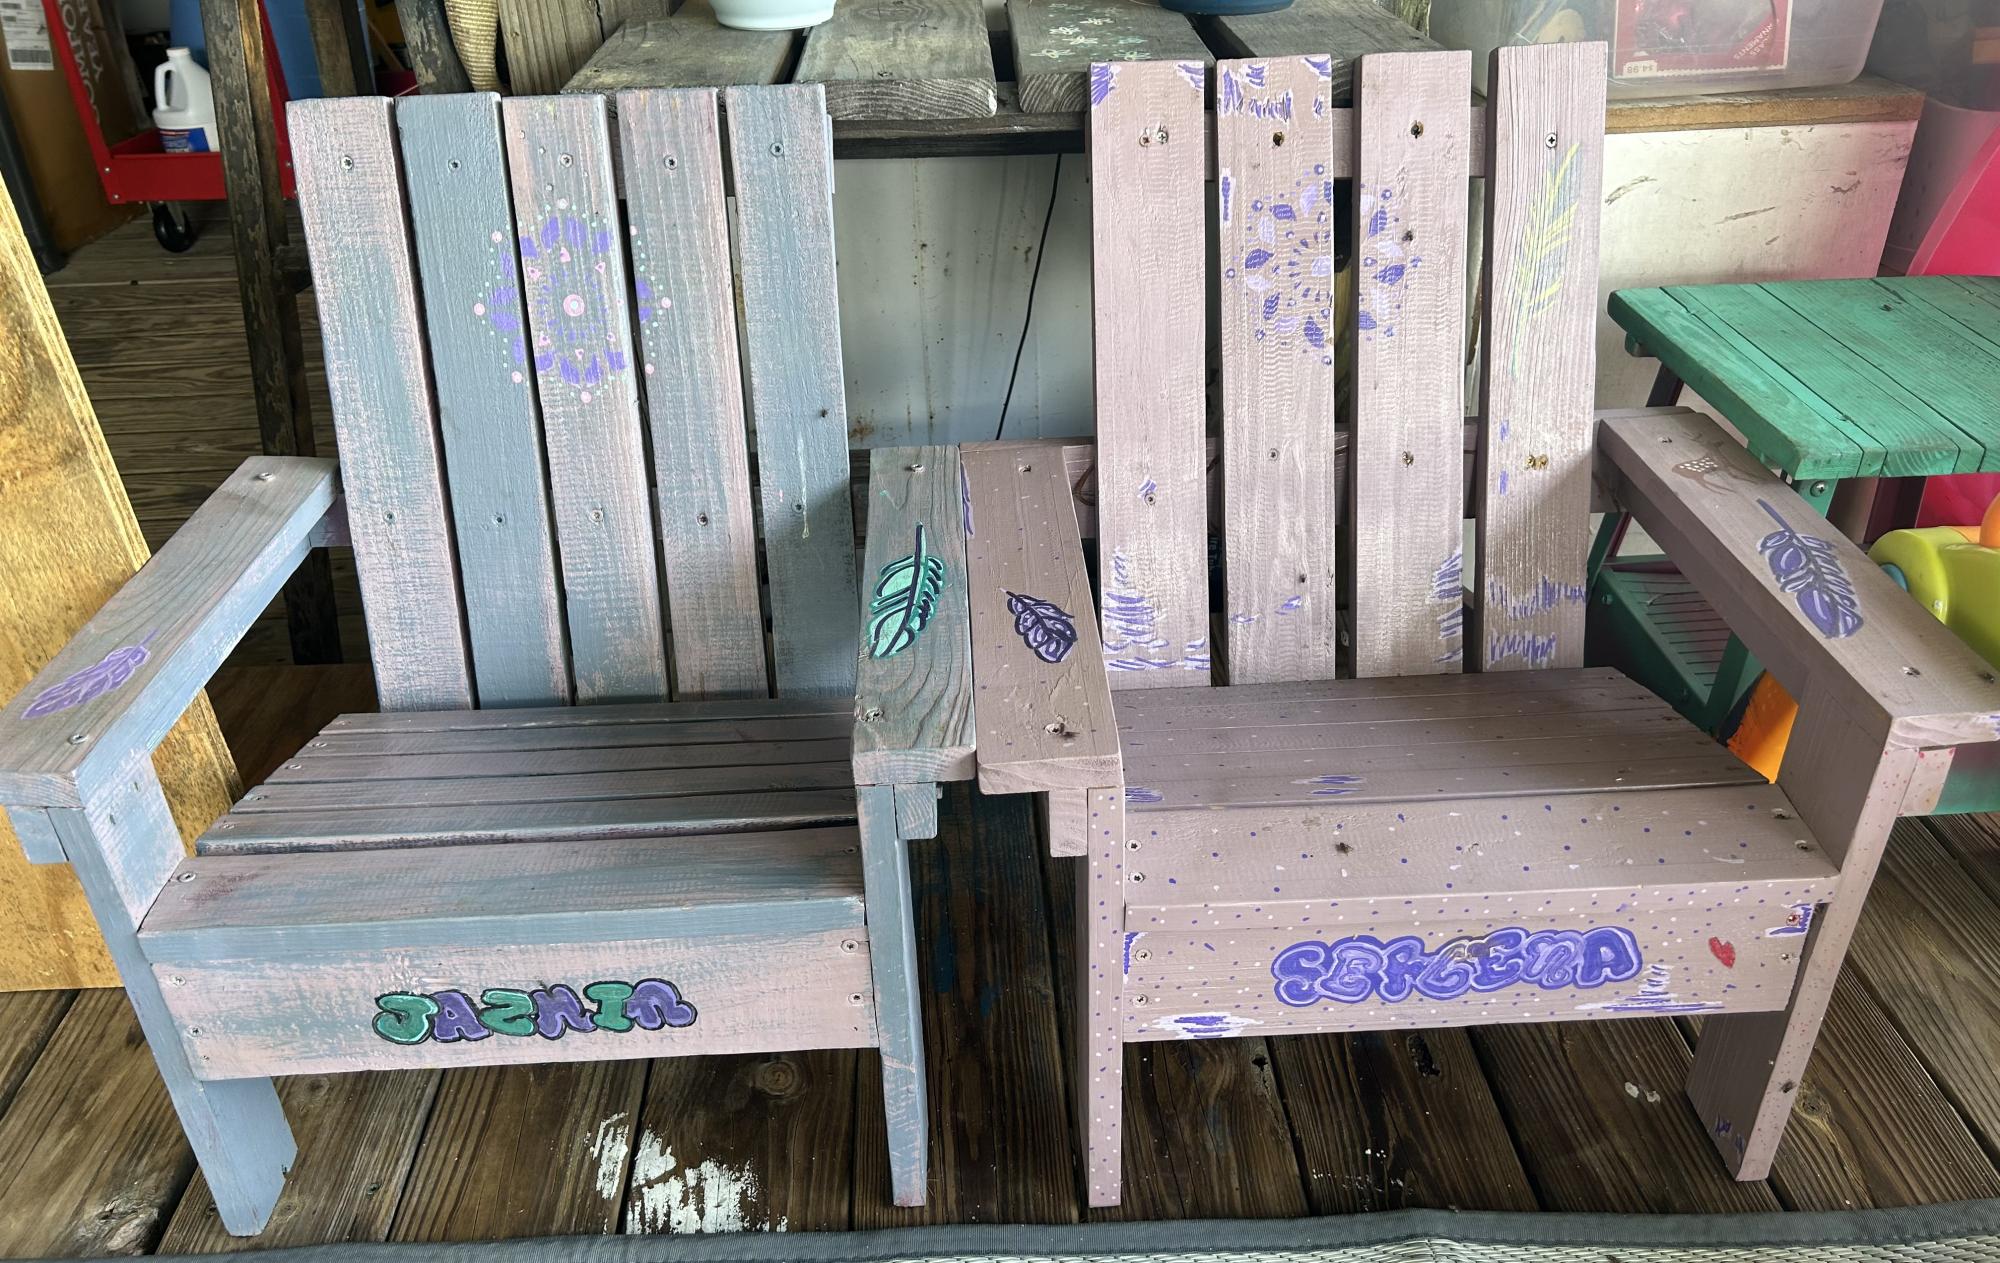
I made two. Somehow one turned out just a tad larger than the other. It works though, my kids are 2 and 9. Love all your plans. Thanks.
Built from Plan(s)
Comments
Wed, 05/17/2023 - 13:28
Great kids chairs!
I bet your children love having their very own chair! Thanks for sharing.
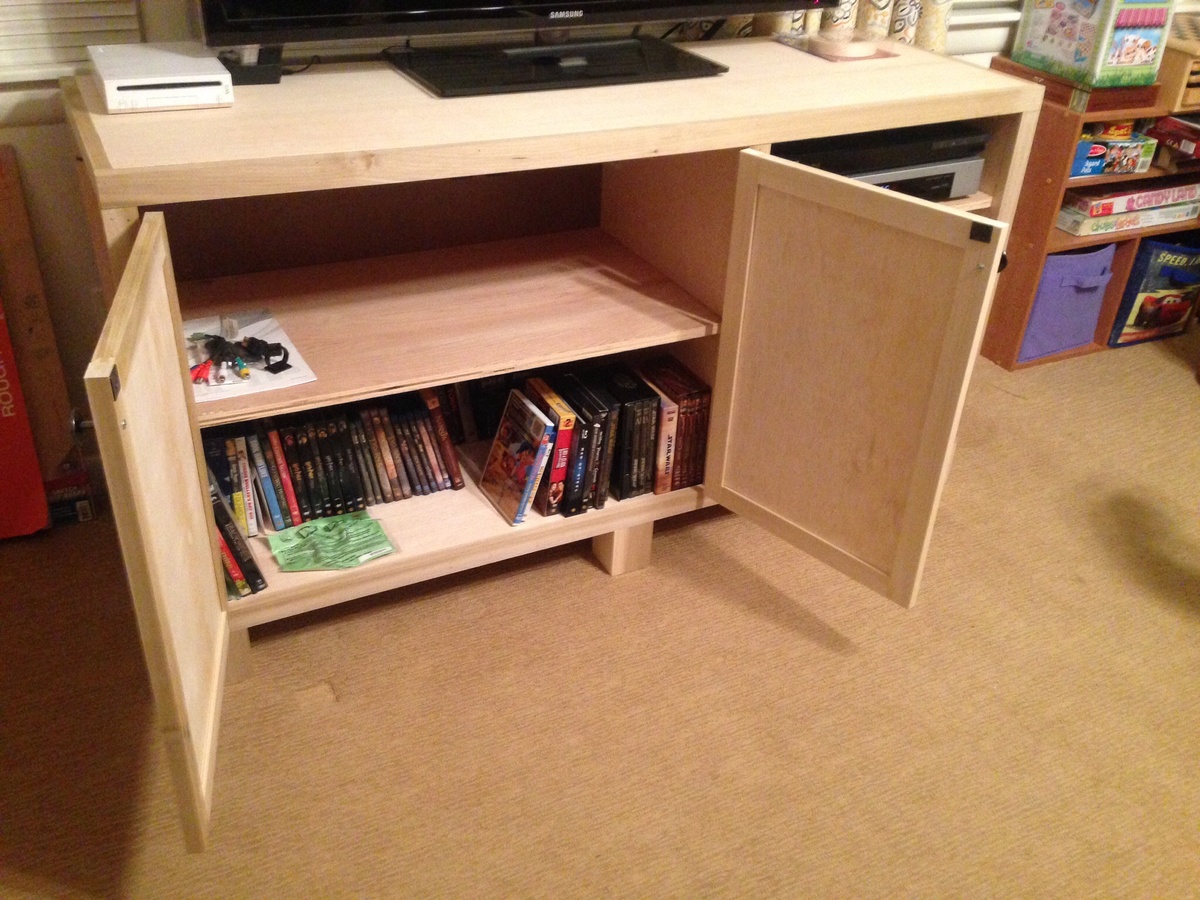
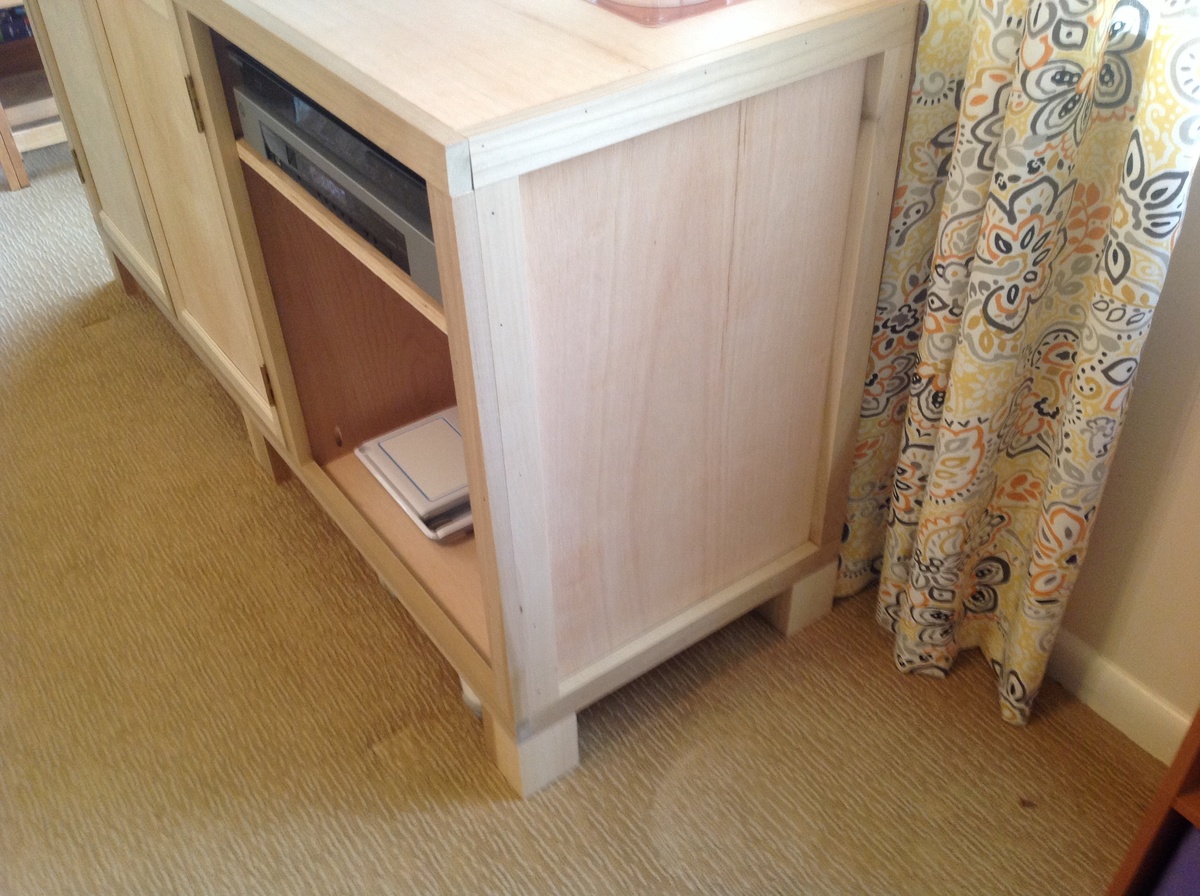
Entertainment console
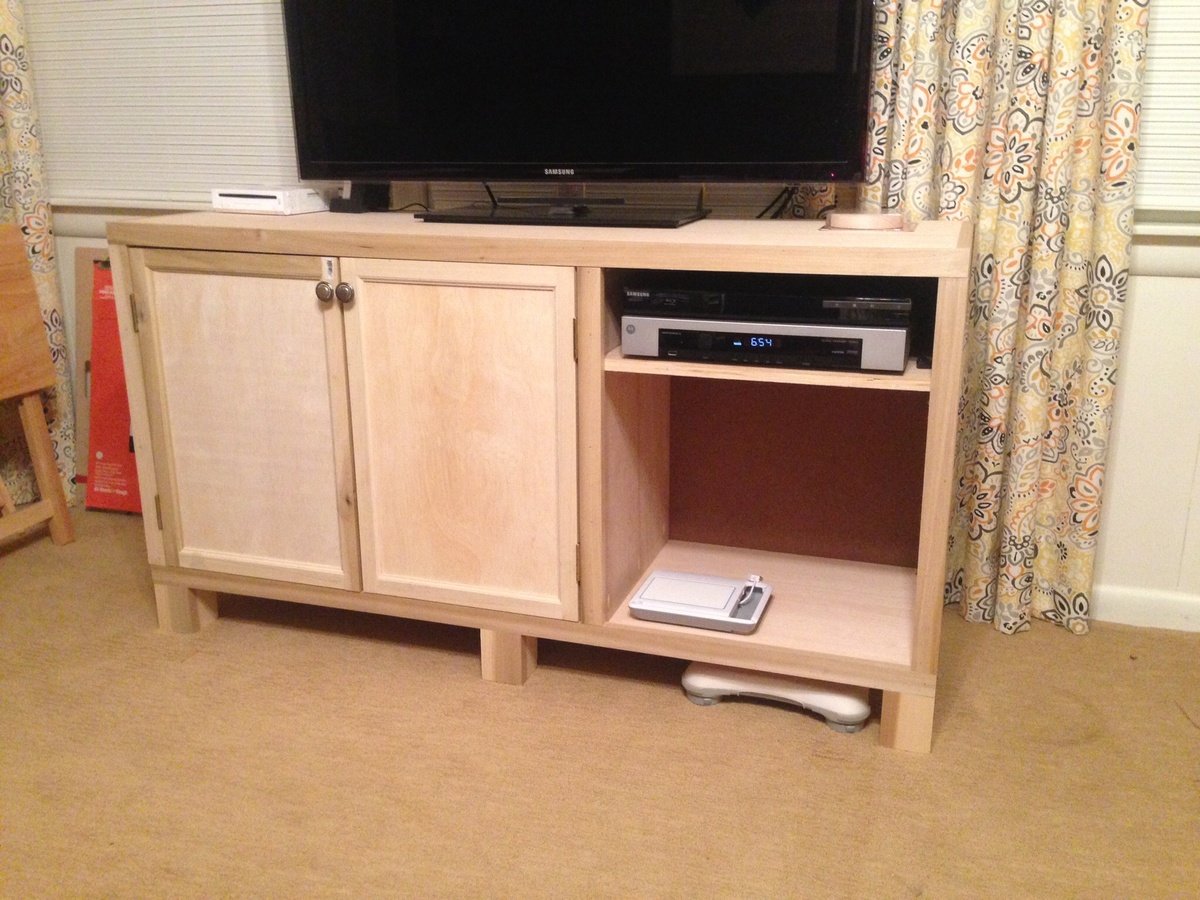
Modified by making 18" deep, right side is 20" wide (inside dimension) to accommodate cable box. I also trimmed out the side panels with 1x2 not just the front.
I used a rail and stile router set to make the doors. To do it again, I would have selected maple, as it routes better than the poplar. I would also consider overlay doors, made from 1x3. The inset doors leave little room for error - the frame must be square!!! You also have more hinge options with overlay hinges.
I also used 3x3 for the legs, I think their weight adds to the piece. The original base looked too small and fragile for the rustic upper half.
Some work still remains, staining as well as placing the veneer step on the shelf edges to give it a nice edge to stain, but I needed the space back for Thanksgiving dinner tomorrow!
Built from Plan(s)
Estimated Cost
$150
Estimated Time Investment
Week Long Project (20 Hours or More)
Finish Used
Final finishing not yet applied, will eventually be a dark walnut stain.
Recommended Skill Level
Intermediate
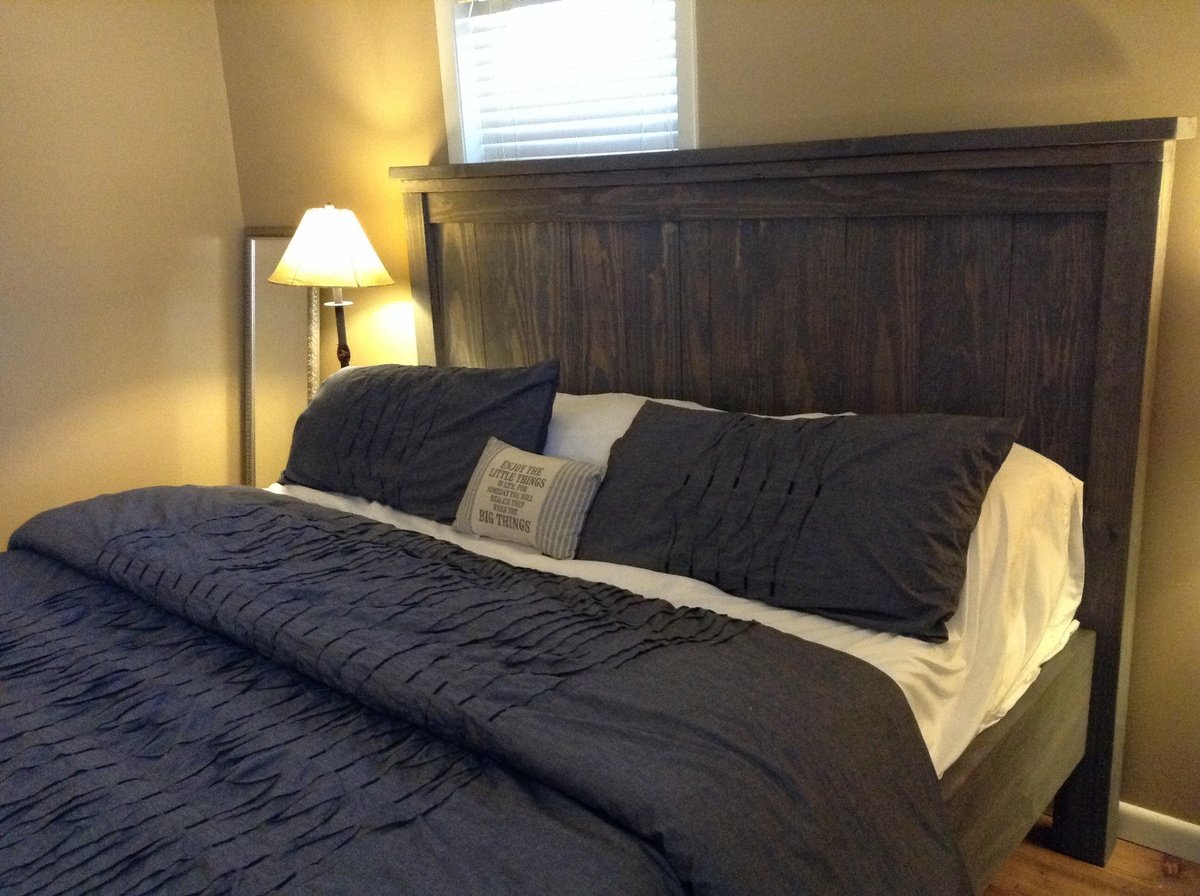
Rustic weathered gray bed
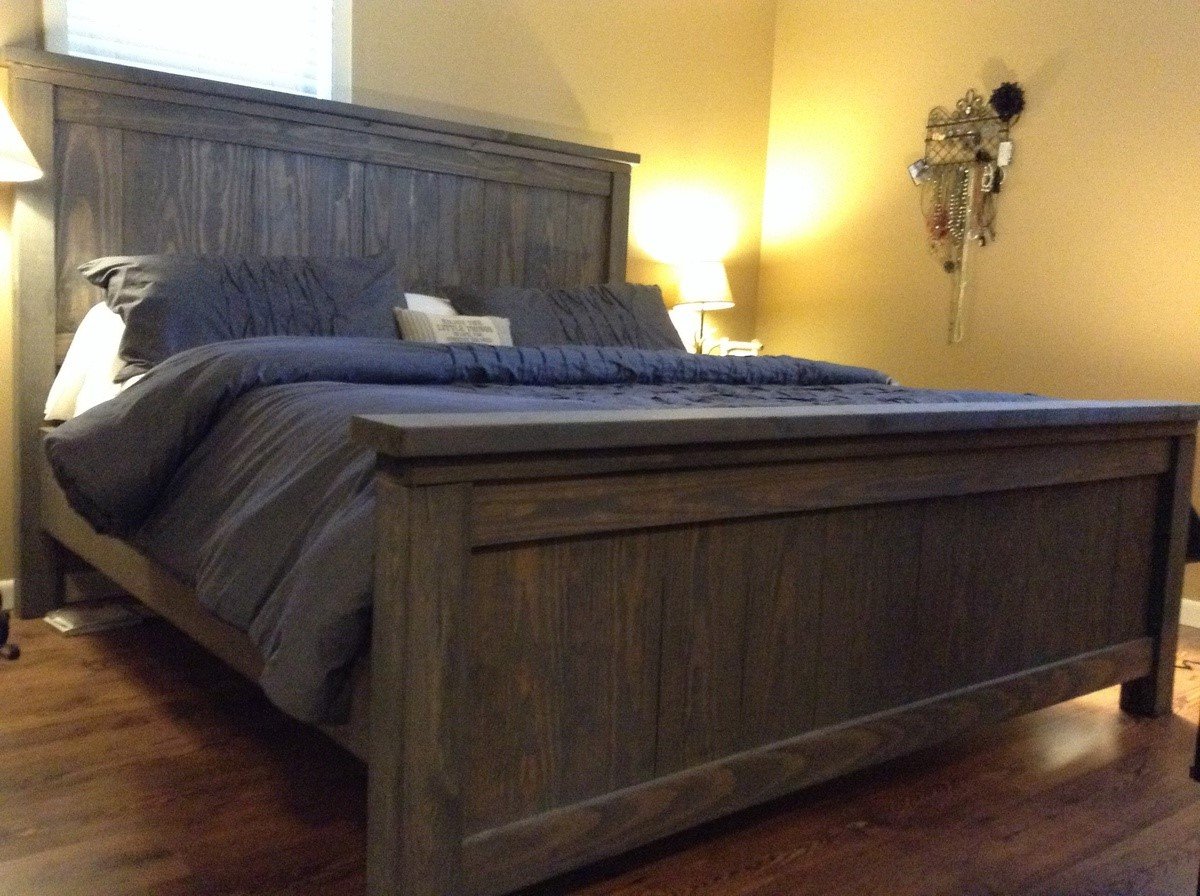
My husband and I built this for our first furniture project. I have the bug! Now I must make night stands . I got the look by staining first with min wax dark walnut, followed by rustoleum weathered gray. This was my first time to ever stain anything, so this does not take much experience to do. Love it! We followed the advice to measure our mattress first, which was good because it turned out to be narrower than many kings. We built the bed custom to our mattress . We also made the height a few inches taller to have a nice tall bed. The footboard is lengthened also. I wanted it to come up above the end of our mattress. This project is easy once you get going. It is also addictive!
Built from Plan(s)
Estimated Cost
$350 includes the stains and all. This includes building in our own bed frame to eliminate needing box springs.
Estimated Time Investment
Weekend Project (10-20 Hours)
Finish Used
Wood conditioner, min wax dark walnut, & rustoleum weathered gray stains. In that order
Recommended Skill Level
Beginner
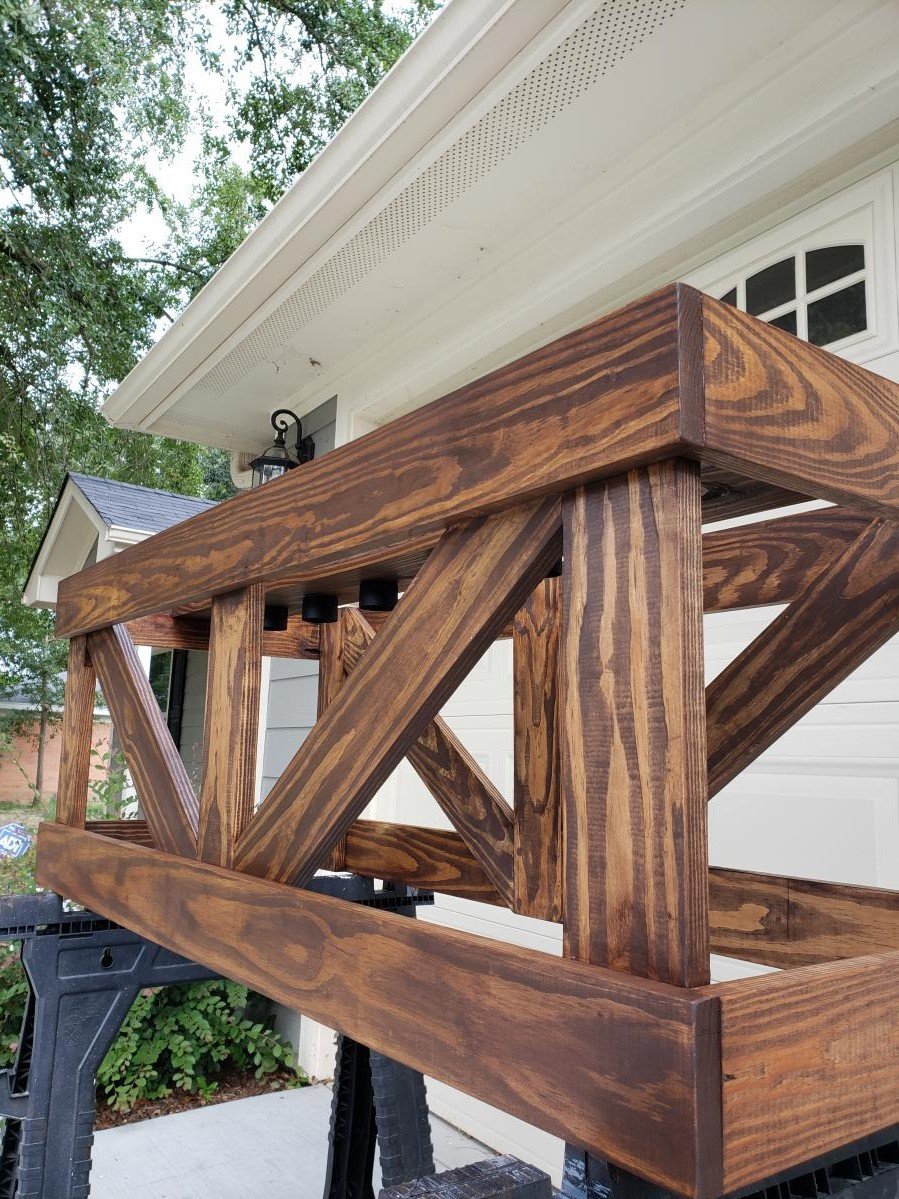
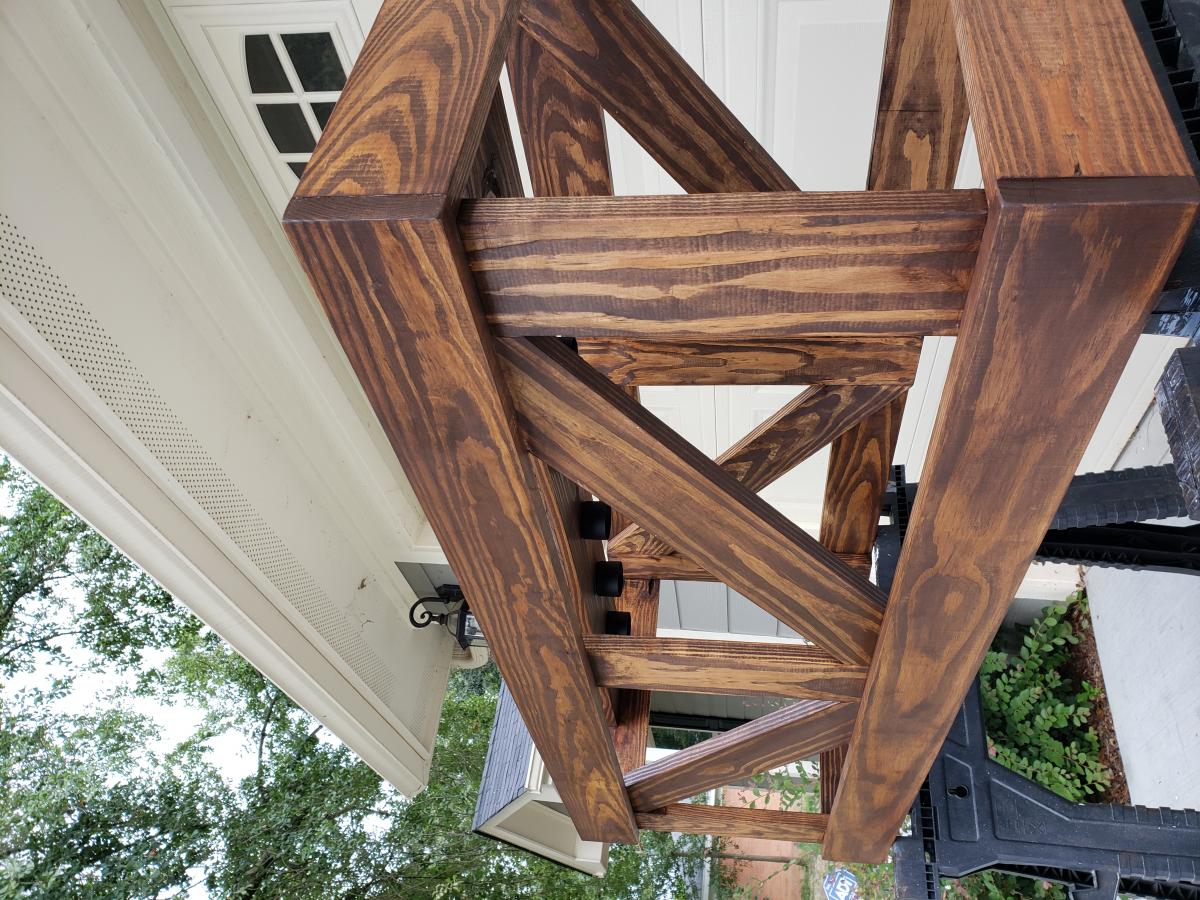
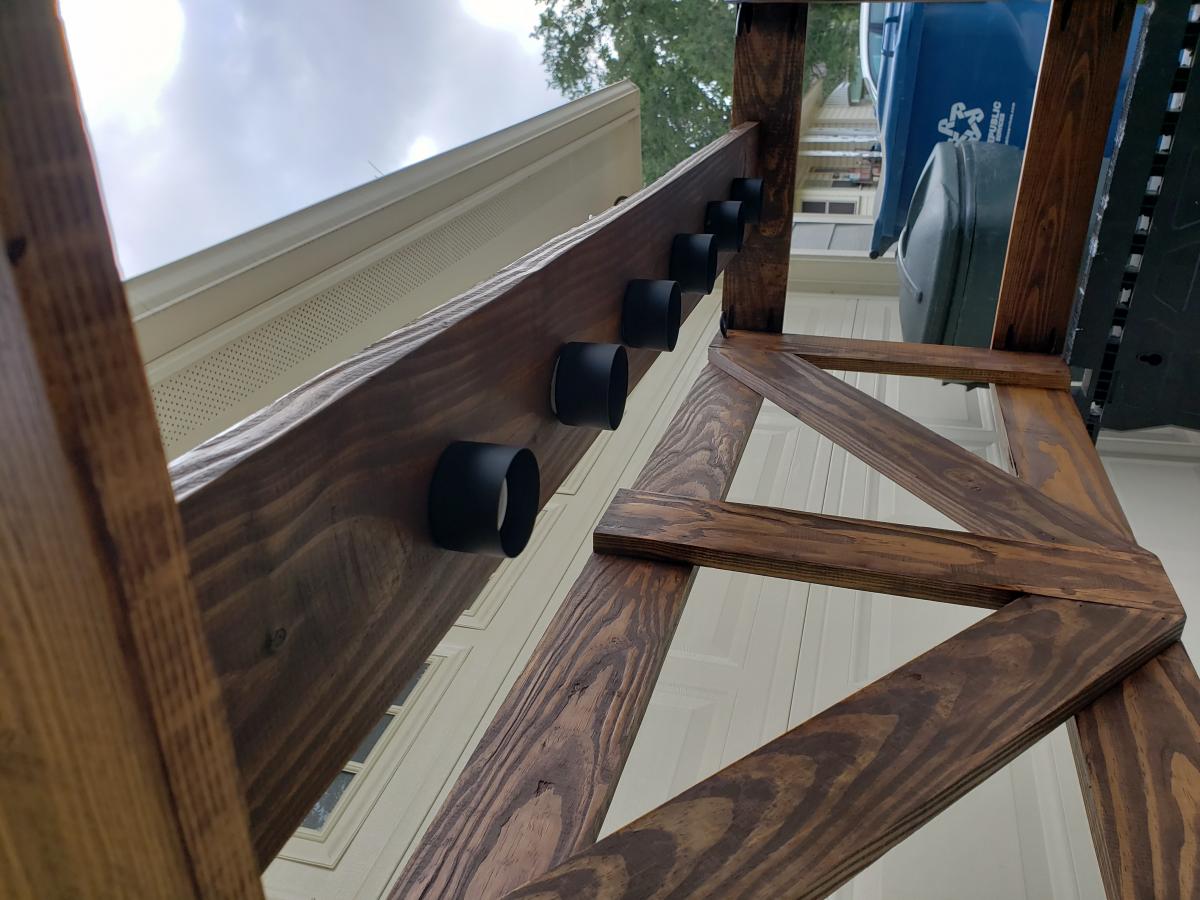
Tress Beam Table
Put this baby together in 3 days and I just LOVE it! I cannot wait to pick my next project. Thank you, Ana White, for your inspiration!
Estimated Cost
$125
Estimated Time Investment
Weekend Project (10-20 Hours)
Finish Used
Golden oak
Recommended Skill Level
Intermediate
Potting Table
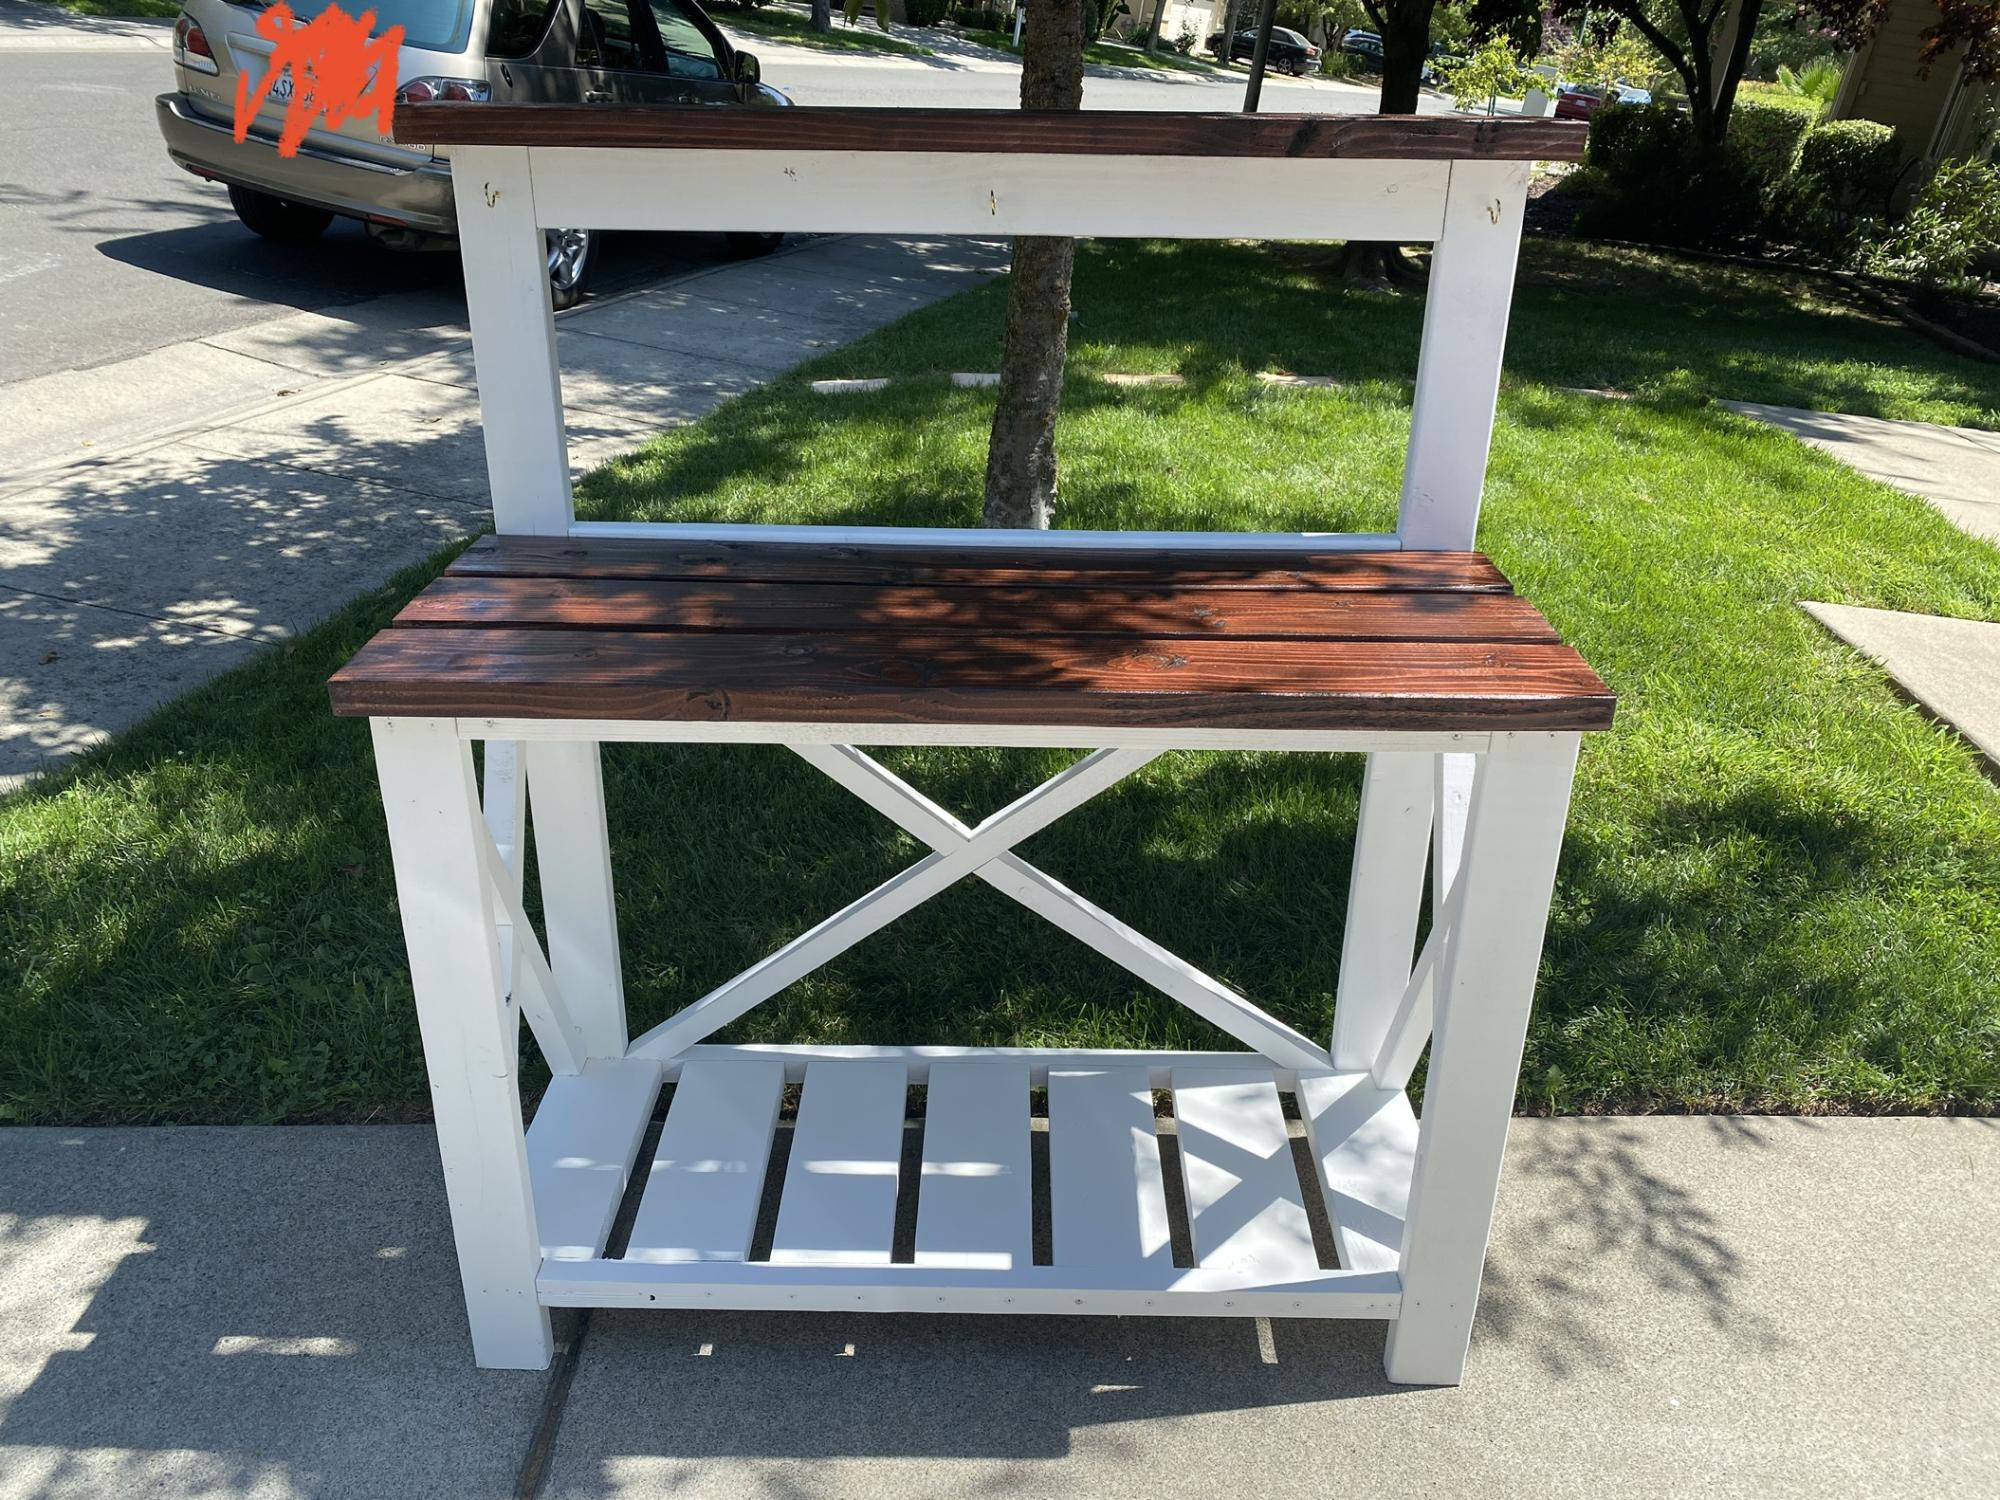
I really liked your design so I decided to make one for my mom for Mother’s Day and she loves it. Just painted it white before adding the 2x6’s and stained them a walnut Thank you ..!!!!
Built from Plan(s)
Comments
Tue, 05/23/2023 - 21:00
Beautiful potting bench!
I bet your mother loves it! Thank you for sharing, love the finish and x detail.
Simple Outdoor Bench
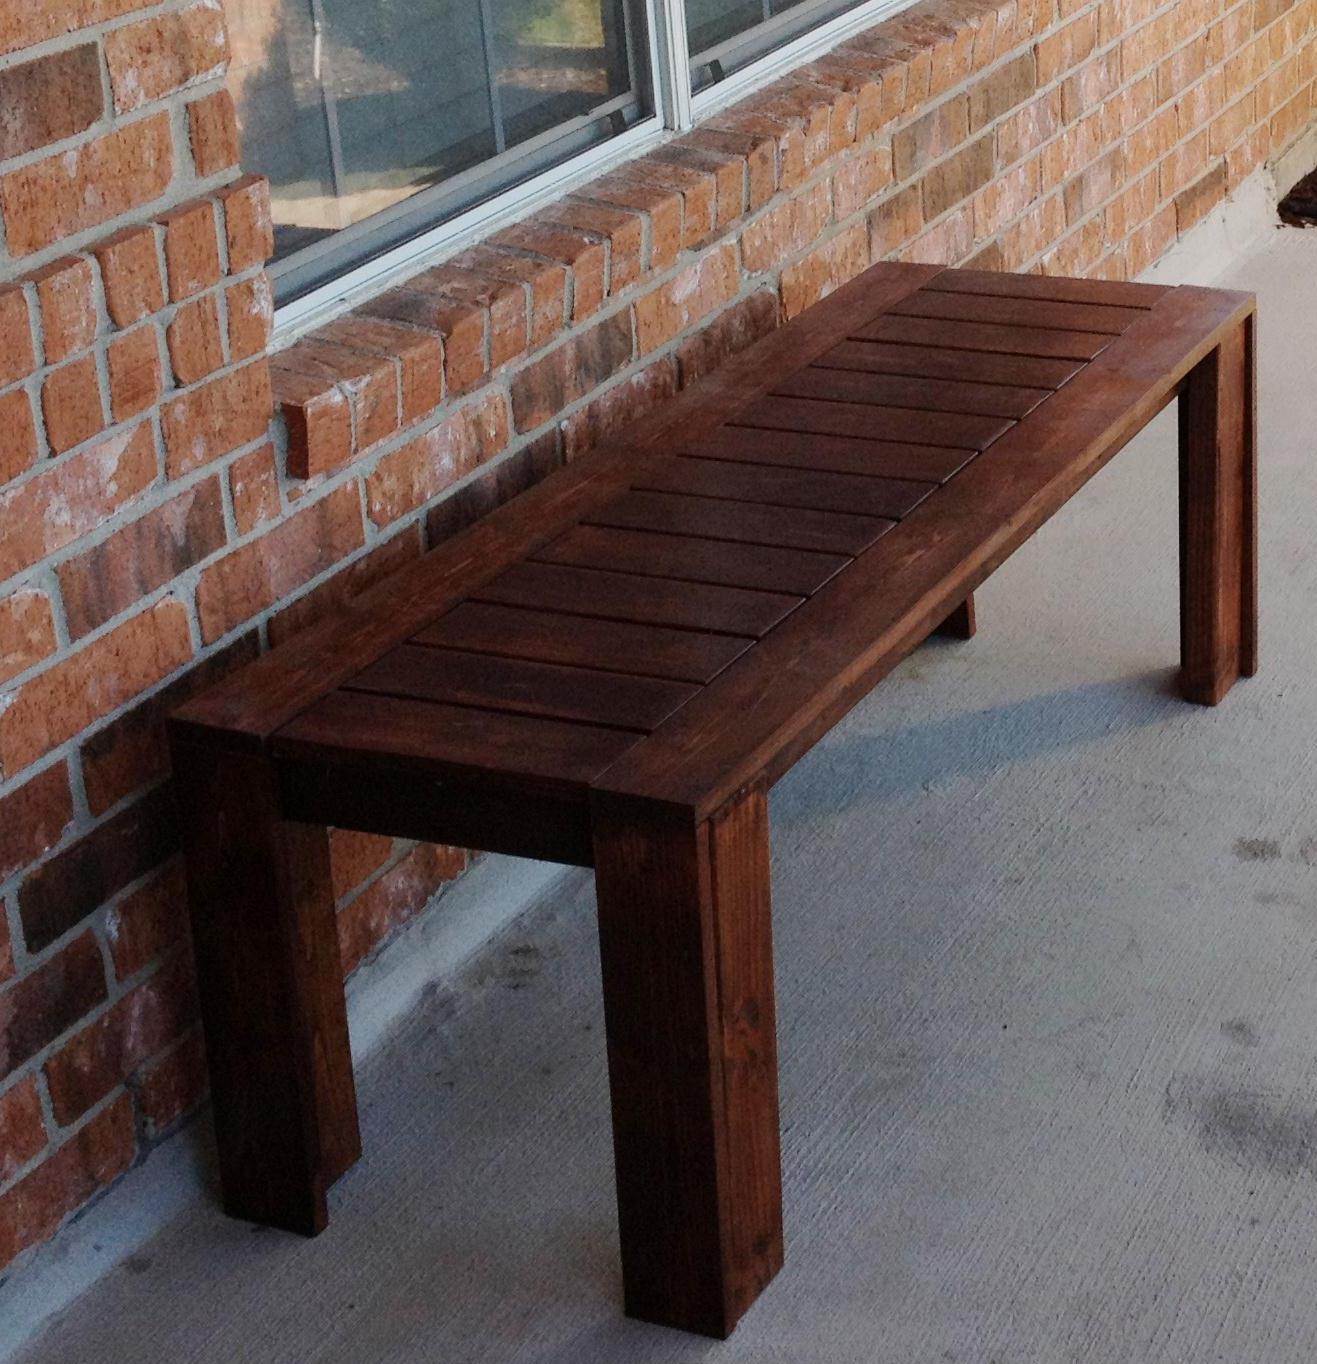
About a year ago, I stumbled across your site, I was a lurker for awhile, finally joined, and can finally post the projects I have done so far. This was my second build from your site. It works perfectly on the front porch.
Built from Plan(s)
Estimated Time Investment
Weekend Project (10-20 Hours)
Finish Used
Cherrywood by Minwax
Recommended Skill Level
Beginner
Comments

Fri, 01/13/2012 - 15:44
Thank you!
Thank you very much, I can't wait to start my next project, new night stands to match the bed. Yep, I'm hooked :)
Tue, 02/21/2012 - 14:09
you should really show the
you should really show the plans for the projects.
Thu, 02/23/2012 - 15:36
Plans for the projects
I'm not sure why the link is not working for you above where is shows: "From Plan." It is working for me.
Thu, 04/26/2012 - 14:55
Did you improve the original plan?
Looks like you added additional leg supports?
Looks great!
Thu, 05/31/2012 - 14:59
Looks great
I really like this plan - re the wood choices and finish: How is the wood, especially the white wood, holding up against the elements? Great job on this btw.
Thanks
Paul
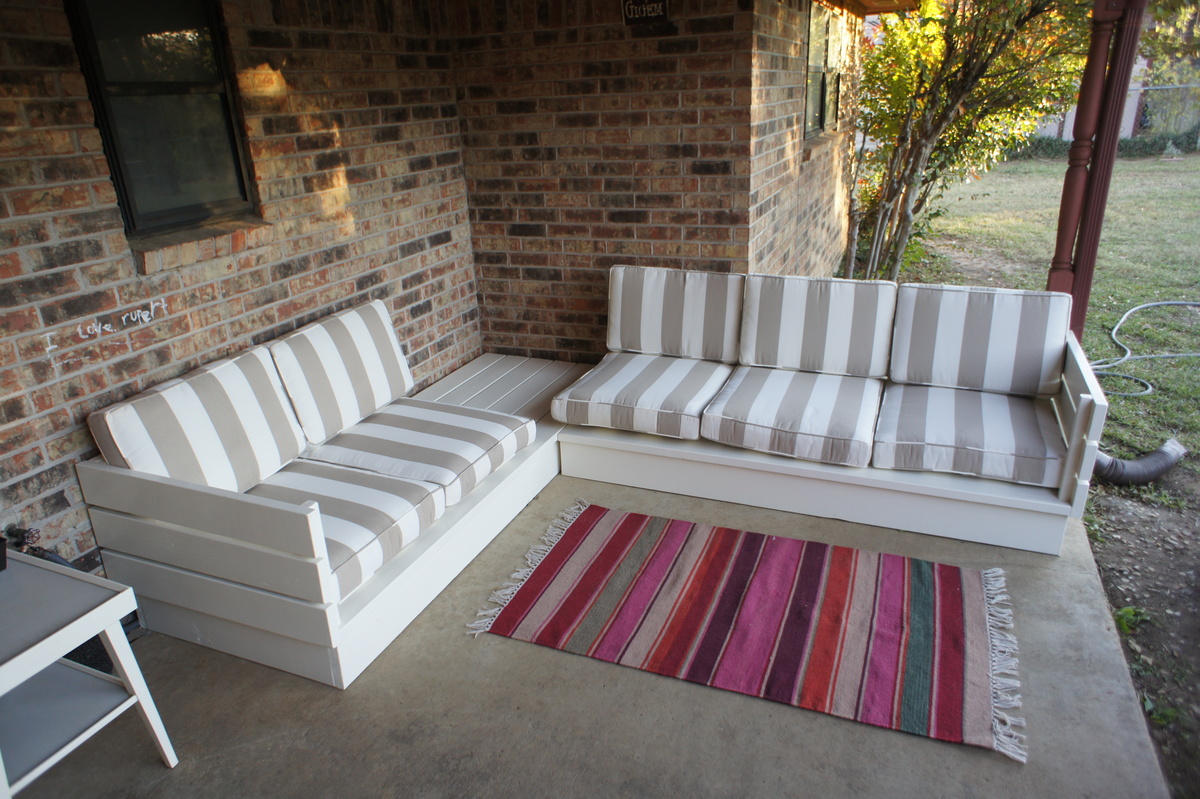
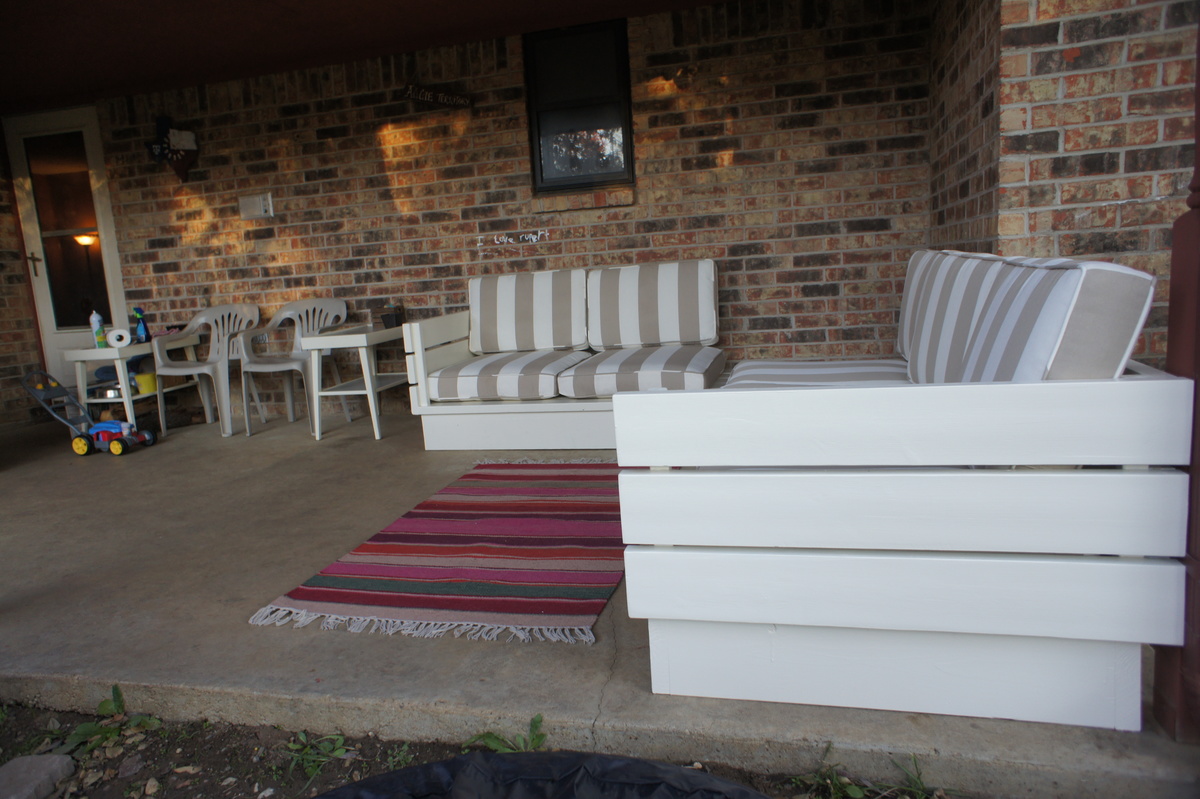
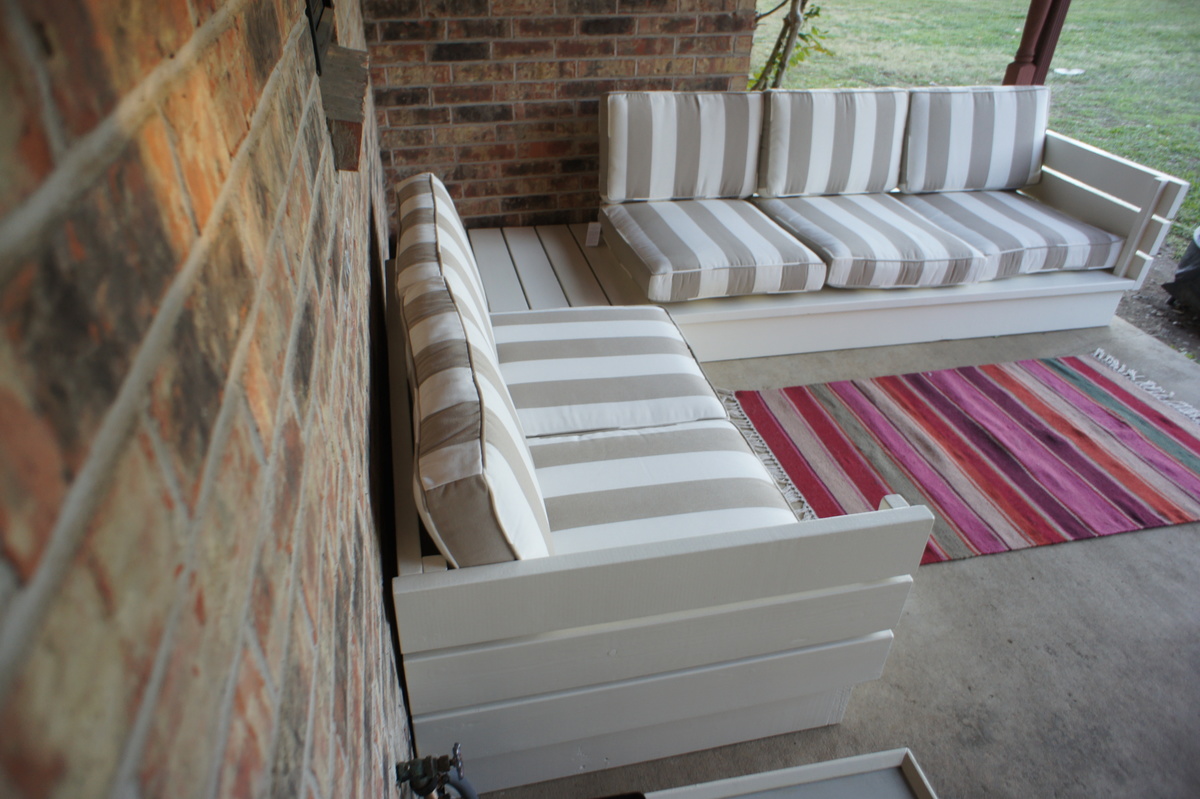
Outdoor sectional couch
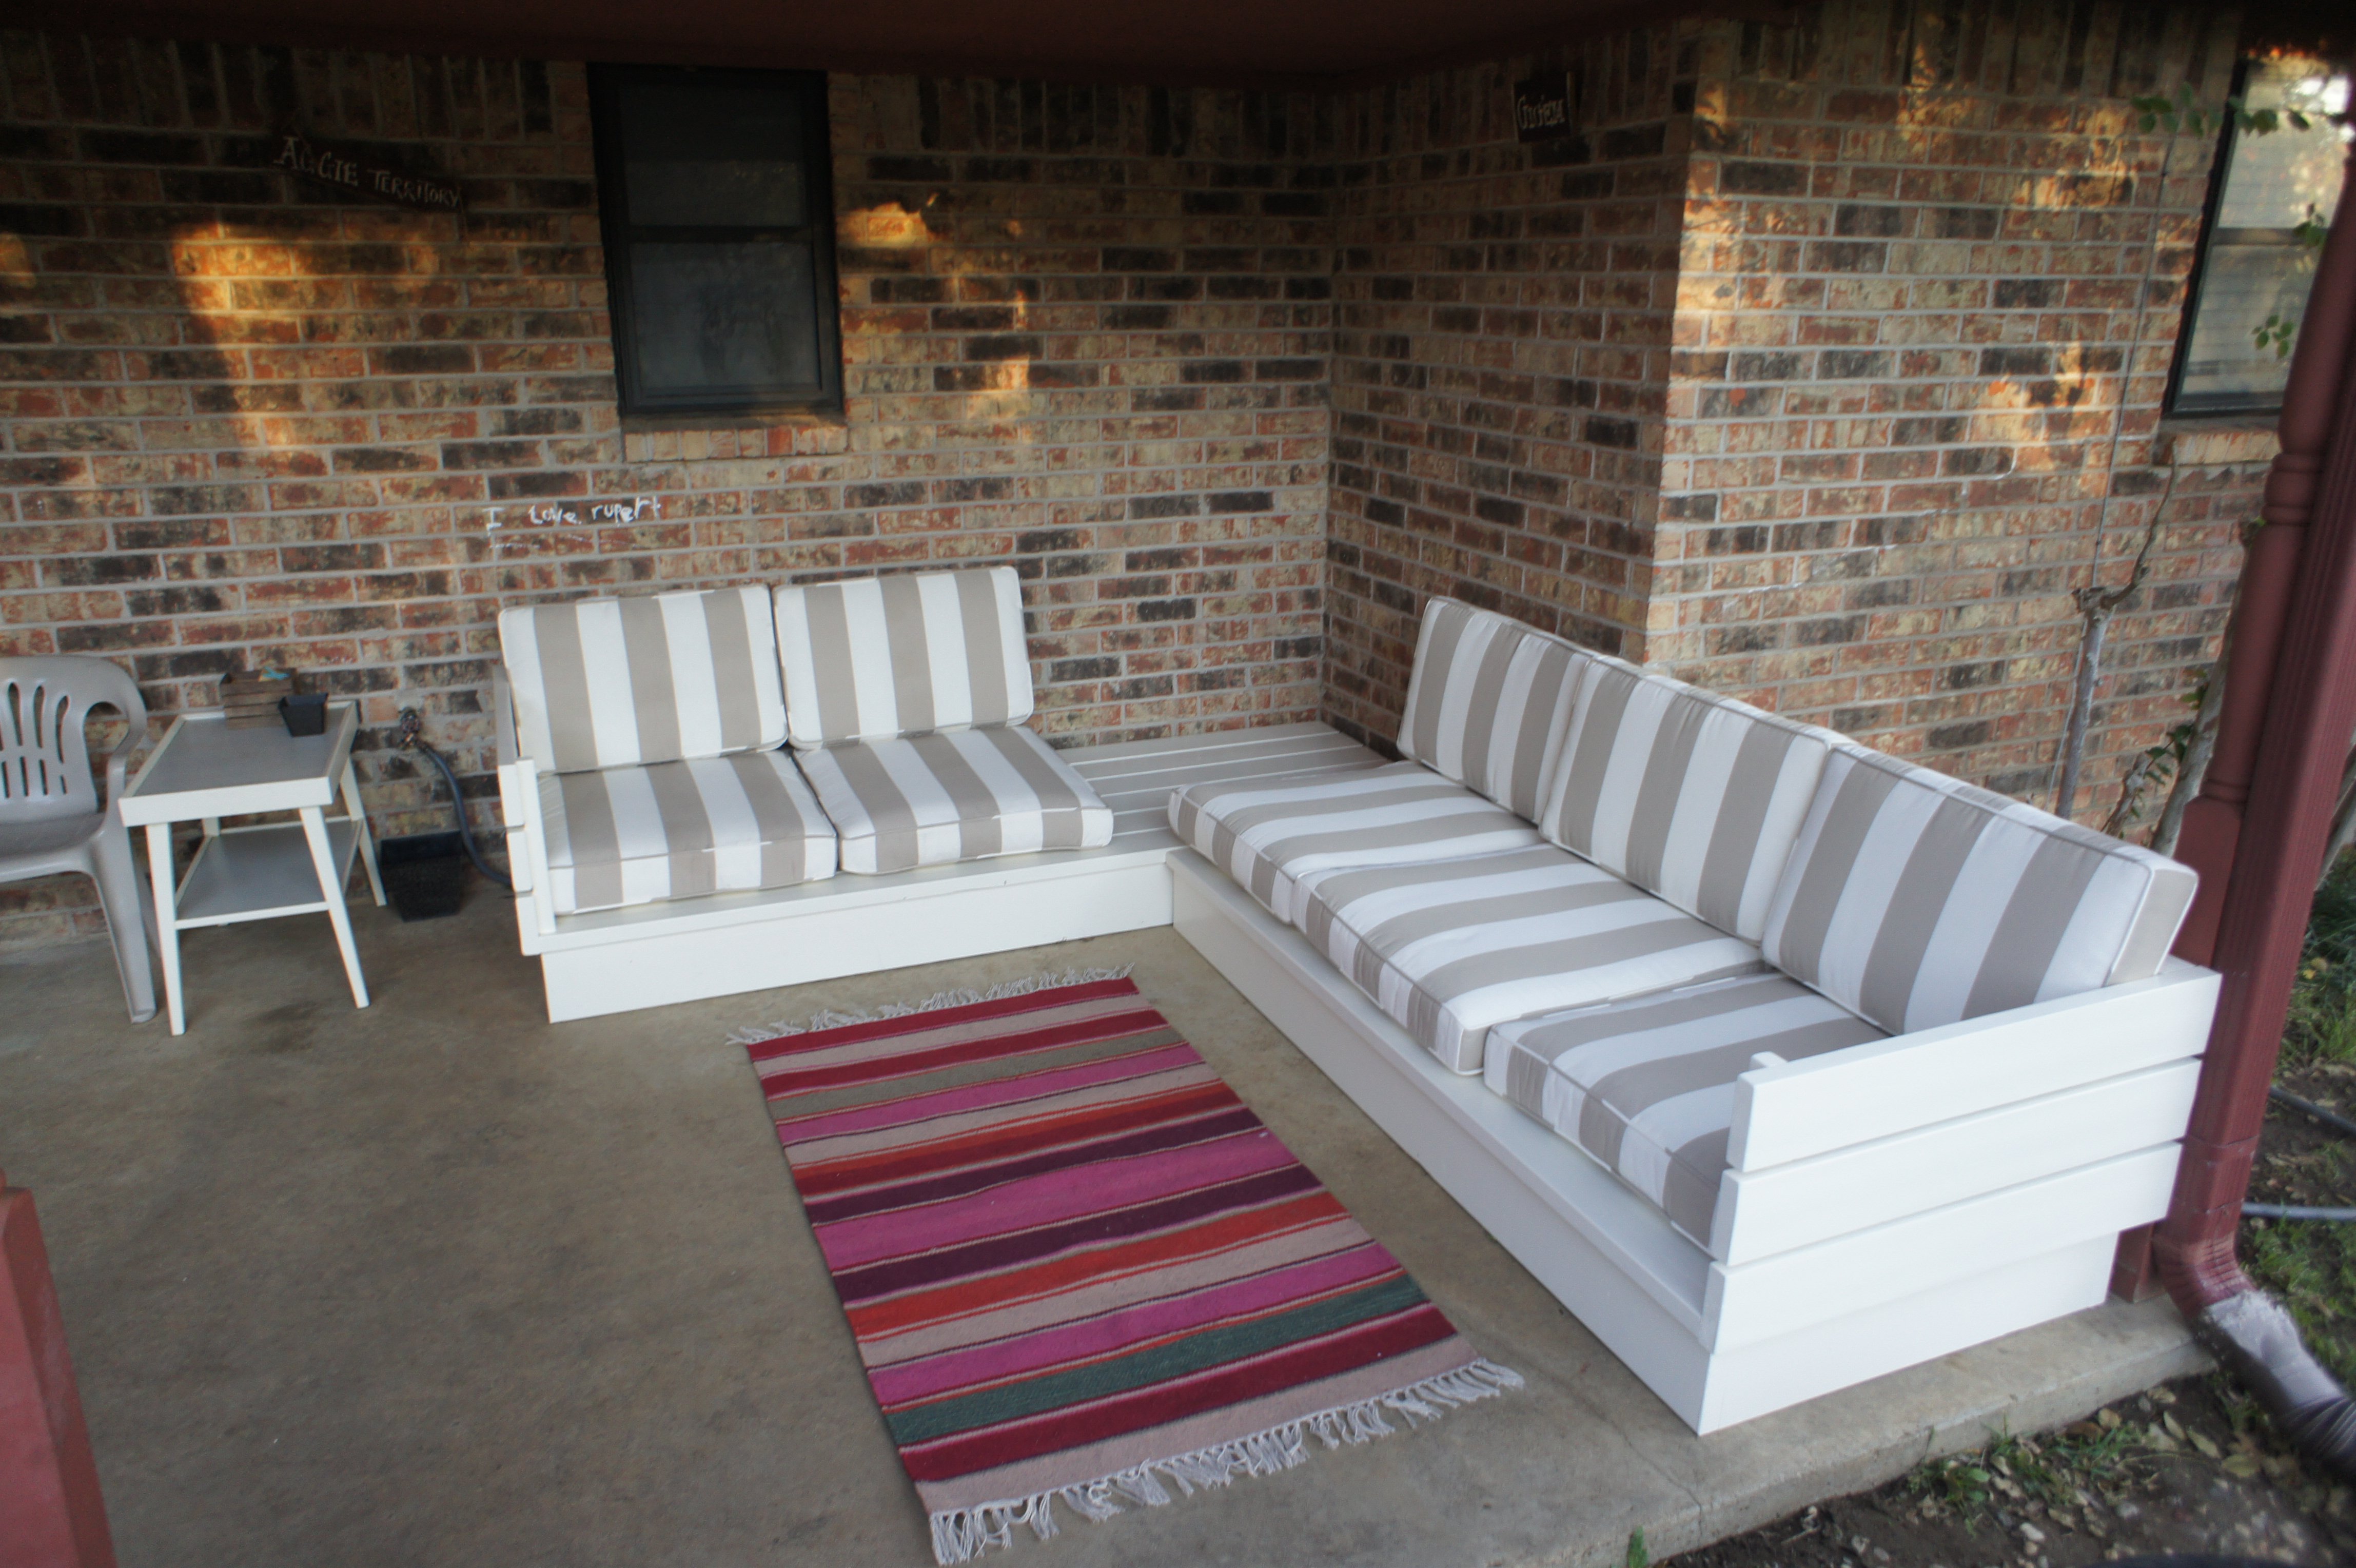
This was my second Ana White project (first was a sandbox). I made a few changes to Ana's plan so that it would better fit my porch. First, I basically flip flopped the plans so that the end table was on part 1. I also altered the length to better fit the cushions I found. Ana's plans were 24" between the 2x2. Mine ended up being 26.5". I also used 2x8's for the base instead of the 2x4 for added height.
The price of outdoor cushions was a big surprise!! We looked into buying outdoor high density foam and making our own cushions, but that seamed to be just as expensive as buying cushions. We also really had a hard time finding large cushions that actually fit this plan. Most cushions are REALLY small for this couch. we found some Pottery Barn cushions online that were on clearance.
It was a fun project and we love the couch!
Estimated Cost
$180 not including cushions
Estimated Time Investment
Weekend Project (10-20 Hours)
Finish Used
Exterior grade white paint
Recommended Skill Level
Beginner
Tryed end table with shelf

Top 22.5" x 24.5" Base 21"x21" Total height 24"
Built from Plan(s)
Estimated Cost
$25
Estimated Time Investment
Weekend Project (10-20 Hours)
Finish Used
Top finished with minwax red mahogany and polyurethane.
Base finished with Dutch boy trim paint.
Base finished with Dutch boy trim paint.
Recommended Skill Level
Beginner
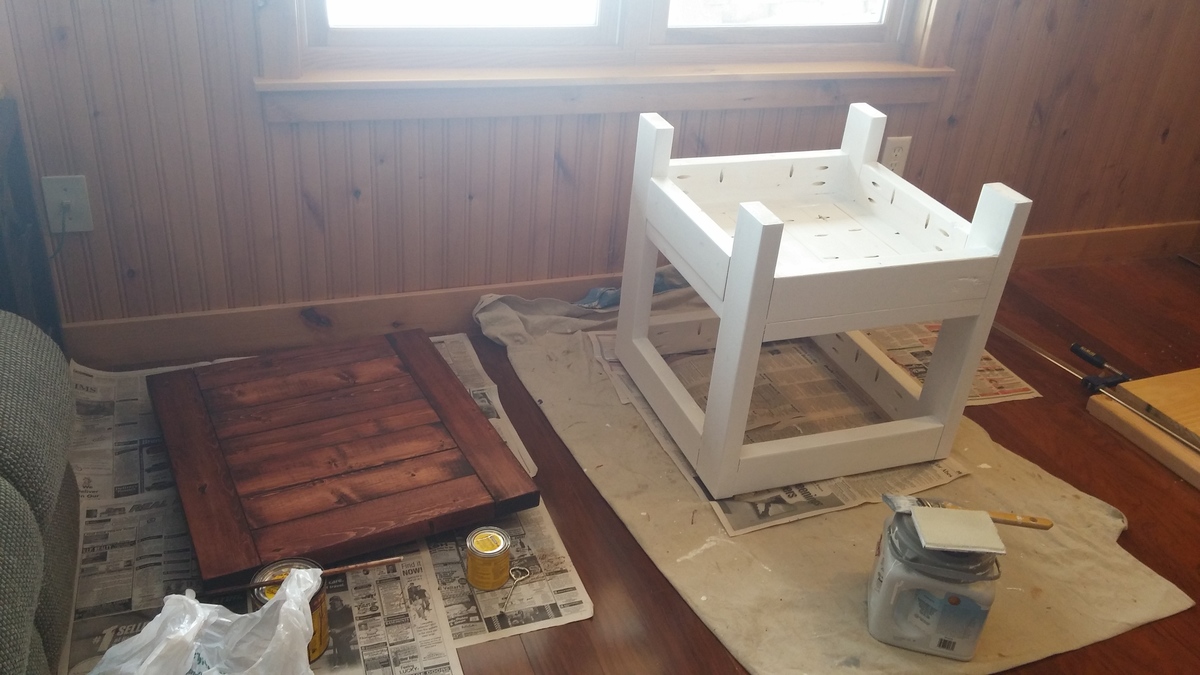
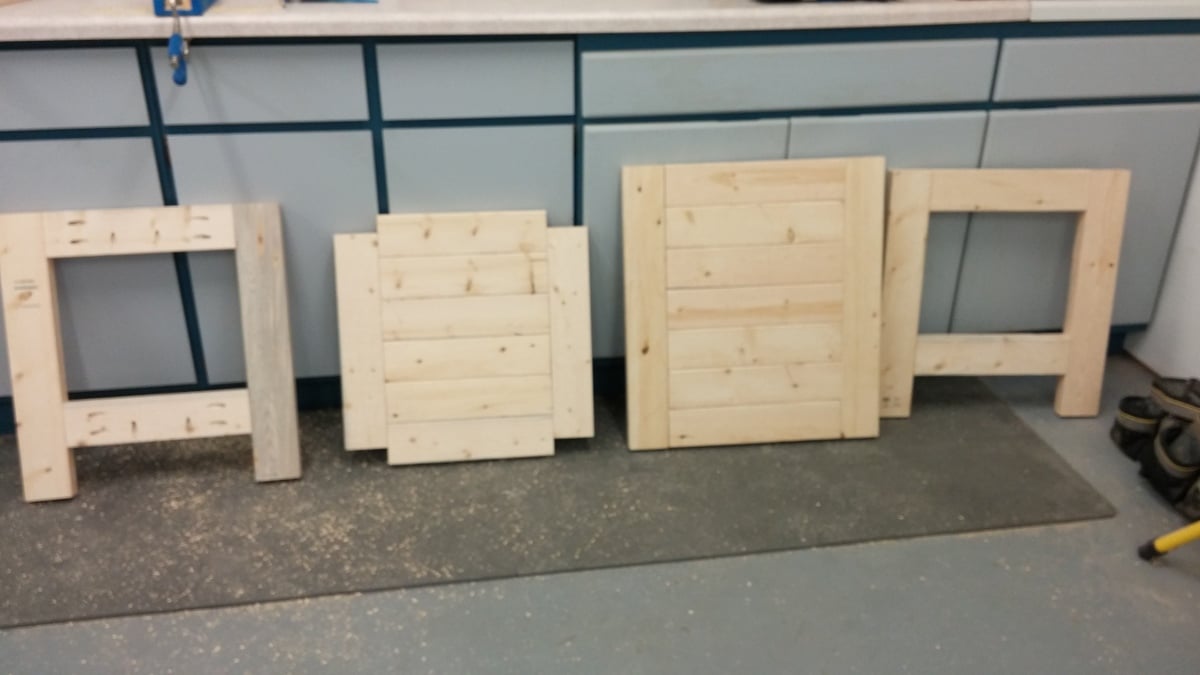
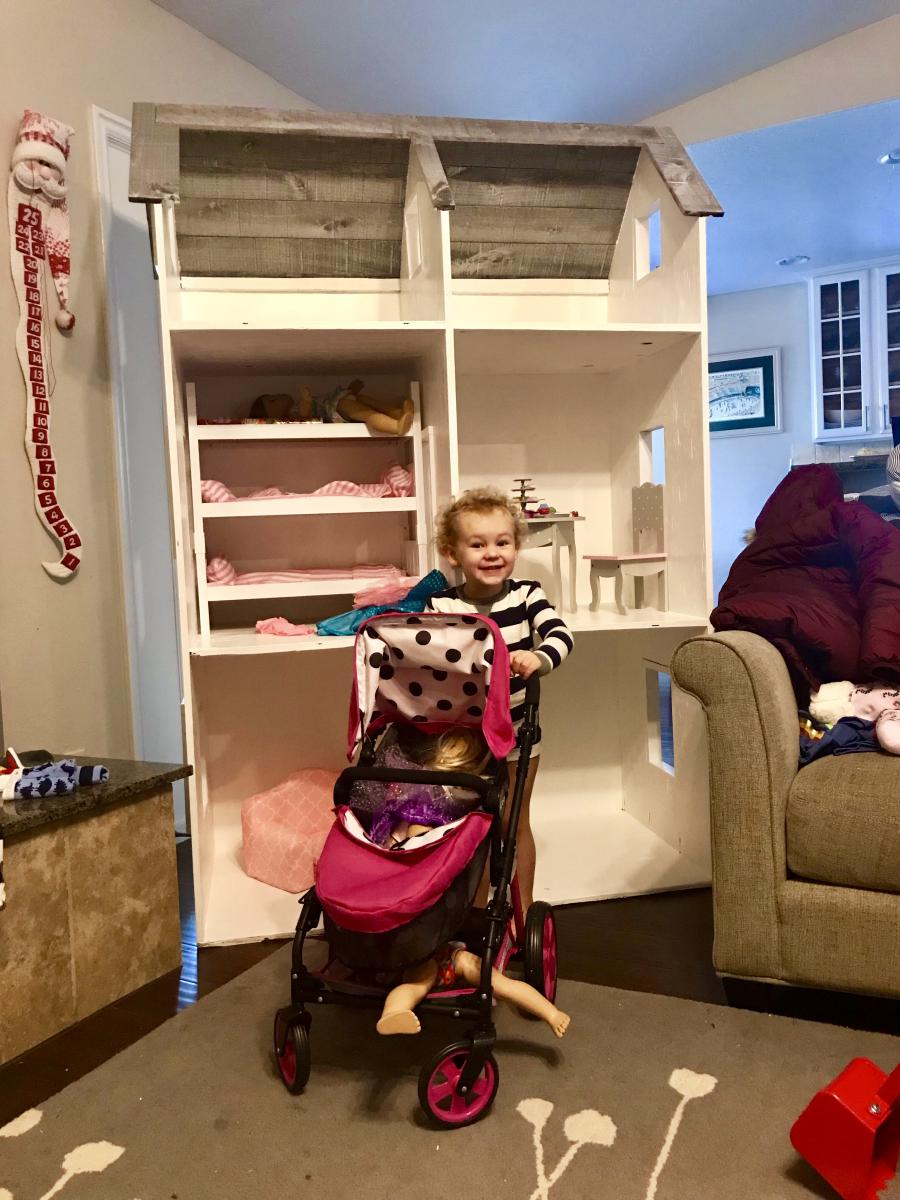
Christmas Doll House for 3
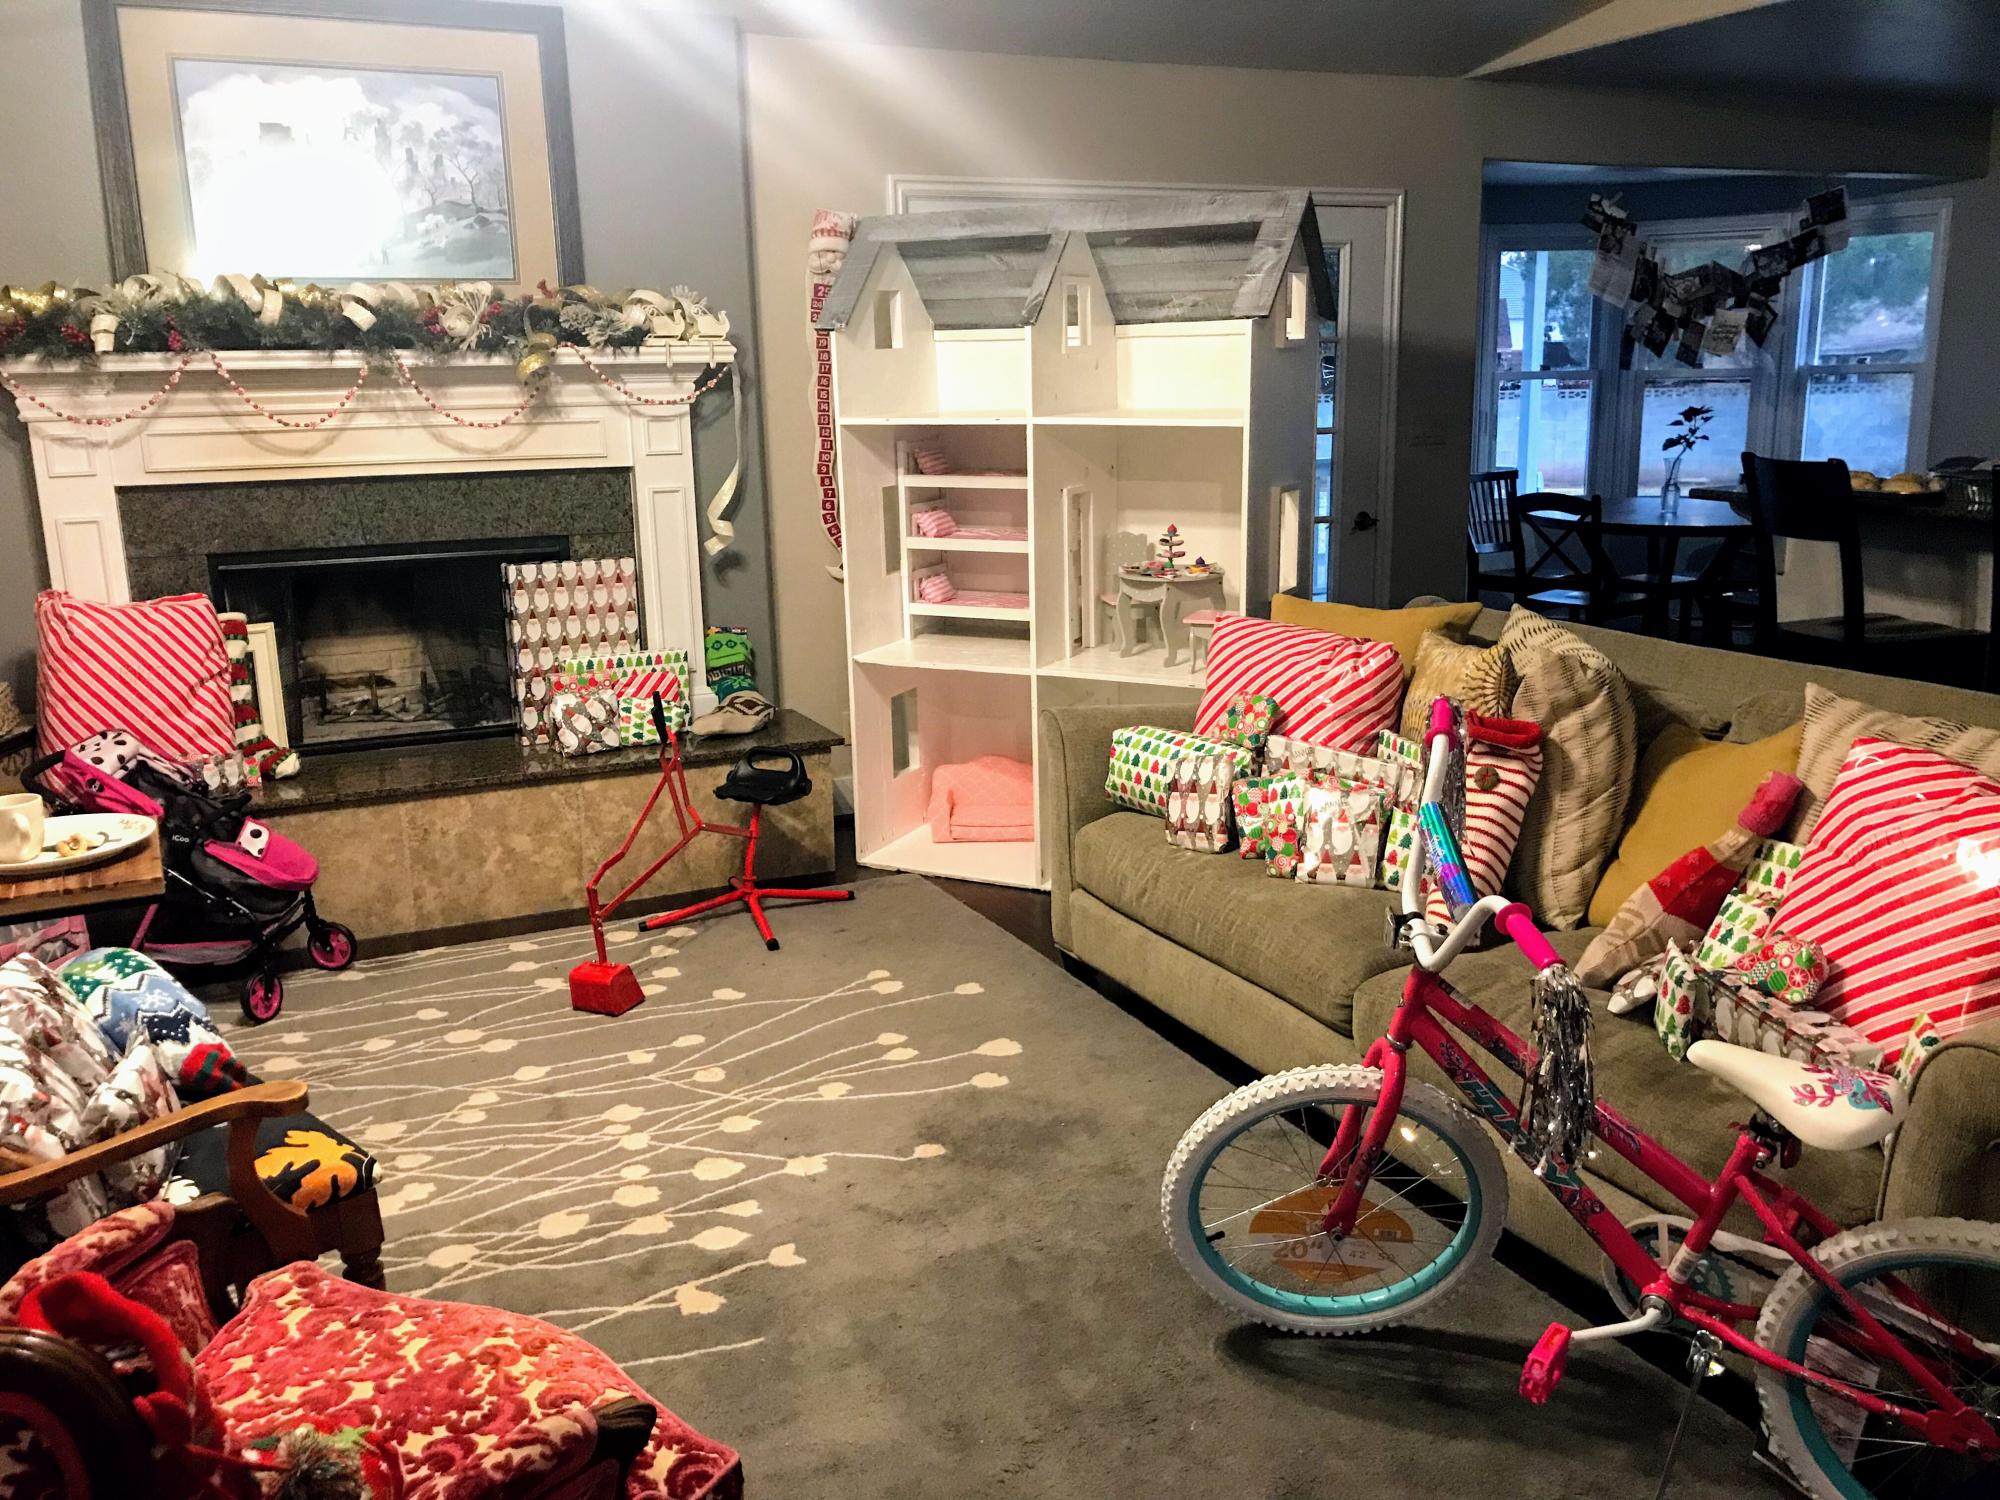
Ana, you saved us! Thanks to you, Santa’s Elf “Ralph,” whipped this up literally the day before Christmas. We have three little girls and wanted to make Christmas magical again after having survived some significant personal tragedy. Christmas has been rather difficult after loss and grief but your doll house was the perfect remedy. Not only do our girls still play with it daily over 9 months later (this has never actually happened with any other toy), but we are thrilled to use it to store all of their dolly clothes and accessories. No mess in our house and it’s super cute! People ask us all the time where we bought it. We tell them it came from Ralph the elf and his bestie Ana White.❤️
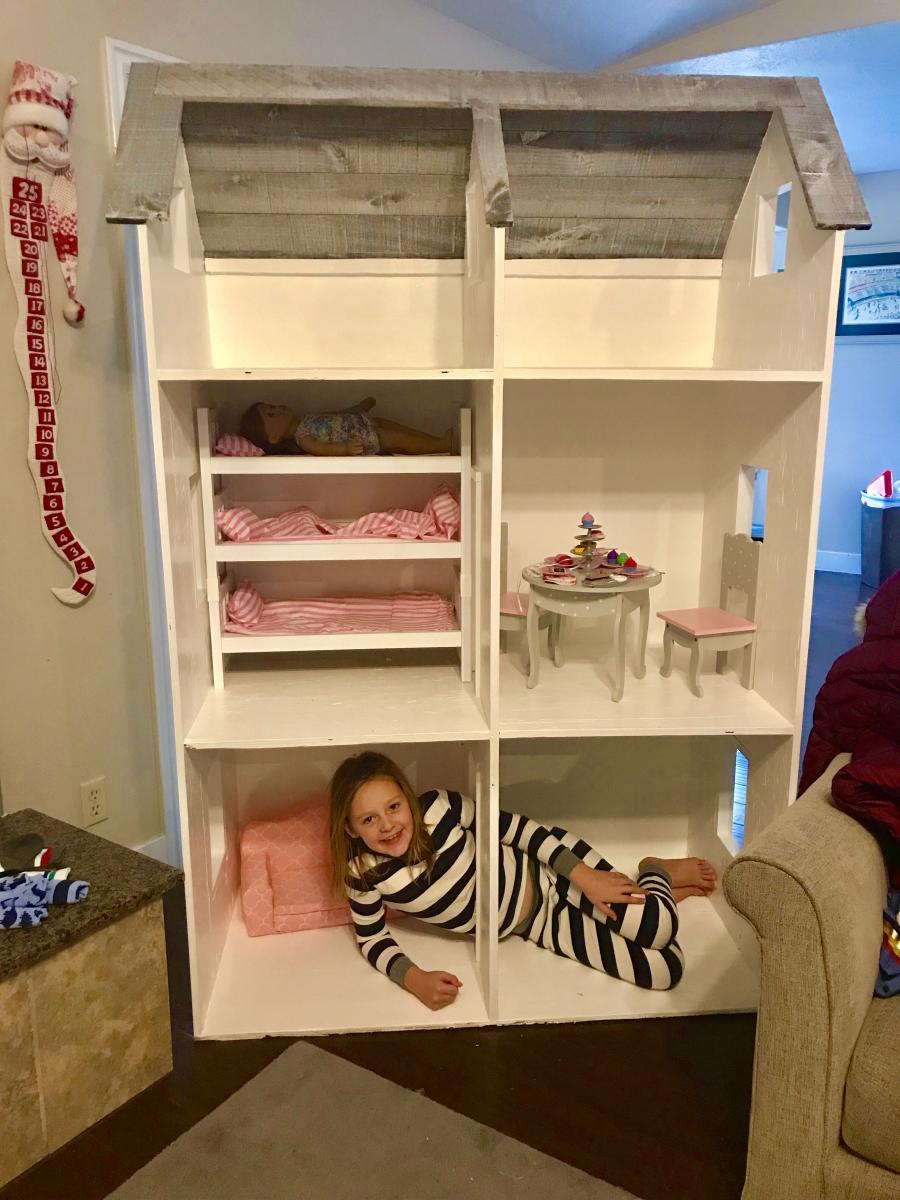
Built from Plan(s)
Estimated Cost
$80
Estimated Time Investment
Day Project (6-9 Hours)
Finish Used
Paint
Recommended Skill Level
Beginner
Comments
Wed, 10/02/2019 - 09:55
This is a gorgeous dollhouse…
This is a gorgeous dollhouse! I especially love the stained roof. And the smiles!
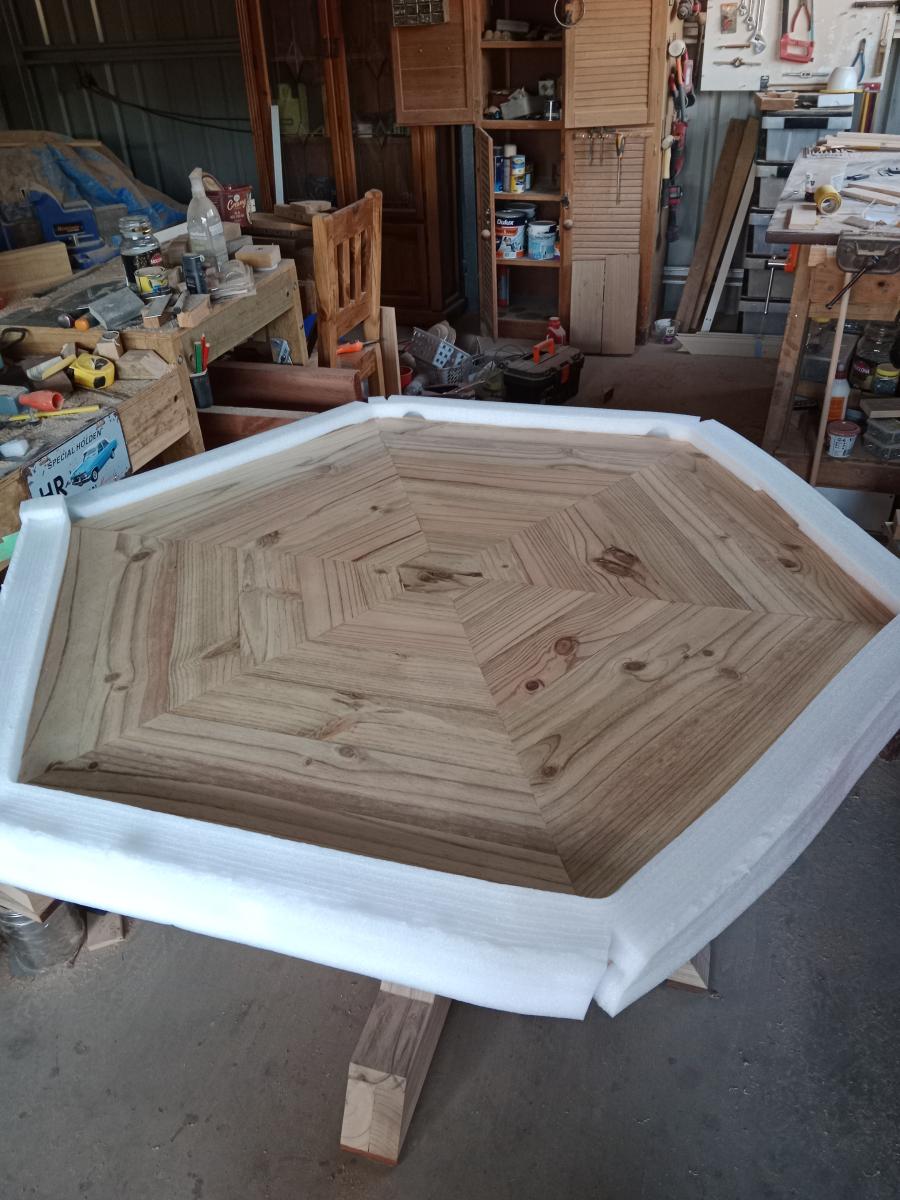
Hexagonal X based pedestal table

After completing all the pieces for myself based on 4x4 pedestal dining table with planked wood top, I thought I would build a table for my daughter.
The pedestal base is the same as the plan.
Now all i have to do is get it transported 400km down the road
The table was made from 200mm x 50mm pine sleepers
The top was finished with 2 coats of British paints 1 coat finish
Built from Plan(s)
Comments
Tue, 05/30/2023 - 12:52
Stunning table builds!
Wow, this is gorgeous, thank you so much for sharing! Your daughter will be thrilled.:)
Barn wood frame

I made the barn wood frame for less than $30 (the plexiglass alone was $23!). It's better than the $80 they were going to charge me at the frame shop for the same style! I used an opaque black stain to both hide my not so accurate miter cuts and give it a modern feel. I'm very satisfied with the results!
Built from Plan(s)
Estimated Time Investment
Afternoon Project (3-6 Hours)
Finish Used
Cabot solid color acrylic deck stain in black. This stuff takes forever to dry, but I prefer this to black paint.
Recommended Skill Level
Starter Project
Comments
Sat, 02/18/2012 - 09:24
thanks for posting.
I need a large frame for a family photo. I cant spend the money right now. This has been very helpful. Great job