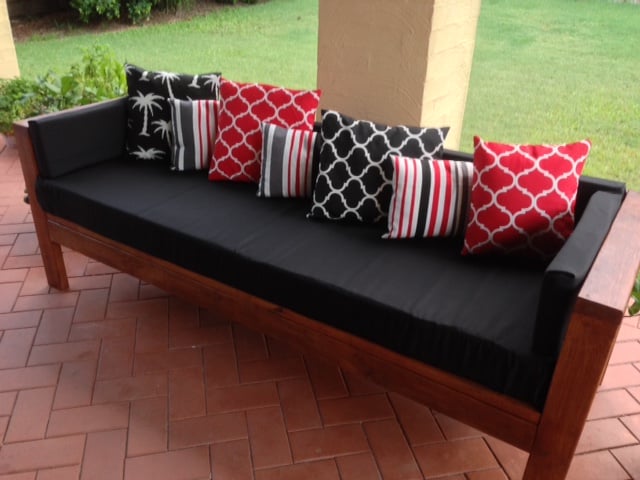
Tryed end table with shelf
Top 22.5" x 24.5" Base 21"x21" Total height 24"
Base finished with Dutch boy trim paint.
Top 22.5" x 24.5" Base 21"x21" Total height 24"
Ana, you saved us! Thanks to you, Santa’s Elf “Ralph,” whipped this up literally the day before Christmas. We have three little girls and wanted to make Christmas magical again after having survived some significant personal tragedy. Christmas has been rather difficult after loss and grief but your doll house was the perfect remedy. Not only do our girls still play with it daily over 9 months later (this has never actually happened with any other toy), but we are thrilled to use it to store all of their dolly clothes and accessories. No mess in our house and it’s super cute! People ask us all the time where we bought it. We tell them it came from Ralph the elf and his bestie Ana White.❤️
Wed, 10/02/2019 - 09:55
This is a gorgeous dollhouse! I especially love the stained roof. And the smiles!
My third project from the Ana-white.com site. Our daughter's books and toys were outgrowing the toy box and small magazine rack we were using, saw this plan, no brainier. It led me the the land of nod website, to see the real deal, and I liked the version with the closed top better, so I modified the plans to fit my needs. Added some trim and oak veneer for the edges, a little stain, and waa laa... Found some boxes at lowe's, perfect fit. We'll move it into her room after I build a new media console for the living room
Thu, 01/19/2012 - 11:17
Could you tell me your exact modifications? I love your book case!!
Fri, 01/20/2012 - 22:18
Thanks! I just figured out how to use google Sketchup today... here are the plans..
http://ana-white.com/2012/01/plans/full-toy-box-bookcase-0
Thanks to Ana as well, for her google Sketchup "How-To" article, it helped out alot.
We made this based on the Emerson Buffet plans, but modified to fit our current TV accessories. We also added legs, instead of the framed base.
We've built over 100 of these farmhouse beds - we've tweaked the design ever so slightly.
Our first Farmhouse Bed took roughly a day to complete. We sanded the entire bed, applied stain & then applied two coats of matte varnish. At least apply one. Stain can leak for weeks, and smell bad for longer.
We use 2x3's for our slats and find them extra strong!
Love this bed so much, we plan to build another 3. Used local white cedar milled just down the road from our cottage.
http://www.ana-white.com/woodworking-projects/modern-farmhouse-bed-frame
We took down a wall in our basement which left us with a gap in between the ceilings and two ceilings at different heights...the beam filled the gap perfectly!
Really fun project. My dividers were a little off, but for kiddo storage- it's not too shabby. Bins were on sale at target. Because I trimmed the whole case out in 1x2s- 11x11 was the size I needed. The labels were extra, but totally worth the cost in my opinion. Loved this project and love the organization it brings!
My daughter needing a dining room table. After discovering Ana White’s web site and building plans, I figured I could do this ! I have a background in quilting so I was thinking , cut the material , piece it together....simple !!!! It was definitely the plans and YouTube videos that made this achievable. I had never run a miter saw or table saw in my life ! I still can’t properly read a measuring tape !!! I had the basics down and away I went !!!
It turned out beautifully and best part of all is I could gift my daughter a table and bench made with love from mom !!
This was a great project. Easy to do.. Had to down size the table to fit our trailer…
My very second furniture do-it-myself. This furniture was inspired by both the Tryde hutch and rustic media console built to suit my space and need. Whew! now I feel like I can build anything:-) Thanks Ana!
In reply to Very beautiful Liz!!! by Ana White
Tue, 02/07/2012 - 07:46
Tnx Ana, and thanks to you I discovered I can make my own furnitures and I'm lovin' it :-)
I used the basic plan but made a few changes. First I wanted a track layout that was screwed down. Easy to start playing for a two year old. And a reversible top that could be used for activities. The top therefor is one piece of ply. With a hole drilled in one end for inserting a finger to start the lift/flip. I used a little thinner ply than recommended to give a little lip around the trim to not allow the crayons and trains to roll on the floor. This also allows me to put two inserts on the plain side. I have a half chalkboard/ half whiteboard inserts. This gives it more flexibility. I also added a theater front to the mix that I store in the cavity of the box with the other top inserts. Finisher with white paint and minwax spray lacquer.
This is a modified version of your plans. I made it 4x8 and adjusted the roof and front according. For the back wall, I used T1-11 siding and the pickets everywhere else. I added a floor and ramp too.
After moving, my wife informed me that I would be building her a new TV console. This is the end result. Now we need a bigger TV!
Proud of this, my very first build. Thanks to Ana White for the detailed, easy to follow plan. Can hardly wait to start the next project!
Fri, 06/16/2023 - 22:02
Absoutely love this, way to go! Can't wait to see your next project.
Media Console--My first build! Read all about it at http://isthisloadbearing.com/2012/01/15/media-console/
Sat, 02/04/2012 - 15:36
I love the legs and the lattice detail. The cat is pretty cute too!
Mon, 02/06/2012 - 13:31
The details really make the piece unique. The additions of the lattice panels and the legs look like simple additions, but they make a bigg difference. It looks great.
Mon, 04/09/2012 - 15:40
Did you follow Anna's plans for this? Some other comments on the plan had suggested the measurements were off. Did you find this was the case?
Thanks,
Randy
Sun, 04/07/2013 - 22:42
well i have read about you r project and i really like this in simply i want to say that good work you have done.
Sanford Locksmith
Mon, 05/06/2013 - 03:58
I like the idea you have in there. It is quite simple but it expresses such coolness and neatness to the place. Simplicity is beauty. It is better that you make your media console not occupied with a lot of stuff.
------------------------
dragon city hack
We recently moved back to my hometown and bought a beautiful farmhouse that was built in 1908. We knew Ana's Farmhouse Table plan was perfect for our dining room! We followed Hillary, from The Friendly Home, advise and black tea stained the wood, then sanded it with an 80grit paper. The next step was to apply the oxidizing solution, made up of 000 steel wool dissolved in white vinegar. We will continue to use this finish technique on other builds so we now keep a massive mason jar in the basement. If you decide to do the same, remember not to tighten the lid. The mixture creates a gas expansion in the jar that could pop the top! Once this was applied we let it dry completely and started sanding again. This is the fun part. The love of my life, who had never attempted to build anything before, felt like an artist! It was so much fun to hear him exclaim he had created another masterpiece! Once we had all the pieces sanded , we put the whole thing together and applied 2 coats of min wax. Unlike Hillary, we did not add color to our wax, but decided we liked the color just as it was.
Built this buffet/sideboard in about a week. Huge, and kind of a pain to move, but beautiful and extremely useful.
I watched your video and modified mine to take up less space by using 1 x material instead of 2X material, and I cut a notch in the top to allow steak knives to store on top. Once a cut a notch, then I used my table saw to create the space where the steak knife blades fit.
From there, lots of sanding and gluing. I made the plywood base about 1/4” shorter than the depth of my drawer so it could be easily placed inside my drawers that don’t fully extend out.
I finished it with pre-stain conditioner, stain, and then an oil/beeswax blend (used for cuttting boards) applied with 0000 steel wool for a super smooth, satiny finish.
Angie
Started out making the Fiona Adironback doll chair, and when my niece saw it in this state, she dramatically screamed, STOP! she's 8, lol. She brought it in to the house, sat her doll in it next to her game chair, gave her dolly the game controller, and began to play 2 player Nintendo, Wii, and xbox.
I've built 5 of these, all for friends of hers, who see her and Sarina (her Doll) playing video games together.