Community Brag Posts

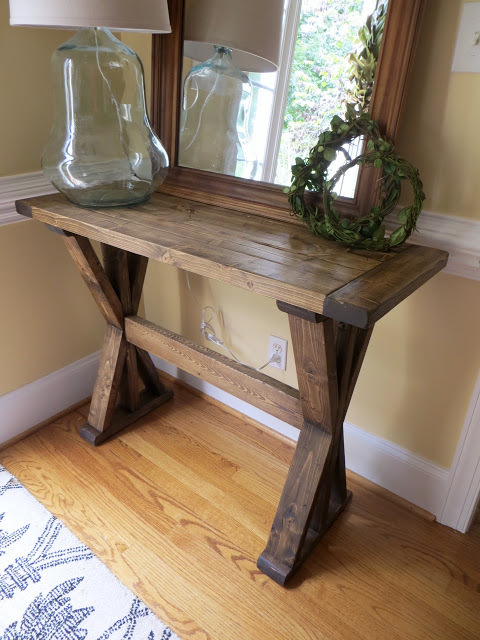
Sonny's Play Mud Kitchen

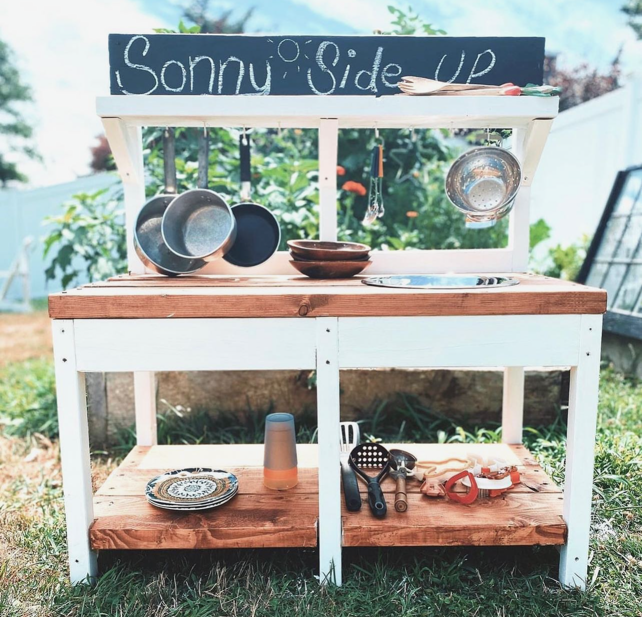
Darling Mud Kitchen by Sarah Jean Gammon

"I had this idea of making Sonny a mud-kitchen, a kids play kitchen for the yard. I mentioned it to Brent and he laughed saying he had enough projects on his list. This was not something he was going to build. Sooo I built this all by my self...or as Sonny would say, “me do this my own self”. It cost ~30 bucks in lumber and a trip to the thrift store for some second hand pots and pans. 3 hours later, a little paint, a little stain and voila... Sonny Side Up Mud Kitchen! Thanks for the plans Ana."

Built from Plan(s)

Octagonal Picnic Table

Submitted by Anonymous (not verified) on Tue, 04/25/2023 - 08:16

Great plans and easy to follow!

Comments

Modified washer/dryer pedestal

Submitted by KaraBoo on Wed, 02/03/2016 - 09:32

I loved the idea of building a washer and dryer pedestal for extra laundry basket storage underneath! Sashua's is beautiful so I took her idea and modified it a bit to work for me. My washer is very, very heavy and I was worried that if there was no support under the weight in the middle, it would start to bow and sag. The original plan also put the washer too high for me to have been able to use without a step stool. So in my modification I screwed cleats into the 2X4 frame of the laundry room wall, placed the 3/4" plywood on top of it and screwed it in. In the front, I used 4X4's as the two corner leg supports and then added two 1X6 supports in the front center, creating three laundry basket bays. I placed it directly onto the floor as opposed to building the bottom base. This saved me money since I was able to buy half the lumber and also allowed me to lower the height of the platform while leaving enough space for my baskets. The top of my platform is approximately 14 1/2" high, which is just low enough so that I can see into the soap filling compartment at the top of the washer. Being that I'm only 5'2" I would have needed to use a step stool to use my washer at the original 19 1/2" plan height. I framed the top edge of the platform with 2X2's, to ensure that my washer or dryer never walked off the edge. Finally, I added some trim along the front edge and around the legs and that's it!

Estimated Cost
$60
Estimated Time Investment
Afternoon Project (3-6 Hours)
Recommended Skill Level
Beginner

Comments

Codding58

Mon, 02/15/2016 - 12:25

I REALLY like this modified version, I think it looks GREAT!    when you say you screwed cleats to the back wall, are you talking a 2x4 across the back fastened to the studs, or what did you use?    I think my wife would love this version, and I may just have to get started on one myself.   yes

Doll bed factory

Submitted by sgilly on Mon, 02/20/2012 - 15:22

I fell in love with the darling bunk bed built by so many of Ana's readers. Since seeing it I've made several for my granddaughter, neighbors, and friends. What I've learned is that although they're cute, they take almost as much time as a full sized bed!

Estimated Cost
$20-30 (less if I used scraps!), another $10 for bedding materials
Estimated Time Investment
Afternoon Project (3-6 Hours)
Finish Used
I left most of the bunks natural. Filled, sanded and sprayed with 2 coats of clear poly. Others were painted white (after filling and sanding).
Recommended Skill Level
Beginner

Comments

Nora E. McClure (not verified)

Mon, 02/20/2012 - 18:54

I love the beds. My child wants one so badly. I like yours better then the one American Girl makes.

sgilly02 (not verified)

Fri, 02/24/2012 - 20:48

That's a sweet thing to say. Evidently, others feel the same; I can't make enough of them! They're really pretty easy to make, I hope you try your hand at it!

Andrea Franklin (not verified)

Mon, 05/28/2012 - 17:27

Hi, I see you've made the Ana-White doll cradle from this post. The link to the pattern for the doll cradle appears to be missing as it is a dead link now. Do you know how I might obtain the pattern? Thanks so much

'X' Entryway Table

Submitted by danicarby on Sat, 09/24/2016 - 14:32

This table is built out of only 2x4's - that's 5 boards for about $15!  It was pretty easy and took half a day.  If the fancy angles are too hard to cut safely I recommend doing 45-degree angles!  I'm happy to have a nice entryway - first time my whole life! :)

I've created a post on my project blog wth instructions & pictures for anyone to make their own.

Rustic console table

Estimated Cost
$15 for Lumber
Additional for Screws and Wood Finish
Estimated Time Investment
Afternoon Project (3-6 Hours)
Finish Used
Minwax Wood Conditioner, Minwax Dark Walnut Stain then lasly, Paste Wax (Dark Brown).
Recommended Skill Level
Beginner

Comments

danicarby

Tue, 09/27/2016 - 12:16

Thank you Ana!  You made my day!  It was such a treat to see it posted on your Facebook page!  I told my husband that NOW that "I am famous" (haha) that I should be able to get the jointer & planer I've been begging him to let me buy!  I'm thinking maybe a direct message from  you would be just the trick! :)

Richard6959

Wed, 01/29/2020 - 13:54

What angle were the leg cuts? More than 50* because my saw wont go that far. Please let me know. 

Outdoor Wooden Cooler

An Outdoor Wooden Cooler is the perfect way to accent any deck, patio, or garage. Can be made from Cedar, Pressure Treated, Cyprus, etc. Sizes can vary from small 28 qt coolers to Large 120 qt coolers capable of holding hundreds of drinks. These coolers can be themed for your favorite sports team, favorite hobby, or anything of your choice. Engraving or wood burning is available.

Built from Plan(s)
Estimated Time Investment
Weekend Project (10-20 Hours)
Finish Used
Stain, painted, distressed, etc.
Recommended Skill Level
Intermediate

Comments

sgilly

Fri, 08/31/2012 - 09:52

Well, actually, two. My beer loving son-in-laws would love this, and Christmas is coming! Do you happen to have any "step-by-step" directions you'd be willing to share? I can figure out the dimensions but it would be really helpful to read - or see - the components and how you put it all together.
Thanks for sharing!

Adam_Scheetz

Fri, 09/28/2012 - 11:41

I had to make a new page because of some password issues. Thanks for comments. I have no plans yet, I've built so many it's sort of muscle memory now. Shoot me an email at [email protected] and perhaps I can help.

And no, the lid style I like is nothing more than some tongue~n~groove boards cut to length, attached with pocket holes and nailed to the lid frame. Tongue~N~groove is optional of course, you could just use regular boards.

sgilly

Fri, 09/28/2012 - 11:58

I really appreciate your response. And, I did indeed send you an email!
I have a bunch of cedar milled and planed by one of my son-in-laws. He'll be thrilled to see that I've made something he can use for his favorite beverage!

Haley platform bed/reclaimed wood headboard/rustic x leg table

i made this king size head board using Ana's website and for the bed frame i used Shanty 2 Chic's website. i just had to convert the measurements to king size when cutting the boards. thats a rustic x leg end table next to the bed, i built using Ana's website also.

Estimated Cost
$100-$120
Estimated Time Investment
Afternoon Project (3-6 Hours)
Finish Used
watco danish oil dark walnut
Recommended Skill Level
Starter Project

Garden Enclosure

This was a fun project.  The plans are written so that many of the boards don't need to be cut.  It's made from cedar that (thank goodness) was on sale.  I made the raised beds twice as deep as was called for in the plans because I wanted to minimize bending while I garden.  That added to the cost of the lumber and the soil.  I also like the way it looks.


I found it helpful to measure and cut the boards as I went.  This was crucial for fitting the door.  The most difficult part for us was working with the hardware cloth and trying to make it as smooth as possible.


It has been effective keeping deer and rabbits out of the garden.  Things that can fly in are another issue.  

Built from Plan(s)
Estimated Cost
>$500
Estimated Time Investment
Week Long Project (20 Hours or More)
Finish Used
None
Recommended Skill Level
Intermediate
Seasonal And Holiday

Outdoor planter steps or benches

Submitted by Anonymous (not verified) on Tue, 09/15/2020 - 00:45

A very enjoyable project. I'm relatively new to diy woodworking projects but these plans make it so much easier.

Thanks.

Estimated Cost
$250
Estimated Time Investment
Weekend Project (10-20 Hours)
Recommended Skill Level
Intermediate

Comments

Rectangular Industrial Coffee Table

I modified this plan from square to rectangular to fit my space. It is exactly what was needed! Modified size: 27.5" x 55"

Estimated Time Investment
An Hour or Two (0-2 Hours)
Finish Used
Minwax Polyshades Black
Matte Poly top coat
Recommended Skill Level
Beginner

Comments

American Girl Doll Horse Stable

Submitted by Dantana1 on Sat, 01/26/2013 - 08:40

So.....my Daughter has this American Girl doll, and she loves it. Then she saves up $75 to buy this HUGE Horse...why? I have no idea, but she loves it.

At Christmas time, Ana White was so kind to post diagrams for building a Horse Stable and with a few minor changes (shingled roof, golden hooks, some stain) I built it with my new Kreg jig (that was my Christmas gift from Santa).

Hope you enjoy the pictures . . .

Ana - Thank you, I enjoy your site and you certainly will be hearing from me in the near future.

Thanks for all you do :-)

Estimated Cost
$40.00
Estimated Time Investment
Weekend Project (10-20 Hours)
Finish Used
Dark Chocolate Brown stain, shims for roof.
Recommended Skill Level
Beginner

Comments

dananryan

Sat, 01/26/2013 - 09:59

I love your modifications. What a great idea to use shims for the roof! I might have to copy this. Great job.

Ana White

Sat, 01/26/2013 - 10:15

Oh I love this!!!! I can't tell you how giddy up happy I am to see the horse stable! Love the roof and the gold hardware too - so cute! Thanks for sharing, truly made my day!

linseylouwho

Sat, 11/23/2013 - 19:18

Oh, I'm in love with the shingles!
My daughter is getting her third AG doll, Saige, for Christmas and my sisters are getting her the horse too. Well, you can't have a horse without a stable too, right?
I've got all the supplies to build the stable and now all I have left to figure out is how you attached the shims to the plywood for the roof. Any suggestions would be fantastic and much appreciated!

Kitchen Pantry

Submitted by JameyD on Wed, 01/13/2021 - 09:35

I took some ideas from an Ana White wine rack I saw and made this Pantry for our kitchen. Pretty happy with how it turned out.

Estimated Cost
$300
Estimated Time Investment
Weekend Project (10-20 Hours)
Finish Used
Golden Oak stain
Recommended Skill Level
Beginner

Loft Bed with Desk & Bookcase

Submitted by Anonymous (not verified) on Tue, 04/04/2017 - 12:47

Created but Modified from the plans found on here, my daughter has a great new bed. This bed saved a ton of space in her very small room. PLUS it allowed her to have an area to do her homework and all the art projects she does! Very easy build. Took a day to build and another to paint. 

Estimated Cost
$250.00 CDN
Estimated Time Investment
Weekend Project (10-20 Hours)
Finish Used
Behr Marquee Paint
Recommended Skill Level
Beginner

Cutting Board

My Dad made a few cutting boards for christmas.  I've added a few additional photos and tips on my blog -  http://www.woodworkingfourdummies.com/blog/more-cutting-boards.

thanks for looking.


Ian

Finish Used
mineral oil
Recommended Skill Level
Intermediate

Comments

dbermolen

Tue, 01/13/2015 - 04:28

Hi Ana! Love your site!!!!!! Please tell me, did you use just mineral oil in order to make this non-toxic finish? I guess you would have done some posts including this kind of information, but I can't find it. Regards from Argentina! =)

Rustic Pot Rack

My kitchen needed a rustic pot rack to hang all my pots and pans. Instead of paying way too much money, I decided to get exactly what I wanted by making it myself. $20 worth of 2x6's and spray painted hardware purchased at The Home Depot in an oil bronzed was all that was needed to create this rack. I attached the hardware with metal screws to give it an even more rustic feel.

Estimated Cost
$20 for lumber
Approximately $60 for hardware
$10 oil rubbed rust oleum spray paint
Estimated Time Investment
An Hour or Two (0-2 Hours)
Finish Used
Minwax Special Walnut
Minwax paste finishing wax
Recommended Skill Level
Starter Project

Comments

Corner Hutch

Submitted by Anonymous (not verified) on Thu, 06/01/2017 - 12:58

Built the corner hutch from Ana's super easy plans!  LOVE IT!

http://www.ana-white.com/2010/12/plans/corner-cupboard

Made a cutout for my thermostat on the wall.  Gotta love building what you need for your space!

Built from Plan(s)
Estimated Time Investment
Weekend Project (10-20 Hours)
Finish Used
Grey Paint wash
Recommended Skill Level
Intermediate