Community Brag Posts

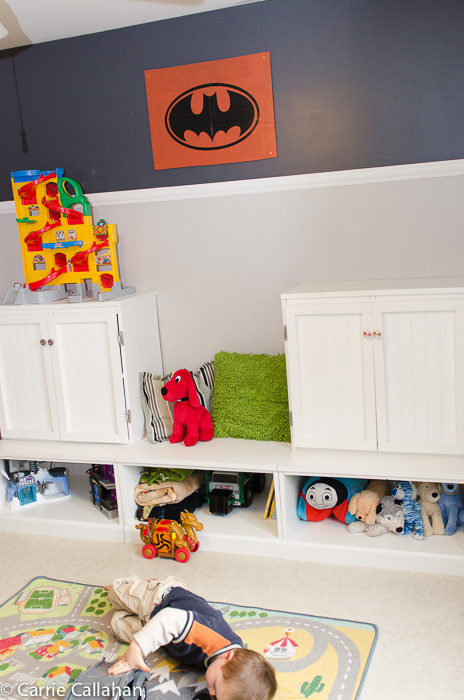
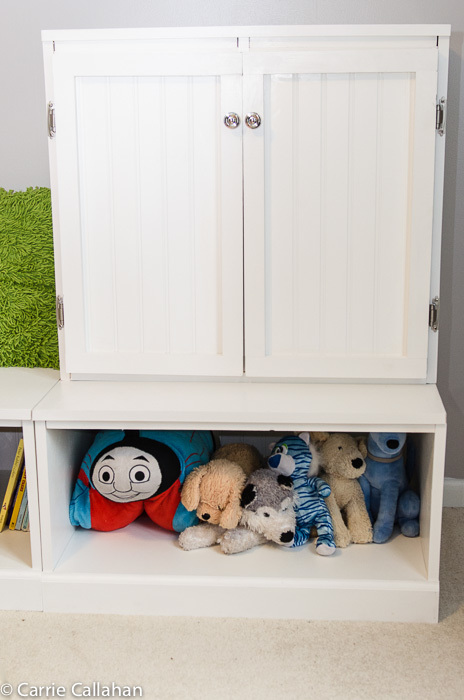
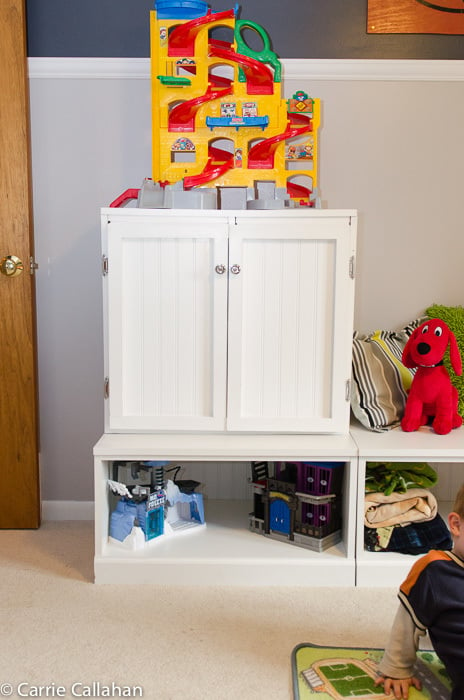
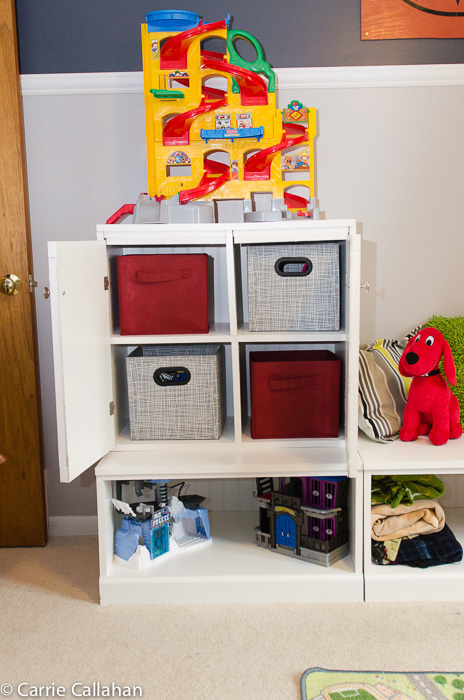
Toy Storage for my Little Man
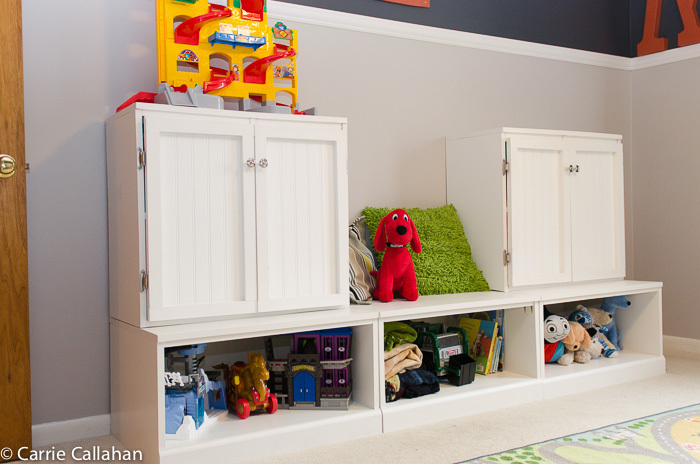
I am so excited about this project! I re-did my entire little man's room. It included a ton of Ana's projects! The closet, $10 ledges, step stool and the toy storage. This was quite the venture for me, I have done a lot of plans from Ana, but this one was a lot - a lot of painting. And hanging the doors, was a challenge :) I couldn't be more happy. My little man didn't want to leave his room he was so excited!
Built from Plan(s)
Estimated Cost
$220
Estimated Time Investment
Weekend Project (10-20 Hours)
Finish Used
Primed, sanded, painted with White Semi-gloss for two coats, sanding between each.
Recommended Skill Level
Intermediate
Comments
Mon, 10/22/2012 - 08:16
Love it!
Love your new room for your son! I love using clear toy storage bags to organize toys and then you could put the bags on display or behind the doors in your storage unit - http://mommby.com/Store/Bag.php.
Patio Furniture
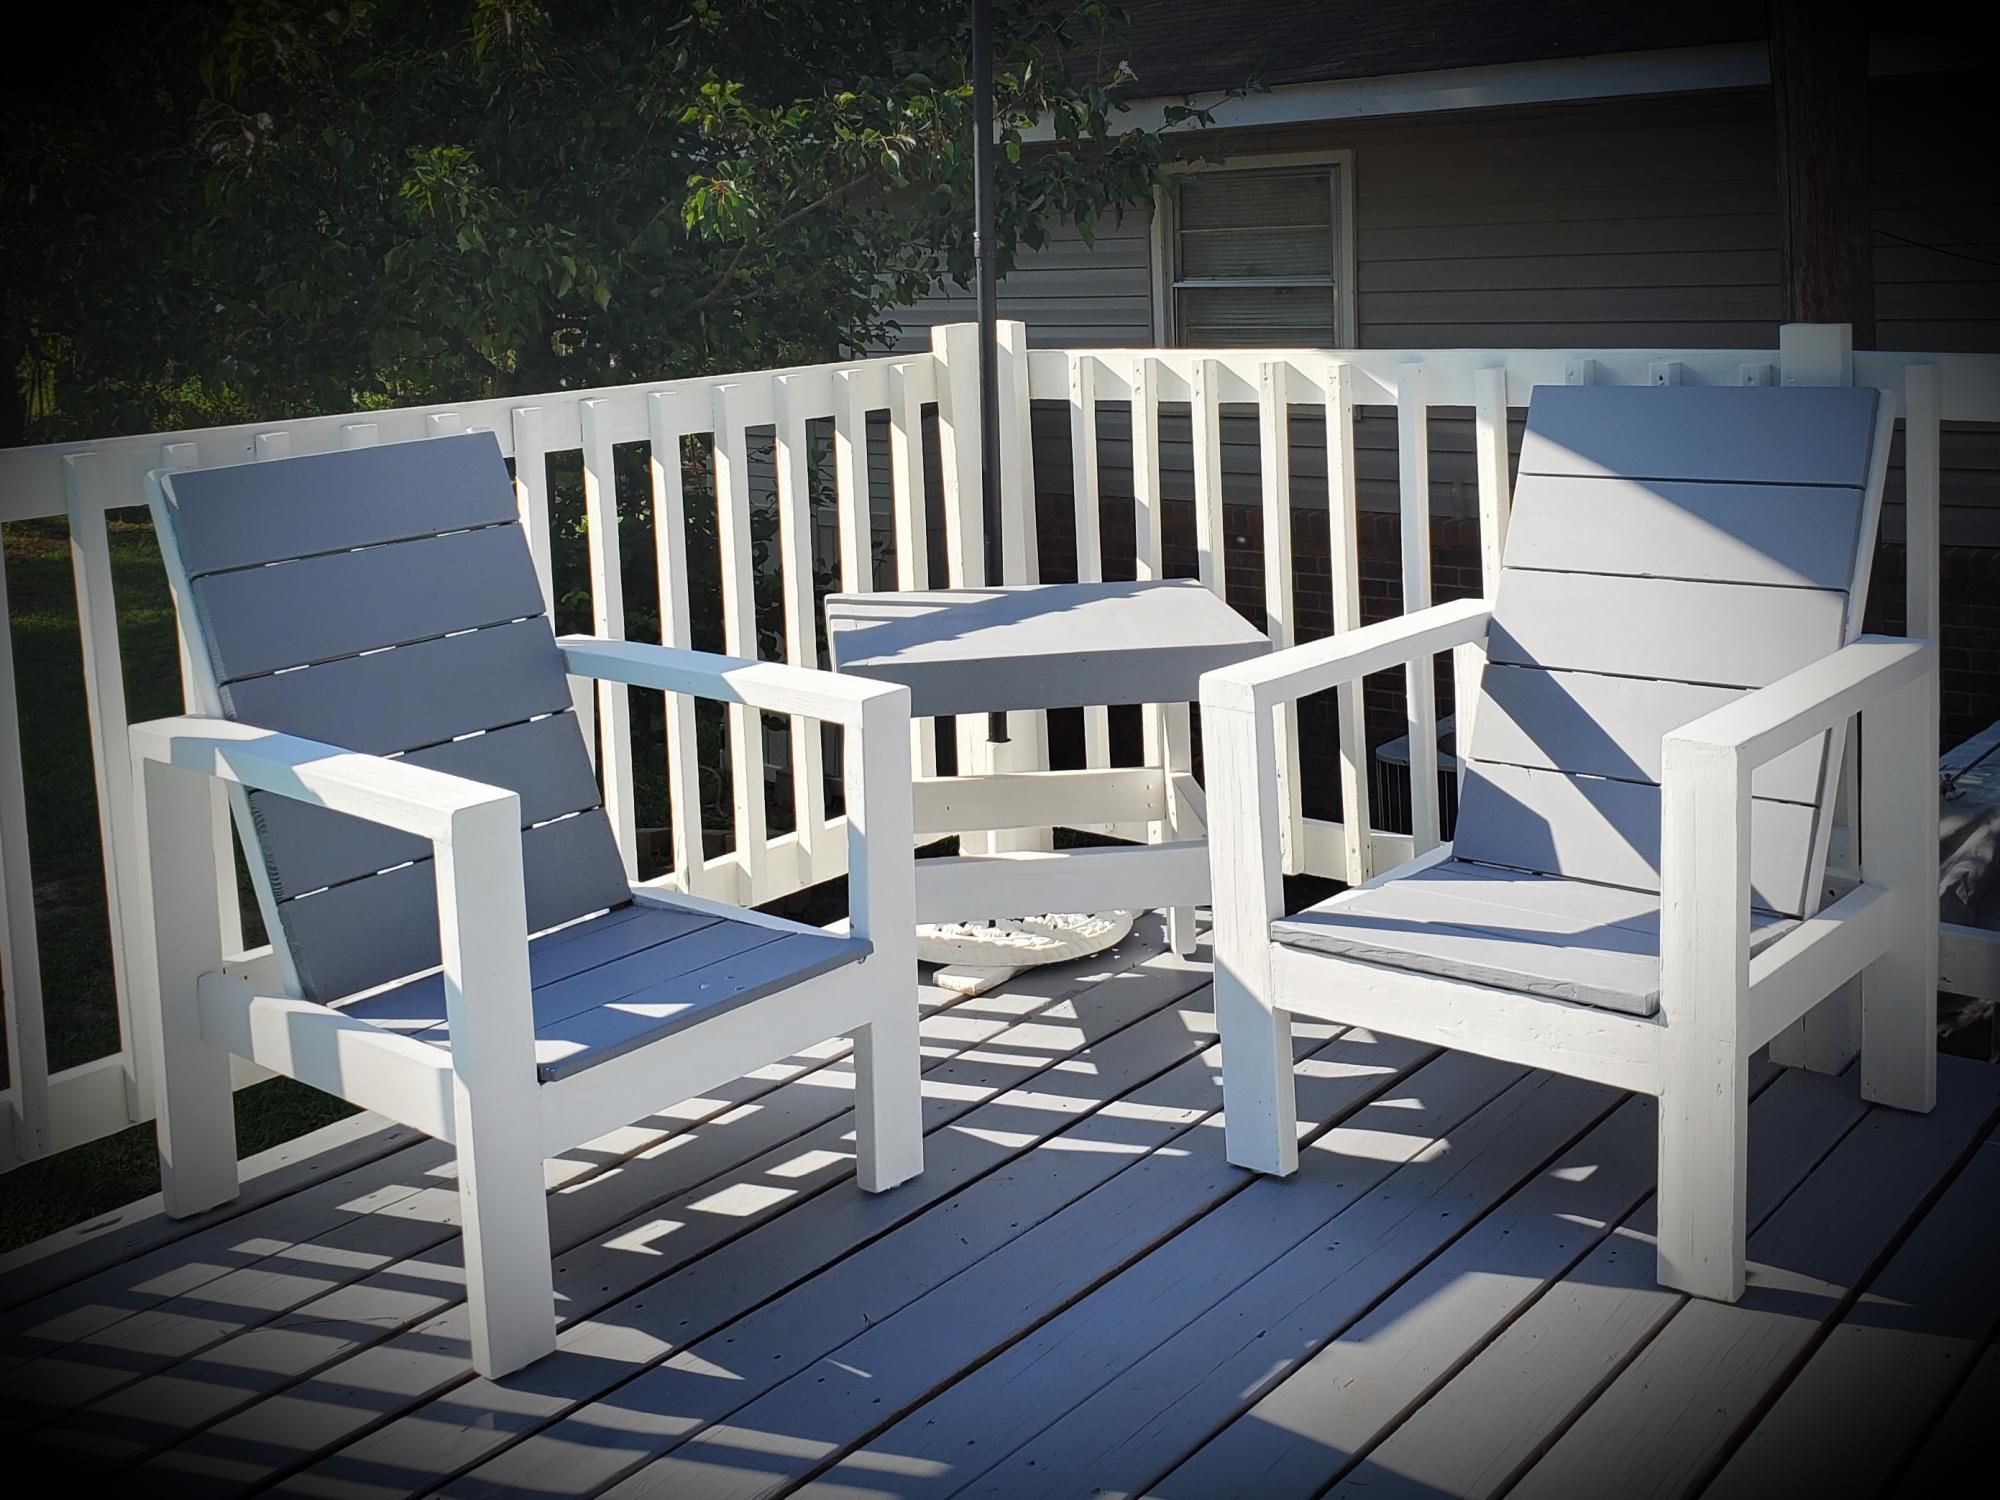
With a mix of the 2 attached plans, I found the perfect design! Plus, I was able to build them both, including the table, out of the scrap from the deck I built!! Thank you so much!!!
Built from Plan(s)
Comments
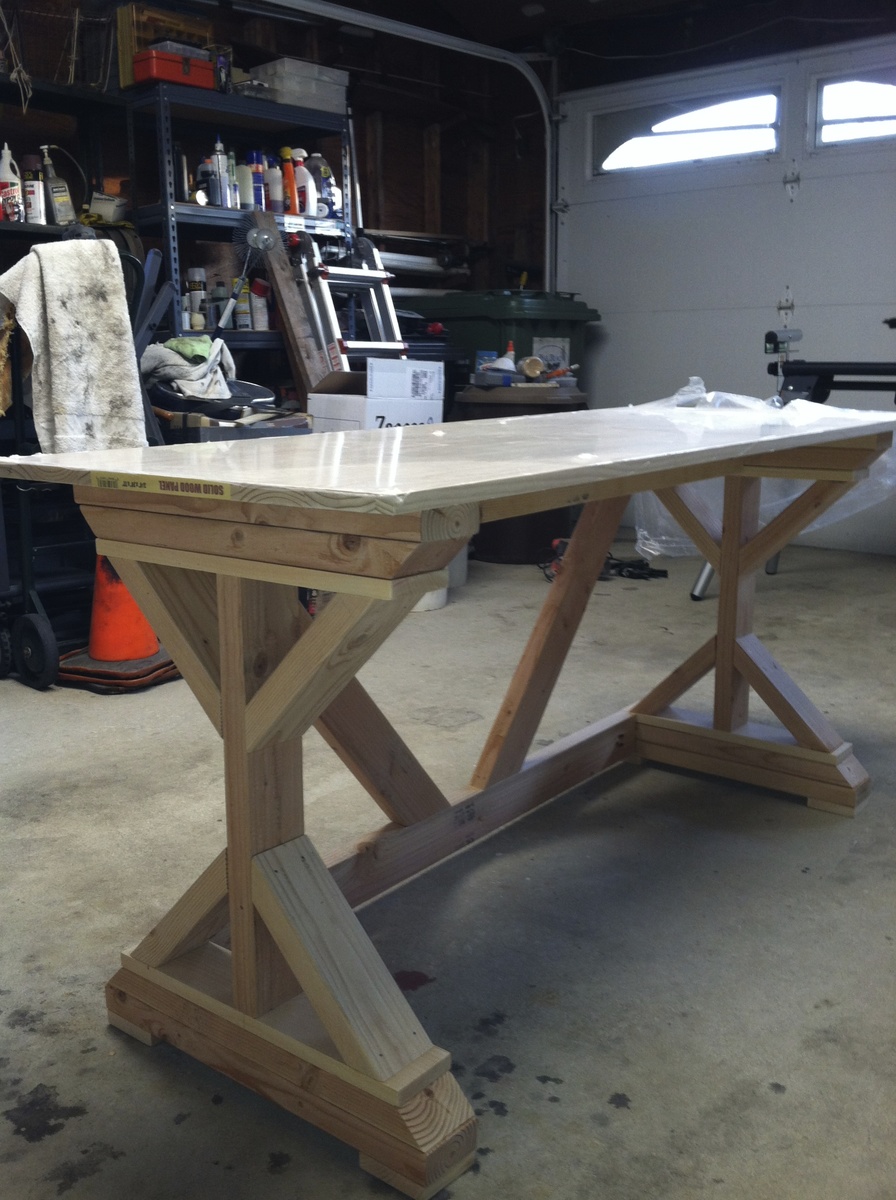
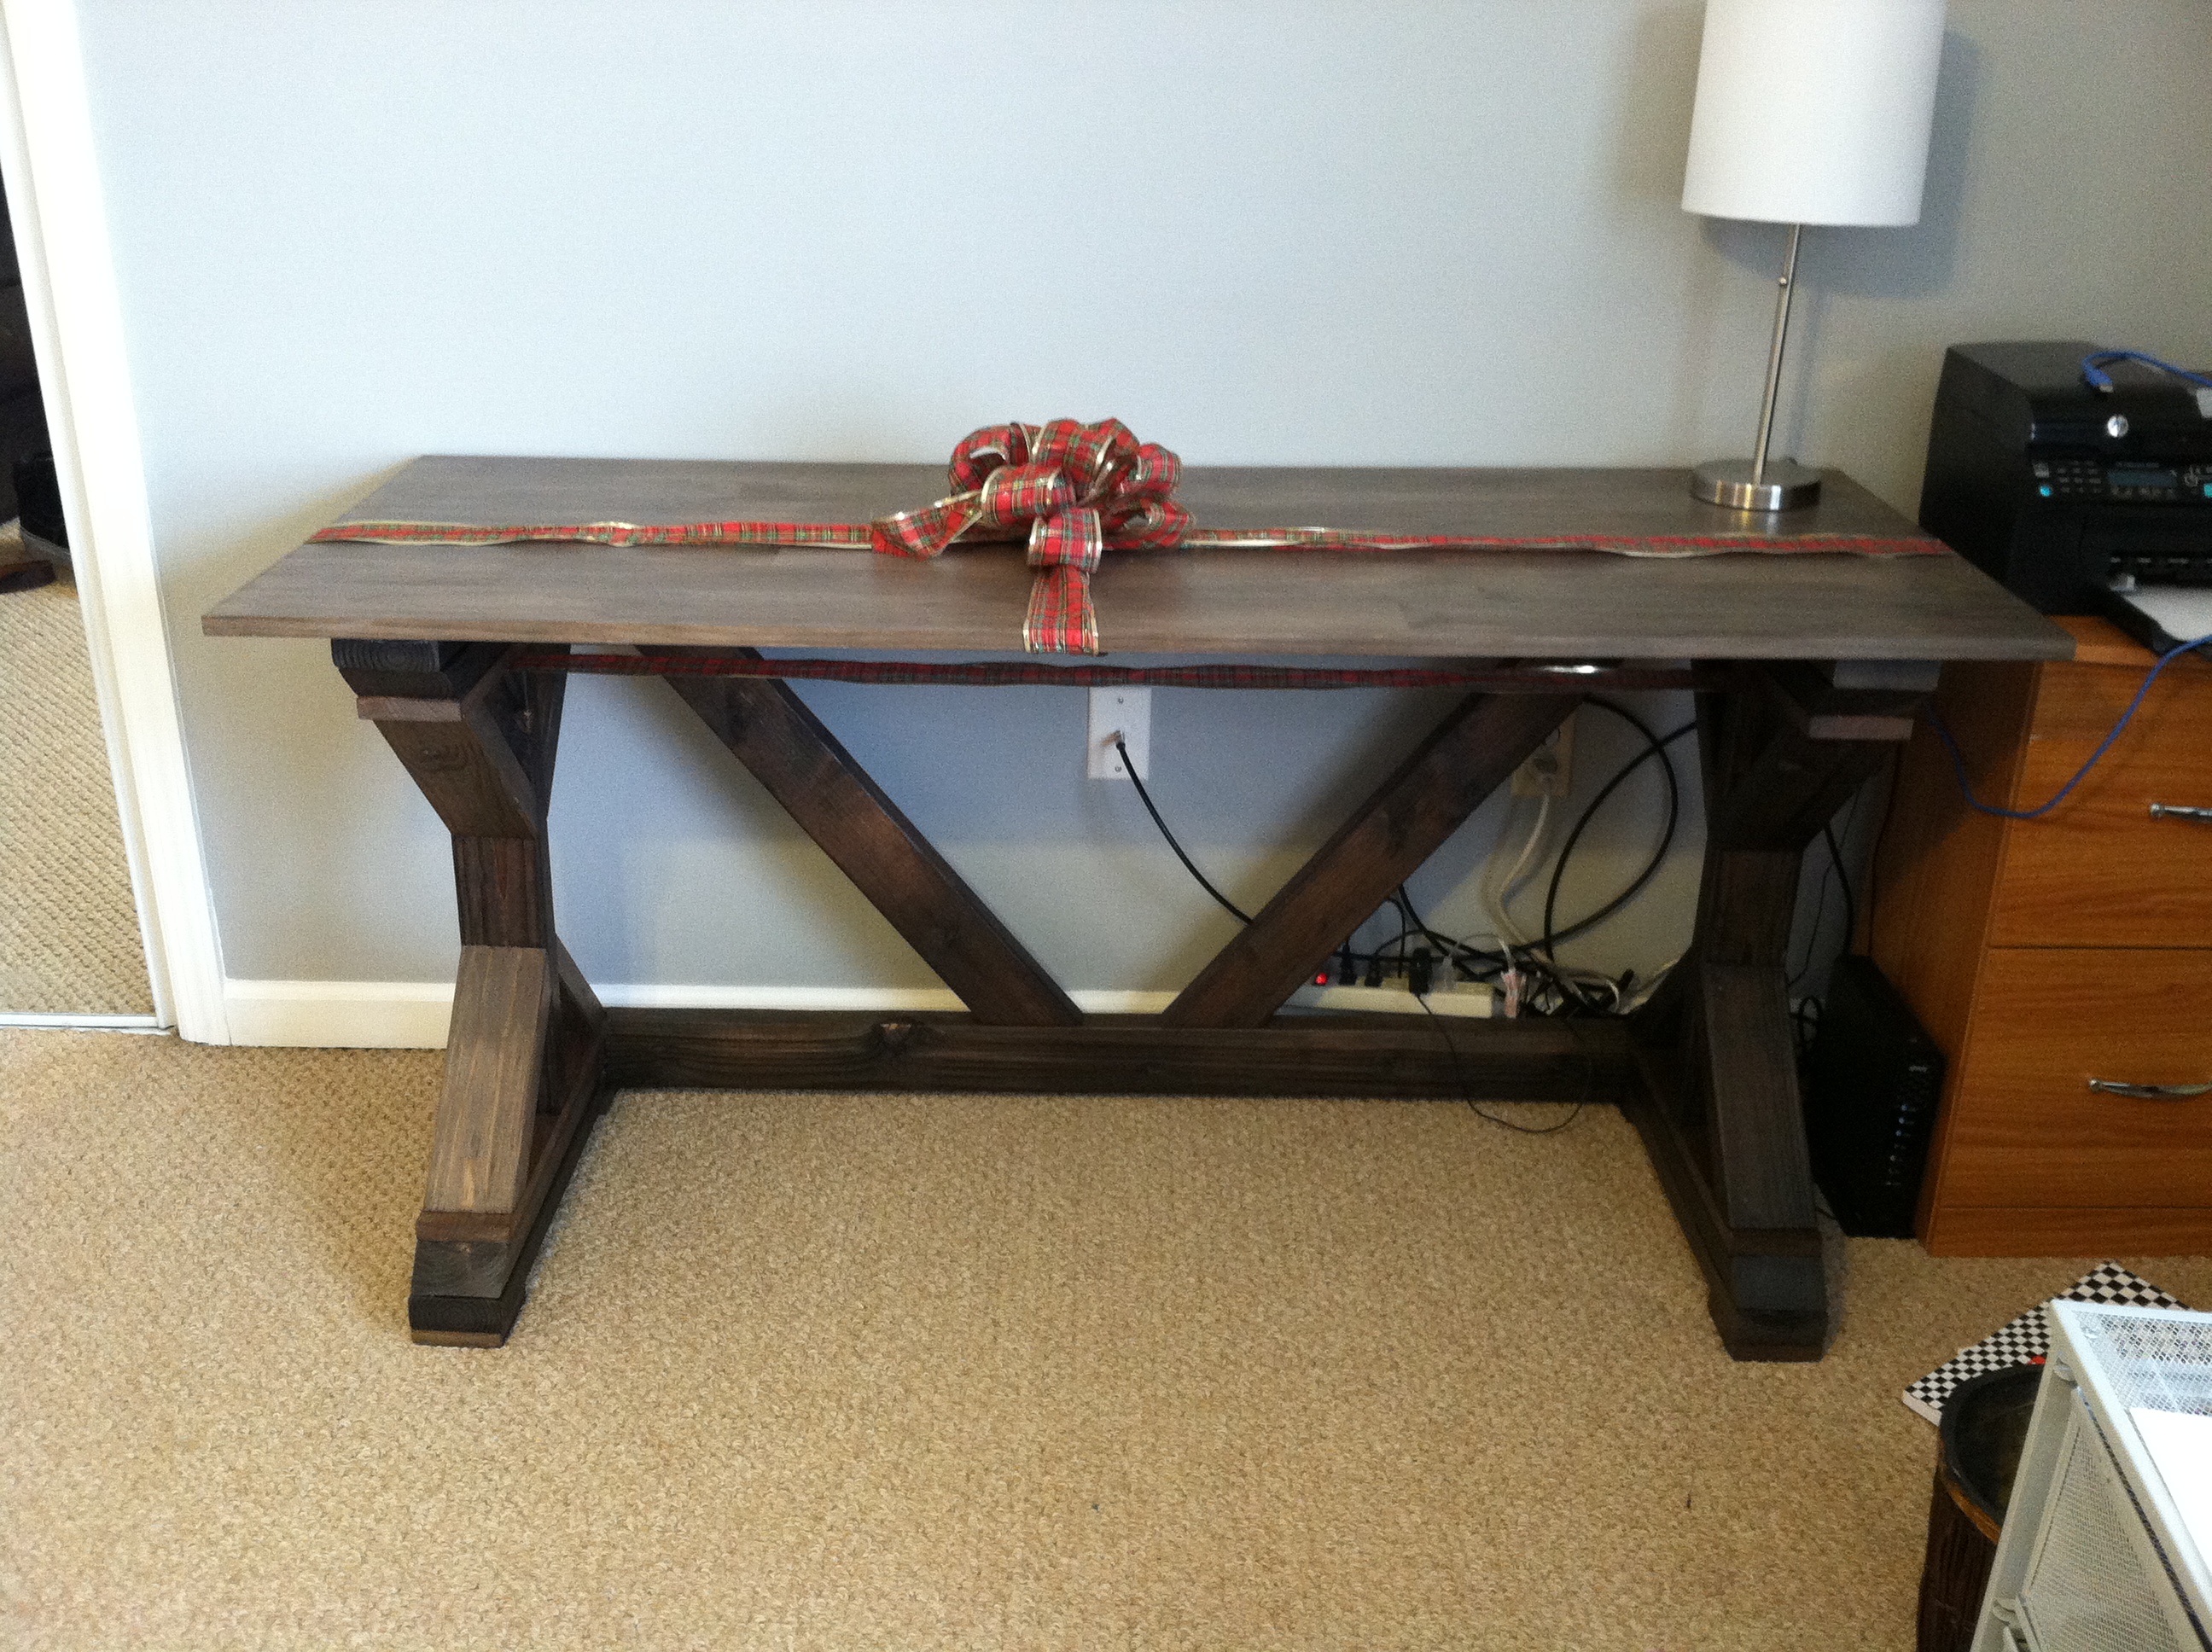
Fancy X Desk
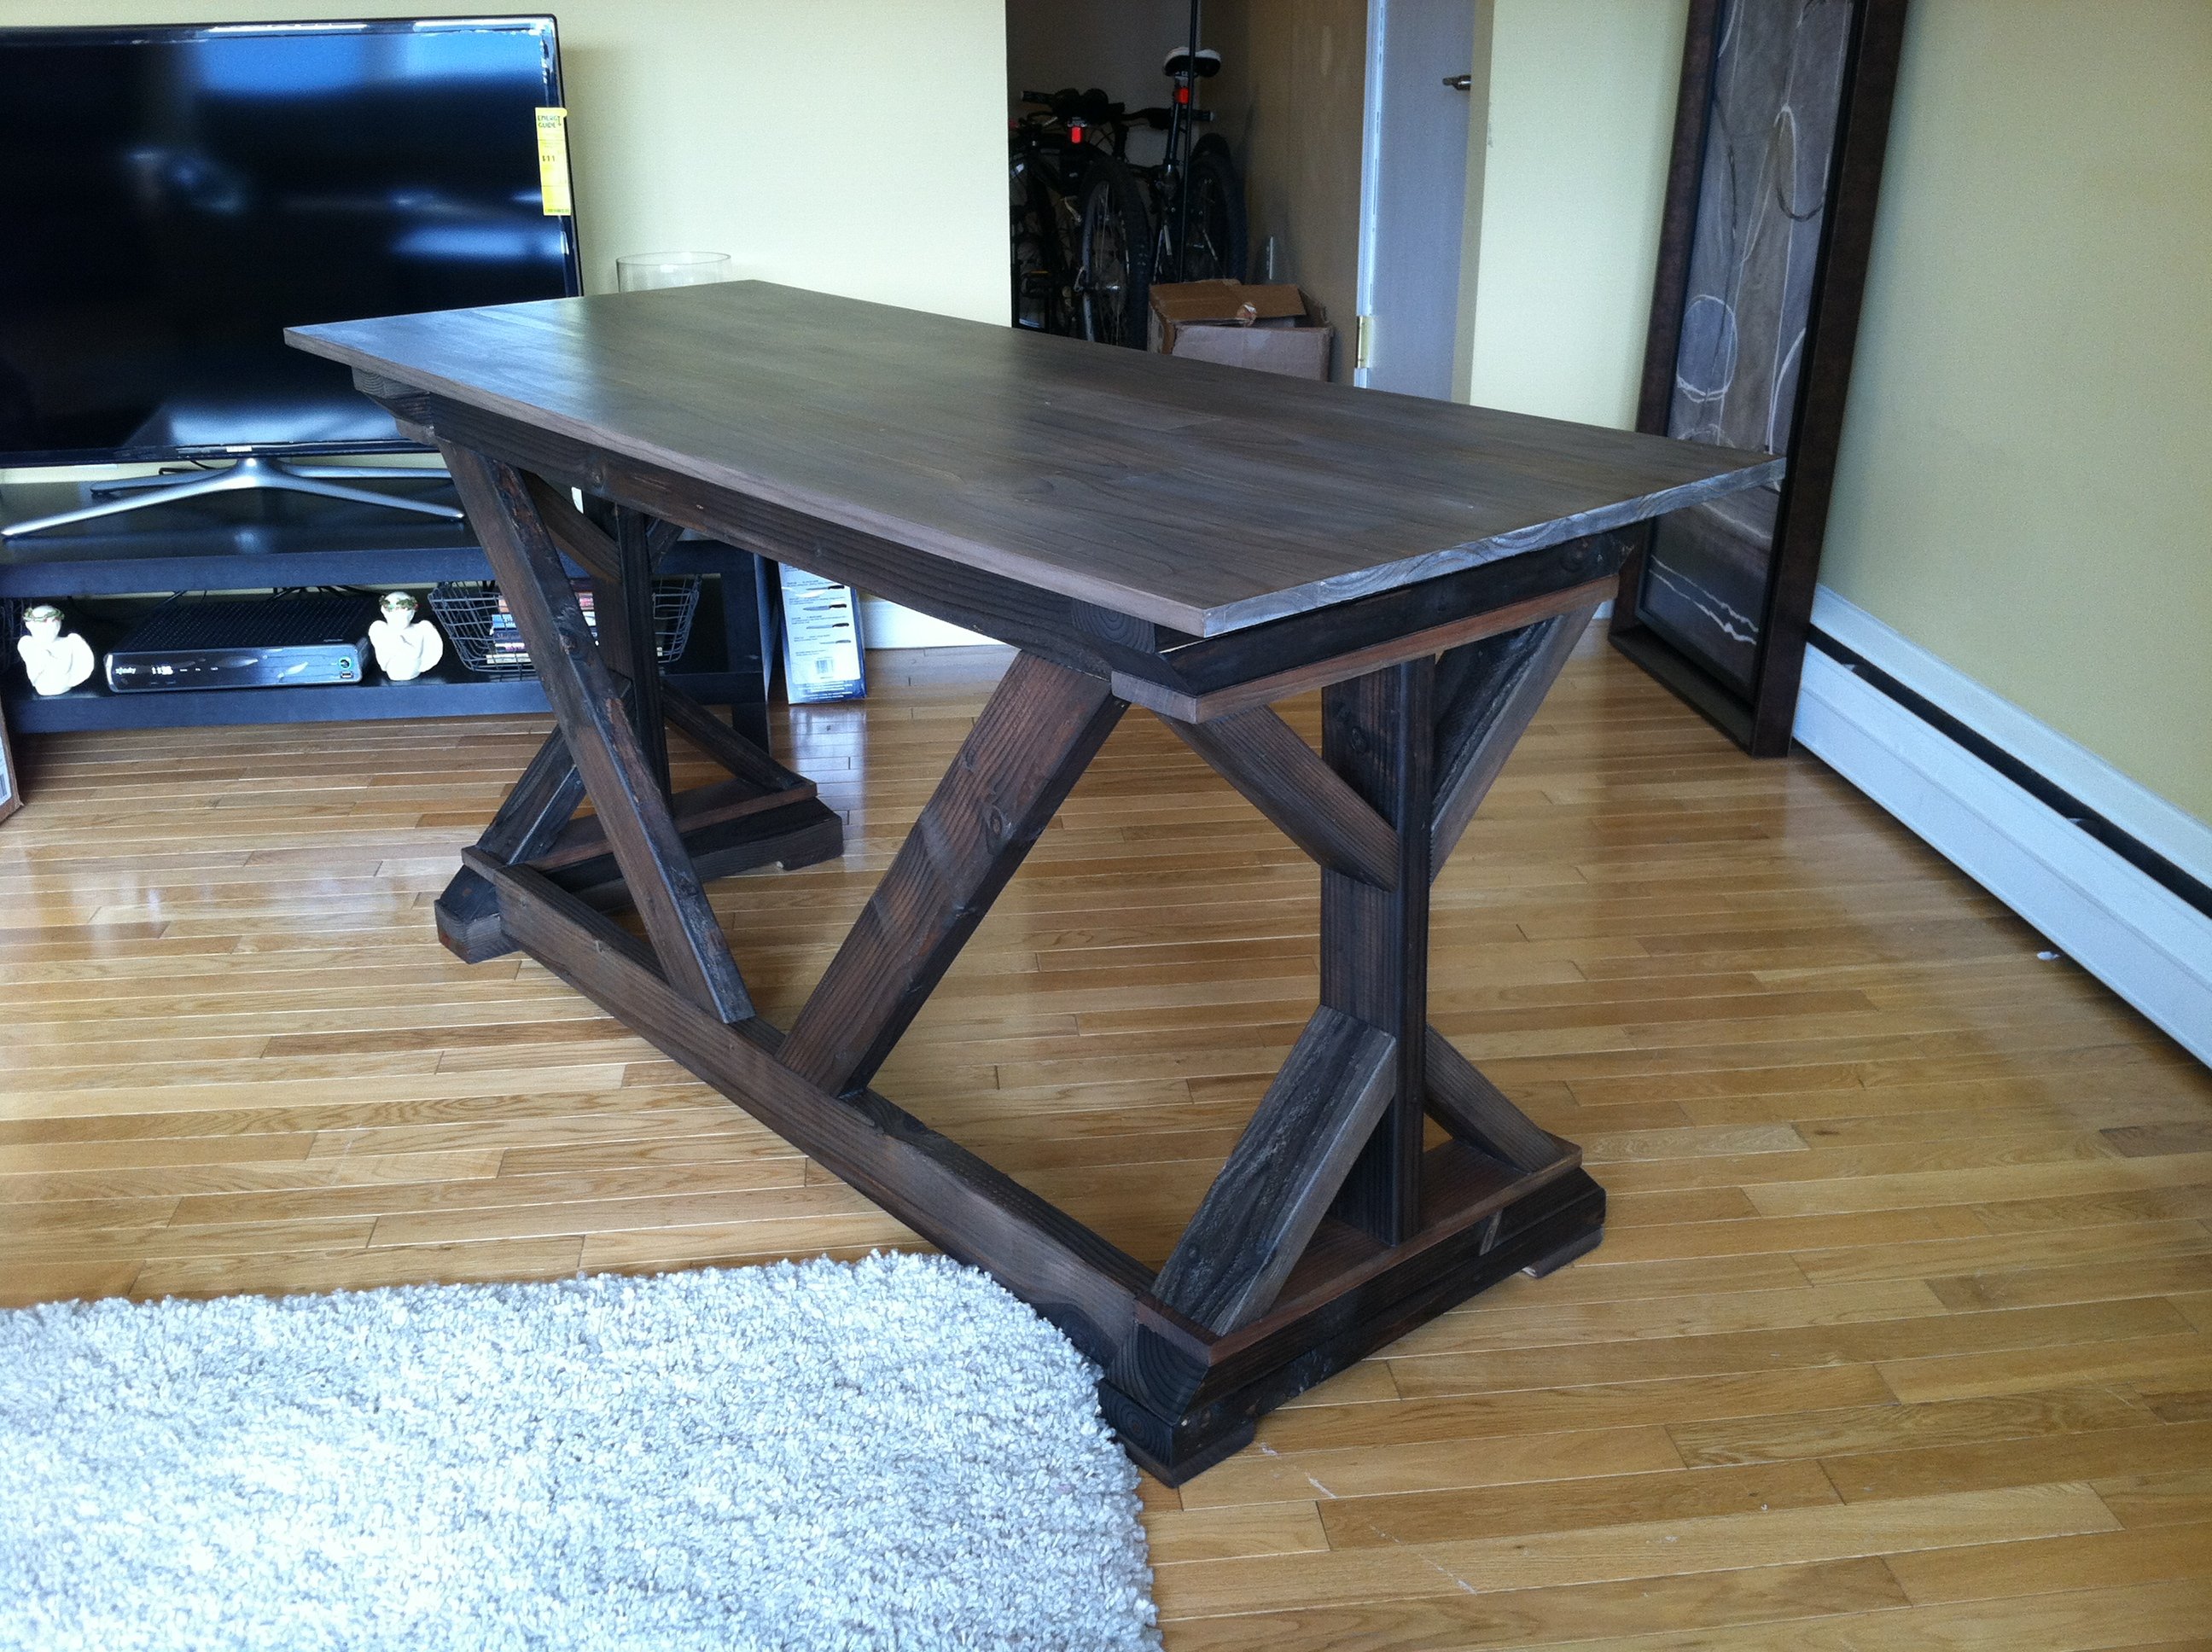
This was my first build. After searching high and low for a desk for my husband for Christmas, I decided to build him one......2 weeks before Christmas. With some help from my father, we somehow pulled it off! (without killing each other) I followed the plans exactly, except for one thing. I used a pine panel for the top so my hubby would have a flat writing surface. I purchased a 6ft panel (i think) and cut it down to 5ft. When he went away on a business trip, I transported it from my parents house (where the build was taking place) and assembled it. Then I put a big red bow on it and surprised him! Don't know how I'm going to top that gift!
Built from Plan(s)
Estimated Time Investment
Weekend Project (10-20 Hours)
Finish Used
Steel wool and vinegar for the whole thing finished with a poly topcoat.
Recommended Skill Level
Beginner
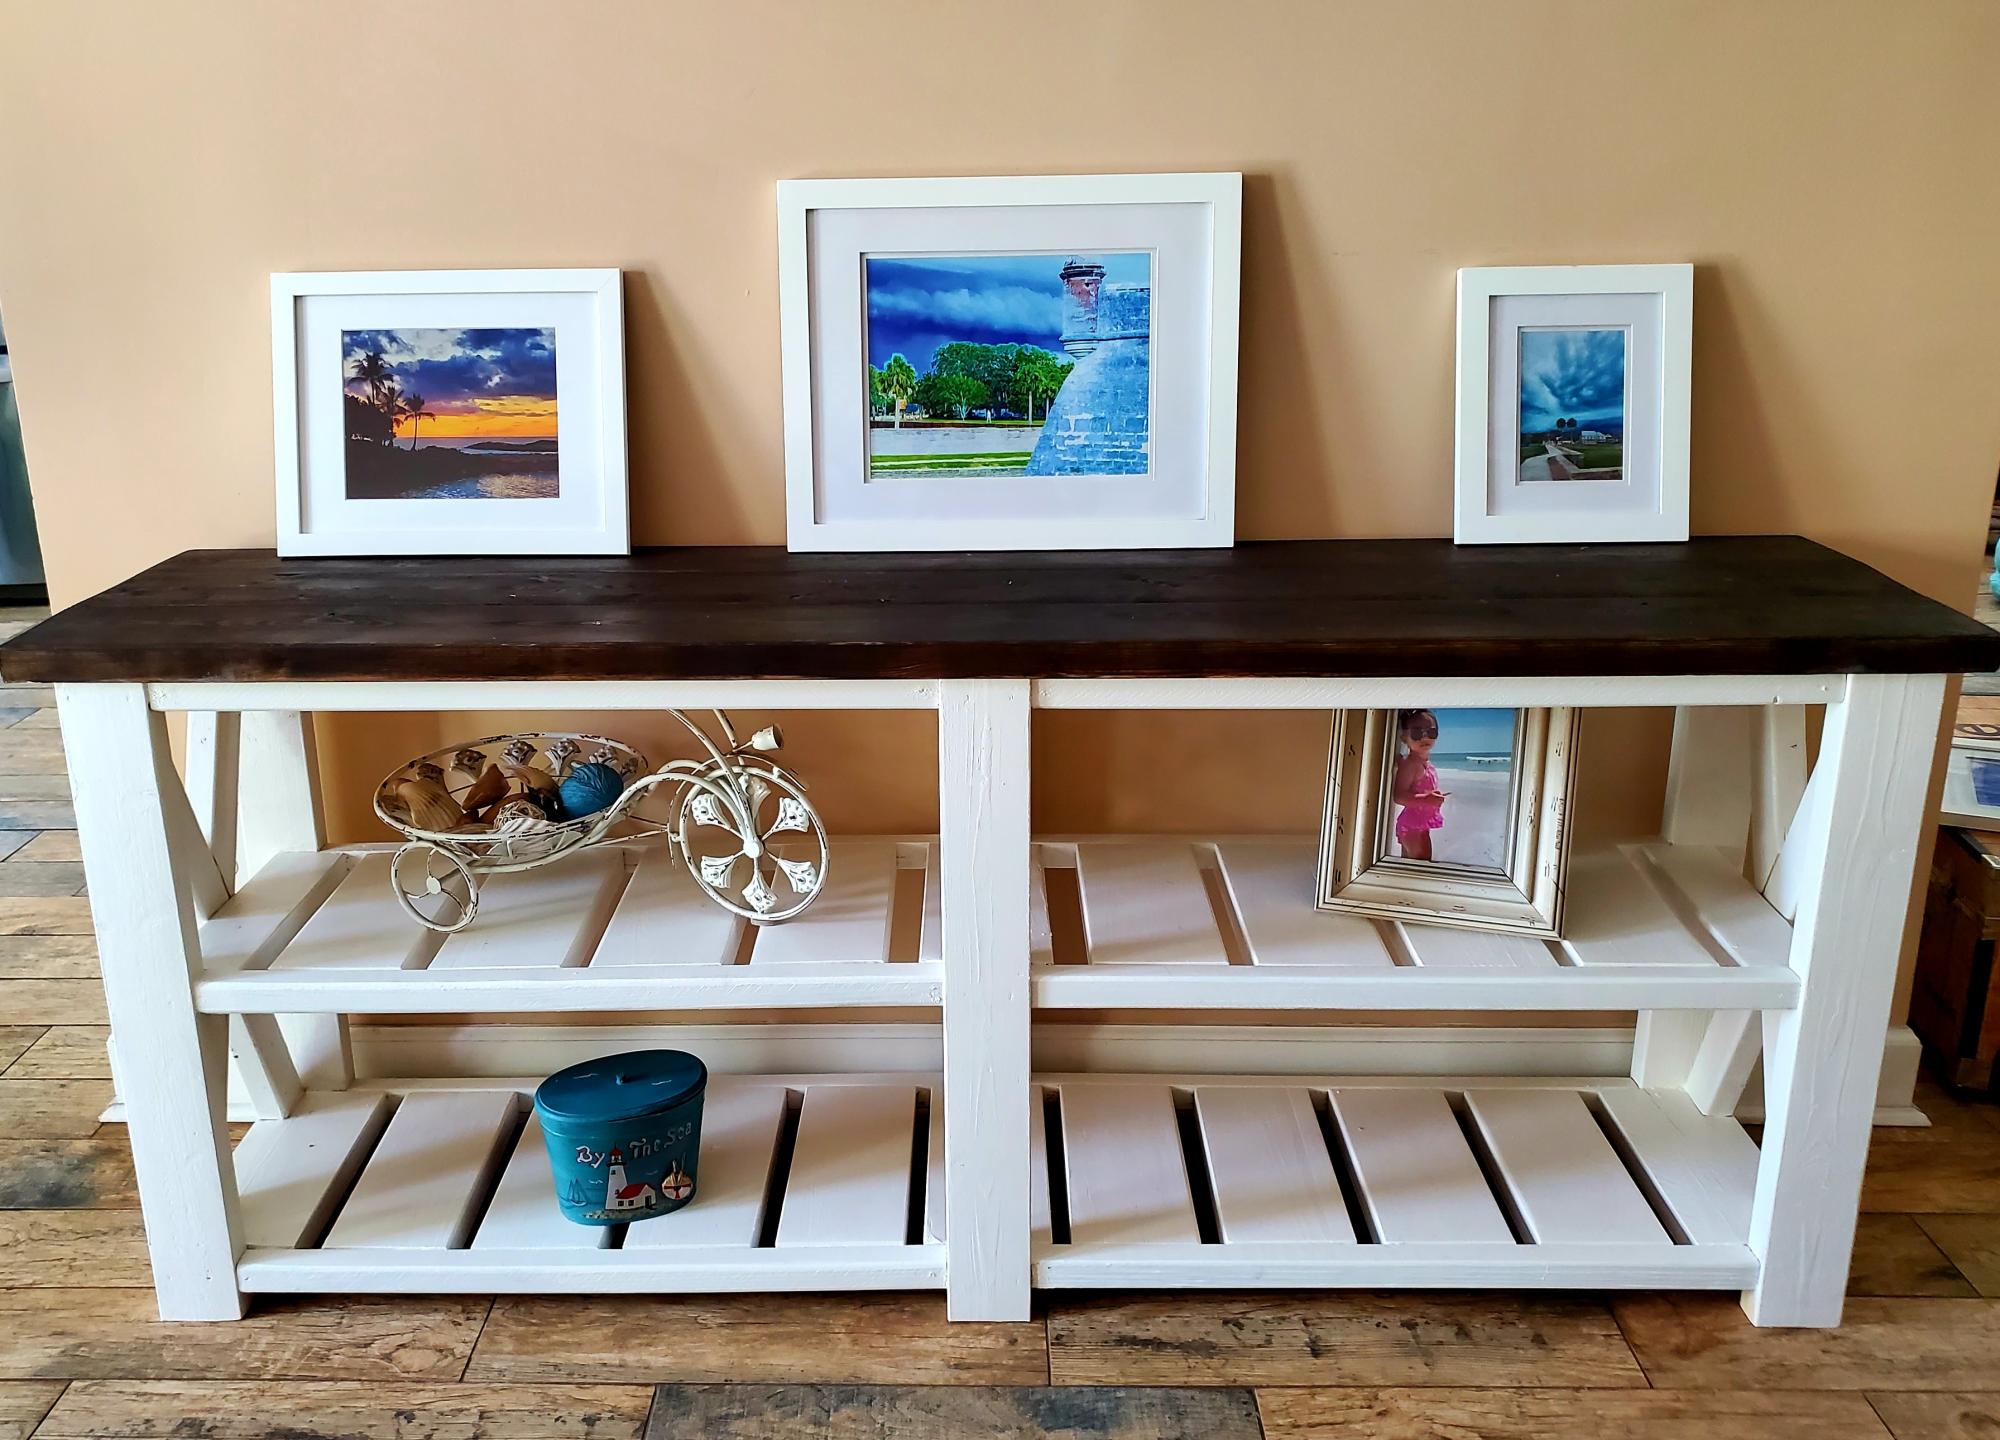
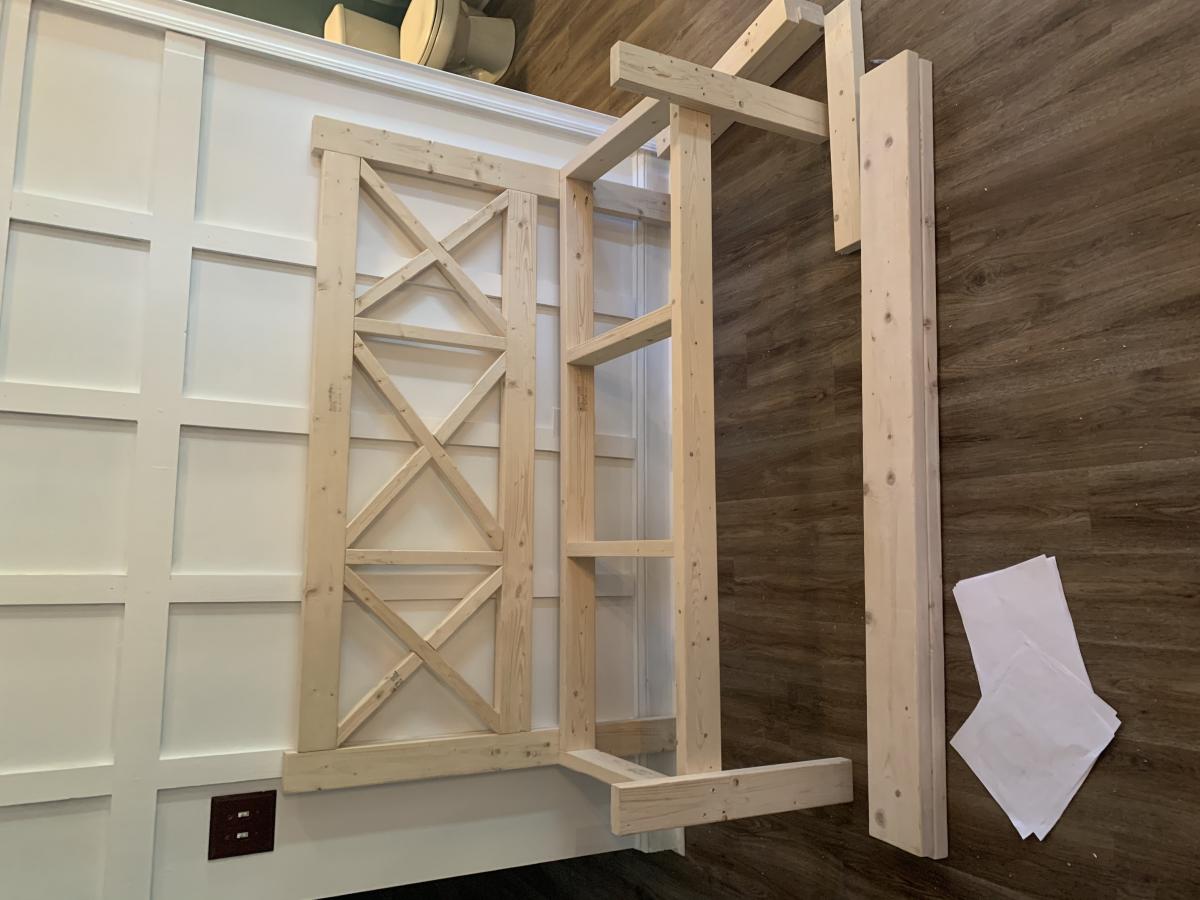
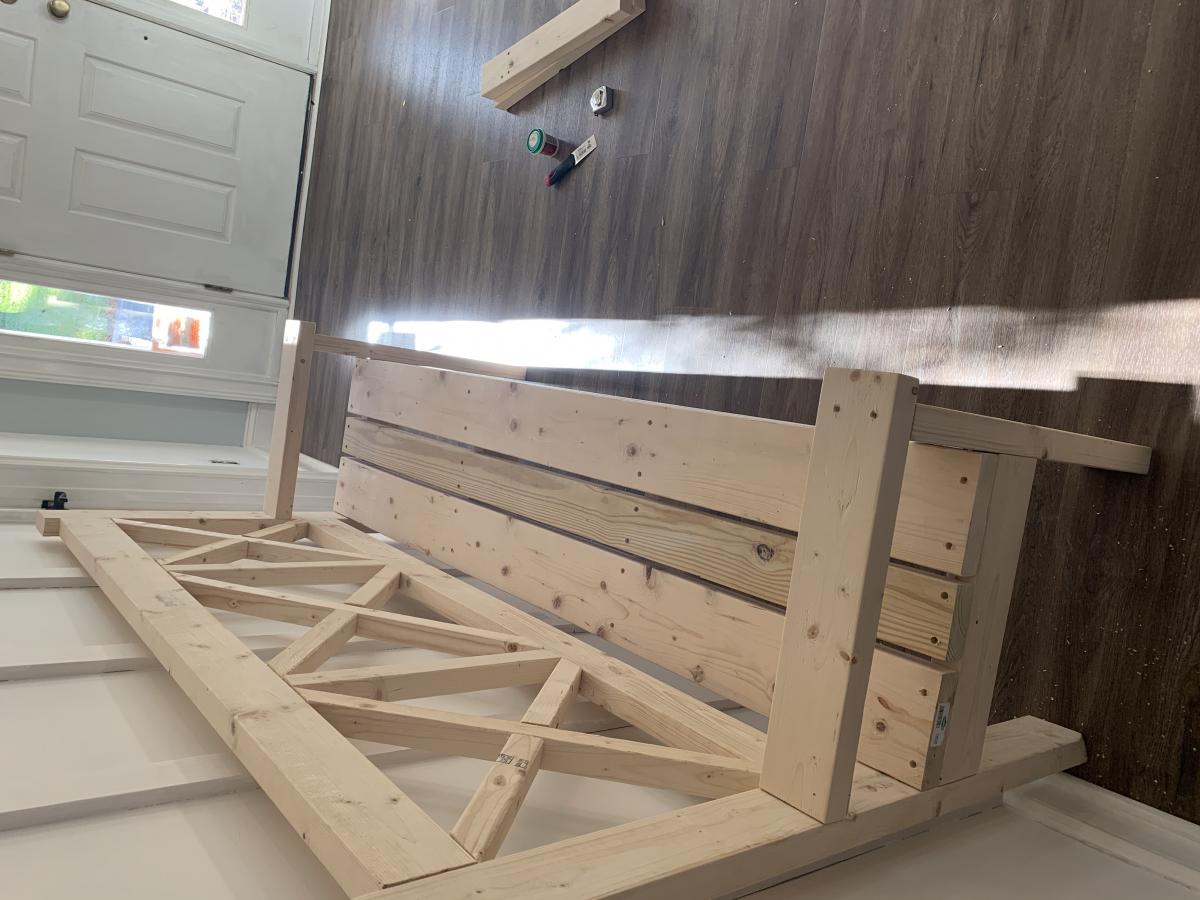
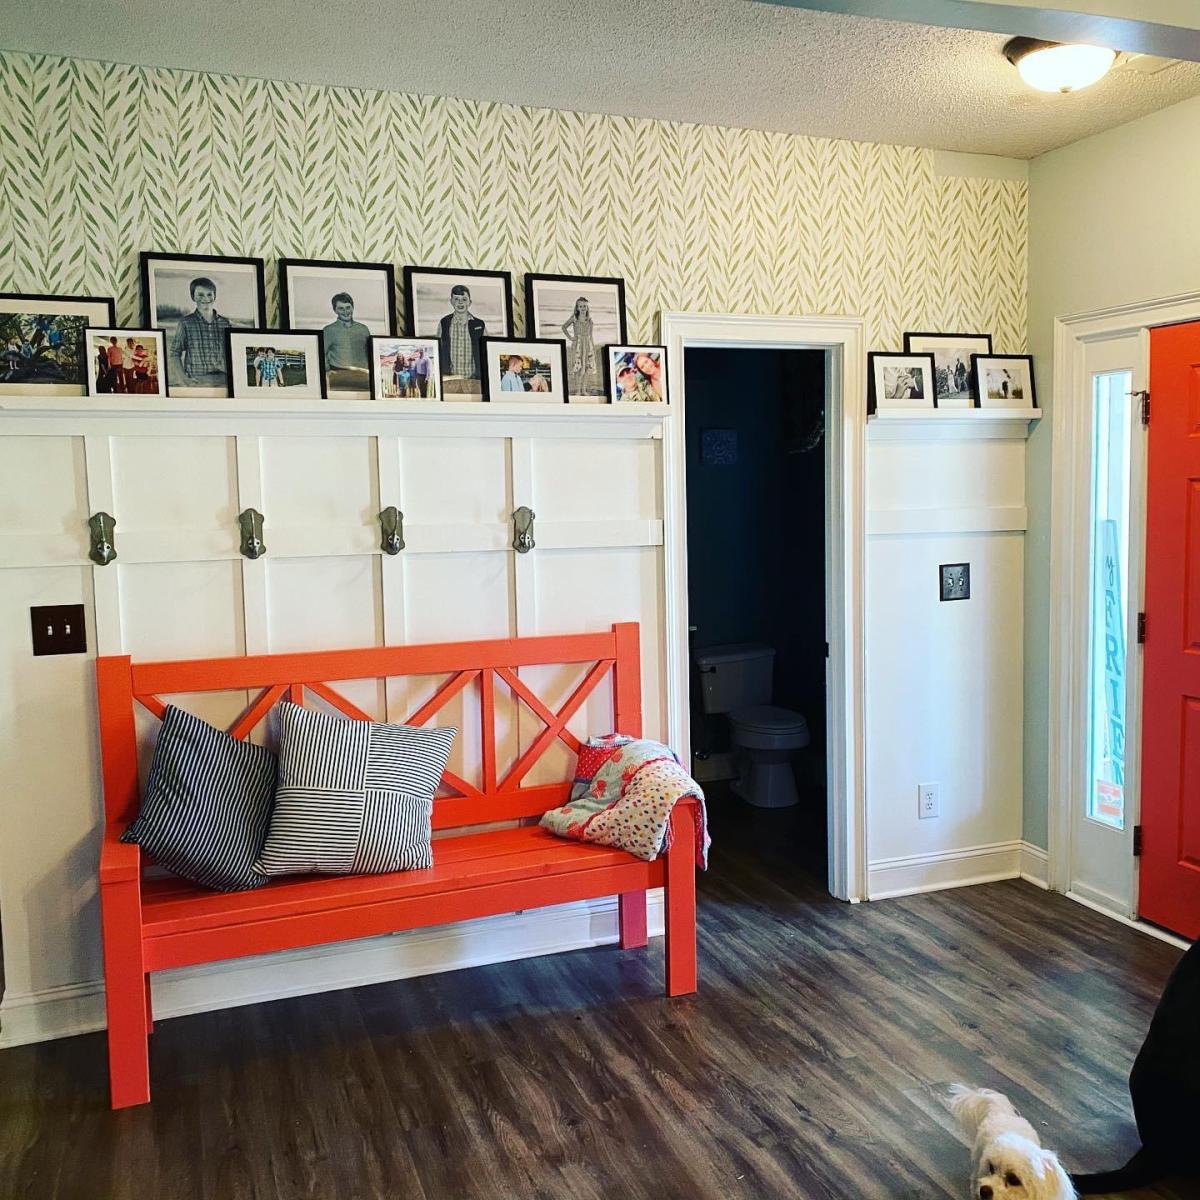
Large Porch Bench with X Backs to highlight feature wall
Using the Ana White plans of Large porch Bench with X backs I was able to create this amazing area in the entrance way of our home. The bench was part of a larger project where I added the modeling and shelves to the wall. The plans were great, I just made the bench a bit smaller, as the original size was a bit overwhelming inside the home.
Built from Plan(s)
Estimated Time Investment
Weekend Project (10-20 Hours)
Recommended Skill Level
Intermediate
Comments
Tue, 11/10/2020 - 09:06
Love the smaller size for indoors
And the red pop, love it! It looks great against that wall:)
Outdoor Sectional
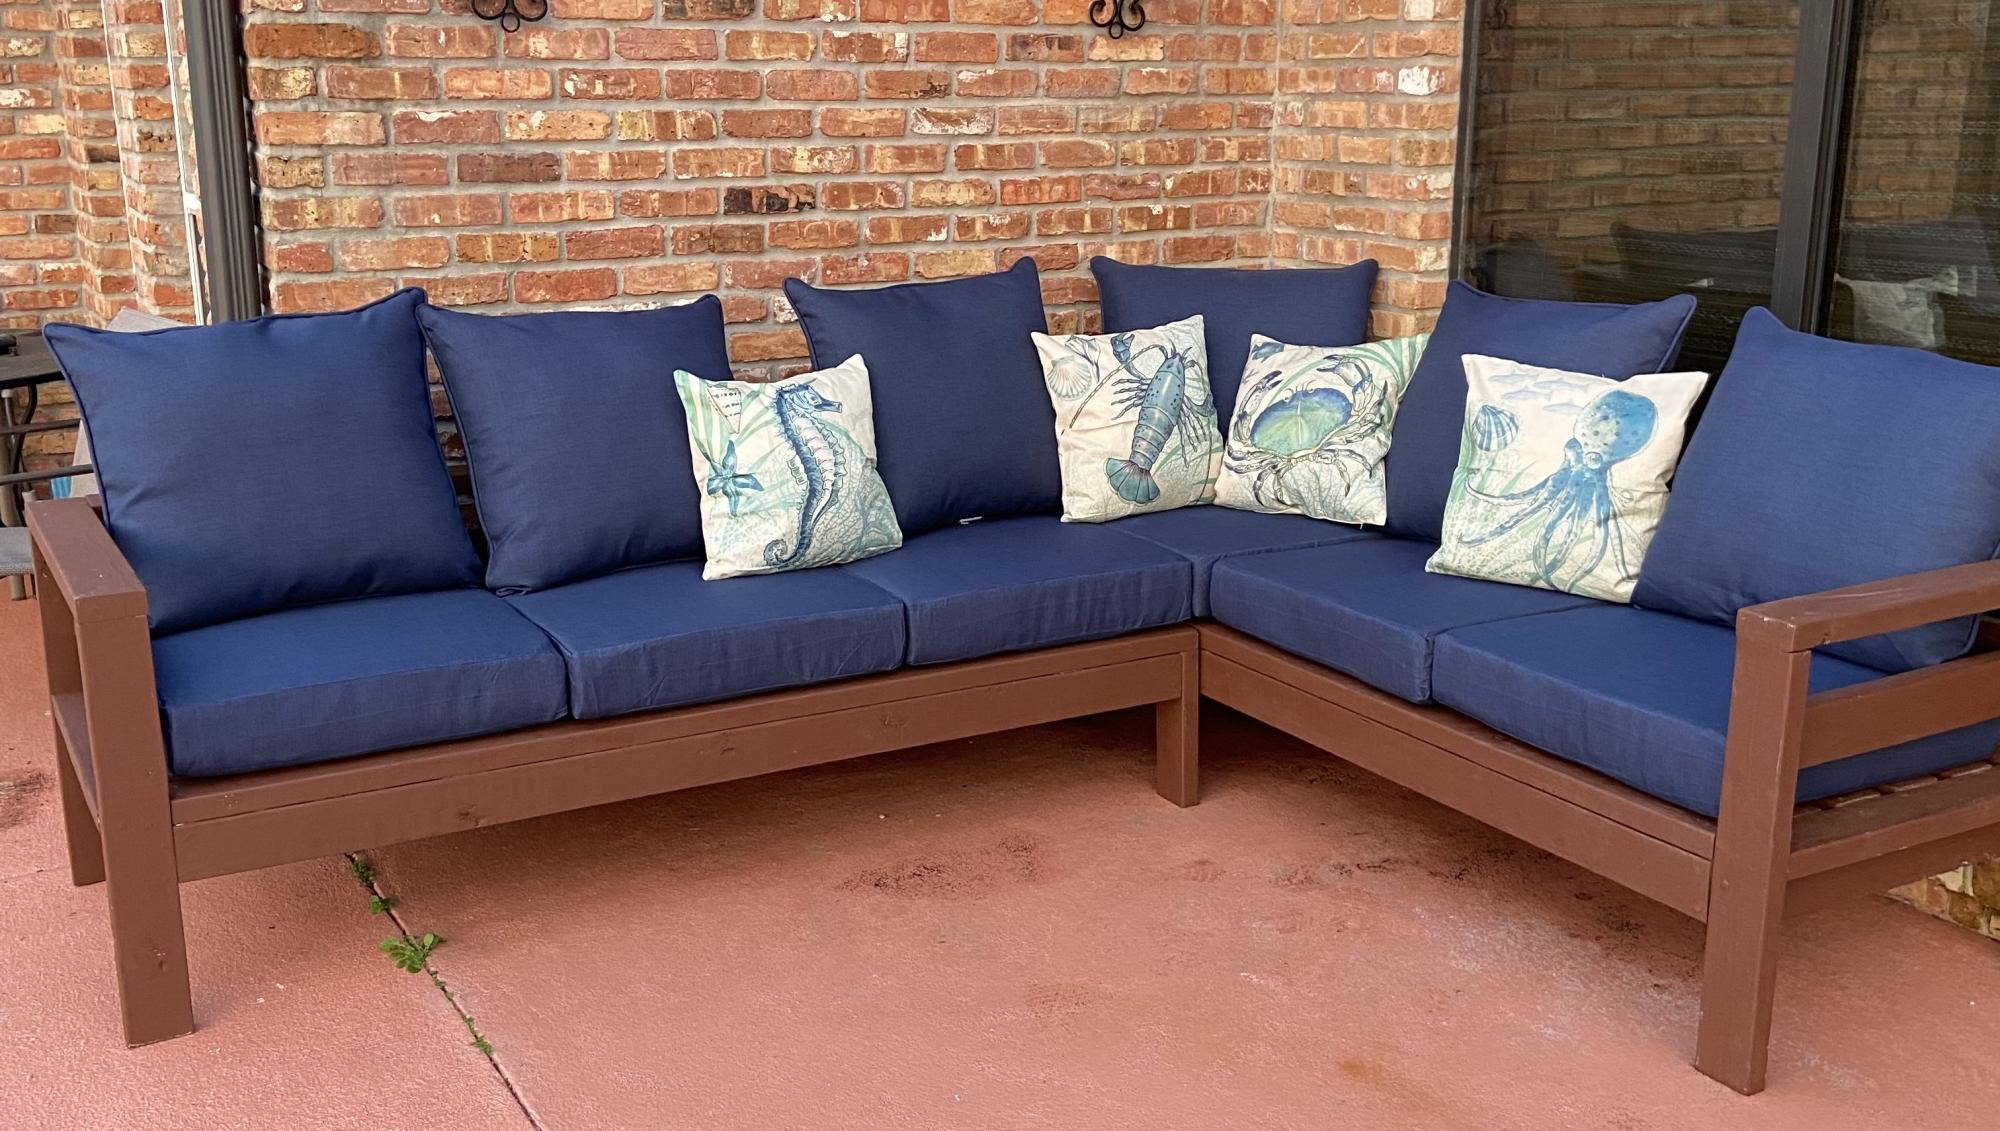
Thanks Ana White, love the way my sectional turned out. Your plans are perfect for someone want to start building things around their house. You are an inspiration to women like me!!!❤️
Built from Plan(s)
Estimated Cost
$150
Estimated Time Investment
Weekend Project (10-20 Hours)
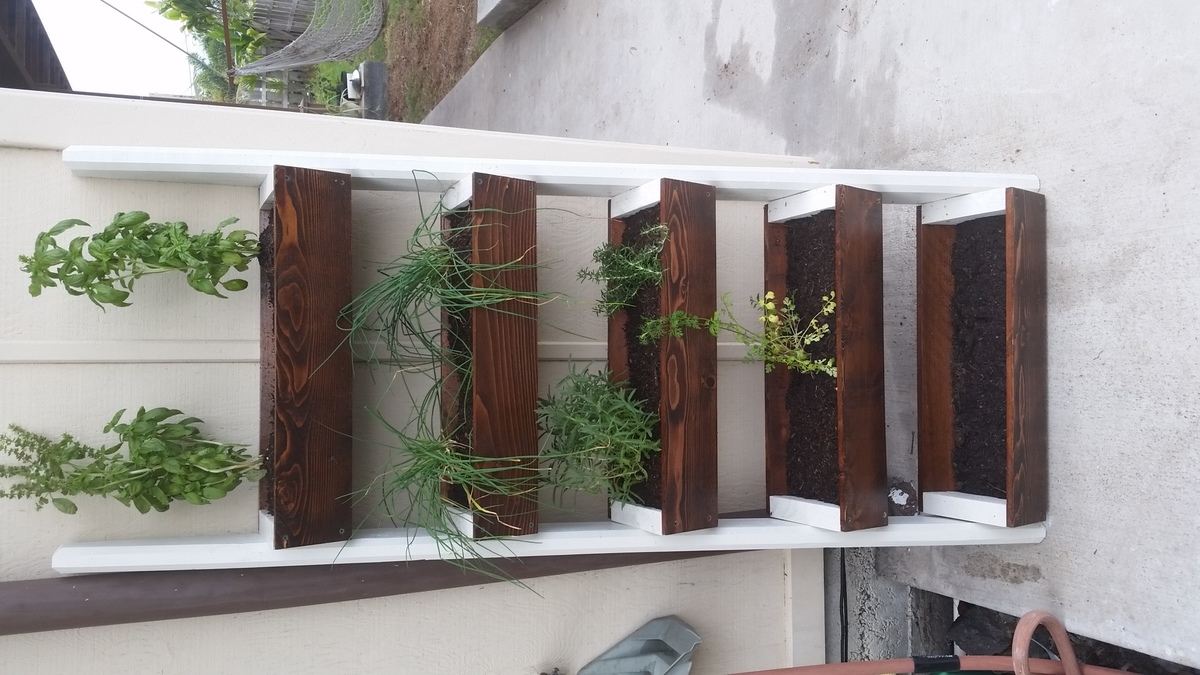
Cedar Vertical Tiered Garden
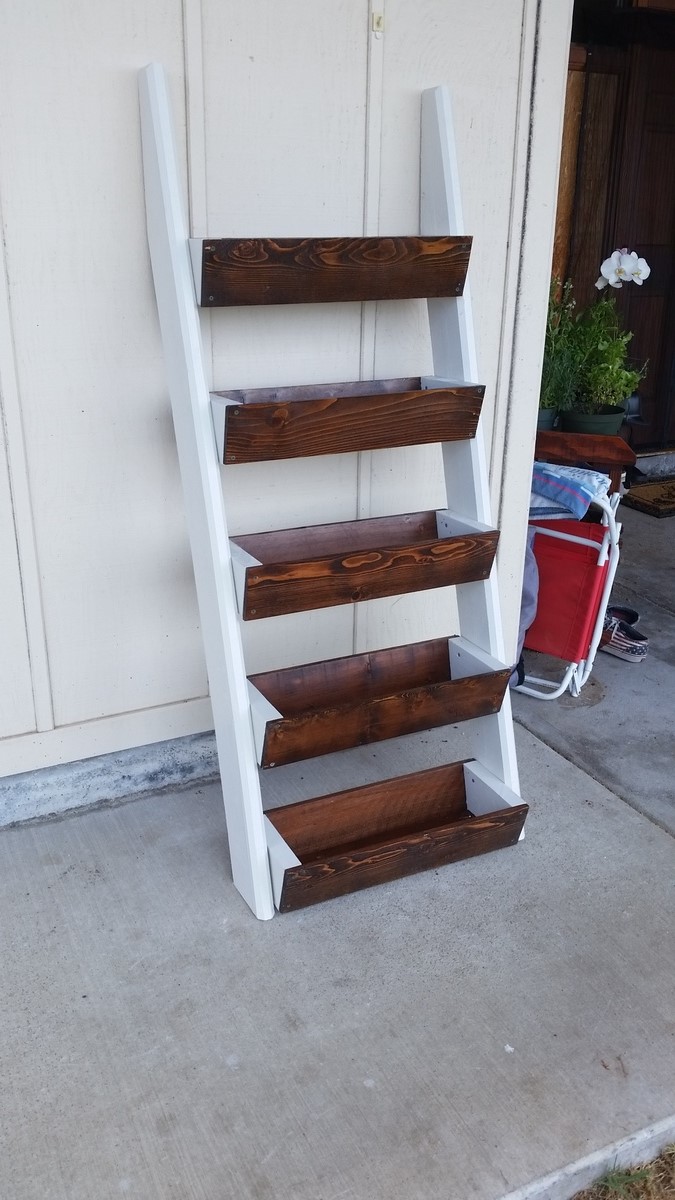
Starting a new garden in a new yard but with limited space this vertical planter was a must.
5 boxes Tiered up 2x6 legs. Changes to the plans Ana White provided include :I added mitered edges to the fronts and backs of each individual box to match the over angle of the legs, slimmed down the box sides to tidy up the look, routed the edges of the legs to sharpen it up and painted and stained/finished to bring the whole project together.
Built from Plan(s)
Estimated Cost
$75.00
Estimated Time Investment
Weekend Project (10-20 Hours)
Finish Used
White Paint, honey stain, semi gloss polyurethane
Recommended Skill Level
Intermediate
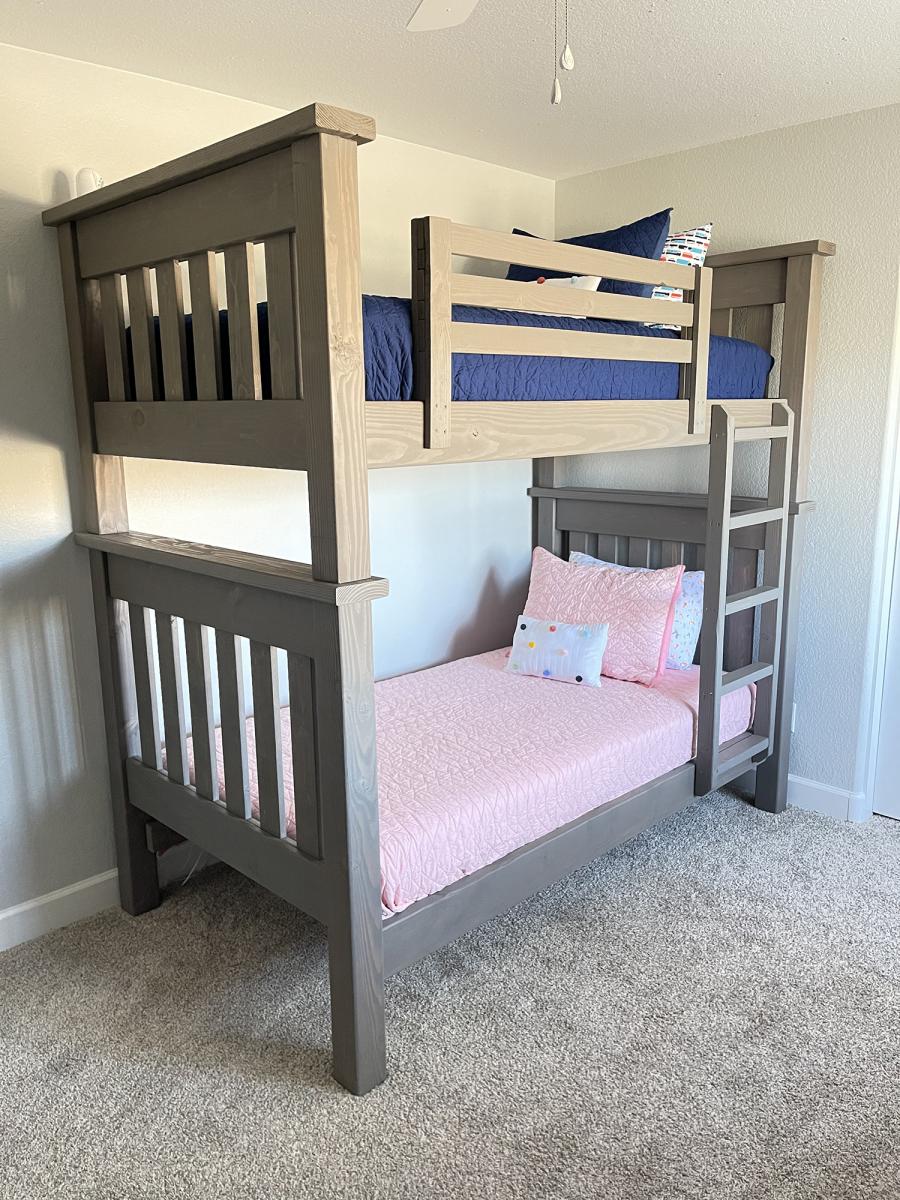
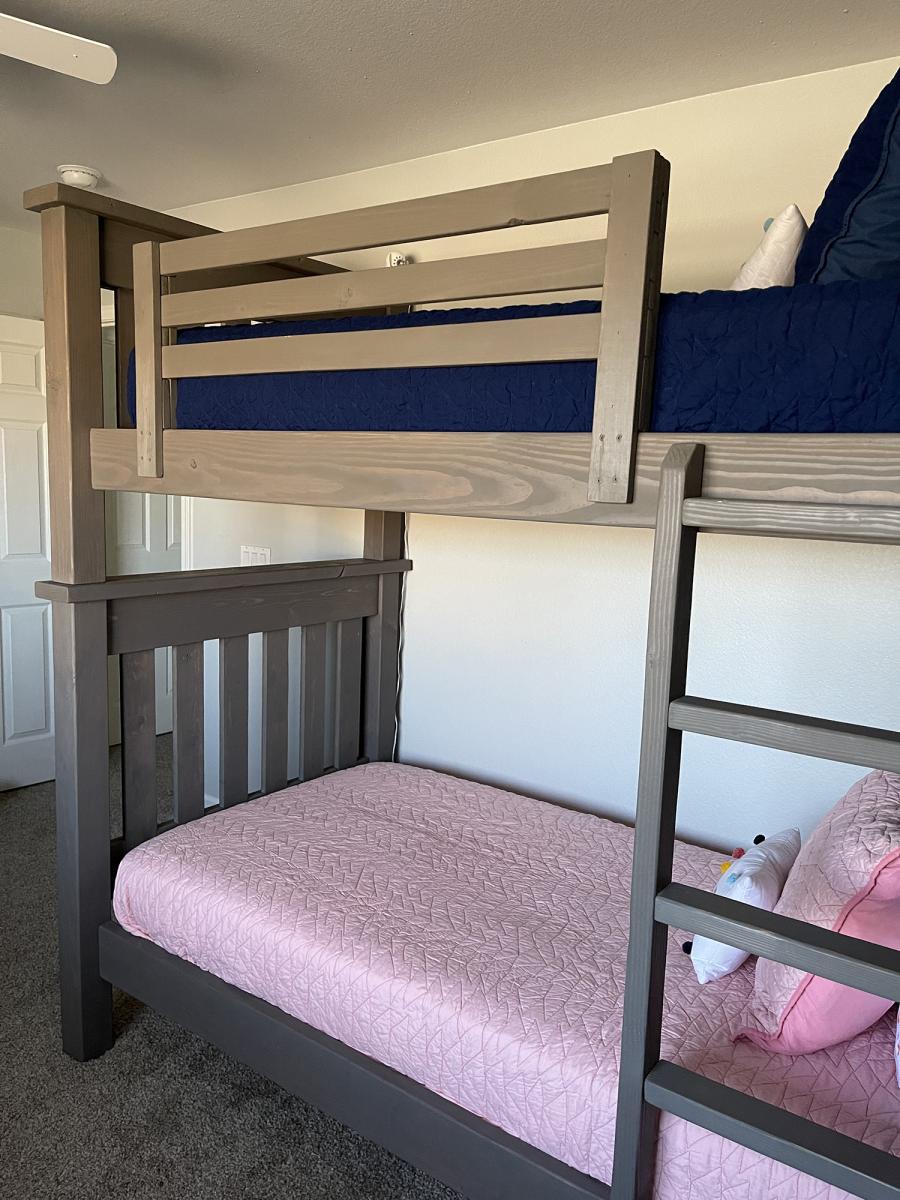
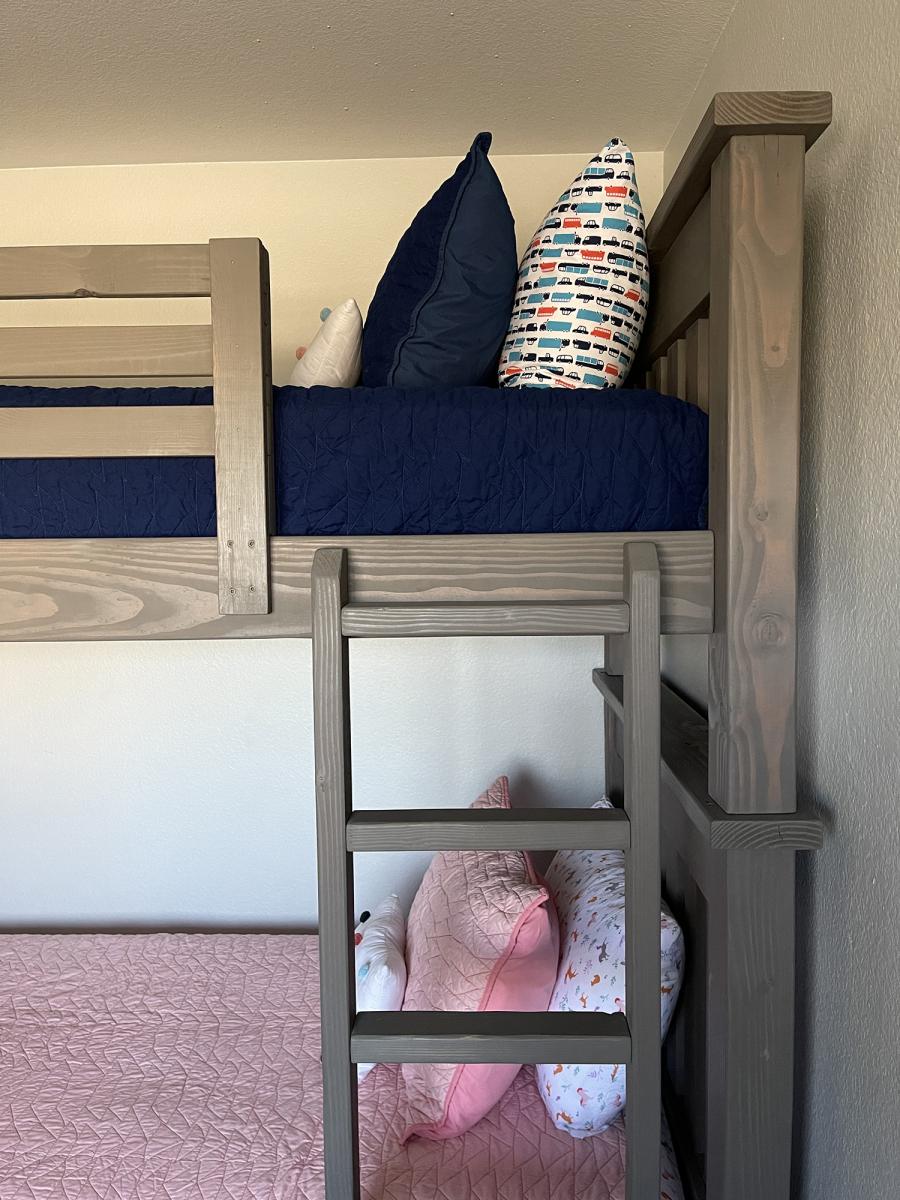
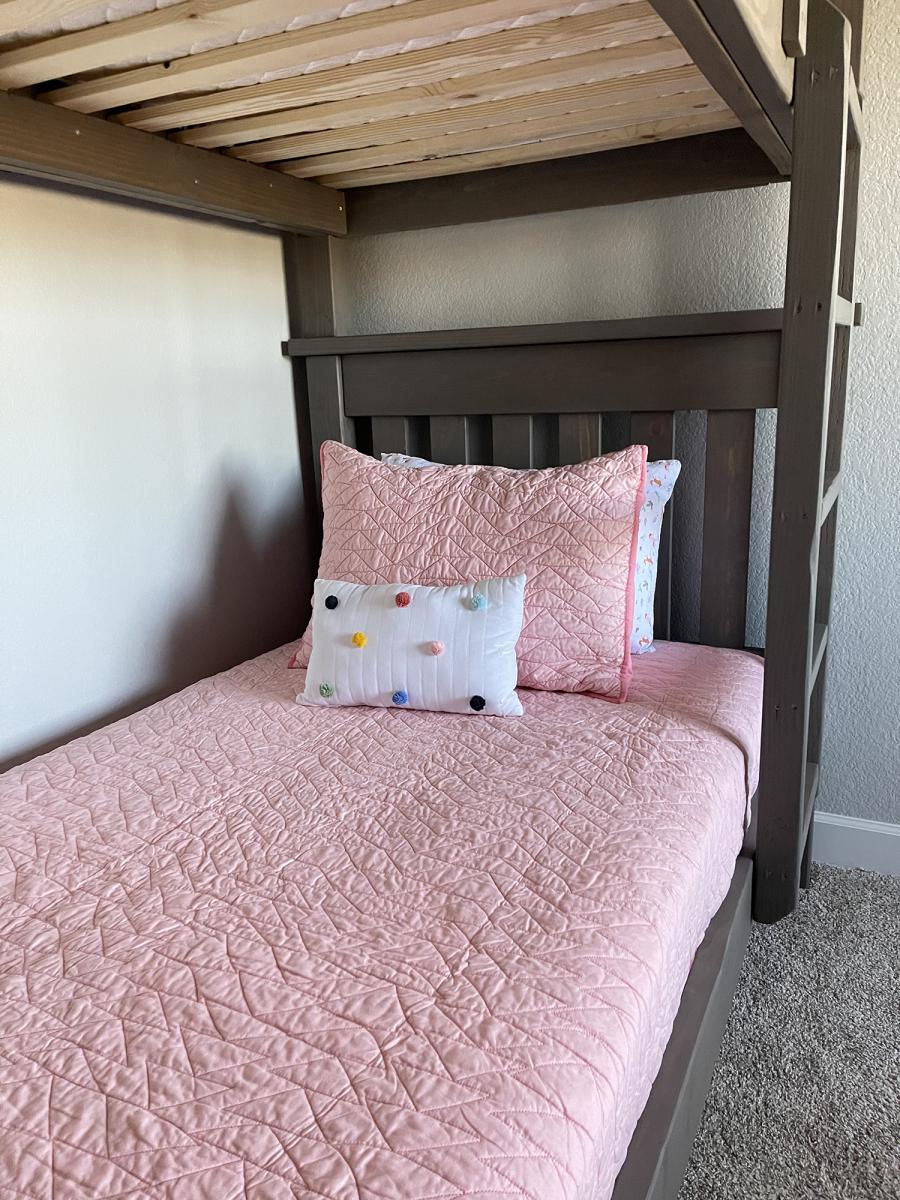
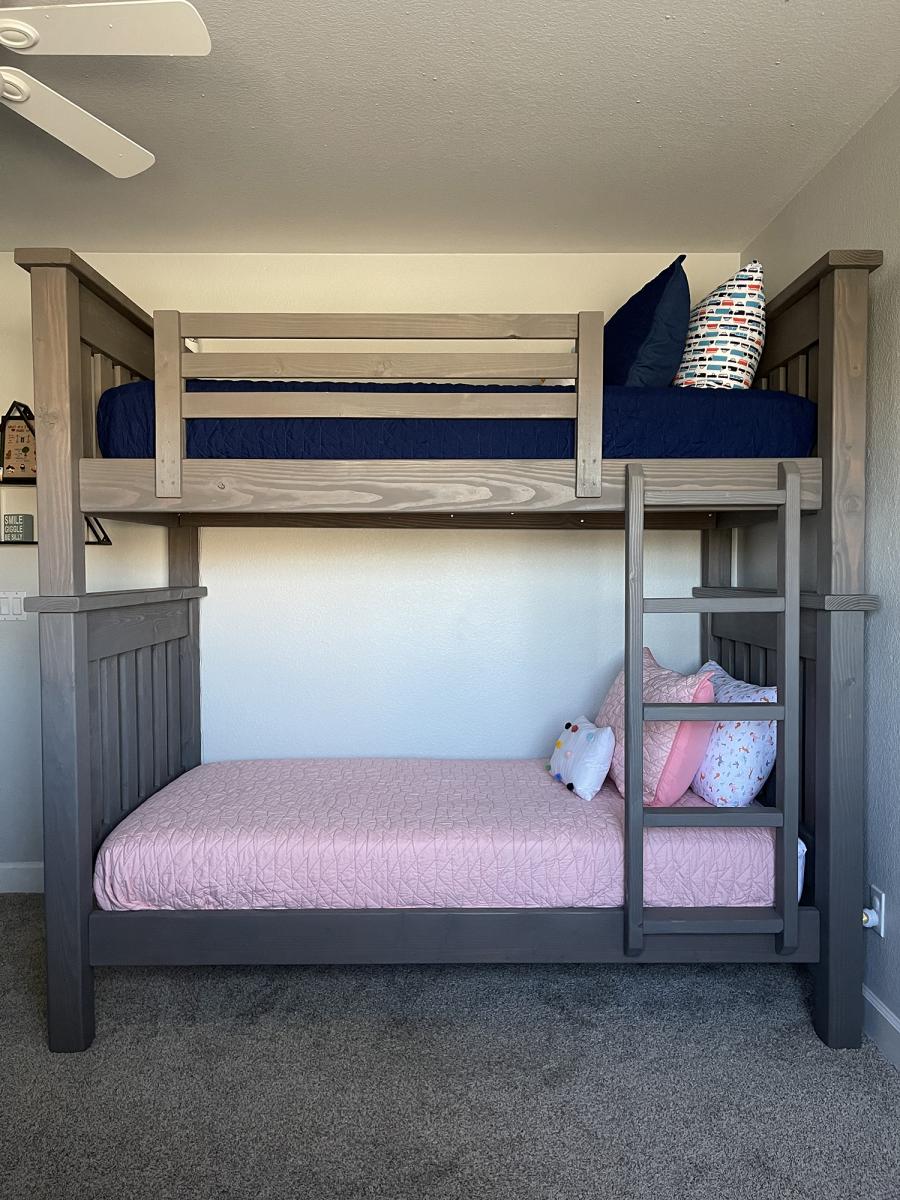
Simple Bunk Bed
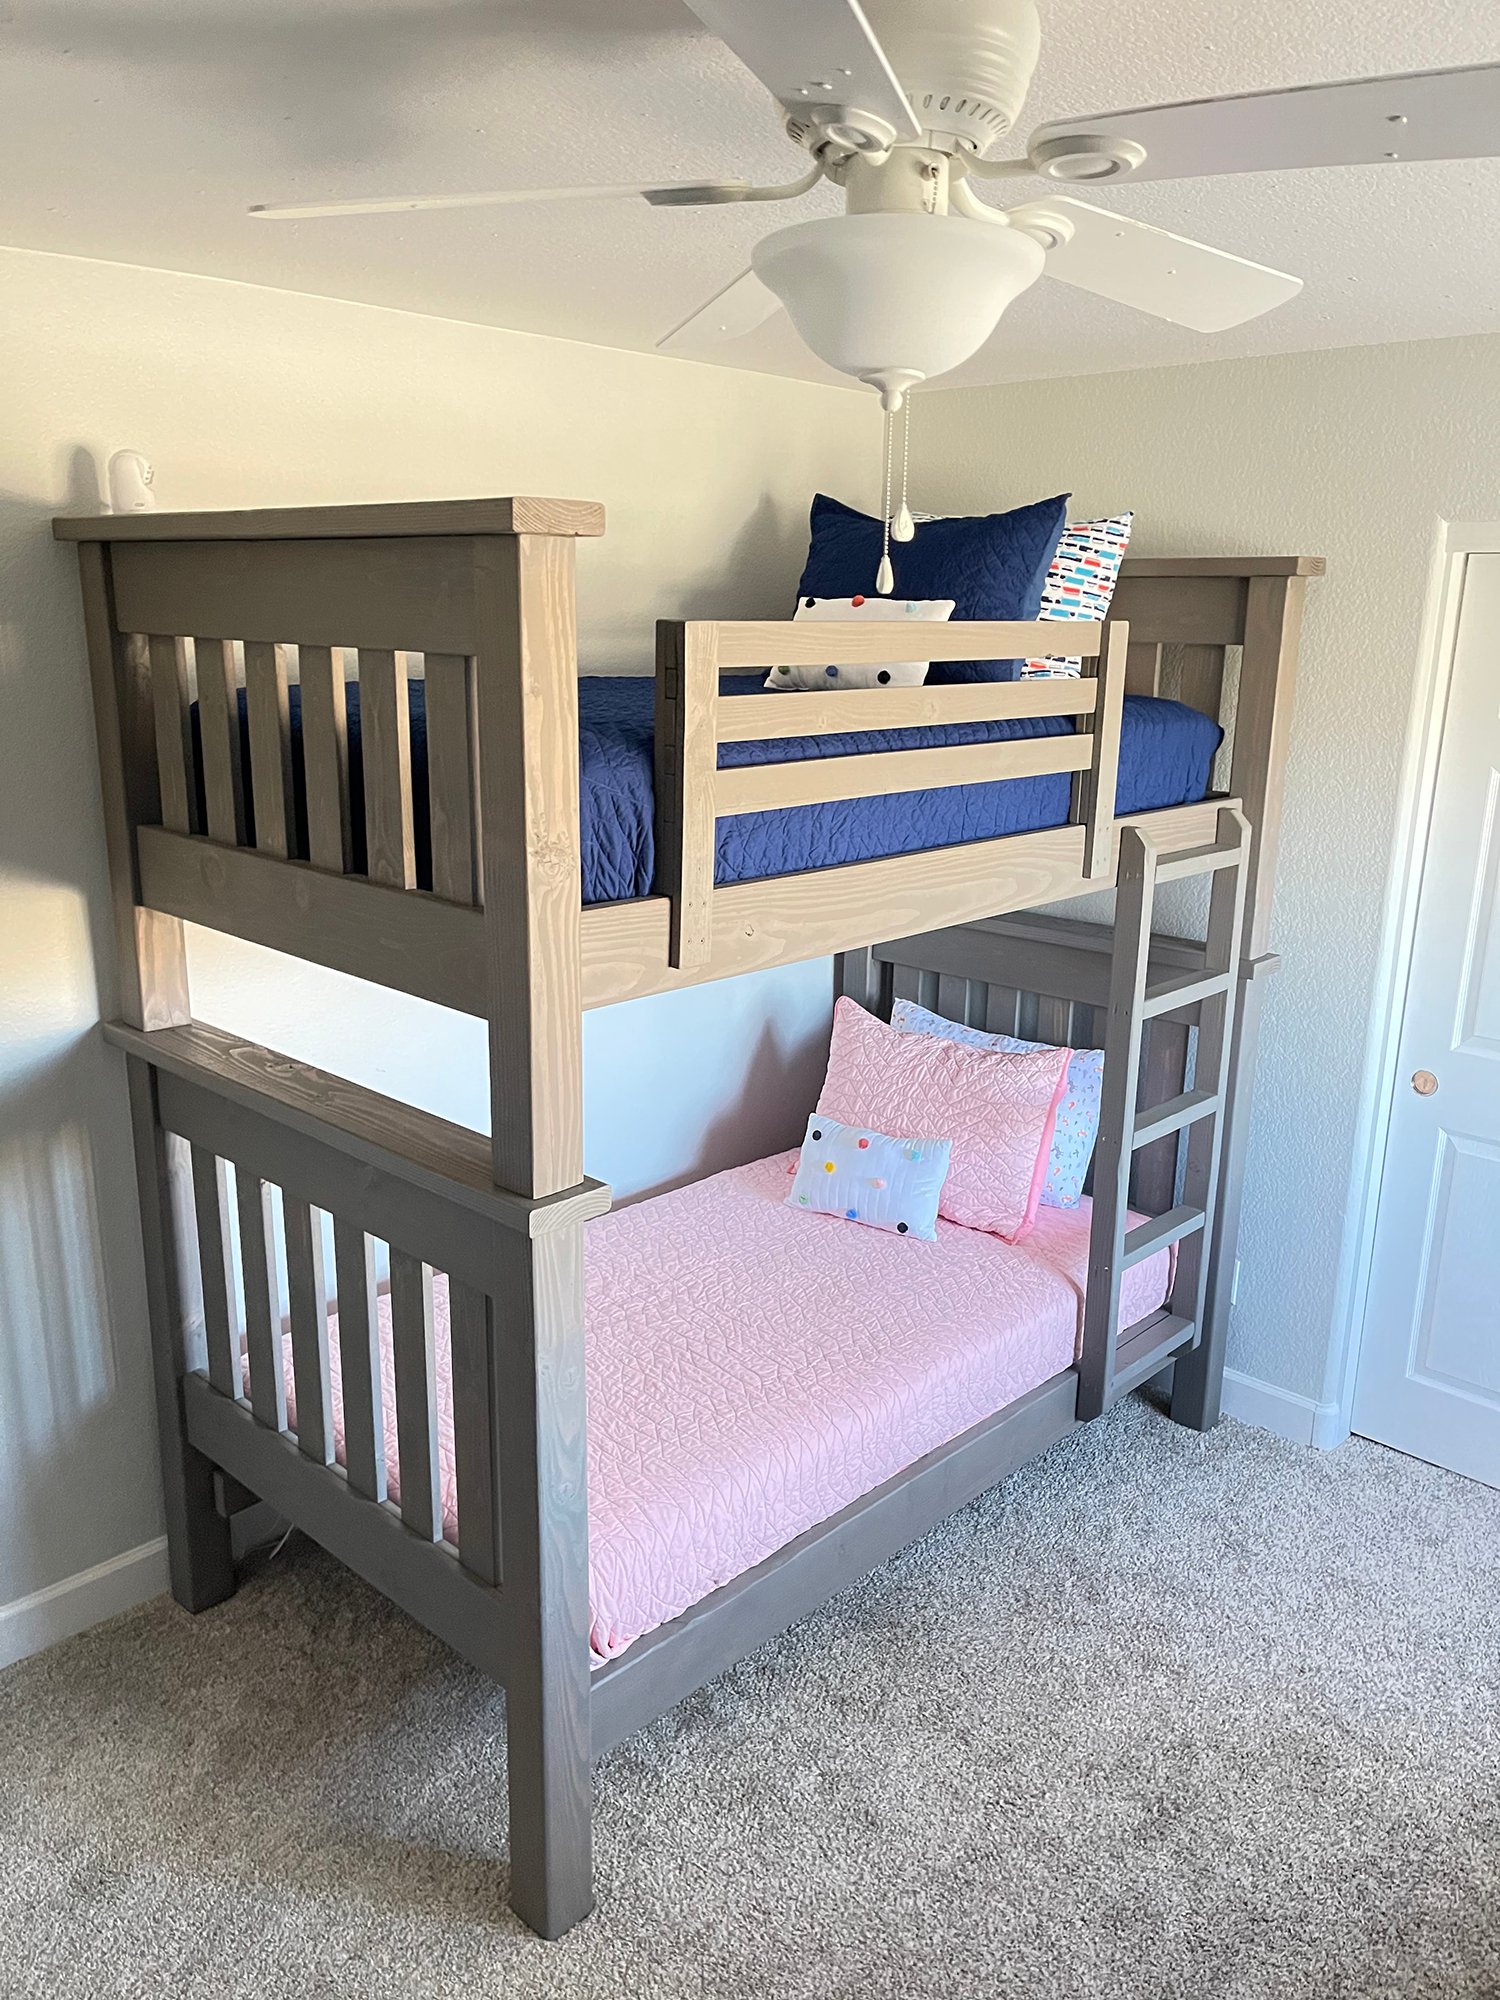
I searched high and low for the perfect bunk beds to buy for my four-year-old son and two-year-old daughter when our third child was on the way. We wanted something that had enough clearance between the top and bottom bunks so my husband and I could comfortably sit on the bottom bunk with our kids to read books before bed and it was nearly impossible to find a pre-made bed that fit that requirement in our price range. I was excited to find this plan because it looked like the perfect fit and we could modify it to meet our needs.
I built and stained most of the parts of the bed (while six months pregnant :P) and my husband did the final assembly. It took us about two weeks from start to finish since we could really only work during naptime and bedtime. We stained them with Behr water-based stain in Classic Gray. I love the way they turned out and they are super solid and heavy. My kids love them too.
Built from Plan(s)
Estimated Cost
$500
Estimated Time Investment
Week Long Project (20 Hours or More)
Finish Used
Behr water-based stain in Classic Gray
Recommended Skill Level
Beginner
Comments
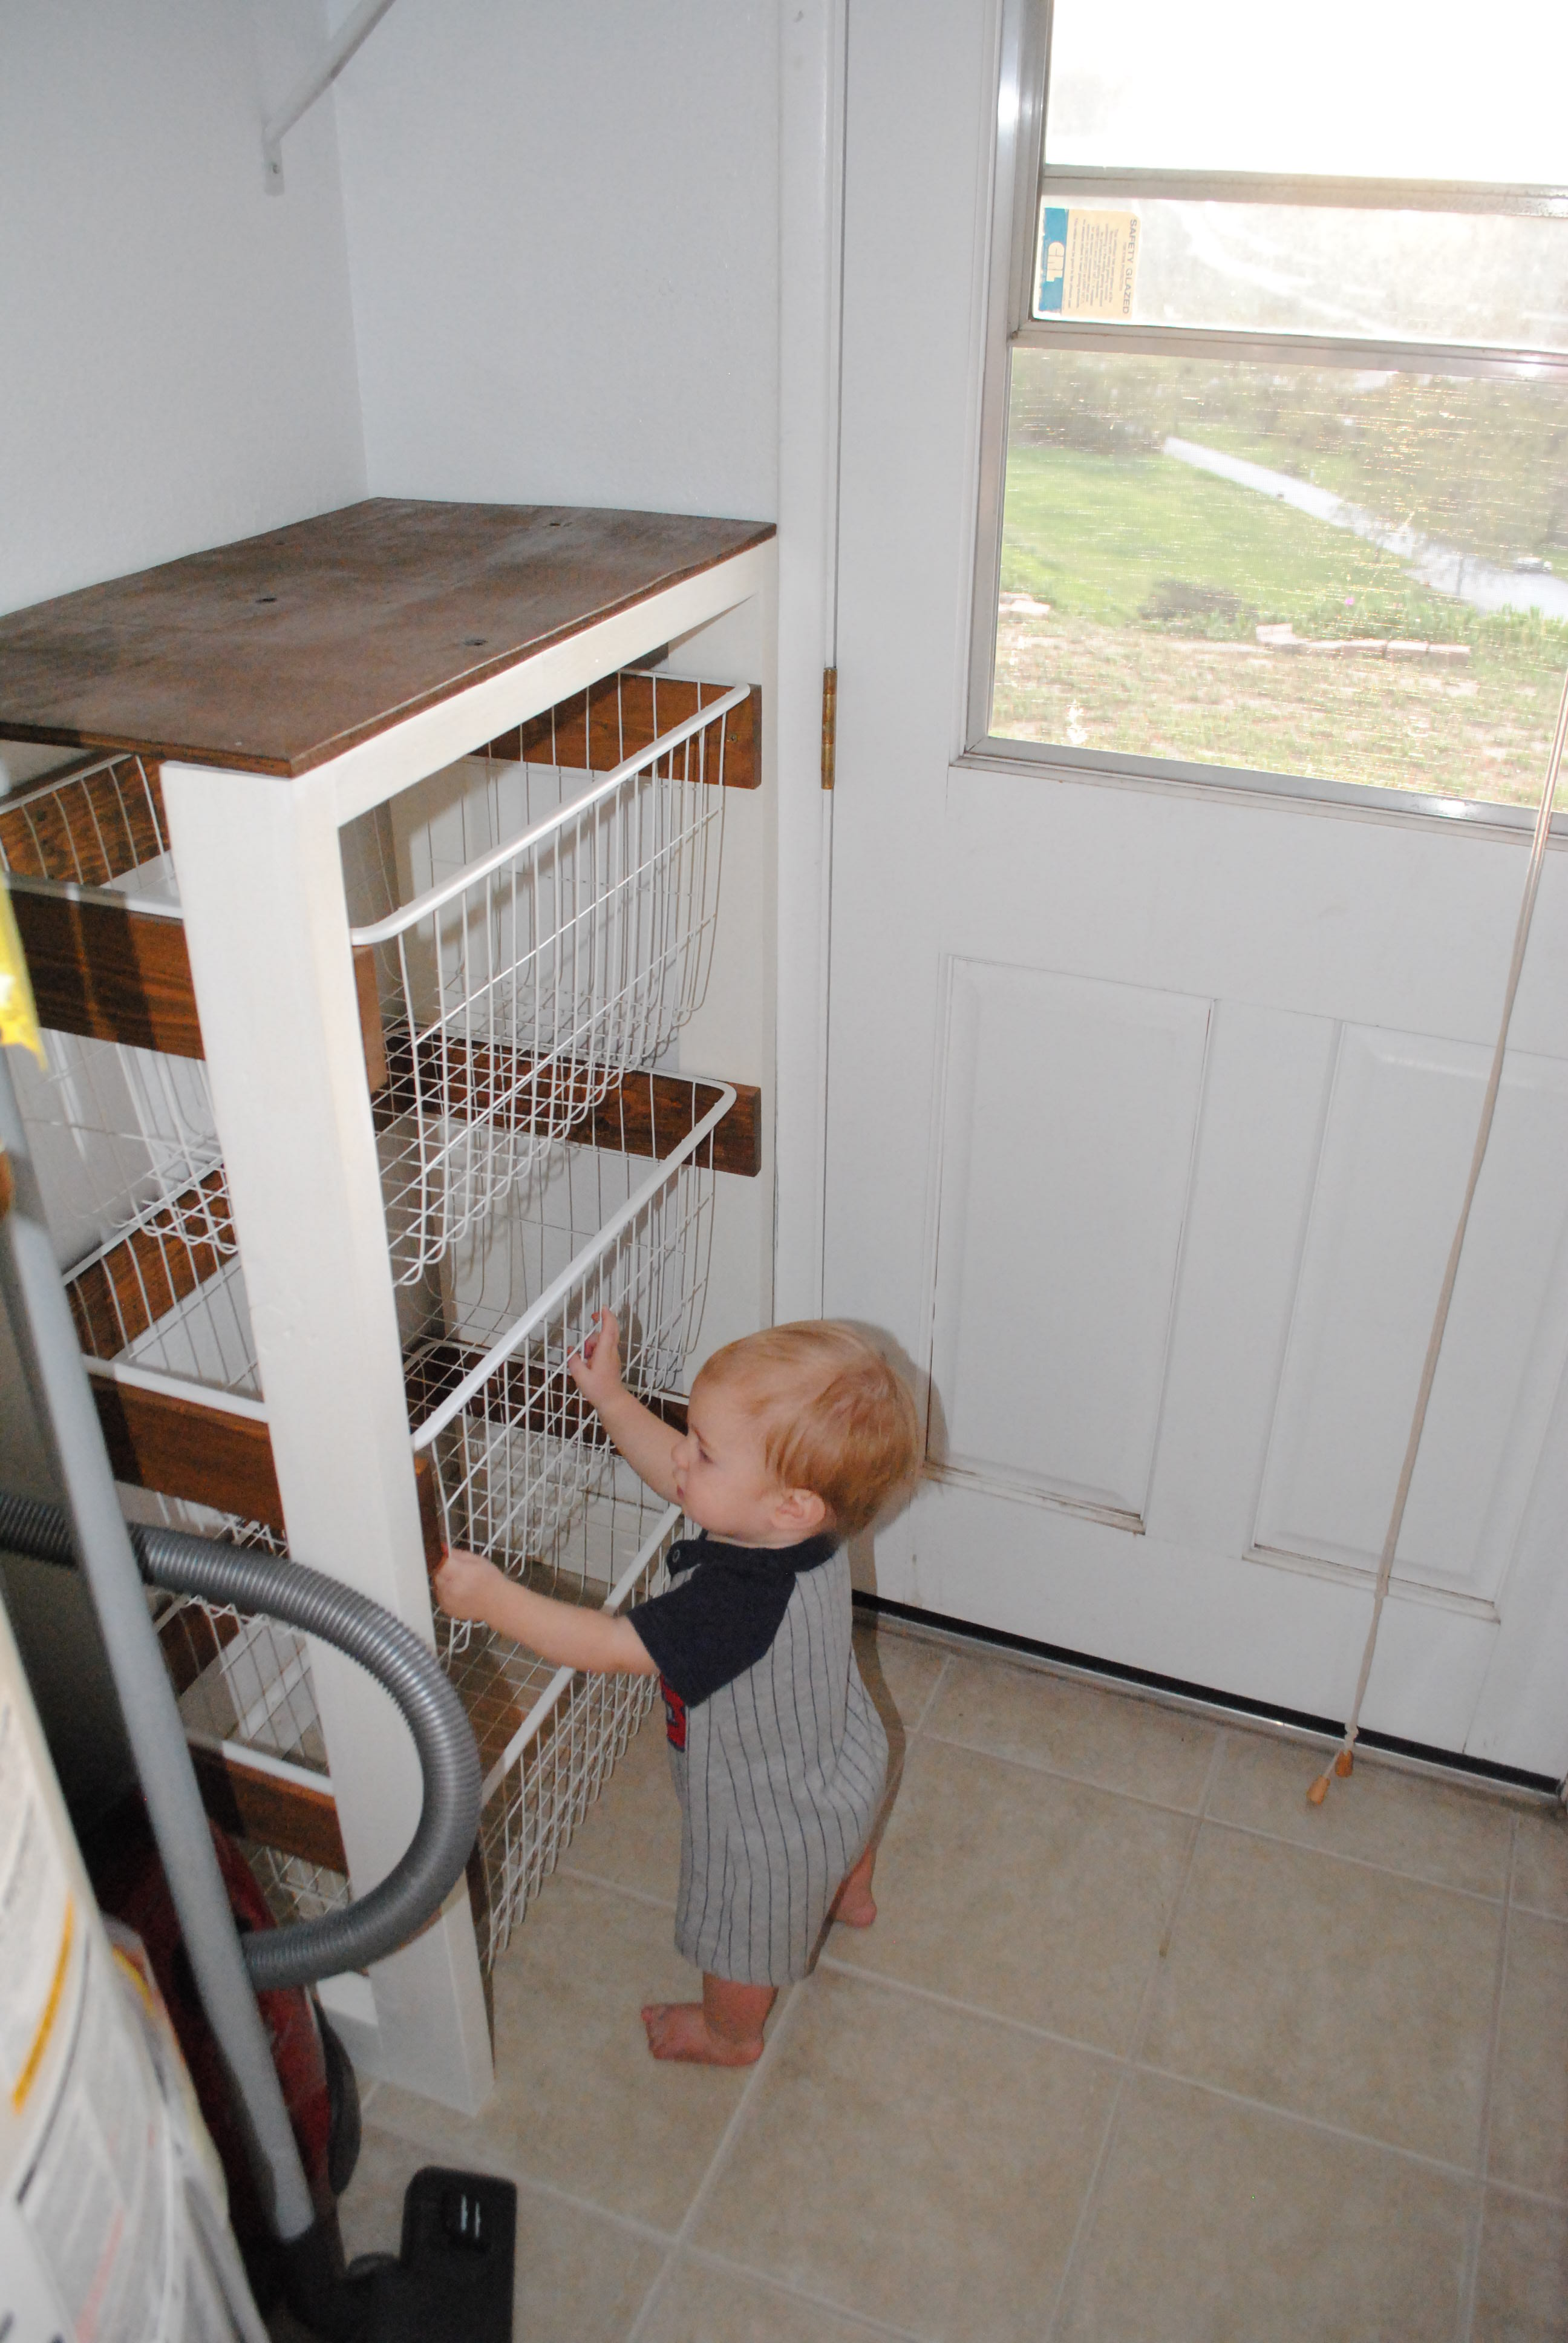
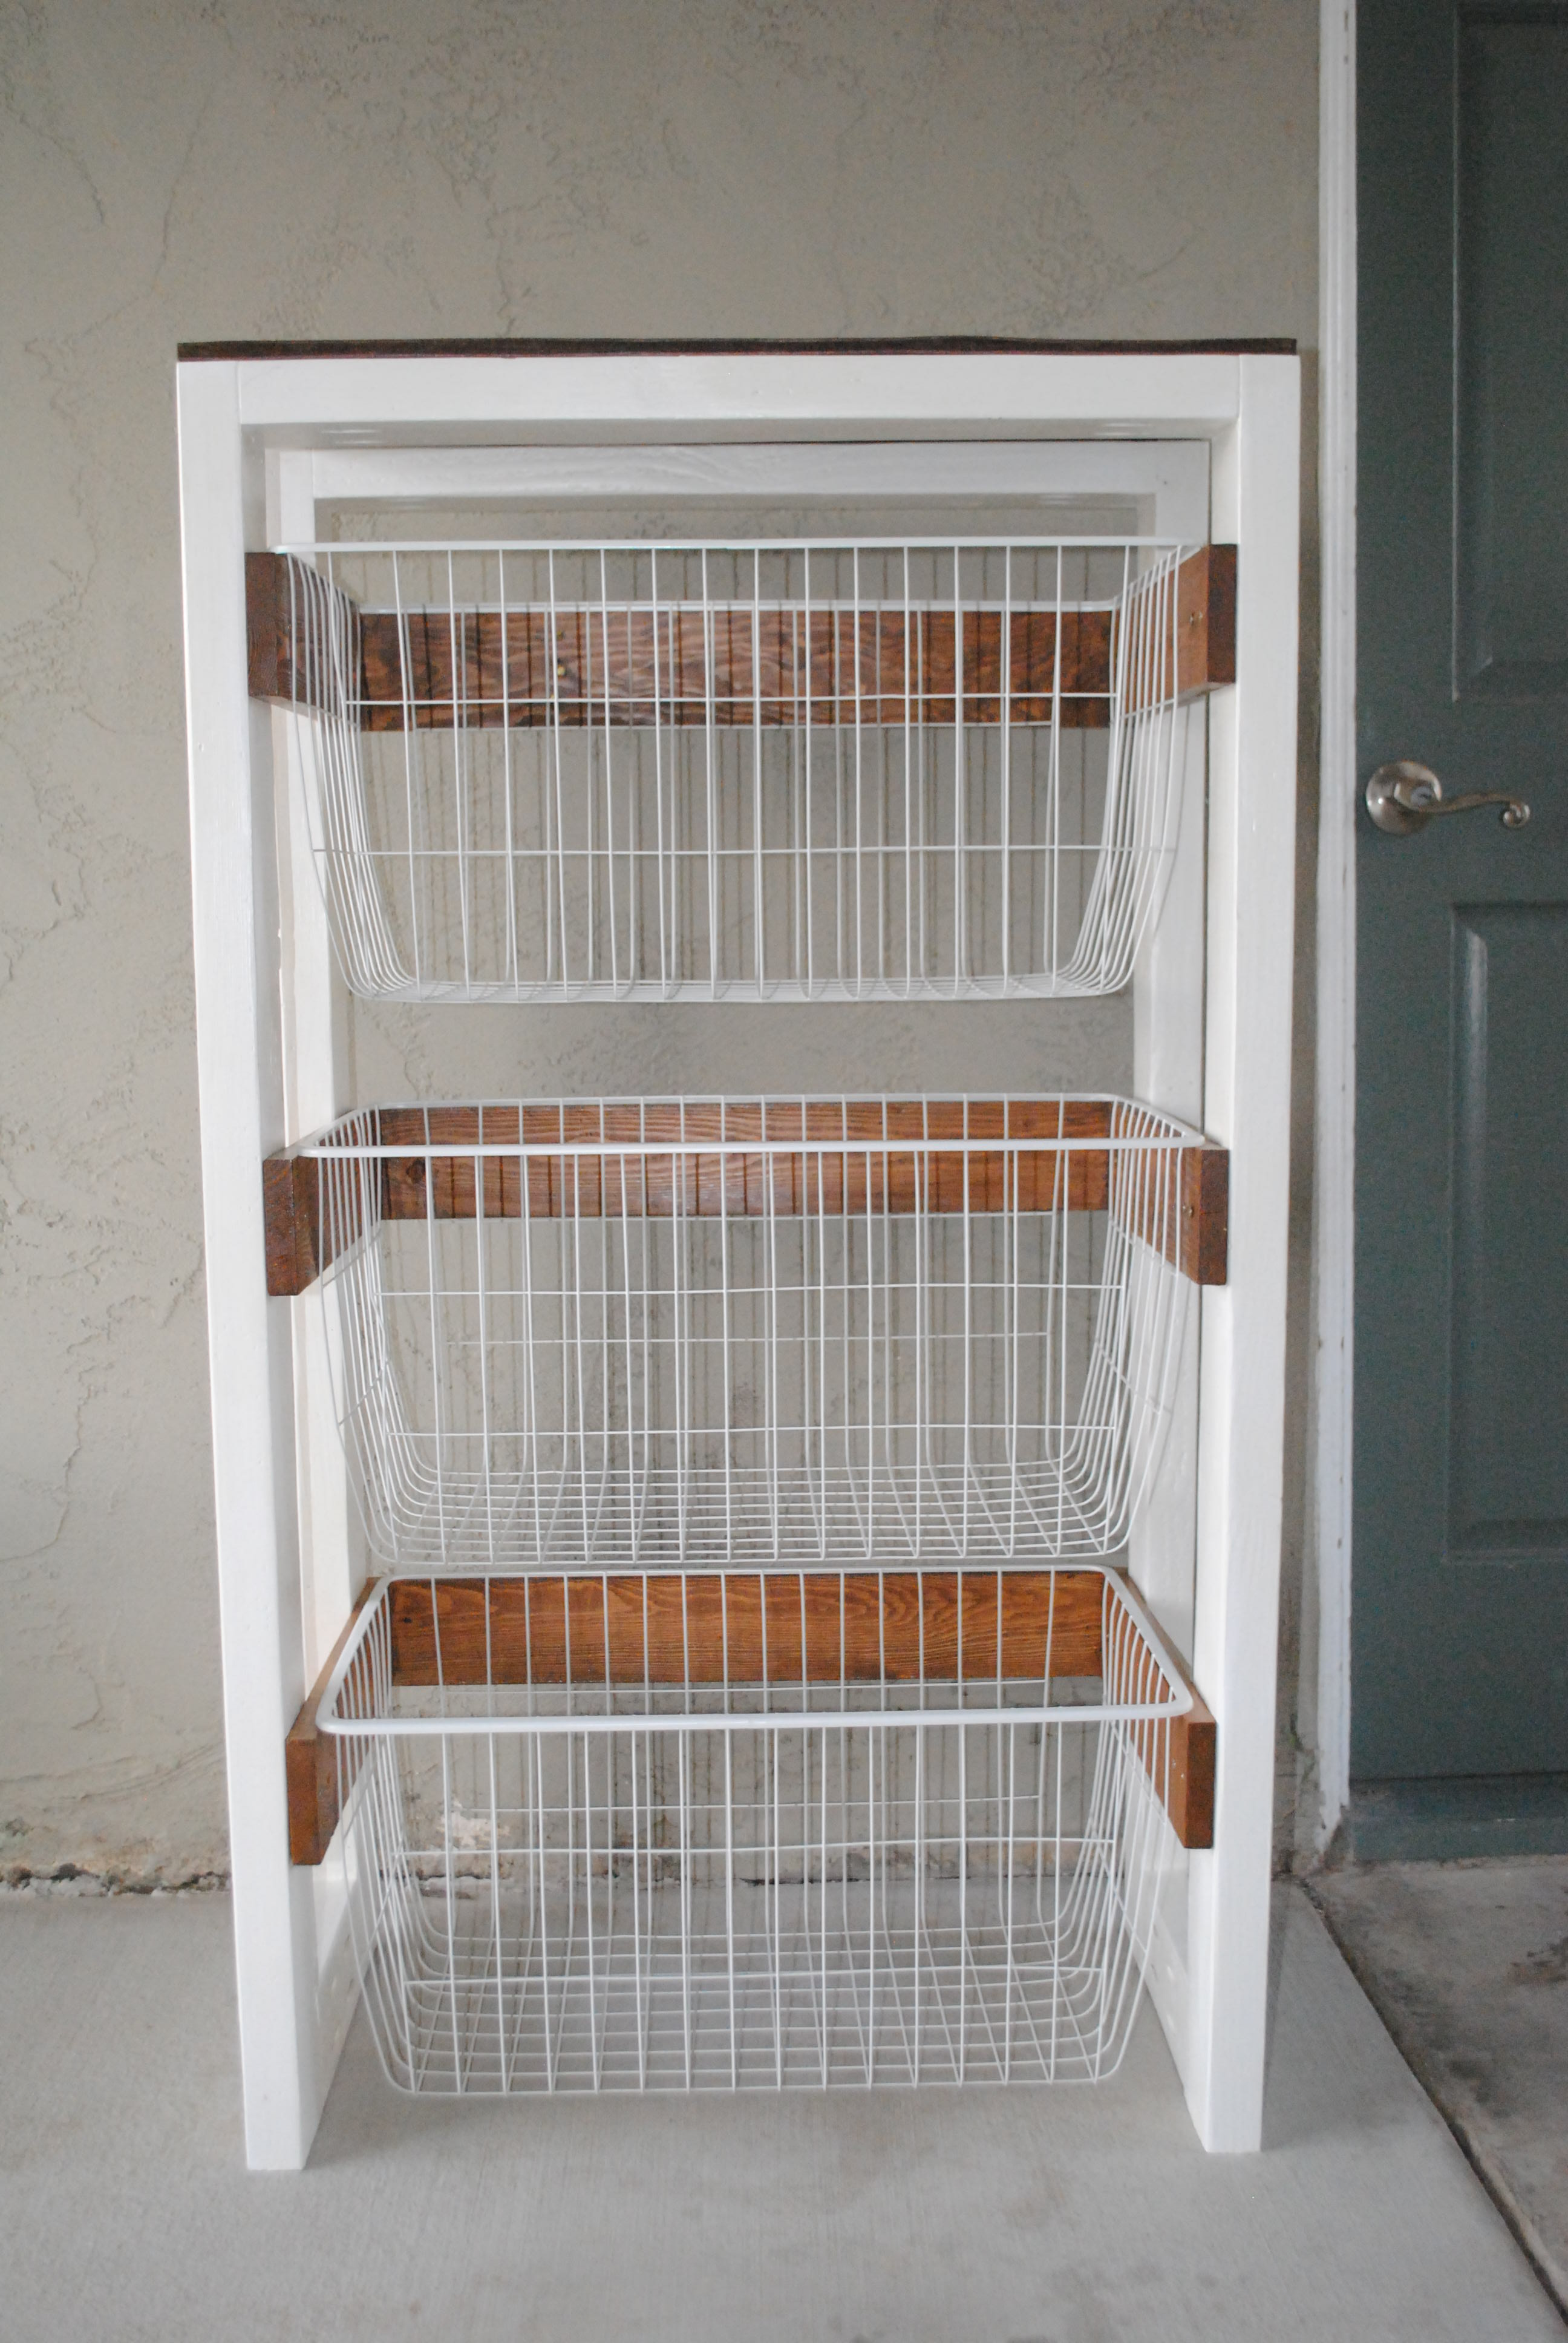
Modern Laundry Basket Sorter
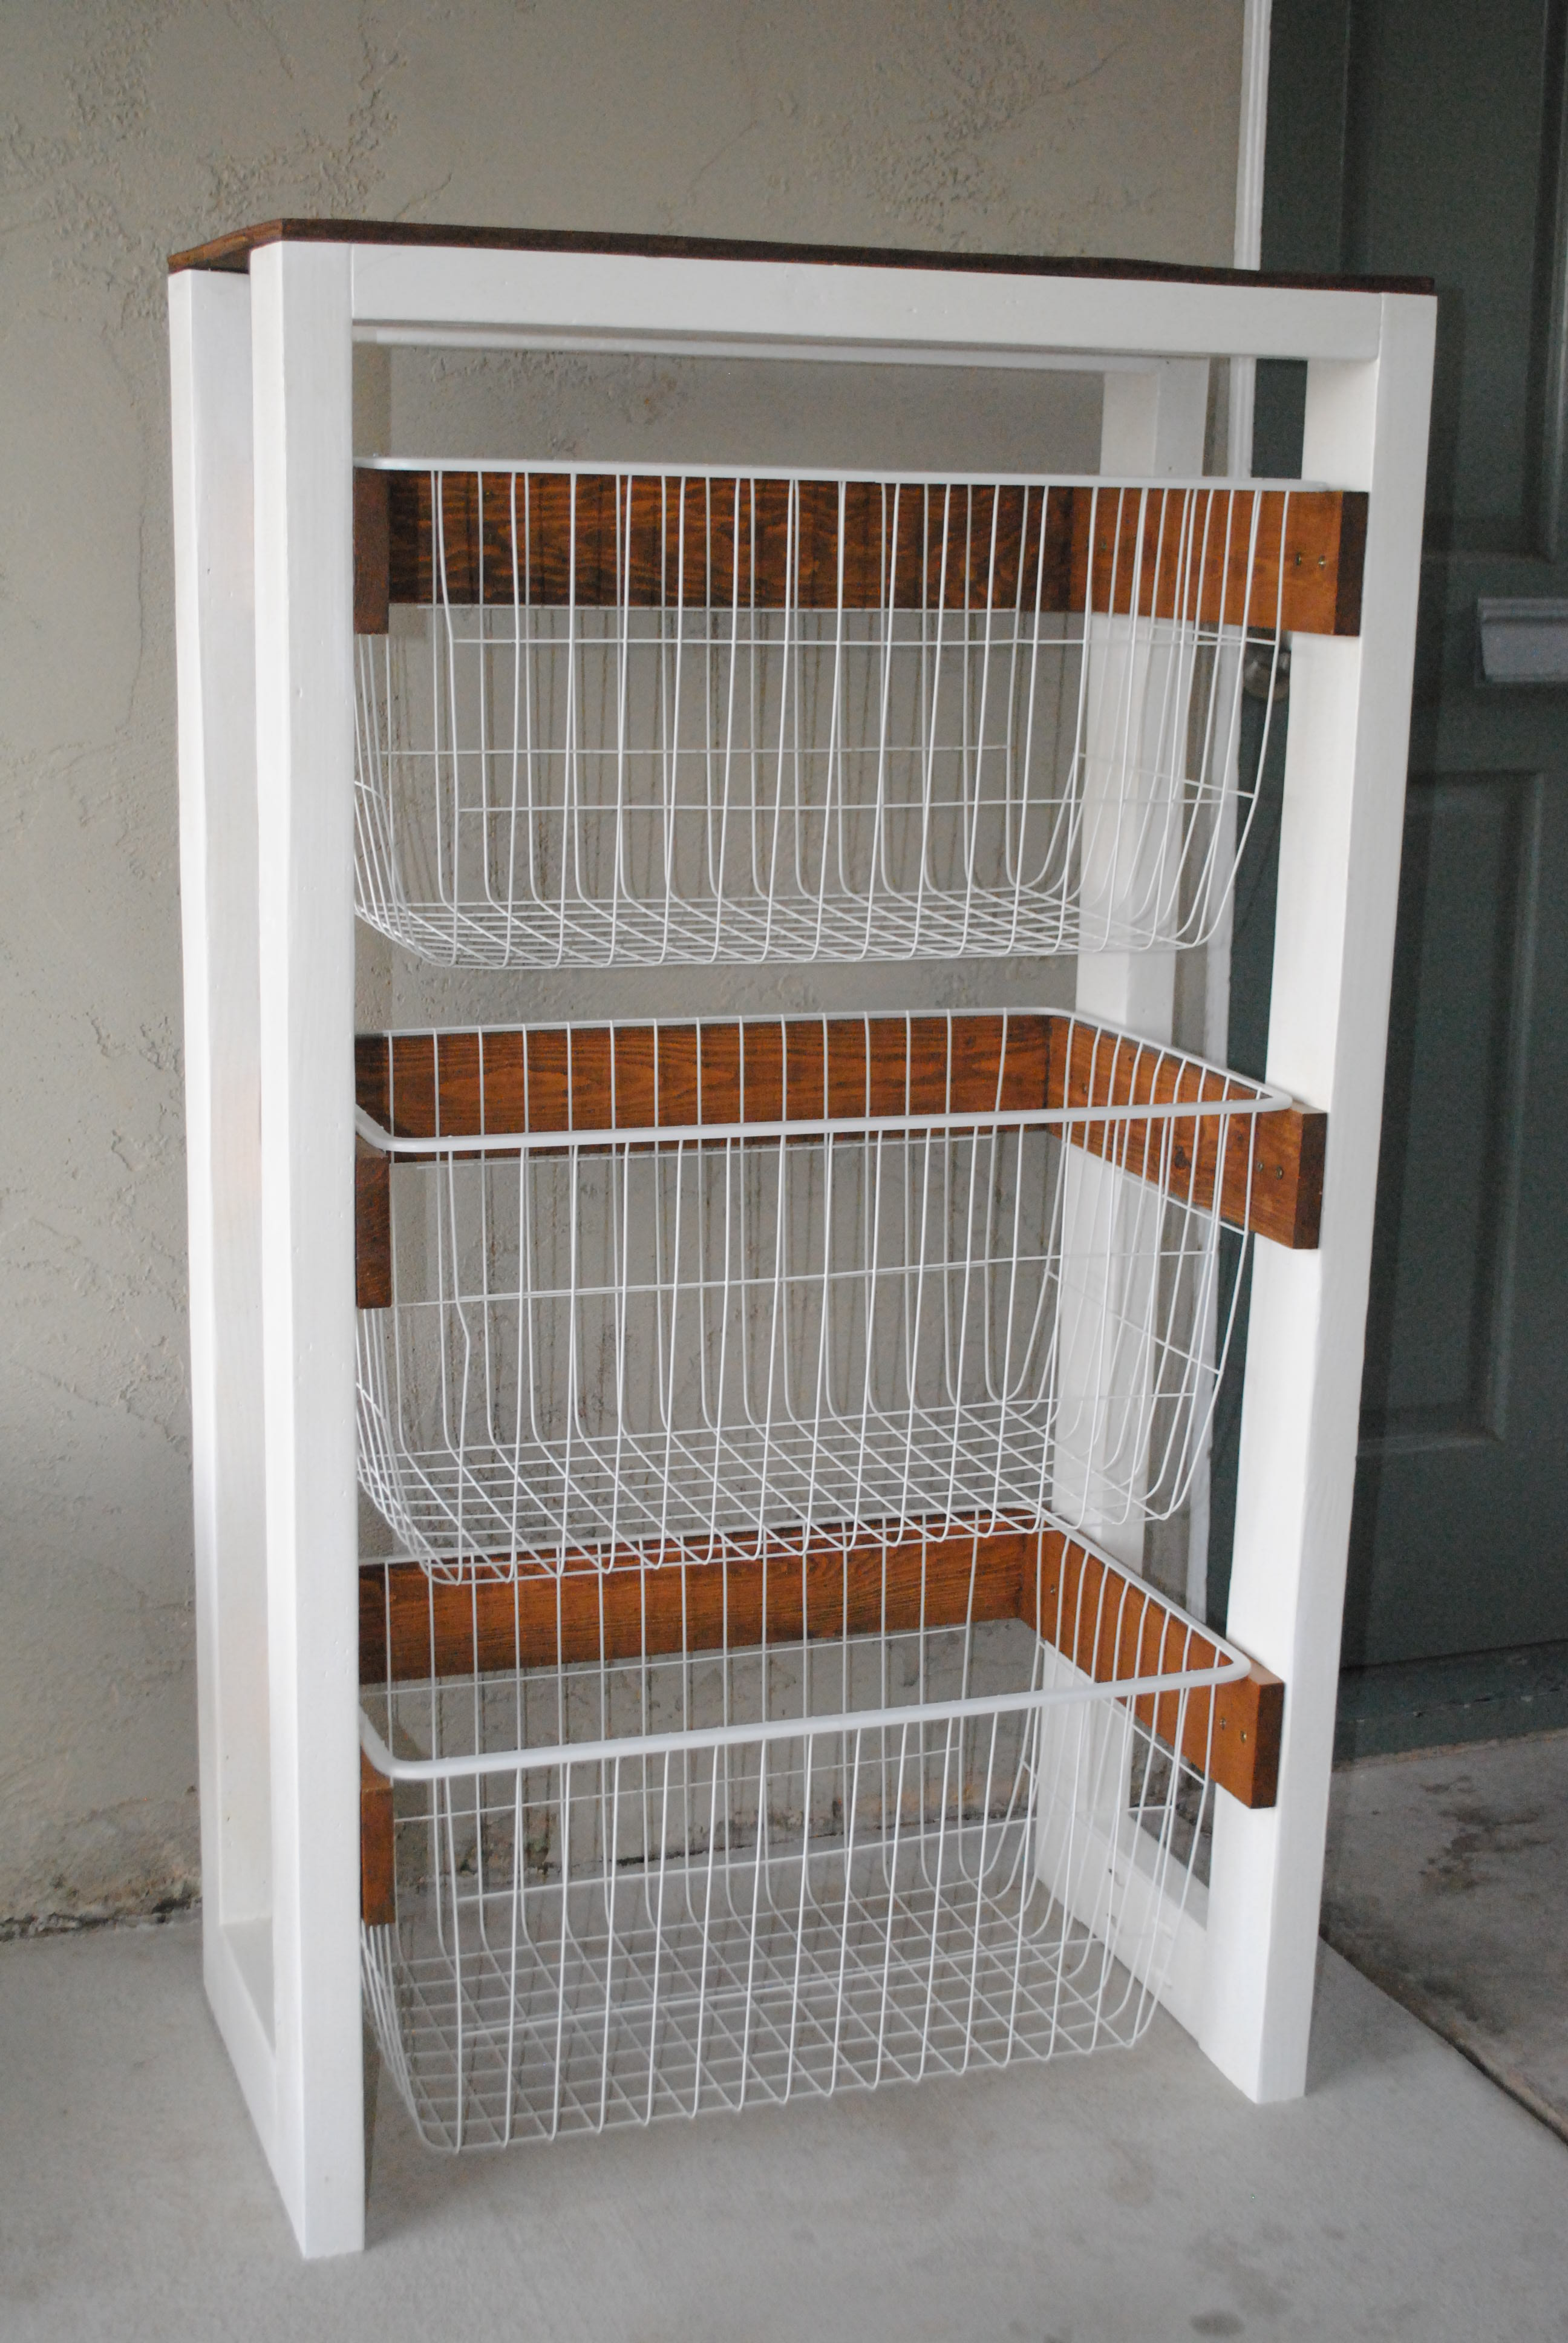
I built this project totally from pallet wood and leftover 2x4's. I already had the paint and stain from other projects, so the only cost was for the baskets, which were $6 a piece at Ikea. This project turned out even better than I expected and I couldn't be happier.
Built from Plan(s)
Estimated Cost
$20
Estimated Time Investment
Day Project (6-9 Hours)
Recommended Skill Level
Beginner
Comments

Folding Sewing Table
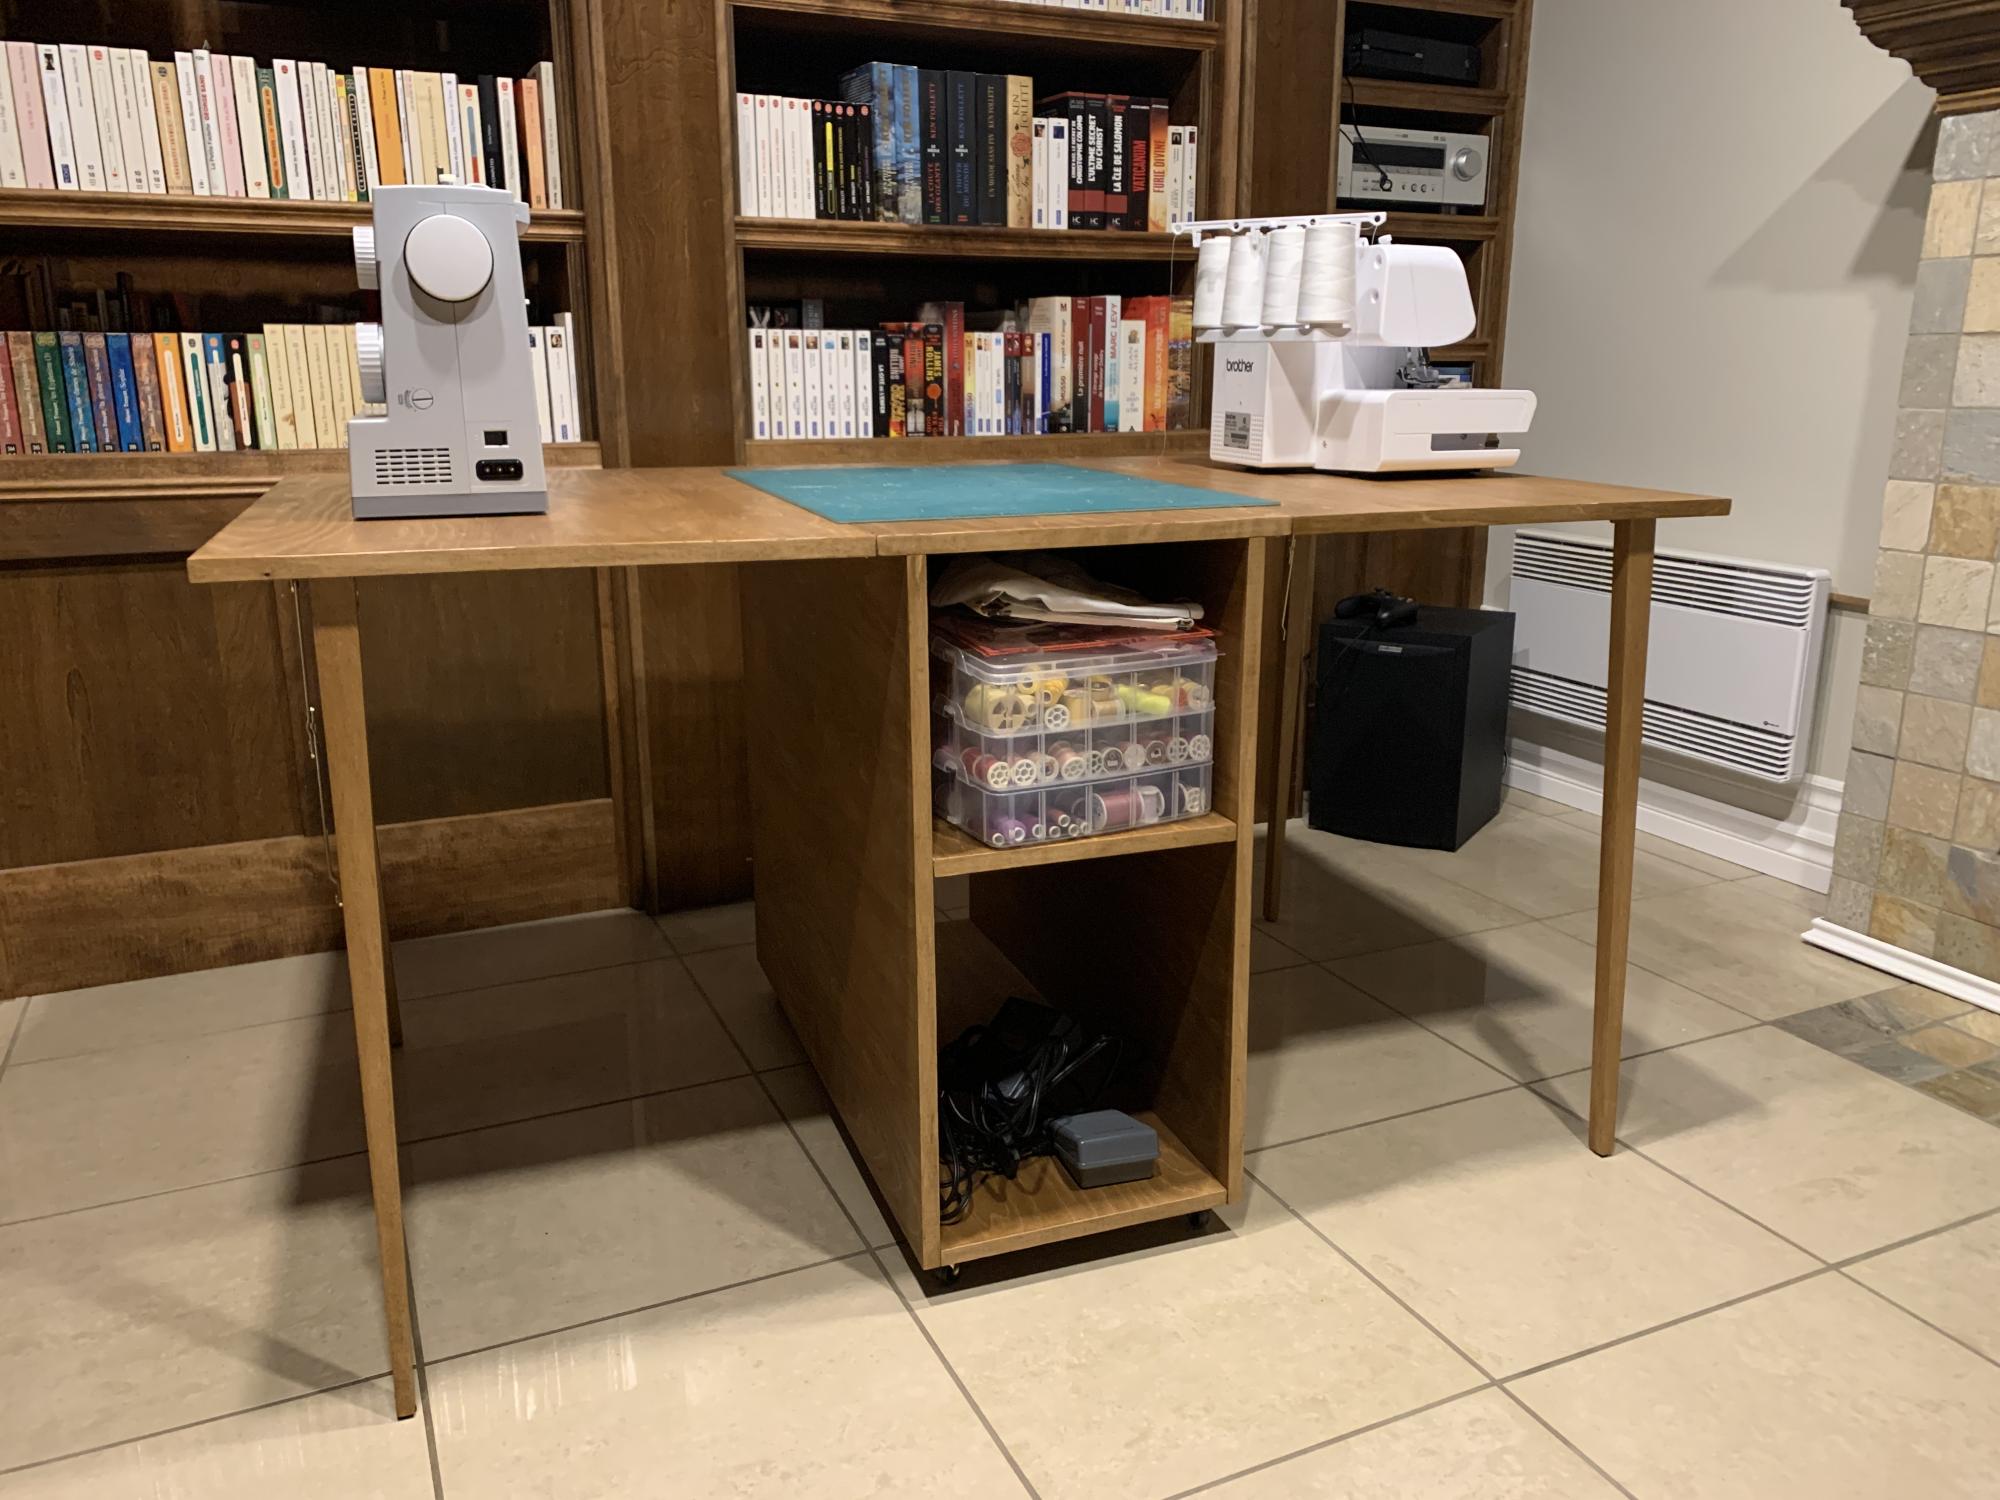
Built this Folding Sewing Table for my daughter.
- 18 mm Baltic Birch
- Birch leds
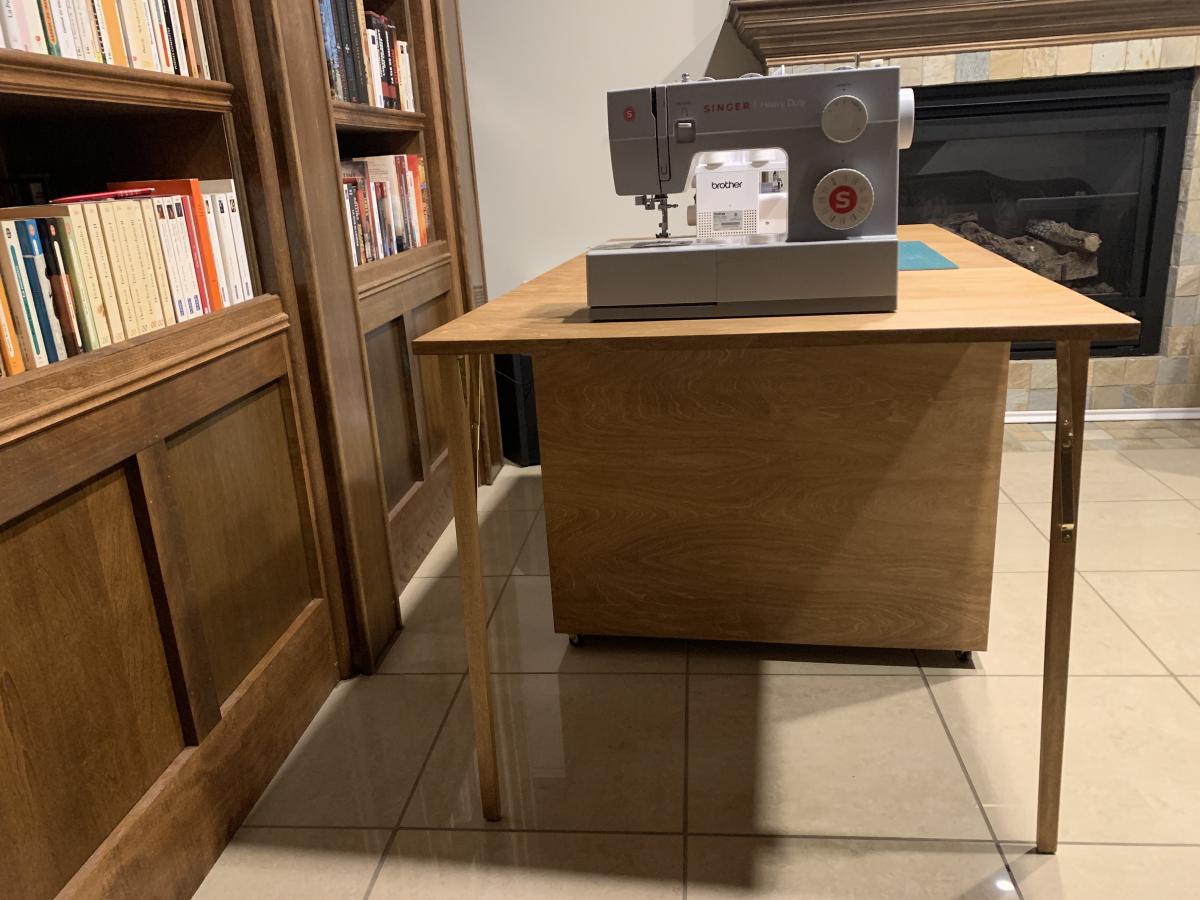
Built from Plan(s)
Comments
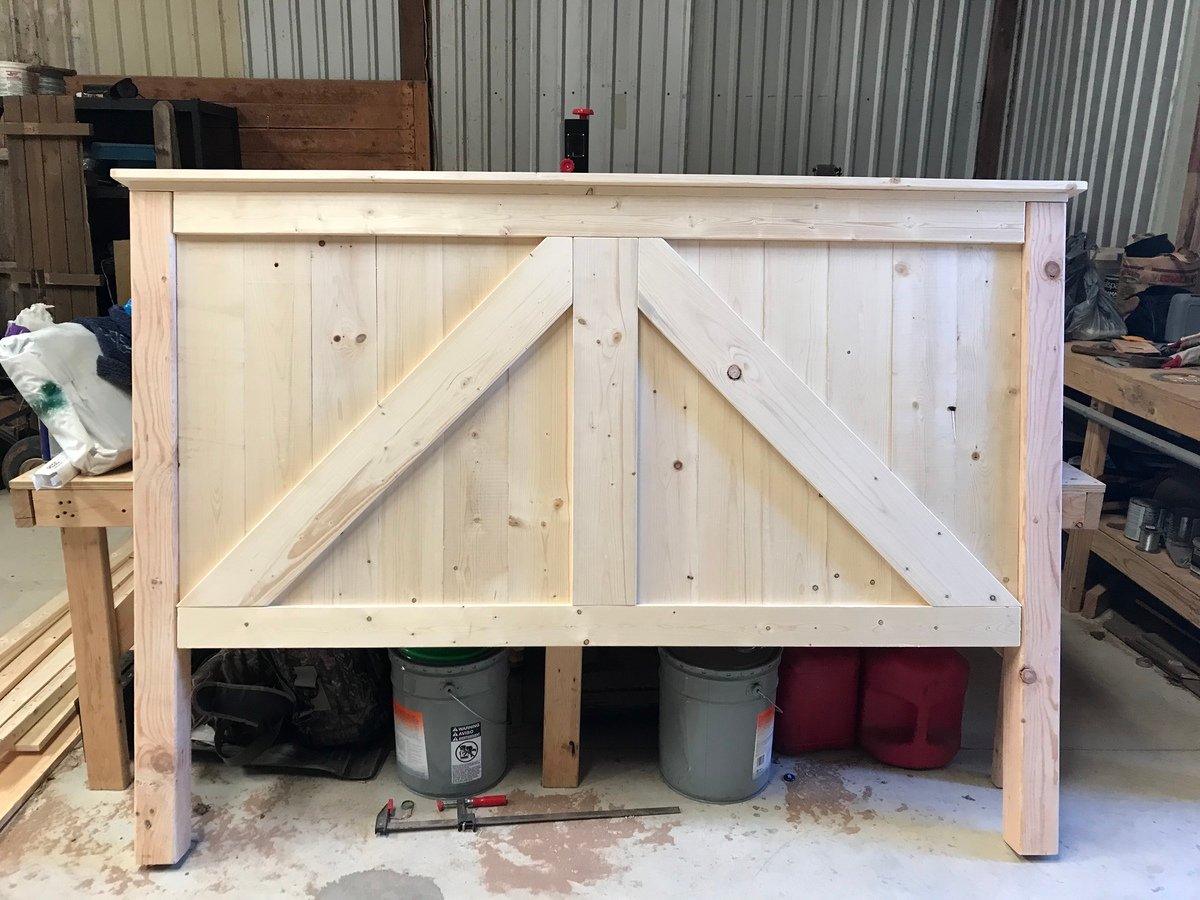
Farmhouse King Headboard/Barn Door
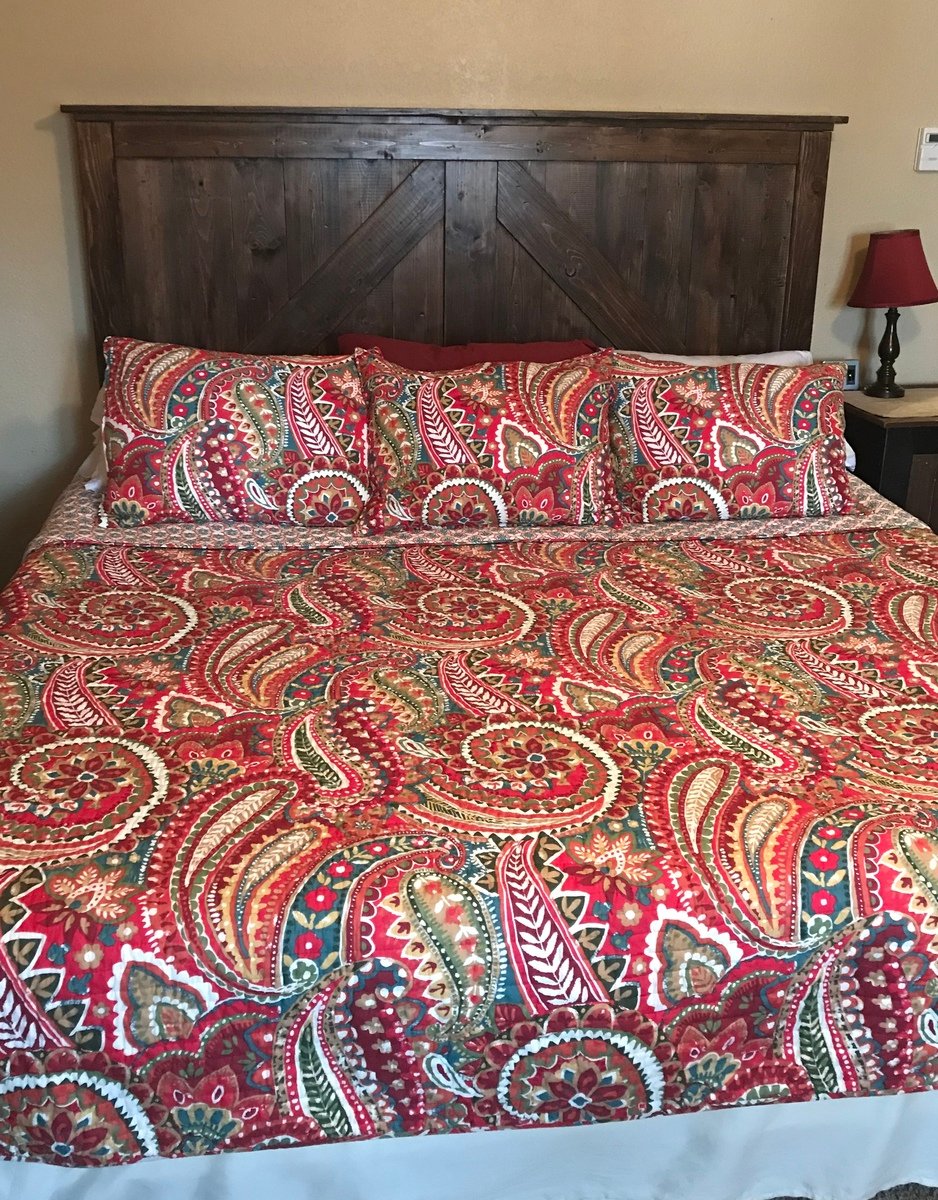
I found a barn door headboard in a rustic furniture store years ago. They wanted $2700 for a Queen size....no thank you! I followed the plans for the Farmhouse King Bed and added cross pieces for barn door look using instructions from the Brookstone Headboard. I cut the legs at 56” to add some height and I set the bottom of the back panel at 18” above the floor to make sure no gap is seen with our thinner, memory foam mattress. I couldn’t be happier with our headboard and the total cost, including screws & stain, was about $150! Boom! Thank you Ana White for sharing plans! I’m working on the Mini Farmhouse Bedside Table now & feel like I can build anything! I would highly recommend Power Pro Premium Interior screws (no splitting or stripped heads, no pre-drilling & they counter-sink great in soft wood). For the 4x4 posts I used GRK UberGrade R4 multi-purpose 4” screws, which had the same quality, all from Lowe’s.
Built from Plan(s)
Estimated Cost
$150
Estimated Time Investment
Weekend Project (10-20 Hours)
Finish Used
I used wood conditioner, as recommended. Then 2 coats of Minwax Special Walnut with light sanding in between. I chose 2 coats of clear satin polyurethane, lightly sanding in between for a great rustic finish that’s not too glossy. I did beat up the wood and sanded off all square edges prior to applying any finish.
Recommended Skill Level
Beginner
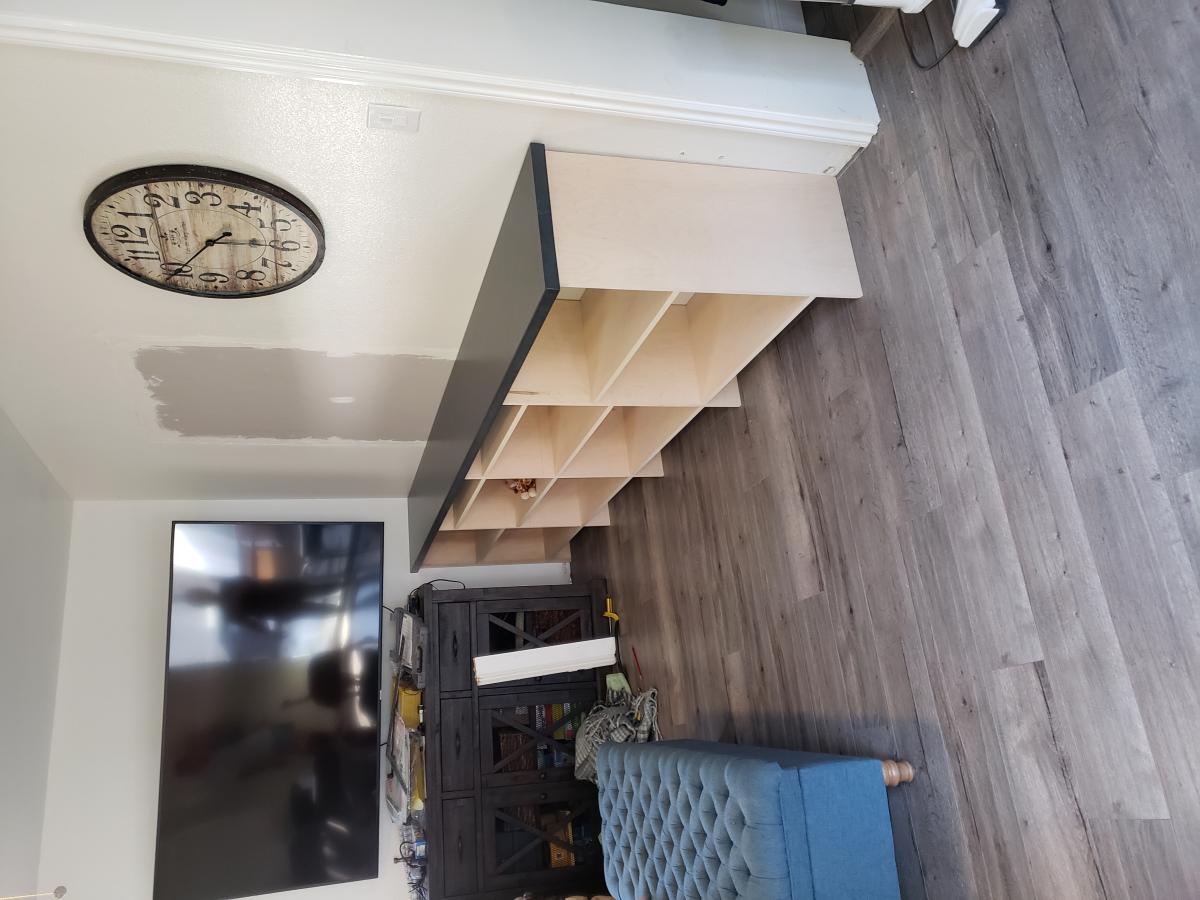
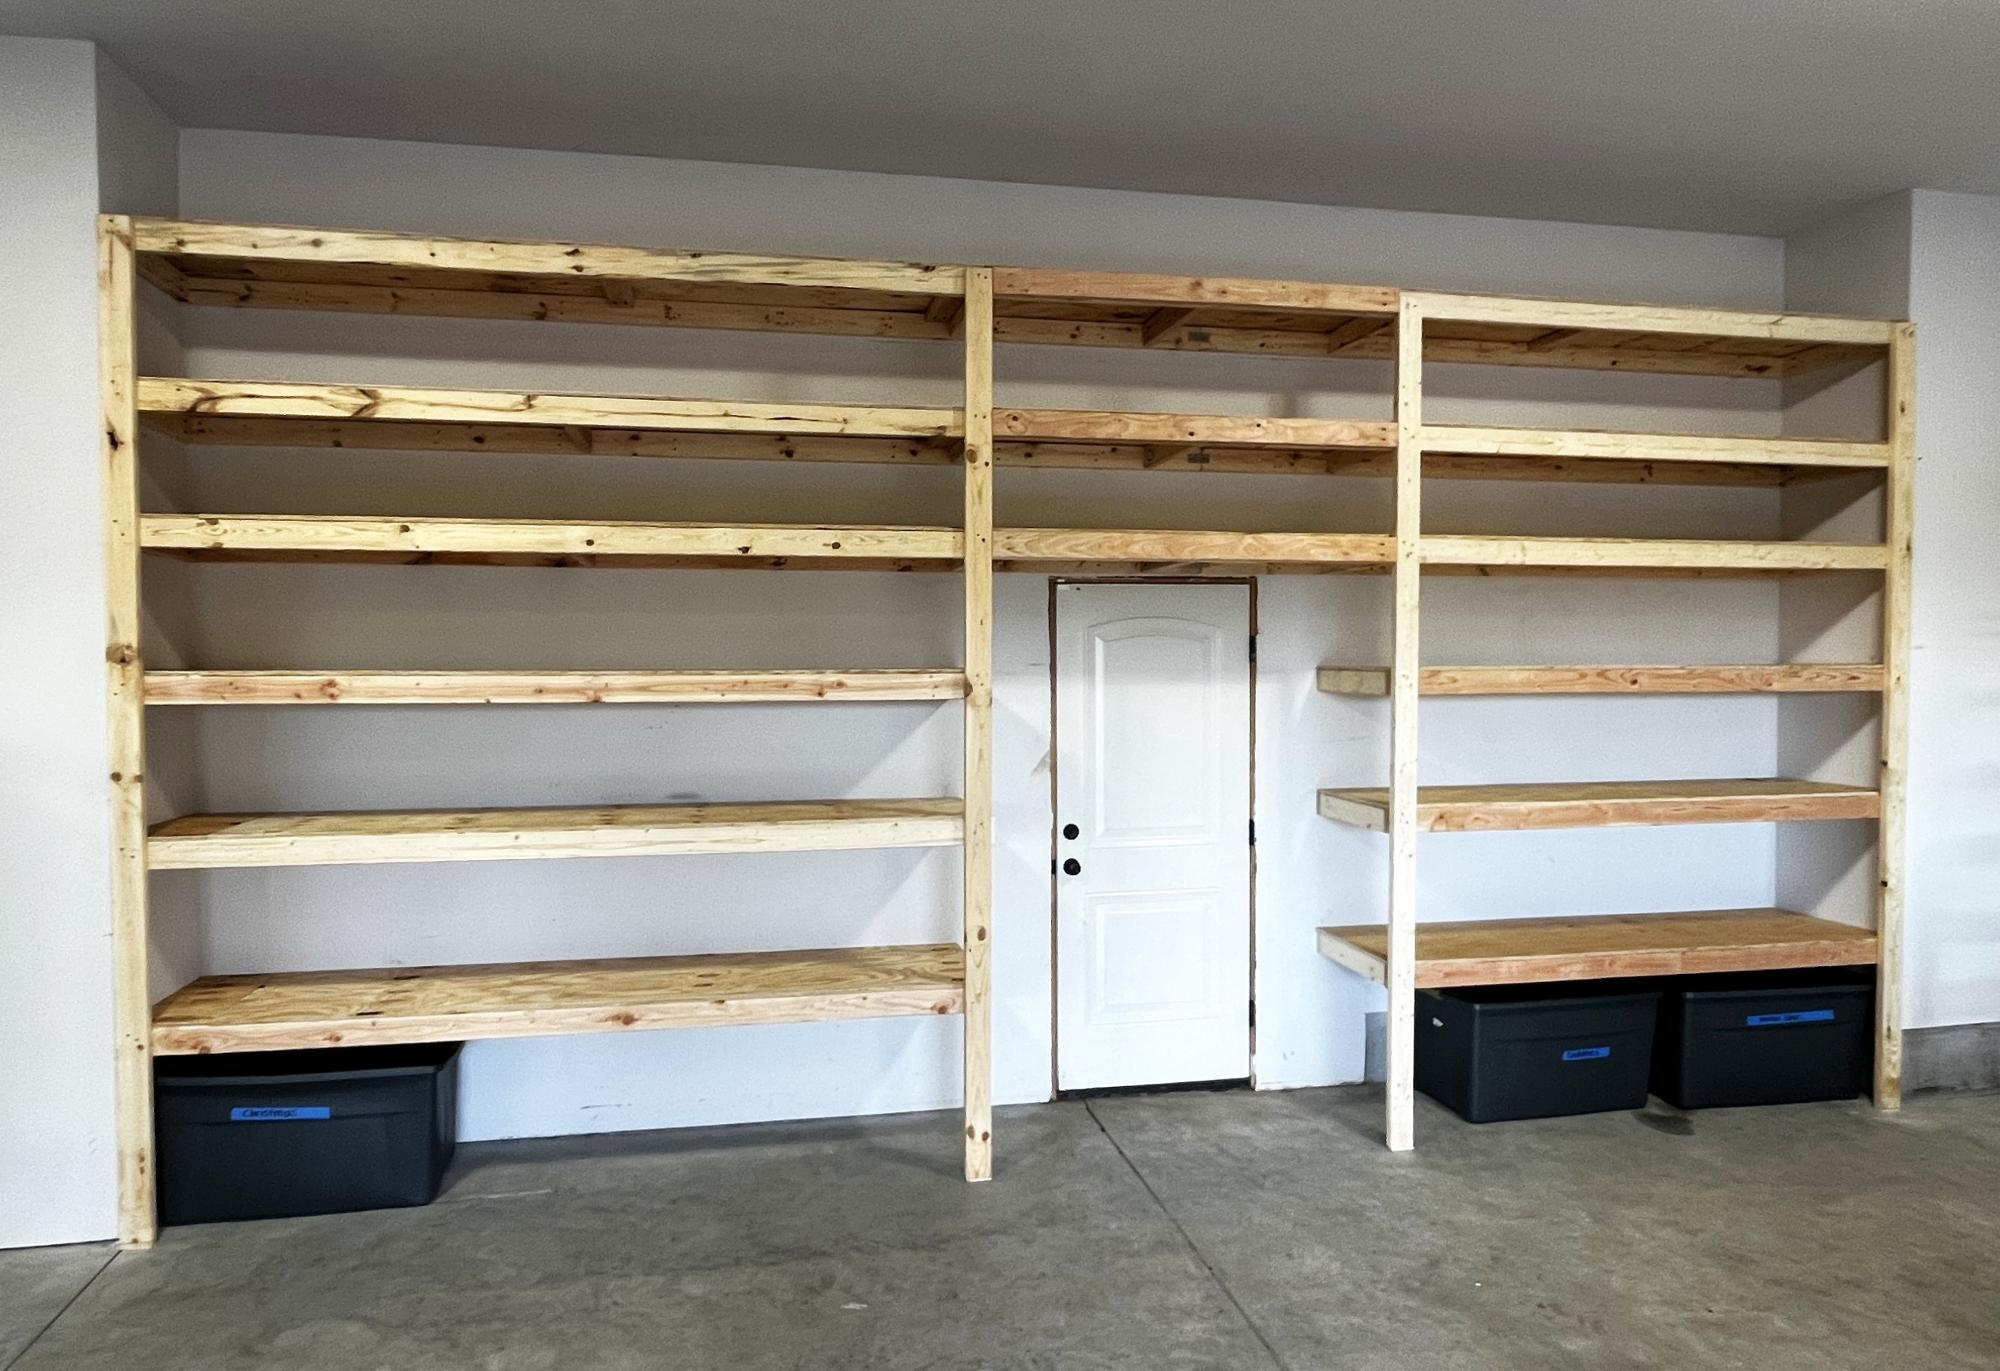
Phenomenal Family Room Built-Ins
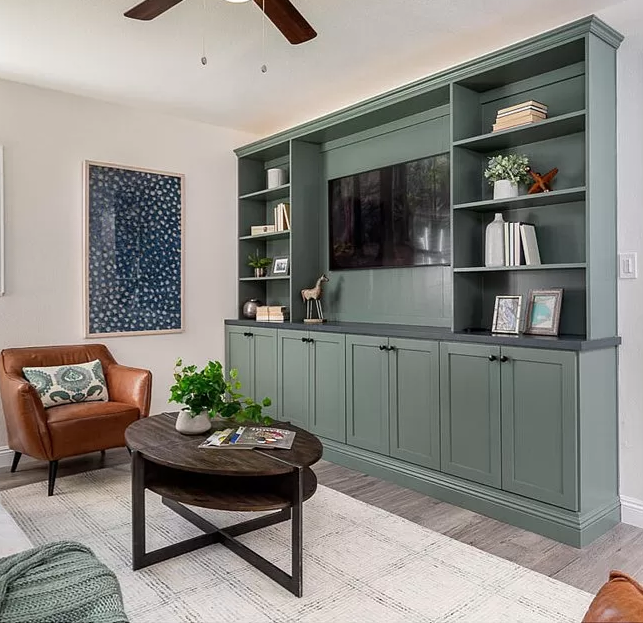
We had an awkward family room with a second front door which rendered the layout less functional than it could have been. My sister mused, "I wonder what would happen if you took out the second entry and added built ins?," and this project was born. With a 4 year old and a 2 year old and limited tools and workshop space, we were excited to find ShelfHelp, which allowed us to create custom built ins at a fraction of the cost and time they otherwise would have required (utilizing the "Frameless Built-Ins, All in One Method" plan) . Including the custom soapstone top that we had made from a local shop that was advertising remnants, the project came in under $1000, and we were thrilled with the results. SO MUCH TOY STORAGE, an unobtrusive TV, and a much more functional layout. Thank you, Ana White!
Comments
Wed, 04/06/2022 - 09:55
AH-MAZING!!!
WOW, this is gorgeous, thank you so much for sharing and trusting us with your huge project!
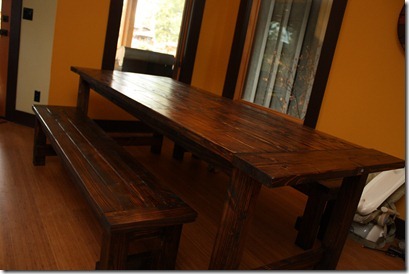
Fancy X Farm Table and Benches
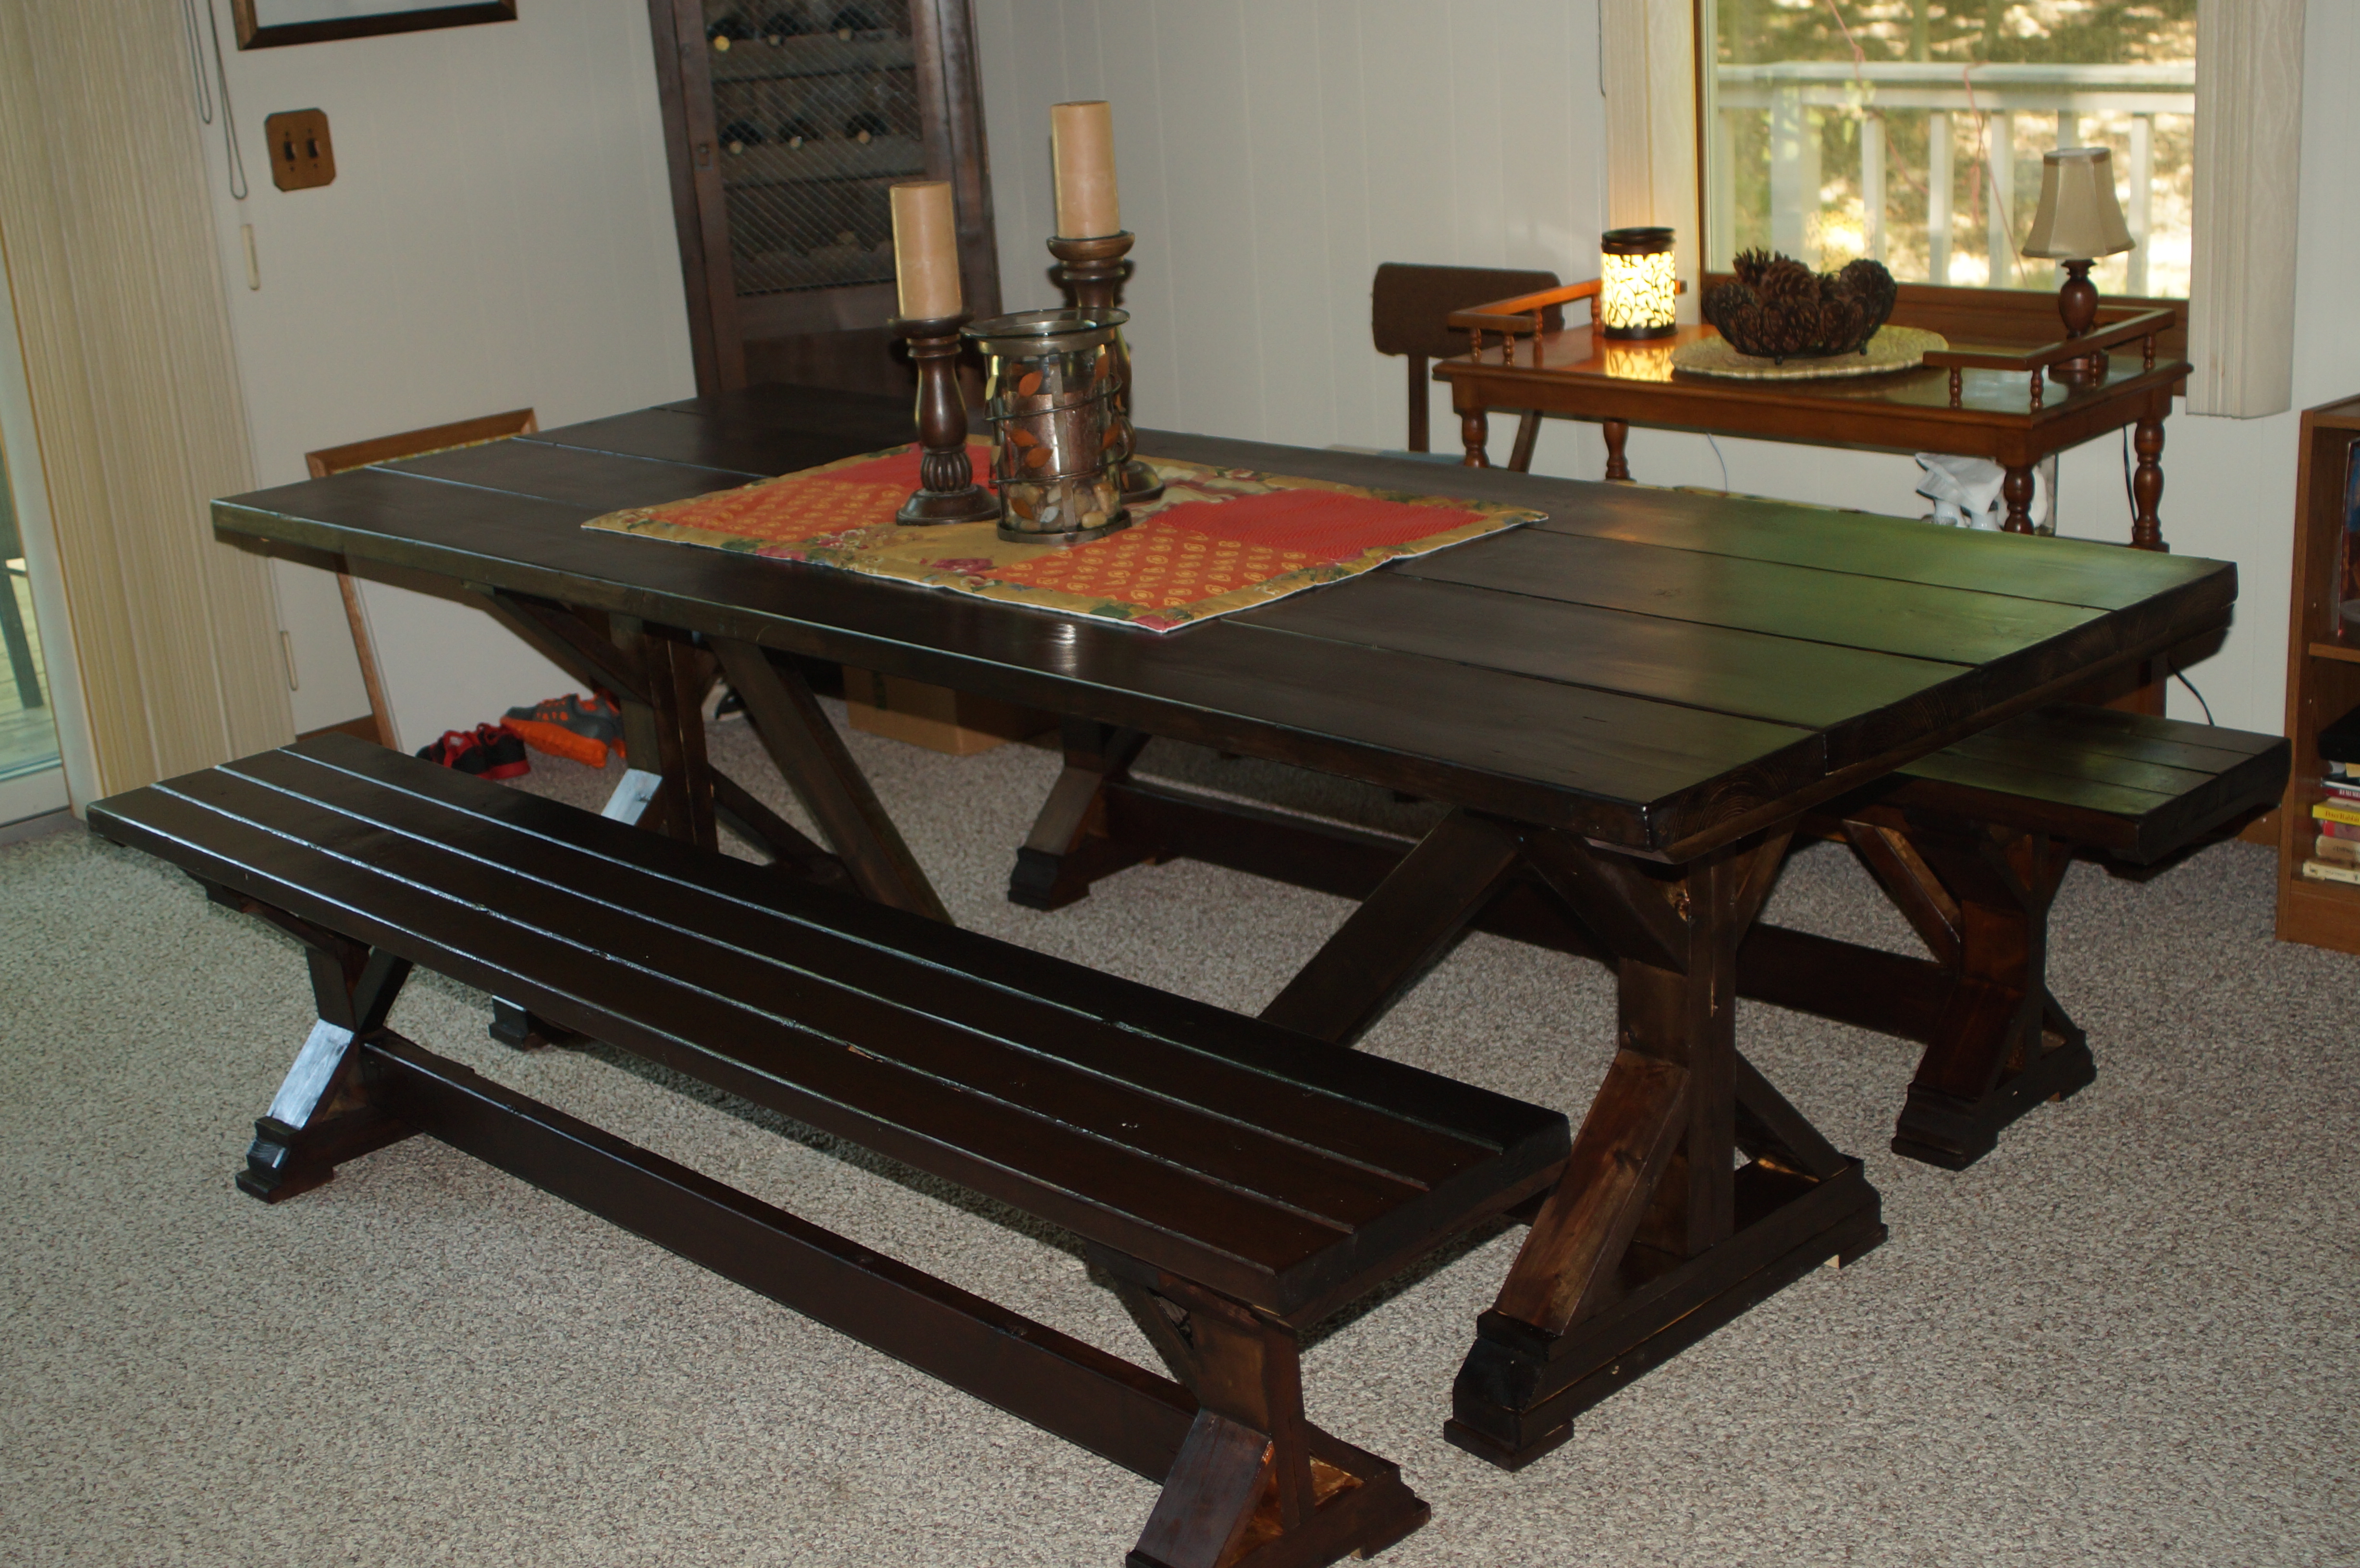
I made this table and benches for my daughter
Estimated Cost
$100.00
Estimated Time Investment
Weekend Project (10-20 Hours)
Finish Used
I finished the table and benches with a solution of extra fine Steel wool disolved in Apple Cider Vinegar and dark brown RIT Liquid Dye. Then gave it a number of coats of Polyurethane.
Recommended Skill Level
Intermediate
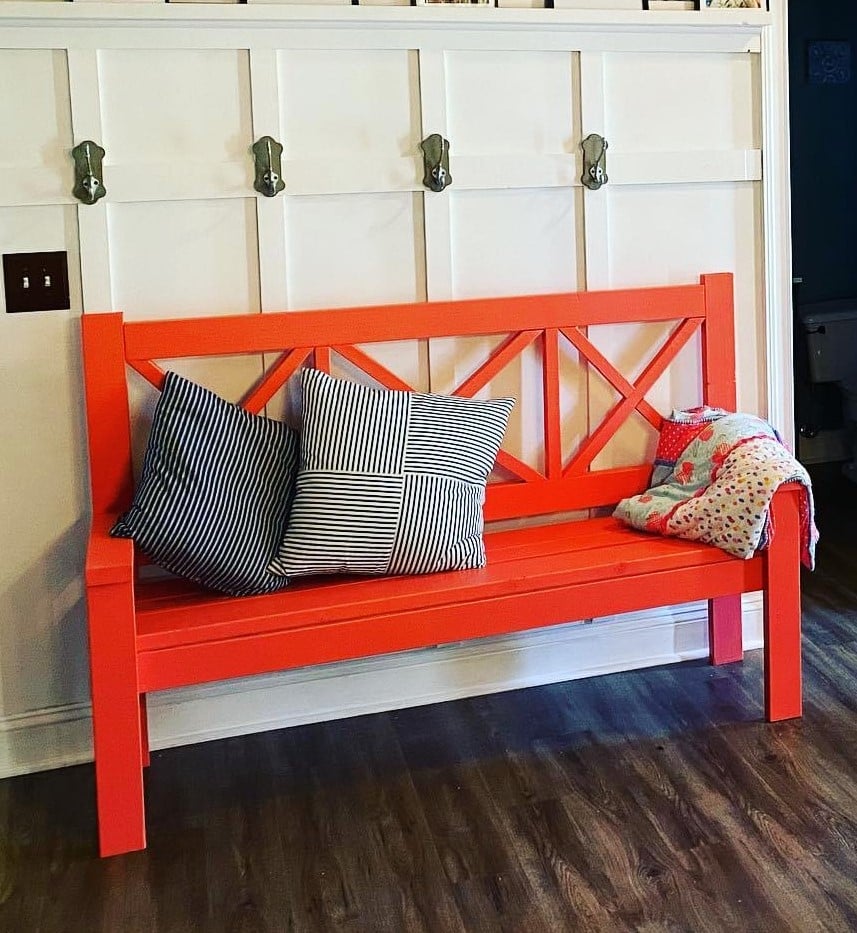
Modern Slat Bench- red and brown
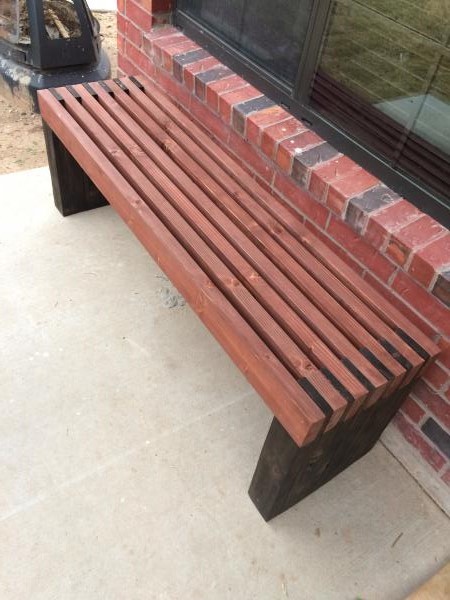
I followed Ana's instructions except for my bench was 56" in length and stained the top red bottom brown.
Built from Plan(s)
Estimated Cost
50
Estimated Time Investment
Day Project (6-9 Hours)
Finish Used
Express brown
Red stain
Red stain
Recommended Skill Level
Starter Project
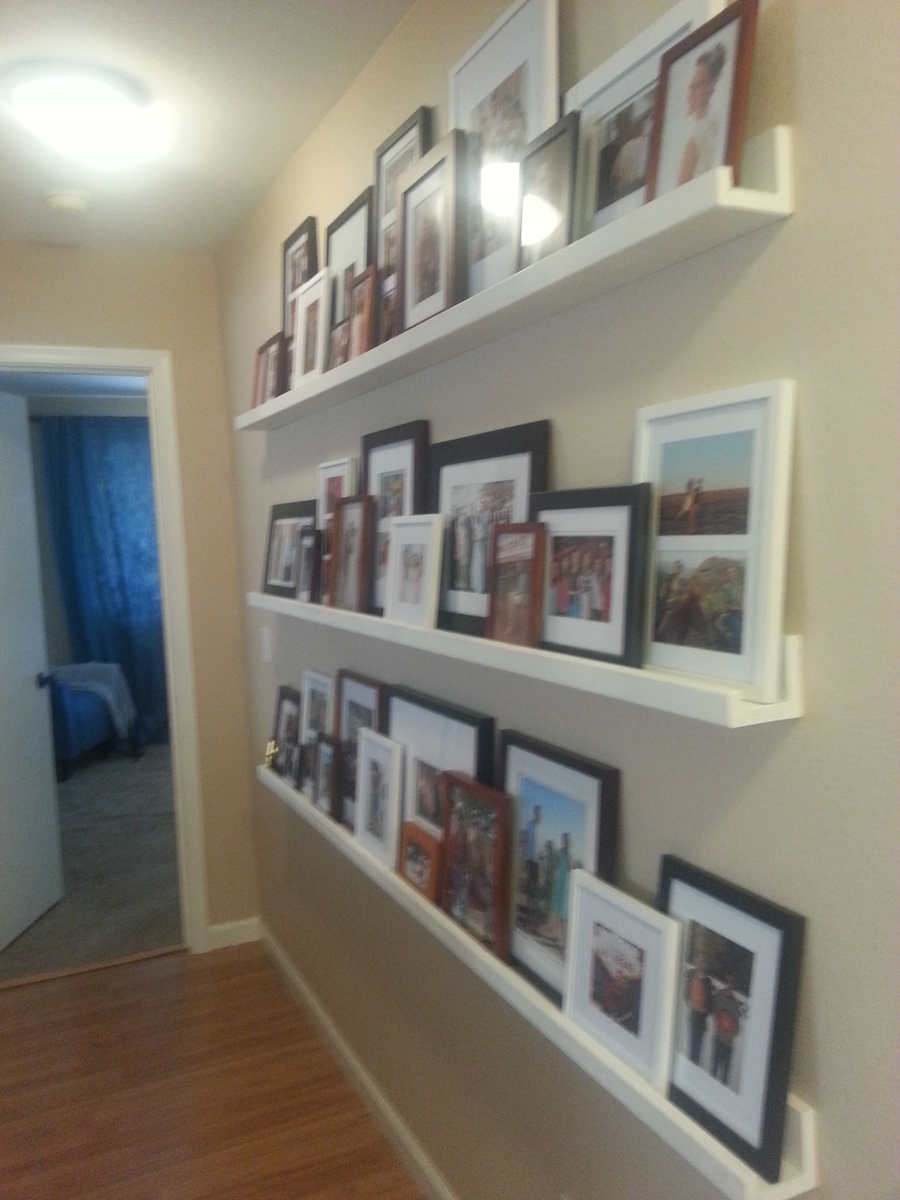
Photo Gallery Made Easy!
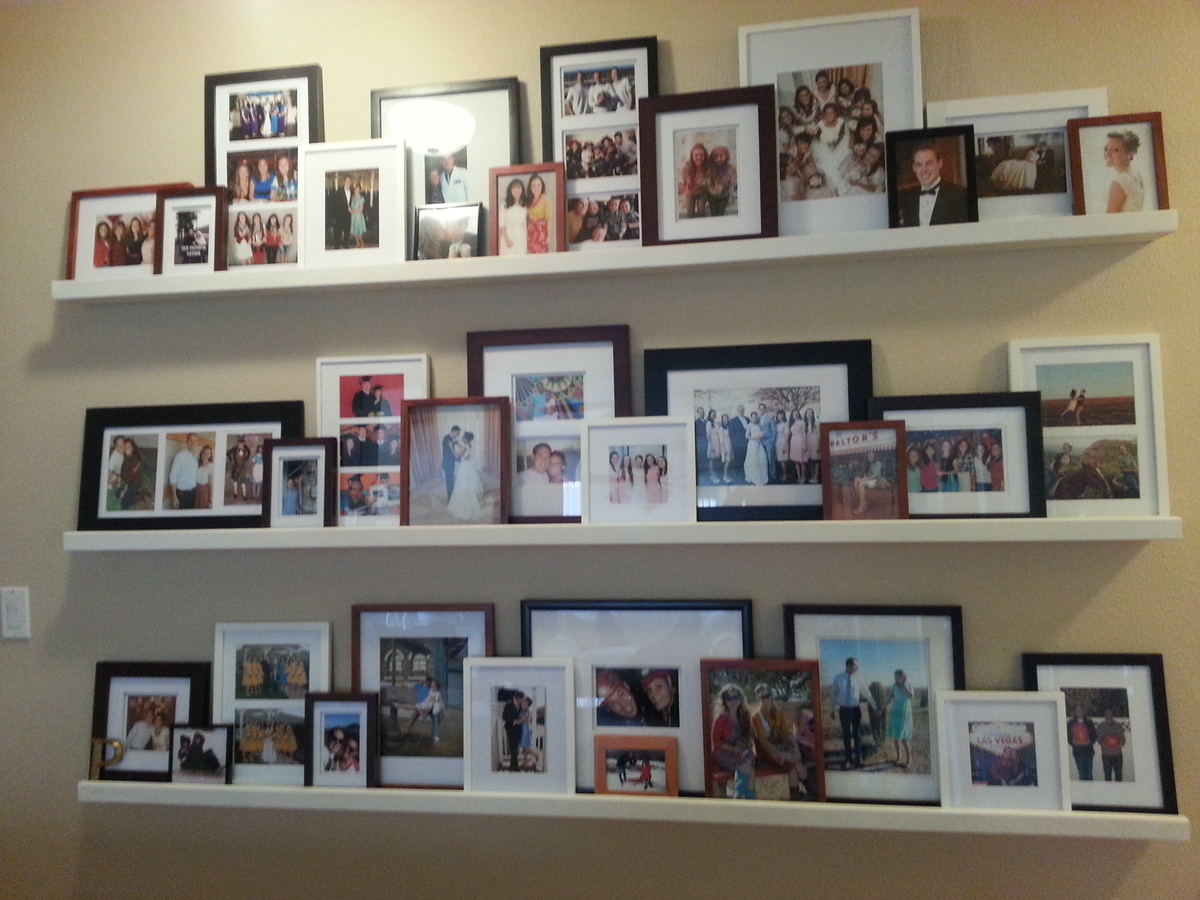
I love my new photo ledges. I had a huge space on my wall and these ledges are perfect. The ledges were so easy to make. I got a kreg jig for my birthday (I never thought I would ask for a tool for a birthday present) and I have gotten so much use out of it. I saw similar ledges at pottery barn for 10 times the cost of this DIY project. I saved so much with these ledges. The kreg jig has already paid for itself. The ledges make it super easy to switch out photos and I love being able to display so many fun photos. Everyone who sees these ledges loves them!! This was my first project. Thanks Ana for the great plans!
Estimated Cost
$50
Estimated Time Investment
Afternoon Project (3-6 Hours)
Finish Used
White gloss spray praint
Recommended Skill Level
Starter Project
Comments
Mon, 10/21/2013 - 12:51
Picture Frames
I might spray paint all the picture frames white or an oil rubbed bronze in the future...I'm not sure yet. Opinions?

Mon, 10/21/2013 - 18:27
Beautiful gallery!
Your gallery looks beautiful! Great job on your first project, congratulations!
(ps- I think the oil rubbed bronze would look super on the picture frames.)
DIY Farmhouse Bed wth Boxspring
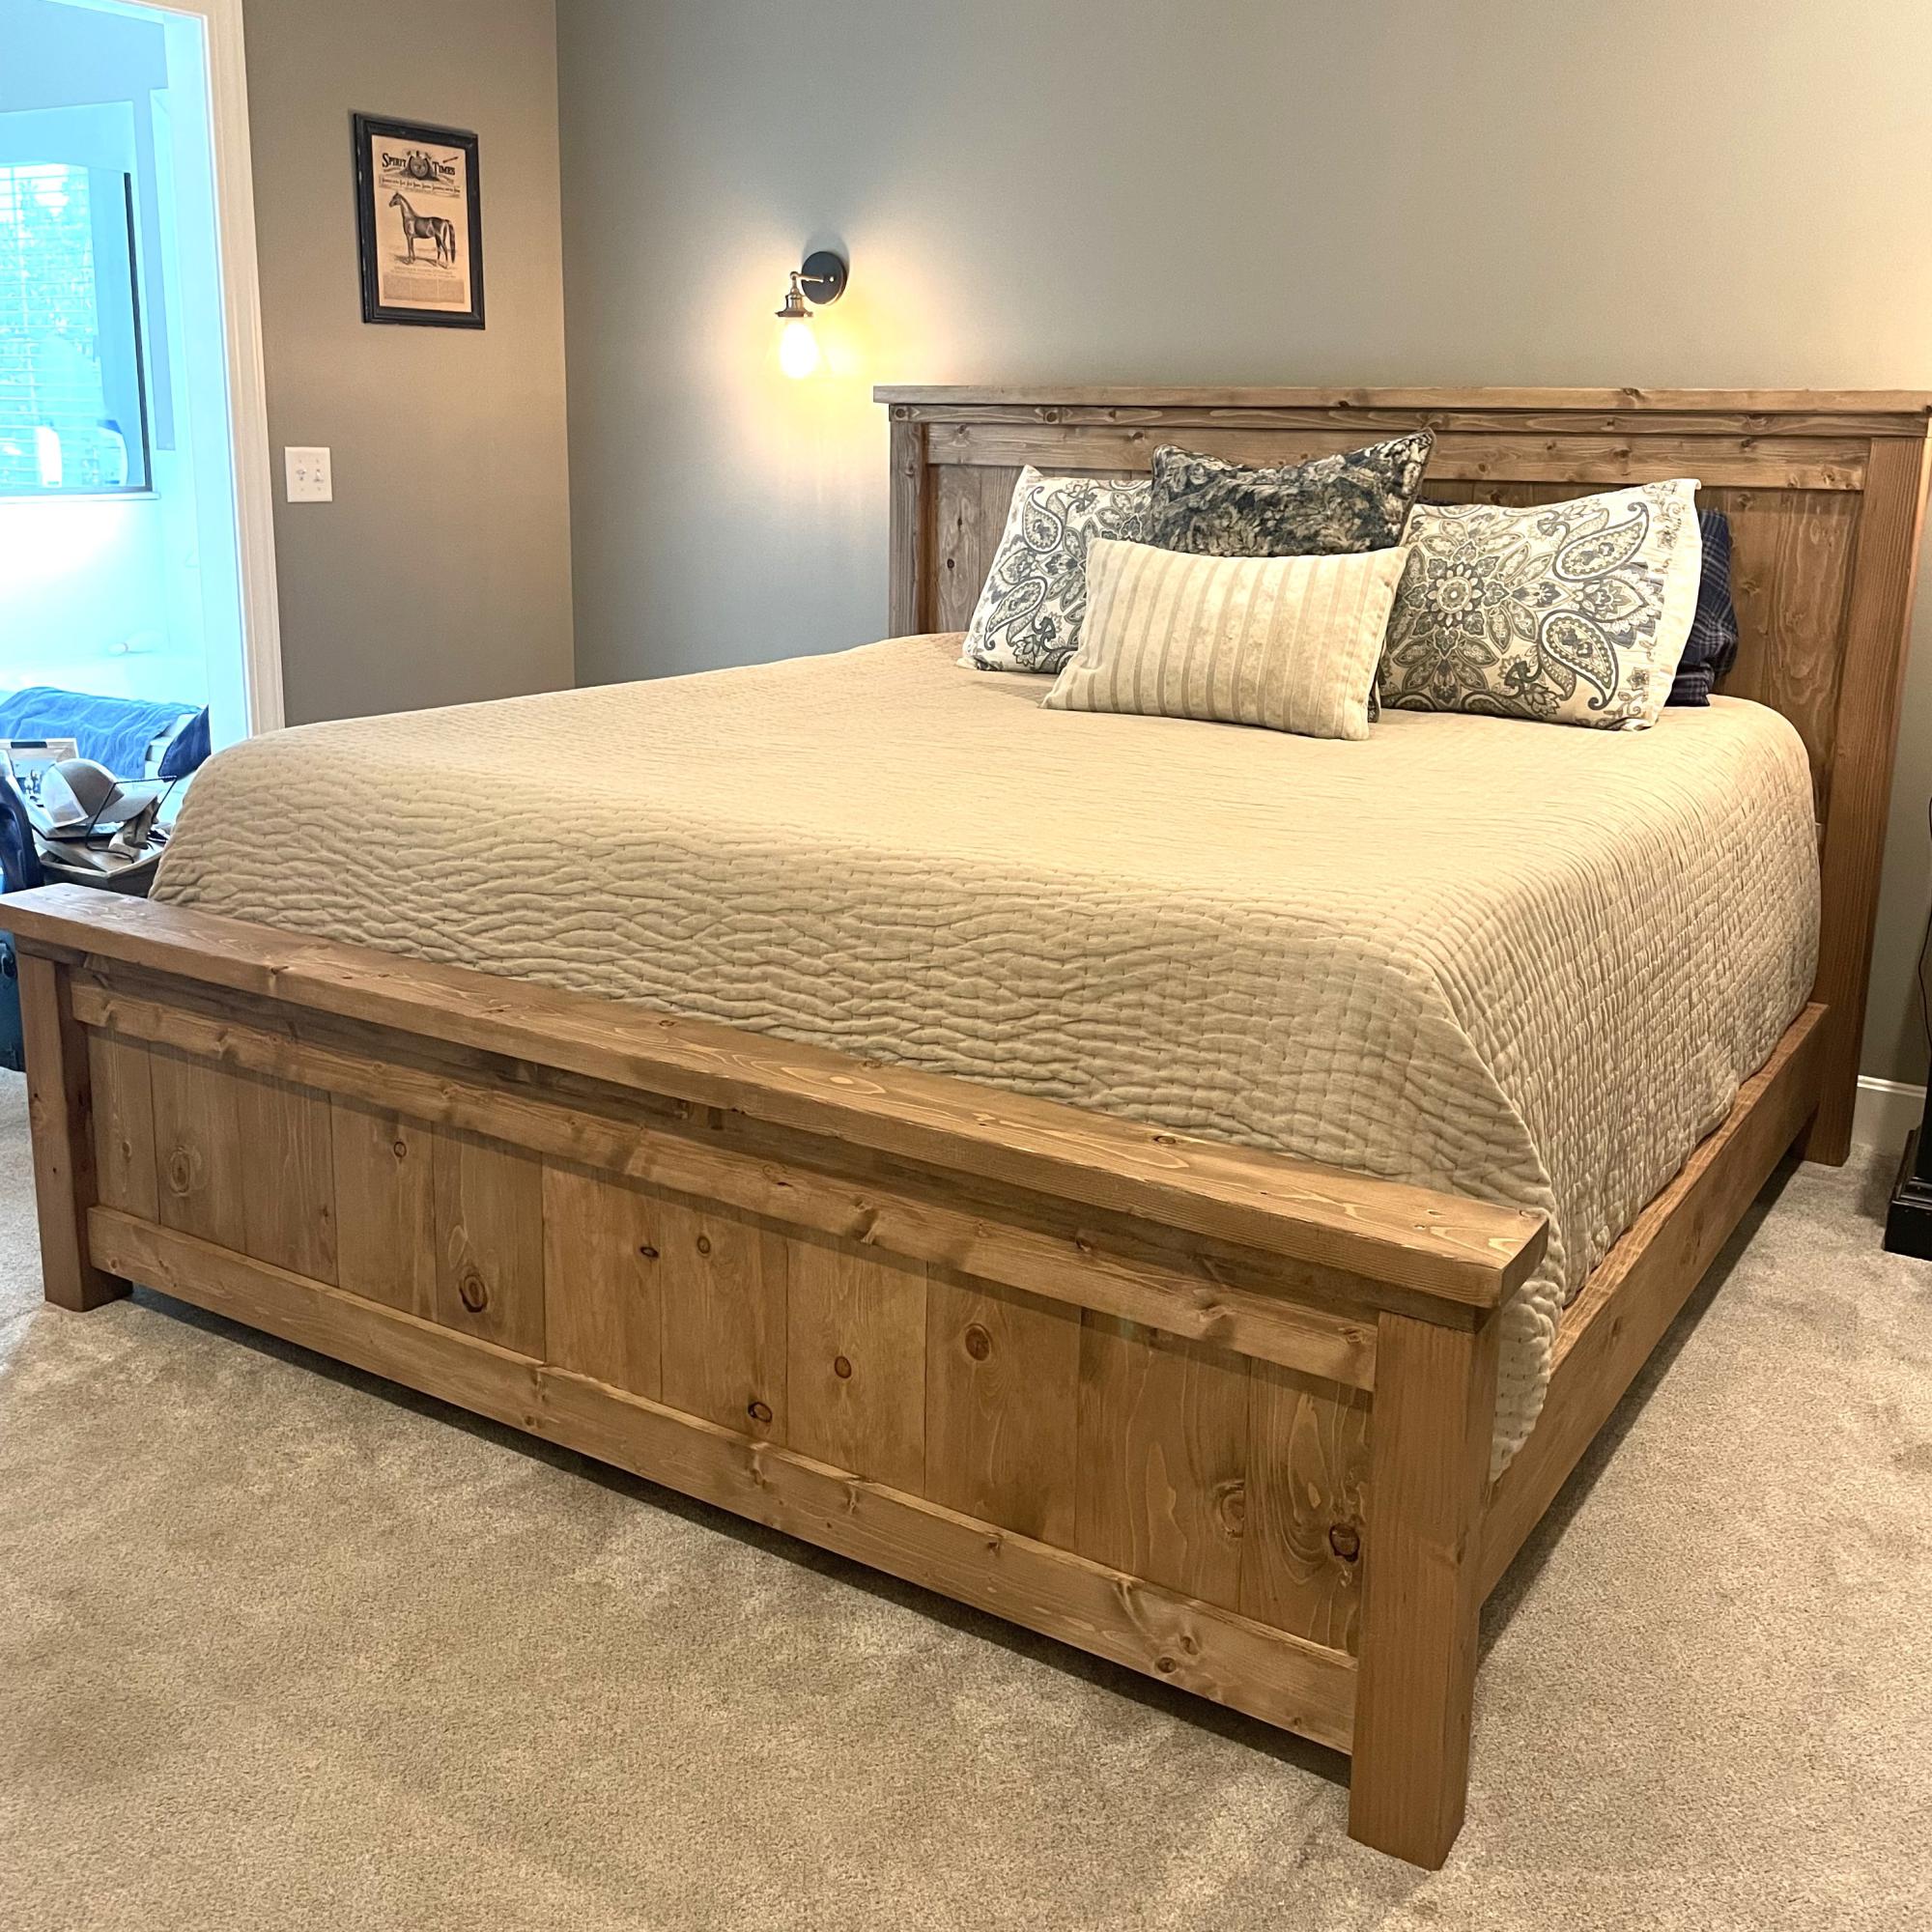
Wood = Pine
Finish = Minwax Special Walnut (after Pre-Stain)
This was a pretty straight forward build, but nice to have an extra set of hands. On the top board of the head/footboard, a countersink bit was used to recess the screw heads (otherwise, all fasteners in the plan are concealed). Then a mixture of glue/sawdust was used to smooth over the countersink hole. The whole project was sanded starting with 60 working up to 220.
We followed the plan, and in the photo this is the height of the bed with box springs and mattress. The bed feels sturdy and comfortable. It was a fun project and my first shot at interior furniture.
Built from Plan(s)
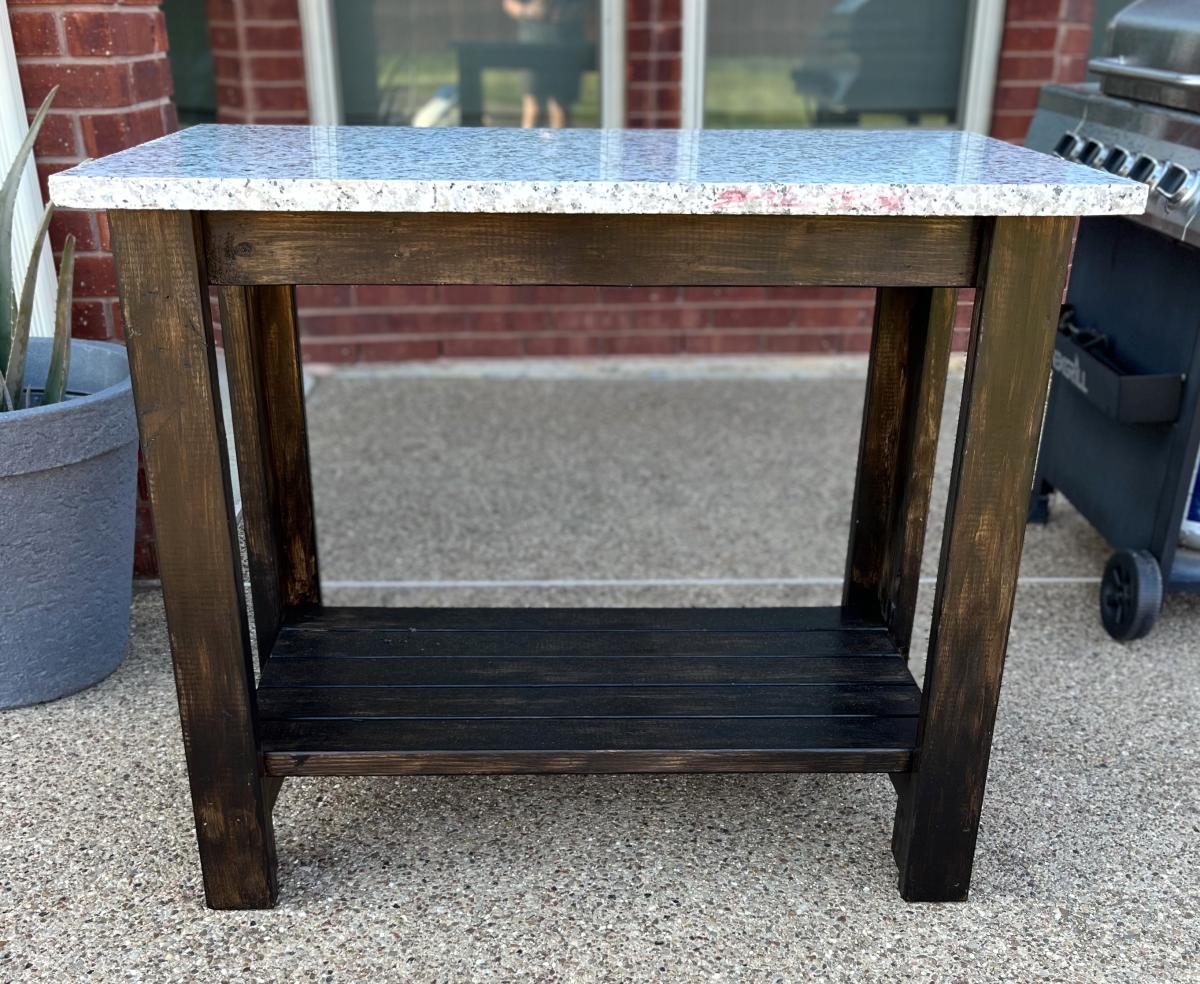
Grill Table with Marble Top
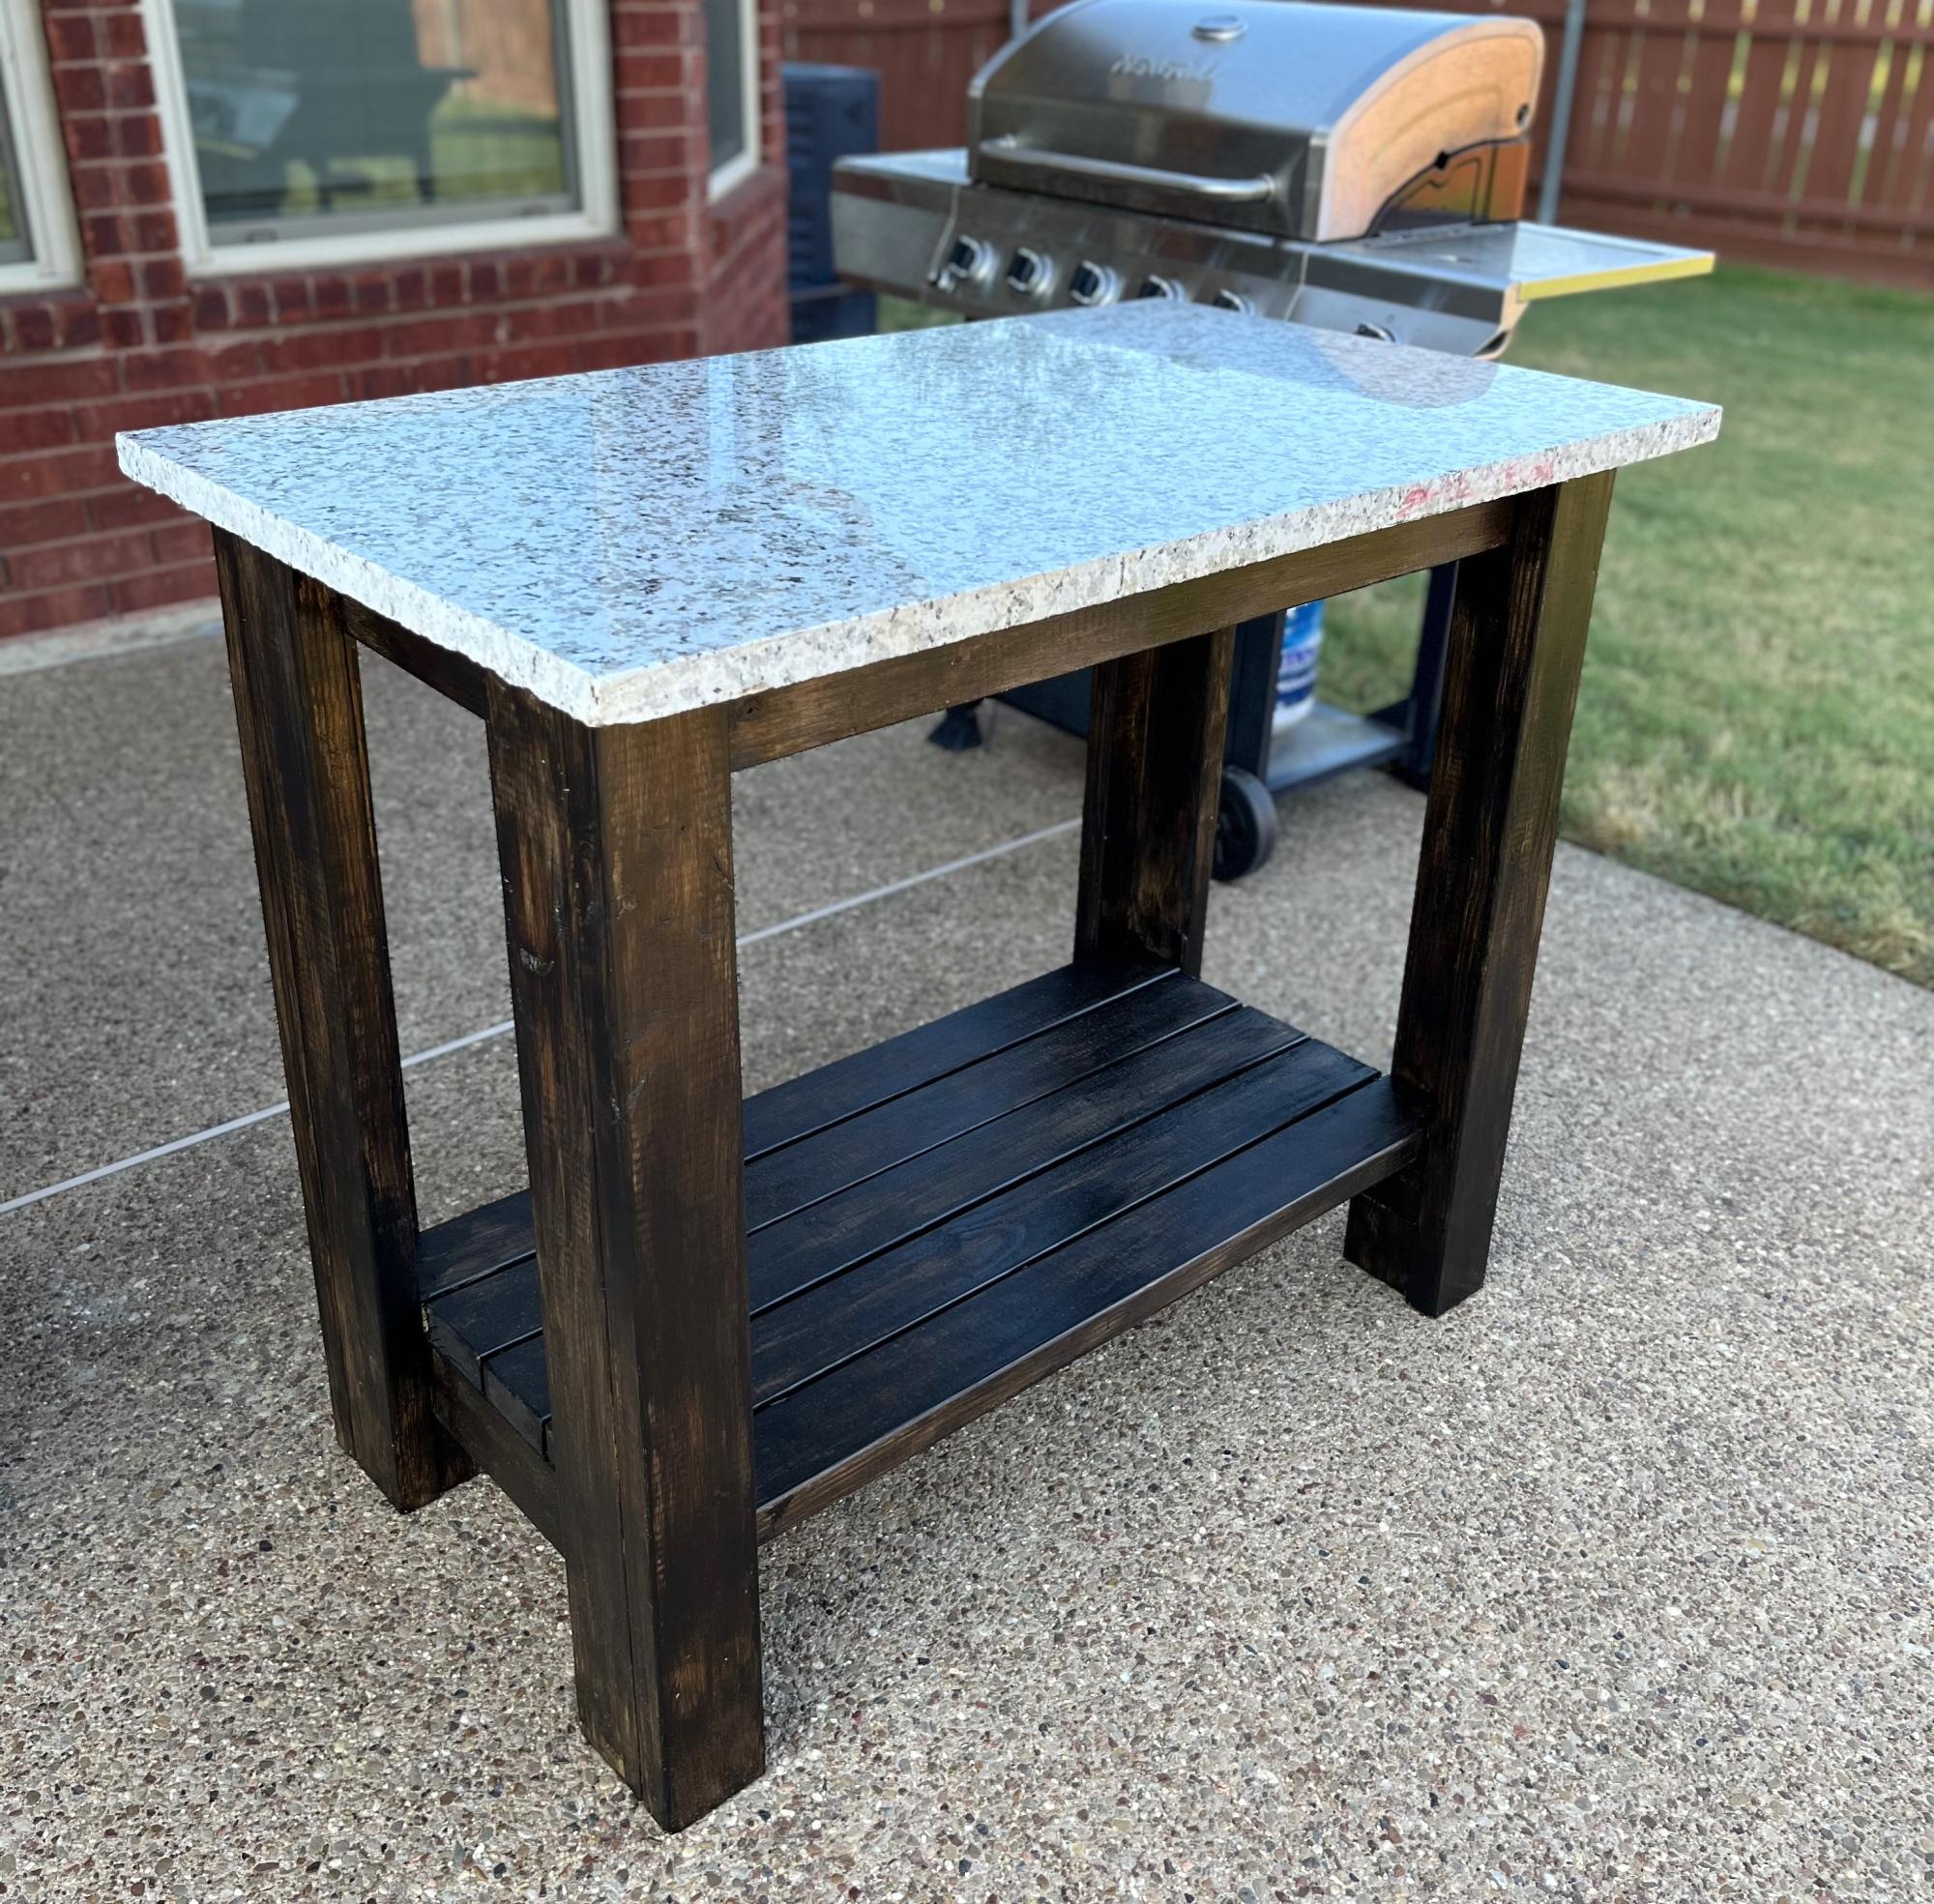
I used some leftover marble from having our countertops replaced and modified the plans to fit the marble. Love my new grill table!
Shawna
Built from Plan(s)
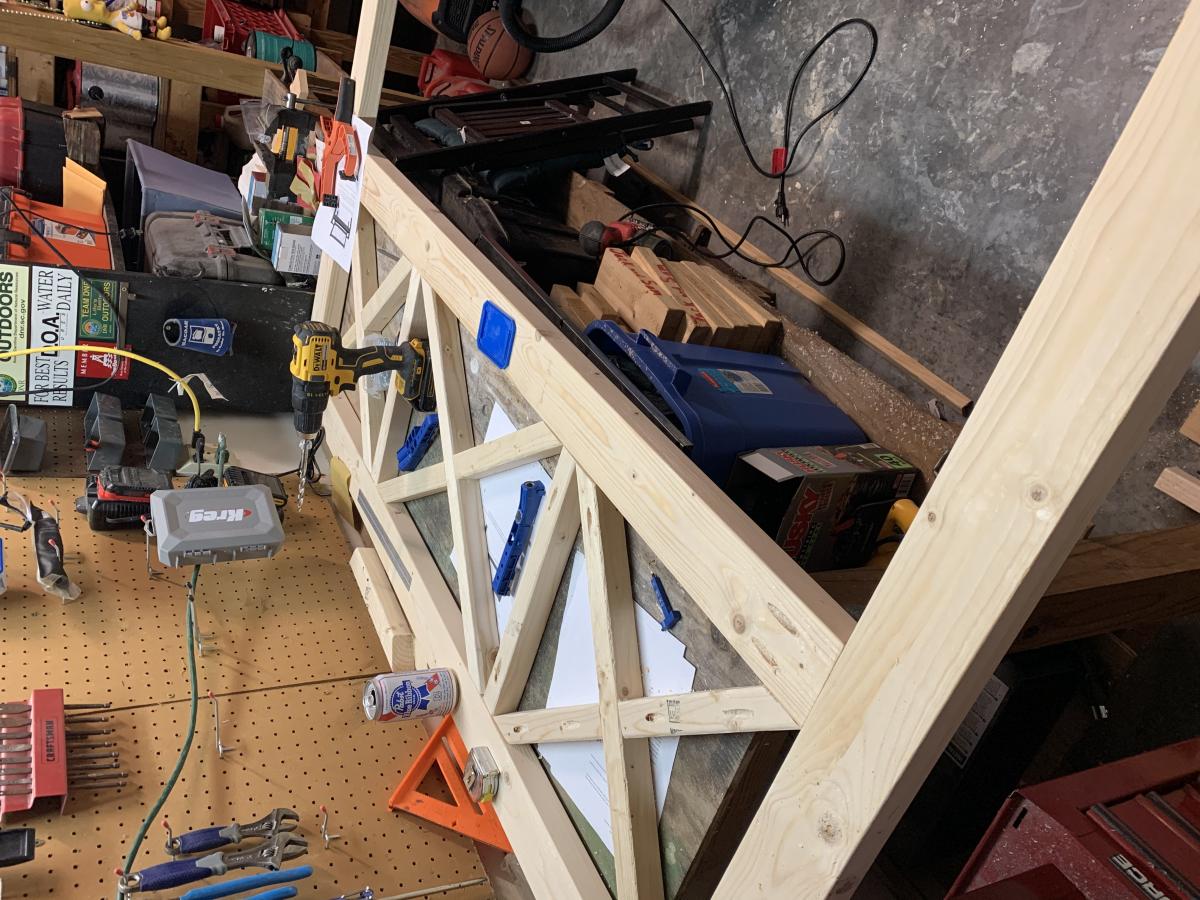
Ultimate Workshop Workbench
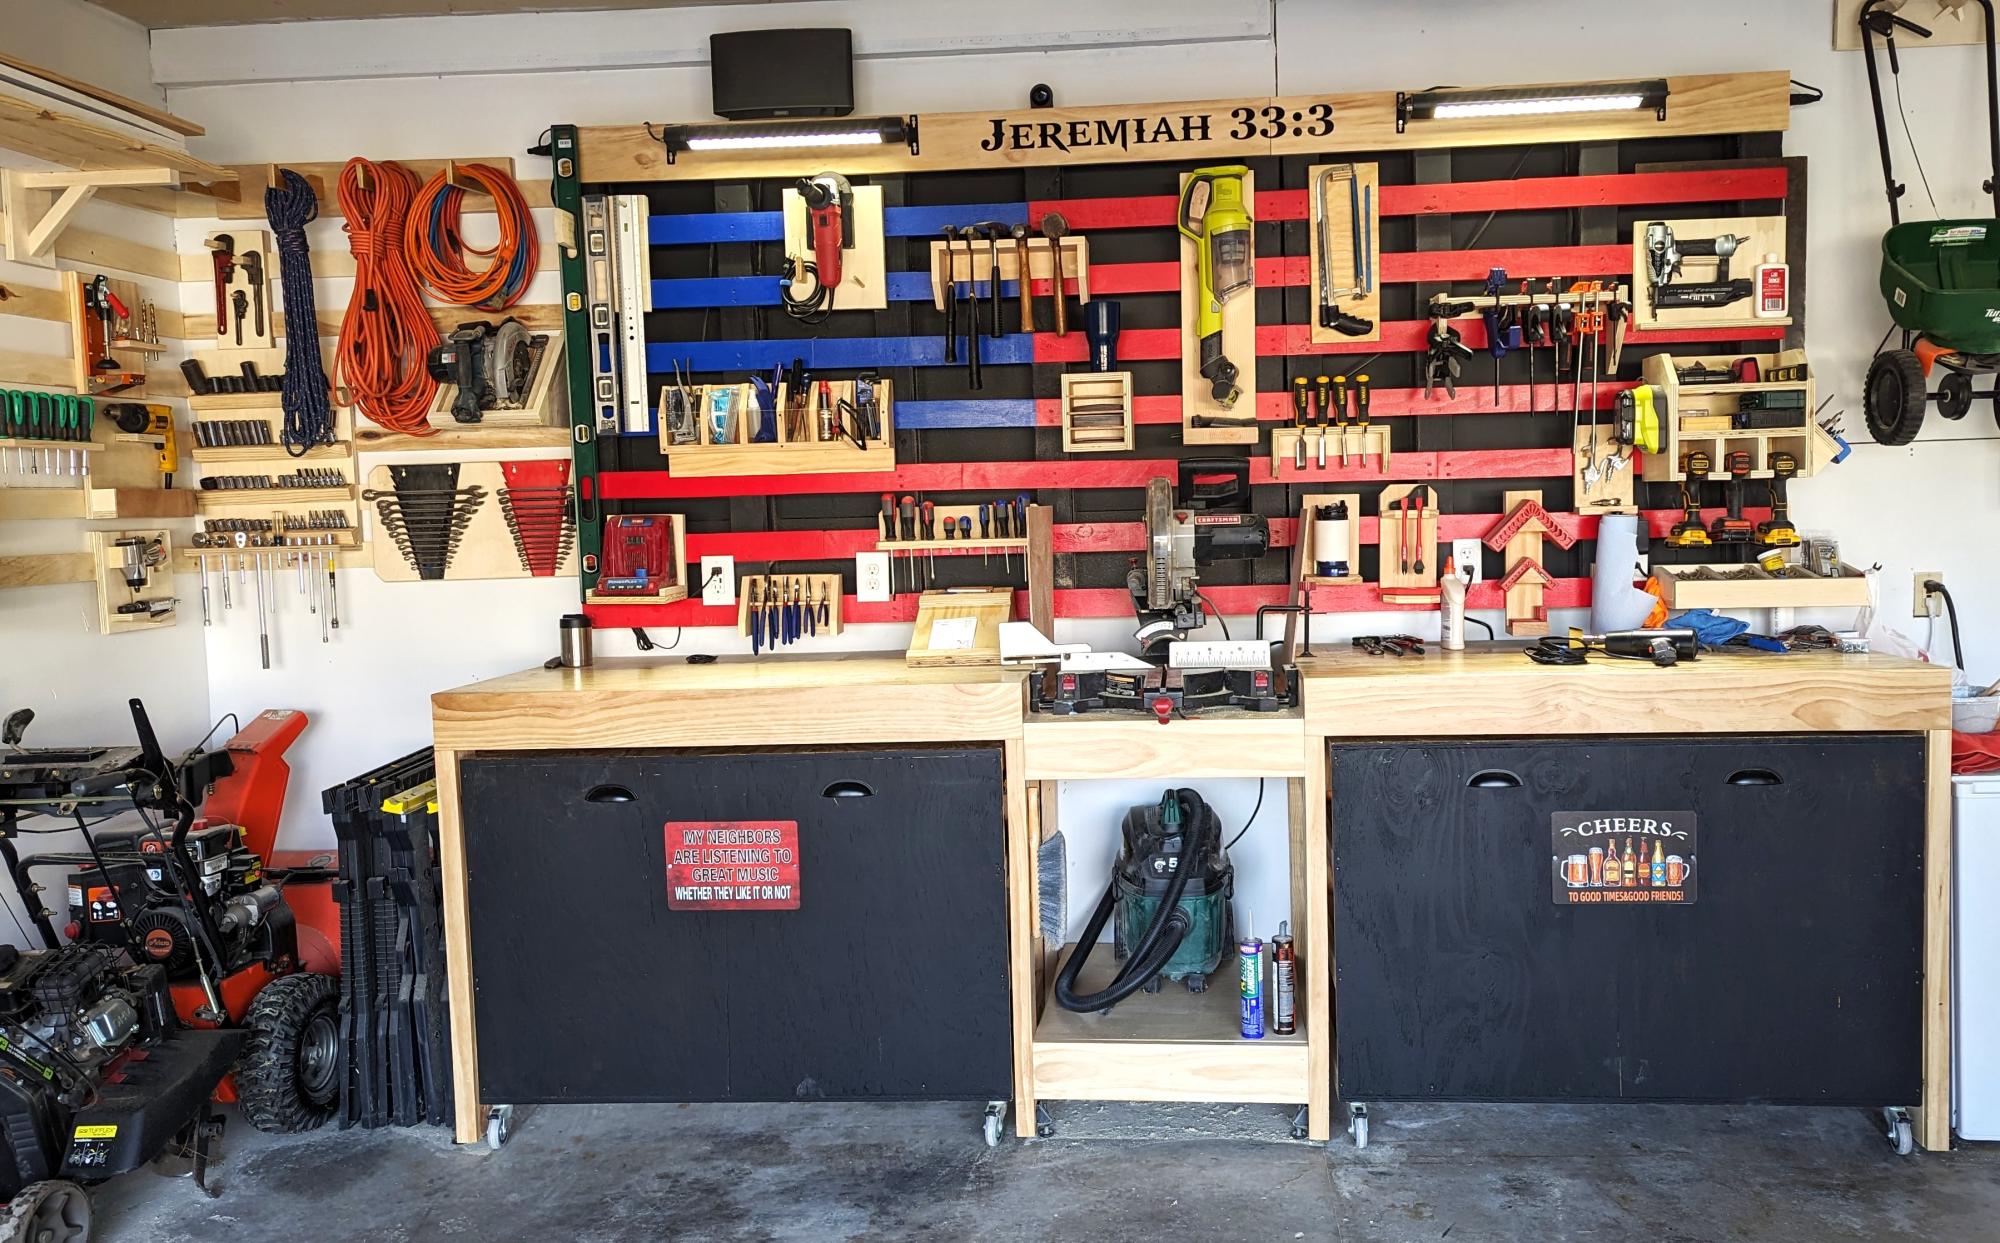
My garage needed an overhaul and I wanted to start a hobby in woodworking.
I found my way to Ana's website and found some of the best ideas and decided to try my attempt at building the Ultimate Roll Away Workbench with Miter Saw Stand.
This helped inspire me to augment my garage and build that workbench and new french cleat wall.
Thank you Ana for having such an awesome website and offering up ideas for free!!
Built from Plan(s)
Comments
Three-Legged Stool
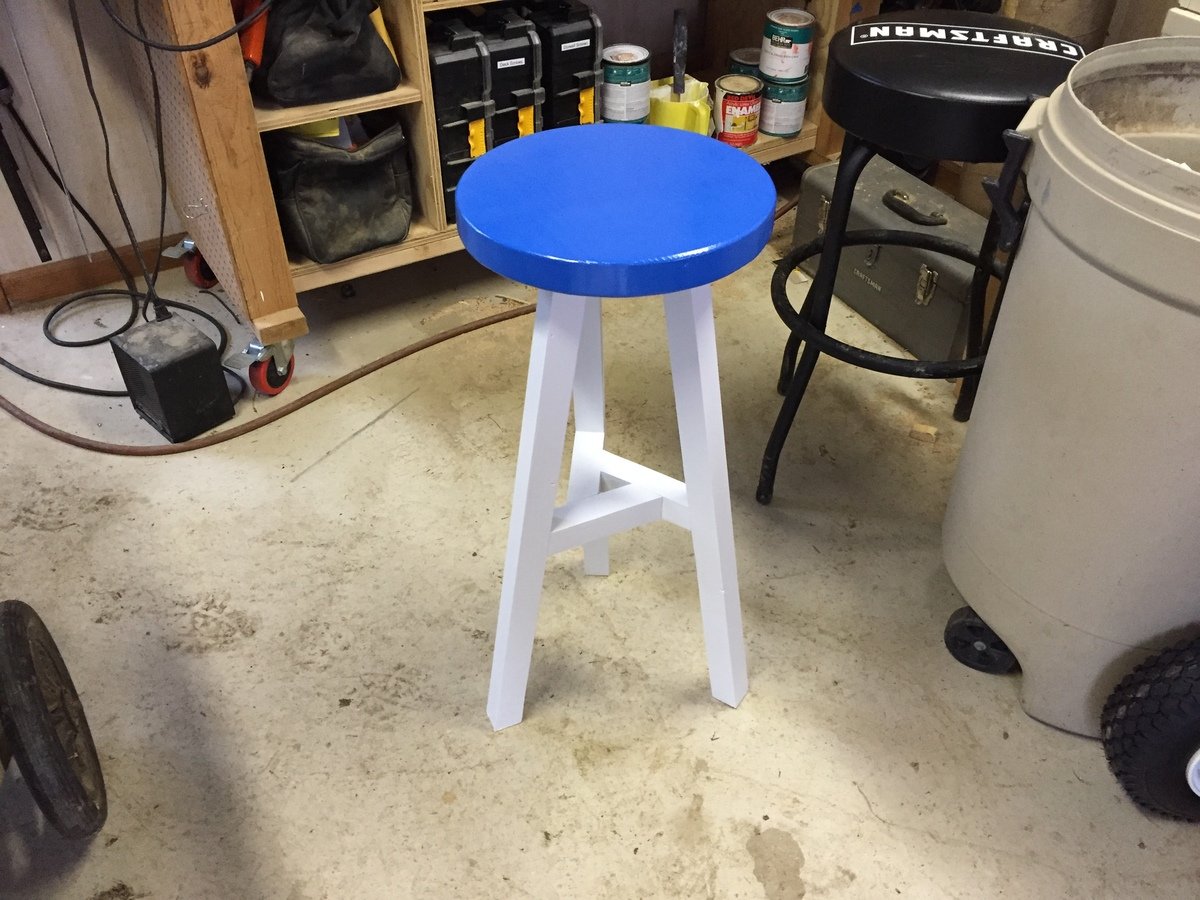
My 13-year-old daughter asked me about making a stool, with the main requirement being it had to have a round seat. So I turned to this ana-white.com to see if I could find something that we could do and found the plans for the three-legged stool. The first one we made with the dimensions specified in the plans but she thought it was too short. So we made another one with longer legs and a larger diameter seat.
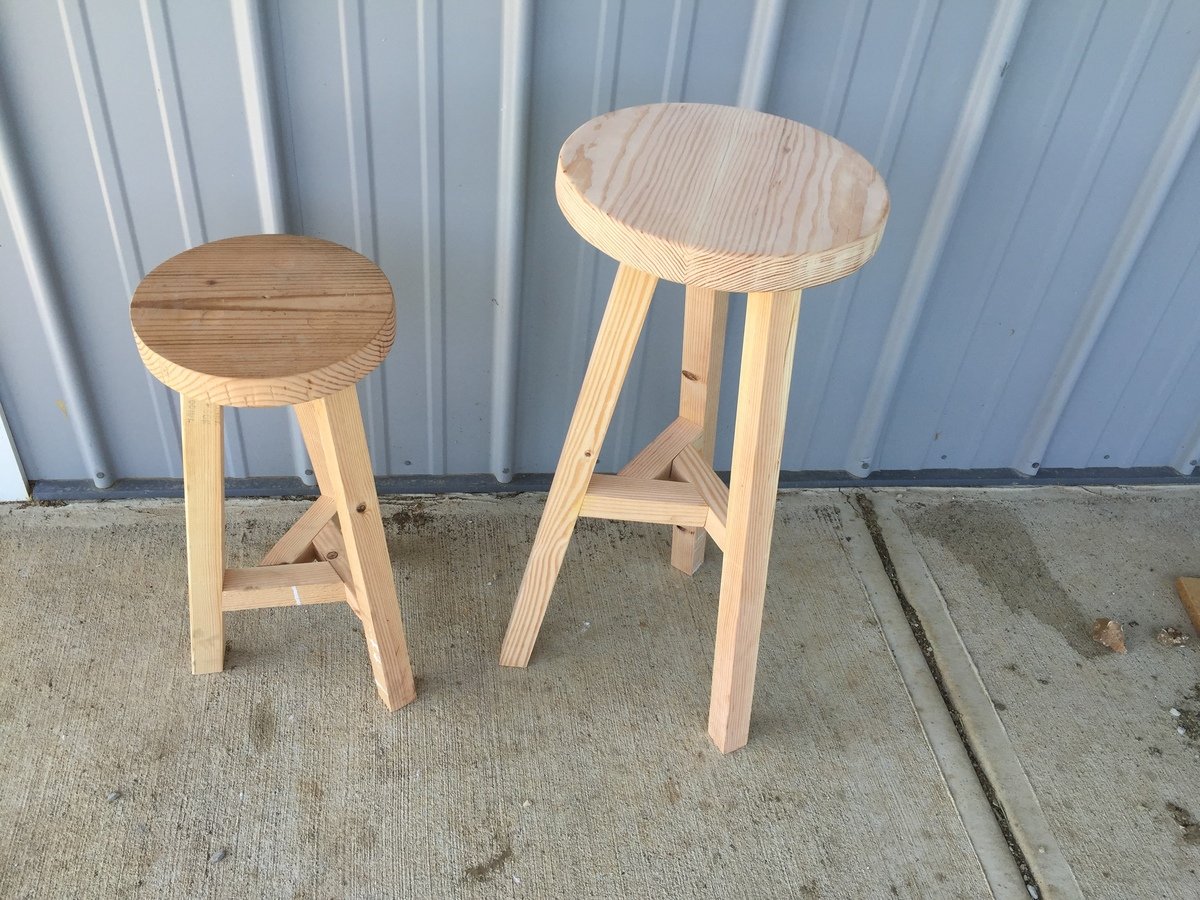
Built from Plan(s)
Estimated Cost
$4. The lumber was scrap and the white paint was leftover. We only bought the blue paint.
Estimated Time Investment
Afternoon Project (3-6 Hours)
Finish Used
Rustoleum Painter's Touch
Recommended Skill Level
Beginner
Log Cabin Birdhouse
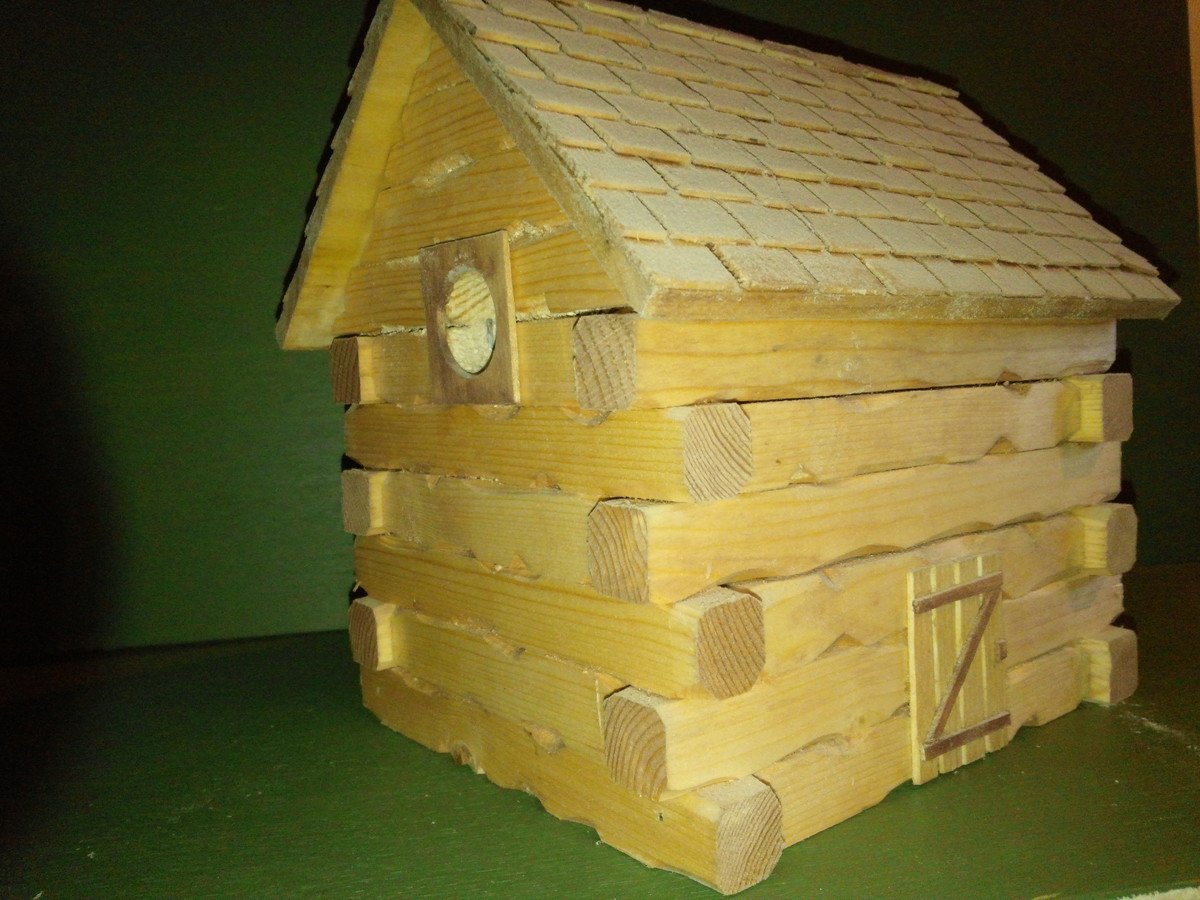
I enjoy making birdhouses and log cabin style is my favorite. I make the logs by setting my saw to rip 3/4 pine at 3/4 so I have 3/4 square strips. I then decide the size of my birdhouse and cut the logs accordingly. I also "wittle" on them a little to make it look more authentic. I simply then just stack, glue and nail one row at a time. You can use 1/4 poplar for the roof but I ripped pine at 1/16 and cut shakes with my utility knife and glue them on one at a time (there are 104 on this roof).
Estimated Cost
7.00
Estimated Time Investment
Afternoon Project (3-6 Hours)
Recommended Skill Level
Intermediate