Community Brag Posts
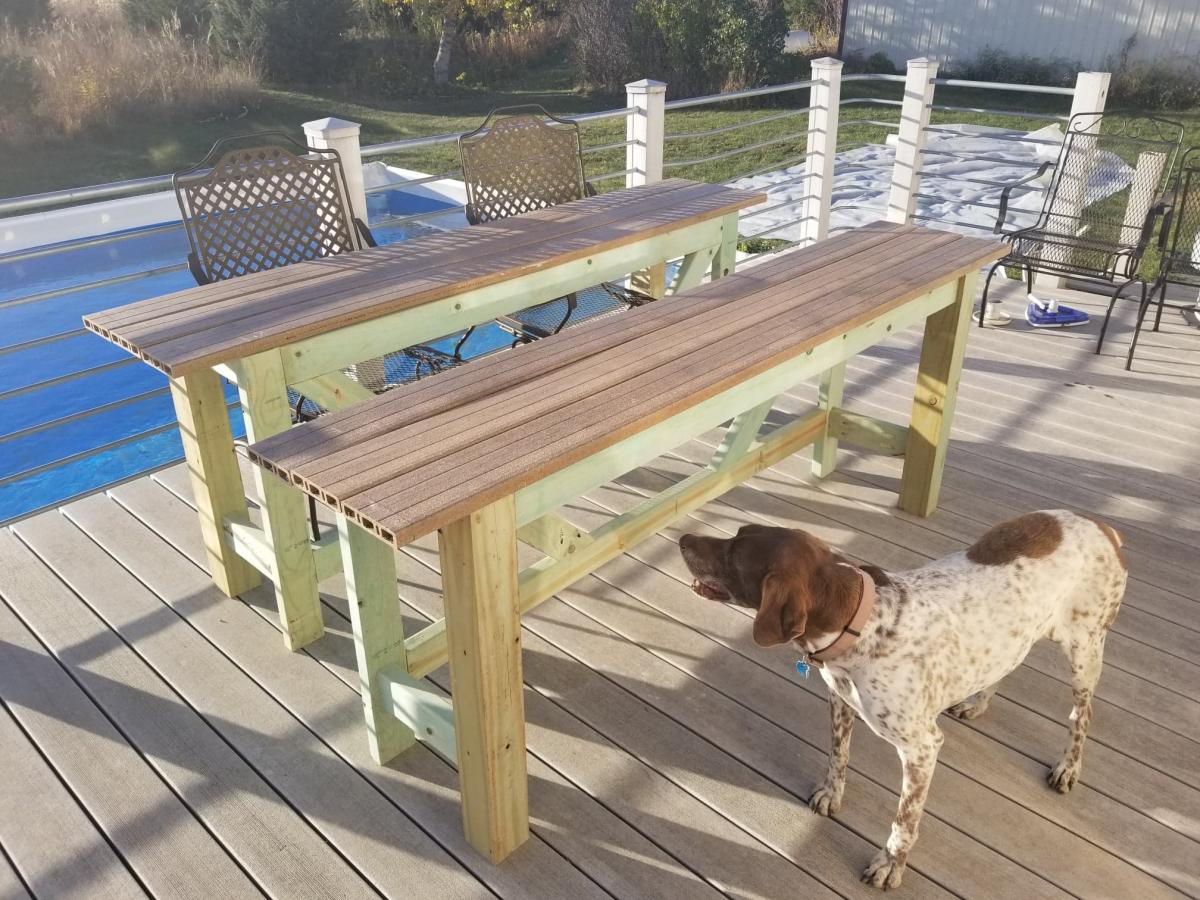
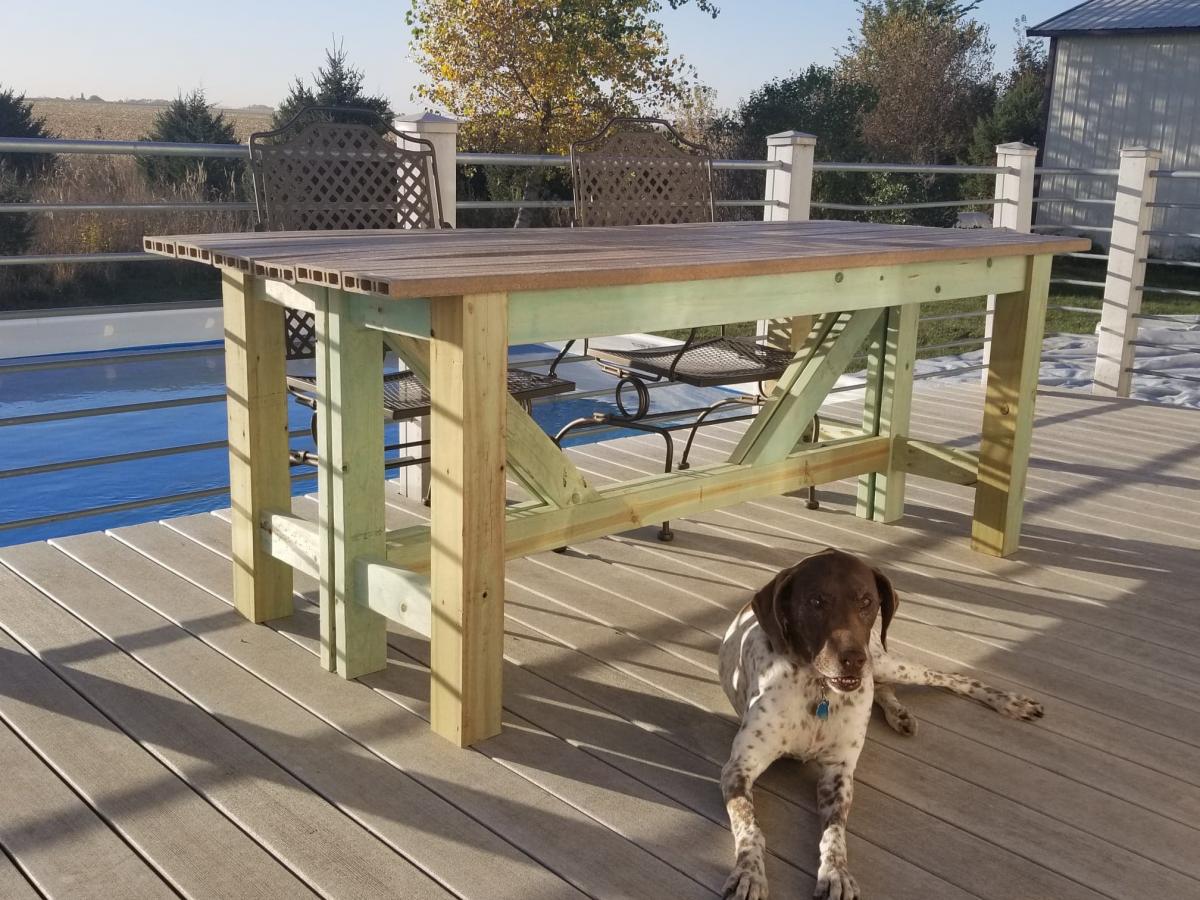
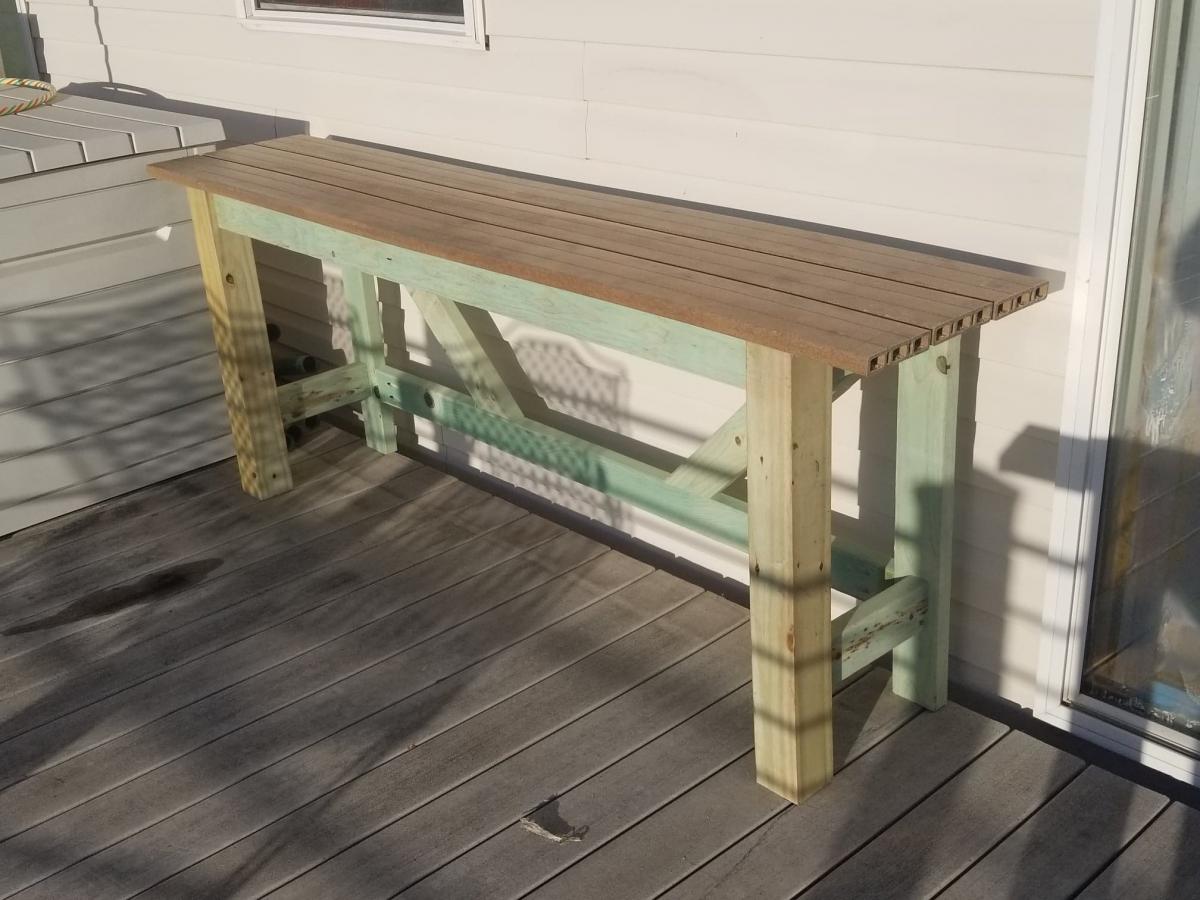
Outdoor Deck Tables
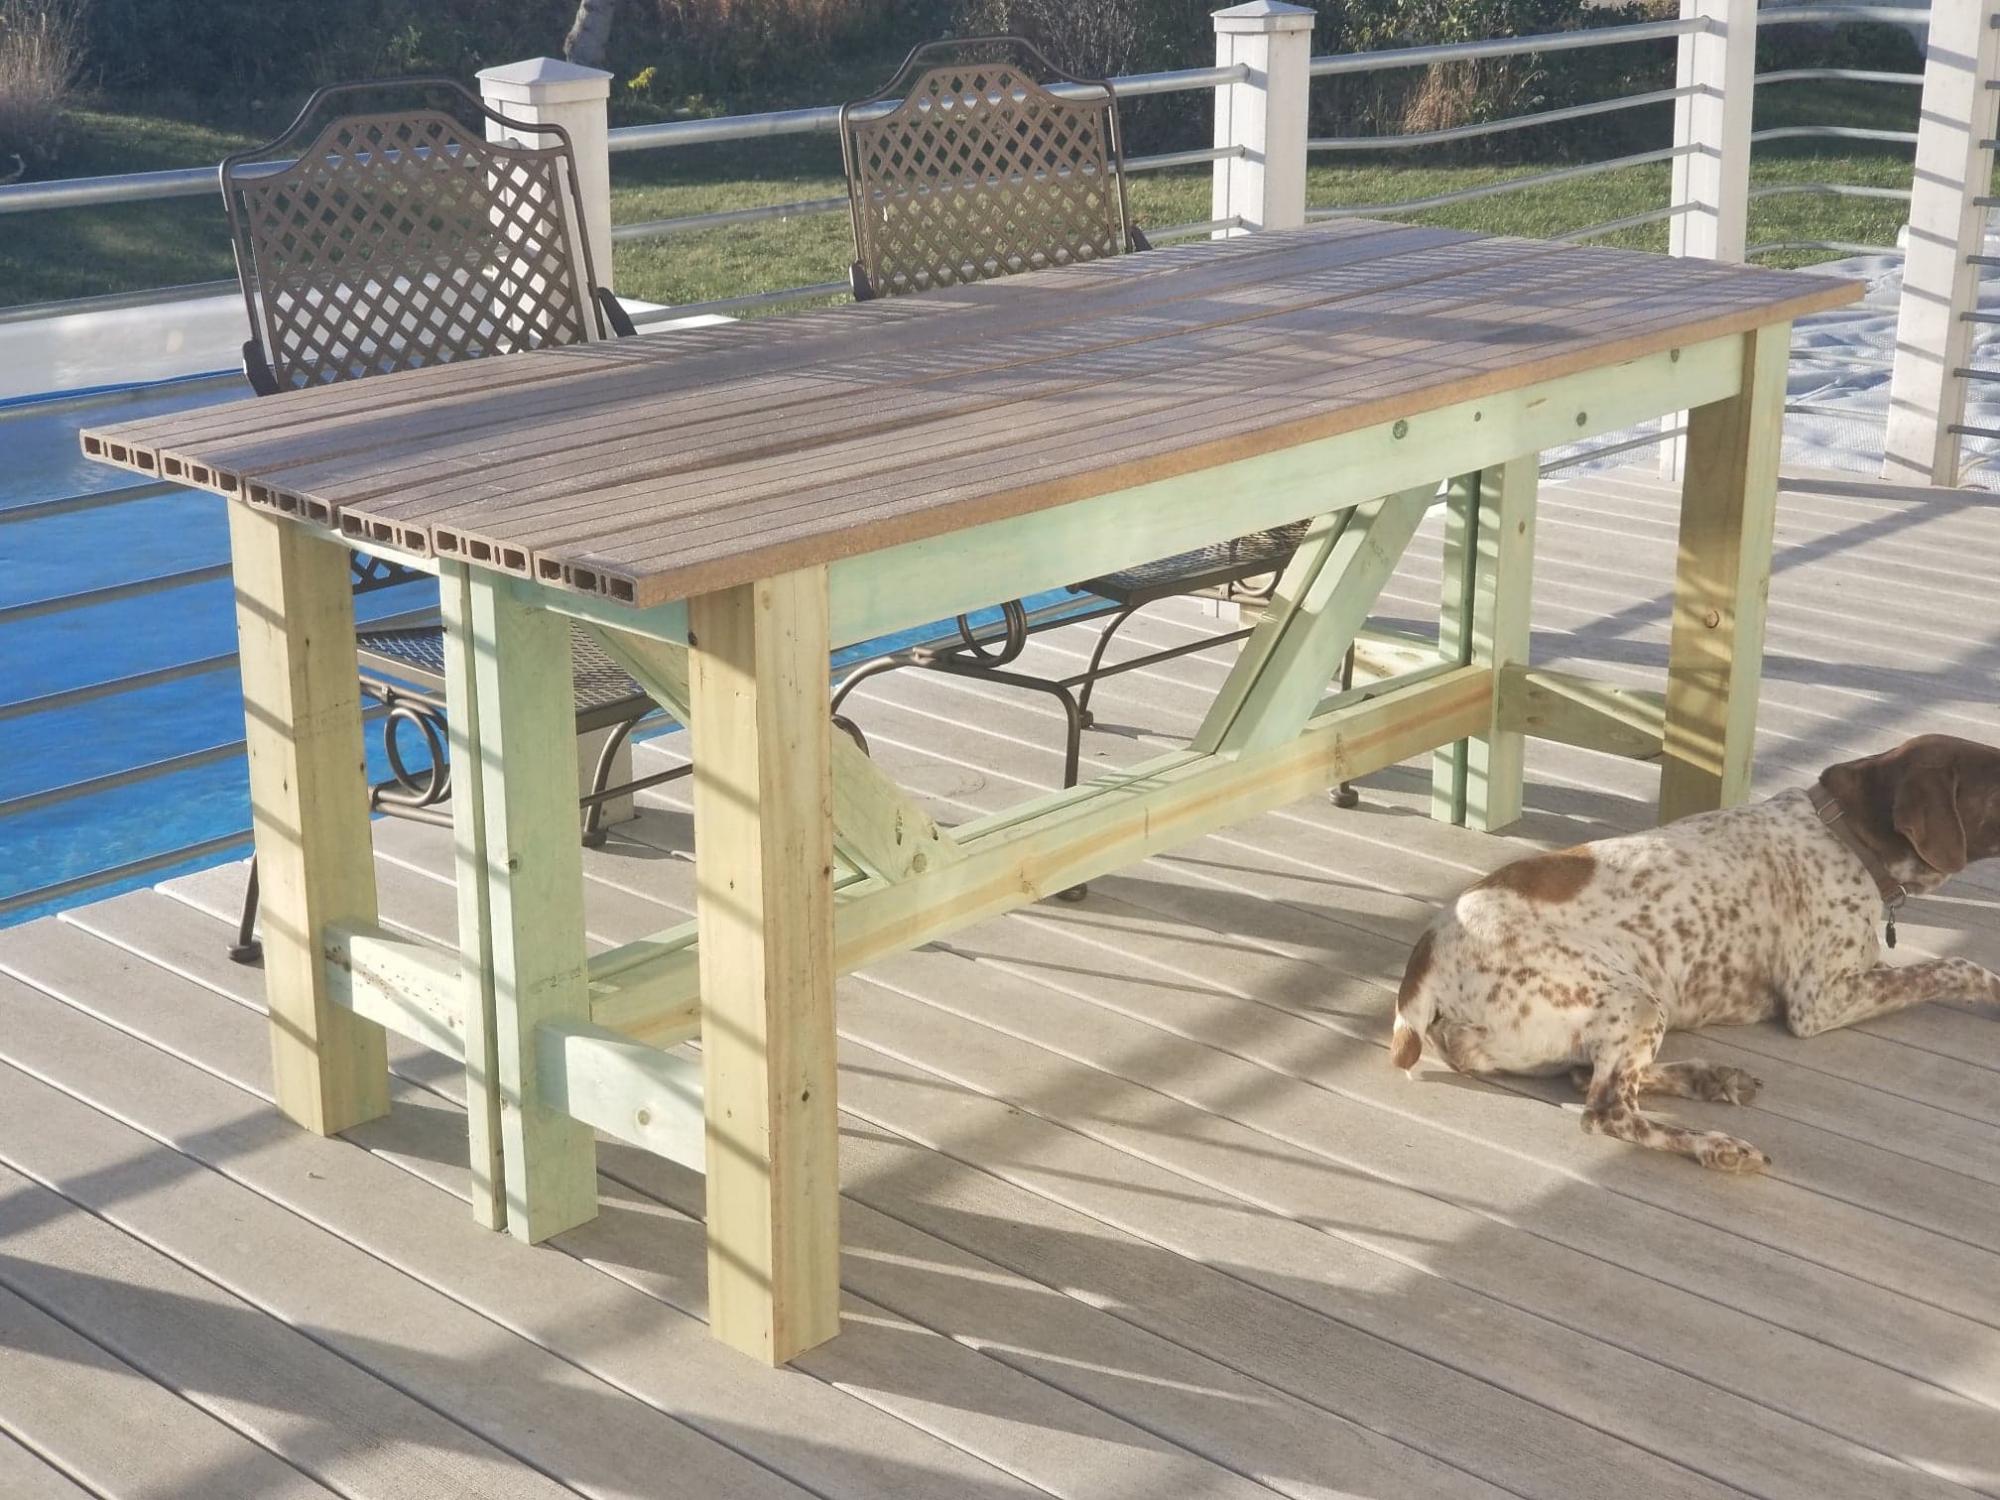
My wife and I were looking for a dining table for our deck. We looked at a few to purchase but could not decide. I wanted something that would not take up a lot of deck space. When the Facebook post for the "Outdoor Bar Table" came up, it inspired me to try to build a similar table. I already had purchased a Kreg HD pockethole jig for a project I never got to (At least yet), so I figured construction would be pretty simple.
I should say my tables are loosely based off of Ana's plans, they served as a good reference. I lowered the table to 30" to match our existing deck chairs. I decided to actually build 2 half tables, so that when we were not using the table they could be set to the side of the deck. The back of each table is constructed with 2x4s so when the tables are put together it maintains the 4x4 look.
For the tabletop I had extra composite deck boards that I never used for the deck, so the depth of each half table was based on using 3 deck boards, with a 1/4" gap between each deck board. I used the same hidden fastener method I used on the original deck, so the deck boards are secured from under the table.
This being my first pocket hole project, there are a couple of small mistakes. 1) On the 45 degree trusses cut all 4 at the same time, then did the pocket holes. I missed the fact that I needed to drill 2 of the pocket holes on the opposite side. 2) I built the 2nd table back on top of the 1st table back so they matched. but I got mixed up when assembling the 2nd table so the pocket holes that should have been on the side facing the other table back, are facing the opposite side.
I did use Treated lumber for the table frame, and some of the pieces were still pretty wet, so we will wait until next year to paint the base.
We really like how they turned out, and that we still have almost all of our deck space when the tables are in the "Stored" locations.
Built from Plan(s)
Estimated Cost
$85
Estimated Time Investment
Afternoon Project (3-6 Hours)
Finish Used
None as of yet, Plan on painting after treated wood dries out
Recommended Skill Level
Starter Project
Comments
Mon, 10/12/2020 - 09:54
Perfect for outdoor dining!
I love your creation and the use of deck boards for the top, thanks for sharing!
Mon, 10/12/2020 - 20:50
I should say Thank You for…
I should say Thank You for all your sharing, which made this project possible!
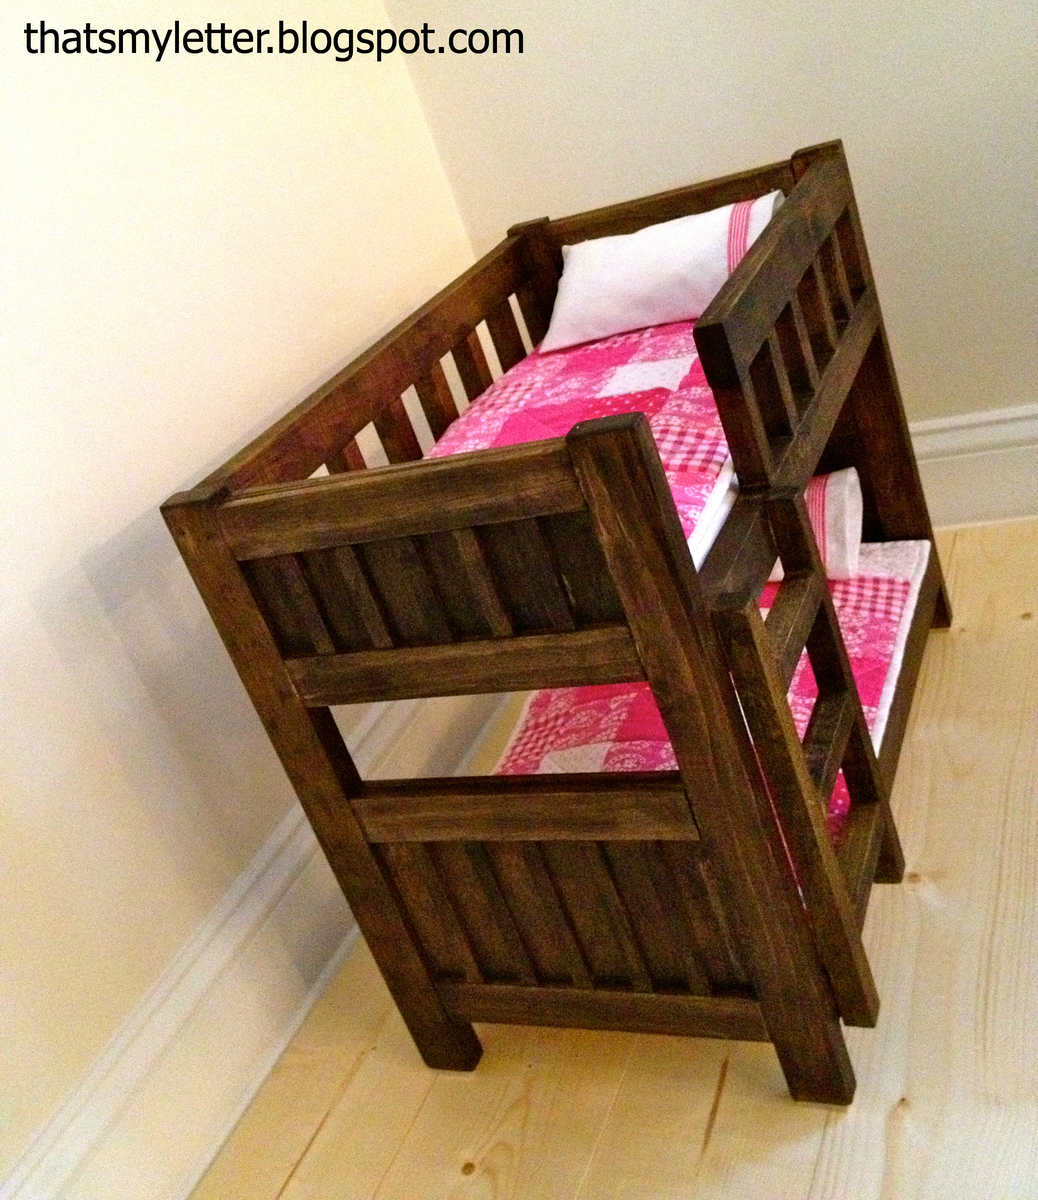
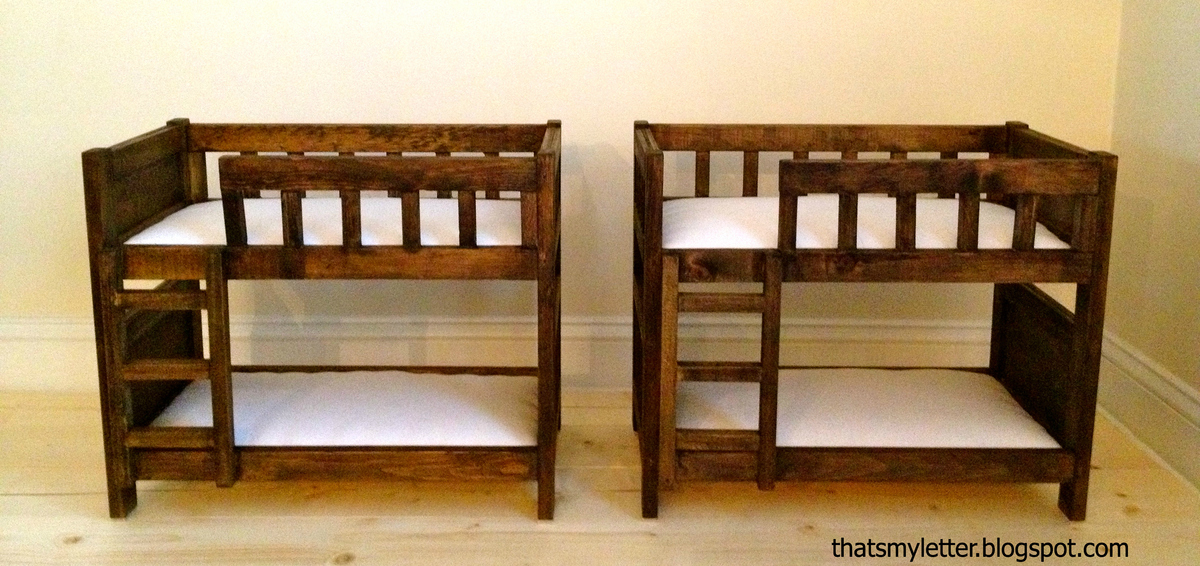
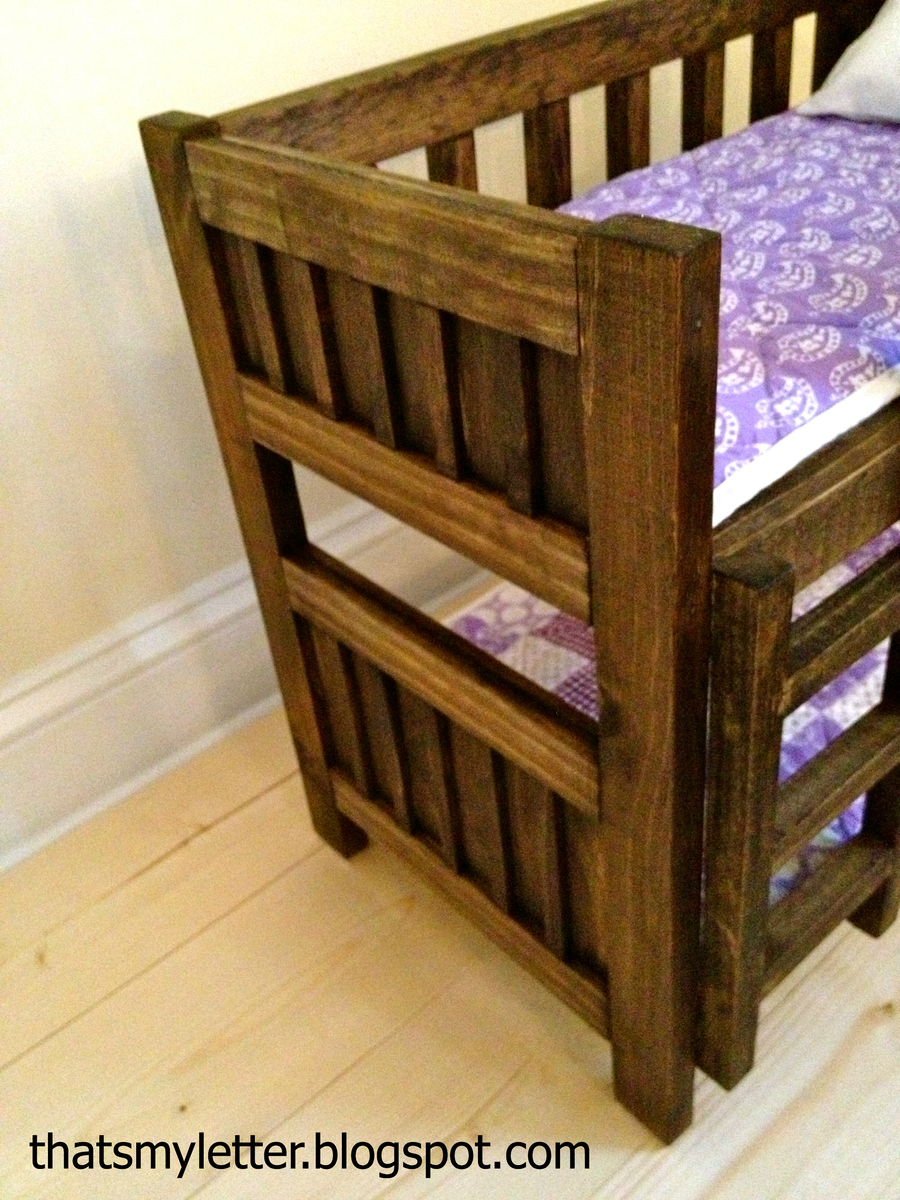
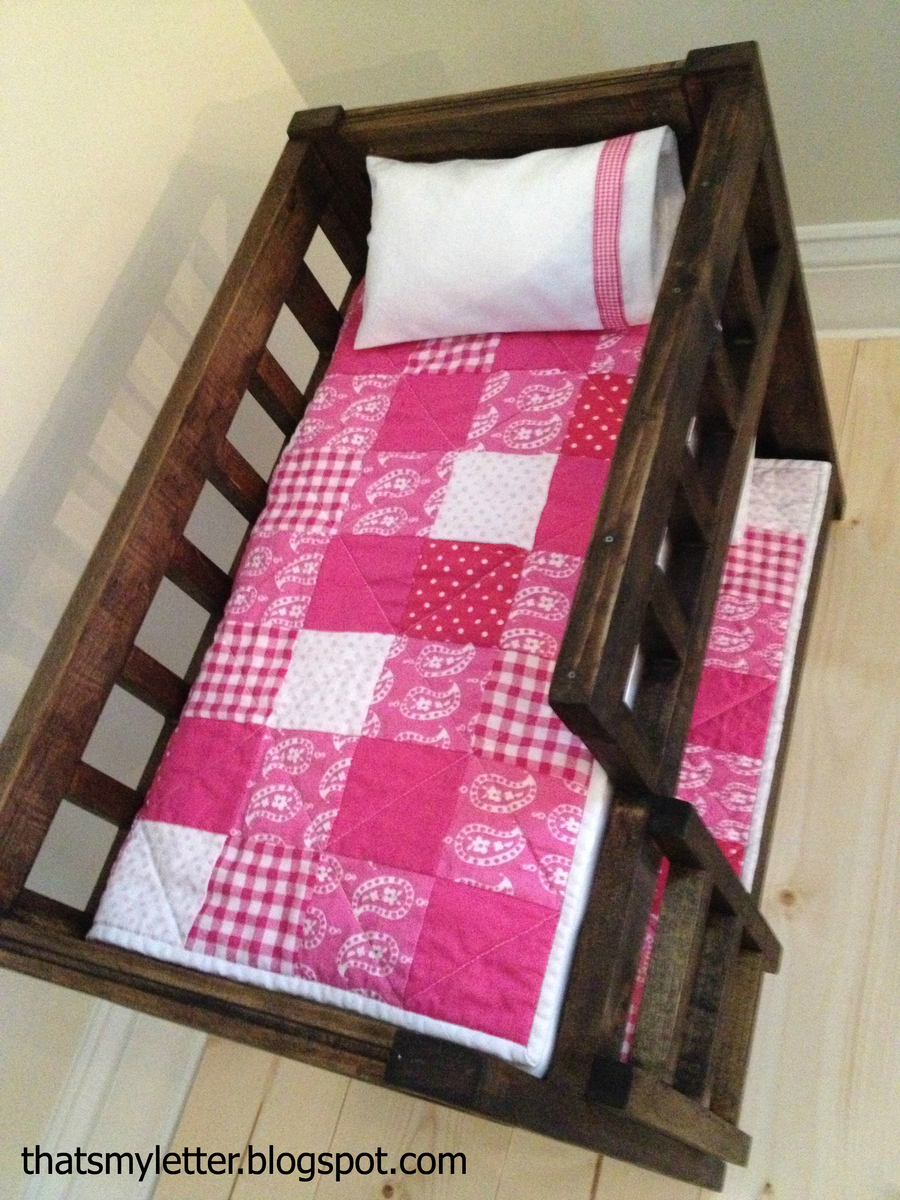
camp bunk beds (solid head & footboards)
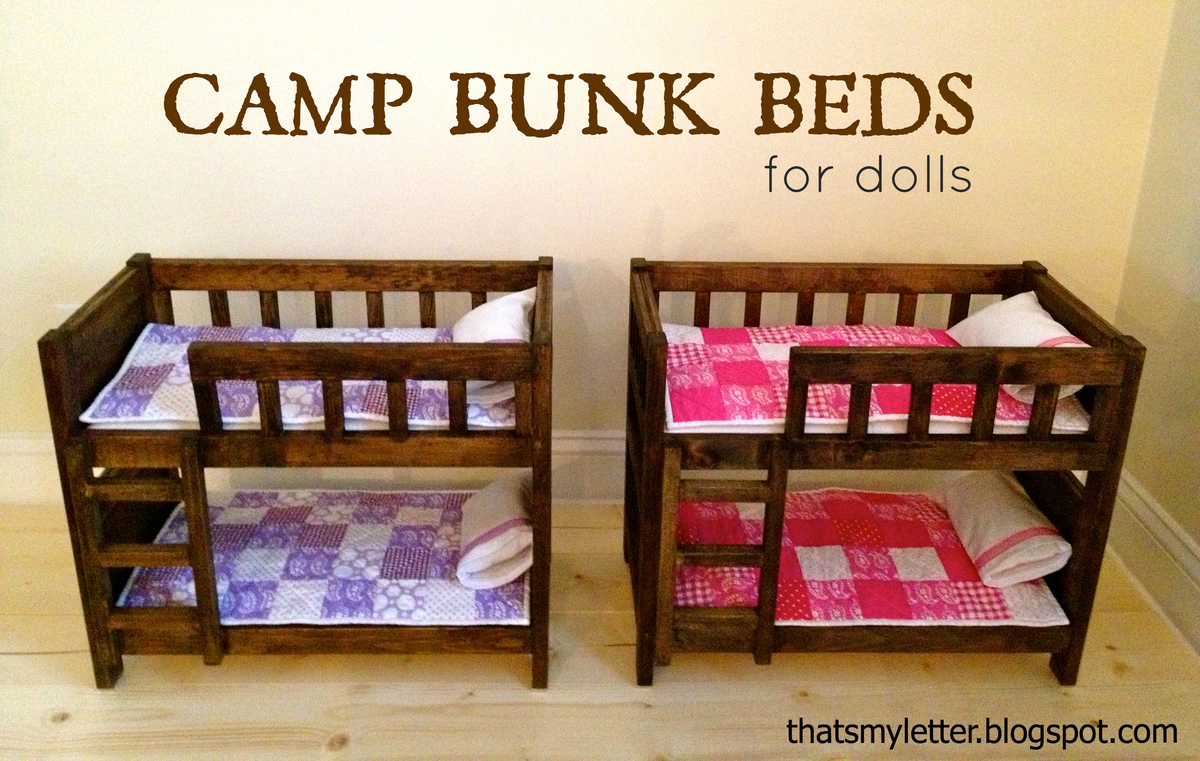
The doll size version of PB camp bunk beds with a solid head and footboard made to mimic the real life size version. I made these bunks to match the life size version which the girls have in their ski house complete with matching quilts using the same fabric from their bedding.

Built from Plan(s)
Estimated Cost
$40 each
Estimated Time Investment
Day Project (6-9 Hours)
Finish Used
Minwax Jacobean stain, wipe on clear satin poly.
Recommended Skill Level
Intermediate
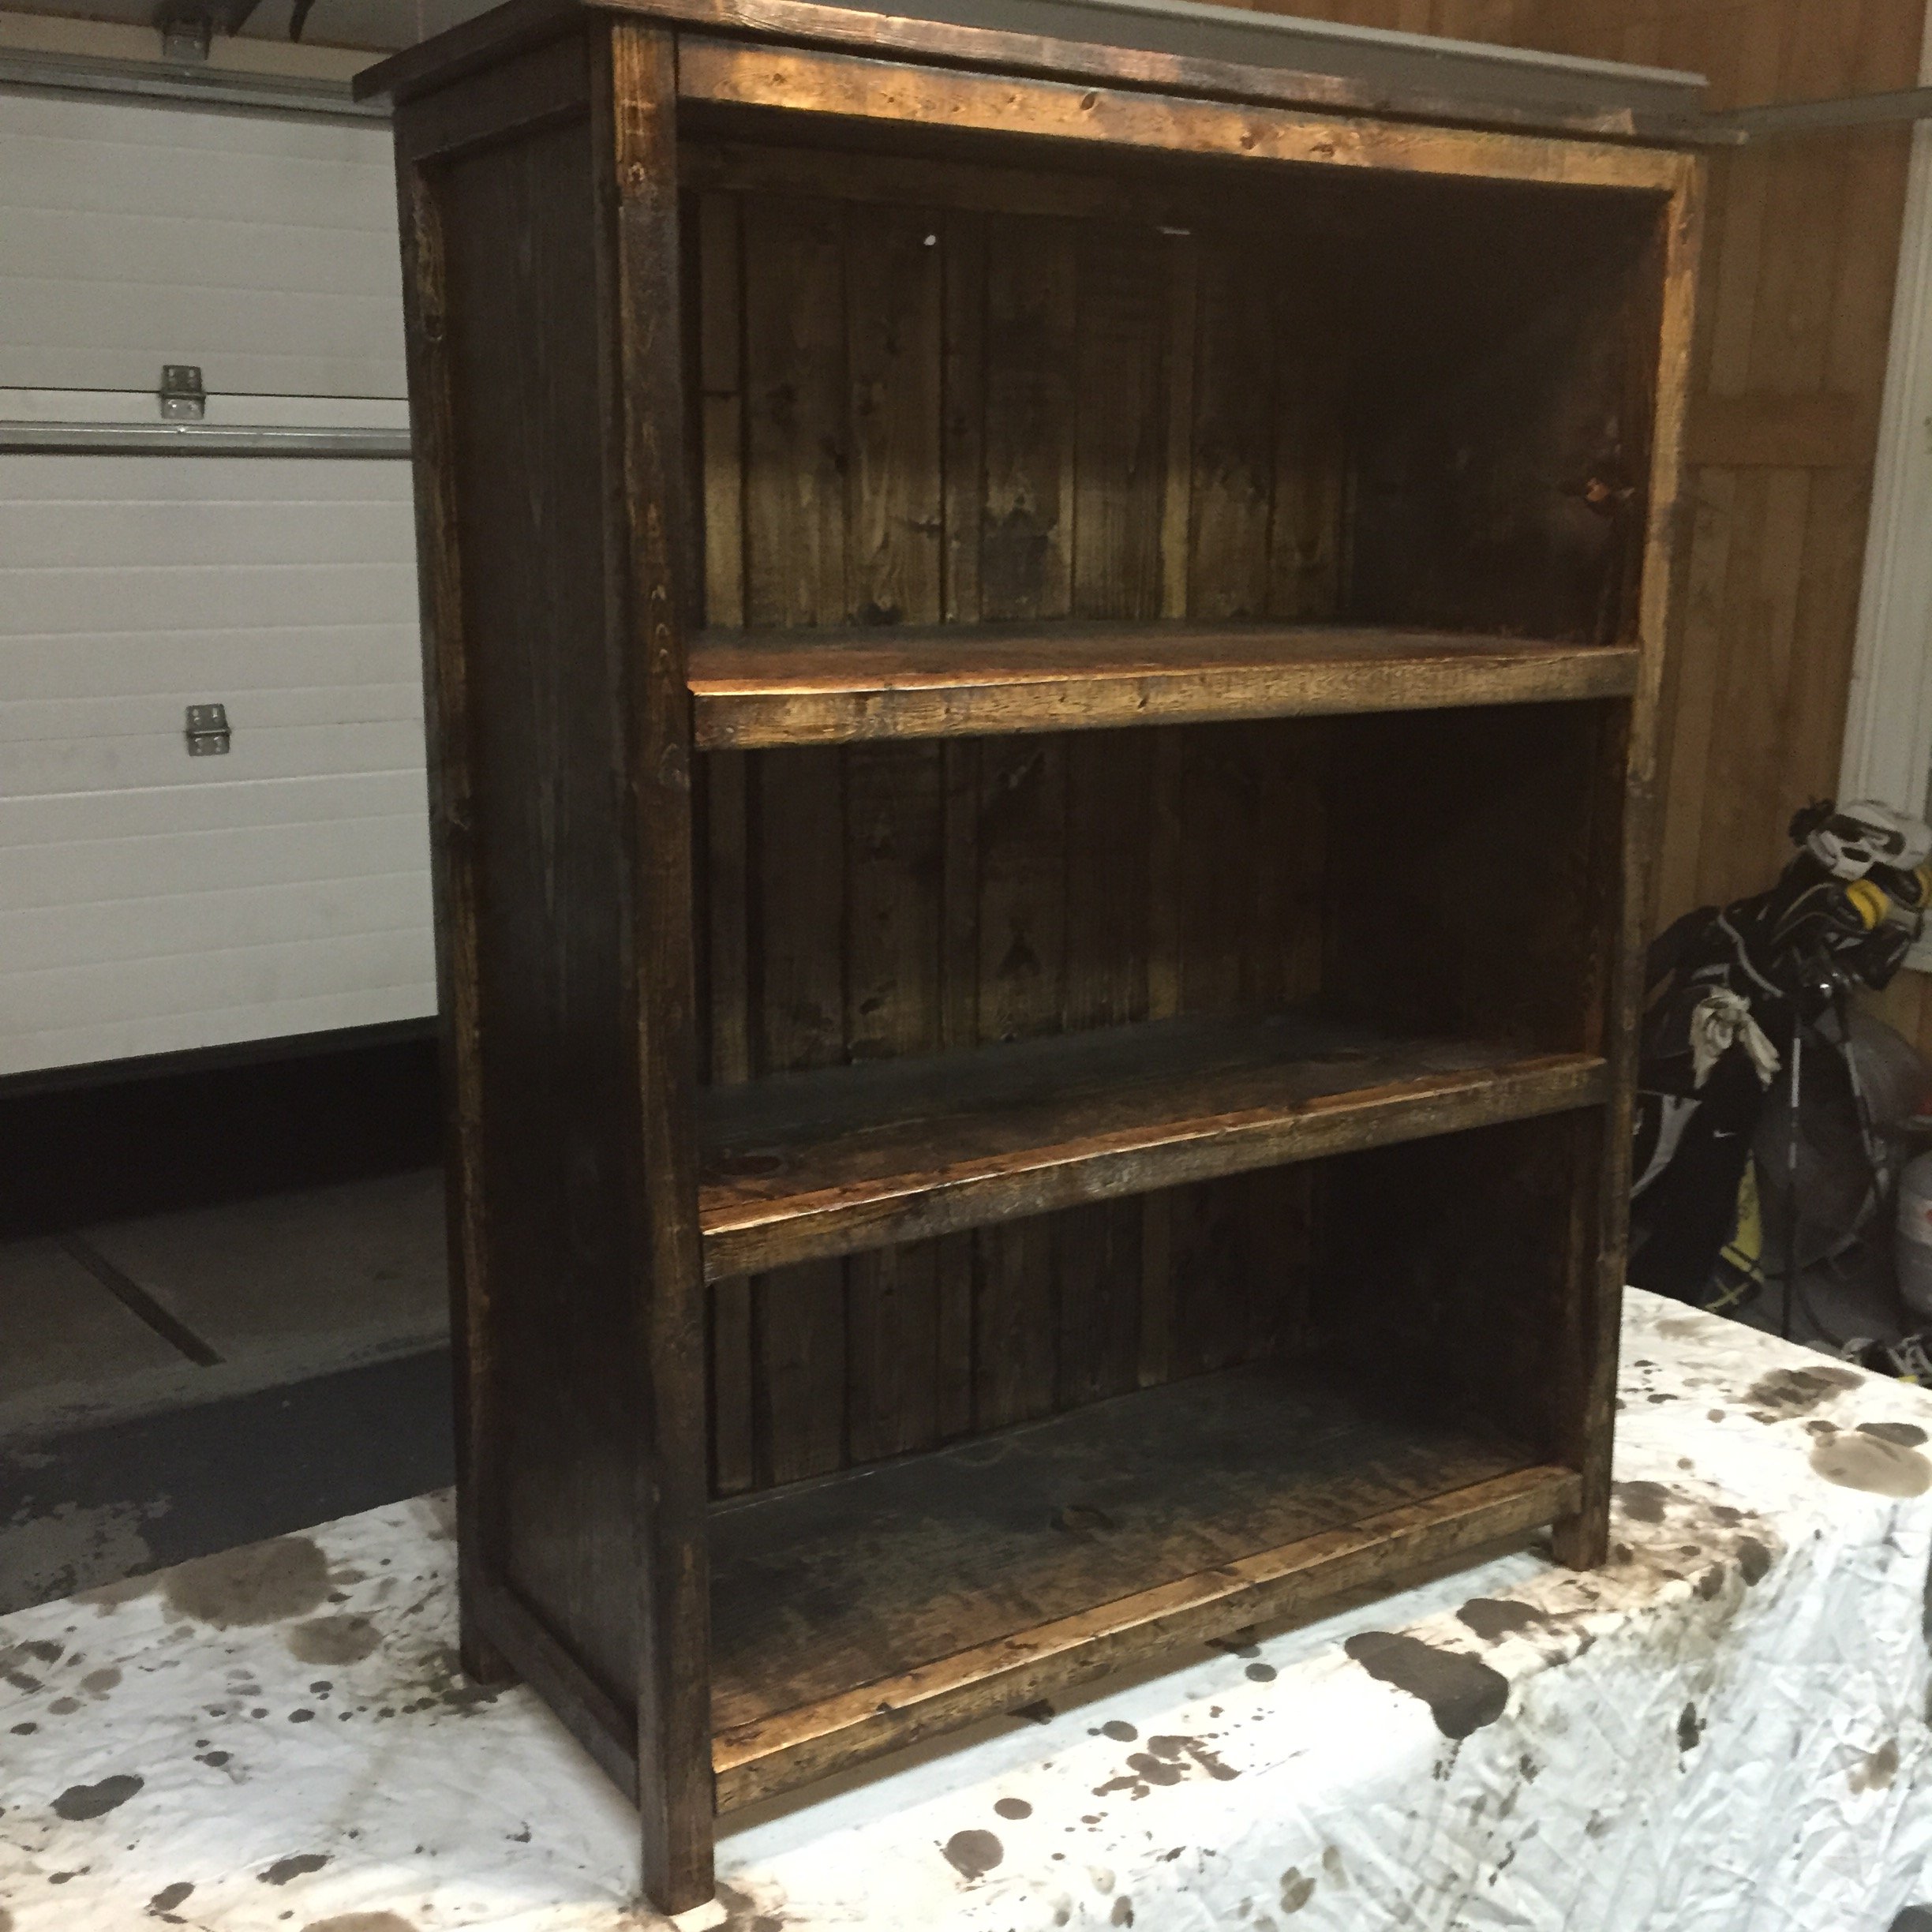
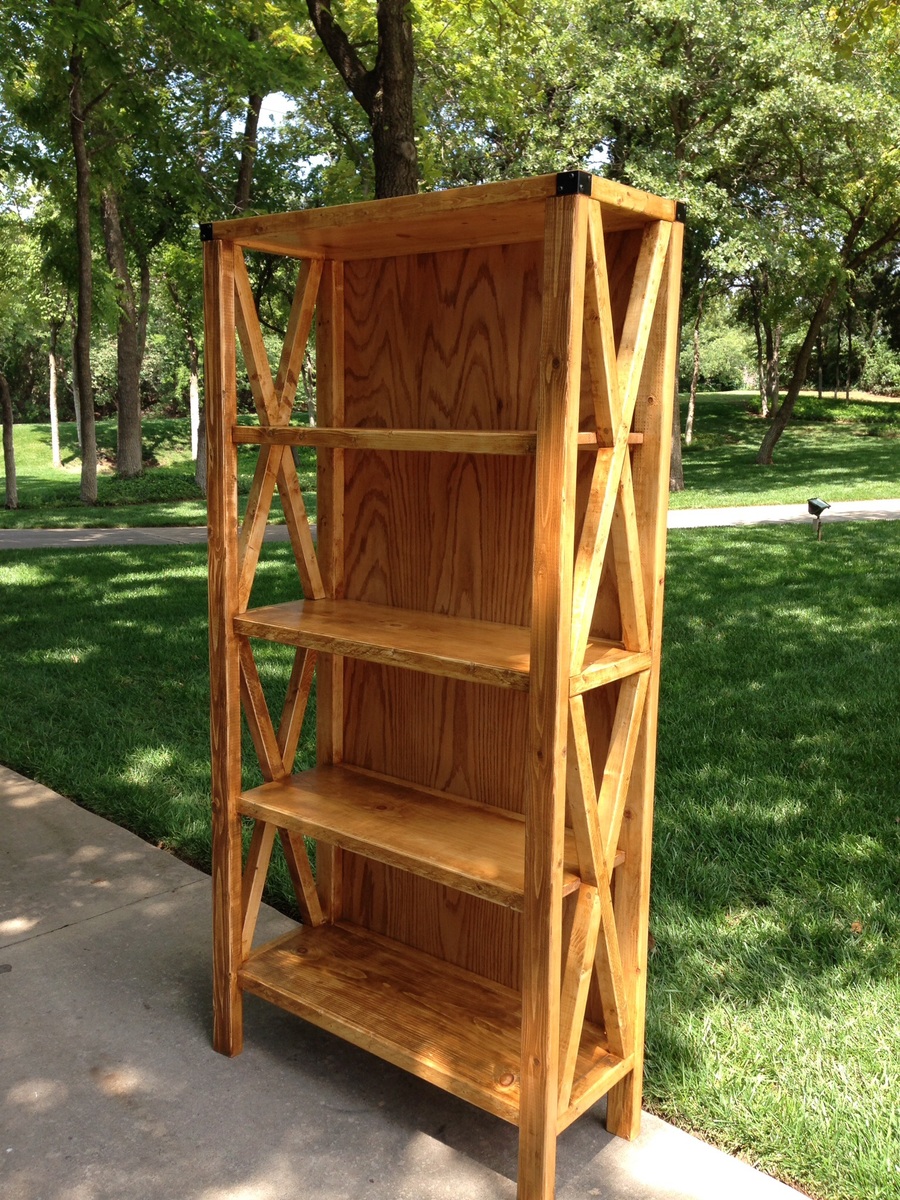
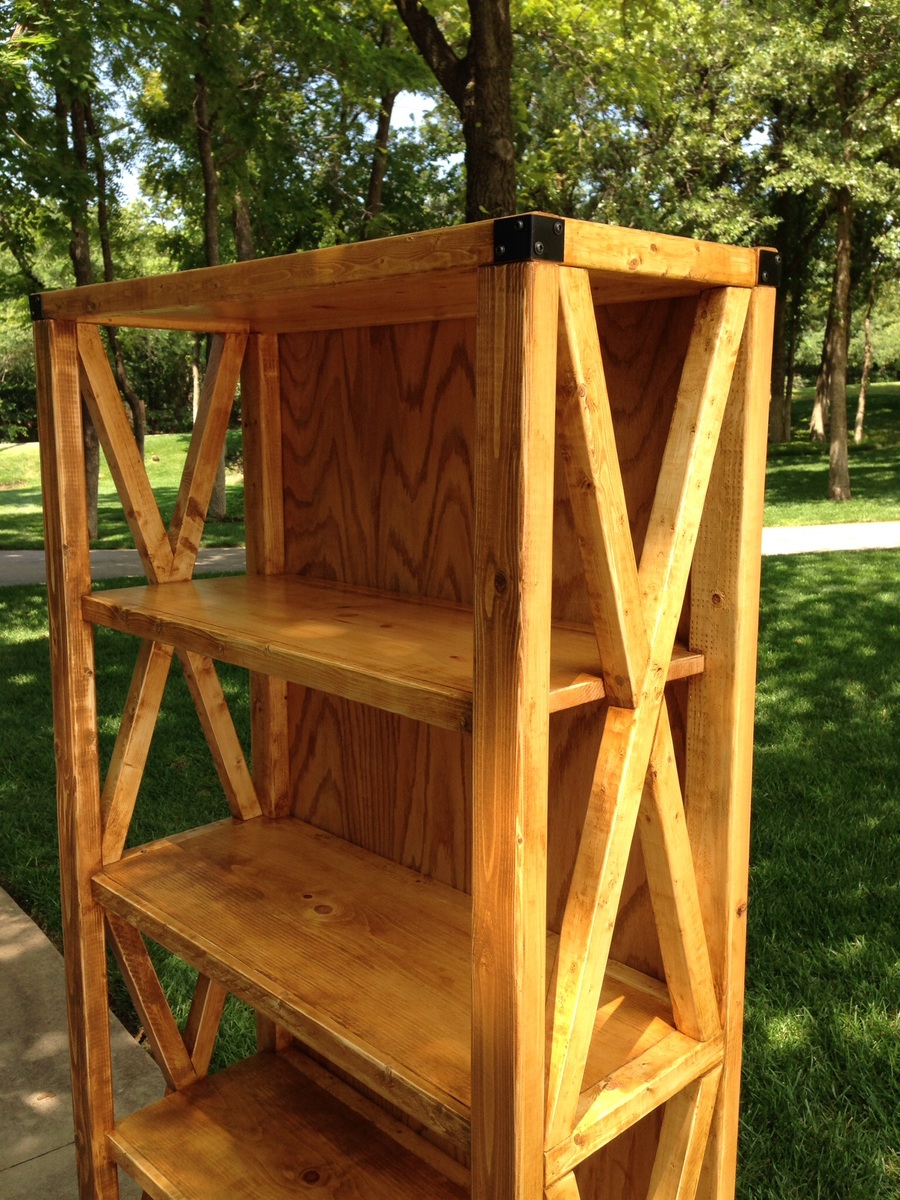
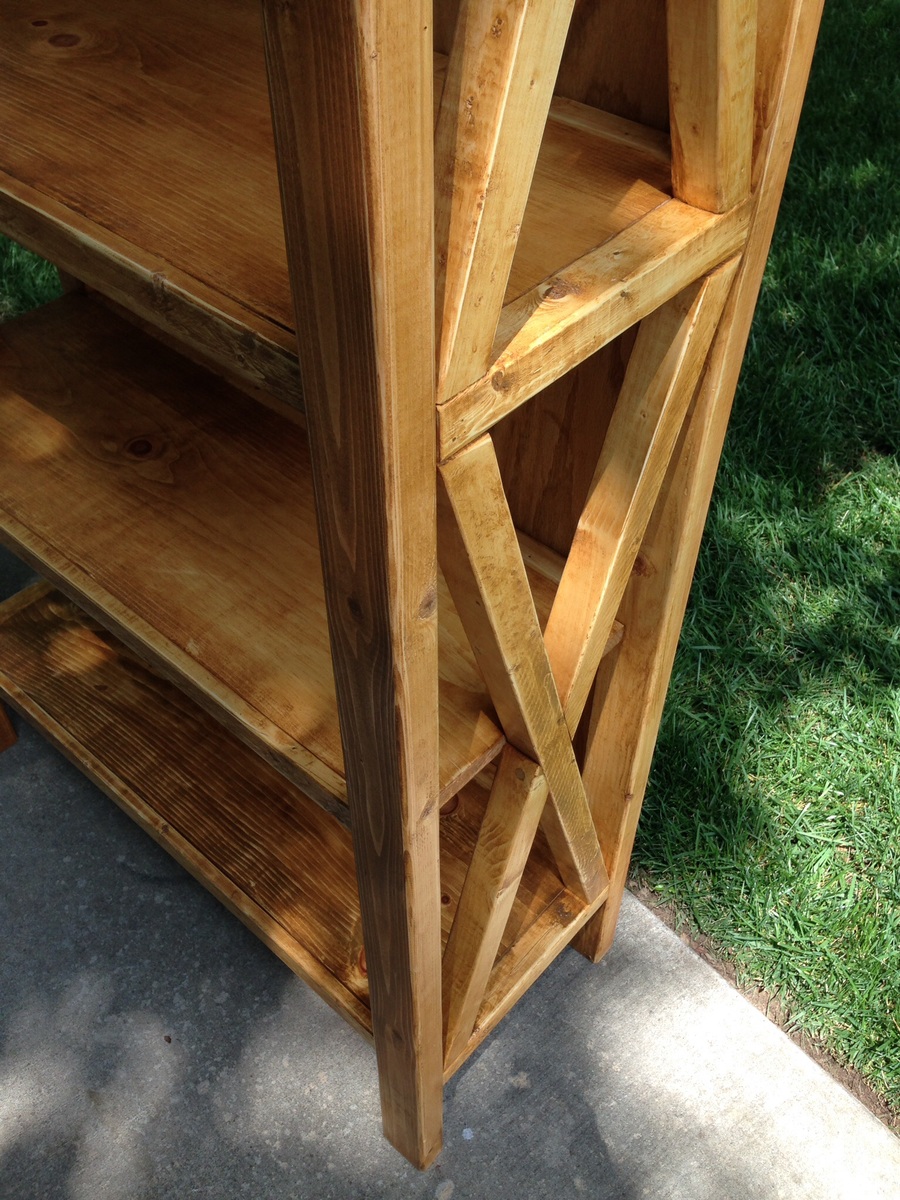
Custom 3 Shelf Kentwood Bookshelf
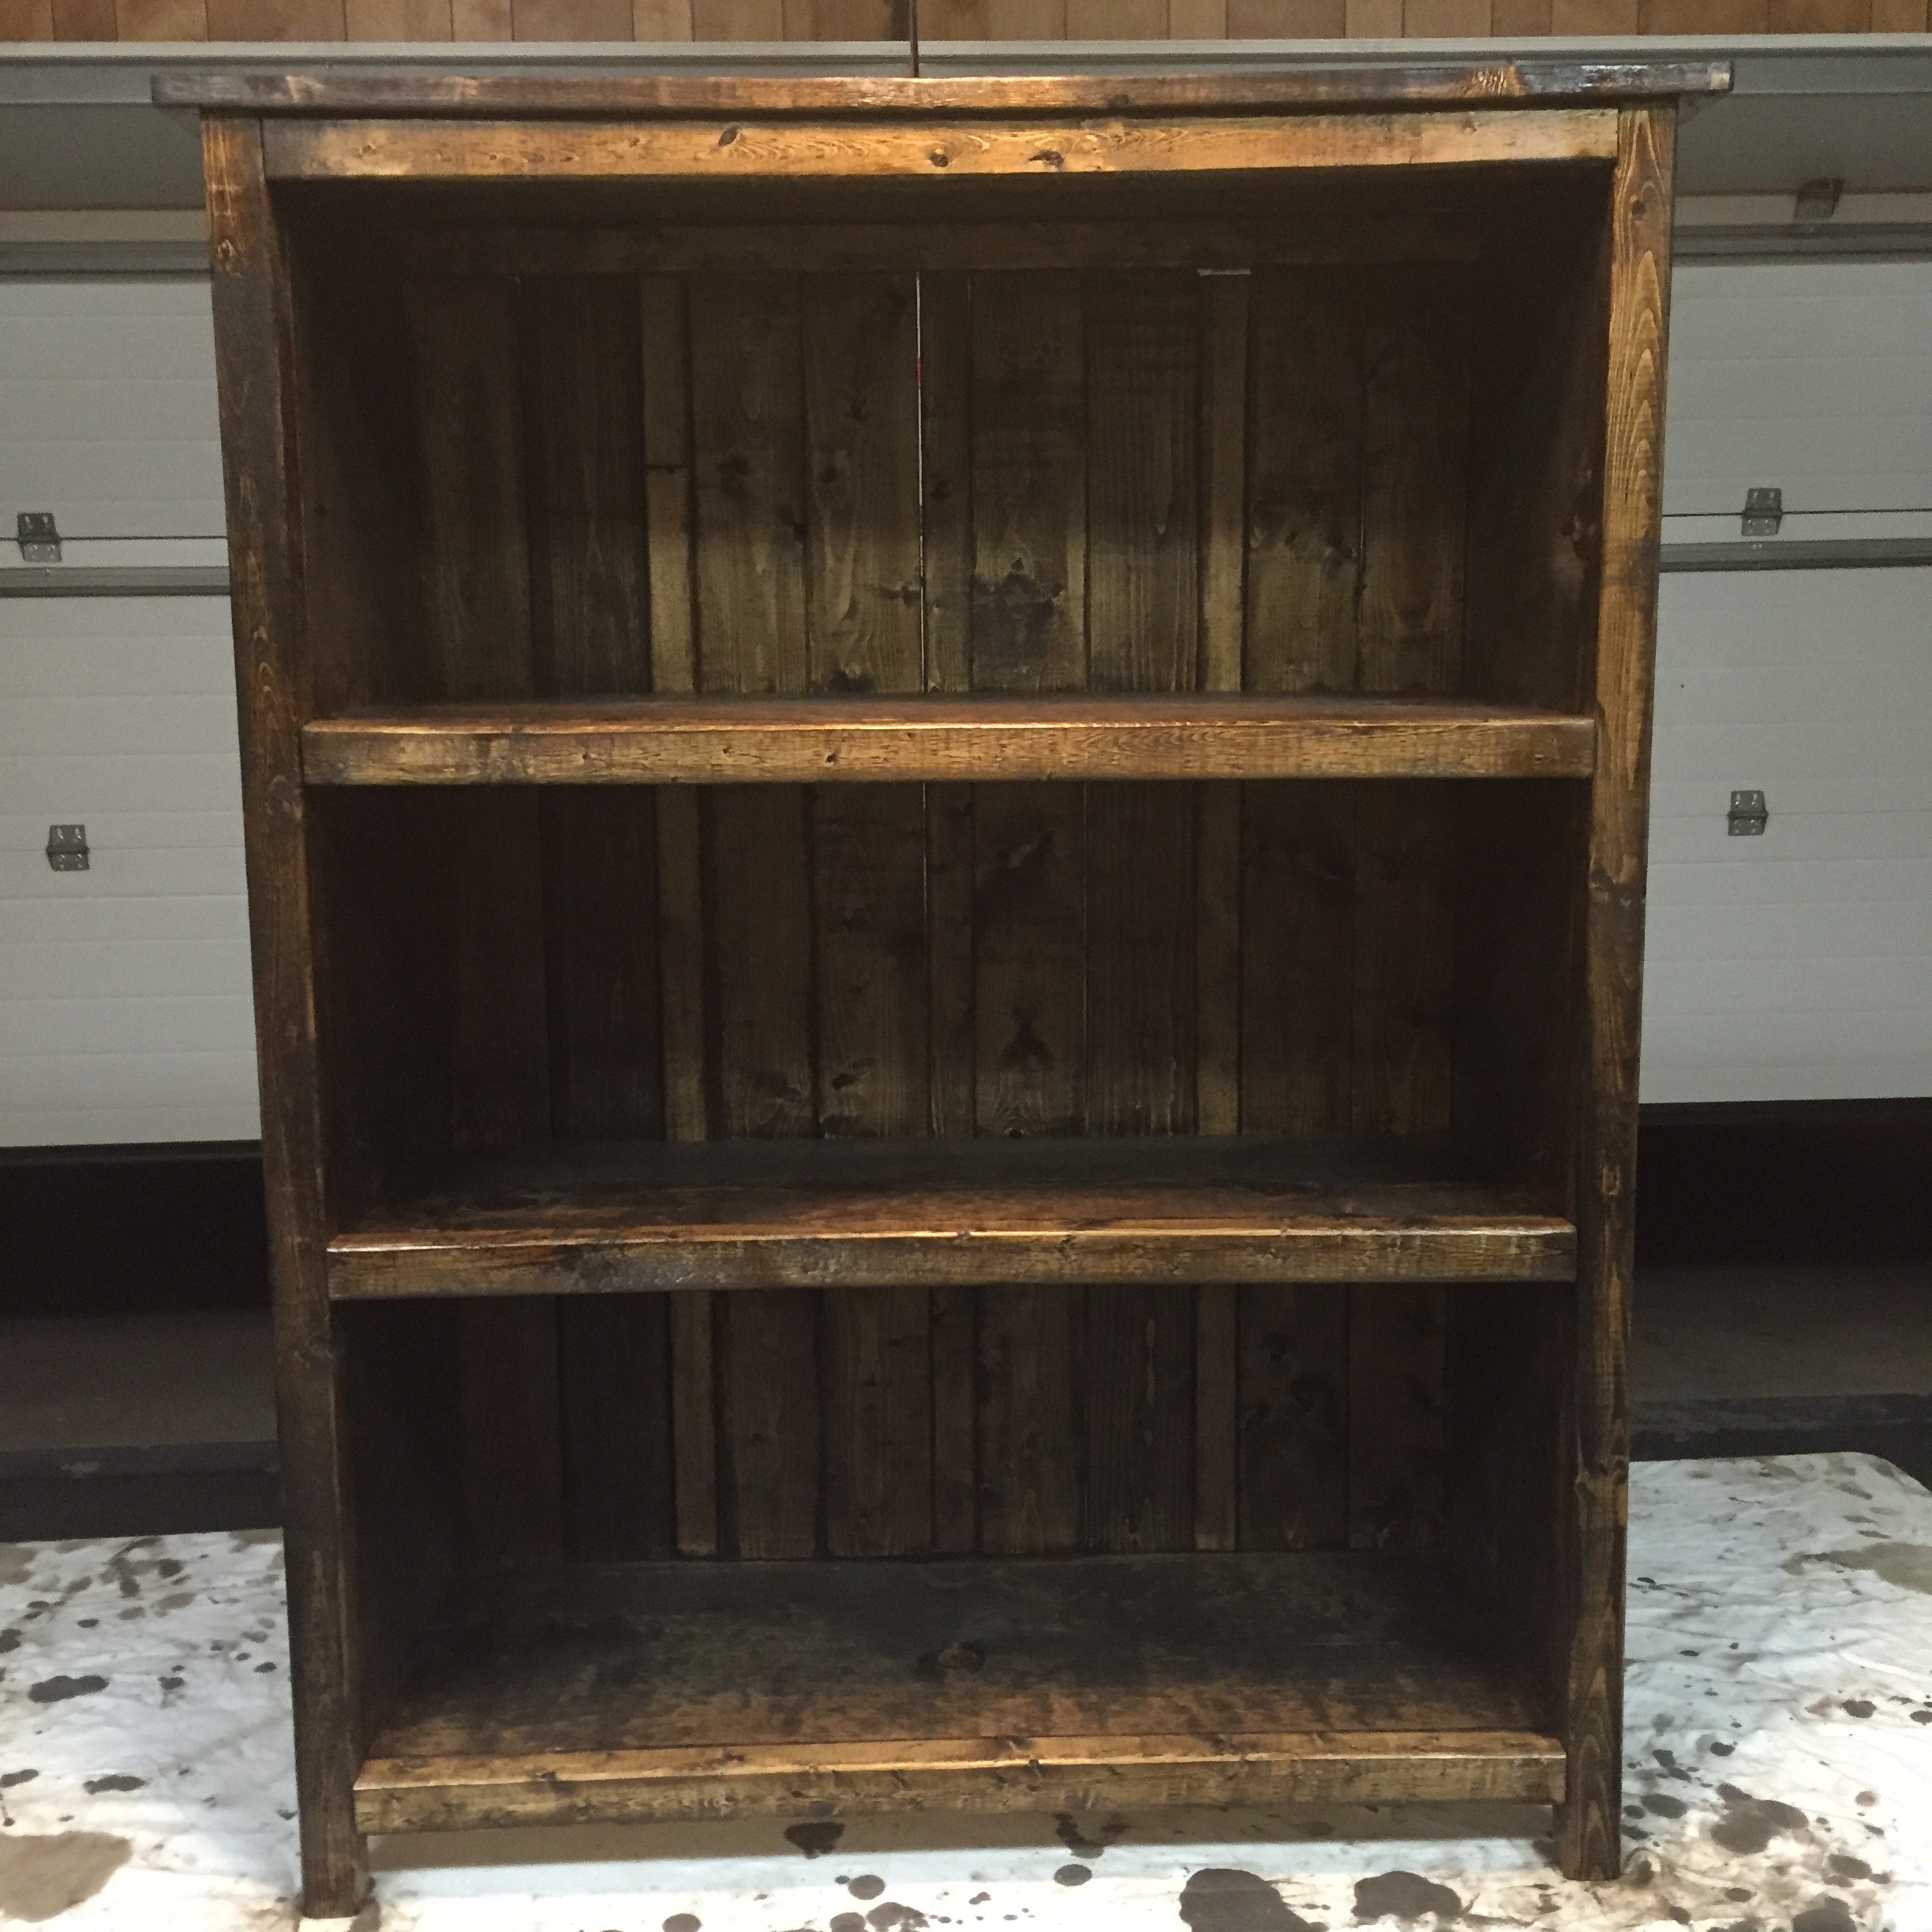
My wife needed a new bookshelf in her classroom so I took this plan and customized it. She wanted three shelves and to be able to fit a three ring binder on the shelves upright. I mitered the top to have a finished edge all the way around the top. I ripped about 1/4" off the back of the two middle shelves so I could put the back planking inside and flush. I patterened 1x2's and 1x4's on the back to give a cool look.
Built from Plan(s)
Estimated Cost
$65
Estimated Time Investment
Day Project (6-9 Hours)
Finish Used
Minwax Jacobean and Minwax Semi-Gloss Poly
Recommended Skill Level
Intermediate
Navin's play house
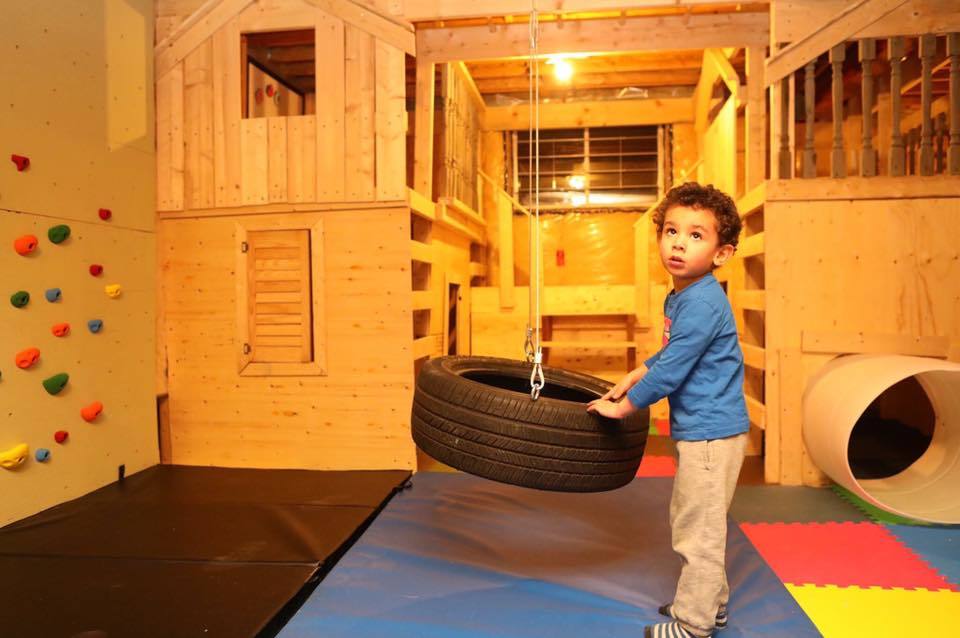
We added a few things, like a tunnel, climbing wall and tire swing. The unveiling was quite the reaction to watch.
Estimated Cost
$1500 (including the mats, climbing wall, etc).
Estimated Time Investment
Week Long Project (20 Hours or More)
Recommended Skill Level
Beginner
Comments
ENTRYWAY bench with drawers
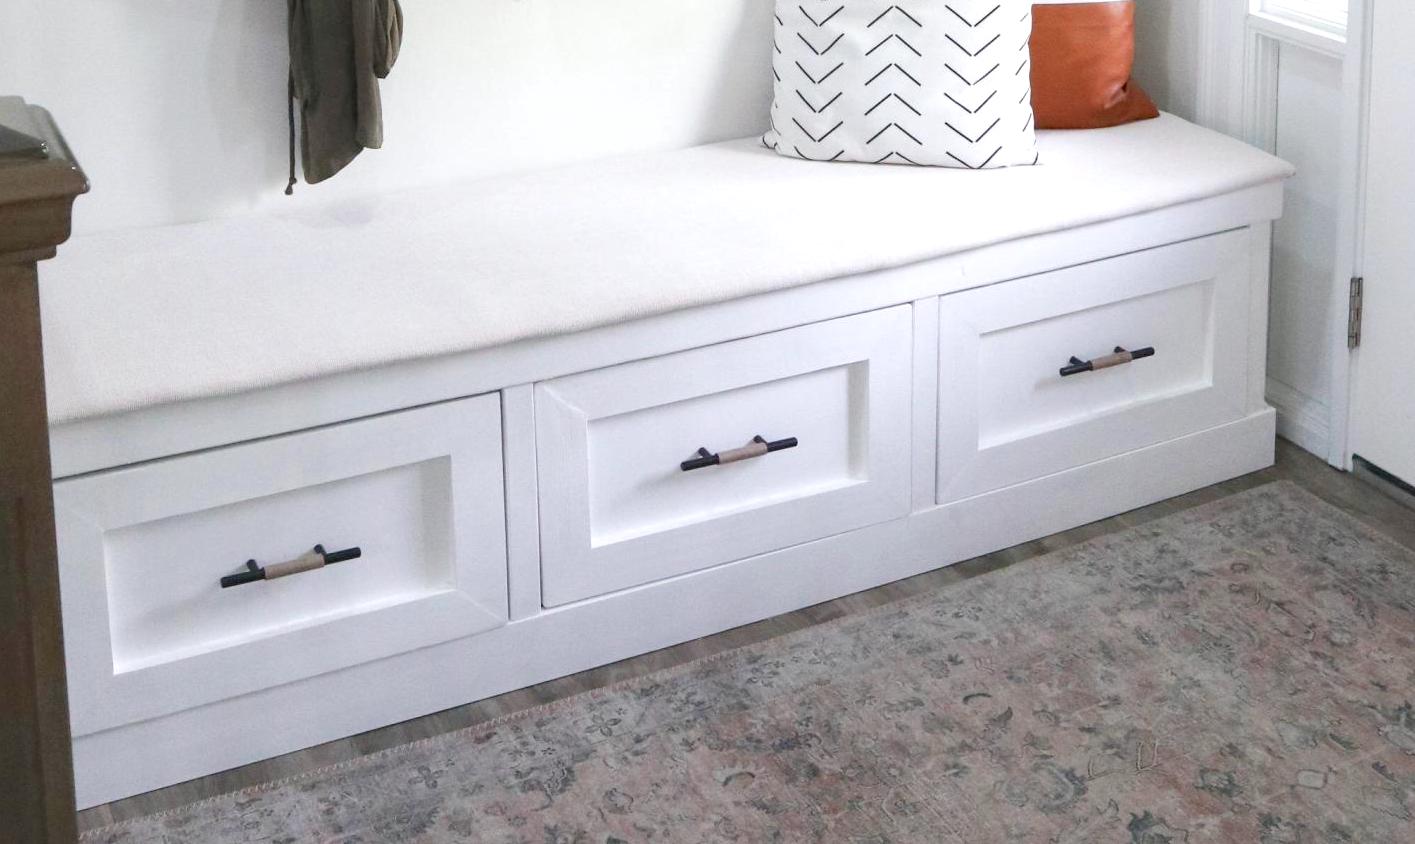
Built from scratch. First DIY build ever! Thank you for your plans. I customized it for my space 💜 instagram @onefortyfour_
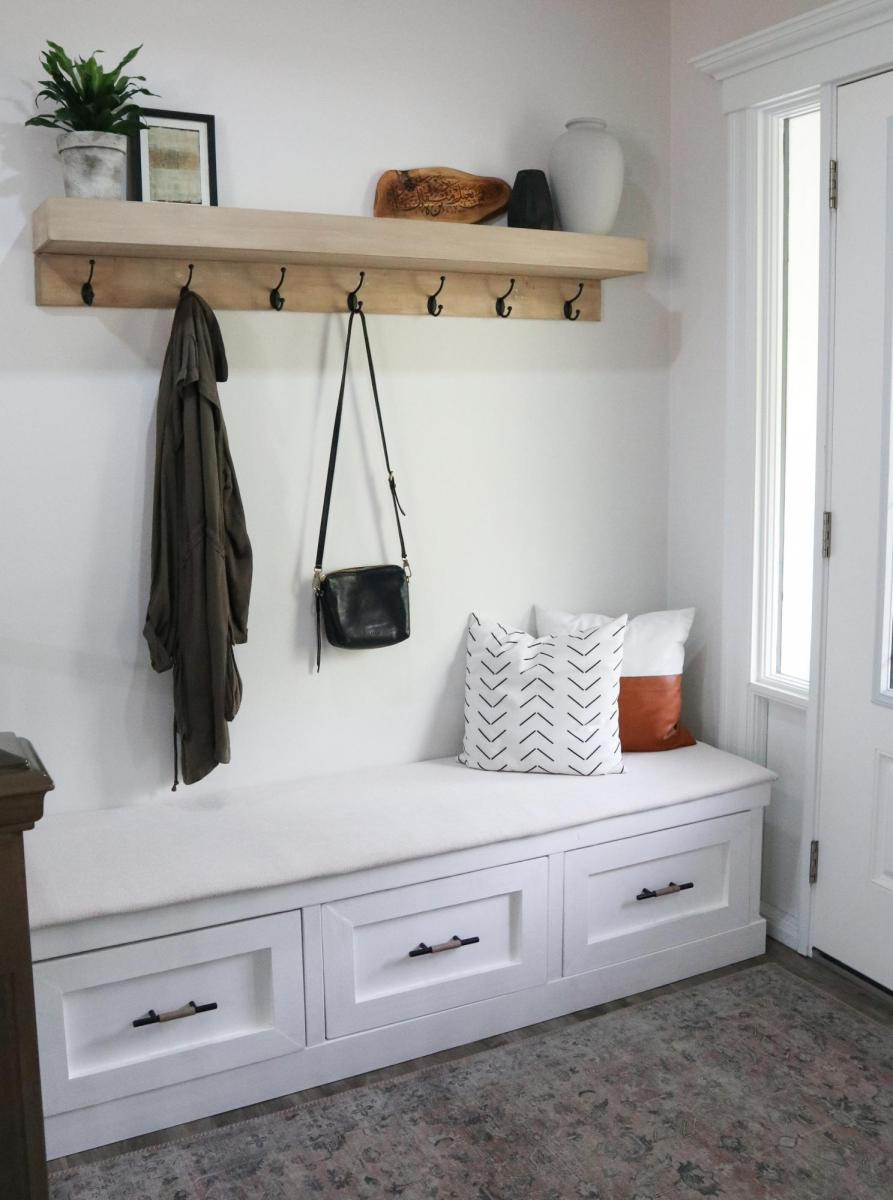
Built from Plan(s)
Estimated Cost
250.00
Estimated Time Investment
Weekend Project (10-20 Hours)
Finish Used
Behr white paint. Polycrylic seal
Recommended Skill Level
Intermediate
Comments
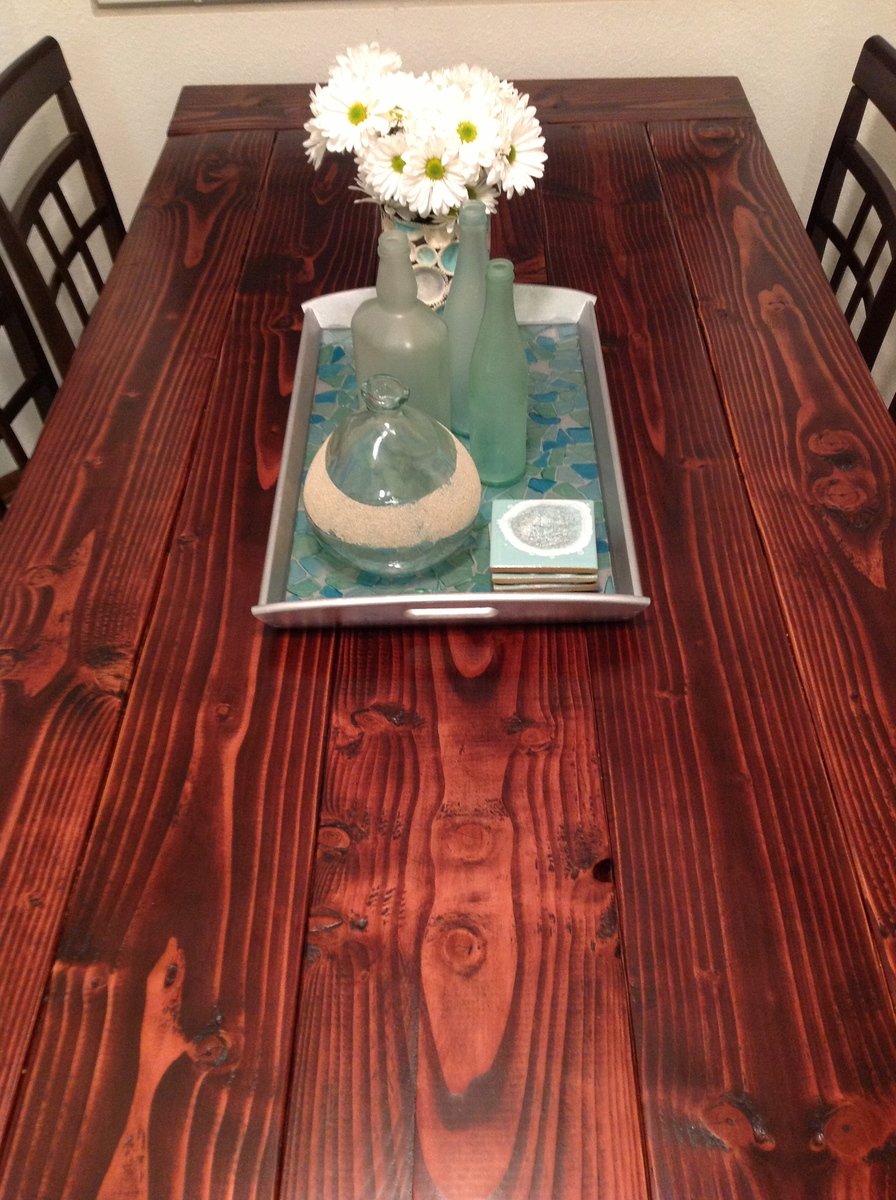
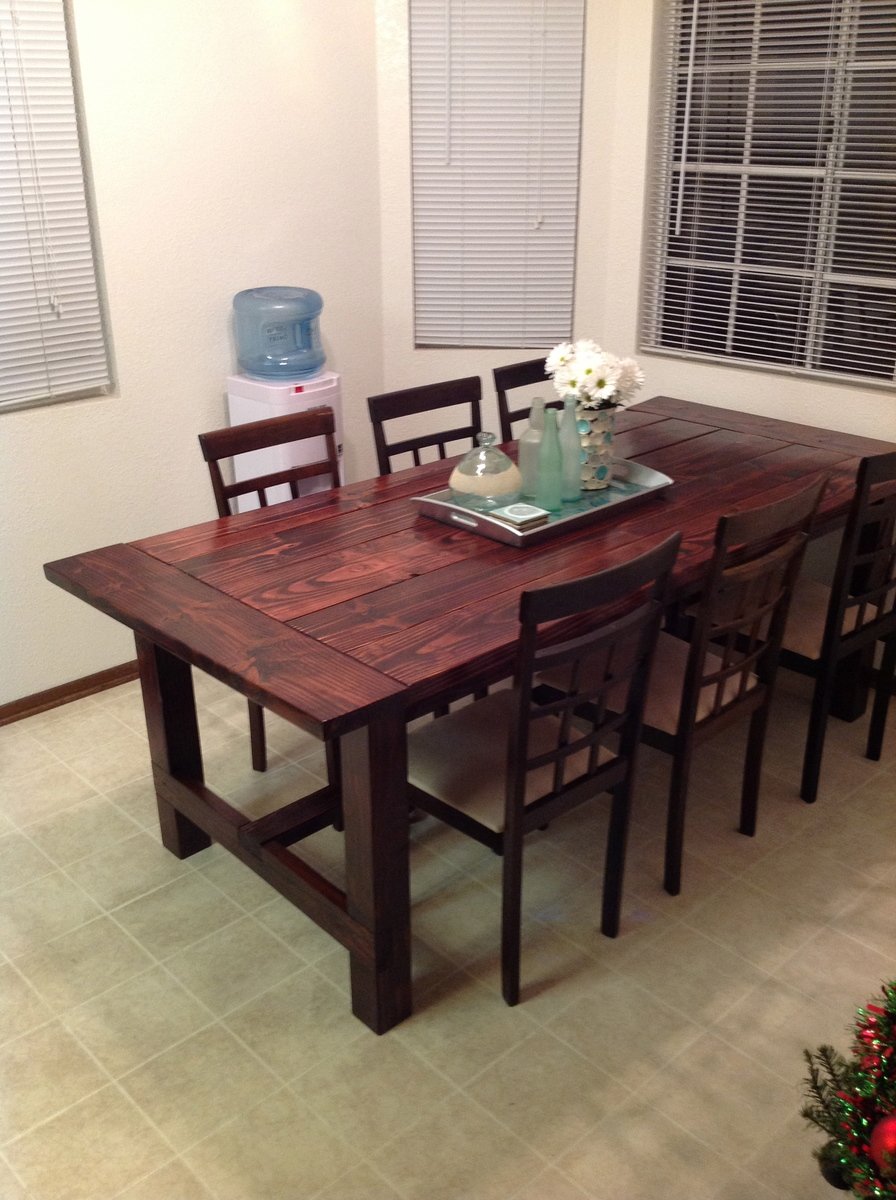
Nick's Farmhouse Table
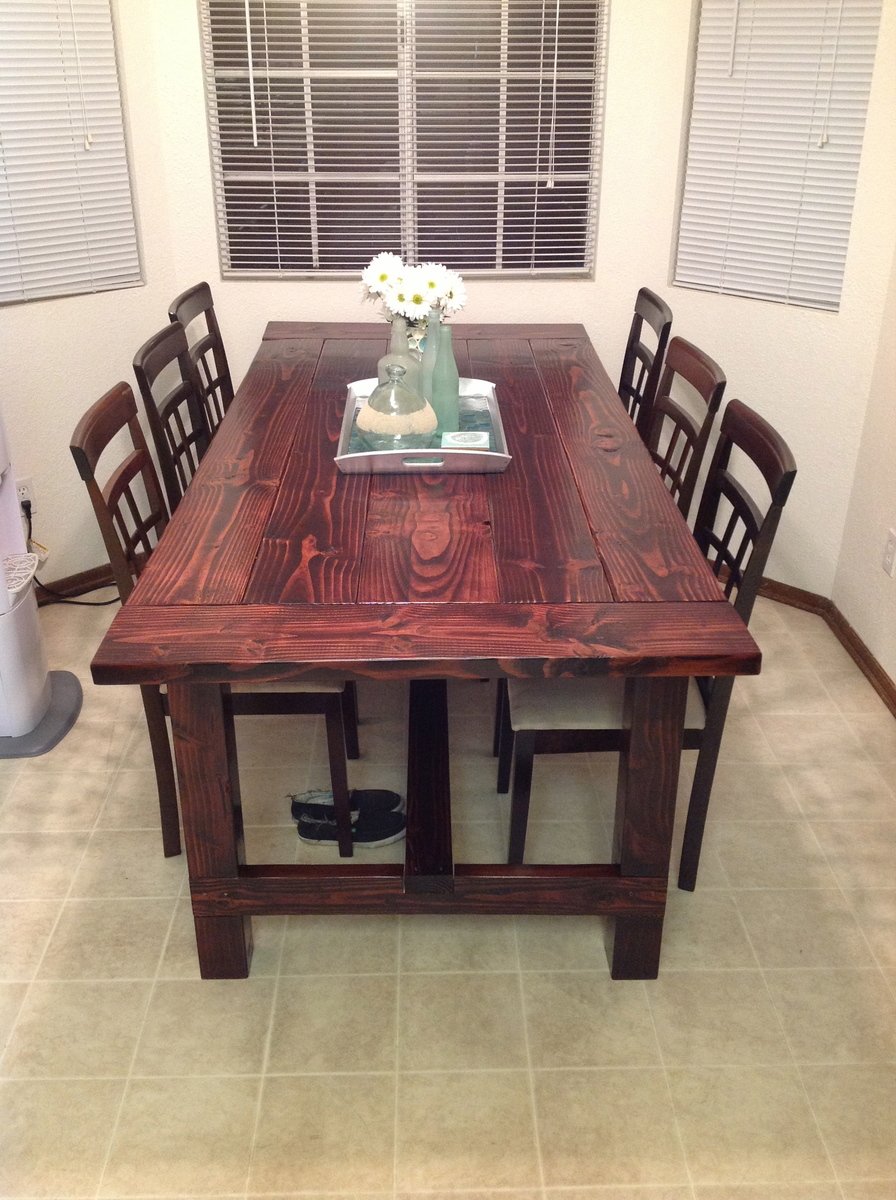
I built this farmhouse table for my beautiful wife for christmas using the update pocket hole plans. It was a lot of work but well worth it.
Bench in the making!
Estimated Cost
$100 + and additional tools needed that you dont have
Estimated Time Investment
Weekend Project (10-20 Hours)
Finish Used
minwax mahogany and poly in satin. I used 3 coats of stain and poly. I sanded with 120 grit first and 220 grit last. The more you sand the better it will look and feel.
Recommended Skill Level
Intermediate
Comments
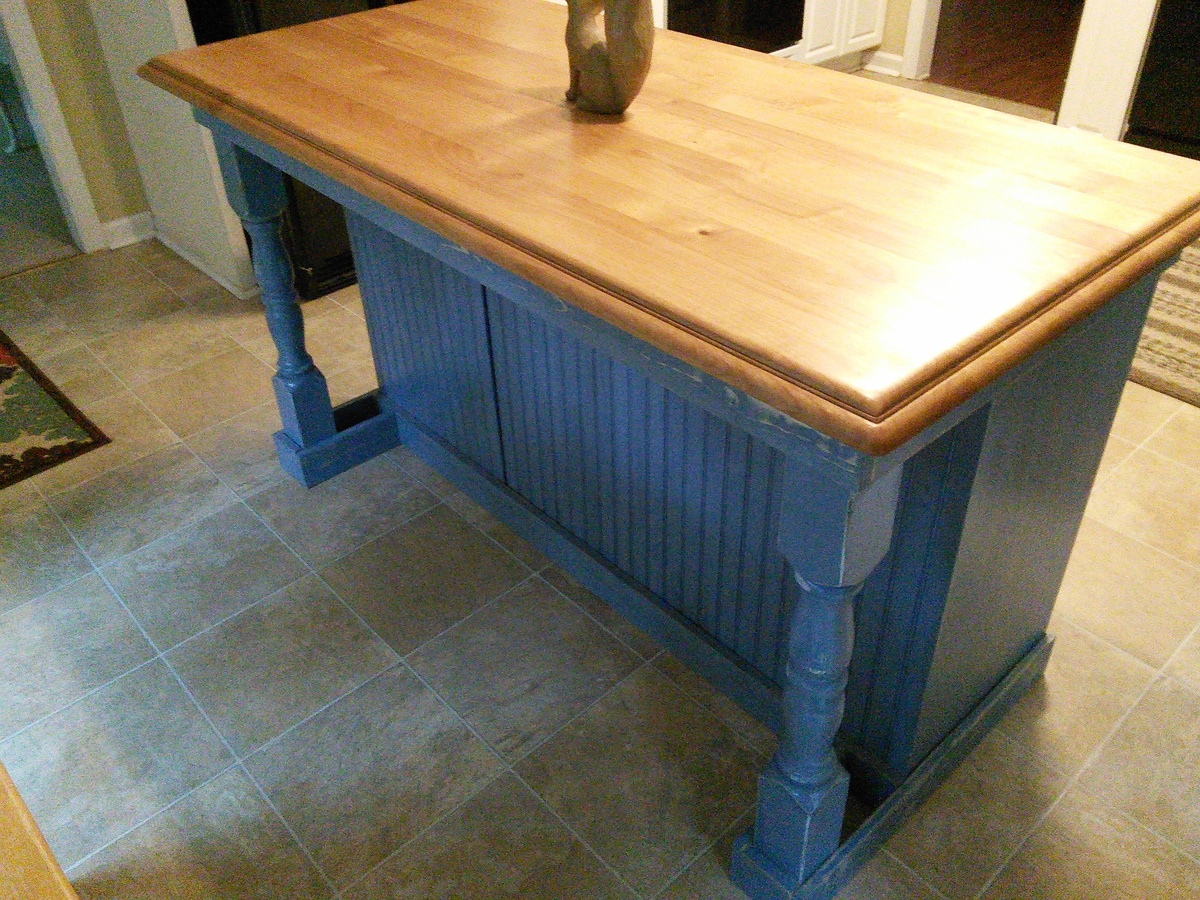
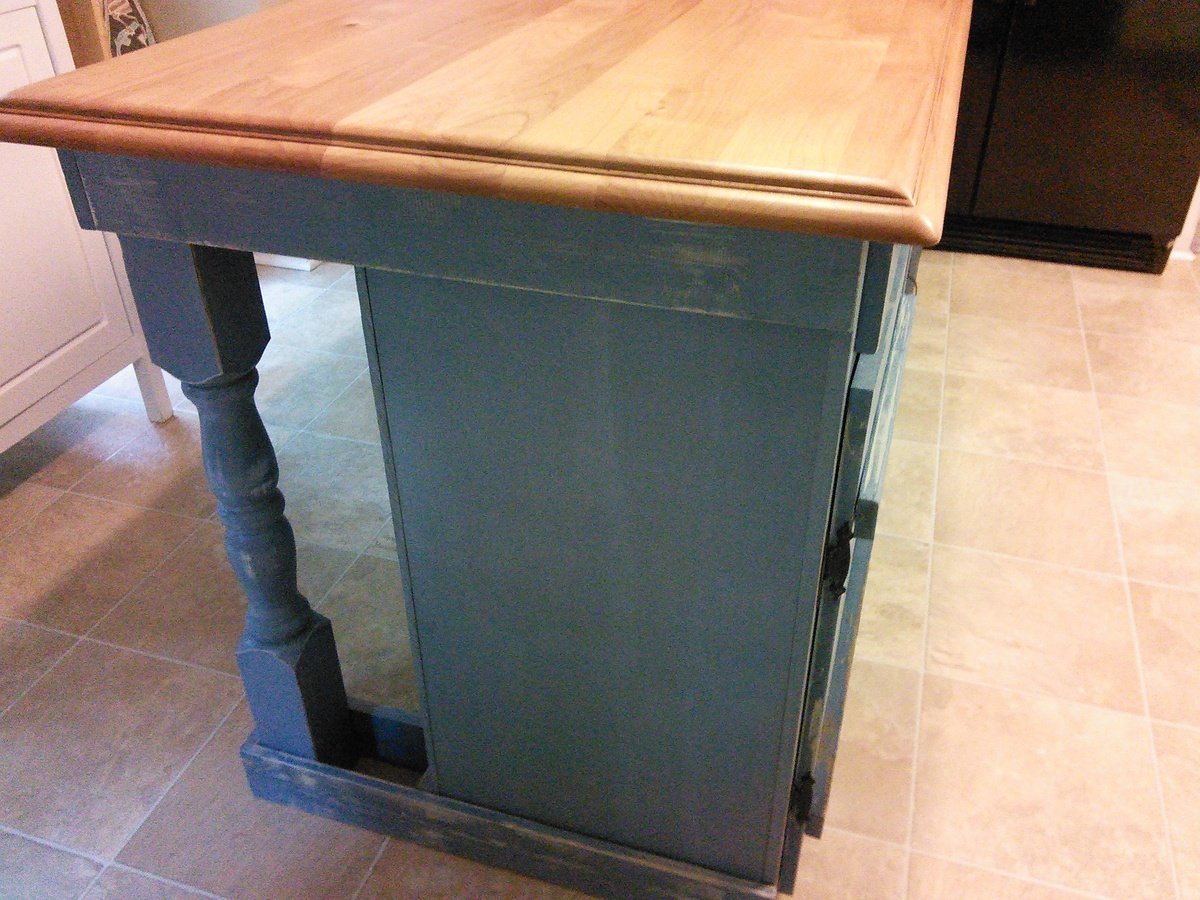
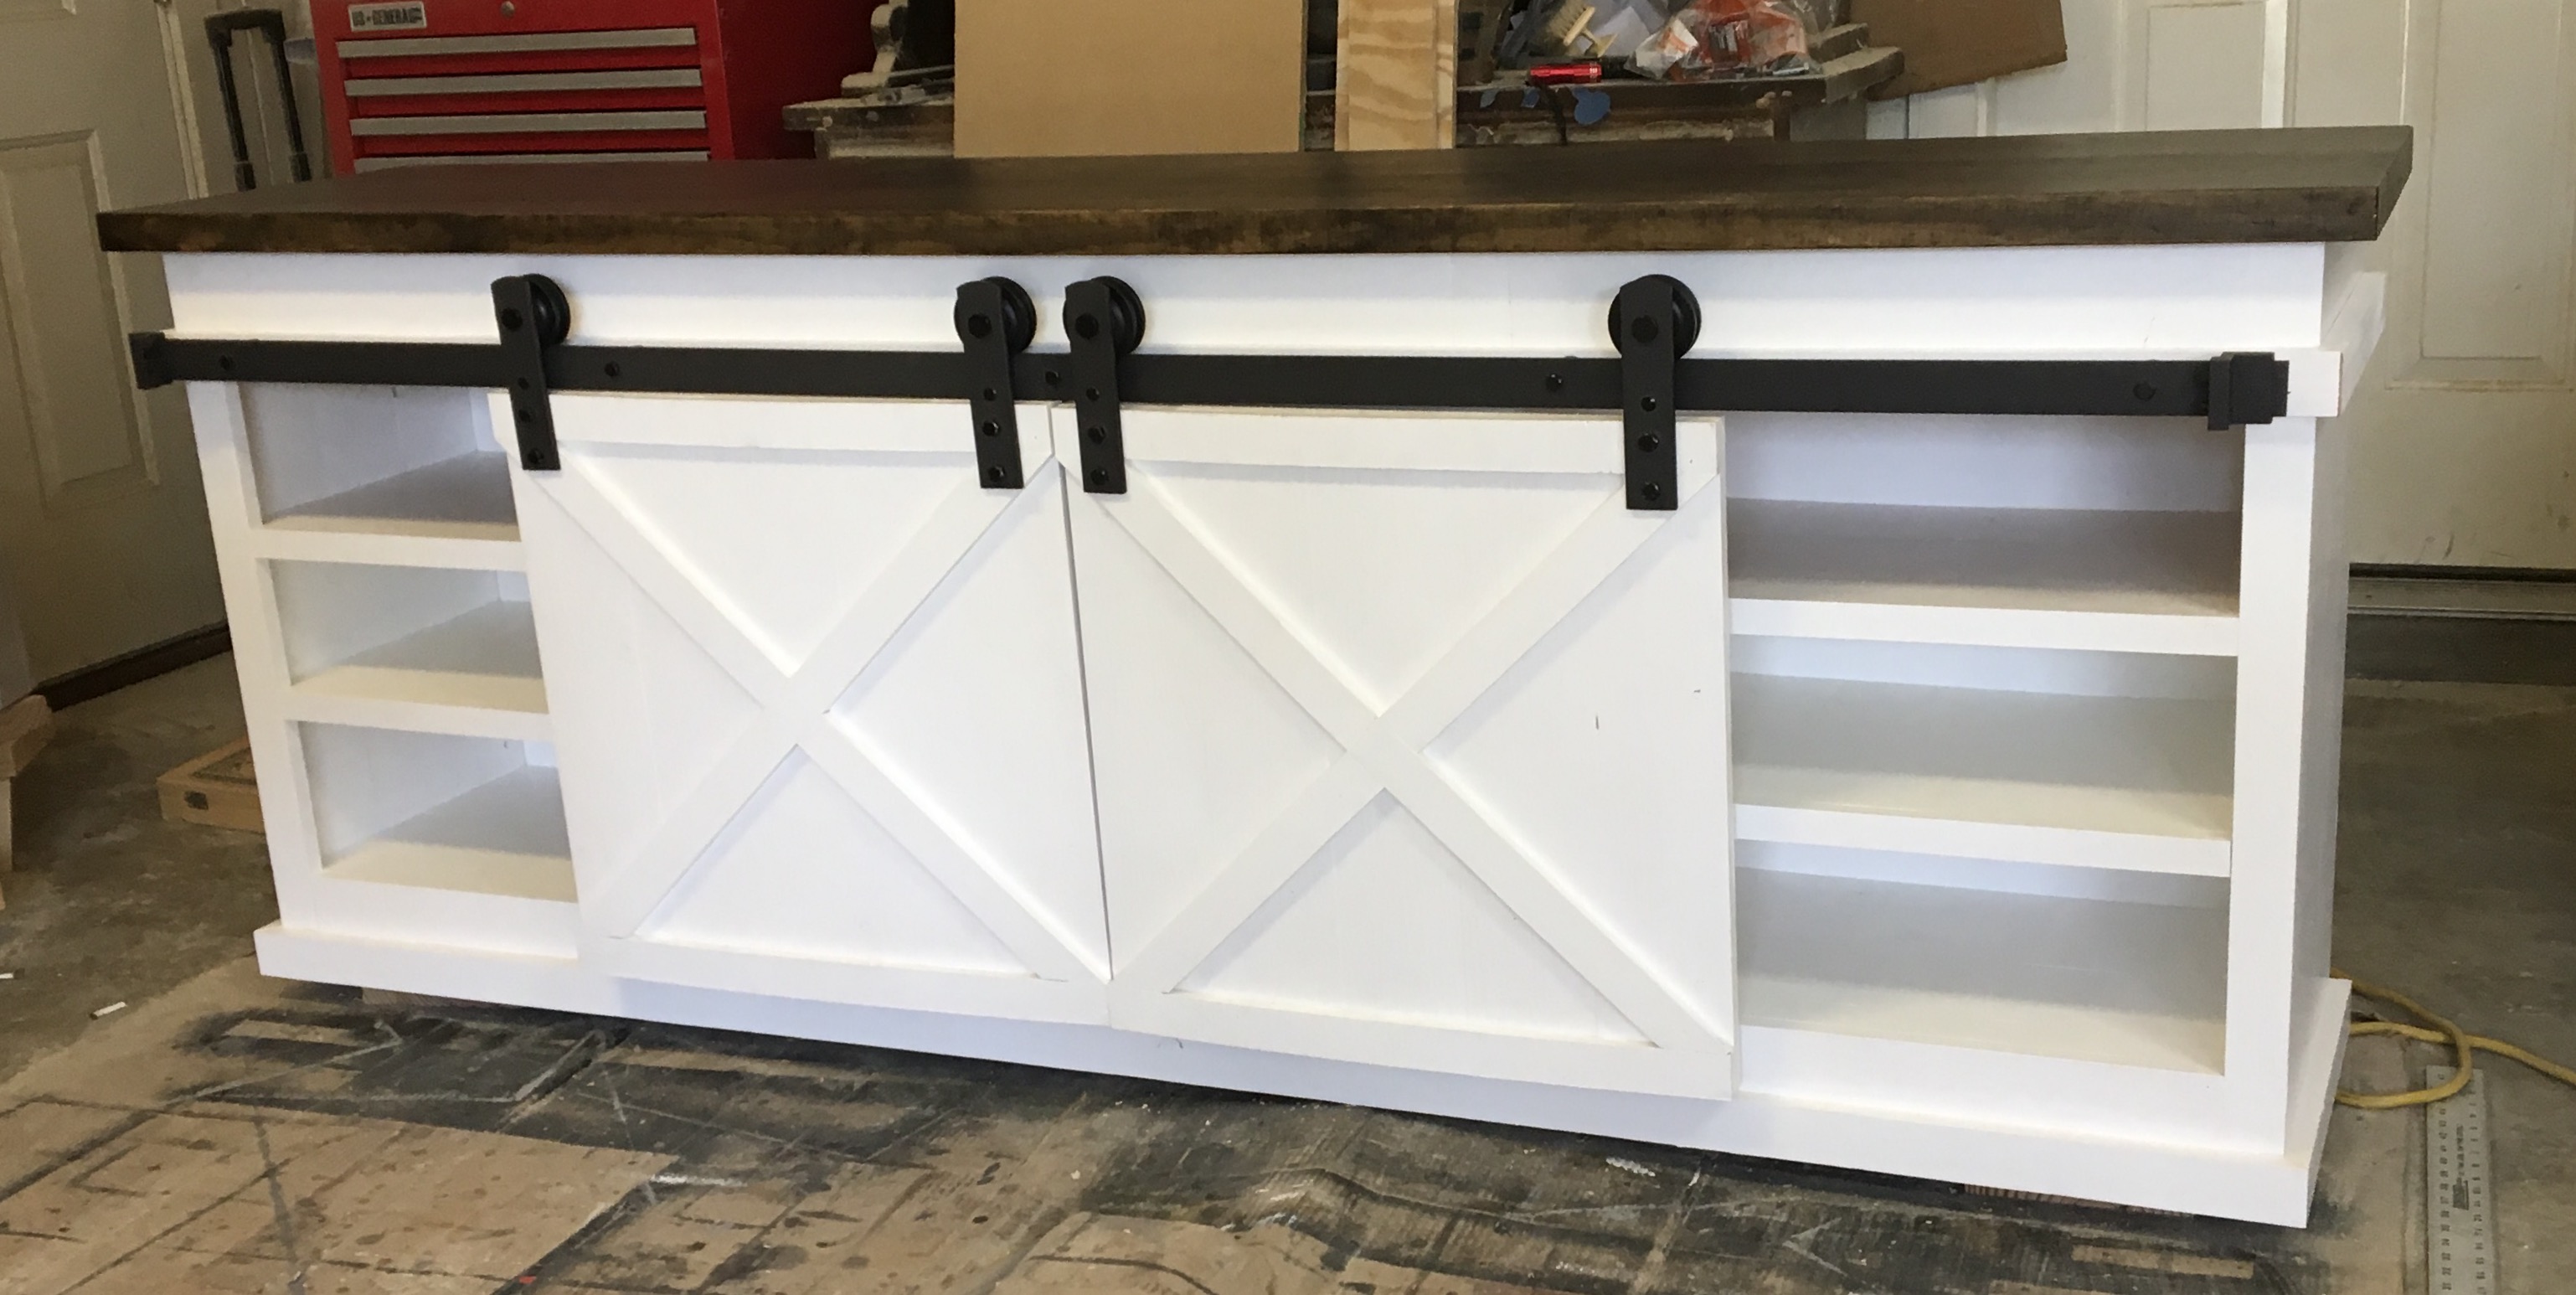
Farmhouse kitchen Island
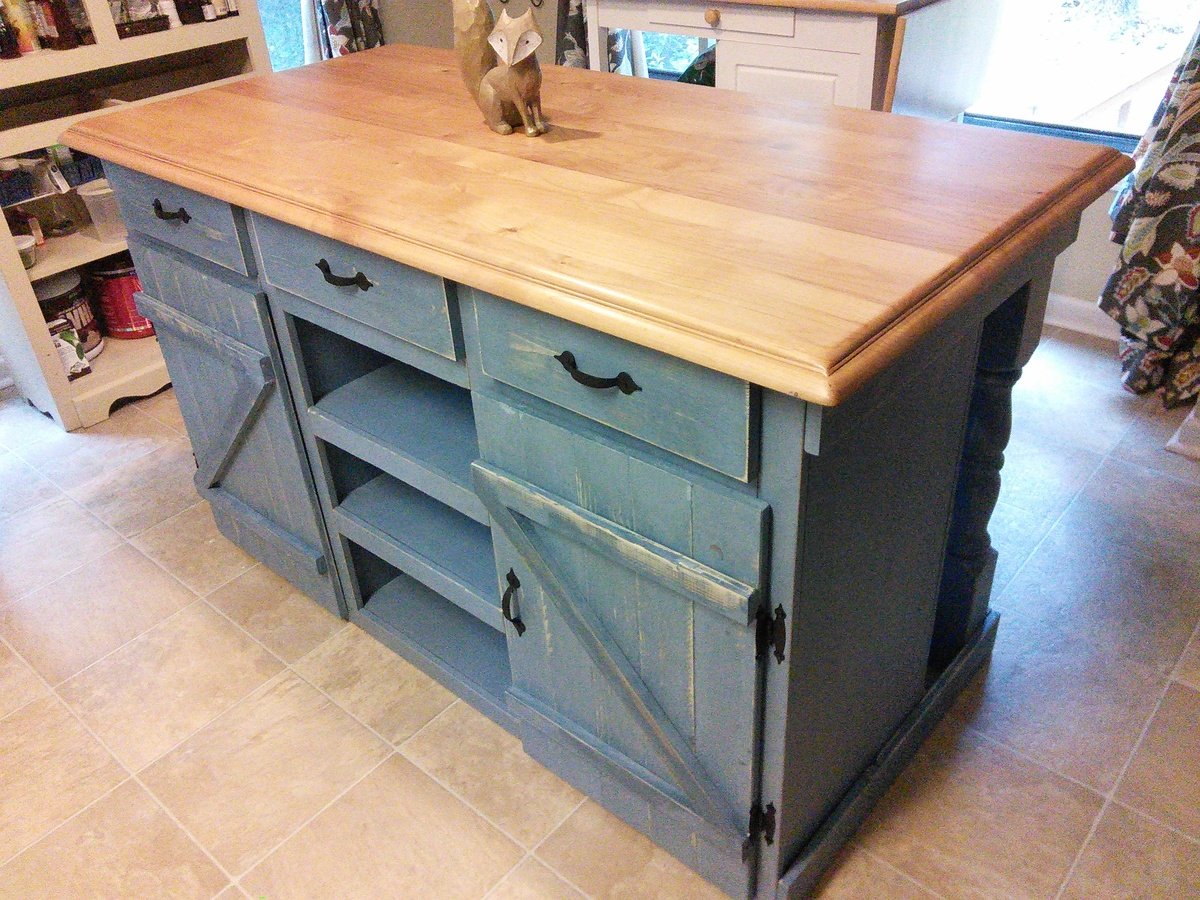
I used the Ana White "Country Kitchen Island" plans to build. The only changes I made was the table top, bead board instead of pine planks, three drawers, and mostly 3/4" plywood. For the island top, i used the top of a maple desk and applied butcher block oil. To make things easier I used plywood to keep everything square and used bead board (very easy to install) instead of having to join boards together. After putting the shelves together I just used pine boards to cover the edges of the plywood. I also installed three drawers for convenient storage.
Built from Plan(s)
Estimated Time Investment
Week Long Project (20 Hours or More)
Recommended Skill Level
Intermediate
Comments
Wed, 10/26/2016 - 13:48
drawers
Do you have more details on how you did the drawers? demensions, etc? Did you just extend the divider vertical bards that are inside all the way up? Or did you build cut 3 holes out of the front facing horizontal board? If you did that were you able to add tracks?

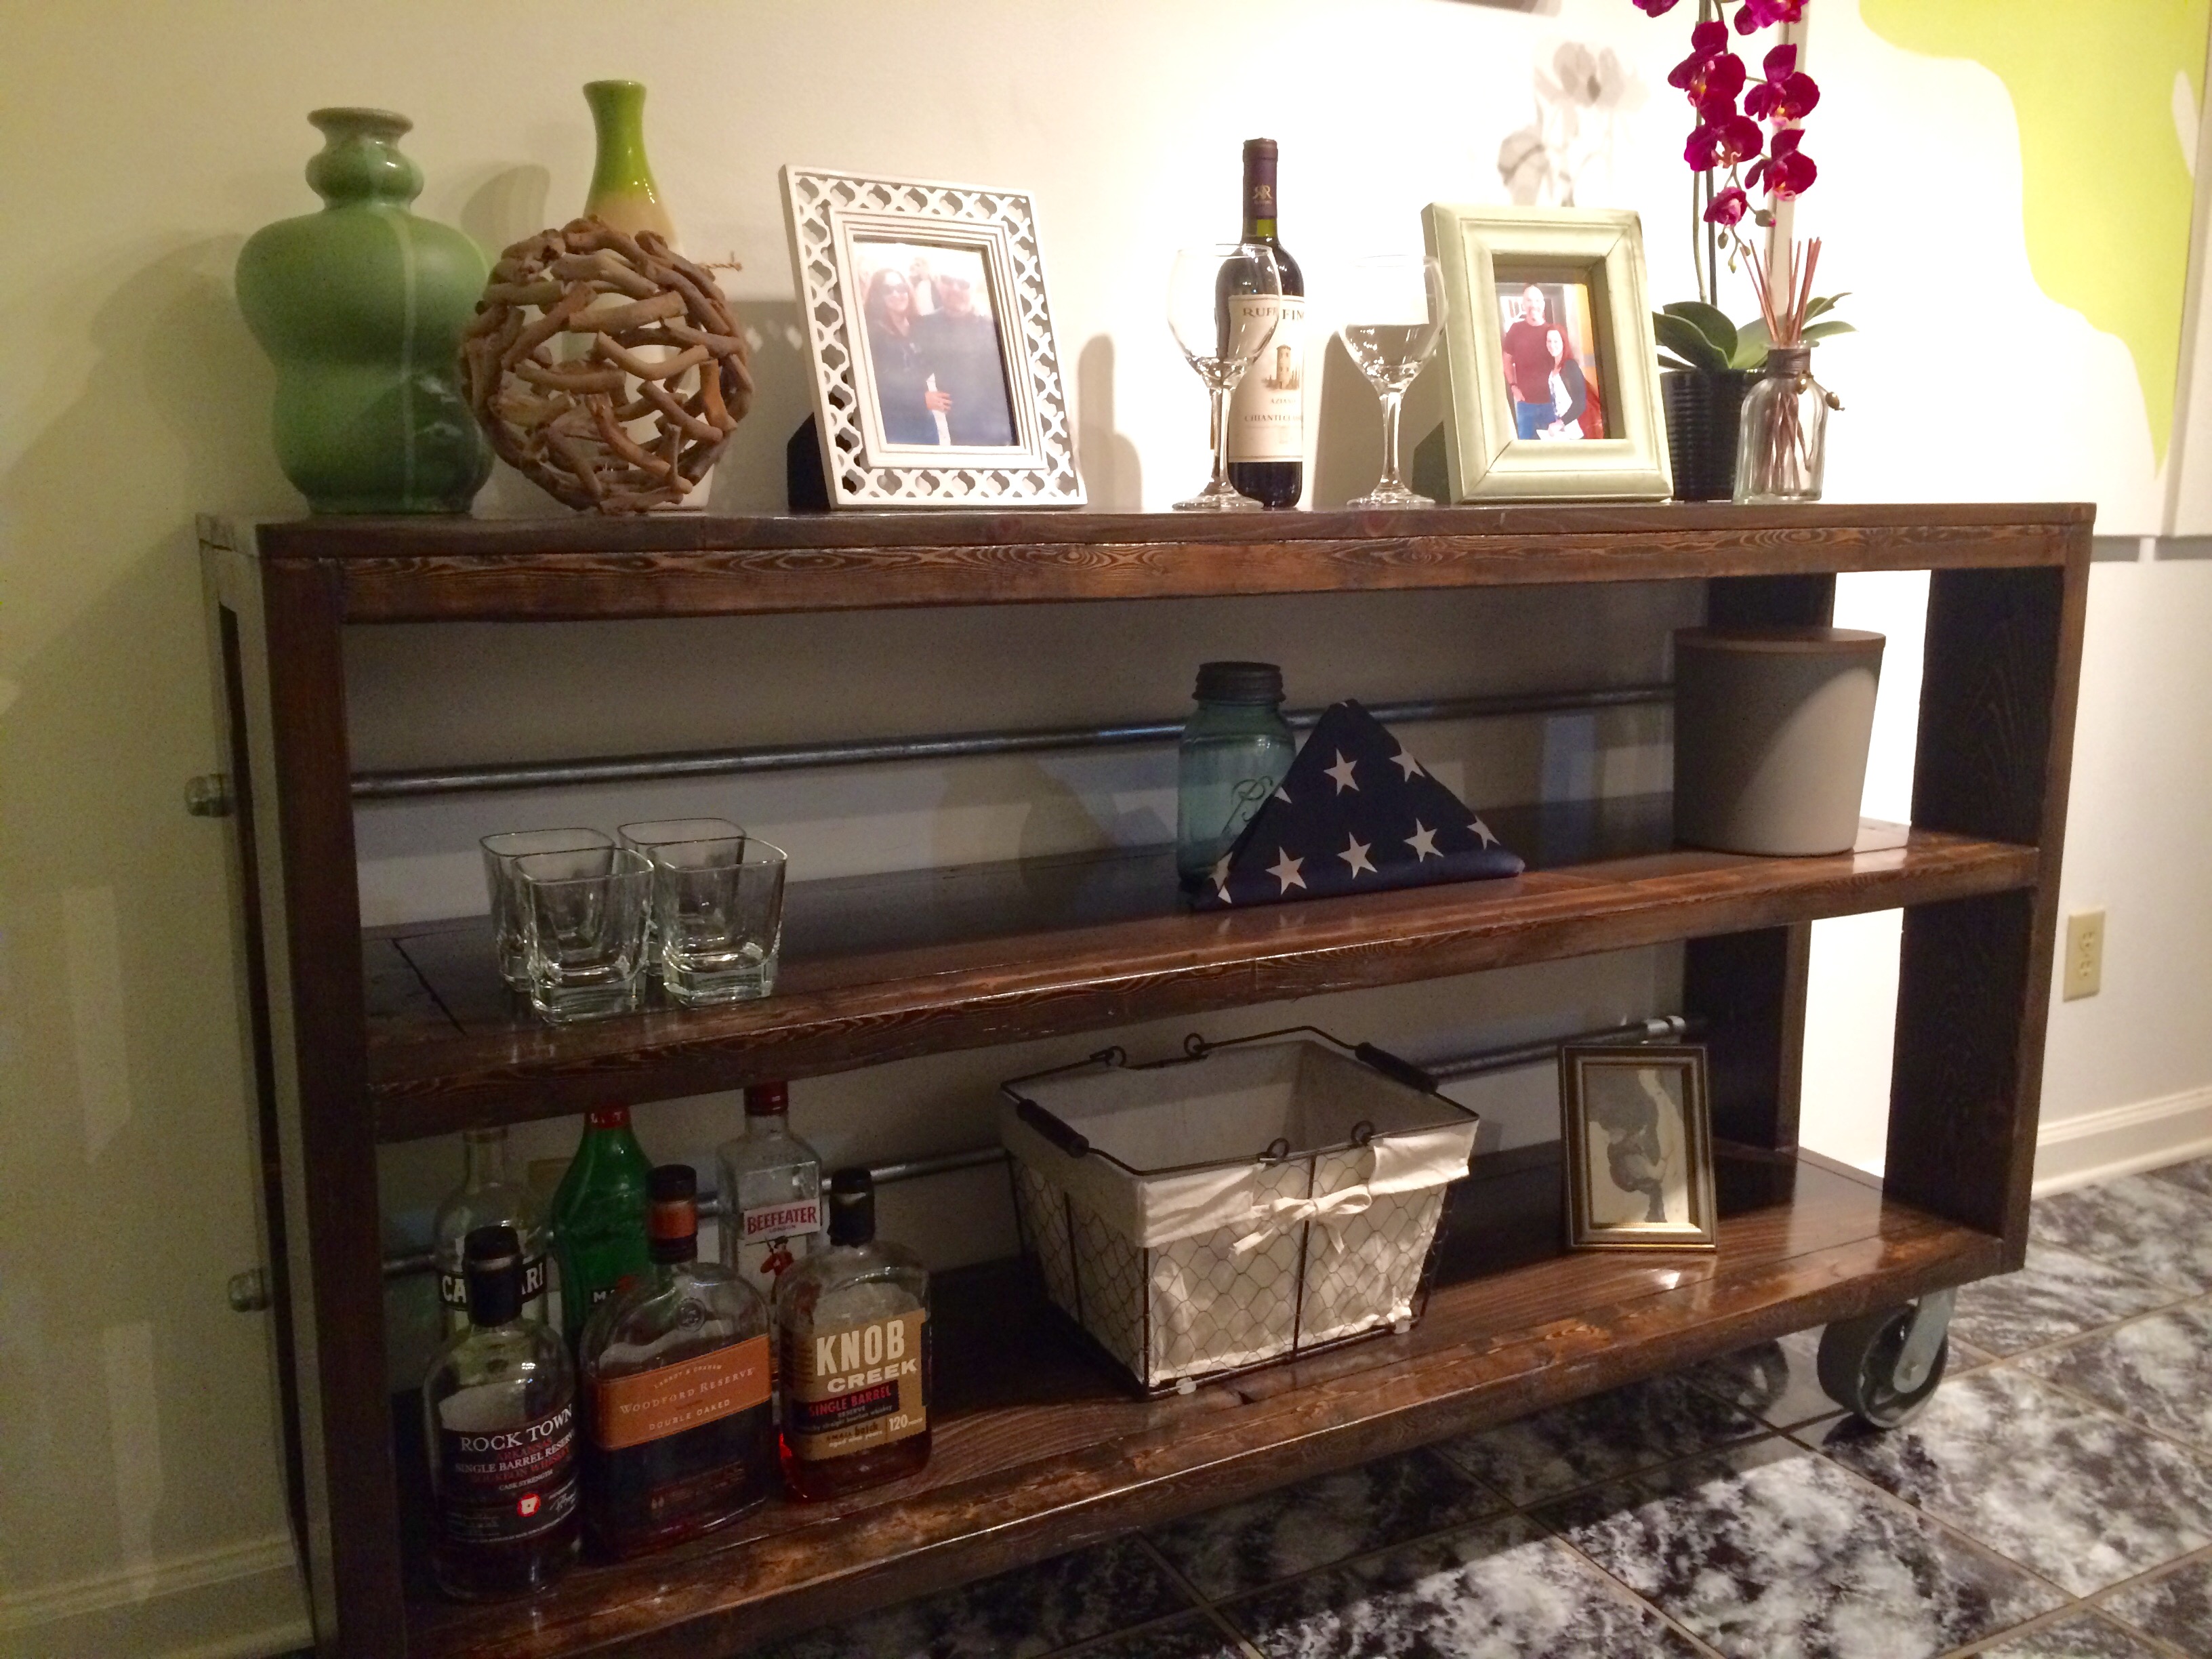
Dining Room Buffet
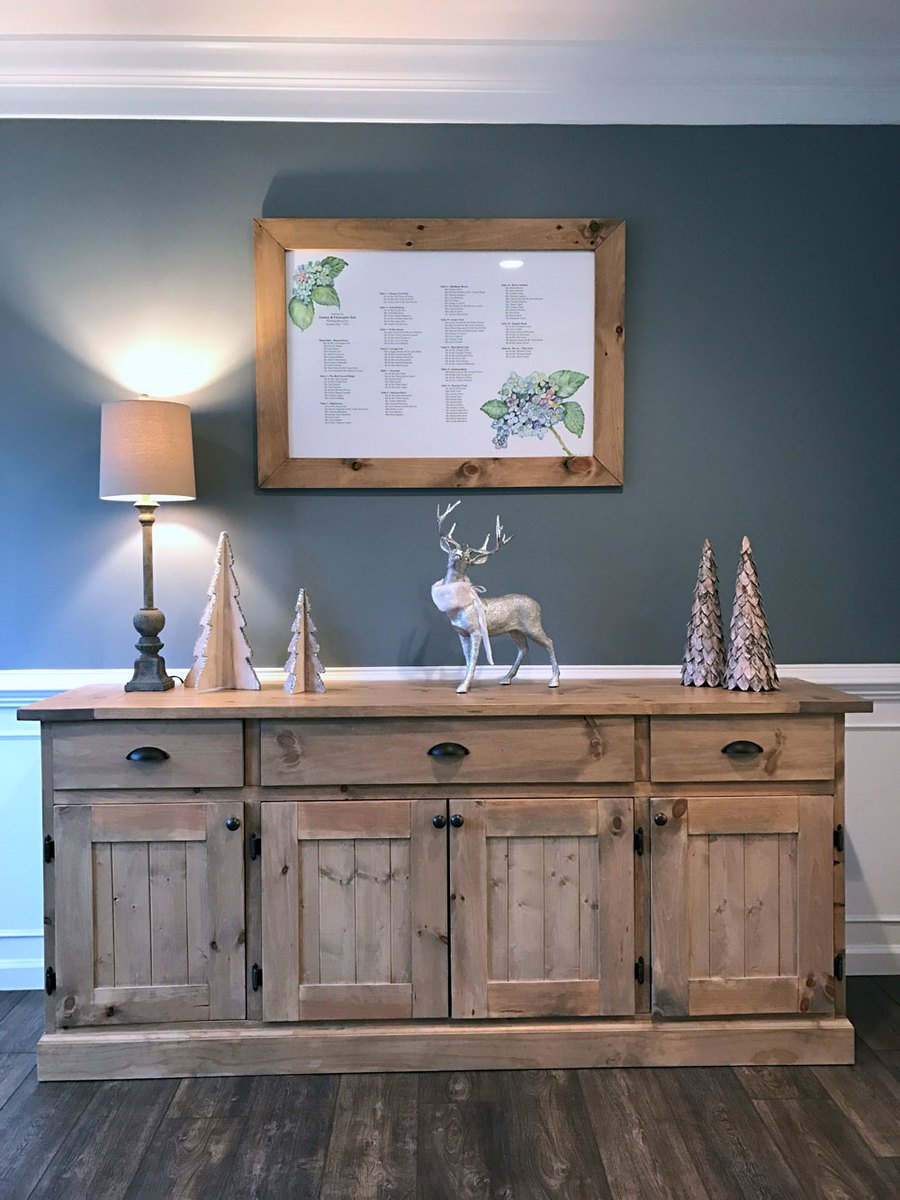
We built this huge 7' buffet for our living/dining room area.
Built from Plan(s)
Estimated Cost
$300
Estimated Time Investment
Weekend Project (10-20 Hours)
Finish Used
Custom stain blend
Recommended Skill Level
Intermediate
Comments
Thu, 09/07/2017 - 07:39
Planked Wood Sideboard
Woud you please share what stain/finish you used on your piece? It is beautiful !
~ Denise
Thu, 04/02/2020 - 16:34
Your custom stain
I would love to have the custom stain color if you would share it!
Tue, 04/28/2020 - 15:00
Buffet special stain color
Would you share the custom stain color for your buffet that looks like the one from Restoration Hardware?
Seasonal And Holiday
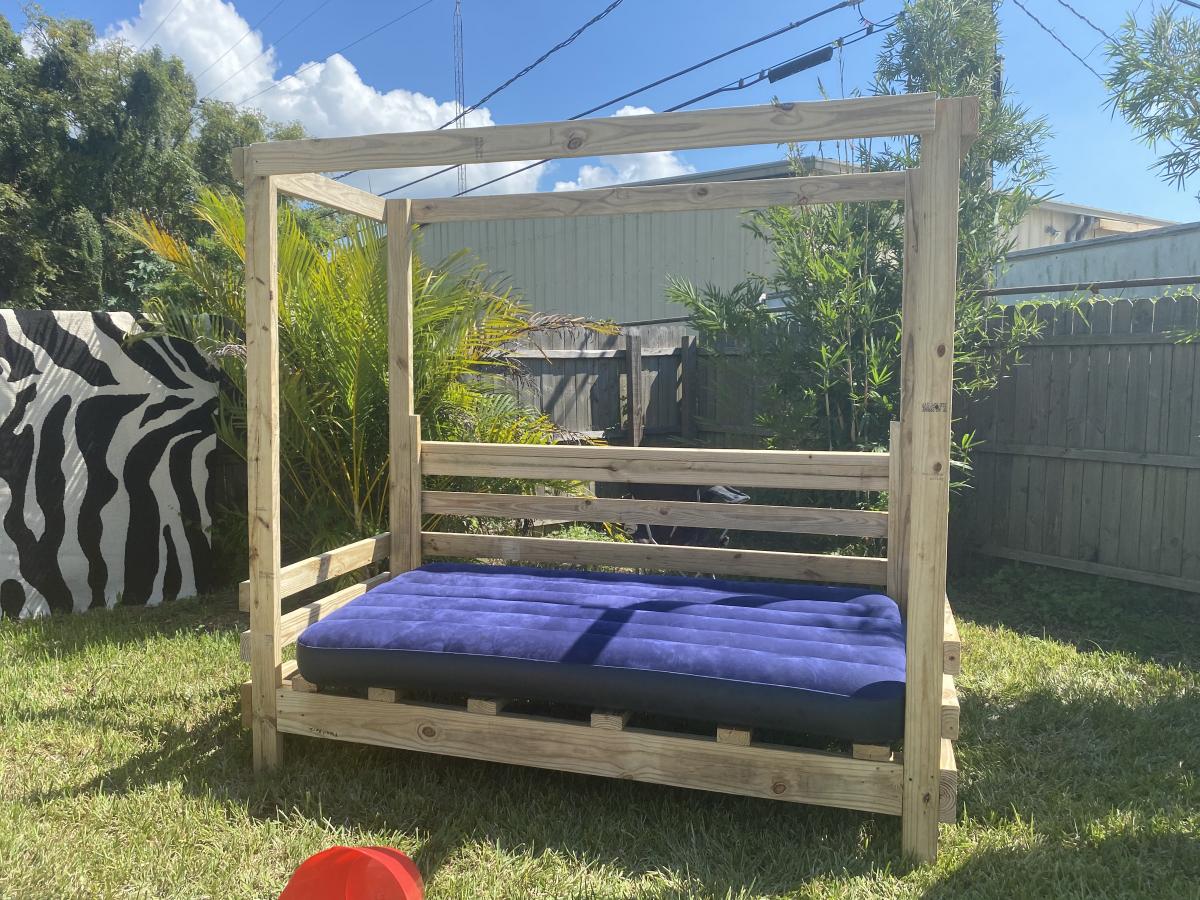
Outdoor Canopy Bed
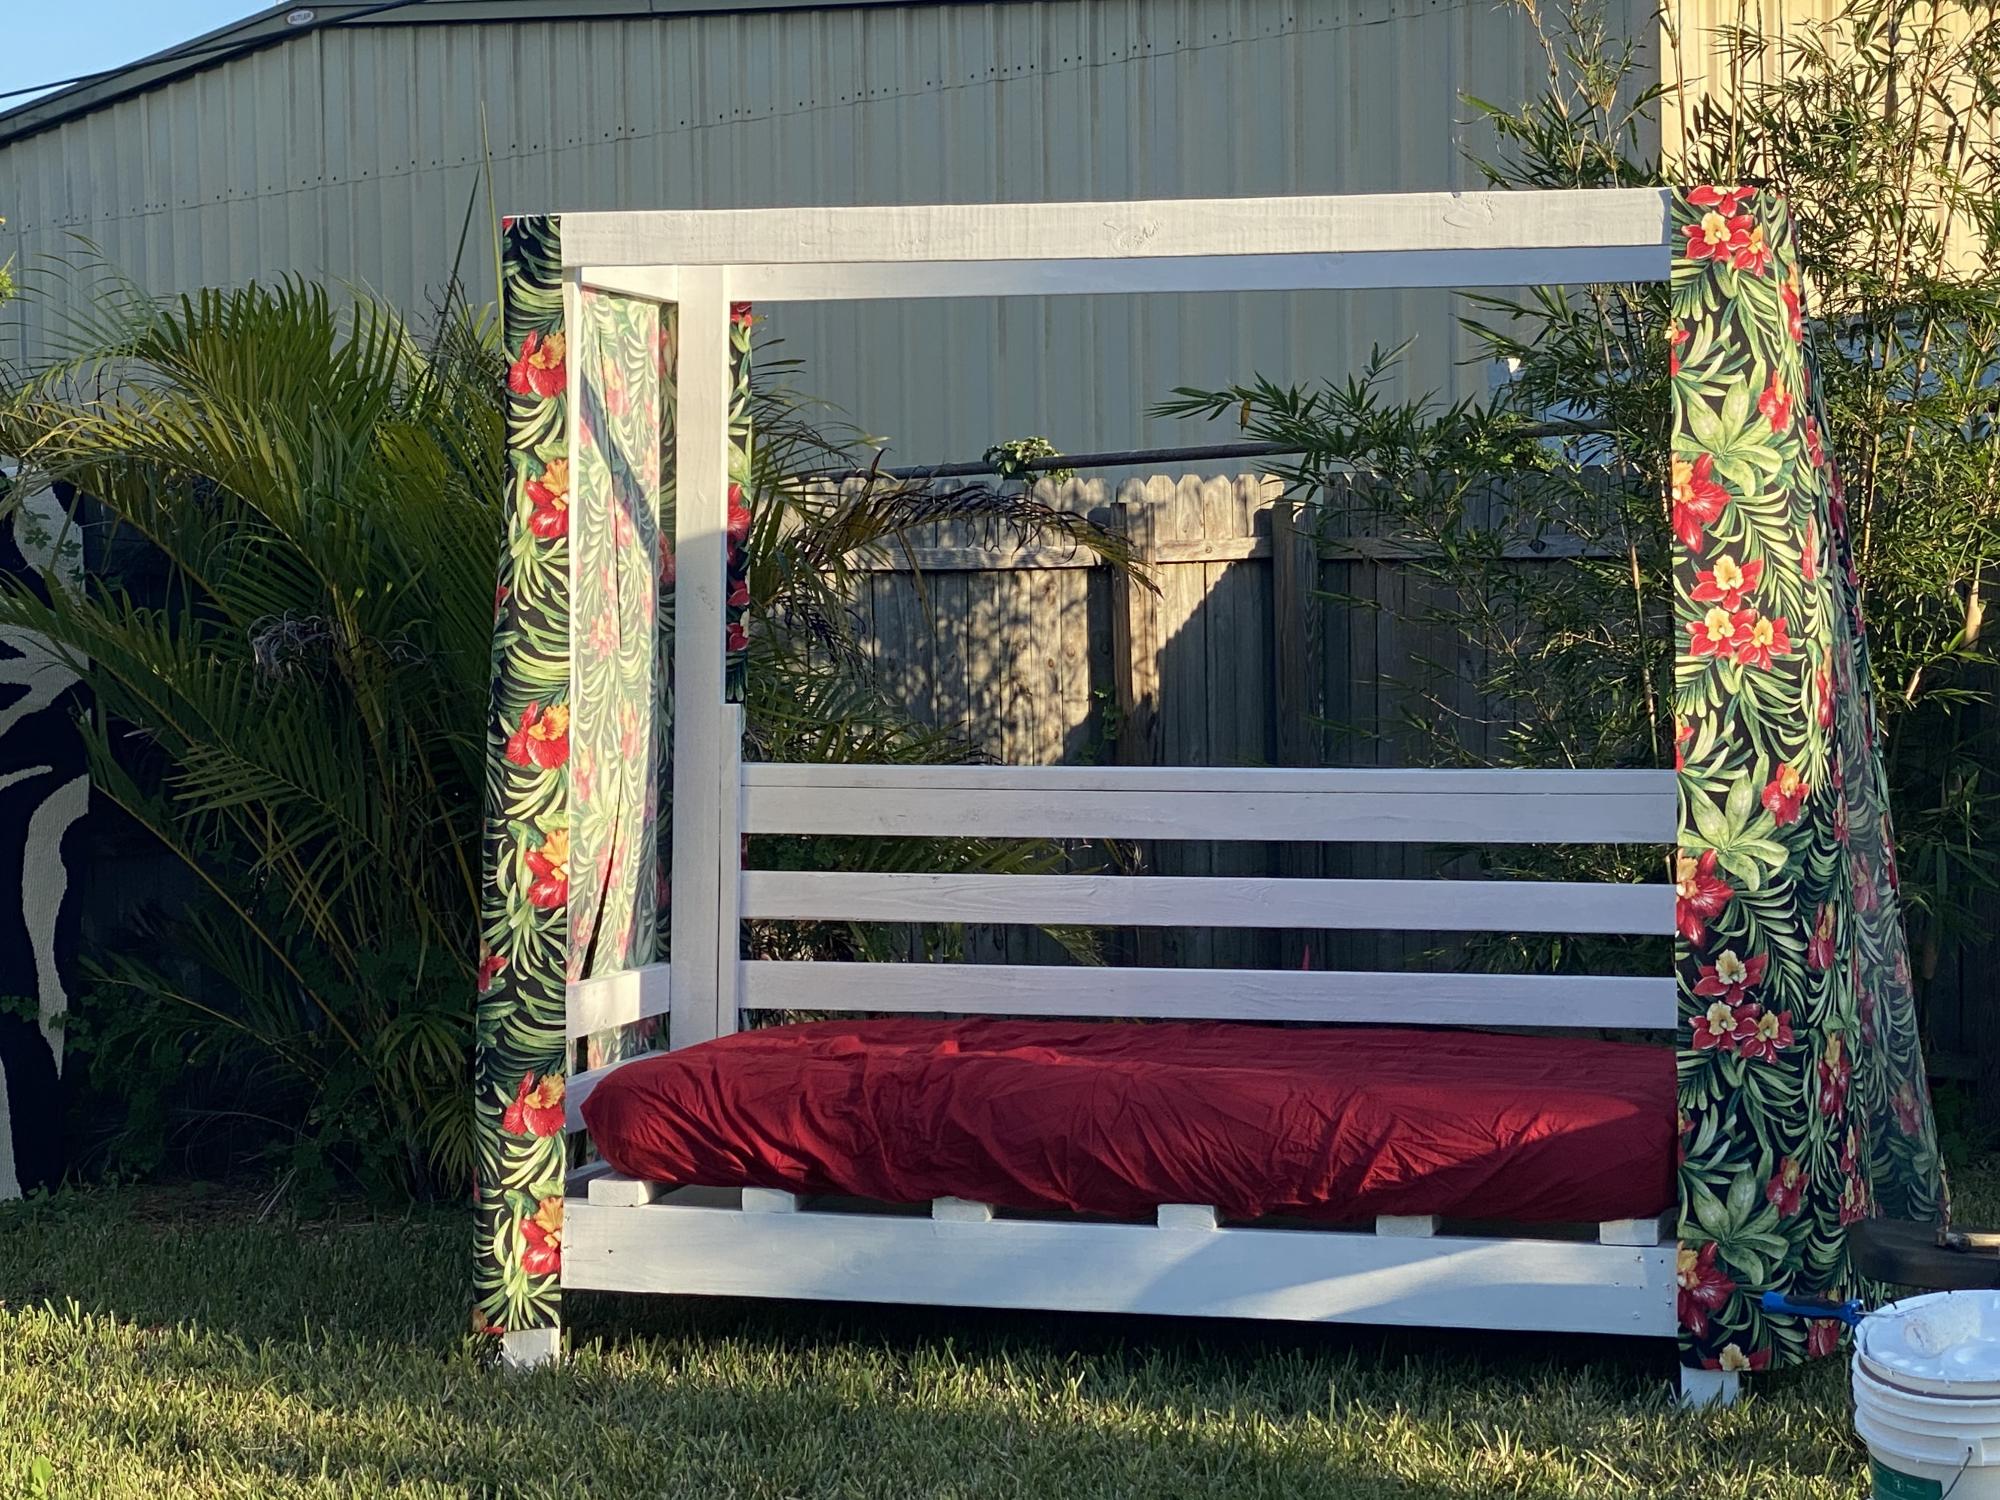
Completed this project last week off of the plans here under outdoor! I Love it and plans were soooo easy to follow!
Estimated Cost
150
Estimated Time Investment
An Hour or Two (0-2 Hours)
Finish Used
Painted white with exterior paint, outdoor fabric and twin size air mattress.
Comments
Mon, 10/19/2020 - 18:39
Great lounge spot!
That looks like a relaxing spot! Great job and thanks for sharing!
Camp Loft Bed with Ladder and Landing
We built this bed for the lil neighbor girl as a gift for Christmas. It turned out better than I expected! The Plans were amazing and easy to follow... It is the first project that I used my Kreg Jig! I am so excited to build another one for my daughter now! We decided to pre-finish all the parts after we cut them to ensure proper sealing of all the ends, just in case of any sap or what not. Special thanks to Ana for all of these plans and Ideas! You truely rock!
Built from Plan(s)
Estimated Cost
$75-100 Dollars
Estimated Time Investment
Weekend Project (10-20 Hours)
Finish Used
Minwax Polyshades Classic Oak
Recommended Skill Level
Beginner
Henry Bookshelf
Built this bookcase for my daughter, only modification was to add the X's on the side. She needed to be able to store all of her books on it. Love it! I now have another family member that wants one just like it!
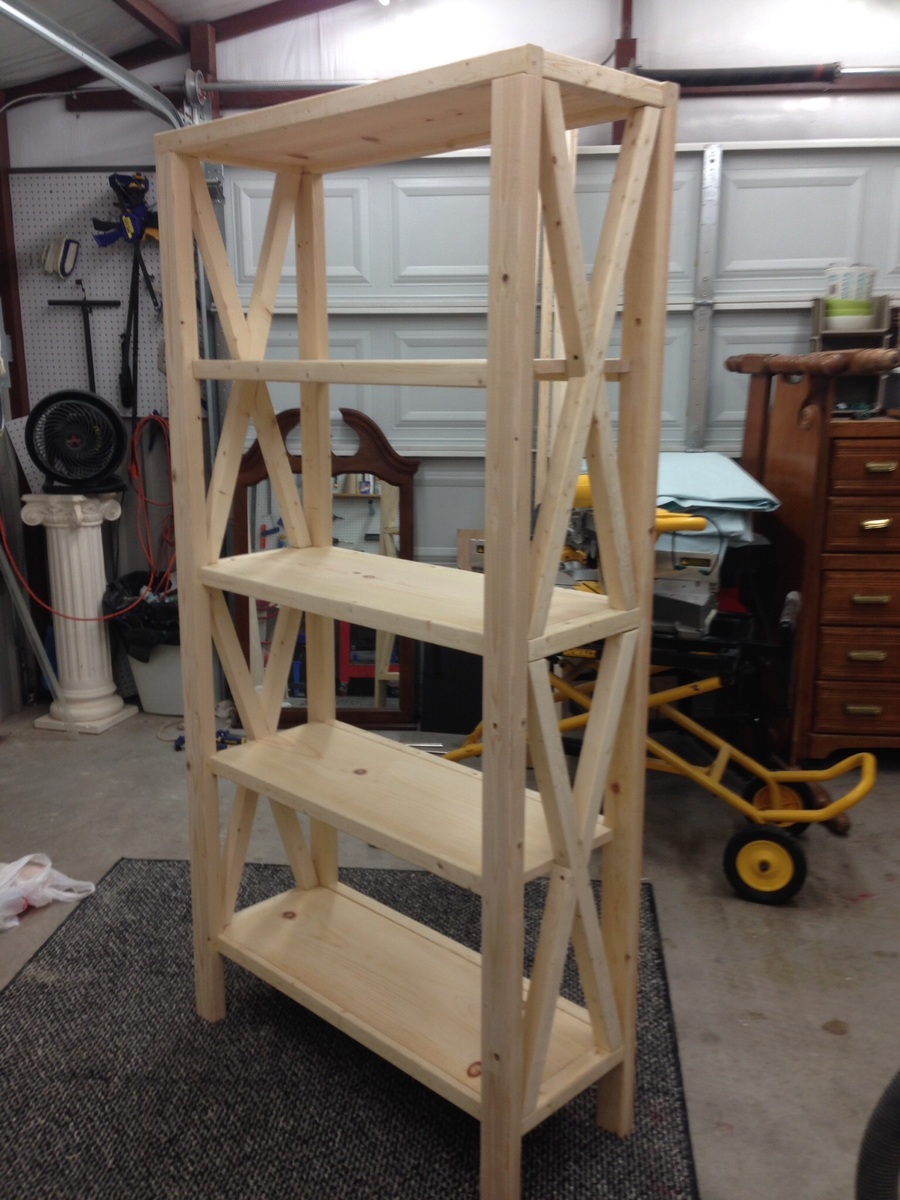
Built from Plan(s)
Estimated Cost
Under 100.00
Estimated Time Investment
Week Long Project (20 Hours or More)
Finish Used
Rustoleum Wheat color with general finishes poly clear coat in semi gloss.
Recommended Skill Level
Intermediate
Tv Console
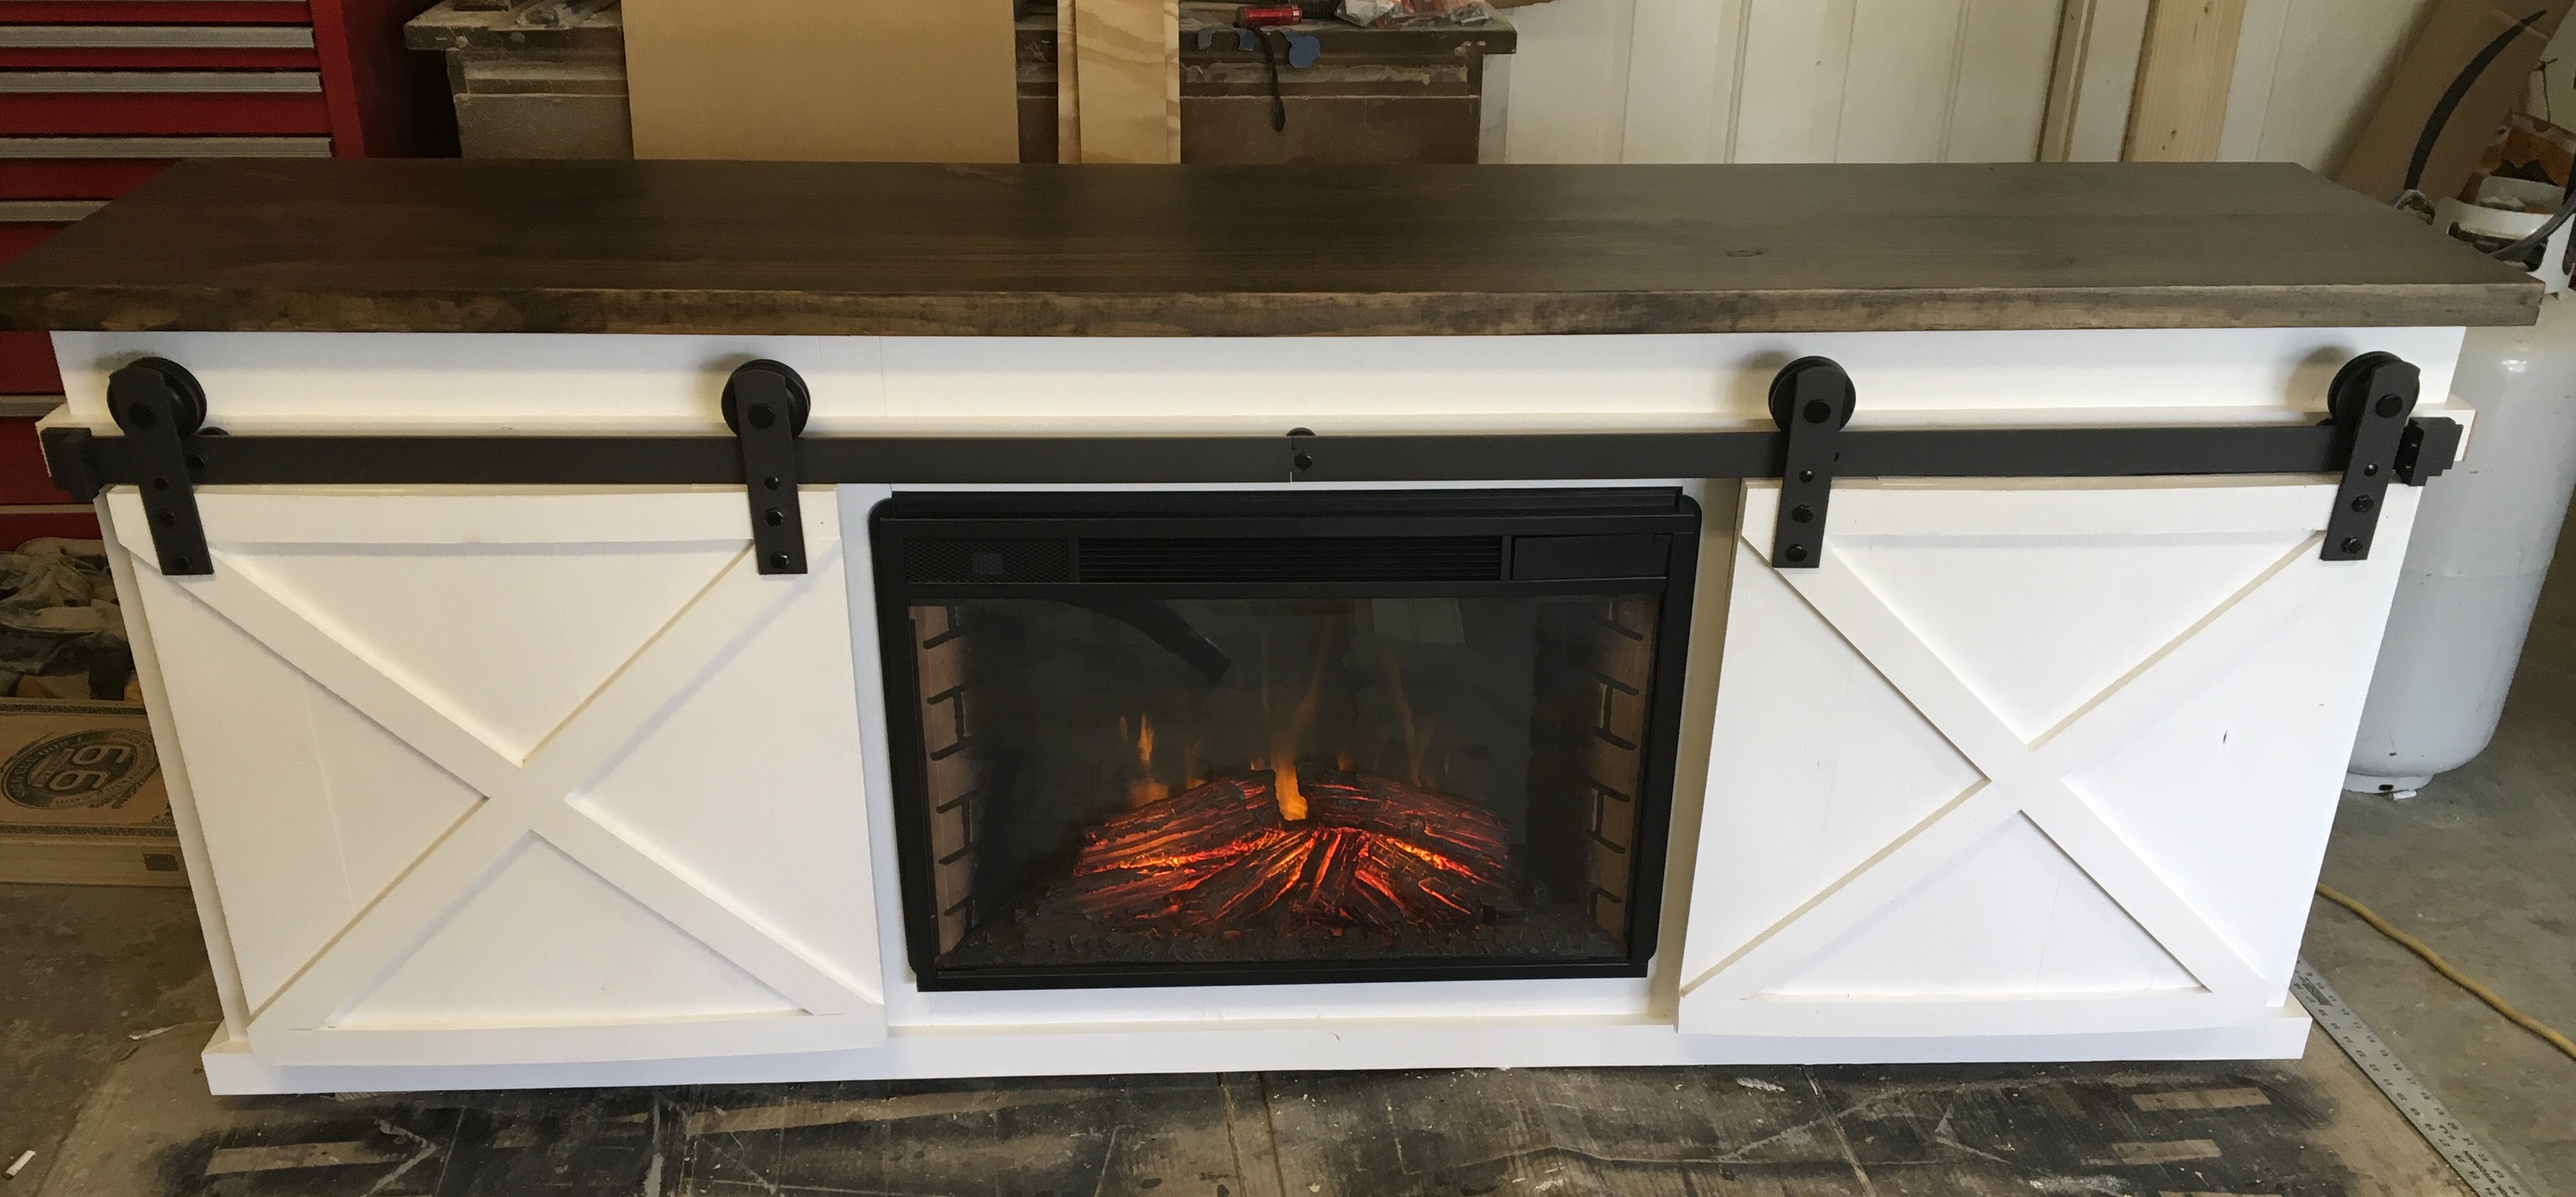
Tv console with sliding barn doors and an electric fireplace insert. Measures 83" wide x 31.5" tall x 18" deep.
Built from Plan(s)
Estimated Time Investment
Week Long Project (20 Hours or More)
Recommended Skill Level
Intermediate
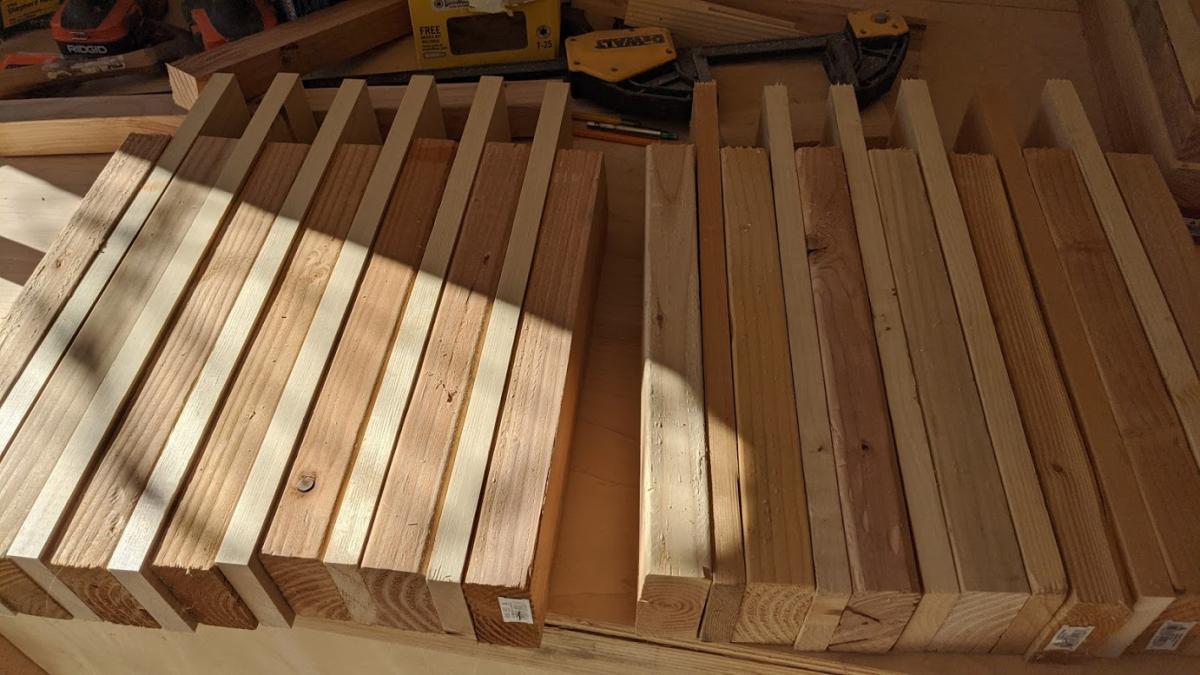
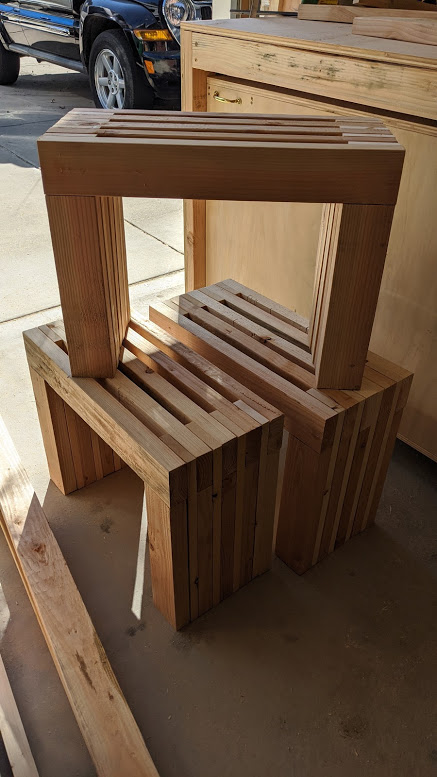
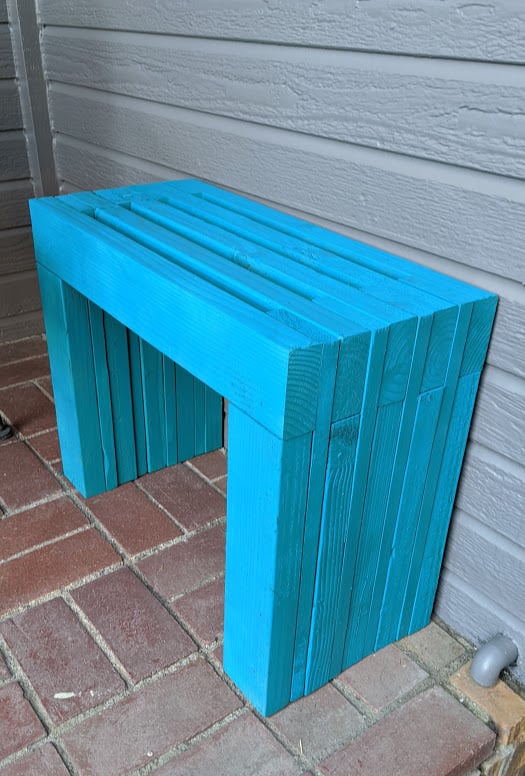
Modern Slat Top Patio Tables

The little tables I had on my front step were super ugly and it was time for an upgrade. I raided my scrap bins for most of the parts and only needed to use 2 new 2x4s but overall it would probably be 7 or 8 - 2x4s and 6 - 8' 1x4s to make all 3 tables
Built from Plan(s)
Estimated Cost
50
Estimated Time Investment
Afternoon Project (3-6 Hours)
Finish Used
2 coats of spray paint (2.5 cans). With the slats being so close together it was the easiest way to get down in there.
Recommended Skill Level
Beginner
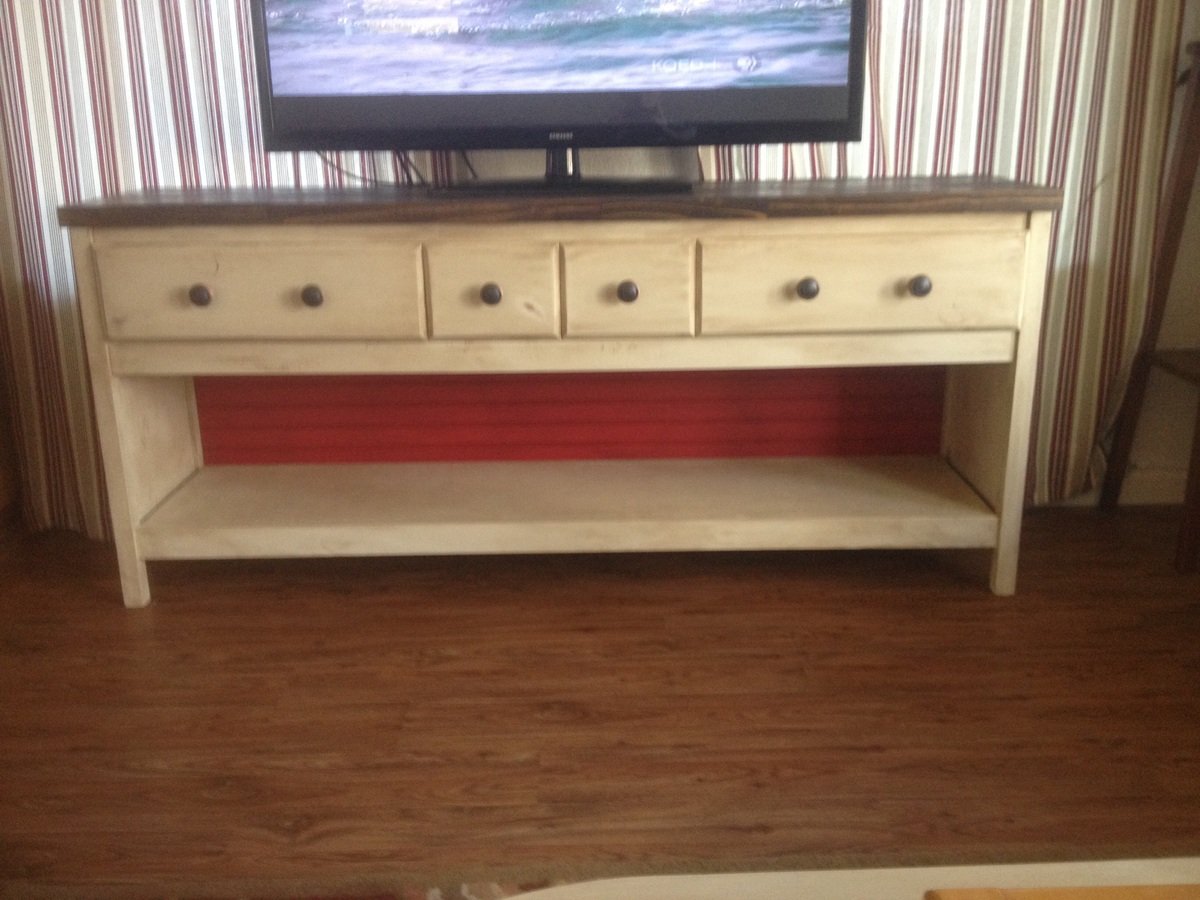
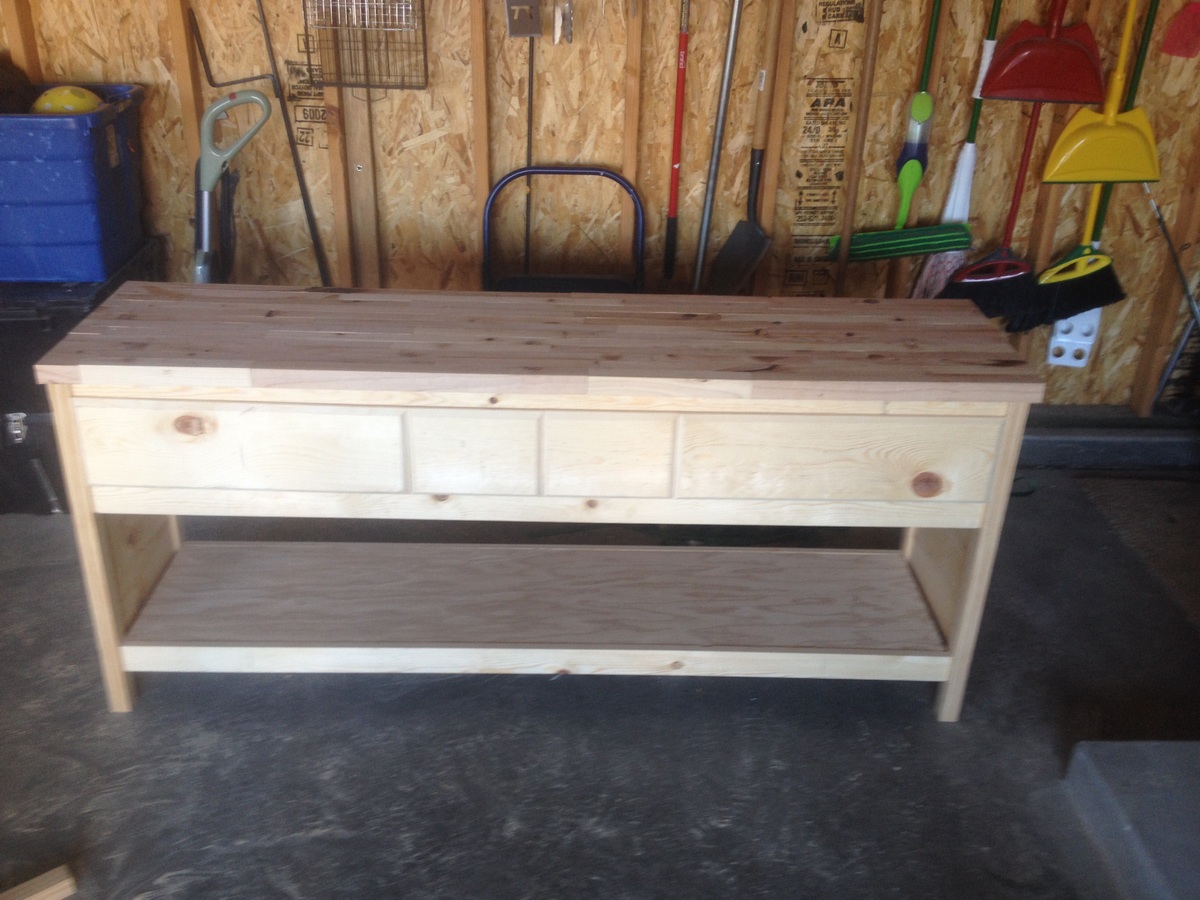
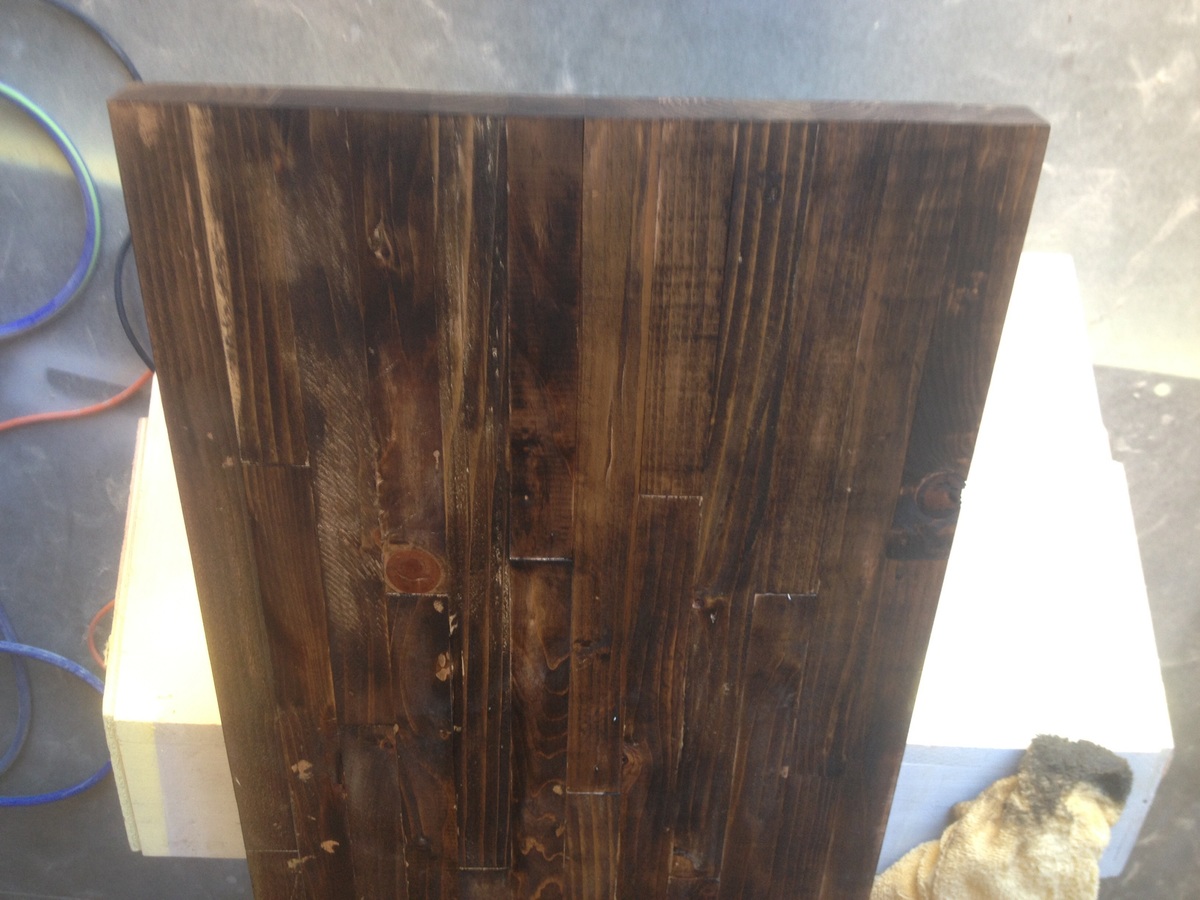
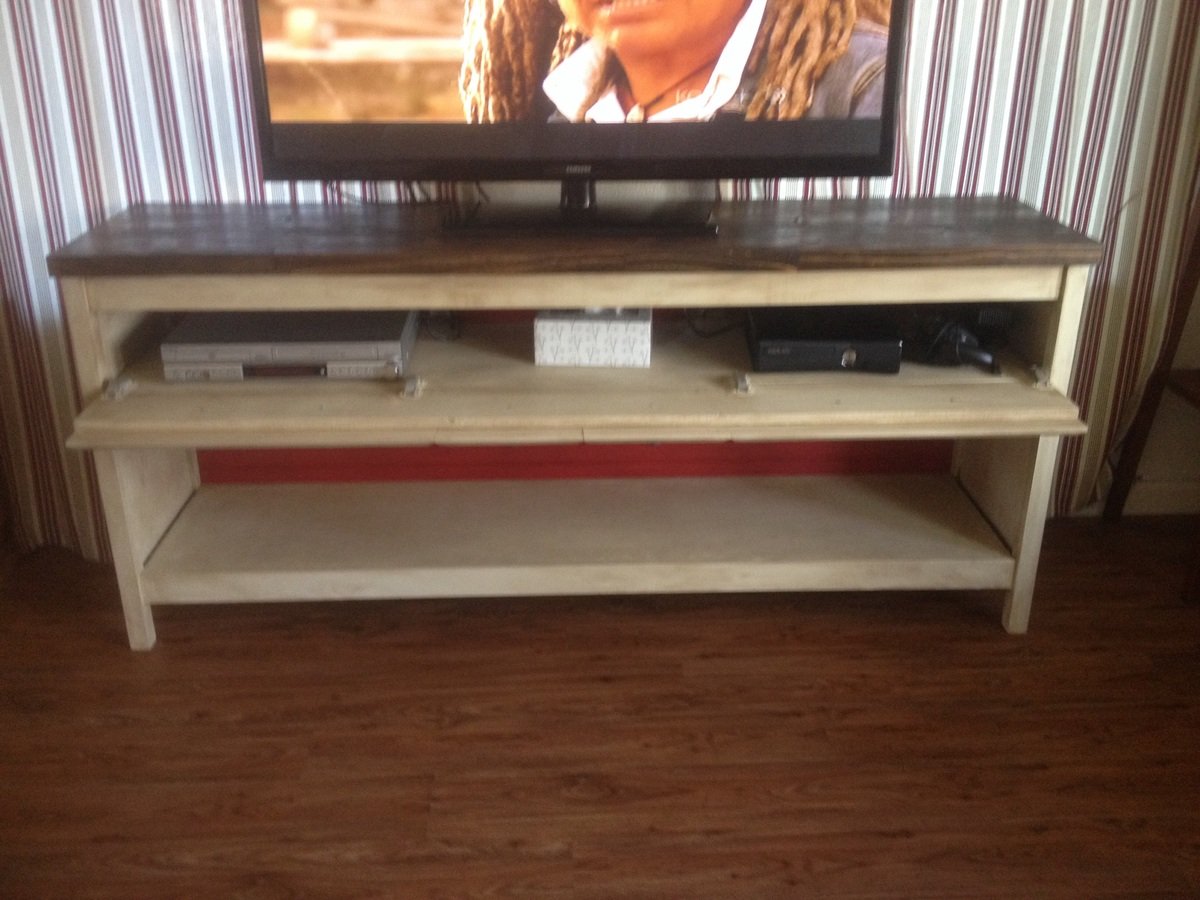
Room divider cubbies
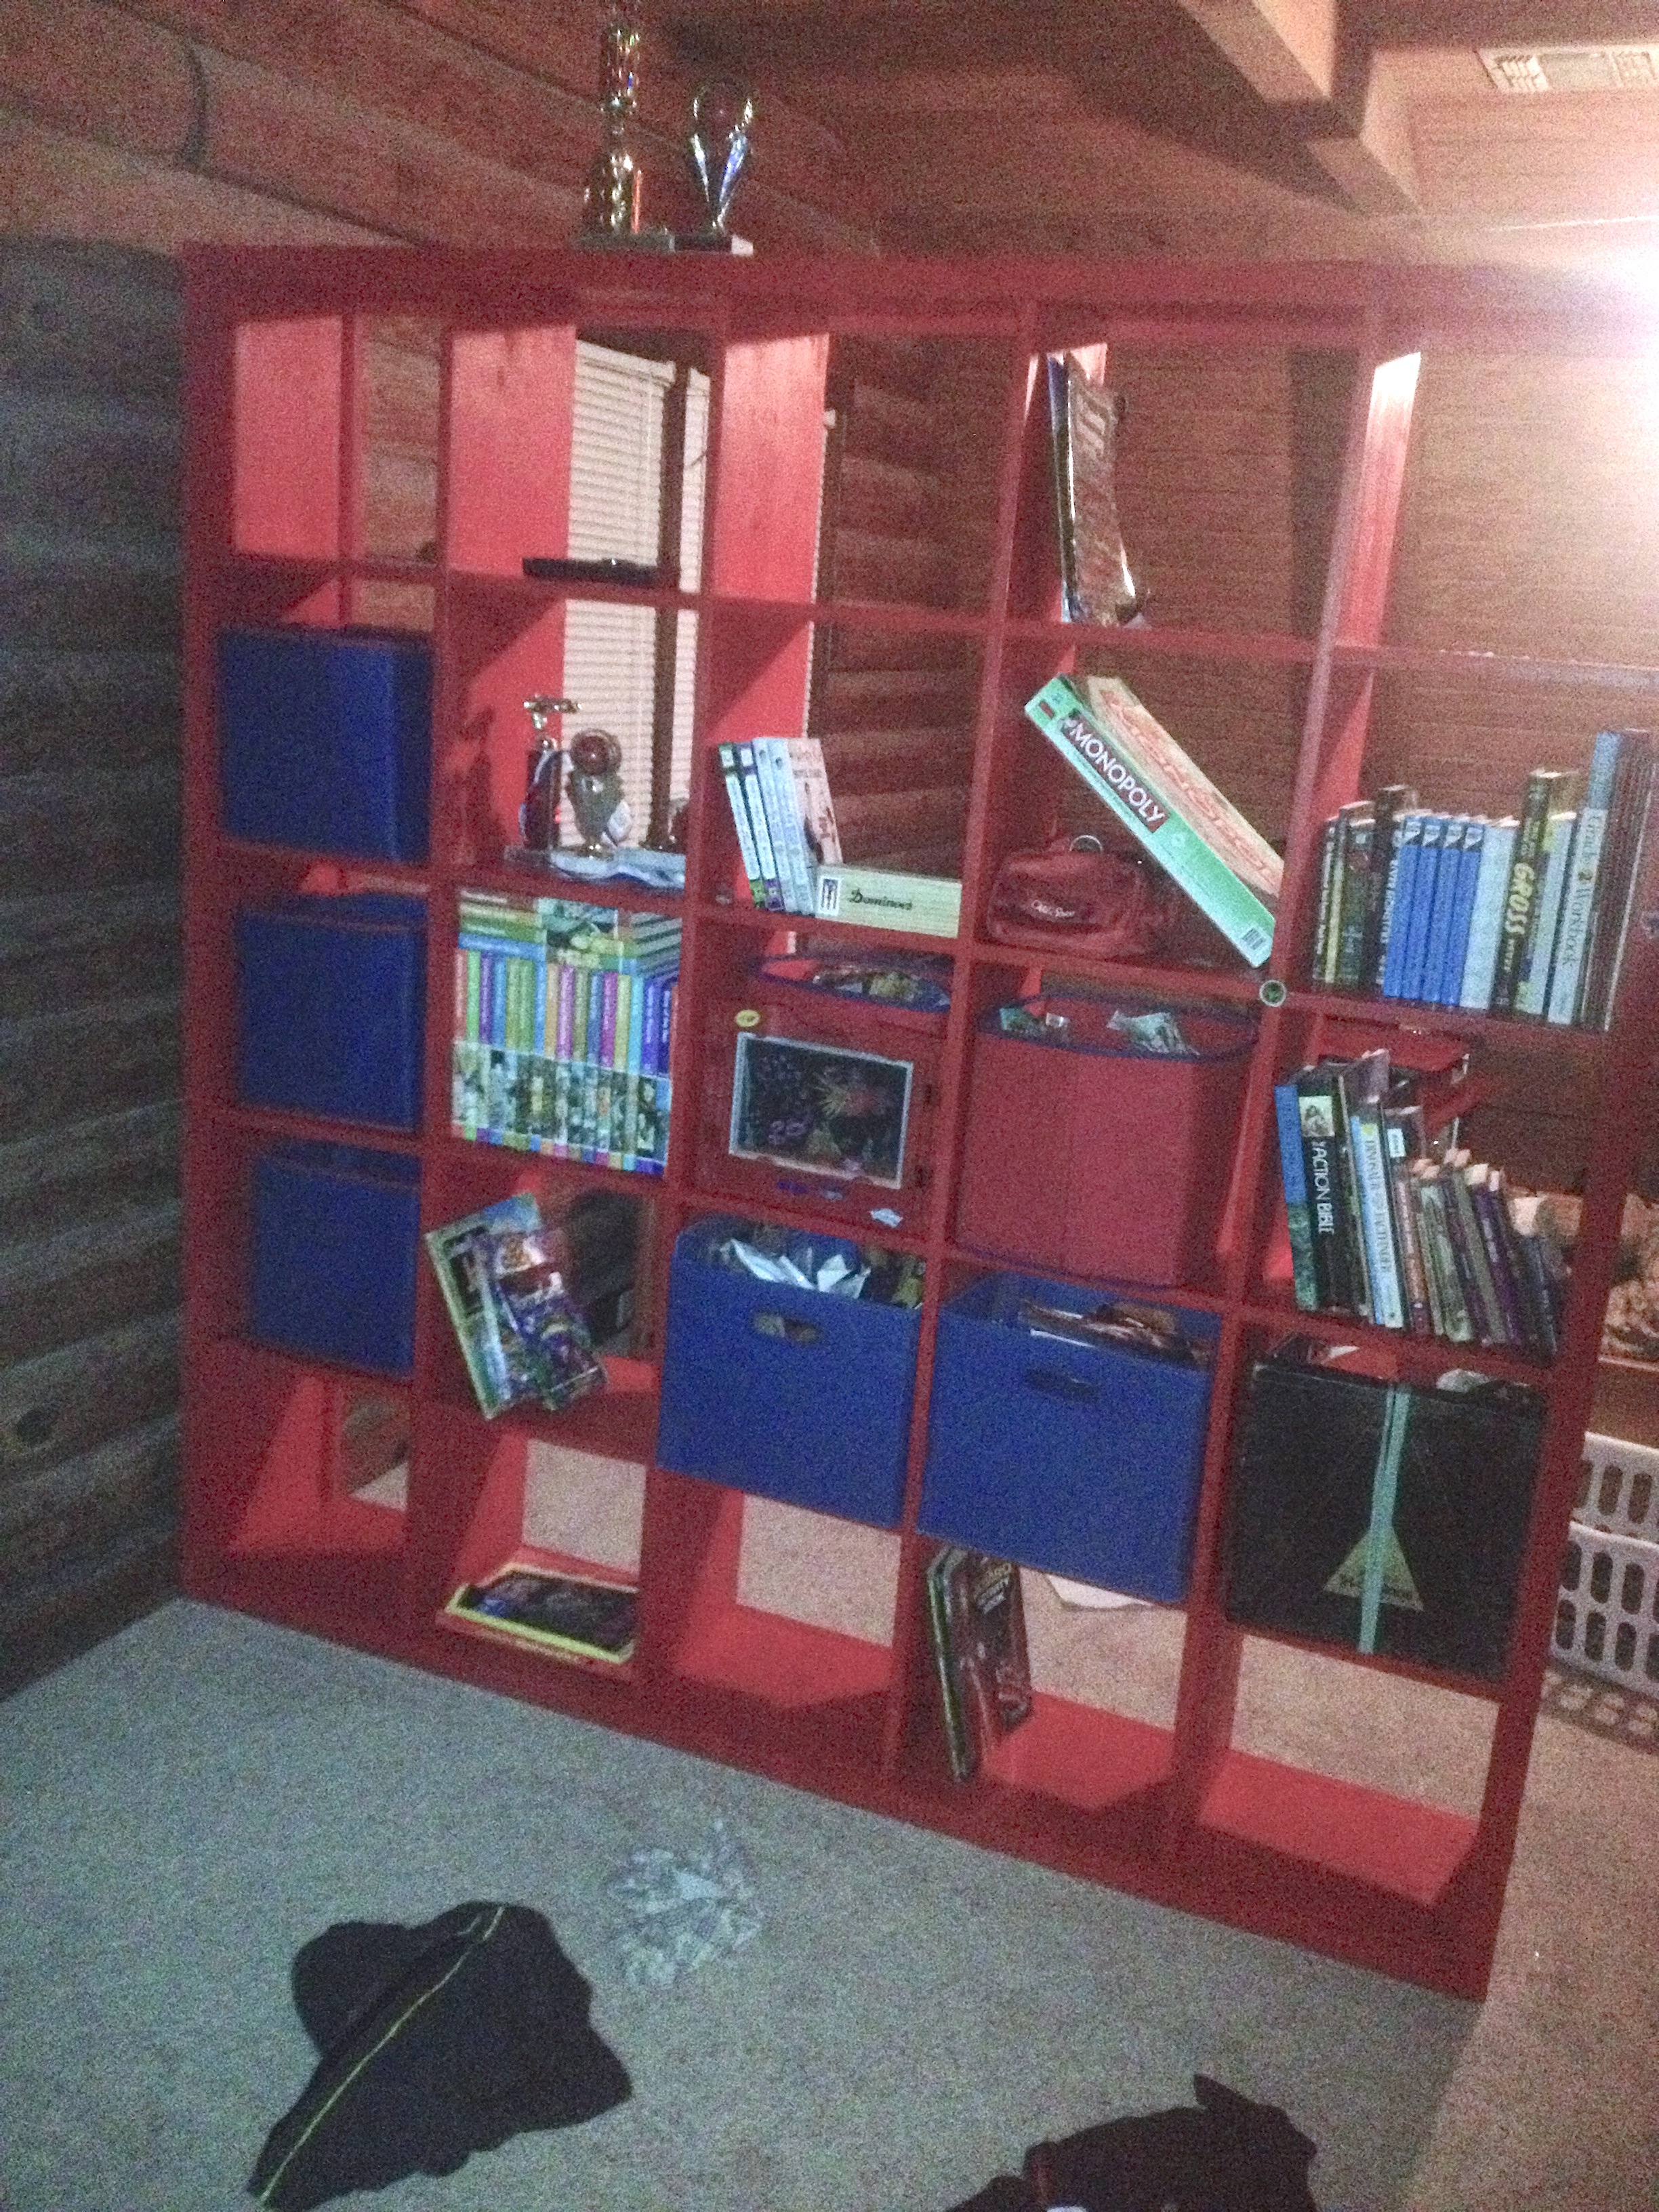
My twins share one pretty large room. They are 11 years old now and getting old enough to want more of their own personal space. This 5x5 cubby shelf was perfect to be used as a room divider!
My challenge was that I typically work in the basement, but their room is on the 2nd floor. I didn't have anyone that would be able to help me carry this massive creation up 2 flights of stairs, so I had to build this "on site." Unfortunately, their room is carpeted (poorly), so I brought up some old subfloor panels that I had to have a more flat surface to work on. It wasn't ideal, but made it possible.
It also took me much longer than it would take most people since I was limited to working only during nap times. It probably could have been done in a day or two if I had the opportunity to work continuously.
Built from Plan(s)
Estimated Cost
$125
Estimated Time Investment
Weekend Project (10-20 Hours)
Finish Used
Red paint
Recommended Skill Level
Beginner
Ridge media console
Used mortise and tenon joints. Primed, painted and distressed the wood. Top was stained.
Built from Plan(s)
Estimated Cost
130 for wood, hinges and knobs.
Estimated Time Investment
Week Long Project (20 Hours or More)
Finish Used
Autumn haze and a dark glaze. Dark stain for the top.
Recommended Skill Level
Intermediate
Basketball hoop for bedroom decor & play
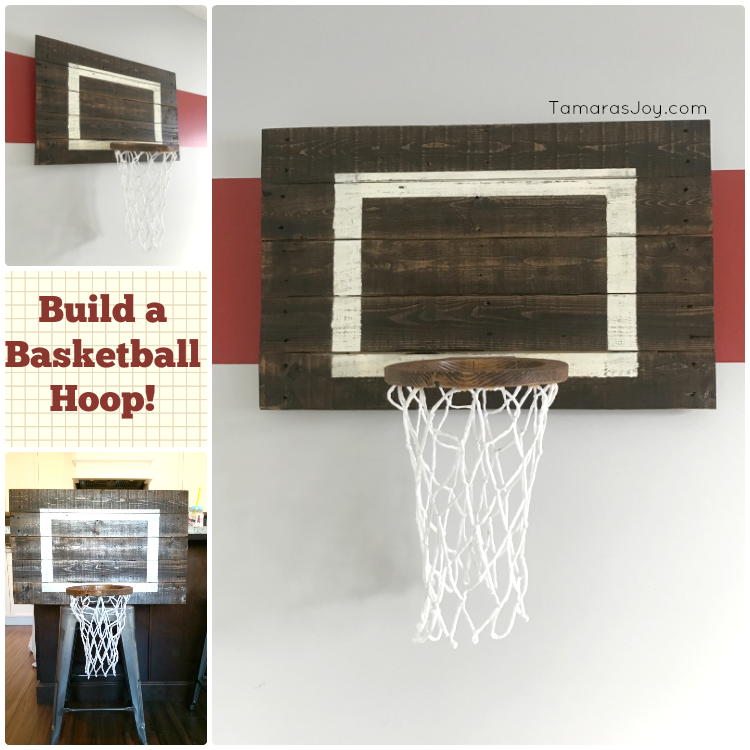
Full tutorial on the blog tamarasjoy.com
I built this basketball hoop for my sons room over a year ago and it has stood the test of time! The wood rim never cracked. Plus it looks fantastic :)
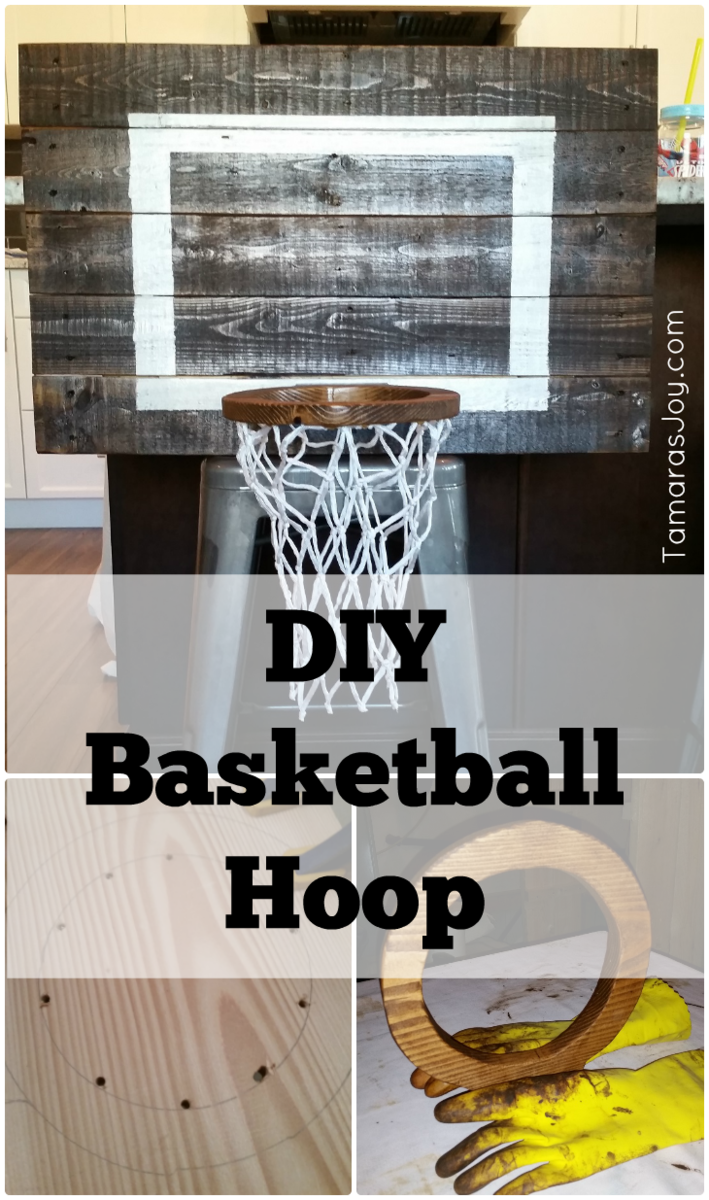
Estimated Cost
I used scraps but if you needed to purchase the wood and screws it may run you $25
The only thing I bought was the netting which was less then $10
The only thing I bought was the netting which was less then $10
Estimated Time Investment
An Hour or Two (0-2 Hours)
Finish Used
Dark stain, nothing special.
Recommended Skill Level
Starter Project
Wine & Cheese Crate
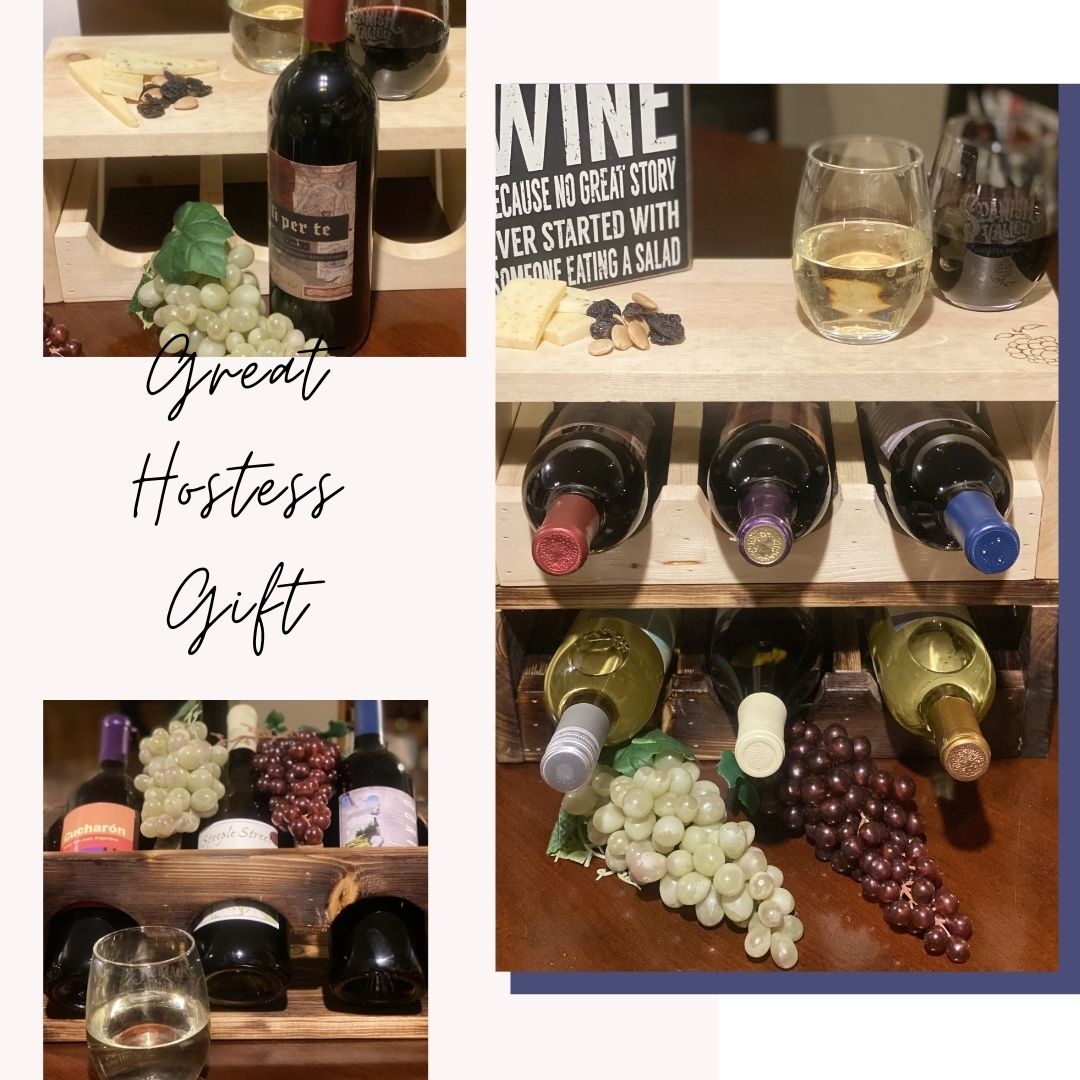
WE love these crates and have so much fun making them!
We have decided to sell these on Etsy and they have done well. we offer multiple stain colors as well as shou sugi ban.
(shou sugi ban traditionally involves scorching wooden boards with a torch or controlled fire, cooling the wood, softening the char with a wire brush, removing dust, and, if desired, topping the wood with natural oil)
Thank you for providing us with a source of income!
Built from Plan(s)
Estimated Cost
$14
Estimated Time Investment
An Hour or Two (0-2 Hours)
Finish Used
stain
brad nails
shlac
brad nails
shlac
Recommended Skill Level
Beginner
Comments
Fri, 10/30/2020 - 14:39
Love to hear this!
How great is it to make some extra money doing what you love?! These are great, thanks for sharing!
My Surprise B-Day Gift and Project Wrapped Into One!
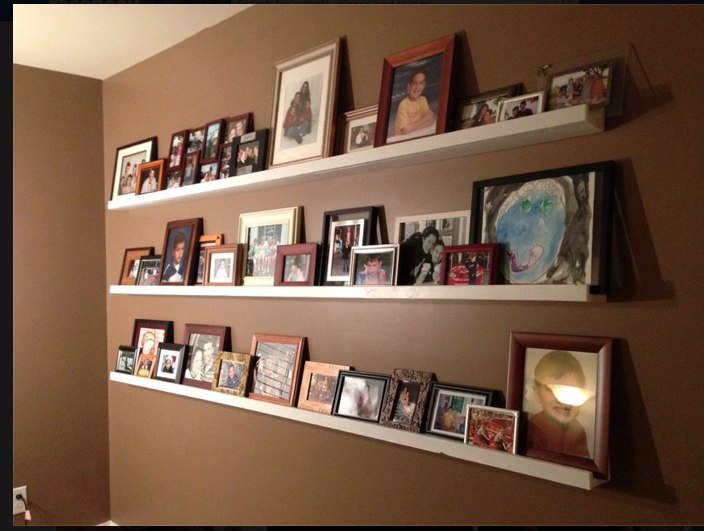
How this beginner project became my B-Day gift: After seeing this on Ana's site I just knew I had the perfect place for these, plus it was a great project to wet my toes :-) After talking my husband's head off for about a week with all the new things I'm going to build this year, we were finally headed to Lowes to get material. Well to my surprise he also bought me a Kreg-Jig(Master Series) I AM GOING TO BE A BUILDING MACHNE! LOL
The cost really is around $10 or less but I spent some extra on Polycrylic to create a nice shine over the wood. I knew I wanted 8ft ledges so there was no cutting involved, wohoo! Here is what I used:
6 1x4 @8ft
3 1x2 @8ft
(I used 1 1/4in screws for project and 2in screws for mounting)
120 grit sand paper
After putting together the wood in a jiffy as described in Ana's plans I then sanded. Even the sanding, which I did by hand was fairly quick. Next the priming and painting took the longest as it had to dry obviously. After a few coats, I sprayed the polycrylic according to directions on can. That's it...
I was so excited as it was going up, I was planning on putting some candles, maybe some decorative stuff to go with the pics. I didn't realize how many pictures I have! Wow! Guess I'll have to dust off my Kreg-Jig and make more. :-)
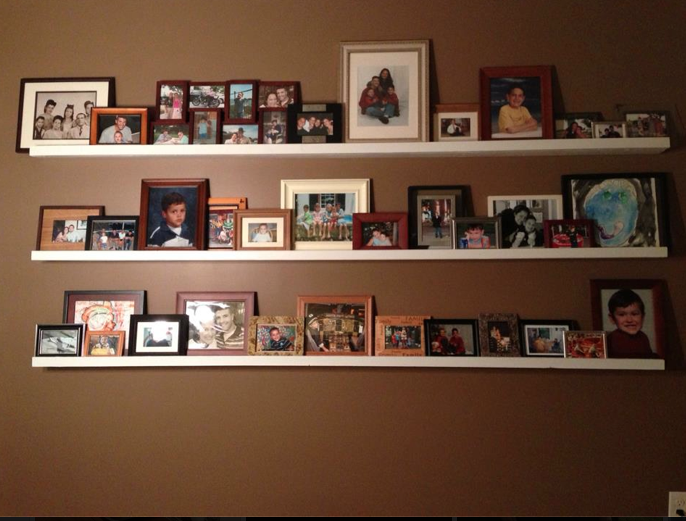
Built from Plan(s)
Estimated Cost
$24
Estimated Time Investment
An Hour or Two (0-2 Hours)
Finish Used
Primer, White Glossy Paint, and Minwax Spray Polycrylic. Polycrylic is easy to use and very quick to dry.(about 30min) I simply used it to create a shiny look.
Recommended Skill Level
Starter Project
4x4 Truss Beam Table
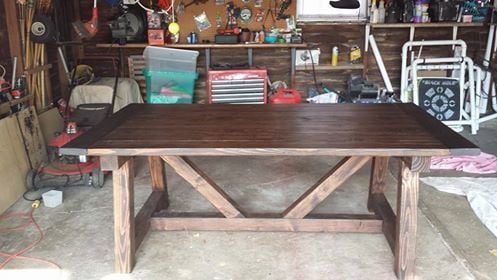
Built for my son and daughter-in-law. Love it
Built from Plan(s)
Estimated Time Investment
Week Long Project (20 Hours or More)
Finish Used
Minwax Dark Walnut with Minwax Ultimate Poly Matte
Recommended Skill Level
Intermediate
Washer/Dryer Pedestal with Flush Front Drawers
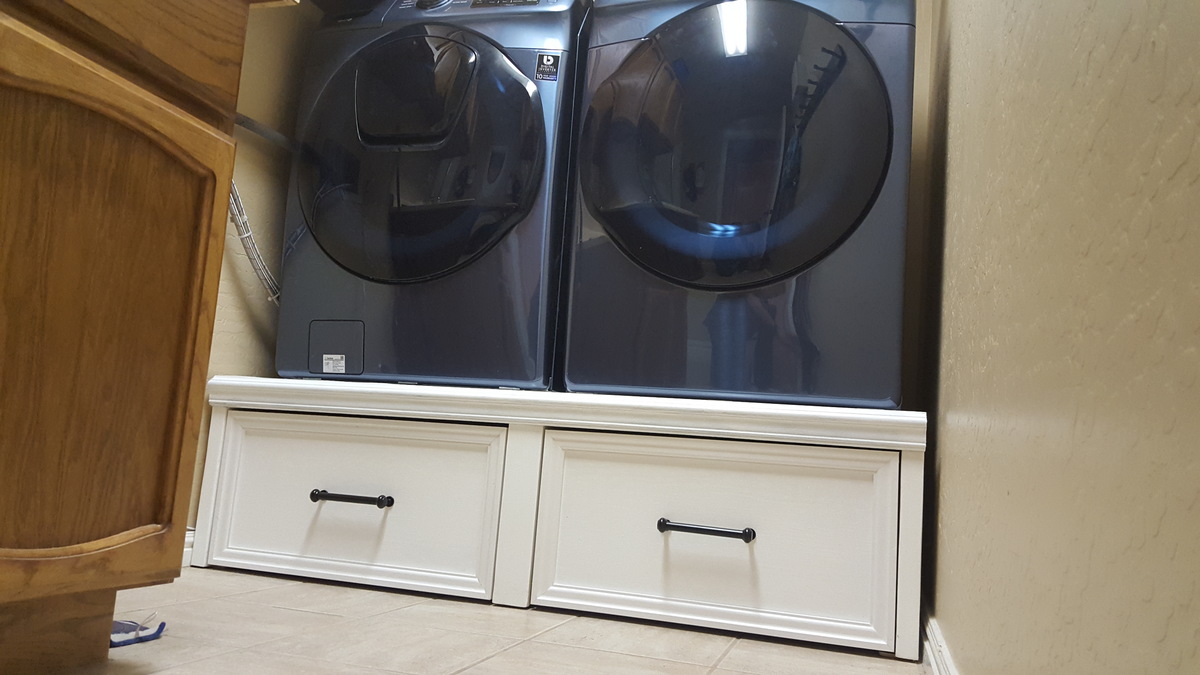
Thank You Dmccoy for the plans used for this project. Great idea using the 2×6s for strength and stability! I built this Pedestal and placed furniture slides underneath to allow for sliding out for cleaning and access.


Built from Plan(s)
Estimated Cost
$130
Estimated Time Investment
Weekend Project (10-20 Hours)
Finish Used
First 2×4s, 15/32", and 23/32" Plywood
Recommended Skill Level
Beginner