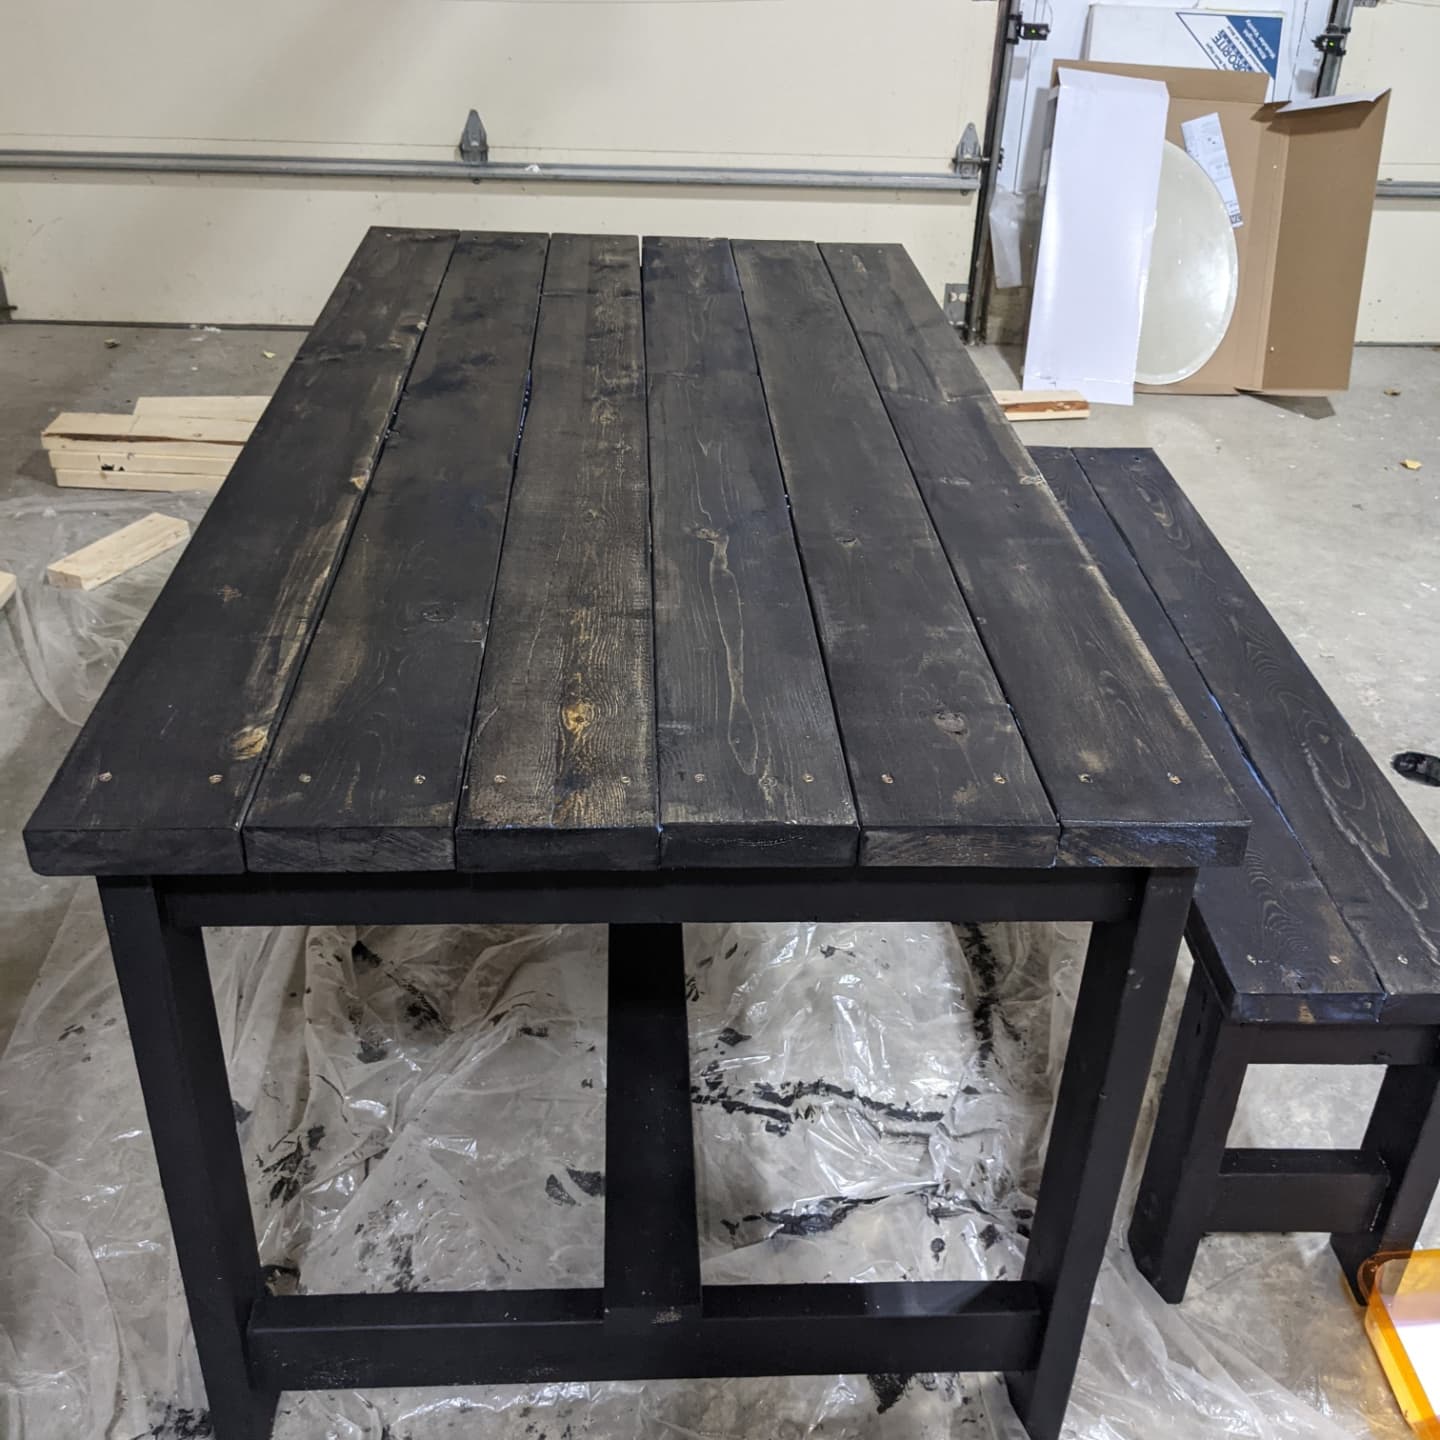
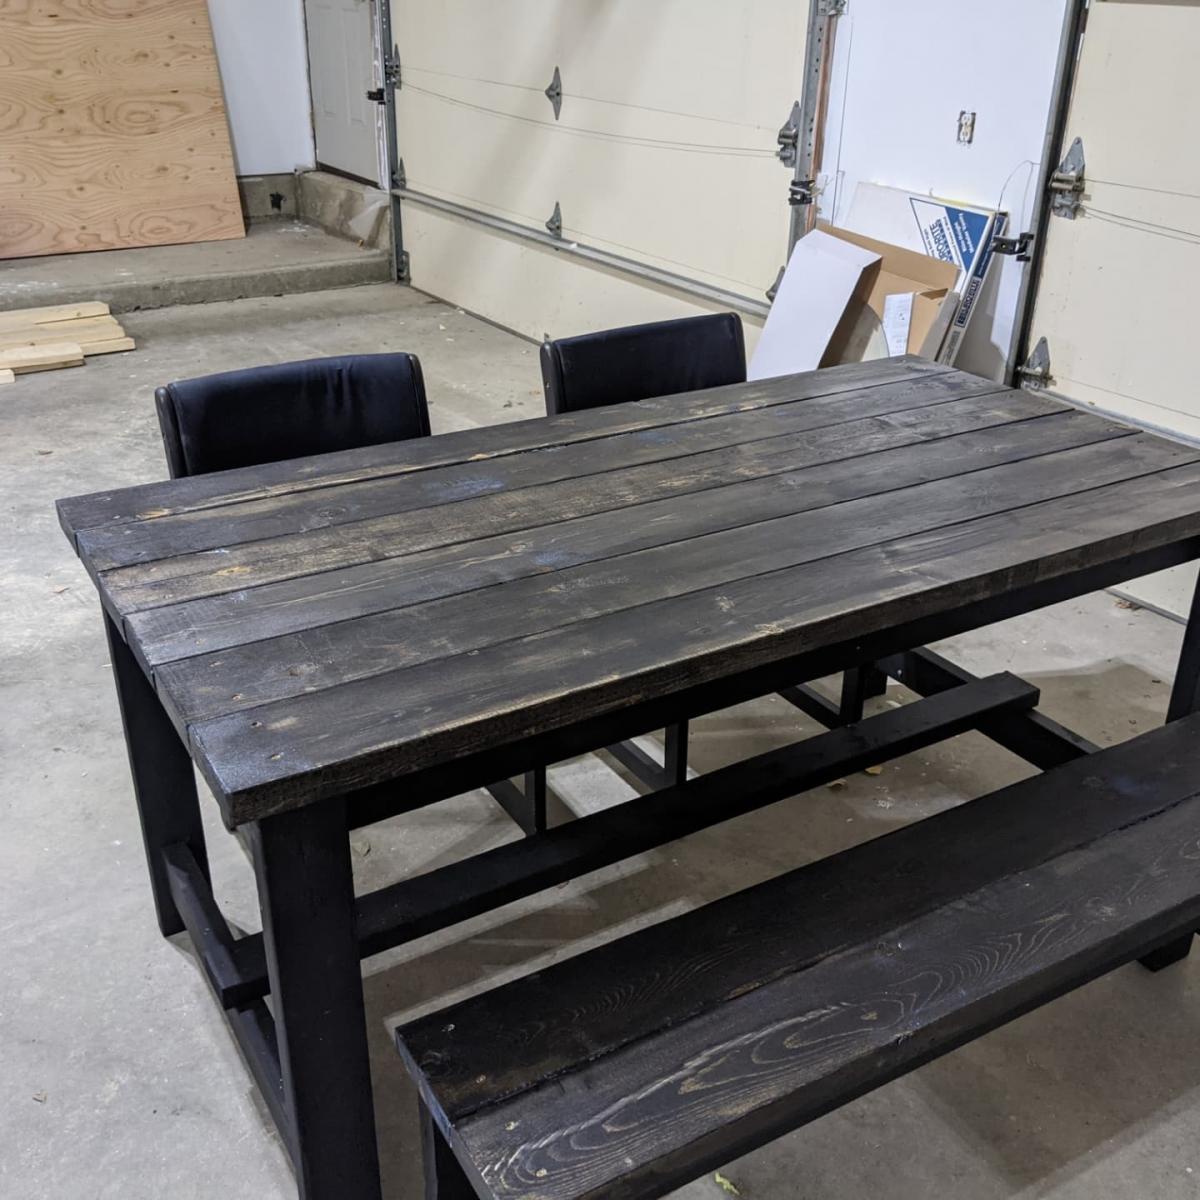
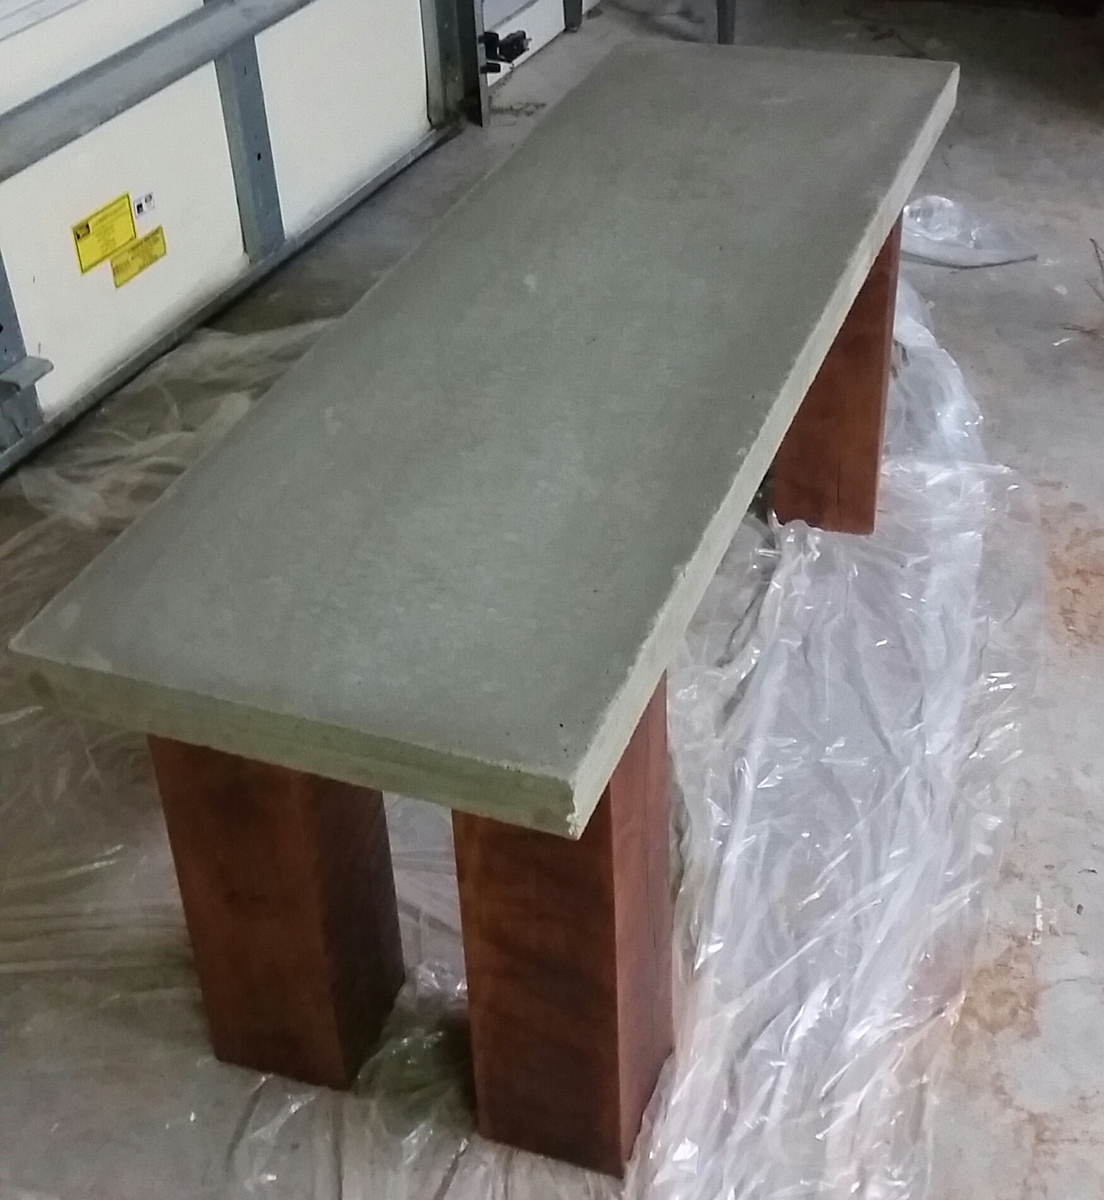
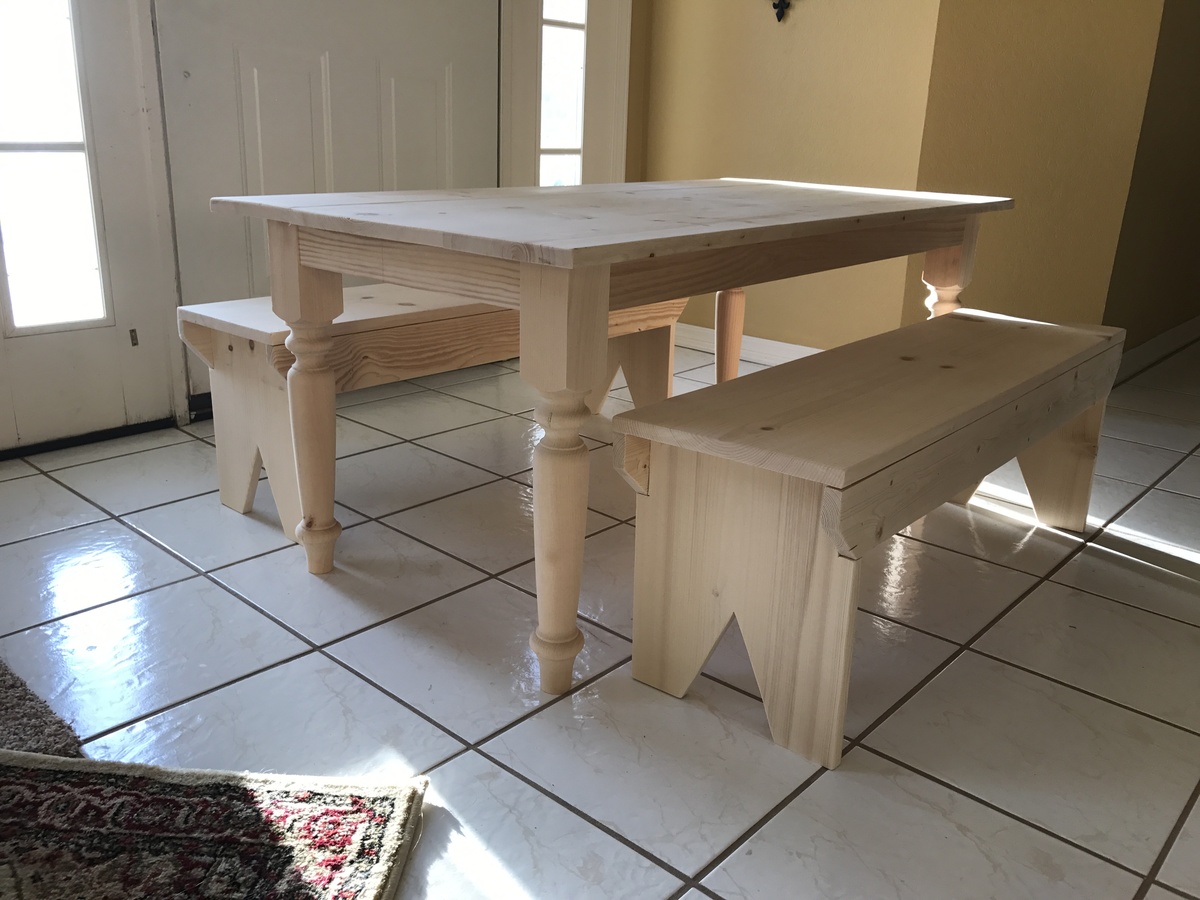
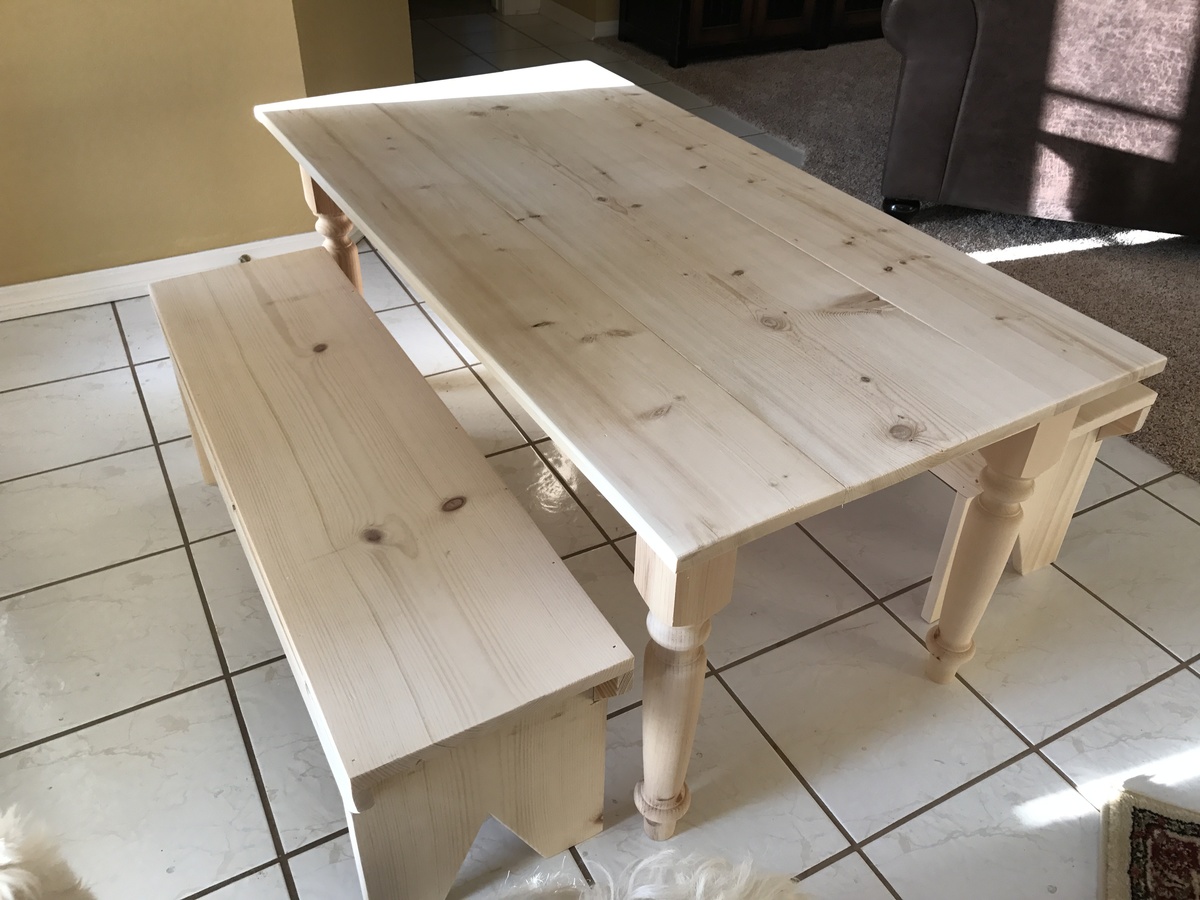
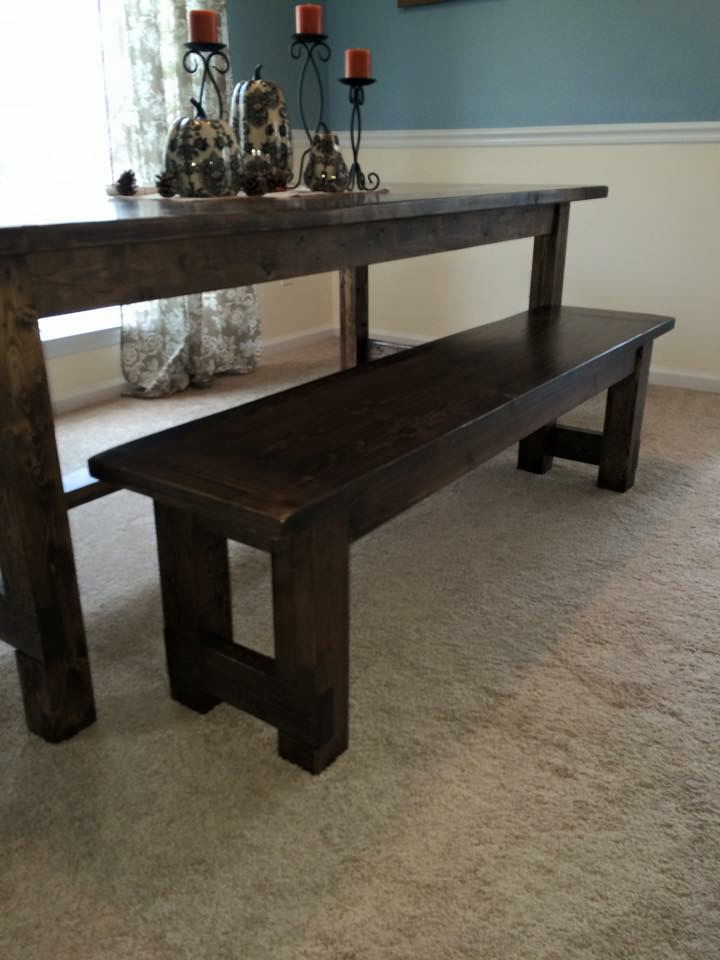
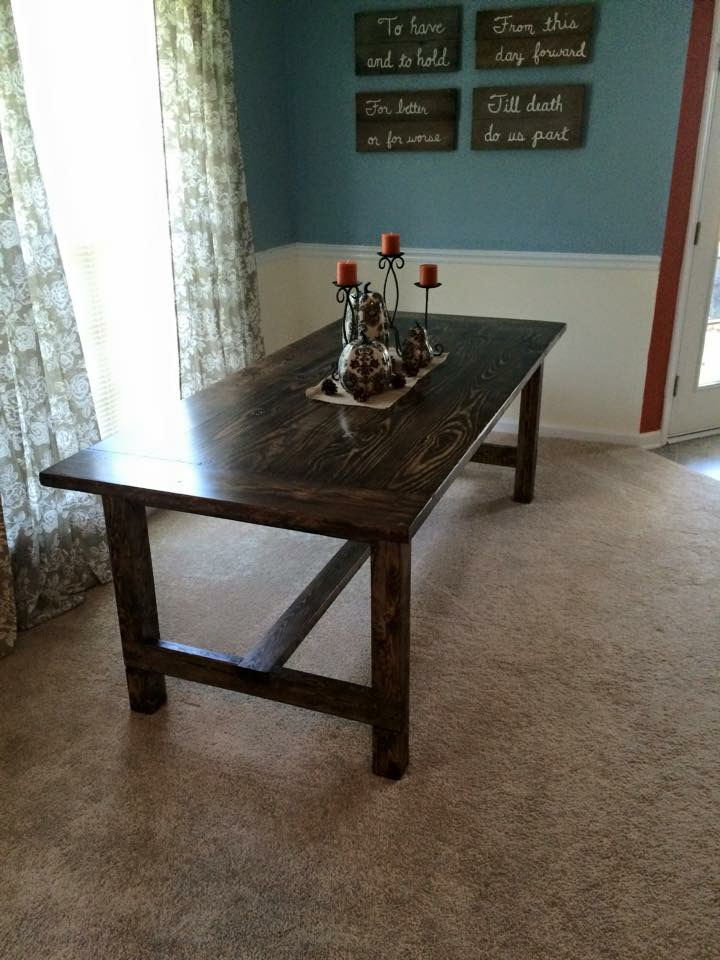
Community Brag Posts

Farmhouse Toy Box

Submitted by Samwise73 on Wed, 07/08/2020 - 17:13

Worked the farmhouse style toy box with two colors of stain. Try and square this up BEFORE you add all the sides. I made that rookie mistake and was 1/8” off; not a huge deal overall but it made for a super snug fit when I put the bottom board in. Overall, super sturdy and I like how it turned out.

Built from Plan(s)

Thanks Ana - Adirondack chair done

Now just to fill and stain (or paint)

Estimated Cost
$100 australian
Estimated Time Investment
Day Project (6-9 Hours)
Finish Used
I will do a jarrah stain (I think) or white paint - thoughts anyone
Recommended Skill Level
Intermediate

Rolling Pantry with Mini Fridge and Recycle

Submitted by vendo on Thu, 06/20/2024 - 08:29

My dad and other mother asked me to build them a rolling pantry to house a fridge, recycle, canned good organizer and sized to fit their existing dry food containers. Using Ana's free design tool, I was able to incorporate all of their asks making this little alcove much more functional! It took some figuring finding the perfect fridge and recycle bin that would fit the space. I left room at the top of the recycle so there would be plenty of room for larger recycle items. The heavy duty casters allow this unit to be moved around easily if needed. I built this in 2 pieces with pocket holes, added edgebanding to the front and added a hole for the power cord  placement. 


alcovehole

Wall mounted bottle opener - rustic

Submitted by Ulrike on Fri, 07/31/2020 - 09:44

Quick and fun little project. Had everything laying around the house except for the actual bottle opener.

Estimated Cost
$5
Estimated Time Investment
An Hour or Two (0-2 Hours)
Recommended Skill Level
Starter Project

Floating Corner Entertainment Stand

This is a corner entertainment stand. I didn't have a plan to follow so I made it up as I went. The dimensions are 40" L xW and 27" tall. It has a base hidden underneath it help support the weight and is also screwed into wall studs to prevent tipping. The angle for the front cross section is 22.5 degrees. I made this for a friend. She is going to paint it unfortunately. Materials cost only around $120. 3 sheets 3/4" plywood, some 1x2s and a couple hinges and cabinet knobs.

Estimated Cost
$130
Estimated Time Investment
Weekend Project (10-20 Hours)
Recommended Skill Level
Intermediate

Comments

Justin G (not verified)

Sun, 01/06/2013 - 04:49

This is REALLY a nice looking corner unit. In our living room, the ONLY place for the tv is in the corner. I have a prebuilt unit now that cost me quite a bit, and we hate it. Its all modern with glass shelves. This corner cabinet is EXACTLY what I want to build. I have a 1 year old so having doors to hide the electronics is a must.

I would VERY much like to build this. Are there any more detailed pictures or a plan I could download? Ive been searching for the last few days an just cant seem to find anything that catches my eye like this one.

Looks great!!

Wounded Marine

Sun, 01/06/2013 - 06:18

The shelves are made out of premium plywood. For the top, bottom, and the middle shelf, I measured and cut out on pieces of plywood. Then used plywood for the "walls" of the unit. I trimmed it with 1x2s. The doors are also plywood. I just rabbit jointed nice wood for the frame of the doors. Underneath the the TV stand is a 2x4 set back a little bit to give it that floating looking. It is anchored to the wall on the inside of the unit with screws going into the studs of the wall. I hope this makes since.

arod718

Thu, 09/05/2013 - 19:13

Is it possible to get dimensions of the stand and what you based the base from. I would like to build the Ana version for my wife because of the storage it has. Thank you, best site ever.

DIY Octagon Table

Why an octagon shape? I wanted a round table and my husband wanted square, so we met in the middle and built this! Very easy and fun to build!

Estimated Cost
$100
Estimated Time Investment
Afternoon Project (3-6 Hours)
Finish Used
Stain color Dark Walnut and polyurethane in matte finish. I applied one coat of stain with a sponge applicator and worked it in with a cotton cloth. I applied 4 coats of poly on the top and 2 coats on the base and legs.
Recommended Skill Level
Intermediate

Comments

booksnotbombs

Thu, 08/21/2014 - 07:40

Thank you for the reply! We have a beautiful old solid wood turned-leg farmhouse table (and matching chairs) that has been in my family since the 60's that needs to be refinished, but it just isn't our style. So we're thinking of building our own in our more modern style but would have to get chairs to accompany it. I LOVE these, so I think we've found our new chairs! I hope our table turns out as beautiful as yours.

I still have plans to refinish the old table and pass it along to someone who will show it as much love (aka abuse) as it received in my childhood...

Benchmark TV stand

My wife and I wanted a nice TV stand for our new living room. Like always, we did not want to spend tons of money and I thought about building something anyways. My wife found the Benchwright series at Pottery Barn and loved it, but for almost $1,000 that was not in our budget. Of course I came straight here and found these plans! I had a great time building this. The measuring and cutting took only an afternoon, and the staining took a long time as this was my first real staining project. I also wanted to get nice glossy coats of clear coat, which took time.Overall we are thrilled with how it turned out! The biggest headache was the euro hinges. I followed the directions that came with them and they did not turn out right at all. It was trial and error to finally get this placed correctly.

Estimated Cost
$300
Estimated Time Investment
Weekend Project (10-20 Hours)
Finish Used
I used miniwax pre-stain for most of the project (although I couldn't tell much of a difference honestly). We used miniwax Dark Walnut for the color. I put on 2 coats of stain followed by water-based clear coat. 5-6 layers of clear coat were put on the gorgeous top and about 2-3 coats were put on everywhere else.
I tried out both oil based and water based polyurethane on this project to try them both out. I highly prefer the water based clear coat over the oil based. The water based is almost twice the cost, but it goes on much thicker so it is easier to apply and took less coats to get a glossy finish.
Recommended Skill Level
Intermediate

Comments

spiceylg

Thu, 12/13/2012 - 05:24

Really great job! Isn't it nice to have options rather than dropping so much money in over priced stores?!

Finally patio furniture that won't blow away!

Submitted by lisa97 on Fri, 10/16/2020 - 20:31

Very clear plans and directions. My husband and I built these and the table in a weekend. We added a back and made a table from the scraps. First time of not chasing furniture that has blown away! We love them!

Estimated Time Investment
Day Project (6-9 Hours)
Finish Used
Behr Premium Seminare transparent stain and seal in Chocolate 5129
Recommended Skill Level
Beginner

Comments

Shoe Dresser

Submitted by Anonymous (not verified) on Sun, 10/25/2020 - 07:57

I've been wanting to make this for so long! I still have a couple blemishes to touch up but I'm super pleased with how this turned out. Easy construction and tons of customization options! THANK YOU ANA!!!

Built from Plan(s)
Estimated Cost
$150.00
Estimated Time Investment
Weekend Project (10-20 Hours)
Finish Used
Minwax Polycrylic. Semi-gloss.
Recommended Skill Level
Intermediate

Comments

Buffet Table / Hutch with Wall Collage

Submitted by JD Corey on Sat, 10/25/2014 - 19:08

My wife wanted something to fill up a large wall in our kitchen so I designed a collage centered over a buffet table. I used the plans from the Salsa Console that I found on this website for the table. I had to modify the plans quite a bit in order for the table to fit the space that we had. After I had the design the way I wanted it, my wife and I found the frames that we needed and painted them with a black, brown,  and terquoise theme. I built the hutch using pine that I bought from the hardware store. I used quarter round moulding strips to accentuate the drawer faces and the cabinet doors. I added glass to the center of the cabinet doors and then backed the glass with the material from one of those cheap ceiling light panels to give the glass a 3D frosted appearance. I then painted the interior of the cabinets with that same terquoise color and ran lights inside the cabinets so that the terquiose color would show through the forsted glass. I finished the table off by staining it with a dark red maple stain (to match our kitchen table and island) and then added a few simple drawer/cabinet knobs. Everything came together nicely when we hung it all up over the table. Now all we have left to do is add our pictures to the frames.

Built from Plan(s)
Estimated Cost
$250
Estimated Time Investment
Week Long Project (20 Hours or More)
Finish Used
Minwax Red Mahogany
Recommended Skill Level
Intermediate

Large Porch Bench with X Backs to highlight feature wall

Submitted by Anonymous (not verified) on Mon, 11/09/2020 - 16:29

Using the Ana White plans of Large porch Bench with X backs I was able to create this amazing area in the entrance way of our home. The bench was part of a larger project where I added the modeling and shelves to the wall. The plans were great, I just made the bench a bit smaller, as the original size was a bit overwhelming inside the home.

Estimated Time Investment
Weekend Project (10-20 Hours)
Recommended Skill Level
Intermediate

Comments

Farmhouse Table (wooden pallets)

Submitted by dak1ne on Thu, 01/31/2013 - 20:36

Hello, I'm doing furniture with wooden pallets and I found your awesome website with nice explanations and plans so I decided to make this nice farmhouse table but with wood from shipment wooden pallets.
Thank you very much for all your work and plans !

I will make other furnitures from your plans with wooden pallets :D and post the brags here soon.

Estimated Time Investment
Afternoon Project (3-6 Hours)
Finish Used
mahogany wax
Recommended Skill Level
Beginner

Joe Shape

Submitted by Anonymous (not verified) on Wed, 03/15/2017 - 21:19

Fun and easy project. I couldn't be happier with the end results. Great plan from Ana White. 

Estimated Cost
$83 for coffee and end table.
Estimated Time Investment
Weekend Project (10-20 Hours)
Finish Used
Waterlox on top and Sherwin Williams furniture paint on frame.
Recommended Skill Level
Intermediate

Rustic X Square Oversized Coffee Table

Submitted by Lotus1 on Fri, 12/19/2014 - 18:56

We could not find a large enough coffee table that we wanted so we decided to make our own.  We loved the Rustic X plan and thought if we put two tables toghether we could get the pefect table size for our living room.  Project cost us around $120 and it took us a week to complete, but we are happy with the results.  The color is a dark expresso.

Built from Plan(s)
Estimated Cost
$120
Estimated Time Investment
Week Long Project (20 Hours or More)
Finish Used
The stain is called Kona
Recommended Skill Level
Intermediate

Comments

Wishing Well Planter

Submitted by RobKelly3 on Sat, 03/16/2013 - 16:57

This is a wishing well I made for my sister for her wedding. It will be used during the wedding for people to drop "wish you well" cards into and afterward she can use it as a planter in her yard.
I followed ideas from multiple plans here on Ana-White.com, but I didn't follow any specific plan. Mostly I followed tips and instructions for cutting angles, drilling pocket holes and some finishing tips. This is the first "big" project I've done and I"m quite proud of it.

With everything, it measures 44.5 inches high. The well measures 21 inches across and 15 inches high. The roof measures 22.75 inches by 23.75 inches.

I hope y'all like it. I worked hard on this! :)

Thank you, Ana and everyone who contributes to this site. It's been so much fun and I've got lots of ideas for more stuff. If I was any good at all at Google Sketchup I'd put up the plans but I'm not. If anyone could help me with that, that would great. :)

Have a great day!

Estimated Cost
about $100
Estimated Time Investment
Weekend Project (10-20 Hours)
Finish Used
Olympic Maximum Stain and Sealant in One, Semi-Transparent, in Oxford Brown. Use 2inch stain brush. Used 100, 150, and 220 grit sandpaper before staining.
Recommended Skill Level
Intermediate

Comments

bellows86

Mon, 07/21/2014 - 20:04

Anyway you can please tell me the angle for the boards ont the walls. I reallly like your well, and would like to build this for my wife but im not sure on what angles to use thank you

Shanty Sideboard

Submitted by Anonymous (not verified) on Sat, 07/17/2021 - 04:47

Wife fell in love with these plans from Ana White. Took longer than I want to admit to finish, but looks amazing! Thank you for the plans Ana!

This was my first major project for my wife with a set of new tools to start into woodworking.

Built from Plan(s)
Estimated Cost
Around $200 in lumbar and hardware
$500 or so in tools and mistakes learned along the way!
Estimated Time Investment
Week Long Project (20 Hours or More)
Finish Used
Valspar ultra white
Minwax Jacobean (three coats)
Minwax clear semi gloss polyurethane (three coats)
Recommended Skill Level
Intermediate

Comments

Pergola

Submitted by benfsu00 on Fri, 04/19/2013 - 01:30

I have wanted a pergola for years and since we moved into our new construction in Dec. '12, I decided to finally go for it and add it to our new backyard plans. When I stumbled onto the plan on ana-white.com, I couldn't be more thrilled to see how simple of a project it was. I do not mean that it was an easy build by any means. I wanted a "beefier" look to it so I used 2x6 and 2x4's. The 4x4 posts are 10ft long (I was going to use 12 ft until I realized just how tall they were!). I stole the steel anchor post idea from the Popular Mechanics site and the "look" of the pergola from the Weatherly plan. I decided not to notch each beam due to time constraints and I just didn't think I need to. I did use zinc L brackets to secure the 2x6s to the support beams (also 2x6s). The top is stiff as can be but the bottom has a slight give to it since it is only four 4x4s sitting on post anchor brackets. I am planning on adding about 6 inches of concrete around the base of the posts (after my HOA "approves" the pergola) to stiffing the structure and then trim around the base for a more "custom" look to it. It will be similar style to the Weatherly except wider around the base so that I can set drinks on it. It took about 8 hours total and about an hour of that was setting the steel anchor posts (measuring and installing 2 1/4" red head screws into the 4" concrete slab patio).

I will stain it with a semi-transparent (BEHR brand) redwood-ish color in a few months after the PT pine dries.

Built from Plan(s)
Estimated Cost
$400
Estimated Time Investment
Weekend Project (10-20 Hours)
Recommended Skill Level
Intermediate

Entryway Bench and Storage Shelf

This is perfect for my two boys. I can now get them to stop dropping their coats and bags on the floor as soon as they get home from school!

Estimated Cost
$50
Estimated Time Investment
Afternoon Project (3-6 Hours)
Finish Used
General Finishes dark brow dye and Minwax clear gloss polyeurothane.
Recommended Skill Level
Beginner

Comments

Industrial Chandelier

Submitted by SaraLodise on Fri, 07/21/2017 - 05:22

Industrial chandelier for our dining room made from black iron pipe pieces from Lowes and some leftover black walnut scraps. It was a sometimes frustrating design-as-you go project that required loads of help from my electrical engineer husband. Love how it finally turned out!

Estimated Cost
$220
Estimated Time Investment
Week Long Project (20 Hours or More)
Finish Used
Minwax special walnut to match pine to other wood, then a coat of Waterlox to bring out walnut grain.
Recommended Skill Level
Advanced