Community Brag Posts
Craftsman Style Playhouse
We built this for the grandkids about 5 years ago; now they're all grown out of it so it's our new gardening shed.
Built from Plan(s)
my first reclaimed wood project
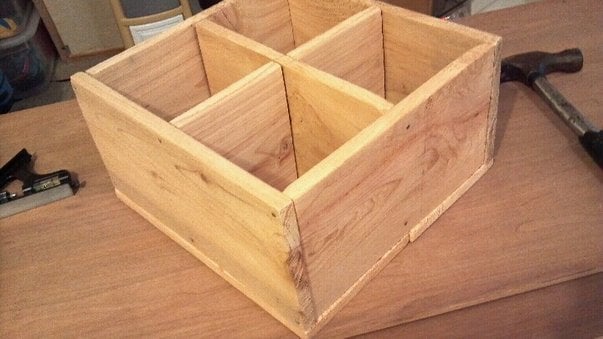
I was going to make this project out of pallets, but all the pallets that I have access too were pretty beat up and falling apart, so my mom gave me some leftover cedar fencing that she had on hand.
This is my first build using reclaimed wood; the boards looked pretty straight when I got them, and even after they had set in my heated garage for a week, but when building time came I found that they are warped. The boards dont fit exact, but I think it gives it more character.
My husband and I are debating on if we should stain it, paint it or just seal it. We plan on using it for a silverware caddy, since the house we're currently in doesnt have a single drawer in the kitchen big enough for a silverware tray! We do plan on using rope for a handle on it, but I have yet to find a rope that I like the feel of in my hands (Im picky like that).
I made this using hand tools, and 16gage nails (what I had on hand). My brother is currently hoarding all the power tools at his house and isnt sharing so I must learn how to do everything old school again!
This is also my first build of anything since becoming a mommy for the first time (6 yrs ago!), since then I've generally stuck to reupholstering things. Now I want better, less expensive things than I could just buy.
Built from Plan(s)
Estimated Cost
free
Estimated Time Investment
An Hour or Two (0-2 Hours)
Finish Used
none, yet
Recommended Skill Level
Starter Project
Spices!
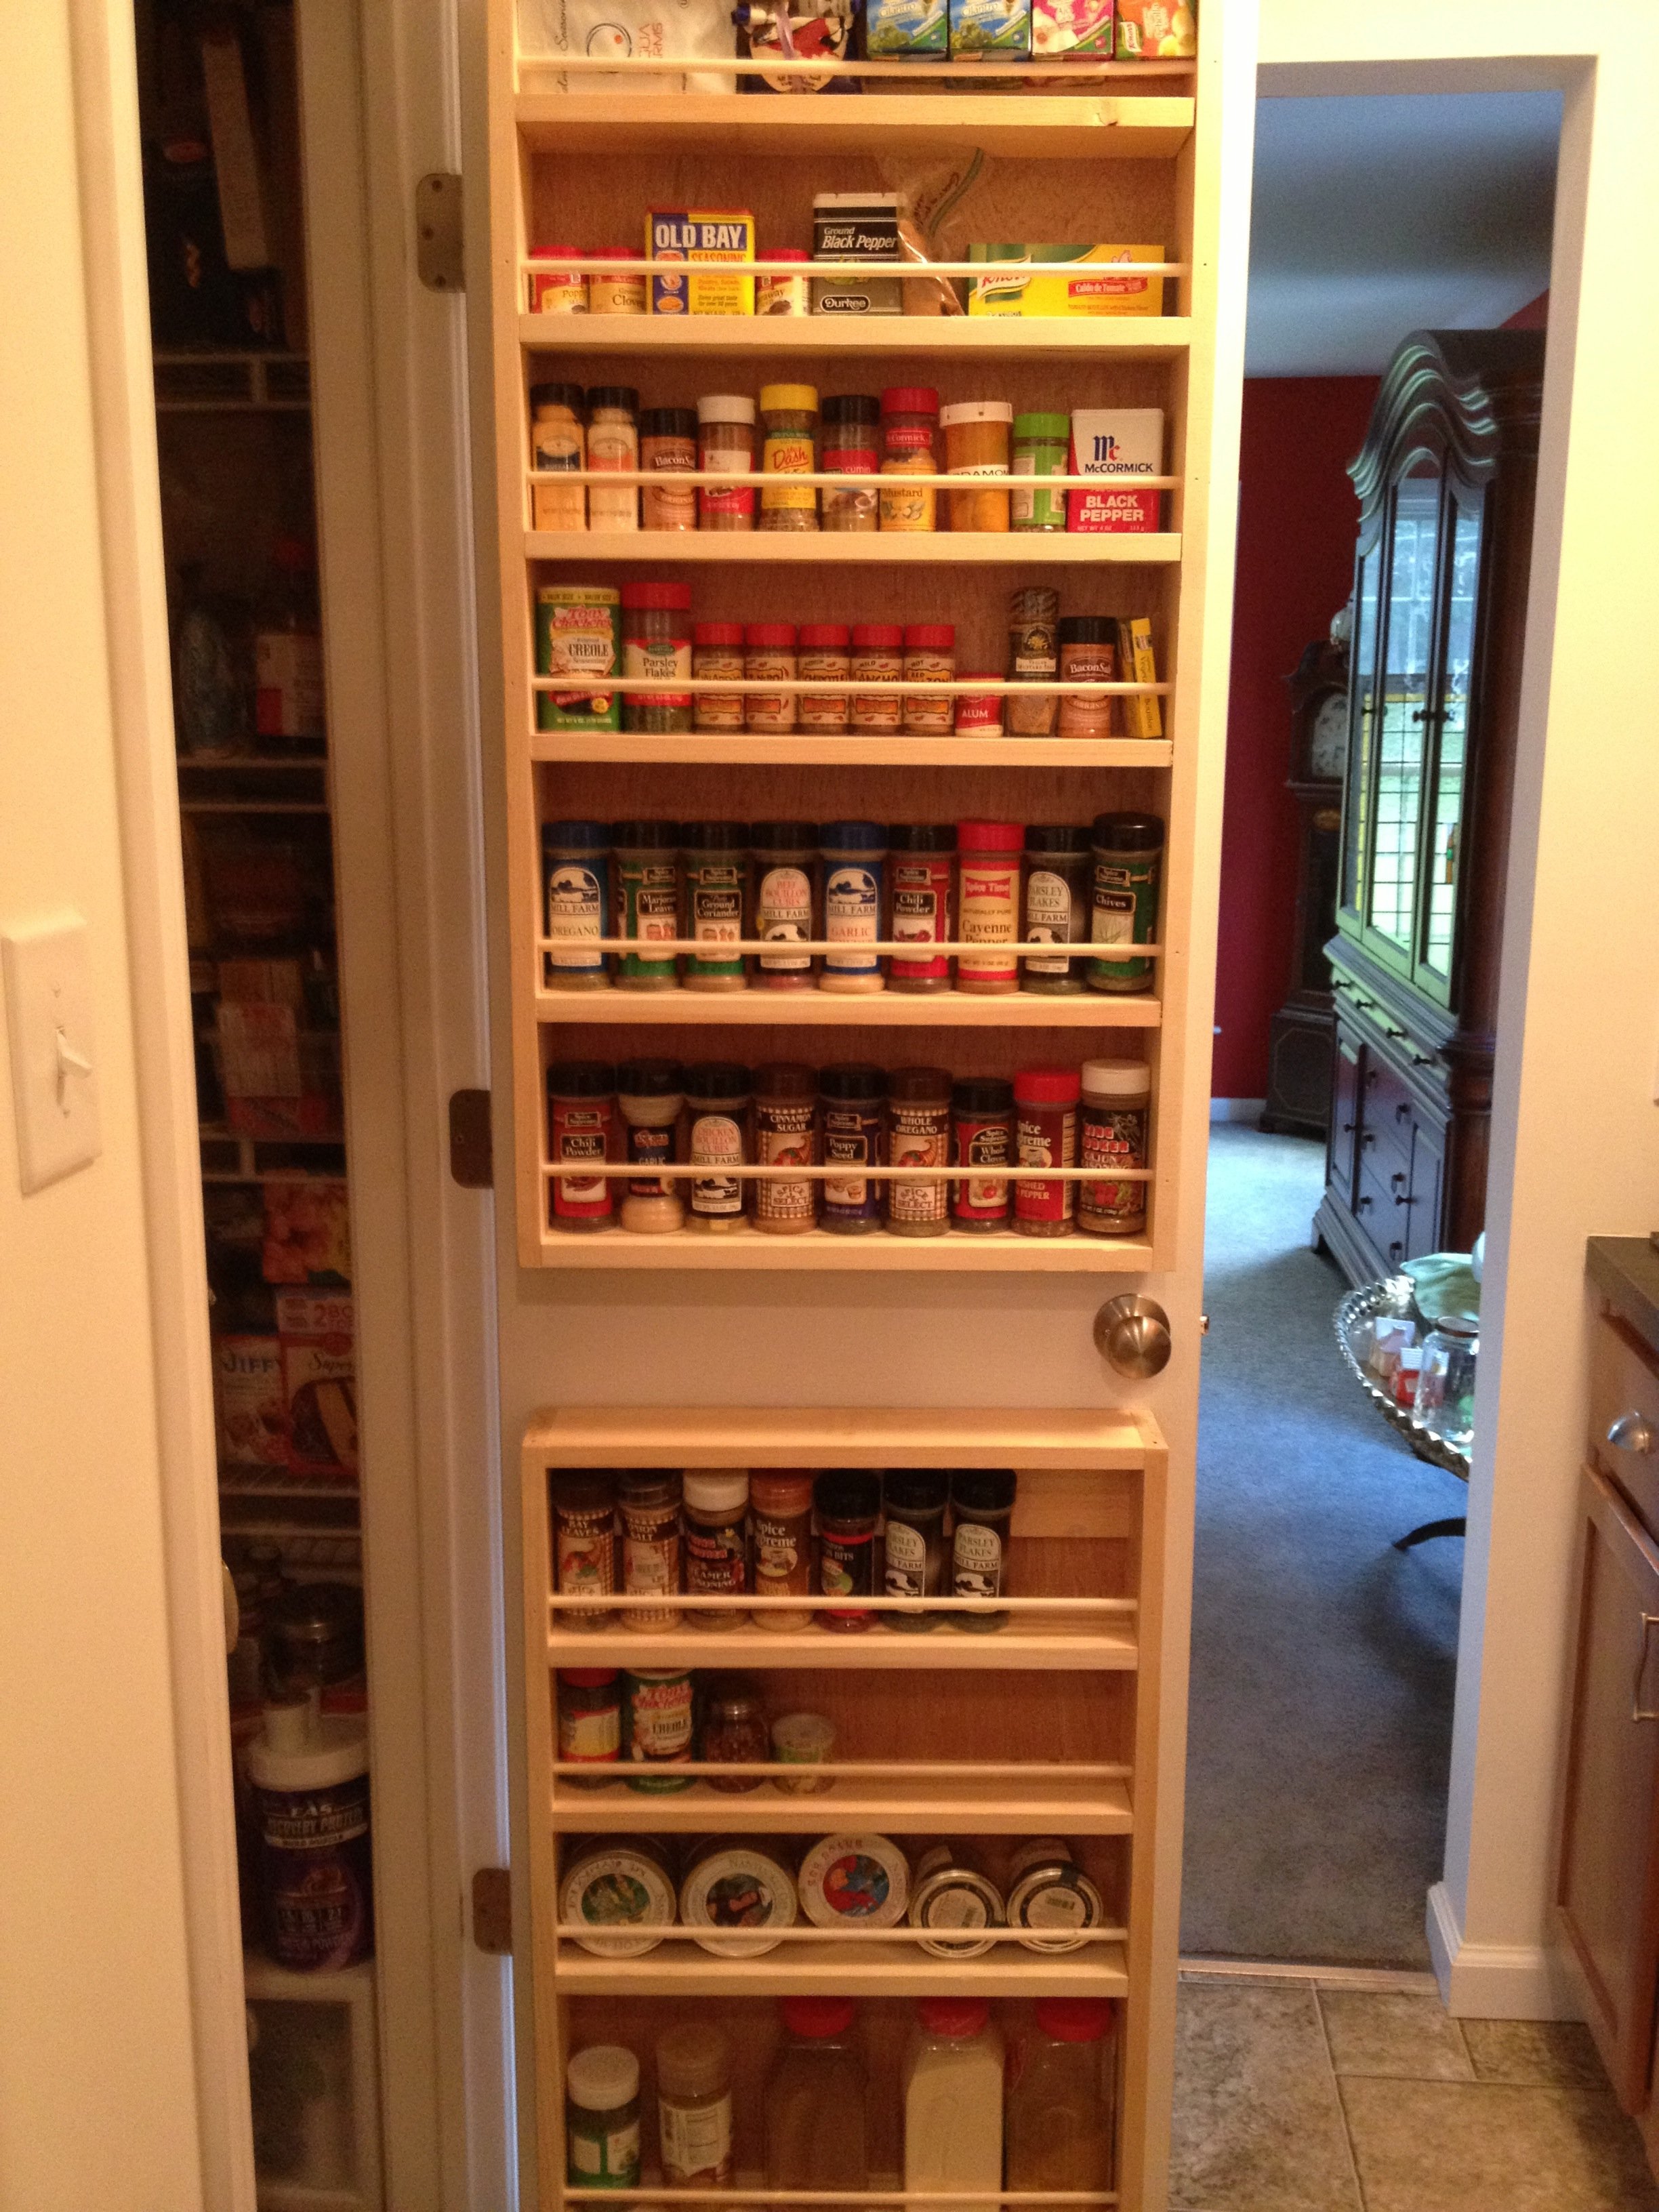
We had these spices in a cabinet, which were impossible to see stuff in the back. This was a perfect solution.
Now, we also had more spices then we know what to do with, so we added a second rack at the bottom of the door as well. I just adapted the plans to be 30 inches tall to accommodate the size of the lower portion of the door. This was accomplished by removing the 1st and 3rd measurements for shelves, and using the remaining for an extra tall shelf.
I also only used a finish nailer (and wood glue),to assemble, in combination with a brad nailer to hold the back plywood on.
I also chose not to include the dowel buttons on the end, and did not cut the dowels to length; they were inserted all the way through and trimmed off with a Japanese pull saw (get one, you will LOVE it), then fastened through the front with the finish nailer, then sanded flush.
I also elected not to paint to finish the piece and leave the natural wood.
Built from Plan(s)
Estimated Cost
$33, including the extra shelves.
Estimated Time Investment
An Hour or Two (0-2 Hours)
Recommended Skill Level
Starter Project
Double Adirondack

Easy to follow the plans. Sanding and staining may be the most daunting task of life!

Built from Plan(s)
Estimated Cost
$100
Estimated Time Investment
Day Project (6-9 Hours)
Recommended Skill Level
Beginner
Barn Door Built-ins with Faux Mantle

We used the barn door console plans as a base to make the built ins and the faux fireplace mantel plans for the center! We love everything this site has to offer!!
Built from Plan(s)
Estimated Cost
500
Estimated Time Investment
Week Long Project (20 Hours or More)
Recommended Skill Level
Intermediate
Seasonal And Holiday


Mini Farmhouse Bedside Table
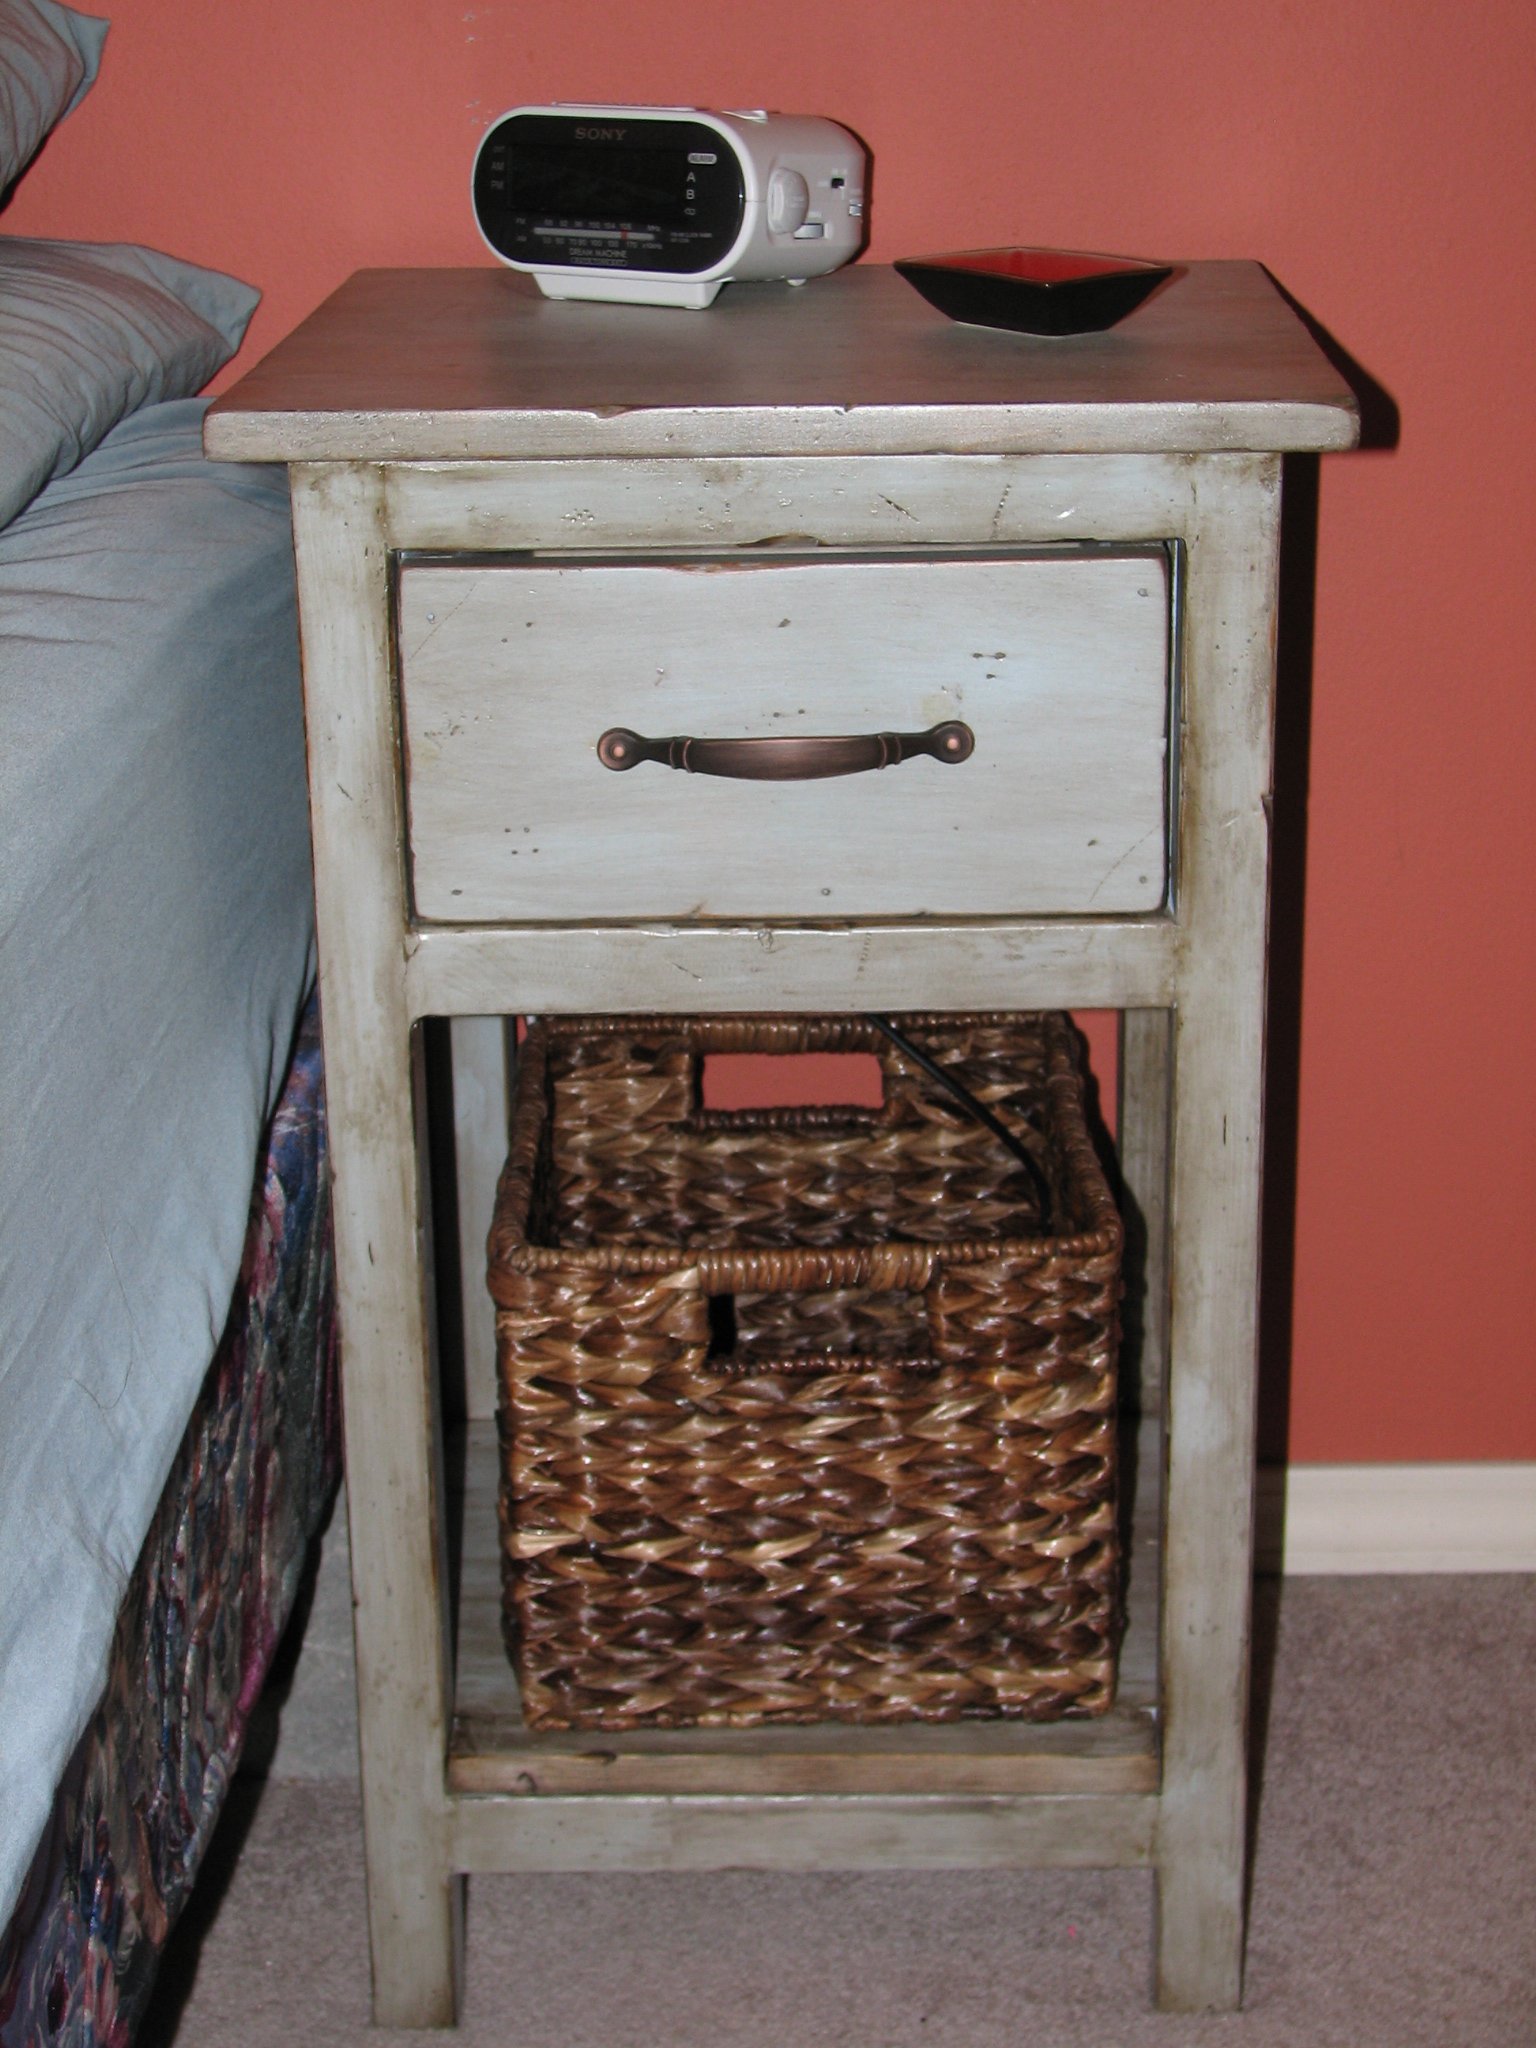
A *mini* Farmhouse Bedside Table
Built from Plan(s)
Recommended Skill Level
Beginner
Comments

Mon, 06/06/2011 - 00:07
LOVE this as a nightstand!
LOVE this as a nightstand! What a great idea! Beautiful finish too!
Sat, 06/18/2011 - 19:16
Mini farmhouse bedside table
I have been looking around and haven't been able to find any measurements for the mini farmhouse table. Are there any or do you just have to wing it? I really don't want to wing it!
Mon, 02/06/2012 - 09:58
don't wing it!
The mini farmhouse table cuts are found here: http://ana-white.com/2011/06/mini-farmhouse-bedside-table-0. Read through the comments there was a mistake with one of the cuts, I wrote 2 cuts when 4 was needed. Just follow the assembly instructions for the original farmhouse table.
Tue, 07/05/2011 - 16:23
Plans, please?
Yes! I would also love, love, love the modifications of this as a nightstand from anyone. This is my favorite nightstand. Pretty please?
Mon, 02/06/2012 - 10:01
I'm pretty sure that you've
I'm pretty sure that you've found the plans but just in case, http://ana-white.com/2011/06/mini-farmhouse-bedside-table-0. Read through the comments there was a mistake with one of the cuts, I wrote 2 cuts when 4 was needed. Just follow the assembly instructions for the original farmhouse table.
Tue, 01/31/2012 - 19:01
This is exactly what my wife
This is exactly what my wife and I are looking for...plans?
Mon, 02/06/2012 - 10:02
http://ana-white.com/2011/06/
http://ana-white.com/2011/06/mini-farmhouse-bedside-table-0. Read through the comments there was a mistake with one of the cuts, I wrote 2 cuts when 4 was needed. Just follow the assembly instructions for the original farmhouse table.
Fri, 10/26/2012 - 14:16
mini farmhouse bedside table
I see theres a cut list but not a shpping list? I know...I'm needy! I'm a beginner!!!! :)
Mon, 04/14/2014 - 11:45
You can do this!
This mini farmhouse nightstand was my first building project. Of course Ana's easy to follow PDF's made it doable but check the tips above for cuts on your 2x2's. One rookie mistake I made was forgetting to double check my pieces. My 1x2's were actually thicker than 1" so they protrude from the side of my piece a bit. A sander could fix that. All in all so proud! Thanks to Ana and to everyone else for your brags.
P.S. A mini keg jig kit is SO worth the investment. I used standard wood-cost of about $20 including $4 for my drawer handle hardware. Kreg jig kit plus pocket hole screws were an additional $30 but I have plenty left for my next project;)
Simple white outdoor sofa & chairs
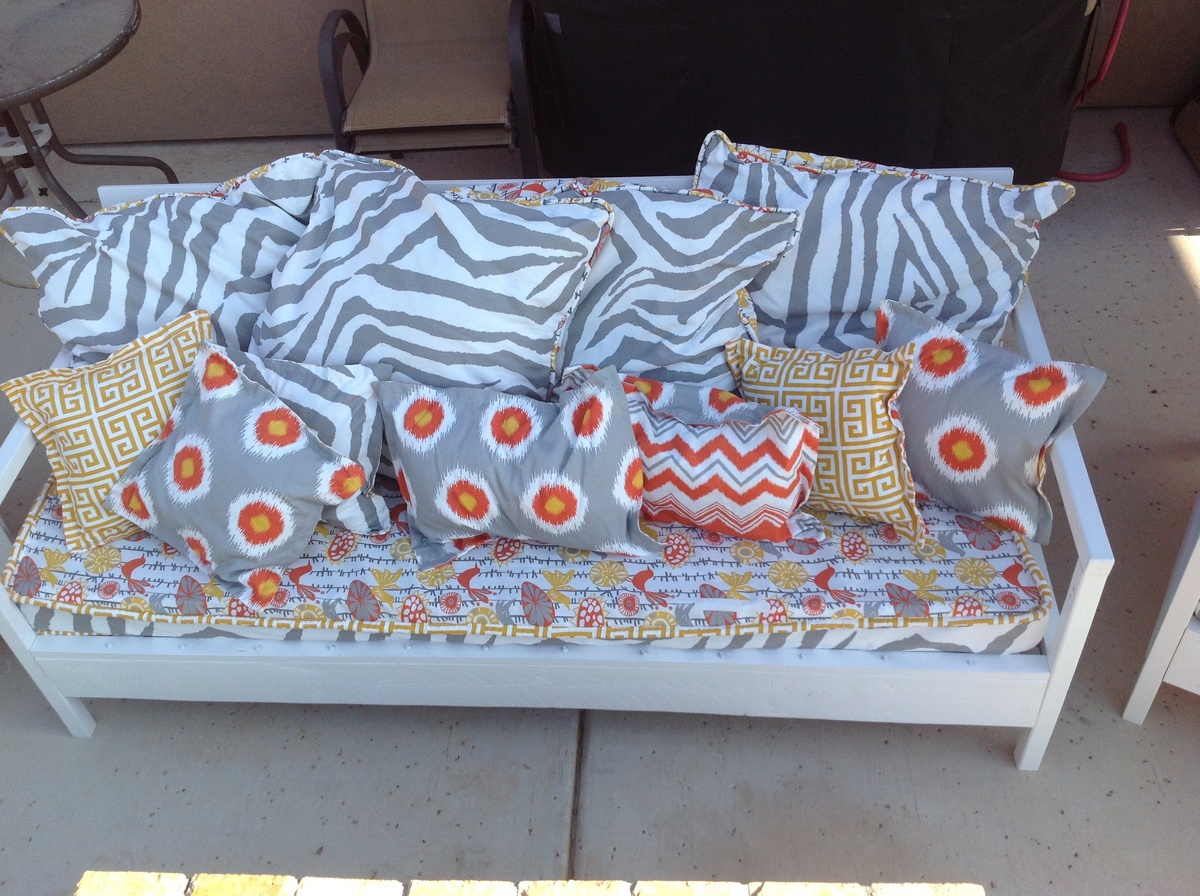
Simple white outdoor furniture. Easy to assemble. Ordered outdoor fabric online @ purchased bulk outdoor foam & cut it myself! Much cheaper than pre made cushions.
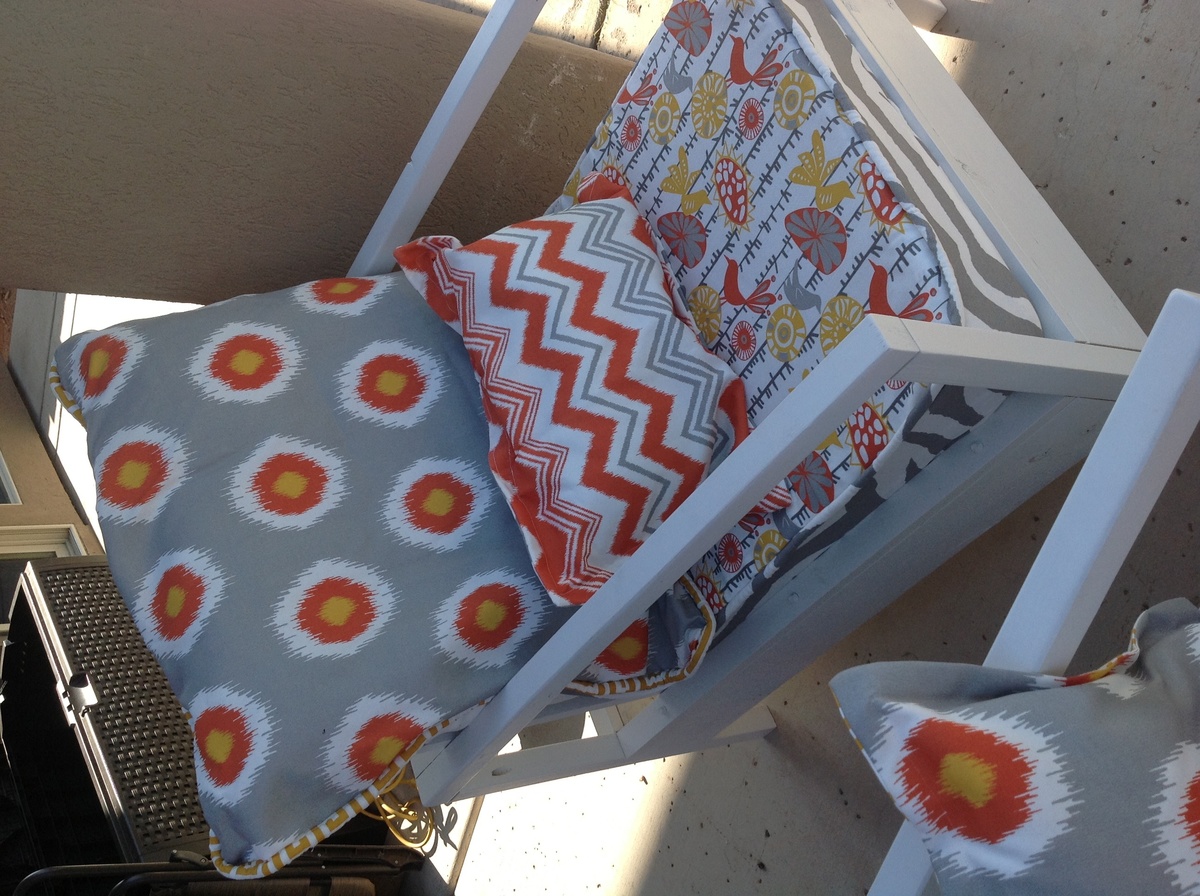
Estimated Cost
Wood, fabric, paint, & foam $750
Estimated Time Investment
Week Long Project (20 Hours or More)
Recommended Skill Level
Beginner
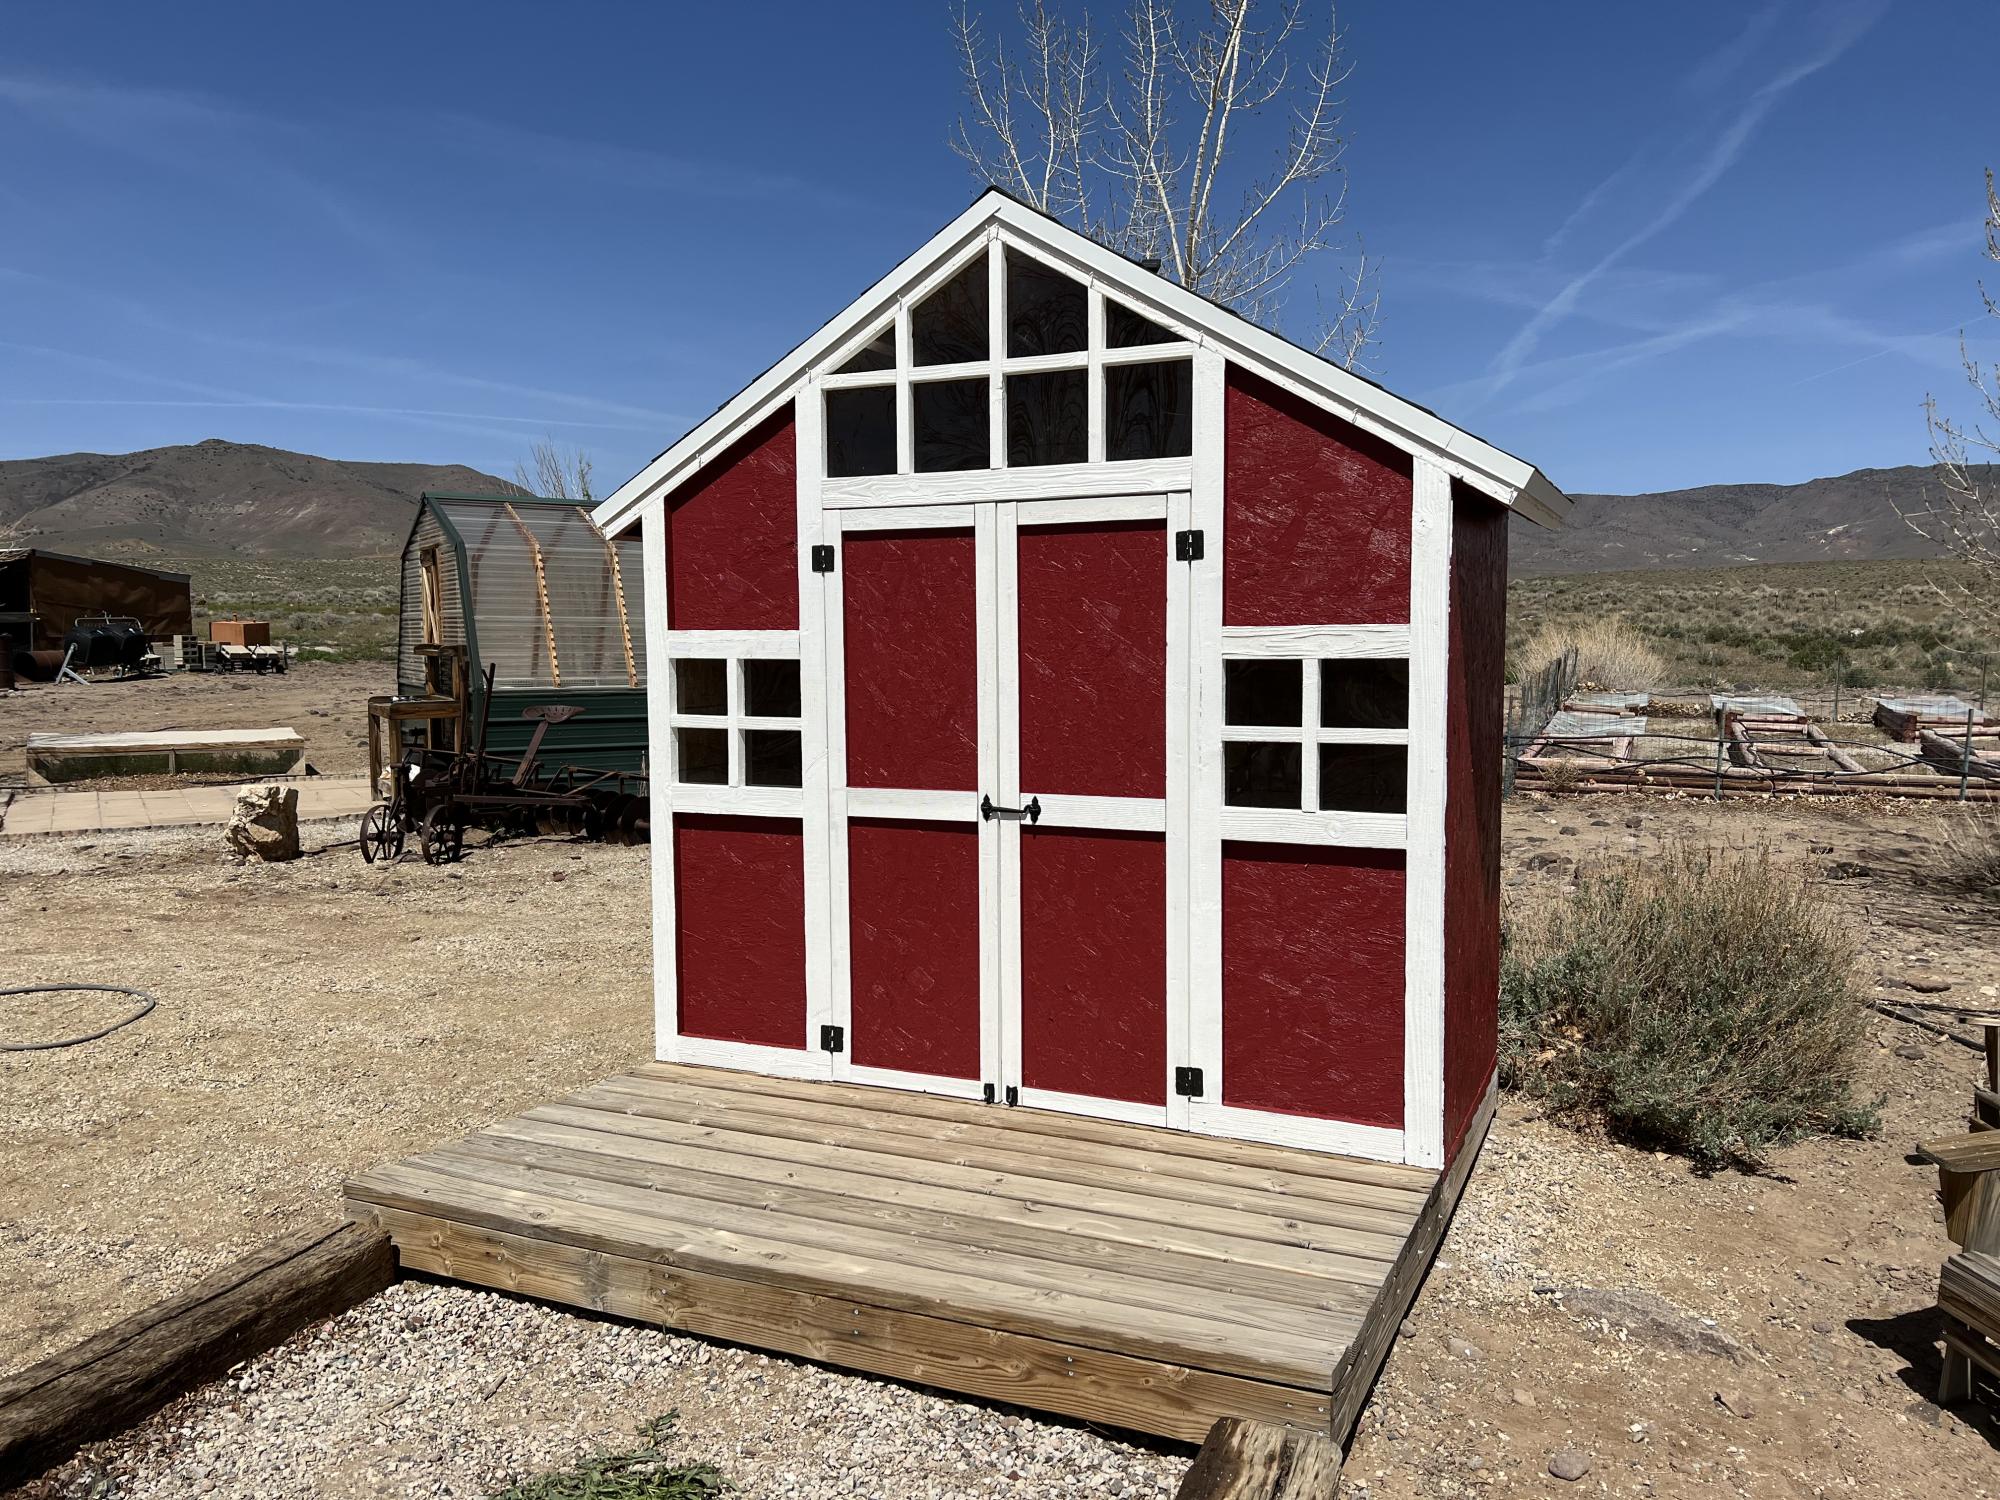
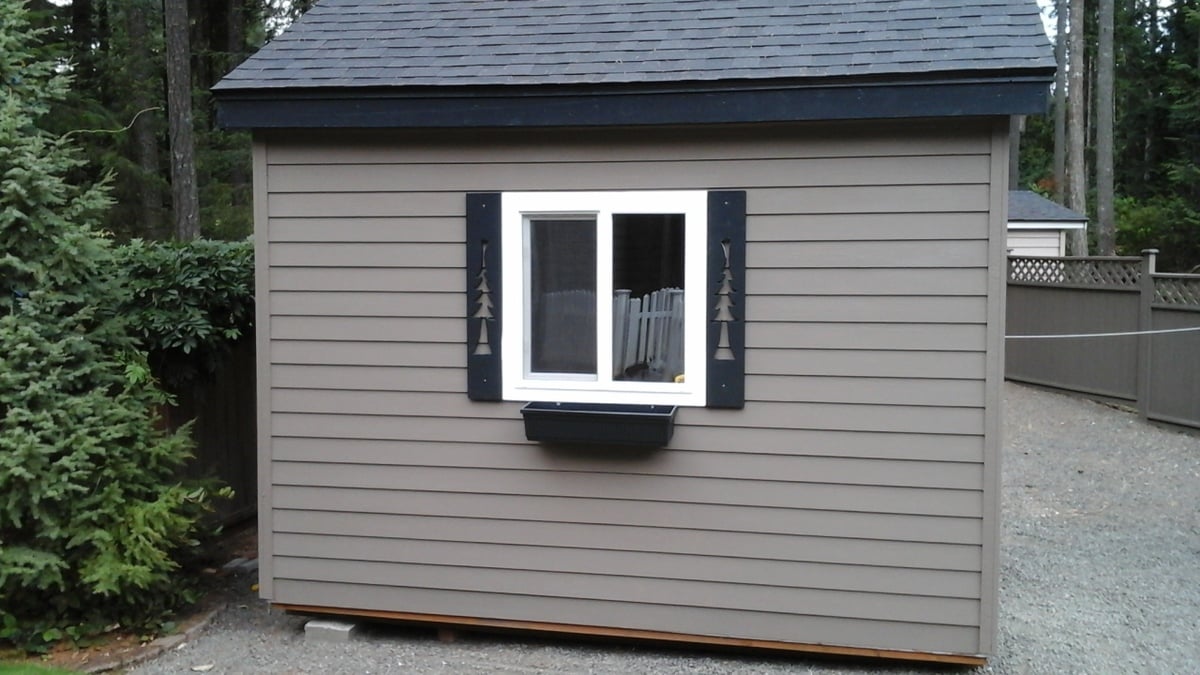
Garden/Storage Shed
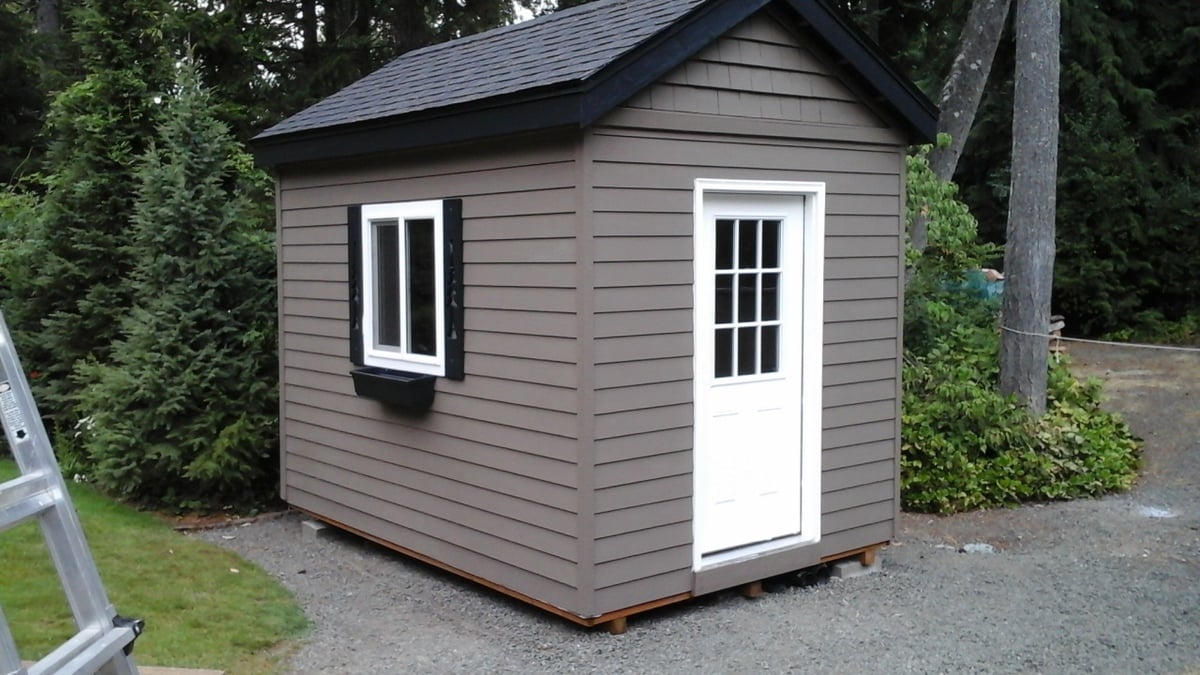
Building a storage shed was quite a jump for me but because of the confidence and experience I gained from Ana's site I decided to give it a shot. I acquired the plans online. It has 8 foot high walls and 3 feet of "attic space". The shed is 8'x12'. I used cement board lap siding. It took about seven weeks to finish working a few hours here and there. I really like it. Even has a little window flower box.
Estimated Cost
2100.00
Estimated Time Investment
Week Long Project (20 Hours or More)
Finish Used
Benjamin Moore Paint
Recommended Skill Level
Intermediate
Comments
Triple cubby inspired
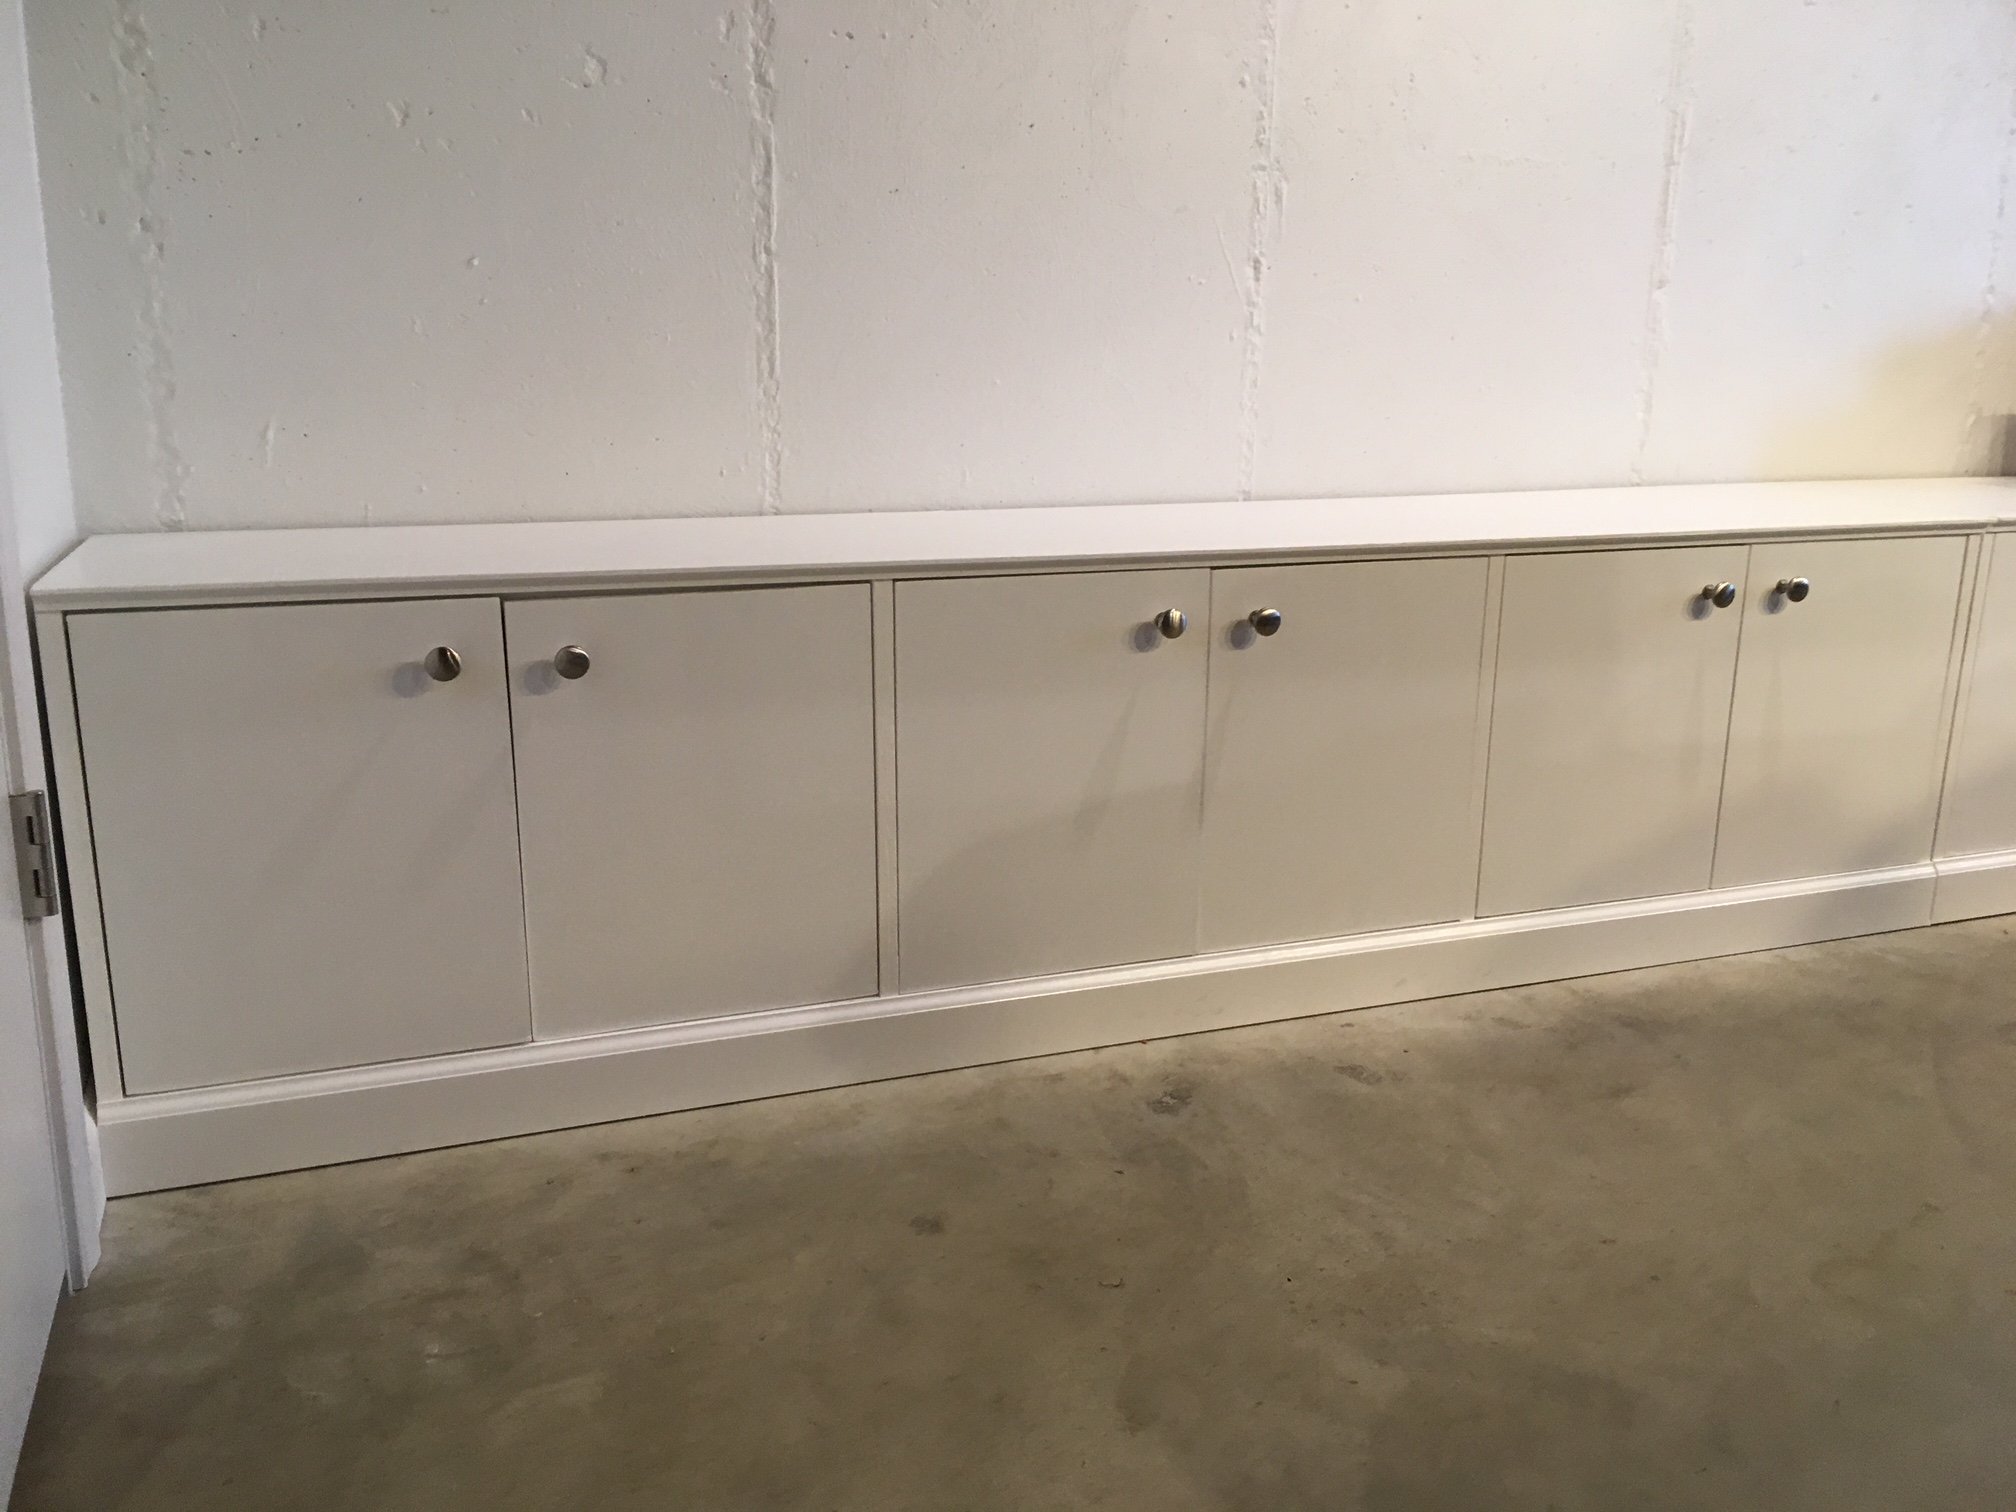
I started with the triple cubby design, resized it to fit my space, added doors, and built three of them. They run the length of the wall in the area where my pool table is, and provide both storage and seating. In the process I used a multitude of Kreg items - the rip cut, the pocket hole jig, the hinge jig, the cabinet knob jig, and the corner clamps. As this was my "starter" project, I made some mistakes, learned a lot of lessons, and can't wait for my next project!
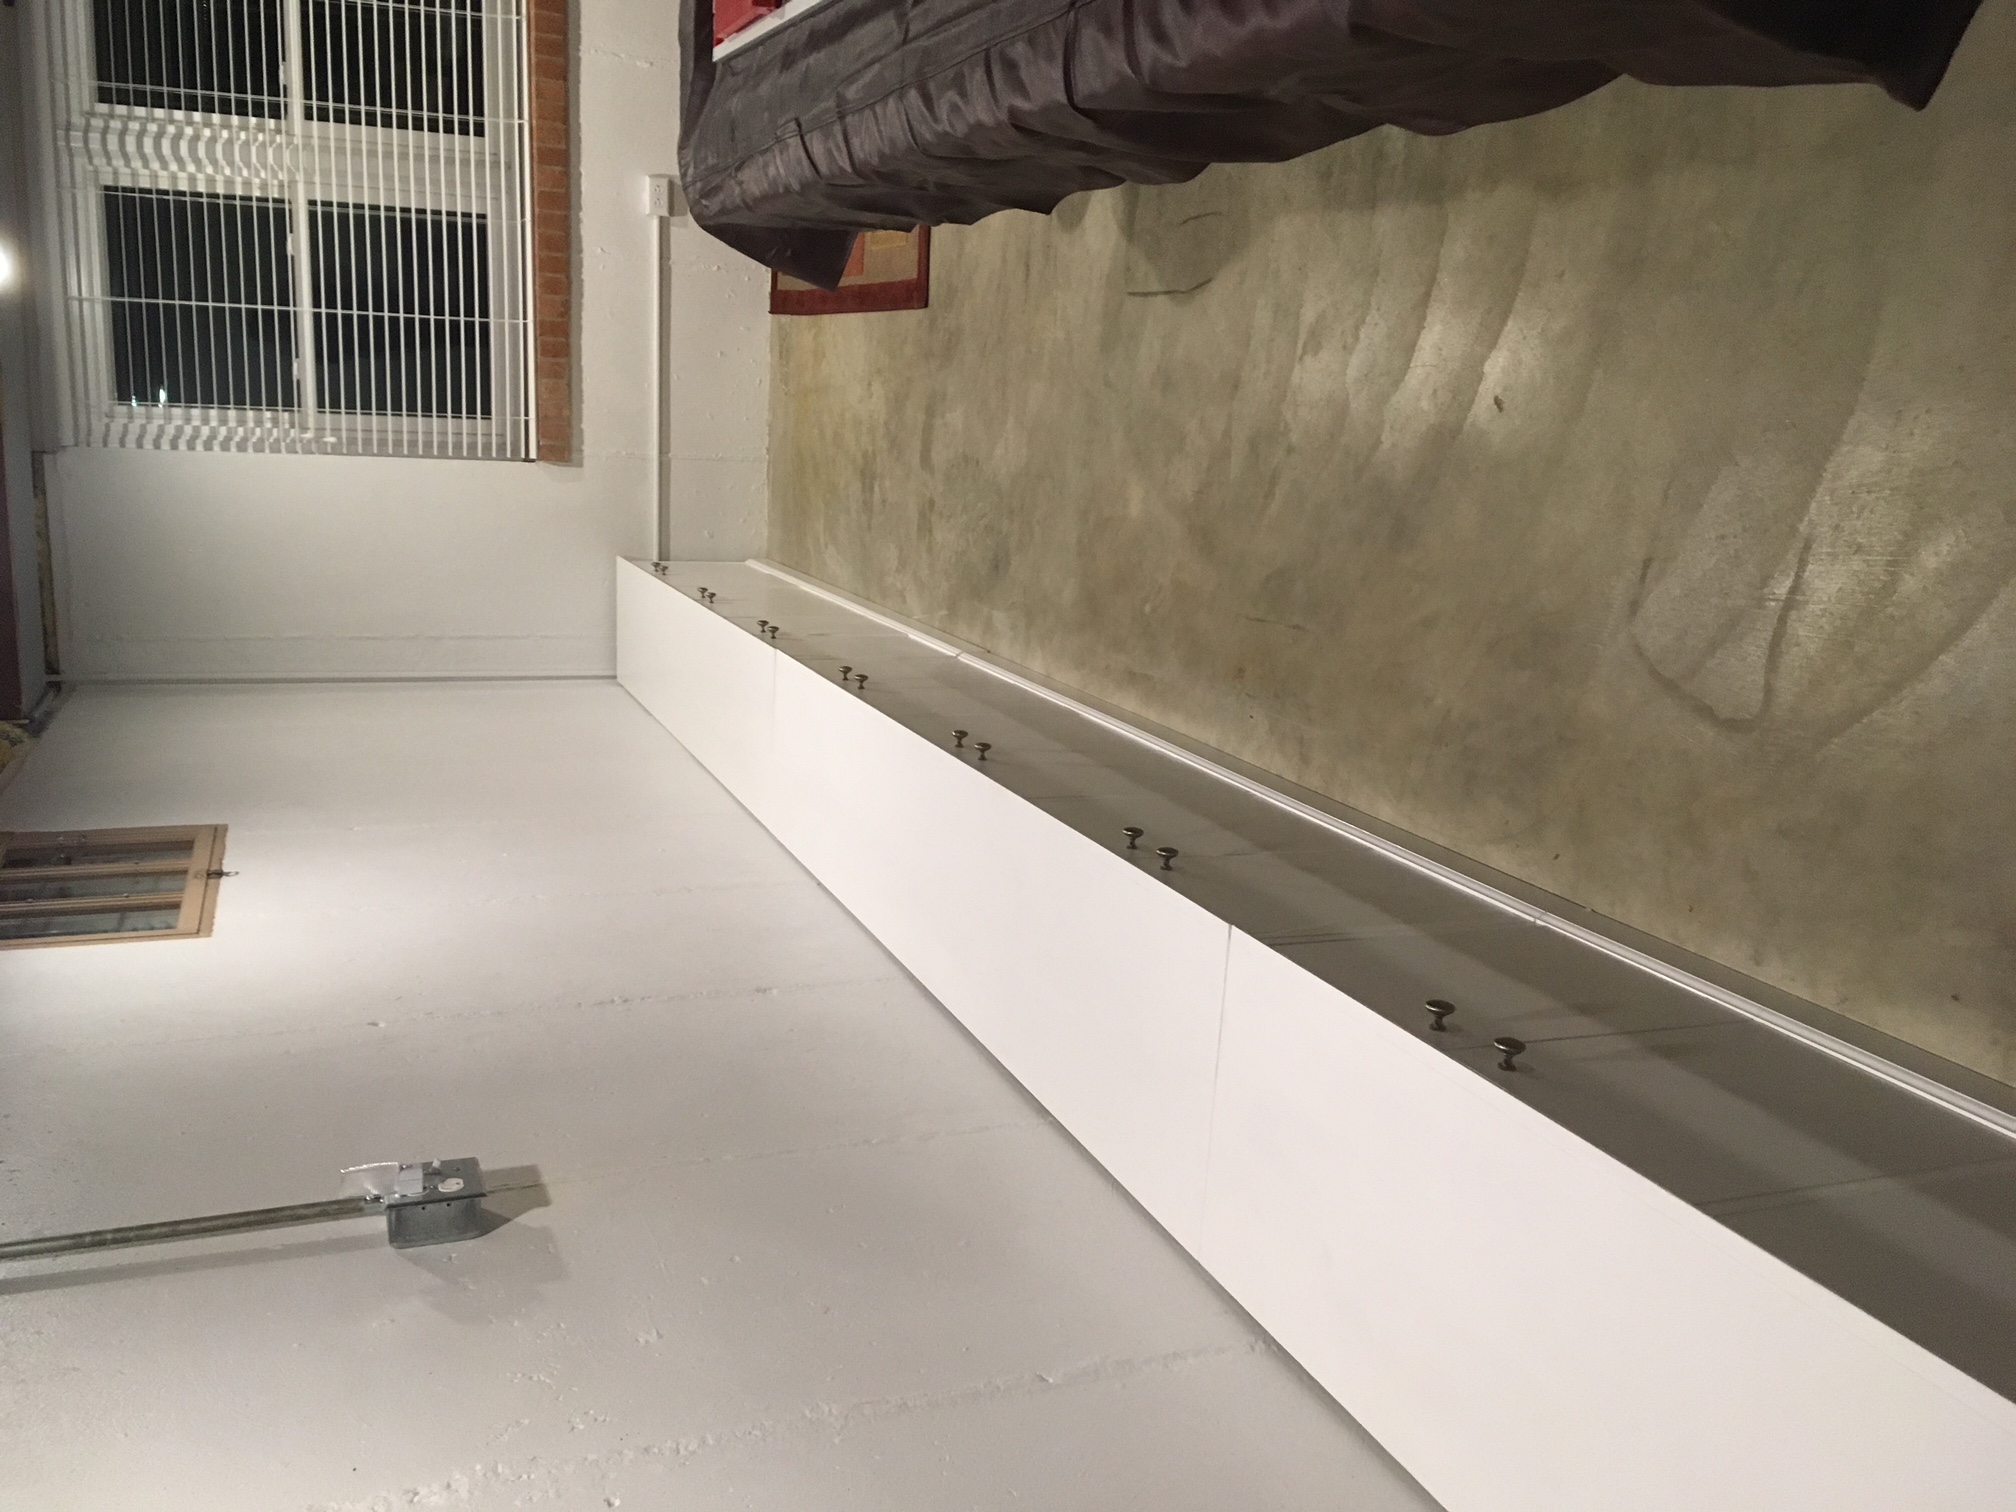
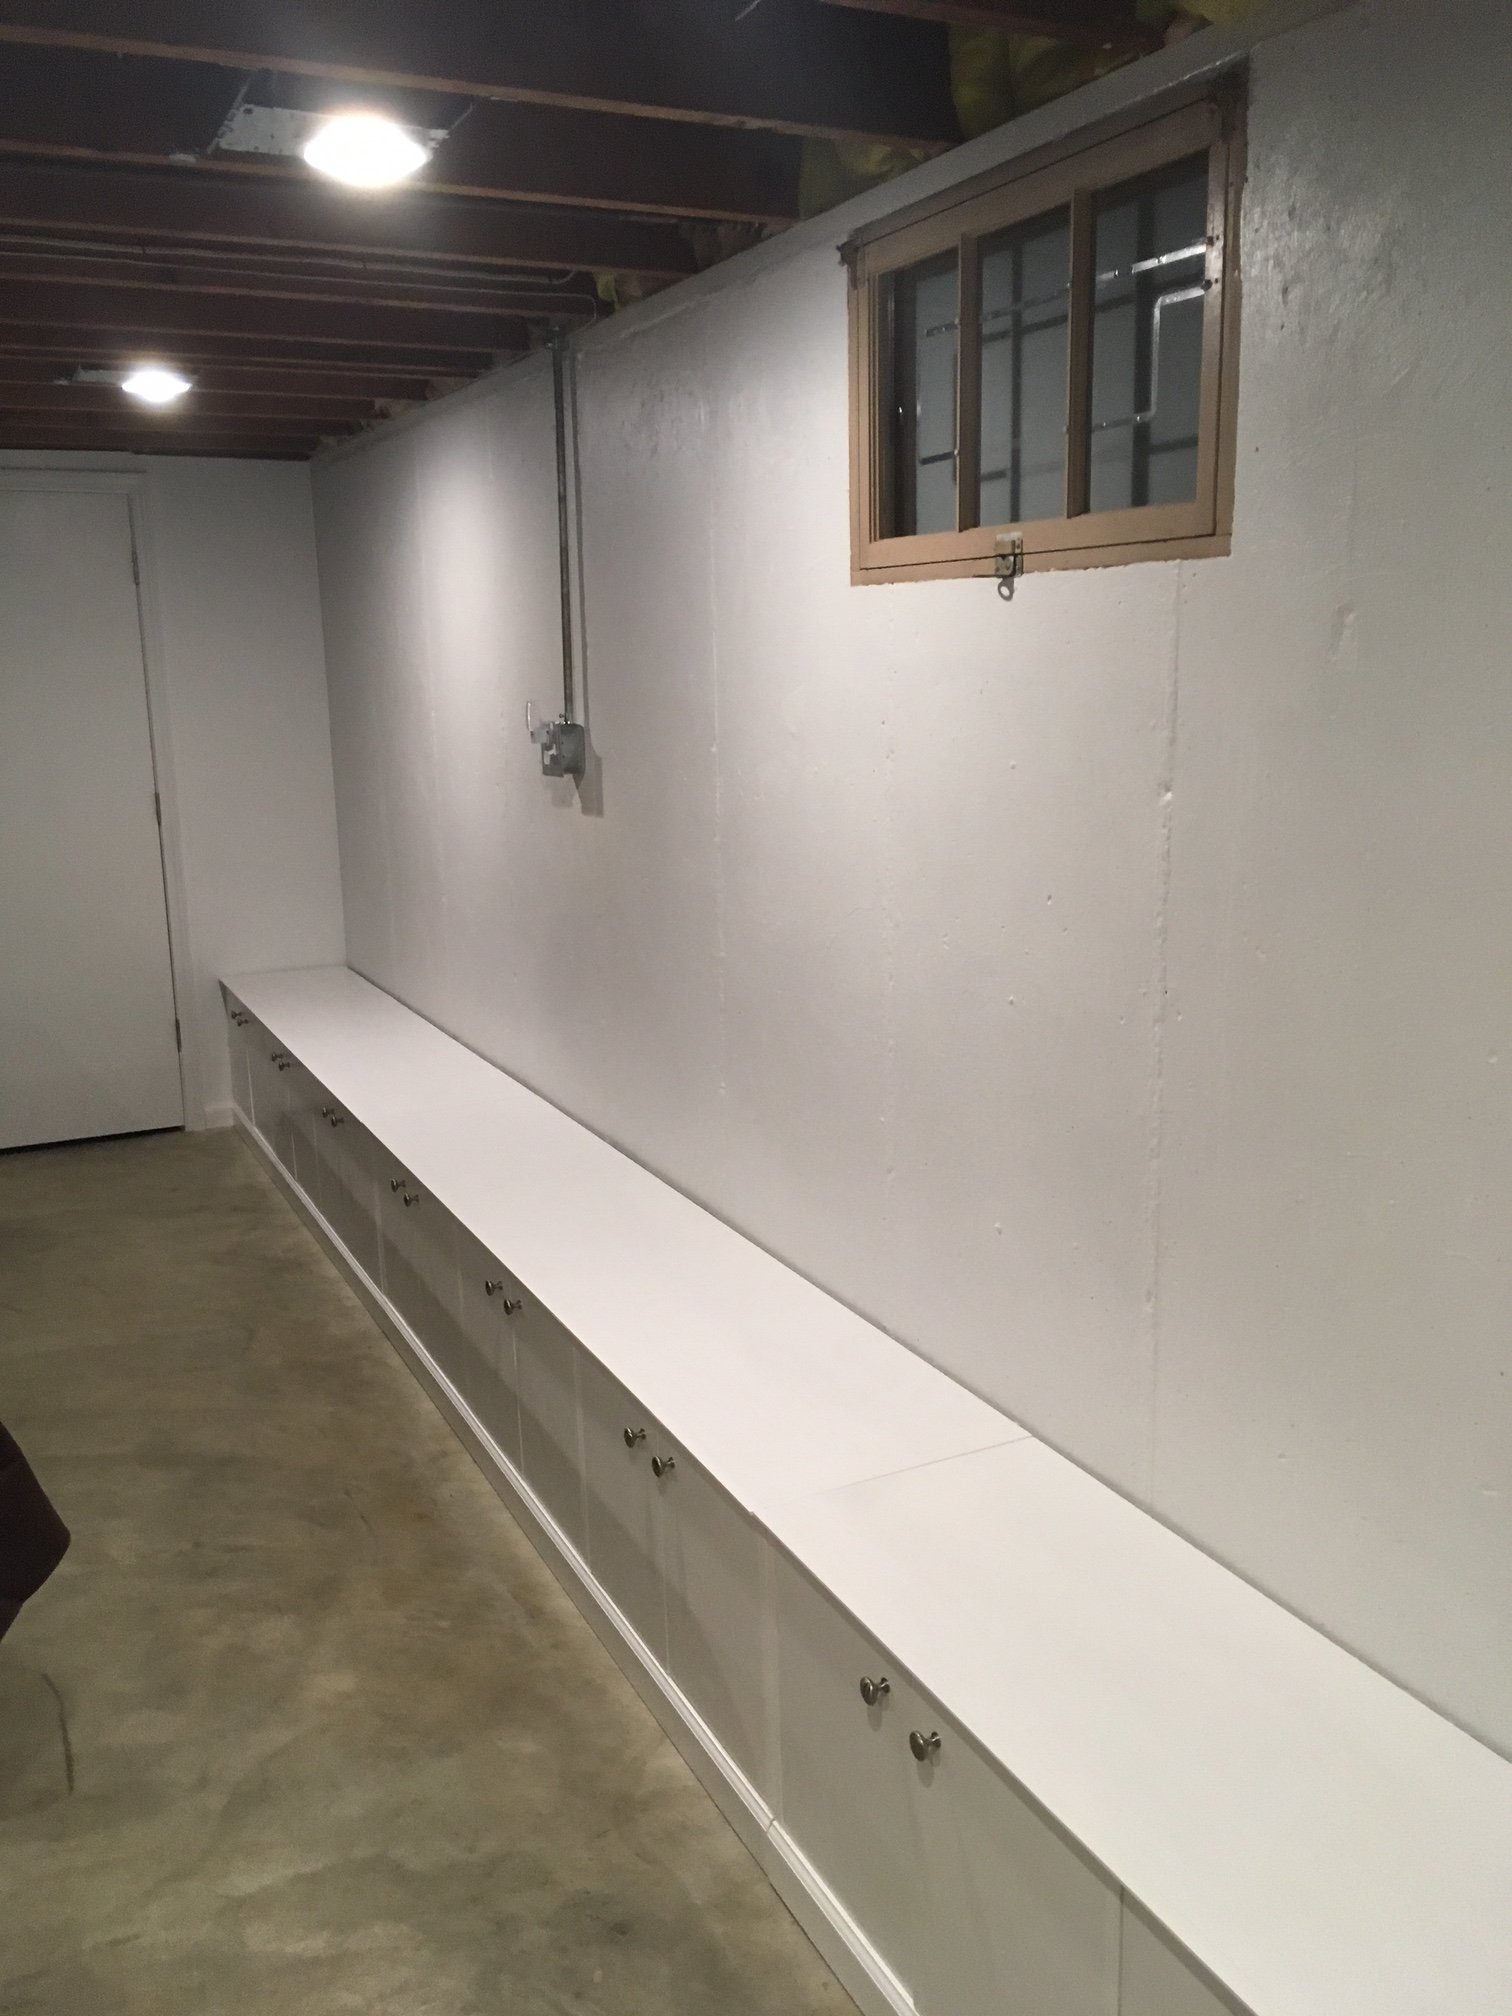
Built from Plan(s)
Estimated Cost
Plywood - $210 (three sheets, very high quality plywood); mouldings - $26; hinges - $80 ; knobs - $23. This was my "starter" project so I also invested in a lot of tools.
Estimated Time Investment
Week Long Project (20 Hours or More)
Finish Used
White latex paint
Recommended Skill Level
Beginner
Mirror

I was so excited to build this mirror using Ana White’s plans. I built it a few years ago and it’s still hanging in my entryway!
Built from Plan(s)
Comments
Child Beach Chair
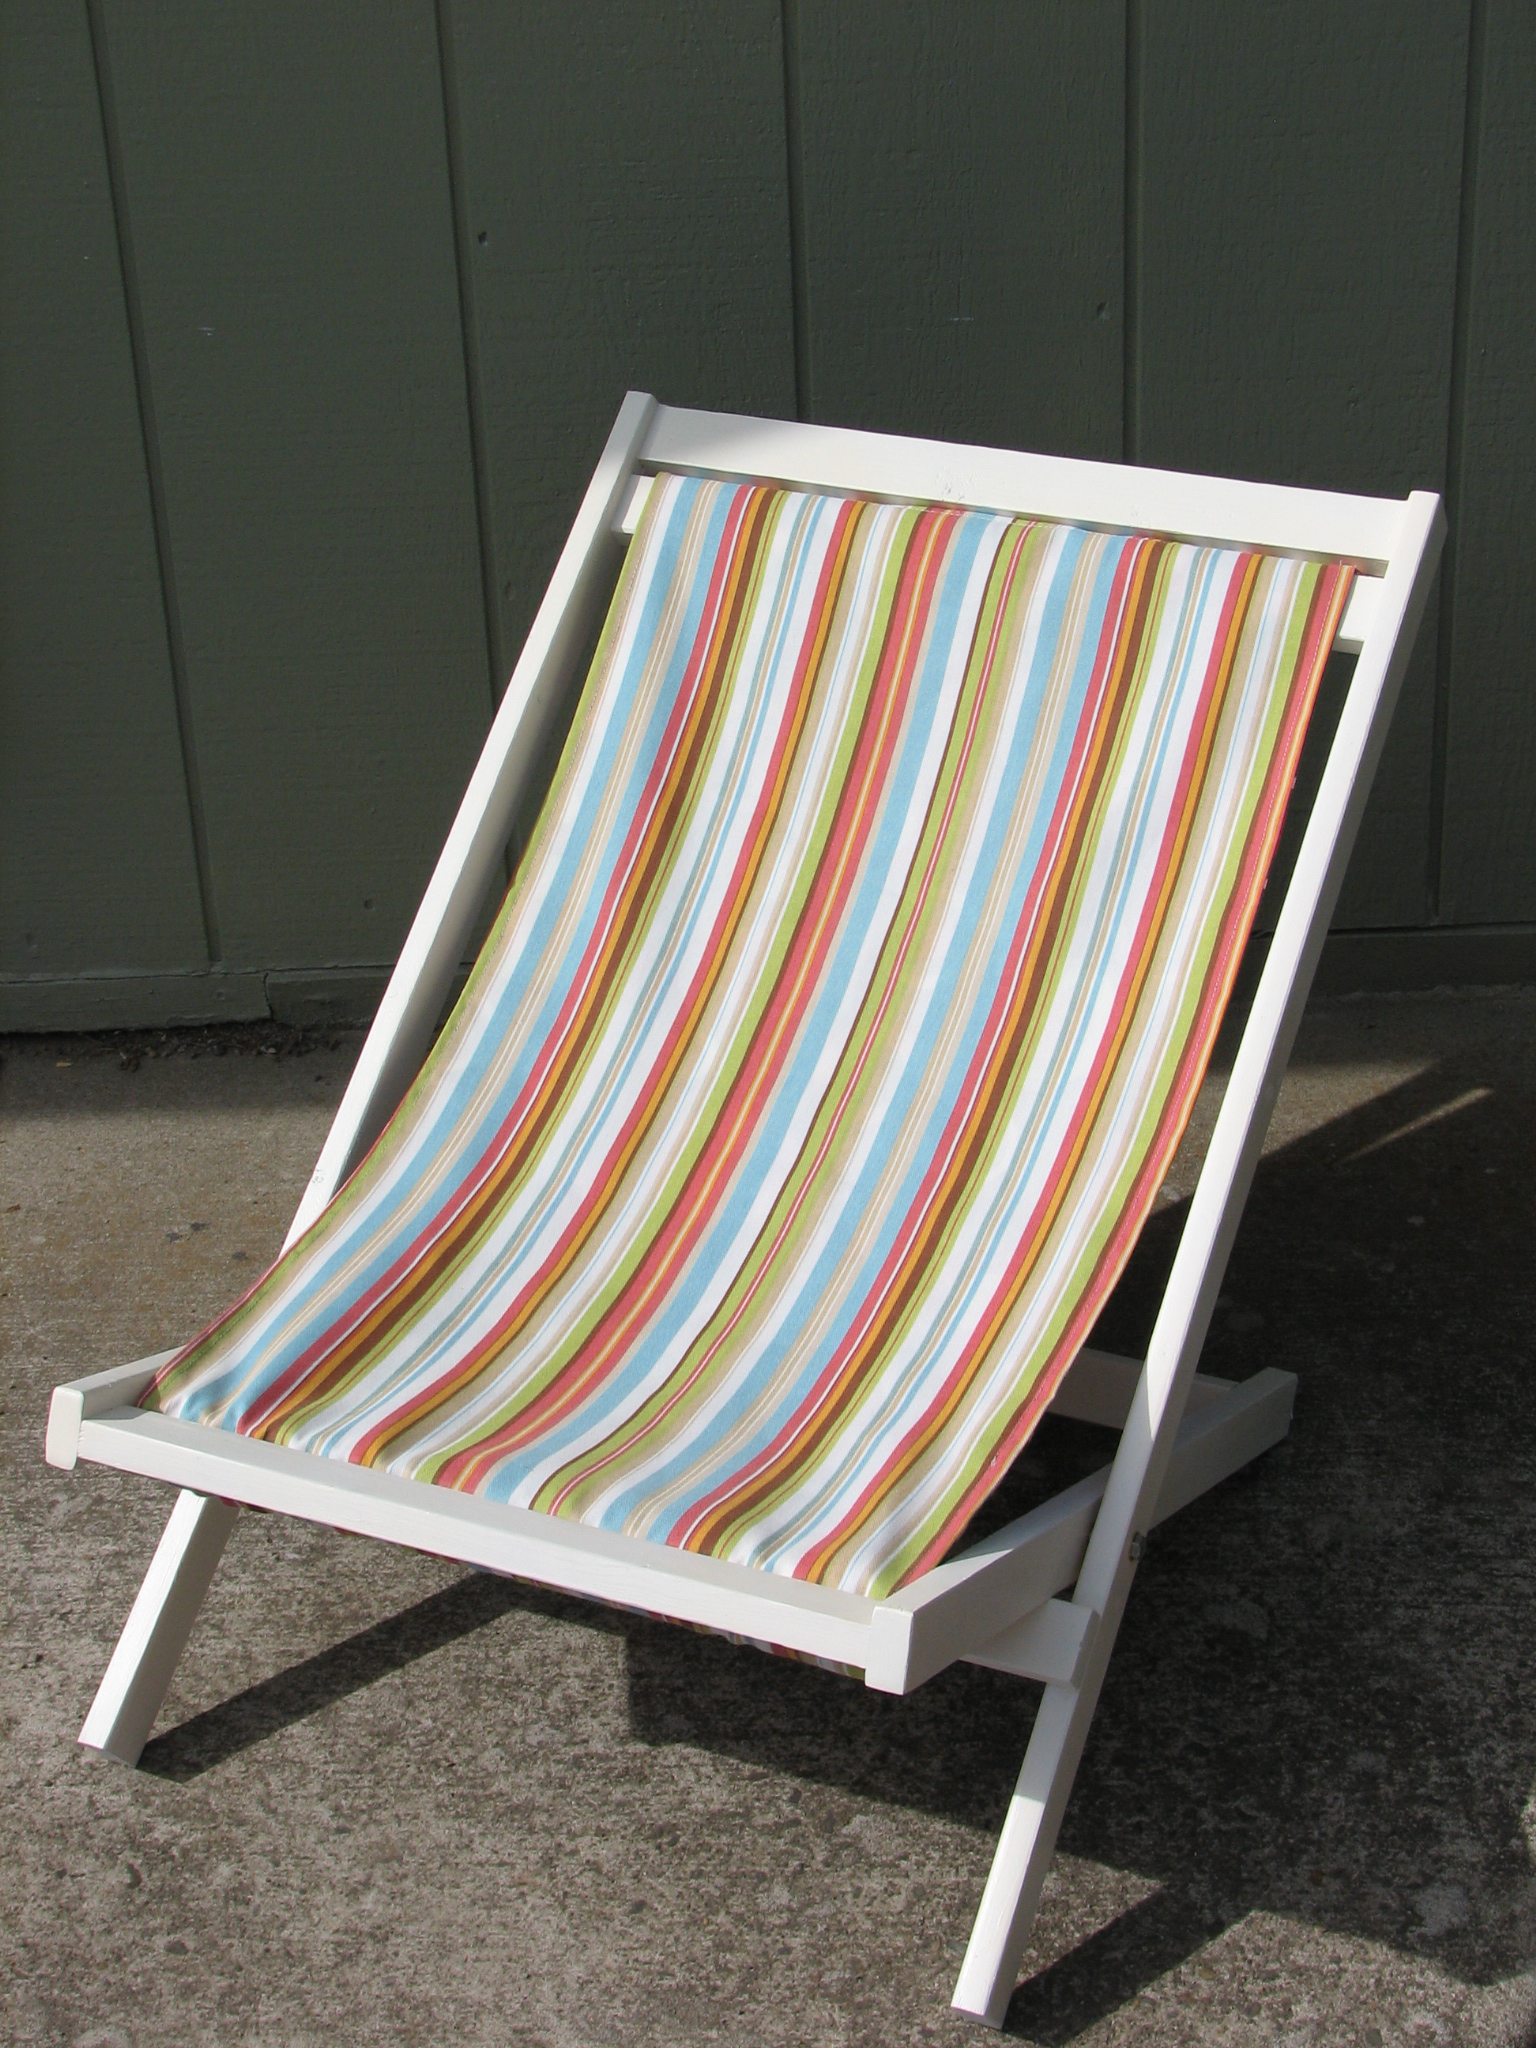
Will be making MANY more of these, so easy and a fun gift! This one was for my niece.
Recommended Skill Level
Starter Project
Comments
Fri, 06/10/2011 - 11:28
This chair is just beautiful!
This chair is just beautiful! Really perfect, really! Thank you for sharing!
Fri, 06/10/2011 - 22:34
Loving the sling!! Simple and
Loving the sling!! Simple and traditional which I am really getting into lateley. Love it!
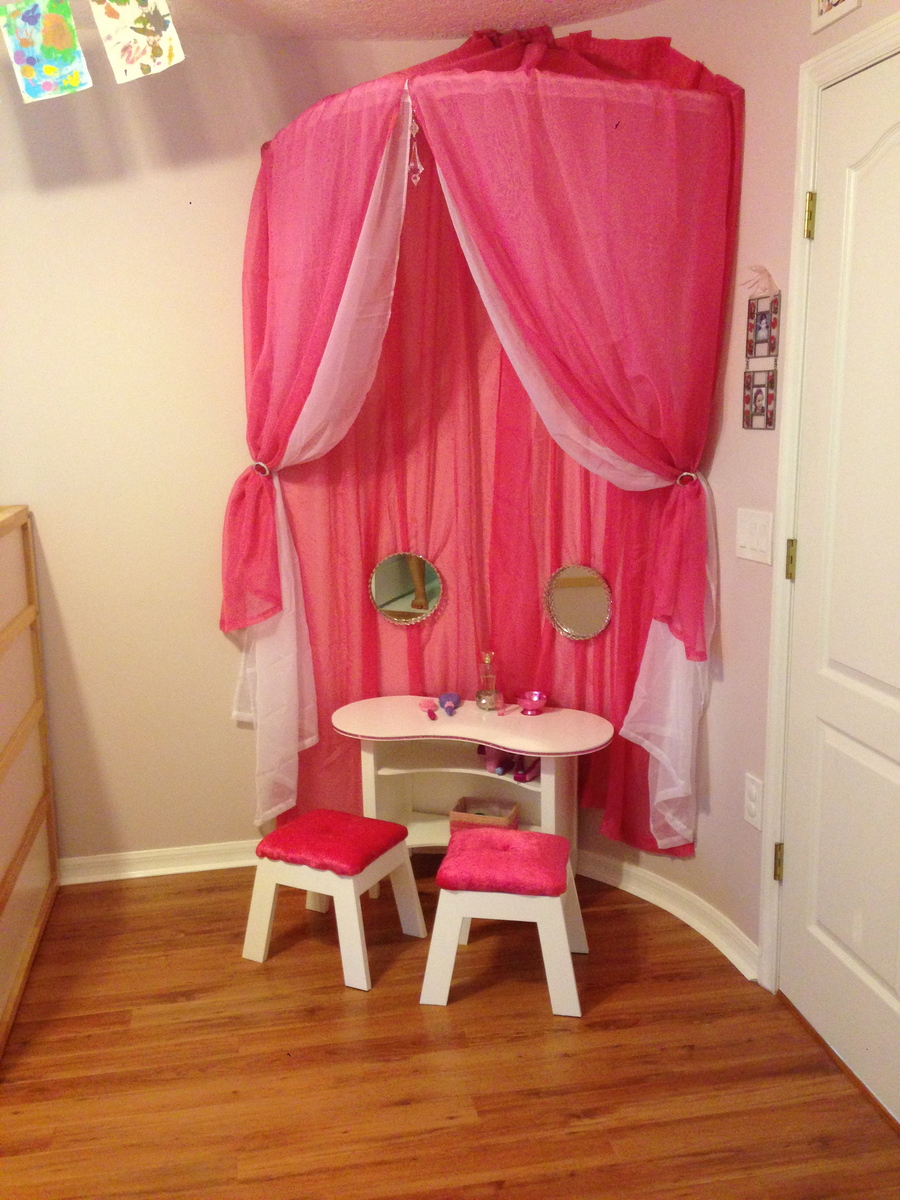
Altered thumb chair
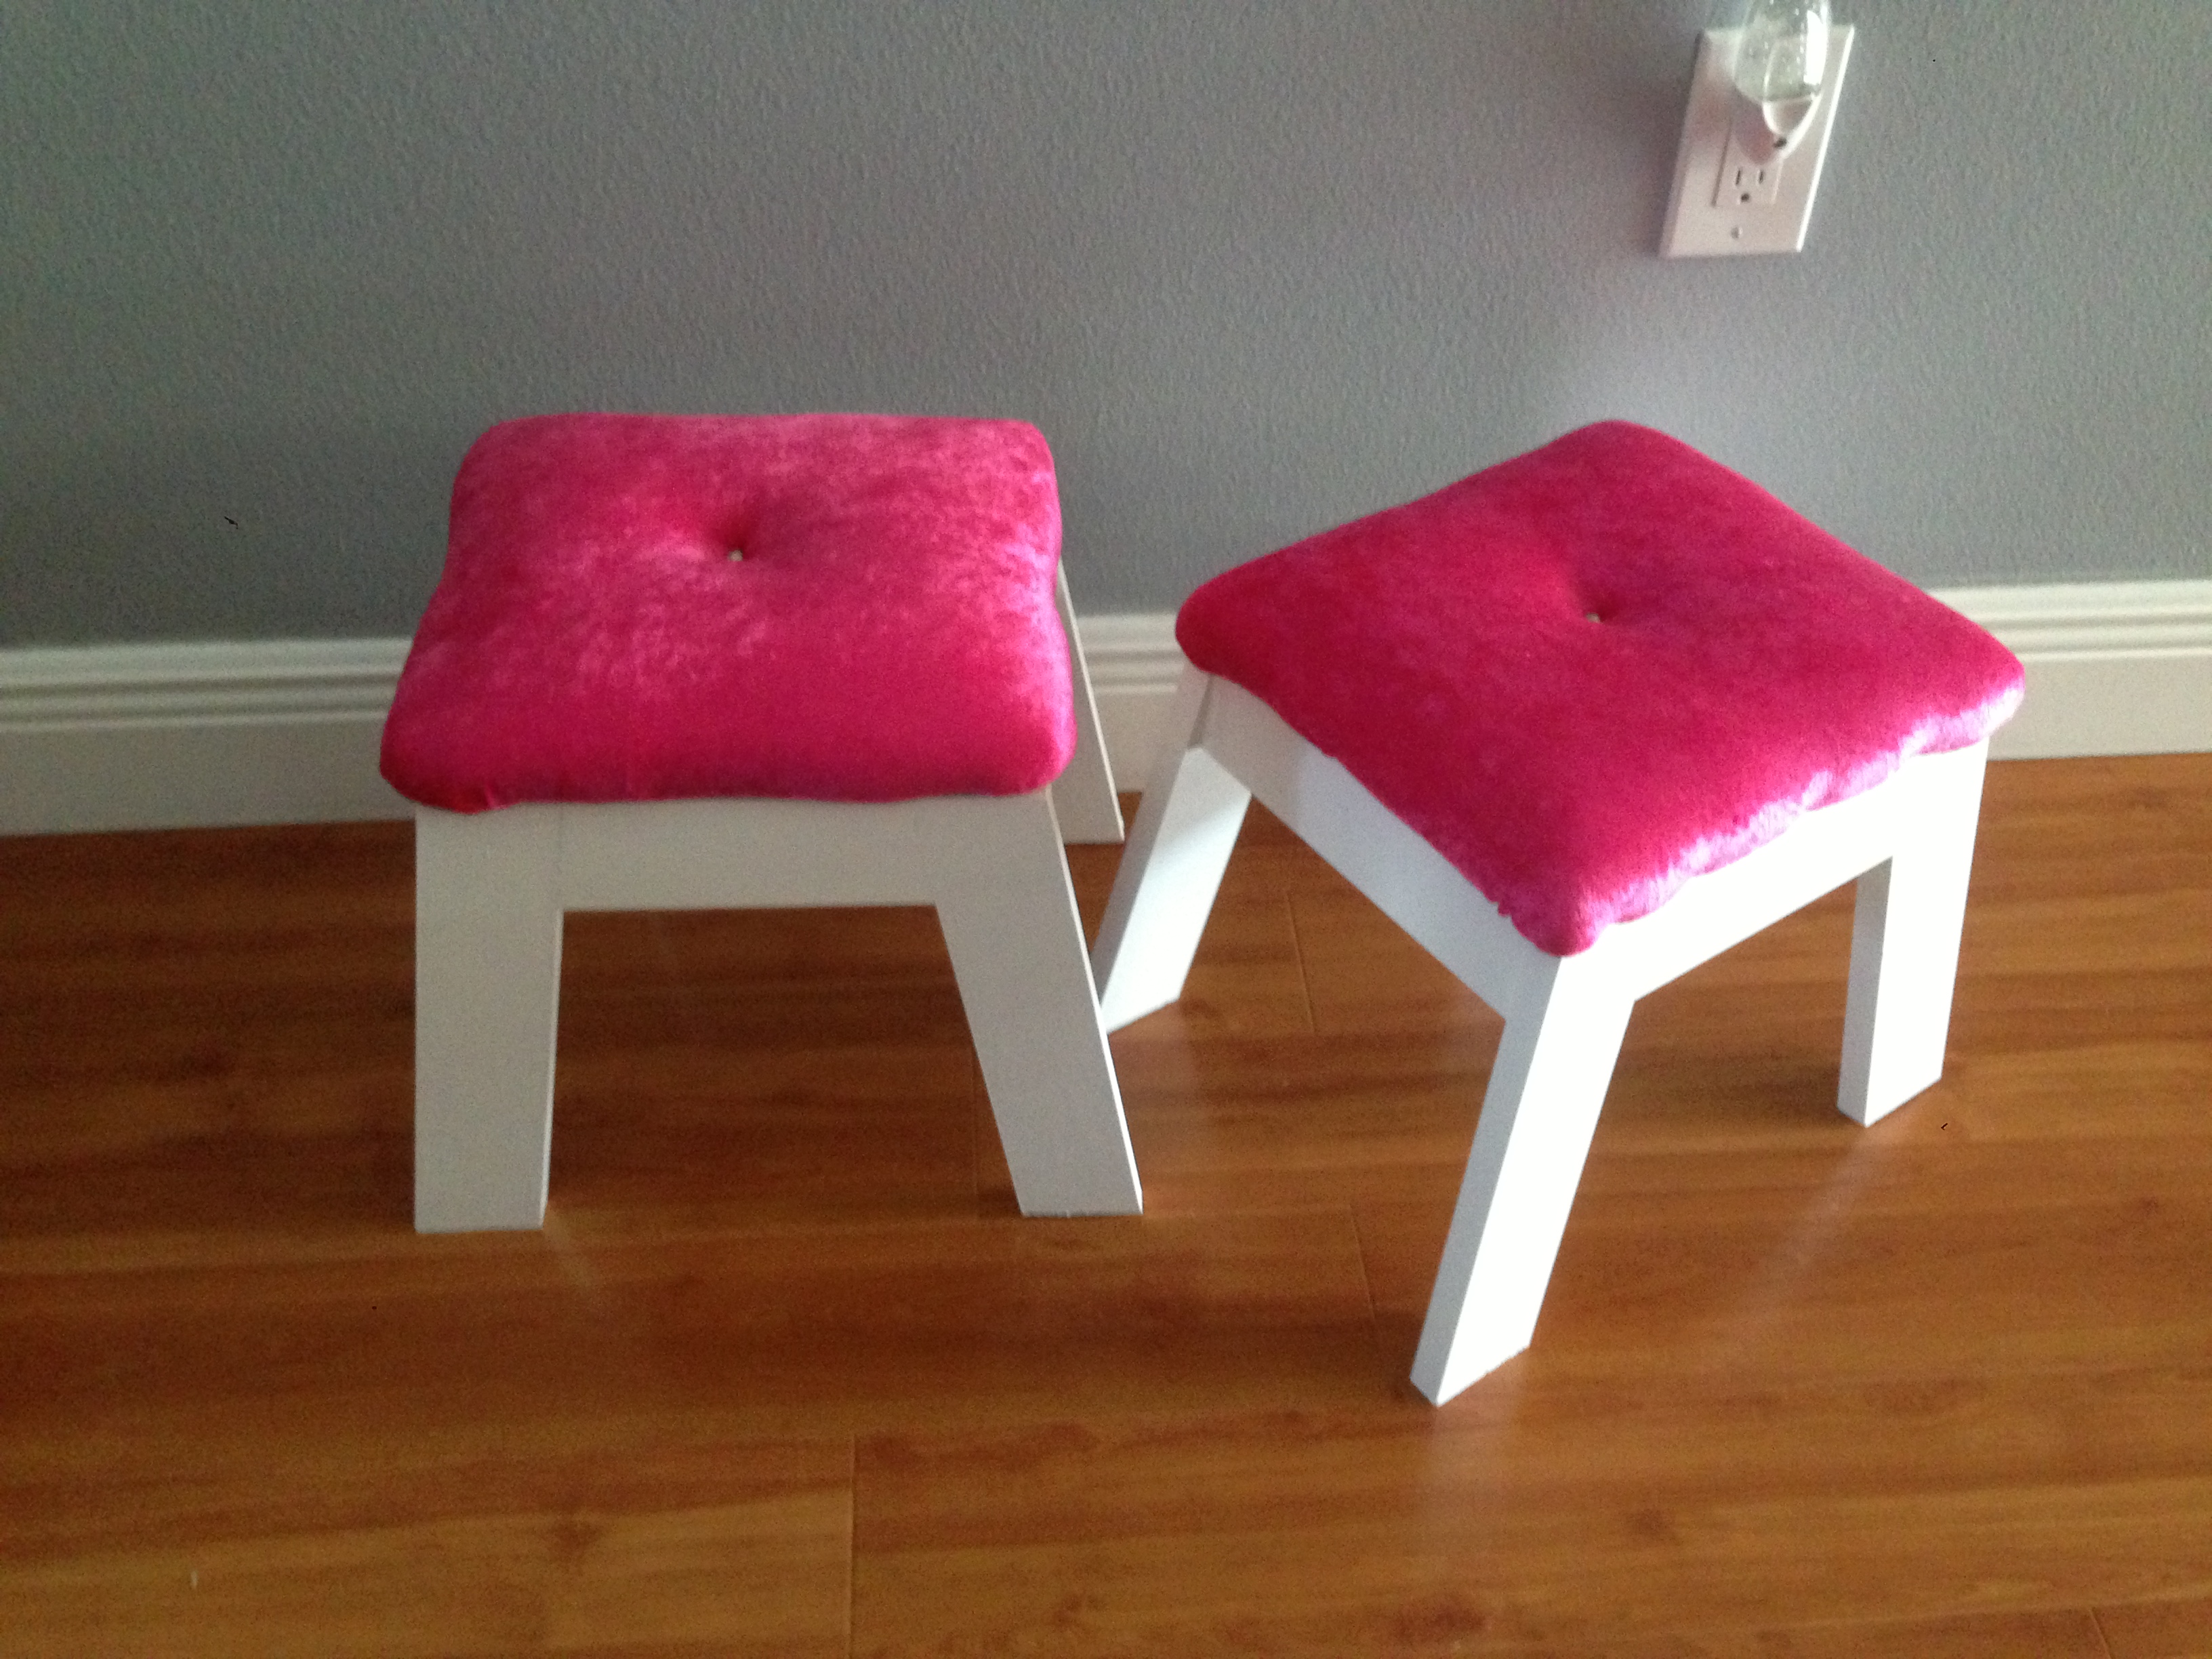
I wanted to make chairs for a vanity that I made for my 5 and 3 year old girls. After I finished the chairs I decided not to attach the back and upholster the seats instead. They love them and so do I!! I measured each cut multiple times and took my time. I think that helped me tremendously because it all came together very easily!
Thank you Ana White!!
Built from Plan(s)
Estimated Time Investment
Afternoon Project (3-6 Hours)
Finish Used
white gloss paint applied with a brush
Recommended Skill Level
Beginner
Adirondack Chairs with Table
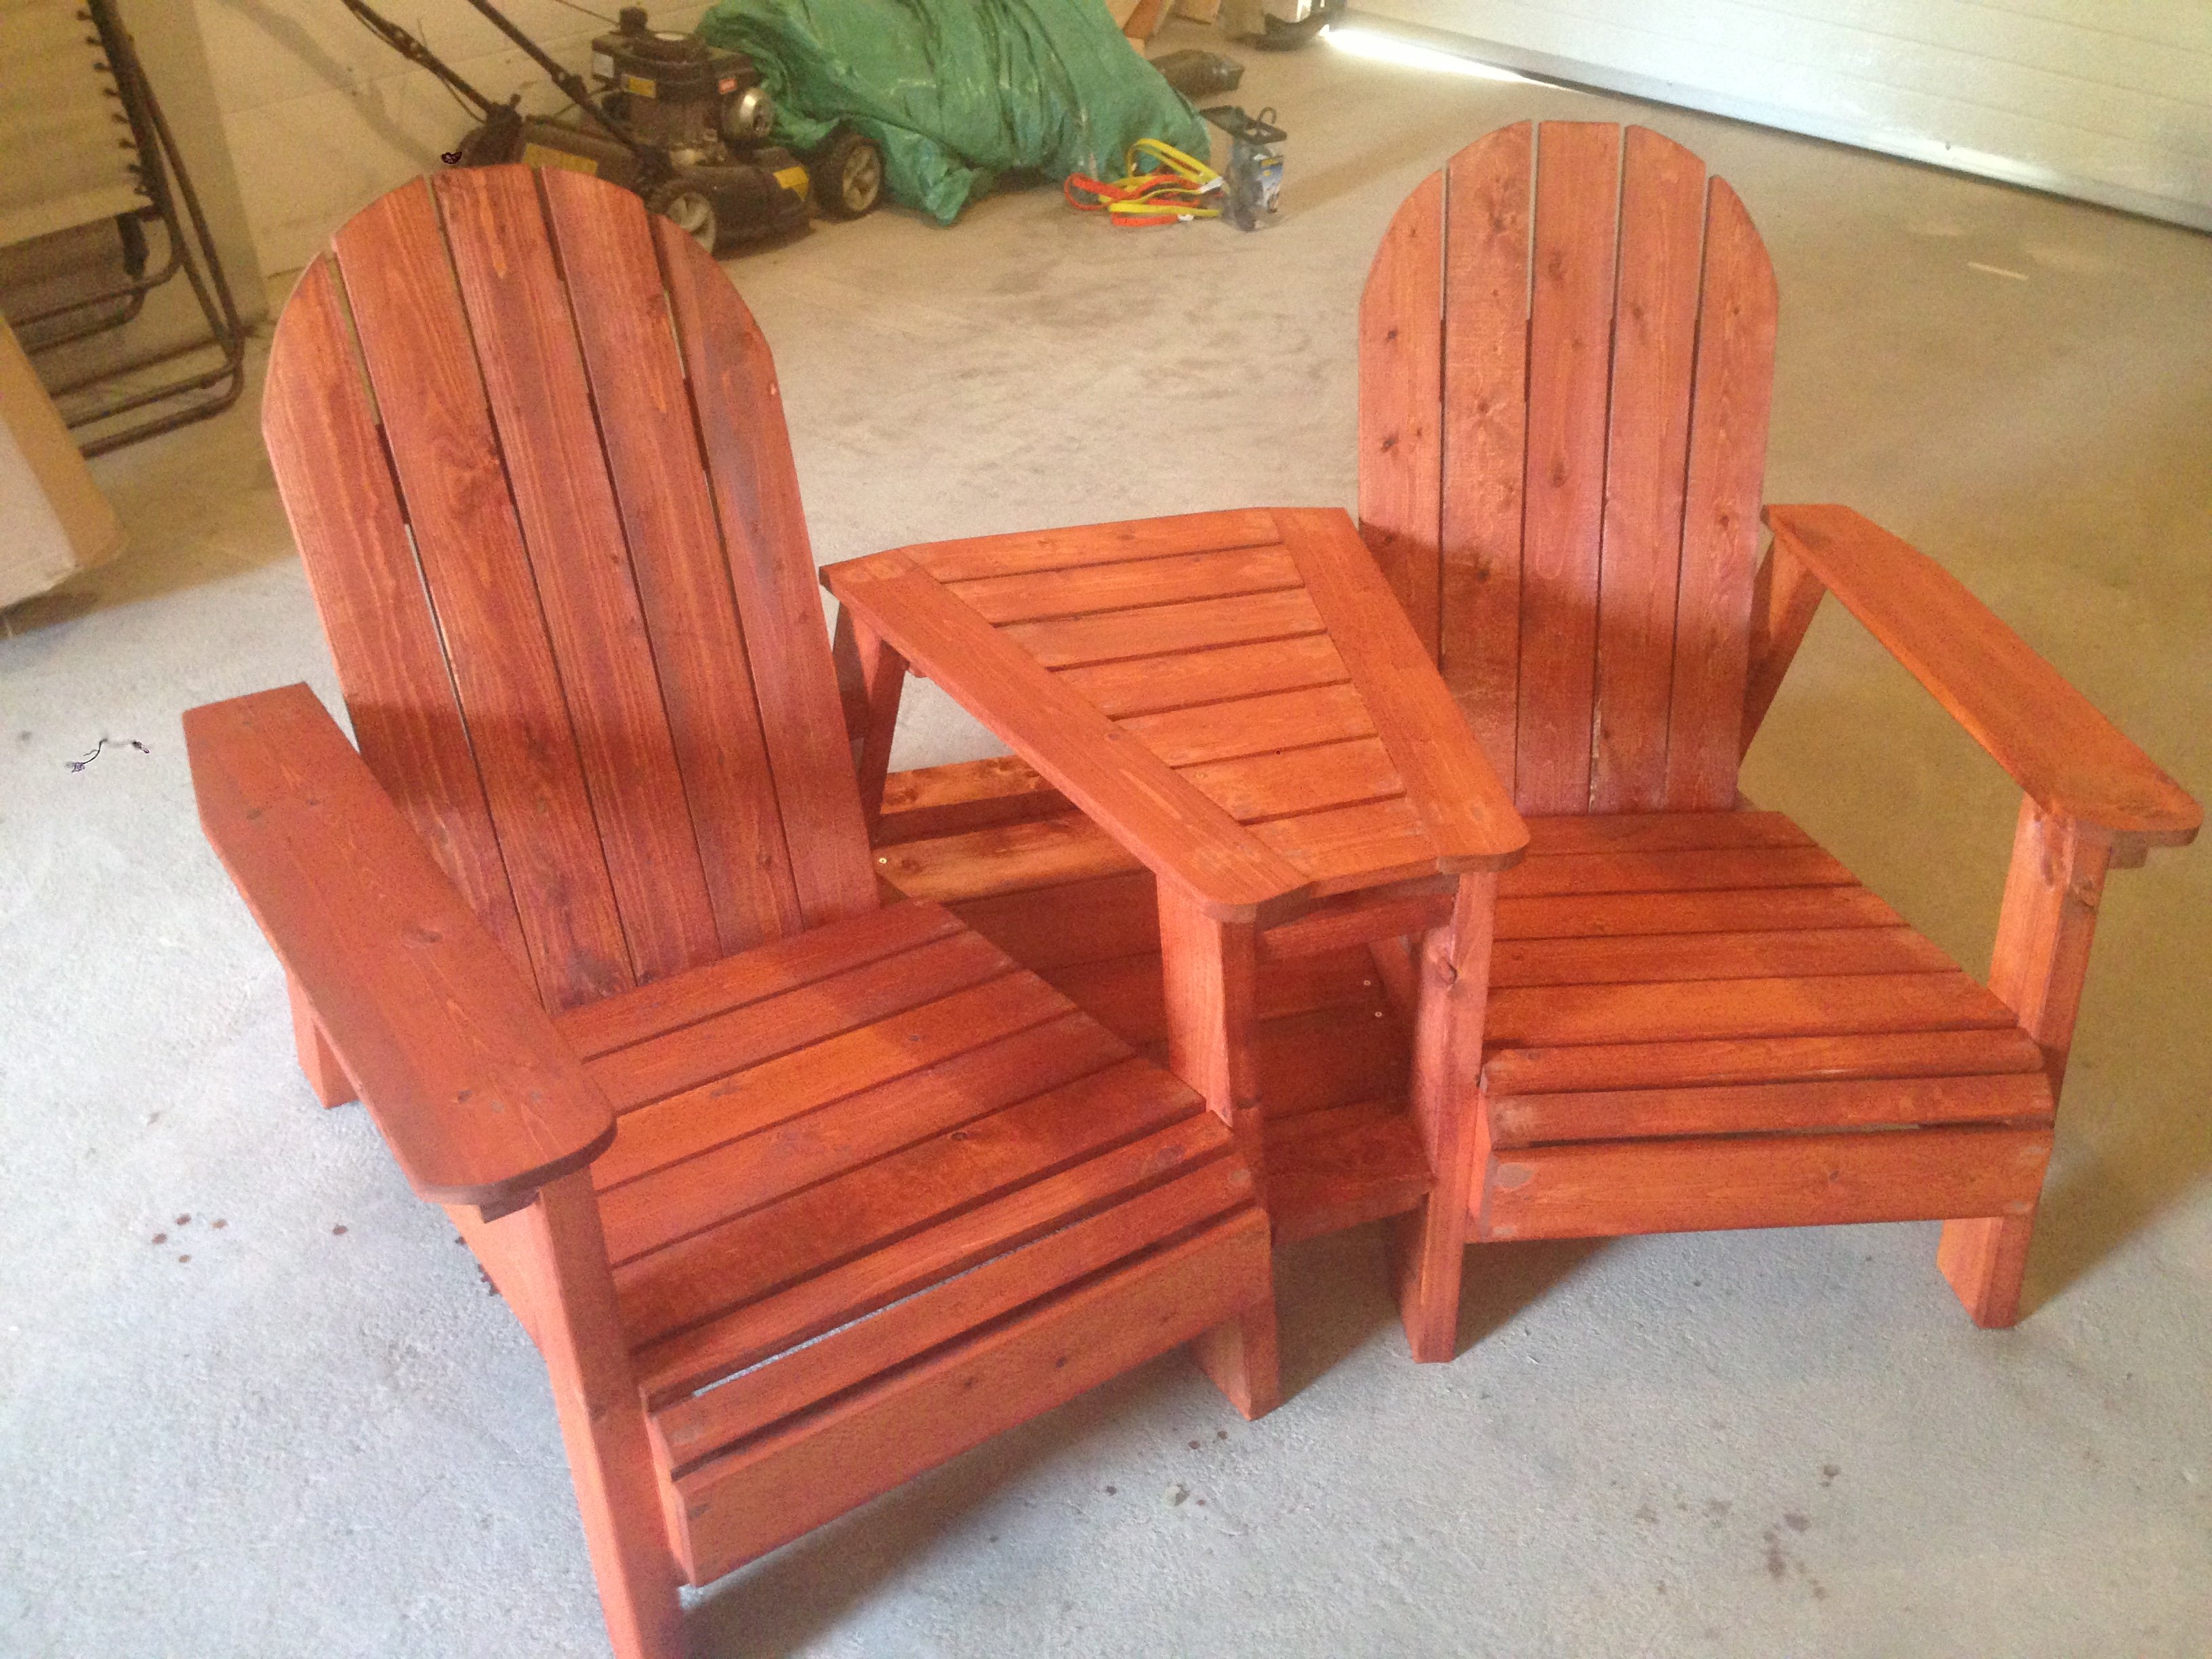
I was inspired by DIY Pete's Double bench seat but wanted more of the traditional adirondack look, so I kind of combined 3 plans together to get this! For my first attempt at these chairs with a few of my own tweaks I think it turned out pretty darn well. Changing the legs to extend out the back and curve out the front posed small challenge and then mounting the chair backs at a comfortable angle. There are some imperfections that probably only I would notice but I can correct it for next time. This photo was taken just after staining when I noticed that I missed sanding some wood filler on the front of the seat. Building these chairs only took about 6.5 hours before the finishing process but the next time would go faster. I am currently in the process of adding a protective varnish to give it a semi-gloss finish. All together it cost me under $100 CDN or $80 USD.
Built from Plan(s)
Estimated Cost
$70-80
Estimated Time Investment
Day Project (6-9 Hours)
Finish Used
Minwax - Gunstock with a semi gloss varnish
Recommended Skill Level
Intermediate
Comments
Memorial Urn
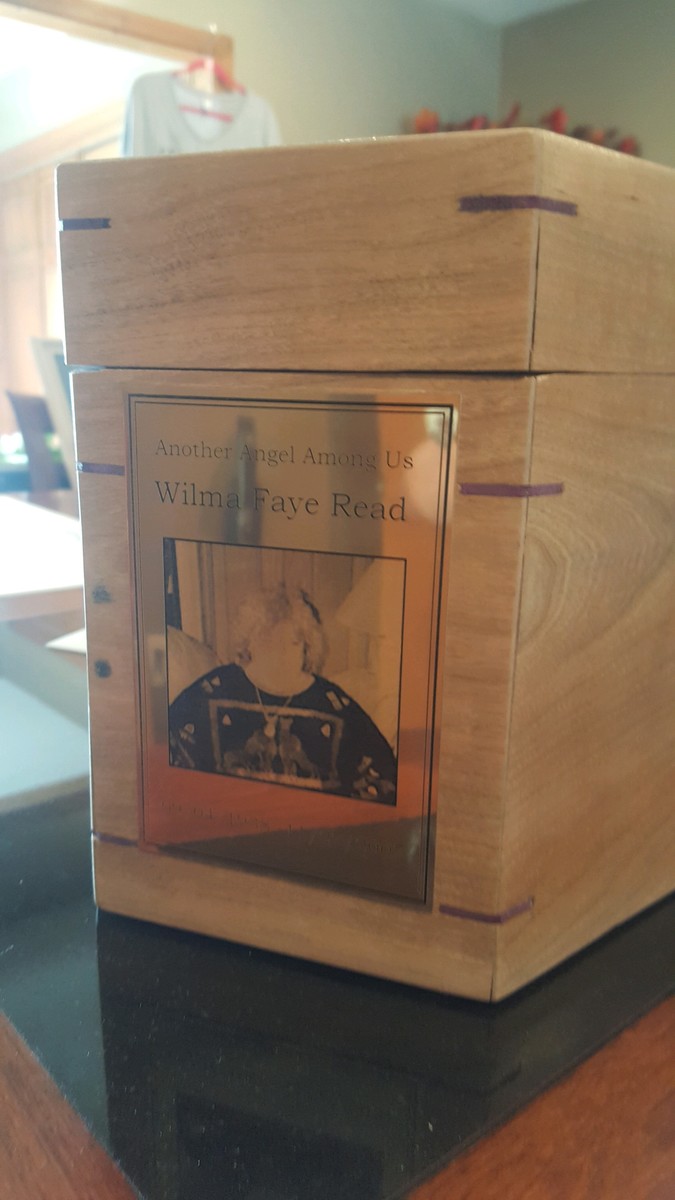
Memorial Box
Recommended Skill Level
Intermediate
Comments
Sun, 06/21/2020 - 07:09
This looks fairly straight…
This looks fairly straight forward but there is one factor that needs to be taken into account when you make an urn. You need at least one cubic inch per pound of the person whose cremains are going into it, so a 200 pound person needs 200 cubic inches.
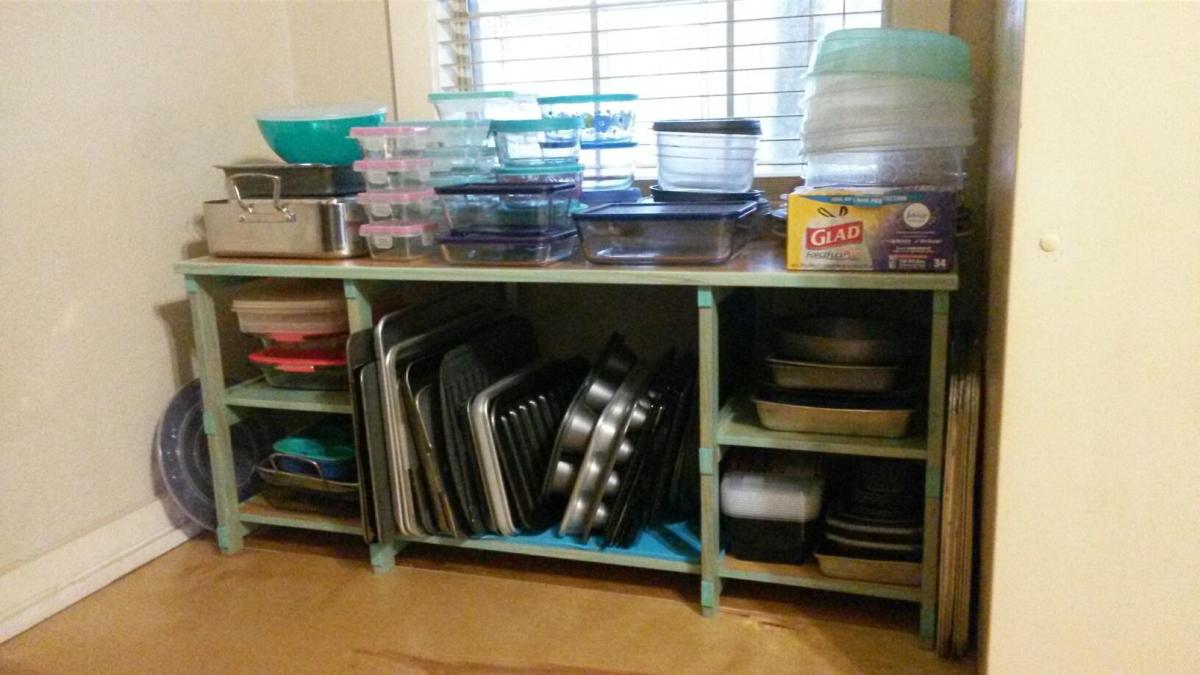
Needed a special kind of storage shelf
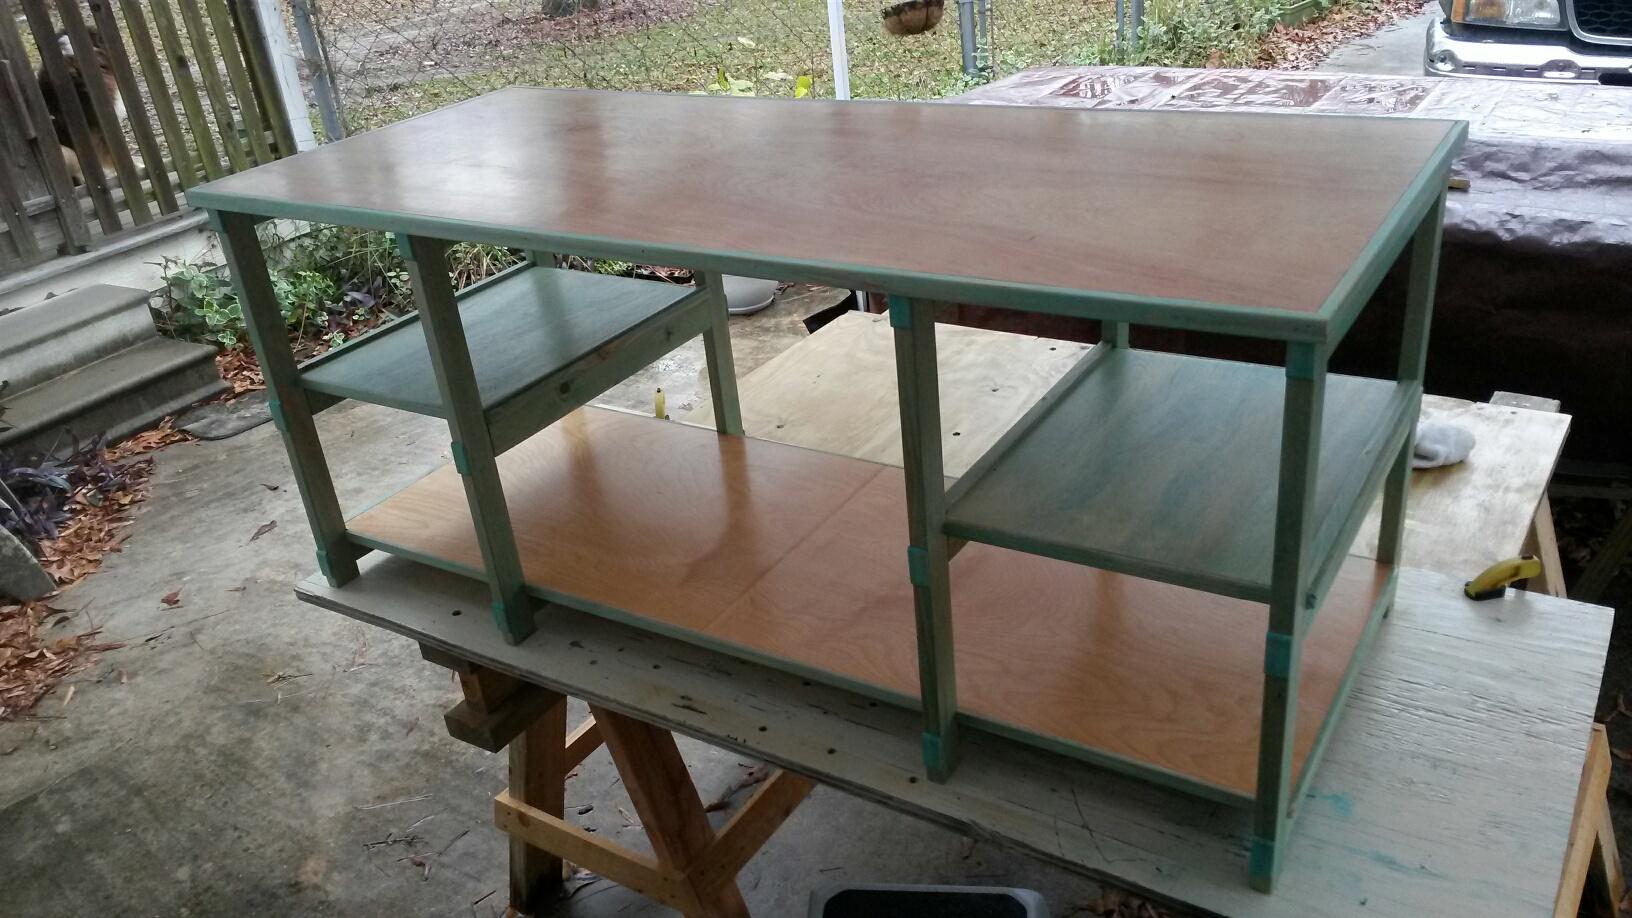
I needed an easy to access storage shelf for cookie sheets, roasting pans, and glass storage bowls. I couldn't find one I liked, so I built this shelf. I love building things. This one is very simple. It's built with 1x2s and 1/2" plywood. I made my own turquoise stain out of acrylic paint and water for the trim and side shelves, and the top and bottom shelves were stained with oil based honey oak stain. I finished it with 4 coats of polyurethane, which I hand rubbed.
Comments
Thu, 04/21/2022 - 20:36
Tons of storage!
Thanks for sharing, it looks great and is super functional!
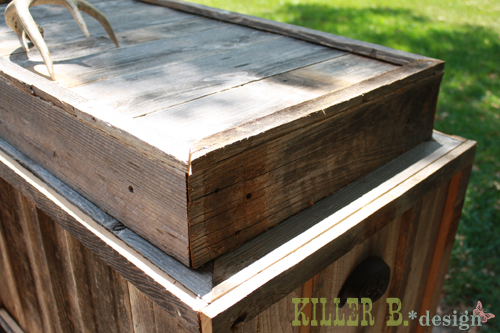
Rustic Cooler

My father gave us a whole mess of reclaimed barnwood that a neighbor had given to him, and I knew just what to do with it! My husband had an old cooler that would be the perfect size to create a rustic cooler case from. We built a frame out of 2x2's, faced it with the old wood (which looked like old cedar fence pickets) and popped the cooler inside. I've got a whole step-by-step on my blog. Love the way this turned out! We used an antler shed to make the lid handle, and bought some great rustic looking handles for the sides, as well as an old rustic bottle opener. Can't wait to see it in action!

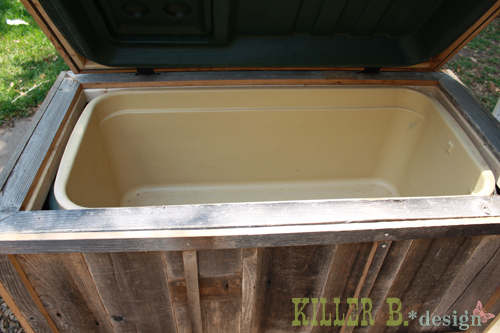
Estimated Cost
$30
Estimated Time Investment
Afternoon Project (3-6 Hours)
Finish Used
None, keep it looking weathered!
Recommended Skill Level
Beginner
Comments

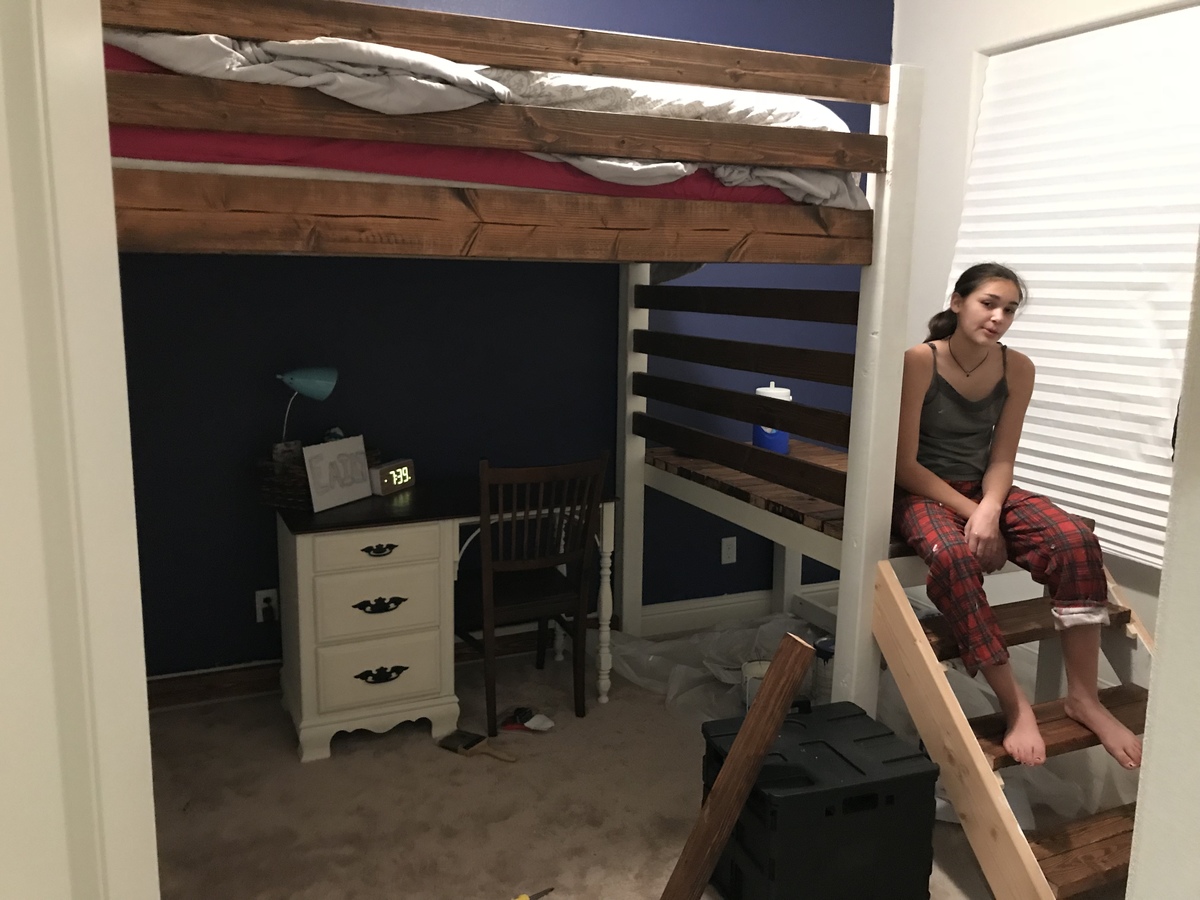
sweetpea bed
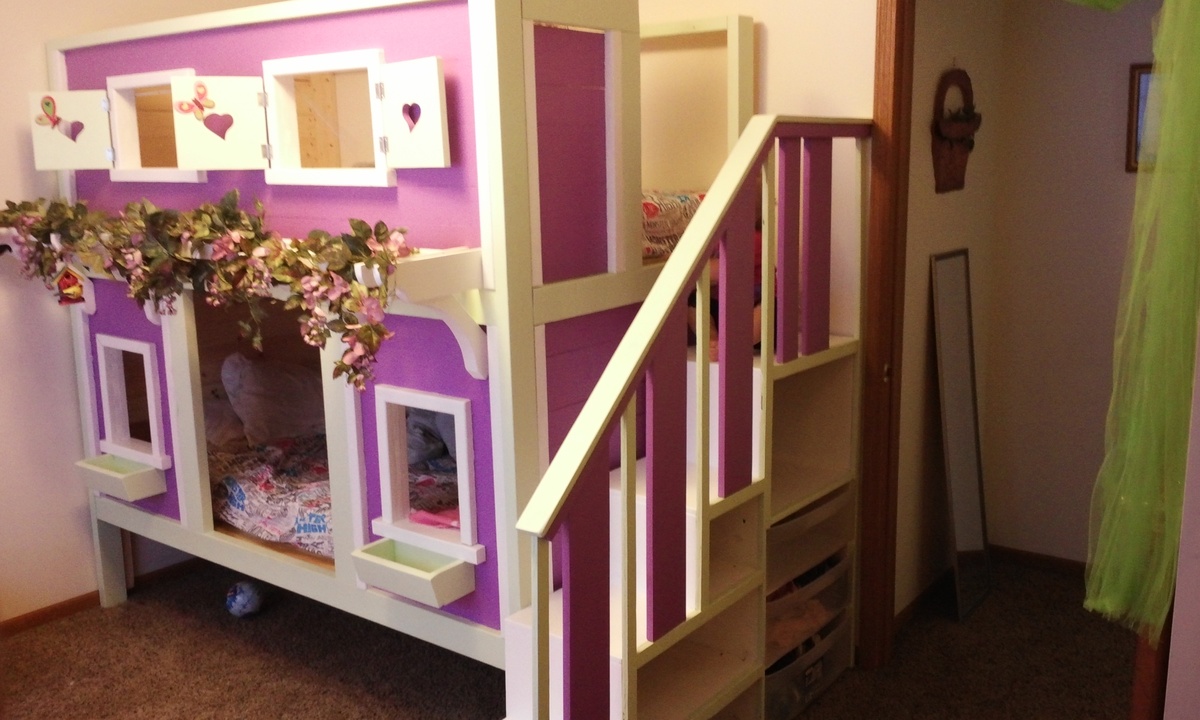
I made this for my 2 young daughters. They love it.
Built from Plan(s)
Estimated Cost
$800?
Estimated Time Investment
Week Long Project (20 Hours or More)
Finish Used
Paint from lowes. I suggest spraying as you cut. The longest part of the pro jest was painting after I built this.
Recommended Skill Level
Intermediate
Comments

Fri, 08/02/2013 - 10:38
staircase
HI! Great Job! i hope mine turns out just as nice! i have a question. how wide did you make the stairs on yours im looking to make my staircase narrower to fit in my spot but i wanna make sure i dont make them too narrow but yours looks perfect!
In reply to staircase by eliseaurban
Sun, 12/21/2014 - 09:31
I'm so sorry that I never
I'm so sorry that I never answered you. I built the steps 14 inches wide. I had to make them more narrow than I had wanted because of the doorway. They ended up perfect for the kids though.

Sat, 10/03/2015 - 08:11
Inspiración!
Hola Ana White, tu inspiras a hacer cosas increibles. Gracias por el tiempo que dedicas a inspirarnos!
Kentwood Bookshelf
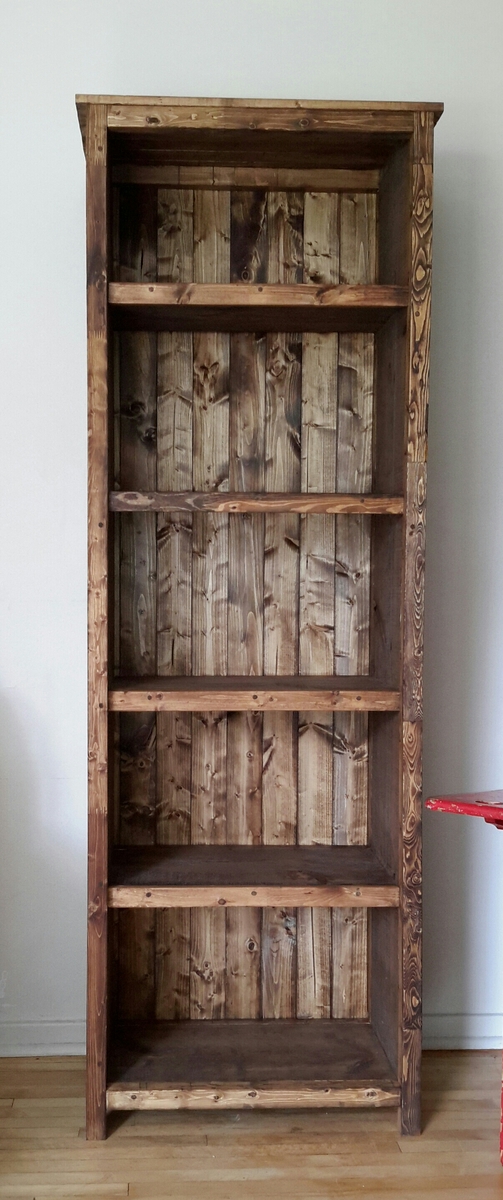
I loved this from Ana's site so much we tacked one. Please note I glued, screwed and dowel ed the holes. I hate kreg jigs. We also made ours taller to add an extra shelf.
Built from Plan(s)
Estimated Cost
$90.
Provincial stain and triple coat poly
Provincial stain and triple coat poly
Estimated Time Investment
Weekend Project (10-20 Hours)
Finish Used
3m triple coat in 1 semi gloss not pictured. My image is stain at this point
Recommended Skill Level
Beginner
Comments
Wed, 09/02/2015 - 06:33
Like to make a 5 shelve case as well..
Can you tell me the length of your 1x12 sides to make it a 5 shelve case? Thank you and your's looks great!
DIY Outdoor Dining Table
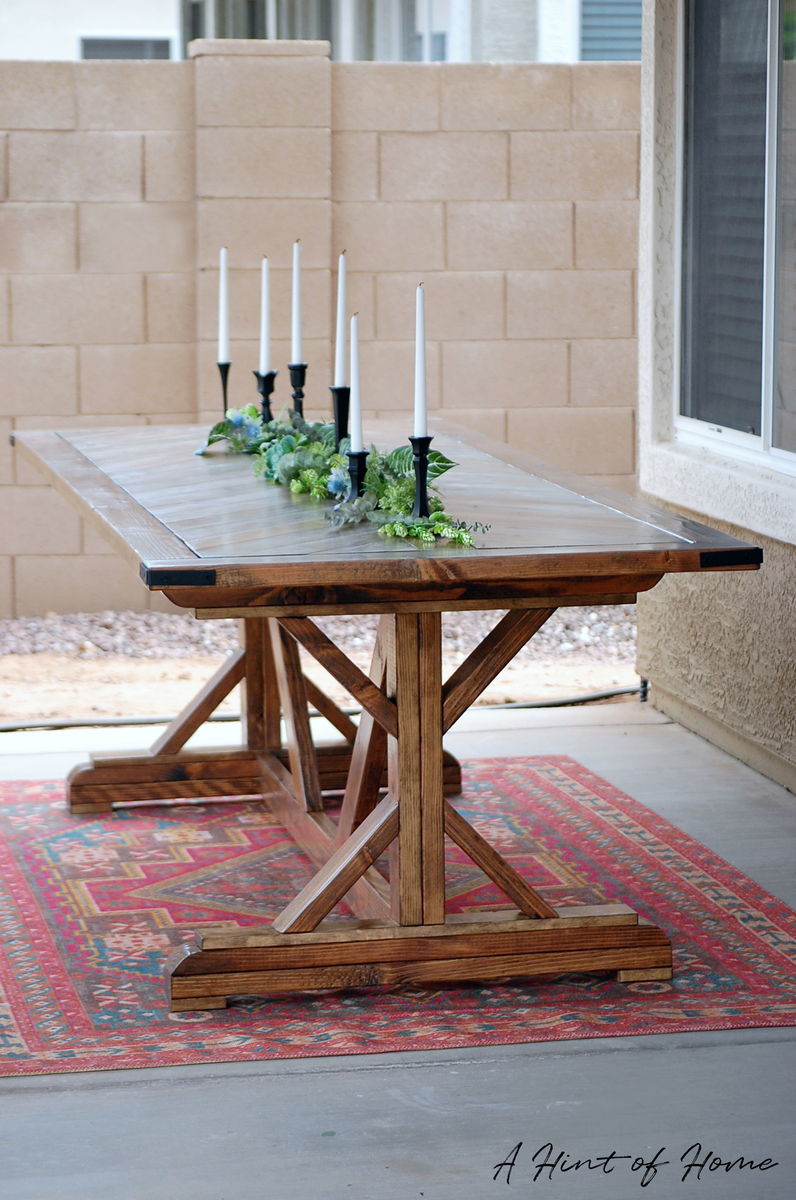
I followed Ana's Fancy X Farmhouse Table to build my base, but switched her tabletop out for a split herribone design. The tutorial for the tabletop is on the blog!
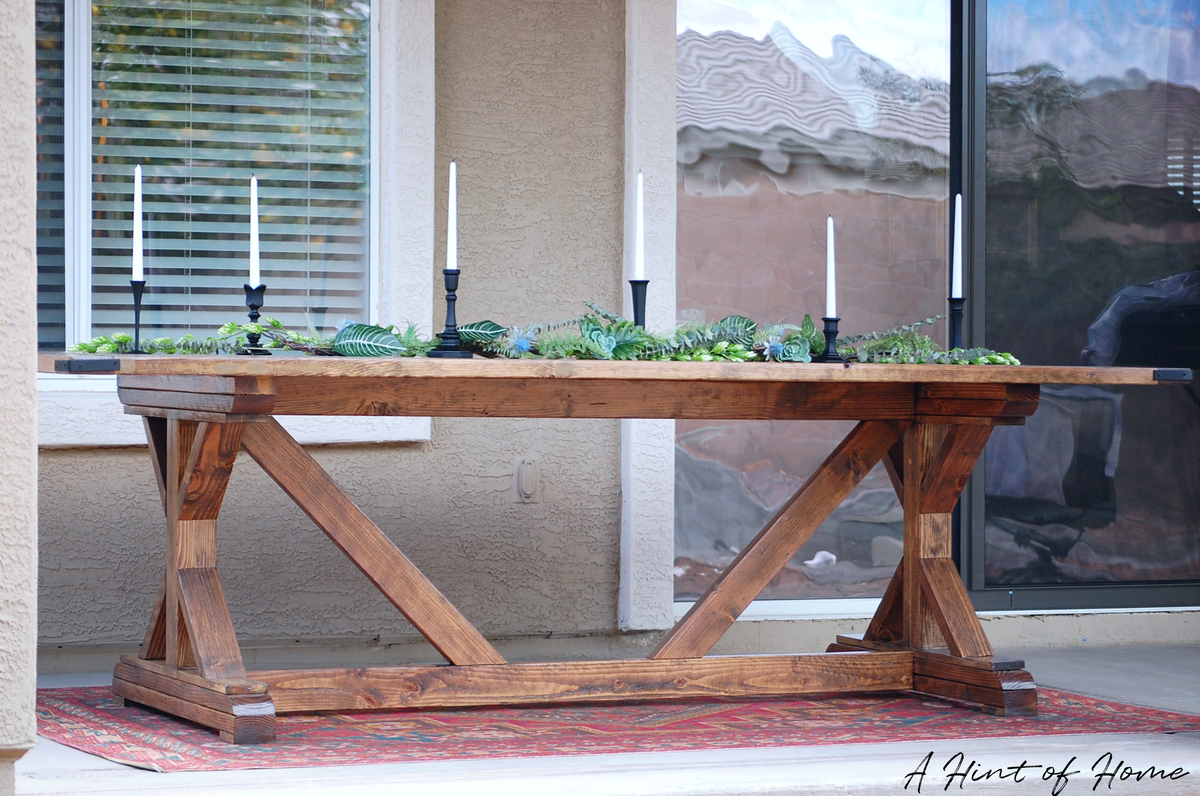
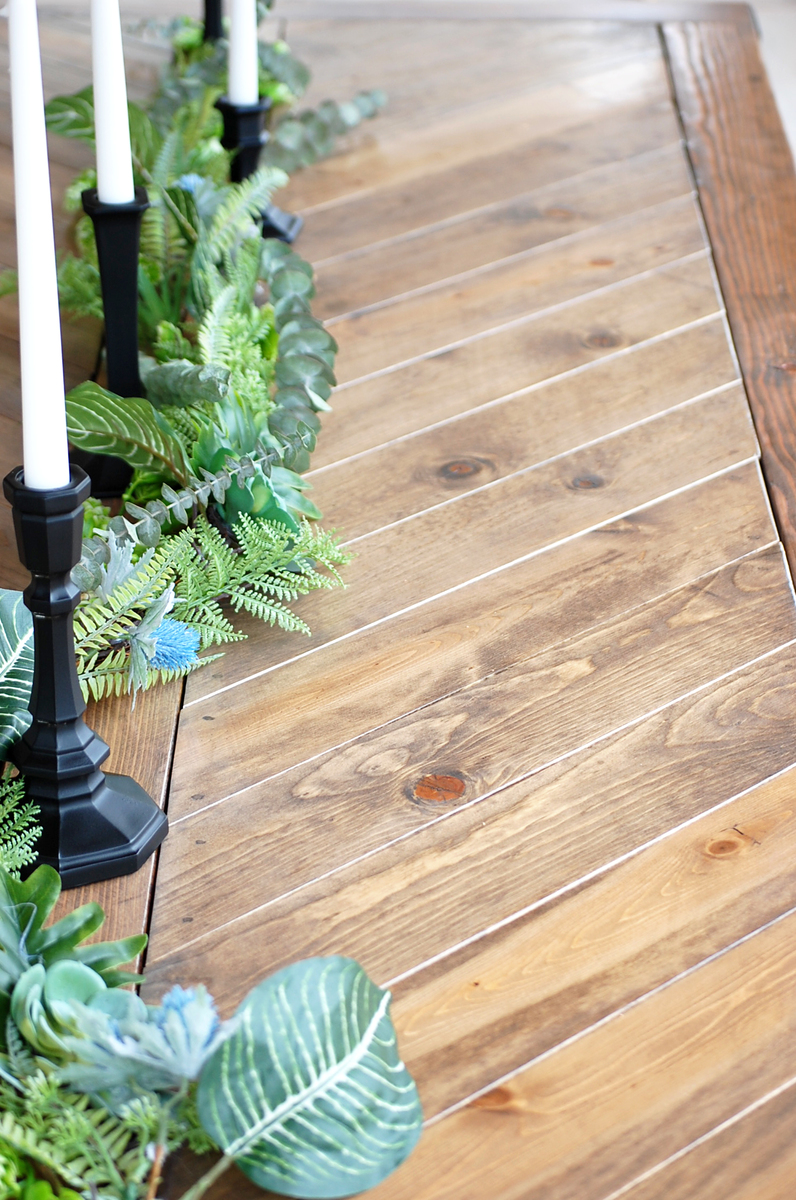
Built from Plan(s)
Estimated Time Investment
Weekend Project (10-20 Hours)
Recommended Skill Level
Intermediate
Comments
Wed, 04/18/2018 - 22:46
Beautiful!
Thank you for the inspiration on the table top. I followed your plans to make mine in the Chevron pattern as well. Well done! And the bench looks great, too!