Community Brag Posts

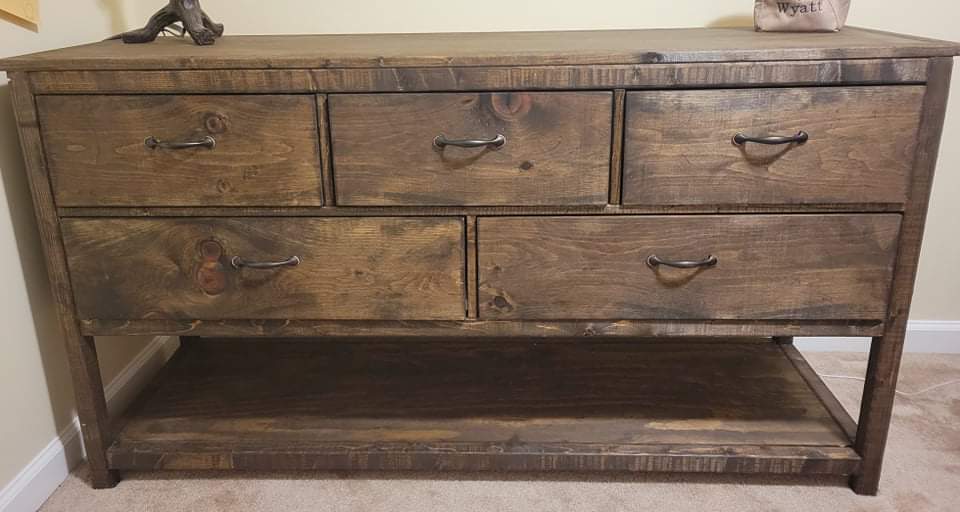
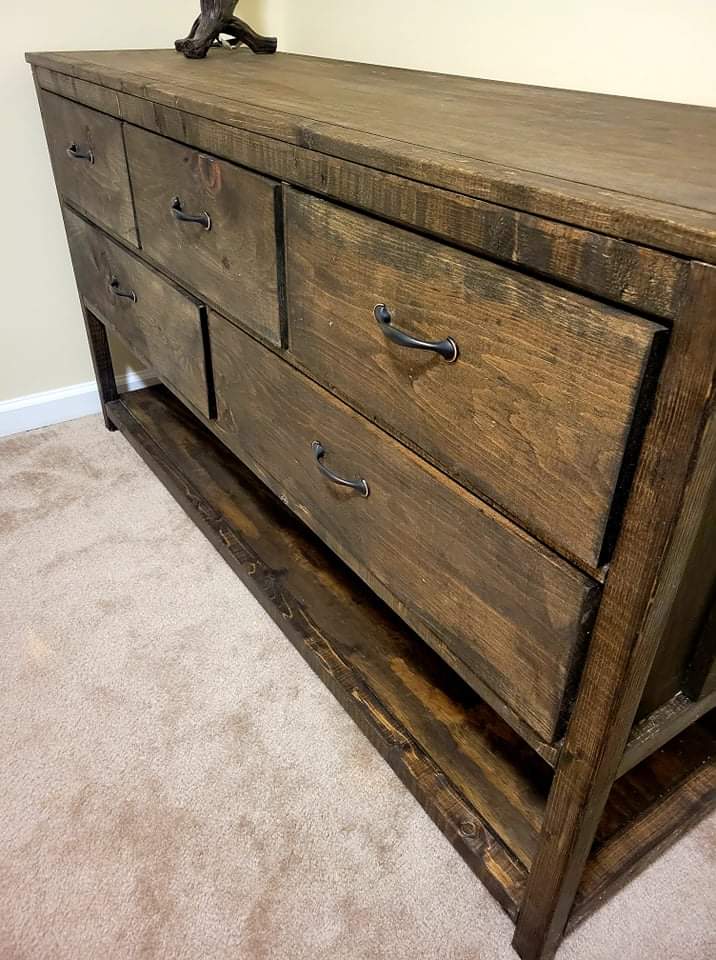
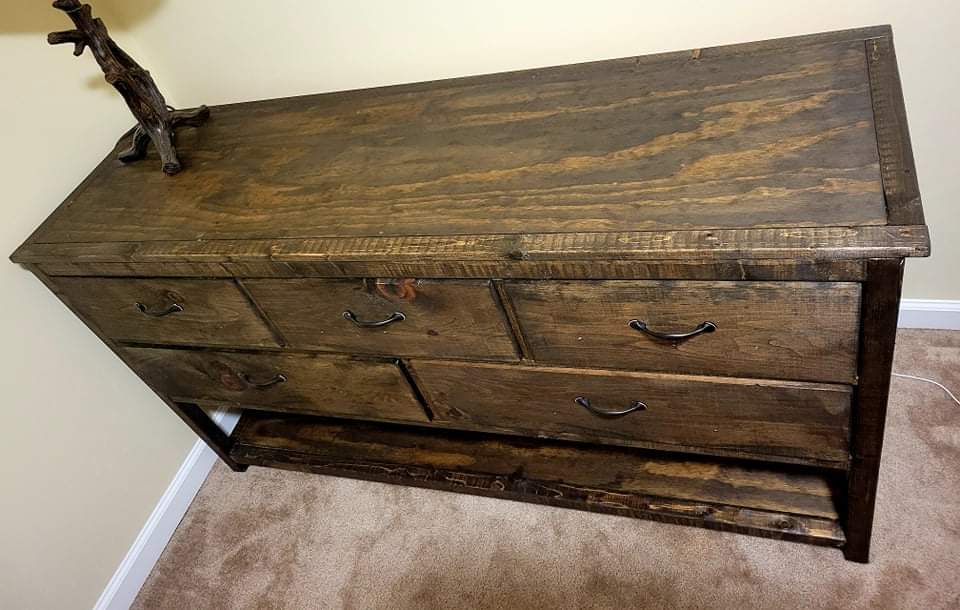
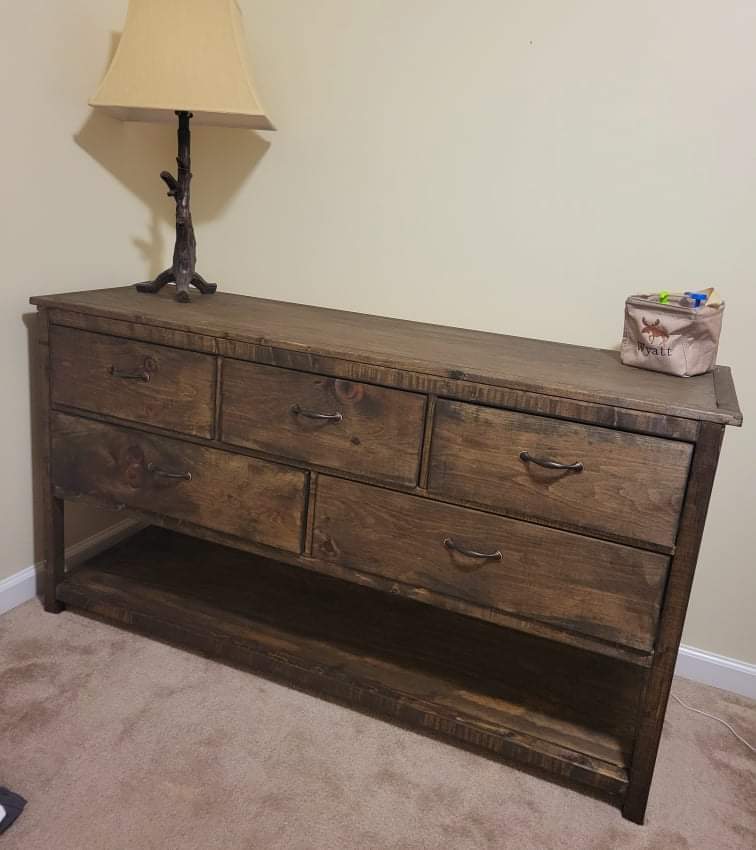
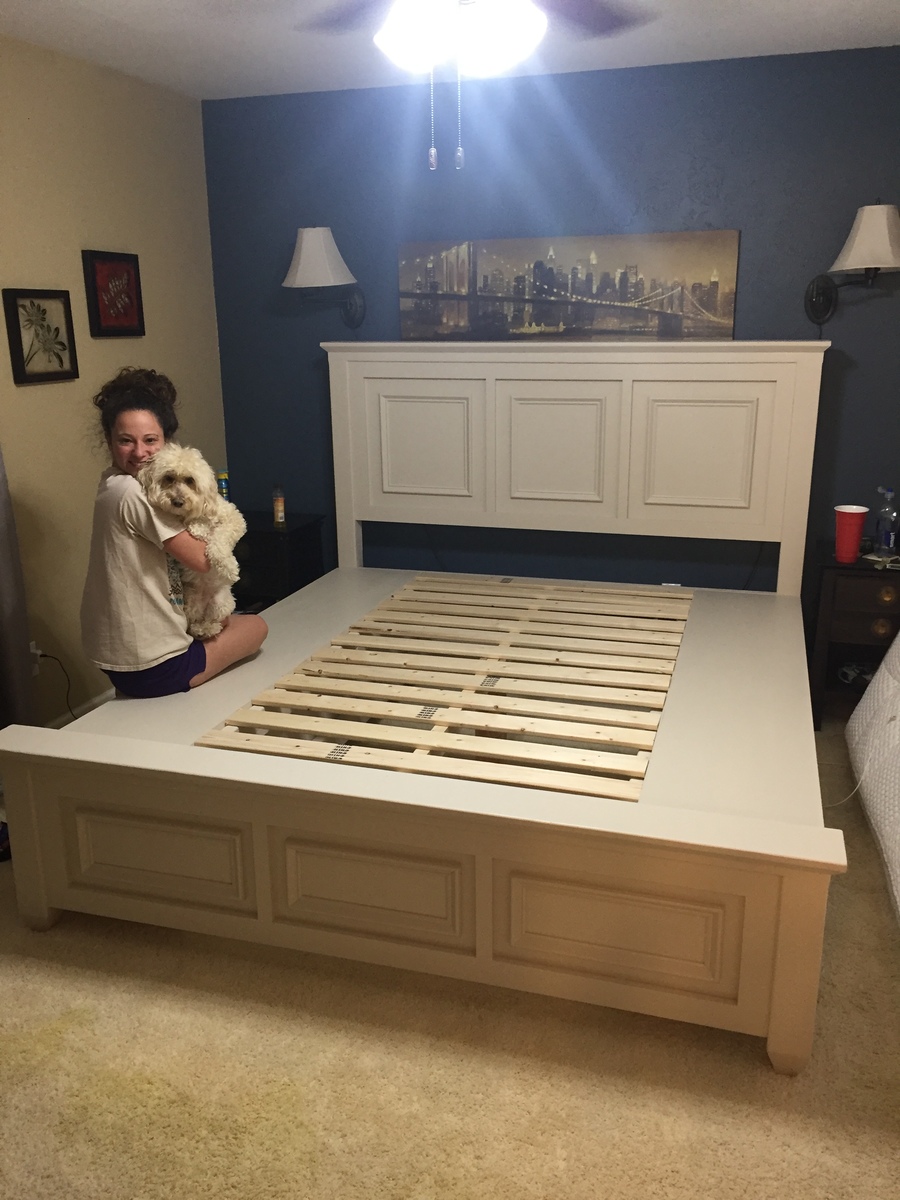
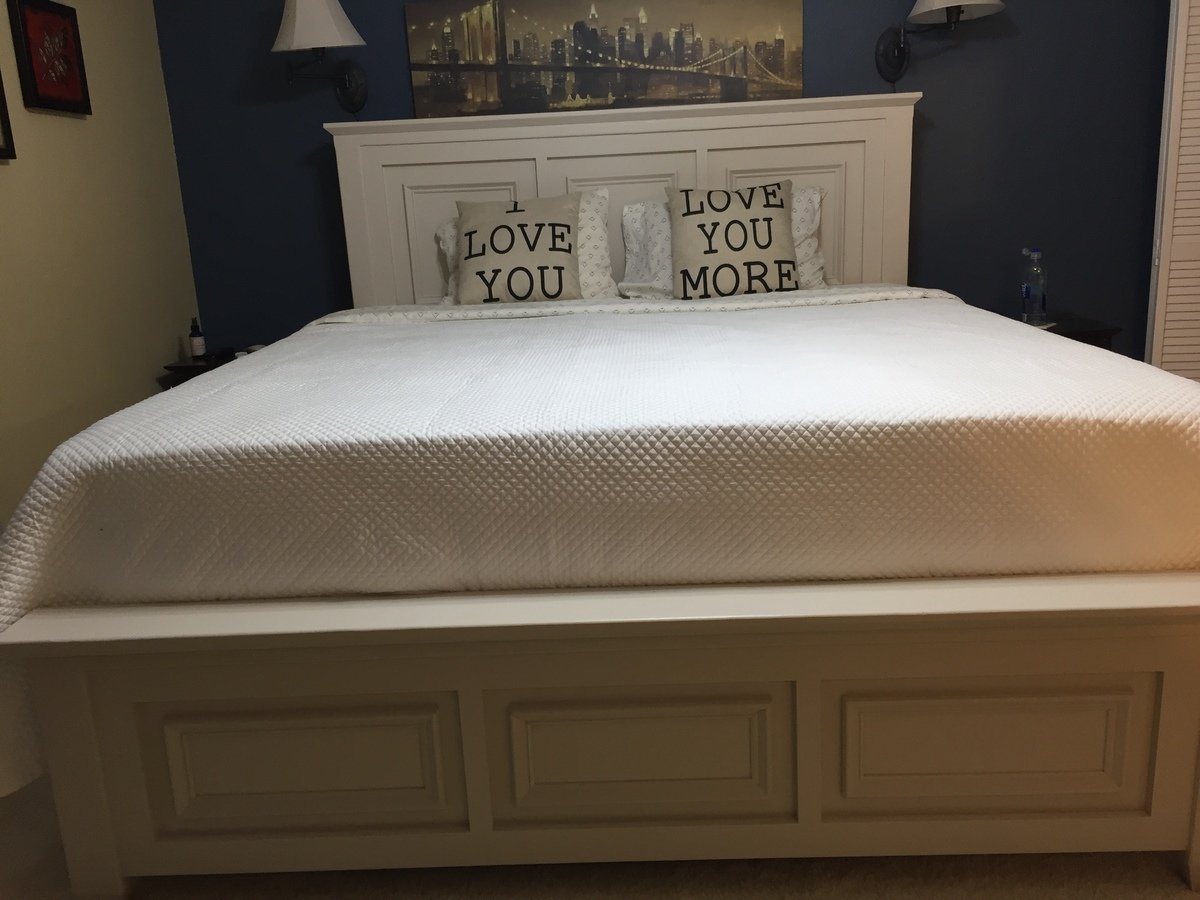
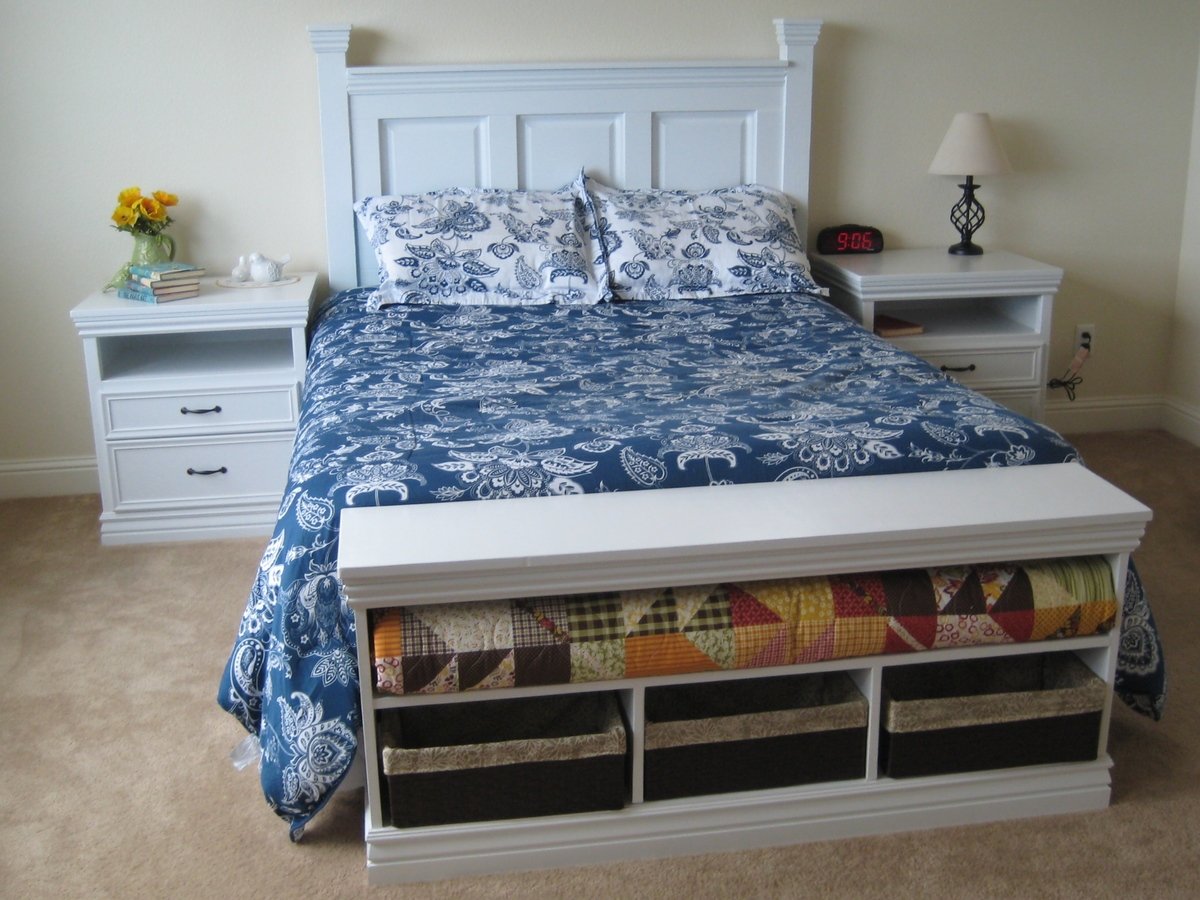
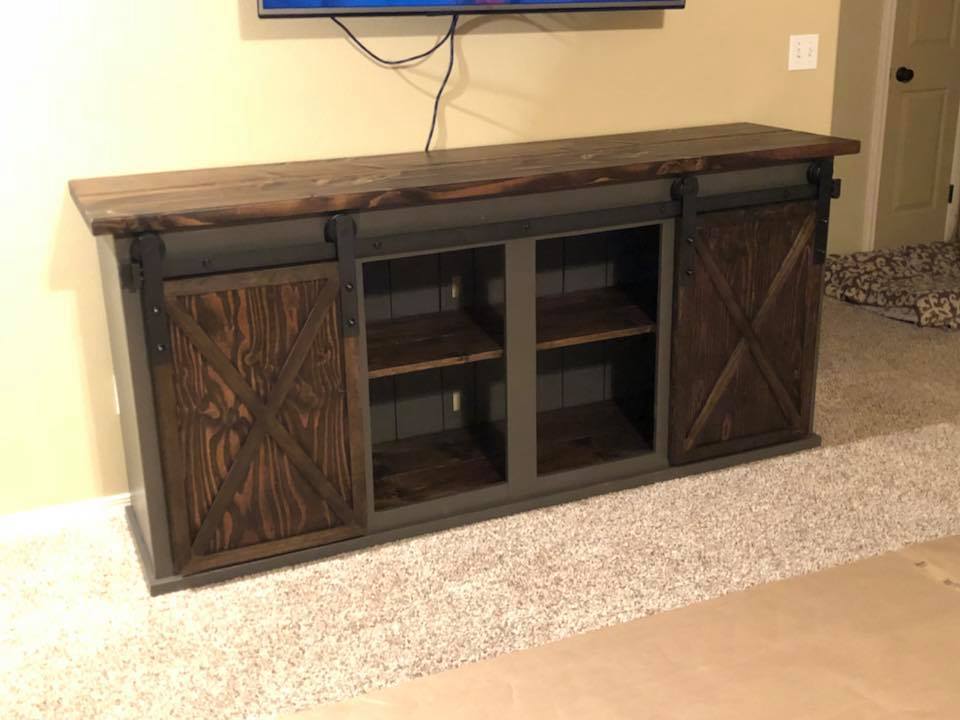
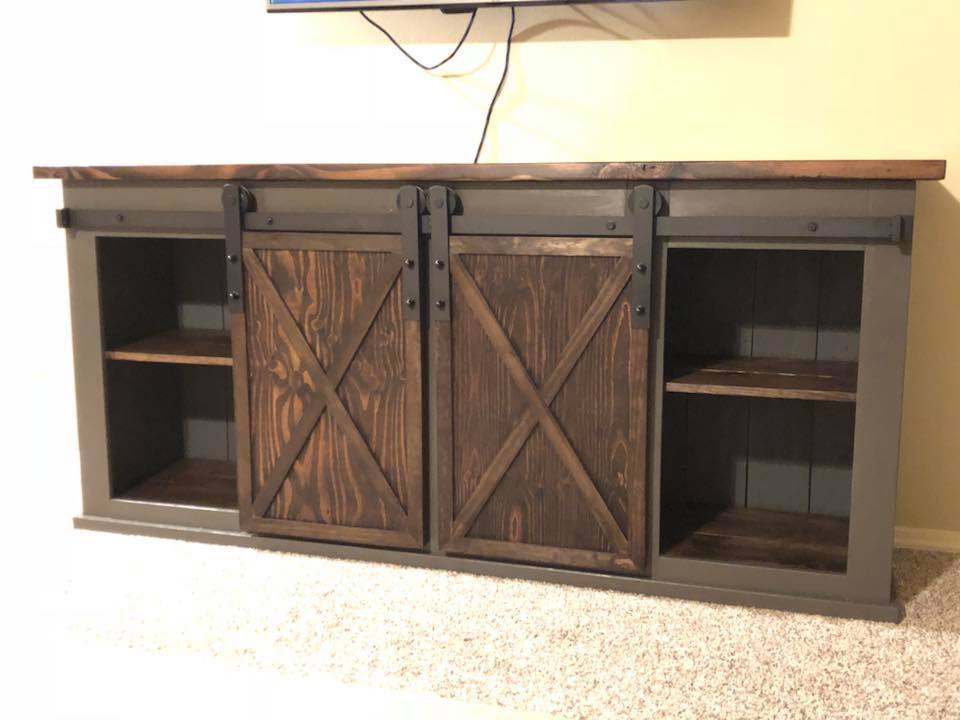
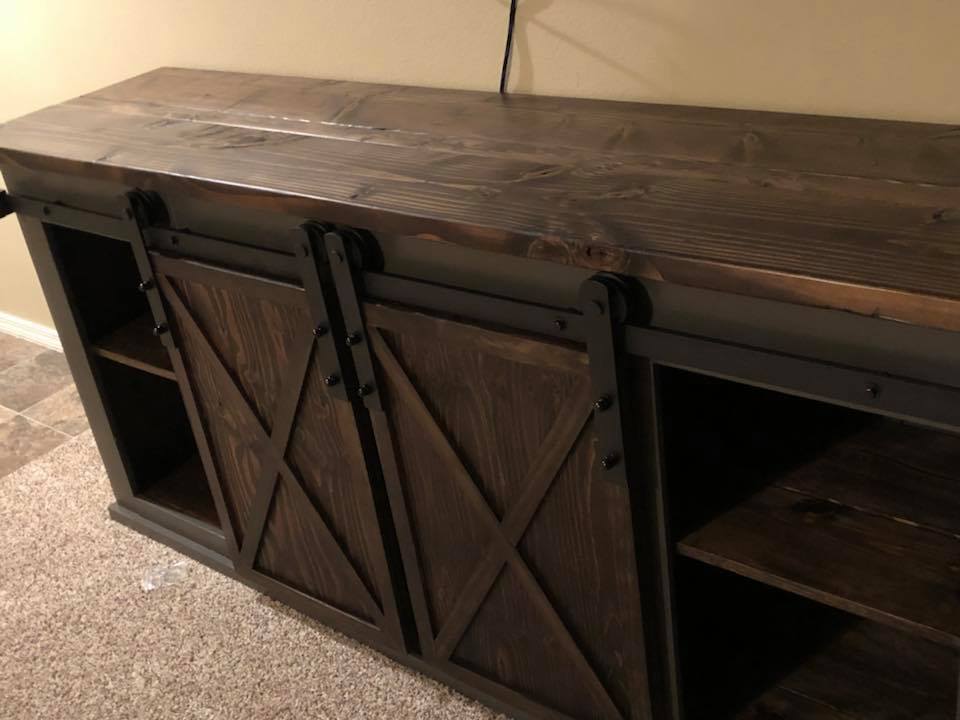
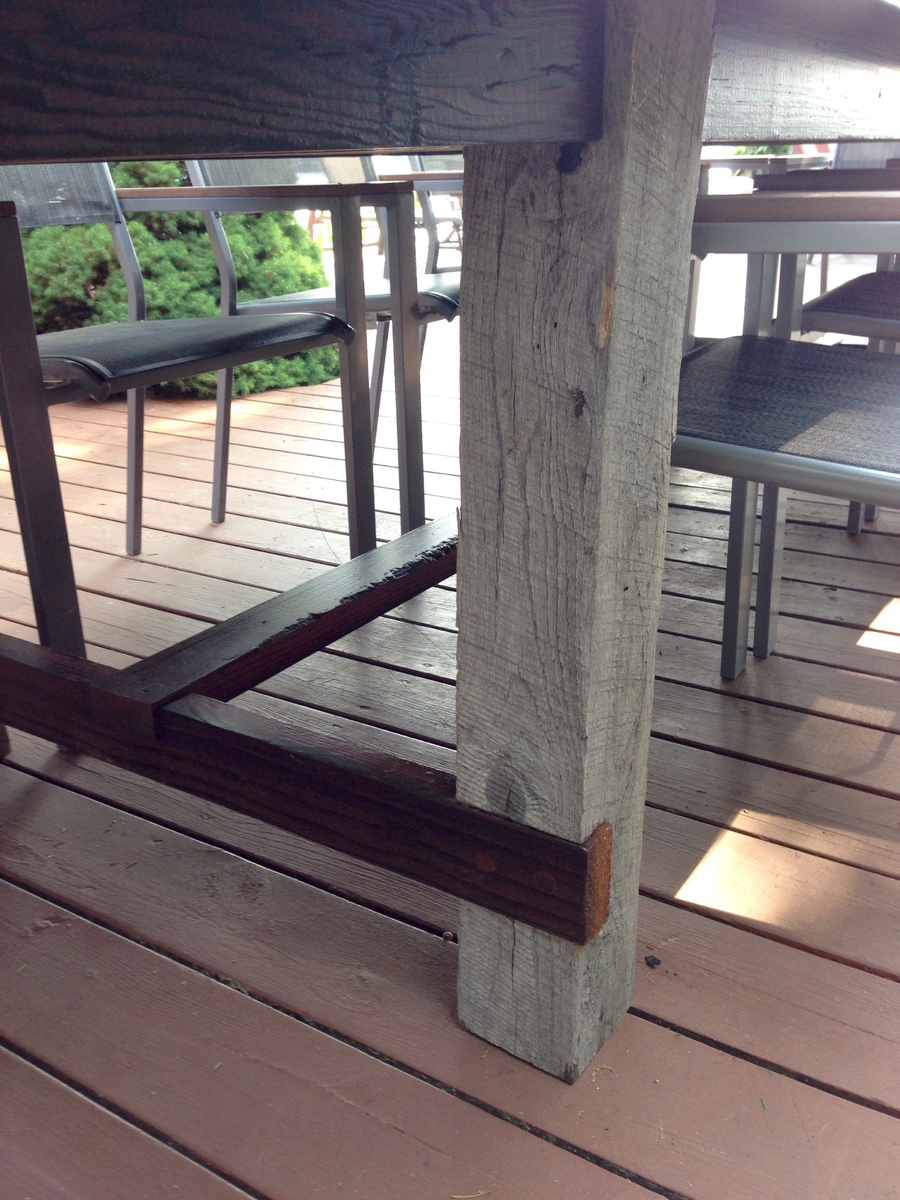
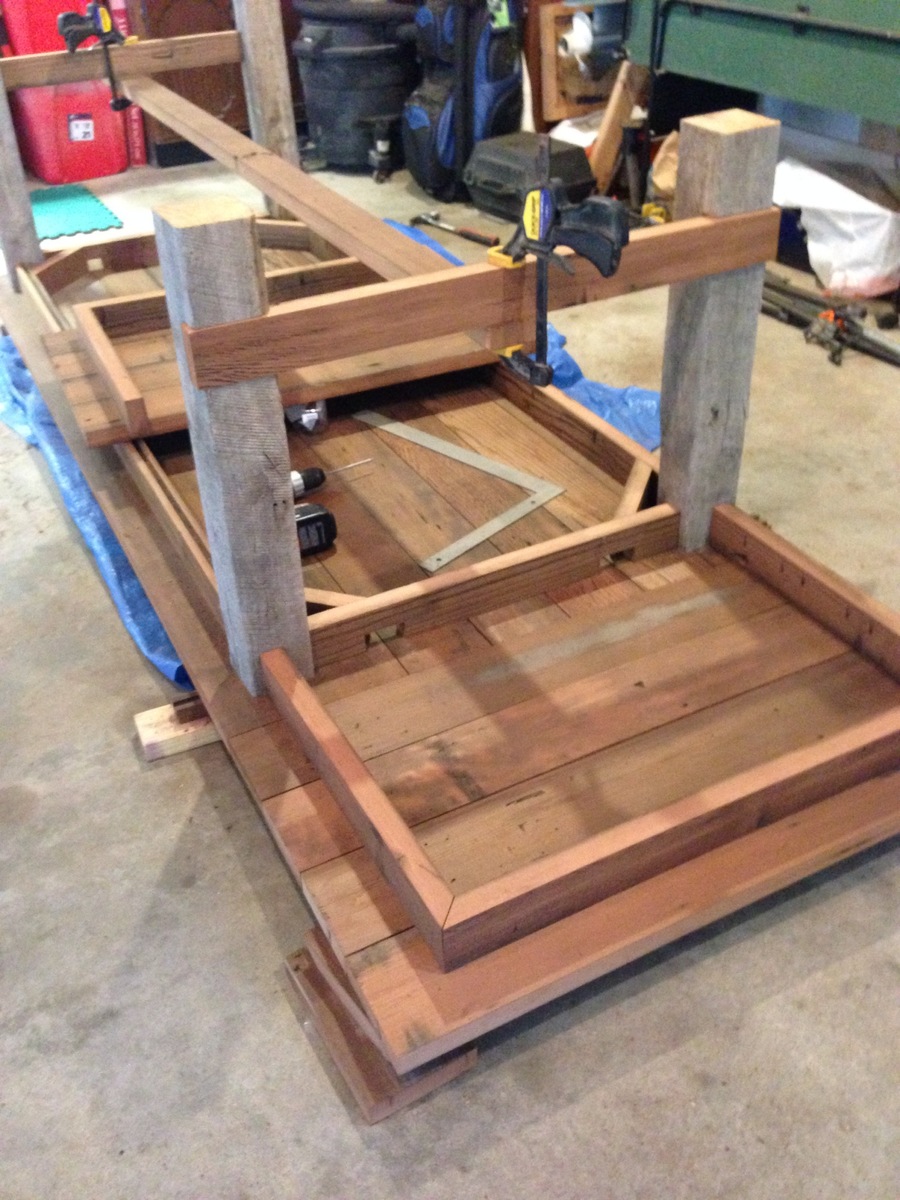
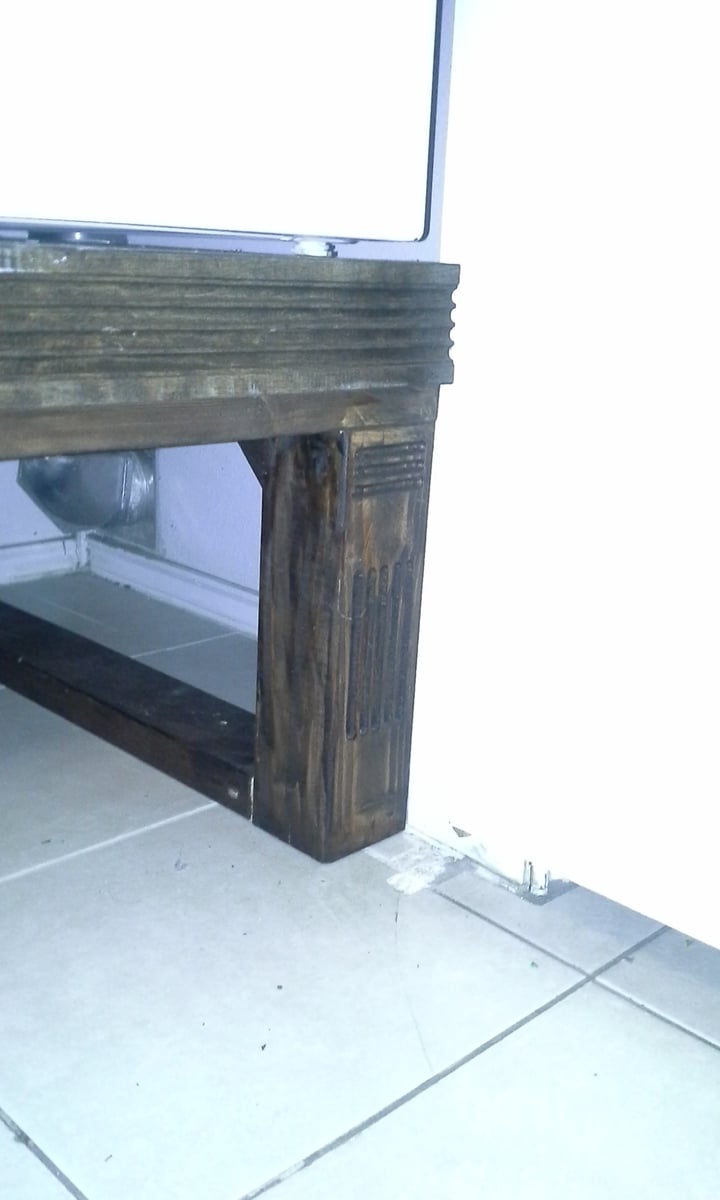
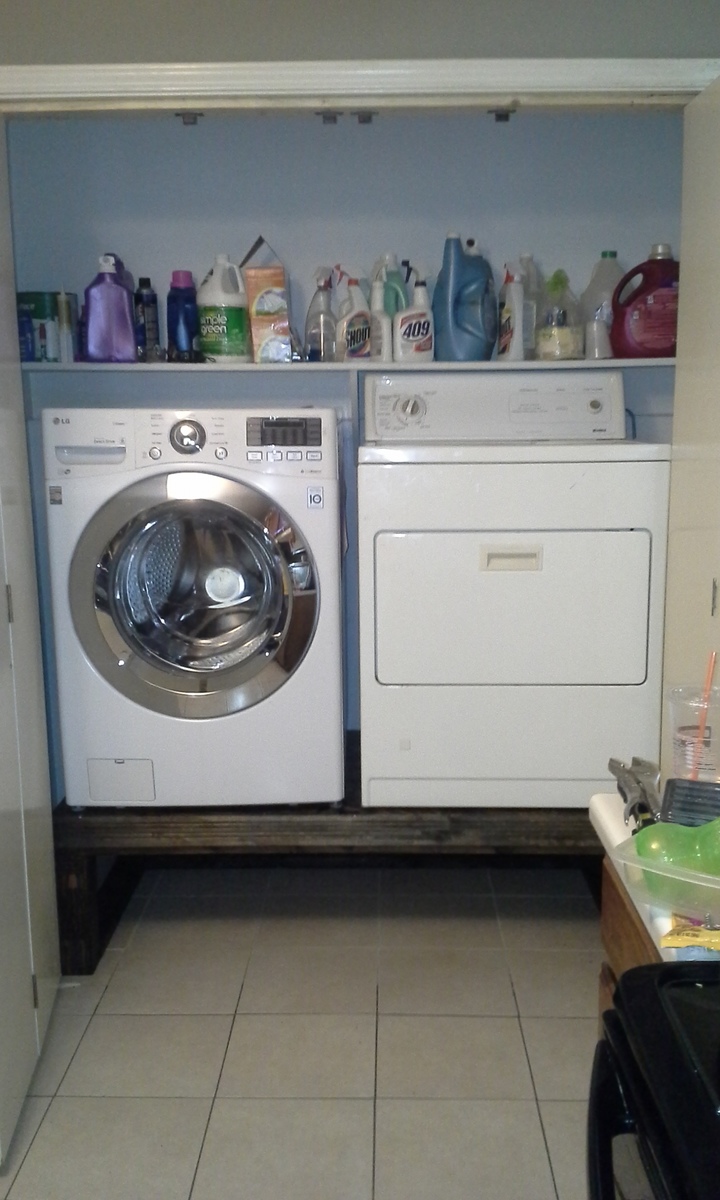
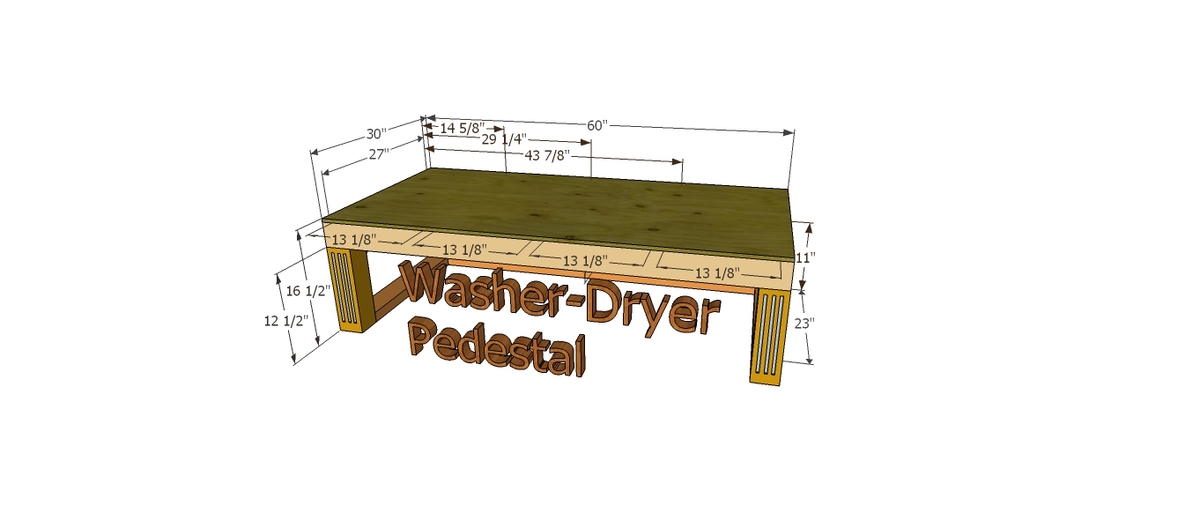
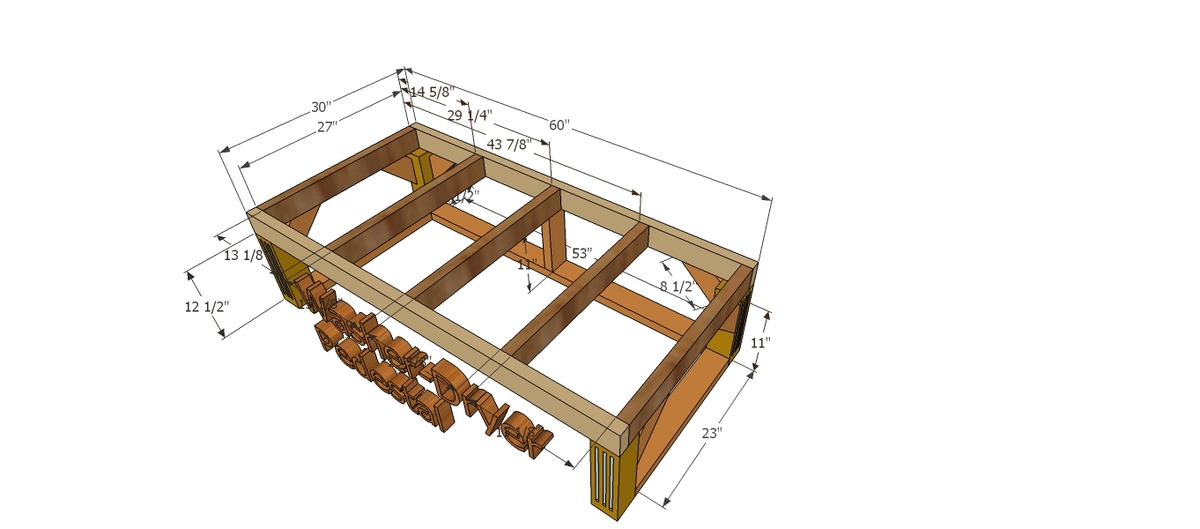
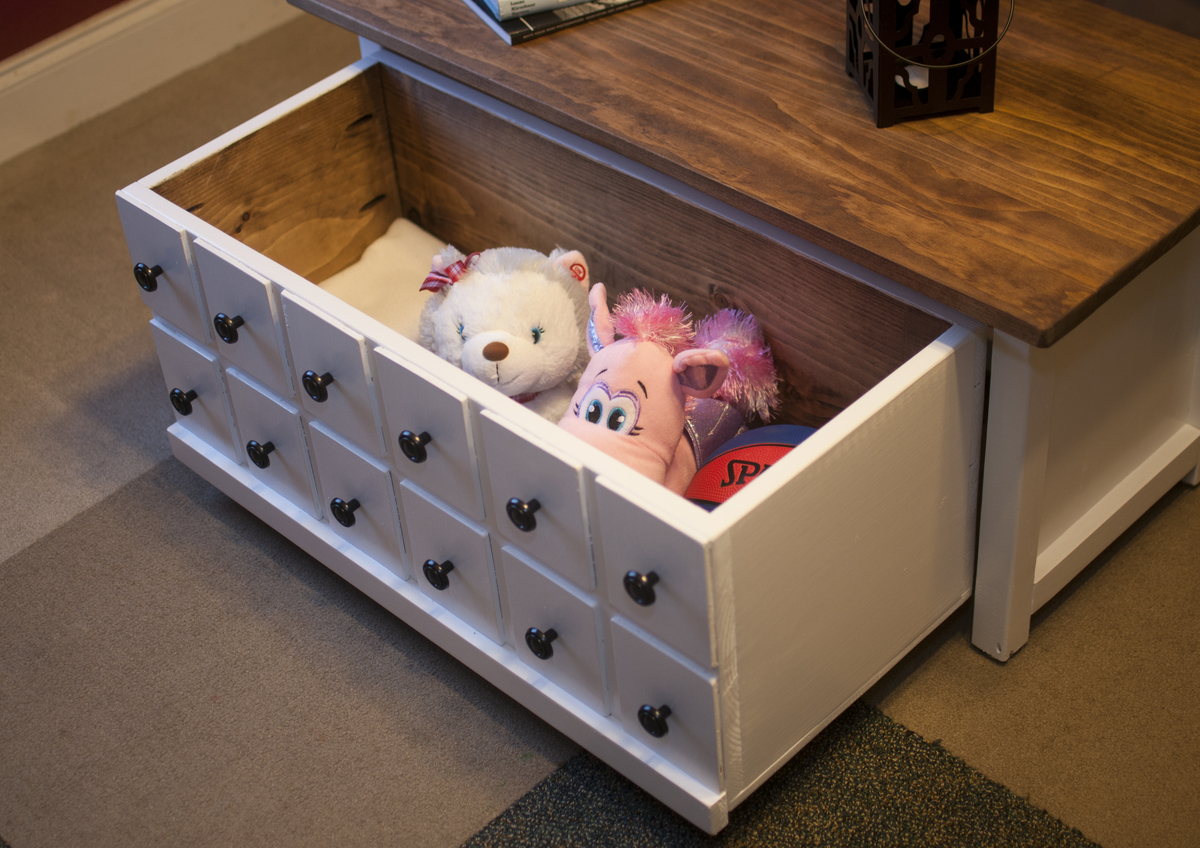
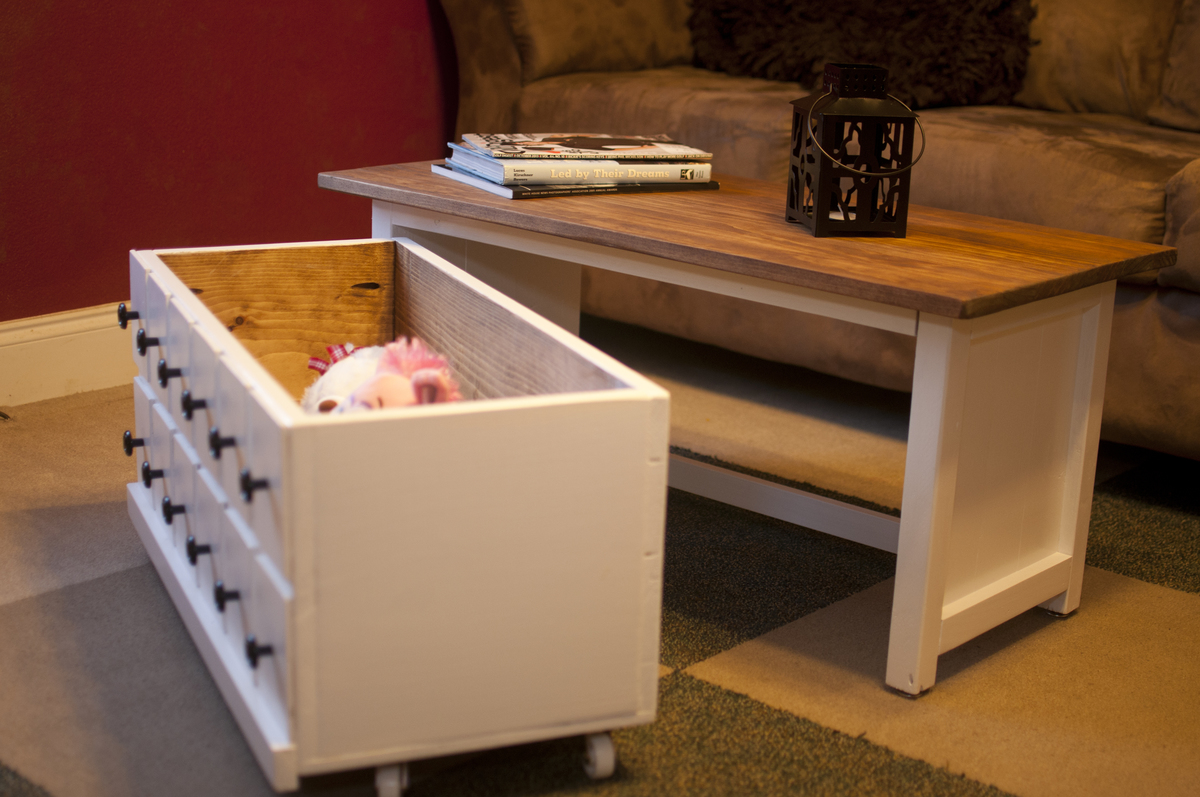
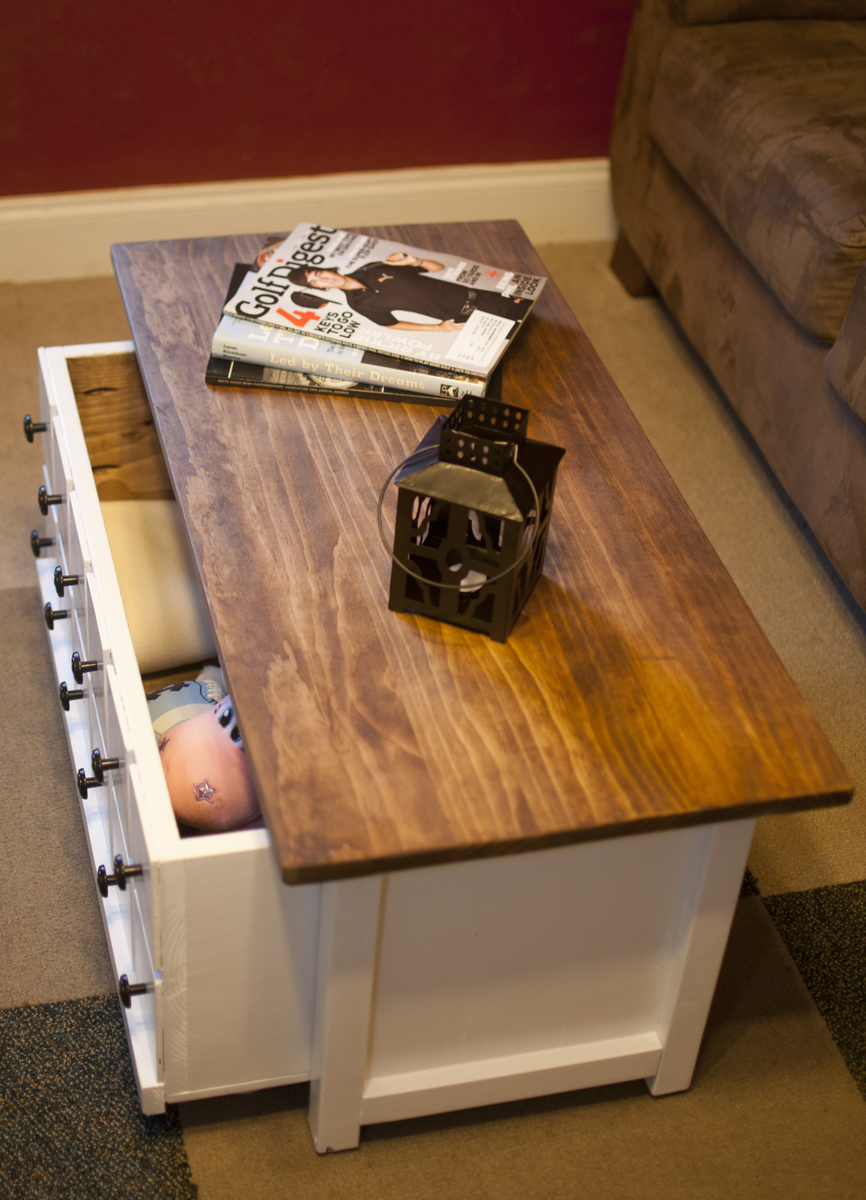
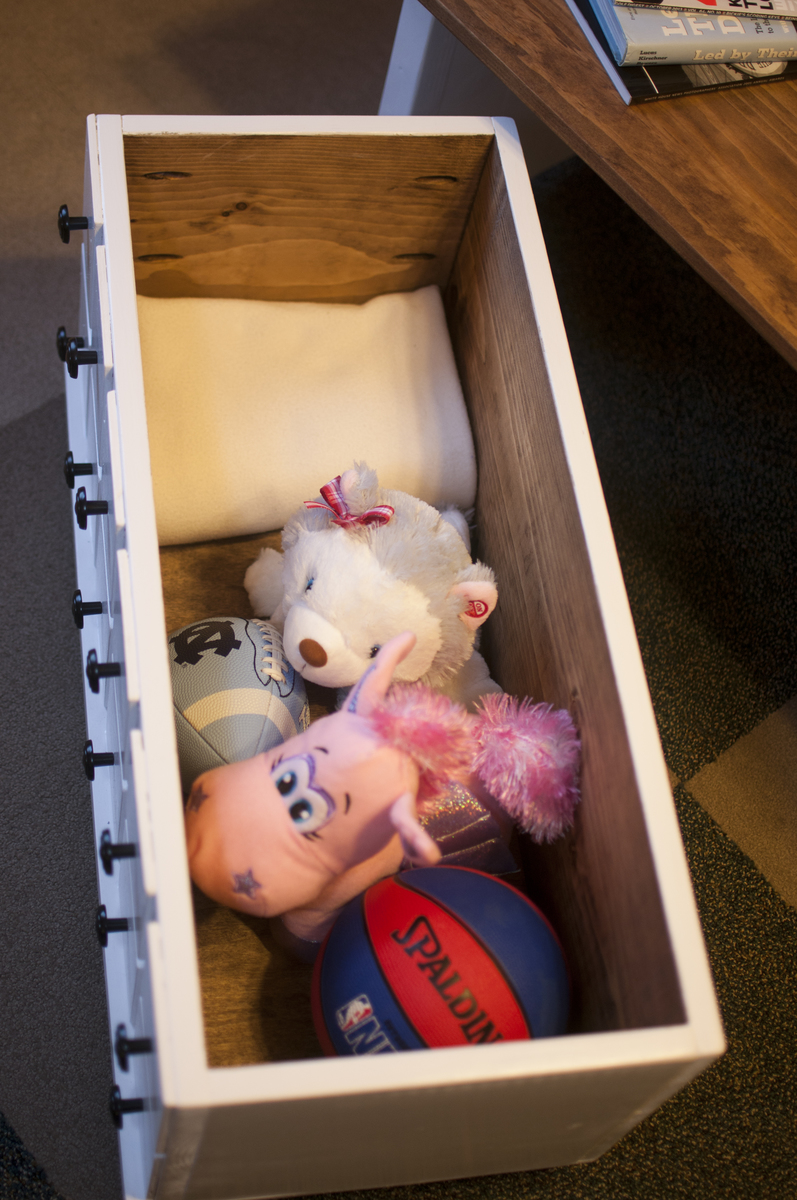
Apothecary coffee table with toy trundle

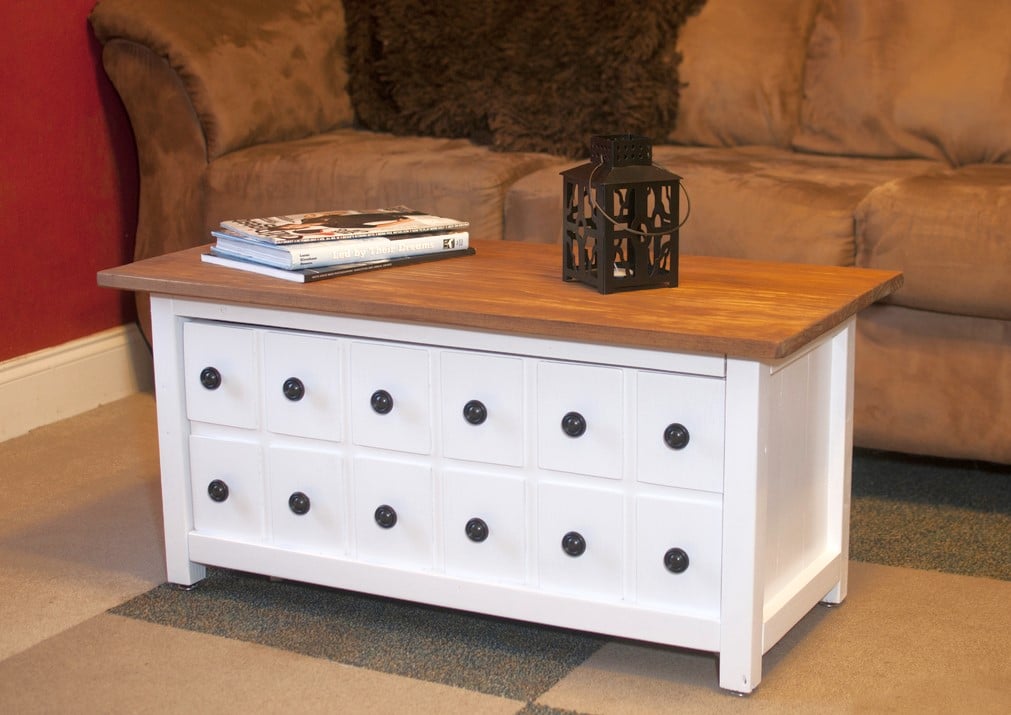
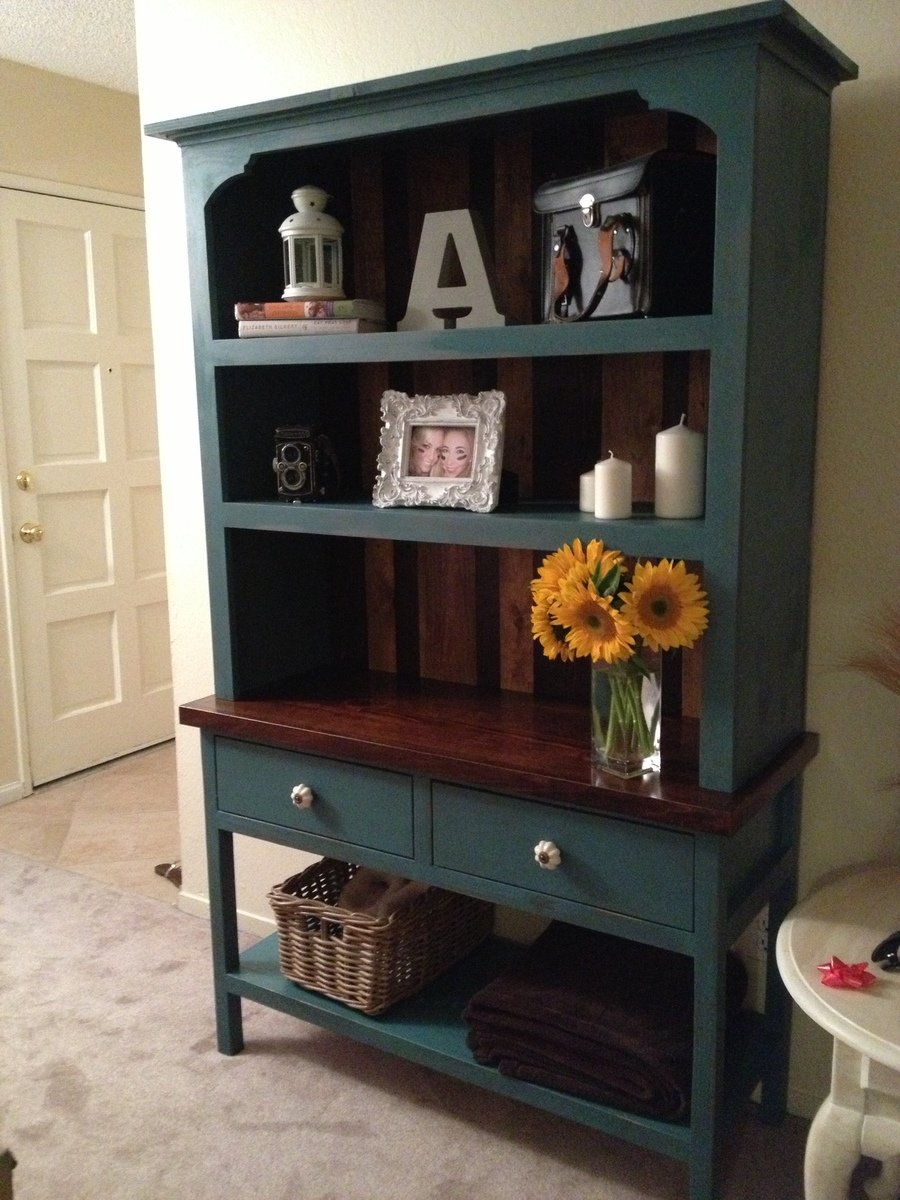
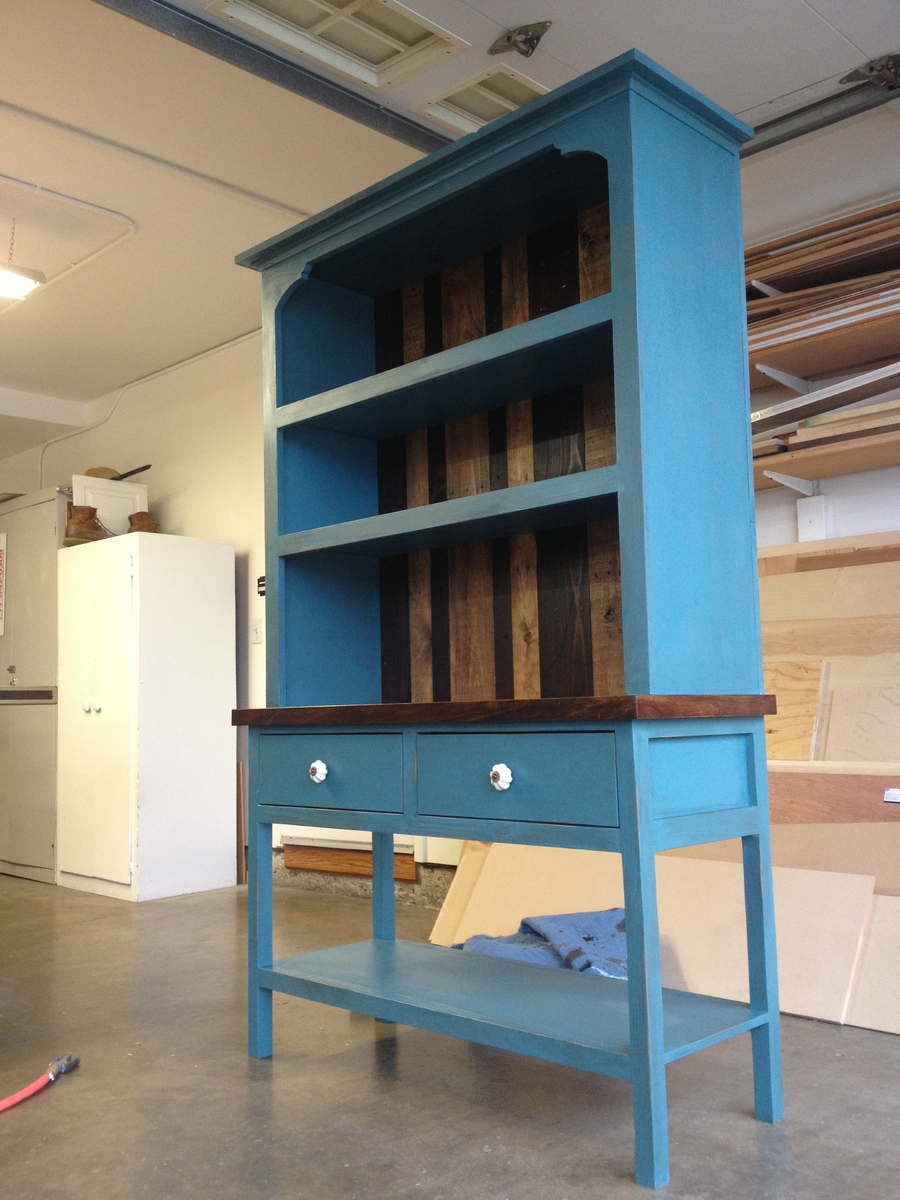
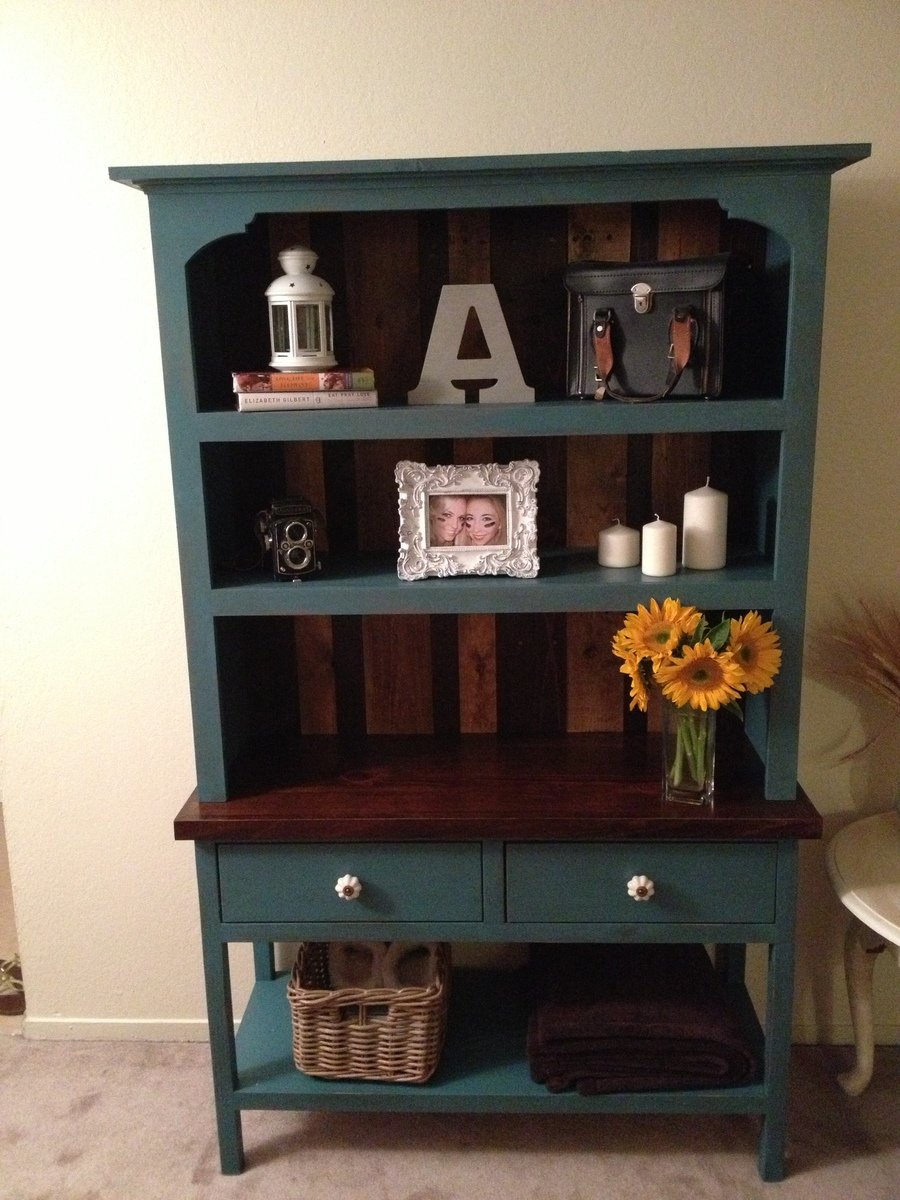
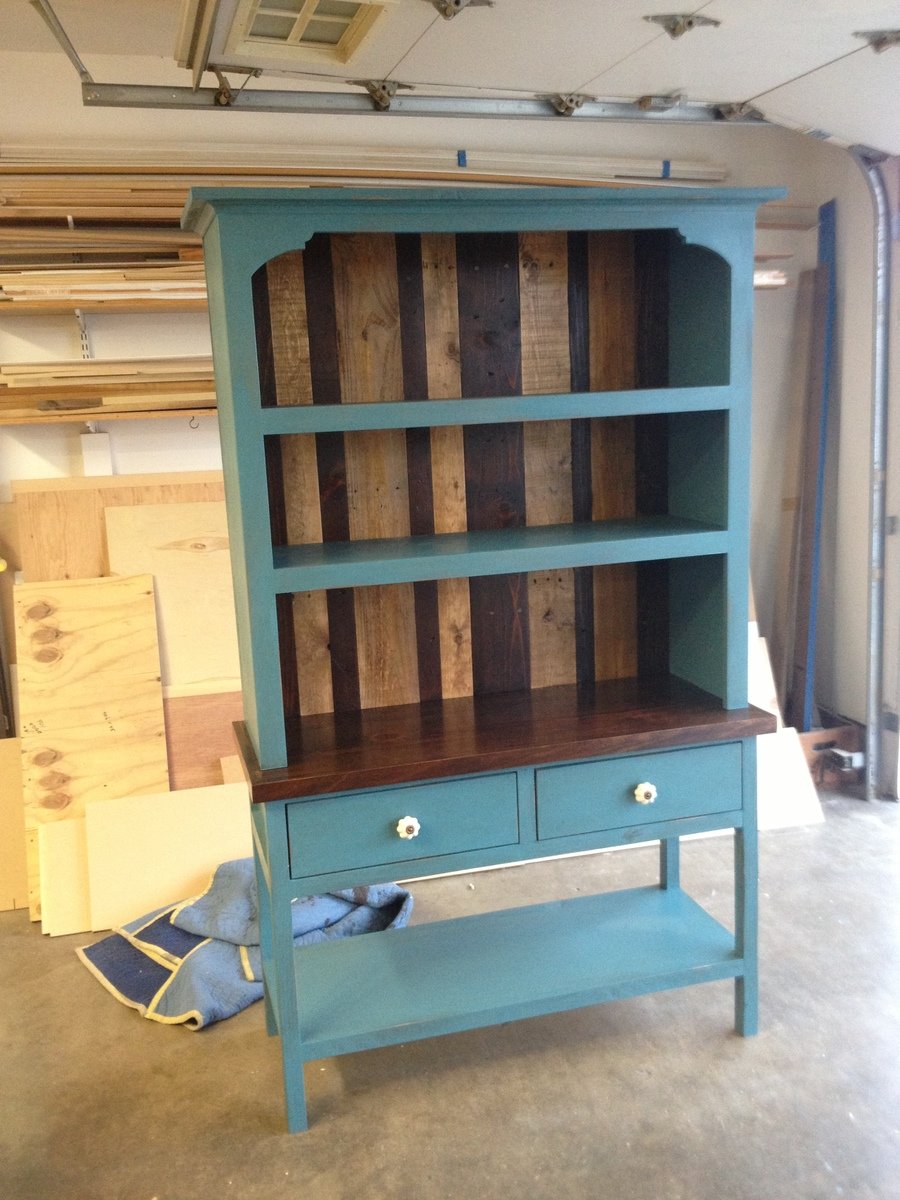
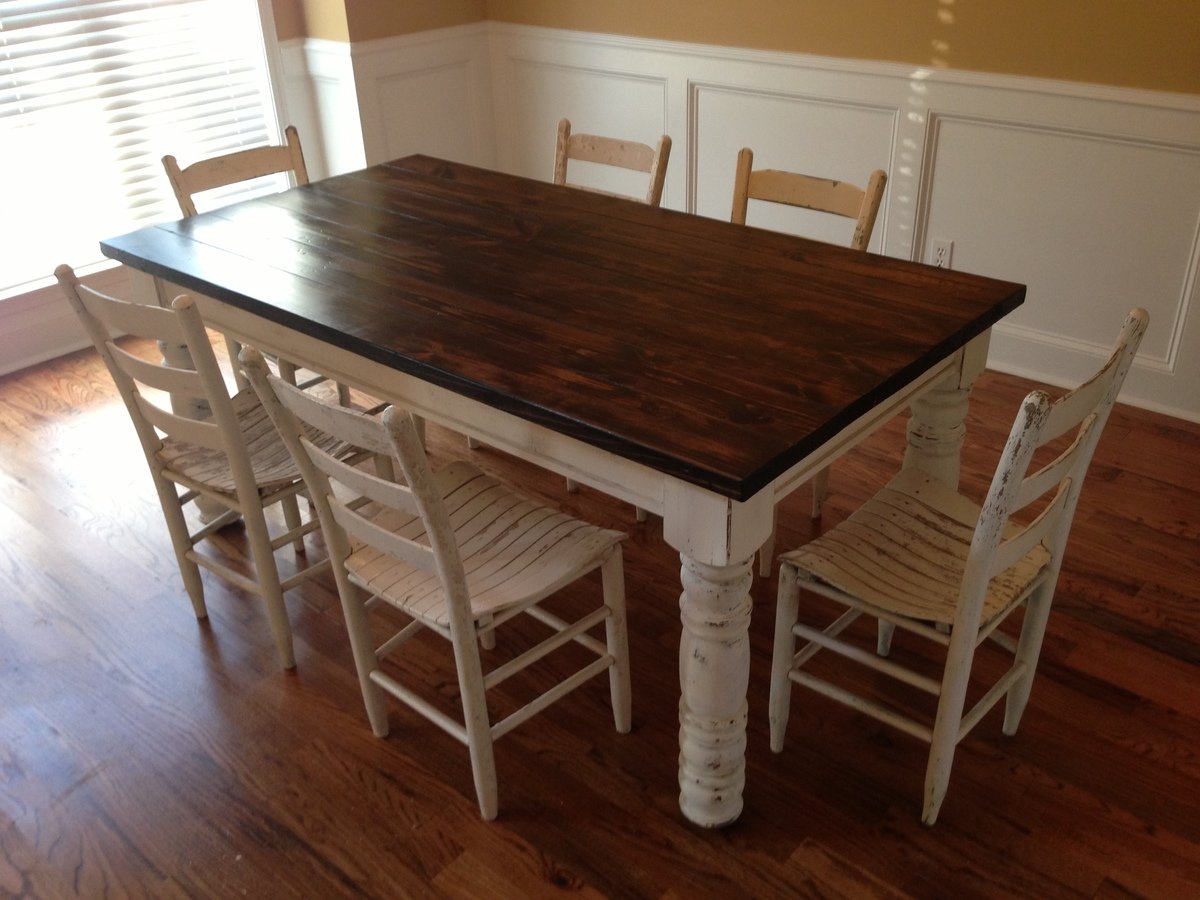
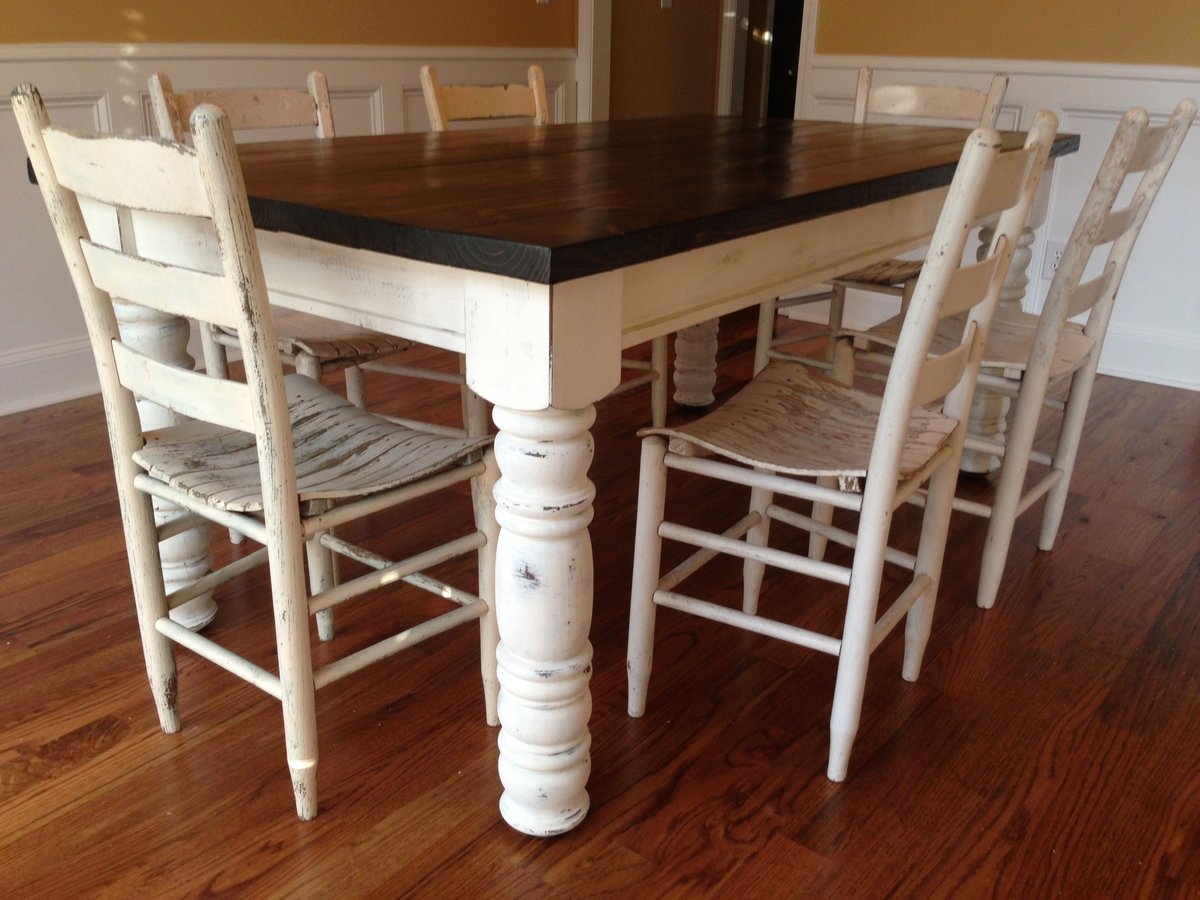
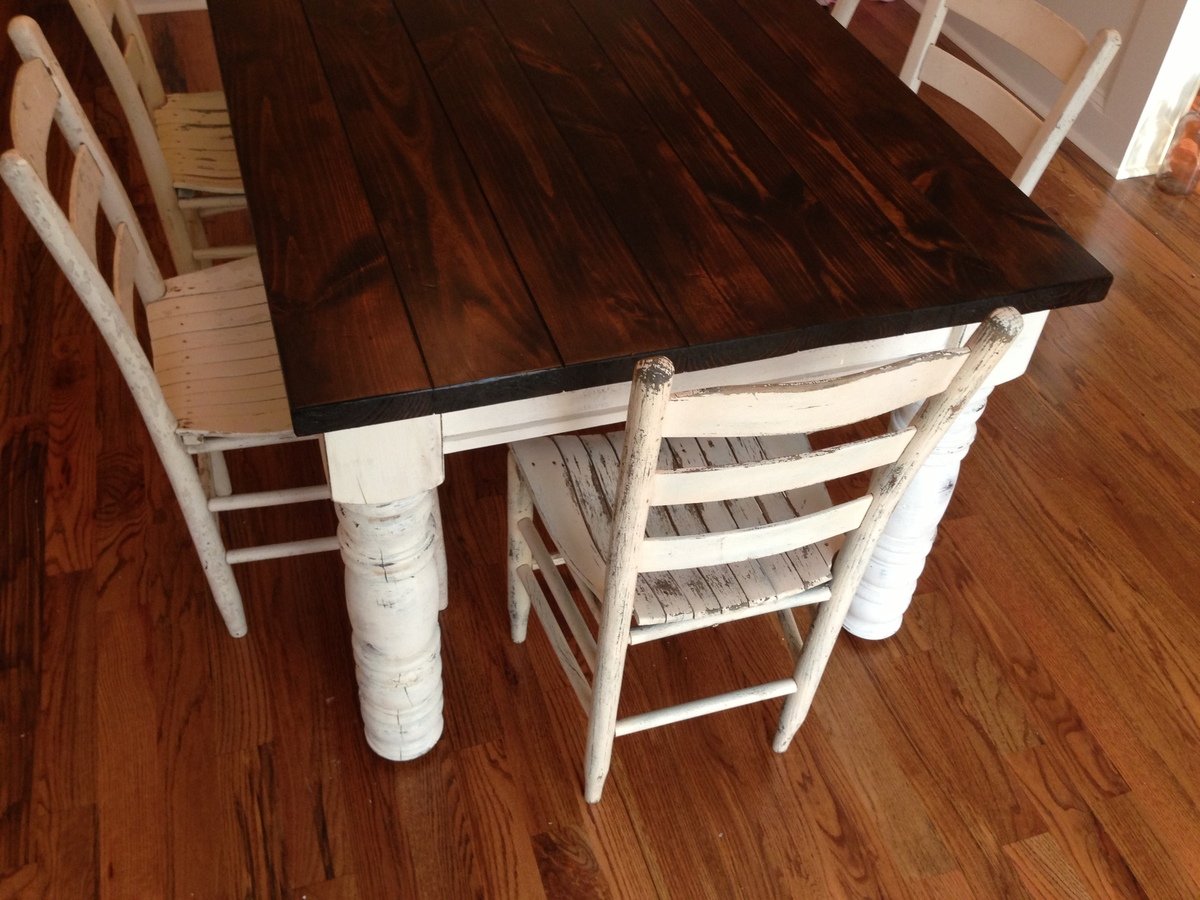
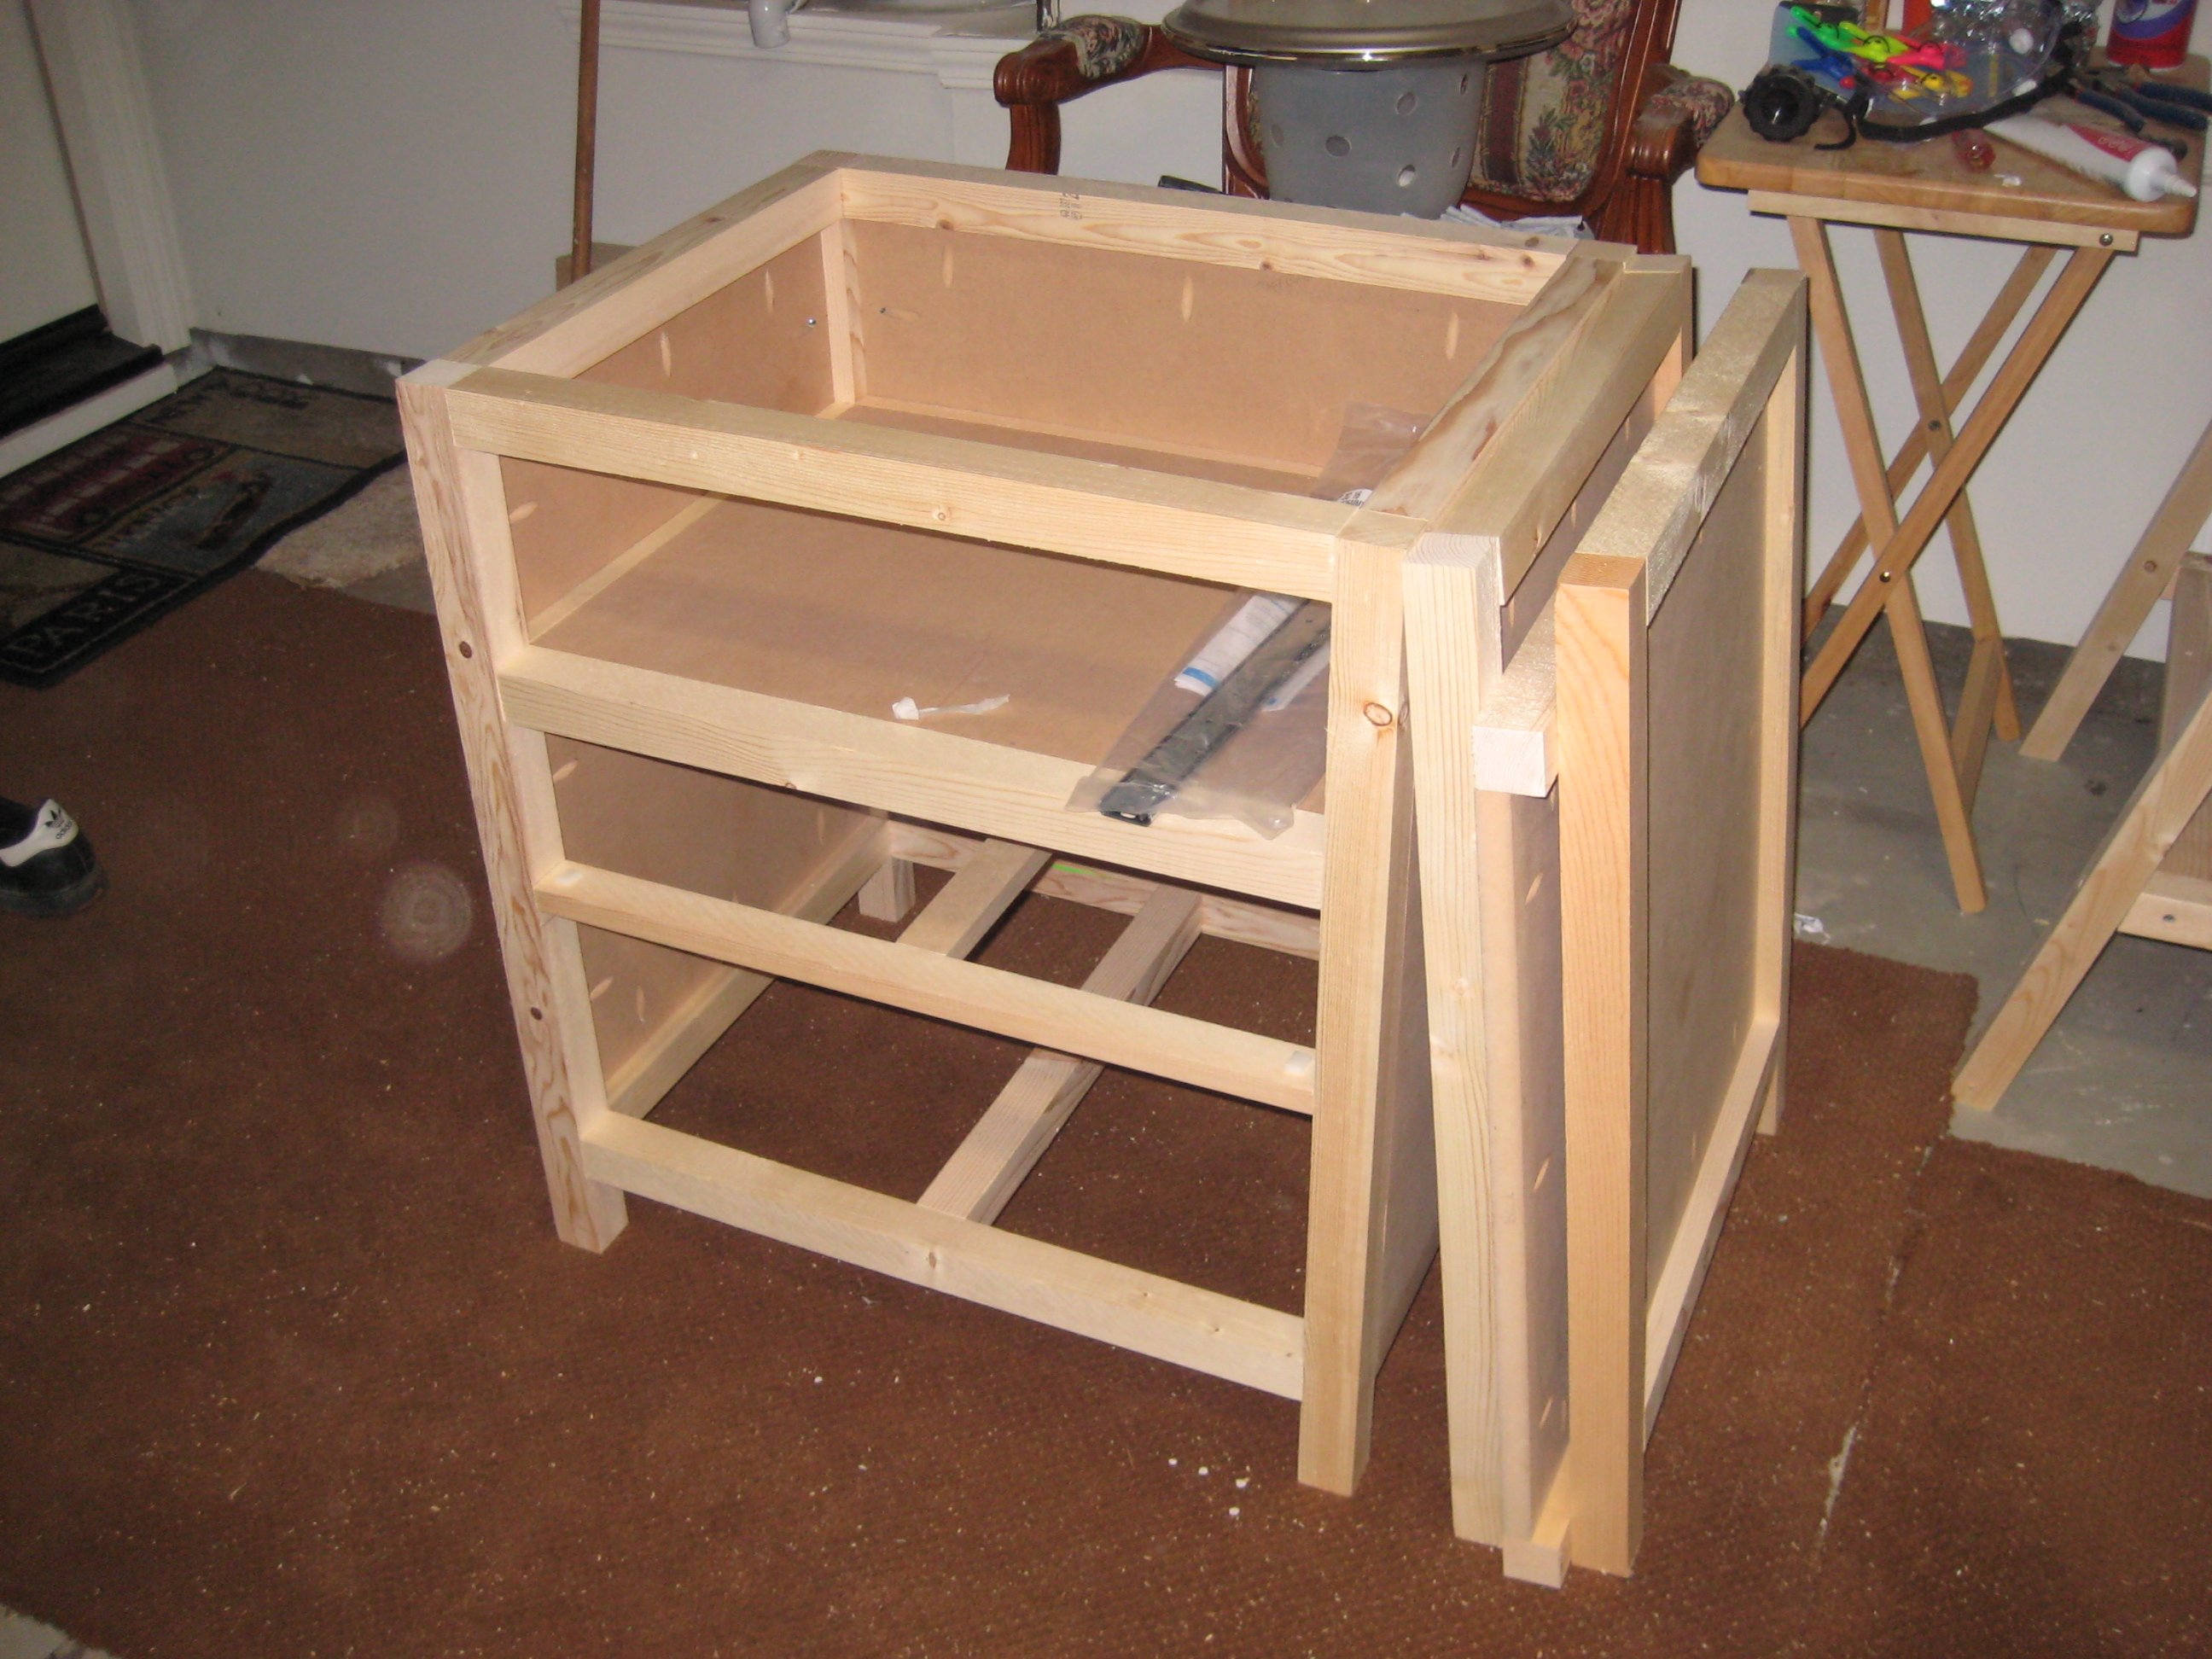
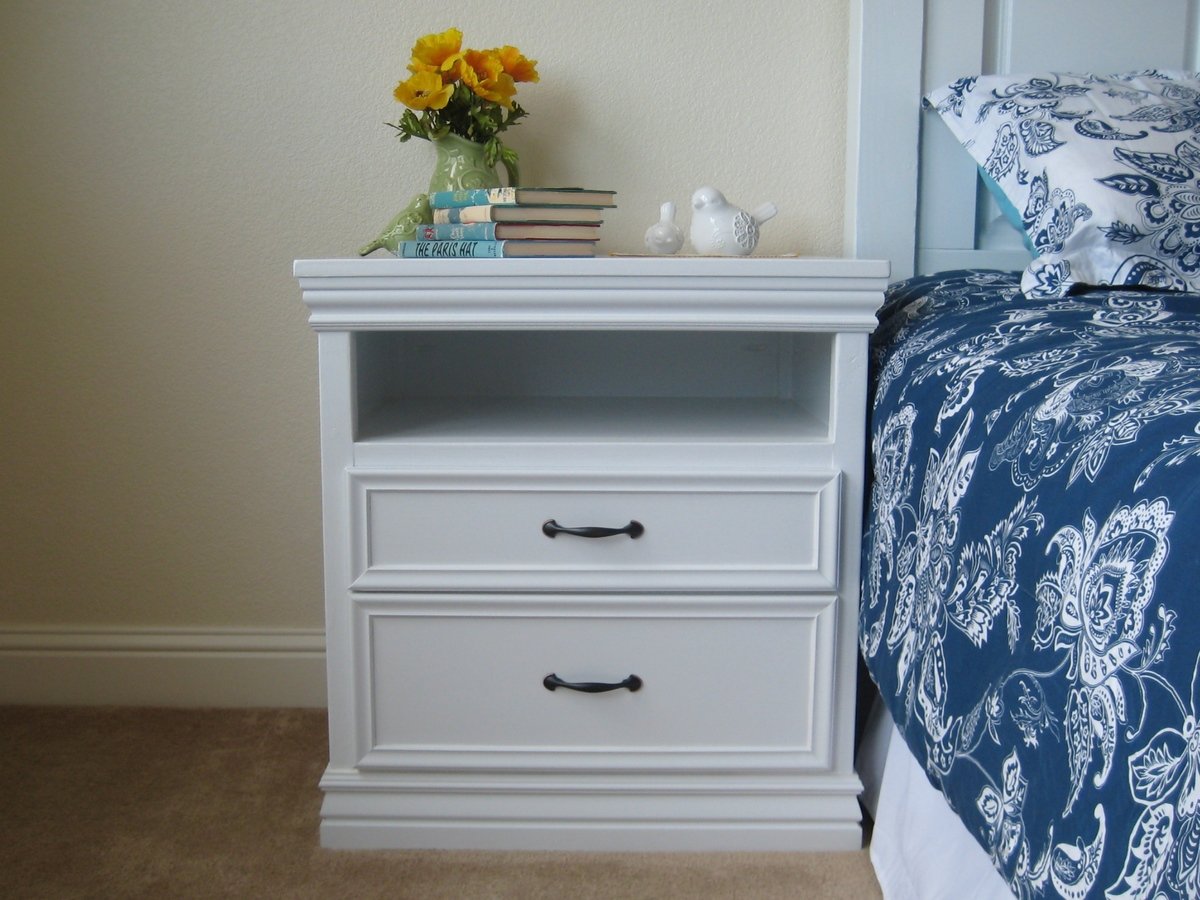
I found the original plans and LOVED them, but my house is tiny, so I was forced to re-work the plans to fit my space! This is a good bit smaller, but every bit as awesome! ;) I decided not to distress it, but I may down the road if it starts to scuff up! ;) Project took about a week long including finishing time. Actual build time was 9-10 hours over two days.

Estimated Cost
Total cost was $60-75
Estimated Time Investment
Week Long Project (20 Hours or More)
Finish Used
Finished the top and inside of the box with Minwax stain and the outside with Kilz primer and latex paint.
Recommended Skill Level
Beginner

Cutting Board

My Dad made a few cutting boards for christmas.  I've added a few additional photos and tips on my blog -  http://www.woodworkingfourdummies.com/blog/more-cutting-boards.

thanks for looking.


Ian

Finish Used
mineral oil
Recommended Skill Level
Intermediate

Comments

dbermolen

Tue, 01/13/2015 - 04:28

Hi Ana! Love your site!!!!!! Please tell me, did you use just mineral oil in order to make this non-toxic finish? I guess you would have done some posts including this kind of information, but I can't find it. Regards from Argentina! =)

Modern Adirondack Chairs

Submitted by frmoody on Mon, 05/03/2021 - 17:35

This was a nice simple build. The only problem where I live (near Edmonton, Alberta) is that the price of lumber has gone crazy. I think it is the same everywhere. 2 x 4's are running about $8.50 (CAD) each. I can see myself building a few more of these as the neighbours like them. Chose to go with a funky magenta colour to add some colour to the backyard. Very comfortable to sit in but I think I will add some cushions. I should have taken Ana's advice and painted the boards (especially back and seat) first. Once assembled I had to go in with a small brush to get the sides.

Estimated Cost
$40 each
Estimated Time Investment
Day Project (6-9 Hours)
Finish Used
Exterior semi gloss paint.
Recommended Skill Level
Beginner

Comments

Outdoor sofa

Submitted by Anonymous (not verified) on Mon, 08/23/2021 - 17:05

Shortened the width for 22 inch wide cushions. Stained with golden oak minwax and finished with tung oil.

Estimated Cost
$150
Estimated Time Investment
Weekend Project (10-20 Hours)
Finish Used
Minwax golden oak, and tung oil finish
Recommended Skill Level
Beginner

Comments

Mudroom Bench with Hutch

Submitted by calliher on Sun, 09/12/2021 - 18:45

This is my laundry room and it is about 12x10. It looked so bare with only the washer and dryer. So I thought making this a mudroom also. I live in the mountains and have snow 3 to 4 months a year. This will be perfect. I purchased an IKEA cabinet built it in and added the Ana White plans with two bays.

Comments

Kids dresser

Submitted by Lukilla on Wed, 09/29/2021 - 16:43

We found ourselves in need of upgrading our 4 year-olds dresser situation. This dresser answered the call and then some. We really like that it's short enough that he can access the top, and wide enough that the risk of it tipping over is fairly non-existent.

Jacobean finish to match his bed.

Comments

Corner Shelf for Nursery

Submitted by wojo1 on Thu, 05/16/2013 - 07:21

Super Easy.. I like it better without the doors. Recommend getting a KREG Jig. I have the Jr and it was perfect for this project.

Built from Plan(s)
Estimated Cost
$130
Estimated Time Investment
Afternoon Project (3-6 Hours)
Recommended Skill Level
Beginner

Comments

Farmhouse Table with Butcher Block

Submitted by kharris on Tue, 05/28/2013 - 16:51

We are selling our house and needed a small table for the corner of our kitchen. Since we had leftover butcher block after replacing the countertops, I modified the Farmhouse Table and bench plans. The piece worked perfectly in the space and the house sold immediately after our open house.

Estimated Cost
$100
Estimated Time Investment
Afternoon Project (3-6 Hours)
Finish Used
Mineral oil for the butcher block top and white paint and primer for the legs. We still need to varnish the top of the benches.
Recommended Skill Level
Beginner

Cabinet Doors

Submitted by Anonymous (not verified) on Fri, 10/08/2021 - 07:58

I made these cabinet doors based on your Entryway Console with Open Shelves. I wanted something to hide the clutter from the cables, modems and hubs for all our smart devices as well as the circuit box. I modified these with open grills in the bottom half to allow for the Wi-Fi signal to travel without being blocked. I love them and am so surprised at how nice they turned out. I am not used to working with wood routers or table saws but found that it was not as difficult as I thought it would be. I used pocket wholes to join the stiles and rails and did use glue also due to the expected high usage.

Comments

Hutch

I built this hutch from Ana's book. I made a few modifications to the plans. The stained top and stained back planks are from reclaimed wood. If you build this hutch be sure to choose white knobs. I my opinion, its what makes those hutch pop. If anyone has any questions I would be happy to answer them. - Brad

Estimated Time Investment
Week Long Project (20 Hours or More)
Recommended Skill Level
Intermediate

Comments

mrsjones23

Tue, 10/28/2014 - 07:25

Hello! I am currently building this console table and hutch. At the moment, I am stuck on attaching the console legs to the side aprons. The legs are not sitting flush with the side aprons. Did you have this issue with your 2x2's when attaching them to the side aprons? If so, how did you fix this issue? The directions say to attach flush to the aprons but mine won't be flush on both sides, only one.

jwoelk

Sat, 07/25/2015 - 07:59

Where are the plans for this hutch? My wife wants this exact hutch for her birthday.

Doll House Bookshelf

Submitted by alhskier on Mon, 04/04/2011 - 19:43

My first project from this website.  Made it for my daughter's first birthday! Had a fun time with it. Caulked the joints for a cleaner look, it came out great.

Built from Plan(s)
Estimated Cost
$100
Estimated Time Investment
Weekend Project (10-20 Hours)
Finish Used
Caulk, and semi gloss paint!
Recommended Skill Level
Beginner

Husky Farmhouse Table

This is one of my favorite pieces on Ana's site. I knew the minute I laid eyes on it I had to build it. I hope you guys enjoy it half as much as I do.You can read the full details of the build at my blog here:

http://copycatcarpenter.blogspot.com

Built from Plan(s)
Estimated Time Investment
Week Long Project (20 Hours or More)
Finish Used
Espresso stain, Helsman Spar Urethane, Light Cream Milk Paint
Recommended Skill Level
Intermediate

Comments

JoanneS

Thu, 06/20/2013 - 16:00

Love this! You did a wonderful job, and the finishes are awesome! Also I read your blog post, what a great idea to give a new life to those bedposts and use them for your table legs.

Copycat Carpenter

Fri, 06/21/2013 - 05:14

I'm glad you like it! I've been showing this picture on my phone to everyone recently, like a proud parent, lol! Check back soon, I should have the full blog finished shortly.

spiceylg

Fri, 06/21/2013 - 07:58

Great job. Love the chunky legs and the story behind them! Way to repurpose!

Not so "Rhyan" Nightstands

Submitted by Kimbers on Sun, 05/08/2011 - 19:05

I used the Rhyan end table plan (with a few alterations) to make my nightstands. I changed the dimensions so mine turned out to be 20”D, 25”W, 27”H, I extended the side and back panels all the way to the top to close in the shelf and I made the bottom drawer larger. I decided to use under mount drawer slides but I think I will try out the side mount slides in the future though.

I wanted them to match the headboard and bench that I made for my bed so I added the same molding that I used on those pieces to finish it off.

I pre cut every piece for the main body of the nightstand and predrilled all of the Kreg holes which made it a really quick piece to put together! I purchased the Mini Kreg jig for this project and am so glad I did. Totally worth the money!

Built from Plan(s)
Estimated Cost
About $80 For 2 Nightstands
Estimated Time Investment
Weekend Project (10-20 Hours)
Finish Used
I painted with Rust-oleum painters touch semi gloss white and then sprayed a few coats of polyacrylic on the top.
Recommended Skill Level
Beginner

Floating Bench (Walnut bench Board and Batten Wall)

Submitted by Anonymous (not verified) on Thu, 12/30/2021 - 06:25

Followed the instructions in the original blog. I would like to thank Ana for the blog. It was the inspiration I needed. This project was challenging for a rookie like myself. The plan is basically the same as the original post from Ana.

Materials:
4" Vertical MDF primed boards
3" Horizontal MDF primed boards
Our wall has texture so we had to use tempered board to make it nice and smooth.
Half inch plywood for under the bench seat.
2x4 for the bench frame
I ordered furniture quality Black American Walnut from a sawmill for the floating bench (not cheap but worth it). I stained it with one coat of Watco Black Walnut just for protection (took 10 minutes to do super easy) let it dry for 24 hours at least.

Challenges:
1. The wall on the right side of the bench did not have a stud just a corner stud, I was not going to risk this bench support so I put the bench support on the one corner stud and installed a hidden strong tie: https://www.homedepot.com/p/Simpson-Strong-Tie-CF-4-15-16-in-x-6-in-Con…
This provided the support that the missing stud would've. Now the bench is structurally sound.
2. Walnut uneven cuts from the sawmill, I had to use a plane to bring the planks closer together didn't want huge gaps.
3. Outlet in the way. City code mandates to remove outlet leaving access to it. We decided to build above the outlet making the bench a bit higher than we wanted it but still worked out, now we still have an accessible outlet under the bench.

Comments

Grandy Sliding Door Console (Modified)

Submitted by NicJT86 on Wed, 01/17/2018 - 00:22

My version of the Grandy Sliding Door Console. My modifications: 

- Length 6.5 feet long (instead of 90inch). Same height and depth.

- Bought hardware from amazon, purchased hardware is larger than the plans call for. Changed face frame top from 1x4 to 1x6 to create clearance for the wheels and top overhang. 

- Wanted a deeper top so I added a 2x3 between the two top boards. I did this also for looks! It stained so nice!

- Modified the mounting spacers for the rail to allow the door to hang closer to the cabinet. 

Advice: Pay attention to the size of the hardware. 

If buying door hardware make your door close to the same thinkness as a standard interior door. This will help them hang correctly and close the space between the frame and the door. 

Lastly, use pocket holes! 

Built from Plan(s)
Estimated Cost
Door Hardware= $70
Wood= $250
Stain + paint= $30
Estimated Time Investment
Week Long Project (20 Hours or More)
Finish Used
Dark walnut stain and Black Fox paint from Sherman Williams
Recommended Skill Level
Intermediate

12 ft farmhouse table with extensions - reclaimed wood

I had no experience building furniture prior to this project but I wanted a 12 ft outdoor table and could not find one.  This tables center section is 8 ft and was built roughly following the plans for the farmhouse table.  I added two 2 ft extensions at each end making the overall table 12 ft.  The extensions included aprons so when installed they look to be part of the table.  The extensions just plug into the end apron of the center section with 2x4 oak braces which engage in the apron and under the table approximately 2 ft from end.  There is no visual sagging of the extensions. I finished the table with Sikkens DEK finish.


Estimated Cost
The lumber was reclaimed and cost approximately $400 for this project.
Estimated Time Investment
Week Long Project (20 Hours or More)
Finish Used
Sikkens DEK transparent
Recommended Skill Level
Beginner

Ana White Greenhouse

Submitted by Anonymous (not verified) on Wed, 04/06/2022 - 12:41

We built the first one about 8 years ago, and then the wind flipped it over and scattered it all over the back part of the property. I then dug footings and anchored the second one down; I was able to save the Dutch Door I made for the first one. Thanks for the plans!!!

Built from Plan(s)

Comments

Seasonal And Holiday

Scrap Wood Cart

Submitted by Scrivman33 on Sun, 02/25/2018 - 13:45

Saw the other project and based everything off of that. I made some adjustments on the shelf side to ensure I could lay down 3 layers of 2x6's without it hanging off too far. At first I wasn't going to go with the rail shelf system, but I couldn't find anything that I liked at the store to make actually shelves. I did cut a 2* angle on the bottom and top of the shelf framing. I figured if I put enough weight on those shelves, I woudln't want it messing with the frame of the cart too much. On the bin side, I decided to just do different heights instead of angled because I know I'll have plenty of 3' plus. I chose to put a scrap bin on the end for anything smaller than a foot. Many of those joints were done with my Kreg setup, but not all of them. The last fix I did was add a 2x4 to the insde of the shelf frame. This was to move the shelf hangers in so that an 8' board wasn't just edge to edge (I found that to be a problem when I put some of the 1x4's on there...they would be on 2, but not always all 3). So moving each side in around 1.5" gives you about 3" to play with as far as 8' lumber goes. This enabled me to turn my old storage into bench and shelves and I'm ready to get moving on projects!

Estimated Cost
$200-$250
Estimated Time Investment
Day Project (6-9 Hours)
Finish Used
None
Recommended Skill Level
Beginner