Community Brag Posts

Therapy sand box

I had a therapist that uses sand therapy asked to build this. It's all made of oak.

Estimated Cost
$150
Estimated Time Investment
Weekend Project (10-20 Hours)
Finish Used
Wood conditioner and then clear coated with polyurethane.
Recommended Skill Level
Intermediate

Office seating and lounging

Submitted by Dwilly0571 on Wed, 02/27/2013 - 17:59

This is my 3rd project from this site and I am very ecstatic with the result. Though I am from a family of carpenters ( father and brother are carpenters) I am an amateur at this. I followed the plan with a little modification for 24 X 72 foam padding. Additionally I added batting to the top and side of the foam pad to add extra cushion.

Built from Plan(s)
Recommended Skill Level
Beginner

First Build - Junior Camp Loft Bed

Submitted by stamhow on Mon, 01/05/2015 - 09:40

We had a blast building this bed for our daughter.  It was our first build and I think it turned out perfect!   Thank you Ana White for the inspiration and fantastic directions to get us through!  Now onto the next project!

Amy

Estimated Cost
We bought a combo miter saw too, so without that cost, paint and all, I would say around $200
Estimated Time Investment
Weekend Project (10-20 Hours)
Finish Used
paint
Recommended Skill Level
Beginner

Comments

Modified for double hanging

Submitted by Anonymous (not verified) on Tue, 04/04/2017 - 14:50

I used 8 ft precut boards for shelves and modified the design so there was enough room for two racks on each side. In addition I screwed 1x4 to the studs to secure the shelving to the wall.  I have a 5 year old climber so it was best to be proactive and secure it. It was easy project took about 4 hours to complete.  I plan to paint the vertical boards a medium gray and stain the shelves a dark coffee color. 

Built from Plan(s)
Estimated Cost
$350
Estimated Time Investment
Afternoon Project (3-6 Hours)
Recommended Skill Level
Beginner

Playhouse Loft bed

Submitted by jlhelzer on Fri, 03/01/2013 - 23:56

Thanks for the plans. Our daughter loves this bed and I am so proud of my husband for building it.

Built from Plan(s)
Estimated Cost
400
Estimated Time Investment
Week Long Project (20 Hours or More)
Recommended Skill Level
Beginner

Comments

Lawnmower Shed

Submitted by PipesTX on Wed, 01/07/2015 - 06:19

Modified the design to allow me to roll lawnmower directly in the end. Fun project.

Built from Plan(s)
Recommended Skill Level
Intermediate

Comments

Truss harvest table with white stain

Submitted by Anonymous (not verified) on Fri, 04/07/2017 - 14:30

Absolutely love the finish on this table.

Estimated Time Investment
Weekend Project (10-20 Hours)
Recommended Skill Level
Advanced

Comments

Farmhouse Counter Stools

Inspired by Ana White's Farmhouse Counter Stools. I contoured the seat tops and added supports just below the the seat. I used dowels and glue for joinery rather than using pocket screws.

Estimated Cost
$20.00
Finish Used
Stool frame was painted with Benjamin Moore Select Soft Gloss White and stool seat was stained with Minwax Gunstock (231) stain and top coated with Varathan Satin Polyurethane.

Comments

Shanty Sideboard and Hutch

My husband and I just bought our first home and in the kitchen there was a large wall that needed a large piece of furniture. To purchase something like what we needed in a store would have been outrageous! I found a piece of furniture that I loved and that would be the perfect fit for that wall on your website. I printed it out and gave it to my dad, who is pretty crafty himself and asked if he could make it for us. He looked at it and said sure. We made a few adjustments to your design. This is how it turned out. I love it and it looks perfect in our home!! Thanks for sharing your ideas!!

Built from Plan(s)
Estimated Cost
600
Estimated Time Investment
Week Long Project (20 Hours or More)
Finish Used
Jacobean stain
Recommended Skill Level
Advanced

A lot of work but worth it!

Submitted by Anonymous (not verified) on Mon, 04/10/2017 - 18:09

A few things that would be helpful - power tools! Nail gun, drill and table/miter saw would all be helpful. I also would stain the pieces beforehand and touch up after. But overall, SO pleased with the final result.

Estimated Cost
$100 for 2 single loungers.
Estimated Time Investment
Weekend Project (10-20 Hours)
Finish Used
Deck stain
Recommended Skill Level
Intermediate

Planter Boxes

Submitted by Doc54 on Tue, 03/09/2021 - 22:31

Hi,
I made these planter boxes from Ana's plans. The plans made it an easy project and we also decided to paint them white.

Cheap and very effective in the garden.

Thanks Ana...

Estimated Cost
Approx. AUD $40 per box
Estimated Time Investment
Afternoon Project (3-6 Hours)
Finish Used
We simply used an outddoor paint - low sheen - white and applied 3 coats to each box.
Recommended Skill Level
Beginner

Comments

Rustic X Coffee Table

Submitted by stina7186 on Thu, 03/07/2013 - 05:47

Very easy to put together... Only hard cuts were the X's. we ended up doing it like the pictures, not the plan. Stain is tricky, make sure to practice! We ended up having to resand and restain the tabletop.

Built from Plan(s)
Estimated Cost
$50
Estimated Time Investment
Day Project (6-9 Hours)
Finish Used
Oxidized wood
Recommended Skill Level
Intermediate

Comments

Kentwood Bed

My son used to have a flimsy headboard and frame that drove me crazy so I decided to build him a bed from these plans. I couldn't be happier with his bed. I used pocket holes and everything has been holding up quite nicely. Love these plans.

Built from Plan(s)
Estimated Cost
$100
Estimated Time Investment
Afternoon Project (3-6 Hours)
Finish Used
Apply 2 coats of Miss Mustard Seed's Typewriter milk paint mixed one part paint to one part water. Sand with a fine grit sanding sponge then seal with Miss Mustard Seed's Hemp Oil. Wipe off any excess oil.
Recommended Skill Level
Intermediate

Comments

Wood Easter Basket Bunny Shaped Trug

Submitted by Hardware on Fri, 04/14/2017 - 12:32

Check it out on iamhardware.com ! Thanks Ana for the plans!

Estimated Time Investment
An Hour or Two (0-2 Hours)
Finish Used
spray paint
Recommended Skill Level
Starter Project

Comments

overbeckdaren@…

Sun, 03/08/2020 - 20:58

This is  great starter project for the diyer I want to personally thank you ana for this plan I'm a modest wood worker and sell my stuff for profit I will say these were a big hit in my area with selling 50+ baskets which is the most I've built of one thing in all my 7 years of woodworking these are the cutest little baskets thanks again

Farmhouse Queen Bed

Submitted by Dudley193 on Mon, 03/15/2021 - 11:06

I got this bright idea that we should change the basement into a master suite. However, we could not get a box spring down the stairs. This gave me the perfect opportunity to take on the biggest project of my woodworking life. I absolutely love how this bed frame turned out and it looks so great lined up here next to the fireplace!

Built from Plan(s)
Estimated Cost
180
Estimated Time Investment
Weekend Project (10-20 Hours)
Finish Used
Weathered Grey Thompson's Water Seal

Comments

Corner Door Cabinet

Submitted by searcyb on Sun, 03/10/2013 - 13:10

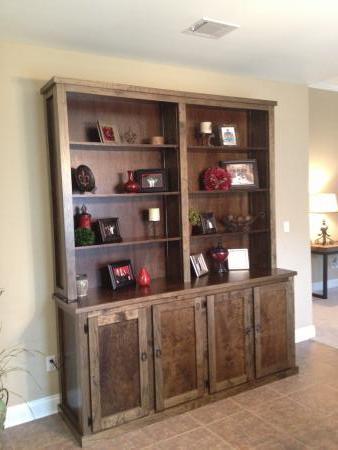
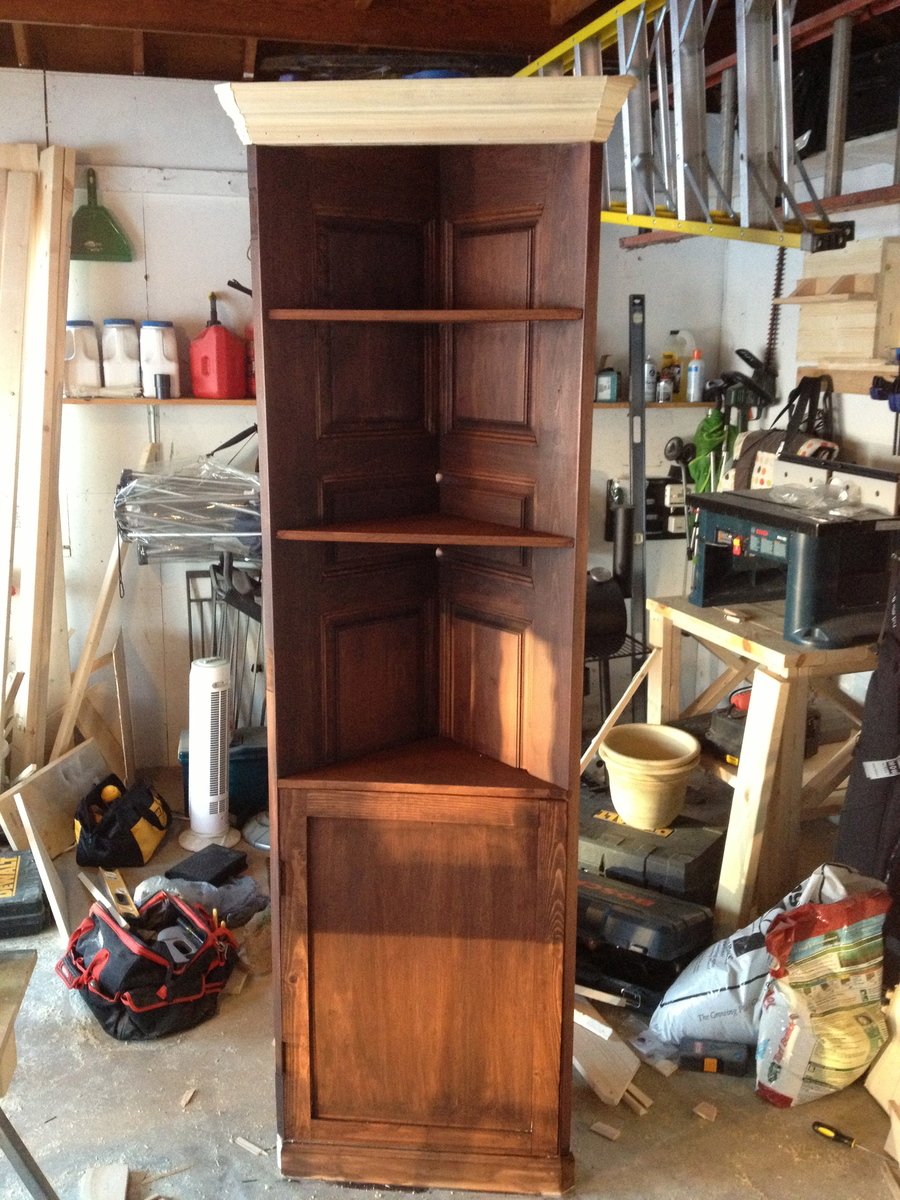
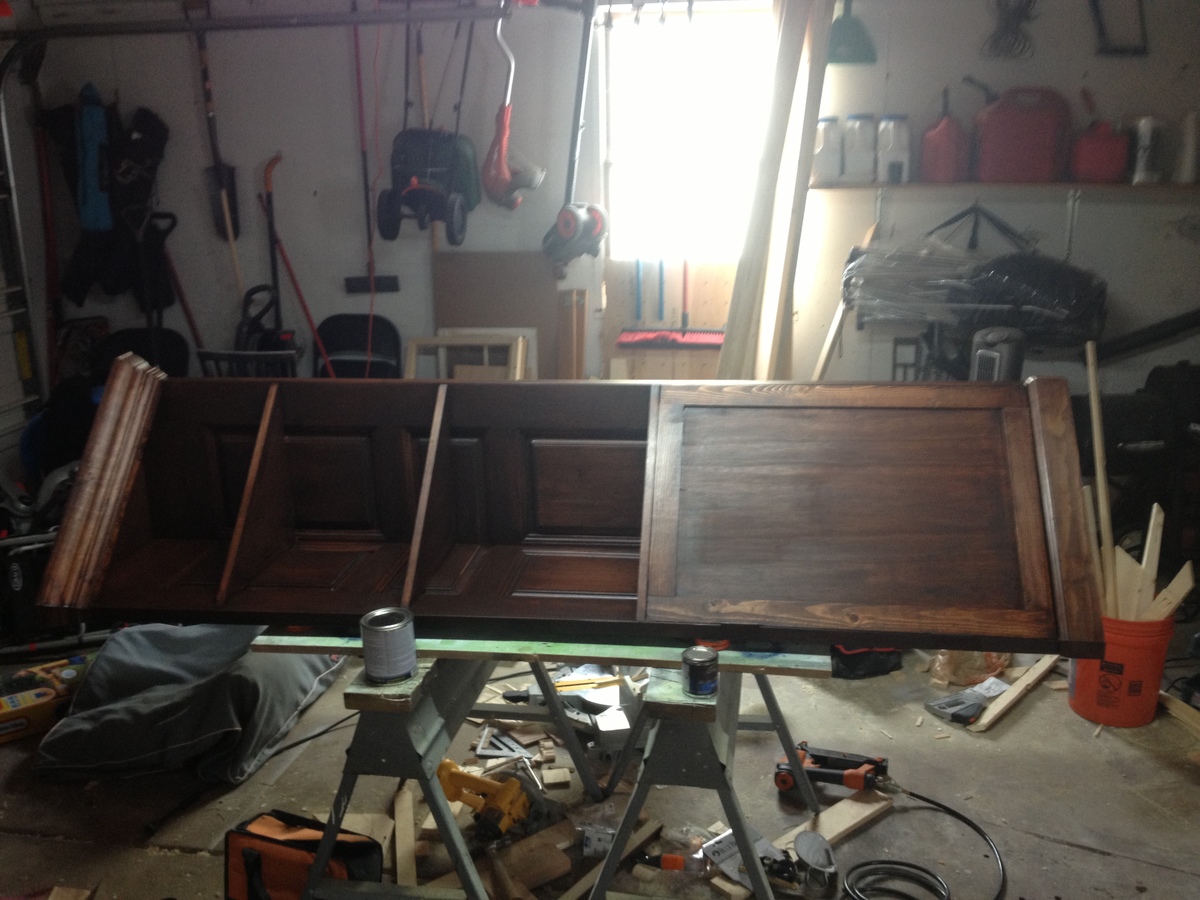
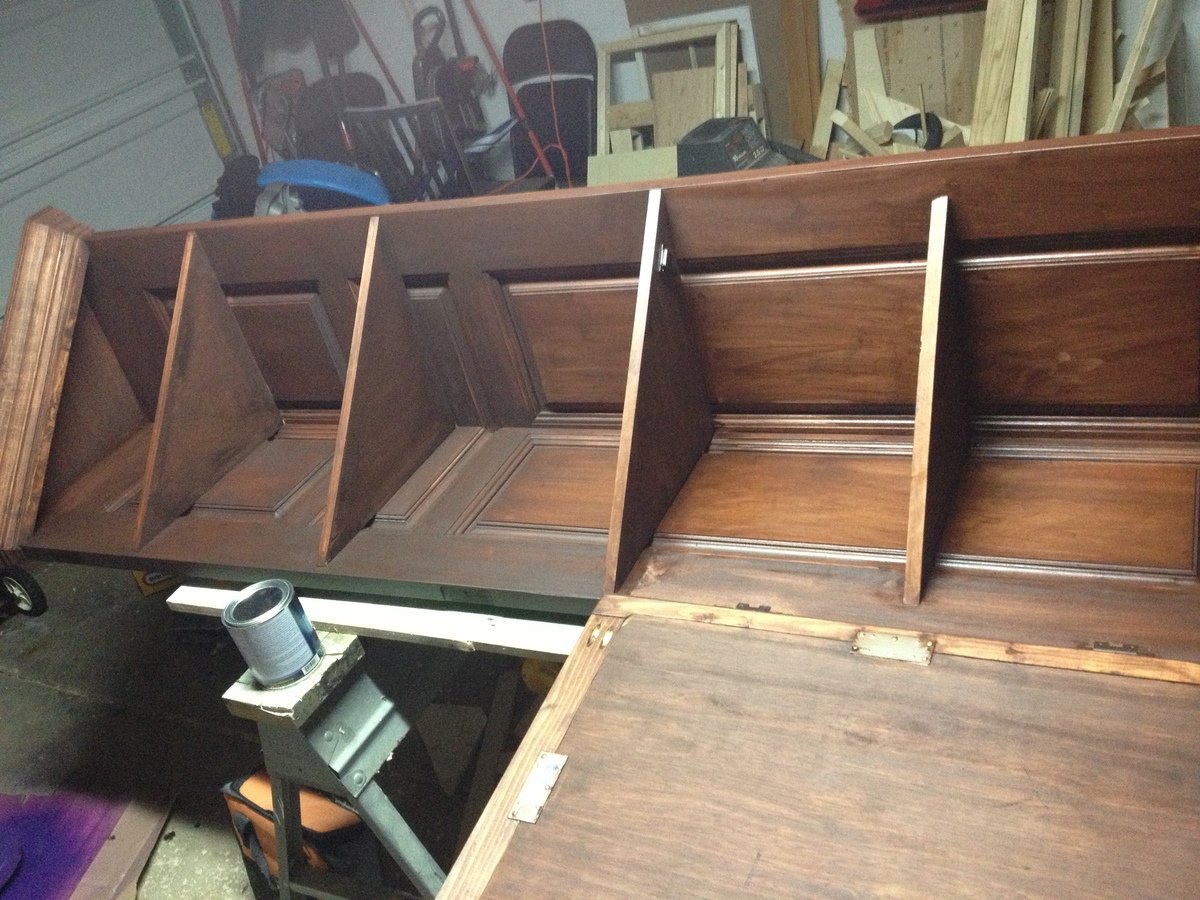
My wife came to me a couple of months ago and asked me to build a corner cabinet for our family room. She had found inspiration through a picture on pinterest that she "had to have." I found a couple of old doors through a resale shop near our house and this is what I was able to make with them.

This was a little tougher than I thought it would have been. I have done crown molding before, however, I have never done a floating crown (no support on the top). I was able to use my nail gun and get a solid fit on the bottom of the crown and then glued a support strip behind the crown.

The shelves are made out of 3/4" ply with a birch veneer facing. Surprisingly easy to use with just a little measuring and a hot iron set to the cotton setting.

Again, another project that would have been made infinitely harder without my kreg jig.

Let me know what you guys think!

Bryan

Estimated Time Investment
Weekend Project (10-20 Hours)
Finish Used
General Finishes Brown Mahogany gel stain
Recommended Skill Level
Intermediate

Comments

Rustic Kitchen Island DIY

Submitted by kstruthers on Fri, 01/16/2015 - 07:57

Modified the plan in order to use 12 inch drawer slides and to fit the 1X24x48 project panel found at Lowes. The 2 inch swivel casters and drawer hardware were found at Home Depot.

Built from Plan(s)
Estimated Cost
$150-$200
Estimated Time Investment
Weekend Project (10-20 Hours)
Finish Used
Behr Premium Plus Ultra in snowfall with Minwax dark walnut stain for top. Sealed with General Finishes High Performance topcoat in flat.
Recommended Skill Level
Intermediate

Comments

Grandkids LOVE IT!

Submitted by Anonymous (not verified) on Tue, 04/18/2017 - 05:31

Simple to build, took longer to paint it than it did to build it!

Built from Plan(s)
Estimated Cost
65 dollars (45 was paint).
Estimated Time Investment
Weekend Project (10-20 Hours)
Finish Used
primed with Kilz, painted with Glidden. Harley symbols were hand painted.
Recommended Skill Level
Beginner

Pottery barn benchright end tables

Submitted by Lilbitmojo on Fri, 03/19/2021 - 05:45

My daughter and son in law needed a small table for the babies room and this ended up being the perfect solution!! Absolutely love it!!

Built from Plan(s)

Comments

Washer & Dryer Pedestal / Platform with Drawers

Submitted by dmccoy on Tue, 03/12/2013 - 10:26

Platform (Pedestal) with Drawers for front-loader Washer & Dryer. Cheaper than buying the manufacturer's plastic pedestals and more fun to build anyway! The drawers are also much wider and deeper than the manufacturer's pedestals. We can usually fit about 3 full loads of laundry in each drawer. (That's 6 loads of laundry before we have to start folding!) It's a very easy and basic DIY project. I made a 2nd one for my brother using these plans (sans the drawers). I gotta say, the drawers are SO nice to have though. But you could just leave the front open, without drawers, and slide some laundry baskets underneath for an even quicker project. We've been using this platform now for over 2 years and there is still no squeaking or rattling. The washer & dryer haven't moved from the vibration even in the slightest. They're exactly where I placed them on the pedestal 2 years ago. There's also zero problem with the weight of the washer either...it really is a strong frame. (After finishing, I jumped up and down on it!) A couple small tweaks I would make doing it over is raising the drawers a 1/2" in. off the floor to tuck a rug underneath (as is, they sit about 1/8" in. off the floor). Also, I would cut out a couple of square holes in the back panel to access those socks that fall behind (I can't access the sides of my W&D in our particular laundry room). Lastly, I would have painted with a quality paint (I just used a few cans of white spray paint to be quicker). Step-by-Step Plans and Materials List (PDF) and many more photos found at the Blog Link below...I'm certainly no professional "Plans Writer" so email if you have questions! Happy DIY-ing! Estimated Cost: ~$200 (2x6 lumber, plywood, drawer trim, nails, screws, paint)

Estimated Time Investment
Weekend Project (10-20 Hours)
Finish Used
White spray paint
Recommended Skill Level
Beginner

Comments

nikolegraves@h…

Wed, 03/13/2013 - 10:12

I have wanted to do the pedestal project for quite a while. I am so glad I held off though. Yours are fantastic! I would never have thought of drawers to hide the dirty laundry! Love it!

gmccoy20

Tue, 04/02/2013 - 11:06

Really appreciate the help with mine brotha! We really like them (even without the drawers) and are glad you had these plans to go off of for ours.

I'll be calling you for our next project!

strahmers8

Fri, 02/07/2014 - 17:05

Hello this looks great and for the amateur carpenter I am but one item I need clarified "the top measurement at 64" is .25" greater than the bottom at 63.75"

Please explain if I am missing something
Thanks

dwm22

Mon, 02/10/2014 - 15:33

Not sure what measurement you mean that's 63.75" since there's no "bottom" to the pedestals. Or do you mean 1/4" wider than the sides? The top panel should overhang both sides by 1/4" each so that when the side plywood is attached, it will be flush. Hopefully that helps? (If I'm understanding the question correctly)

jmkc

Mon, 02/24/2014 - 10:29

Could leave the back panel of plywood out so you could reach what may fall behind? Then you would just have to pull the drawers out?

heverest

Wed, 06/22/2016 - 16:35

Back panel is very very structural and provides lot of strength. If i wanted more access than the 5-7 inch of duct space behind the pedestal gives me, then i would replace the back panel with a long 2x6, that holds the three legs from going in different directions due to all that weight.

dmccoy

Mon, 12/12/2016 - 14:58

This is the one modification I could make if i could redo these plans...I would still put on the back panel of plywood as it stabilizes the pedestal, I would just have cut out a rectangle (behind each drawer) so that I could remove the drawers and stick my hand/arm through to grab fallen clothes or vacuum the lint.

dachiri

Mon, 12/18/2017 - 19:17

Rather than cut holes in the back, I just cut the back and side boards a little small and left a gap around the bottom the whole way around.  That way I can get a vaccuum hose in there or reach through and get lost items.  Because my washer and dryer seem to be deeper than yours (I needed at least 33" depth, so I went with 3'), that also worked out well in getting the most out of the boards.  I could do the top, back, and sides out of one single sheet of good 3/4" plywood just leaving those small gaps at the bottom for clean-up and retreival.

Jperera

Fri, 11/20/2015 - 05:23

Hello,

I downloaded the pdf but have exactly the same information that the website html, where can I find a solution step by step guide?

Thank you for all the interesting posts.