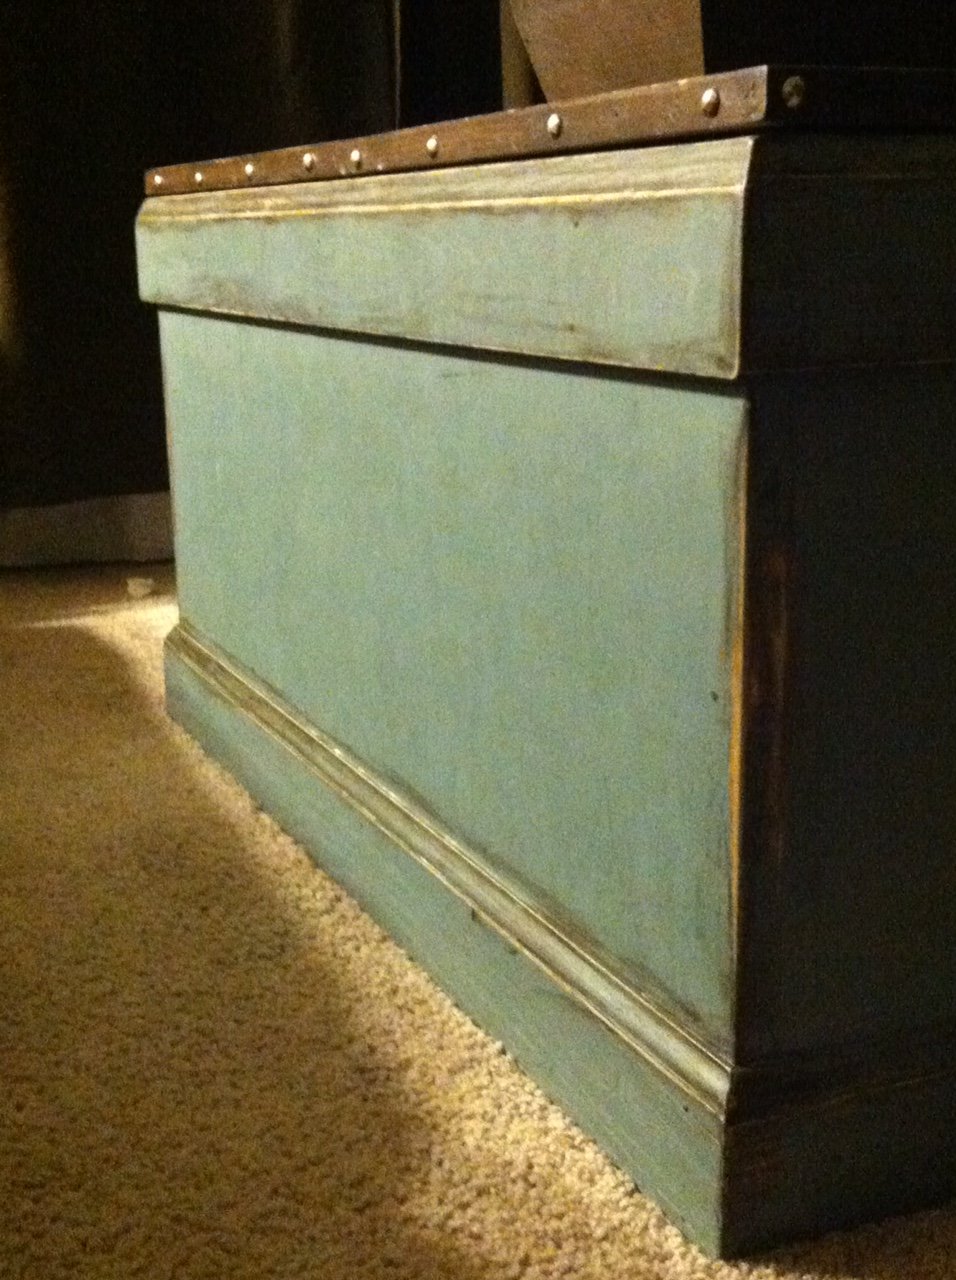
Community Brag Posts

Becca Trunk

Submitted by DMax2010 on Sat, 04/25/2015 - 17:44

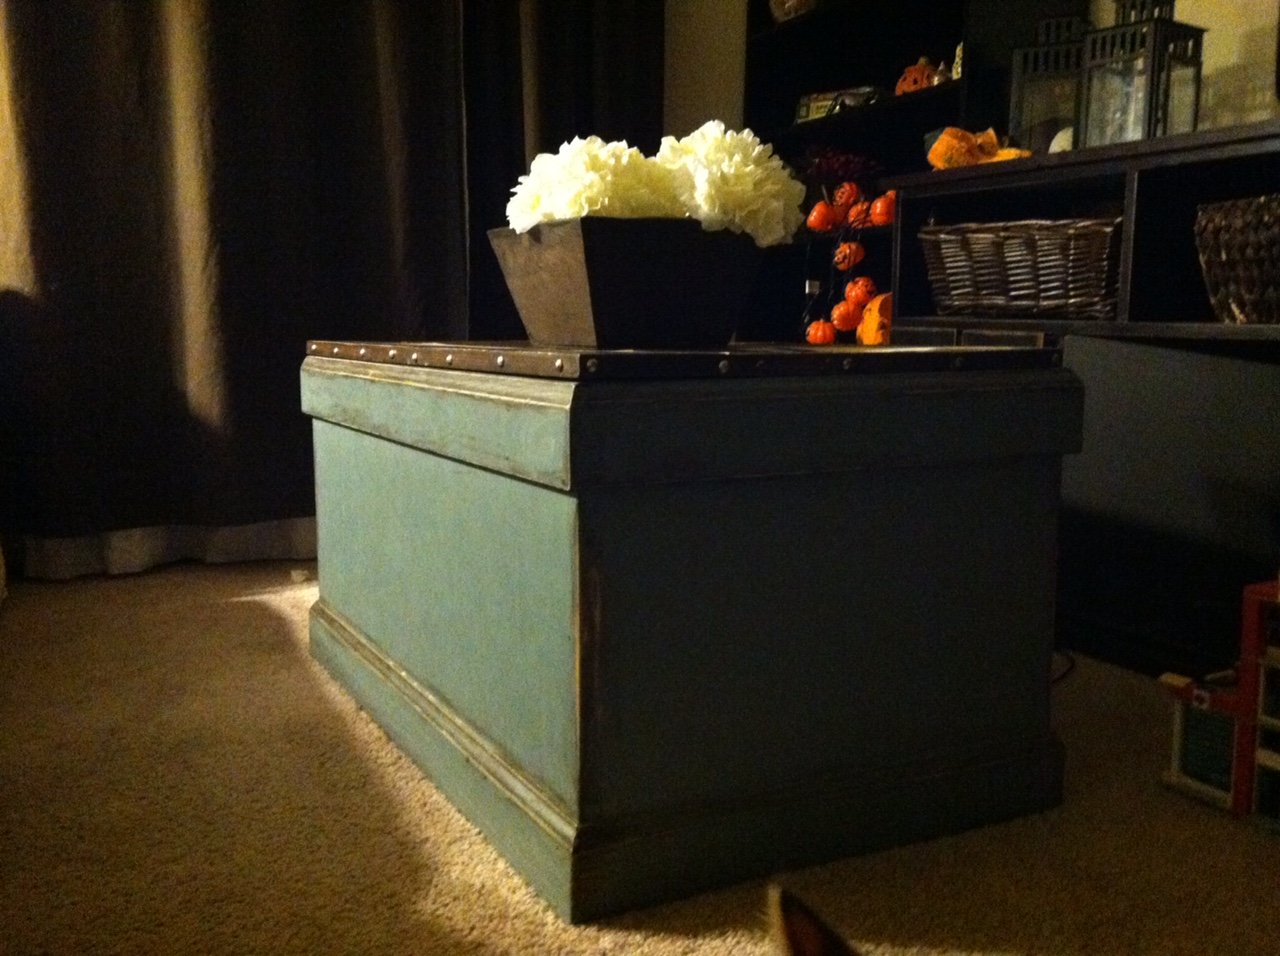
Love this trunk! It was my first attempt at moulding and I probably should have practiced on scrap wood first (recommend)! But it turned out great and one of my favorite pieces (because it's filled with toys).

Built from Plan(s)
Estimated Cost
Not sure, I purchased the purebond plywood and the moulding but pretty much had the rest already
Estimated Time Investment
Day Project (6-9 Hours)
Finish Used
Body of trunk:
Minwax Express Color in Walnut (base)
Behr Premium Plus Flat in Juniper Ash
Rustoleum Soft Touch Matte Poly

Top:
Minwax Express Color in Walnut
Rustoleum Soft Touch Matte Poly
Recommended Skill Level
Intermediate

Kids Country Bench Modified: First Build

Submitted by EllenFitz on Sun, 03/13/2011 - 19:20

My husband and I put this together to fit a spot that was just slightly off of what standard furniture would accomodate. Looking for something simple as a first build, we went with the Kids Country Bench and made some changes along the way.
We made 3 cubbies on the bottom shelf for extra storage and a little extra stability, since our boards were more bowed than we preferred. We also removed the front and back aprons. In the front we just attached a 1x2 that we ripped into a 1x1 as a trim piece. In the back, we centered a 1x2 to give a slight lip in the back.
I don't have a jigsaw, so we used my FIL's Scroll Saw. That was interesting ... but the sides turned out ok. Not perfect, but ok.
I was hoping to finish this with a high gloss product, but since the boards we ended up with more 'rustic' than I anticipated, I decided to embrace that and go with a distressed finish. I used a spray primer, and then one coat of Sherwin Williams yellow, covered with a dry brush of Sherwin Williams blue. I then sanded the corners and edges and finished with a spray top coat.
We had lots of fun, although it took us a long time. We were only working in small shifts, in between naps. If we had managed to get, say, 3 straight hours to build, I think we could have finished in in that time period.
This was a great starter project, and it's nice to know that we can make MINOR modifications to a plan and not have it fall apart on us :)
Thanks for the inspiration Ana!

Built from Plan(s)
Estimated Cost
$50
Estimated Time Investment
Afternoon Project (3-6 Hours)
Finish Used
Distressed/Dry Brush paint
Recommended Skill Level
Starter Project

Little Kids Picnic Table

Submitted by Cassie1686 on Tue, 04/12/2011 - 23:35

Thanks to LoriInVegas for her help with the legs on this project!  My legs were so wobbly, even thought I was super careful to cut them evenly.  So, I unscrewed all the screws besides one, in each leg, and then re-screwed everything in one by one, being sure it was steady after each screw.  I built this for my 3 year old and 1 year old daughters.  The table was a bit smaller than I had imagined, but it's sooooo cute!  It will fit them both for now, but definitely no more than one child on each side, and I assume my 3 year old won't be able to fit comfortably much longer.  I plan to build the Bigger Kids Picnic Table this weekend!  I painted the entire table in chalkboard paint so that the kids could go crazy decorating it.  I plan on putting a cute little basket in the middle of the table to hold their chalks.

Built from Plan(s)
Estimated Cost
$15
Estimated Time Investment
Afternoon Project (3-6 Hours)
Finish Used
Behr Paint, mix 1 cup paint with 2 tablespoons unsanded grout. Paint and let dry. Prime the surface for chalk by coloring entire surface with chalk and wiping clean with damp cloth before using.
Recommended Skill Level
Beginner

My First woodworking Project!

Submitted by minhnguyen on Mon, 06/08/2015 - 11:39

I really wanted to build something for our first home so 3 months after moving in (and 7-8 months pregnant) I started on our dining table. To fit our dining room, the measurements were modified to have a 7ft-table, with the bench just long enough to slide all the way under the table. The legs are made of 4x4s of Douglas Fir and everything else is pine. I also removed the stretchers underneath because I wanted to be able to have chairs on the ends. The table seats 8 people very comfortably. It took me a little longer than anticipated, since I couldn't do any of the lifting until my husband came home, and he stained it with 2 coats of Rustoleum Weathered Grey stain and 2 coats of poly (with my light sanding in between each coat).

Estimated Cost
$100
Estimated Time Investment
Week Long Project (20 Hours or More)
Finish Used
Rustoleum Weathered Grey Stain
Minwax Fast-Drying Semi-Gloss Polyurethane
Recommended Skill Level
Beginner

Comments

Reclaimed wood loveseat - in-work pictures

Submitted by JoanneS on Mon, 06/22/2015 - 19:08

Couldn’t wait to share this one. I’ll post the finished pics on here once the painting is finished and the cushion is sewed.

This build is a reclaimed wood version of Ana’s Simple White Outdoor Loveseat. We’ll be using this inside. This started as a way to repurpose those blue vinyl cushions (which I made 11 years ago for a hot tub bench – these had been stored in the garage for a few years). Using reclaimed wood on hand – reclaimed 2x4 studs, an oak 1x12 shelf and some pine 1x12 scrap ripped to 1x6 for the aprons, plywood from an old entertainment center ripped to 1x4 size, some 1x4 that used to be trim, a left-over 1x2 and S4S, and some left-over 1x6, constructed the frame and back. After I got that together, Hubby suggested we add some wide arms so it wouldn’t need to have a side table. That was the only wood I had to purchase on this one – a 1x6x6 for the arms, and a 2x4 for bracing the arms.

So far this has been a weekend project, including re-sizing the plan to fit my 24” x 24” x 4” cushions, doing the math to use 1x4 size instead of 1x3 size for slats and rails, and sizing to use the 2x4 frame on their ends rather than flat, to save a tiny bit of space in the footprint. Originally there were going to be 8 1x4 rails for the back, but I was 1 piece short, so instead of having 8 rails in 1x4, I have 6 1x4’s plus the 1x6 in the center (now I have 1 piece of the 1x4 left over). And it’s very comfortable for sitting!

Still left to do: sand the filled screw holes on the arms and paint the arms, and sew the cushion. I got that high density foam with a 60% off coupon at JoAnn Fabrics. Also the fabric was 30% off (right now it’s just draped around the cushion for the photo). The fabric and foam was only $90, and I’ll have enough fabric left over for a few accents. Hopefully I’ll get to that during the week, if not, on the weekend.

Estimated Cost
Total spent: about $100 for foam, fabric, and 2 boards.
Estimated Time Investment
Weekend Project (10-20 Hours)
Finish Used
The bottom and back frame is painted with 2 coats of semi-gloss Clark & Kensington Paint + Primer in Crushed Peanut (my absolute favorite cream color). Once I get those filled screw holes sanded, the arms will be painted with that as well. Paint was already on hand.
Recommended Skill Level
Beginner

My take on the chicken coop design

Submitted by Anonymous (not verified) on Thu, 12/30/2021 - 13:01

When we became accidental chicken owners, we had to build a coop fast. I found the plans for Ana’s replica of the Williams Sonoma chicken coop and got to work. They were very easy to follow and easy to modify to fit our own needs and aesthetic. We decided to enlarge the coop and remove the planter in the original plans do we could accommodate more chickens while keeping the original footprint. Instead of plywood, we used cedar reclaimed from an old fence we had recently replaced. We also enlarged the rear door to make clean out as easy as possible. I cut pieces of corrugated plastic that fit inside the door and windows to winterize the coop when temps drop below freezing. The run is designed to follow the shape of the coop and is large enough to give our 5 chickens plenty of space. The planter box runs the length of the chicken run, providing some plants to munch on inside and shady vines that will eventually cover the outside. Thanks for the awesome plans!

Comments

Pottery Barn Benches with X Table...Modified

Submitted by AJW on Thu, 05/19/2011 - 13:18

Pottery Barn Bench: Length Modified and utilized 2-1x6s for seat. X Table: Length Modified, utilized a 6x6 for the stretcher and drilled a hole through both the 1 top material and 6x6 stretcher beam. Holds the Pottery Barn umbrella real well. All made of Cedar and painted for good measure. Everything counter sunk and plugged, sanded to high heavy and ready to last.

Estimated Cost
$350
Estimated Time Investment
Week Long Project (20 Hours or More)
Finish Used
Oil based primer with 2 coats of acrylic over top.
Recommended Skill Level
Intermediate

Art Table!

Submitted by Jess1221 on Sat, 06/04/2011 - 09:50

I used the plans for the craft desk and modified it a little. I made the top like a lid that just sits on top so I can take it apart easier. I also put on full extension drawer glides and made the drawer larger. This took me quite a long time because I was working on it and studying for finals! Well worth it though!

Estimated Time Investment
Week Long Project (20 Hours or More)
Finish Used
High Gloss black paint with Jamaican Aqua accent color
Recommended Skill Level
Beginner

Shark Shack

I had my eye on this clubhouse bed from the Pottery Barn kids catalog and was so excited when I came across this plan and my hubby offered to build it for my 4-year-old. I think it actually turned out cuter than the Pottery Barn version! Thanks so much, Ana!

Estimated Cost
$350
Estimated Time Investment
Week Long Project (20 Hours or More)
Finish Used
Eggshell Paint
Recommended Skill Level
Intermediate

Indoor Playhouse for nephew

Submitted by Anonymous (not verified) on Tue, 04/26/2022 - 10:18

First project with pocket holes. A little challenging for a complete beginner, but pretty forgiving and fun to make! My nephew LOVES it!

Built from Plan(s)

Comments

Farmhouse King Bed

Submitted by KKGaskin90 on Sat, 07/07/2018 - 17:38

We couldn’t be happier with the outcome! This bed is beautiful and everyone who sees it is impressed. We did raise both the footboard and headboard so that both gave a bit more impressive appearance and so that the footboard rises above the mattress.

Estimated Cost
$250
Estimated Time Investment
Weekend Project (10-20 Hours)
Finish Used
Dark Walnut interior wood stain by Minwax
Recommended Skill Level
Beginner

Home is Where the HEARTH is (Faux Fireplace)

Submitted by cbeach1717 on Fri, 07/08/2011 - 14:11

Only about a month before Ana published her Christmas plan for a faux fireplace, the hubby and I built one of our own out of a sheet of quality plywood, 1x12's, crown moulding, and a little trim. Originally we simply wanted a place to hang our stockings over the holiday season, but now our HUGE faux fireplace is the HEART(H) of our home.

Built from Plan(s)
Estimated Cost
$150
Estimated Time Investment
Weekend Project (10-20 Hours)
Finish Used
We just primed and painted white! So easy :o)
Recommended Skill Level
Intermediate

Comments

Pug Bug (not verified)

Fri, 07/08/2011 - 15:22

Wow...that's gorgeous! Nice attention to detail, too! Just a suggestion...have you considered painting the inset of the "fireplace" black? I painted the inset of my fireplace with a flat black paint and it made ALL the difference in the world. Just something to consider. Either way, job well done!

In reply to by Pug Bug (not verified)

cbeach1717

Mon, 07/11/2011 - 08:28

Thanks so much! Would you believe that I am not as brave as I would like to be when it comes to painting anything black? We are planning to have faux logs made and stacked in the faux fireplace! We think that will do the "trick"--pardon the pun :o) Thanks again!

jharm

Tue, 07/12/2011 - 13:06

Have you considered trying a faux marble paint treatment? Or, marble-look wallpaper might be a little more fail safe and could even be applied in squares like marble tiles.

I love the proportions you chose. I think a foundation would really sell it, and would increase the safety if using candles.

Allison Byles (not verified)

Thu, 10/27/2011 - 10:07

Do you have the plans for your fireplace? Love your design and clean lines, I am planning to make one!

Guest (not verified)

Fri, 11/25/2011 - 13:22

Love this fireplace, very beautiful but very disappointed that there isn't any plans and just pictures lol a little bit of a tease.

cbeach1717

Sun, 02/26/2012 - 04:44

Hello Everyone,

I am so sorry I have not responded sooner, but I wasn't even aware that there were any recent comments on this post :o)

Now that I do know, I just wanted to let you know that I will try to get something drawn up and post it here. I am not entirely well suited for design drawing software, but maybe you all wouldn't mind if I literally draw them out for you and post pictures of those drawings, yes?

Thanks for your kind comments, and I promise to have something soon! This project really is so simple, I just know you'll love the finished product :o)

In reply to by Wendy T (not verified)

cbeach1717

Mon, 06/25/2012 - 06:17

Hello Everyone,

I apologize for the delay, but we have been out of the country for six months and don't have any way of knowing the dimensions of the faux fireplace without measuring it personally. But we will be home within the next few weeks and I will try to measure and draw up some simple plans for those of you would like to see them.

Thanks :o)

srush (not verified)

Thu, 10/11/2012 - 10:35

Hi!
I love this room, do you know who makes the paint and what the color is called?

Thanks so much! Great job on the fireplace!

srush (not verified)

Thu, 10/11/2012 - 10:36

Hi!
I love this room, do you know who makes the paint and what the color is called?

Thanks so much! Great job on the fireplace!

Tall Bedroom Dresser

Had a blast with this project and am getting more confident with drawer slides. I built a matching dresser that is much shorter and wider. It can be found here: http://www.ana-white.com/2018/08/DIY_furniture/bedroom-dresser

Estimated Cost
$150-$200
Estimated Time Investment
Weekend Project (10-20 Hours)
Finish Used
Varathane Weathered Wood Accelerator, Varathane Poly
Recommended Skill Level
Advanced

Comments

hutchingslv

Thu, 08/12/2021 - 15:35

Any way to get a copy of these plans? I really like the look and want to give it a shot. Have to make a few of these if all goes well for all my boys.
Thanks

DIY Barn Door and Hardware for around $80!

I really wanted to put a barn door in my husband's home office, but have you looked at the prices of the kits?  No way was I going to spend that for a door.  So I decided to fabricate it myself.  For the rail hardware- I used a 72" steel rod, copper pipe fittings, and lag screws.  For the door hardware, I used 12"ish, long pieces of steel, pulleys, and carriage bolts.

The door itself is made from plywood siding, 1 x 4's, 1 x 6's, and 1 x 3's.  The entire door and hardware cost around $80 to make myself.  It's functional and looks amazing!  The entire tutorial is up on my blog!

Estimated Cost
$80
Estimated Time Investment
Day Project (6-9 Hours)
Finish Used
white paint
Recommended Skill Level
Beginner

Comments

Jewelry Boxes

Submitted by yhaas on Sat, 11/28/2015 - 06:55

I made these boxes for my daughters for Christmas. I used maple, and I rabbeted the drawers and backs so that the plywood would sit flush. On the first box, I attempted to join with dowels, but as a novice, that didn't work well, and I converted to a few countersunk screws. On the second box, I used glue and nails as the plan suggested, which was much better. Installing the box hinges and lock was the most finicky part of the project.

Built from Plan(s)
Estimated Cost
$150
Estimated Time Investment
Weekend Project (10-20 Hours)
Finish Used
The dark wood is stained with Goudey stain - San Miguel Oak. Goudey is a family-run Toronto business, and they make beautiful stains. For the finish, I used Tried and True varnish oil. Hardware was from Lee Valley Tools.
Recommended Skill Level
Beginner

Comments

JoanneS

Wed, 12/02/2015 - 14:28

Gorgeous jewelry boxes!  You did a beautiful job, and I'm sure your daughers will love them!  Love the finishes too!

Rocket bookcase

Submitted by Anonymous (not verified) on Tue, 01/29/2019 - 16:02

My son saw this project and wanted a rocketship.  I was also tired of piling up his books on the floor.  The only wood I bought for it was 1/4" ply for the back as I used leftover 3/4" plywood for the bookcase itself.  Fairly easy with a Kreg, it just took a little while to finish all of the painting.

Built from Plan(s)
Estimated Time Investment
Day Project (6-9 Hours)
Finish Used
the only paint I bought for this was the red - just bought a sample of Behr's MPH in Satin. I used leftover Behr National Anthem (originally purchased for a dresser that I made my son) and some shade of white that Ihad used on closets (eggshell sheen but can't remember the exact color).
And of course, Zinsser Bullseye primer.
Recommended Skill Level
Beginner

Dollhouse

Submitted by samueldodd on Mon, 12/21/2015 - 06:04

The house is 48" high and 36" wide and 28" deep. It has 3 floors with a total of 10 rooms. Floors were made to look like hardwood floors and stained. Was fun to build and my granddaughter cried when she saw it. Due to the size of it, I installed wheels on it also. I made it from a picture on Ana White of Kidkraft Chic Dollhouse 2011-12-06 Paint all your pieces before you assemble. It makes it a lot easier than trying to paint afterwards.

Estimated Cost
$100,00
Estimated Time Investment
Week Long Project (20 Hours or More)
Finish Used
Roof was painted with oil based Red( because that is what I had on hand. The frame and walls and ceiling were painted white. The floor was made to look like a hardwood or plank floor and was stained with minwax Special Walnut
Recommended Skill Level
Intermediate

Farmhouse King Bed

Submitted by Lantz198 on Thu, 12/24/2015 - 12:15

My bed frame dimensions were 76 wide by 80 length. So that is the inside demension after assembly. My headboard posts were cut to 54" and footboard posts were cut to 24". Headboard panels are 31.5" (14- 6" boards) and footboard panels are 15.5" (14- 6" boards). My posts were made from combining two 2x4s together. I plan on mounting the metal bed frame to the inside of the bed rails. I enjoyed this project greatly.

Estimated Cost
$166.25 unfinished. $185.00 painted.
Estimated Time Investment
Day Project (6-9 Hours)
Finish Used
Glidden Interior White with Satin finish
Two coats.
Recommended Skill Level
Beginner

Small Cedar Fence Picket Storage Shed

Submitted by Pembat on Sun, 10/06/2013 - 20:37

Built this in a weekend, took about 1.5 days. I ended us using 2x4's instead of 2x2's, I think it resulted in a much stronger frame. I also built a base for it to sit on. I got pre-stained cedar fence boards, and overlapped them 1" instead of a 1/2". Pretty easy project, I ended up siding the back on the ground, installing it, and then adding the side walls without the siding (just the framing), and then sided them in place. The doors work perfectly. I took my total inside dimension between walls, made sure the opening was square, and then divided that by two to get the width of each door. I then took another 1/4" off that, so each door had an additional 1/8" gap, it worked perfectly. When I set the doors, I put them on a piece of roofing closed as I screwed in the hinges, and then opened them and removed the roofing. I opted to run the door siding horizontal to use up a bunch of waste wood. I'm happy with the outcome. I also found some 6" self starting lag bolts and lagged through the back of the shed into studs (through the siding) into the garage behind it.

Estimated Time Investment
Weekend Project (10-20 Hours)
Recommended Skill Level
Intermediate

My daughters platform bed

Submitted by Anonymous (not verified) on Sun, 03/24/2019 - 05:33

I’m in love with how well this bed turned out. Modified by using a 2x4 for middle support and 1x4’s for slats. It was less money and felt better for support. 

Built from Plan(s)
Estimated Cost
$150
Estimated Time Investment
Weekend Project (10-20 Hours)
Finish Used
Early American stain & matte poly
Recommended Skill Level
Beginner

Pantry Shelf

Submitted by Anonymous (not verified) on Sat, 03/04/2023 - 13:03

I have a small kitchen. I found this plan on Ana's site to turn it into a pantry shelf. Initially, I was going to have wheels. That way, I could roll it to sweep. I took measurements to match the height of my upper cabinets and width so my door would clear. I put this shelf up to the side on my fridge. I didn't account for the height difference adding wheels. I still can add wheels if I change my mind. I did differing spacing, considering spices and cereal boxes and items between. I haven't quite figured out the end placement for items. I also am considering appliances to be placed on the bottom. I purchased baskets and spice drawers so I can visually organize and see what works. I used odd and end prices of wood and adjusted the measurements to fit my space. I love my corner 2x4s! They are dark and once planes, have these dark brown ribbons revealing the growth rings. We think they might be brown treated boards. Some of the shelves have a darker brown edge, 5 total. I purposely wanted the dark edge facing out. But I didn't have enough so I used different looking boards (same thickness) and played around with assign them their spot. My friend had copper pipes laying around, so I used those in the back to stop my items from falling off the backside. I polyurethaned to keep the natural wood colors. I really love it and am excited to do more projects!!

Built from Plan(s)

Comments