Rustic X Console
Have a long wall and this was perfect! I love everything about it! I enjoyed working with miters for the 1st time! FUN!!!!
Had a bunch of scrap wood from other projects and random pieces we found in our barn after we moved into our new house so decided to make a new coffee bar to use it up. Modified the Potting Bench plans and pretty happy with how it turned out!
Nate B
"Cellar? What cellar? We don't have a cellar... Oh, you mean the new sand box! Here, let me get some shade too."
I'm not sure why, but I can never seem to follow plans exactly. I guess that's not entirely true. I CAN follow plans exactly, but I almost never do. Maybe it's some sort of passive rebellion or something, but I usually have to put my own spin on the things that I build. Sometimes it works out in my favor. Sometimes not. This build was a little of both.
I decided to only build one bench in our sand box. This cut down on a lot of supplies. By making it longer a single bench and making it longer, it covers about the same amount of square feet, just in a rectangle instead of a square. When pricing lumber, I noticed that 2x8's were cheaper than 1x8's. So I went with those instead. It can't hurt to beef up the sides a little, right? This required some easy calculations on the cut list. I also decided to use 1x6 fence planks instead of 1x4 whitewood or pine. The fence planks were cheap, and I figured they would look nice in the back yard. They are also naturally pest and rot resistant. They required extra sanding to take the rough off. However, this is one place that I'm thinking the modification didn't work in my favor. The fence planks are not as thick as the whitewood. This combined with the increased length makes the the top pieces feel pretty weak. I put a little support piece under the bench. I'm quite sure the bench would not have held up well without the support.
Because this is an outdoor piece, I dry fit everything, and then stained everything before assembling it, to make sure all of the edges were well protected.
Cost breakdown (not including canopy)
Fence planks $14
2x8x8 $11
hinges $9
handle $2
stain $10
Thu, 03/07/2013 - 08:49
I just love the changes you made to this sandbox! Can you tell me what you used for the construction of the canopy? Thanks!
I used the plans for the simple outdoor lounge chair and just made the arms wider, the cushions came from Target.............the dog loves it !
Thu, 05/31/2012 - 07:14
This is BEAUTIFUL!!! Nicely done woodwork and cushions too!
Thu, 05/31/2012 - 07:15
This is BEAUTIFUL!!! Nicely done woodwork and cushions too!
Thu, 05/31/2012 - 09:28
I love how you made the arms wider and rounded. Adirondack chair meets school desk! Bravo!
Sat, 07/28/2012 - 18:06
My husband and I love to sit outdoors and read with a hot cup of tea. The wide are will be perfect for us. Would you mind sharing the cost of your project?
Sun, 09/14/2014 - 22:04
Hi! I would love to make this patio set but I am having some trouble with cushions. I noticed that Ana stated this chair will use a standard size 20x20 cushion. On your notes it says you got your cushions at Target, are they 20x20, I love the deep cushions but cant seem to find any that sized. Are yours 20x20, or did you modify you project? If so, what dimensions did you use? Thanks so much!!!
Sun, 09/14/2014 - 22:05
Hi! I would love to make this patio set but I am having some trouble with finding cushions. I noticed that Ana stated this chair will use a standard size 20x20 cushion. On your notes it says you got your cushions at Target, are they 20x20, I love the deep cushions but cant seem to find any that sized for the bottom ones. Are yours 20x20, or did you modify your project? If so, what dimensions did you use? Thanks so much!!!
Laundry Mudroom Storage
Modified to have storage boxes on only one side since it was being placed next to a wall.
Mon, 04/20/2020 - 14:26
Love everything about this room! Great job on the bed!
I started off with Ana's plans and kinda went rogue from there. The idea of creating those curved back legs scared me so I thought I'd sacrifice an Ikea dining chair and use it as the legs. When I ruined one of the legs I decided that I'd come too far to back out and that I must continue. I adapted many conventional methods to make the settee but I'm super pleased with the outcome. For the full step by step on how I completed the settee, please check it out here Part 1 Part 2 Part 3
I was looking for an excuse to use my new Kreg Jig and also Annie Sloan Chalk Paint. My entrance from my garage had a cheap two level shelf which never was enough for all our shoes so when I saw this I thought it would be perfect. This was my first Ana-White project and the left cubbies ended up being wider than the right. I loved the Kreg Jig. What's cool is I did it all alone, with the help of my husband watching my kids! It was a lot of painting to get the distressed look that you really can't see from the pictures but I am very happy with it and it is very sturdy. I ended up doing 4 columns instead of 3 but only one shelf...probably also why the measurements got messed up.
We built this workbench adapting Ana's plans. We did not build the carts yet.
It is very practical! We just love it!
I used discarded lumber from when they built our house a few years ago for the support structure. I only needed the headboard for our new split king adjustable bed. There posts are 2 2x6s sistered together. The top shelf is a 2x6 and the insert is 1x6 tongue and groove (got the idea from the fancy farmhouse bed and loved it!) blue spruce flooring with worm holes. I love it, now to do a mashup of the two nightstands with a drawer and a door 😁Thanks Ana!!!
Ps, my hubby also bought me the Kreg electric pocket hole machine for mother's day for upcoming projects. I didn't even know that was a thing until i saw your video... It's awesome!!
This basement storage room was packed with 10 years of junk and smelled like funk! Divided into 3 piles, burn, donate and keep. Now with sealed and painted walls and epoxy'd floors we hope to use this as a storage/craft room. Next on the list is a craft/storage/wrapping station for the other corner. I also built a small stand that the artificial tree is sitting on. Due to condensation (humid Michigan summers) we don't want anything to sit on the concrete.
Finally I was able to replace my wobbly little dining chairs with solid wood chairs, thanks to Ana’s Harriet Chair plan. For this build, I made a few mods from Ana’s plan: added a padded seat, made the chair 2” wider, and substituted a slatted back. Used select pine 1x2 instead of 2x2 (really liked that look in the inspiration chair) and used 1x3 for the 2 inner slats on the backs. Also added a few more cross supports. Instead of predrilling pocket holes and hiding the screws, I chose to use the round washer head self-tapping screws and left them visible. This saved time on having to pre-drill and fill screw holes, but also thought the exposed screw heads made a nice decorative element. The seats are covered with 1” thick high density foam, batting, and outdoor fabric. The first of the 4 chairs took longest to make (I made and corrected all my mistakes on that one). The remaining 3 went a lot faster (took about 11 hours total for building the 4 chairs, and 12 hrs total for finishing them). The changes/steps I used are documented in a .pdf file in the second plan post linked above. Ana, thank you for all your wonderful plans. You rock!!!
Sun, 07/15/2012 - 11:15
Very nice. Your chairs are very beautiful. I love the modifications. Well done!
Sun, 07/15/2012 - 16:00
I would be interested in pdf file if you wouldn't mind posting it!!! The chairs look awesome.
Sun, 07/15/2012 - 17:26
Thank you so much! I just posted a plan of the modifications, which includes a .pdf file of the full plan with the steps and photos (still haven't learned sketchup yet). I sure hope it worked! The .pdf file is located about 2/3 of the way down through the plan post, right below General Instructions. Let me know if the .pdf opens for you? :)
Mon, 07/16/2012 - 08:22
You did a great job on these - the modifications you made, the fabric and the paint are all wonderful.
Mon, 11/26/2012 - 14:57
Colsen, thanks very much for the comment! Happy Holidays! :)
Wed, 07/10/2013 - 02:31
Thank you! We still love them and they are holding up great! I made a storage bench to go with these, but it still needs a few tweaks before blogging that one.
Mon, 11/11/2013 - 08:50
Did you also make the table? If so how/which plan did you use? The whole set together looks fantastic!
Mon, 11/11/2013 - 10:58
Hi AdamR, Thank you very much for the nice comment! Yes, we did the table also. Here's the brag post:
http://ana-white.com/2011/05/my-new-almost-farmhouse-table
This was done under my original username JES. I had locked myself out of that username and had to create a new one ;)
We used our existing table and painted the legs, and added a new top. The tabletop finished dimensions are 56" long x 38 1/2" wide.
Joanne
Mon, 11/11/2013 - 19:38
This is what I have been looking for. I know my wife doesn't want any indents or grooves but it seems like everyone build tables out of boards. I don't have a jointer or planer to even the boards out.
Question 1 - the 1x2 trim...to be clear you attached the 1 inch side to the table right?
Question 2 - how has the 3/4 thickness working out? Thick enough?
Question 3 - anything you would have done differently?
Thank you so much for your help. I build some small custom shelves for my son's room, found this site and now got a major bug to build stuff we have been looking for. I actually joined the site just to ask you about the table so thanks again!
Adam
Tue, 11/12/2013 - 07:07
Thanks again for the nice comments, Adam!
On the 1x2 for trim, I attached with the 2" side to the edges of the plywood (the 1x2's were actually 1 1/2" wide and 3/4" thick). This gives the illusion that the table is 1 1/2" thick. On this one I used finish nails and glue to attach the trim. If I had it to do over again, I'd have attached the trim boards to the plywood edges with pocket holes from under the table, so there would be no nail holes to fill.
3/4" thickness for the table top works fine. Our original table had a top thinner than 3/4", so we attached this new top directly on top of it. I didn't think I could get the leg assembly off that old table without damaging it.
If you wanted a more 'beefy' feel to the whole table top, you could stack 2 pieces of plywood, glued and fastened together from the bottom with screws. The 1x2 for the edges would still cover it.
Once you catch the wood working bug, you'll want to build everything you see! :) I hope you post a brag picture when you build this. I'd love to see pictures! :)
Joanne
Wed, 11/13/2013 - 06:02
First off thank you for all the info! I see now why you picked the larger trim, I didn't catch it the first time around that you put the new wood right on top of the old table. My kitchen table has the exact opposite problem the legs are weak (plus my wife hates the top too) hence why I will be doing both top and legs. Still debating on one 3/4, two 1/2 or two 3/4 inches for table thickness.
I am going to build the kids trestle table this weekend first. Just the get a project under my belt besides some book shelves. lol
http://ana-white.com/2011/09/kids-trestle-style-play-table
My Kreg Jig will be here Friday, picking up wood on Sat....hopefully I will have a unfinished kids craft table ready to roll by Sunday then the Kitchen table will be my Thanksgiving weekend project.
Thanks again for all of your help.
Adam
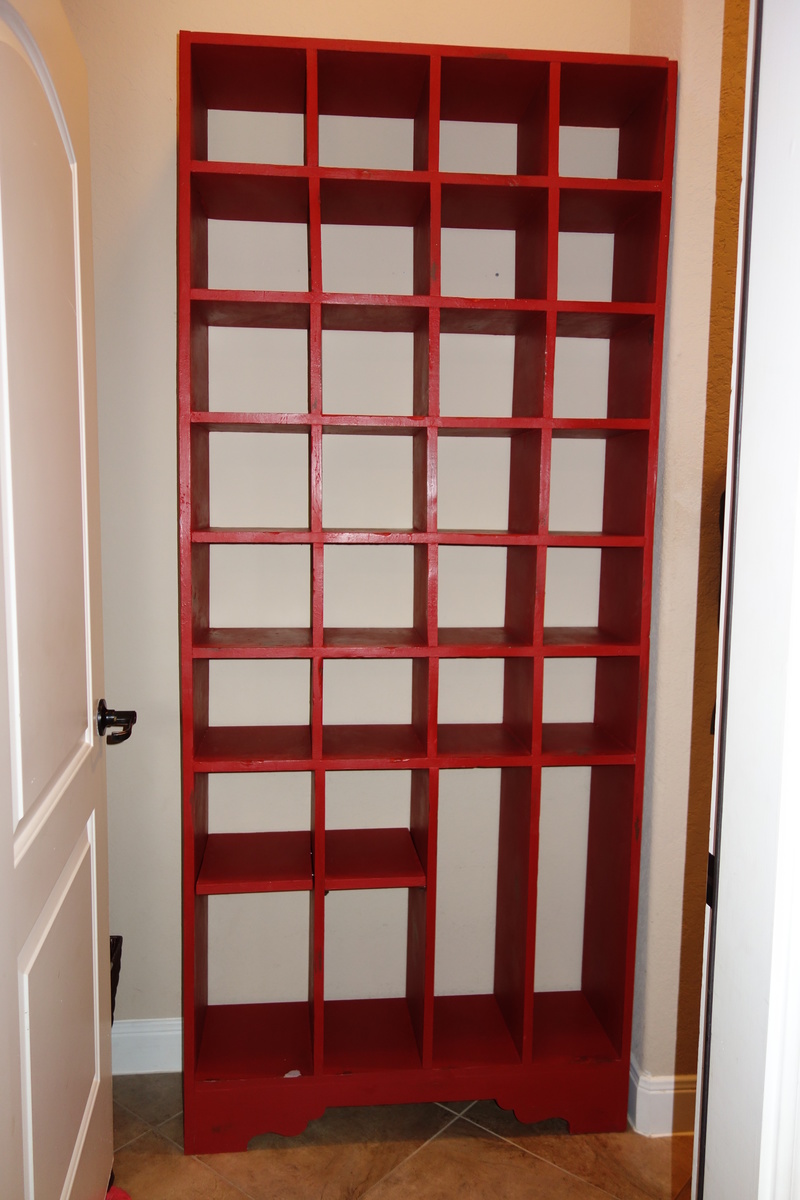
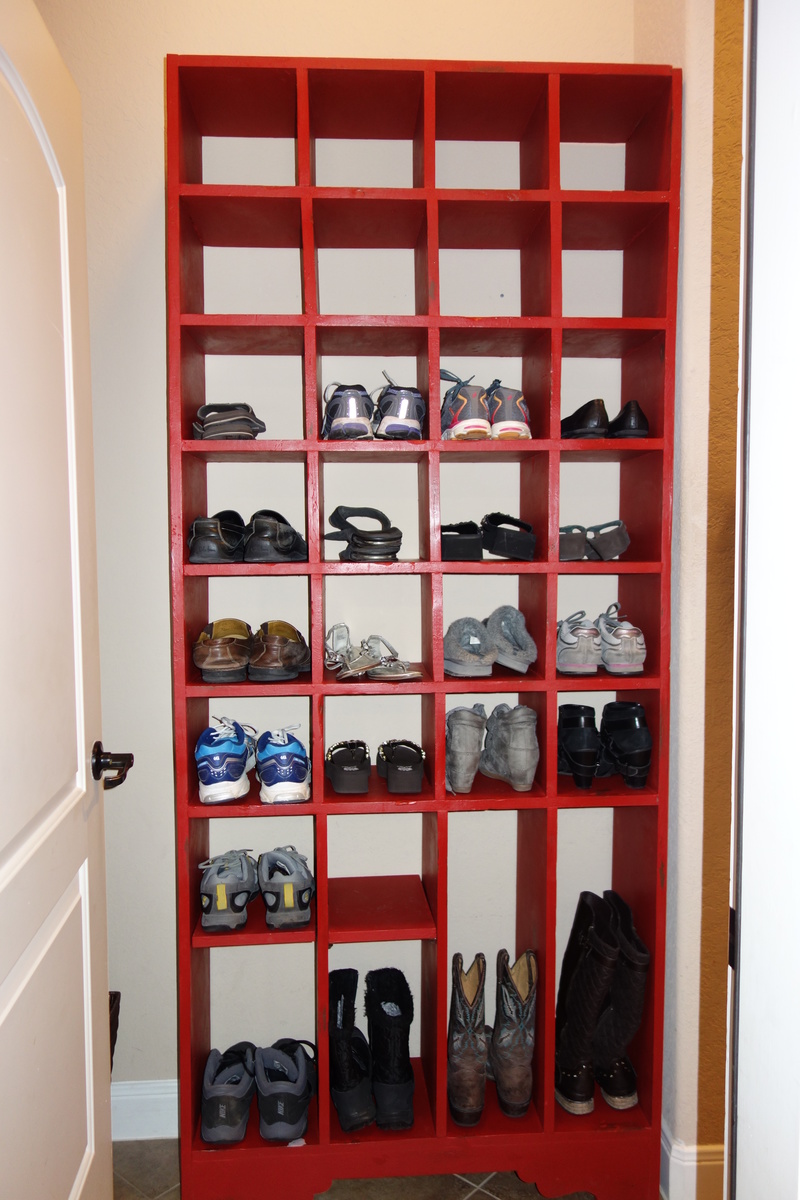
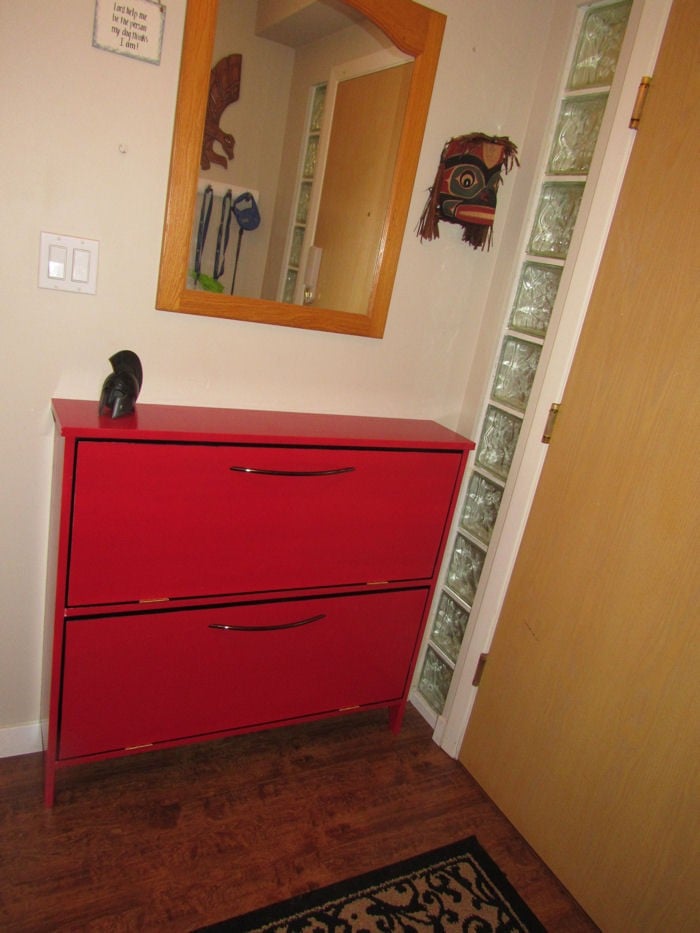
Loved a shoe cabinet at Mobler Furniture, but hated the 300 dollar price.
Figured Ana would have a plan: She Did. We used the Shoe Dresser plans but I built the gables in one piece to eliminate the need for separate feet. The overall length is only 38 inches. I built it counter height.
Because we used wood that we had laying around from previous projects, the drawers, and the unit are made of pine, while the top is made of oak. Total cost for the wood was 30 canadian dollars.
Rather than buy catches, I ran an extra support rail under the top, which made attaching the top easy, but also served as a "bump" for the closing door - it adds a satisfying clunk when closing the doors. I did the same for the second door too.
The handles were purchased for a project in our previous house and used here instead.
We used paintbrushable Tremclad matte black for the interior (23 bucks - used less than half the tin.)
We used 1.5 cans of spray Tremclad red enamel for the exterior (8 bucks a tin)
We hit it all with two coats of Zinsser sealer first - 14 bucks, used half.
Total hit was well under a hundred bucks.
Took me a couple days to work out the details, a day to construct, and about three days to paint, one for the undercoat, one for the black, one for the red.
Great plans and a great build. I used 4x4’s for the legs and decided to go with the Farmhouse Bench instead. The color I went with is Weathered Grey. I applied it with a brush and immediately wipes it off with a clean rag, then 2 coats of poly to finish it off.
I needed a new hobby and missed going out on date nights with my husband. So we decided to take on a new hobby that we could do together while filling in our new home. (We moved from Florida to Illinois a year ago) I came across the farmhouse coffee table plans and just loved how it looked. With it being a beginner project I was pretty optimistic about how it would come out. I watched videos on how to stain and use polyurethane on YouTube to complete the project. I love that my husband and I built these together and that we can finish furnishing our new house with things we built.
Our cost was higher cause I added in everything it took to get to the end result.
Loved these plans. Made a table as well. Great set!
Thu, 06/11/2020 - 13:18
I am so in love with the table you made to match! Did you find the plans here?
My daughter found some of these online for $400+ refinished. I was able to locate some locally and did all the refinishing myself and saved a bundle. I have finished 6 of these carts to date. They are old railroad luggage, cotton bale, and whatever movers. They were manufactured around the early 1900's. The ones I have done were made by the Lineberry, Nutting and Globe companies. One piece of hardware is actually cast with a date of Feb, 26 1907. These were a lot of fun and hard work. I carefully disassembled each one including the original nails to be resused, I did not repair any of the wood, just presevered it in its original found state. As you can see from the pictures there are a lot of splits, cracks, and checks in the wood. I wanted to keep those as they added to the caracter of the table. As you can see in the before and after pics there is quite a amazing difference.
Tue, 08/21/2012 - 20:01
Where did you get the hardware ie... the wheels? I've been looking everywhere for the steel wheels
In reply to Factory Carts by Jennifer Branton (not verified)
Wed, 08/22/2012 - 06:46
I have one of these carts unfinished with wheels and all hardware, for 100.00 these carts are heavy so shipping may be an issue. my email is [email protected] i can send pictures if interested.
Sun, 01/29/2017 - 18:16
You don't happen to have any of these still around and/or are selling any, are you? Thank you!
Great project and super easy! Made such a difference in organizing our tool shed. I modified one of the handles because several of my tools would not fit over the 2x4. I also had a challenge hanging it in my shed due to the metal sheeting for walls, but the build itself was very easy. No more messy tool shed! :) As an organization freak, like Ana, this makes me so happy!!!!
Just built this today, very easy build. I used cedar tone treated lumber for the frame and the cedar pickets. I modified the size some, little smaller than the plans. Total material cost about $70.
We LOVED this project. It was pretty simple, yet the outcome was beautiful. We used 2x8 boards for the tops of the benches, just to make sure we had enough space. We also have a toddler, so the bigger seating area is perfect for his booster chair. If you wish to use 2x8s like us, you will want to cut your middle support board 7" and the end aprons/stretcher at 10". So for example;
Cut list for one bench (adjusted for 2x8 boards on top):
2 - 2x4 @ 66" - long aprons
4 - 2x4 @ 16-1/2" - legs
4 - 2x4 @ 10" - end aprons and stretcher
1 - 2x4 @ 7" - middle
We used the normal plans for the table. The total came out to be $110 for both the table and 2 benches. That includes all the wood and screws. We were lucky in that we still had stain and wood filler from previous projects. Overall, I would 100% recommend these plans. Thank you ANA White!!!!