Community Brag Posts

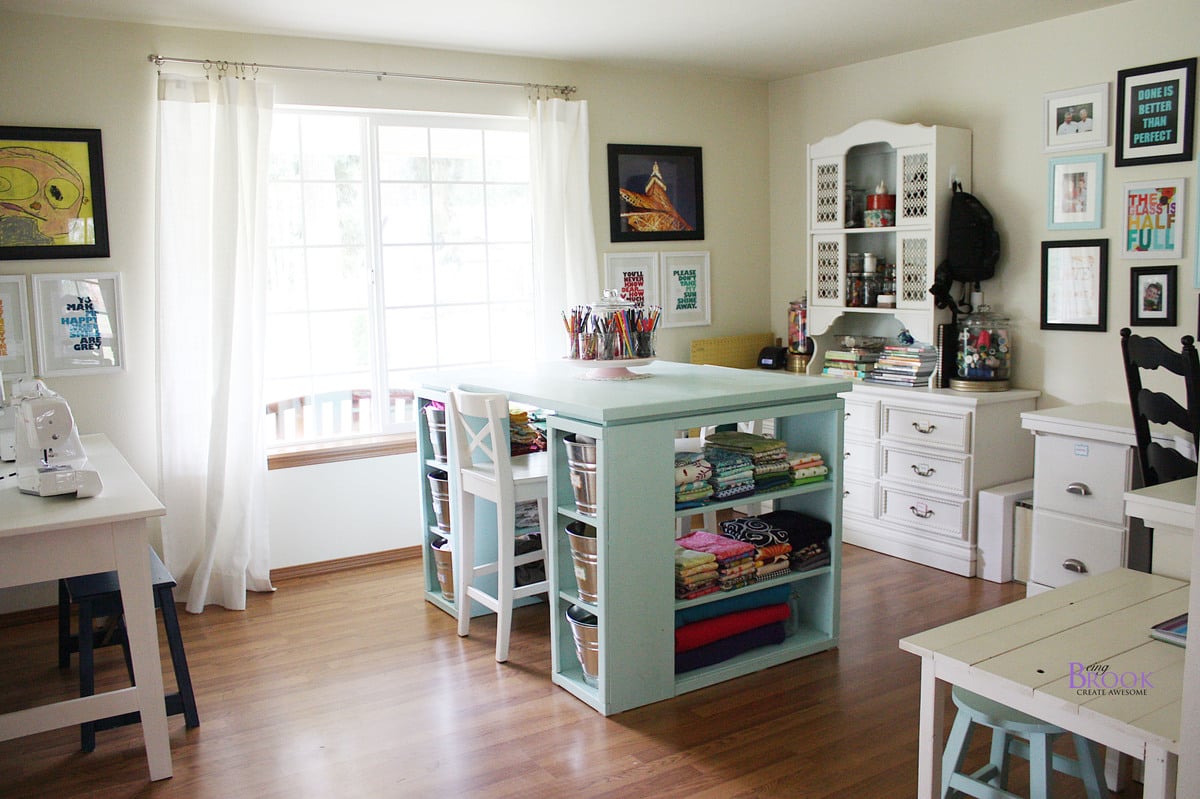
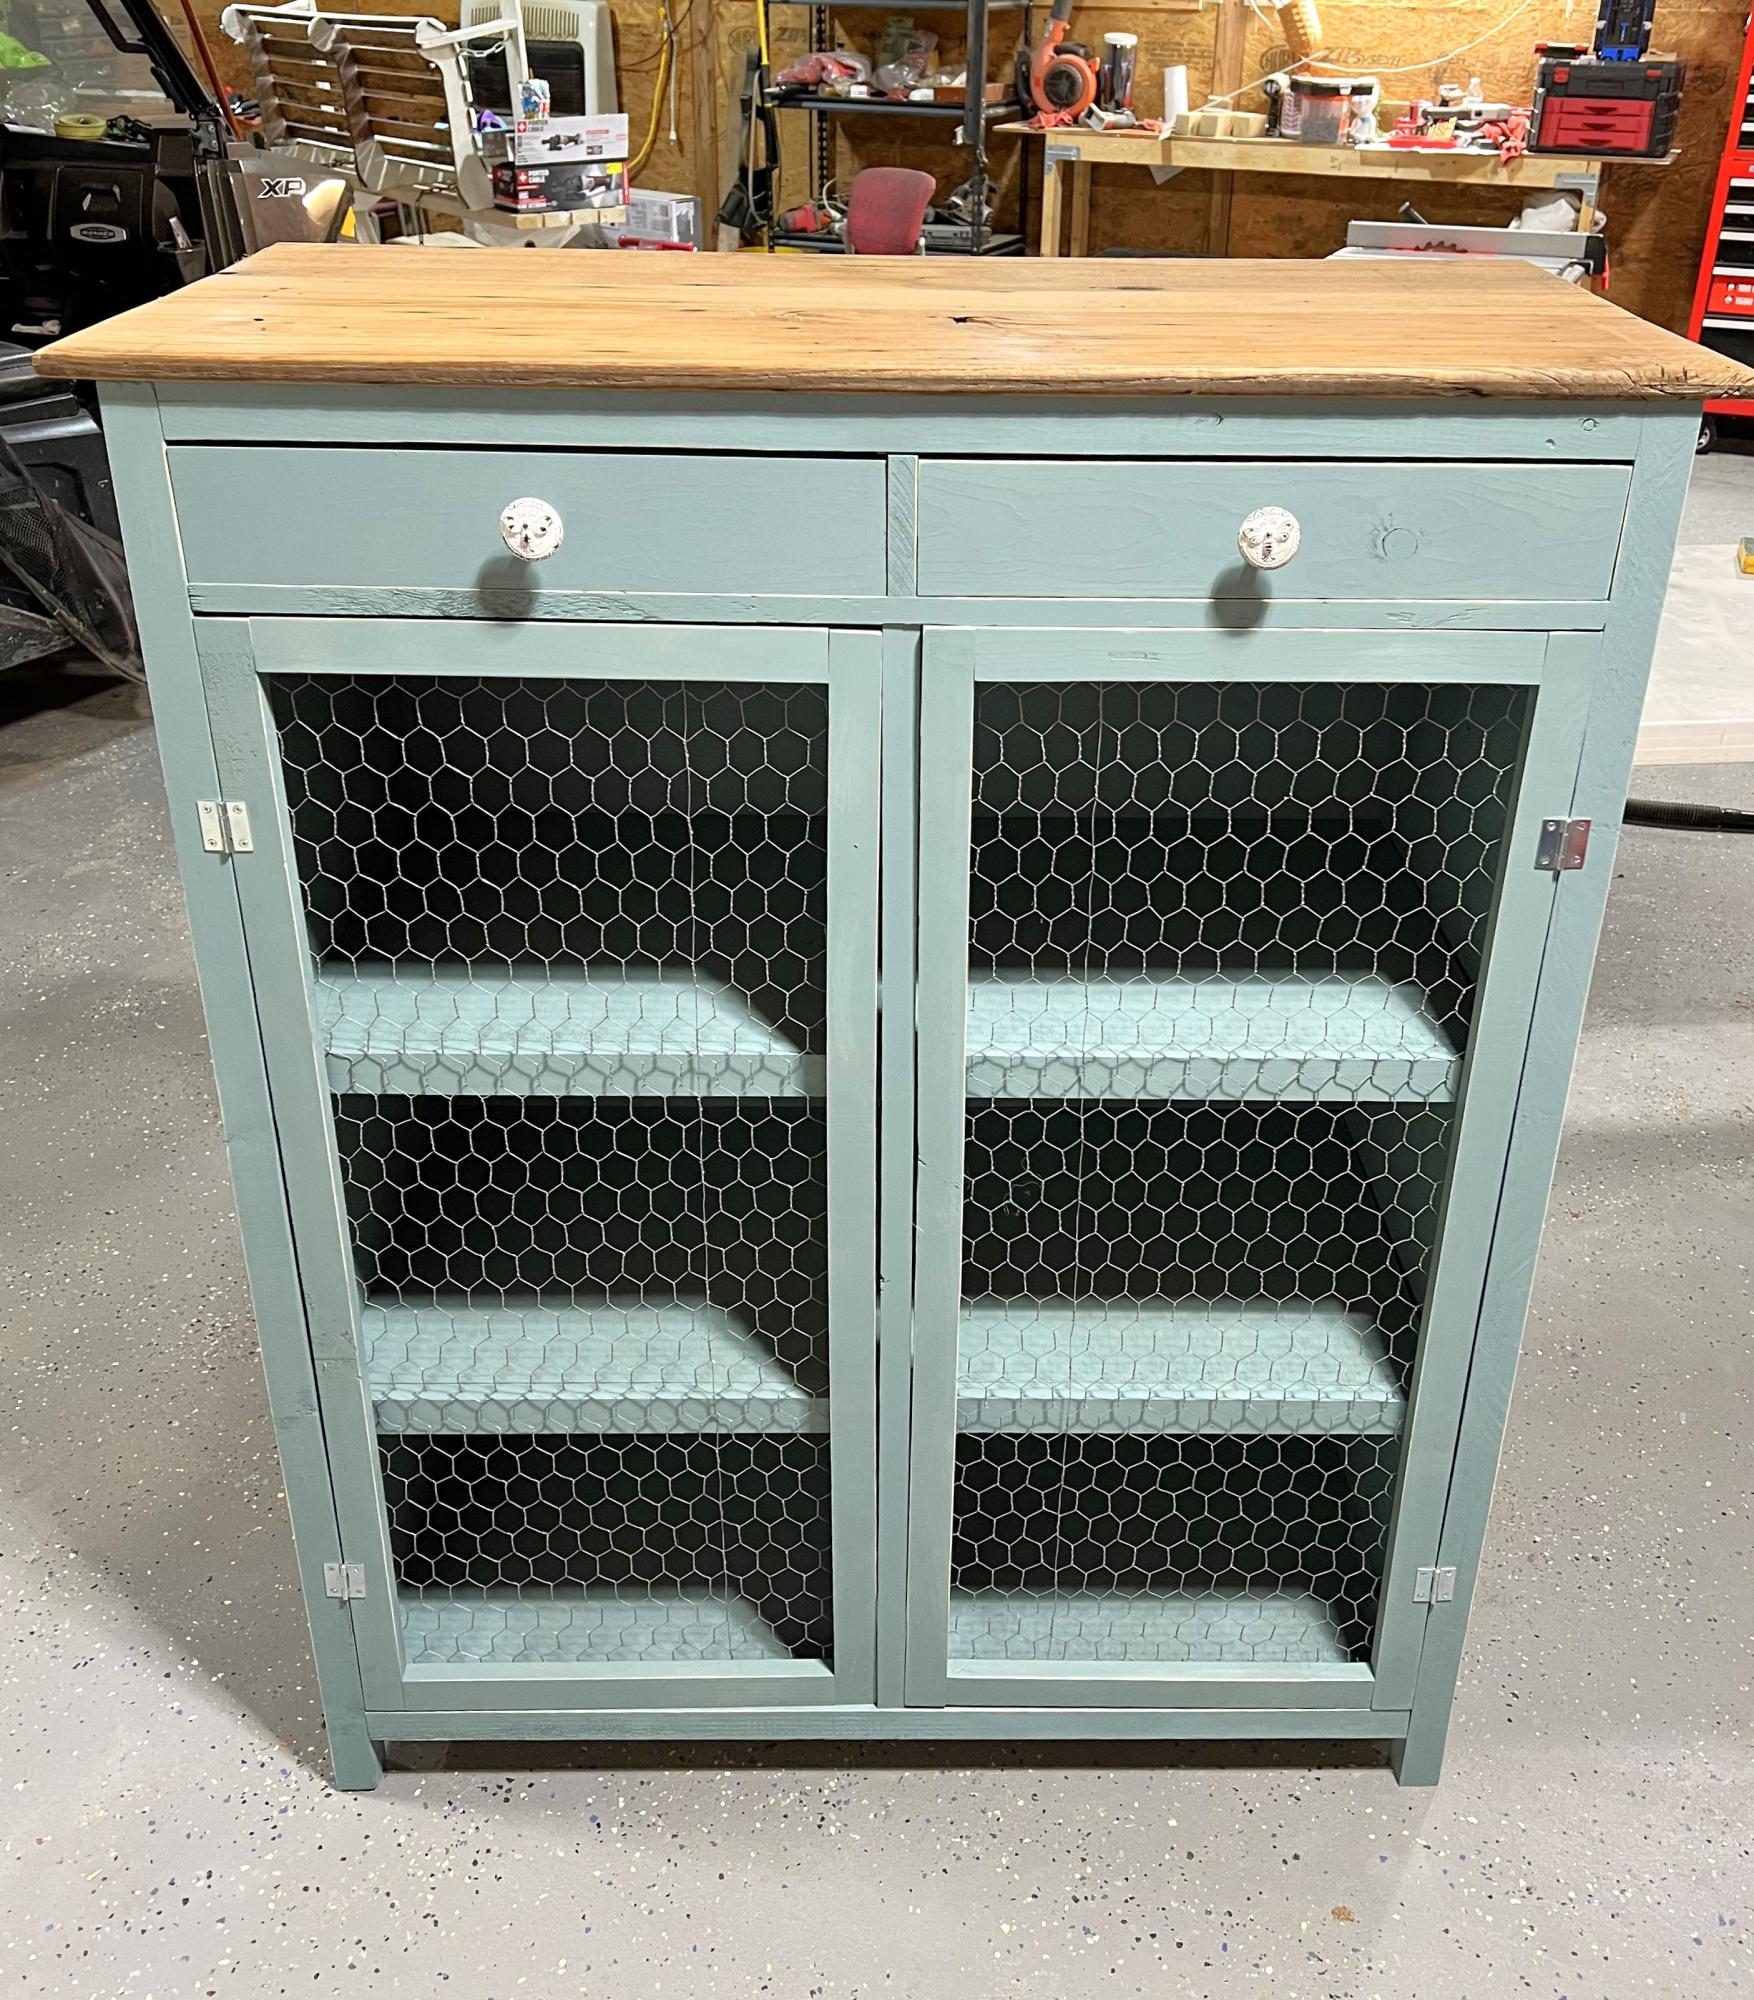
Modern Craft Table-Aqua

Submitted by beingbrook on Sun, 01/15/2012 - 15:16

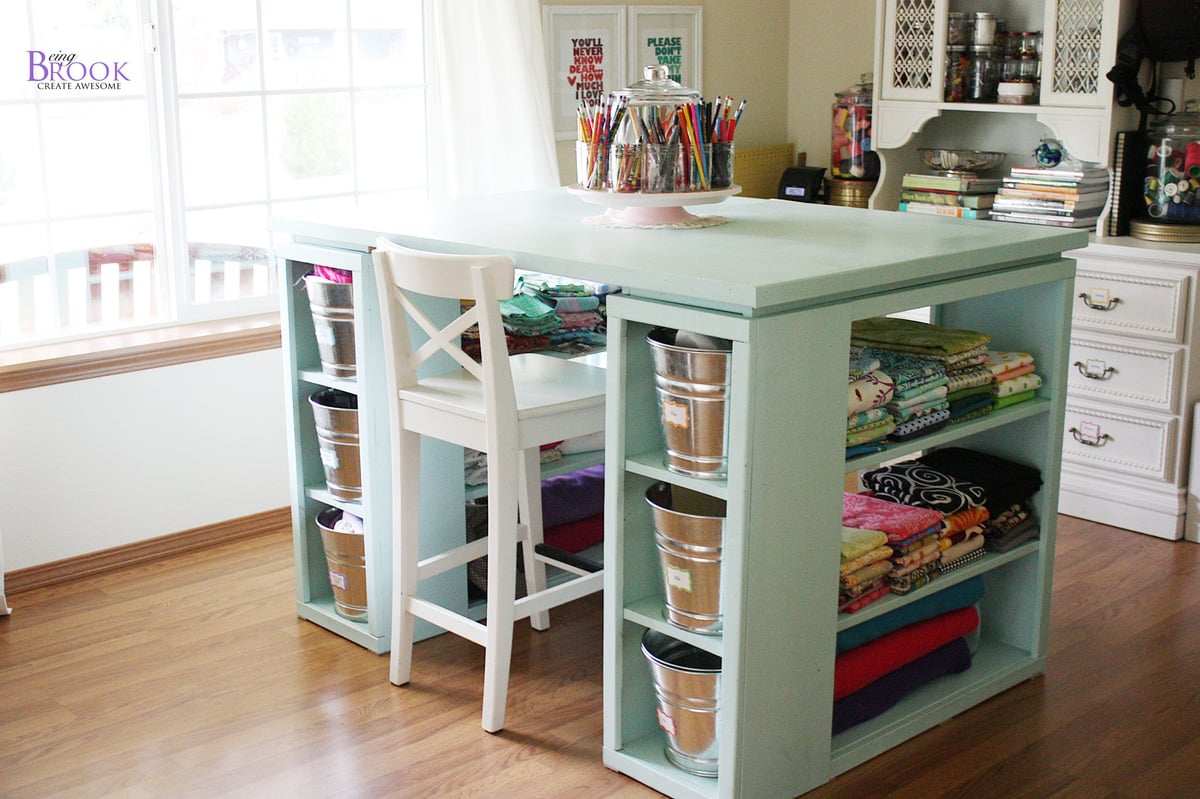
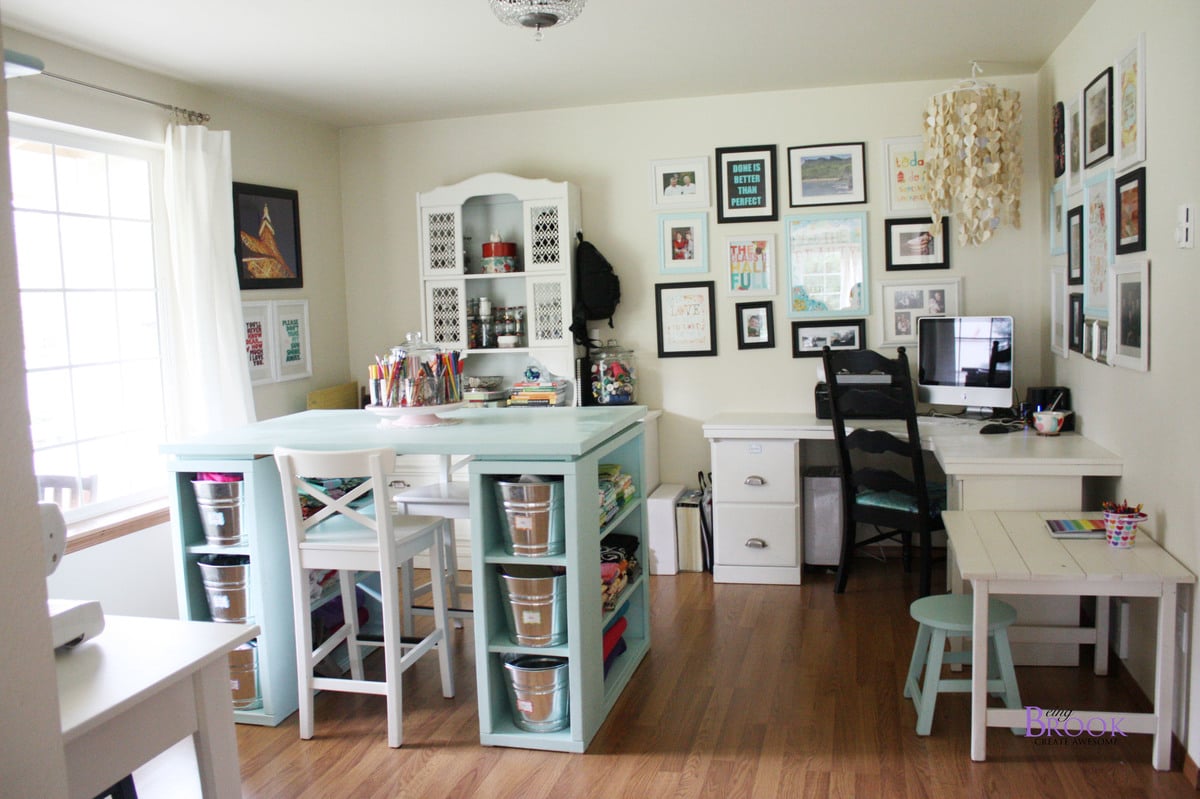
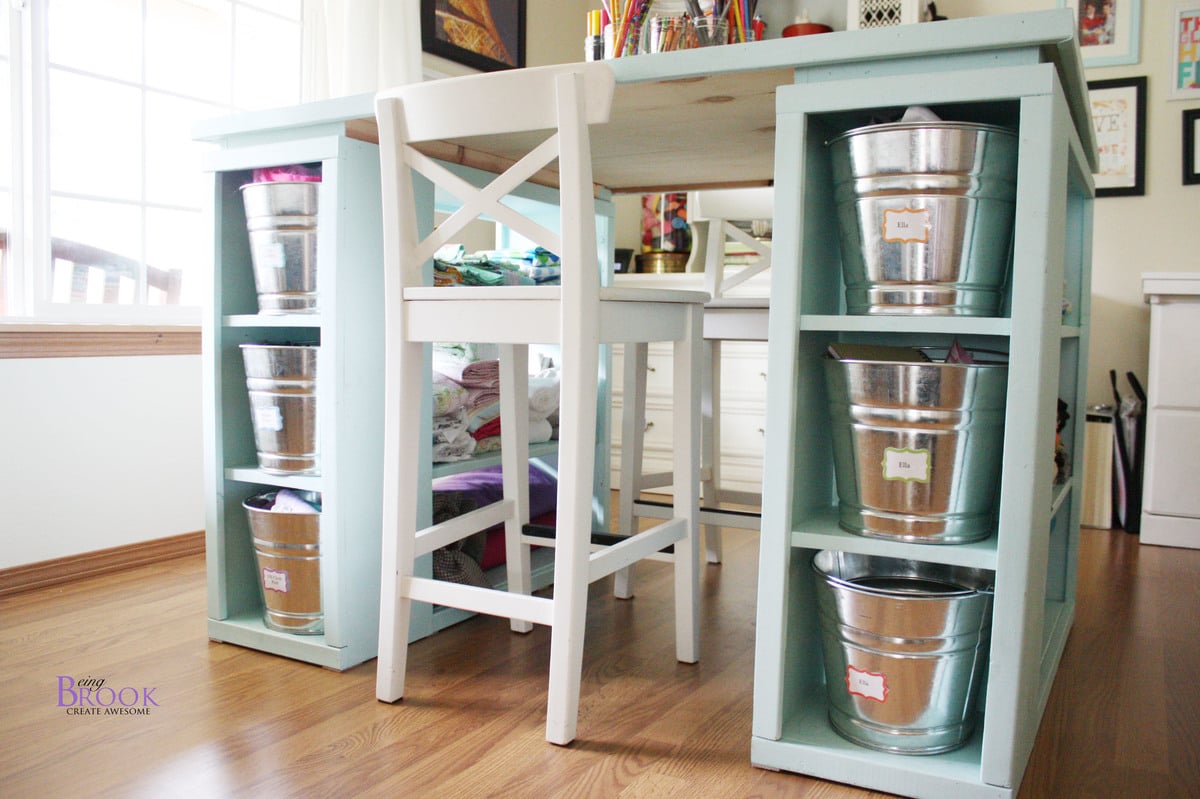
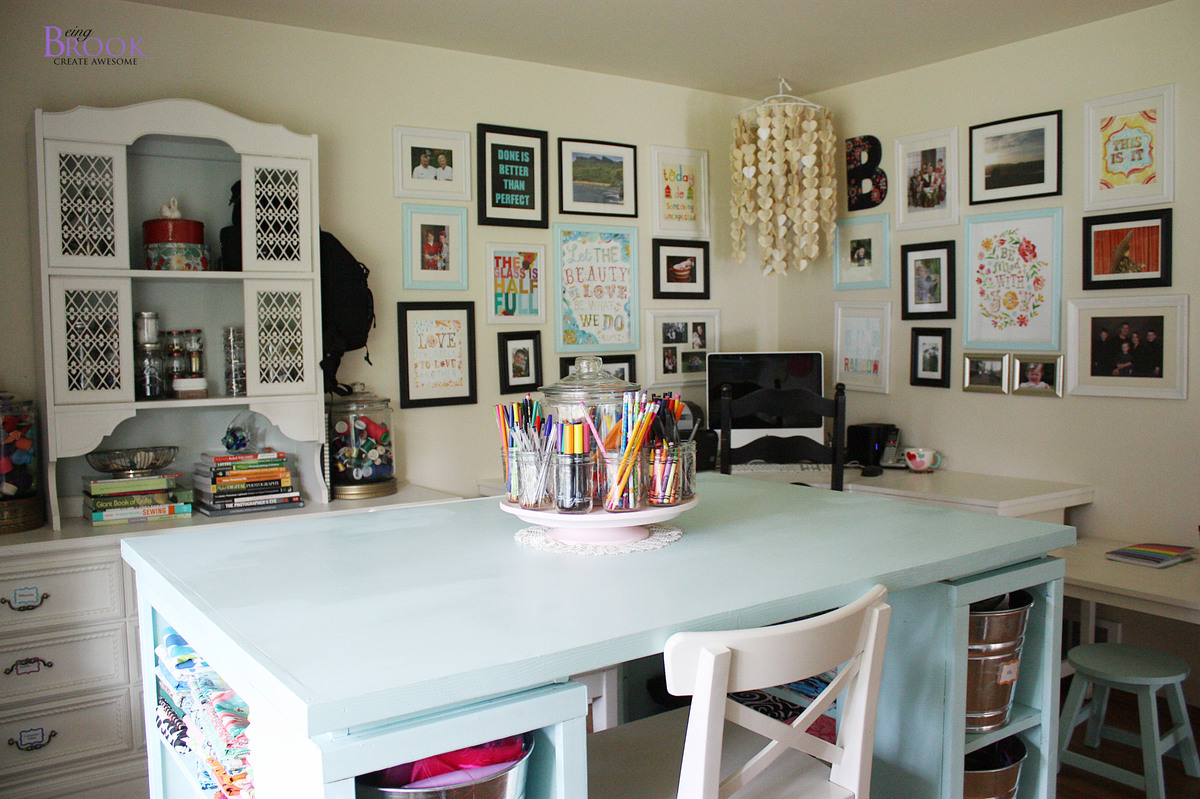
Love the Modern Craft Table! It has lots of storage space and tons of workspace on top. We used pine for the shelves and plywood for the top and edged the top with pine.

There is a spot for two counter stools at the opposite ends of the table which is perfect to give kids their own spot to craft/color.

Built from Plan(s)
Estimated Cost
$150
Estimated Time Investment
Day Project (6-9 Hours)
Finish Used
Primed and Painted with Two coats of Behr's Woodwind Springs. Top has two coats of polycrylic.
Recommended Skill Level
Intermediate

Comments

Guest (not verified)

Sun, 01/15/2012 - 20:10

I love this table but I wonder how do you use it to sew with? or do you sew on this table?

beingbrook

Sun, 01/15/2012 - 20:24

I don't use this table to sew on. My craft room also has a sewing table that we built using the narrow farmhouse table plans. I use this to craft on and to cut fabric out.

Guest (not verified)

Mon, 01/16/2012 - 10:03

the whole room is beautifull. how many of the other pieces of furniture were built using Anna's plans?

Guest (not verified)

Mon, 01/16/2012 - 10:03

the whole room is beautifull. how many of the other pieces of furniture were built using Anna's plans?

mebohn

Mon, 01/16/2012 - 12:06

This table is fabulous and I'm really in love with the color! Thank you for sharing. So many new ideas for my room now!

mebohn

Mon, 01/16/2012 - 12:06

This table is fabulous and I'm really in love with the color! Thank you for sharing. So many new ideas for my room now!

Lis West

Mon, 01/16/2012 - 17:32

You won't believe this...but today I was shopping for the wood to make the Modular Craft Table, but I did not buy the wood because I was trying to tweek the plans to change the "cubbies" and size. So, I came back to this sight and here is this craft table that would be much better. I want to make it table height rather than counter height so I can sit down and sew at it. I also want to be able to drop the back 12 inches of the table if I do not need it and so it will fit better in my room, wheels on the bottom to pull it out easily so I can extend the 12 inch table when needed. I love what you have done!

Cindy from Indiana (not verified)

Tue, 01/17/2012 - 11:36

You did a fantastic job on this project! Love the way it looks and the color!

Great job!

Ricci (not verified)

Sat, 01/21/2012 - 07:00

I love this table, but I can't seem to find the directions to make it. Can you point me in the right direction to find it?

Joe (not verified)

Wed, 01/25/2012 - 17:24

Is there a reason you can't sew on this (from what I gathered from a previous comment)? I want to build something for my wife's craft room and love this, but she will need to sew as well. Help?

Brook @ BeingBrook (not verified)

Wed, 01/25/2012 - 17:32

Joe,

It would be hard to sew at this table because the table is counter height. You wouldn't be able to reach the foot peddle to run your sewing machine. You could alter the plans to fit a spot that could hold the peddle foot. I sew on a different table in my craft room and use this for cutting fabric and general crafts.

Brook

Guest (not verified)

Wed, 01/25/2012 - 19:26

at one time I had my sewing machine in a spot that was counter height. I used a wood box to put the foot peddle on. One of anna's steep stool plans or the bathroom platform for kids plan might be good to build with this. It was also nice when I was sewing small pieces that needed lots of ironing to stand and sew at the counter.

Guest (not verified)

Wed, 02/01/2012 - 14:25

I have a modern sewing machine (within last 5 years) and I routinely sew at counter height with no problem. I prefer it because it really helps my back. I cannot wait to make this!

Guest (not verified)

Fri, 02/24/2012 - 22:36

Joe,
I think it would work to mount the foot pedal on the inside of the shelf area. She would use her lower outer thigh to depress the pedal while seated.

Angela Preimesberger (not verified)

Tue, 05/08/2012 - 07:47

I love this table! I'm with Brook and don't sew on mine. Height issue is easily worked around - main issue is usually back support. Sewing at a huge workstation tends to leave you feeling unsupported and sitting on a stool (I have a nice wide comfy one from Target) leaves your back unsupported so you usually slouch (bad! bad!). I sew at my smaller desk in a good supporting chair and use my table for everything else. I use this table for a true work area including cutting. I have an Accuquilt Studio and that sucker is HUGE and heavy!

Michele Crane (not verified)

Mon, 11/12/2012 - 11:22

I just talked my fiance' into building this for me to use as a desk. I need a desk for my work from home position where I can store everything as well as have a large area to spread things out. I loved this the moment I saw it and talked him into building it for me. Can't wait to post the pictures when it is finished.

bbawol

Wed, 12/12/2012 - 16:47

I was wondering if you could tell me where you got the chair from? It looks like it pairs very well with this table and I would love to get one for my wife for her table I just finished.

nkliegel66

Thu, 02/28/2013 - 16:15

My husband made this FABULOUS Craft Table for me last weekend, it turned out PERFECT! Thank you so much for posting this with such detailed directions....

What do you have in your galvanized pails? What do the labels say?

Thank you!

2 X 4 Adirondack Chairs and Tables with a Twist

Submitted by Anonymous (not verified) on Wed, 05/31/2023 - 15:59

I had a bunch of my old skis that I had used as a display wall in my chalet that I needed to do something with, and this was a perfect solution!

Comments

My First Project (Home Depot Inspired Bookcase)

Submitted by C.Lang on Tue, 01/31/2012 - 19:26

My wife was watching TV and she saw a Bookshelf on a Home Depot commercial with diagonal shelving. She kept telling me how much she wanted a bookshelf like that. So, for my first wood project ever, I decided to try and tackle it for her. It is slightly over 7 feet wide and a little over 6 feet tall. I am currently trying to learn sketchup8 to create plans for this project.

Unfortunately I didn't use a certain plan from Ana's site for this project, but you can find any bookcase plan and place the diagonal shelves in place of the horizontal ones.

Estimated Cost
about 500 ( because I am a novice. Im sure someone with more experience could build it for much less depending on type of finish)
Estimated Time Investment
Week Long Project (20 Hours or More)
Finish Used
Benjamin Moore Black with a pearl finish
Recommended Skill Level
Starter Project

Comments

loniwolfe

Tue, 01/31/2012 - 21:02

So you totally just solved my no fireplace dilemma! I think I'm going to take your design here and leave an open space for some electric logs. Thank you so much for sharing, it is really stunning!

In reply to by nicwolford

C.Lang

Wed, 02/01/2012 - 06:10

Those were challenging because, as I stated before I am not even a beginner. I was going to try and use my little trim router to cut them but I learned quickly routers cause much saw dust. I don't have a router table and my router is small. I decided to use my miter saw. I measured out where the slots should go and Cut the outside boarders of the slots with my miter saw. I don't have a jig saw either so I chiseled the the remaining piece to form the slot. I then used my small trim router to smooth out the slots. After I got in a groove it went pretty fast. It was a lot of Slots. Like I said before, I am very new and I know there are easier ways to do this lol. Just a hint..If you ever use interlocking slots and plan on painting the project, I wouldn't make the slots exact to the bare wood. The primer and paint add to the thickness of the wood so it is important to take this into consideration before cutting the slots. Again, very new to this.

Guest (not verified)

Wed, 02/01/2012 - 06:28

I don't think that you can say that your "new to this" any more. You cut your teeth on quite an ambitious project. You did a fantastic job! And just wait till you learn sketchup, the FUN you will have! Keep up the great work and keep posting! Can't wait to see your next project!

Robohead

Wed, 02/01/2012 - 12:32

I've never seen a diagonal bookcase before, but I like this one. You'll never have to worry about straightening books that have fallen on their sides either.

Debi G

Sat, 02/04/2012 - 15:22

This book case looks truly expensive! My excuse is always a lack of tools, but look what you did with what you had! Everything is square and precisely done.

In reply to by Debi G

C.Lang

Sat, 02/04/2012 - 19:26

Thank you for your kind words. I appreciate all the input I have been getting. I look forward to posting more projects and getting more ideas.

katiesommer

Tue, 02/07/2012 - 12:16

I really hope you post your plans! You did a nice job. I'd like to use a very scaled down version of this to make a wine rack in an open cupboard we have over our sink. Might have to pick your brain later. ;)

mrs2tone

Tue, 02/07/2012 - 20:25

I saw the same commercial your wife saw, and kept trying to describe the bookshelf to my husband. Now I can show him. Thanks for posting,and I hope you figure out Sketch Up so we can see your plans!

In reply to by mrs2tone

C.Lang

Wed, 02/22/2012 - 20:33

I have started to figure it out a little bit. I thank you for the comments and am close to finishing the plans. Again thank you for your comments

Guest (not verified)

Fri, 02/17/2012 - 14:15

My daughter loves to read, I am going to see if my husband can turn this into a headboard.I will post pics if it turns out! Great Job!

In reply to by Guest (not verified)

C.Lang

Wed, 02/22/2012 - 20:34

That would be an amazing project. If your husband does convert it, I would love to see the final results.

Emily Mazzone (not verified)

Wed, 04/04/2012 - 11:09

And I second the headboard idea!

Angela Merrill (not verified)

Thu, 05/10/2012 - 17:29

Wow! That is wonderful...I have a similar one that I LOVE and wanted for years. It was in the Pottery Barn Catalog and OUTRAGEOUSLY priced...I don't remember exactly the $$. When "Hold Everything", a subsidiary of PB, went out of business, I got the second to last one they had in stock for $200. AND...When I saw the HD commercial I realized I might be able to make a more custom version someday. Your story inspired me to plan something, and also to perhaps even open up and learn SketchUp which I downloaded months ago...Look forward to more projects!

Tausha (not verified)

Mon, 10/15/2012 - 20:33

Well it's crooked. LOL Jk I think it is insanely awesome! I hope my first project is even half as good!

alu906

Mon, 07/15/2013 - 10:09

Great beautiful first build! Thank you for this great idea that triggered an idea for myself. Going take this format, and adjust the dimensions to fit as a wine shelf.

Rustic X Bench for Entry

Made 2 changes to the plans which was using a 2 x 4 as a center top board to add some variety to the board width and also decided to go with breadboard ends which also used 2x4

Thanks for the plans!

Built from Plan(s)
Estimated Cost
$50
Estimated Time Investment
Afternoon Project (3-6 Hours)

Lets make a Bar Table!

I got so inspired by Ana White I just assumed I can make anything just like her :D
But deep inside I knew, I wasn't nearly as good as her :(

So when we needed a bar table of definite length and height and type and color and way out of our budget, I thought to myself "hey girl! you can do this ;)"

So I came up with this super easy plan.
You can read all about it from the link below

http://tinyurl.com/pkntwa9

Estimated Cost
50
Estimated Time Investment
An Hour or Two (0-2 Hours)
Finish Used
Minwax
Recommended Skill Level
Starter Project

Comments

rjbarthel

Sat, 02/13/2021 - 06:51

Hi Anna I have enjoyed coming to your page and have made many things from your plans but your page is so over run with pop up adds that it is jumping all over the place and give me a headace from all the movement sorry to say I must leave

Farmhouse King Bed Frame

Since developing a love for woodworking I’ve began building things for other people. This particular bed frame I built for a couple who are rebuilding their home after it unfortunately burned down. It’s a beautiful farmhouse home out in the country, and this bed frame fits perfectly in their new home.

Estimated Cost
$250
Estimated Time Investment
Weekend Project (10-20 Hours)
Finish Used
I used minwax pre-stain to prepare the wood. I then stained it using special walnut by Varathane (got it from The Home Depot). Finally, I finished it using a clear satin polyurethane by Minwax.
Recommended Skill Level
Beginner

Kennedy's Christmas Surprise

Submitted by Anonymous (not verified) on Mon, 01/20/2020 - 07:37

My granddaughter had been wanting a loft bed for well over a year. We decided after a year it wasn't just a phase so I went to Ana's website and got the plans. Can't thank you enough Ana! Easy to follow instructions, sturdy finished product and most of all a VERY HAPPY granddaughter! We call that a Win/Win.

Built from Plan(s)
Estimated Cost
$170
Estimated Time Investment
Day Project (6-9 Hours)
Finish Used
Valspar White
Recommended Skill Level
Beginner

Twin Raised Planter Boxes

Submitted by dave92082 on Sun, 04/29/2012 - 18:46

This is a build of the Raised Planter Box design by Tracy. While it is a fairly simple plan, I would still call it intermediate. One thing to note is that the bottom Cross Supports are listed in her plan as 46" when they need to be 47 1/2 to match the side panels. You can see in the picture above, I laid the incorrectly cut piece on top of the correct one that is screwed in.

Estimated Cost
Around $50 each ( a little less not counting hardware)
Estimated Time Investment
Day Project (6-9 Hours)
Finish Used
Going to prime and paint soon.
Recommended Skill Level
Intermediate

Comments

tracysmith

Sun, 04/29/2012 - 20:34

Thanks Dave for posting the pictures.. I see what you did differently from my plans and I think the way you did it was MUCH better. Congrats on the build, they look great!!! I'm going to rearrange my plans to make the changes and post the correct measurements to reflect that.

Kentwood Bookshelf

Submitted by BeckySmith on Thu, 05/10/2012 - 05:11

This was one of my first bigger builds. I am so happy with the way it turned out!

Estimated Time Investment
Day Project (6-9 Hours)
Finish Used
Golden Oak. I applied the stain with a foam brush and wiped off excess after about five minutes.
Recommended Skill Level
Beginner

Comments

canadianlam

Thu, 05/19/2016 - 19:05

This bookcase wouldn't be out of place amongst the Pottery Barn's bookcases. In fact, it inspired me to go out this afternoon and buy some cedar boards so I can start building my own version first thing tomorrow. Thank you, Becky.

Modified L Shaped Desk

This was my first woodworking project in a couple years. I modified the size to make it about 60" on each side. Now that  I am working from home now due to COVID-19 for the foreseeable future this has been perfect to use in order to have two monitors and enough room on the sides for other work. 

Estimated Cost
70
Recommended Skill Level
Beginner

Comments

Deck Chair

Submitted by bigskygirl on Tue, 05/29/2012 - 12:44

I used the plans for the simple outdoor lounge chair and just made the arms wider, the cushions came from Target.............the dog loves it !

Built from Plan(s)
Finish Used
Benjamin Franklin oil based Dragons Breath
Recommended Skill Level
Beginner

Comments

Londons91 (not verified)

Sat, 07/28/2012 - 18:06

My husband and I love to sit outdoors and read with a hot cup of tea. The wide are will be perfect for us. Would you mind sharing the cost of your project?

Camey21

Sun, 09/14/2014 - 22:04

Hi!  I would love to make this patio set but I am having some trouble with cushions. I noticed that Ana stated this chair will use a standard size 20x20 cushion.  On your notes it says you got your cushions at Target, are they 20x20, I love the deep cushions but cant seem to find any that sized. Are yours 20x20, or did you modify you project? If so, what dimensions did you use? Thanks so much!!!

Camey21

Sun, 09/14/2014 - 22:05

Hi!  I would love to make this patio set but I am having some trouble with finding cushions. I noticed that Ana stated this chair will use a standard size 20x20 cushion.  On your notes it says you got your cushions at Target, are they 20x20, I love the deep cushions but cant seem to find any that sized for the bottom ones. Are yours 20x20, or did you modify your project? If so, what dimensions did you use? Thanks so much!!!

Corner beds

Submitted by CLDavis on Sat, 03/15/2014 - 12:52

Thanks for the plans! The beds turned out great. I just made everything about 6 inches higher for more storage space.

Built from Plan(s)
Estimated Time Investment
Weekend Project (10-20 Hours)
Recommended Skill Level
Beginner

Sandbox with Seats

I built this sandbox for my kiddo's because we have cats! It was great. Easy to build, great plans for it.

Built from Plan(s)
Estimated Cost
$50 CAD
Estimated Time Investment
Afternoon Project (3-6 Hours)
Finish Used
Minwax 2-in-1 in Natural
Recommended Skill Level
Beginner

Diagonal Wall Corner Cabinet

Submitted by joeysmom on Sat, 07/16/2016 - 05:09

I made this cabinet first, actually two of them, that way I would know the exact depth to build my other wall cabinets.  The depth without the face frame came to 11 3/4".  I built it exact to the plans, Thank you Ana!  I did modify the height to 36" and the rails of my face frames are 2 1/2" to accomodate the trim at the top and lighting at the bottom.  I have never built cabinets before and never made a pocket hole before either!  But I couldn't invest the $15,000 that Lowe's quoted me, this house is too old.  So I found a really nice set from craigslist and went from there.  I built all my wall cabinets to a custom height of 36".  The doors came from FastCabinetDoors and they are great quality doors.  The door I chose was "Camden" in oak frames and panels.  I used Rustoleum Cabinet Transformations in Pure White for the finish.  I hope to be finished in 5 weeks.

Built from Plan(s)
Estimated Cost
$75 for lumber
Estimated Time Investment
Weekend Project (10-20 Hours)
Finish Used
Rustoleum Cabinet Transformations "Pure White". When I ran out, I switched to Rustoleum Varathane Water based polyurethane in Satin as the clear top coat. Its an awesome product. Magic eraser will take anything off of it! And it is the only polyurethane I have found that doesn't discolor white paint.
Recommended Skill Level
Intermediate

Farmhouse Stair Railing

Submitted by Anonymous (not verified) on Wed, 01/03/2024 - 08:44

We built our house 5 years ago and I’ve disliked our stairs since then. They were never finished and were big and bulky compared to the rest of the house. These plans were the perfect fit. We switched the top 2x4 for an actual handrail, purchased from a big box store. We used pocket holes to install it and I couldn’t be happier. It’s now my favorite thing in the house. We plan on adding a loft and will use these plans for the railing.

@livingsmallerintheholler


DIY Linen Cabinet

Submitted by Anonymous (not verified) on Mon, 01/08/2024 - 10:07

My husband and I built the Hemnes Linen Cabinet for our daughter and it turned out beautifully! Thanks for the plan, Ana.

Cheryl

Built from Plan(s)

Comments