Community Brag Posts

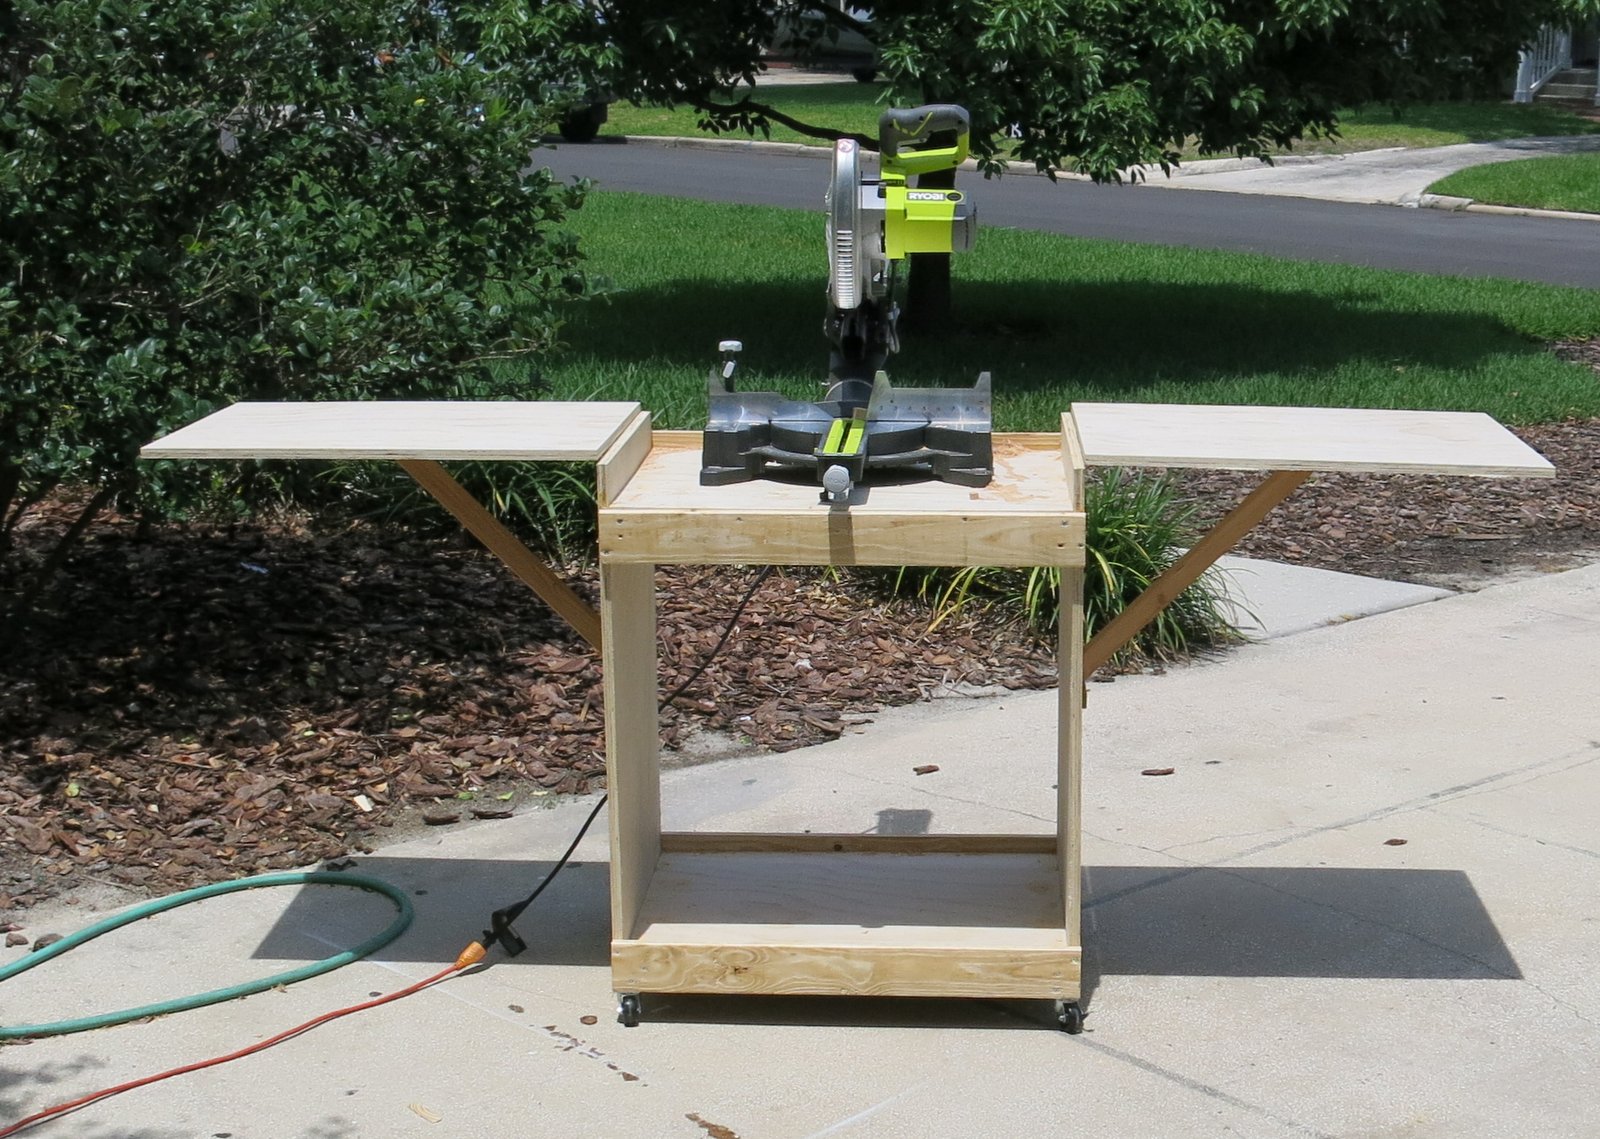
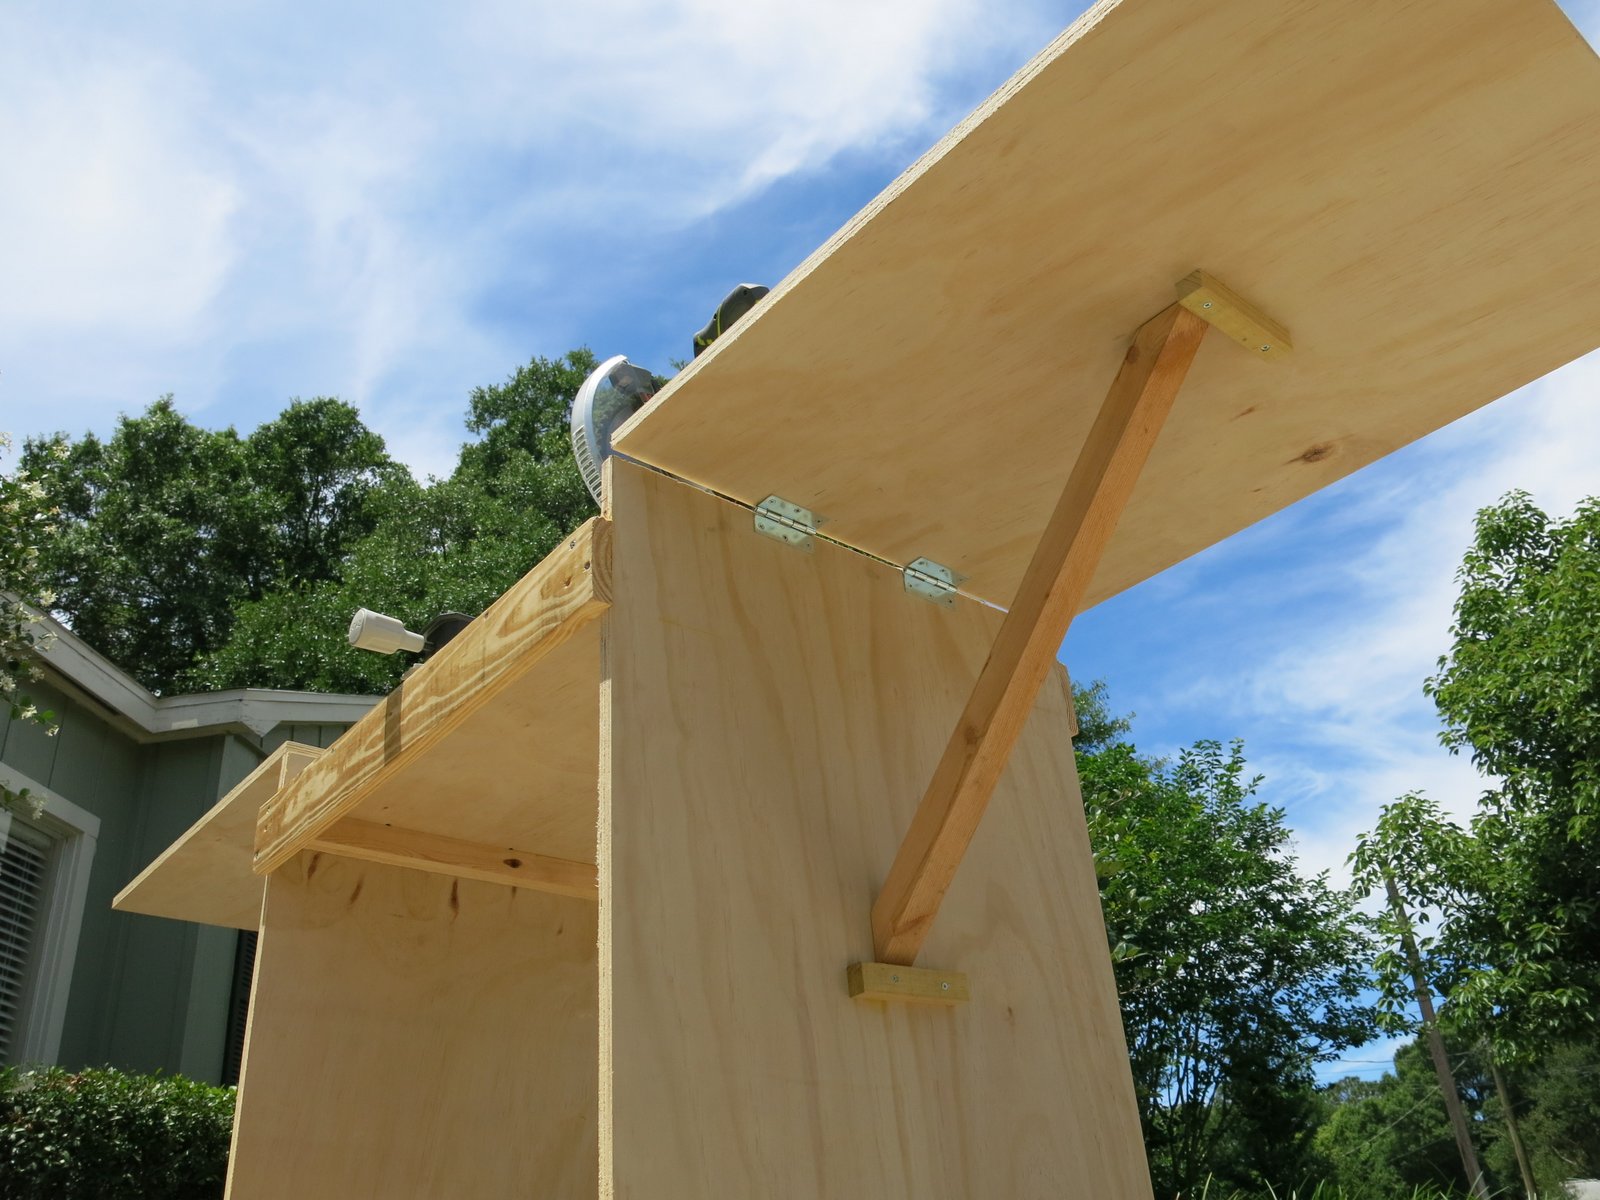
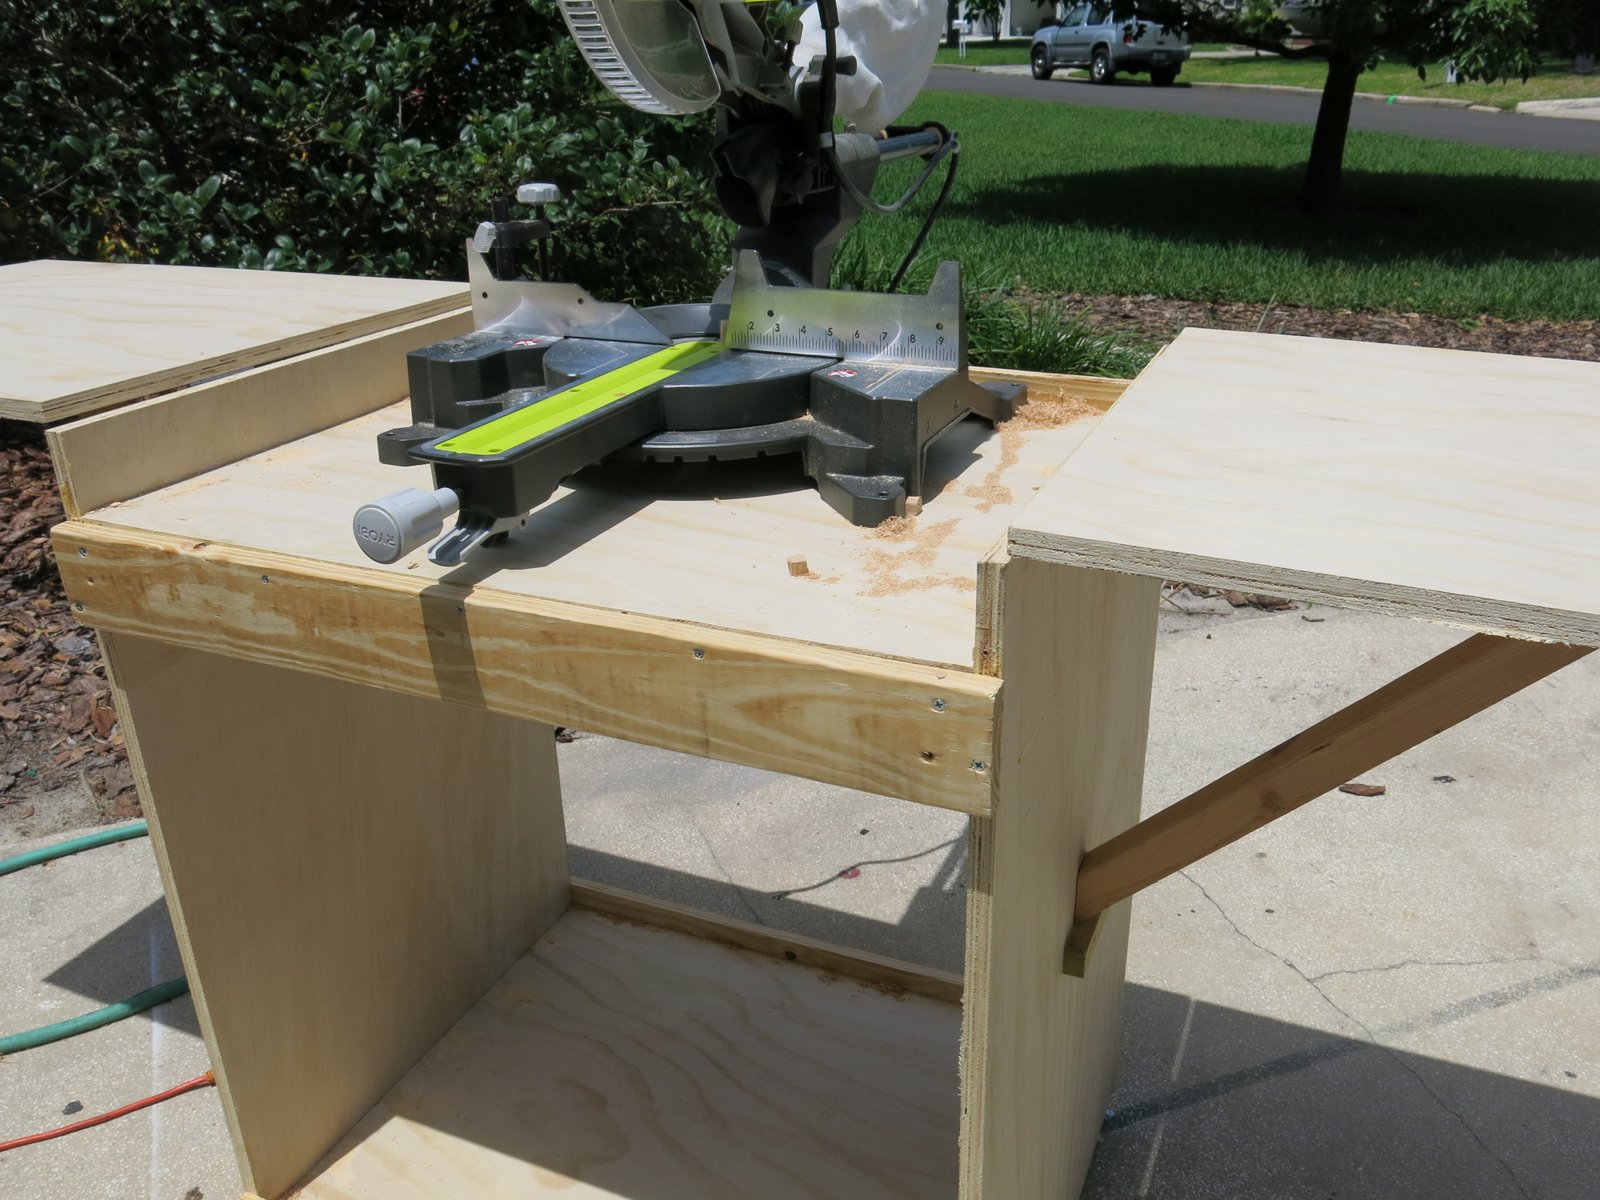
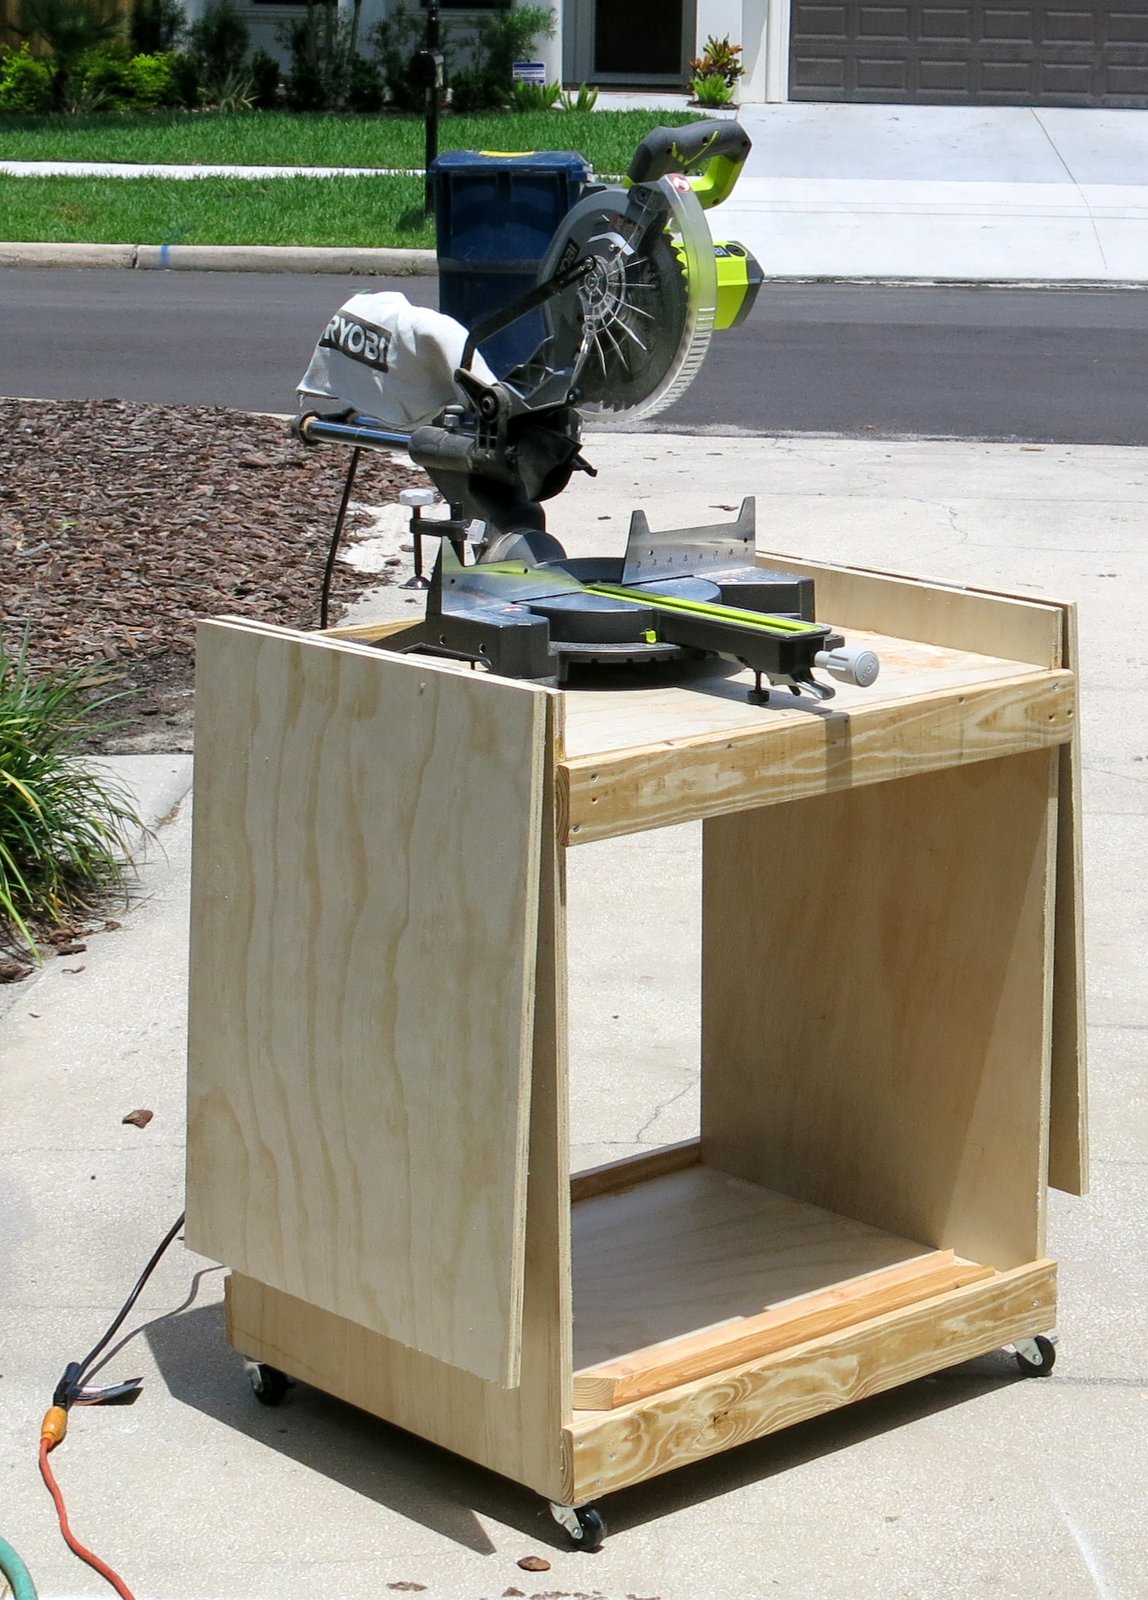
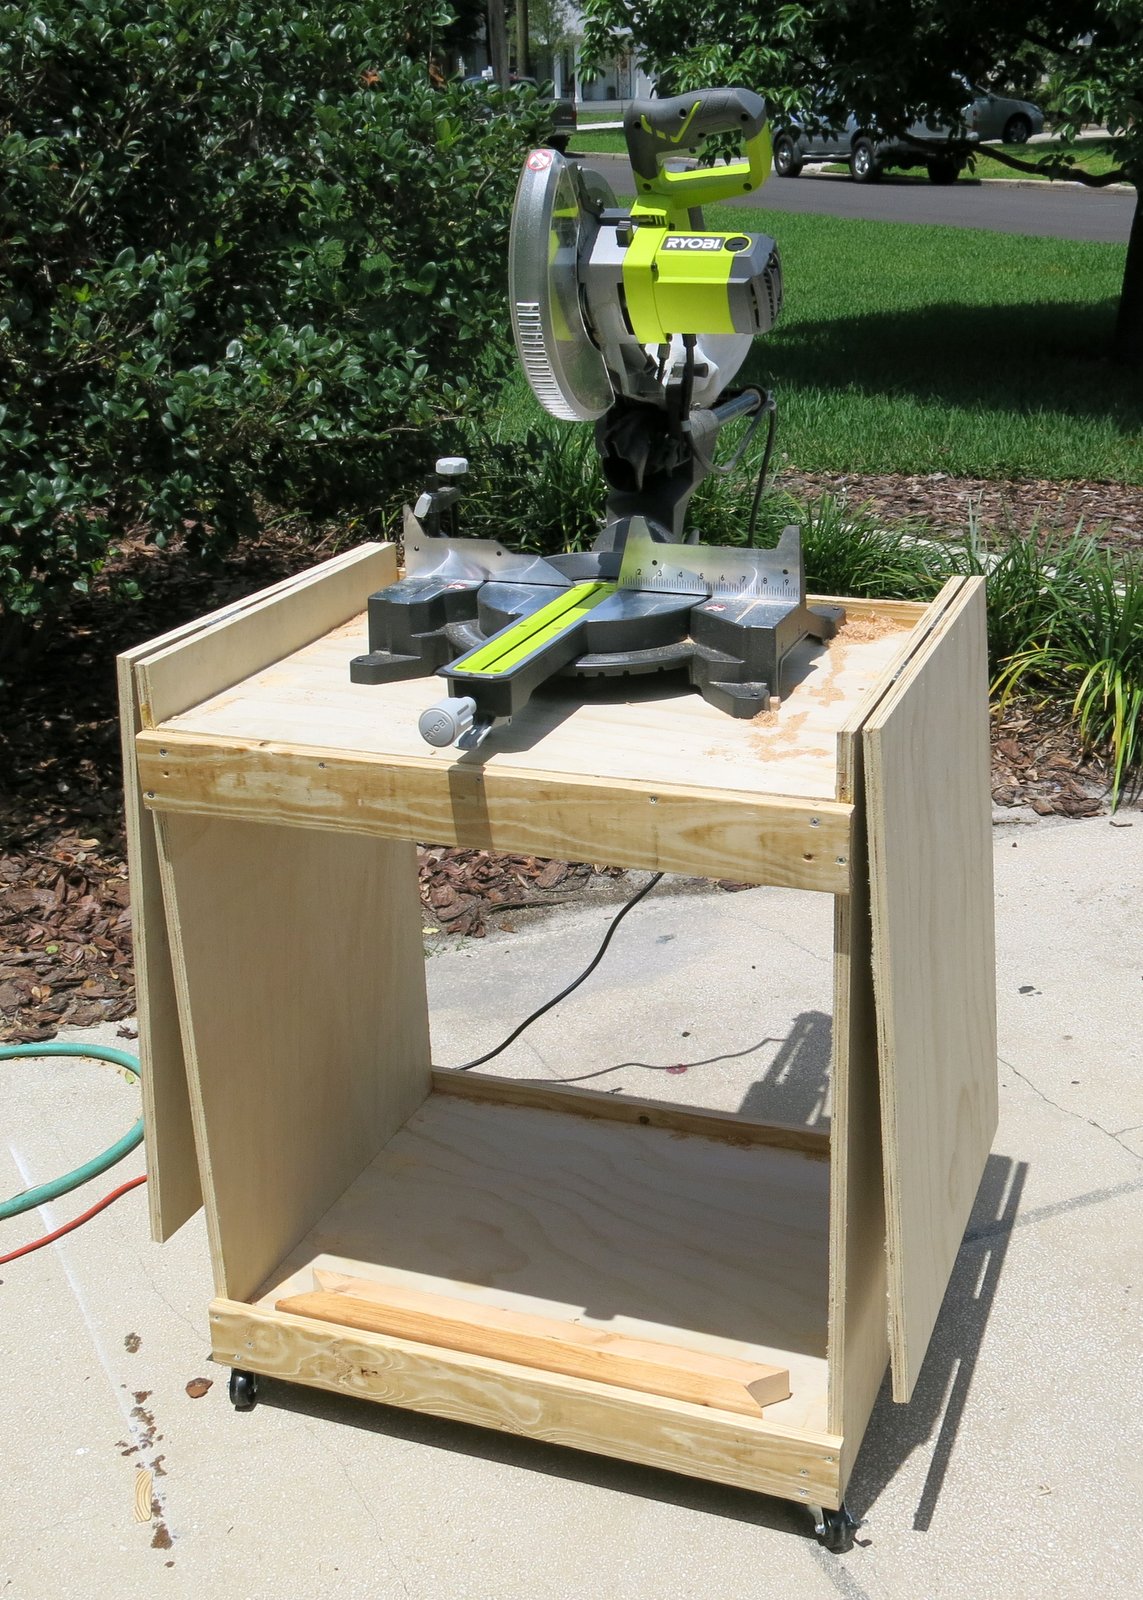
Used 2X2s to support the wings.

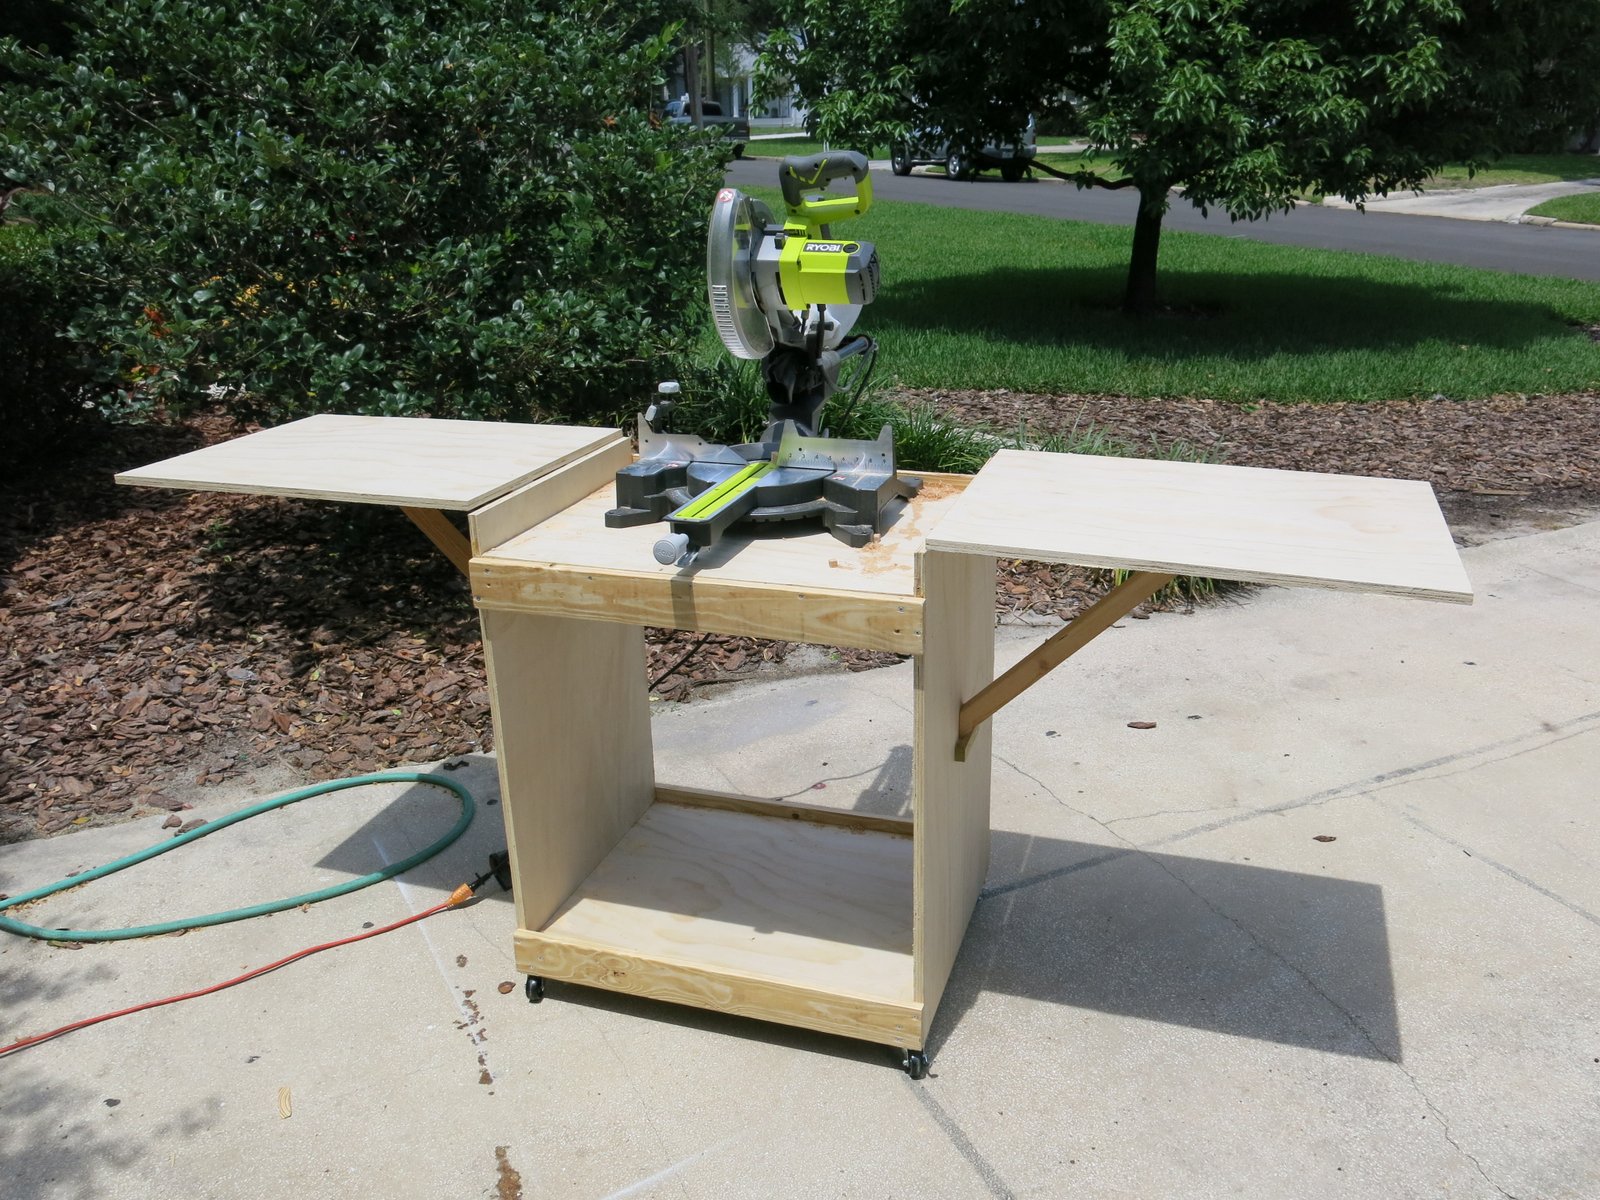
I essentially stuck to the main plan - except to support the wings I used 2X2 boards and standard hinges.

I was worried that there may not be enough space for my Ryobi 10" sliding miter saw because of the slide however, it fits nicely and there is plenty of space.

Thank you for the wonderful plan. This was my first project of this size and I am very happy with the results!

Built from Plan(s)
Estimated Cost
More than I expected. $39 for the plywood (sanded), $16 for the 4 hinges, $17 for the 4 caster wheels. The boards I already had.
Finish Used
None
Recommended Skill Level
Intermediate

Comments

jennibee

Fri, 05/01/2015 - 08:10

This is great. I am currently getting my Dad's help to turn an old kitchen cabinet into a miter saw cabinet with wings like this. (it was a 1940's solid wood kitchen cabinet we took out of the house when we remodeled). I really like your 2x2 support struts. Have you considered putting a shelf in the middle of your box? It would add extra support and also more room to store stuff.

richsessums

Sat, 05/02/2015 - 09:09

Good idea. I did consider adding a shelf however I have now decided to use the lower area to store my small router table. I discovered that it would fit in the spot however it leaves not enough room for a shelf.

Farmhouse Nightstand

Submitted by RenoRustic on Tue, 05/12/2015 - 10:17

I built this nightstand when my wife and I purchased a new bed. We had to rearrange the bedroom and as such, I no longer had a desk or table on my side of the bed. I wanted something "country" style and after searching through several different plans I found a brag post that fit exactly what I was looking for. Well, technically, I found the original Farmhouse Bedside Table plans and modified them to fit what I needed. It wasn't until after I completed the project that I realized there was a "Mini" version as well. What can I say, I'm not that great as using search. I actually built this over a year ago at this point, and it was the second project I ever built. I learned quite a bit on this project, including the fact your project will only come out as good as your lumber selection! This build actually created my addiction for DIY and woodworking. Thank you Ana!

Estimated Cost
$40
Estimated Time Investment
Day Project (6-9 Hours)
Finish Used
I used Minwax Special Walnut for the entire project, then painted the base and drawer Behr white (their basic white off the shelf, I didn't have the paint mixed) in semi-gloss. I antiqued everything for a more rustic look.
Recommended Skill Level
Beginner

Comments

Planters

Submitted by Liz H. on Thu, 03/31/2011 - 11:33

This was a fun easy build...I took the toy box plans and used 1X4s instead of solid sides and bottom.  I cut the legs short and put finals on.  

Estimated Cost
$25
Estimated Time Investment
Afternoon Project (3-6 Hours)
Finish Used
Black outdoor paint.
Recommended Skill Level
Starter Project

DIY Planter Box

Submitted by Anonymous (not verified) on Sun, 12/12/2021 - 17:37

My very first project. Was so easy thanks to Ana's instructions. Dark walnut gel stain and Fusion Seaside. Thank you so much Ana.

Comments

Barnwood Frame

As part of a redecorating project using reclaimed barn wood for our guest bedroom, we constructed this window frame to display some photos from one of our siblings of barns found in Iowa.

The dimensions are 44” X 33” with each photographic image being 11” x 16.5”.
Since the wood had so many bore holes, we used ¾” redwood under the visible fascia for added strength.

Cost - $75 / 4.5 hours to build.

http://ana-white.com/2009/12/plans-barnwood-frames-1-and-10-minutes.html

Estimated Cost
$75.00
Estimated Time Investment
Afternoon Project (3-6 Hours)
Finish Used
None
Recommended Skill Level
Intermediate

triple pedestal dining table

This table is enormous at 106" long made from pine boards and fir studs. A very easy build considering the final outcome, totally doable by any DIYer.

Built from Plan(s)
Estimated Cost
$200
Estimated Time Investment
Weekend Project (10-20 Hours)
Finish Used
1. Minwax provincial stain
2. Two coats Minwax polycrylic clear satin
Recommended Skill Level
Intermediate

Shoe dresser

Submitted by RoseOfShaz on Thu, 07/04/2013 - 15:26

I didn't build this shoe dresser because I particularly needed one, but it looked so lovely that I couldn't resist.

- I modified the plans by building 3 bins instead of 2 so it could hold more shoes.
- I decided against the dowel stick and opted for hinges instead, which were surprisingly not too difficult to assemble. I found that I didn't even need the magnets after installing the hinges as the doors stay closed.
- I used 7" chains on both sides of each bin instead of a belt to make it extra sturdy.
- I added two back legs.

Et voila! This is the end result. I'm very pleased.

PS. Those flopping bins are a pain when you're trying to build!! An extra pair of hands is definitely recommended.

Built from Plan(s)
Estimated Cost
$150 (with extra bin)
Estimated Time Investment
Weekend Project (10-20 Hours)
Finish Used
Walnut (can't remember the exact name of the stain, but it's the one Shanty 2 Chic always uses!)
Recommended Skill Level
Intermediate

Comments

SoCaliforniaMel

Fri, 07/05/2013 - 22:49

Pretty :) Good Job. Now if I only had the space for one thats 10 rows high :P I like the stain color too. Shanty 2 Chic always uses Rust-o-leum. I think its called dark walnut. Dont quote me though. I love the stain and spray paint combo colors they use.
~Melody

Nursery Room Book Shelves from $10 Ledge Plan

Submitted by karahart on Wed, 05/11/2011 - 08:42

I built these bookshelves with the help of my husband for our daughter's nursery. They were so simple to build, the finishing work is what took the most amount of time. They're very sturdy, and we get tons and tons of compliments on the 'feel' that they add to the nursery!

Built from Plan(s)
Estimated Cost
$35
Estimated Time Investment
Afternoon Project (3-6 Hours)
Finish Used
I put on a coat of white primer, and then painted quite a few coats of ultra-white paint on each shelf. I sanded between each coat of paint, and finished it off with a top coat of polycrylic. I also filled in the screw holes with white caulk and painted over that once they were all mounted.
Recommended Skill Level
Starter Project

12 ft farmhouse table with extensions - reclaimed wood

I had no experience building furniture prior to this project but I wanted a 12 ft outdoor table and could not find one.  This tables center section is 8 ft and was built roughly following the plans for the farmhouse table.  I added two 2 ft extensions at each end making the overall table 12 ft.  The extensions included aprons so when installed they look to be part of the table.  The extensions just plug into the end apron of the center section with 2x4 oak braces which engage in the apron and under the table approximately 2 ft from end.  There is no visual sagging of the extensions. I finished the table with Sikkens DEK finish.


Estimated Cost
The lumber was reclaimed and cost approximately $400 for this project.
Estimated Time Investment
Week Long Project (20 Hours or More)
Finish Used
Sikkens DEK transparent
Recommended Skill Level
Beginner

Recycle/garbage center

Submitted by YeenYus on Wed, 07/24/2013 - 08:50

We just moved in to a newly built house, so it was important for everything to have a place. I don't like the garbage can to be under the sink, and my wife doesn't like the can just out on the floor...too many missed hook shots with the coffee filters I guess! This cabinet solves many kitchen problems all at once. An attractive cabinet that hides garbage and recycle, yet is easy to get in and out of. The railroad spike handles are something we sell on Etsy, as well as knobs and shelves. The shop name is YeenYus.

Estimated Time Investment
Weekend Project (10-20 Hours)
Finish Used
Stain, paint
Recommended Skill Level
Intermediate

Comments

Ecspronk

Wed, 07/24/2013 - 20:44

I was wondering if you had a price estimate on how much the supplies cost you along with some measurements. I am looking to build a double one like this. More details would be awesome. Thank you

In reply to by Ecspronk

YeenYus

Wed, 07/24/2013 - 21:15

Yeah, I kind of built this on the run with nothing but the space it had to fit into. But it is 34" wide 32" deep and 24" high. I needed it to fit under the window and used the Home Depot garbage bins as the starting point.

I build a lot of stuff...and this was a tough one. The frame is 2x4's with pine facing and bead board. 4 hinges, stain and paint...less than $100.

I'd love to work with you on this if you want. The hard part was engineering the bins falling forward equally and not binding up. The back of the bin actually hits the counter top perfectly now. But you can see that I had to put an extra 1" under the top for it to hit something.

It' gonna take some work but this thing looks and works so smoothly. You can do it...I can help!

momaimp

Thu, 05/08/2014 - 06:07

Would you be able to post a sketch of this project? I assume there are three boxes - the main cabinet and the two tilt-out boxes, but I would appreciate seeing a breakdown of the parts. Thanks!

momaimp

Thu, 05/08/2014 - 06:07

Would you be able to post a sketch of this project? I assume there are three boxes - the main cabinet and the two tilt-out boxes, but I would appreciate seeing a breakdown of the parts. Thanks!

Jsanderson

Wed, 09/23/2015 - 06:32

Is there a way I can get plans for this? I tried to sign up on site but can't locate

Modern Farm Table - Dark Stain

Submitted by nittle on Thu, 07/25/2013 - 22:27

This was my first project. I learned a ton through the process. Ana's directions were very easy and straightforward.

I purchased the wood (Doug-Fir) from Lowe's and cut it at home with a circular saw. I filled the gaps in the table/benches with a crystal clear silicon caulk - I have mixed feelings about this, since it dried kind of shiny. The coats of polyurethane helped to dull the finish a bit. For the stain, I used Rustoleum Kona, and Minwax Helmsman Spar Urethane Semi-Gloss for the finish.

Like others have suggested, I built the benches first, then the table. This was a great tip, since you can learn the design on a smaller model before tackling the beast of table (it's heavy). I also added some horizontal supports on the ends of the tables/benches, not in the original plans. I just duplicated the end aprons of the table and countersinked/screwed them in at an angle.

Cutting and building the project didn't take nearly as much time as the sanding, staining and finishing. The back-end part of the project was very detail-oriented and stretched out over several days.

Overall, very pleased with the finished project. It was very empowering to know that I can build something like this. Thanks Ana and all of the others with their tips and suggestions! My wife and I know have a long list of other projects to tackle :)

Built from Plan(s)
Estimated Time Investment
Weekend Project (10-20 Hours)
Finish Used
Rustoleum Kona Wood Stain and Minwax Helmsman Spar Urethane Semi-Gloss for the finish
Recommended Skill Level
Beginner

Simplest Stool : Saddle Back Style

Submitted by tsibiga on Mon, 06/20/2011 - 09:52

We've been looking for some saddle back stools for quite a while that would fit snug under our kitchen island. I couldn't find any, so I checked Ana-White and found the perfect building plan. I used scraps to build two matching stools and so I altered the plans to fit what I had. Other then the dimensions being different, I also used a 2x12" piece of wood cut down to 9x15" for the stool top.

I've documented the process as best as I could at; http://www.tommyandellie.com/Site/Home/Entries/2011/6/13_More_Seating_f…

Built from Plan(s)
Estimated Cost
$0 I used all scrap wood from a previous project
Estimated Time Investment
An Hour or Two (0-2 Hours)
Finish Used
"Rainwater" Martha Stewart Paint
Recommended Skill Level
Beginner

Comments

tsibiga

Thu, 06/30/2011 - 04:50

I skipped a step that I might redo. I'd recommend taking some wood filler and spreading over the knots and imperfections before painting it. Sand it down, smooth it out, and it'll be Looking flawless.

Stef (not verified)

Thu, 07/07/2011 - 15:02

I've been looking for some stools like this, so I followed your lead and just finished making some. Thanks so much for sharing!

tsibiga

Fri, 07/08/2011 - 17:53

Awesome! I'm so glad you made some. Thanks for sharing. We love our stools and hope you enjoy them as well.

Reclaimed Cedar Board 10x 10 Barn Greenhouse

Submitted by bailie on Sun, 04/24/2022 - 13:02

Thank you for sharing your plan!

10×10 greenhouse made with re-claimed cedar boards from old barn on Menlo, WA

Built from Plan(s)

Comments

rick1956

Wed, 06/08/2022 - 05:52

Beautiful! I like the fact that you bucked the trend and turned your clear panels for Washington rainwater runoff. There are good and bad with both directions, vertical makes the most sense. I can see myself re-doing ours at some point to change the panel direction. At least they're pointing the right direction on my skylights.
Great design, and of course, I love the 'live edge' details you added throughout!

Factory Cart Coffee Table

I used Ana's plans for her factory cart coffee table to create my new coffee table. It was super easy and cheap! I used 1x10's for the sides to make it a bit taller. I found my casters at Northern Tool for $12 a piece. That was the main cost of the table. I used Gorilla Glue and 2" nails to hold everything together. I had it done in a couple hours and I love it! You can see more details at http://www.shanty-2-chic.com/2011/06/crate-coffee-table-reveal.html !

Built from Plan(s)
Estimated Cost
$85
Estimated Time Investment
Afternoon Project (3-6 Hours)
Finish Used
Minwax Dark Walnut stain and 1 coat of Polycrylic Semi-Gloss
Recommended Skill Level
Beginner

Loft Bed for Renee's Room

This is the 2nd of two loft beds I have built using Ana's plans - they came out great and my girls love them! I did make some modifications to each, as the girls have different needs. It was a great project and I would like to thank Ana for the concise plans, cut lists, ideas, etc. You made it so easy!

If you are interested in seeing more about this project feel free to visit my blog at www.mothersmusings.net. See you there!

Estimated Cost
$150.00
Estimated Time Investment
Week Long Project (20 Hours or More)
Finish Used
I must say, if I had it to do again I might have upgraded on the wood, but I got the cheapest pine I could find. This led to using A LOT of wood filler and sand paper - and probably took me about twice the time it would have taken had I used prime wood. I used an oil based primer to make sure the knots stayed covered, and 2 coats of Behr high gloss white paint for the finish. Extra work...yes - but ultimately I think I cut my cost in half.
Recommended Skill Level
Beginner

Love love love my new bedroom!!!!

Submitted by DogDoc25 on Tue, 08/27/2013 - 18:49

I've posted pictures of these separately, but I'm so excited about how these things came together in my room! This is the reclaimed wood headboard (queen) and the mini farmhouse bedside tables (only 1 pictured but the other is identical). Thanks so much Ana (and friends) for these awesome plans which have given me a fun thing to do in my free time and also inexpensively furnish my house!

Finish Used
Minwax Jacobean (looks slightly lighter in the picture than it is in real life)
Recommended Skill Level
Beginner

Coat closet

Submitted by Anonymous (not verified) on Mon, 12/31/2018 - 06:57

I just wanted better organization and shoe racks up close to the front of the closet instead of in the back but I also didn’t want them too deep. These plans fixed that.

Estimated Cost
$150
Estimated Time Investment
Weekend Project (10-20 Hours)
Finish Used
Paint
Recommended Skill Level
Beginner

Comments

Small Cedar Woodshed

Spaced out the boards to allow airflow; did a sliding barn door and metal roof. Thanks for the plans!

Comments

Seasonal And Holiday

Christmas Tree Shelf with Lights

I made this Christmas tree shelf using the plans here.


I modified it by adding on two shelves so that it could accommodate the 6 hooks I needed for my family's stockings.  I also hot glued a string of lights to the perimeter.  This is serving as our Christmas tree due to space constraints, so I wanted it to be "fancier" and more like an actual tree.

I think I did ok for my first real build and my family seems to really like it.

Estimated Time Investment
Weekend Project (10-20 Hours)
Finish Used
Rustoleum Sage Green spray paint in Satin
Recommended Skill Level
Beginner

Comments

Shoe Dresser

Submitted by Anonymous (not verified) on Tue, 11/29/2022 - 13:04

Modified the shoe dresser dimensions to fit the space.

Built by Janae

Built from Plan(s)

Channing Bookcase

Submitted by plumbguy on Mon, 12/07/2015 - 14:40

I'm a better plumber than a carpenter.

Built from Plan(s)
Estimated Time Investment
Weekend Project (10-20 Hours)
Finish Used
Paint & Poly
Recommended Skill Level
Beginner