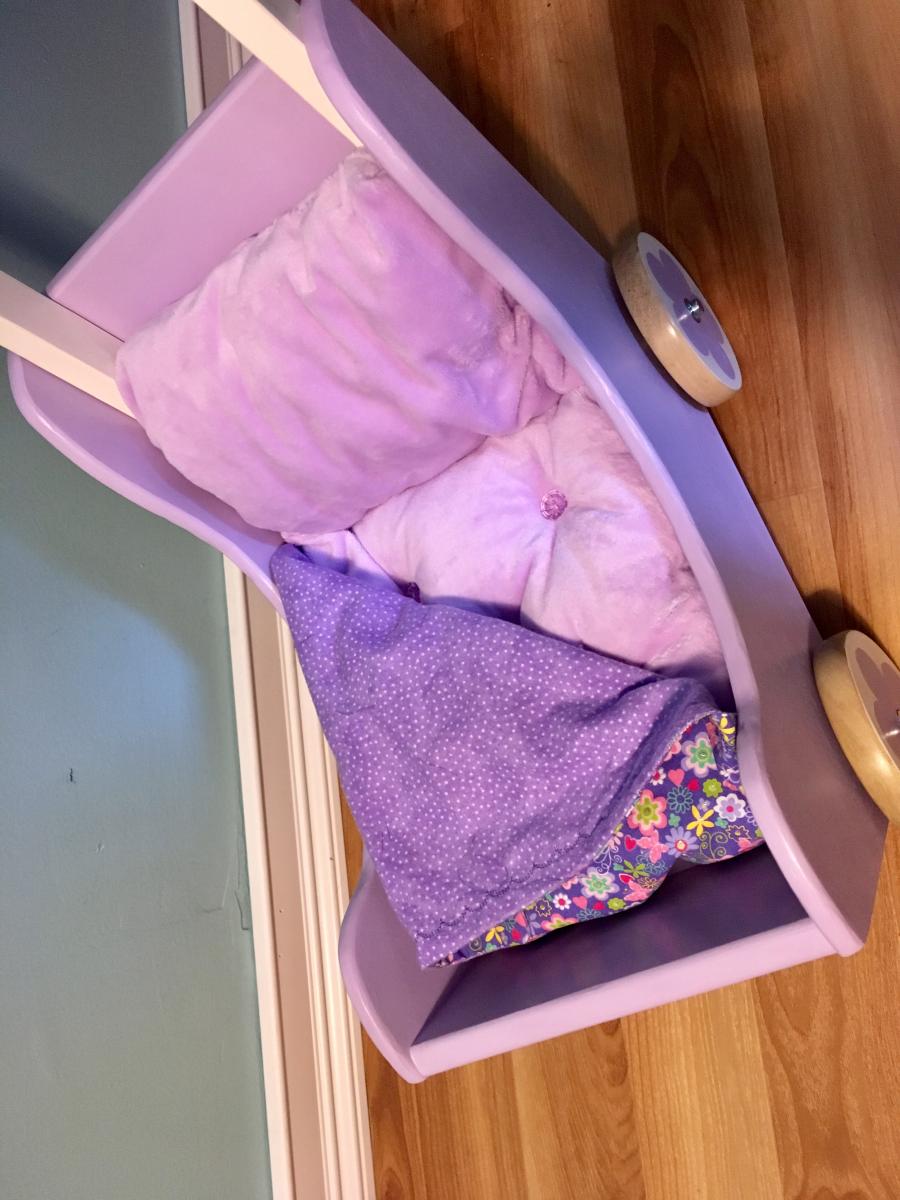
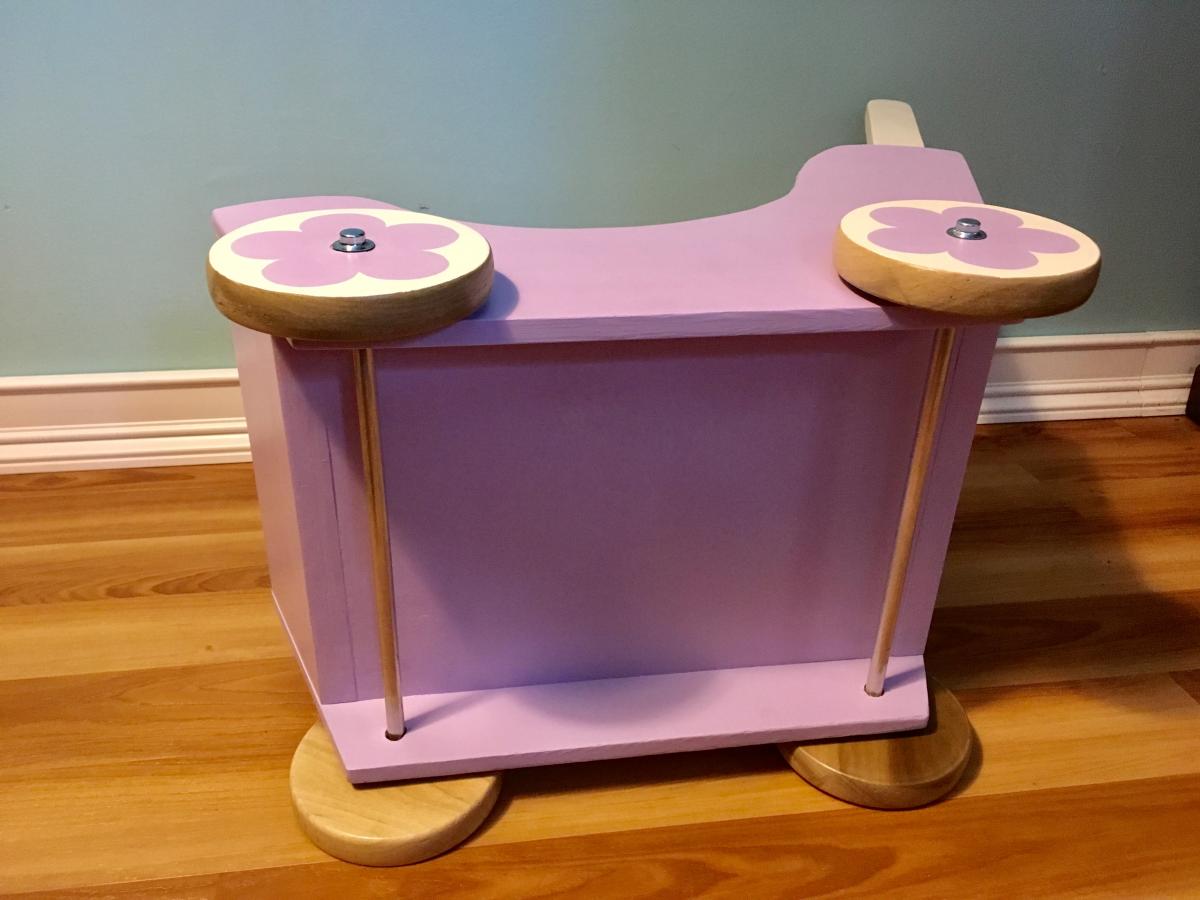
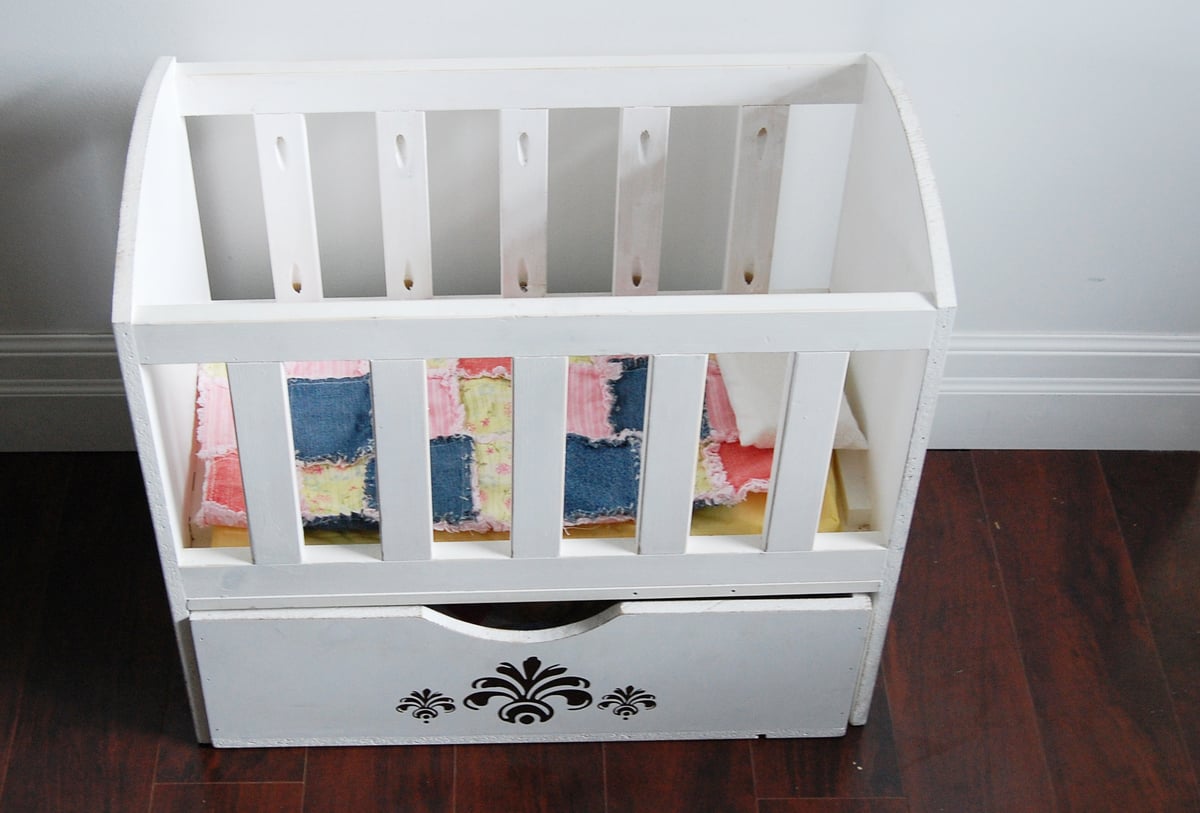
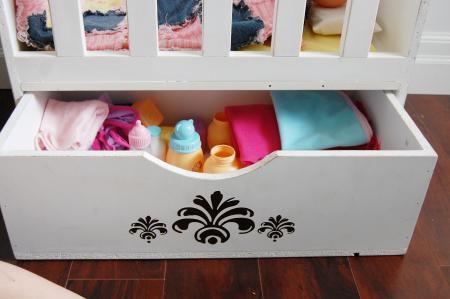
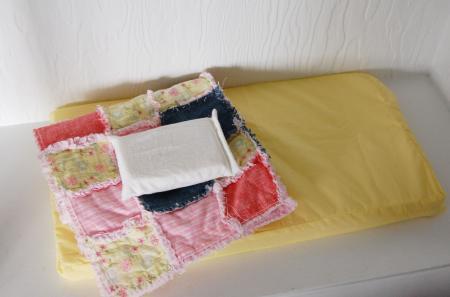
Doll Crib
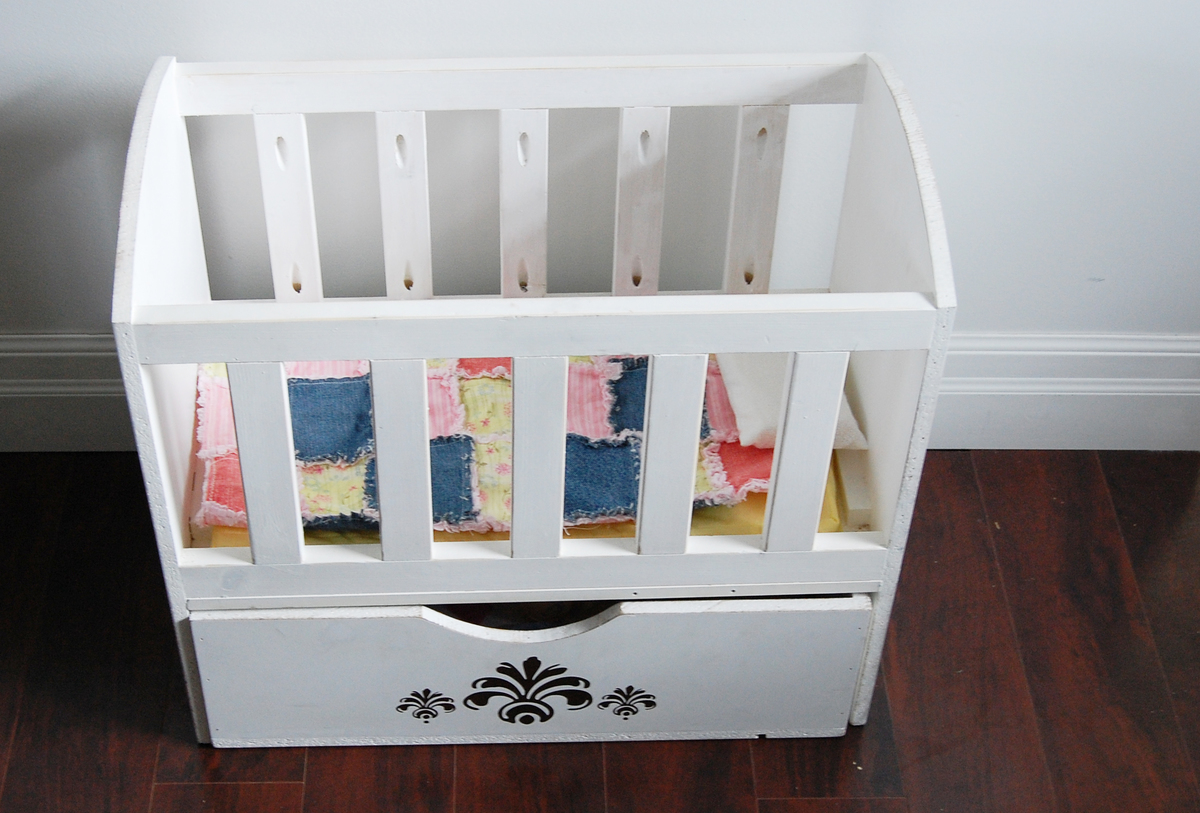
Made this for Christmas for our 2-year old last year. The plans were easy to follow, and it turned out great. She loves it!
Built from Plan(s)
Recommended Skill Level
Beginner
Made this for Christmas for our 2-year old last year. The plans were easy to follow, and it turned out great. She loves it!
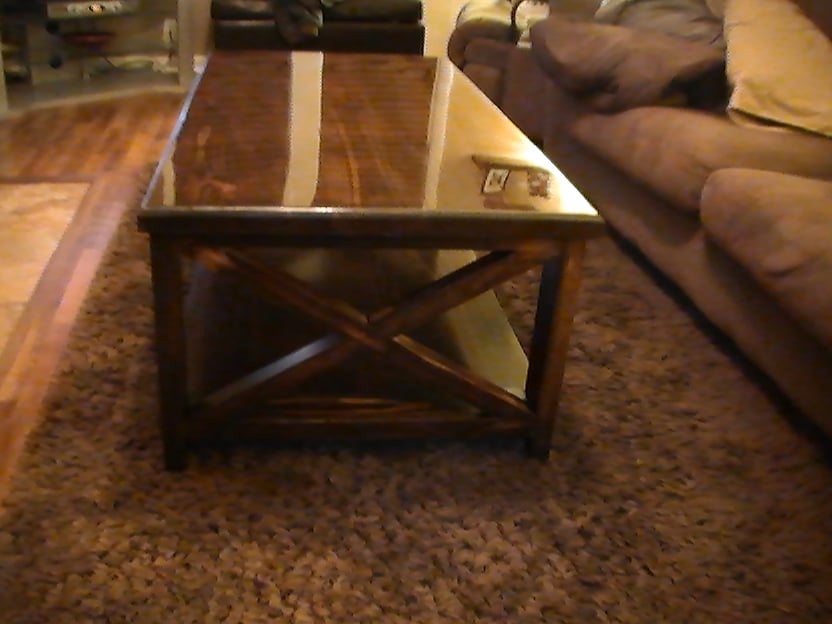
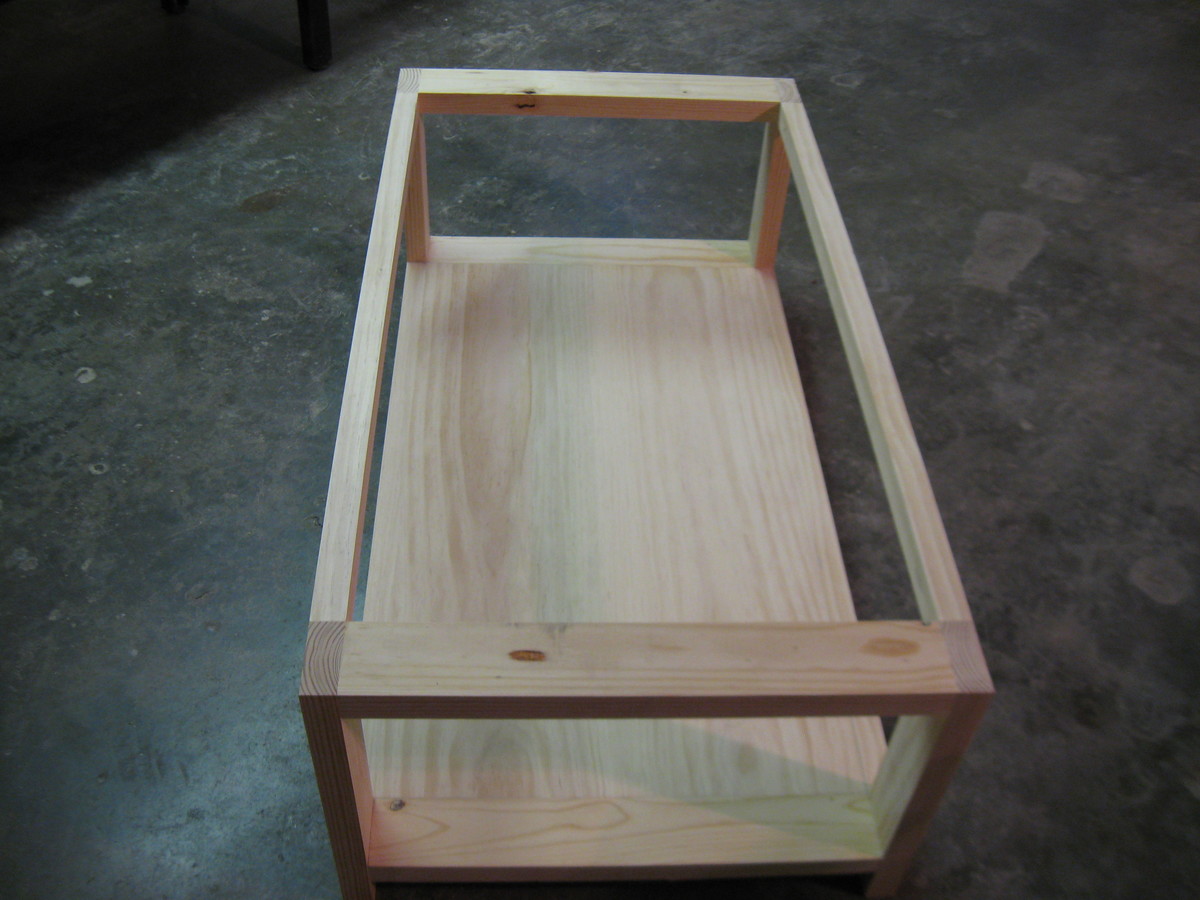
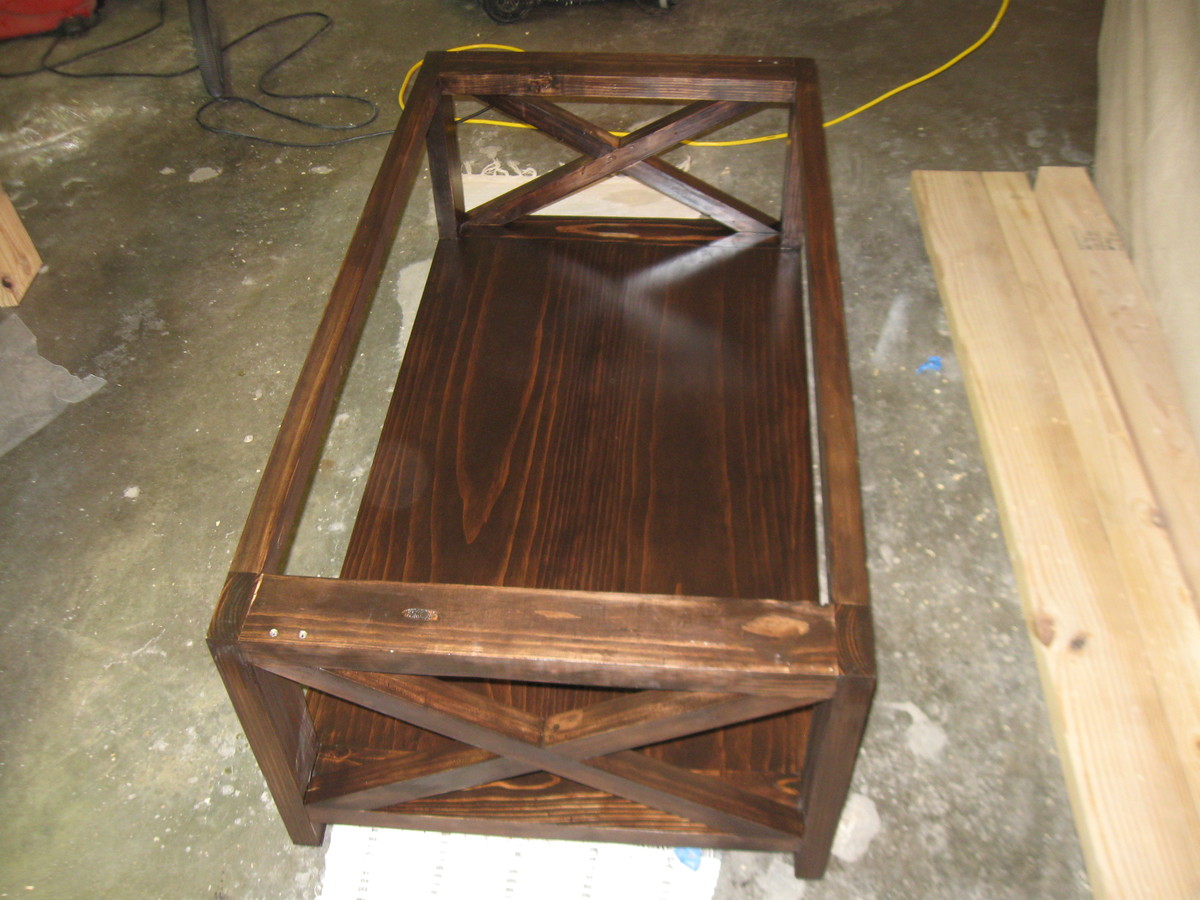
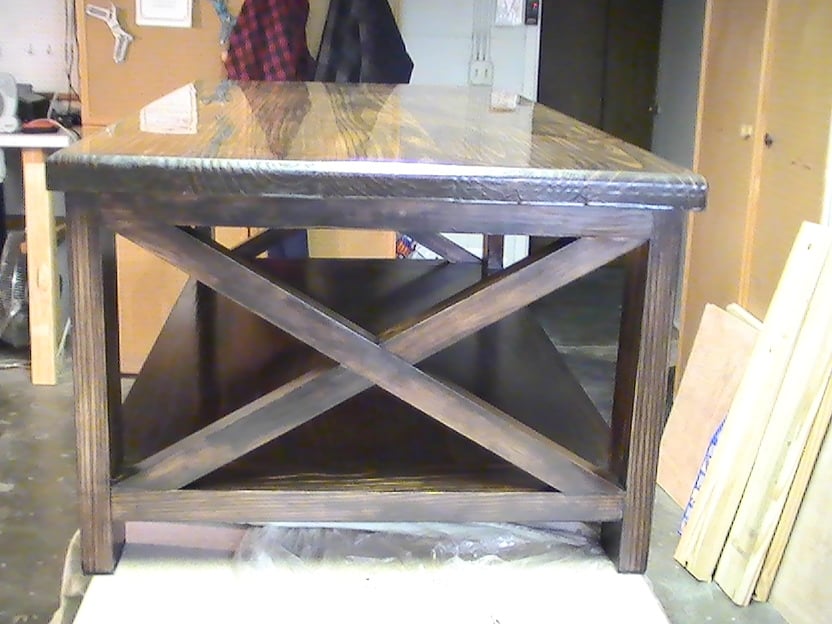
I chose the Southern Yellow Pine because of its strength for furniture. Also I have used the pour on finish before with good results. The wood was a special order thru Menards and took about a week to get.
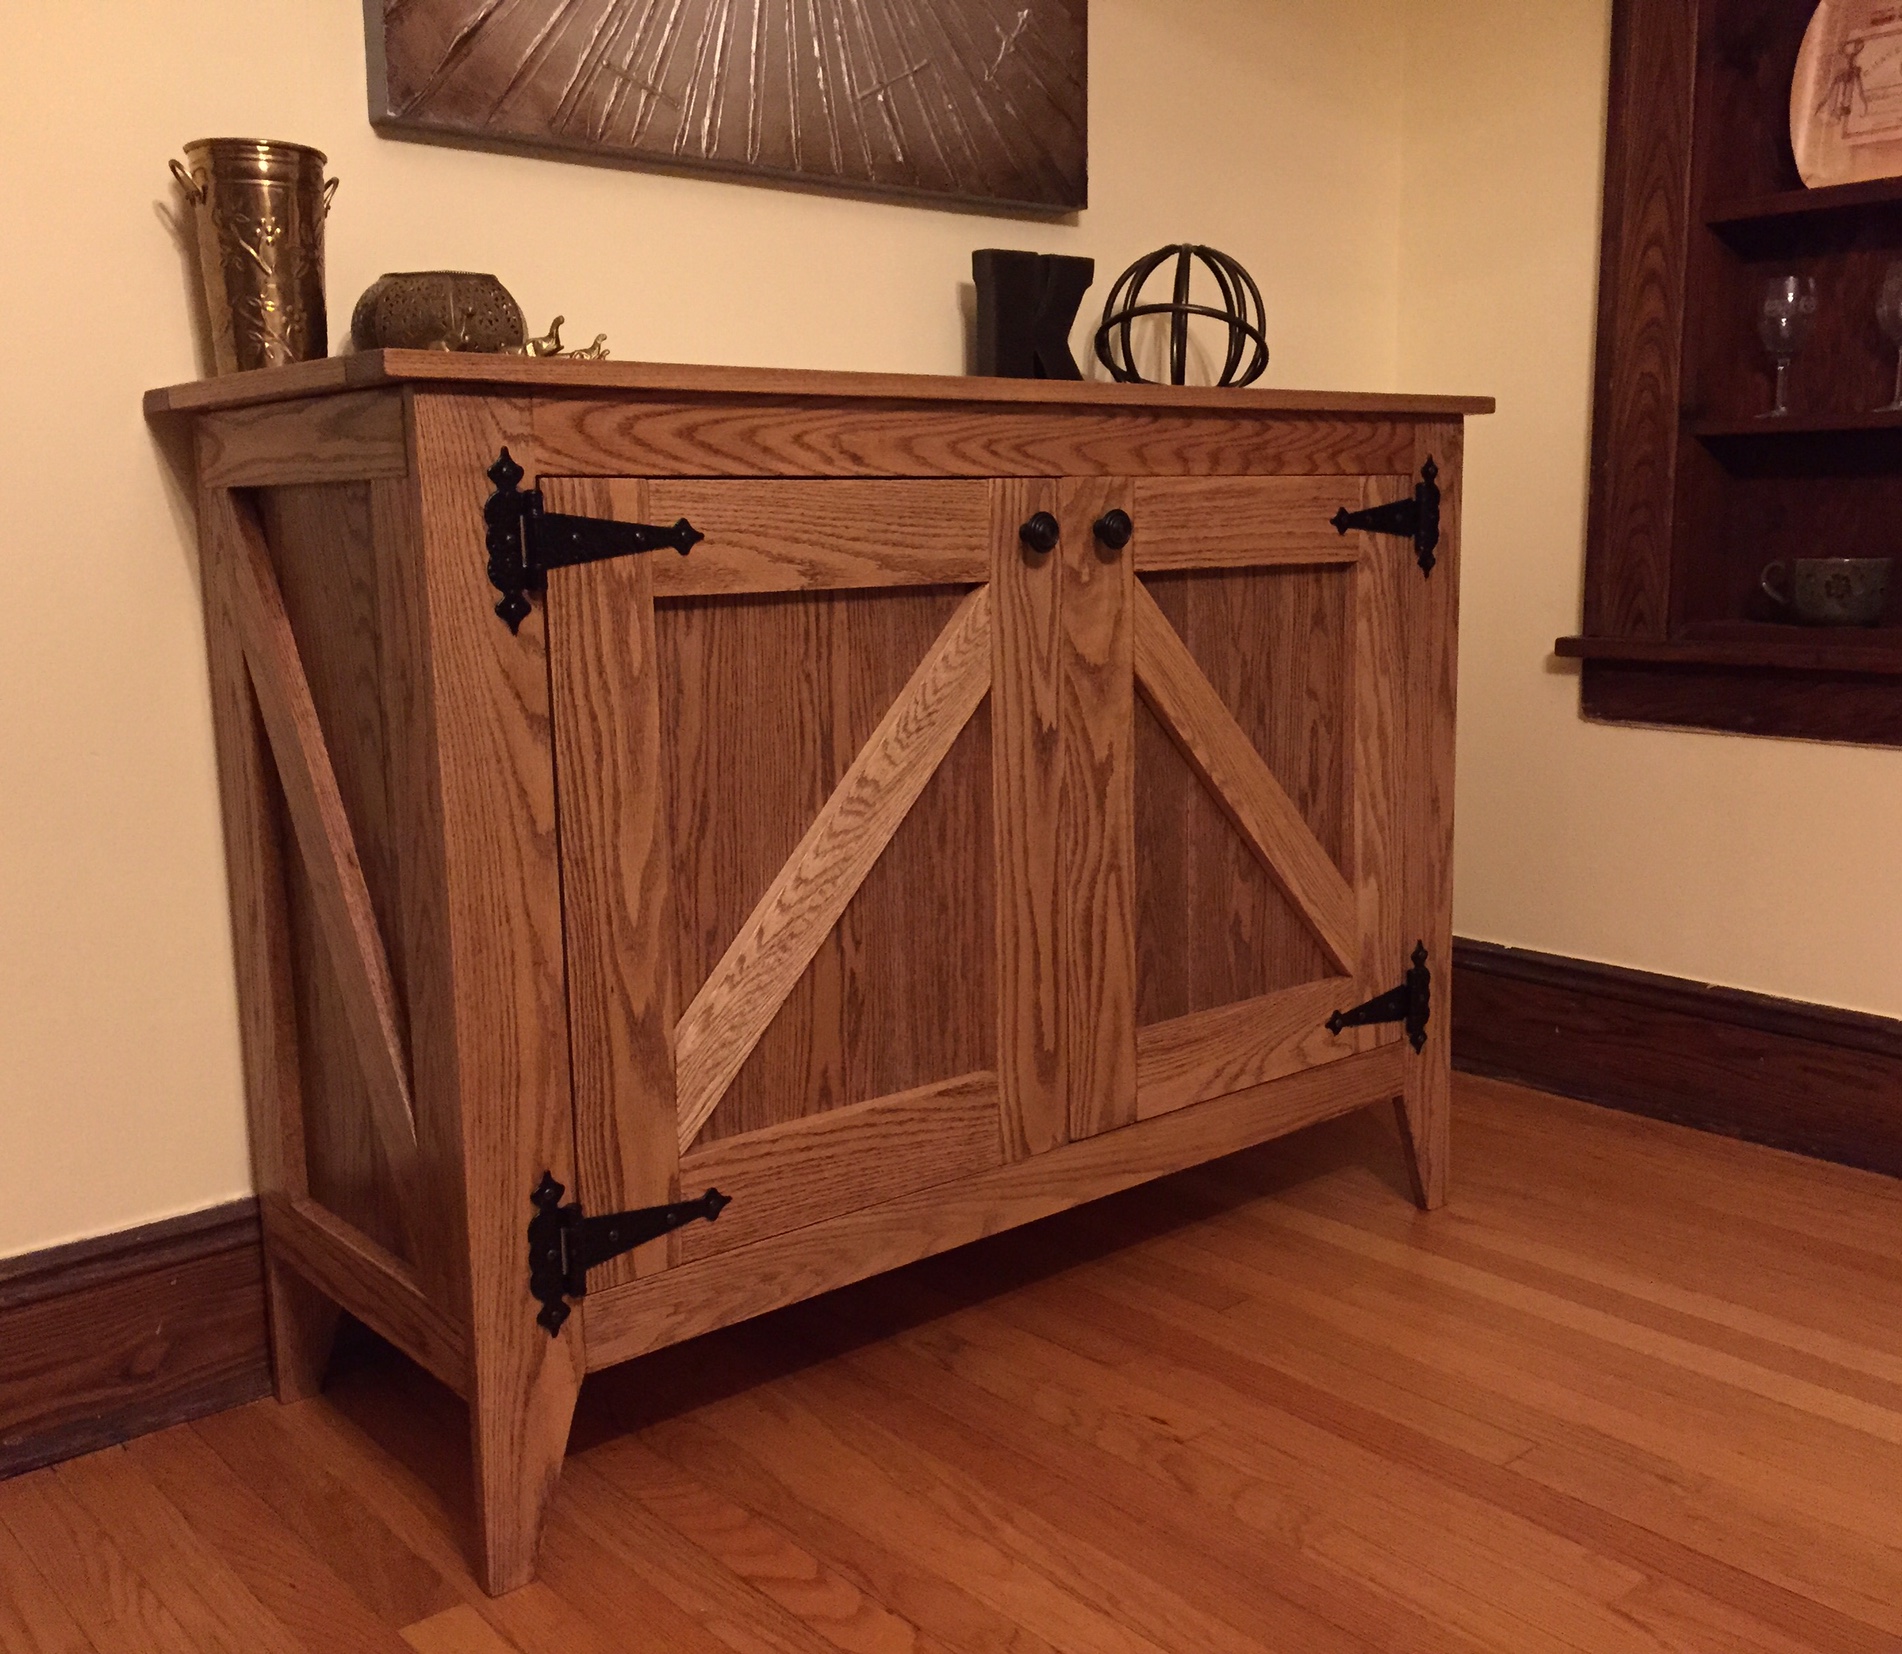
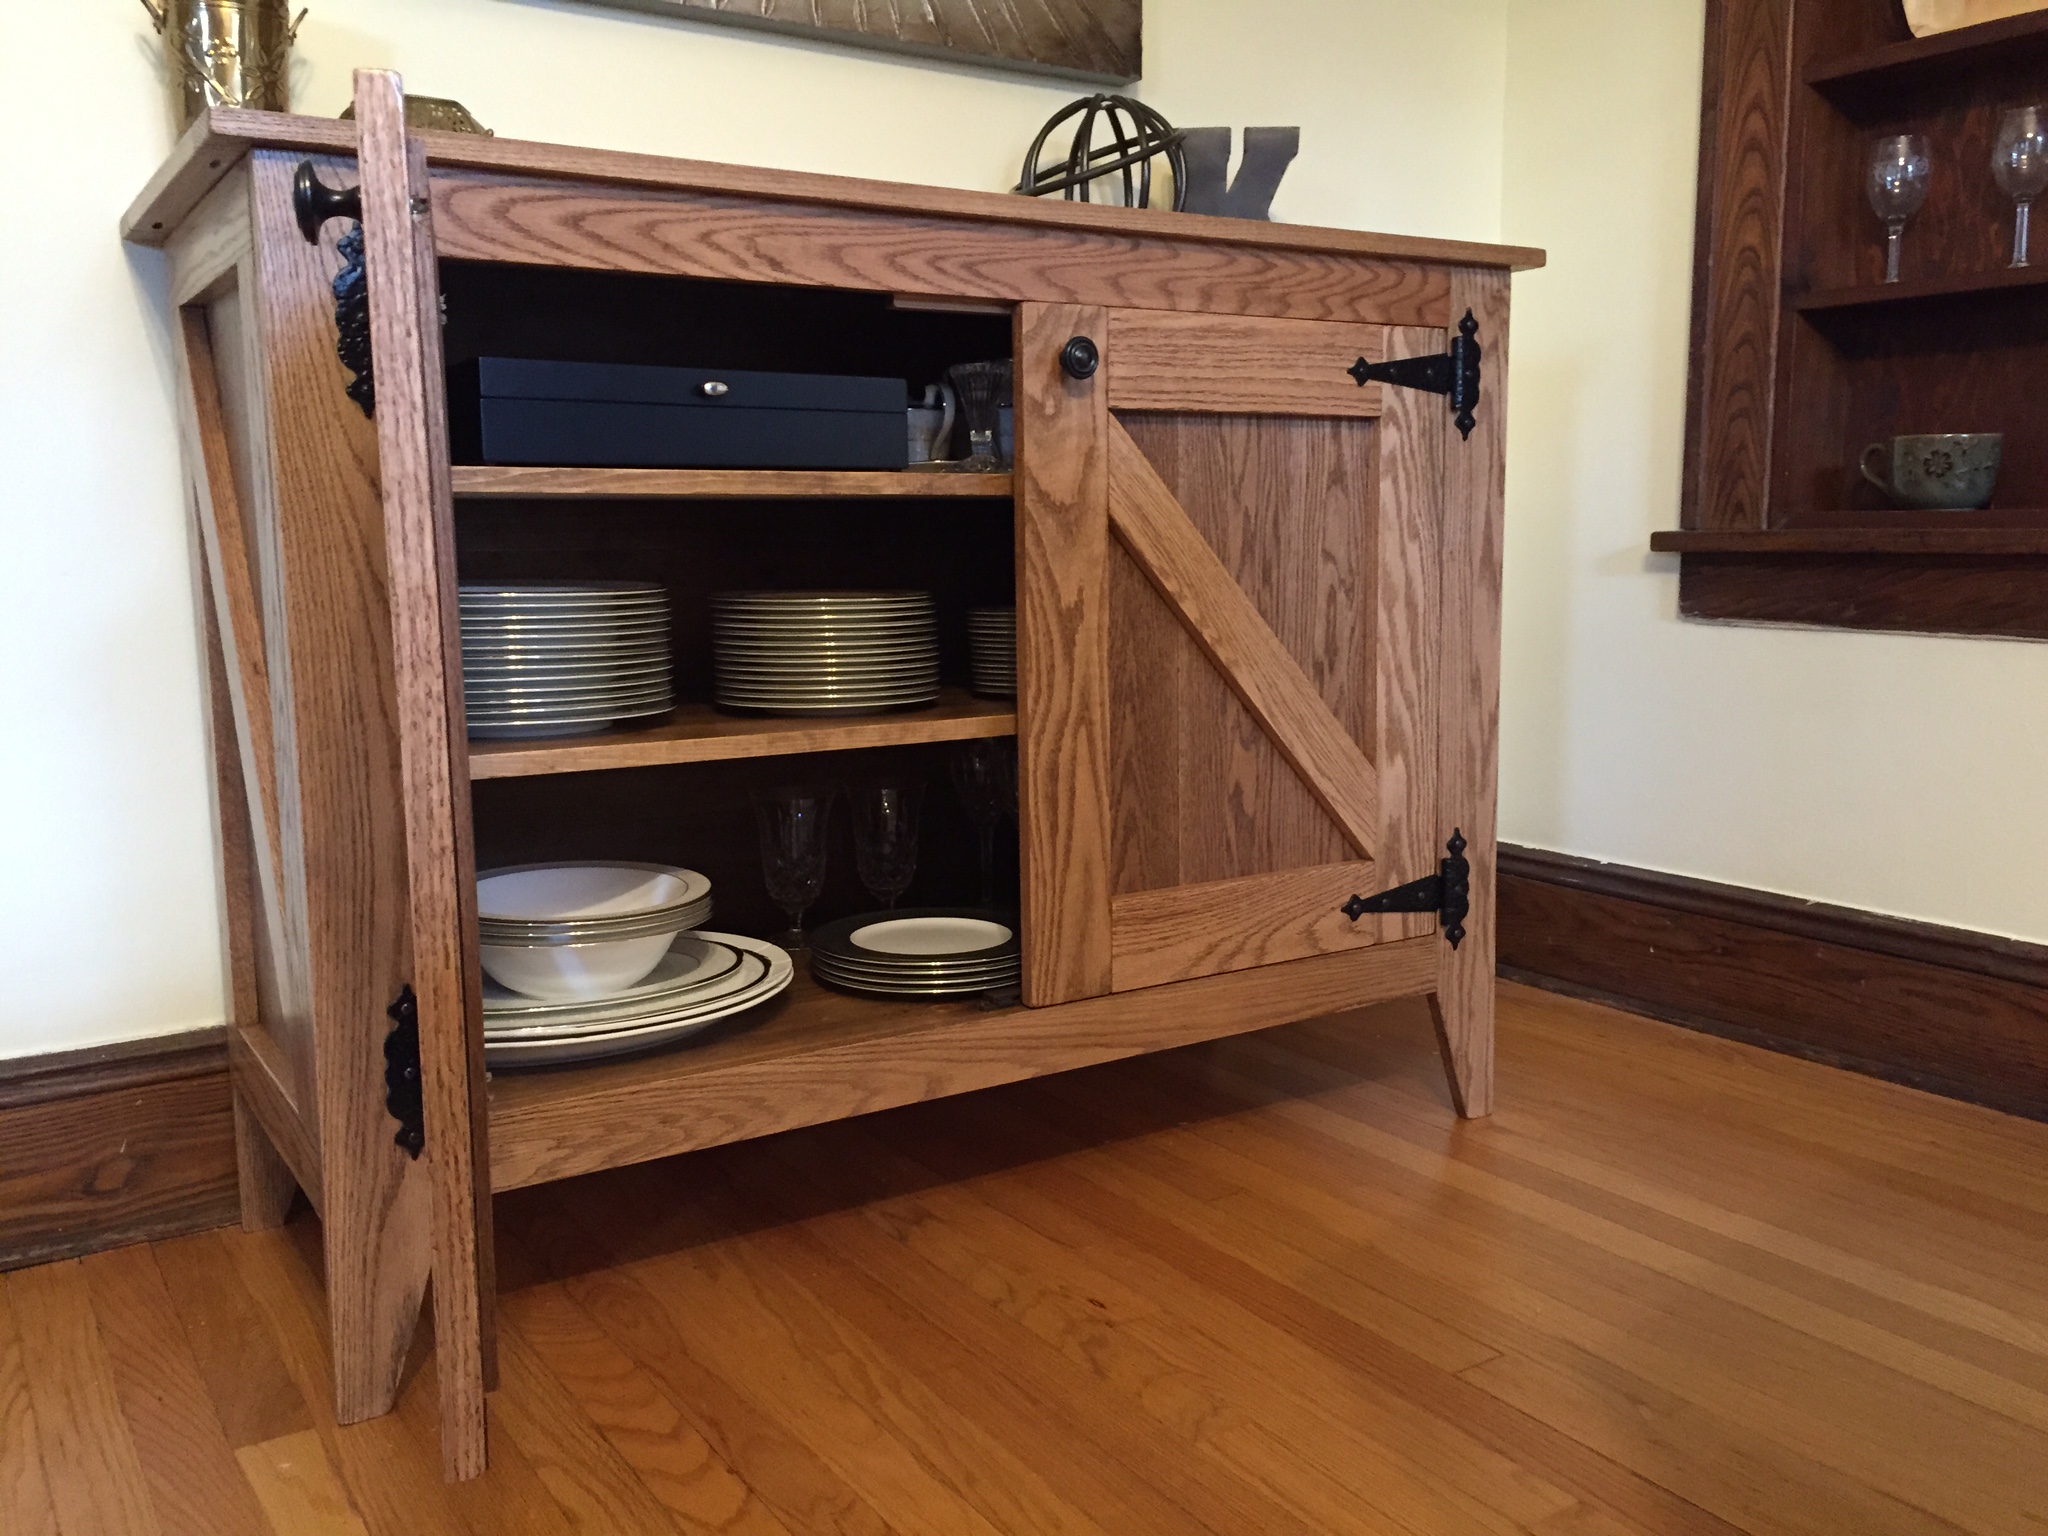
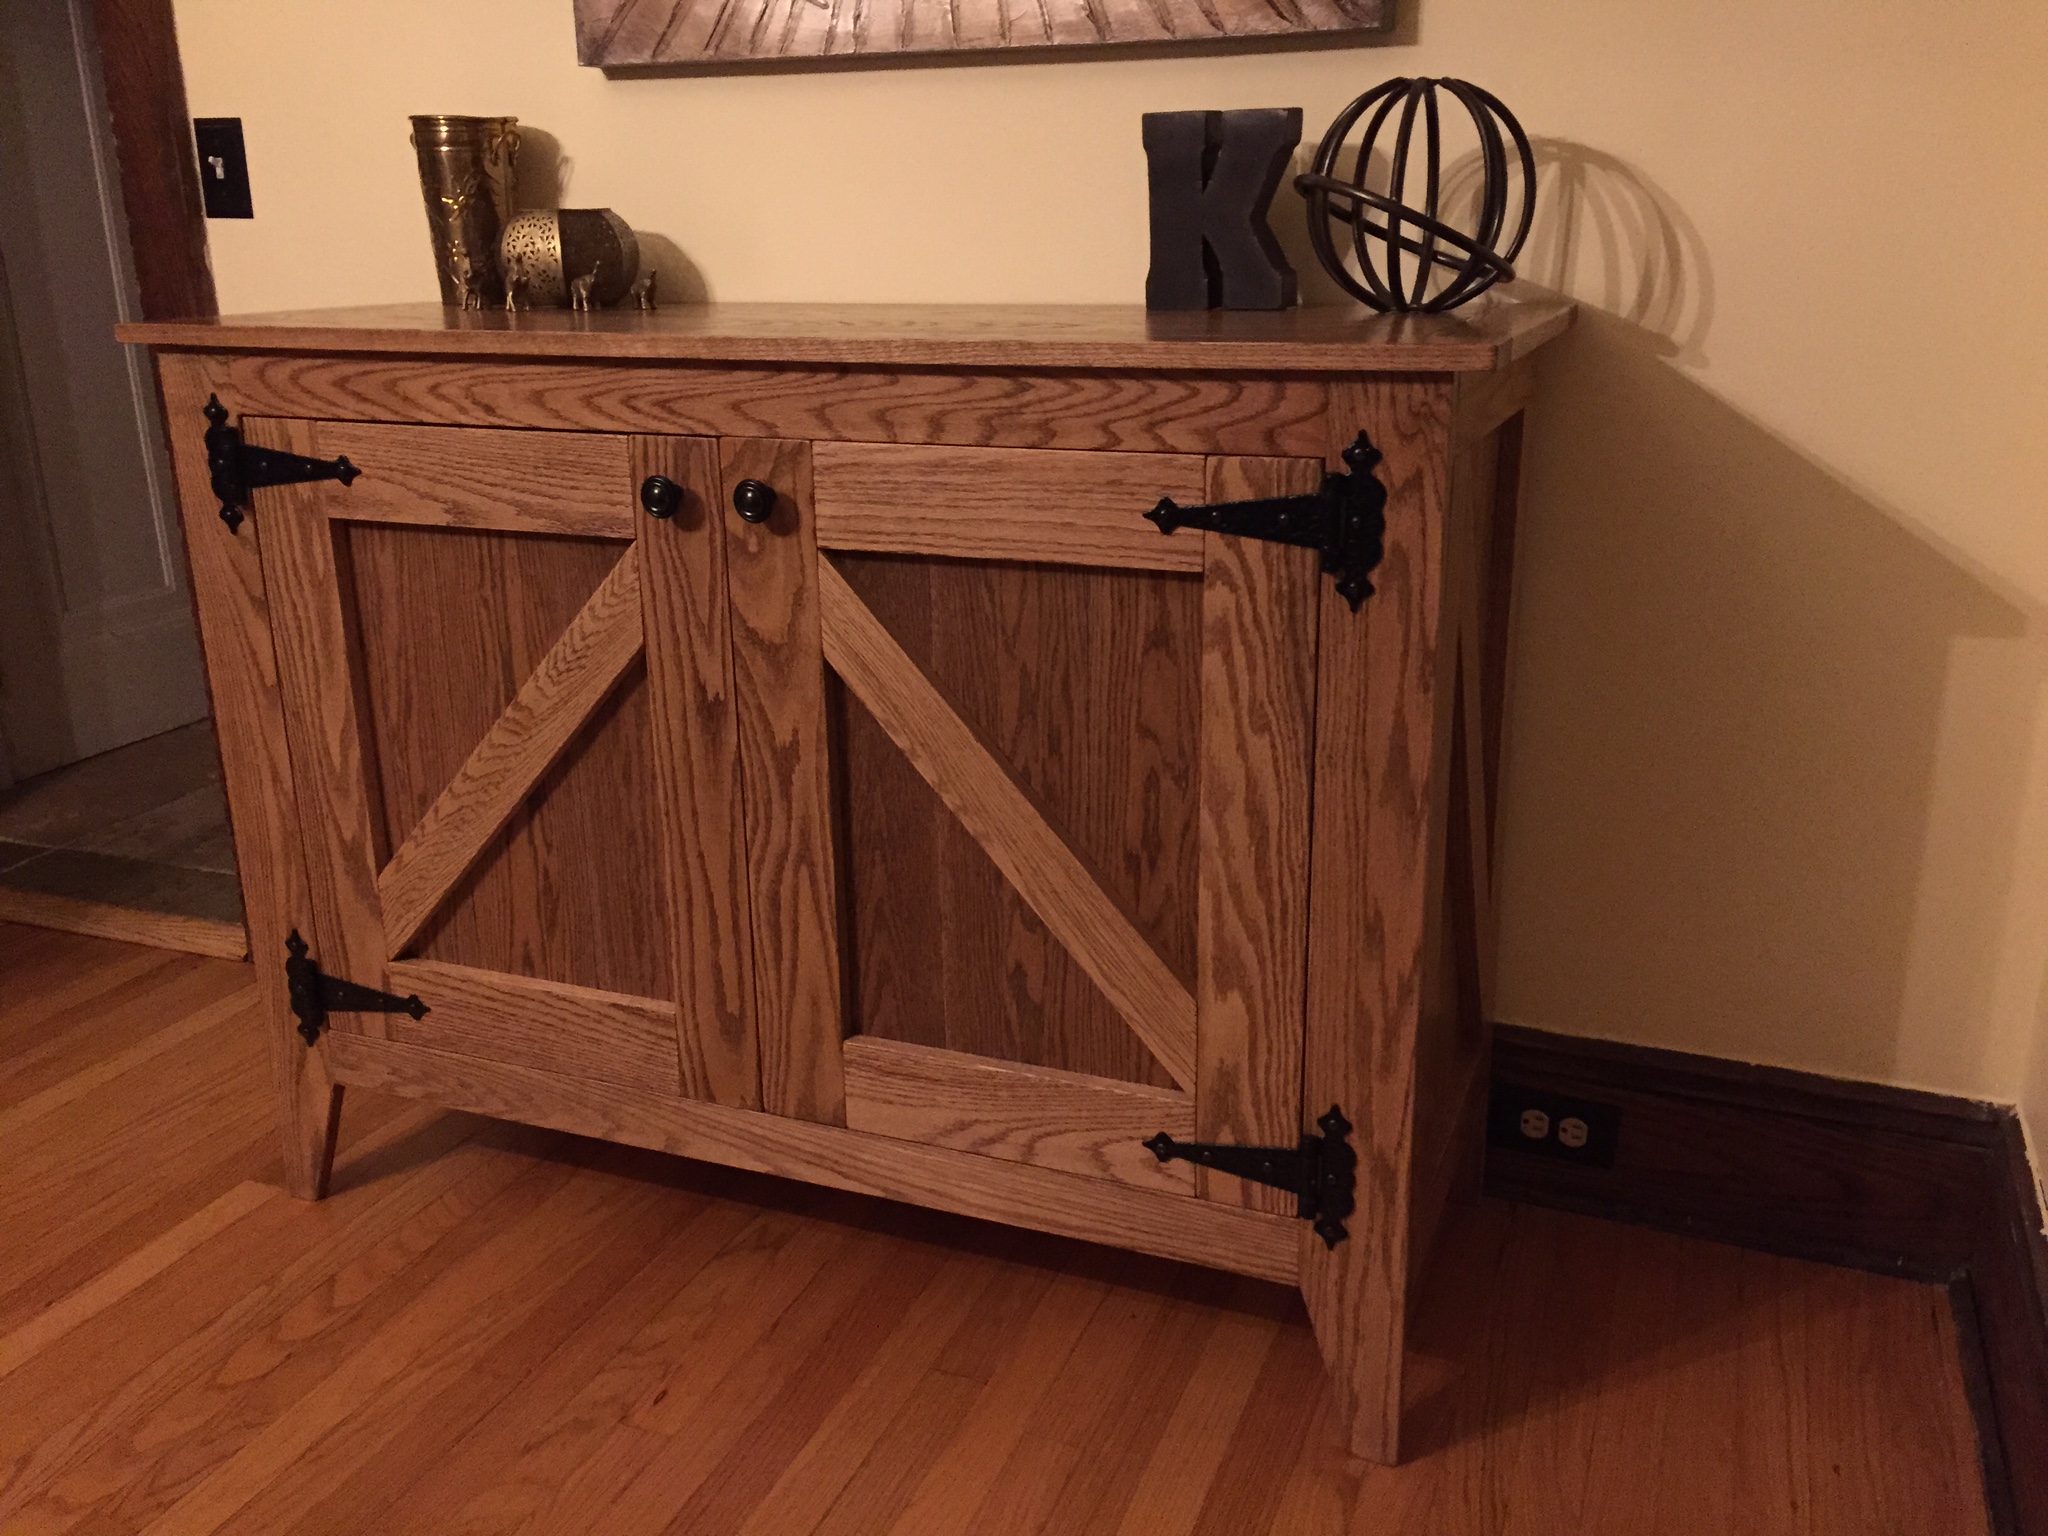
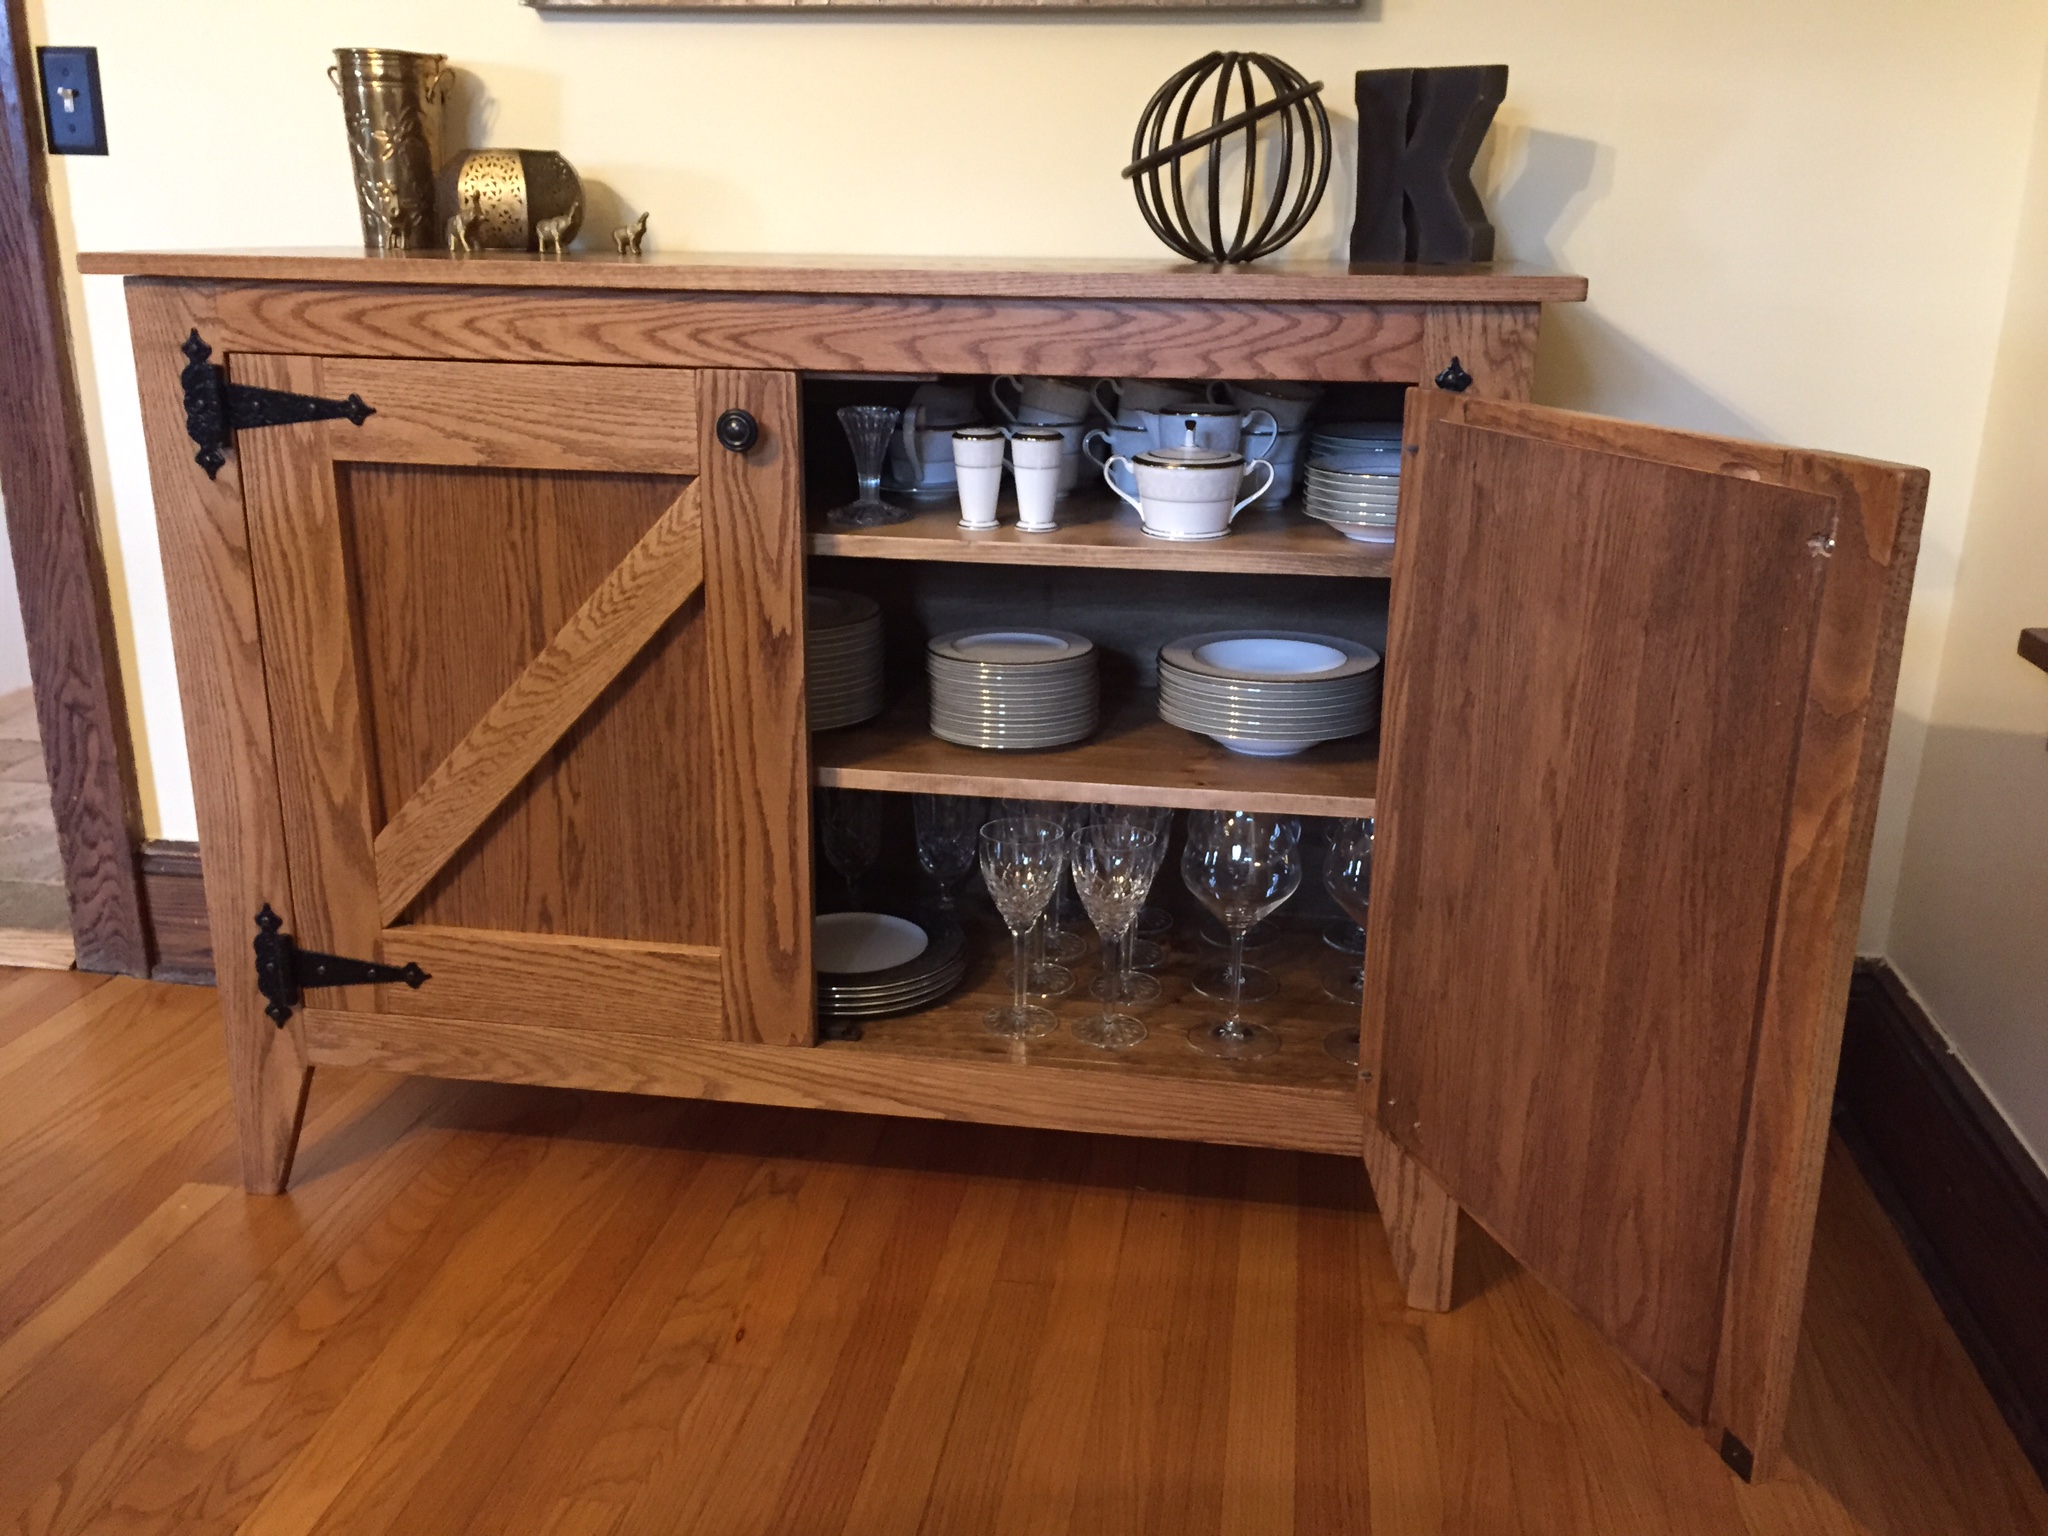
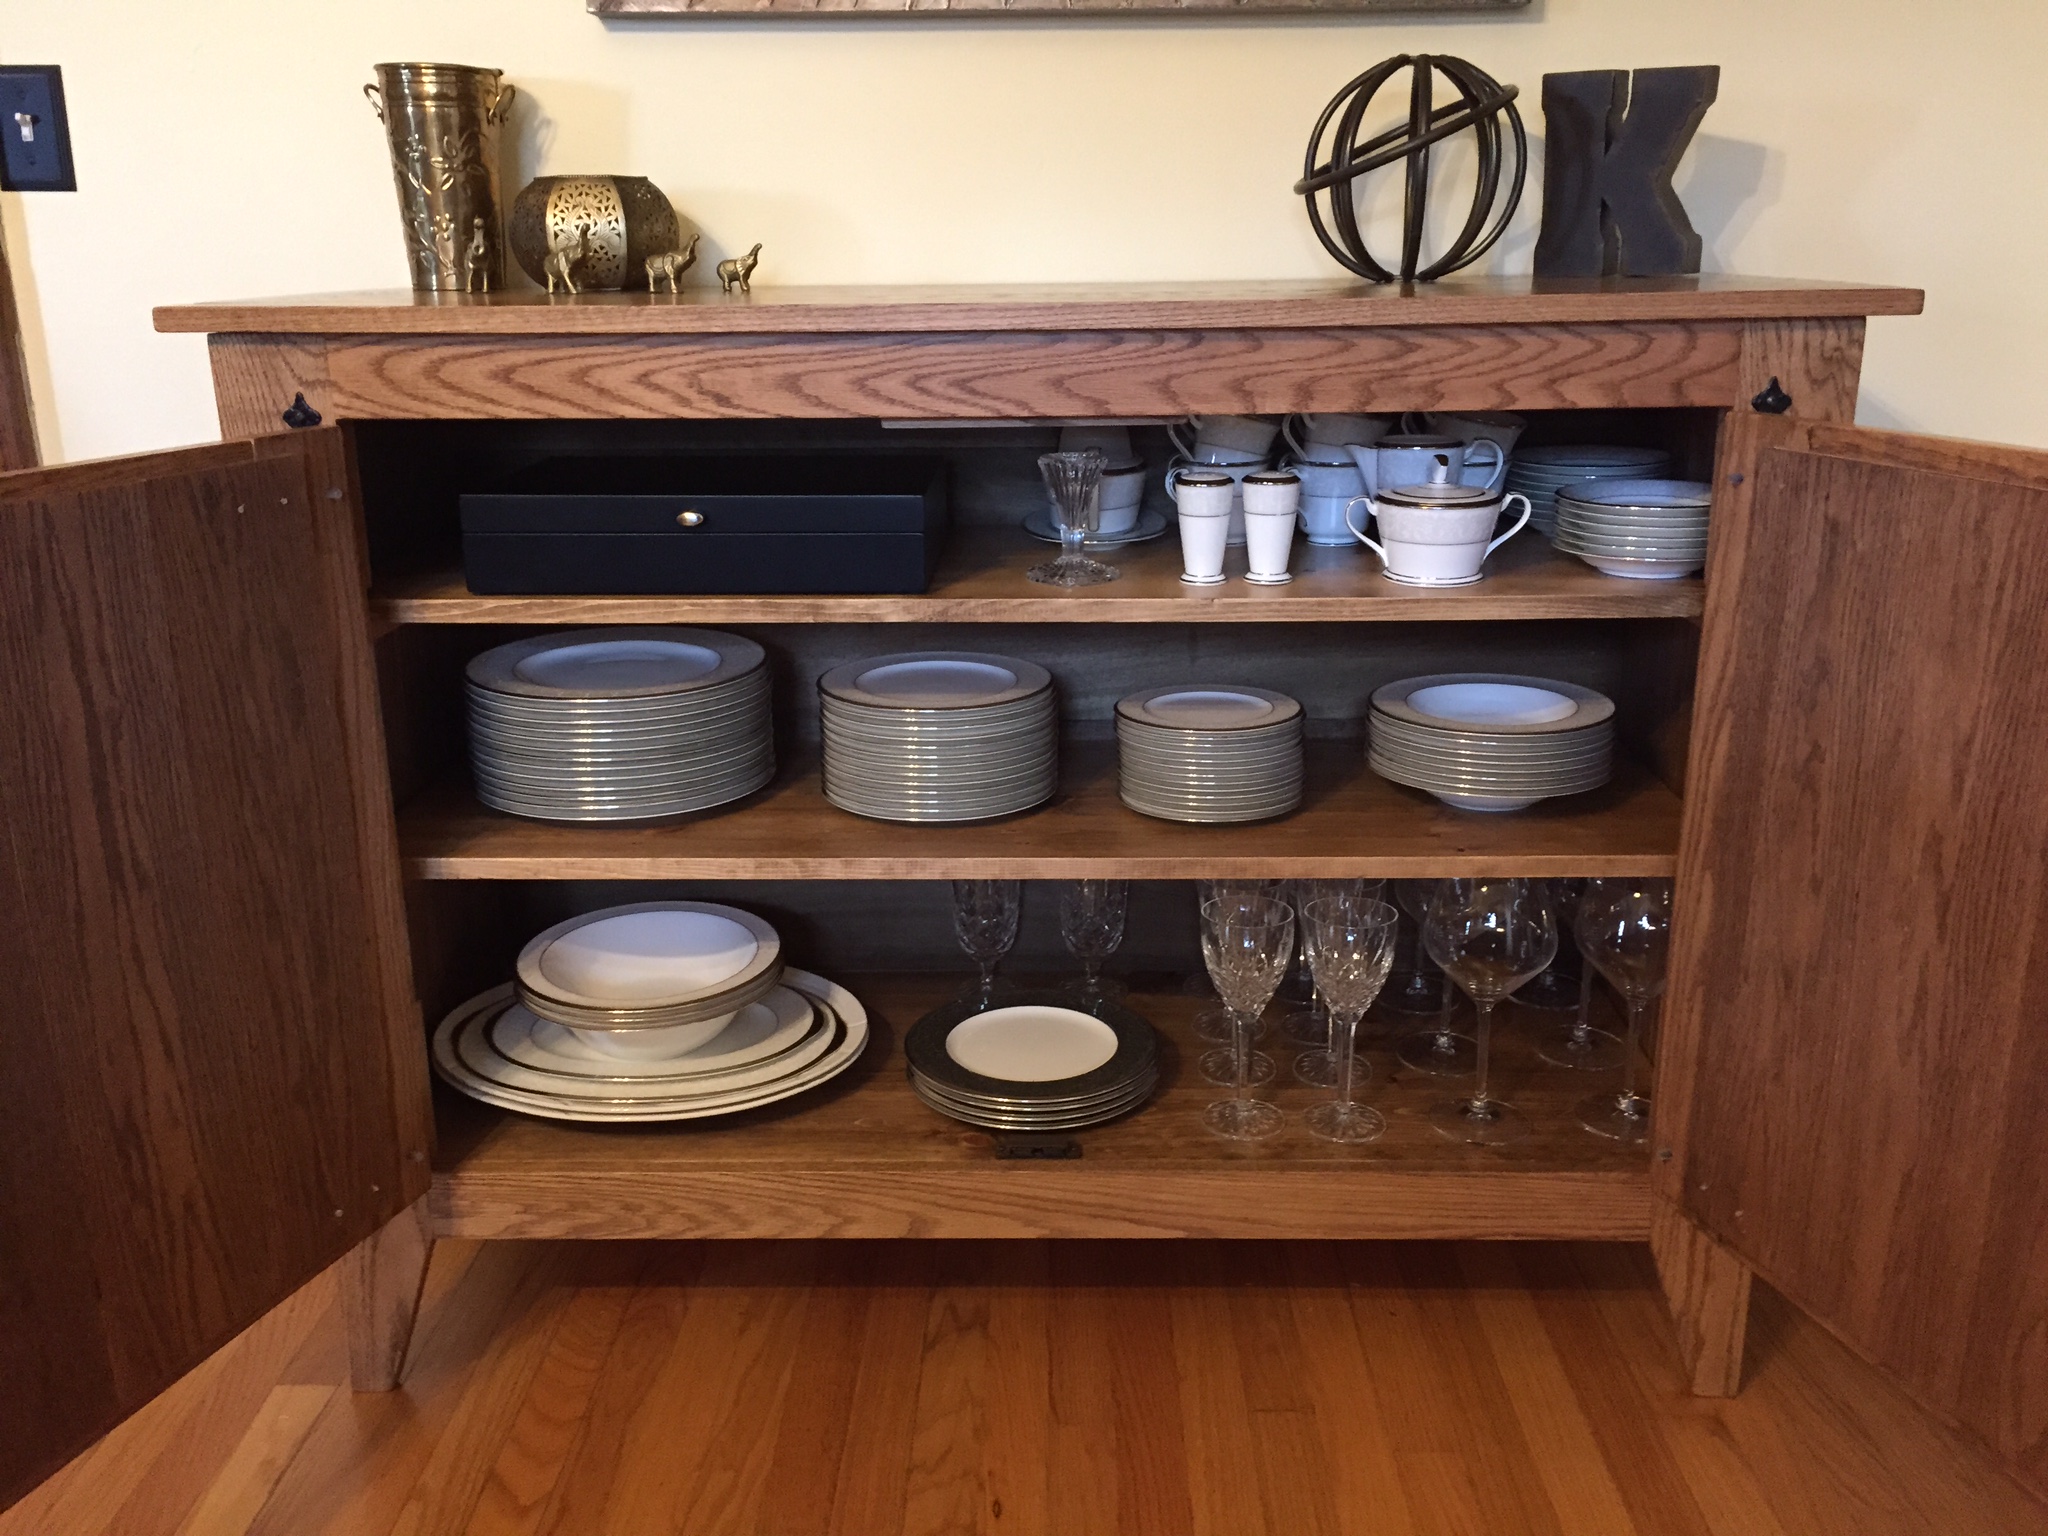
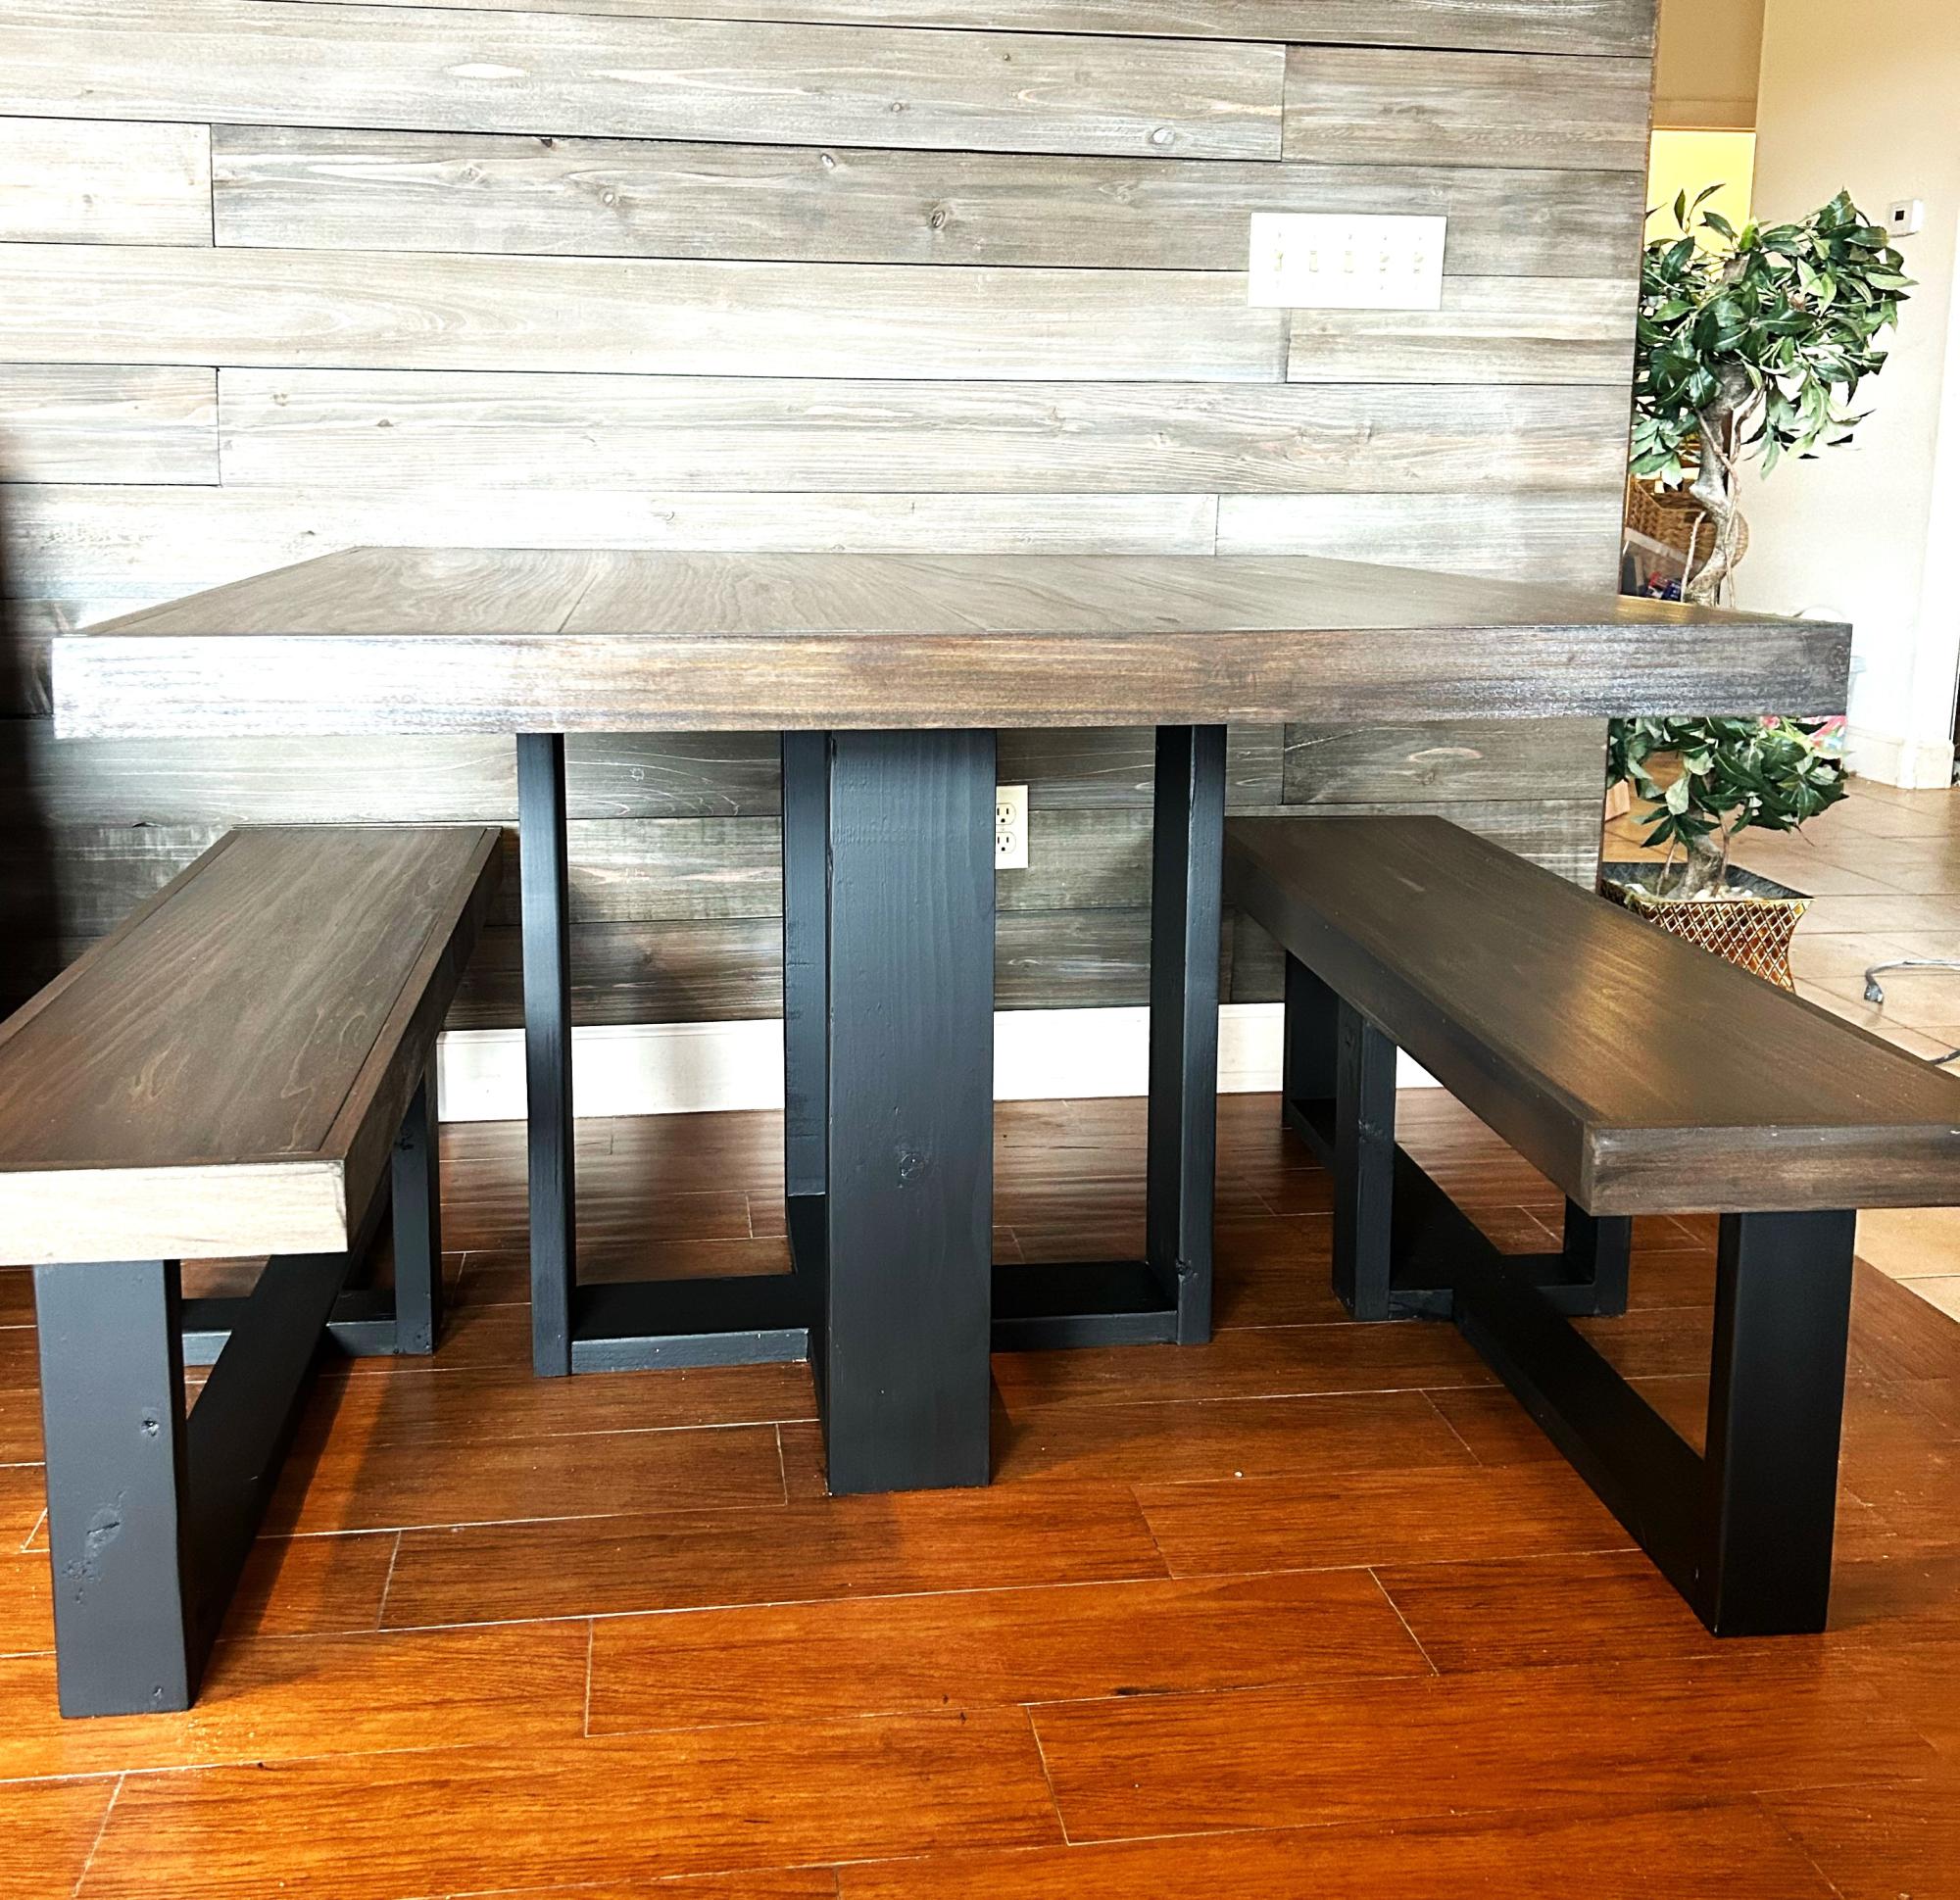
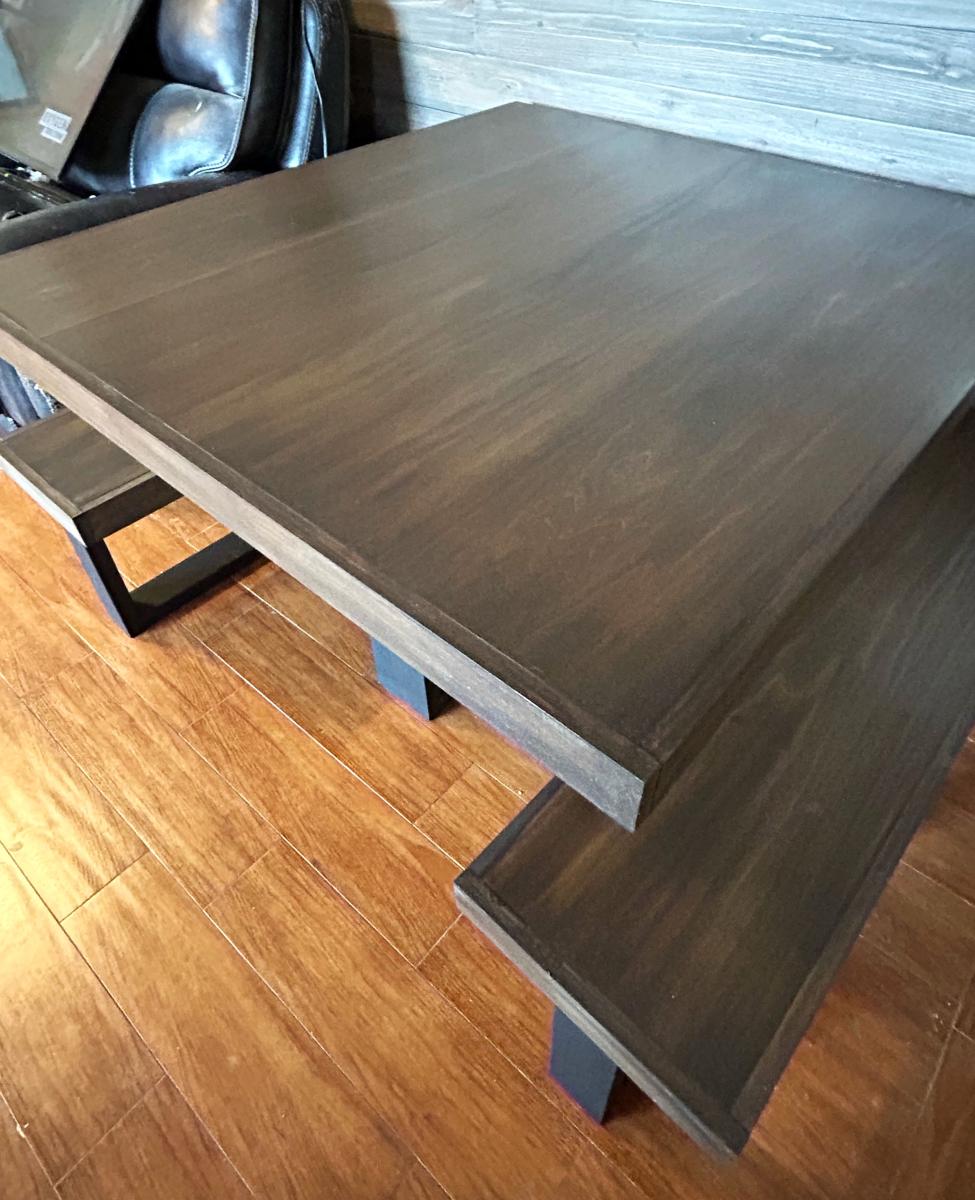
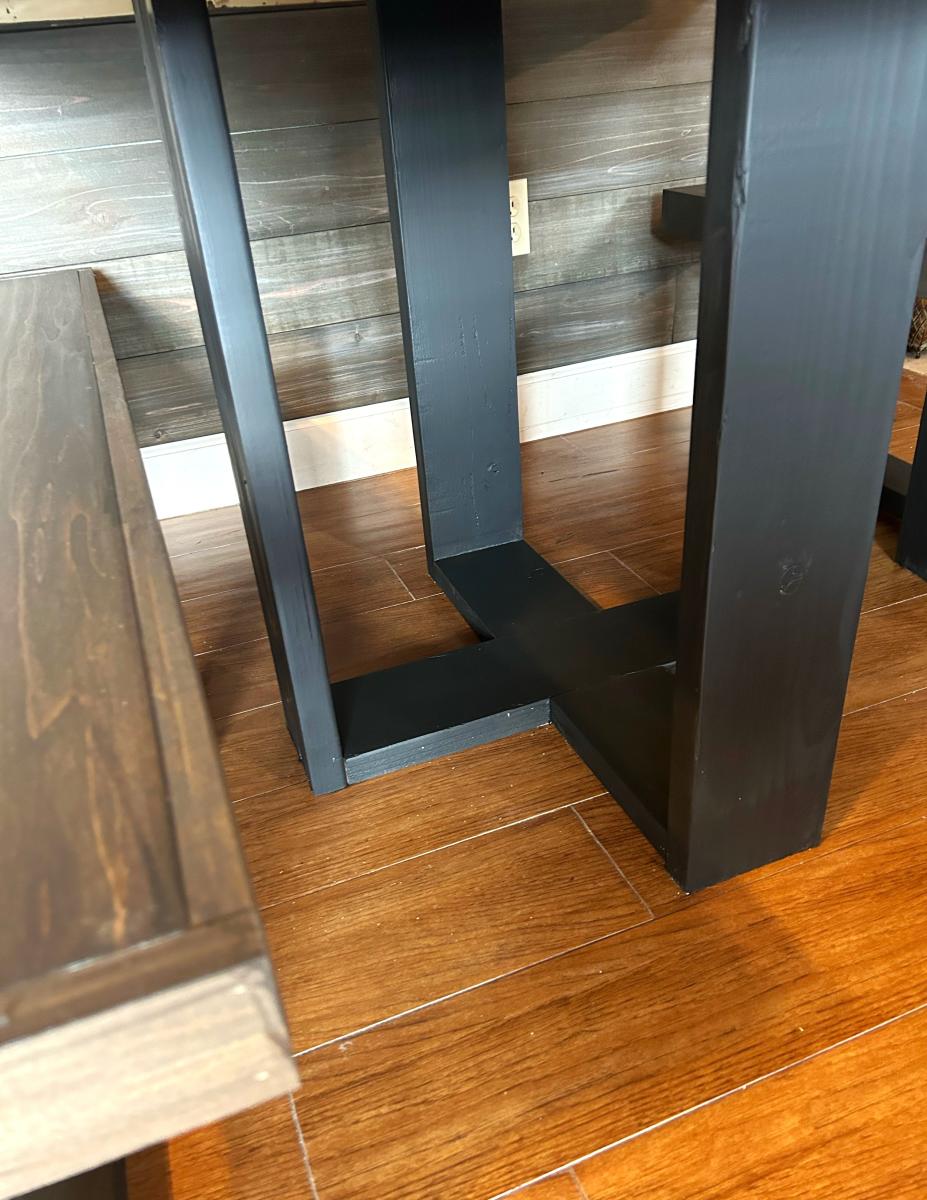
DIY Buffet Table! Our last edition to the dining room. Very happy with how this one came out! Its all Oak with Special Walnut stain and hardware from Home Depot. We needed this piece to store our fine china we received from our wedding. Still haven't eaten on them yet. . . Anyway! I was inspired by the planked sideboard plan and made it my own. My shelves are straight across and I went for the barn-styled cabinet look. Pretty much used all the tools in my arsenal for this one! Used a belt sander for the first time to make the top perfectly level. Hated using it, to be honest! It really shreds the wood. Other than that, I have another piece to be proud of. Thanks for the inspiration!

Needed a new coffee bar to fit a specific area. Changed the plans to fit my needs and this is the result. Spent a few hours a day over two weekends, probably 8-10 hours in all (paint/stain/poly included)
My son needed more shelves/storage in his room. Modified this a bit shorter in length and with to fit better in his space. Easy to build and love how it turned out!

This project took me about 10 hours. I enjoyed every minute of it! I built this bed for my son. I looked at other plans but you had to pay for them and they weren't as good as these. It's good to no that there is people like Ana that is still willing to help people. Thanks for the plans


Tue, 07/05/2016 - 10:59
Hello,
I've been on this website trying to find the plans for the Simple Bed Plan. I have seen many beds made; however, I don't see the cutting list (supply list) of the materials needed. Can you please help me with the supply list? My hubby and I are going to attempt to make this over the winter for a 3rd birthday present for my son. I would really appreciate the list so that we know what materials to purchase. Thank you in advance for your help with this issue.
Sincere thanks,
The Maynors
Sat, 01/19/2019 - 12:38
I am trying to build the Twin over the full bunk beds that stack. When looking at the site it says to use the Simple Bed Plans. When I look at the simple bed plans I get 3 pictures and that is it. I don't get a supply list or any kind of dimensions for the bed. Could you please point me in the right direction. I need to build the twin over the full bunk bed for family coming to my home in early March.
Thanks
Gary Dalton

I needed a quick project that could easily be modified for my height needs and would make a good temporary base for my new water dispenser. This was perfect!
A little different take on the plans. We opened up the wall into the playroom and needed something functional yet decorative. This was the perfect addition!
Inspired by Ana!
Thu, 04/05/2012 - 14:01
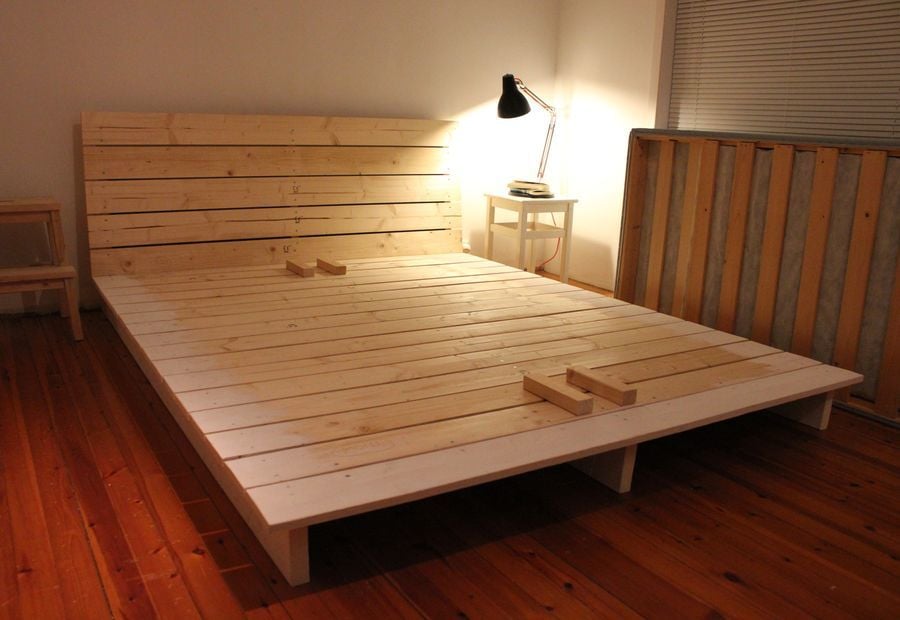
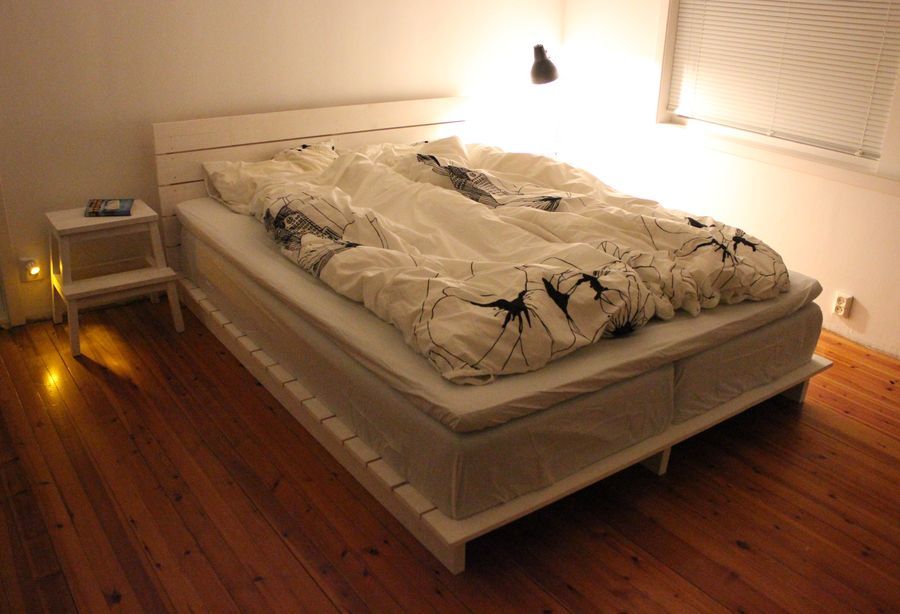
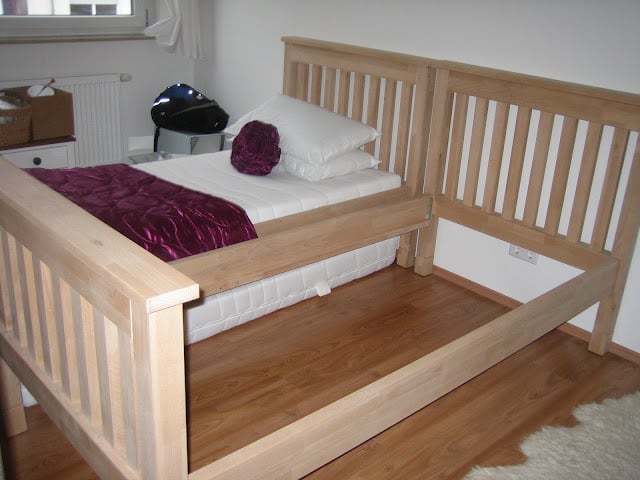
The bed has two matresses, the blocks are there to keep the matresses in place.
Tue, 04/17/2012 - 11:21
Now this is my kind of project! Looks easy but polished. Do you have plans for this?
Tue, 04/17/2012 - 12:03
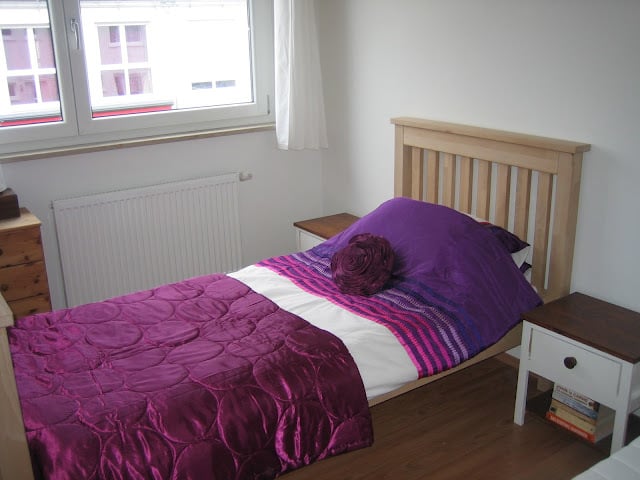
Platform bed measures:
- Deck: 18x120 mm, width = matress width + 10 cm, length = matress length + 5 cm.
- Headboard: Height 80 cm, width = matress width + 10 cm.
- Beams bed: 36x150 mm, length = matress length - 5 cm.
- Beams headboard: 36x150 mm, height = headboard height - 5 cm.
Thu, 04/11/2013 - 23:04
I would love to make this but I would require plans in order to build it. So if there is any way I could get plans you would make me quite happy.
Fri, 01/15/2016 - 17:11
It looks simple enough, but the headboard looks like it may be tilted. Can you provide instructions on the attachment of that? Thank you
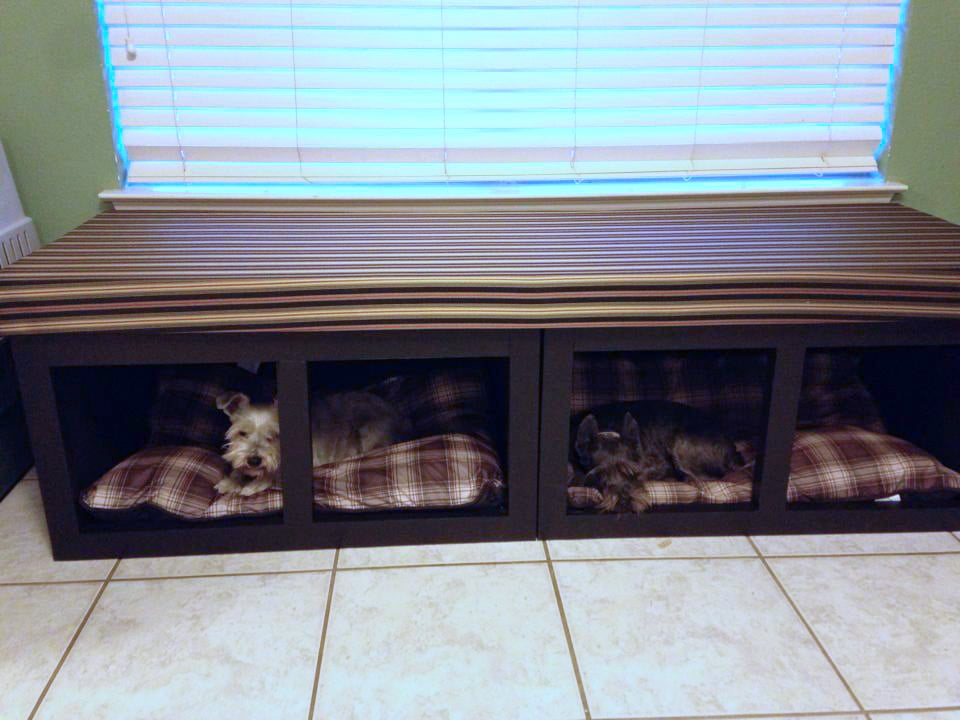
I wanted a place for our dog beds, without just having them all over the floor (we have 2 big dogs and 2 little ones. I decided to build a window seat in front of the large window in our dining room which could double as dog beds/kennels. While the base plan was off the large wood pet kennel end table, it had to be modified significantly to be wider, shorter, and sturdy enough to sit on. I am also still trying to decide if/how i want doors on here. This is actually 2 kennels next to each other (not 4) Next will be to build 2 actual kennels for the big dogs to place on either side of this.
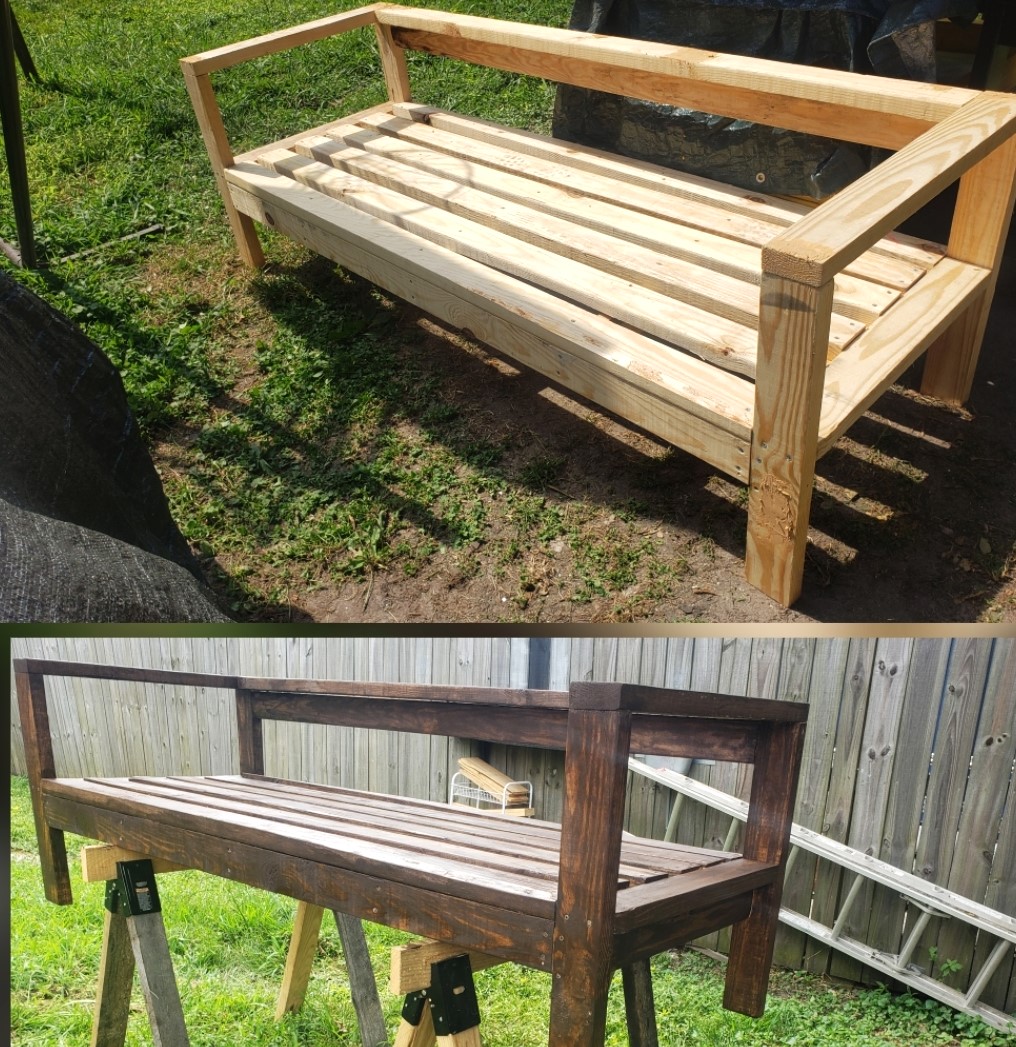
Outdoor Sofa
Wood Worker Flames
I used the basic design for this bed but altered it quite a lot to make the joins stronger, the edges smoother and the whole thing generally easier to take apart and put back together.
I used beech wood and completed the project at a woodworking club, so it's quite hard to estimate the time taken, as I only did it one evening a week and spent most of the time bringing the wood out, putting it away and clearing up each time I was there!
I am still undecided whether to give it an oil finish or to paint it white with chestnut wood stain on the headboard and footboard tops.
Just copied the plans from ana, we built it for an auction to support a group home. it was easy and quick. the project panel was big enough to also use as a shelf when cut down for the top, we loved how the top and shelf matched. we built a bigger drawer to have a more chunky look.
My wife and I built this for our 3 year old and 1 year old. They love them already.
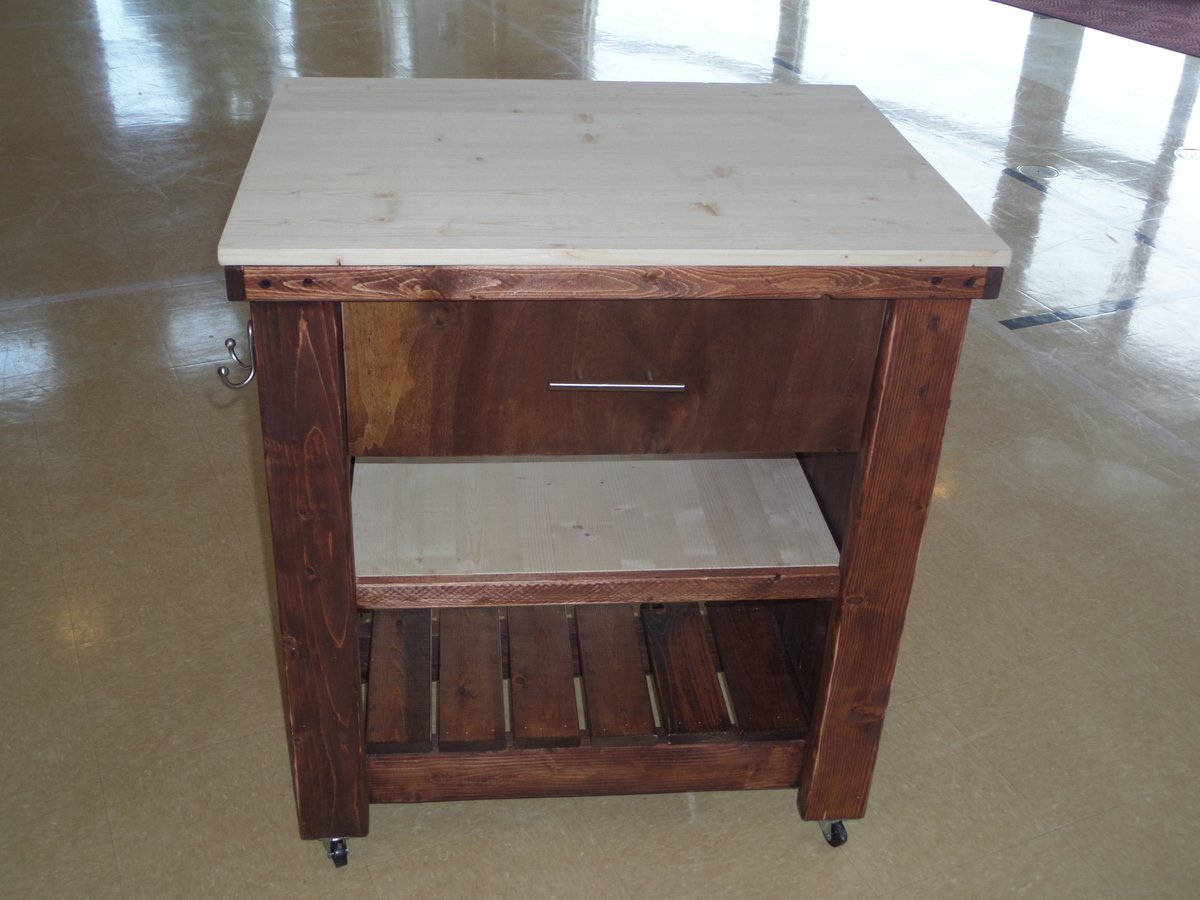
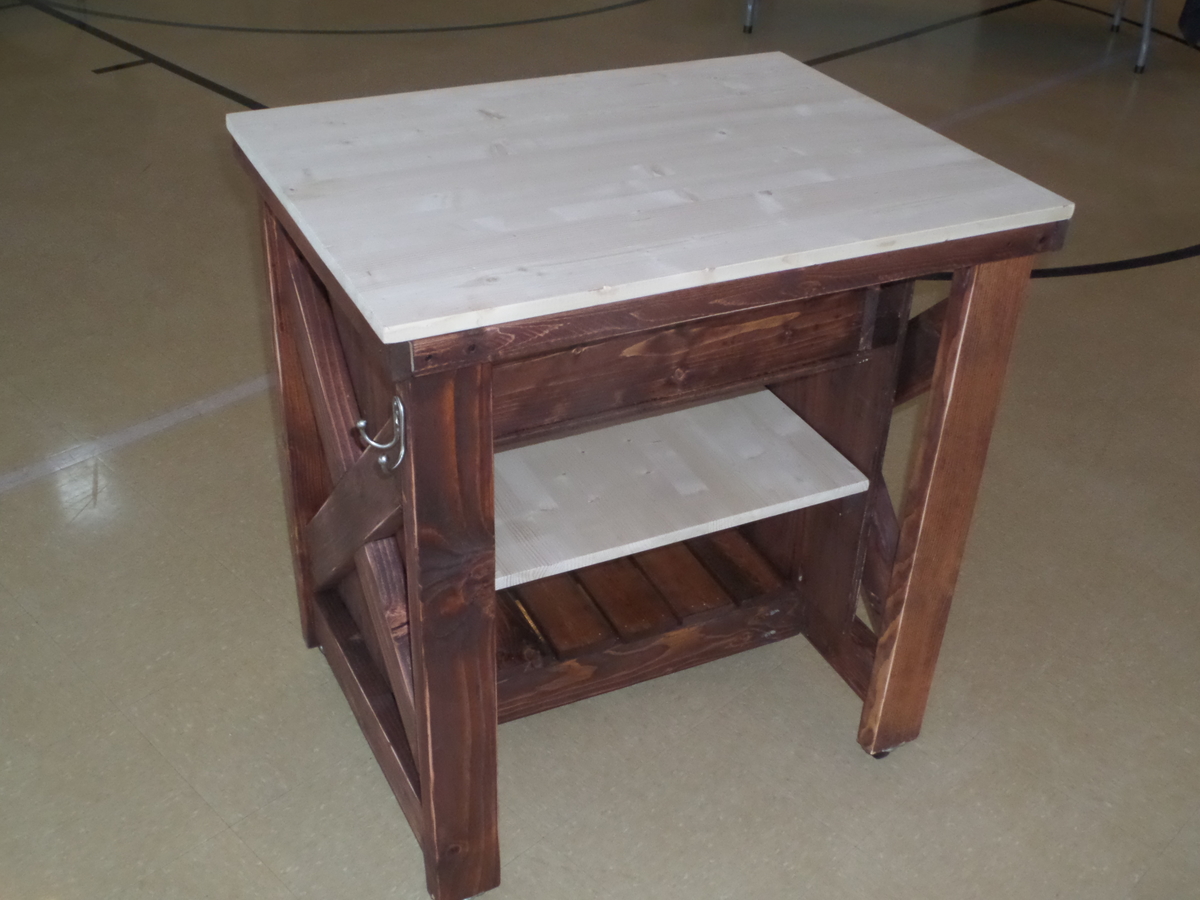
We do not have a garage yet, so this size works great to push out of the way when not being used and pull out for a workbench and also to extend the table top for the saw. The plans were easy to follow and easy to modify. I added a base made of 2x4’s to make it sturdier since it will be moved across a deck vs a level floor. I also added some boards behind the shelf to keep things from falling out the back and adjusted the height to match the table saw top. Next up will be a router table stand to replace the camping footlocker.
This is my first brag post! I modified the base to make benches. I am not super creative or any good at math, so I was super proud :D
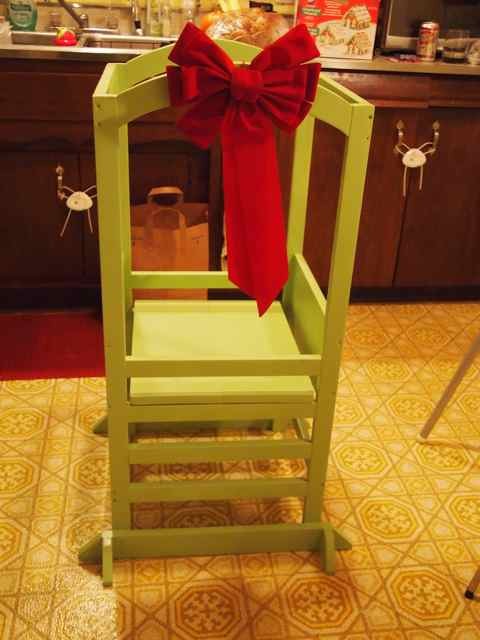
We decided to make a helping tower for my little guy for Christmas after I saw it on Pinterest. The curves were not the easiest, but I think they turned out fine. He's just finally starting to use it more as a helping tool rather than a playing platform. Definitely happy that it keeps him from standing on the chairs.
Thank you so much for this plan. I love this site!
Sat, 07/14/2012 - 13:57
Beautiful! Love the colour too. I will be attempting this as a beginner project myself: fingers crossed!
Sat, 07/14/2012 - 13:58
Beautiful! Love the colour too. I will be attempting this as a beginner project myself: fingers crossed!
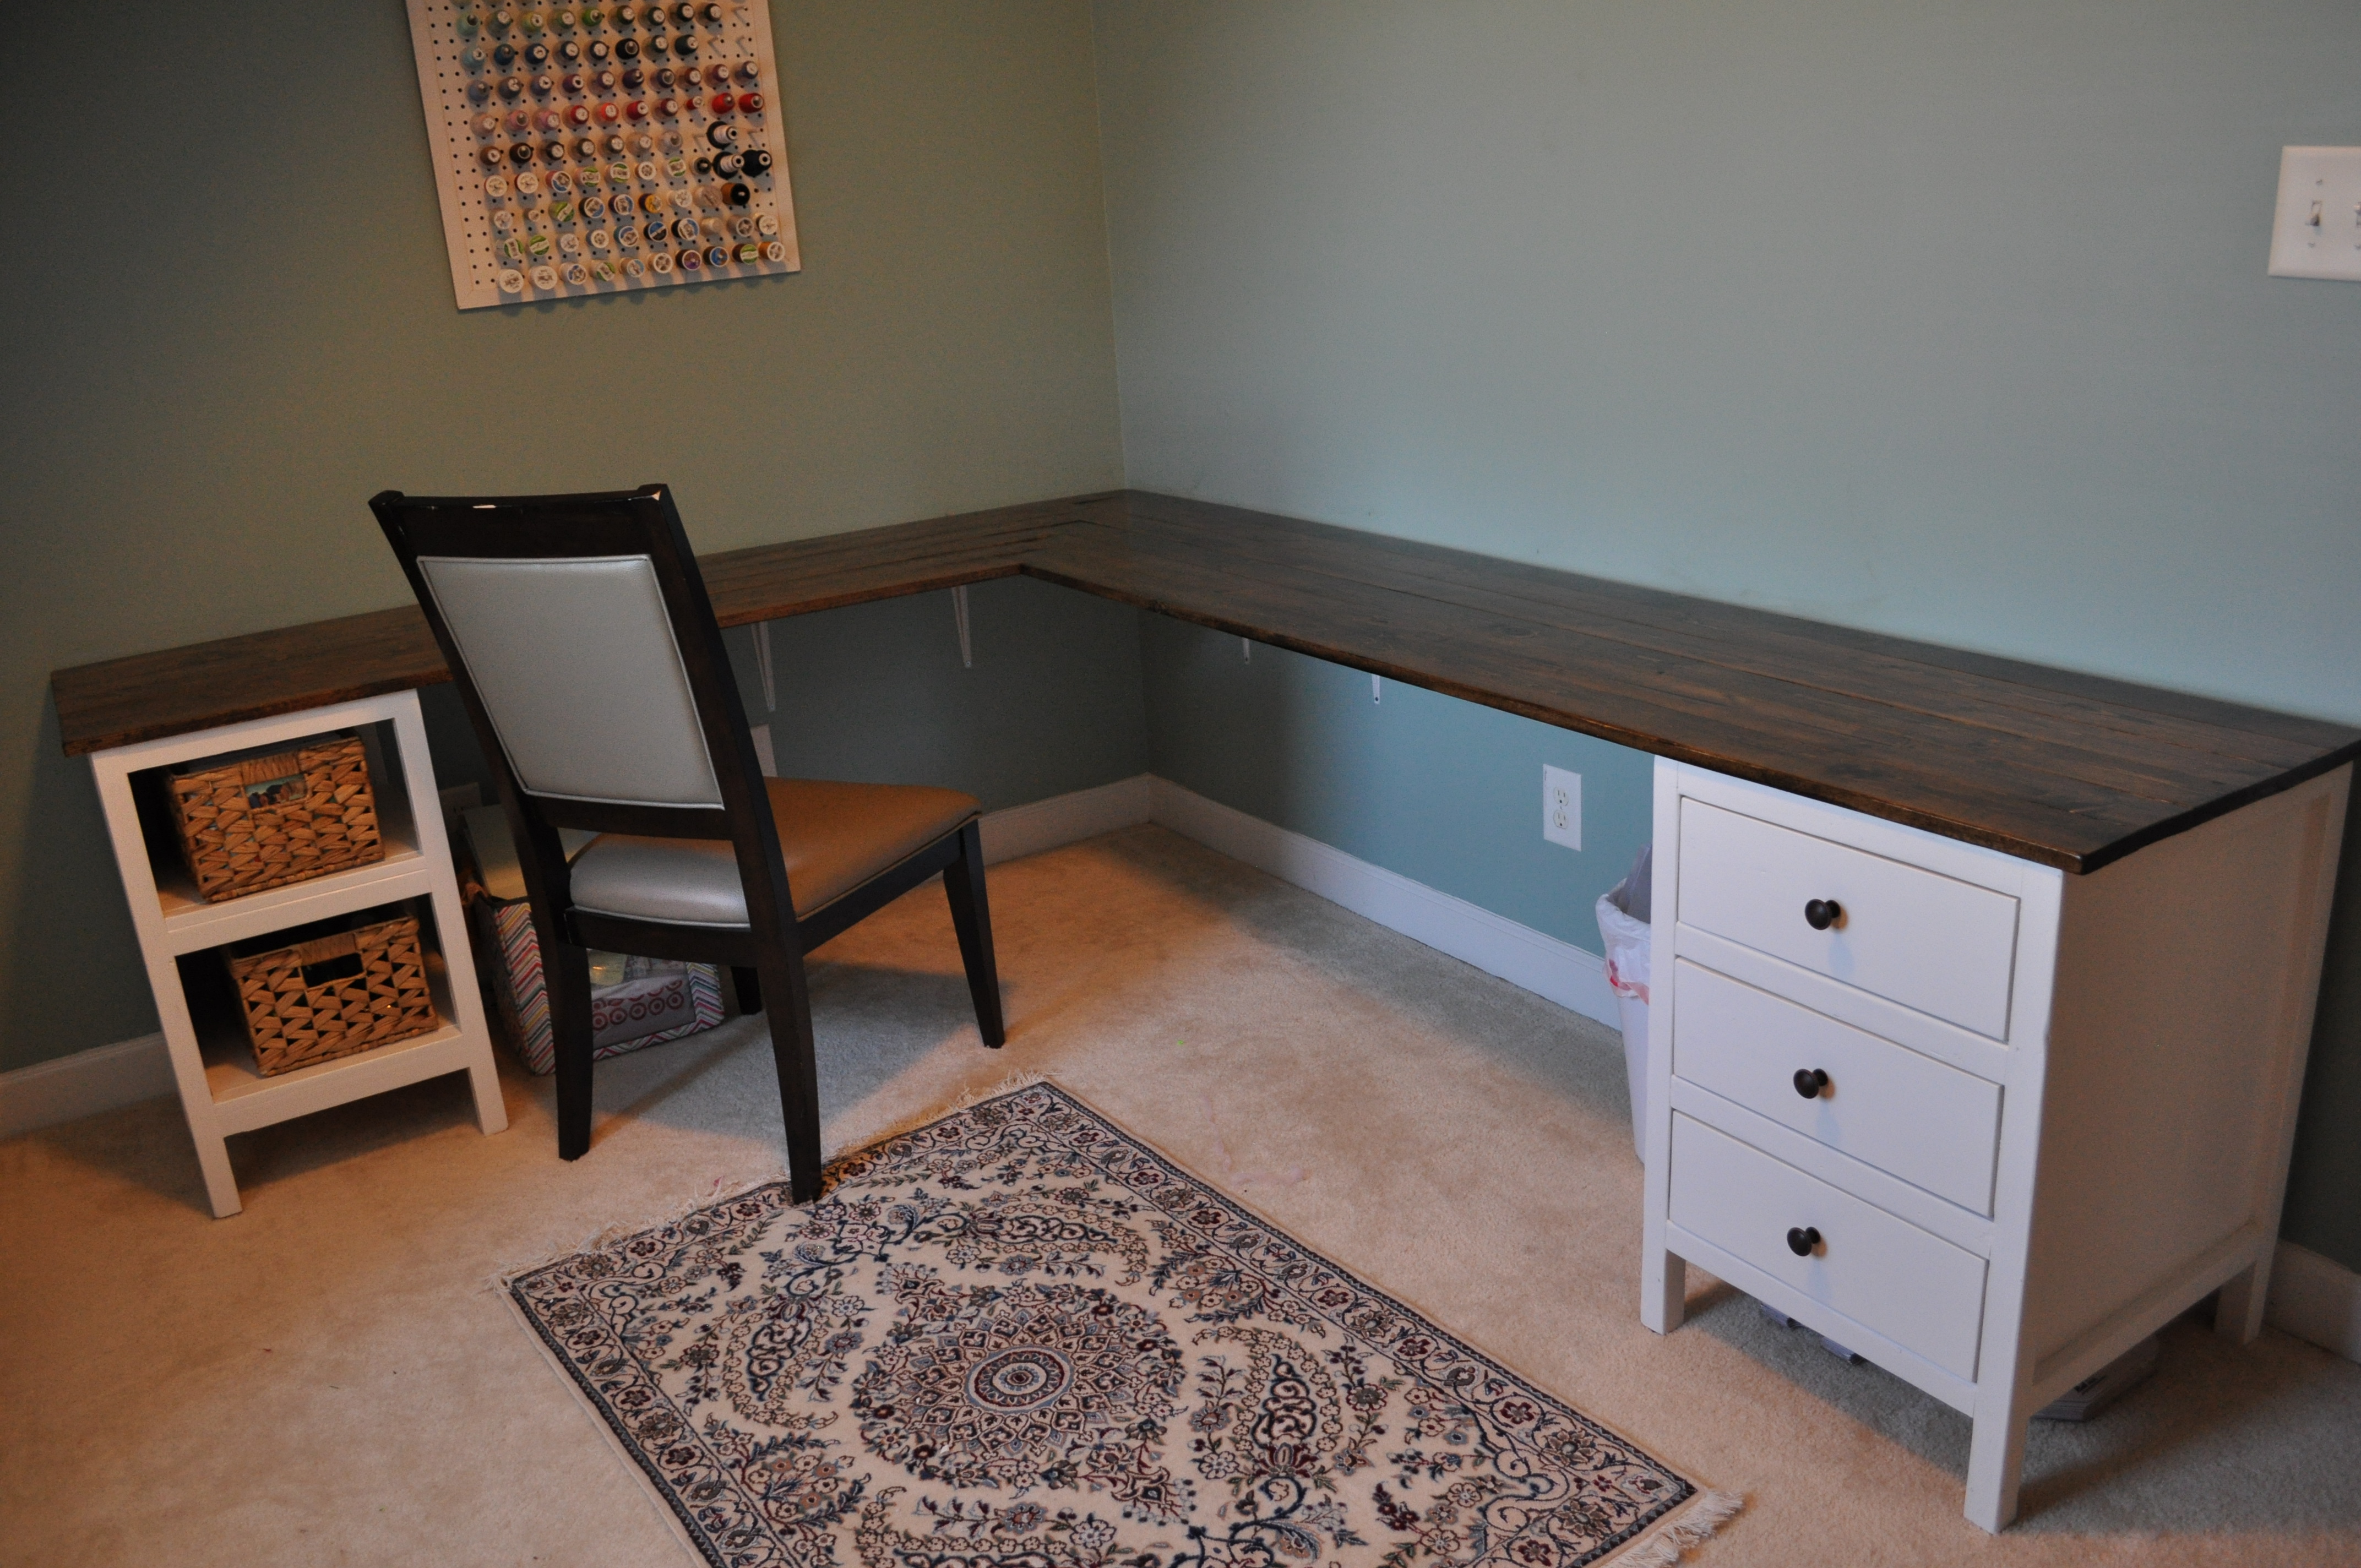
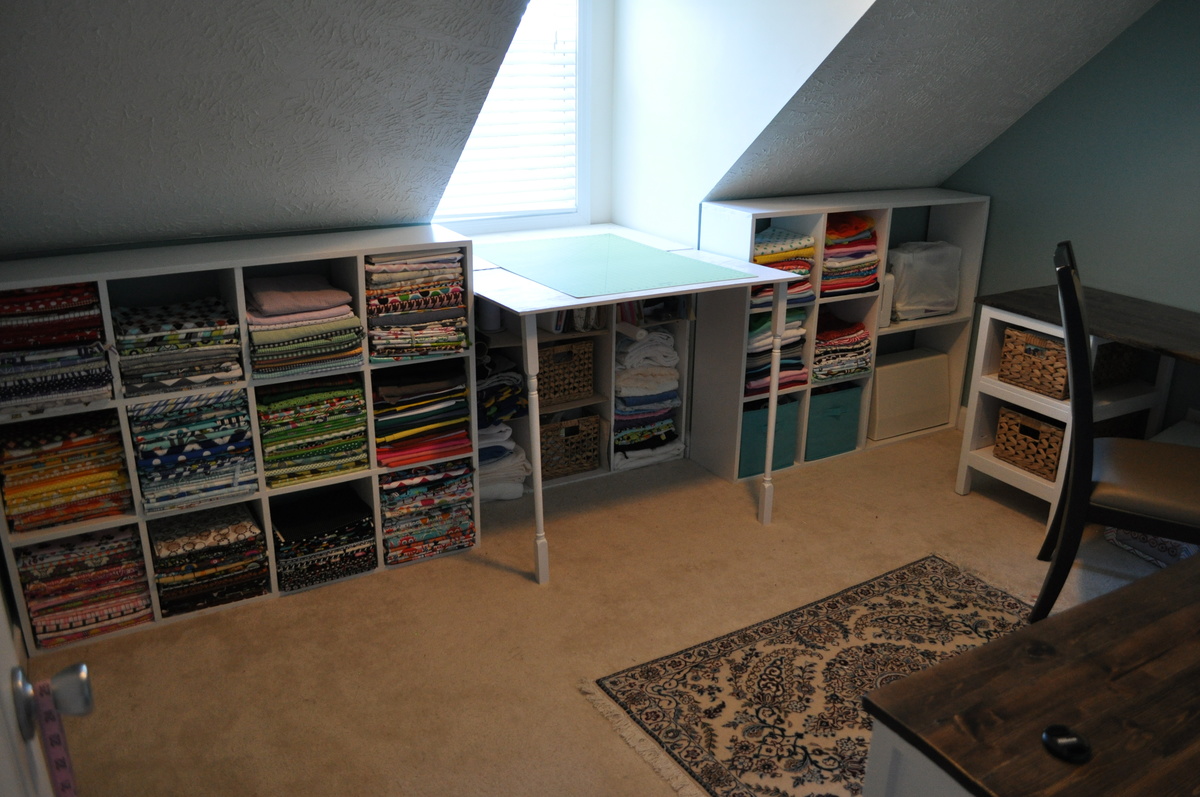
This project was one that I've been planning for about 18 months- I had to wait until we moved back into our home to start the build, so I had plenty of time to think about how to maximize my storage space in this small room with a slanted ceiling. My husband had some time off from work and offered to watch our toddler during the day time- so that was all the motivation I needed to start this big build!
Overall, it took about a week from beginning to end. The cost was between $400-$500 for everything- including hardware, paint, supplies etc. Still a huge savings over what it would have cost us to purchase desk and storage units to work in this room (I priced them out at about $2000-$2500 - WAAAAY out of our price range).
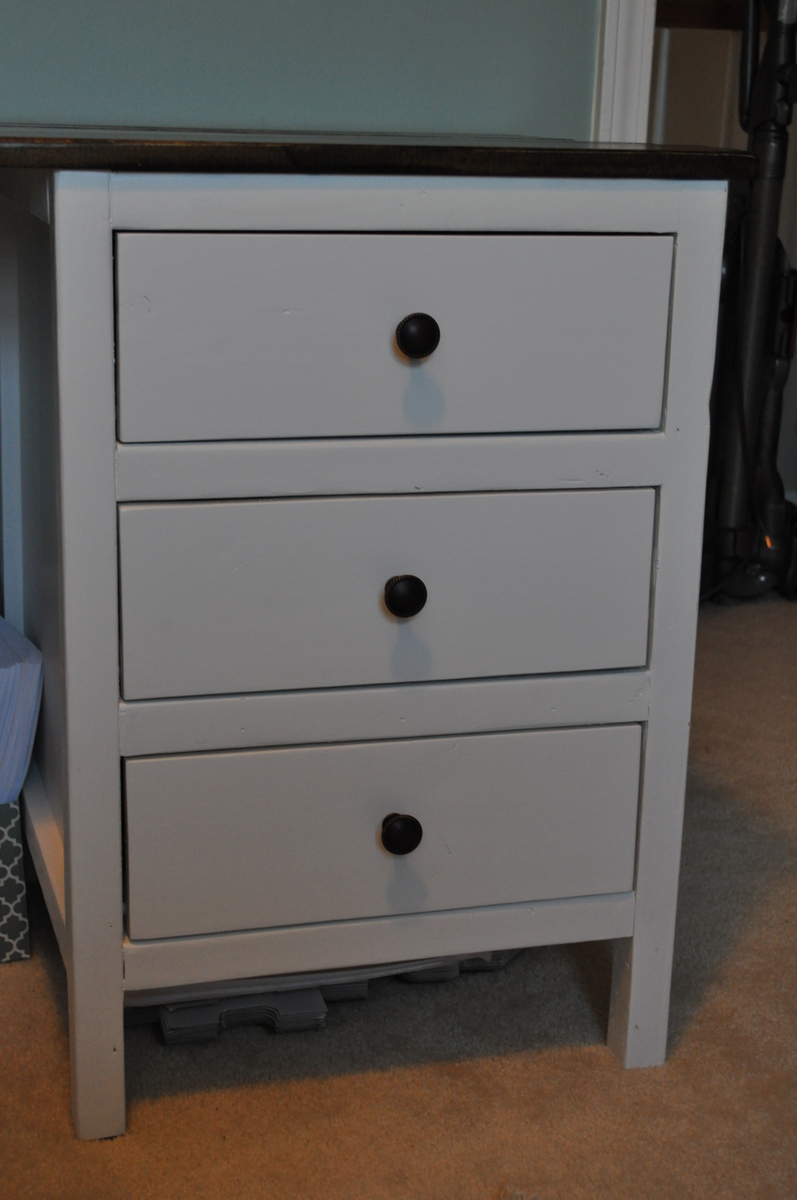
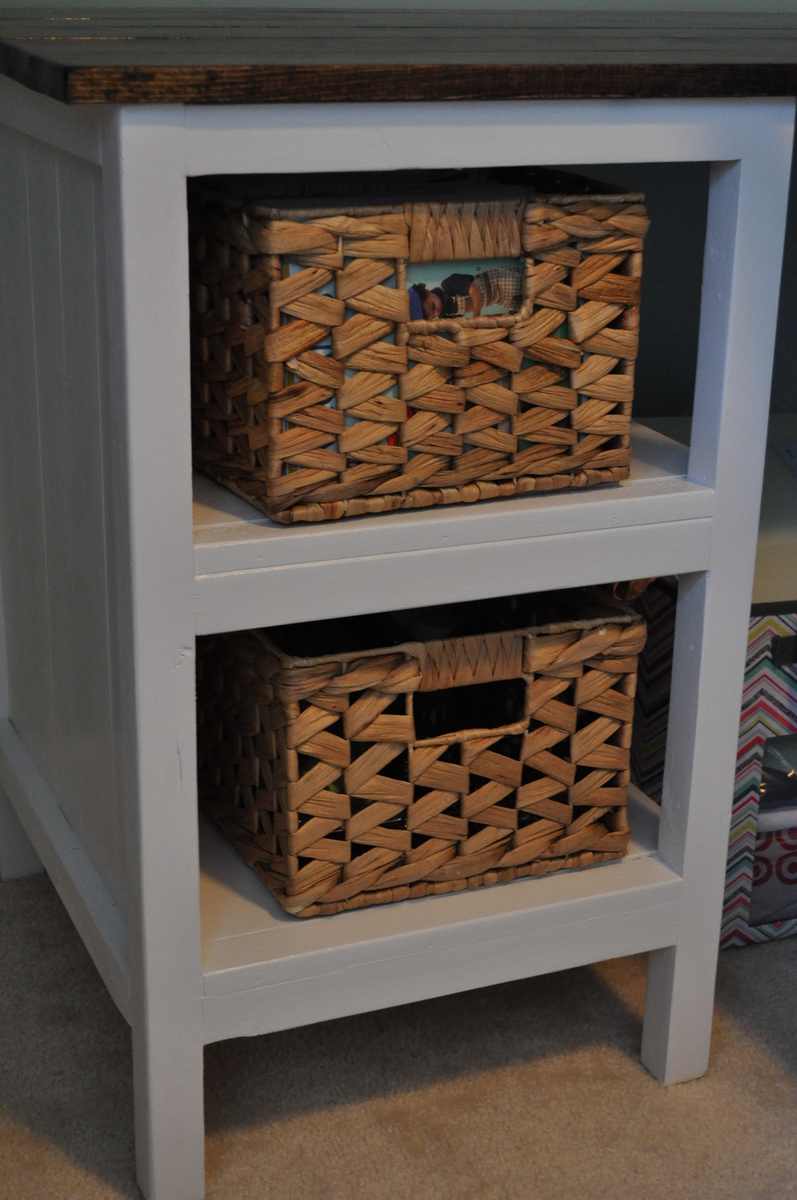
For the main desk unit I used the plans for the reclaimed look wood bedside table. I modified the height of the legs to 28" tall so that the sewing desk height was correct for when I'm sitting at my machine for hours on end. I also modified one of the units to be an open shelving unit, so that I could store my patterns and misc. sewing notions in baskets on the shelves.
The desk top was created by using six 1 x 4 whitewood boards joined with pocket holes. The corner joint is "woven" in a sense to give a unique look to the unit. I used 4 brackets in the corner (secured to the studs) to support the weight of the corner of the desk. I used Dark Walnut stain and then followed up with 3 coats of Poly (sanding in between each coat).
The two fabric/machine storage bins were made using the cubby bookcase plans as a base. Both plans were modified to maximize fabric storage with the small space- hence no face frame on each unit. The middle storage unit is one that was my first build a few years back, before I'd even heard of knock off wood- oh how it would have been so much easier if I'd known about this site back then. I added a plywood top with a piano hinge to fold out for a stand up cutting unit. For the legs, I simply went to the table/baluster aisle at my local hardware store and purchase some hardware to secure two balusters to the plywood top. Screwed them in on the outside of the window frame so I don't have to unscrew the legs every time I fold it up and away, cut the balusters down to the proper height and that was done!
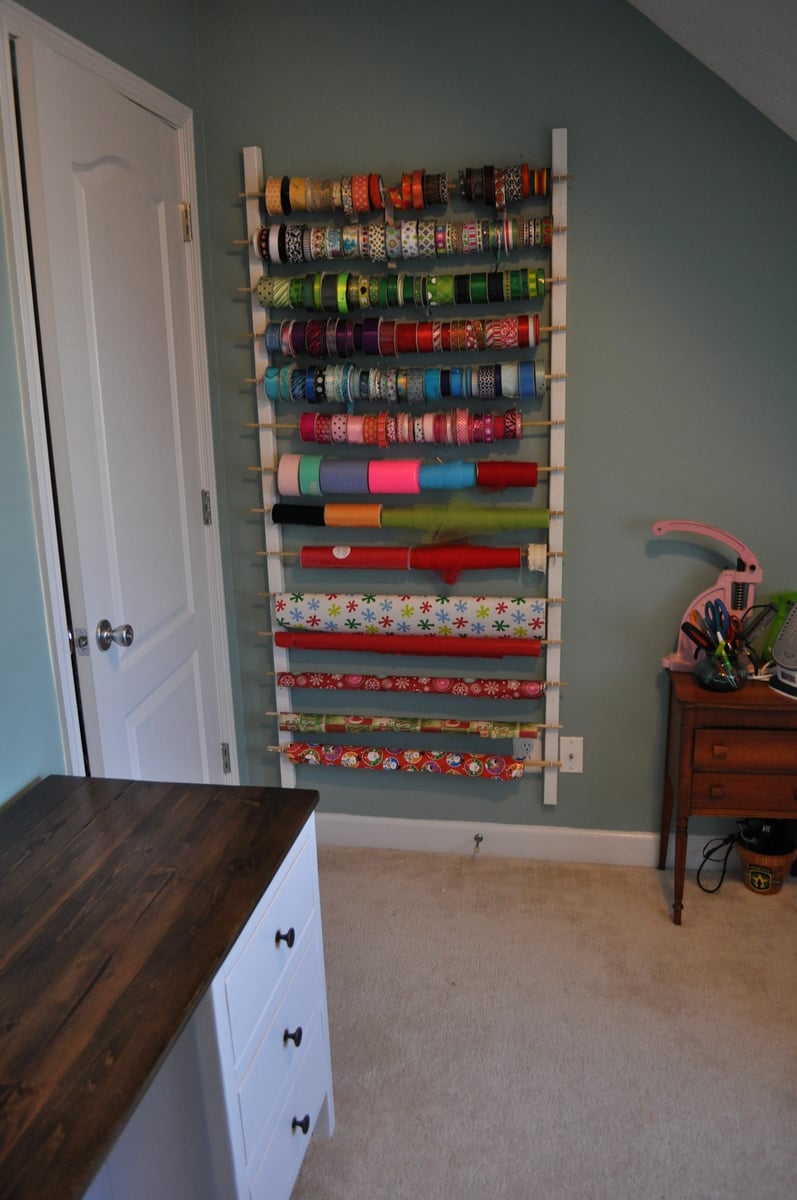
The ribbon/wrapping paper storage was super easy- just used some of my left over 2 x 2 furring strips, along with 14 dowel rods and 1 /14 screw in hooks. I pre-drilled the holes for the screw in hooks as well as the 3" screws I used to mount it to the wall.
The thread holder was a previous build of mine as well- just cut out LOTS of dowels that fit into the peg board and glued them in place. Added a little decorative trim to finish it, and painted it white.
Overall I could not be more excited about how this build turned out...aside from wood working, sewing is my next favorite thing (I have a small Etsy shop and do local craft fairs for fun). Having the stand up cutting station is a HUGE relief, as after 10 or so years in the Army, my knees and back are shot (who would have ever thought that jumping out of airplanes wasn't good for you!) The fabric storage is great and allows me to see all of my different fabrics so I eliminate over-buying (which I obviously have a problem with) and purchasing doubles.
I can't thank Ana enough for her website- I grew up with a dad that builds everything, but was always a bit intimidated when it came to building stuff for myself. Her plans really break everything down to the simplest level of instruction and make the building process stress free. This was my first time building a cabinet unit and I was very worried about the drawers not working, but I just followed along on the instructions and they came out perfect.

Fri, 01/24/2014 - 10:23
Thanks Ana- I could have never done it without your website... I can't thank you enough for this resource!!
Fri, 01/24/2014 - 17:11
You did an amazing job, way to go! I love to sew too, and I think building is a lot like sewing...but with saws and hardware instead of scissors and a sewing machine!
Tue, 02/04/2014 - 09:51
Stephanie Dexter -
Can you give us more insight on the corner weave? Maybe an up close picture? Angles? Board lengths? Thanks!
Tue, 02/04/2014 - 09:51
Stephanie Dexter -
Can you give us more insight on the corner weave? Maybe an up close picture? Angles? Board lengths? Thanks!
Fri, 02/07/2014 - 13:09
I would also like to see your corners up close.
Was your decision to not use a leg(s) for the support (and instead used the brackets) for a reason? Was it just easier?
I love the desk that size, but since we are military we move every couple years...I want to use legs for easier breakdown for transportation instead of something as permanent as the brackets. Not sure how far apart to space the legs for the support...
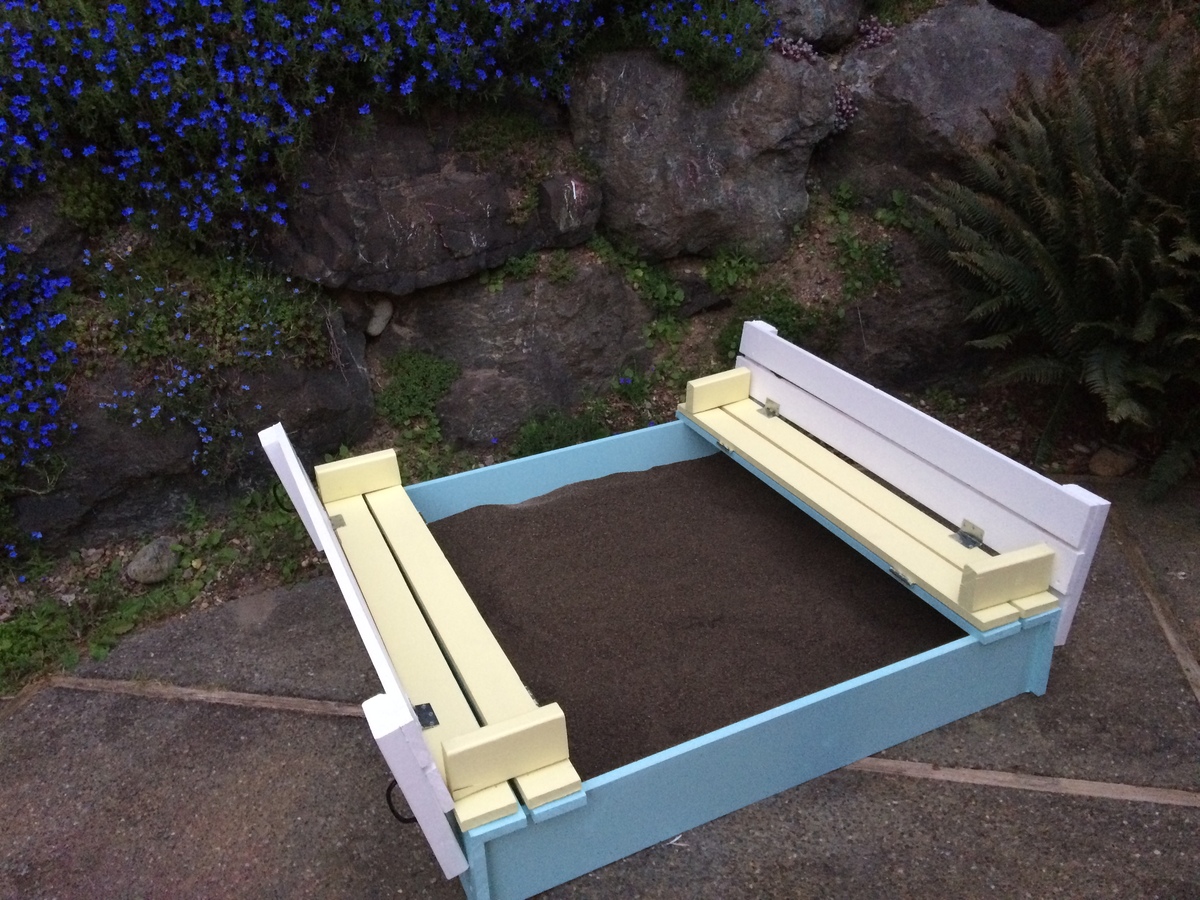
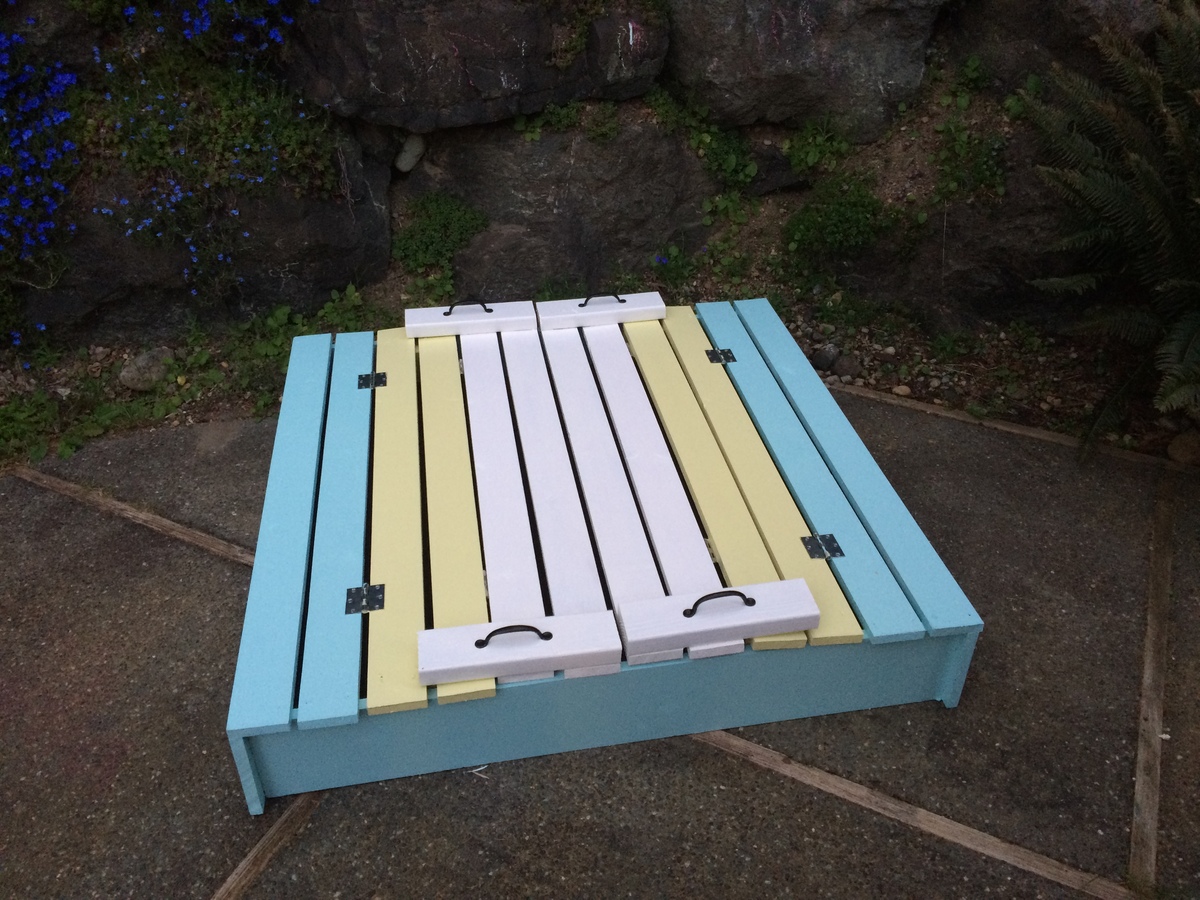
Sandbox with built in seats
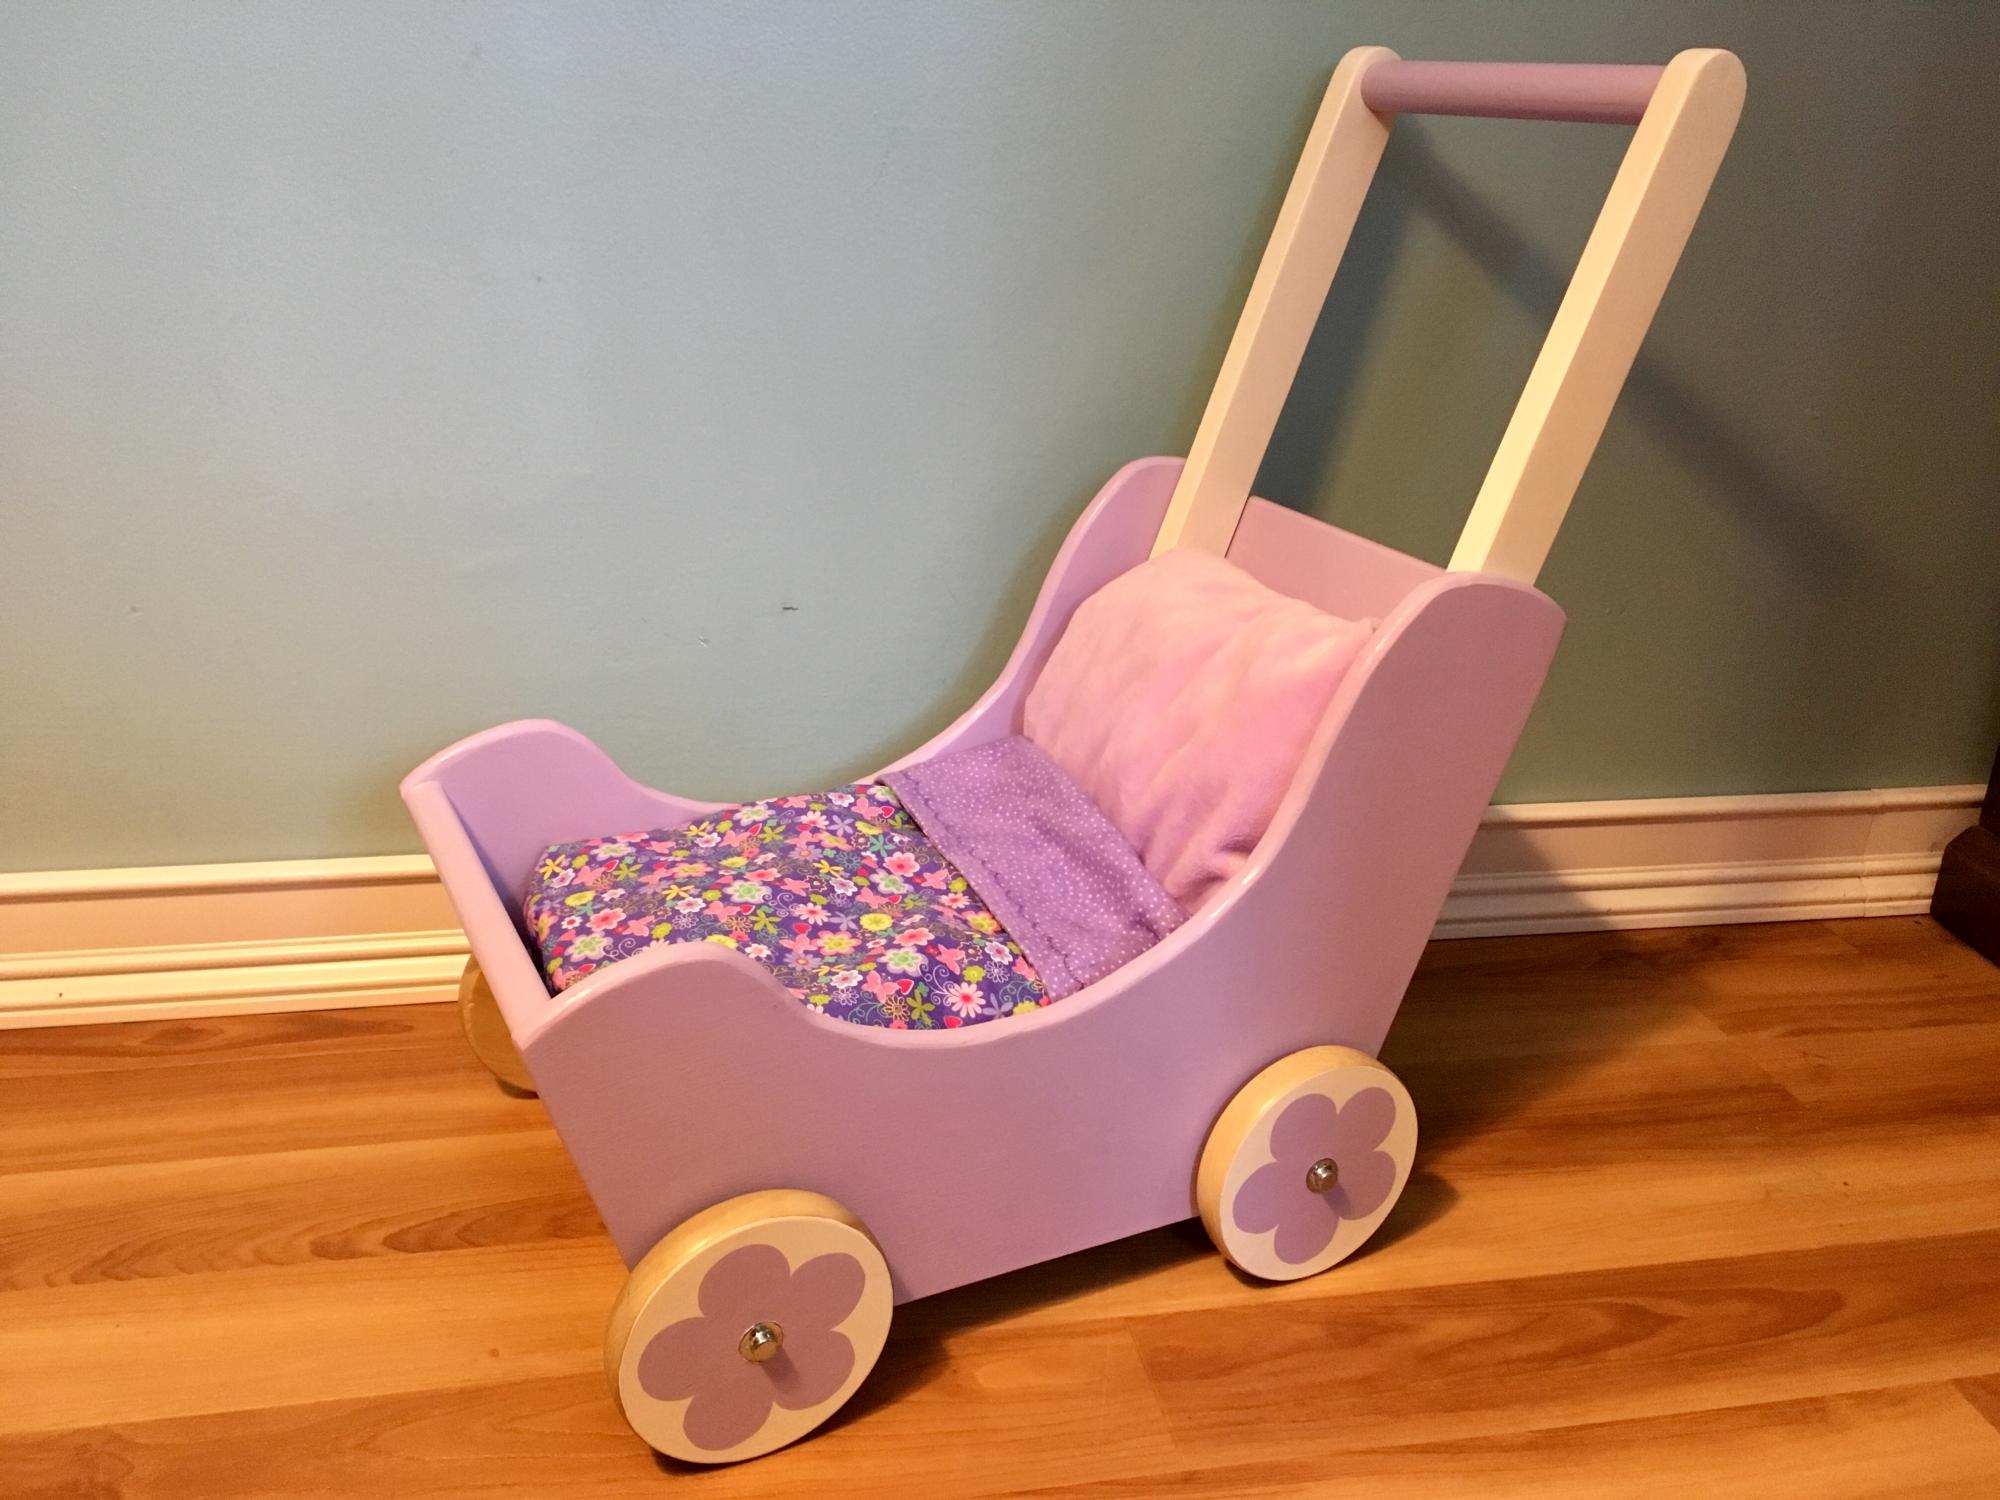
I made this for a friends daughter. I attached the wheels with 3/8" aluminum rods, washers, and axle caps. It can be tricky to get the rods the exact length you need, but it allows the wheels to roll very well. The wheels were cut with a 5" hole saw and then sanded smooth. For sanding, I attached each wheel to my drill and spun them over sand paper. This allowed the wheels to maintain their circular shape.