Community Brag Posts

painter's ladder shelf

Submitted by Anonymous (not verified) on Thu, 05/20/2021 - 13:28

I made this shelf from some old pallet wood, it took me long time to sand them.
I also made it about 5 inch higher, 1 inch deeper.
The result is perfect, I've already put my plants on it, love it! thank you Ana!

Built from Plan(s)

Farmhouse King

Submitted by dl85 on Thu, 04/04/2013 - 20:41

Went together nicely. I had to use cedar 4x4s for the posts -they were kind of pricey compared to the pine.

Estimated Cost
300
Estimated Time Investment
Weekend Project (10-20 Hours)
Finish Used
Acrylic - high gloss.
Recommended Skill Level
Beginner

Comments

Nursetogo

Tue, 03/01/2016 - 12:52

Hello I just finished building the bed, and was wondering if you could give me the dementions for yours? Did you use 1x3, or 1x4's, also how did you attach by the headboard. Thank you so much.


Clothesline Peg Display Frame

Submitted by AndyH on Tue, 02/17/2015 - 16:41

Initially made this to display Christmas cards in.

Made from 1 by 4 No. 2 Whitewood.  Was stained with Rustoleum Driftwood and then painted with some left over paint I found in garage.  I then sanded it back a bit to show the grain and stain through.

The nails are 1 inch Clavos nails from a website called www.Directfrommexico.com

Measures about 30 by 25 inches on outsides.


Estimated Cost
Wood $4.50 as only needed one piece and used one left over piece. The large hammered nails were most expensive part at about $8. Line and pegs around $5.00 Stain and paint were leftovers. Total about $17.00. Have specified an hour or two but the down time between stain and paint drying obviously adds time.
Estimated Time Investment
Day Project (6-9 Hours)
Finish Used
Rustoloeum Driftwood as base and some left over paint. Painted on the stain without conditioner. Let dry overnight. Painted the next day and left another day to fully dry. Sanded by hand to show some grain through.
Recommended Skill Level
Starter Project

Planter

Submitted by Neil B on Wed, 05/17/2017 - 00:39

Thanks for the easy to follow plans!

Estimated Time Investment
Day Project (6-9 Hours)
Recommended Skill Level
Intermediate

Farmhouse Style X table and benchea

Submitted by Rbmalatt on Sat, 05/29/2021 - 19:11

This is a Farmhouse X style table I build my mother in law. This was the first project I’ve done this big. Love the way they turned out.

Estimated Cost
$750
Estimated Time Investment
Week Long Project (20 Hours or More)
Finish Used
Special Walnut stain on the top. The bases are white washed.
Recommended Skill Level
Intermediate

My first toddler bed!

Rather than buy a cheap toddler bed from a chain retailer I decided to build my own. Ana's plans were amazing! I changed just few things to fit our needs. My son loves it and so do I.

Built from Plan(s)
Estimated Time Investment
Weekend Project (10-20 Hours)
Finish Used
Minwax Dark Walnut w/ Semi gloss Poly
Recommended Skill Level
Intermediate

Keg Tap Handles

A buddy of mine brews his own beer (great beer btw) and mentioned that he was looking for some tap handles that he could write on to identify what brews he had on tap.   I decided to help him out...

For more details and photos, check out my DIY blog:

http://www.woodworkingfourdummies.com/blog/keg-tap-handle-diy

Cheers,

Ian

Estimated Cost
$25 for 3 handles
Estimated Time Investment
Day Project (6-9 Hours)
Finish Used
Polyurethane
Recommended Skill Level
Beginner

Planter

Submitted by Anonymous (not verified) on Mon, 05/22/2017 - 09:08

Instead of mixing pine and cedar, I used all cedar.  I mounted the panels to the legs flush at the top so that I could add the trim pieces.  Finised with Cedar Timber Oil.

Trim and all cedar increased the price to about $35 each.  Of course cedar prices are really high right now.


Estimated Cost
$35
Estimated Time Investment
Day Project (6-9 Hours)
Finish Used
Thompson's Timber Oil Clear Cedar.

http://www.homedepot.com/p/Thompson-s-WaterSeal-1-gal-Clear-Penetrating-Timber-Oil-Exterior-TH-047801-16/300766448

Recommended Skill Level
Beginner

Made the wife happy with a kitchen cabinet alteration

Submitted by essjaypee on Thu, 06/03/2021 - 13:42

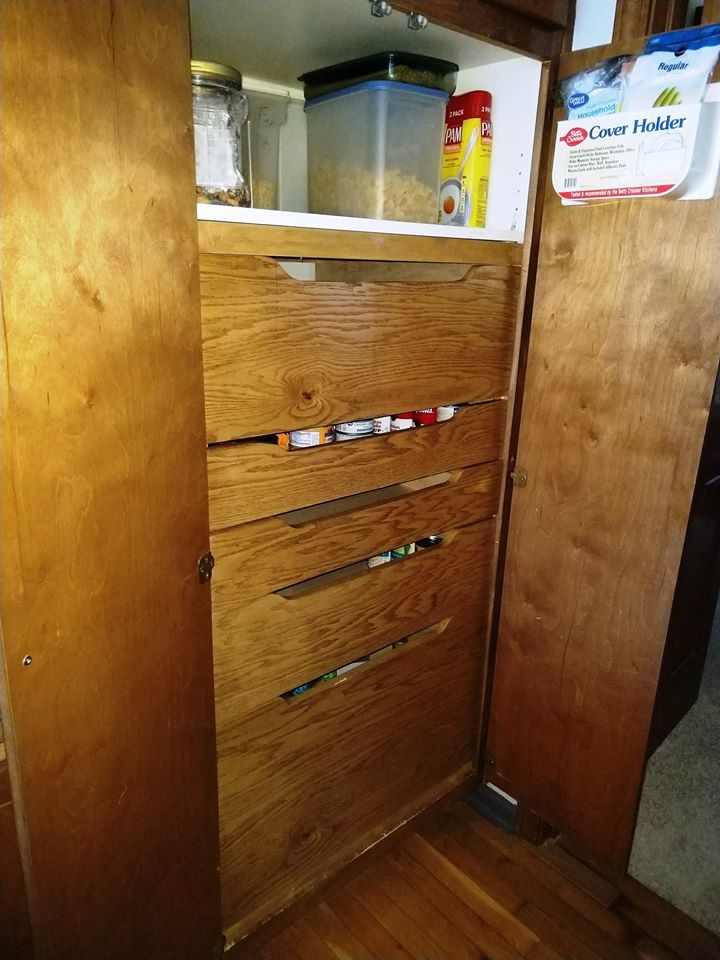
Our pantry had shelves 29" wide by 24" deep which made it difficult for my wife to see what was in the very back of the pantry. At her request, I replaced the shelves with full extension drawers at her suggested heights. Now, she can pull out the drawers and get whatever it is she needs.

She has more useable space and my life is a whole lot easier.

I used 3/4" birch plywood scraps left from an earlier project (4'W x 8'H x 18"D, 3-bay cabinet) in the laundry room.

I used self-designed plans and modified them as needed during the build.

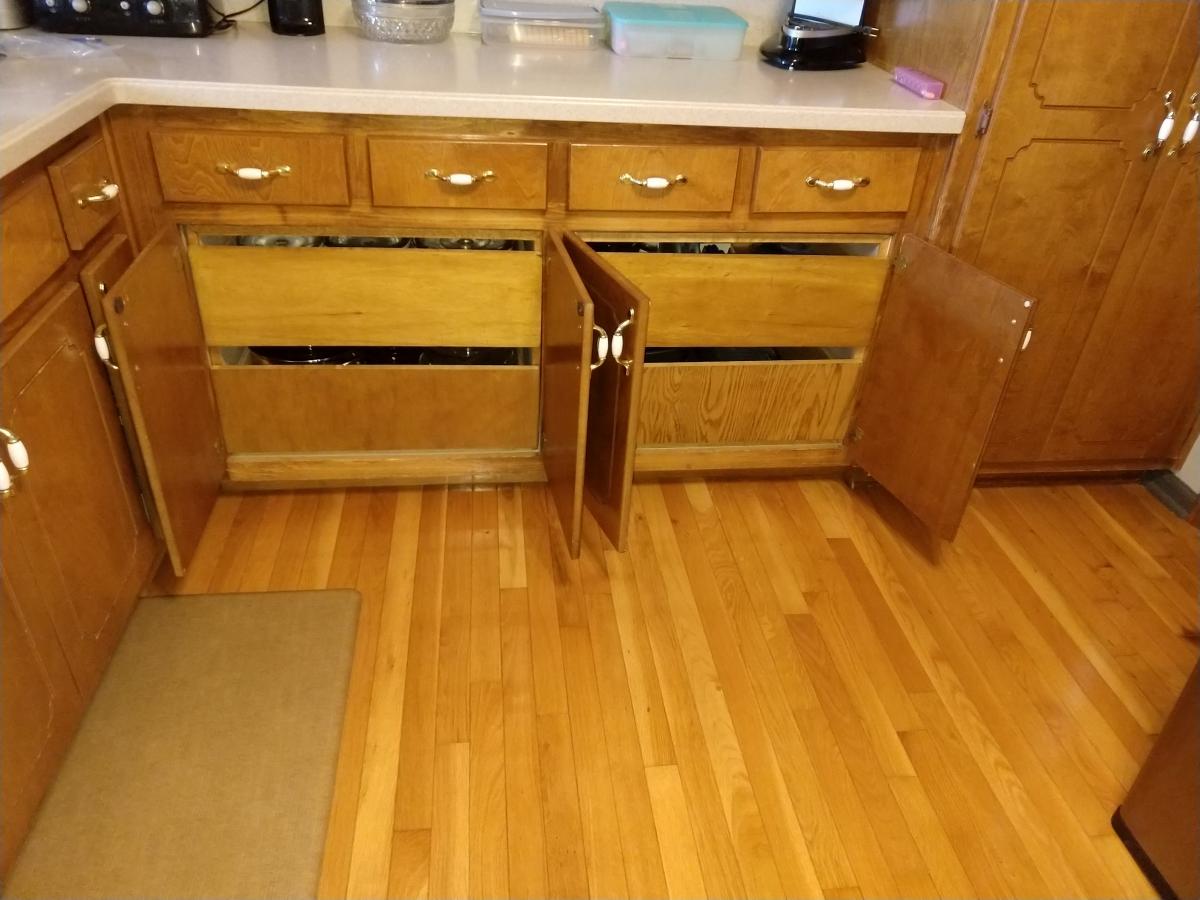
She liked the pantry drawers so much the two base cabinets between the sink and the pantry also got the conversion from shelves to drawers.

Finish Used
provincial stain with polyurethane finish
Recommended Skill Level
Intermediate

Comments

Sturdy Work Bench

Submitted by lbaker on Mon, 04/08/2013 - 13:15

Wanted to make a table for my knife making projects. Often watch tutorials online so I built a frame to house 2 computer monitors and attached a spare laptop to the underside of table. Dimensions are pretty close to original plan, little taller (with the obvious height for back 2x4's. Sheet of plexiglass over monitors. Added baseboard trim to create "pool" for tabletop, adding a bottlecap epoxy top later.

Built from Plan(s)
Estimated Time Investment
Week Long Project (20 Hours or More)
Finish Used
Dark stain
Recommended Skill Level
Intermediate

Side Street Bunks Twin Over Full Modification

Submitted by swpagnani on Wed, 02/25/2015 - 12:52

I needed a good sturdy bunk bed for my boys and I didn't want to spend a bunch of money. Every bunk bed I looked at seemed to wobble and cost a fortune so I ventured off to make my own! I came across the Side Street Bunk plans and did a little modifiying to make them work with the mattresses we had. I absolutley LOVE the way they turned out and my boys are so excited to finally have their bunk beds! Thanks Ana!

Built from Plan(s)
Estimated Cost
$165
Estimated Time Investment
Weekend Project (10-20 Hours)
Finish Used
Semi-gloss paint
Recommended Skill Level
Beginner

Comments

Octagon picnic table

Submitted by Anonymous (not verified) on Wed, 05/24/2017 - 20:34

I love our new table. 

Built from Plan(s)
Estimated Cost
$150
Estimated Time Investment
Week Long Project (20 Hours or More)
Finish Used
Thompson deck stain (cedar) and black Laytex paint.

Recommended Skill Level
Intermediate
Seasonal And Holiday

How to Build a DIY Mobile Triangle-Shaped Chicken Coop

Submitted by thediyplan on Thu, 06/10/2021 - 10:41

Every so often, we purchase several baby chicks. Our kids really enjoy watching them grow and develop throughout their growth phases. When the chicks were old enough to spend the night outside, I’ve built them a Mobile Triangle-Shaped Chicken Coop to live in. Once they are full-grown, they will be moved to a larger coop. I wanted to have a mobile chicken coop so that I could easily move it around the backyard.

There are so many different chicken coops out there. They come in various shapes and sizes. Most of them are built to be stationed in one place, but I wanted to try a mobile coop.

see my website for additional pictures and how I've built it, href="https://thediyplan.com/mobile-chicken-coop"

Estimated Cost
$ 200
Estimated Time Investment
Day Project (6-9 Hours)
Recommended Skill Level
Intermediate

Comments

Land of Nod Inspired Little Sloane Desk and Bookshelf

Submitted by jaime19861 on Fri, 04/12/2013 - 13:11

I found the Little Sloane desk and bookshelf on the Land of Nod site. I thought it would be a great bday gift for my niece, who has a very small bedroom. I did not have an actual building plan to use, but I loosely based my plan off the Leaning Bookshelves project in Ana's book. The picture I have is when I first gave it to her and then a few with it in use.

Estimated Cost
$50
Estimated Time Investment
Weekend Project (10-20 Hours)
Finish Used
I primed it using Kilz and then used Dutch Boy Cabinet and Trim paint that I had left over from another project.
Recommended Skill Level
Beginner

Comments

Ana White

Fri, 04/12/2013 - 13:23

Hi Jaime, thank you so much for posting!!! We've had a ton of requests for this project - mind if I draw up plans to share? Thank you so much - it is beautiful - and I love the smile! Ana

Small Dresser

Submitted by plewis on Sun, 03/01/2015 - 14:08

For my second project I decided to make a small dresser to match the Camp Loft bed we bult last week. I must say it was a great success.  The only challenging aspect was installing the drawer slider properly.  This took quite a bit of time to get it right.  Everything else was a breeze.  In the top drawer I added a little divider so I can seperate undies from socks.

Estimated Cost
$150.00
Estimated Time Investment
Weekend Project (10-20 Hours)
Finish Used
2 Coats Dark Walnut Stain followed by 2 Coats of Clear Shellac
Recommended Skill Level
Intermediate

Love my table!

Submitted by Anonymous (not verified) on Sun, 05/28/2017 - 23:14

This is my one and only woodworking project so far, and I am so proud of it. I used reclaimed 2x6 redwook deck boards for the top and had to modify the design to make the table a little bigger. I also added an umbrella hole to the center. I'm hoping to add benches one of these days, but with two daughters and a baby, I'm not sure when that will be! Thank you, Ana, for your design!

Built from Plan(s)
Estimated Cost
Less than $100
Estimated Time Investment
Week Long Project (20 Hours or More)
Finish Used
Satin water-based polyurethane on the redwood top, primer and flat white paint on the legs.
Recommended Skill Level
Starter Project

Queen size Farmhouse bed and night stands

With no experience but a lot of time during Covid, we tackled this project and love the results. Queen bed and nightstands. Made from pine, stain is Saman Wood Stain 013 - IRON EARTH. We modified the night stands to be 4 inches narrower to fit the room a little better.

Finish Used
Saman 013 - IRON EARTH
Hard to find but worth it, water based stain, had no odor and I stained it in the basement in the winter. No special instructions, apply and wait a minute and wipe off. I am planning to use a matte polyurethane when I have more time to protect the finish.
Recommended Skill Level
Beginner

Comments

Shoe Bench

Ana's spa bench inspired me this project. My shoe rack had been screaming 'foul' for a long time and I had been on the market looking for a three-tiered shoe bench. The benches I saw online were either too small or too expensive. So when I found this plan, I said "why not?" So the rest is history.

Estimated Cost
$70 - $85
Estimated Time Investment
Weekend Project (10-20 Hours)
Finish Used
Stain in Maple Walnut.
Recommended Skill Level
Starter Project

Twin Platform Bed

Submitted by mcm76 on Mon, 03/02/2015 - 23:00

This is a great bed for todlers.

Estimated Cost
$100 Bed
$150 Matress
Estimated Time Investment
Weekend Project (10-20 Hours)
Finish Used
Paint and gold primer
Recommended Skill Level
Beginner

Comments

Corner Hutch

Submitted by Anonymous (not verified) on Thu, 06/01/2017 - 12:58

Built the corner hutch from Ana's super easy plans!  LOVE IT!

http://www.ana-white.com/2010/12/plans/corner-cupboard

Made a cutout for my thermostat on the wall.  Gotta love building what you need for your space!

Built from Plan(s)
Estimated Time Investment
Weekend Project (10-20 Hours)
Finish Used
Grey Paint wash
Recommended Skill Level
Intermediate

My first big woodworking project - a farmhouse table!

Submitted by jfleming on Wed, 06/30/2021 - 12:02

I used the no pocket hole plans and as per someone's great recommendation - I moved the stretcher supports to the inside of the legs to give a little more room when the chair is pulled out and someone is sitting on an end. I also made a planer tool for my table saw so I could square off the edges of the table top boards and the bench seat boards. The boards then sat closer to each other so I don't have places for crumbs to fall down between the boards. I did have a couple of sections that didn't quite match up and used resin to fill those areas after staining the boards. I then used a lacquer finish (Watco clear satin lacquer). The stain is Minwax English Chestnut but I did use the Minwax wood conditioner prior to the stain for a more even uptake of the stain. All great recommendations from folks on this site!

Comments