Community Brag Posts

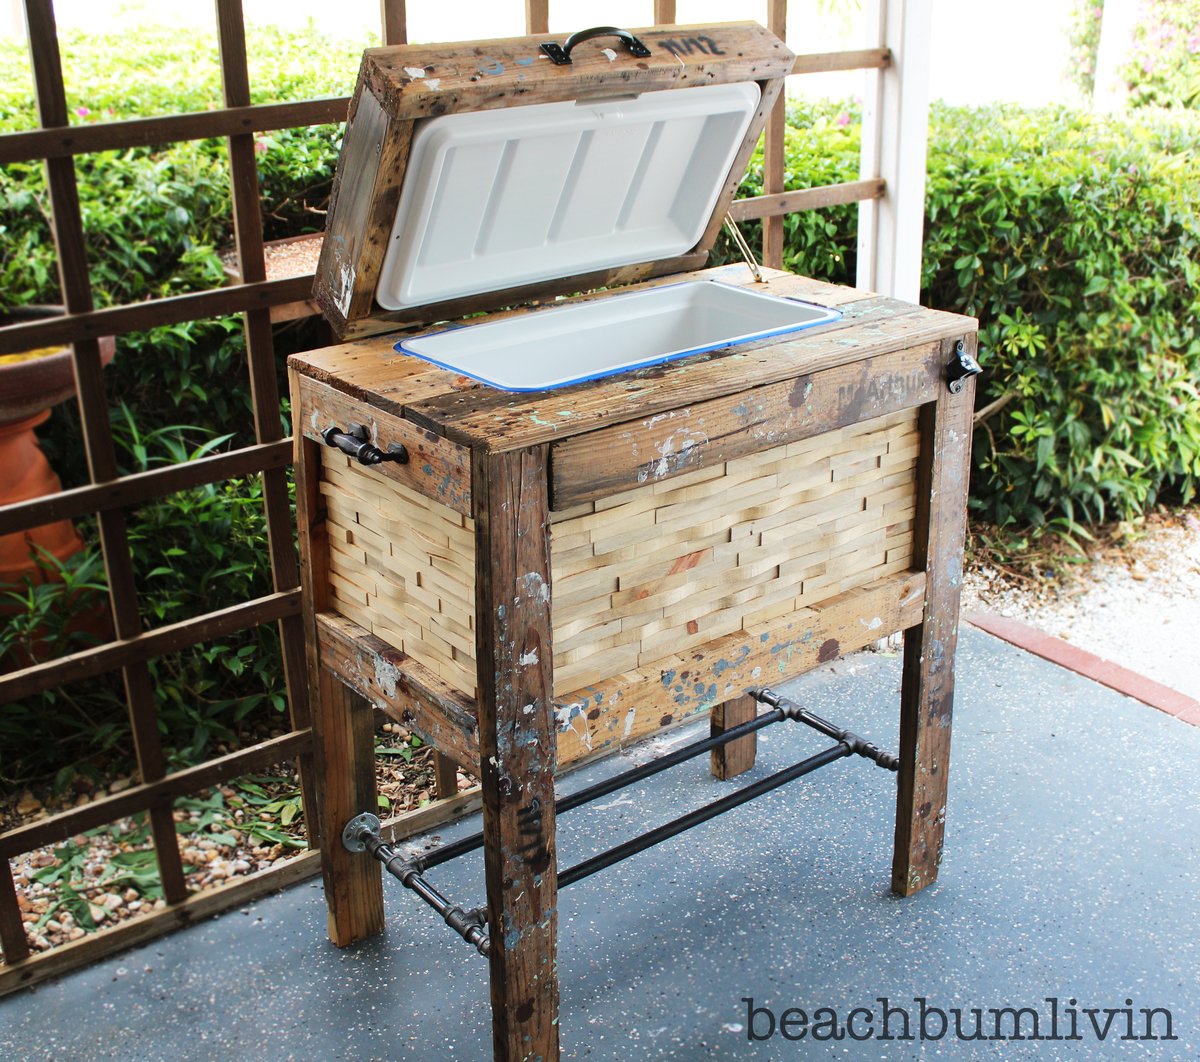
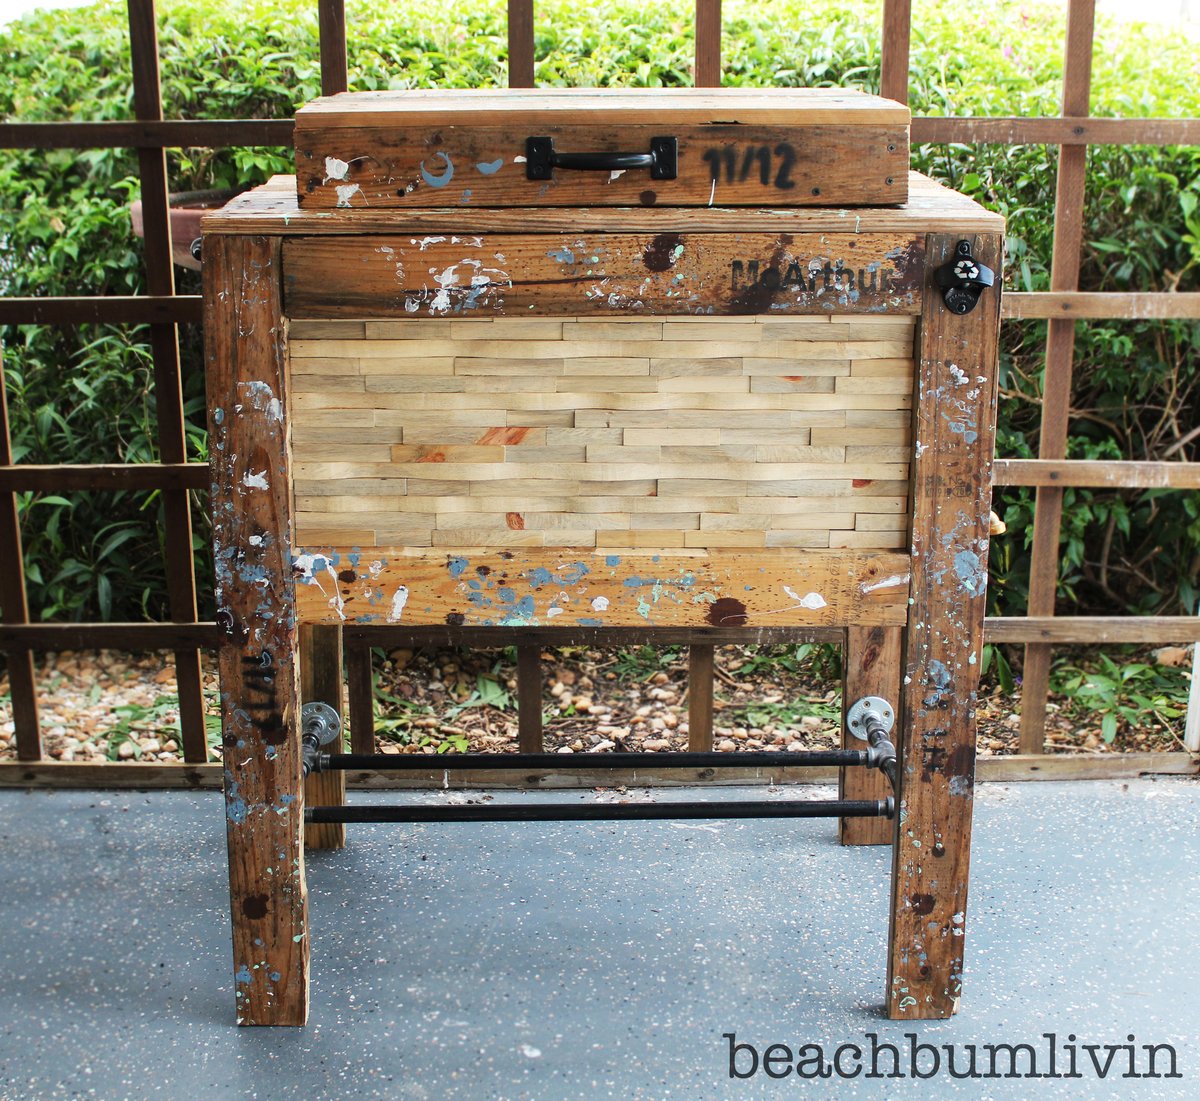
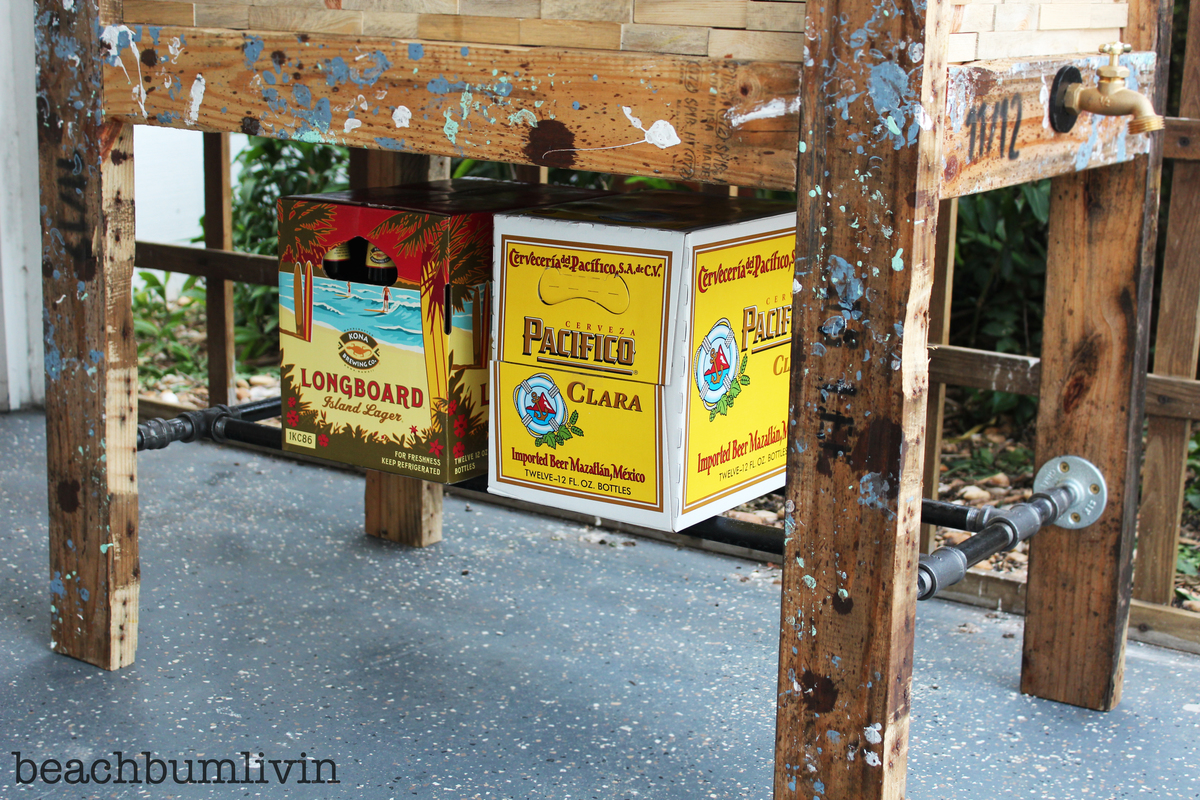
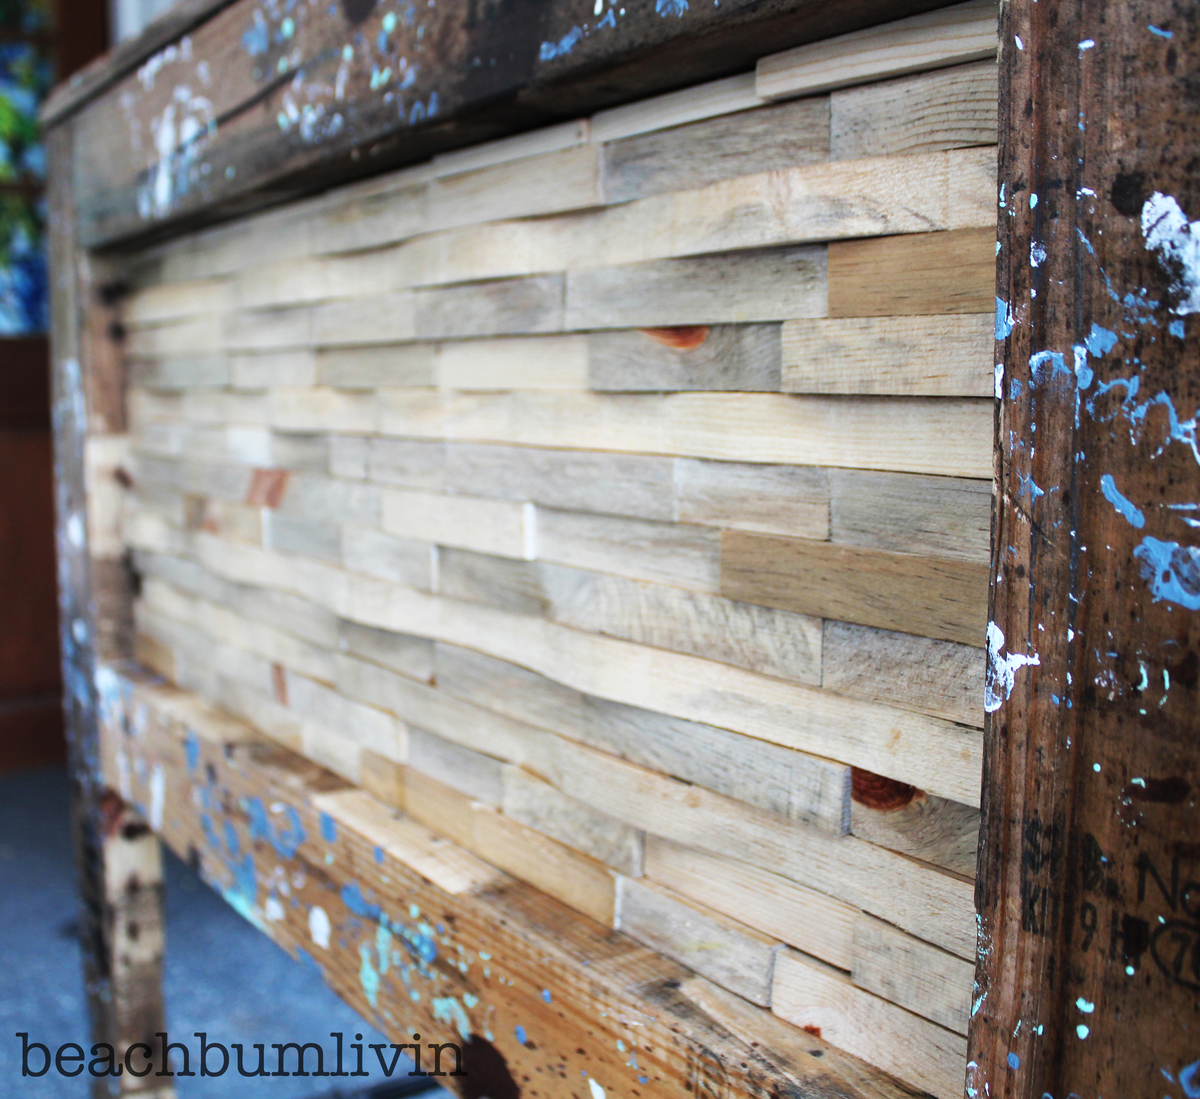
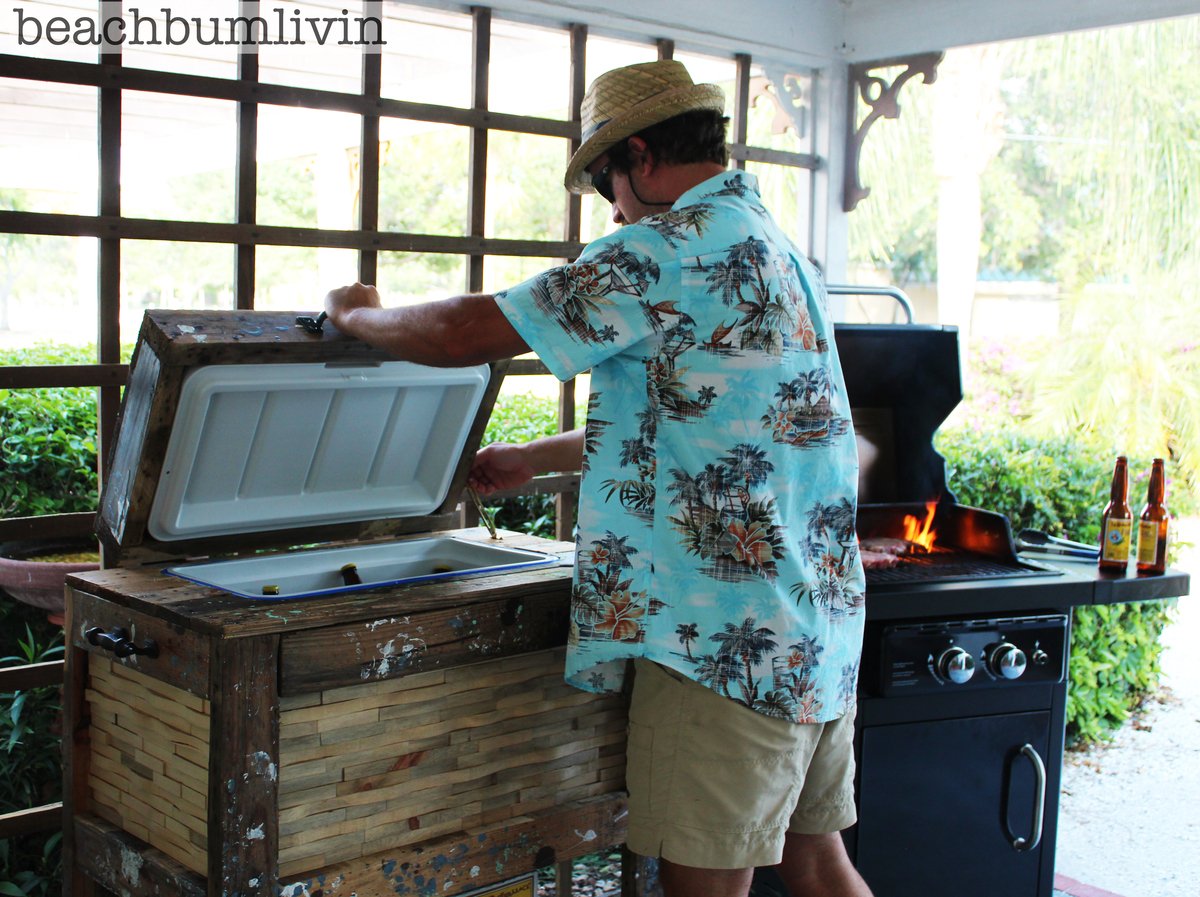
Rustic Wood Cooler Box made from Pallets!

Watch the video on how I did this project here: http://youtu.be/IoP2cKN2WeY

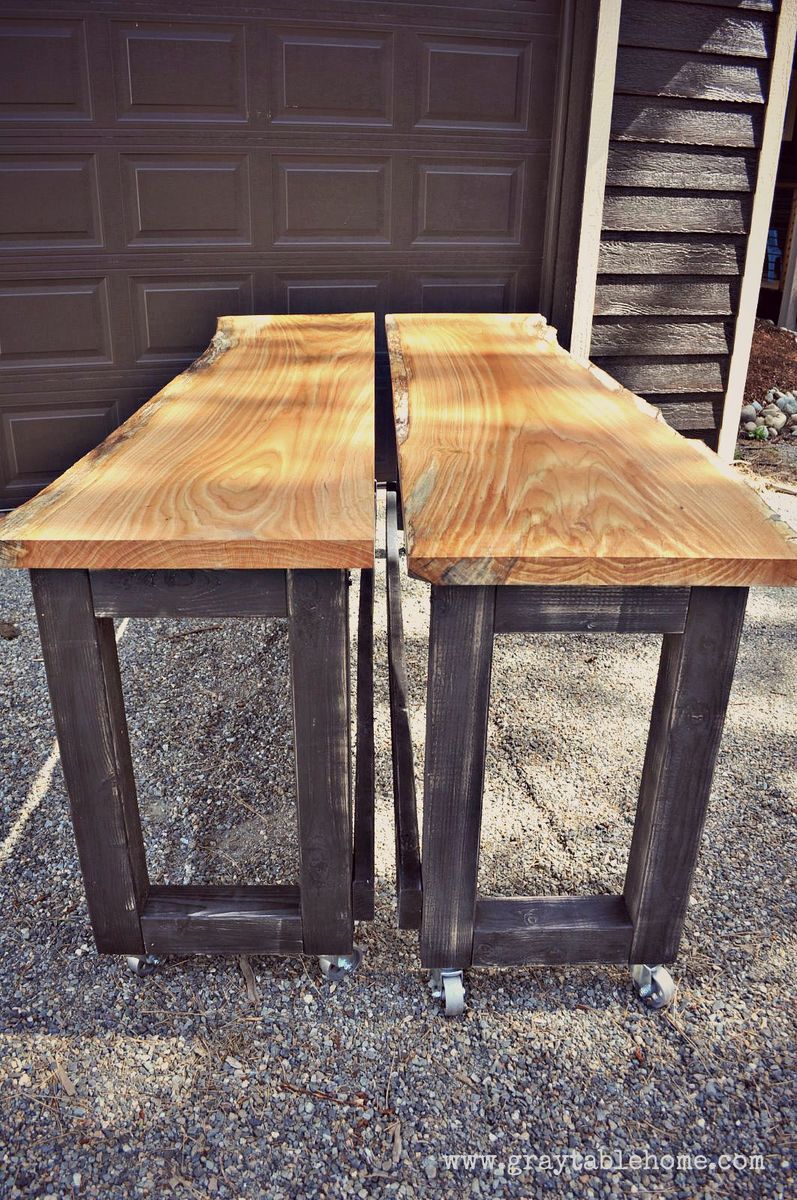
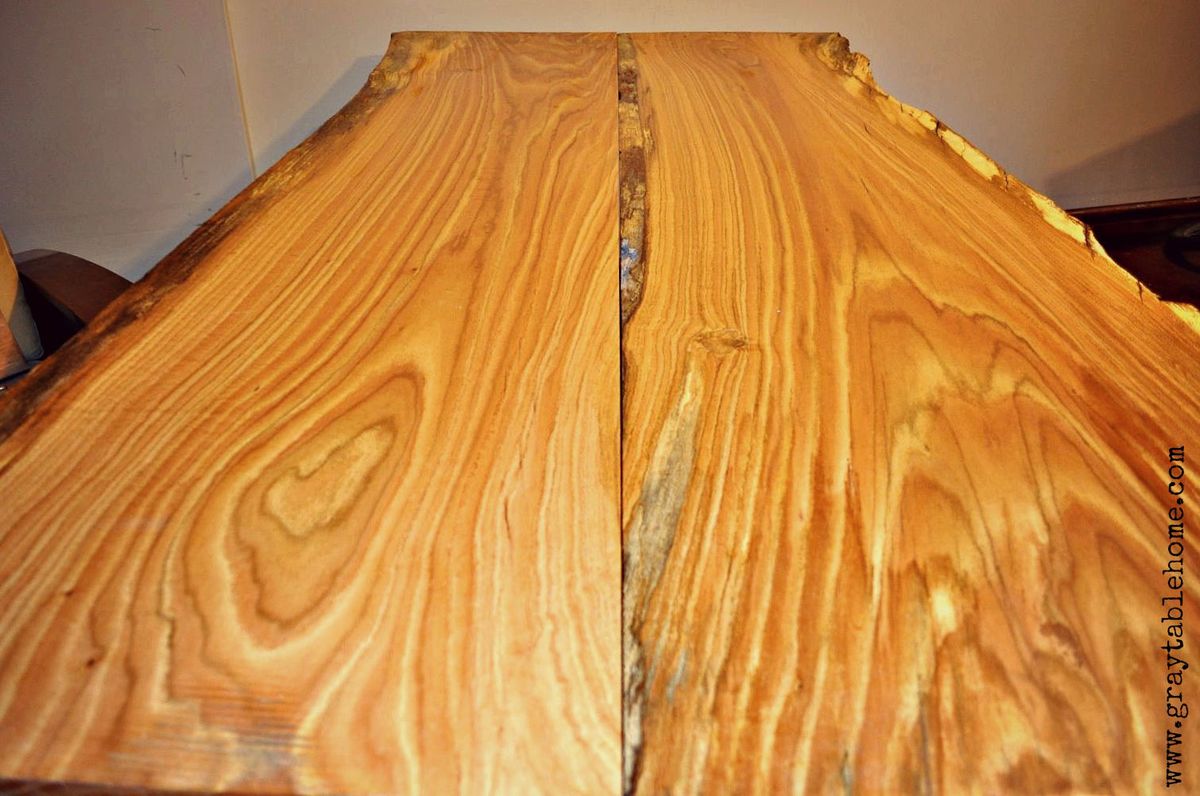
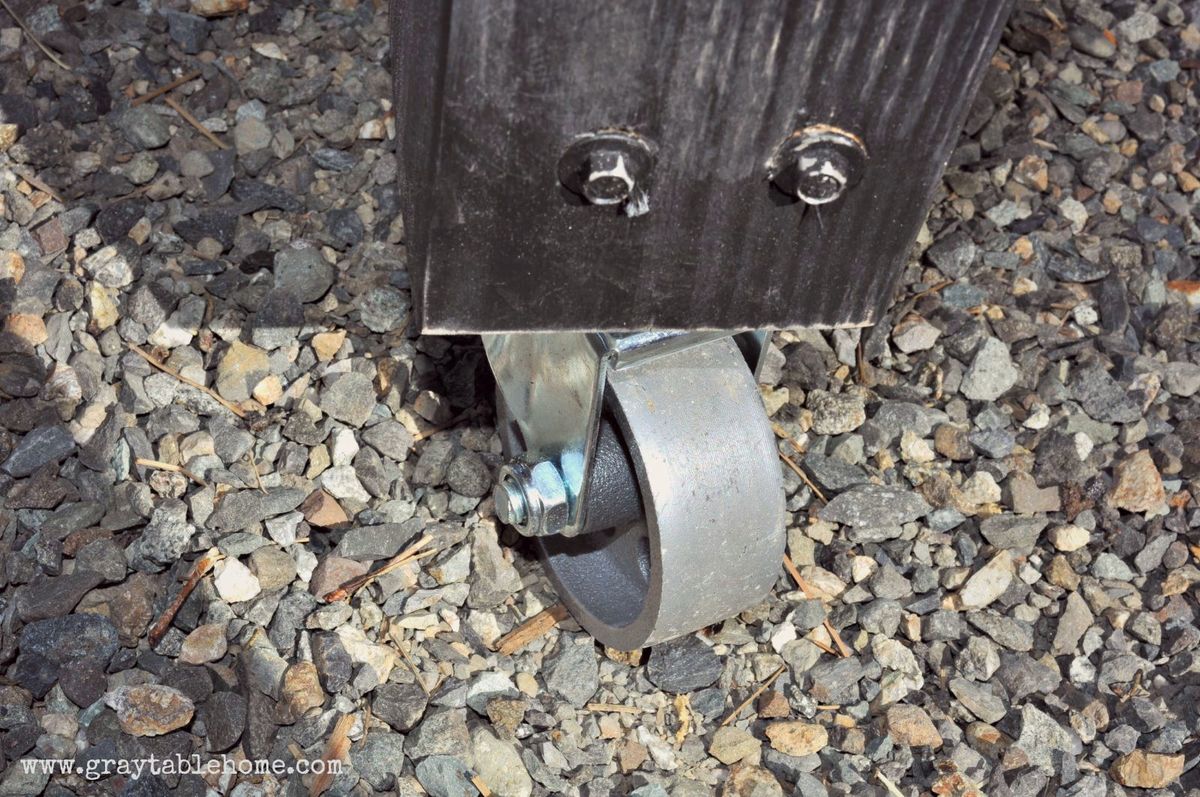
For this week's woodworking project I'm building a Rustic Cooler Box from used Pallets. The project was a lot of fun to do and pretty simple! By just using some old Pallets that were free I was able to build something that will get a lot of use. Plus, by using the Pallets I think it turned out really cool looking!

How to video http://youtu.be/IoP2cKN2WeY

Built from Plan(s)
Estimated Cost
$40 for cooler and accessories. Pallet wood was FREE.
Estimated Time Investment
Day Project (6-9 Hours)
Finish Used
Outdoor Polyurethane. Wood was left natural.
Recommended Skill Level
Intermediate

Comments

Wounded Marine

Fri, 06/14/2013 - 05:14

That is way to cool. I love your idea for the sides. It adds a lot of texture and cleans up the look of it. I enjoyed watching your videos. You have a lot of talent and I like your work man.

Stevens

Wed, 11/27/2013 - 04:02

Awesome way of doing a pallet cooler. Keeping the cost minimal your way of finishing it was really good. Personalizing such coolers would be interesting!

tedgray86

Fri, 10/17/2014 - 10:30

Cooler looks amazing!!  Well done!  What is the black ring inbetween the hose bib and the cooler?  I am looking for something similar to hide the PVC coupling as its white and my cooler is stained.


Thanks

Octagon table

Took about 1 week to finish the project. I like the overall result.

Instead of using pocket hole to join the top, I use dowel and glue to join the board together. Clamp the top in sections then combine 2 large piece together. 

using the speed squre to create the 45 degree angle and use the circular saw to cut out the angled section. 

I used the table saw to cut off the round edge on 2x2 to create smooth Table apron.

Use wood filer to fill all the crack and hole from brad nail/joint. 

apply 2 layer of stain. allow it to dry overnight. Then Thin out poly with minaral Spirit to wipe on 4-5 layers.

sand finish in between with 330 grit paper

Estimated Cost
300
Estimated Time Investment
Weekend Project (10-20 Hours)
Finish Used
Min-wax Red Mahogany with 4 layer of Min-wax polyurethane
Recommended Skill Level
Intermediate

King Sized Farmhouse Bed

My first attempt at one of Ana's beautiful projects, and it turned out better than I (and my wife) could have imagined. I made this for our 14th anniversary as we have not had a bed during that time. I used Jacobean colored stain, which I wasn't sure of, but as luck would have it, a neighbor who is a professional painter drove by and stopped to check it out. He offered to lacquer it in a satin finish for free!!! and it made a world of difference. I have received several comments on how it looks showroom quality. My wife is very happy. Only problem is she now wants the Farmhouse nightstand and a matching dresser. Looks like I have many more weekends worth of work ahead of me. Wouldn't have it any other way though. Had a blast!

Estimated Cost
$180
Estimated Time Investment
Weekend Project (10-20 Hours)
Finish Used
Min-Wax Jacobean and Satin Lacquer
Recommended Skill Level
Beginner

Murphy Bed

Submitted by Newfey on Fri, 07/19/2013 - 14:59

This is a Murphy Bed that I made for my daughter Alicia for their getaway home at Canadian Lakes, MI. Due to limited space i had to make it horizontal instead of the normal way of being vertical. It really comes in handy and takes up very little space.

Finish Used
Red paint mixed with Baking Soda
Recommended Skill Level
Intermediate

Comments

JoanneS

Fri, 07/19/2013 - 15:17

Looks great! Love the color and the trims you used. Where did you find your hinge hardware? PS- How did you like the baking soda paint? I've tried ASCP which was good but very pricey, and last time made my own with some plaster of paris. Your finish is lovely.

Newfey

Sat, 07/20/2013 - 18:47

I bought the spring hardware on line. I can't take the credit for the paint as my daughter did that part. She loves the way that the baking soda and paint covers everything and it is a whole lot less expensive than buying the commercial stuff.

DIY Convertible Bar / Pub Table

Submitted by susanshamp on Thu, 07/30/2015 - 16:38

This rustic modern version of a pub table has multiple uses - it can rest along a wall to make a 16 foot long bar, or rolled together to form an 8 foot long pub table. It is standard counter height 36" and will accomodate seating for 8-10 counter stools. If you don't have live edge wood slabs, you can also use construction lumber (2x8s or 2x12s) to achieve similar dimensions and versatile use in a more cost effective way.

Estimated Cost
Using construction lumber, approx. cost is $50 per table
Estimated Time Investment
Afternoon Project (3-6 Hours)
Finish Used
Poly on slabs, distressed black paint on base
Recommended Skill Level
Beginner

Comments

kev117s

Fri, 07/31/2015 - 04:10

Awesome idea! I think I will have to try for a dining table version of this table. Do you happen to have a way to lock the 2 pieces together? 

Salvaged Wood Planter

Submitted by JoA on Tue, 07/30/2013 - 02:49

I built a planter box from salvaged wood all by myself in a morning. While the project was a little more involved than I had expected it really encouraged me to keep trying to build new things.

Built from Plan(s)
Estimated Cost
FREE
Estimated Time Investment
Afternoon Project (3-6 Hours)
Finish Used
Natural; unfinished
Recommended Skill Level
Beginner

Comments

Class/School Auction Projects

Submitted by jendon on Tue, 05/03/2022 - 15:32

This year my 2nd-3rd class built the Modern Park bench for the school auction. They sanded, stained, and set the screw for the seat and back.
I also made two Adirondack chairs with matching stain.
Both projects had two coats of poly and really shined. They were a hit at the auction and the kids and families really appreciated the experience and final products.
Thank you Ana for making plans simple to follow and new skills learned each time.
Blessings,
Jennifer

Comments

jendon

Mon, 05/16/2022 - 18:33

My students really enjoyed it and many picked up a tool for the first time. I like planting seeds in their heart and mind for the future!! Blessings, Jennifer

jendon

Mon, 05/16/2022 - 18:33

My students really enjoyed it and many picked up a tool for the first time. I like planting seeds in their heart and mind for the future!! Blessings, Jennifer

Monika

Sun, 03/31/2024 - 14:30

I've been helping with our class auction project, and it's been a fun experience. But balancing schoolwork and project deadlines can be tough. That's why I found this article finance.yahoo.com/news/pay-essay-top-5-safe-105019899.html on safe essay services helpful. It saved me time and stress, allowing me to focus on both my studies and the auction project.

Colorado Backyard Gable Greenhouse

Submitted by Anonymous (not verified) on Tue, 05/24/2022 - 20:17

We started this project last fall with the goal of creating a multi use hobby greenhouse with plenty of space for the kids to get their hands dirty. We purchased the Small Gable Roof Greenhouse plans and made our first (of many) trips to the hardware store. Since becoming homeowners in 2015, we've done countless projects but nothing as big as this. We are still very much learning the nuances of greenhouse growing in Colorado, but that has become a fun experience for our entire family. Since completing the structure, I've found that I'm more interested in making the space more functional than I am in actually gardening. I added a shelf built almost entirely from old pallets, a raised cedar bed and solar powered exhaust fan/lights. Luckily, my wife loves spending time in there tending to the plants! As the summer heat sets in, we will face new challenges of how to keep the space cool. Maybe by adding a shade cloth and misters? Regardless of what the "output" looks like we are loving this new hobby and are looking forward to learning new skills!

Comments

Easy, Economical Garage Shelving from 2x4s

I modified the width of the shelves and as you can see from the variable height of my garage one side was made higher.  

I used some scrap wook so I was able to cut expenses by about 25 dollars.  The total cost was 50 dollars not including the nails.  Although time is money.  It took me one day to draw up the modified design, get prices and get the wood and then another day to put it together.  With what I saved by doing it myself I could have made more working and buying a premade unit.  However with this said, it would not be my personal accomplishment and modified to my unique needs.  Besides, I had fun doing it.  

Thanks for your info.  It was very clear and simple.  Debbie

Estimated Time Investment
Day Project (6-9 Hours)
Recommended Skill Level
Starter Project

Comments

Yellow Sewing Table for Small Spaces

Submitted by kjshaw on Thu, 08/18/2011 - 12:25

We used MDF, drop-leaf lockable hinges for the leaves, and piano hinges. I wouldn't recommend MDF because it wasn't strong enough for the screws and we ended up having to add bits of plywood to reinforce the areas for the hinges. We also put pegboard on the back to avoid things popping out the other end, and I'm planning on getting some hooks to hang crafty things like scissors and glue guns.

Despite the modifications we had to make, I love my little sewing table! It fits perfectly under our dining room table and but has tons of workspace when it's folded out. Perfect for a small, cramped house! The finished project isn't quite as bright yellow as the flash made it seem, but it is still bright and happy!

Estimated Cost
$55
Estimated Time Investment
Weekend Project (10-20 Hours)
Finish Used
Sanding, primer and spray paint. I ended up needed four cans of each - that MDF really soaked up the paint!
Recommended Skill Level
Beginner

Comments

rapunzel

Thu, 08/18/2011 - 20:23

Looks great! I agree that plywood just holds together better.

I noticed that there's room to add 2.5" of length (when hanging down) or width (when in table configuration) to the side pieces. If you do, then when you fully open the table, you can open up even 60" fabric completely and cut pieces such as chair backs easily.
I think it might be a modification worth making.

sarydon

Thu, 01/21/2021 - 12:21

Great idea!!!!! If you did this it would require more than 1 piece of plywood though.... I think that's why it's the dimensions it is. I plan on making one soon. So excited!

kjshaw

Wed, 09/05/2012 - 21:24

It is sturdy enough to sew on - I usually put it on a rug we have, which may stabilize it. The table did shake a bit, but it didn't affect the sewing very much. I'm not sure how it would do on the tile - the sewing machine might move it a bit because of the wheels. But, I also don't use it much for my sewing machine and use it more for my cutting mat and measuring since I don't have a large flat table at my house.

Rapunzel - I agree, there is room to make the table bigger. I think if/when we make another, we'll do that. It's surprisingly big now, but there's always room for more table sewing space!

Floating Bunk Beds and Desk

This little girls room needed a little happy birthday!  I planked the wall with birch veneer, made simple box frames for the beds and desk, and attached them to walls with heavy duty cable.  Then my friend added her designer touch, and made it cozy and  girl CHIC!

Built from Plan(s)
Estimated Cost
$500
Estimated Time Investment
Week Long Project (20 Hours or More)
Finish Used
white paint
Recommended Skill Level
Intermediate

Shiplap Fireplace

Submitted by Anonymous (not verified) on Tue, 12/20/2022 - 19:10

We did the Easiest Shiplap Fireplace in a weekend, thanks to Ana’s plans. I convinced my husband to help me build this by upgrading to a 65” tv and adjusting the dimensions. We also built a shelf behind the tv to hold our receiver and Xbox that is hidden when the tv is in place. Ana’s tutorial was amazingly and gave us the confidence to finally build something that’s been on our list for 2 years!

Comments

washer and dryer pedestal

Submitted by KL728MX on Tue, 01/05/2016 - 13:07

my wife tagged me on facebook right before Xmas with the plans and picture of this, so i dusted off my tools and built her one as a present. its not only great for her but it makes the laundry easier for me as well. I had to mofidy the base of mine because my dryer vent comes up through the floor in the corner.

Estimated Cost
$100
Estimated Time Investment
Day Project (6-9 Hours)
Finish Used
Valspar white latex
Recommended Skill Level
Beginner

Fancy X Farmhouse table

Submitted by rjgold on Tue, 05/21/2019 - 12:47

I came across some 18'x12"x1" (actual size) boards that were milled around 1870.  These planks came out of the roof for the building.  Rather than cut them down I just built a "double frame"

I used 2x redwood for the frame.


Built from Plan(s)
Estimated Cost
$40
Estimated Time Investment
Week Long Project (20 Hours or More)
Finish Used
Thompsons water sealer
Recommended Skill Level
Intermediate

Stenciled Santorini blue farm table

Submitted by newhousel on Thu, 05/30/2019 - 11:58

We used Ana White's plans beginner farm table plans to build this table and can't recommend these plans more! Thank you Ana! The build took my husband and I two hours to build. The sanding, sealing, painting, stenciling, and finishing took several days, but the actually build was VERY easy and straightforward. We're total beginners, so we were very happy. The stencils are from Cutting Edge Stencils and are called "Indian Inlay Furniture Stencil Kit by Kim Myles."

Estimated Cost
$300
Estimated Time Investment
Week Long Project (20 Hours or More)
Finish Used
Rustoleum Painter's Touch 2X (Ink Blue, Satin) spray paint. DAP Silicone sealant. Latex paint (Simply white, for stenciling). Waterproof clear coat.
Recommended Skill Level
Beginner

Comments

Little Kids Picnic Table with Umbrella

Submitted by Handy Andy on Tue, 04/04/2023 - 11:35

My daughter was given this umbrella at Christmas, but needed a table to go with it.  Ana's plans for the preschool sized picnic table worked perfectly.  I built it using one standard sized shipping pallet and even got to try out my new router!  Thanks Ana!

Built from Plan(s)

Comments

Farmhouse King Bed

Submitted by gahan22 on Tue, 02/02/2016 - 10:36

This was our first ana white build. Bed build took one Saturday - to finish up took another week or so working nights - most of our time spent on getting the color we wanted and sanding and finishing. Building the 2x4 frame took more time than anticipated as well. We are super happy with how it turned out.

Estimated Cost
$250 for lumber, stain and lumber for bed frame. We used lag screws on the side and 2x4 hangers for the frame which increased costs.
Estimated Time Investment
Week Long Project (20 Hours or More)
Finish Used
Stain is two coats minwax dark mahogany plus classic grey over the top - wiped off and finished with minwax satin poly.
Recommended Skill Level
Starter Project

Patio couches

Submitted by Anonymous (not verified) on Thu, 04/27/2023 - 19:14

This project was fun to build with hubby said the shopping list and the cut list was perfect! Love all your designs! King bed is next!

Comments

Seasonal And Holiday

$55 Fancy X Desk....with a few alterations.....

Submitted by Anonymous (not verified) on Wed, 04/06/2016 - 11:48

I loved the design of the desk, but needed it to be just a little higher so I could use it as a standing desk in my office. (So I'm not sitting ALL day). The plans were easy to understand and very clear.

Thank you Ana....You are awesome!!!

Estimated Cost
$100 (but that was because I "needed" to buy a couple of new toys......I mean tools).
Estimated Time Investment
Weekend Project (10-20 Hours)
Finish Used
Desk for my office.
Recommended Skill Level
Beginner

Murphy Bed

Submitted by bjhoove on Sat, 04/14/2012 - 21:58

I used the Murphy Bed Plan that Ana had on her website. I modified it so that it would look more like a dresser and would fit into the space that I have. It is perfect and I have used it myself just to see if it was comfy. It was!!! :)

This project took me longer to do as I had a creativity issue that you can read about here .. http://joy2journey.blogspot.com/2012/04/m-is-for-murphy-bed-its-finishe…

Estimated Cost
100.00
Estimated Time Investment
Week Long Project (20 Hours or More)
Finish Used
Jacobean Stain and a clear Poly.
Recommended Skill Level
Beginner

Comments

JoanneS

Sun, 04/15/2012 - 11:37

What an amazing job! Really looks just like a dresser. The lock closure is a great idea for keeping it securely closed. Beautiful finish, and the fabric and stencils are so creative!

redhead_61

Sun, 04/15/2012 - 14:15

Yeah this is pretty much awesome. It looks like a piece that should be there not something that is there to provide additional sleep space. LOVE it.

CharlesJr (not verified)

Fri, 12/14/2012 - 03:36

Things derived in this material will surely have some impact on the process of making of a classical overview. You should bookmark this page and http://allfreepapers.blogspot.com for the future. The question about it is a very important for the contemporary society. They have become proclaimed national standards recently.

MeganBurrell

Wed, 01/08/2014 - 12:28

You did a fabulous job on your murphy bed. Good to know it can be made horizontally too. Thanks for the inspiration! =]