Community Brag Posts


Library Bookcart

This was a fun, easy project...and perfect solution for the book clutter. I got some good practice rounding off corners (invested in a belt sander) and cutting out the handles. I beleive the baskets my wife bought for the bottom shelf cost double the entire project.
This is by far the best site I have ever found for wood projects.
Built from Plan(s)
Estimated Cost
$25
Estimated Time Investment
Afternoon Project (3-6 Hours)
Recommended Skill Level
Beginner
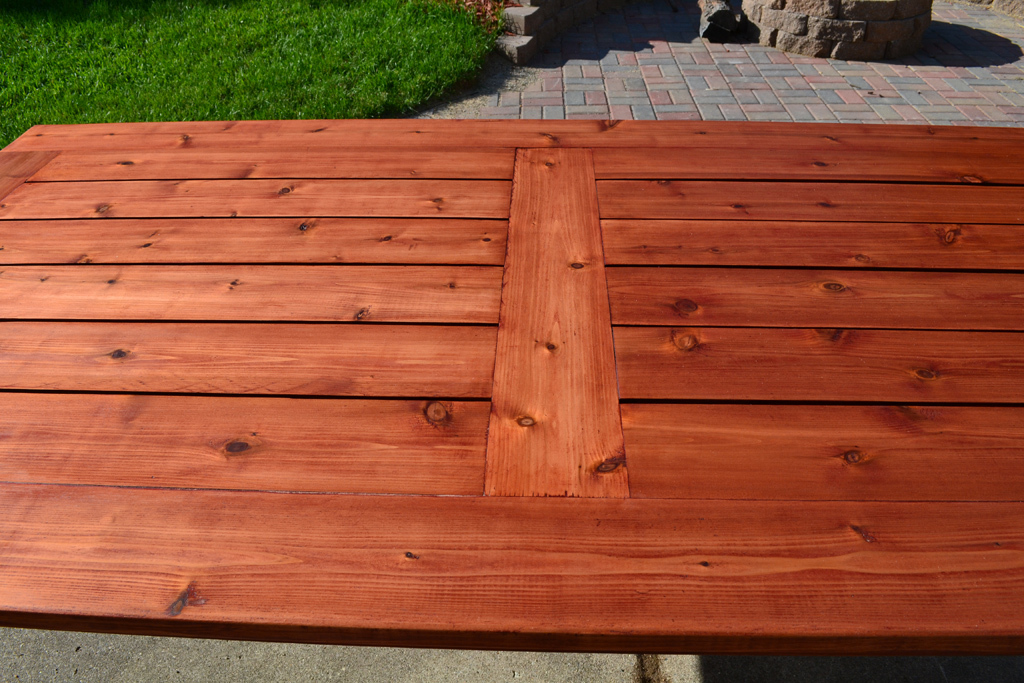
Beautiful Cedar Patio Table
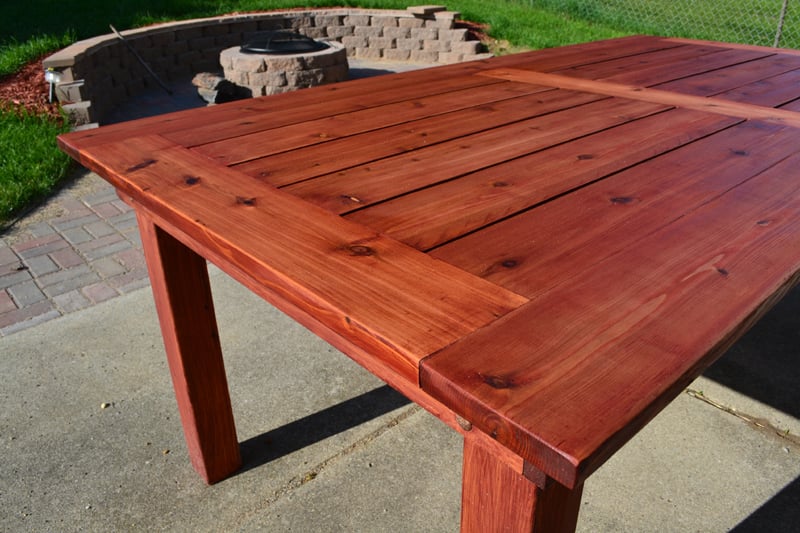
Slightly more elegant version of an outdoor cedar patio table. This is made from 100% cedar and joined using Kreg pocket hole screws. The finish is 2 coats of Sikkens Cetol MRD that has been hand rubbed on using a cloth, with 24 hours of dry time between coats.

Built from Plan(s)
Estimated Cost
$140
Estimated Time Investment
Weekend Project (10-20 Hours)
Finish Used
2 coats of Sikkens Cetol MRD, hand rubbed with cloth.
Recommended Skill Level
Beginner
Comments
Wed, 06/19/2013 - 23:22
Love your take on this table!
I really like the way you modified this design and I would like to duplicate it. I am curious about how you changed to framework to accommodate table top with the boards running lengthwise. The original design has the framework running lengthwise, so I am assuming you added framing that runs perpendicular. Is there any way you could include pictures and measurements of the framework under the tabletop? Thanks. Great work!
Thu, 06/20/2013 - 07:13
More details on my build on my website
Hi odpdxo, you should check out my website:
http://www.bryanpryor.com/2013/05/22/diy-cedar-patio-table/
I have a lot more details, including a full sketchup model for the build of this table posted. I think it will answer all of your questions.
Fri, 06/21/2013 - 14:58
Wow that's beautiful! Are
Wow that's beautiful! Are you going to make benches to go with it?
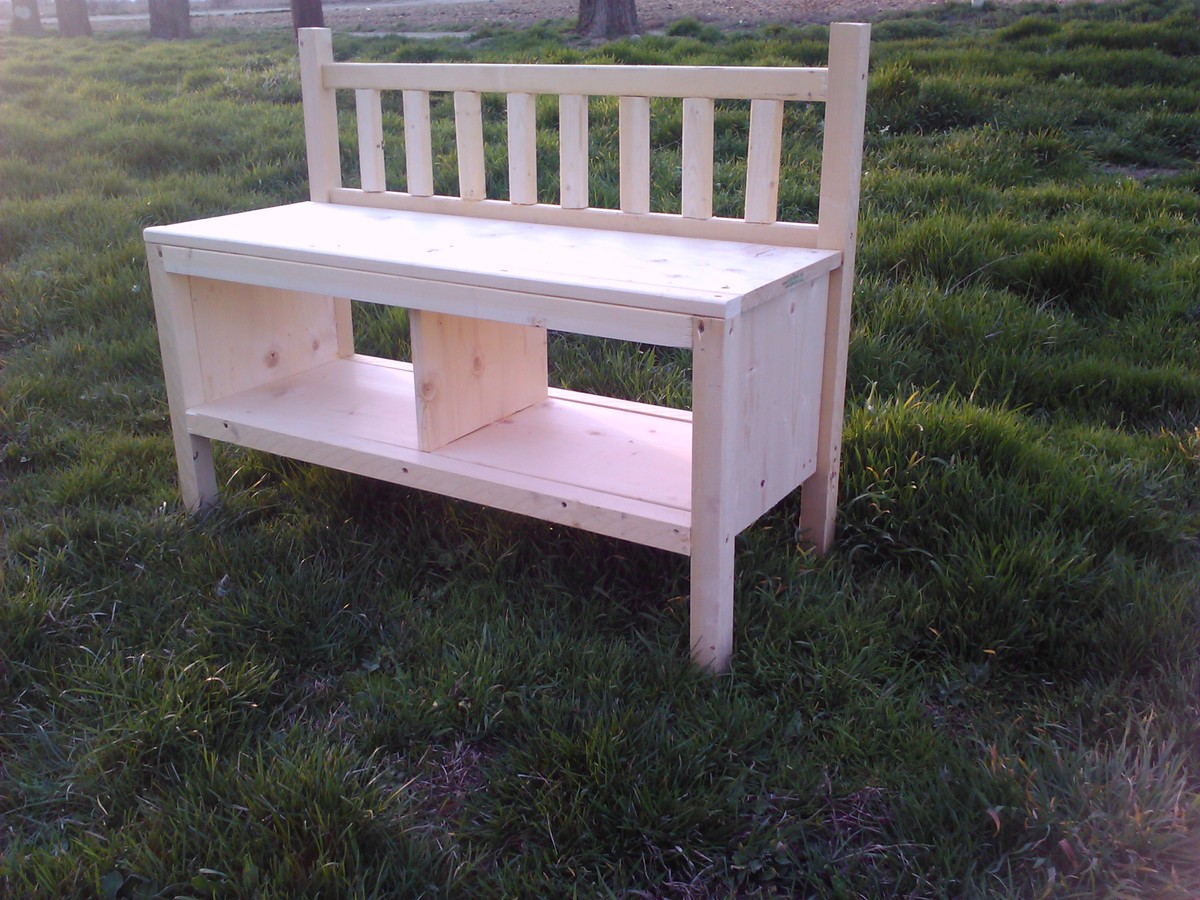
bench with storage chest
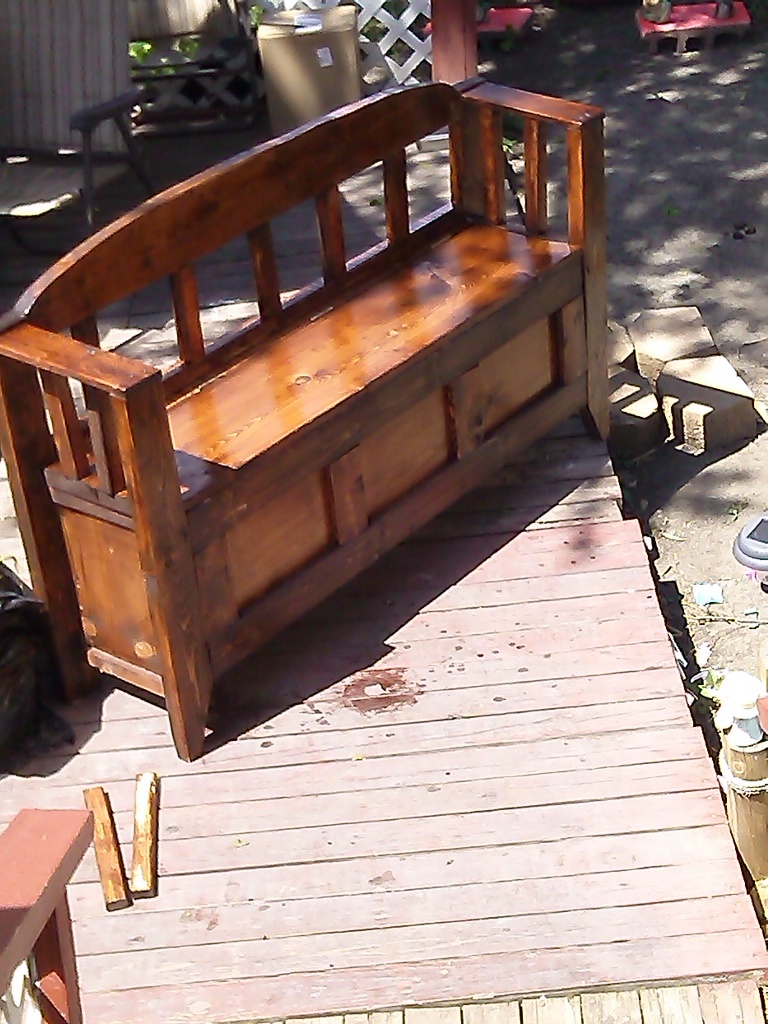
wanted a storage chest but didn't want just a chest so saw this in a picture then did my own measurements for what i wanted
Estimated Cost
about 50.00 for the lumber cost
Estimated Time Investment
Weekend Project (10-20 Hours)
Finish Used
red oak stain and poly
Recommended Skill Level
Intermediate
Comments


Pub Table

My daughter-in-law requested a pub table for my son’s birthday. Having never done this before I searched the web and found Ana White’s site (great by the way). Table was built using the image of old_man’s table on Ana White’s site as inspiration (size 42” x 44” x 42” high). I used 2x8s for the top, jointed and trimmed down to 6” wide and then glued together. Since I could only clamp up to 25” wide, I made the top into two sections gluing one board at a time to minimize wet boards. I then had two halves that I glued together using a wedge setup so as to avoid purchasing additional expensive clamps. Once the top was complete, I sized out my base and opted to place the apron boards between the 4x4 leg instead of placing them outside the legs. They were attached by drilling pocket holes in the apron and then attached with glue and screws. The top was then attached to the legs and apron from using 1 1/2” right angle brackets. As old_man stated and I concur, this table is HEAVY.... Thanks to both Ana White and old_man for the inspiration.


Estimated Cost
$109.00
Estimated Time Investment
Week Long Project (20 Hours or More)
Finish Used
Used Minwax Ebony stain and Minwax Spar Polyurethane that I had on hand. Initially 2 coats of polyurethane over the entire table, sanding with 220 grit between coats and completed the top with 3 more coats with the final sanding of 600 grit on the top before the last coat of polyurethane was applied
Recommended Skill Level
Beginner
Planters
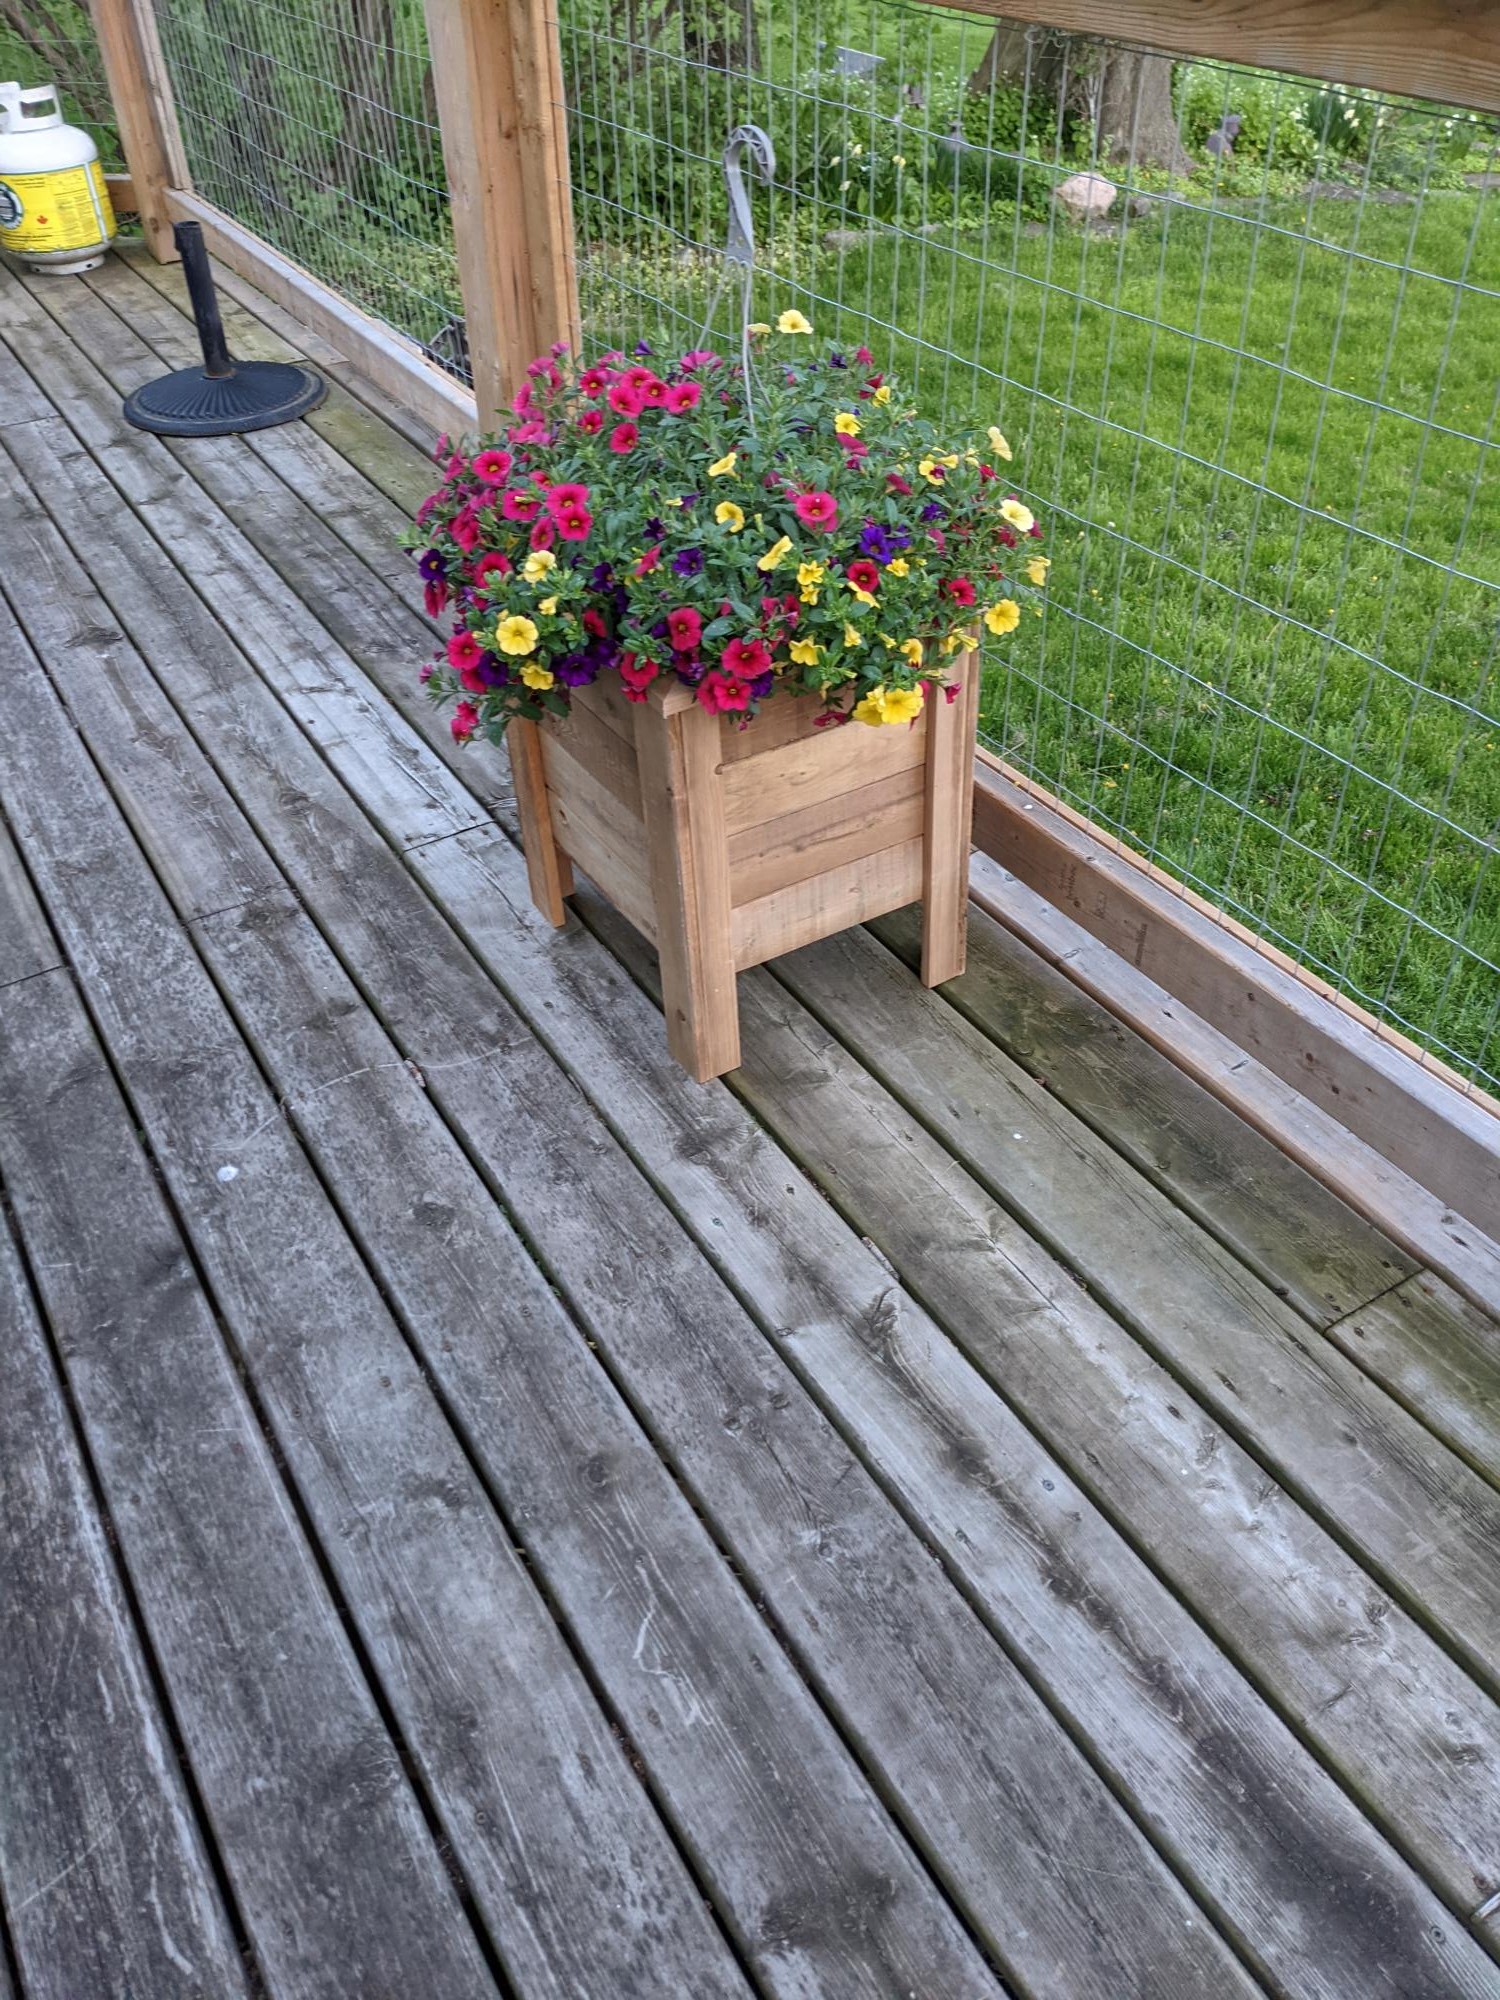
This was my first project! I did get better the more I made. Even mitred corners on the top! Thank you for the easy to follow plans.
Comments
doll picnic table
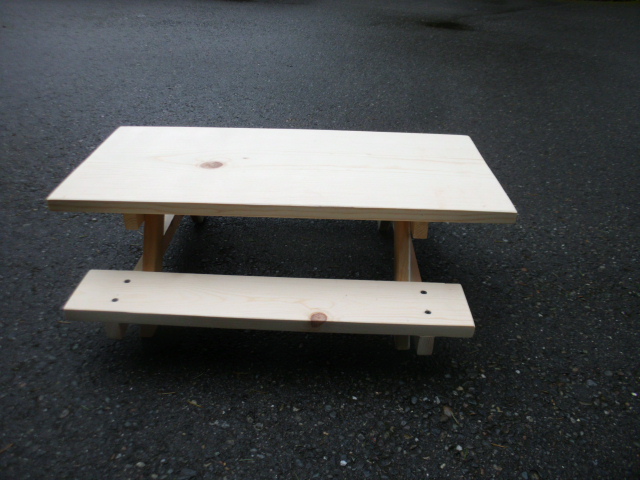
This is a picnic table my husband made for my niece's doll from scrap wood we had left over from the drawer pull project. he said "enough room so that she can have a doll party" I'm waiting to see her at Easter to piant it with her!
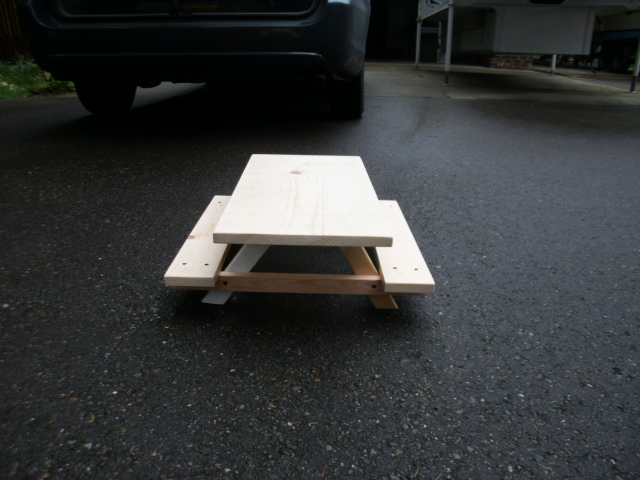
Estimated Cost
free
Estimated Time Investment
An Hour or Two (0-2 Hours)
Recommended Skill Level
Beginner
Fantastic Garden Beds
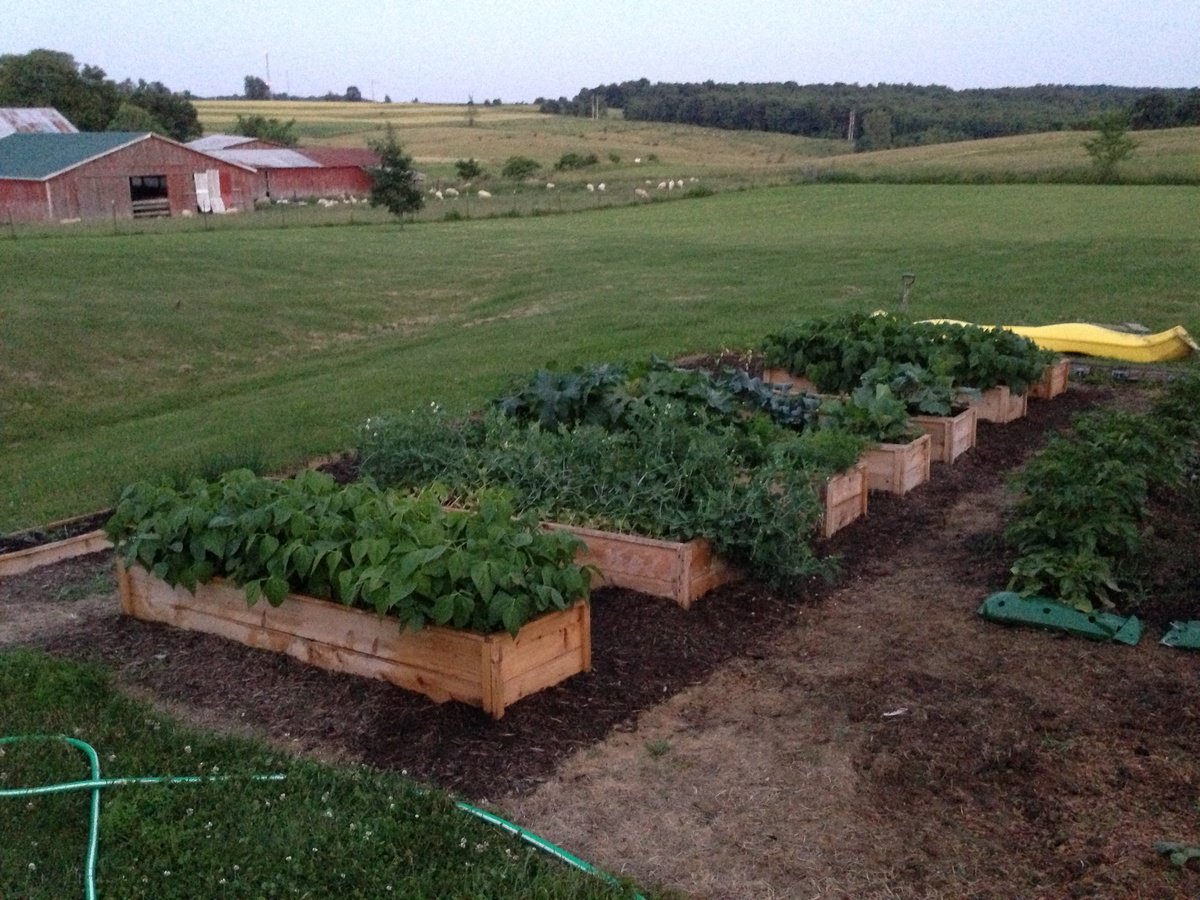
These garden beds are fantastic! They were so easy to build and look great in our backyard. We have always found ourselves with a garden covered in weeds or plants out of control. Our garden this year looks wonderful and we have hardly any weeds in the beds. Thanks for the great plans!
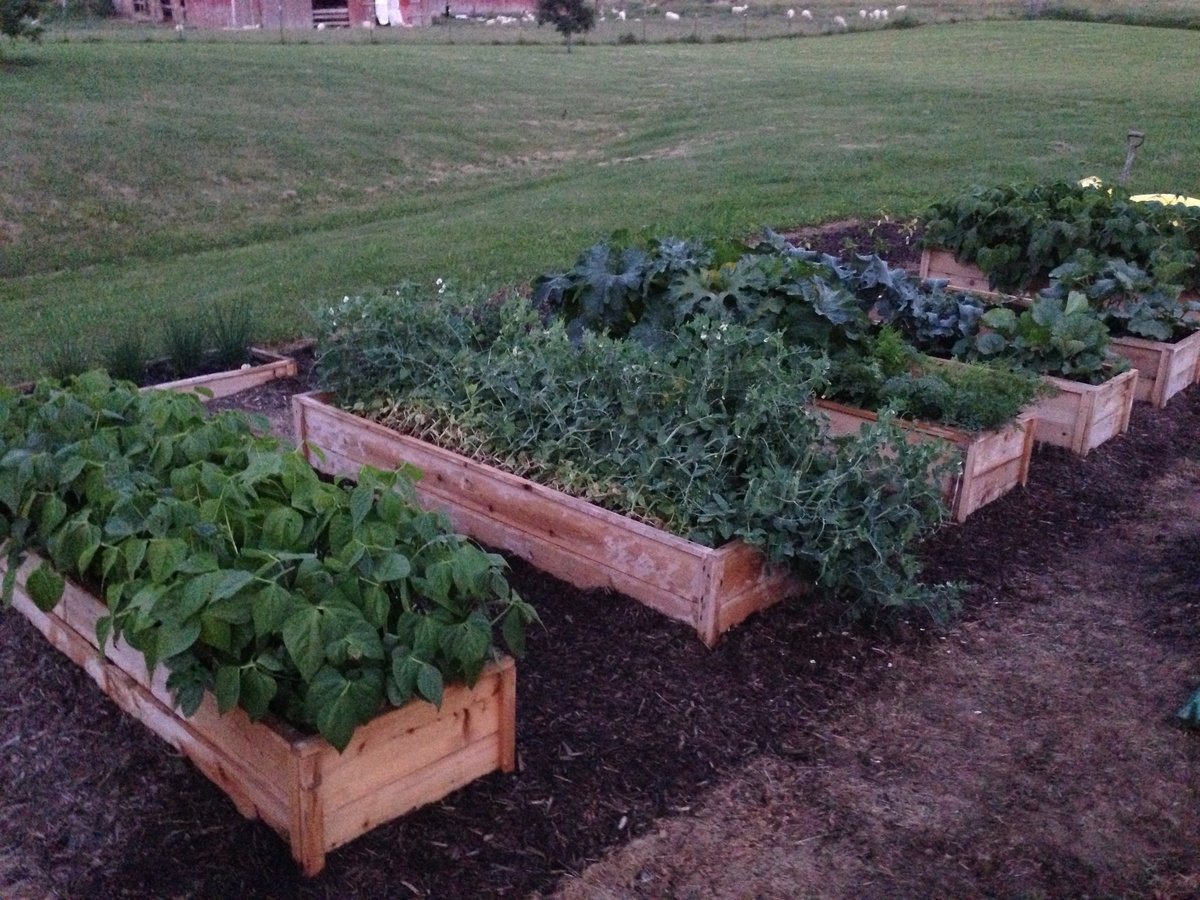
Built from Plan(s)
Estimated Cost
$15 each
Estimated Time Investment
An Hour or Two (0-2 Hours)
Finish Used
None
Recommended Skill Level
Starter Project
Comments

Fri, 05/24/2019 - 10:05
I'm so glad the plans worked…
I'm so glad the plans worked for you! Your garden looks fantastic!
Kids Desk
I build the x-desk with drawer with slight change in length and height to fit it for Kids. I also took pictures as I was building the project and converted them into a time lapse video of 2 minutes. Hope you enjoy it. https://youtu.be/KcrF2zqKudQ
Built from Plan(s)
Estimated Time Investment
Week Long Project (20 Hours or More)
Recommended Skill Level
Beginner
Comments

Doll house for 18" Dolls
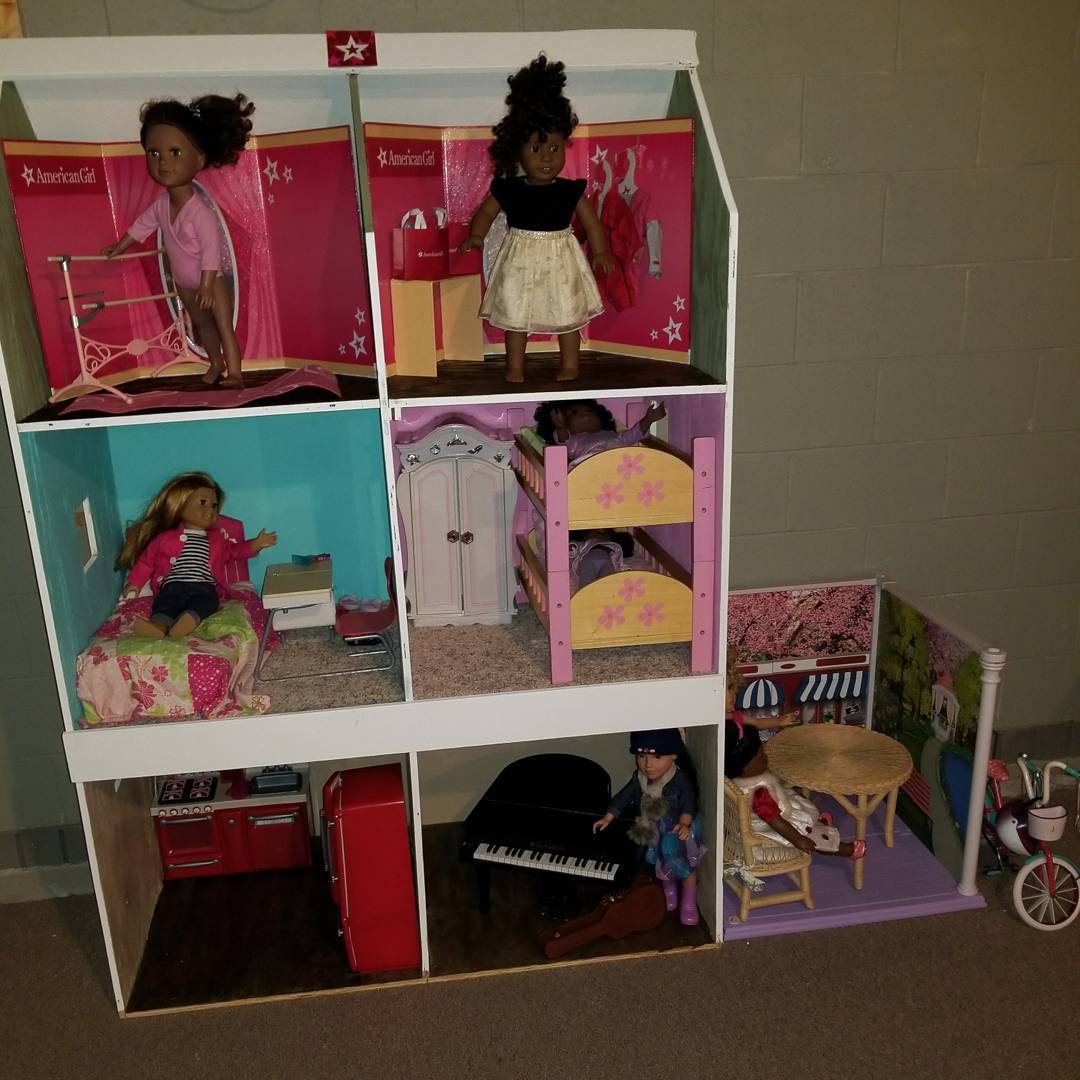
Both my princesses absolutely LOVE their dollhouse. It was my first diy project and it's wasn't nearly as difficult as I thought it would be.
Estimated Cost
I spent roughly $46 on the wood. We had a bunch of extra paint lying around the house and left over carpet pieces we decided to use.
Estimated Time Investment
Weekend Project (10-20 Hours)
Recommended Skill Level
Beginner
Adirondack Chairs!
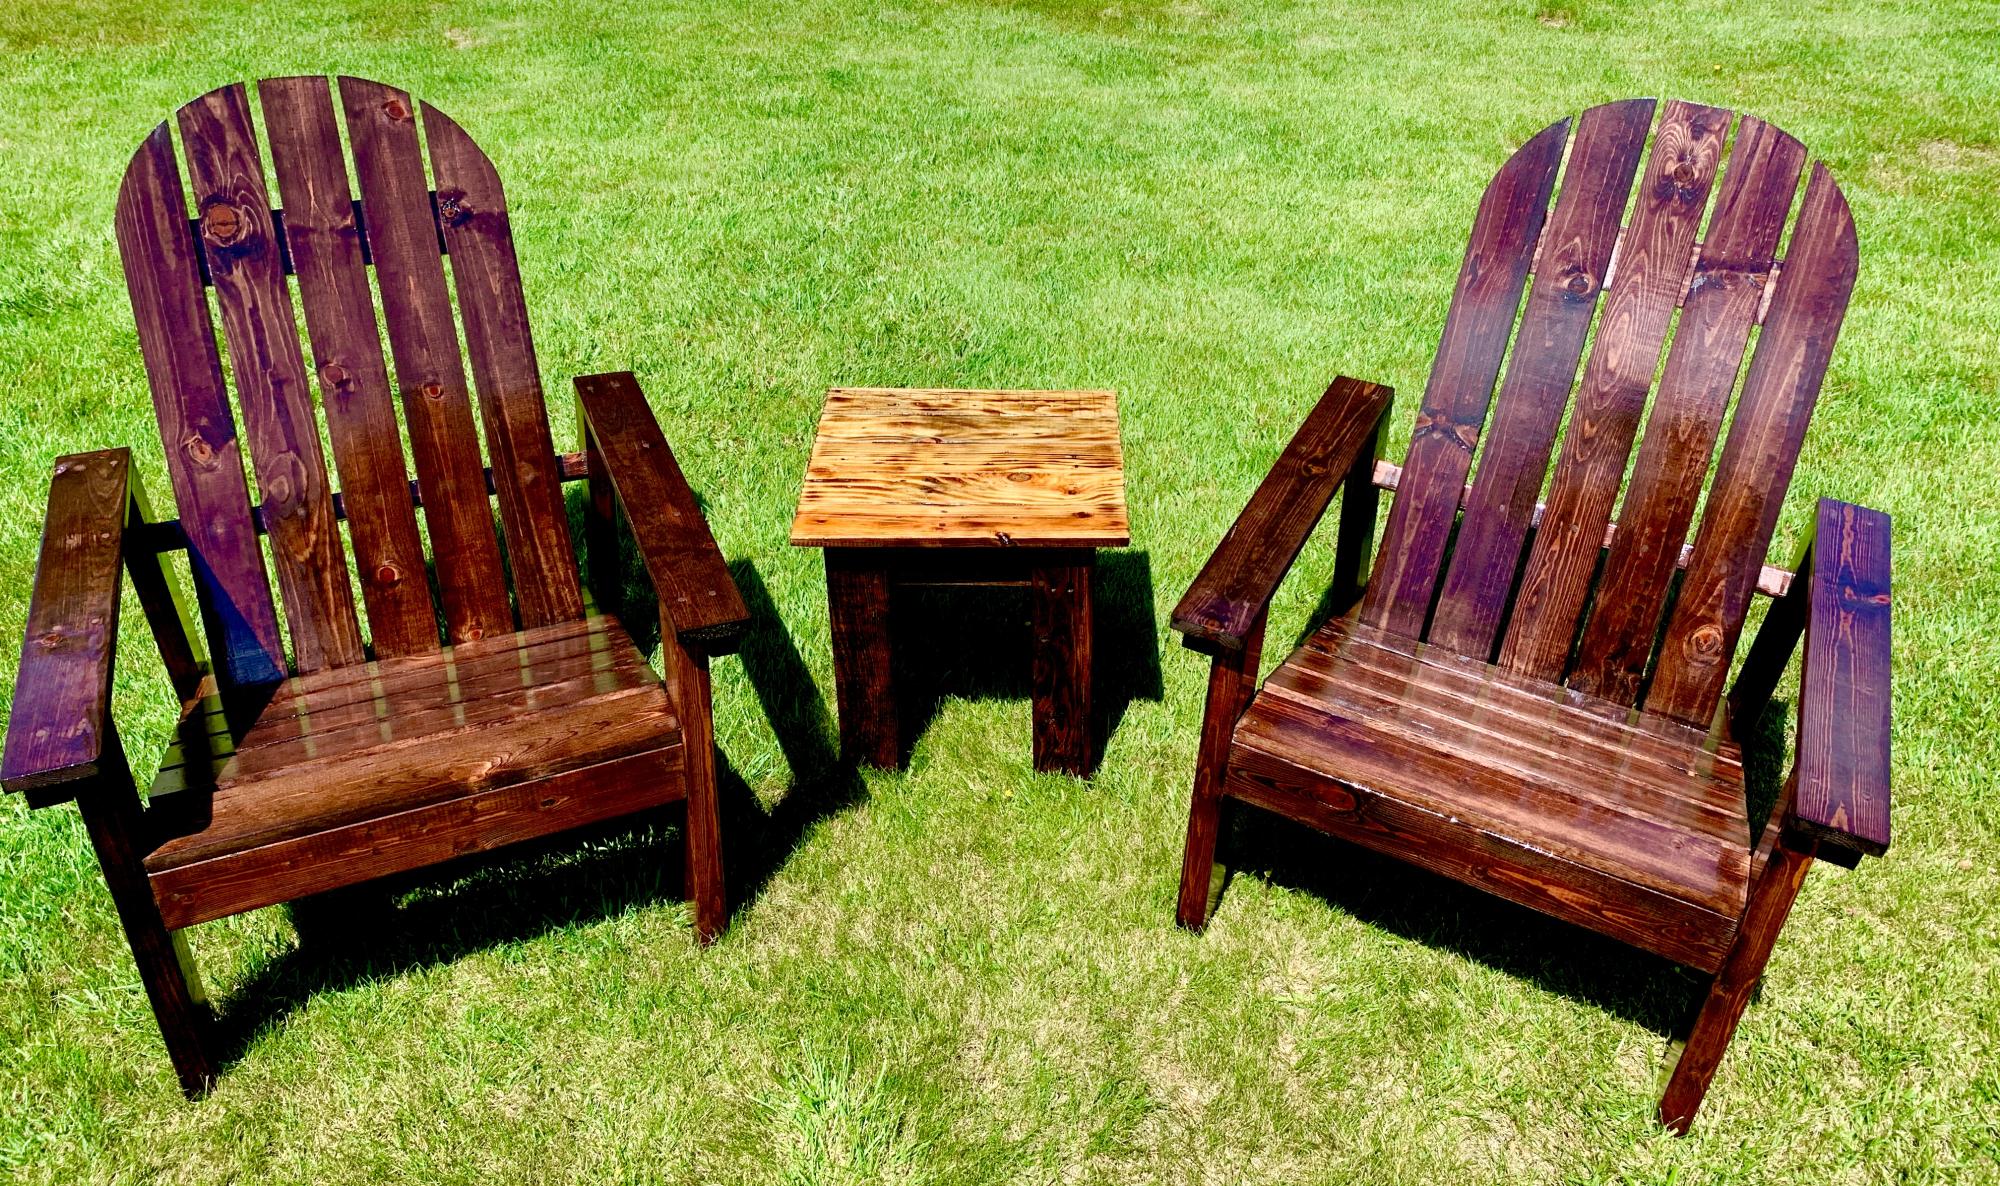
Ana’s Adirondack Chairs are the best!! The plans are so easy to follow and the chairs last for years! I made a pair for myself years ago and still constantly get compliments on them. I now make them (when I can) for gifts for friends for all occasions... Christmas, Weddings, you name it! Thank you Ana for sharing your talents with all of us. Blessing for a great 2022!

Built from Plan(s)
Comments
Sun, 12/26/2021 - 13:53
Great gifts!
These are beautiful, I am sure the recipients love getting them! Thank you for sharing~
cottage bench in a day
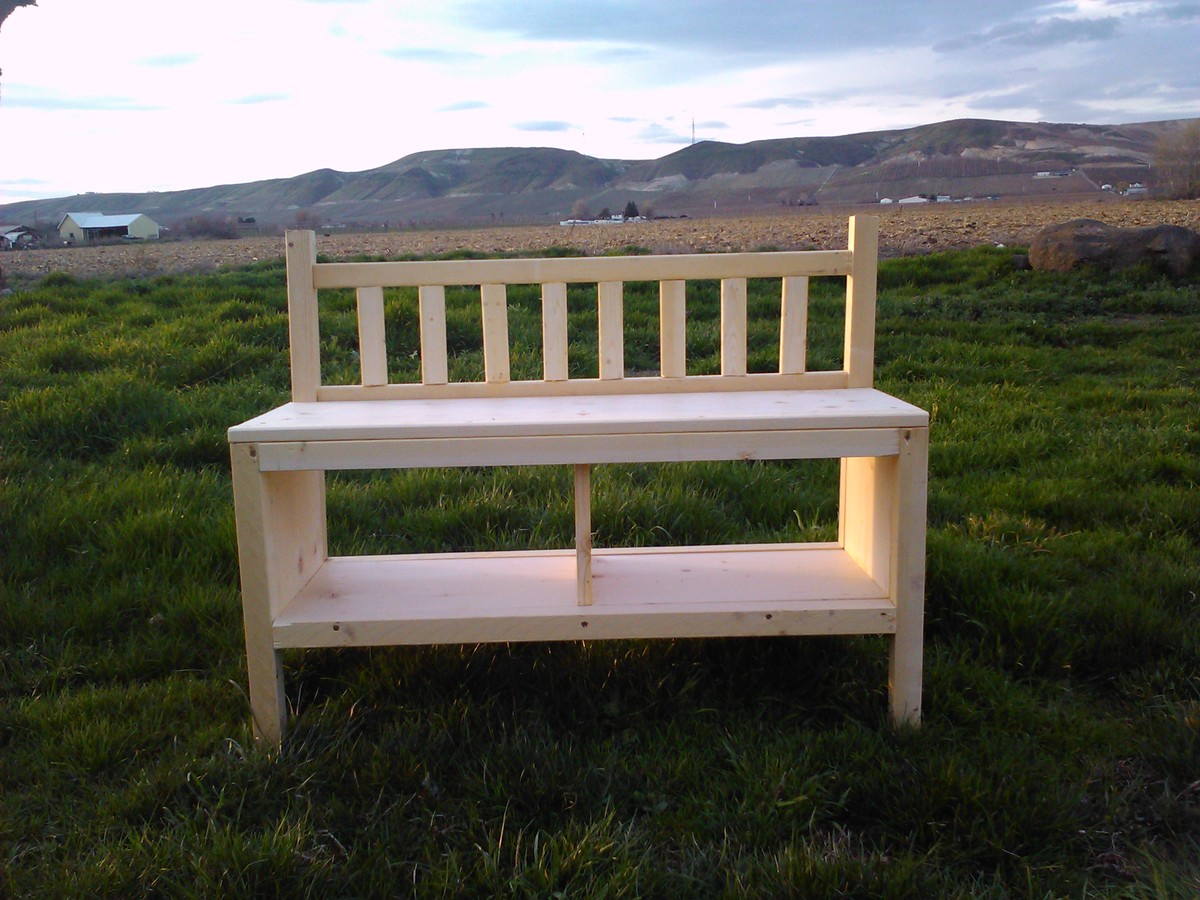
Love this bench! Its now finished in a Martha Stewart paint called leafy green and resides in my large bathroom housing excess towels.
I did change this up a little and used 1x2's for the top and bottom of the backing. I drilled my screws in from the top and it went together easily. Then I just filled in all my holes.
one suggestion would be to make a paper template 2 1/4" for the spacing between the rails. Saves lots of time.
This project took me about 3 hours the first time and about 2 hours for each one after.
Built from Plan(s)
Estimated Cost
maybe $30
Estimated Time Investment
Afternoon Project (3-6 Hours)
Finish Used
Pic is shown unfinished. But its now in martha Stewart interior/exterior satin leafy green.
Recommended Skill Level
Beginner
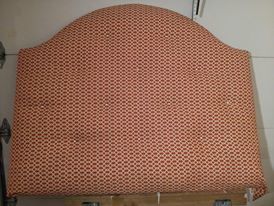
Jessica's Bed & Headboard
This bed is so perfect for my studio apartment. I don't have the floor space for multiple dressers, and the modular 3 bench design made it super easy to move in (and hopefully to move back out when school is over). LOVE LOVE LOVE this project.
I also made the headboard.
It is a single sheet of plywood, cut down and covered with polyfill and fabric. We predirlled holes for the buttons, and I set the headboard (fabric side up) across 2 saw horses with a flashlight underneath so I could see the drilled holes. I used nylon thread and a large needle to attach the buttons. There are flat buttons on the backsides of the holes so the thread doesn't slide through. It is hung directly on the wall behind the bed via wire hooks - make sure you hang it from the studs!
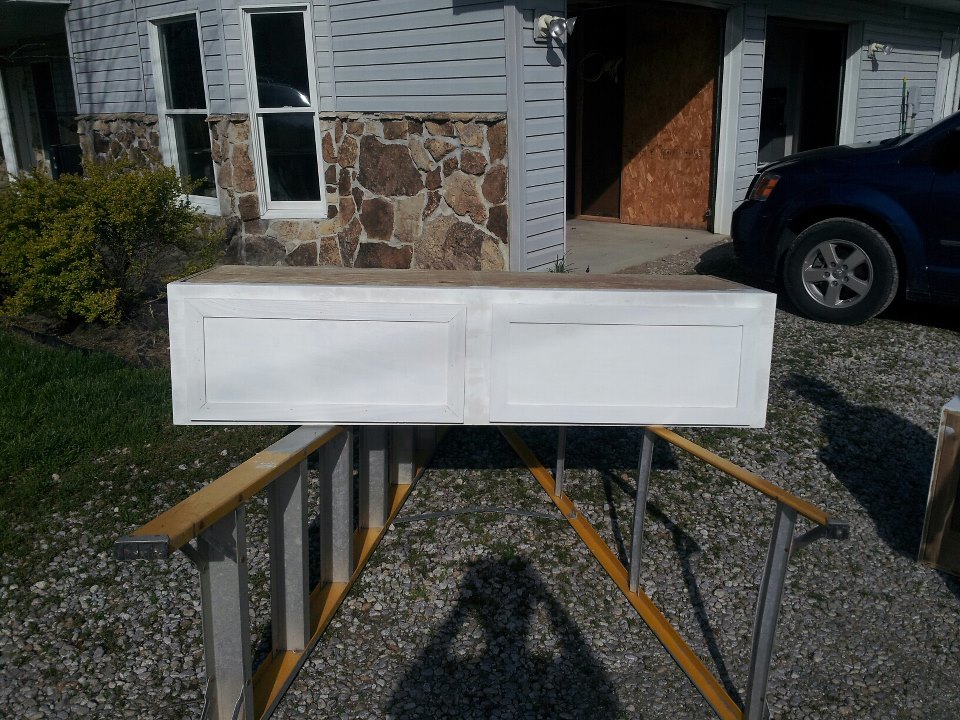
Built from Plan(s)
Estimated Cost
$250
Estimated Time Investment
Week Long Project (20 Hours or More)
Finish Used
Painted with white semi-gloss paint.
We used sheetrock mud to fill in holes and divets since we used cheap plywood.
We crafted our own drawers as well - they ended up being 18 deep x 24 long x 10 tall. We used premade metal drawer slide kits from Lowe's.
Use an air nail gun if you have access to one. My very number one recommendation for this project! Makes your life so much easier.
Recommended Skill Level
Intermediate
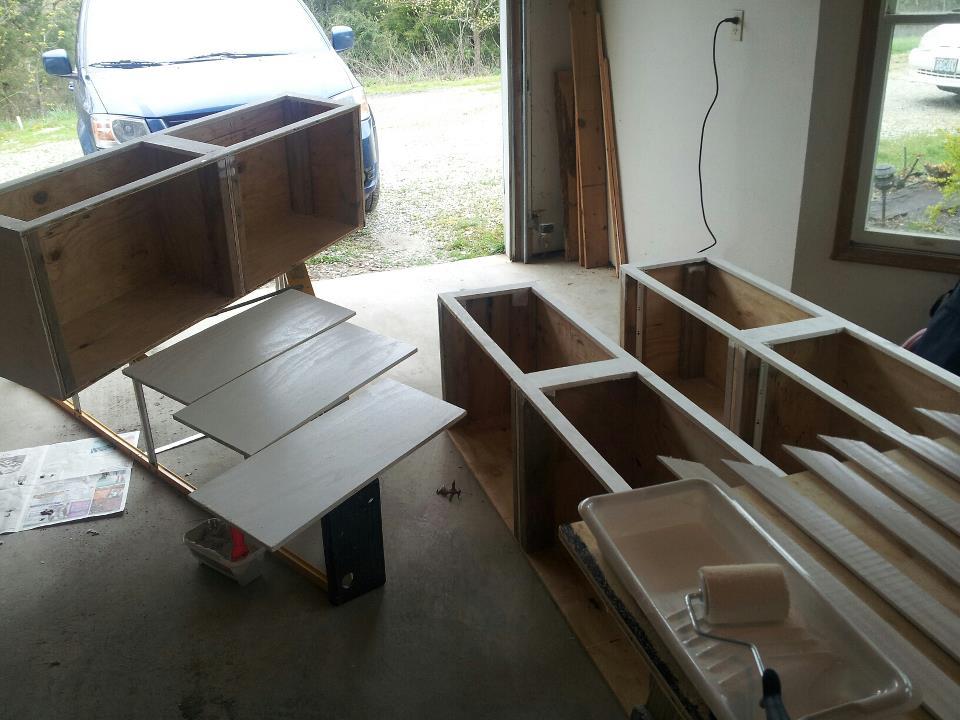
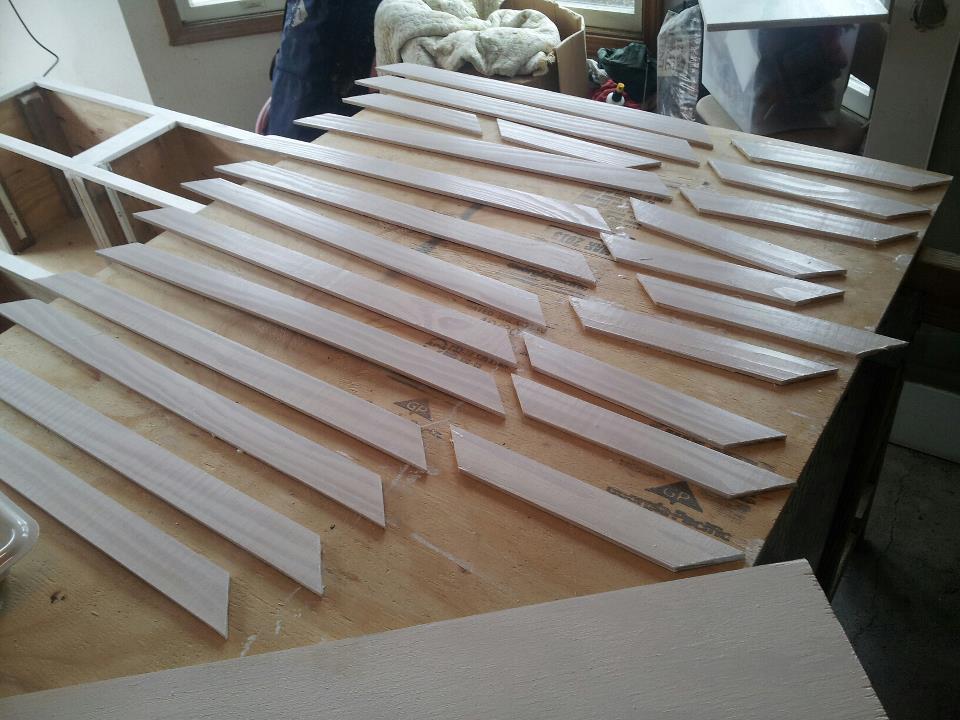
Nautical Picnic Table for Big Kids
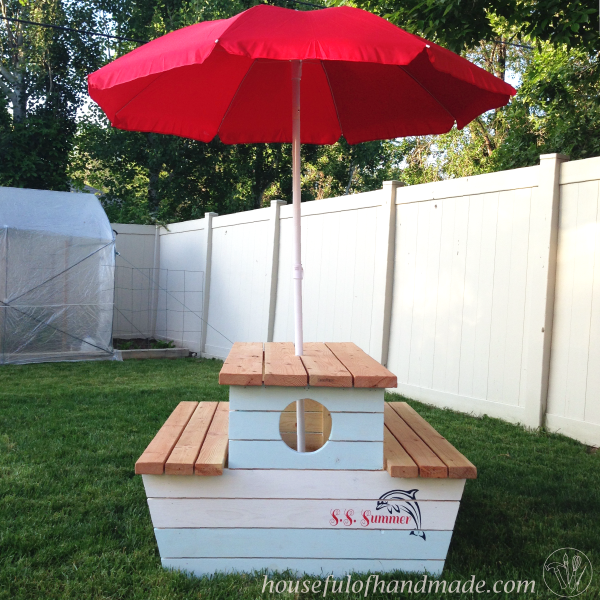
I needed a picnic table for my kids to enjoy summer meals outside and when I saw the plans for the Pirate Picnic Table, I knew we needed it! But it was made for toddlers and my kids are 4 and 6 so it wouldn't work for us for very long. I decided to combine the plans for the Pirate Picnic Table and the Picnic Table for bigger kids. I turned out awesome! And then I finished it off with a nautical paint job to look like a bit of the beach was left in the backyard.
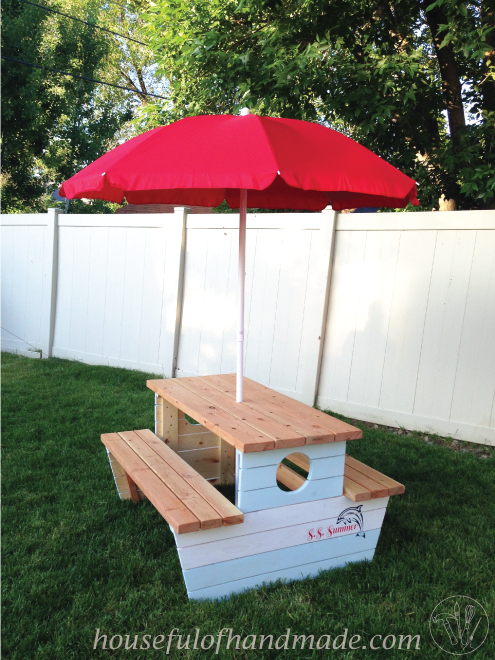
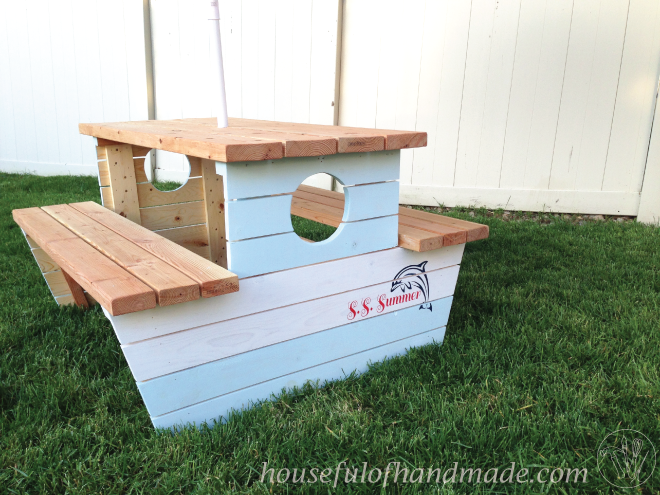
Built from Plan(s)
Estimated Cost
$50 (without umbrella)
Estimated Time Investment
Day Project (6-9 Hours)
Recommended Skill Level
Intermediate
Comments

Thu, 06/04/2015 - 09:50
That's excellent! I wish I
That's excellent! I wish I would have thought of something like that when my kids were younger.
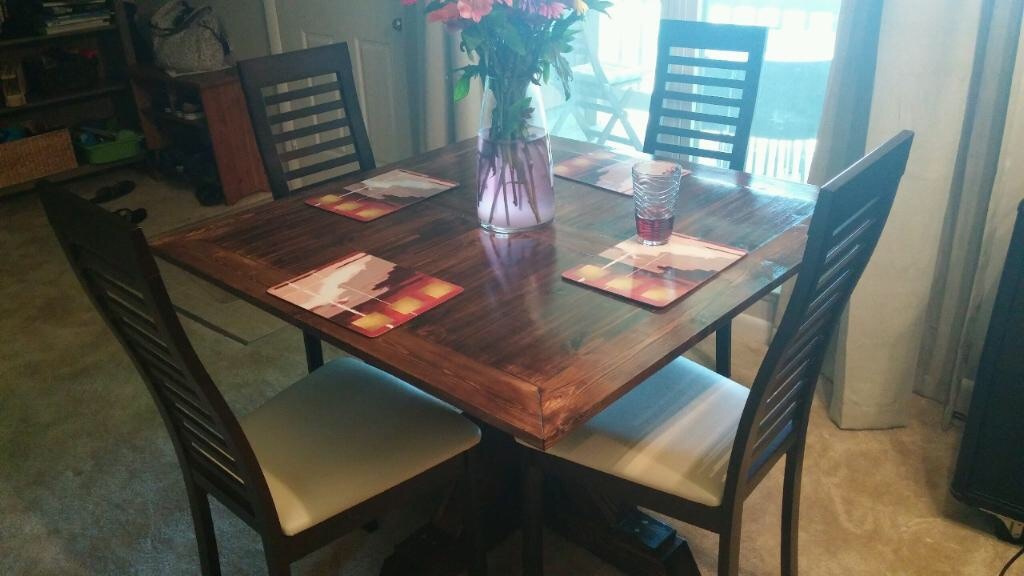
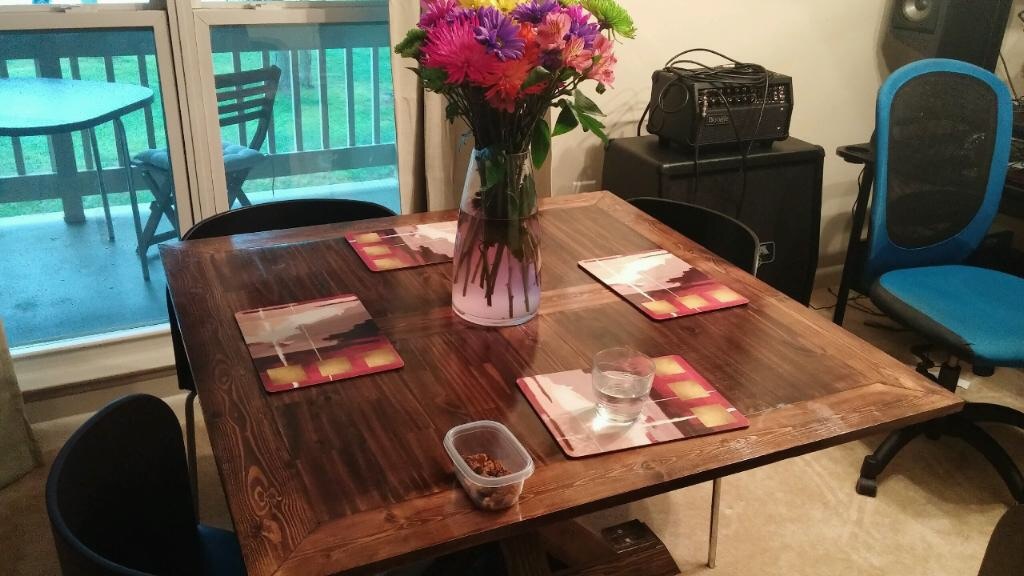
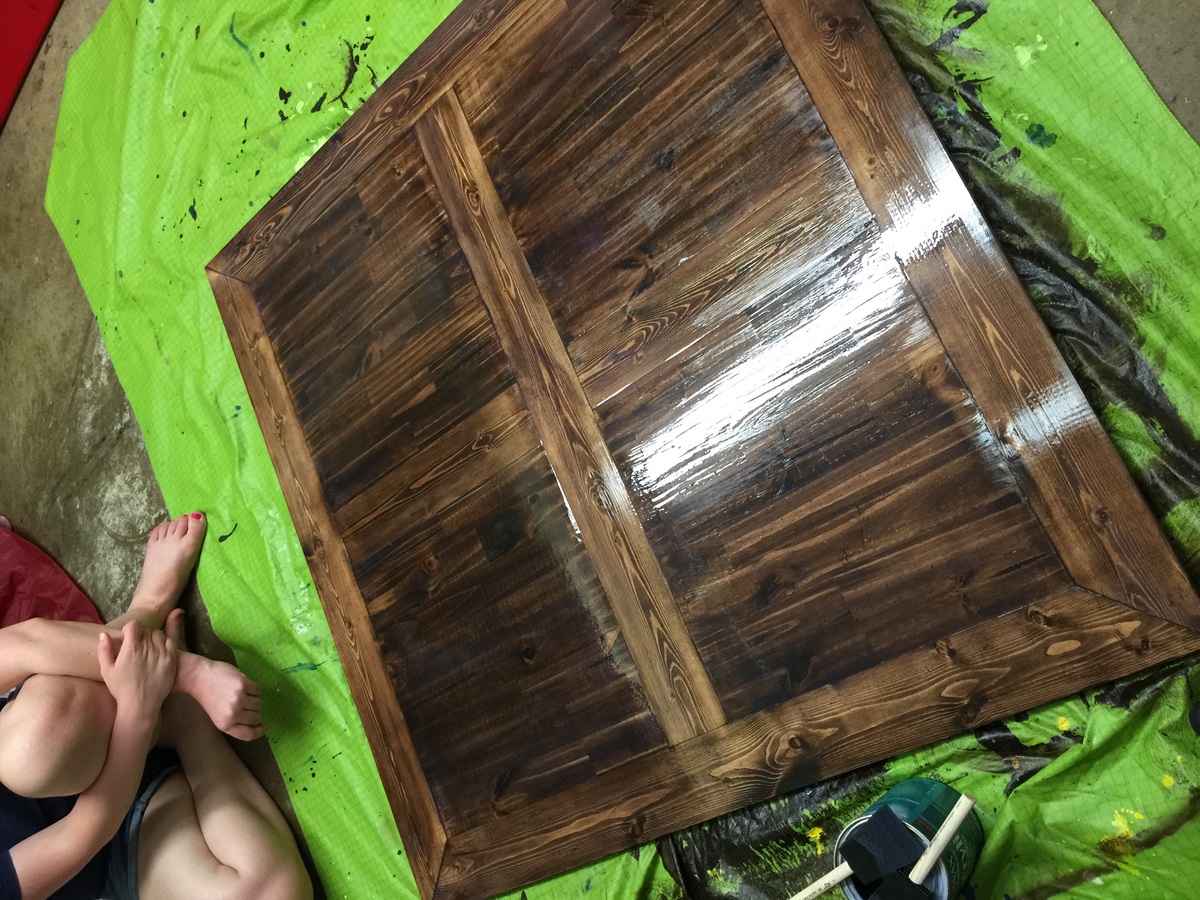
Dining Room Pedestal Table
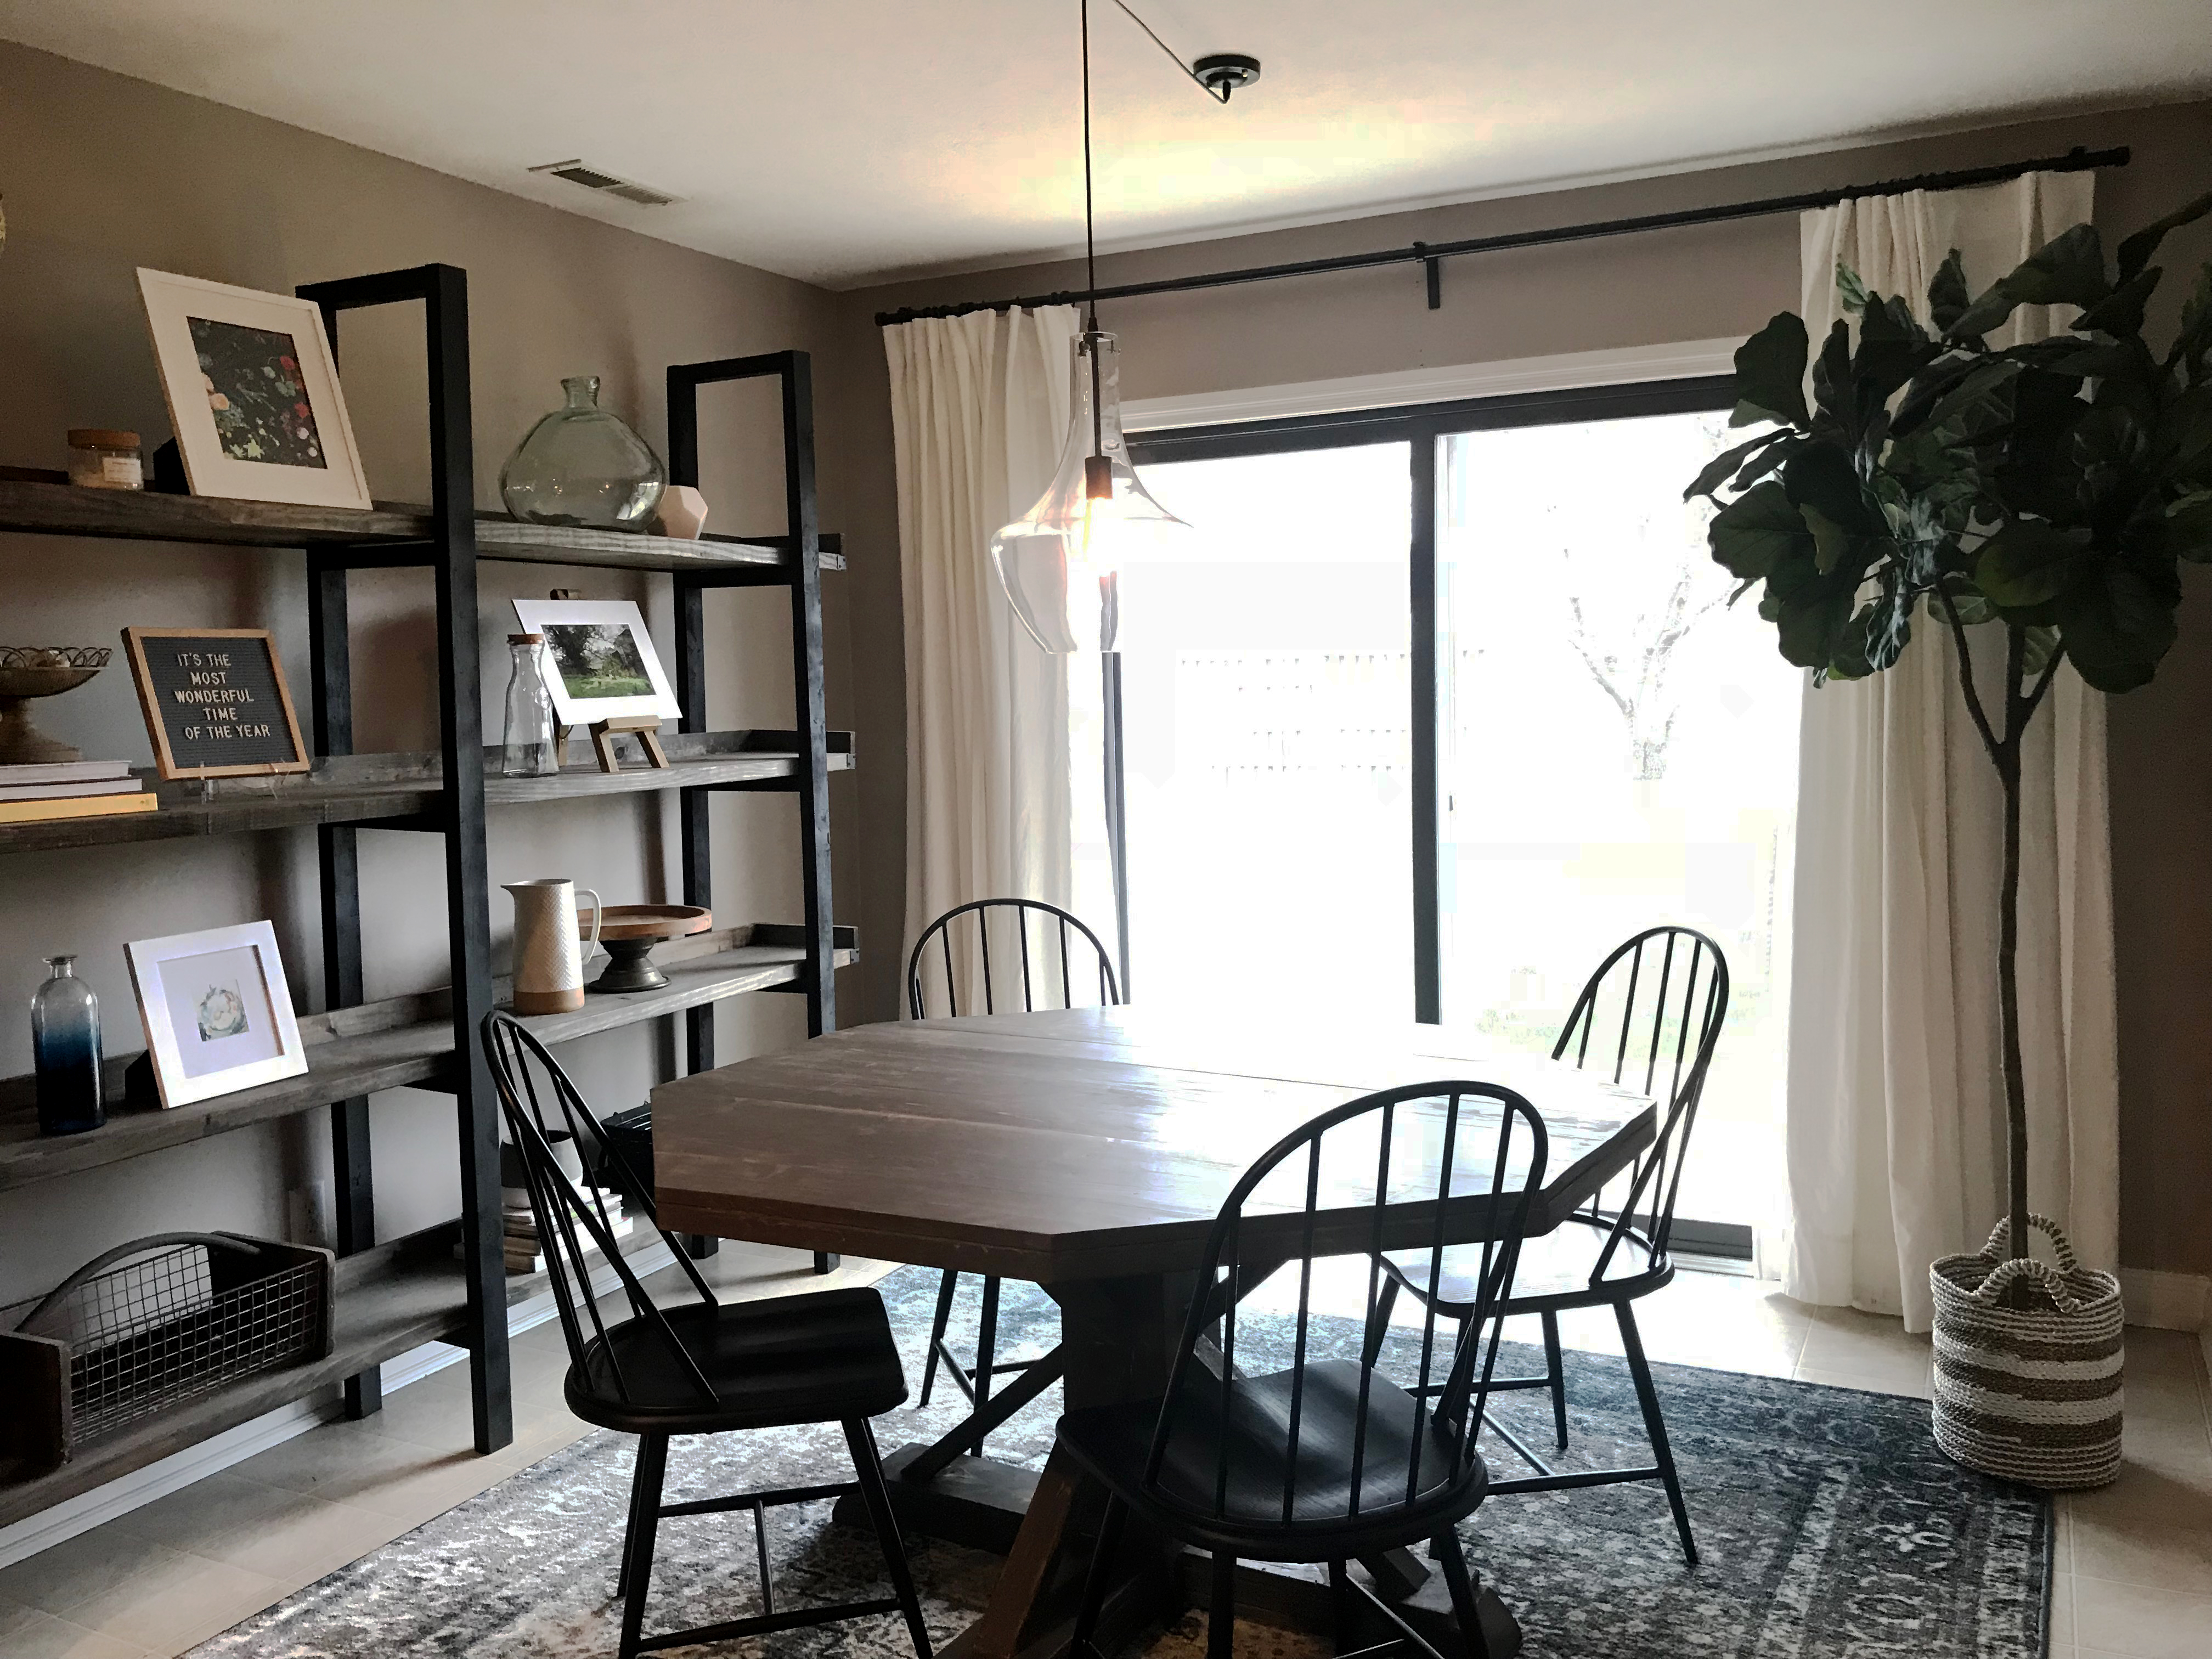
I've been wanting to build a pedestal dining table for a while, and loved these plans!
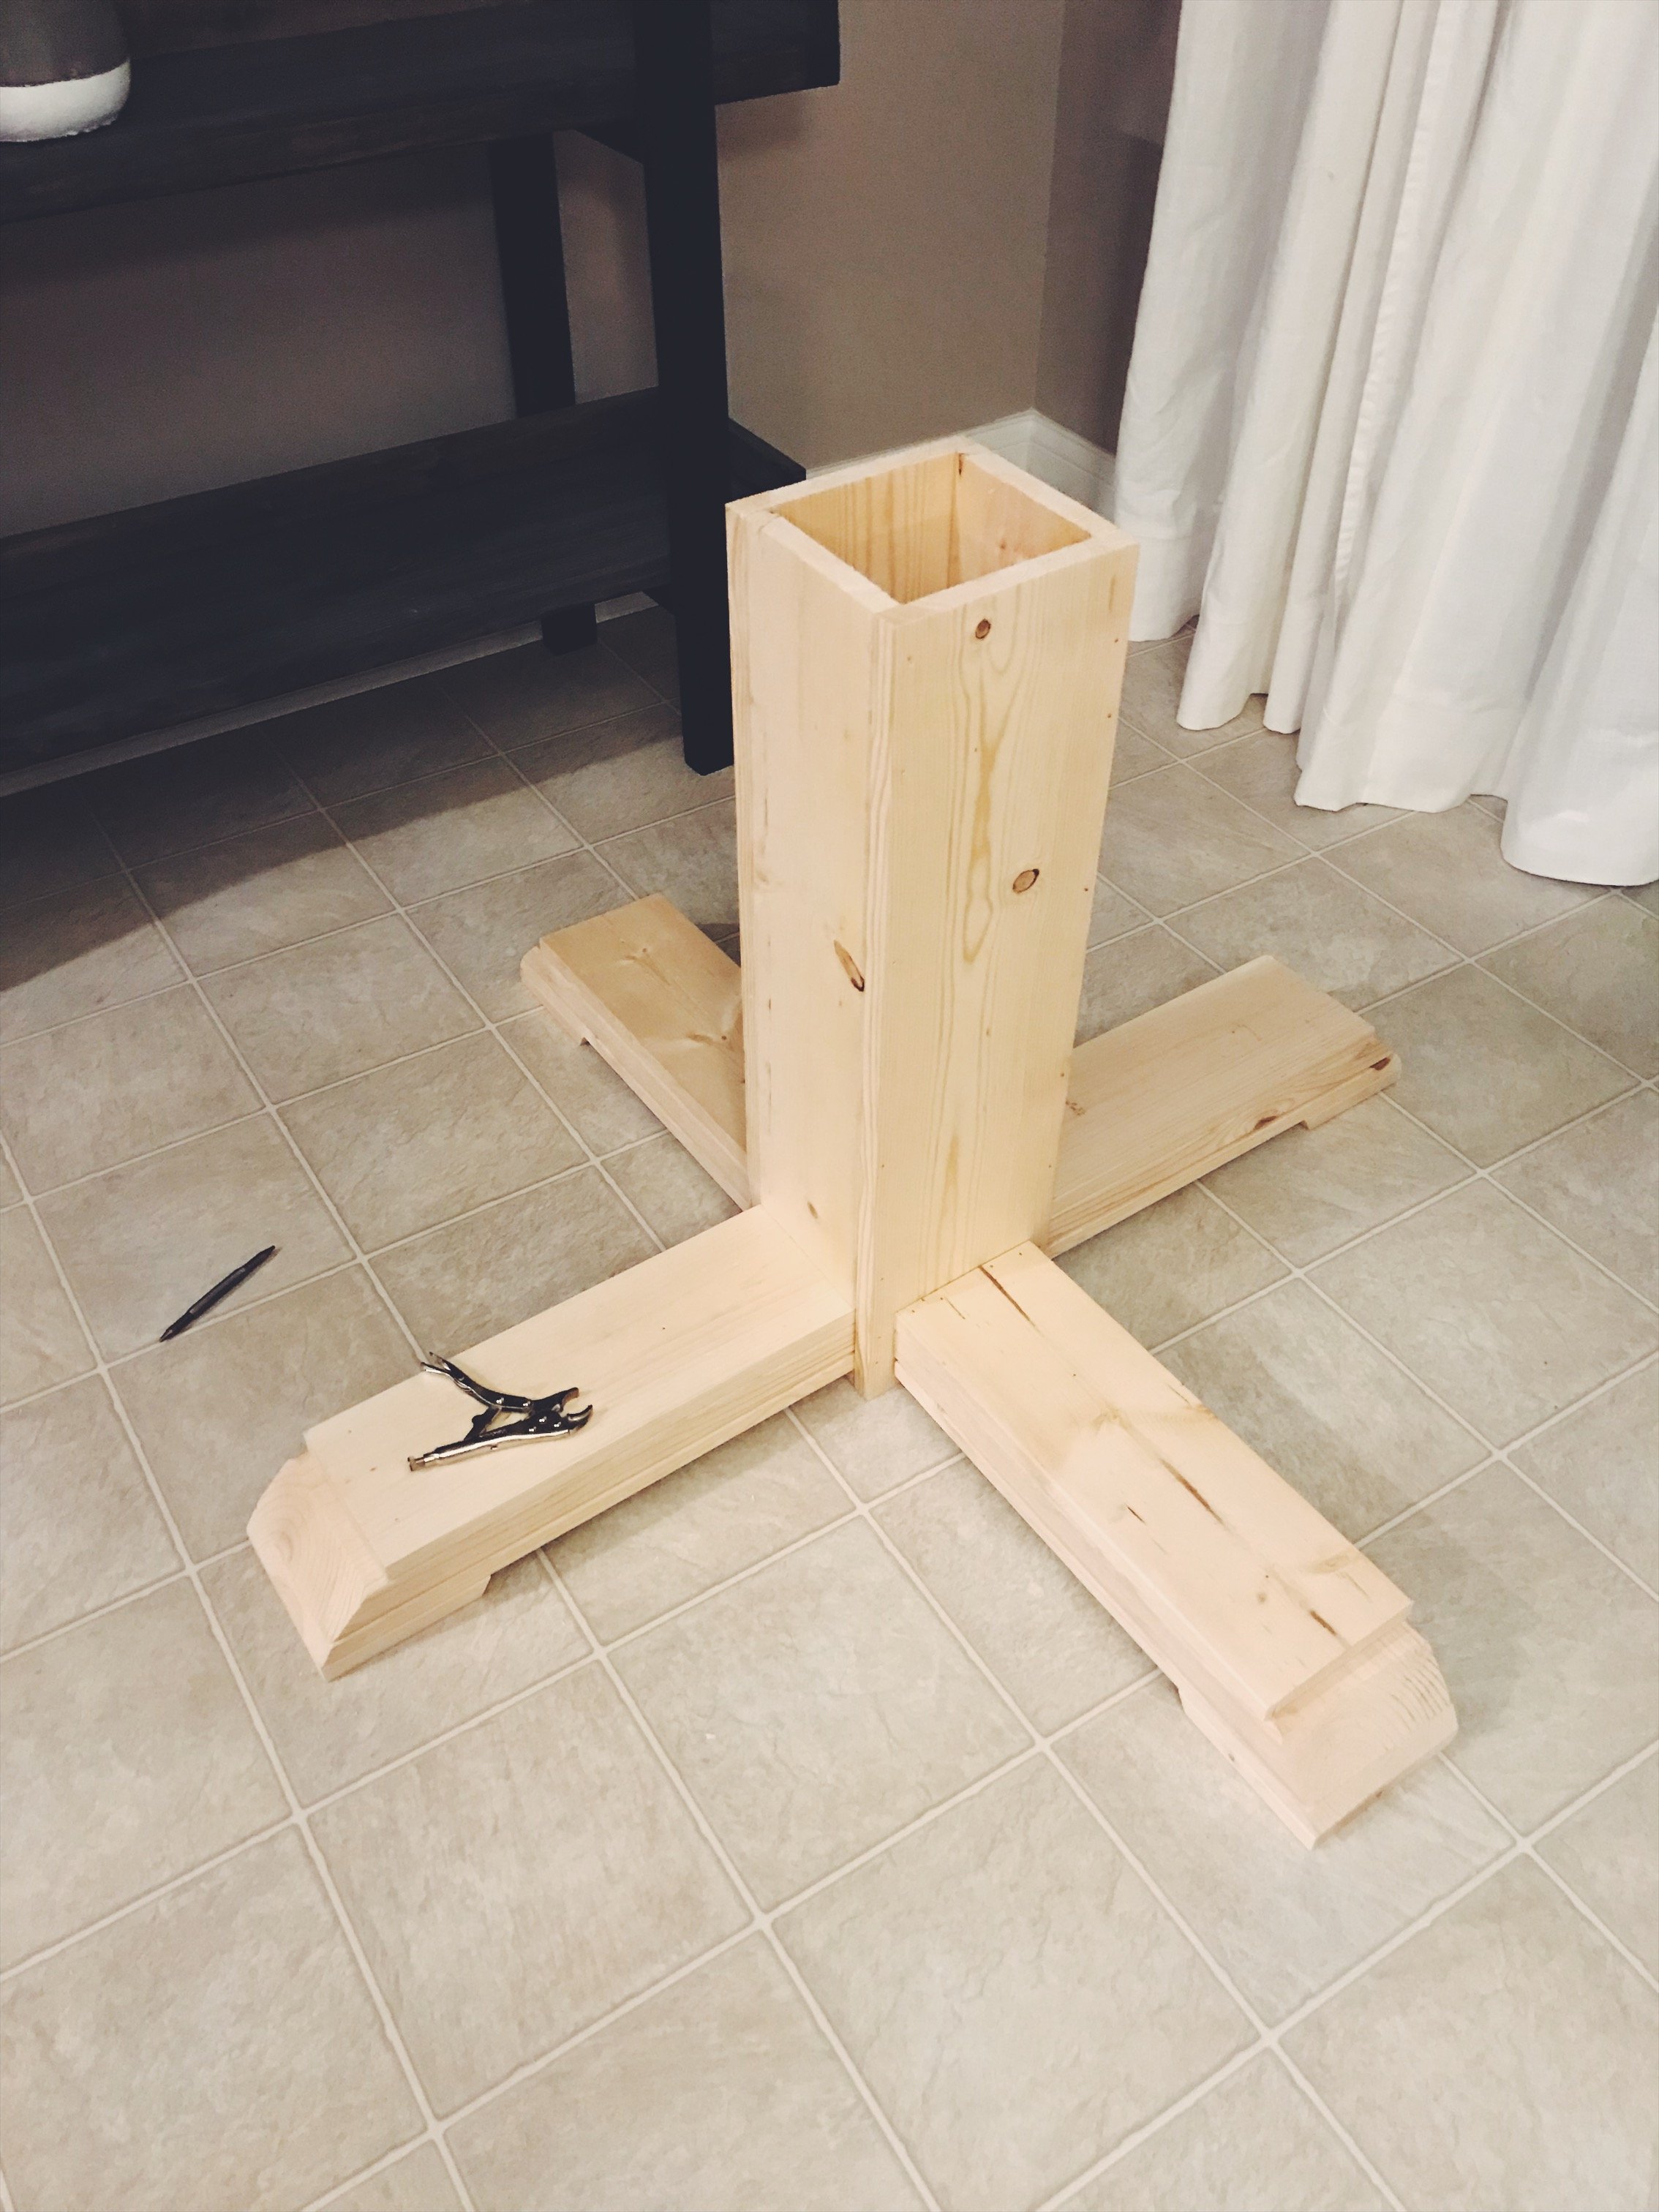
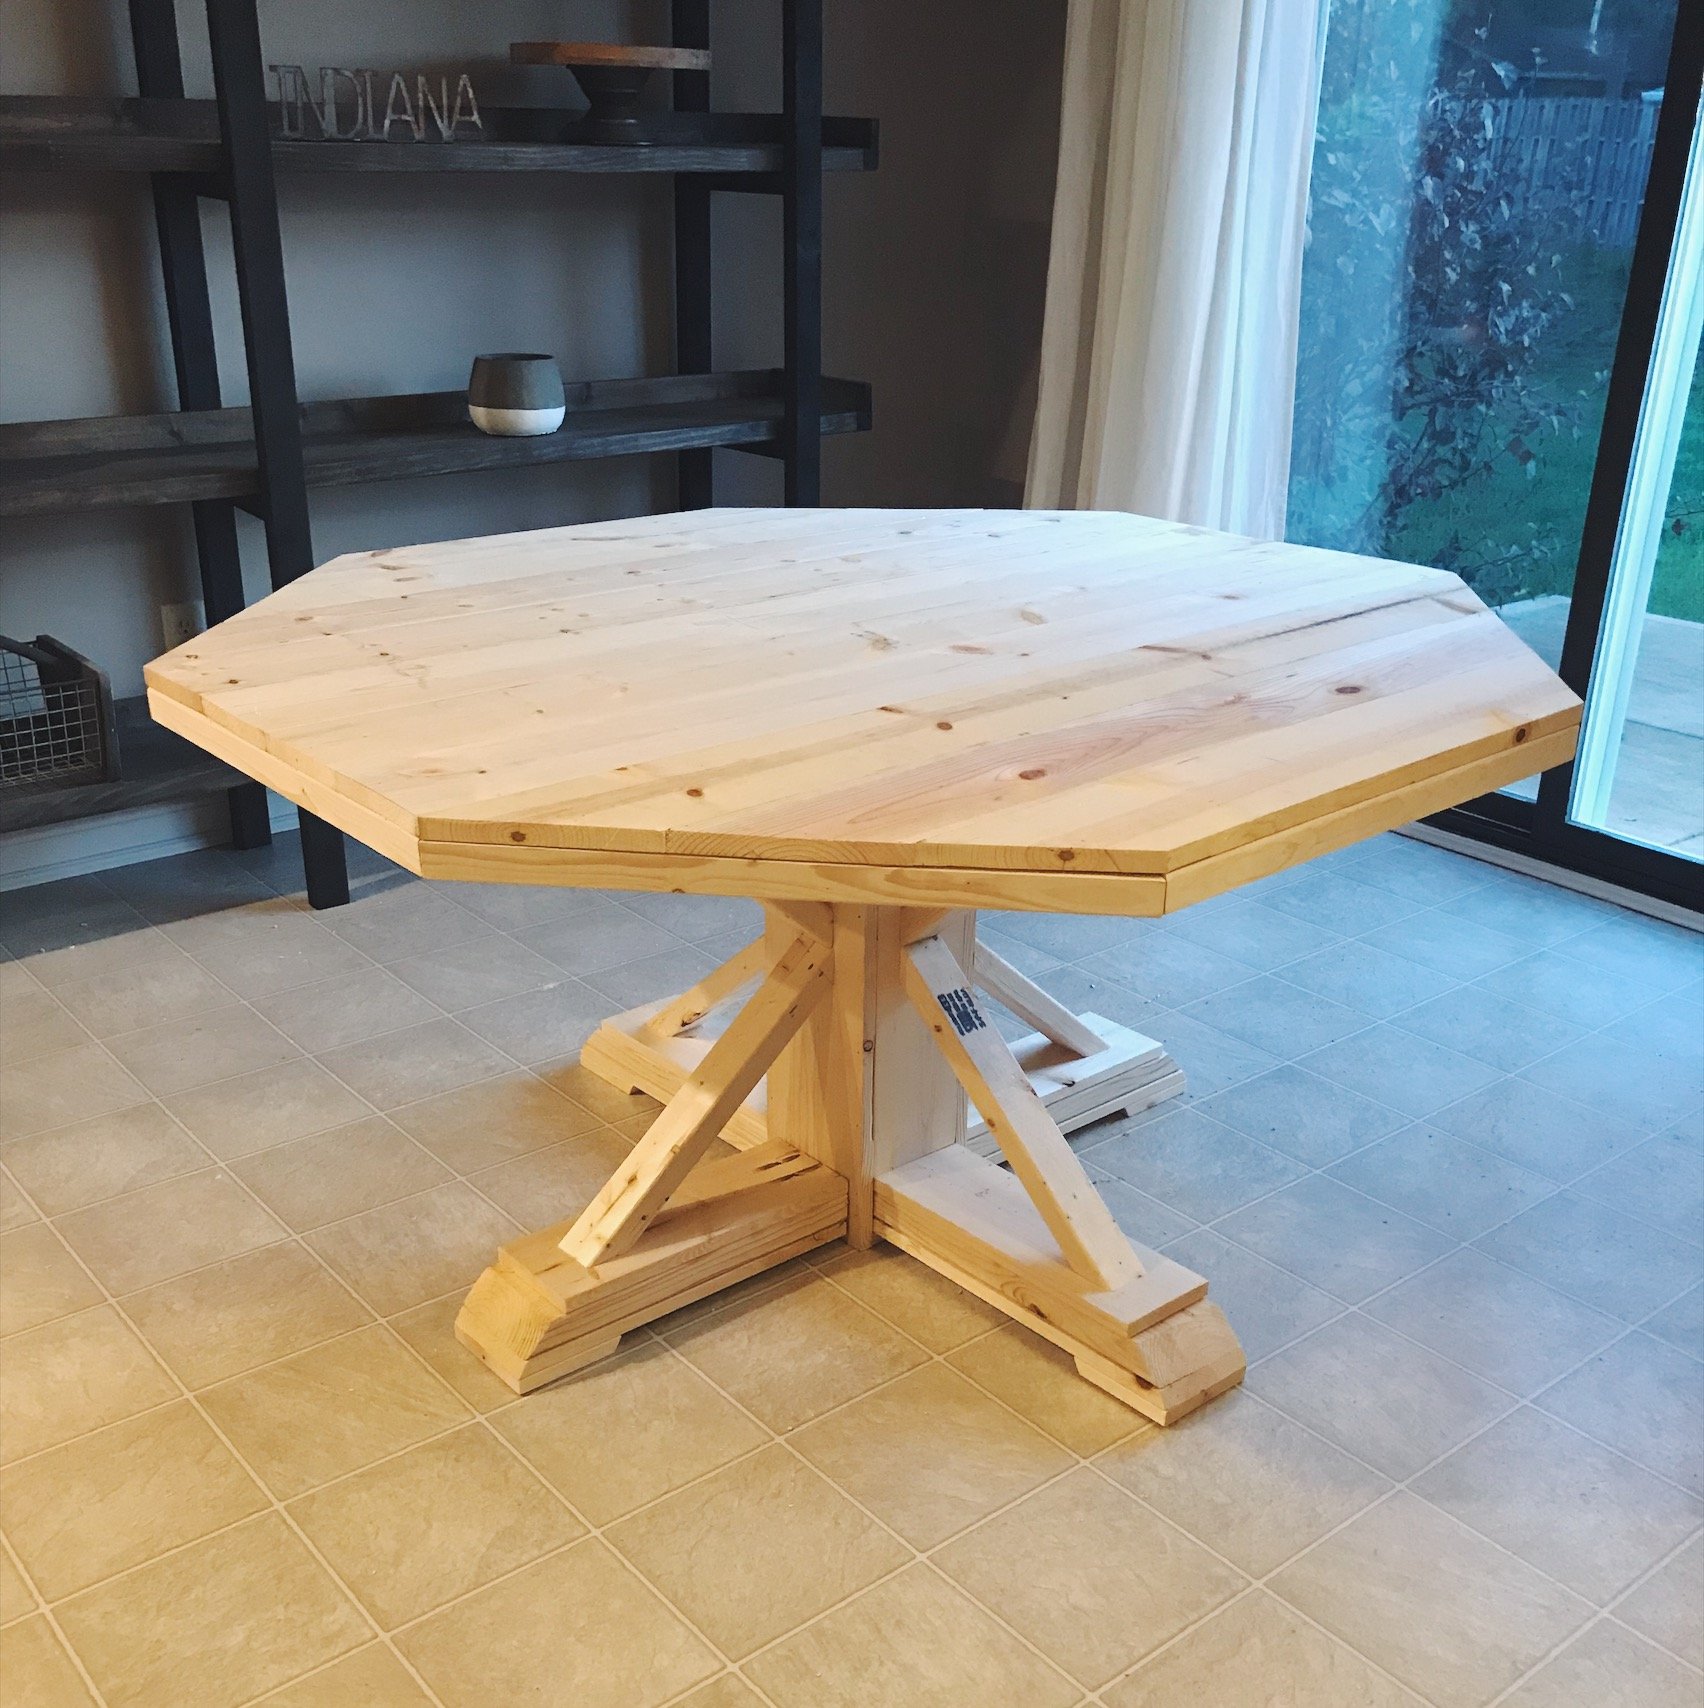

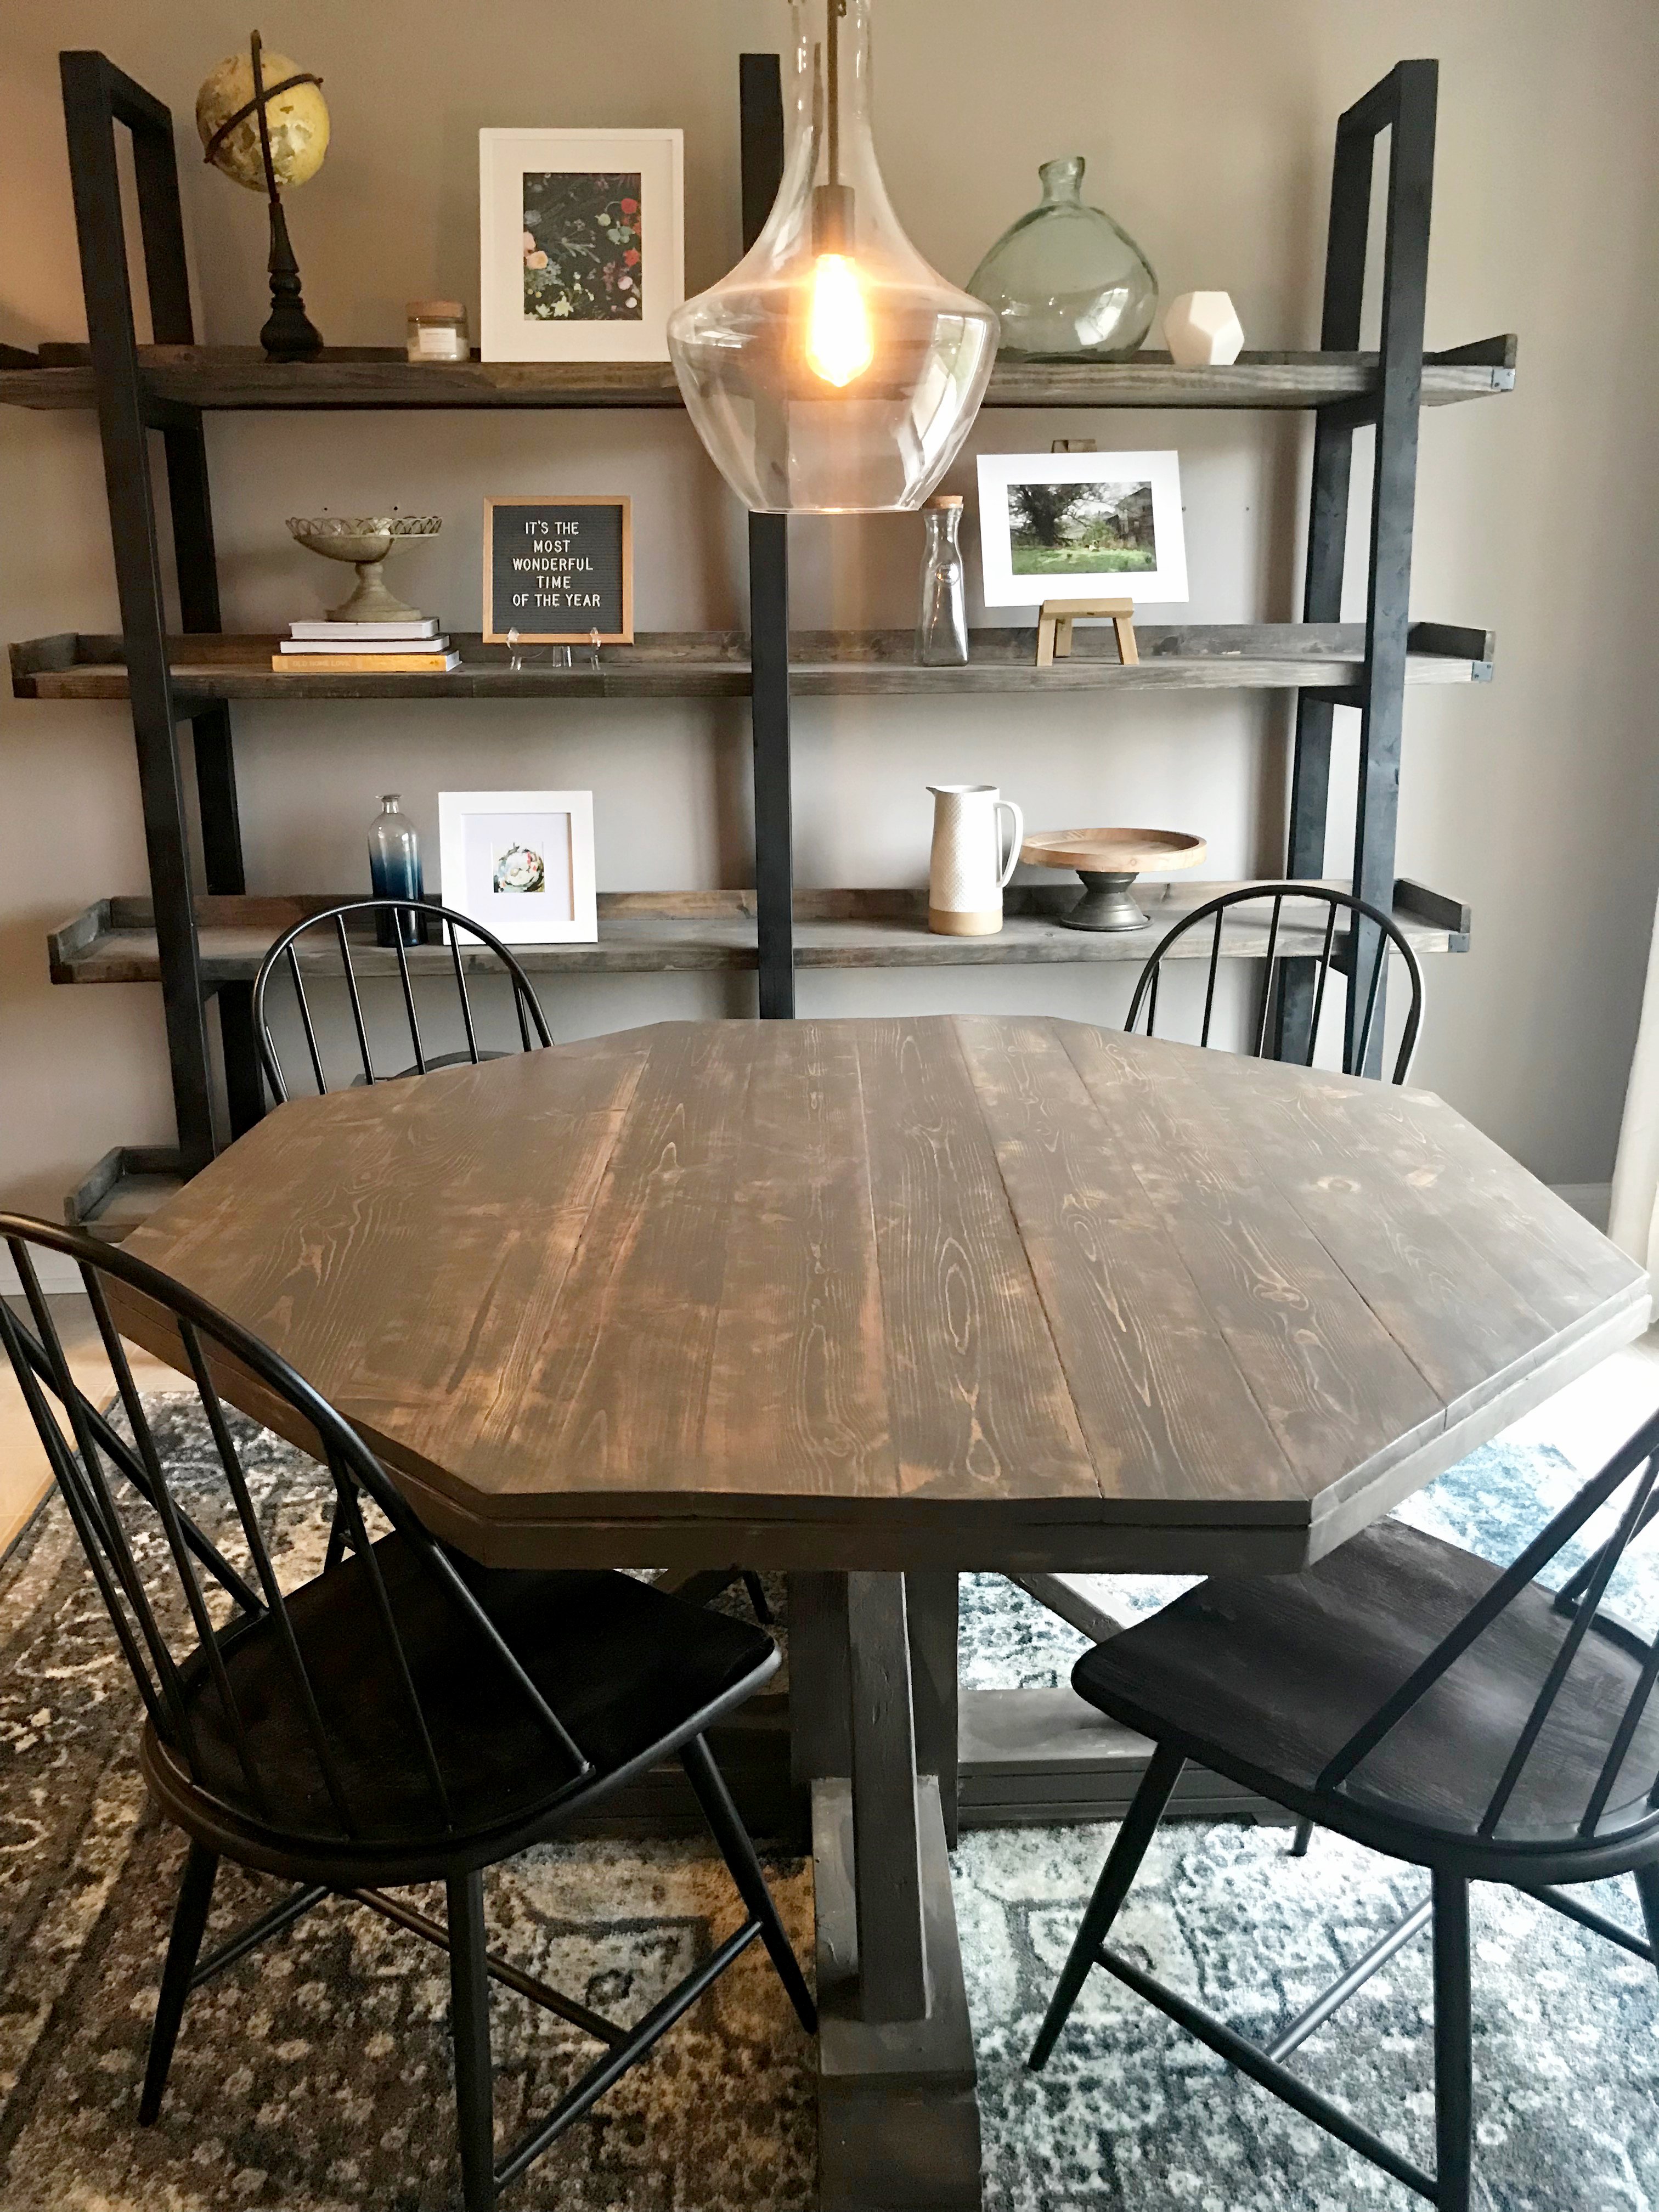
Built from Plan(s)
Estimated Cost
$120
Estimated Time Investment
Weekend Project (10-20 Hours)
Finish Used
I used a variety of stains but ultimately went with Briarsmoke by Varathane.
Recommended Skill Level
Intermediate
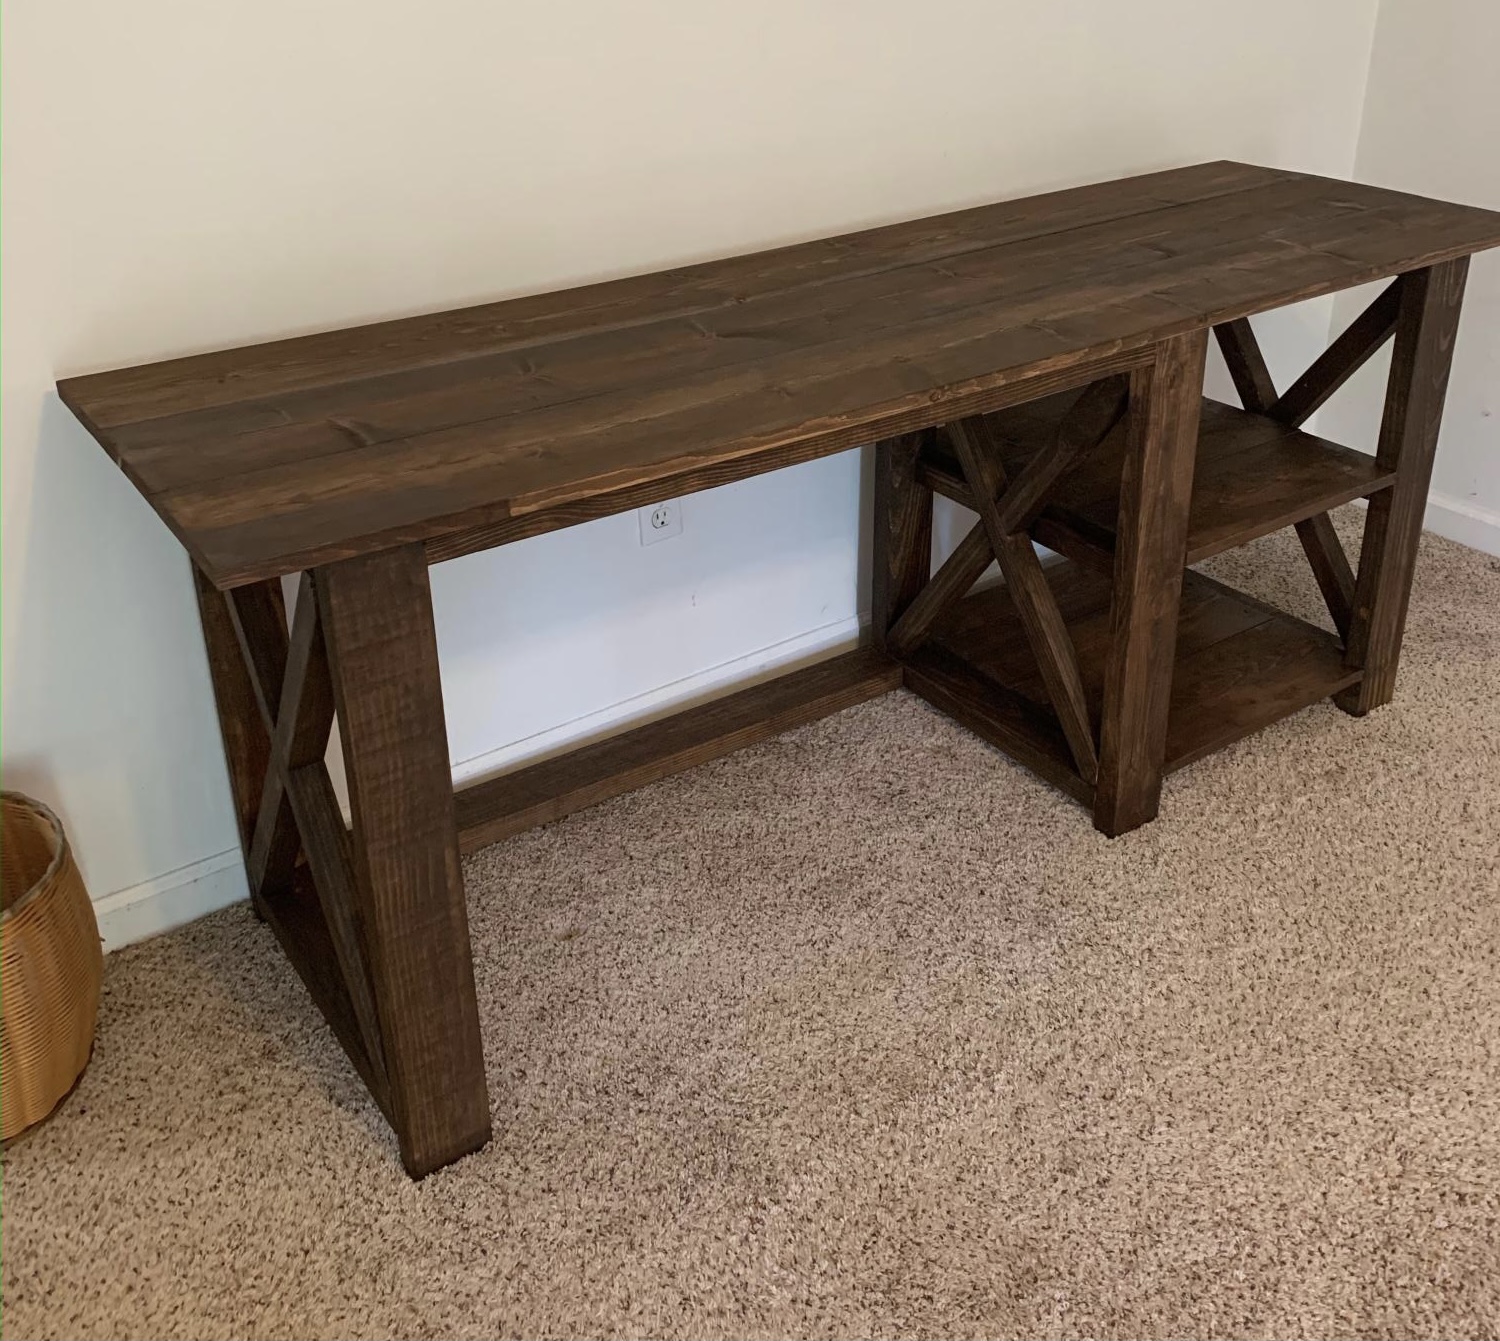
Puzzle table
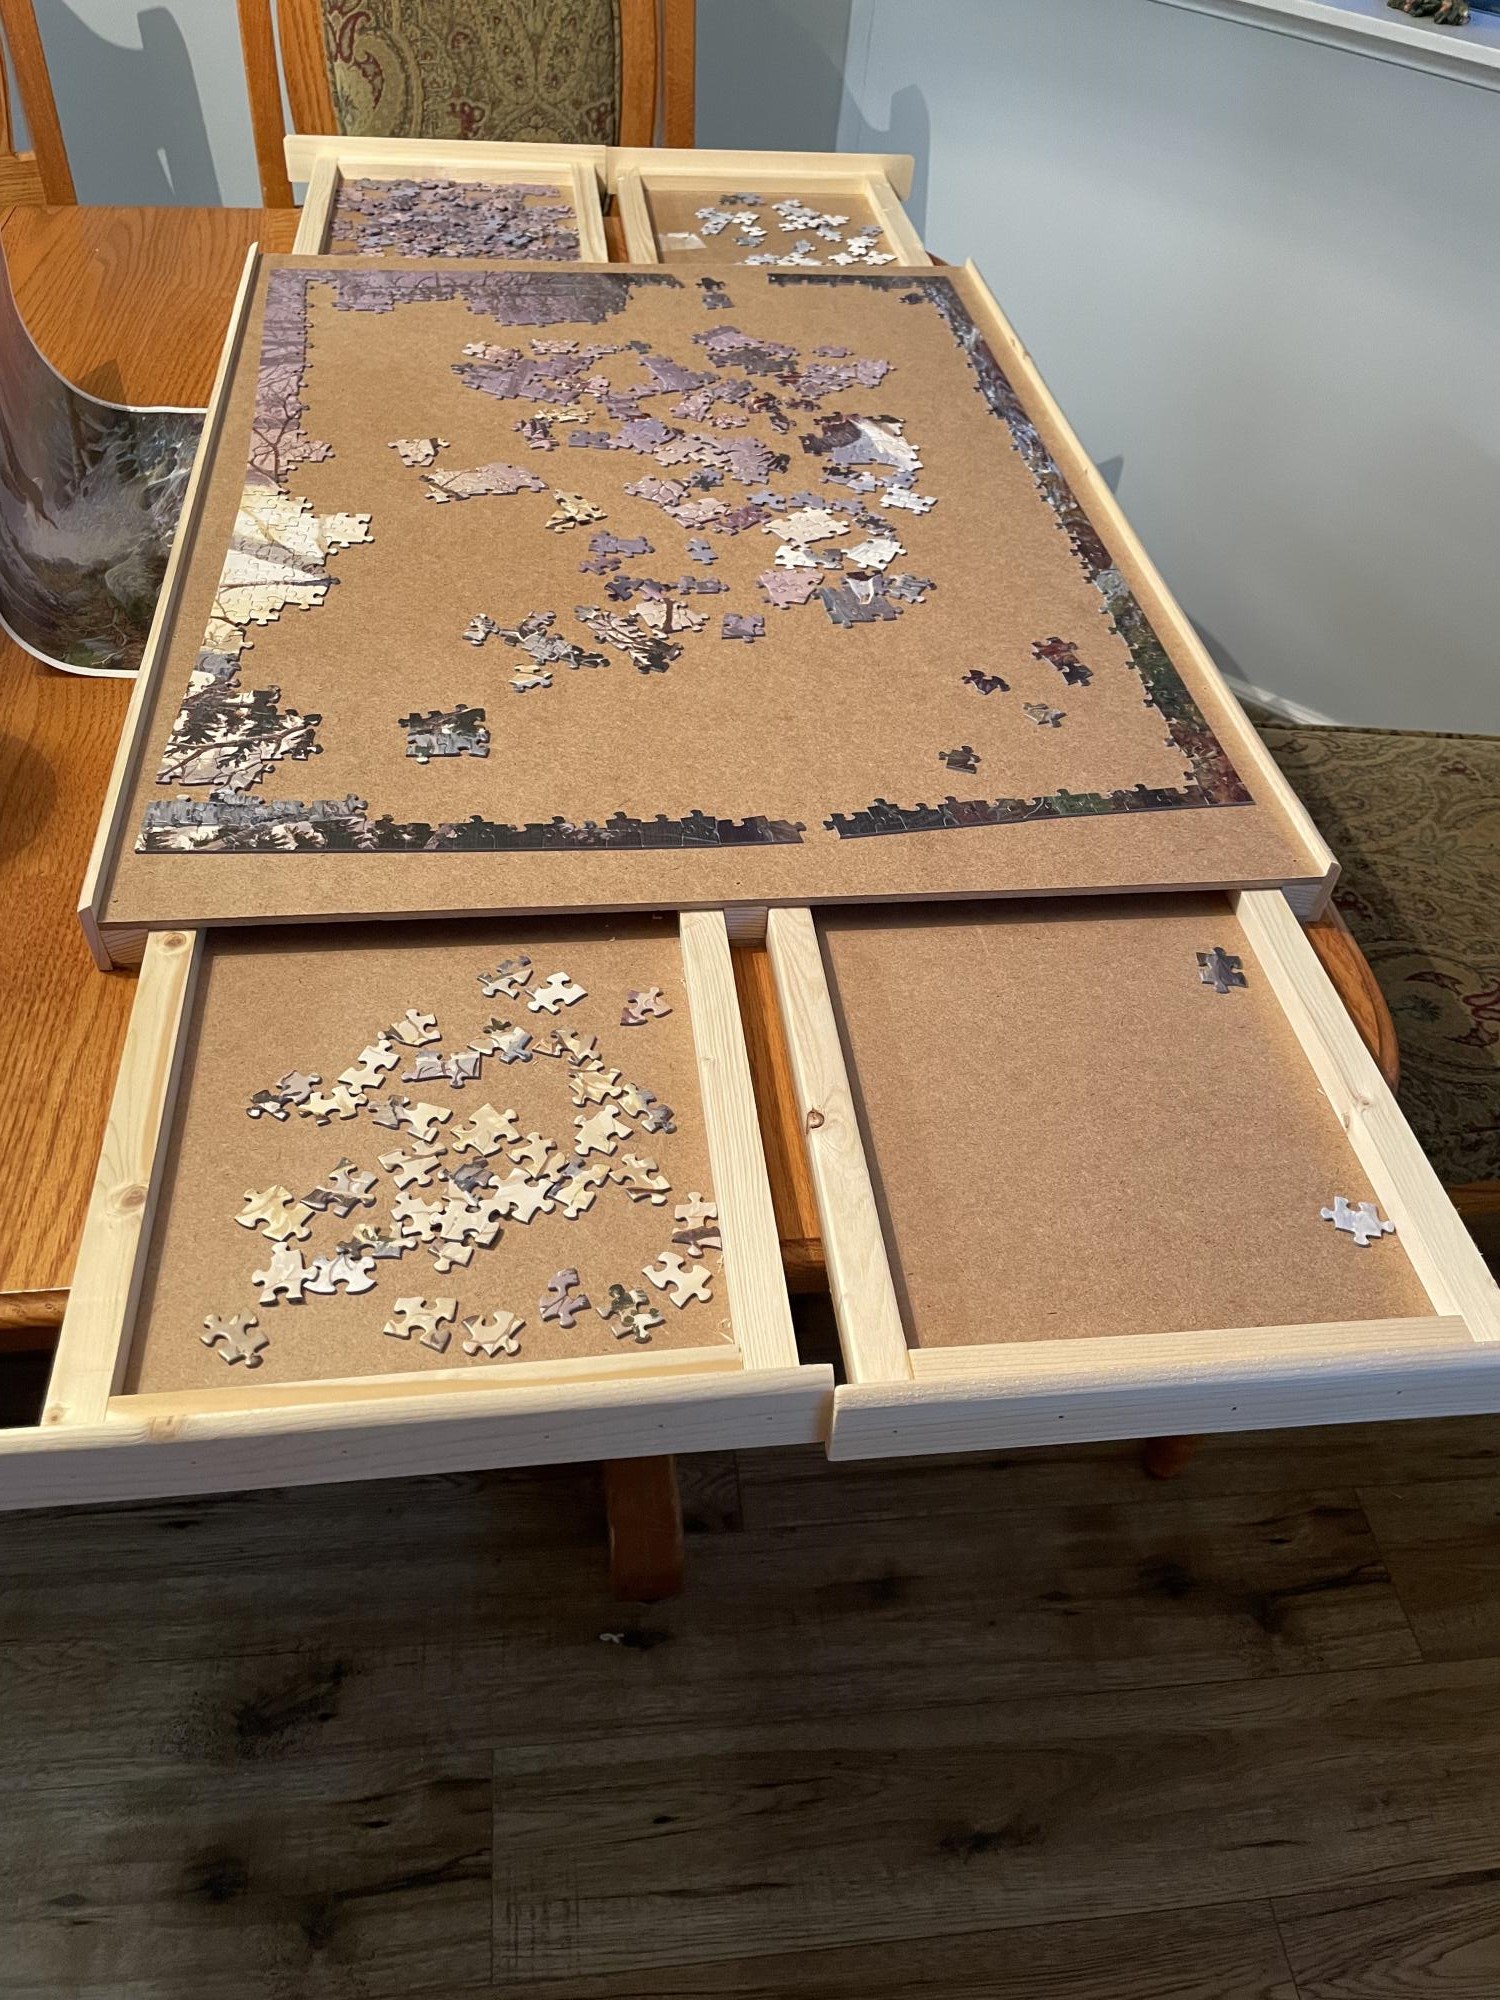
This is a table that will fit a large 1000 piece puzzle. The drawers can hold the pieces you believe would fit in that particular corner of the puzzle. When you need the room on your table this puzzle table is easily picked up and moved without disturbing the puzzle
Comments
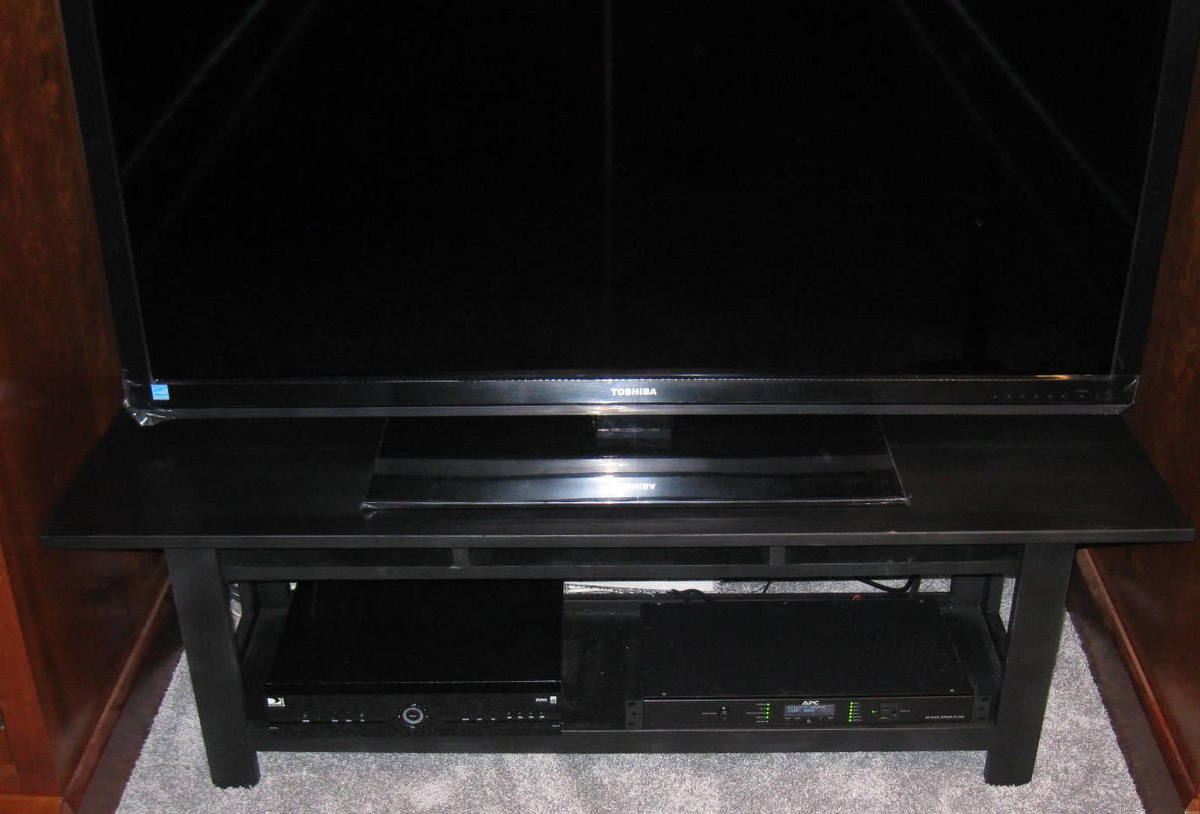
Modified Flip Top Storage Bench / Coffee Table
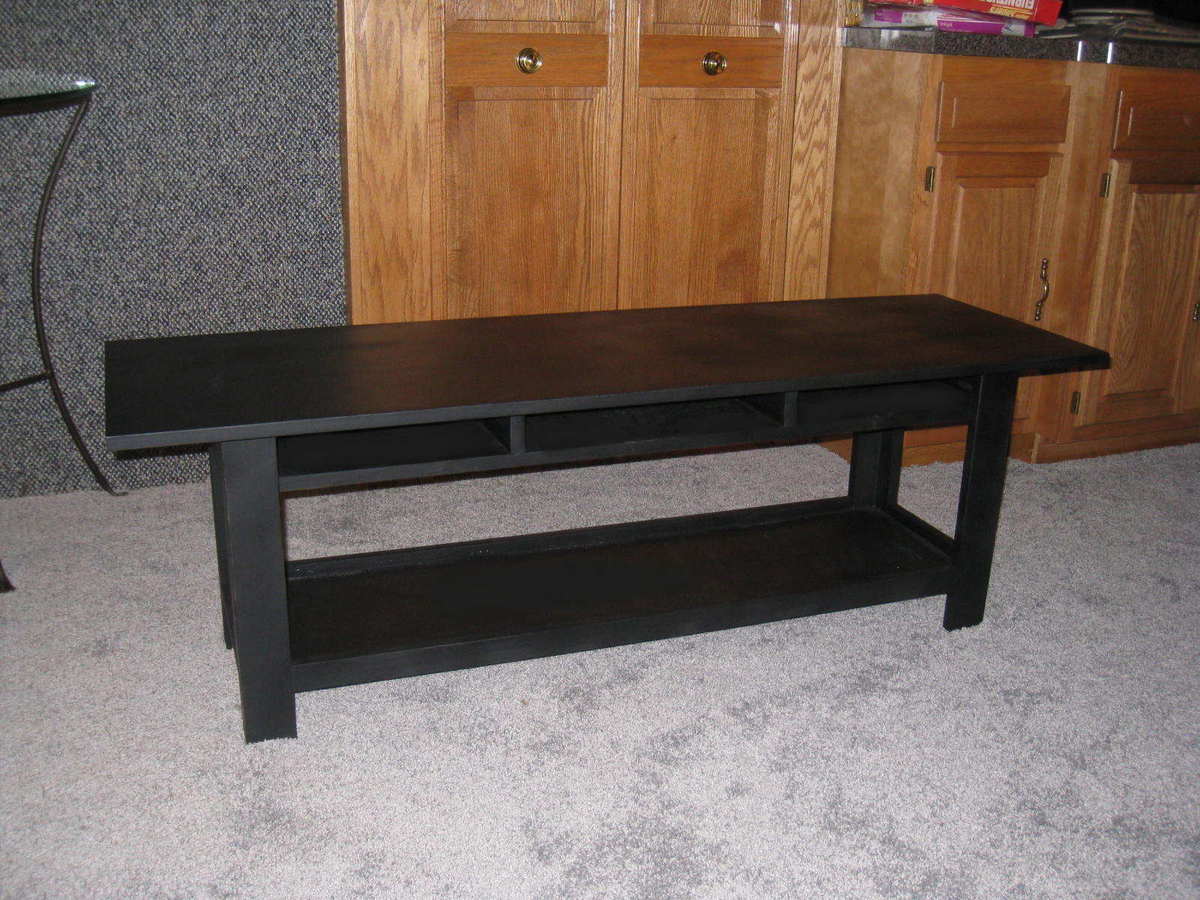
This table is based on the Flip Top Storage Bench / Coffee Table. While the original design size was almost perfect for my needs, my intended use was as a base for a flat panel TV. For this use, the flip-top made no sense so a modest design change was required.
To add some strength to support the TV, and still get some utility out of the top shelf for remotes, magazines and what-not, I left off the front trim and pocket screwed a couple risers to the top shelf and back trim and attached the top to these as well as the legs.
I had big-time warpage issues with 1 X 12 pine boards, So I settled on a 'speed' approach using a 18 X 72 laminated pine board, which I cut to 52 inches length. These dimensions eliminated the need for second top board used for the hinge mount in the original design. I immediately took it home, cut and mounted it on the table carcass and locked it in position with screws before it had a chance to move on us. My wife then quickly painted it.
I have a sketchup model of the revised non flipping bench. If anyone is interested in that let me know.
Estimated Time Investment
Weekend Project (10-20 Hours)
Finish Used
Flat Black Paint
Recommended Skill Level
Beginner
Our Much Appreciated Mudroom Bench!
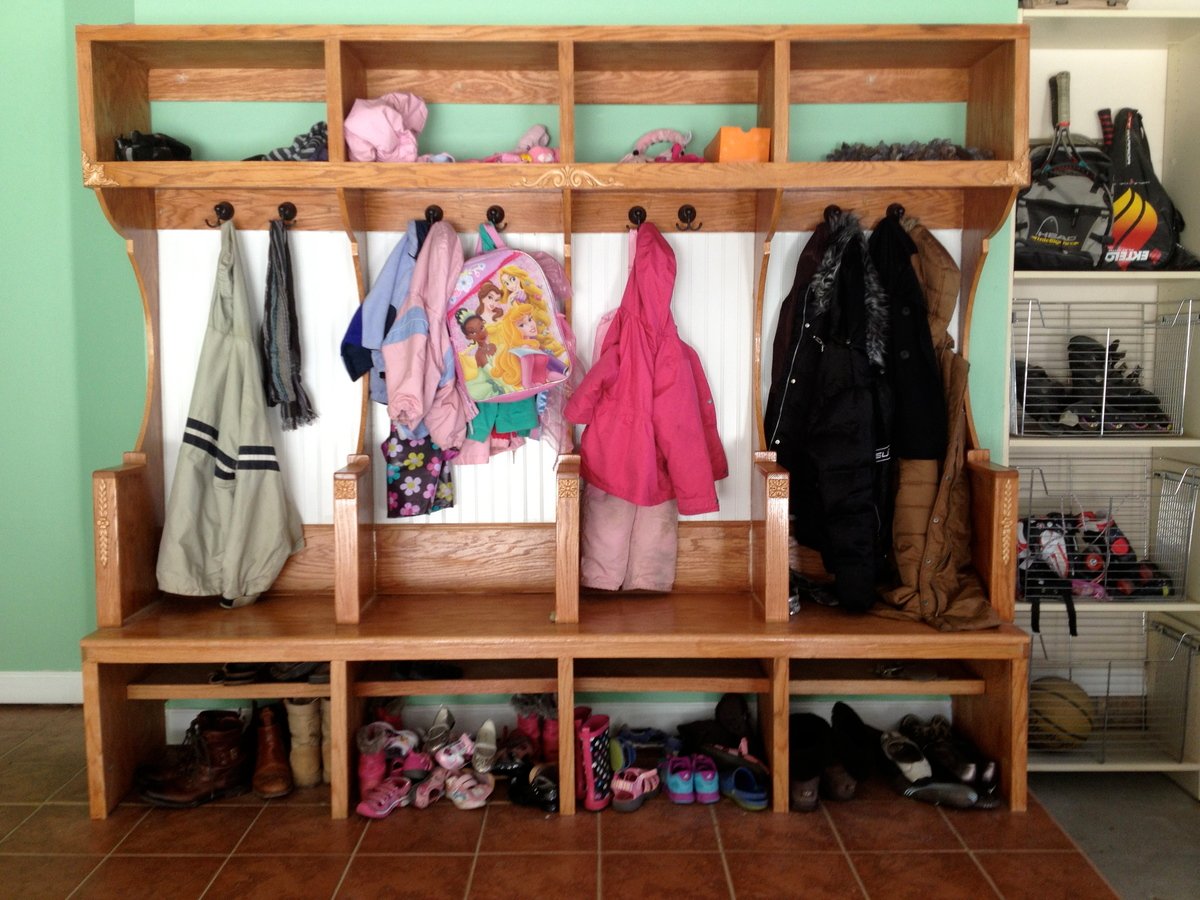
I followed Anna's plans pretty closely though deviated somewhat as well. Added additional length and one more seat separators & seat, increased depth by a few inches, changed design of seperators to allow for arm rests, added some additional trim, a second inset shelf w/in the shoe box area (for sandals and whatnot), and then inset wainscoting.
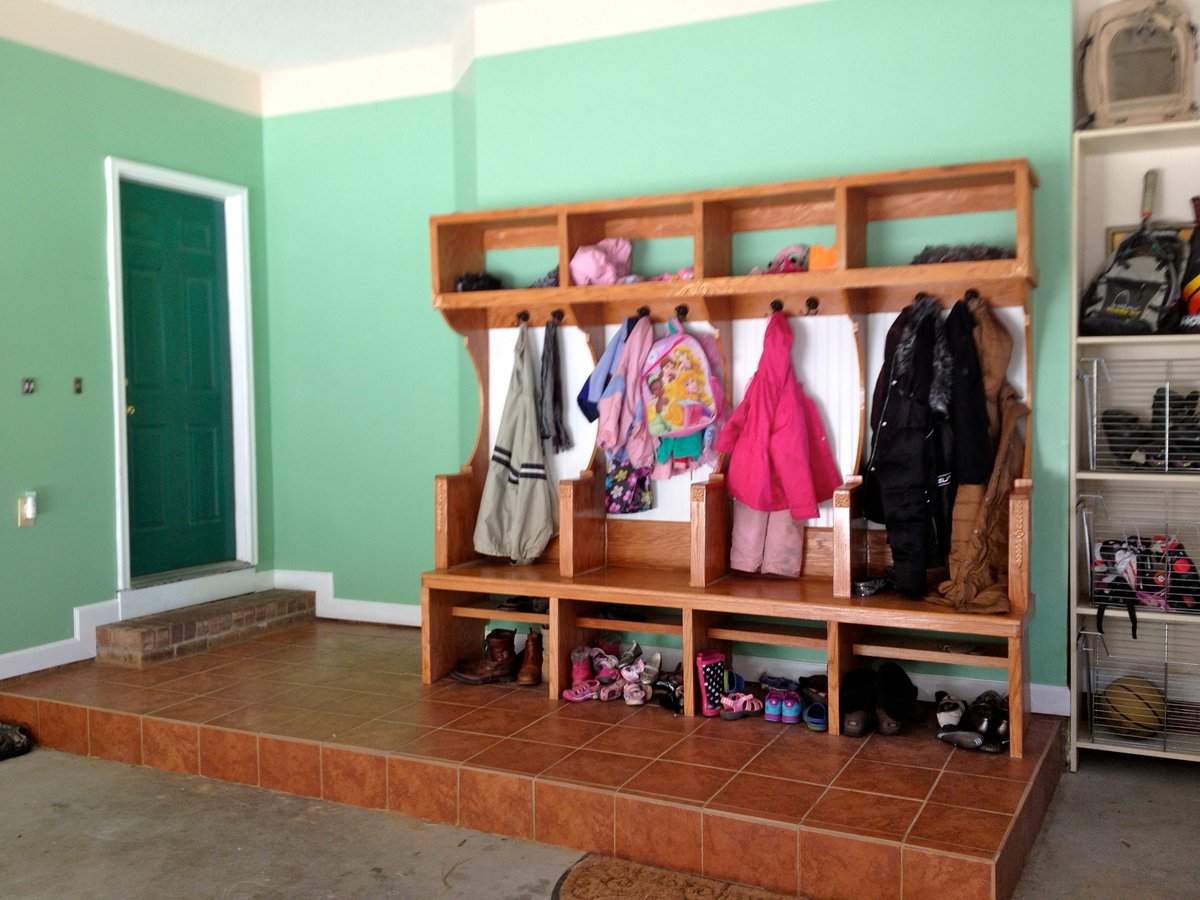
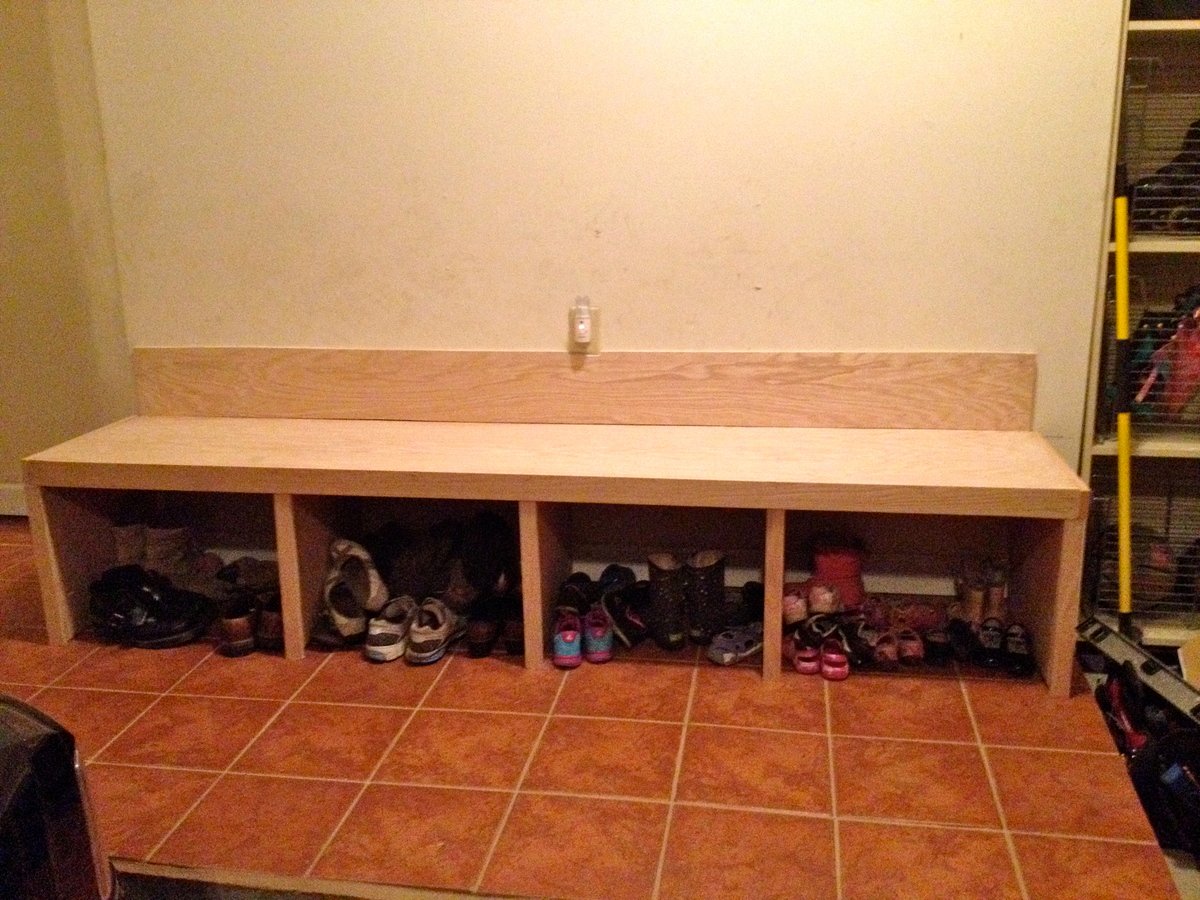
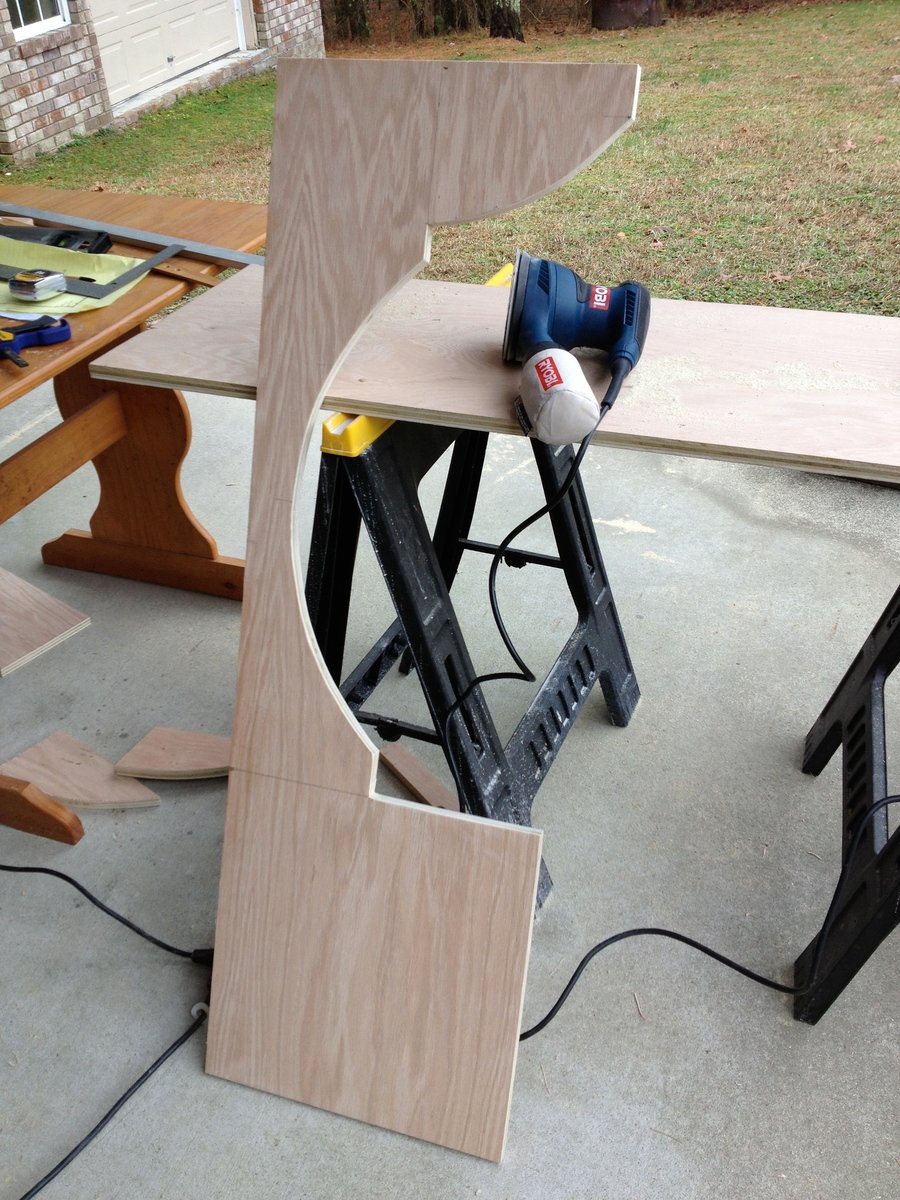
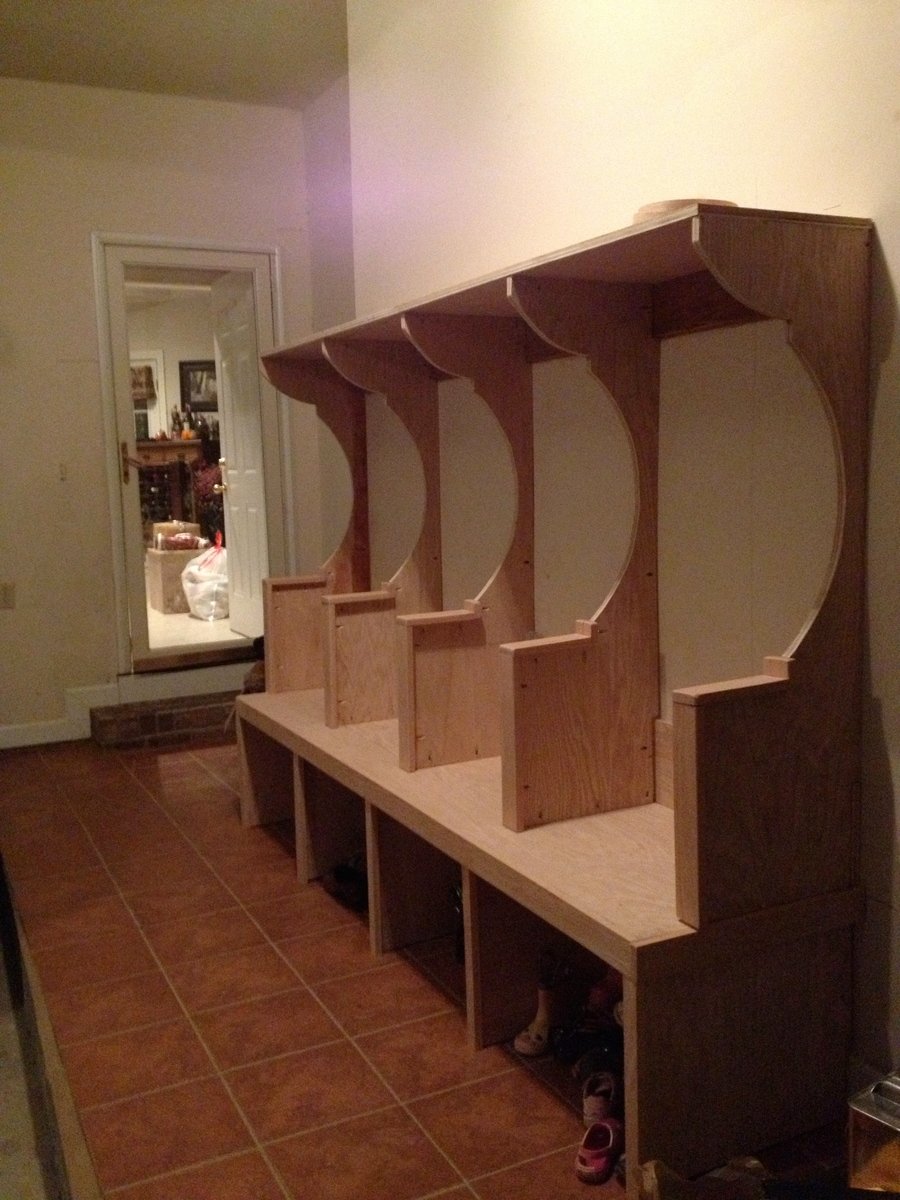
Built from Plan(s)
Estimated Cost
$200-$250
Estimated Time Investment
Weekend Project (10-20 Hours)
Finish Used
2 coats of Golden Pecan 245 Minwax stain (and then a poly clear)
Recommended Skill Level
Intermediate
Comments

Square x base breakfast nook
Made from the square x table breakfast nook plans and then altered the table top a bit.
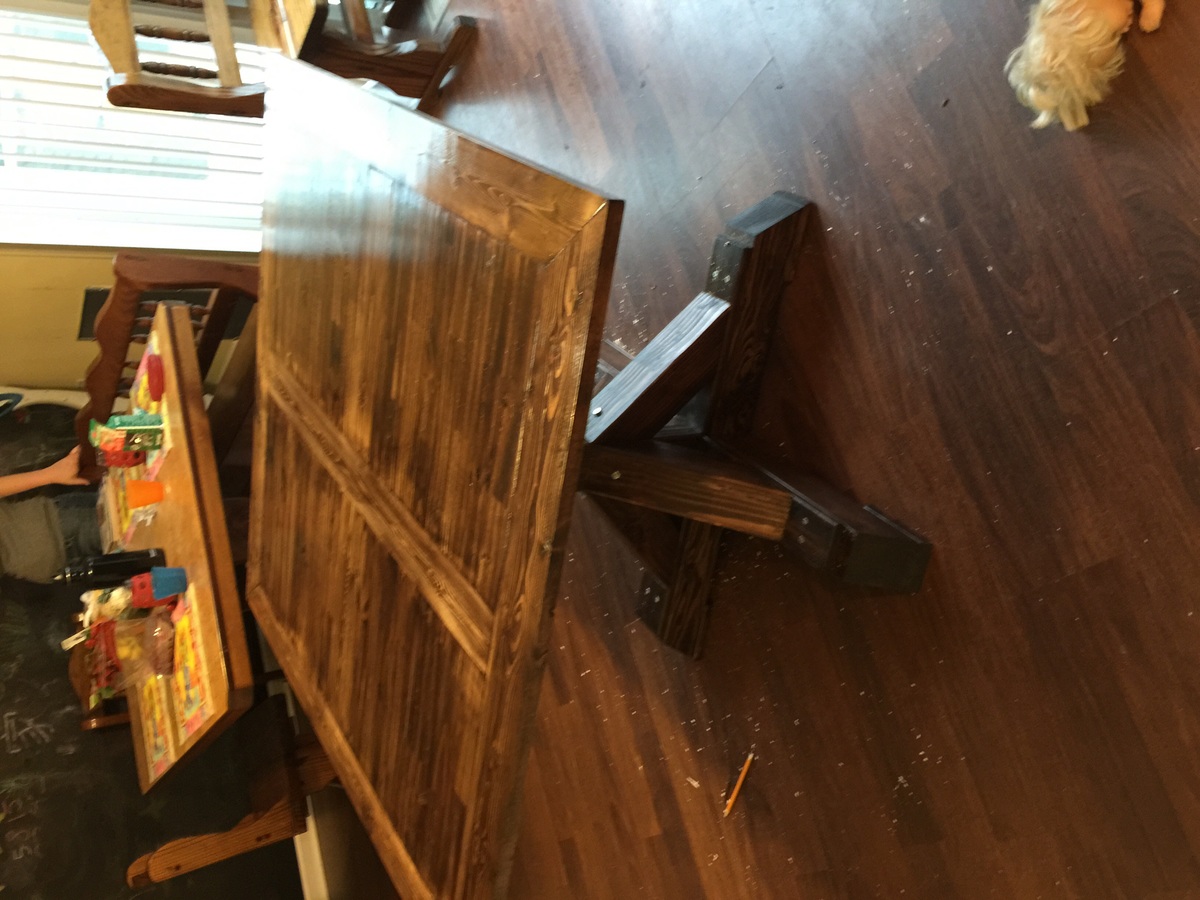
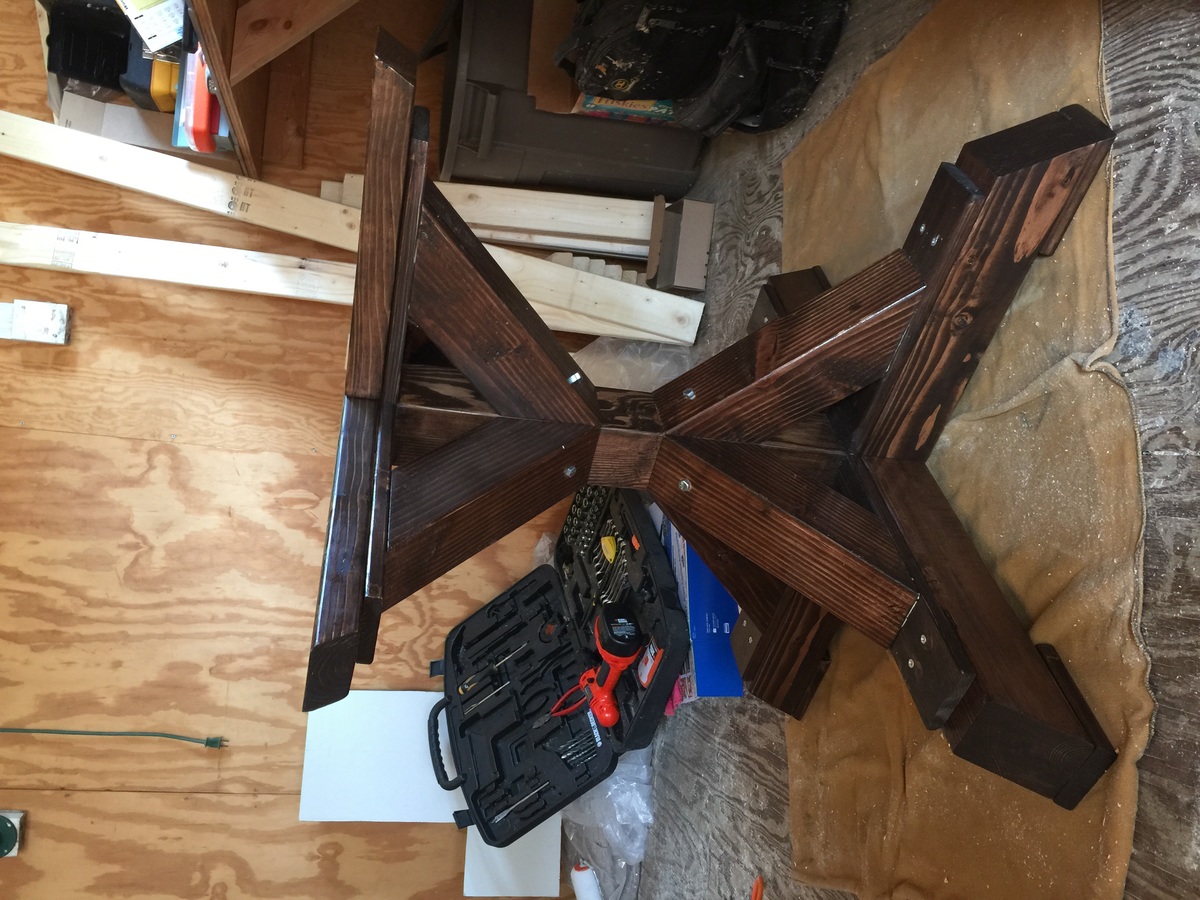
Built from Plan(s)
Estimated Time Investment
Weekend Project (10-20 Hours)
Finish Used
Kona wood stain and polycrylic
Recommended Skill Level
Intermediate
Farmhouse Table

Finally got the time to do the farmhouse table. Changed up just a few things. Flipped the ends around to add more leg room and put a 2x10 as breadboards. Chairs fit in about 8 inches under now and plenty of leg room and I'm 6'3. Only real adjustment is shorten the stretcher board by 3 inches total but just do stretcher board last and measure it to fit exactly.
Also wanted a different style bench so went with the bench that matched the Big Ur Farm Table and Bench and customized the benches to fit. Also instead of 2x4 all across top of bench I place a 2s8 in center. Adds just a 1/4 inch in total depth and looks great and one less board to do pocket holes on.
Built from Plan(s)
Estimated Cost
Approximately $300. Wood was close to $200 for table and two benches. Rest was stains, wood conditioner, poly, pocket screws etc.
Estimated Time Investment
Weekend Project (10-20 Hours)
Finish Used
Miniwax Red Oak stain. Just used a rag and wiped in the stain. Definitely use wood conditioner first. Drastically helps if using pine or other soft woods. Then just a few coats of poly.
Recommended Skill Level
Intermediate
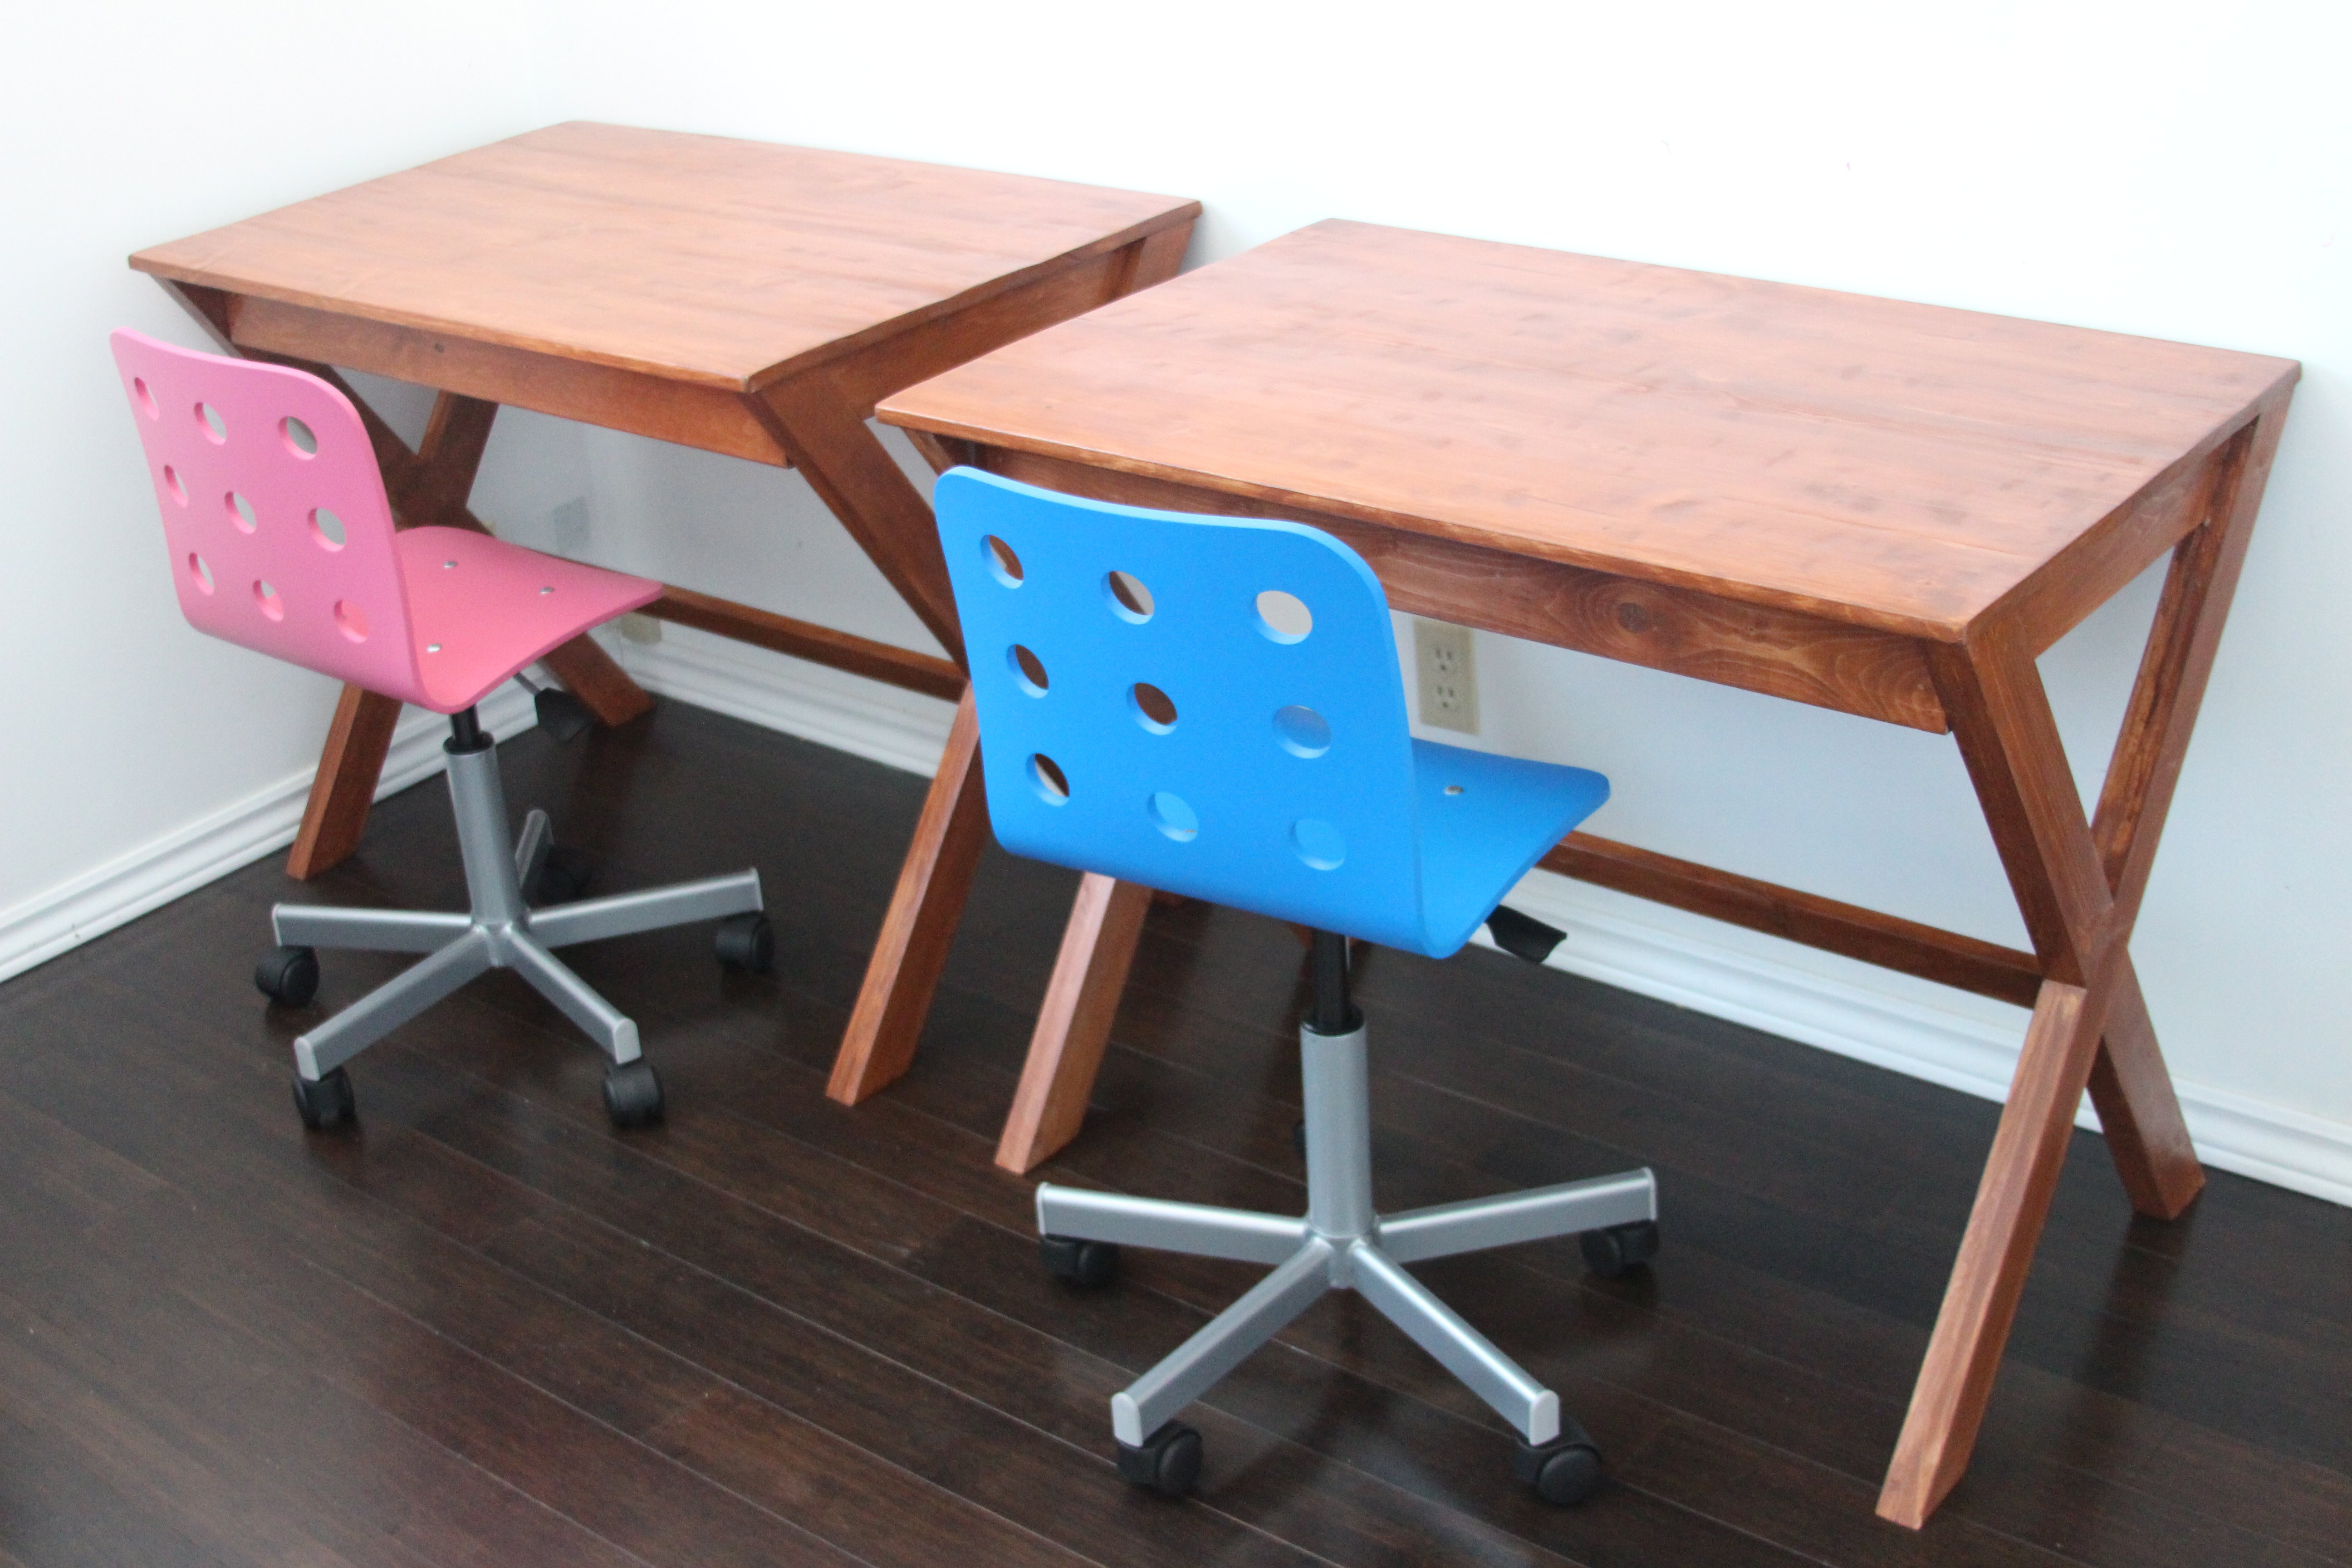
Office Desk
Used these plans to make this office desk for my daughter!
Built from Plan(s)
Comments
Ana White Admin
Mon, 12/13/2021 - 15:11
So nice!
WOW, that looks amazing, thank you for sharing!
texasjuju
Sat, 01/20/2024 - 18:18
Is there a plan for this…
Is there a plan for this somewhere?