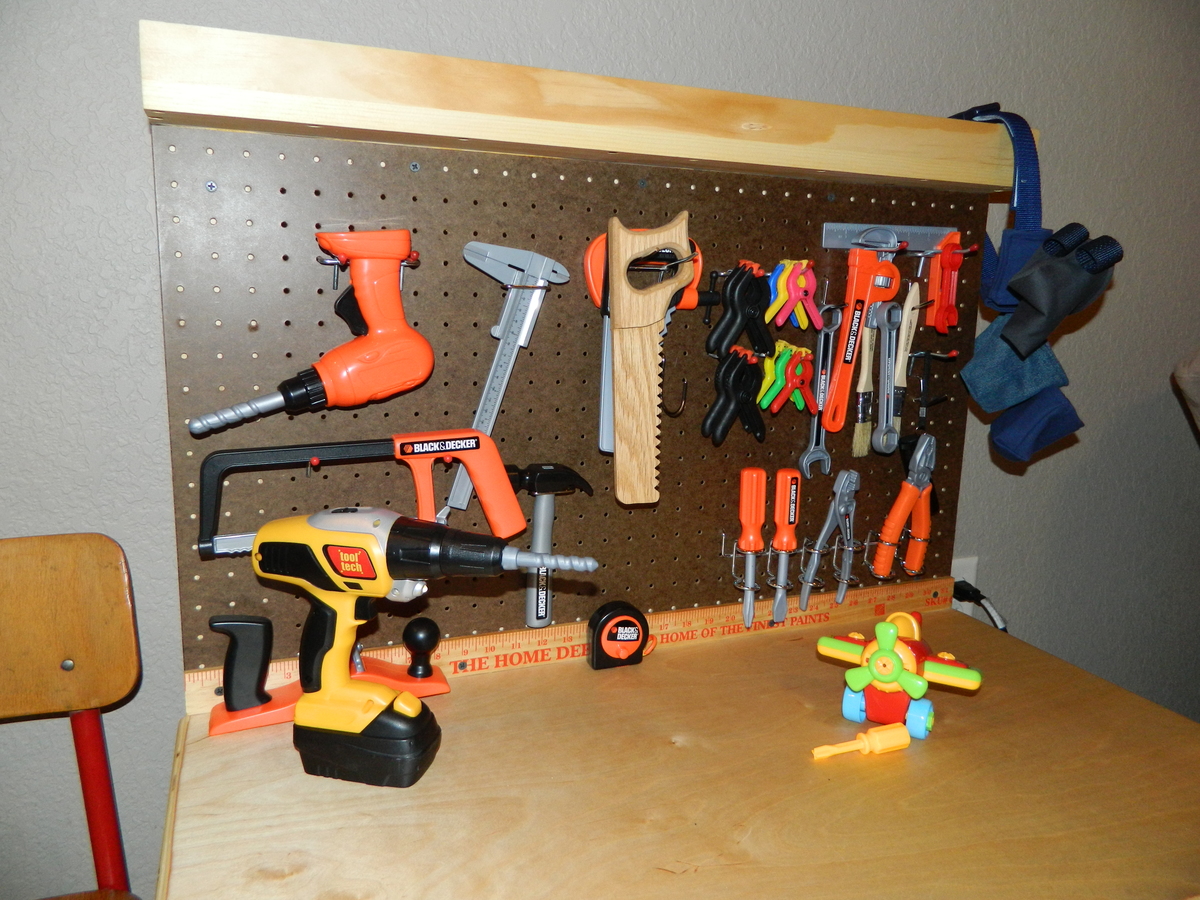
Community Brag Posts

Play Workbench

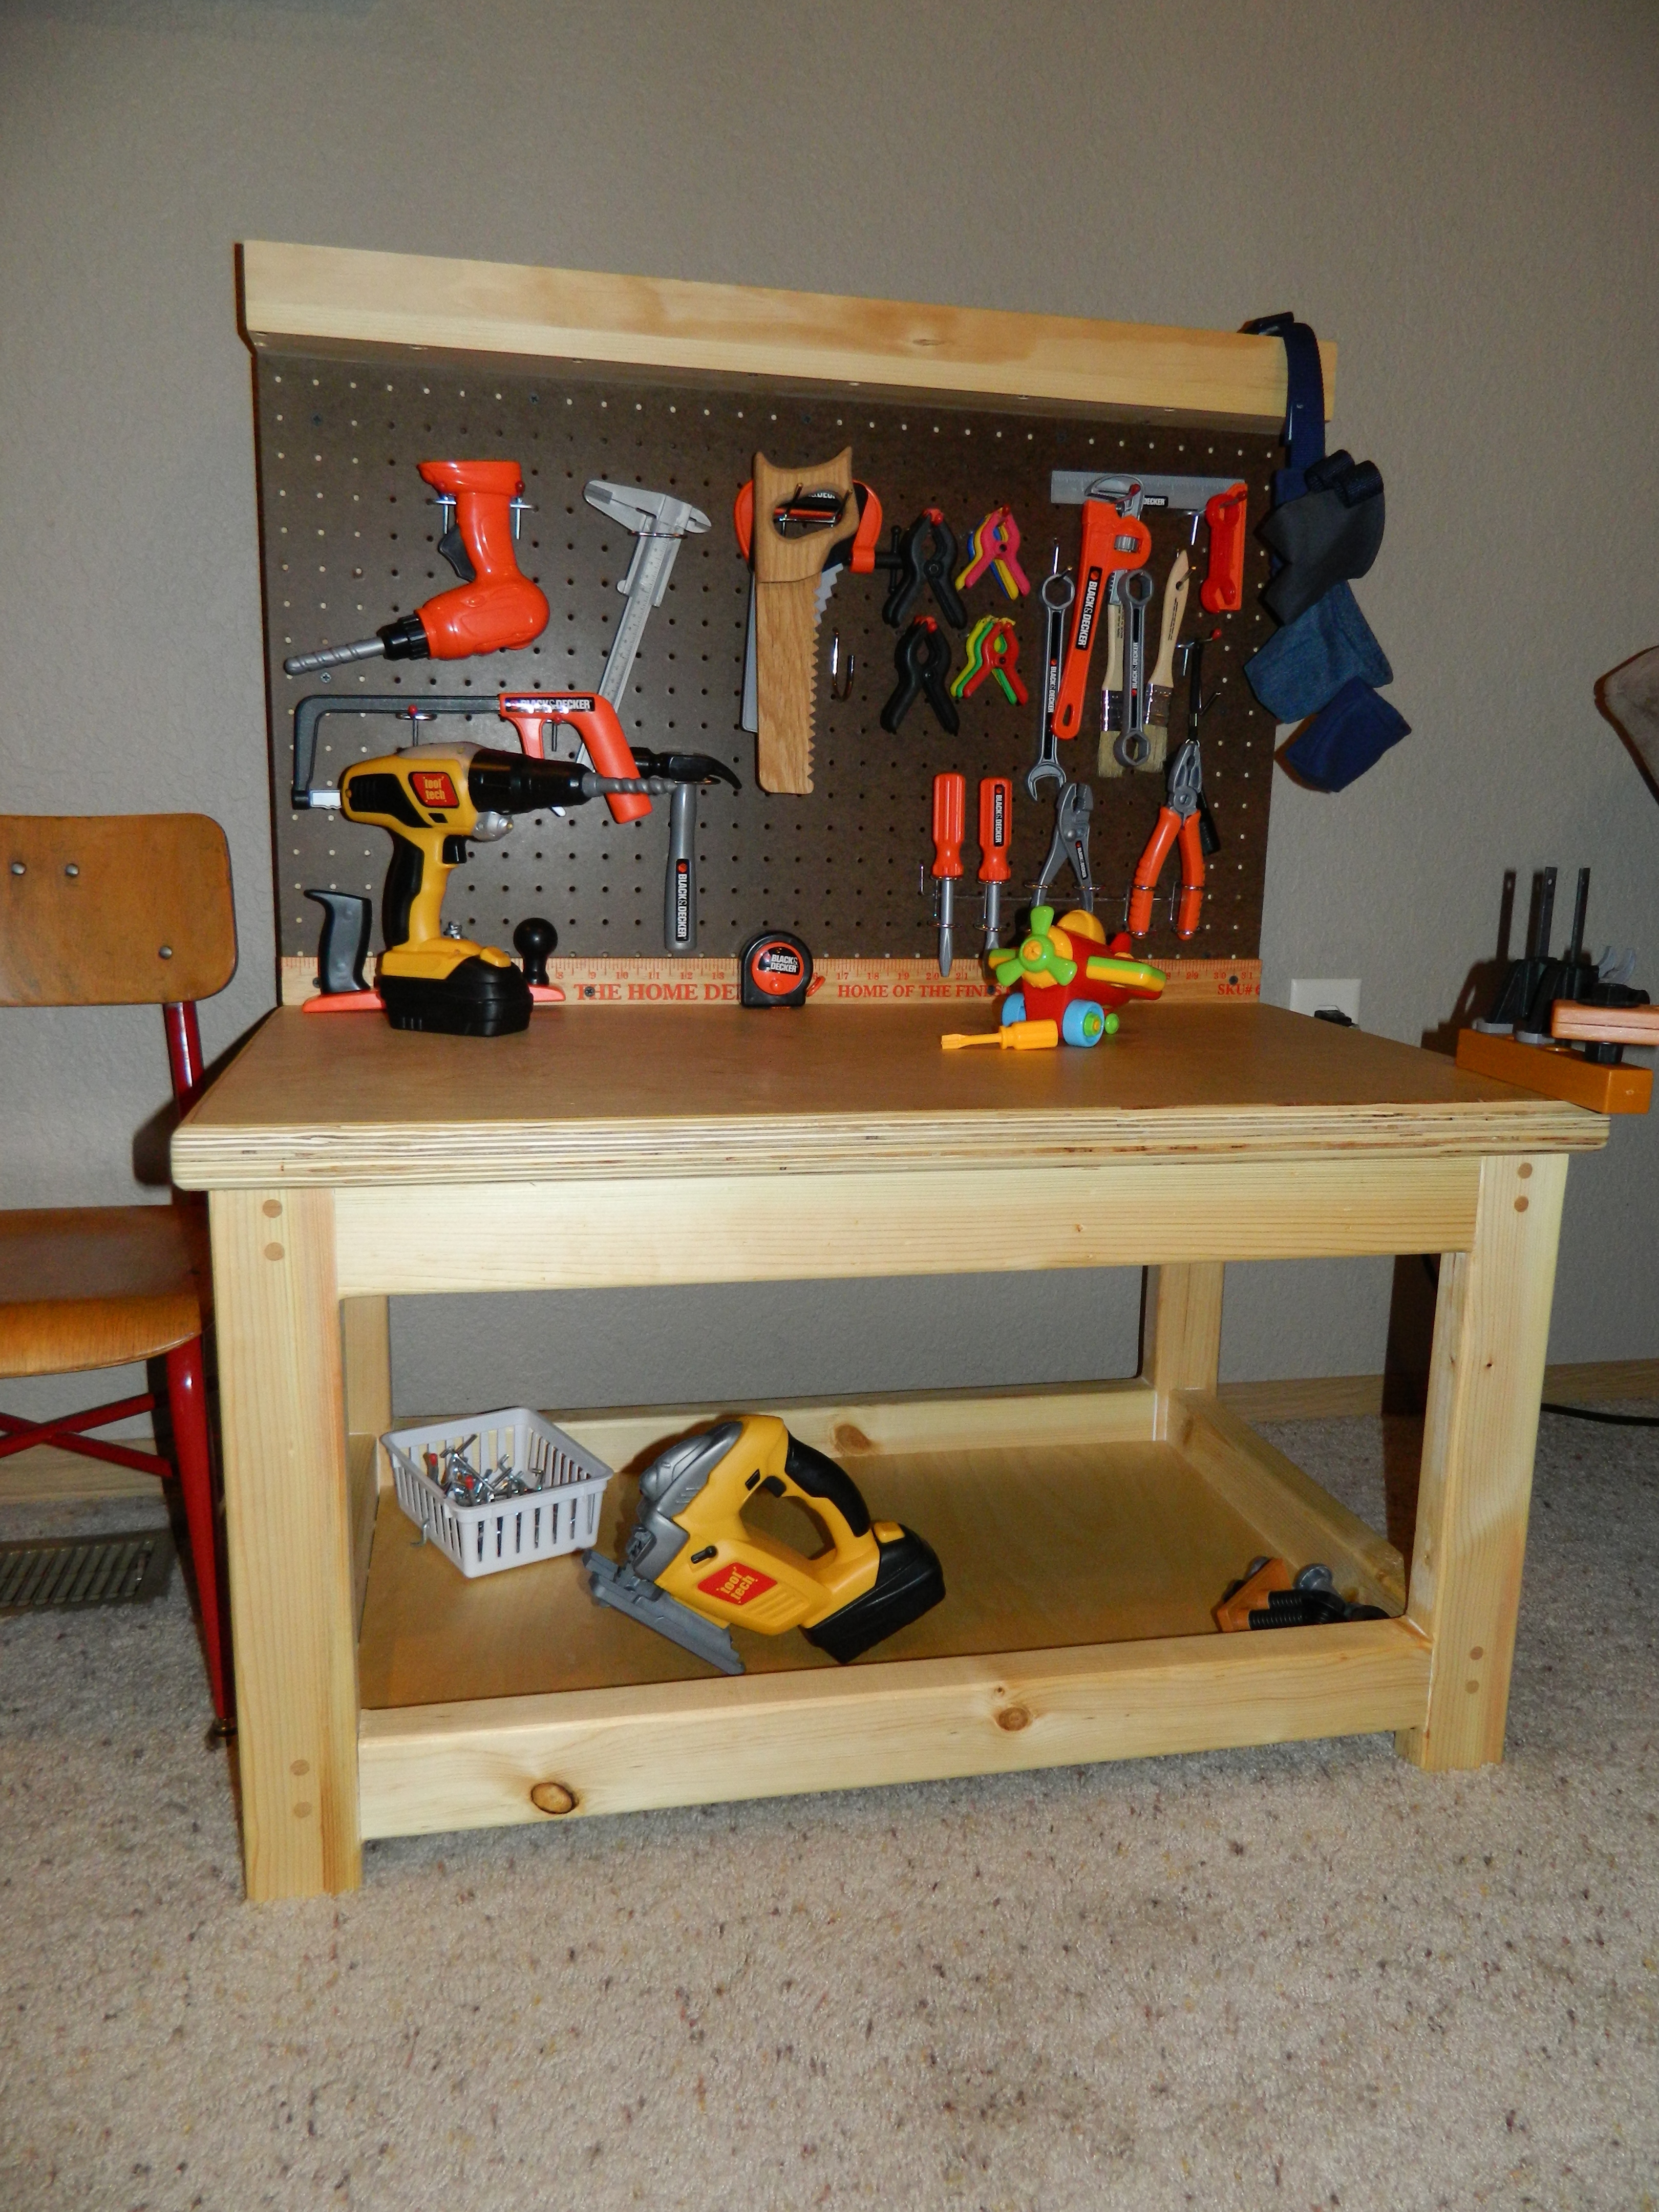
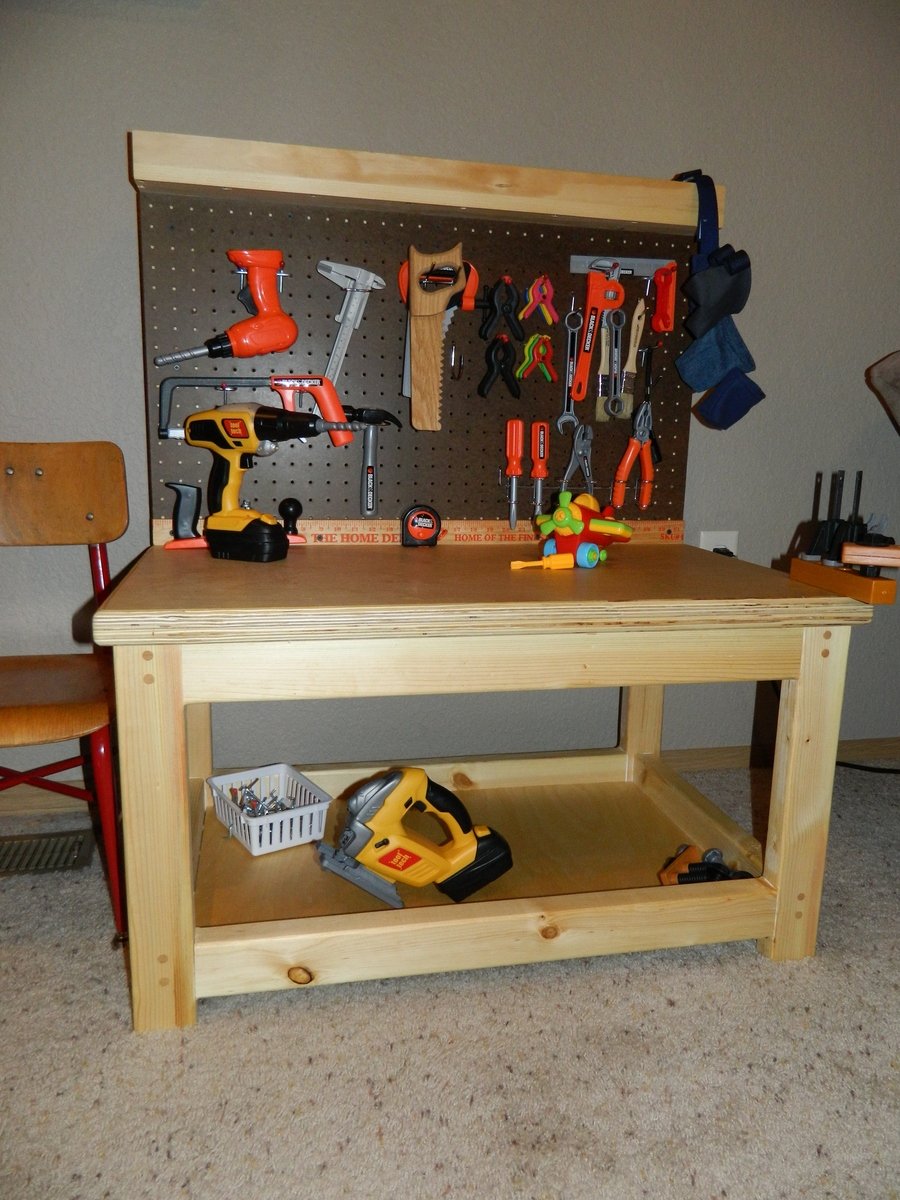
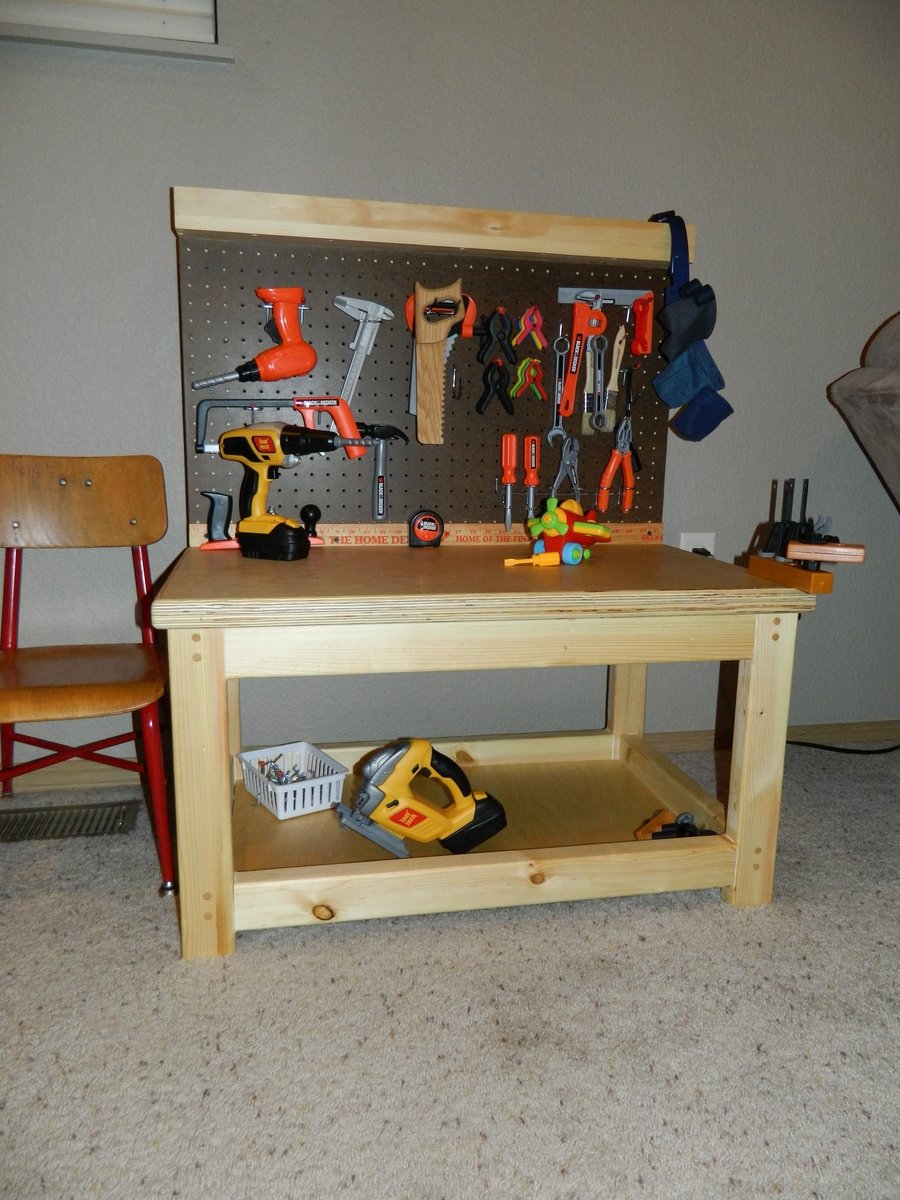
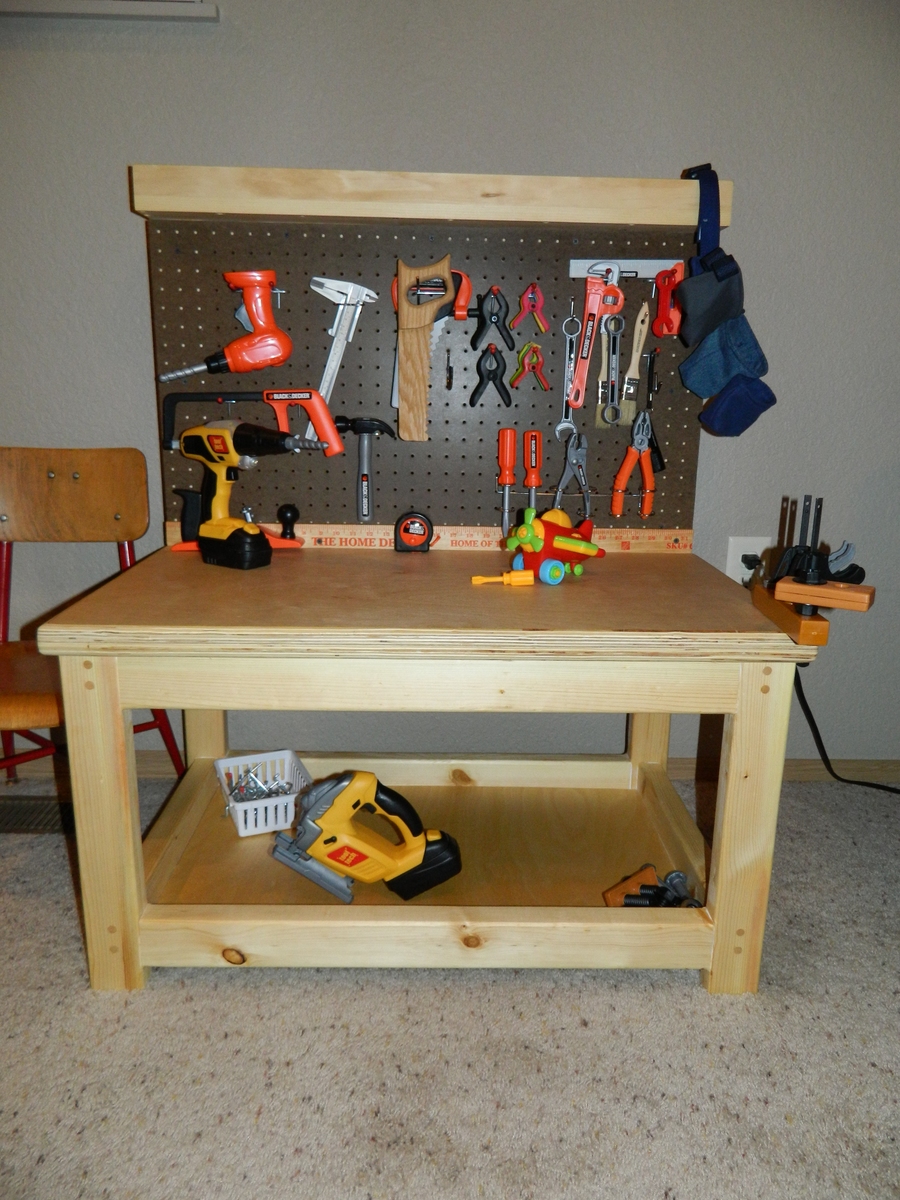
My son loves to be in the shop with me. For Christmas I thought he would really like his own workbench with some tools that he sees me use. He really gravitates toward the clamps and my drill. I lucked out and found a fun drill that he really enjoys... "just like Daddy's!" I hope it serves him well for years to come.

The frame is joined with glue and screws. The screw holes are filled with contrasting dowels and cut flush. The top is 2 pieces of 3/4" birch laminated together. I rounded over all the edges with 1/4" roundover bit in the laminate router. The top is attached with pocket screws.

Estimated Cost
Scrap wood and free pegboard
Estimated Time Investment
Weekend Project (10-20 Hours)
Finish Used
Danish oil
Recommended Skill Level
Beginner

Comments

Scott Kershaw

Wed, 01/02/2013 - 01:41

I put a 1/4" roundover on all the edges. I need to sneak it out to the garage to round over the top shelf but the kid hasn't stopped playing "wood shop. More power. Ogh, ogh, ogh!"

Pantry Door Storage - 78 inch tall version.

Submitted by Anonymous (not verified) on Sun, 01/22/2017 - 09:47

Pantry Door Storage

Thank you for your plans.  Love this!  I made a few errors and would make a few changes if I were to do it again...  I would make the dowels higher from the shelves (I think I made a mistake).  I would also try to place the dowels closer to the front of the unit to give deeper shelf space - bigger space containers would benefit from deeper storage.  But it's a great improvement over the commercial options.  Combined with motion sensor LED lights, the pantry is much improved!  Thanks again! 

Built from Plan(s)
Estimated Cost
60
Estimated Time Investment
Afternoon Project (3-6 Hours)
Recommended Skill Level
Beginner

Mudroom bench and storage rack/shelves

Thants for the inspiration We love it.

Comments

Christmas Gift-Chalkboard

This project was a Christmas gift for the niece and nephew. It turned out better than expected and was easy to do. I followed the plan, just made it shorter and narrow for a 3 and 6 year old to use. Mom and dad liked it a lot. I took off 8 inches from the height and width. Luckily someone else had the chalkboard paint leftover. That helped to keep the cost down. I had left over plywood from another project. I just bought the hinges and 1x2 and 1x3's. That's why the cost is fairly low for this project. Its worth saving those scrape pieces. Thanks Ana.

Estimated Cost
$30
Estimated Time Investment
Weekend Project (10-20 Hours)
Finish Used
Chalkboard paint, 2 layers of Red Oak stain, with 2 layers of polycrylic.
Recommended Skill Level
Beginner

Kitchen Shelving

Just finished this project...took a little longer than I expected...it was a low cost project...I had most of the stock...but probably would cost around $75 to make. Paint and stain were the most expensive items. This was a lot of fun to make...Now to make the matching table...LOL

Built from Plan(s)
Estimated Time Investment
Weekend Project (10-20 Hours)
Finish Used
Varathane Spring Oak Stain
Behr Paint....Crème White
Recommended Skill Level
Beginner

Square X Base Pedestal Gym Floor Table

I used the "square x bass pedestal" plans to complete this 4' card table. The top is made from reclaimed gym flooring from the local high school. The "x base pedestal" provides a nice sturdy base for the large table. The project was completed over several weekends when I had time to work on it. 

Estimated Time Investment
Week Long Project (20 Hours or More)
Finish Used
I painted the base and frame around the top with a black gloss paint. The top and base both have 3 coats of water based polyacryllic.
Recommended Skill Level
Intermediate

Wall mounted can organizer

Added a backing of thin plywood to prevent the cans marking up the walls. I knew how many types of canned goods I wanted this to fit and adjusted the width to meet our needs. Love how this is going to save space in the pantry and with just a glance I can see what we have on hand.
Thanks Ana for another great plan!

Built from Plan(s)
Estimated Cost
About $150.
Estimated Time Investment
Day Project (6-9 Hours)
Finish Used
Spray paint
Recommended Skill Level
Beginner

Comments

Farmhouse table and benches

Submitted by Magnus on Sat, 10/18/2014 - 18:08

The kitchen remodel left me with 400sqft of old-growth-pine laying around(60year old subfloor). While still pine, this was too good to throw away. So I decided to build a kitchen table and some benches.

Given these were old tounge and groove 2x6 I spent a lot of time with the planer, so hardly a weekend project. Further more I decided to use biscuit joints. The table probably took me like 5-6 weekends and the benches another 4...

My kids already managed to put some dents in the table, but that just makes it look more rustic.

Estimated Time Investment
Week Long Project (20 Hours or More)
Finish Used
I used Minwax for this project. Started of with a light coat of pre-stain, then stained it twice with 'Red Mahogony #225'. The kitchen table I spray-painted 4-5 coats with Semi-gloss Polyurethane and polished it off with some 'finish wax'. I did regret the semi-gloss on the table so the benches I just painted 3 coats of satin polyurethane...
Recommended Skill Level
Intermediate

fire pit bench

Submitted by Anonymous (not verified) on Thu, 01/26/2017 - 18:34

fire pit bench

Recommended Skill Level
Beginner

Rollaway Workbench

Submitted by Indiri on Sat, 10/17/2020 - 18:26

I have a one car garage for my "shop" which means I can be really short on space. This build is perfect for saving space!

I made a few adjustments for the bigger saws (it's deeper and the center part is wider). I also used screws more in places that it called for nails but I wanted to be sure nothing would budge and also I didn't put the shelf backing on the one part where the table saw is in so I have better access to the saw while it's in place. I tried to use leftover wood I had in the garage wherever possible but I still had to buy 2 sheets of 3/4" and 1 sheet of 1/4".

Since I used more screws I may pretty up the front later with trim, I don't know. TBD

Estimated Cost
$150 because I used a lot of leftover wood
Estimated Time Investment
Weekend Project (10-20 Hours)
Finish Used
None
Recommended Skill Level
Beginner

Comments

Cabin Bunk for my 5yo son

Submitted by SDPerkins on Wed, 01/02/2013 - 12:27

My first Ana-White plan project. We are pleased with the plans and result. only made a few minor changes.

Estimated Cost
375
Estimated Time Investment
Week Long Project (20 Hours or More)
Finish Used
Kona stain/sealer
Recommended Skill Level
Intermediate

Comments

Labine37

Tue, 03/31/2015 - 09:01

I'm making the top bunk right now, I was wondering which plan you used for the ladder?

Thanks

My $55 Live Edge Desk

Submitted by jrbamberg on Tue, 10/21/2014 - 11:22

Built using the plan except for removing the back angle supports and creating a top that resembles a live edge look.  Most of the build is done with pocket hole screws, glue and nails. 

Built from Plan(s)
Estimated Cost
I had most of the wood except for the 1x12's which cost around $15. Screws and nails were all under $10. Took a long time to put together but most of that time was spent on the edging rather than the actual building. Sanding took a long time as well.
Estimated Time Investment
Week Long Project (20 Hours or More)
Finish Used
I used a quick dry (1 hr) oil stain and then a quick dry water-based poly.
Recommended Skill Level
Beginner

Comments

JoanneS

Tue, 10/21/2014 - 18:02

What a great build!  That live edge effect on your desktop is super cool!  (looks very real)  I'd love to know how you achieved that look, it's stunning!

jrbamberg

Wed, 10/22/2014 - 06:25

Joanne,

Thank you!  Grab a belt sander and go at it.  I tried using a grinder and that probably would work too, but mine doesn't work very well.  I also found that it burnt the wood.  Since the wood is soft, I used a belt sander to cut through the wood.  Dug in the edge of the sander to make deep gashes.  Its a lot of work but can be acheived with a great results.  Use a low number sandpaper to get rid most of the wood off (50 grit was good).  I practiced drawing out an idea on a spare block of wood off the same board and tried it out.  When the sample went well I got ready for the big board.  Once completed the initial slicing and dicing, I changed grit levels, 80, 120.  Lastly, with my orbital sander I used 120 again and then finished with 220 to get it all nice and smooth.  Hope that helps.  Then just stain and poly.  I hand sanded between layers of stain and poly with 220.  Lots of work sanding.  But it turned out smooth and flat. 

20 Second Tidy Up Table

Submitted by adamderkey on Mon, 01/30/2017 - 07:03

We needed a way to store our 6 month old's toys in our main living area. We were previously keeping them in a pack and play and that wasn't going to cut it. We decided this plan would do the trick. It works even better than we anticipated. Built exactly the same as the plans with the same finish as well.

Estimated Time Investment
Weekend Project (10-20 Hours)
Finish Used
Same finish that Ana used.
Recommended Skill Level
Beginner

Christmas Tree Shelf

Submitted by Anonymous (not verified) on Wed, 10/21/2020 - 08:50

This is my first time using some of the power tools that this required, however, it came out SO CUTE! I put one together and someone bought it raw. I put one together as the video showed, and then did one out of old fence pickets that were cleaned up and planed by a neighbor. They both came out beautiful. We used knobs that we had in the shop and offset them a little to be whimsical.
Vasiliki

Built from Plan(s)
Estimated Cost
$8-12
Estimated Time Investment
An Hour or Two (0-2 Hours)
Finish Used
Entry way to home, by the front door.
Recommended Skill Level
Intermediate

Comments

4-Foot Crown and Hooks Wall Shelf

The decorative 4-foot crown and hooks wall shelf makes a beautiful place to display photos and other decorations and also provides a practice application to hang backpacks, coats, hats and even Christmas stockings. It is fairly simply to build with basic tools such as a table saw and a miter saw.

The project costs about $57 to make with about half of the cost in the hooks. The overall dimensions of the project are 48 inches wide by 12 inches tall. It takes about 2-3 hours to build.

Download the plans at my woodworking blog at:
http://www.jrlwoodworking.com/

Estimated Cost
$57
Estimated Time Investment
Afternoon Project (3-6 Hours)
Finish Used
We painted the wall shelf with a high-quality Rust-Oleum 32 oz. Painter's Touch (two coats) and then mounted Everbilt Decorative Coat and Hat Hook from Home Depot. We chose a semi-gloss paint to give it some sheen. Depending on the color, we used the Everbilt Oil-Rubbed Bronze hooks for white shelves and the Everbilt Antique hooks for dark shelves.
Recommended Skill Level
Intermediate

Comments

kristenlotz

Fri, 01/04/2013 - 12:30

We actually have this shelf in a bright white color in our foyer to hang coats for visitors. We also put our Christmas stockings on it (one hook for each member of the family).

60 year old Barnwood Table

The wood came from a 60-70 year old barn that was torn down out on a friends property. The wood was fee and materials cost around $175. Took a couple weekends to build. 

Estimated Cost
$175
Estimated Time Investment
Weekend Project (10-20 Hours)
Finish Used
Polyurethane
Recommended Skill Level
Intermediate

Comments

Gmiller1966

Fri, 10/24/2014 - 19:56

My wife wanted a large table to entertain. She mostly wanted to be able to decorate the center and not have to move it during dinner. The table measures 10' x 4'8" and is 29" high.

My version of Crate and Barrel Atwood queen bed

Submitted by Chriss45 on Thu, 02/02/2017 - 00:51

My daughter loved Crate and Barrel Atwood bed so I built her this bed that is very similar. 

Estimated Cost
300 dollars
Estimated Time Investment
Weekend Project (10-20 Hours)
Finish Used
Walnut stain and watered down chalk paint
Recommended Skill Level
Intermediate

Comments

Corner Cupboard Hutch

Submitted by necdice on Tue, 10/27/2020 - 08:53

Thanks to Ana for the custom corner cupboard hutch plans! This project turned out great using Red Oak boards and an ebony stain. My customer loved it!!

Built from Plan(s)
Estimated Cost
100
Estimated Time Investment
Weekend Project (10-20 Hours)
Finish Used
Minwax Ebony with a couple coats of poly
Recommended Skill Level
Intermediate

Comments

Thankful FAUX the Fireplace!!

This Christmas I was determined to have a fireplace for the stockings to hang from! I played with the design a little to add depth and height.... and tiled a little.

Loved the results for only my second project from here!! Not perfect, but mine!lol Thanks for sharing Ana!!

~Dina

Estimated Cost
140
Estimated Time Investment
Weekend Project (10-20 Hours)
Finish Used
American walnut stain
Recommended Skill Level
Beginner

Comments