Community Brag Posts

Adirondack chairs with funny back legs

Submitted by Anonymous (not verified) on Wed, 02/06/2019 - 07:45

The project was easy and fun. The plans are perfect, provided you follow instructions. I assembled the back legs backwards and that complicated the instalation of the back rest. I liked the result in the end.

Estimated Cost
~ $100 for the pair.
Estimated Time Investment
Weekend Project (10-20 Hours)
Finish Used
Exterior Behr Marquee Matte
Recommended Skill Level
Starter Project

Bigger, Stronger, Kitchen Floating Shelves

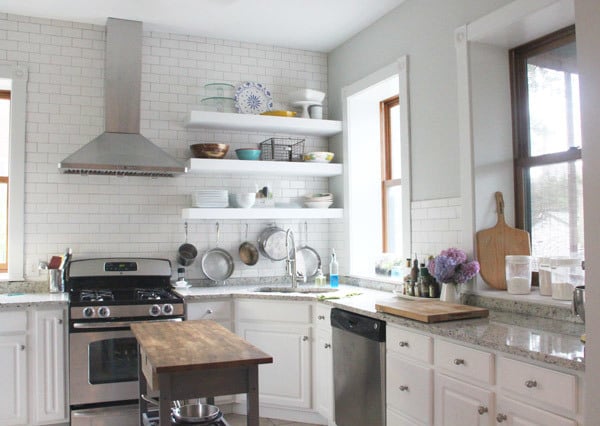
When we recently bought our 150+ year old house, we were pretty happy with just about everything (not stopping us from coming up with projects!) except the kitchen. This kitchen hadn't been updated in about 15 years, had dark brown walls, boring square white tiles with white grout, and TONS of cabinets. Everywhere. I felt like the walls were closing in!

So before we ever signed a piece of paper I had a vision of open shelving. Wide, white floating shelves to put our every day items at arms reach and display the few items we rarely use but think are beautiful.

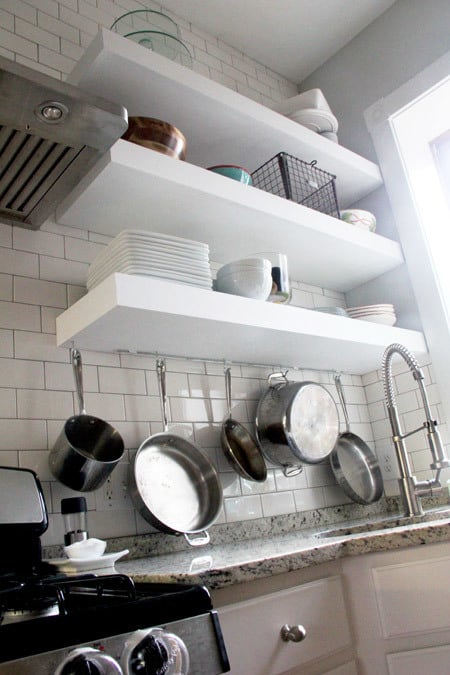
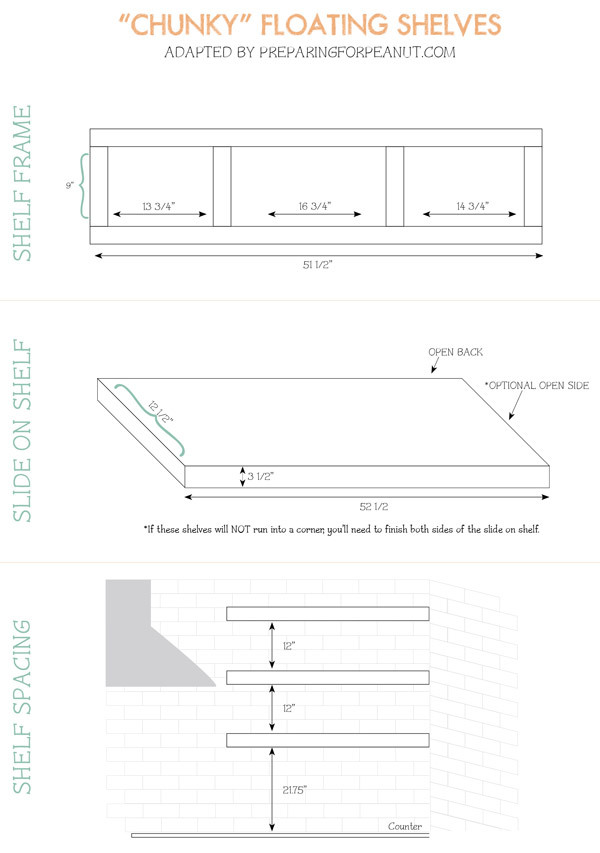
I loved Ana's plans, but I needed these shelves to hold 12 dinner plates, 12 bowls, 12 salad plates, 4 pasta bowls, and...well, right there that about 40 pounds of stuff. And the basic plans just didn't seem heavy-duty enough.

Enter our contractor, John, who I asked for help because, while they were my vision, they were his handy-work. My husband and I didn’t even attempt to build them on our own. John is a perfectionist and we knew he’d make this plan work…perfectly.

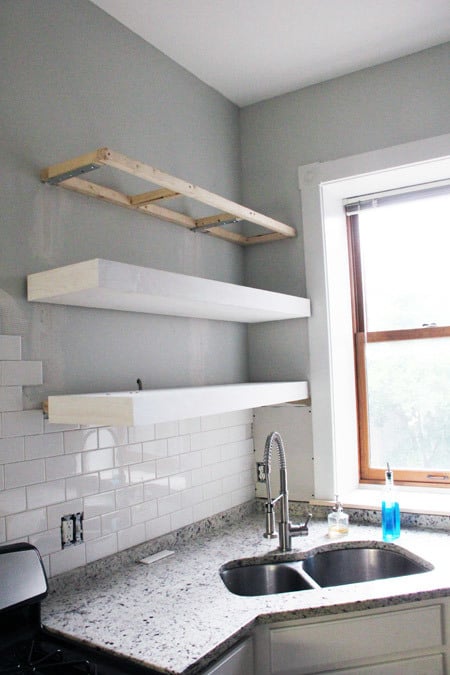
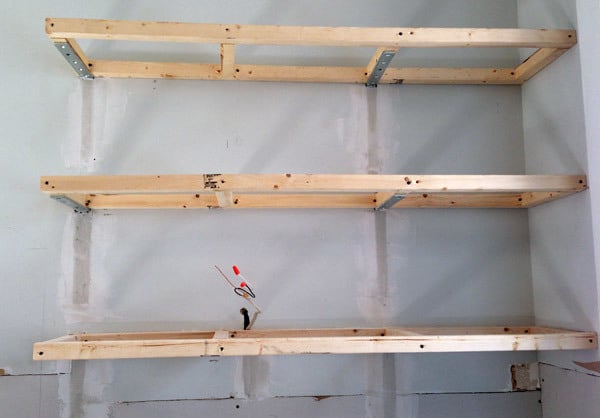
As usual, this was no sweat for John. To build the frames he used 2 x 2′s and secured them with 10 x 1 1/4″ angle brackets. During assembly, John made sure to position the center supports to match the wall studs in front of which the frame would hang. Once assembled, he removed some dry wall and attached the brackets directly to the studs.

We could store baby elephants on these shelfs, they wouldn’t budge.

Since I knew what needed to be stored on that first shelf (our every day items), we used the measurements to equally distance the three shelves (not including the first shelf of course—it needed more space above the counter top). Then we sealed up the dry wall. Another help with support was butting the shelves right up to the corner, putting another screw in another stud.

We moved the lighting electric up for new under cabinet lighting—so easy pre-tiling.

For the actual shelves—I like to think of them as “sleeves”—John used 3/4″ sanded plywood for the tops and bottoms of each shelf, then 1 x 6 clear pine ripped down to desired thickness for the fronts and one side (the other side is against the wall, so was left open). The primed sleeves spent a few days on the screened in porch while I tiled around the frames, they were pretty heavy and very solid.

I’ve made an attempt to lay out the measurements involving our floating shelf project. These are to scale and give a good idea of how our plans differed from Ana’s.

We LOVE our shelves and get so so many compliments. The seemingly small and simple changes (tile, shelves, new window trim, paint, and soon flooring) made a HUGE impact and not that huge of a cost. And we don't miss the upper cabinets at all.

Thanks for the head-start and inspiration Ana!

Built from Plan(s)
Estimated Time Investment
Weekend Project (10-20 Hours)
Finish Used
Primer and white paint
Recommended Skill Level
Advanced

Comments

claydowling

Mon, 10/21/2013 - 08:41

I'm not sure where to get big angle brackets like that, but you might want to try a local lumberyard instead of a home center. Even when they don't have a product they often know who does. The angle brackets embedded in the drywall is a clever idea I never thought of using.

Melissa015

Tue, 11/25/2014 - 20:08

What city was this work done in?  I live in Seattle and I am looking for a contractor.

Kitchen nook

Submitted by Anonymous (not verified) on Sun, 03/10/2019 - 07:26

I have just finished this project one thing I recommend is the pneumatic lifts for the lids they are 10 dollars a piece and make a huge difference 

Estimated Cost
300-400
Estimated Time Investment
Weekend Project (10-20 Hours)
Finish Used
Strap hinges and pneumatic lifts
Recommended Skill Level
Intermediate

Moses Basket Stand

Submitted by Tbacks on Sun, 07/07/2019 - 19:34

Thank you Anna!!  We have friends who are adopting and they were given a beautiful mosses basket.  Your pattern allowed me to make this gift for them.  

The rockers were a bit complicated but I pulled it off.  

Built from Plan(s)
Estimated Cost
$85
Estimated Time Investment
Day Project (6-9 Hours)
Finish Used
Natural with semigloss clear coat.
Recommended Skill Level
Intermediate

Comments

Scrap Wood Barstools

Submitted by BERobinson on Tue, 02/09/2016 - 07:33

Wife wanted me to throw out all the scrap wood I had lying around. Instead I made some killer barstools. Fun look.

Estimated Cost
FREE SCRAPS
Estimated Time Investment
Afternoon Project (3-6 Hours)
Finish Used
Ebony stain on the chair border and legs, various paint colors from previous projects on other pieces
Recommended Skill Level
Beginner

Comments

Upmarket hardwood Adirondack

Submitted by Anonymous (not verified) on Tue, 05/16/2023 - 11:33

Loved design so decided on hardwood and no visible screw heads….. took a while but loved the result

Comments

Seasonal And Holiday

Cost less than $5

Nothing was bought for this table. I allocated $5 as cost for the screws and sandpaper. 2 x 6 legs & 2 x 4 rails used wood recycled from material removed during alterations to our 1930's barn. Supports were extracted from the woodpile. Nails were removed where possible, or cut off and punched below the surface where they were not removable. Because the wood was very old and splintery an enormous amount of time was spent sanding.


The top is an Ikea counter thrown out from a kitchen remodel and rescued from the roadside, still in its cardboard box. Score!


I am very pleased with the design and plan to make another using better lumber. The table is very sturdy and will be used as a sewing/crafts table.

Built from Plan(s)
Estimated Cost
Less than $5
Estimated Time Investment
Afternoon Project (3-6 Hours)
Finish Used
The paint is Glidden Rusty Red latex leftover from a friend's barn and so old it had separated beyond remixing. What was left acted like a cross between a glaze and chalk paint. It had to be rubbed down with rags after each coat to remove specks of pigment and loose powdery color. Four coats each applied 24 hours apart and coverage was as good as it was ever going to get. Final coat was Minwax wax.

To duplicate it:
1. Randomly paint white or light paint. Let dry. Sand.
2. Dilute 1 cup of red paint with one cup of water and rub it in/wipe it off immediately. You shouldn't need more than one coat if you want the white to show through depending on how much "old paint' you want to show.
Recommended Skill Level
Beginner

DIY Loft Bed

We adjusted the plans slightly to better fit our room. Rather than an angled set of stairs leading to the platform, we replaced it with a short vertical ladder. We also increased the height of the bed to allow for another bunk in the lower section for when Callaghan outgrows his crib. Plus, we added handles to the bed which made it easier for Luke to get up and down.

Estimated Cost
75
Estimated Time Investment
Afternoon Project (3-6 Hours)
Recommended Skill Level
Beginner

Comments

Happy Entertainment Center

Submitted by tzachary on Fri, 12/13/2013 - 14:27

I really wanted a new entertainment center but could not find one in the stores that I liked and looked to be made of good quality. I liked the Apothecary Console but needed to make a few adjustments to the plan, which is why I marked my project at an intermediate level.

I built this about a year ago and love it as much today as I did the day I finished it. I have had a ton of compliments on it and many are impressed when I tell them I made it myself.

Built from Plan(s)
Estimated Time Investment
Week Long Project (20 Hours or More)
Finish Used
I painted with a Satin Sheen Behr Pure white paint then wiped on and then off a dark walnut stain.
Recommended Skill Level
Intermediate

Coen's Cabin Bed

Submitted by Anonymous (not verified) on Mon, 02/29/2016 - 15:28

This is a fairly easy build. It did take some time with three little ones running around, but the finished product is well worth it! My three-year-old doesn't want to get out of bed in the morning (win!).

Built from Plan(s)
Estimated Cost
$250-$300
Estimated Time Investment
Week Long Project (20 Hours or More)
Finish Used
Minwax weathered oak stain
Recommended Skill Level
Intermediate

Comments

Ana White Admin

Tue, 03/01/2016 - 12:19

You did an amazing job on this, I wouldn't want to get out of bed either! Thanks for sharing:)

Farmhouse Table

Submitted by sbowes1 on Sun, 02/26/2012 - 23:05

This was our first woodworking project. I was not that hard to put together.

I made a couple of changes to the design. I used 4x4 for the legs. I also change up the board that were used ontop. I have a step by step on my blog.

The almost the same as the table. Check out the changes and the cut list here: http://www.domesticated-engineer.com/1/post/2012/05/bench-for-farmhouse…

Built from Plan(s)
Estimated Cost
$200
Estimated Time Investment
Week Long Project (20 Hours or More)
Finish Used
#41 Walnut Wood Stain
Satinthane Polyurethane
Recommended Skill Level
Beginner

Comments

Guest (not verified)

Tue, 02/28/2012 - 05:13

Can you post a link to your blog with the instructions? Did you make your table a little shorter than the original plans?

Ultimate loft bed

Extremely easy with Ana's plans. Under $100. 

Estimated Cost
100.00
Estimated Time Investment
Weekend Project (10-20 Hours)
Finish Used
Redwood stain
Recommended Skill Level
Beginner

Comments

Storage Coffee Table with Lift Top

Submitted by Anonymous (not verified) on Tue, 08/01/2023 - 15:04

I wanted my top to be a lift top, so I used 1x3's adding breadboard ends. I ordered the lifts from Amazon. I applied a single coat of stain and then sanded it down to give it a more rustic look before applying a satin poly coat.

A. Henry

Comments

Tall Loft

Submitted by Anonymous (not verified) on Sun, 08/06/2023 - 13:55

We just finished building this room and decided to finish it off with Ana's loft bed. It's mounted at height of 6 feet in order to accommodate our 18 year old.

Renae Gilford


Hanging Bed

Submitted by cecimoreno on Sun, 04/01/2012 - 08:05

Hanging bed for my daughter built from the "Easiest Hanging Daybed Plans". Super easy to do and looks and feels great!

Built from Plan(s)
Estimated Cost
$60
Estimated Time Investment
Weekend Project (10-20 Hours)
Finish Used
Benjamin Moore Latex Paint in Early Dawn and topped with Minwax Paste Finishing Wax
Recommended Skill Level
Beginner

Comments

cecimoreno

Sun, 04/01/2012 - 12:26

Thanks! We just hung it up last night, so I can't say for sure yet- but putting her to bed last night was a breeze (at least compared to most nights :))

Birdie (not verified)

Sat, 08/18/2012 - 17:56

Love this bed! You did a great job! Quick question, did you screw this to the wall, or just leave it swinging free? I'm curious if it bangs agains the wall when your daughter gets in.

Thanks!

Pallet Reclaim Swing

I work for a large manufacturing company that frequently has 'desirable trash'. Found 3 beautiful, heavy-duty pallets with beautiful wood on them. Took them home, took them apart, and got to work. The wife had been wanting a swing out near our children's playset so she could sit and watch them. Used Kreg pocket holes for everything that I could so as to hide as much hardware as possible.

*Side note regarding why I did the rope the way I did - the original post had mentions of it being a bit tipsy (particularly with little ones!). With this design, there's no flip front or back and the rope only gets tighter the more weight that is applied.

Built from Plan(s)
Estimated Cost
Almost free, only had to pay ~$30 for the rope.
Estimated Time Investment
Afternoon Project (3-6 Hours)
Finish Used
Olympic Cedar Naturaltone Stain, foam brushed on and wiped off with rags.
Recommended Skill Level
Starter Project
Back