Community Brag Posts

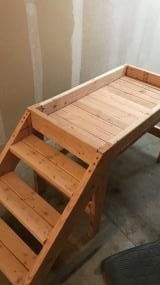
Easy, cheap garage shelving

Submitted by Anonymous (not verified) on Thu, 03/23/2017 - 20:12

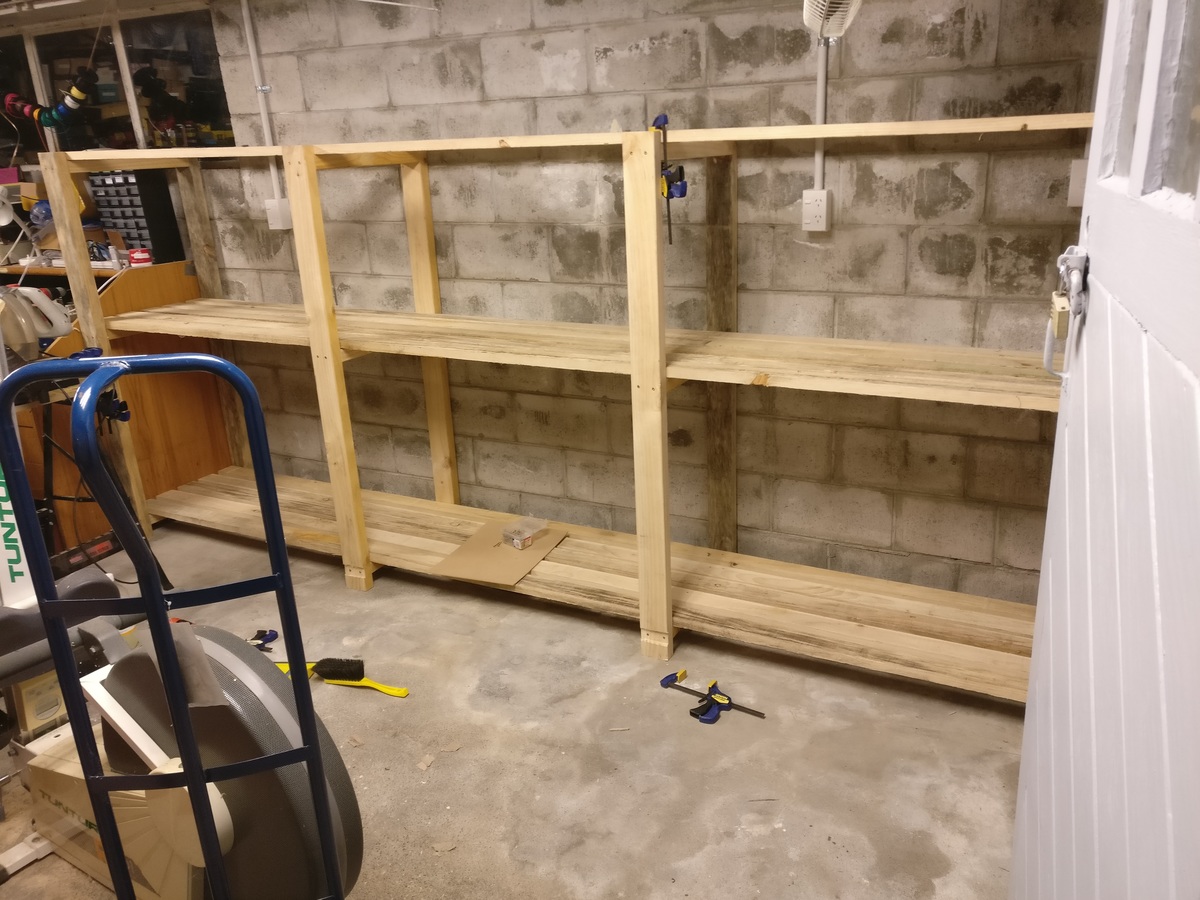
I used 1x3 box pine instead of 2x4's for the bits that things sit on, and everything fits perfectly.

Originally I was planning on a 3.6m long x 0.6m deep X 1.8m high shelf.  At the lumberyard I found out that 2x4's came in 6m lengths as standard, so I adjusted this to 1.5m high instead, which worked out fine as I think 1.8m would have been a bit tall to get heavy things on top of.  Luckily for me my power points and light switches were just under this, which I didn't think about at the time!

Originally I was going to try and cut grooves for the 'rungs' of the ladder frames to slot into, hence the insets at the bottoms of the legs.  I think that the glue-and-screw construction will be plenty strong enough, though.

This took me about 4 hours to put together, and cost about NZD$170 all up, which is about USD$120.

I've got the bug.  Making things is awesome.

Estimated Cost
USD$120
Estimated Time Investment
Afternoon Project (3-6 Hours)
Recommended Skill Level
Beginner

Fancy Jewelry Box

Submitted by mmihelcic on Thu, 12/25/2014 - 21:18

My first real wood project with no help from my father. I wanted to make this for my mother for christmas and I got it done 2 hours before church. I recently purchased a kreg jig r 3 and put it to good use. I made a few changes to the plan that helped me achieve the look that I desired. First, through trial and error I adjusted the kreg jig to be able to drill pocket holes to secure the shelves without the need to go back and wood putty the scrww heads that normal would have been exposed on the outer walls. There is a picture of this set up that I uploaded. Also, when byielding the drawers I made two changes. From what I could tell, the plans called for 1/4 inch plywood for the bottoms of the shelves and that is the way I made them at the beginning. However I was not happy with the appearance of the plywood on the nice face boards I was using for the drawers. So I decided to rip down the two side pieces and the back piece of the drawers ( should be 1 - 5 1/2 inch back piece and 2 - 5 3/4 inch pieces ) but I left the face Plate the full inch and a half that way the plywood wous not show from the front. The last change I made on the drawers was I made 2 pocket holes on each side piece to attach the face to the drawers that way the nail holes would not be showing from the front view. While these steps might not have be necessary , it worked for me. Thank
you very much for the plan my mom cried when she opened the box for the first time.

Built from Plan(s)
Finish Used
Minwax early American
Recommended Skill Level
Intermediate

Comments

JoanneS

Fri, 12/26/2014 - 16:25

Great job! What a lovely gift for your Mom! It turned out beautiful!

Patio sectional

Submitted by Anonymous (not verified) on Mon, 03/27/2017 - 12:22

This was exactly what I was looking for! I was able to make a sectional that fit our 4-season patio perfectly, and saved thousands of $$ in the process. 


Cushion details

Fullerton Outdoor Deep Seating Cushion Set - Threshold - http://www.target.com/p/fullerton-outdoor-deep-seating-cushion-set-threshold/-/A-52019240

Watch for sales on patio furniture, we were able to save 35% on the cushions (30% off sale + 5% Target REDCard discount)


Estimated Cost(s):

  • Lumber = $200
  • Cushions = $500
  • Screws, stain, miscellaneous supplies = $100
  • Total = $800

Finish Used:

  • Minwax Pre-Stain Wood Conditioner
  • Minwax English Chestnut Oil-Based Stain
  • Minway Fast Drying Polyurethane
Estimated Time Investment
Week Long Project (20 Hours or More)
Recommended Skill Level
Beginner

Flip down kids table

Submitted by EDanido on Thu, 03/21/2013 - 04:22

I saw this plan a couple of months ago, and knew right away that this is what we need for our kids - their old table was always filled with papers, crayons and they never had enough space to store whatever they did.

I made the table longer so that it would be enough for both of them, and added foldable legs to support the table top.
Since I didn't find the right hinges for the legs, I used a piece of 1x1 with wood dowels which are attached to the inner side of the legs when unfolded.

Built from Plan(s)
Estimated Cost
$ 40 - but I had to buy the wood for the table top twice...
Estimated Time Investment
Weekend Project (10-20 Hours)
Finish Used
Walnut stain
Recommended Skill Level
Beginner

Comments

sawdust

Fri, 03/22/2013 - 16:08

Well, I now know what I'm doing tomorrow! I'm going to make a small hinged one to go in our entryway because we have nowhere to put stuff while we're getting our shoes on. Yours looks great!

Adirondack Love!

This was my second build ever, and I'm so extremely satisfied with the entire process! Ana's plan was super easy to follow, and I couldn't be more proud of how they turned out!

Recommended Skill Level
Beginner

Comments

Doggy loft bed!

Submitted by Anonymous (not verified) on Sat, 06/03/2017 - 17:31

My dog loves to people watch all day while I'm at work and she needed a new bed so I took the plans for the lower platform and modified them so it would stand alone. Took the platform and put it on the bottom so that her bed would sit inside instead of on top where she could more easily fall off.

I tried building without PH screws at first and all I ended up with was a lot of cracked and wasted lumber. Got the PH jig and finished the whole build myself in 2 hours. Sanding, staining, and sealing tomorrow but I'm just so excited about it I had to post now!

Estimated Cost
With the two sets of lumber, having to buy the jig, hardware, stain, and electric sander it cost me about $130
Estimated Time Investment
Afternoon Project (3-6 Hours)
Recommended Skill Level
Beginner

Comments

Reclaimed Wood Farm Table

I built this table for a friend a few weekends ago. The reclaimed top turned out amazing!

Built from Plan(s)
Estimated Cost
$60
Estimated Time Investment
Afternoon Project (3-6 Hours)
Finish Used
Polyurethane Satin
Recommended Skill Level
Beginner

Comments

Console Sofa Table

Submitted by naomi on Fri, 06/23/2017 - 06:51

Made from the modified Ana White Rustic X-Console Table.

I made this console table to fit the length of my sons couch. It's about 6 foot long.

It was really easy to make. My only tip is to sand all your timber before assembling. Getting into the tight spots with a sander is quite difficult. I hae now made 4 of these tables and sanding first saves so much time and headaches. The other 3 I have made were painted white and had stained tops. 

Estimated Cost
About $50
Estimated Time Investment
Afternoon Project (3-6 Hours)
Finish Used
Walnut Stain
Recommended Skill Level
Beginner

Comments

kgoss5

Tue, 06/18/2019 - 08:46

Any way you could share your material list/plans ? Thanks 

Airondeck Chairs and Bar

Submitted by Anonymous (not verified) on Mon, 10/04/2021 - 16:24

Lockdown here in Sydney has been going for over 100 days now, so in-between home school and quietly going insane, I thought I would make something for the house in the hopes that at some point we may be able to have people back in our home and enjoy entertaining again. The Deck chairs are to replace some horrible plastic ones we had on our balcony. Now my wife and I can enjoy a glass of wine while looking out over our bay in style! The bar was made from leftover timber I had and the deck chairs are made from 2x4 Treated pine (bits painted white) and NSW Spotted gum - which is a hardwood. The bar is also made from 2x4 treated pine and Merbau ( another hardwood) . I have put a few bronze hooks on the front to hold tea towels etc when entertaining. They are both fantastic additions and we love them. Thank you for saving my Sanity Anna!

Comments

Full Storage (Captains) Bed

This was a pretty quick build and works perfectly in my son's room.  I love all the room for the cubbies!  All of his cars and tracks stay off the ground!

The only tricky part for me was attaching the first edges and keeping it straight.  Since I was doing this all by myself, I used my nail gun to attach them quickly and then drilled in screws to secure them.

I kept them in three separate parts so it was easier to take upstairs and then I used my nail gun to attach the slats in the middle.  Pretty easy and inexpensive for a nice wood full size bed frame!

Check out my blog post for more pictures of my build!  http://www.leapoffaithcrafting.com/diy-full-bed-frame-storage/

Built from Plan(s)
Estimated Cost
$110
Estimated Time Investment
Afternoon Project (3-6 Hours)
Finish Used
I filled all holes with wood filler. Sanded with 120 grit and then 220 grit sandpaper. Applied Varathane Colonial Maple with brush, let soak a few minutes, and then wiped off with towel.
Recommended Skill Level
Beginner

Toddler Farmhouse Bed With Canopy

Submitted by christy on Sat, 03/12/2011 - 19:18

When I saw the farmhouse toddler bed plans on Ana’s site, I knew I had to build it for my daughter. I added siderails (modified from the bunk bed rail plans) and a canopy (modified from the adult size farmhouse bed canopy plans).

I can’t really give an estimate of how long this project took…I had to work on it while keeping my five year old and one year old entertained. If I’d had no distractions, it probably would have taken only 3 or 4 hours to build it (more for the painting).

Built from Plan(s)
Estimated Cost
$100
Estimated Time Investment
Afternoon Project (3-6 Hours)
Finish Used
Primed with Kilz then painted with leftover paint from an old project. The color is a dark charcoal gray.
Recommended Skill Level
Intermediate

How to Build Simple Raised Garden Beds

Starting with Ana's simple $10 raised garden plans, we built ours to be part of our experiment: Growing Vegetables in Our Driveway. Because our boxes are visible from the street, we made them a bit fancier and sturdier than we would have if they were hidden away in the backyard. An easy, afternoon project - with delicious results!

Estimated Time Investment
An Hour or Two (0-2 Hours)
Finish Used
none
Recommended Skill Level
Starter Project
Seasonal And Holiday

Seesaw

Submitted by KimmoPT on Wed, 06/12/2013 - 02:38

Greetings from Finland. I made teeter-totter from excellent plans Ana has donatet for all of us. I used treated wood, so I didn't need to paint the project (and never will :-) Handles and seats are made from raw wood. Gives also nice twin color look. To add some extra support I embed the beams at foot.

Built from Plan(s)
Estimated Cost
37€
Estimated Time Investment
Afternoon Project (3-6 Hours)
Recommended Skill Level
Beginner

Comments

Seasonal And Holiday

Faux fireplace with hidden storage

Submitted by Amymesser on Mon, 12/18/2017 - 05:59

I saw this project on the Ana-white website DIY. Luckily I have a friend that has all the tools so we used the cut list & built this faux media cabinet fireplace. I wanted it to store all my media stuff & have my TV set on top instead of the boring & expensive hanging the tv on the wall route not to mention the damage to my rented apt wall. We made a few modifications we extended the top & moved the center hidden shelf up. 

Estimated Cost
$400
Estimated Time Investment
Week Long Project (20 Hours or More)
Finish Used
Painted white
Recommended Skill Level
Starter Project

Rustic table

Submitted by jdawn1988 on Mon, 01/01/2018 - 16:05

We built our table from the rustic table plans and I am in love. I am a beginner and I was so scared but it turned out amazing!! Thank you for giving me the courage and confidence to start building my own furniture! 

Built from Plan(s)
Estimated Time Investment
Weekend Project (10-20 Hours)
Finish Used
Minwax stain in slate
Minwax polycrylic
Recommended Skill Level
Beginner

Fancy X Farmhouse Table and Bench

Built this table and bench for my wife. She wanted to host Thanksgiving dinner and needed a bigger table. I used the 96” plan, building the bench first and the table second. 3 coats of Danish oil dark walnut, and 2 coats of poly. I get a lot of compliments about this table. The bench is remarkably comfortable and sturdy. And yes, my wife was very pleased, plus I finished on time for dinner.

Comments

BearWoodworks

Mon, 01/17/2022 - 13:49

Thank you. The set up gratitude goes to my wife. She inspires me to complete these builds. And thank you to Ana White for these awesome build plans. I’m running out of house for all the builds so far.

Rustic Bathroom Vanity

Submitted by khoran66 on Tue, 04/05/2022 - 13:18

This was a great first project for my husband and I. First time doing drawers but was amazed how easy it rally was.

Comments

Fancy Hall Tree

Love this site!  I've made the Facny X Farm Table, and now this piece.  I changed the back to ship lap.  Also cut out the baseboard so it sits up against the drywall then coped the baseboard around the base to look built in.  Thanks!!!

Edit - sorry for the pics being sideways, they're not like that on my phone or computer :(

Built from Plan(s)
Estimated Cost
$50
Estimated Time Investment
Weekend Project (10-20 Hours)
Recommended Skill Level
Beginner

Rustic Modern TV Console

Just finished up this unique TV console.  Built from reclaimed pallet wood. 

Estimated Cost
$150.00
Estimated Time Investment
Weekend Project (10-20 Hours)
Finish Used
Clear coat of wax
Recommended Skill Level
Advanced

Comments

Templar

Mon, 12/02/2019 - 22:10

Hi there Im new to site and also have the issue of not seeing the plans for this Rustic Modern TV Console. Are they available and Im doing something wrong or??

A Home for Some Orchids

I built this with some scrap mdf, and 1x3's. I offset the shelves, and voila! A modern shelf to go with our eclectic, yet very modern decor. It also gives me a nice display for some of my orchids. I love this shelf!

Built from Plan(s)
Estimated Time Investment
Afternoon Project (3-6 Hours)
Finish Used
Kona Brown
Recommended Skill Level
Starter Project