Community Brag Posts
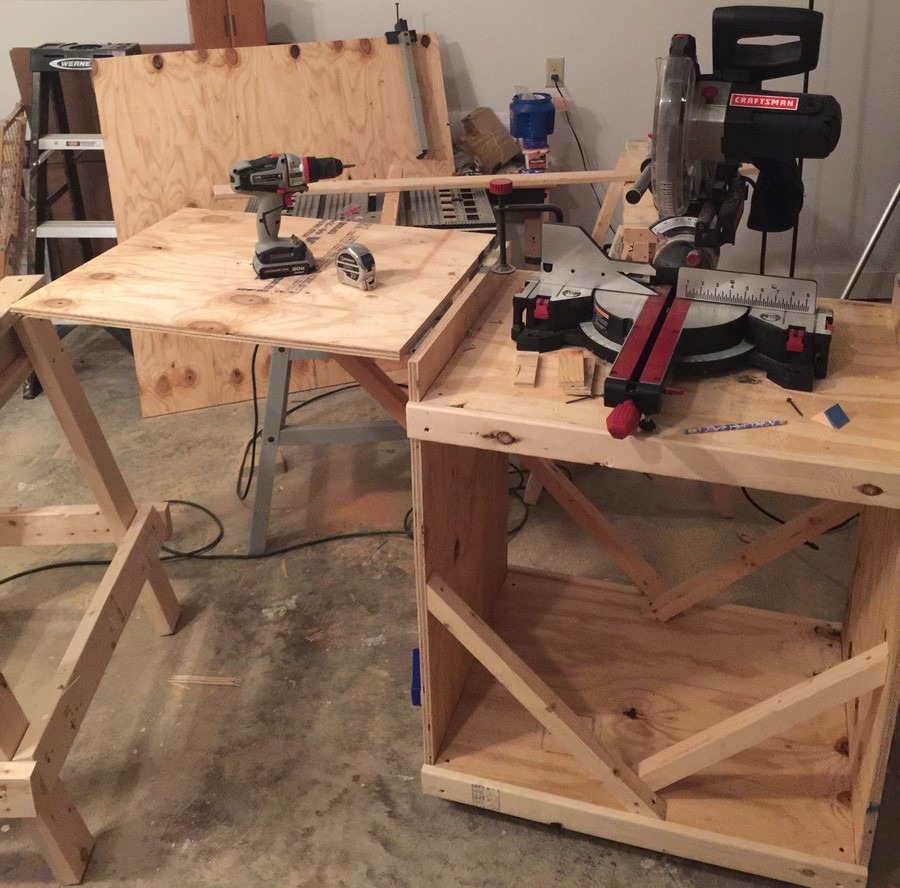
Kitchen Table
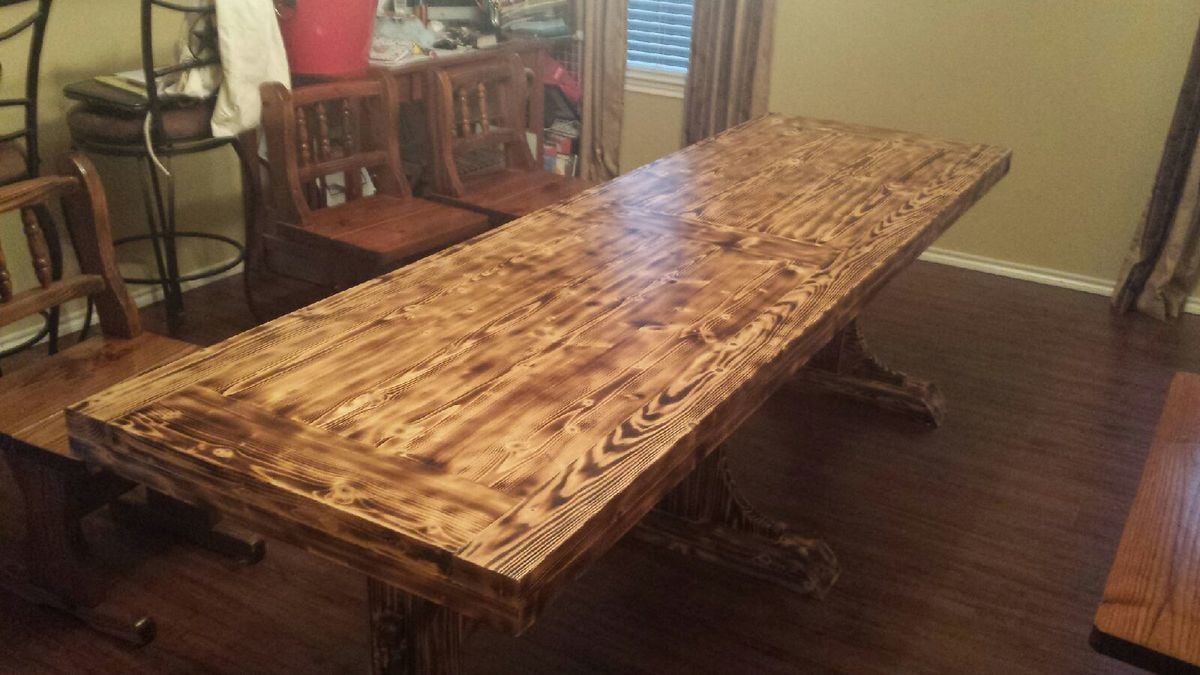
My wife wanted an 8 foot long table, but wanted it to be a little narrower that as standard table. This one ended up being 97.5" x 29" I used a torch to scorch the wood then apply poly finish.
Built from Plan(s)
Estimated Cost
250.00
Estimated Time Investment
Week Long Project (20 Hours or More)
Recommended Skill Level
Intermediate
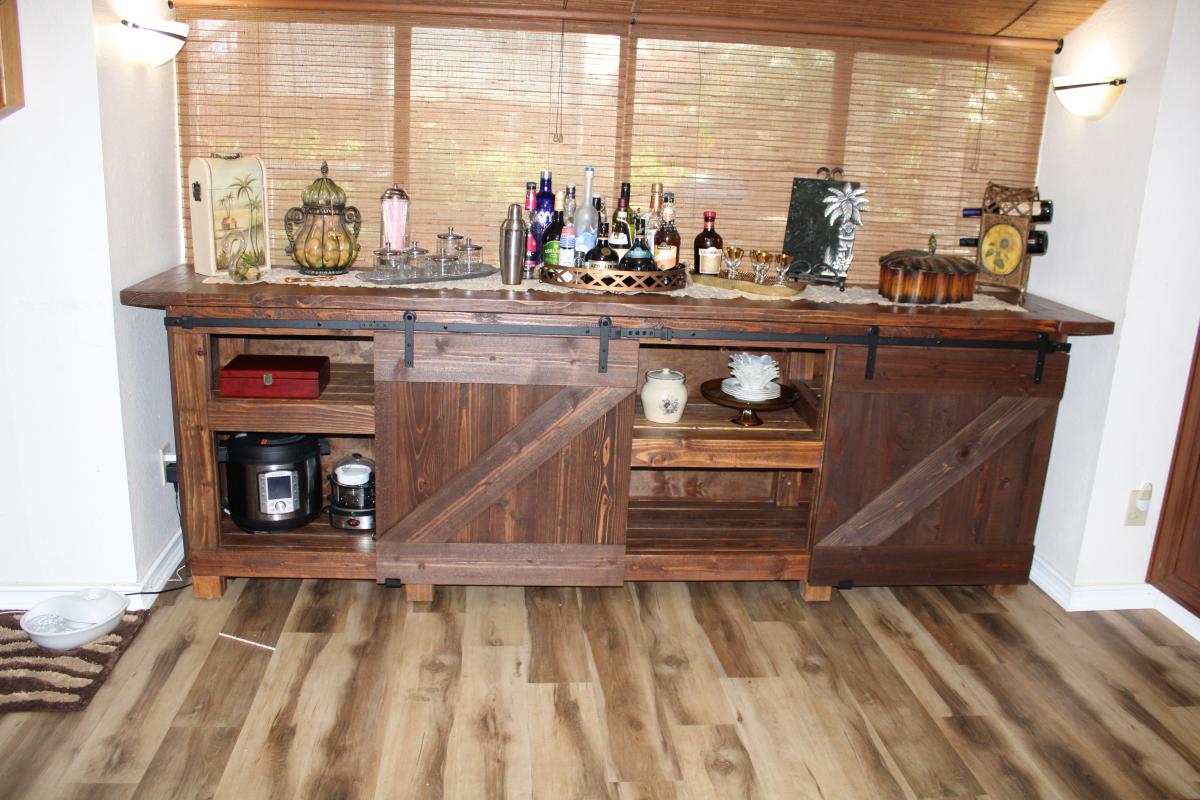
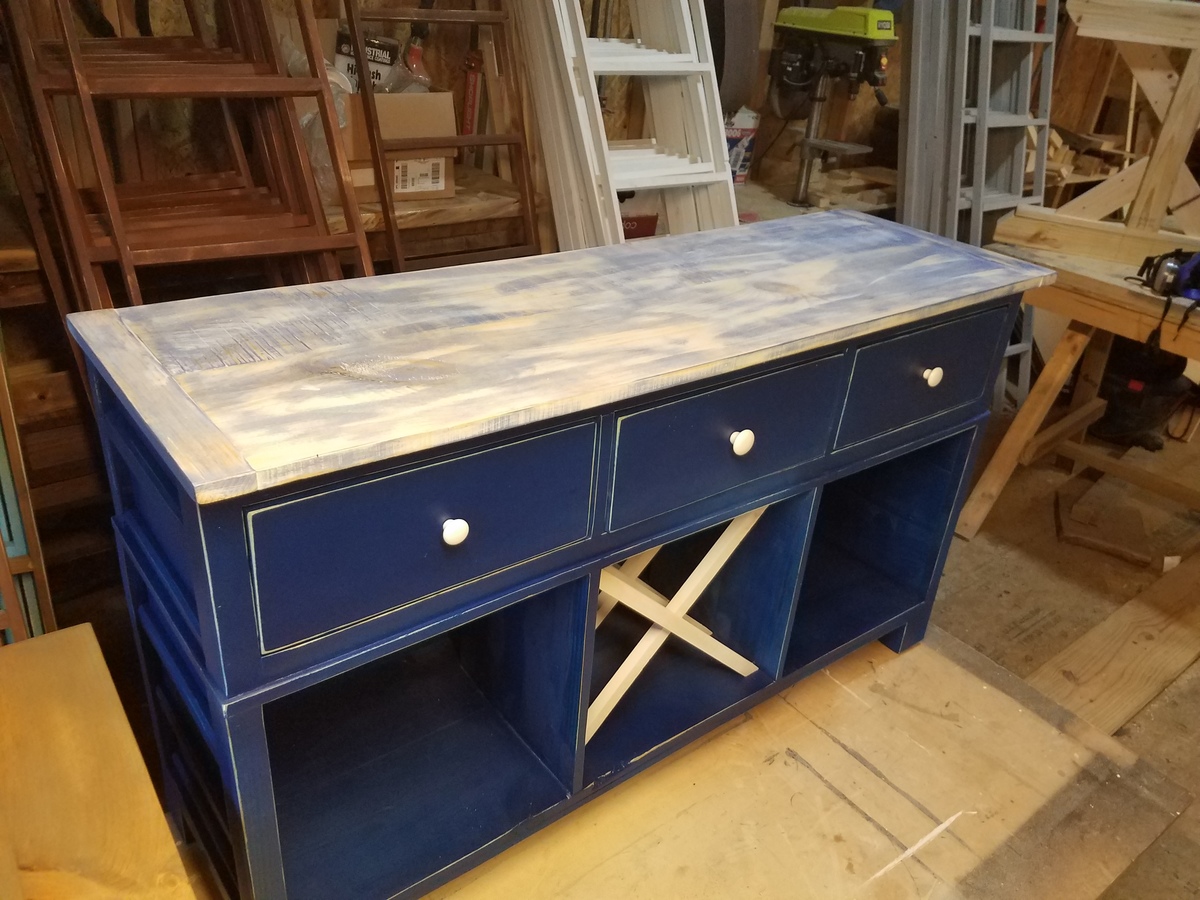
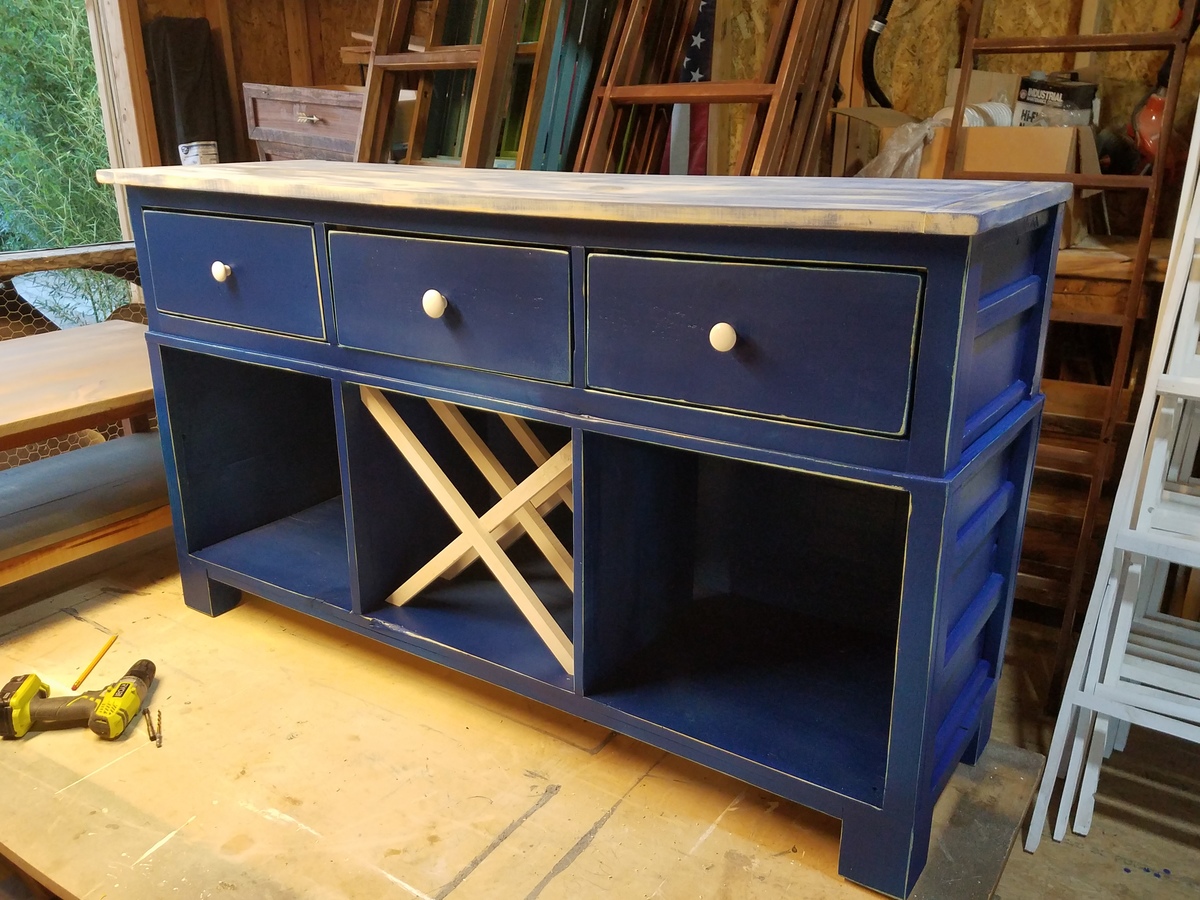
Sidebar with sliding barn doors.
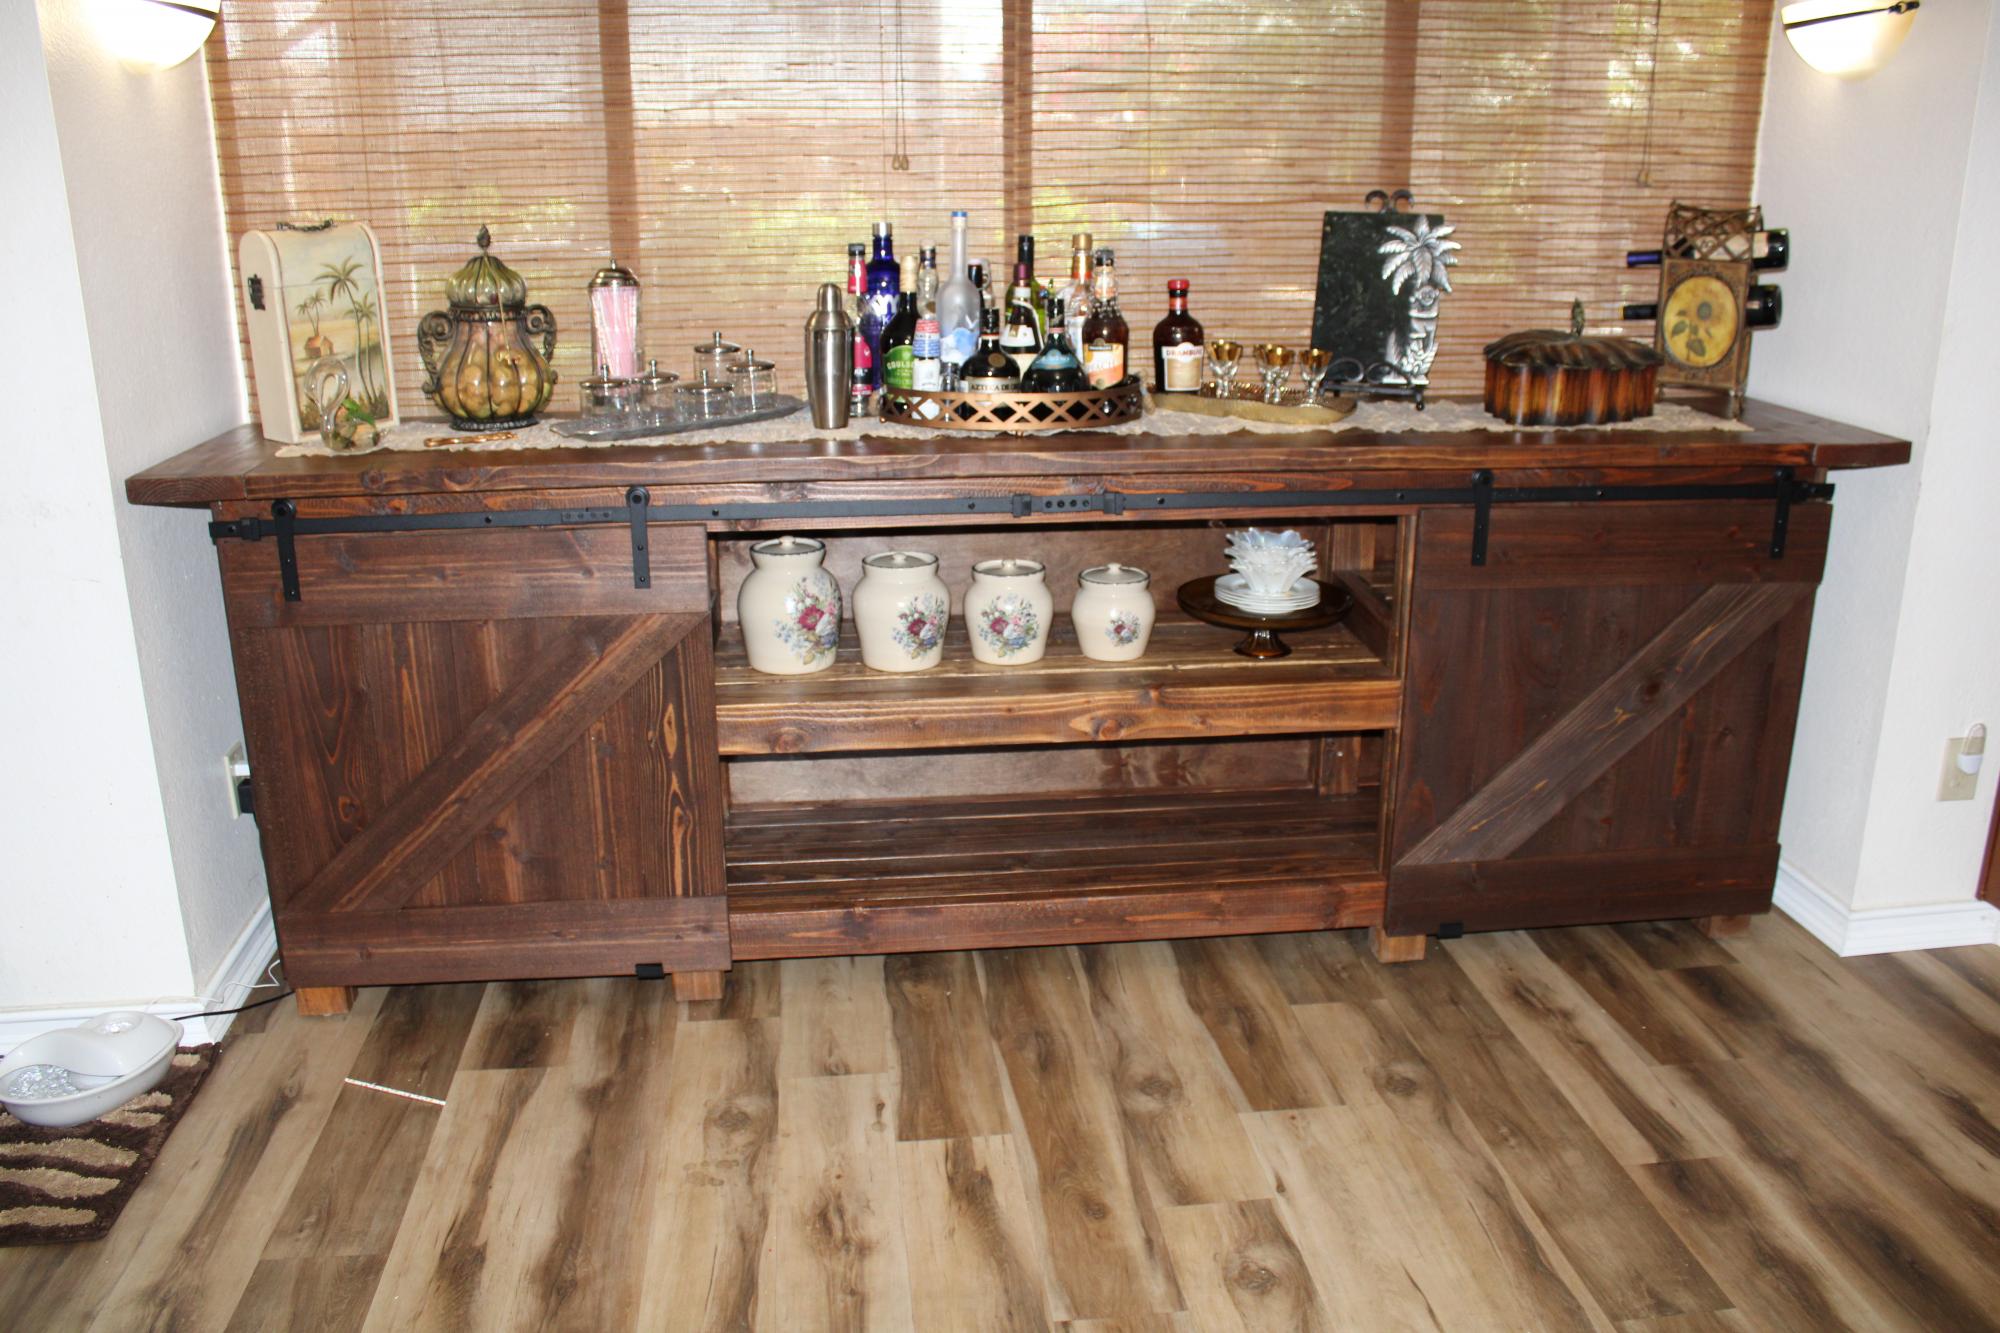
I built this sidebar from a plan I cooked up in my head, using the lesions I learned building the farmhouse table and bench. I sort of built it as I went along. It took me 40 or 50 hours and cost around $400.00 to $450.00 to finish. It matches the table and bench I made. Thank you Ana White for giving me the confidence, with your easy to follow plans, to under take such a project.
Estimated Cost
$400 -$450
Estimated Time Investment
Week Long Project (20 Hours or More)
Finish Used
Minwax stain (special walnut), Varathane polyurethane.
Recommended Skill Level
Intermediate
Comments
Thu, 06/10/2021 - 08:48
Fantastic!
Wonderful build that will last a long, long time! Thank you for sharing.
First Project and pretty proud of it!
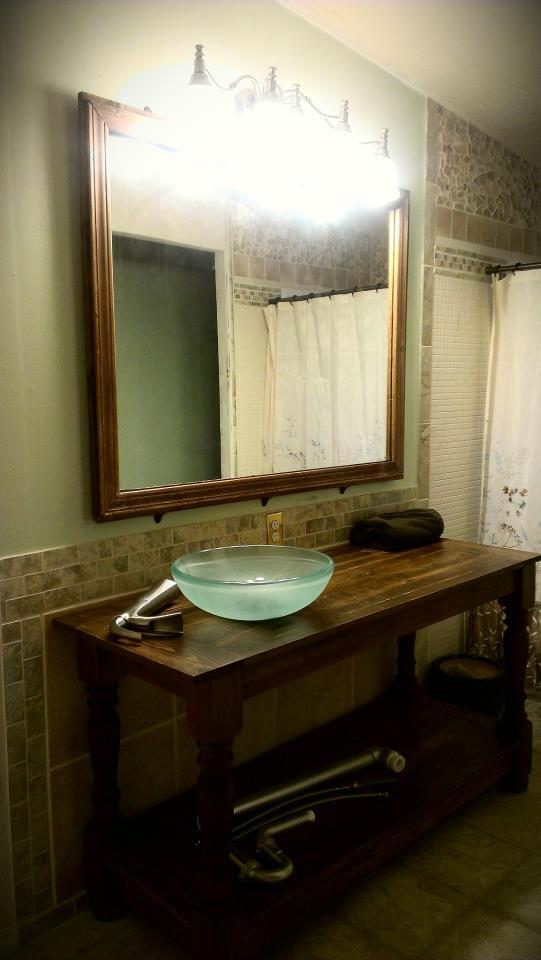
We have quite a fixer upper and while re-doing the bathroom, I came across Ana's Island plan in her book, The Handbuilt Home. This isn't the finished picture as we have installed the sink fixture and pipes, where I wrapped the exposed pipes with twine to give it a more rustic look. The table was modified in size and the mirror was a salvaged piece where I made a backer and framed it. Though still in need of some finishing touches, the look so far is spectacular... I wish I had a before and after photo. Much of what you can see, such as the tile in the shower and mirror has been made from found materials around the house or were items that were going to be sent to the dump. I love recycling!
New to building,
Stephanie Broker
Estimated Time Investment
Week Long Project (20 Hours or More)
Finish Used
Daly's Stain (Walnut) and water resistant seal
Recommended Skill Level
Intermediate
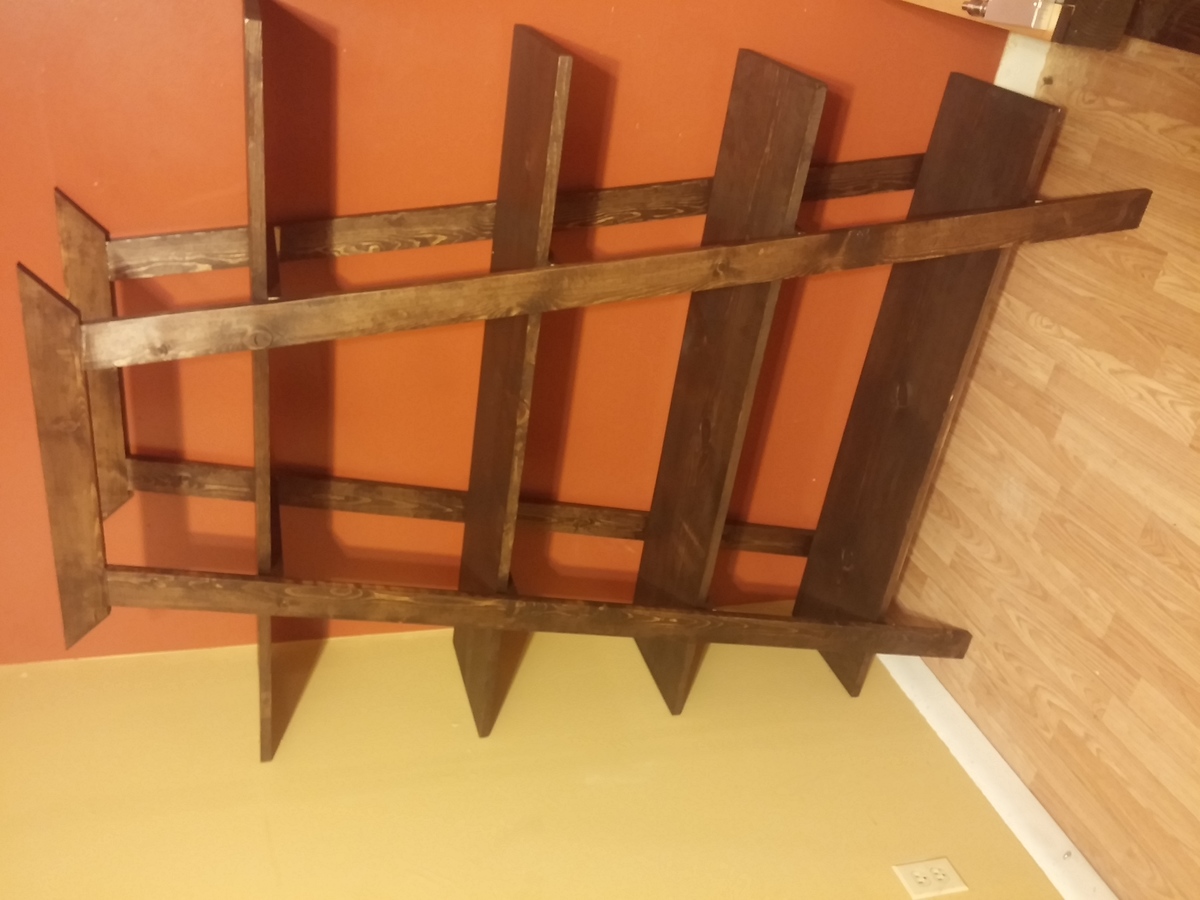
Truss Shelves
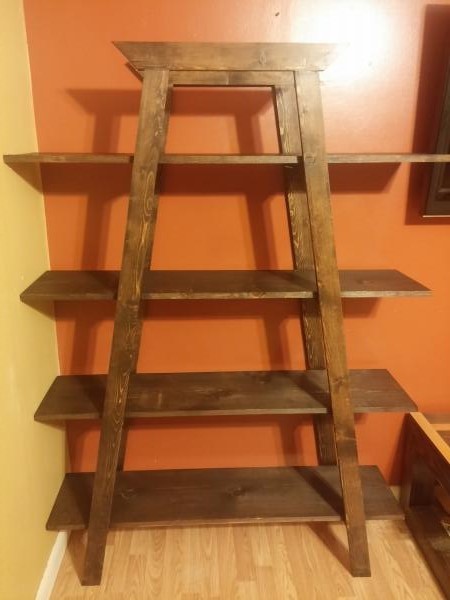
Went a slightly different route, since I'm not a fan of furniture built using 2x4's. I opted to use 1x3"s for the supports. Still more than sturdy, and I think it adds a little to the look.
Built from Plan(s)
Estimated Cost
$58.87
Estimated Time Investment
Afternoon Project (3-6 Hours)
Finish Used
Rustoleum "Kona" stain, valspar semi gloss poly.
Recommended Skill Level
Beginner
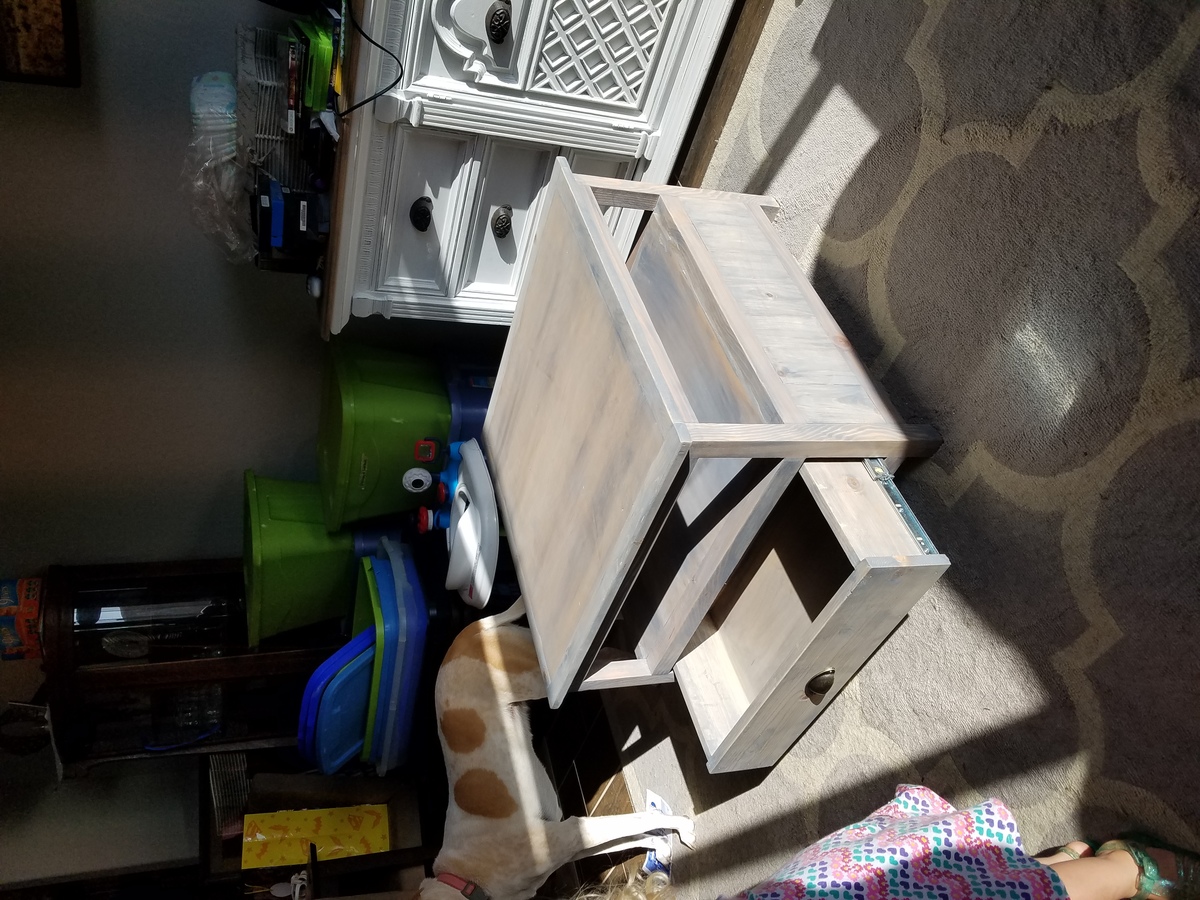
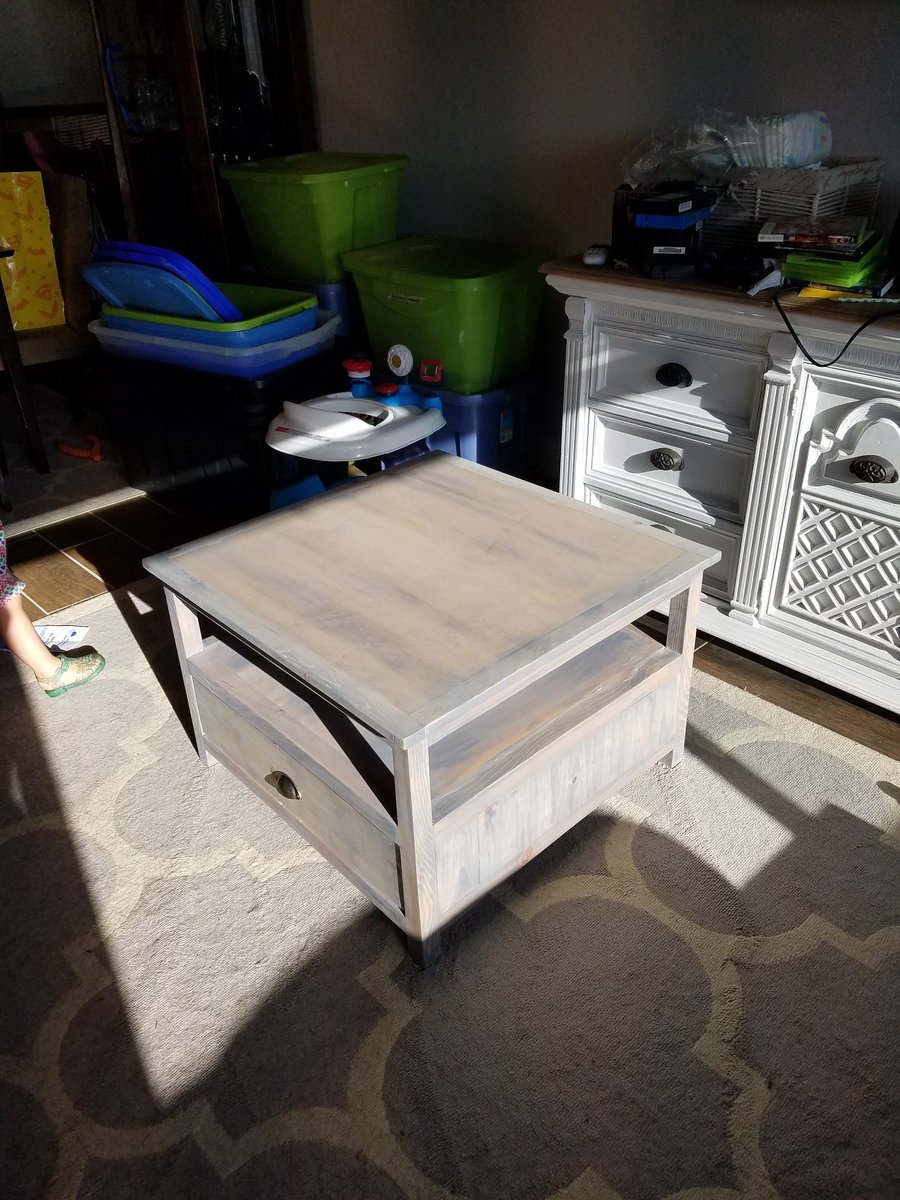
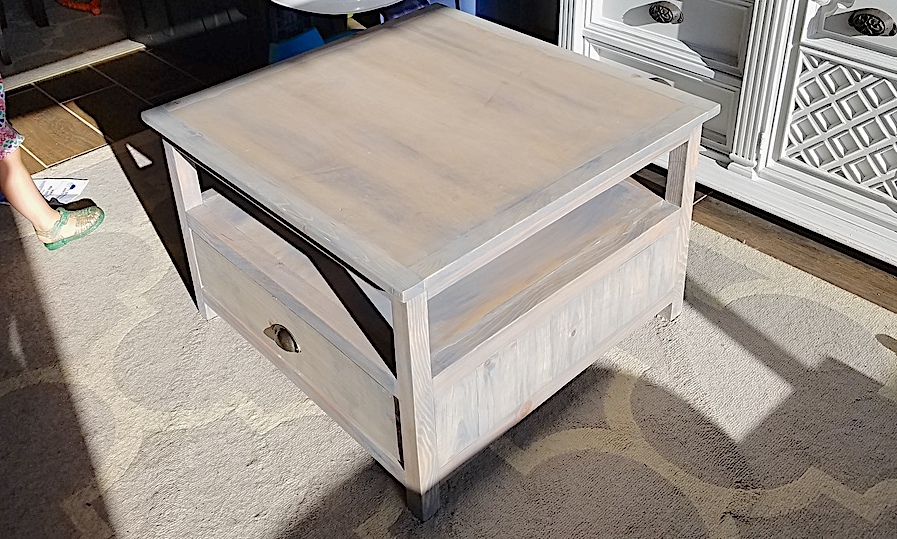
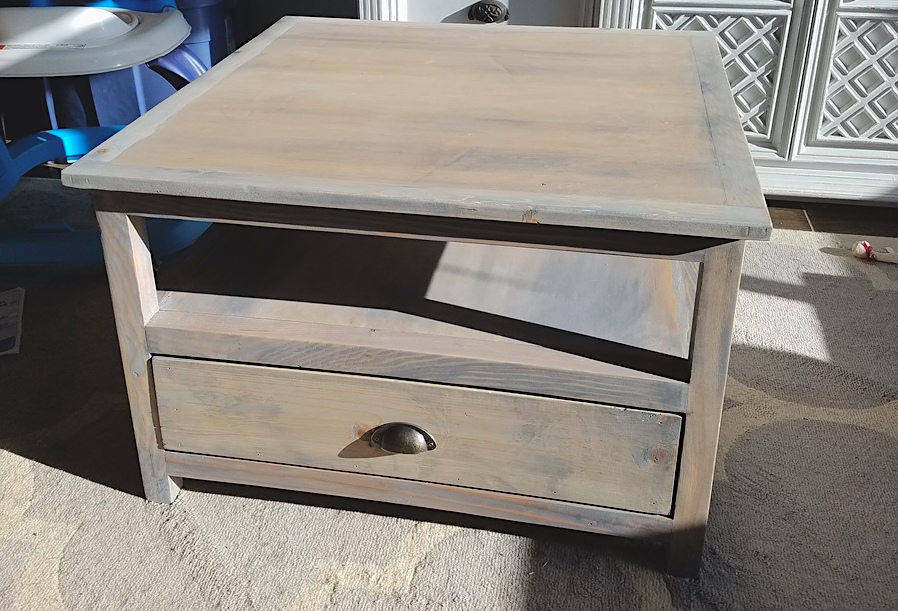
Square solutions coffee table

Shrank it down to 28" x 28" to match the size my wife wanted. At that point a single drawer on each end made more sense for them to be practical. This was my first furniture project, so lots of mistakes were made, but I learned a lot. I look forward to many more projects from this site.
Built from Plan(s)
Estimated Cost
$150
Estimated Time Investment
Weekend Project (10-20 Hours)
Finish Used
Classic gray
Recommended Skill Level
Intermediate
4x4 beam table with matching bench

This was all made from an old barn. The legs were actually rough cut 4x6 floor joist I used a hand planner to round out.
The chair were from my grandmother old table that I replace the seats with barn board that I had to cut and glue together.

Estimated Cost
50
Estimated Time Investment
Week Long Project (20 Hours or More)
Finish Used
Spray water base varnish. About 5 coats.
Recommended Skill Level
Intermediate
Comments
Jilly and Mia Workbench Console
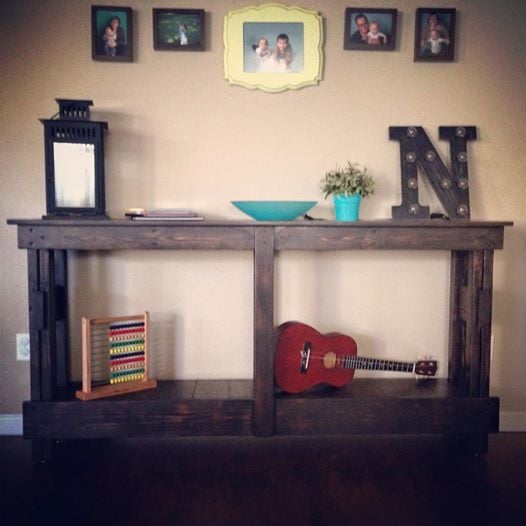
This was my first wood working project from Ana White. I am in love with how it turned out.
I ended up making the console narrow and long to fit in the living room area.
Built from Plan(s)
Estimated Cost
$100
Estimated Time Investment
Week Long Project (20 Hours or More)
Recommended Skill Level
Intermediate
Comments
Salsa Console
Did this build in about 8 hours. Very nice plan getting alot of compliments. Will surely be building some more. Made from white pine. Left the front doors off this one. The color is American Dream from Amy Howard. The top is a base white with a blue tincture stain then distressed to get my desired effect. And finally a matte clear catalyst laquer to finish it off

Built from Plan(s)
Estimated Cost
I actually only spent about $30 on this project as I resawed all the material from reclaimed shipping crates made from Spanish pine.
Estimated Time Investment
Day Project (6-9 Hours)
Finish Used
Matte Laquer
Recommended Skill Level
Intermediate
The Orange Library Book Cart
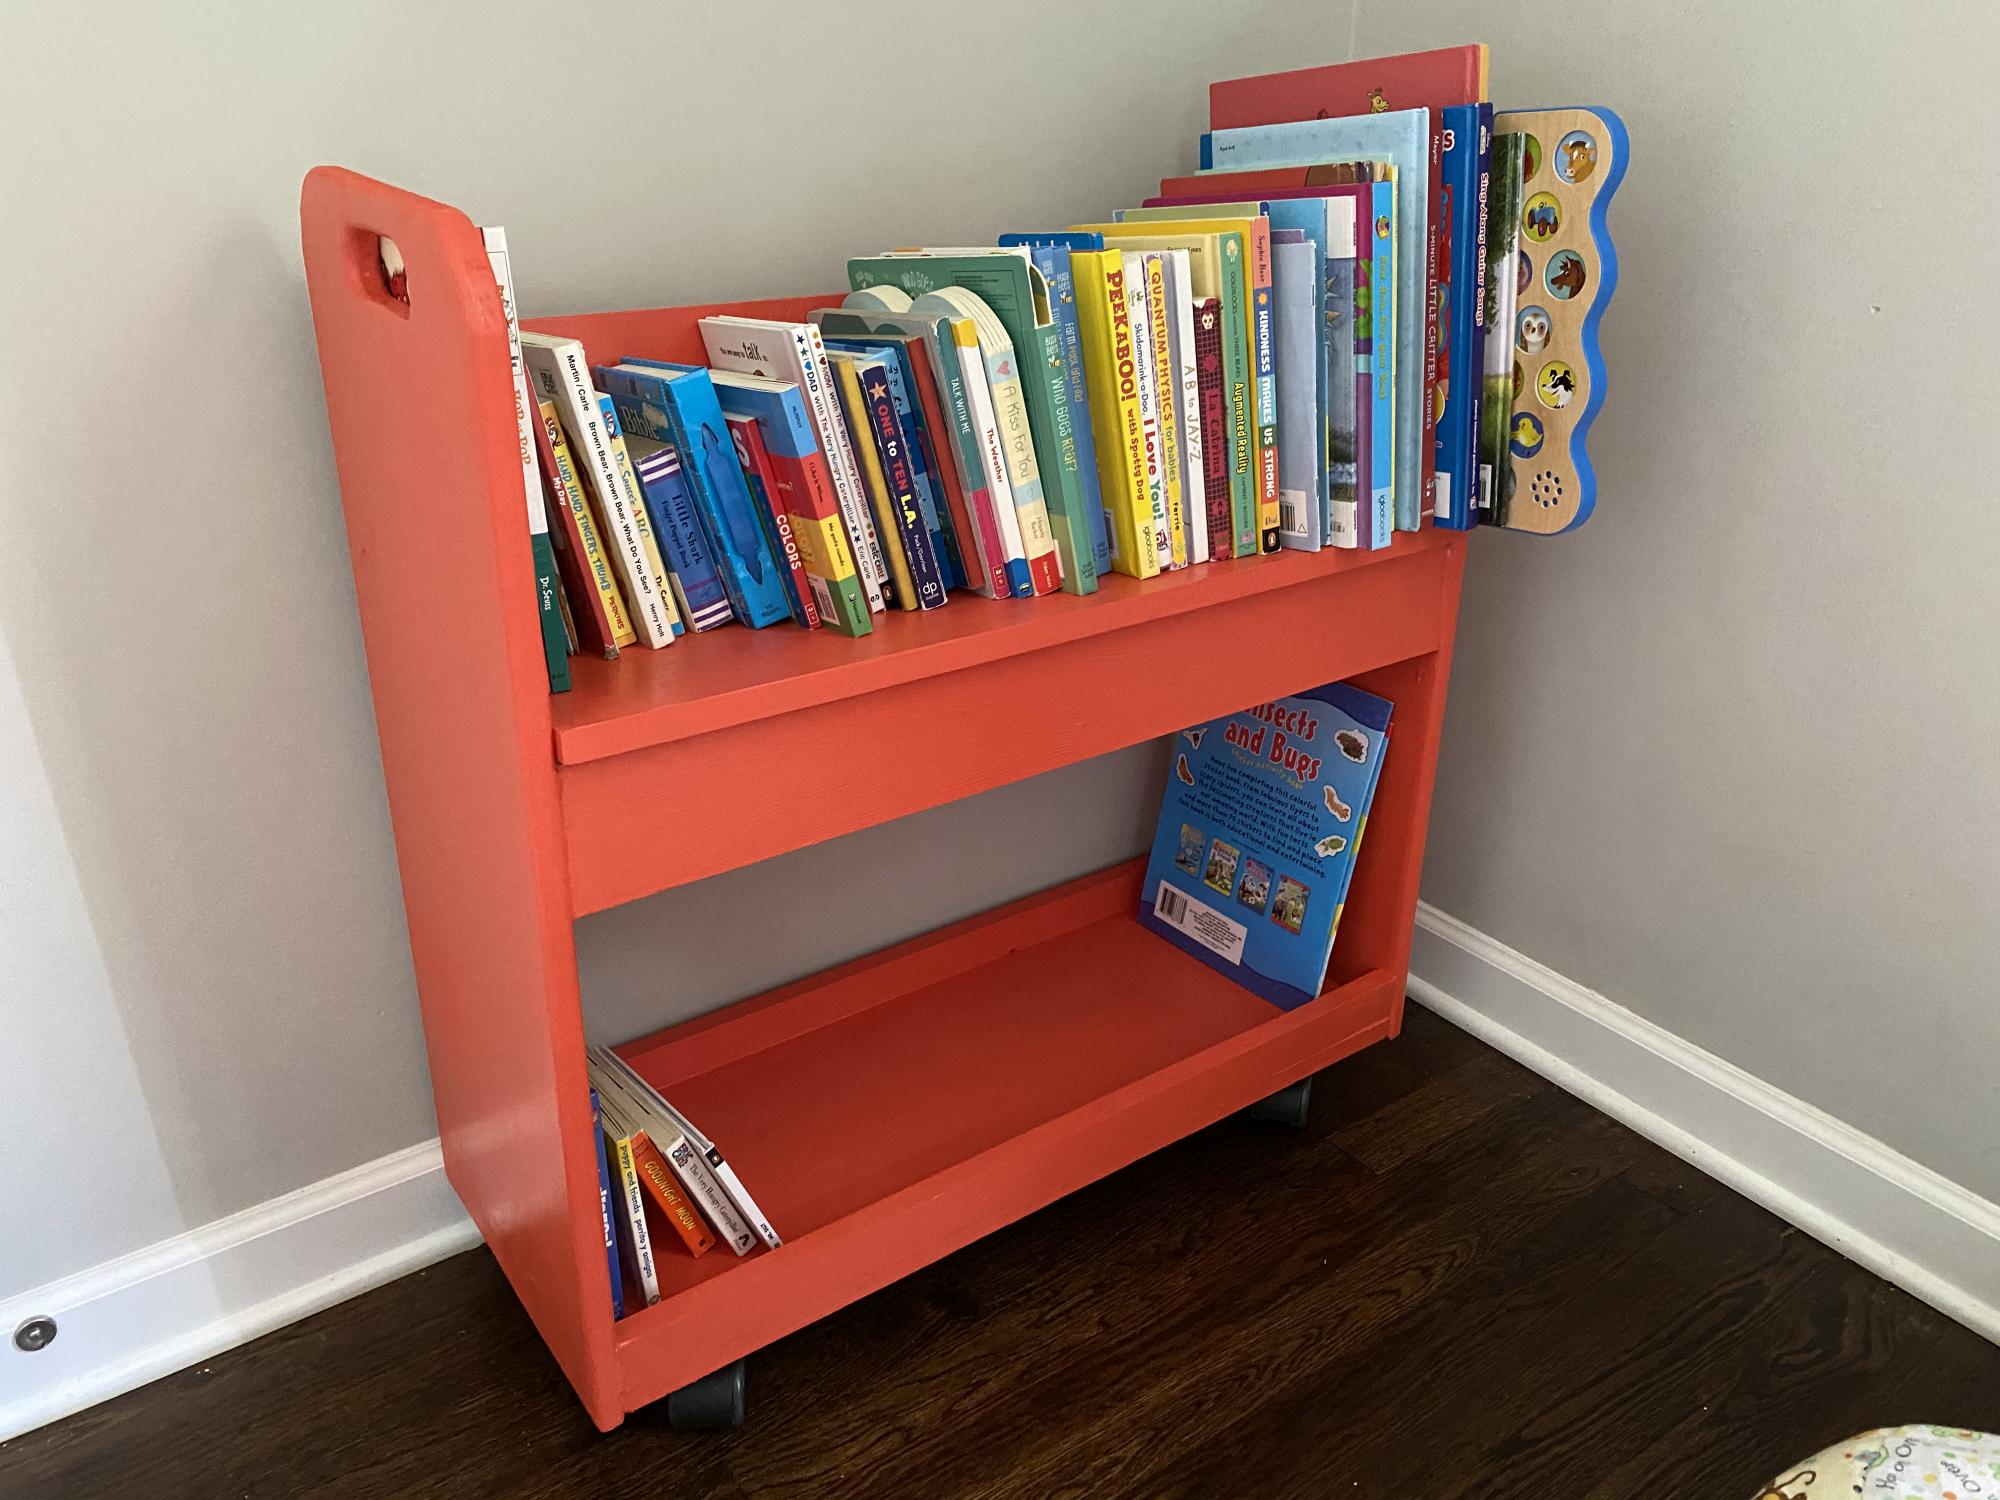
This was really easy once I finally got the top and handles on the side pieces complete. I still haven’t master my jigsaw yet :( Any tips would be helpful. The tearout I get when I use my jigsaw makes it impossible to follow any lines I draw. But I think the curves came out pretty okay.
Built from Plan(s)
Comments
Mon, 06/28/2021 - 20:09
Great Job!
It looks awesome, love the color choice! The jig saw just takes practice, but it looks like you did a wonderful job on that aspect as well!
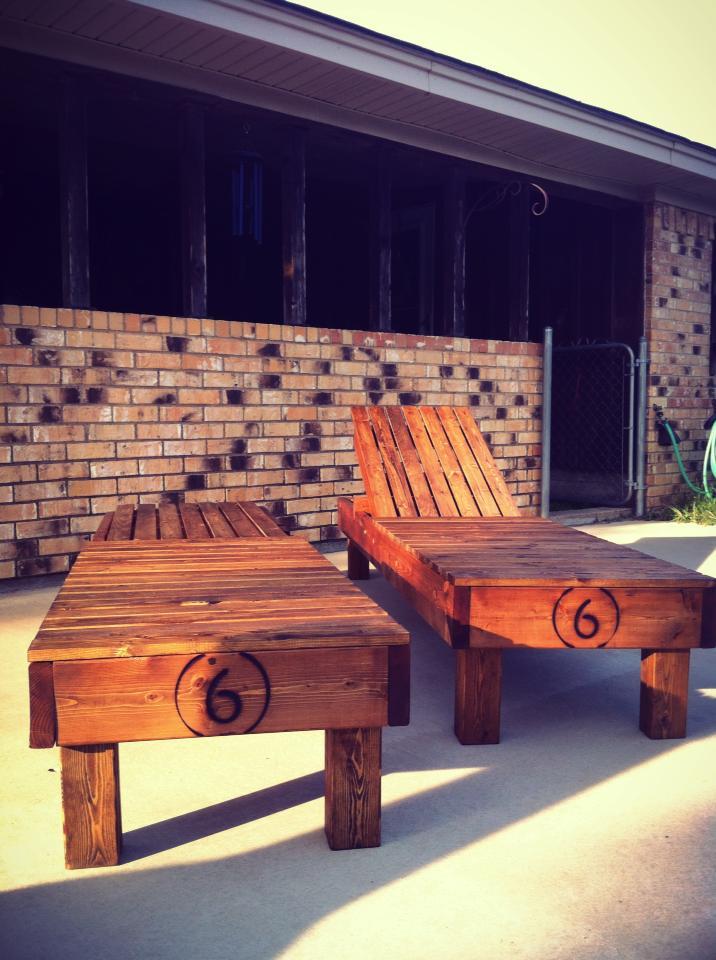
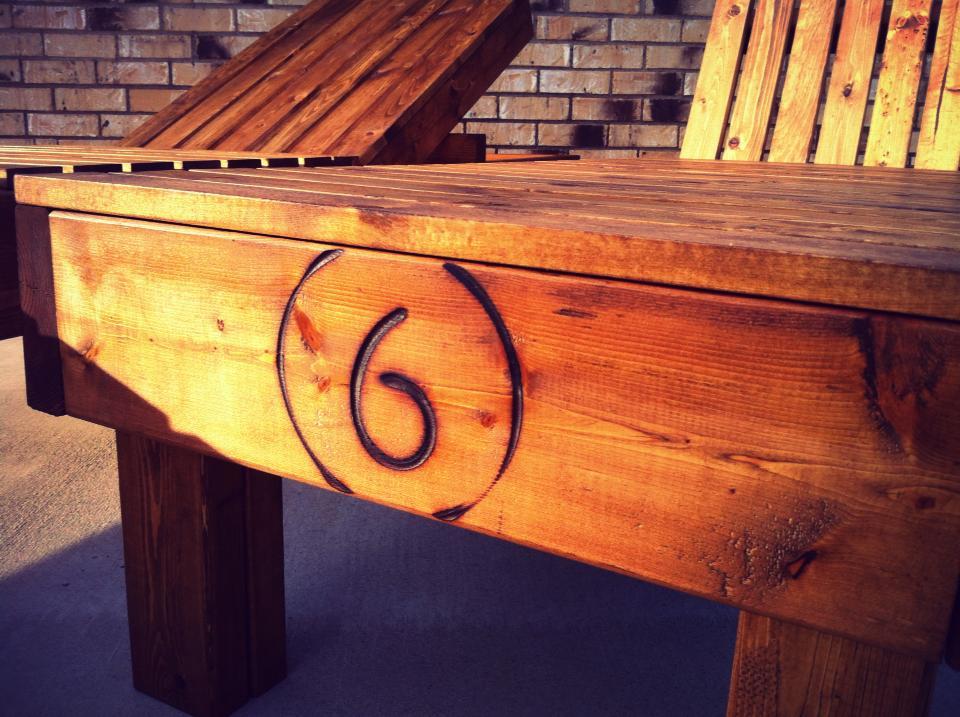
My take on Ana's Wood Chaise Lounge
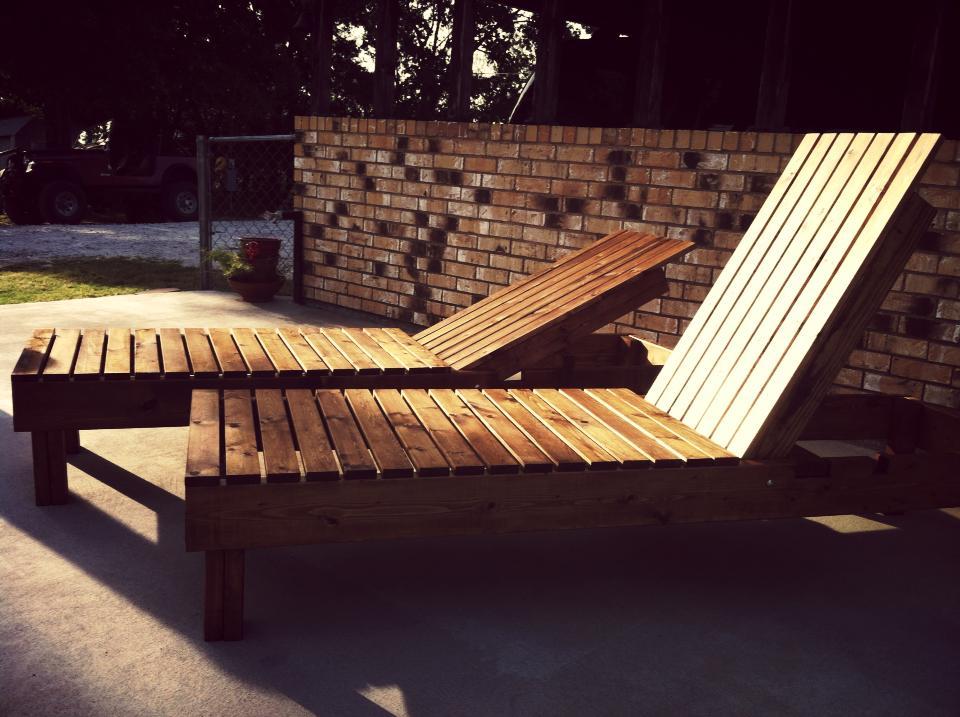
I used the plans for Ana's $35 Wood Chaise Lounge plans, but changed the frame to the 2x6 boards to match a loveseat & two chairs that I've previously built. My husband helped me with the notches, but now I think I can do them on my own. The chairs are so comfortable, even without cushions.
Built from Plan(s)
Estimated Time Investment
Weekend Project (10-20 Hours)
Finish Used
Minwax Outdoor Wood Sealer (I can't remember the exact name) in clear over Minwax Provencial stain. I customized the furniture with the family's cattle brand.
Recommended Skill Level
Intermediate
Comments
Sun, 05/17/2020 - 15:00
Stop Block Help
How did you get the stop block to fit using the updated 2x6 plans?
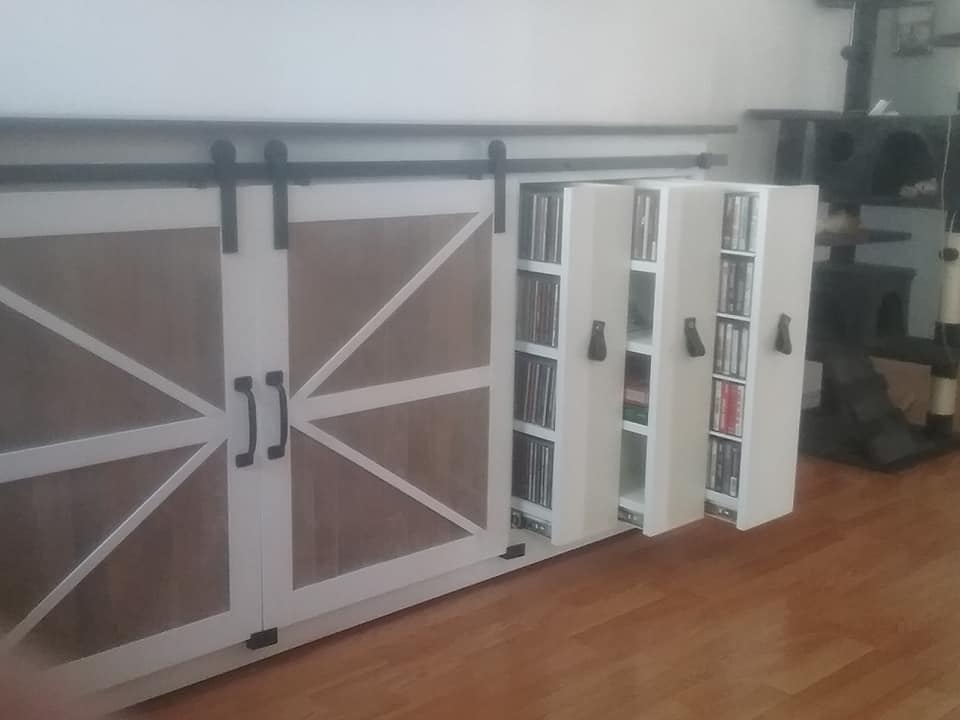
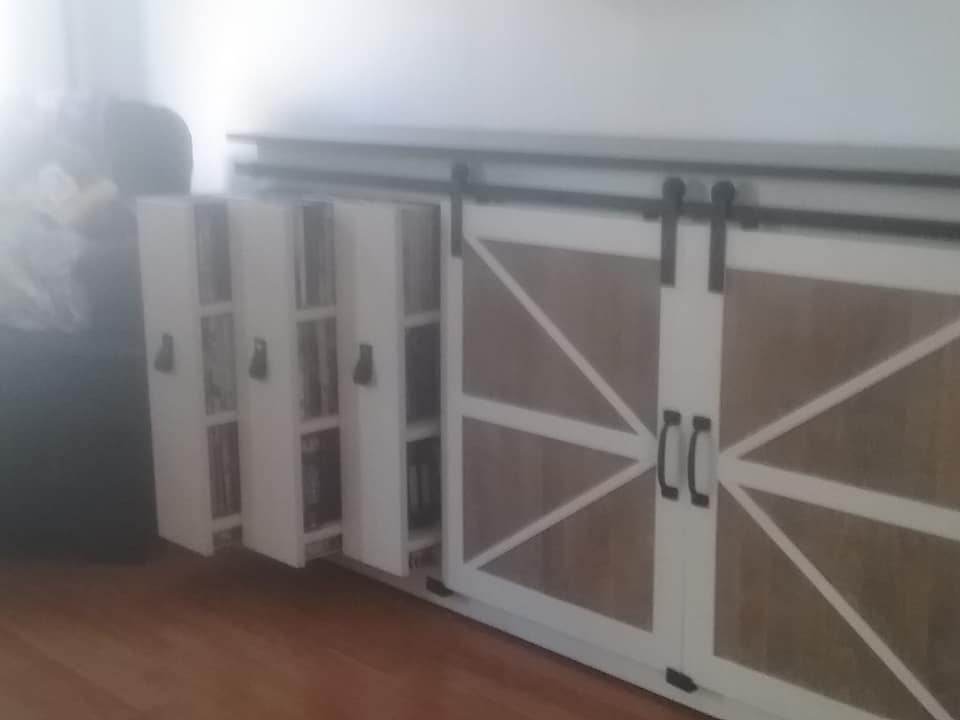
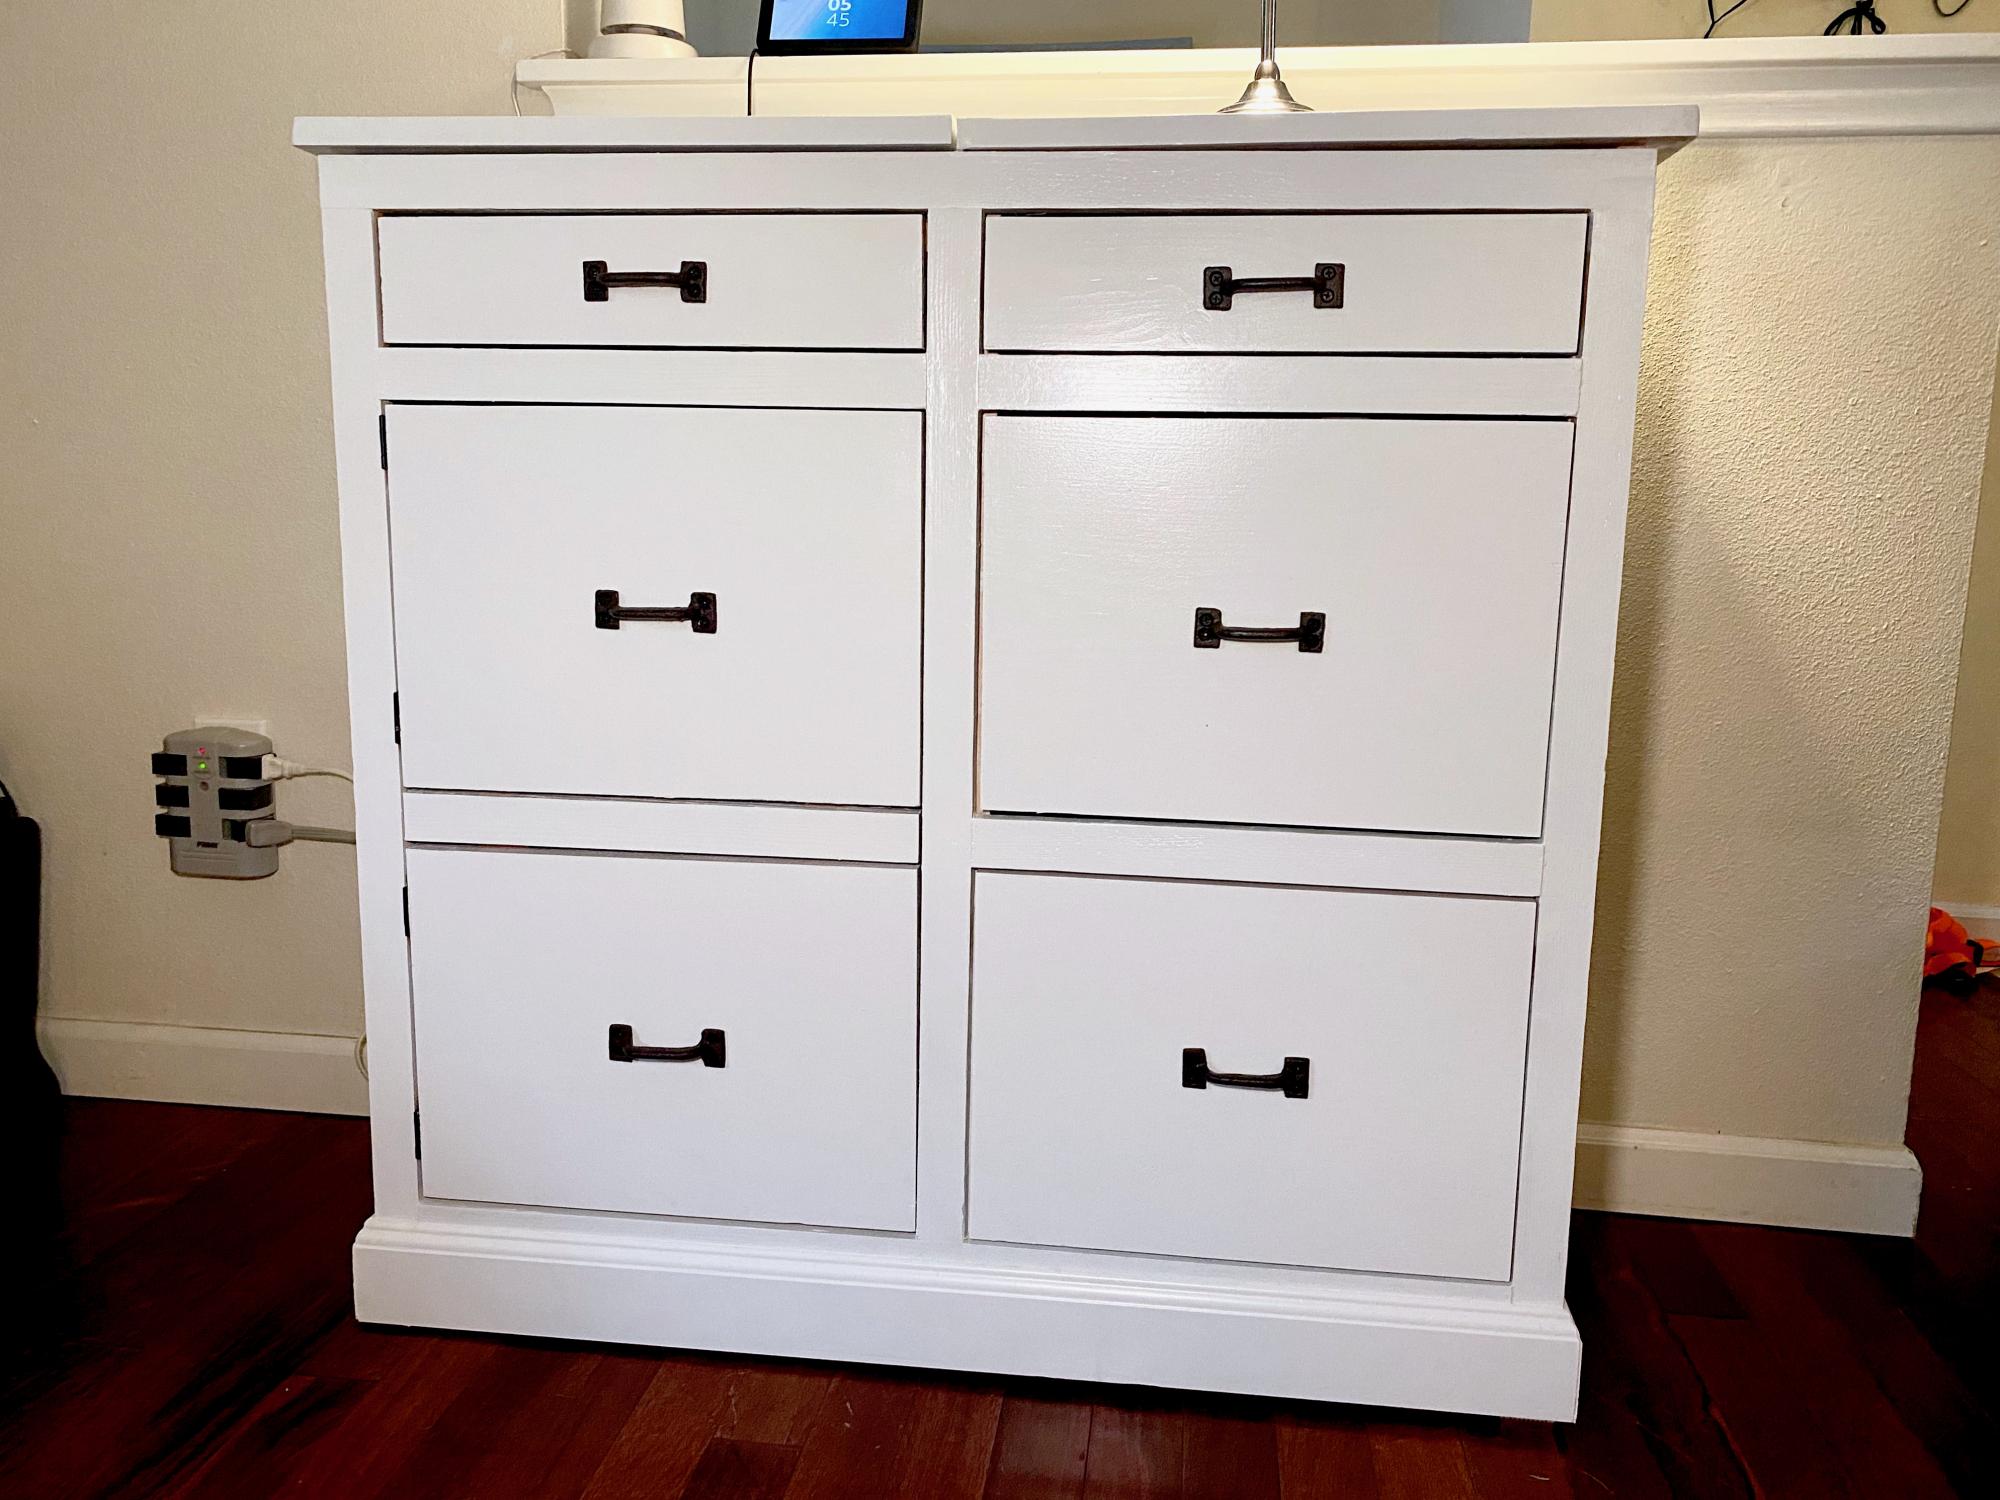
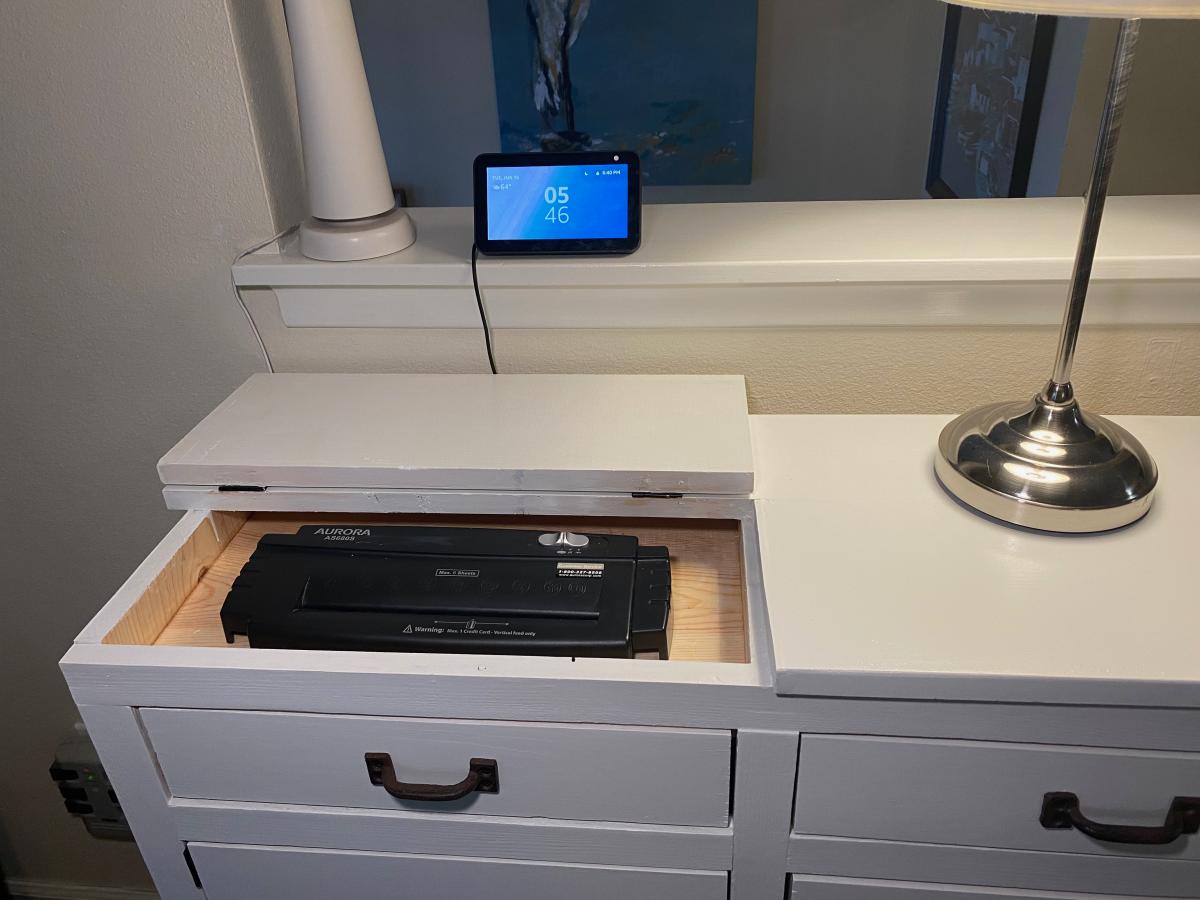
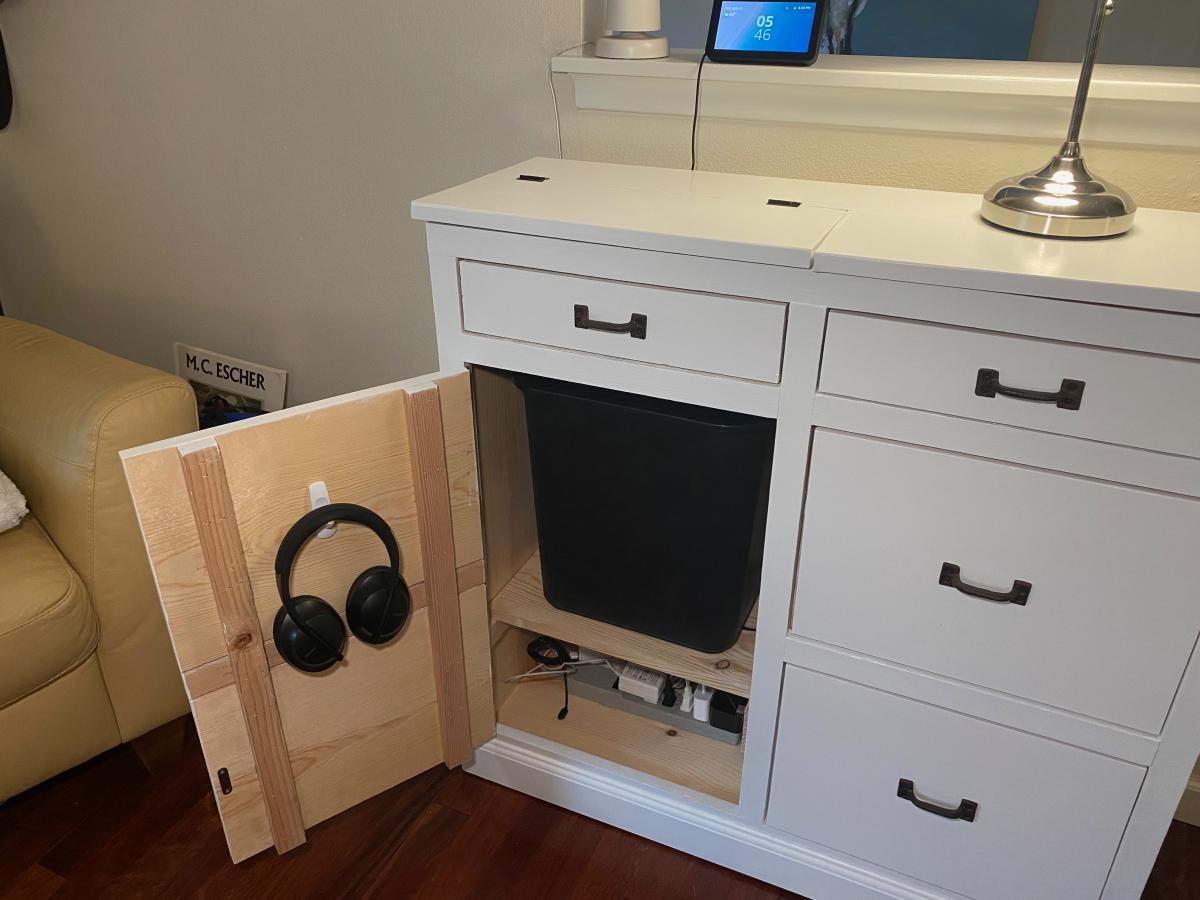
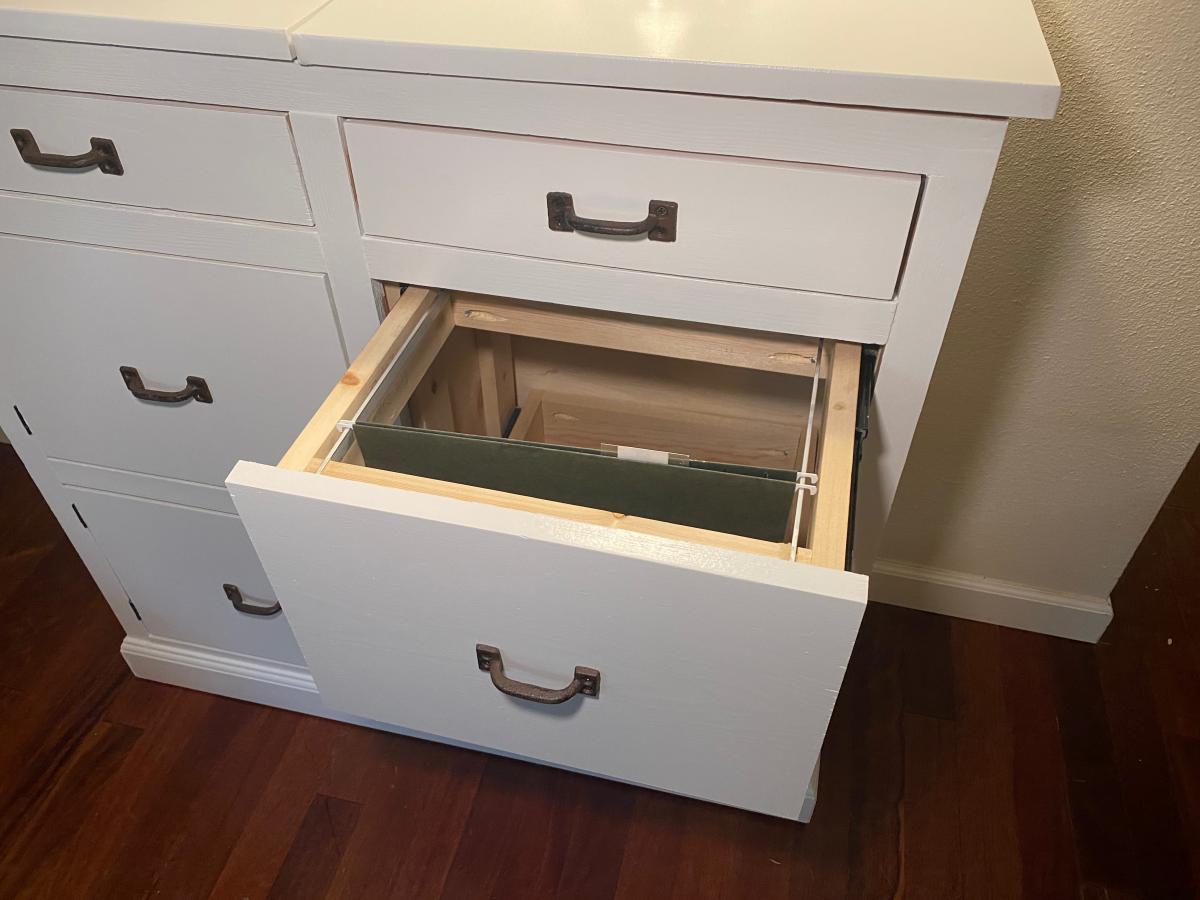
Farmhouse Media Cabinet (modified)
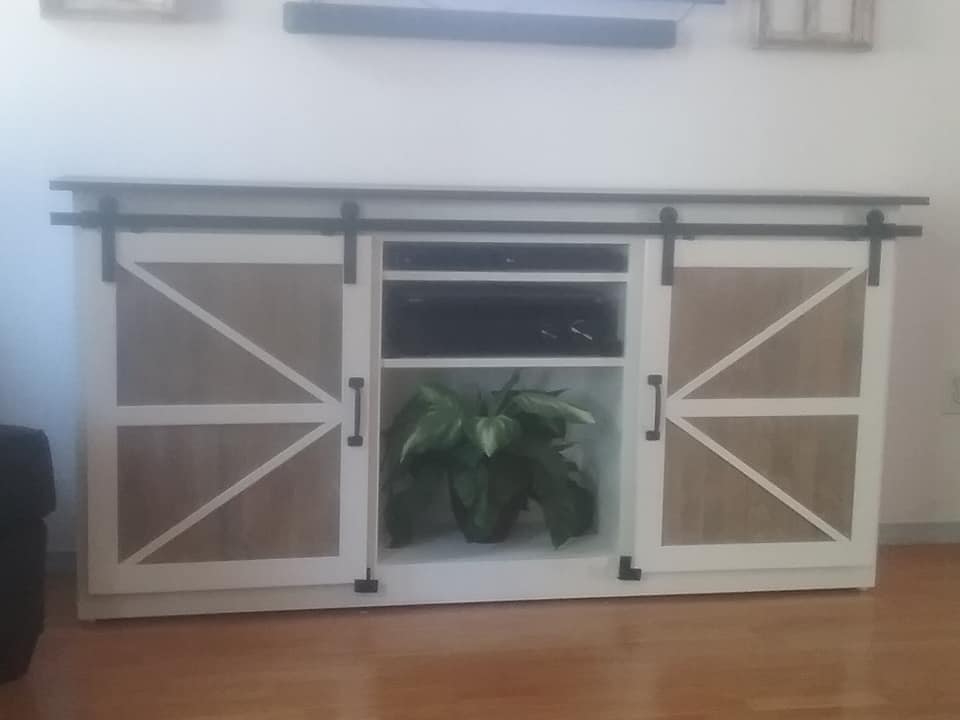
This is a modification to the Patrick Hosey Plan. Being my first ever furniture build it took considerable time to plan out the dimensions for the project before I even began. The Mrs and I both felt strongly the media cabinet needed the ability to store large amounts of media thus the design you see was born.
Each of the 6 pull outs are on a pair of 10 inch full extend drawer glides for complete access. The body was painted with an Oxford White furniture paint, and the top is painted with a Mocha Paint. The sliding doors are inset with a pre-finished Barnwood found at a local box store ripped to width and fitted into the 3-rail door. The angled trim is ripped from the edge of 1 x material and planed to thickness.
Built from Plan(s)
Estimated Cost
$625.00
Estimated Time Investment
Week Long Project (20 Hours or More)
Finish Used
Paints: White and Mocha
Recommended Skill Level
Intermediate
Comments
Wed, 07/21/2021 - 14:06
Love the media storage…
Love the media storage shelves that pull out. Fantastic idea!
Entryway Mirror
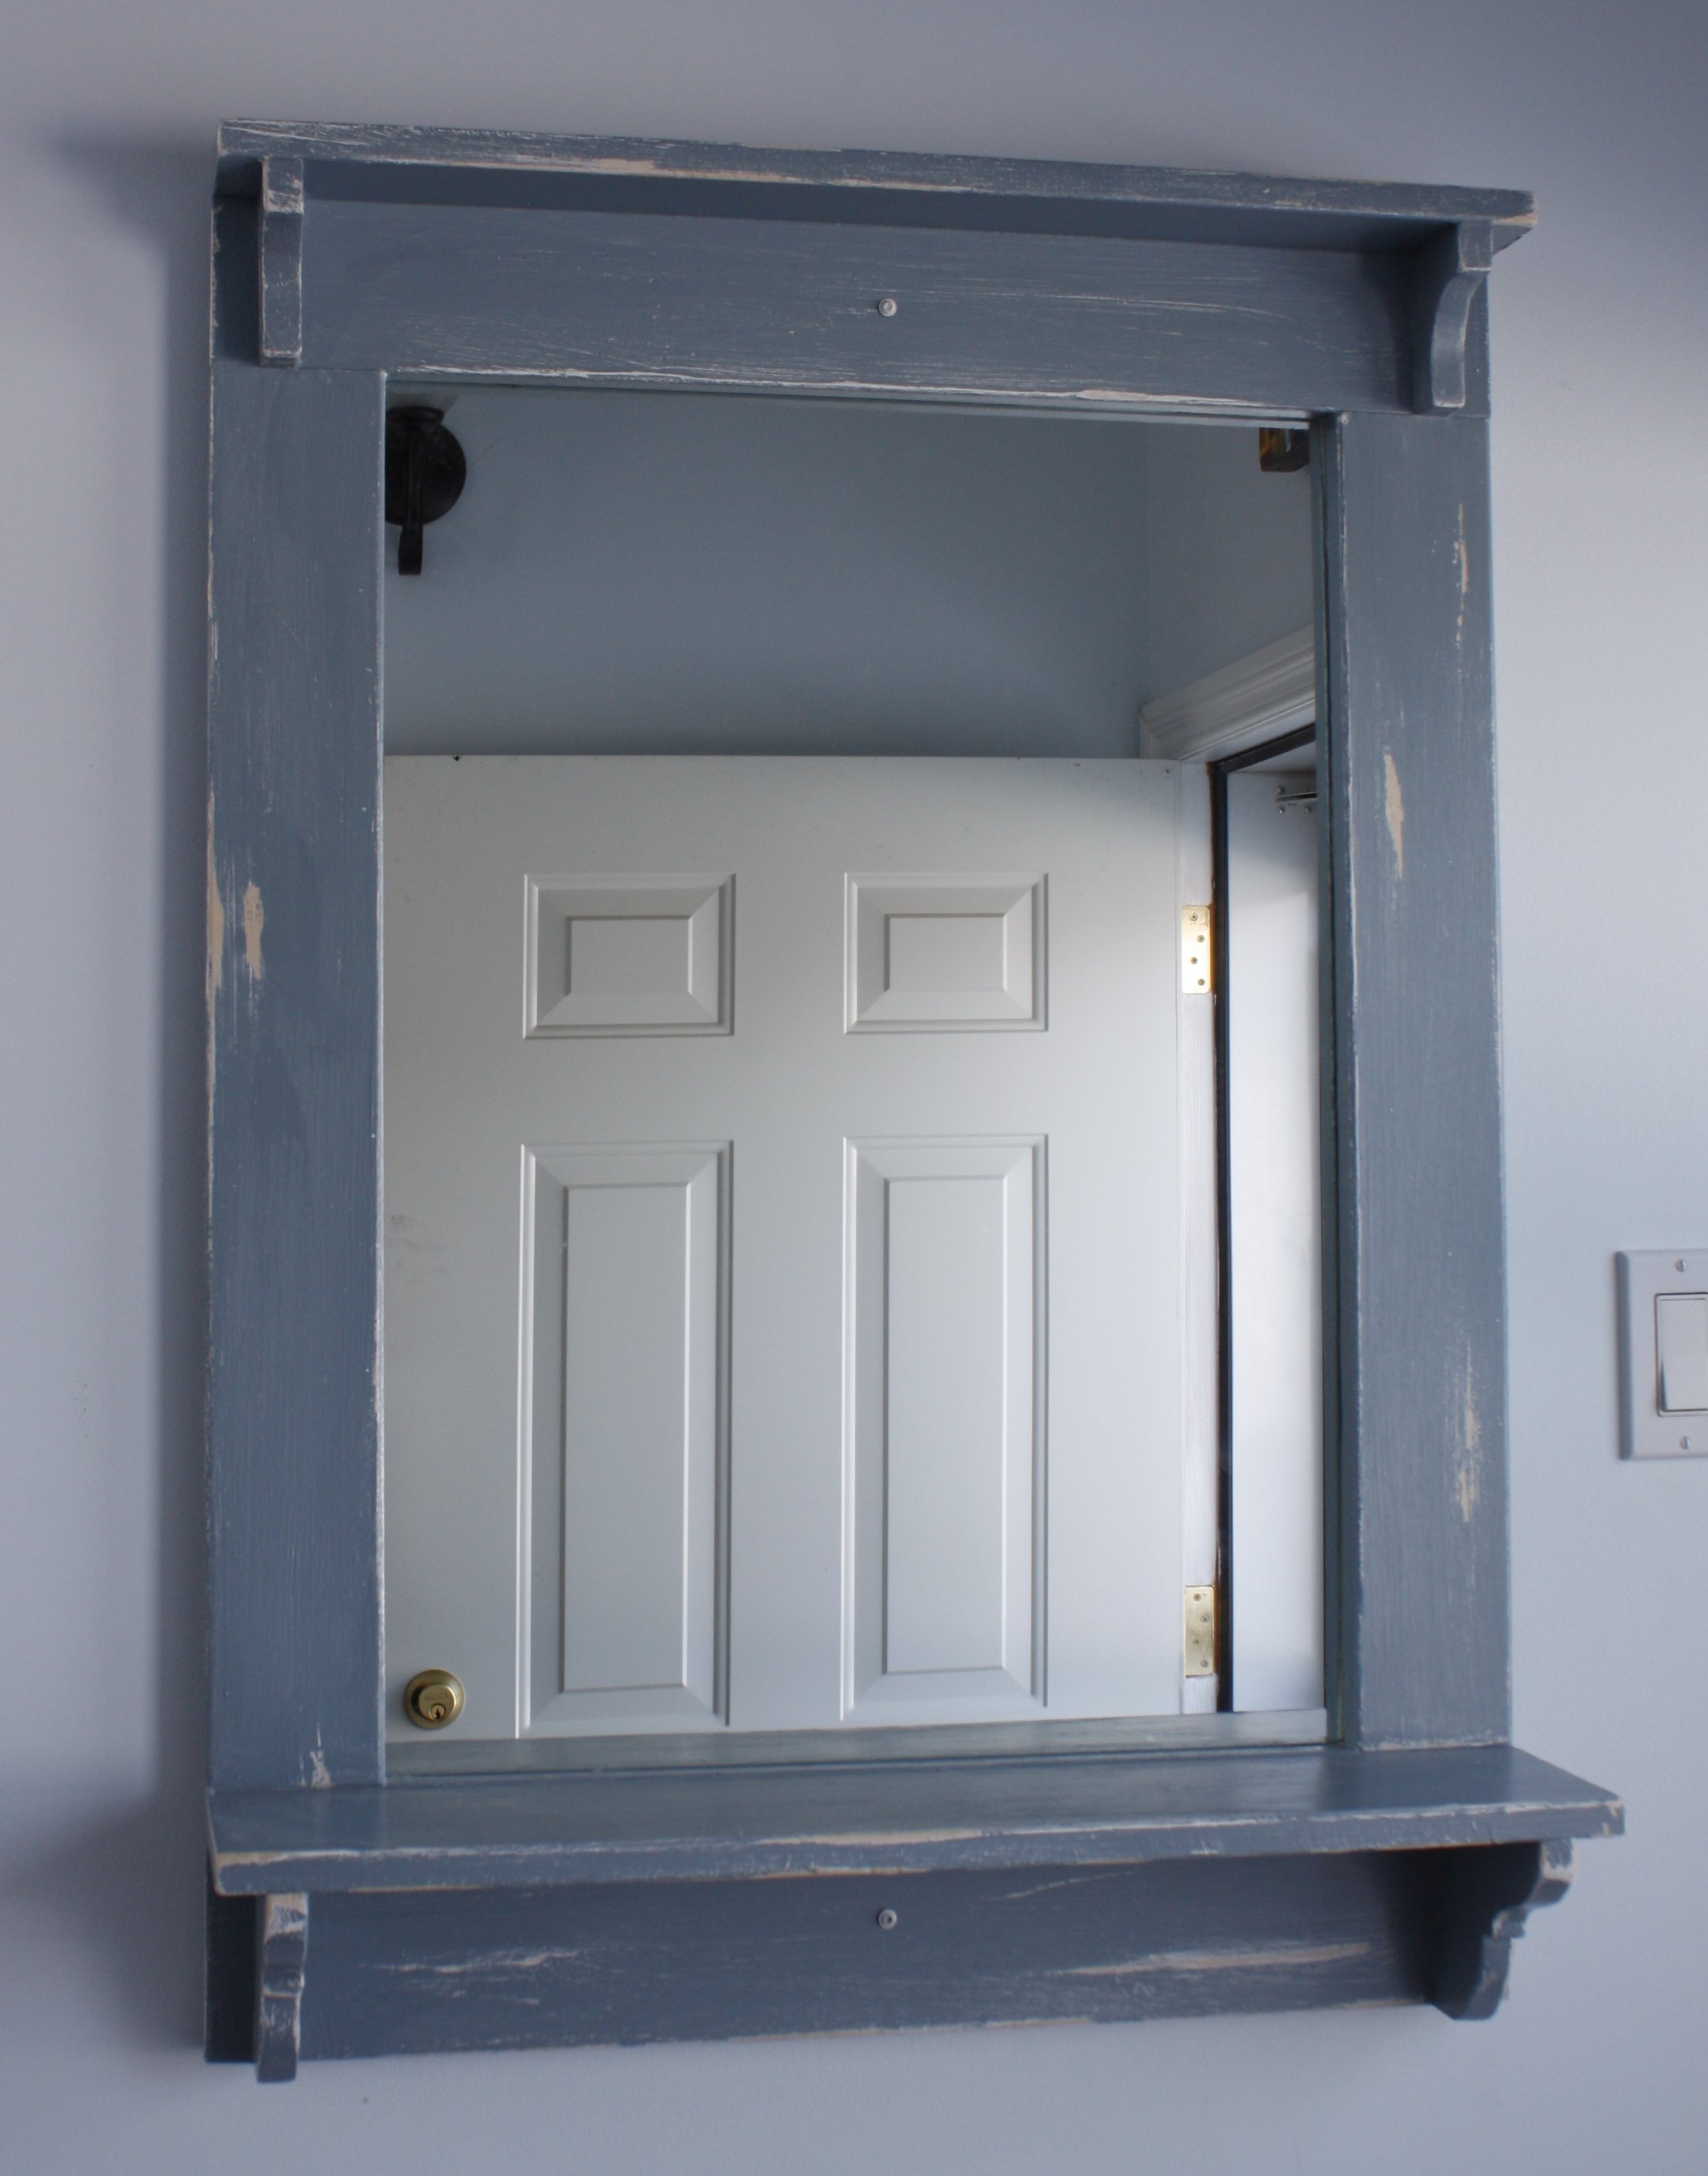
This is my very first project, and is from The Handbuilt Home. I had an old dresser mirror that I just couldn't throw away, and now I'm glad I didn't! It fit the frame perfectly. This project only took a few hours, and the plans were so easy to follow. Just have to get the hooks and she's done! Thanks Ana!
Built from Plan(s)
Estimated Cost
$10 plus the mirror clips
Estimated Time Investment
Afternoon Project (3-6 Hours)
Finish Used
A mix of Ultramarine Blue and Slate Gray (cheap craft paints), followed by two coats of Poly Satin finish. I tested the colors on the back of the project first.
Recommended Skill Level
Beginner
Comments

In reply to I really like the stain you by dsteinberg
Thu, 01/23/2014 - 21:42
Thank you! Val
Thank you!
Val
Custom Home Chifforobe
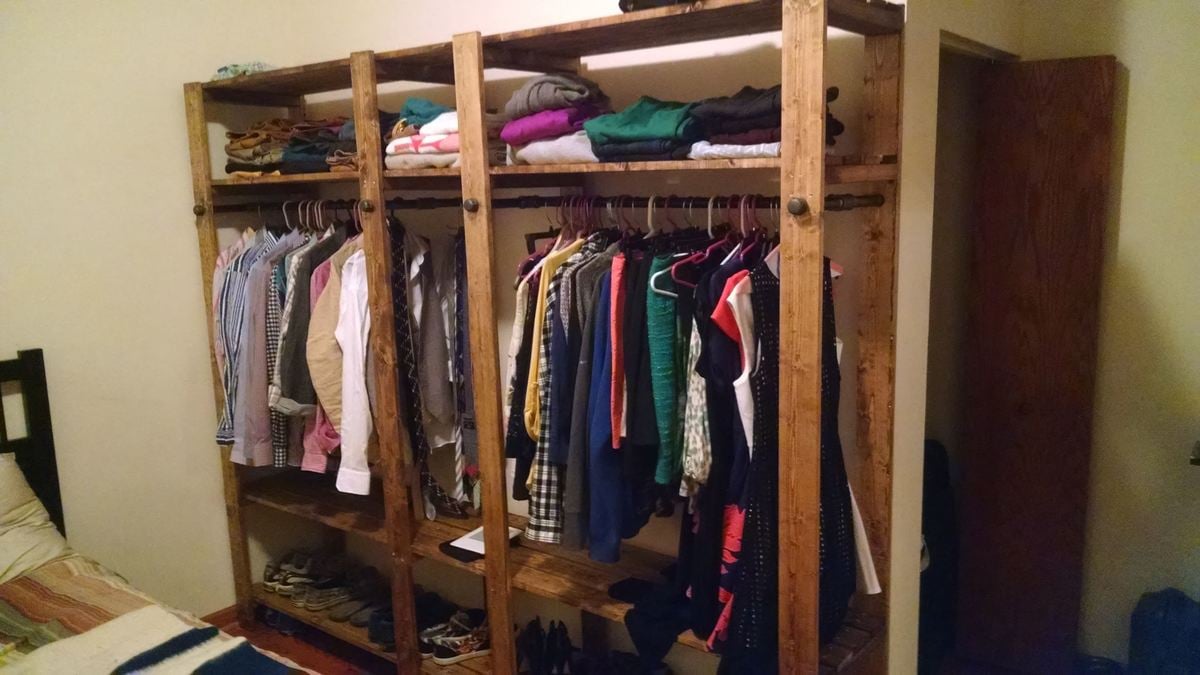
My girlfriend and I just moved into our new apartment. It has hardly any storage space at all and very little closet space. So we built our own! It was a long day's work, but the reward of a beautiful Chifforobe is well worth it.
This was my first carpentry project, and I couldn't be happier with the way it turned out.
Built from Plan(s)
Estimated Time Investment
Day Project (6-9 Hours)
Finish Used
Just a basic stain. Early American.
Recommended Skill Level
Beginner
Comments

Tue, 03/10/2015 - 18:42
This is sooo awesome! You
This is sooo awesome! You look like a professional!
Small Chicken coop
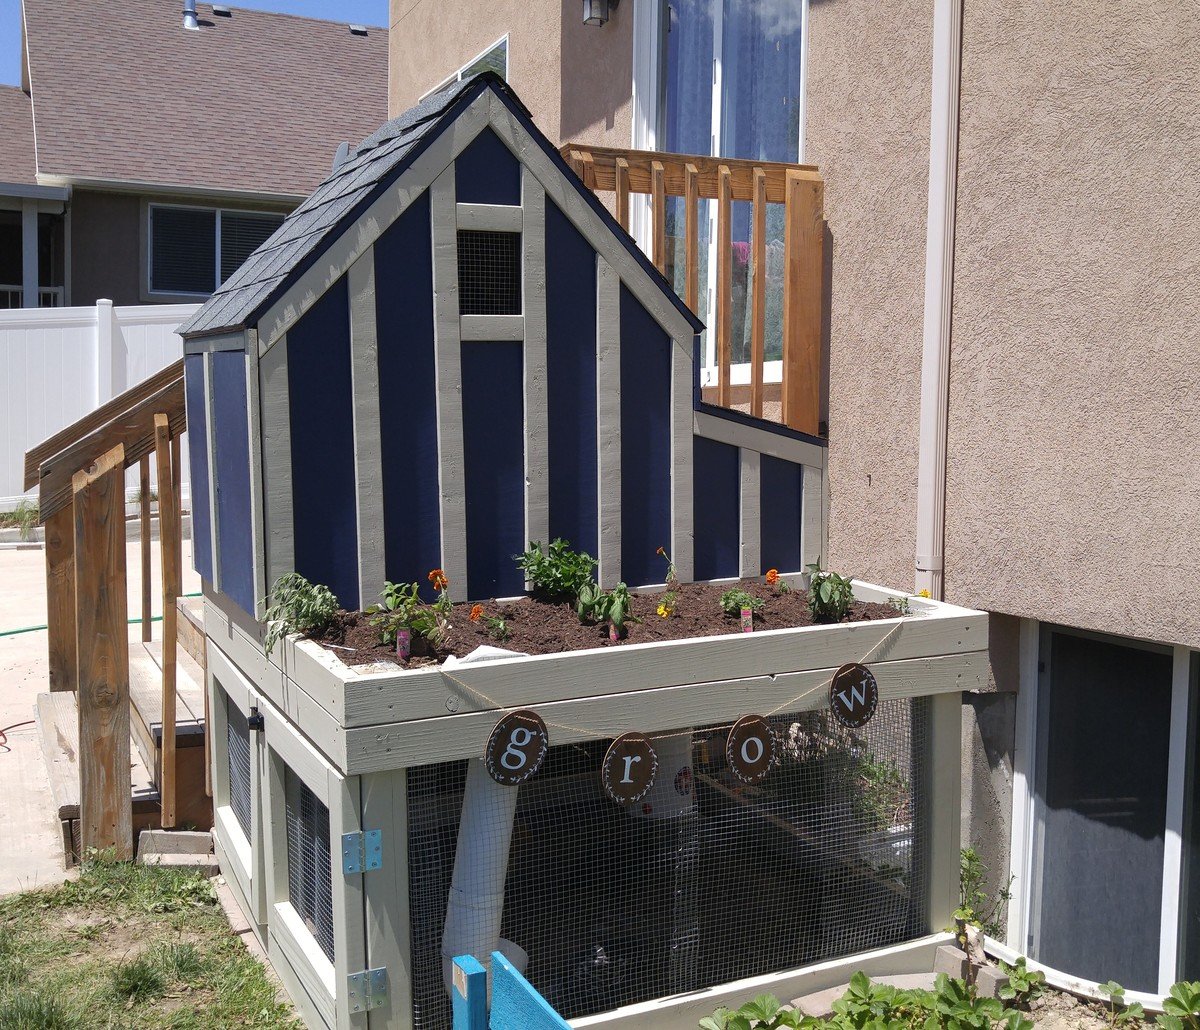
We built this to go right next to our stairs. The run has hardware cloth on 3 sides and then the side touching the stairs opens up to under the stairs so they have a bigger run.
We extended the floor so that it went all the way to the nesting box. We will be adding a nesting box to the wall by the cleanout doors rather than where the plans put the nesting box. We like that this gave us more square foot per chicken on floor space. Due to this change though we had to use interier hinges so the floor could slide in and out easily. We also added a door to the bottom so the coop could be locked seperately from the run.
I wanted to turn the space where the planter box is into a storage space and may still do that later to store food, clean out supplies, and first aid supplies. We'll see!
Built from Plan(s)
Estimated Cost
$500 This includes Cedar wood for all exterior wood, hardware cloth to cover everything and have a 12 inch apron under the coop, two colors of stain, shingles, big boxes of screws (we had a million leftover), hinges and locks with keys. We definitely went the expensive route but I think it will last us a long time and hopefully we've created a Fort Knox!
Estimated Time Investment
Weekend Project (10-20 Hours)
Finish Used
Cabot Stain Newberry Blue and Navajo White
Recommended Skill Level
Intermediate
The Mail Boss (my attempt)
This was my take on the mail boss. It took a lot longer than I thought but I learned a lot in the process.


Built from Plan(s)
Estimated Cost
$150
Estimated Time Investment
Week Long Project (20 Hours or More)
Finish Used
Benjamin Moore Advance in Pure White
Recommended Skill Level
Intermediate
Comments
Wed, 07/28/2021 - 09:20
Looks fantastic!
Thank you for sharing your build, great hardware choice and finish!
Router Table
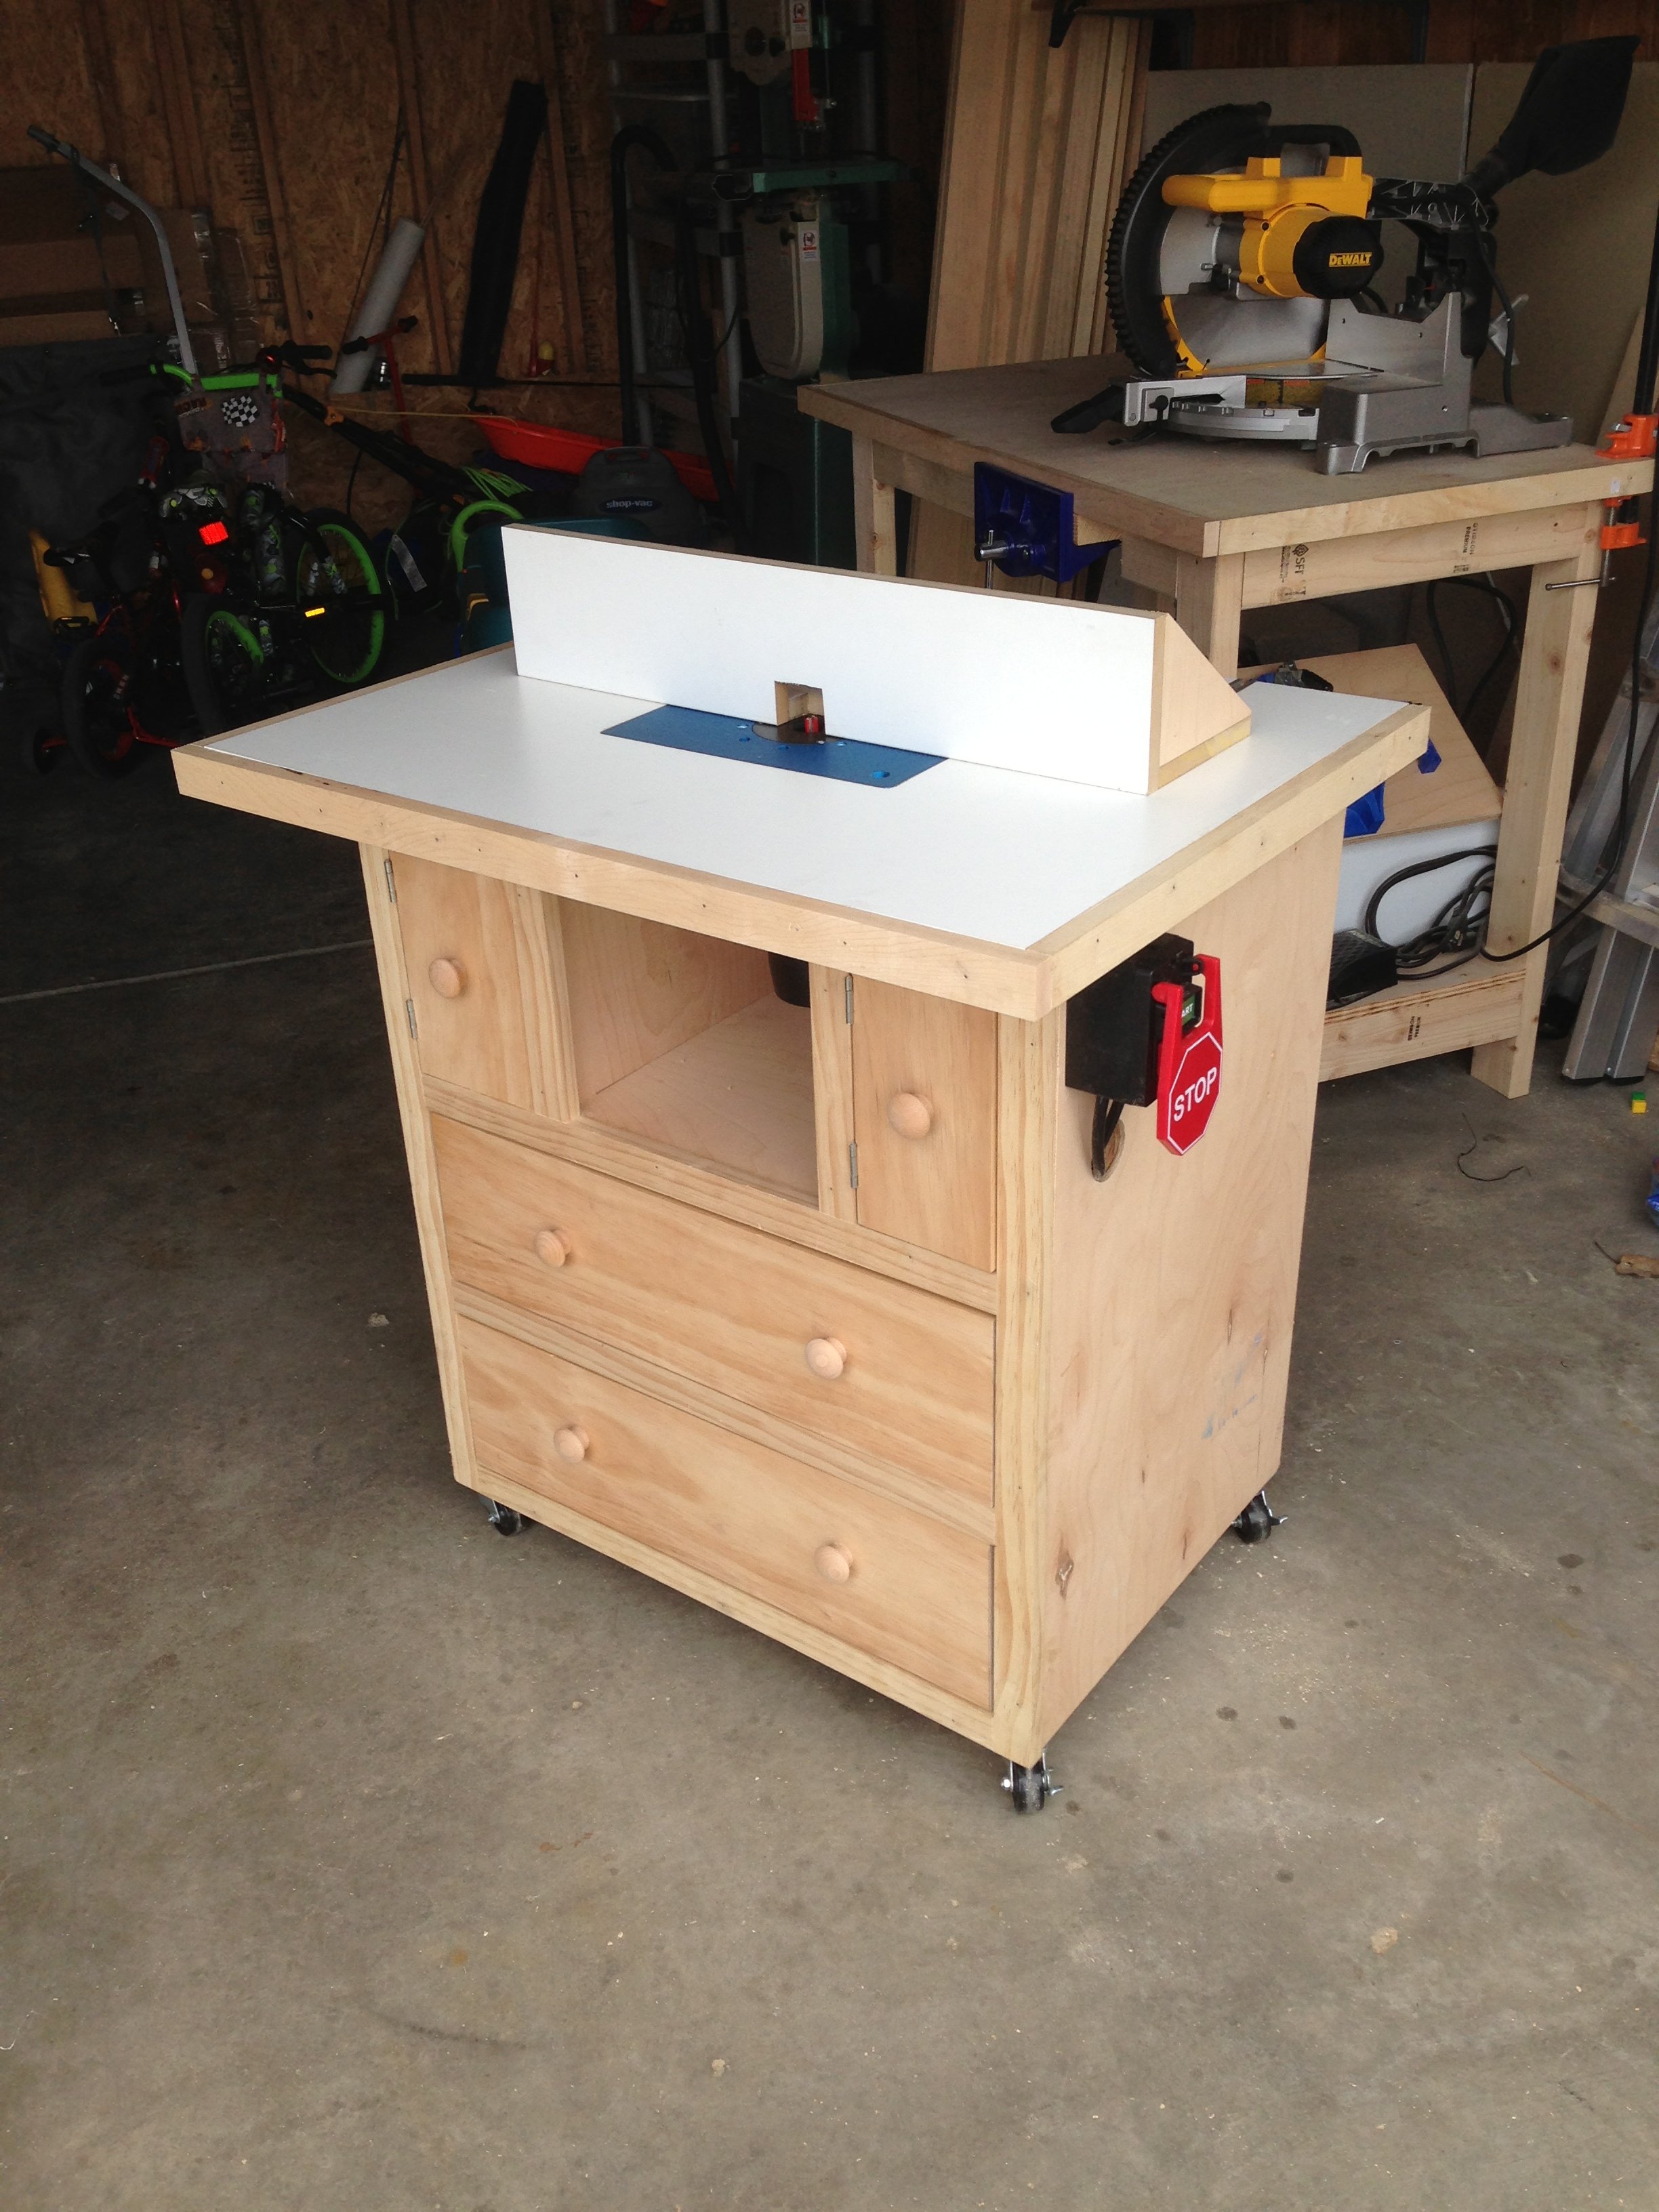
My wife has been asking for new dressers for the boy's room for a while now but every time we go out shopping for them I am very disappointed in the quality of what is available. So I decided to make them myself. I have not made any furniture before and needed a few tools to help me out and thought what better way to get both the practice and the tools then build my own router table.
I searched the web for plans and found these great ones. I loved these plans but wanted to make a couple of changes anyway. I decide to build the table top as well as the cabinet and decided to make it a little taller to fit me better. Due to the changes and making the table top it took me 2 days to finish, 1 day for the cabinet and 1 for the top and to put it all together. (Not having used a router before it took me a while to get the template just right to cut in the insert.)
It works great and looks great in my shop. Now on to the dressers.
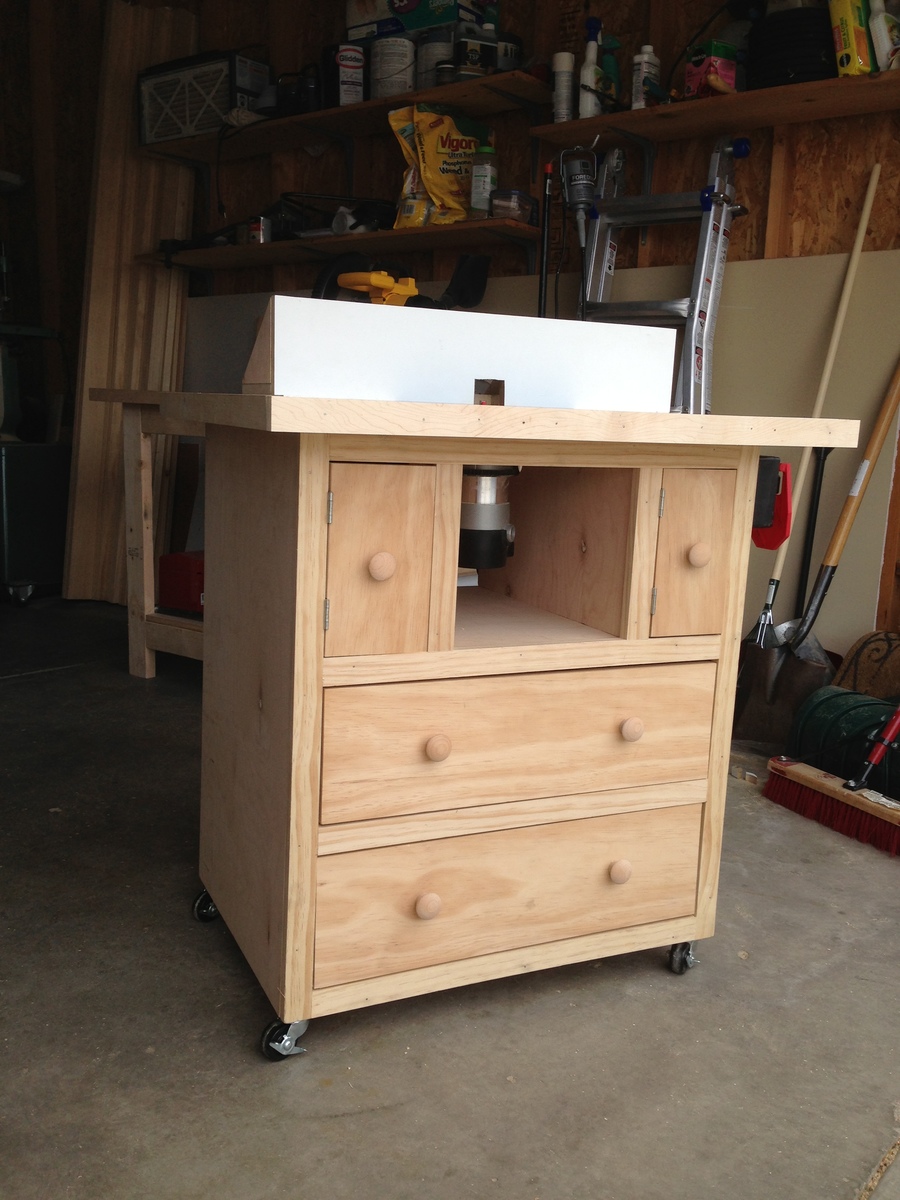
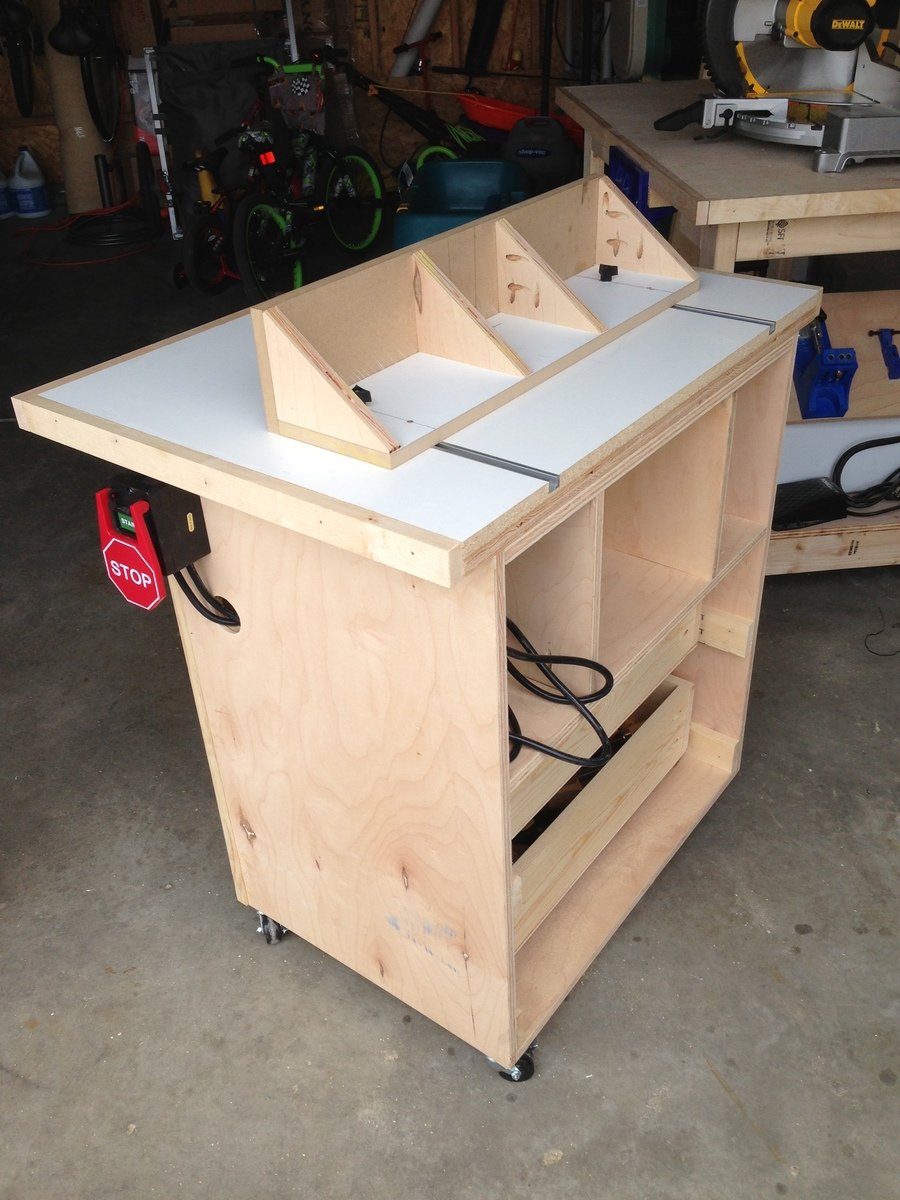
Built from Plan(s)
Estimated Cost
350 with the router
Estimated Time Investment
Weekend Project (10-20 Hours)
Finish Used
none
Recommended Skill Level
Beginner
Comments

Sun, 04/21/2013 - 10:55
I need to build one of
I need to build one of these!!
Yours looks very nice!
Bunk Beds {land of nod inspired}
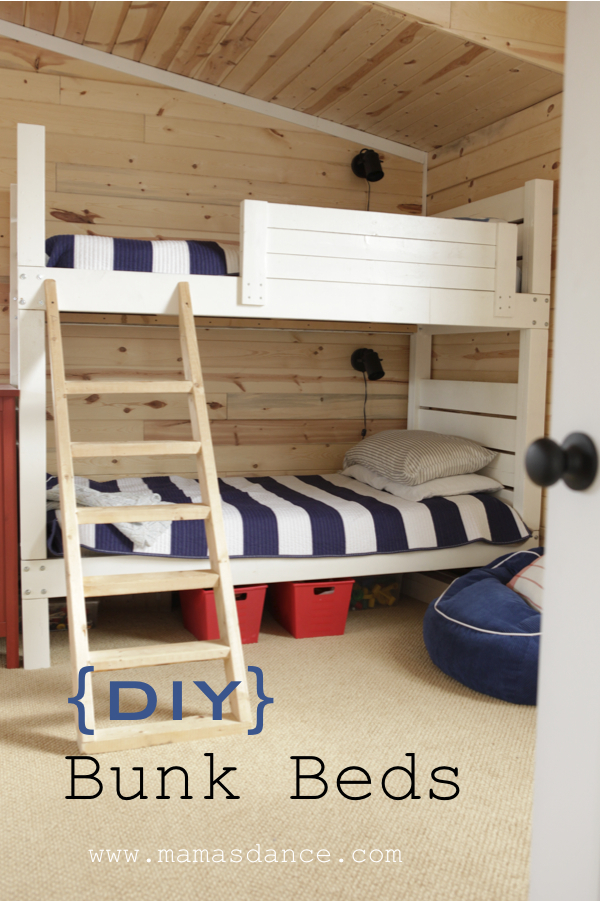
We built these bunks for our boys, ages 4+6. The plans were super simple to follow. The frame was built out of scrap 2x6's and 2x4's. We did have to make a modificatioon on the ladder- it came up just short for some reason, so we added a 2x4 to the bottom.
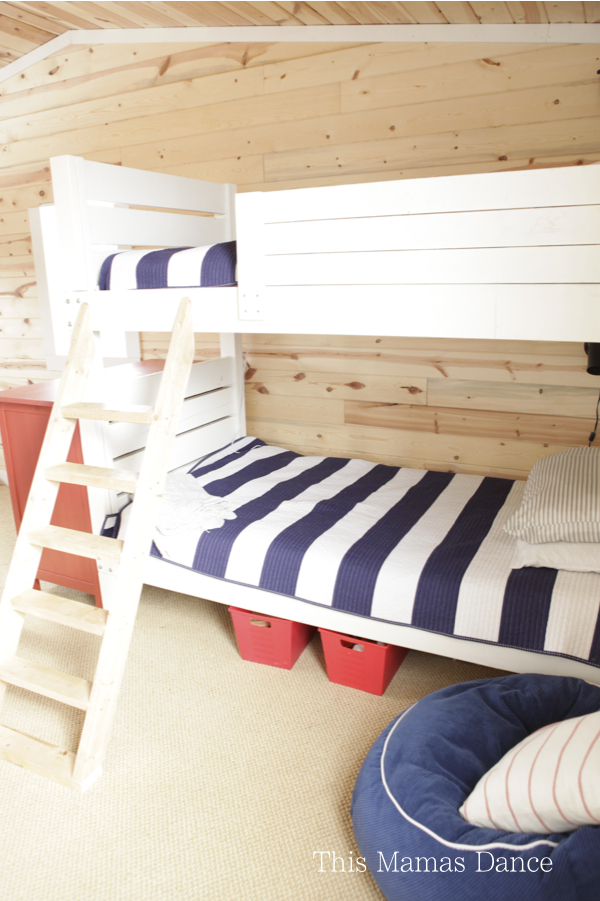
Built from Plan(s)
Estimated Cost
we only had to purchase nuts and bolts, so this didn't cost much. If you were to build from scratch I think it would be between $100-$200 CAD
Estimated Time Investment
Day Project (6-9 Hours)
Finish Used
Latex Paint in Semi-Gloss
Recommended Skill Level
Beginner
Comments

Sat, 03/14/2015 - 20:26
Great job on the beds! That
Great job on the beds! That room looks awesome. I love the color selection.

In reply to Great job on the beds! That by handmadewithash
Sat, 06/20/2015 - 08:56
Thank you!
Thank you!
Farmhouse King Bed
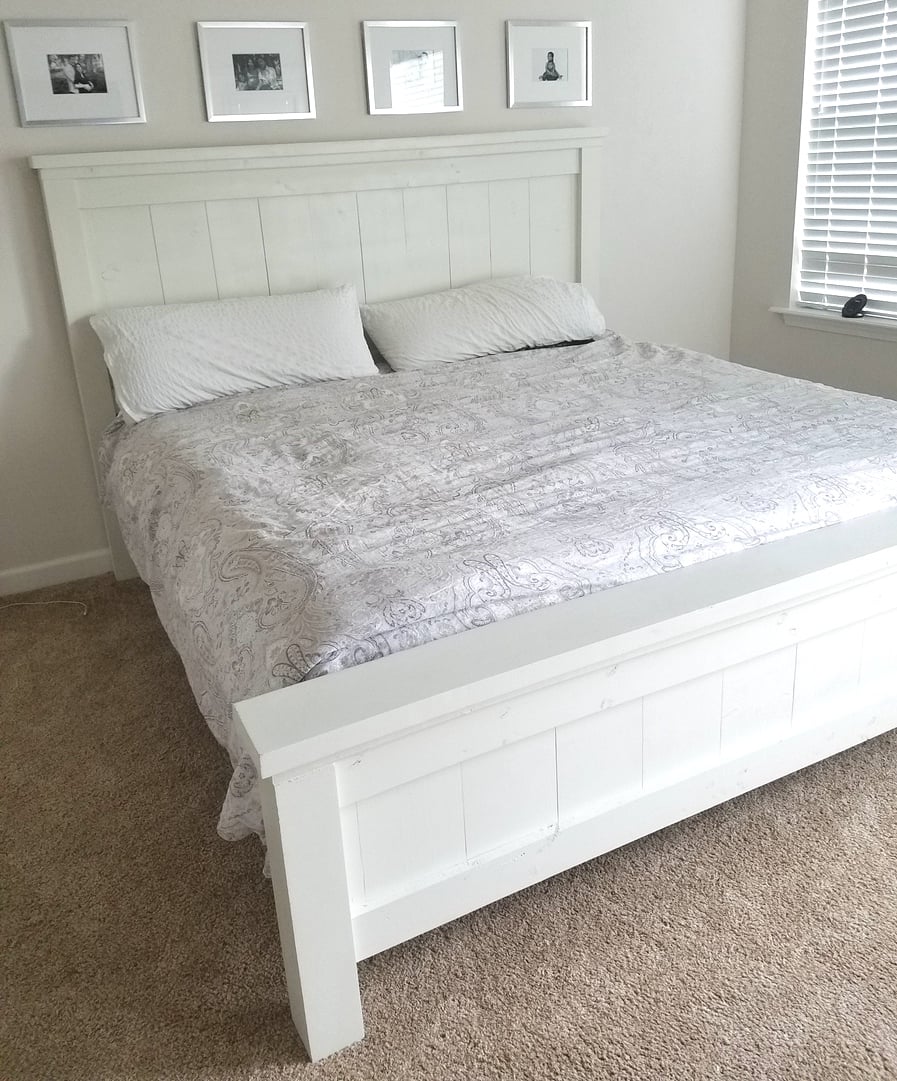
Took a little longer than I anticipated. By far the hardest part was finding straight boards at Home Depot. Used Cedar 4x4s for the post to avoid treated wood. Had to make a few adjustments for our king mattress, but well worth it. Bed and platform came in right at $300 for the wood, screws, paint, etc. Thanks for the plans!
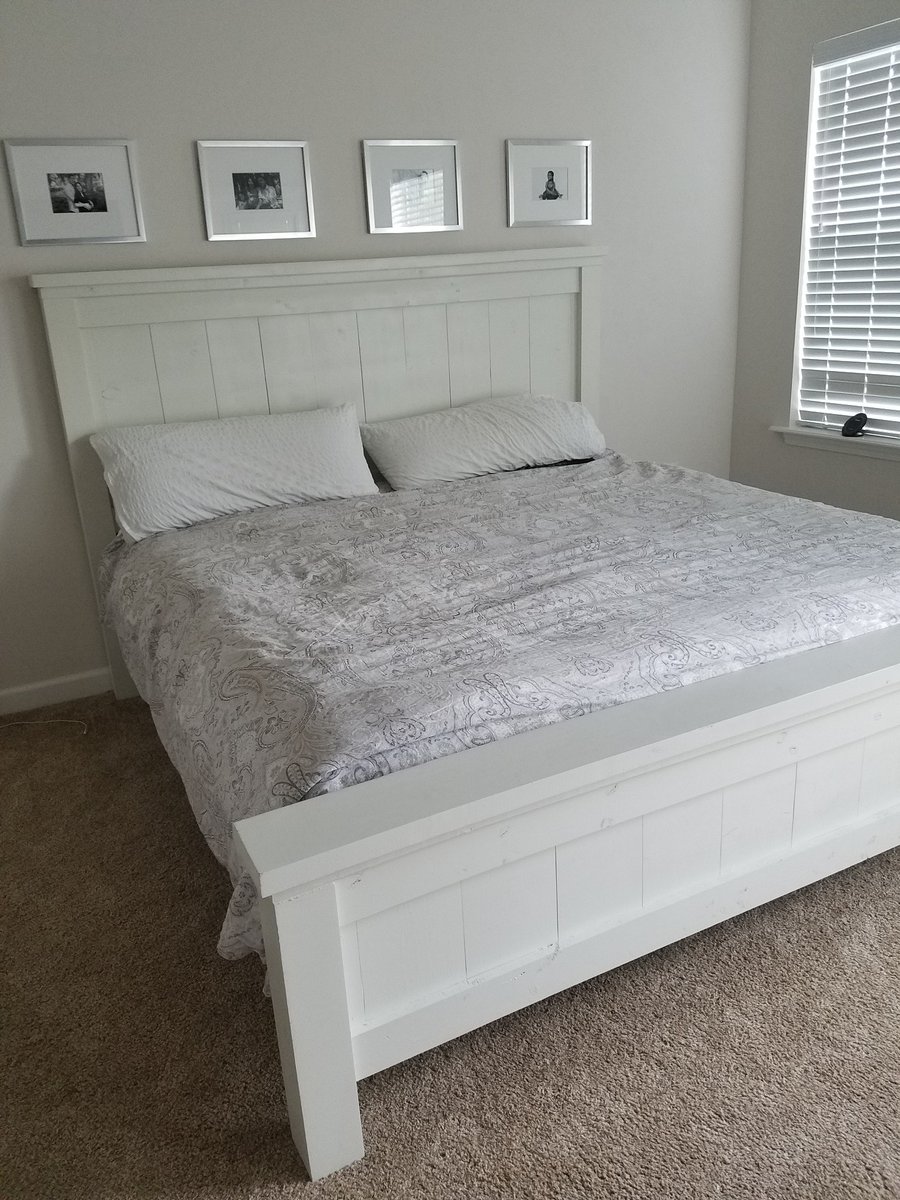
Built from Plan(s)
Estimated Time Investment
Weekend Project (10-20 Hours)
Recommended Skill Level
Intermediate
Coffee Table for College
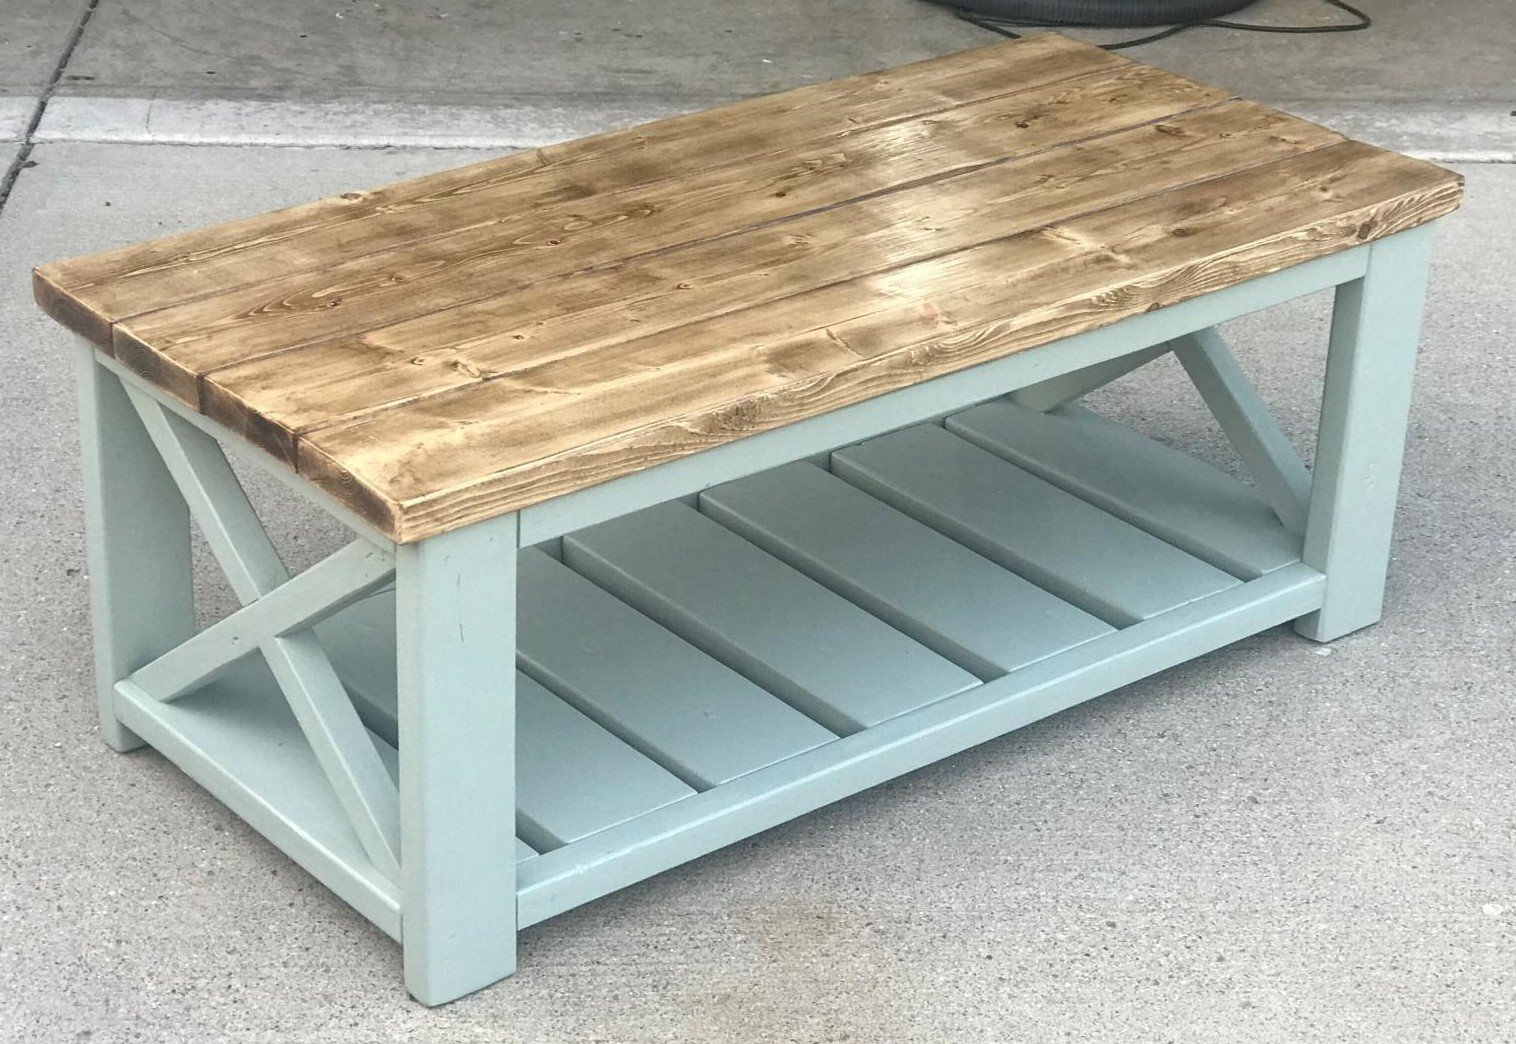
My daughter is going back to school and moving out of the dorms and into a house and needed a coffee table. Saw these plans, had almost all the wood so off we went. Happy with how it came out. We used some paint we had for the base (Pure Sage) and I used a Weathered Oak stain with 5 coats of satin polyurethane for the top. If she has room will make a matching end table!
Comments

my picnic table
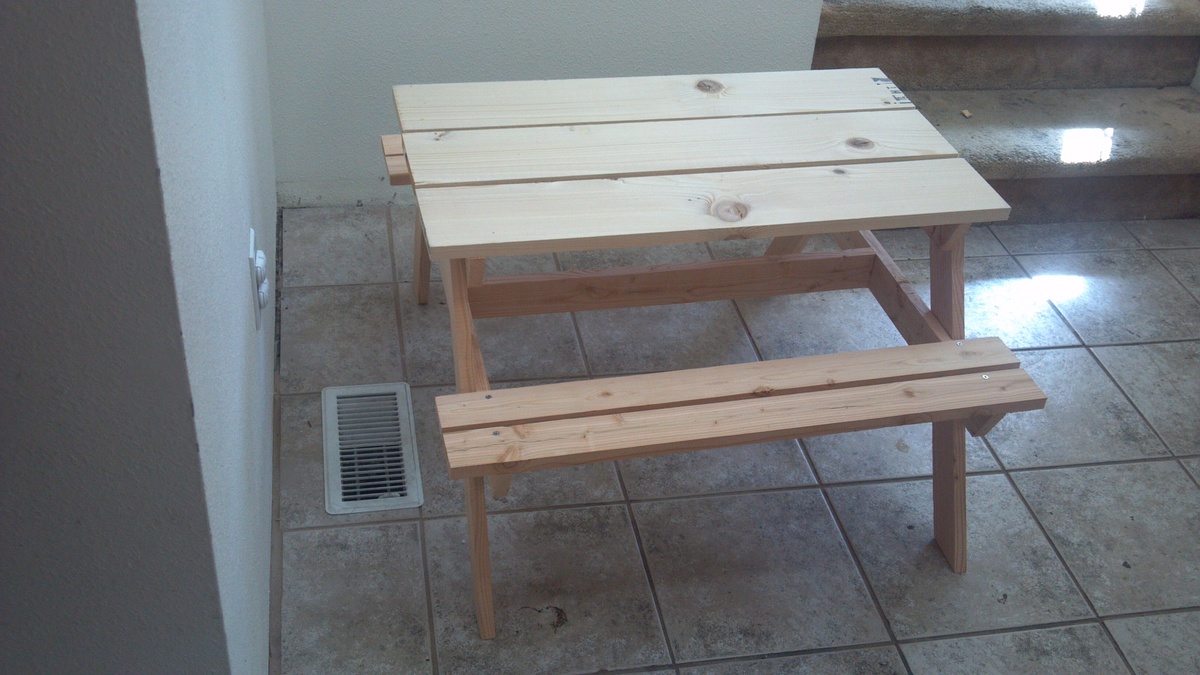
Very easy project to make. From leaving the house to get the wood, get home, make cuts and assemble was about 4-5 hours. I have used this website as inspiration for other projects, but this was the first that I just followed the plans and it turned out great!. Very sturdy and perfect size. My daughter in the picture is almost 5 and this is perfect for her and will last years for our youngest daughter.
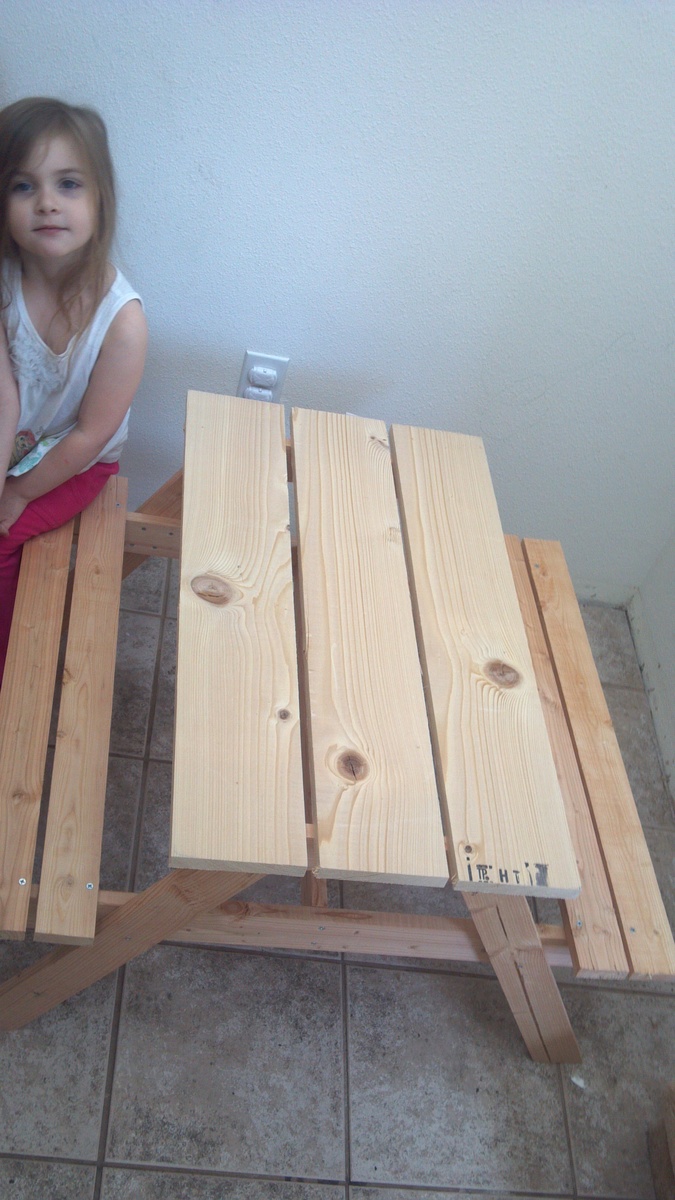
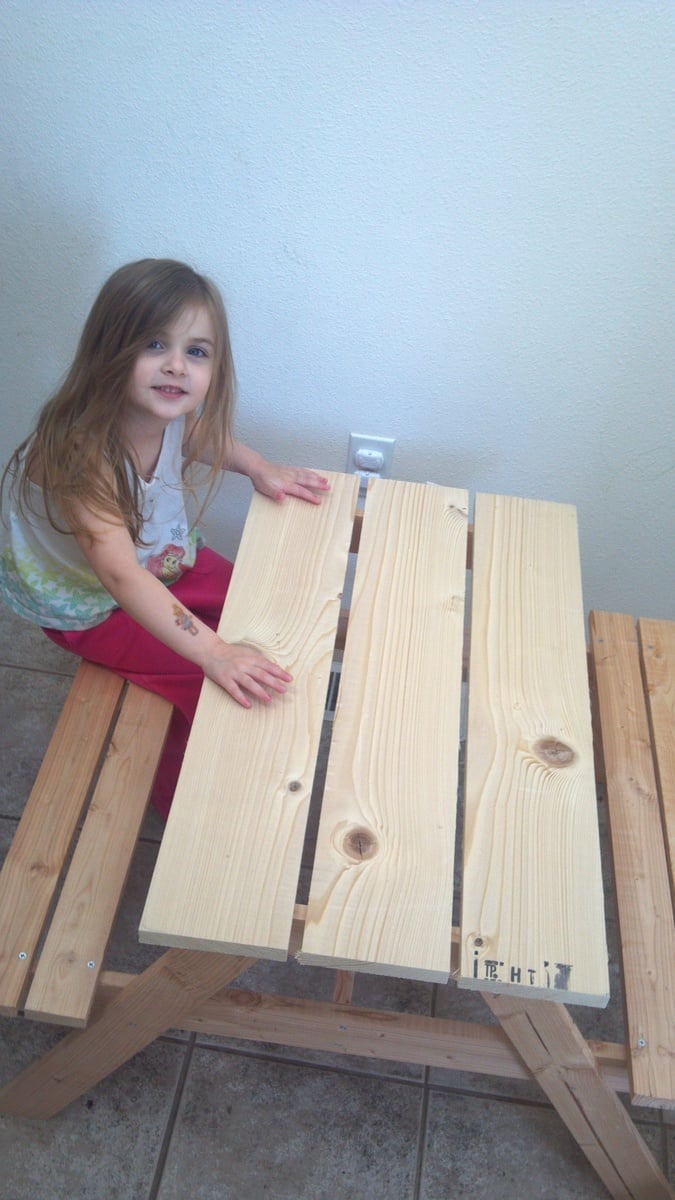
Built from Plan(s)
Estimated Cost
15 for wood, screws I already had and paint will be 3-4 dollars
Estimated Time Investment
Afternoon Project (3-6 Hours)
Finish Used
Will be painted
Recommended Skill Level
Starter Project