Community Brag Posts

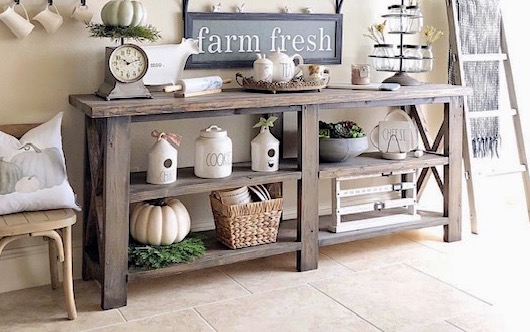
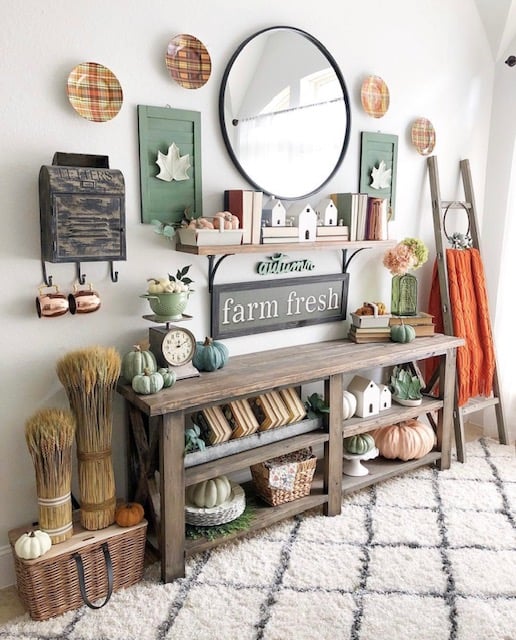
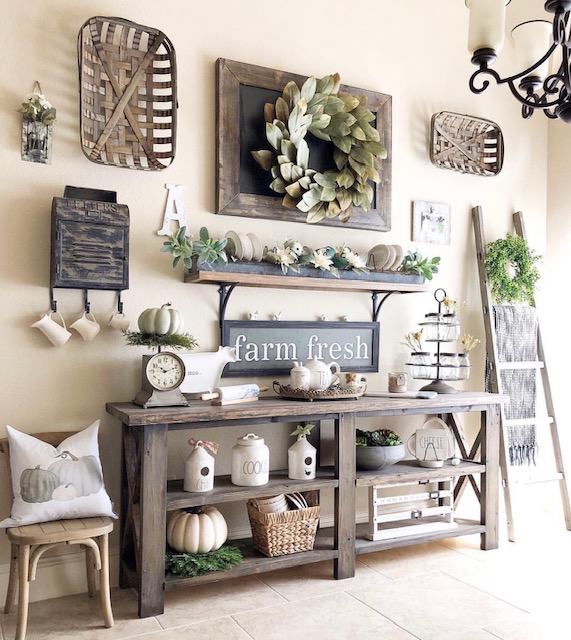
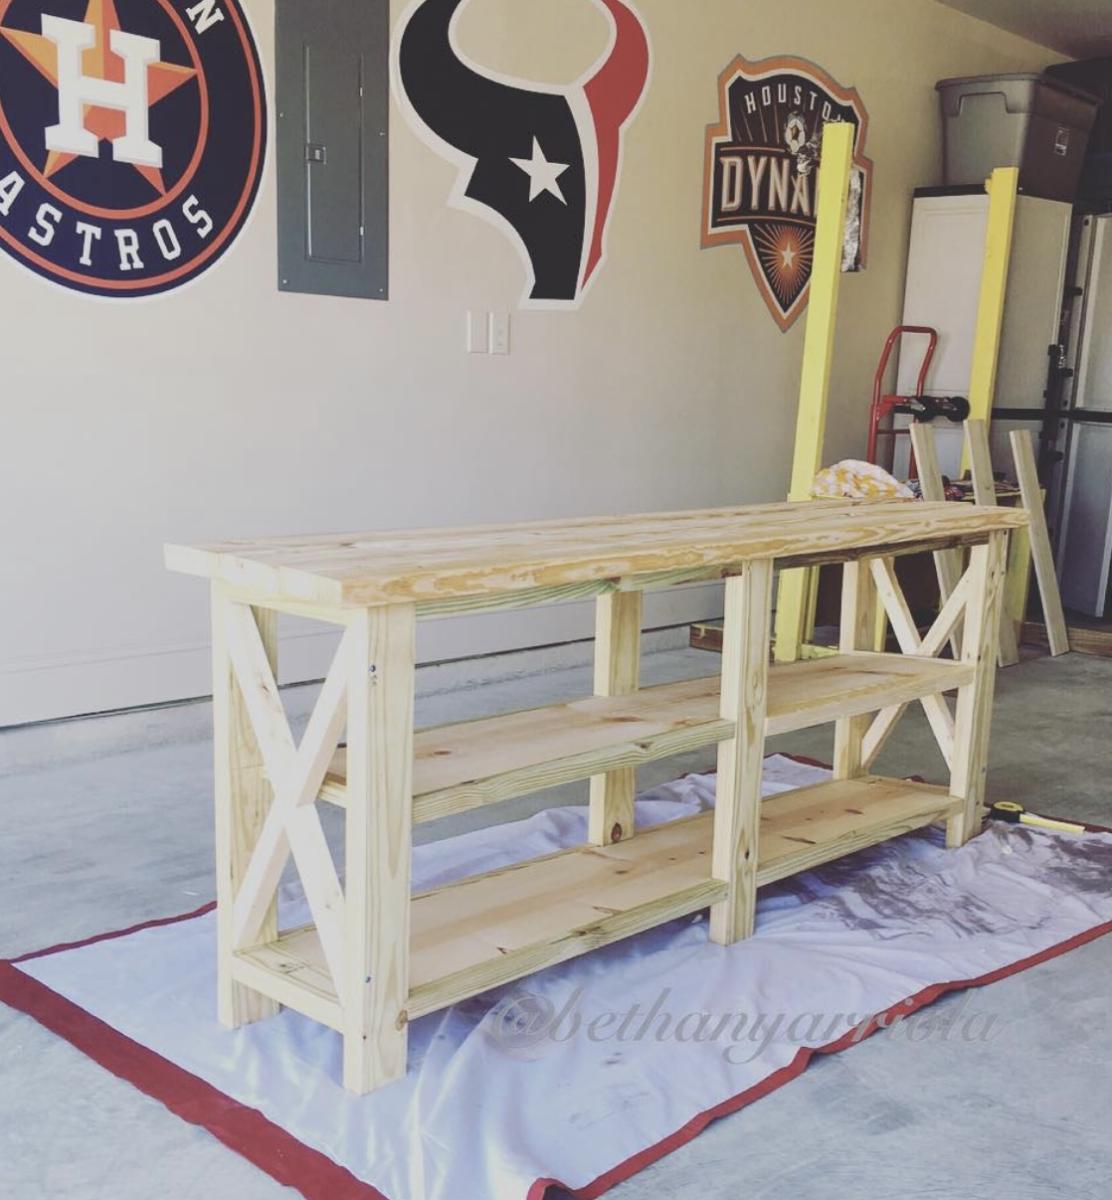
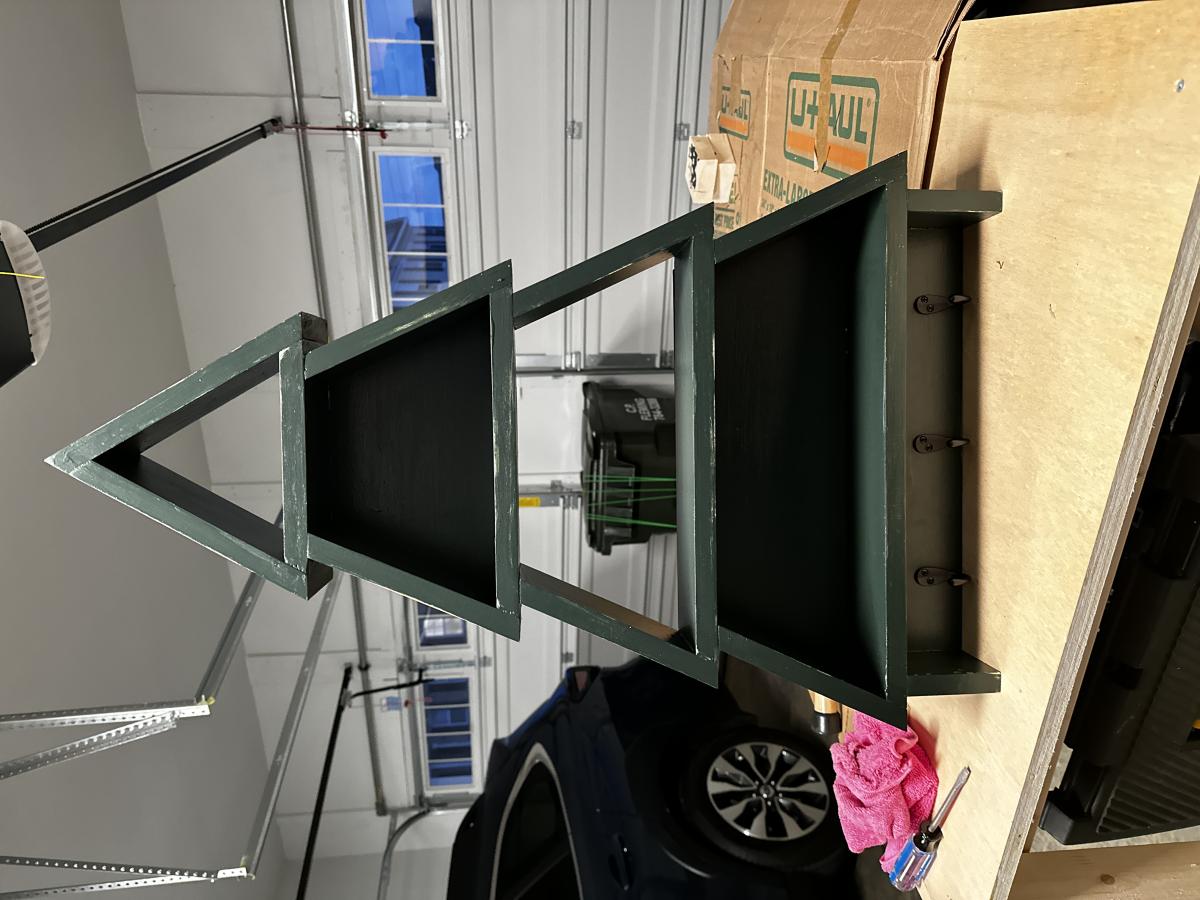
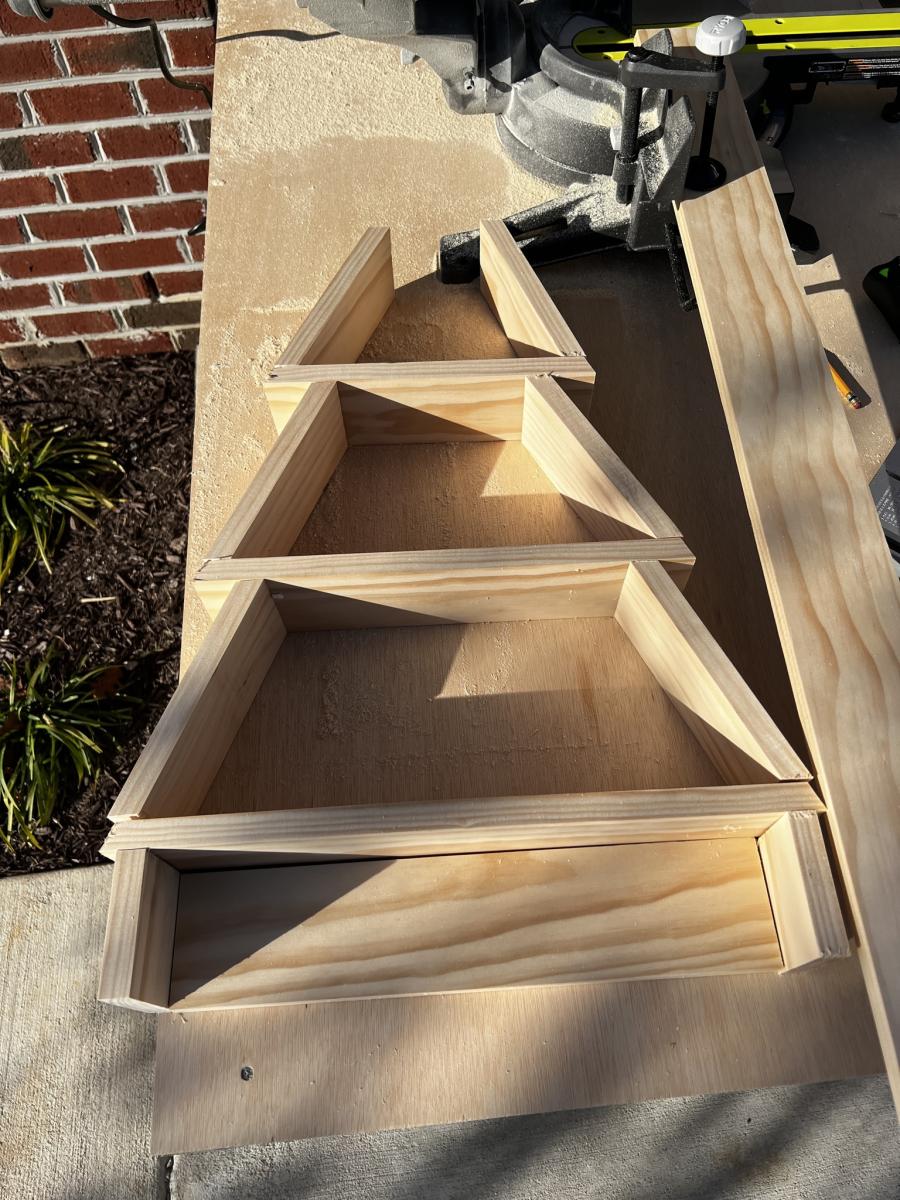
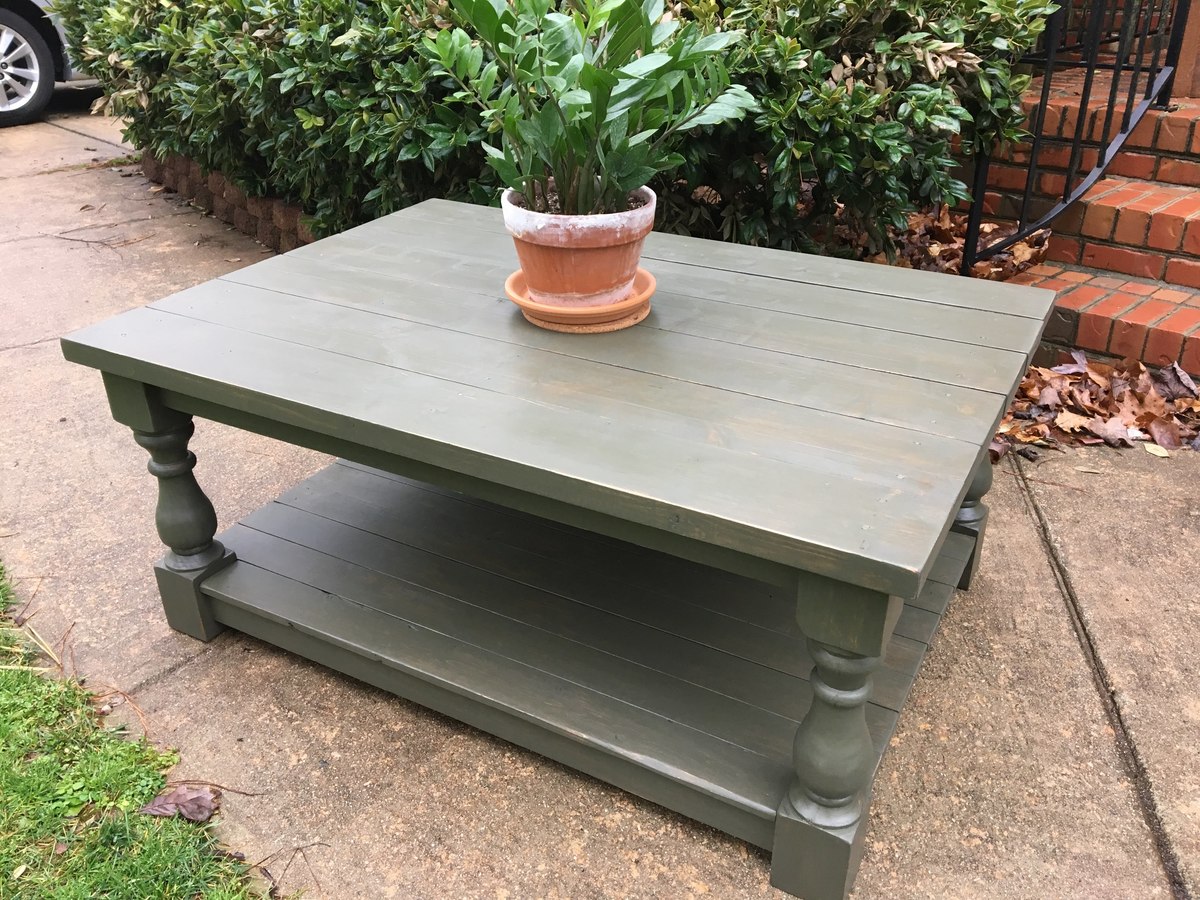
Chunky Coffee Table with Turned Legs

Submitted by danicarby on Sun, 02/18/2018 - 06:53

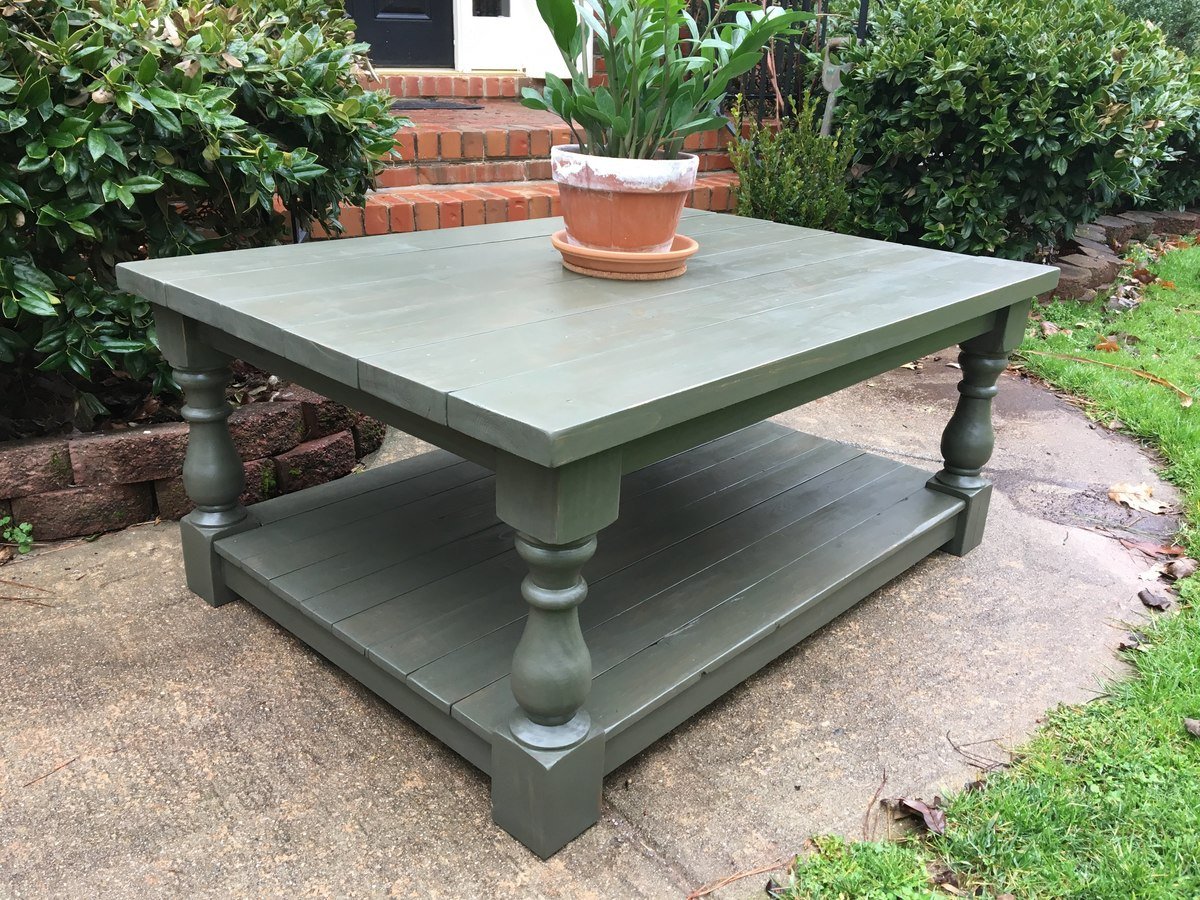
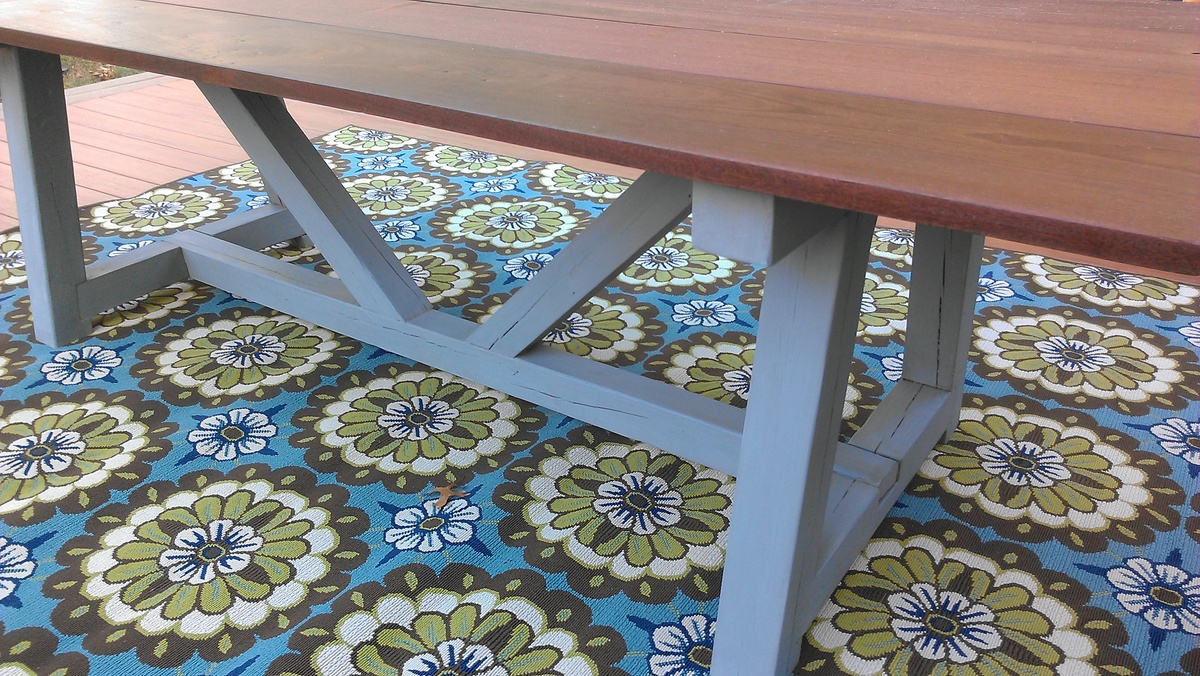
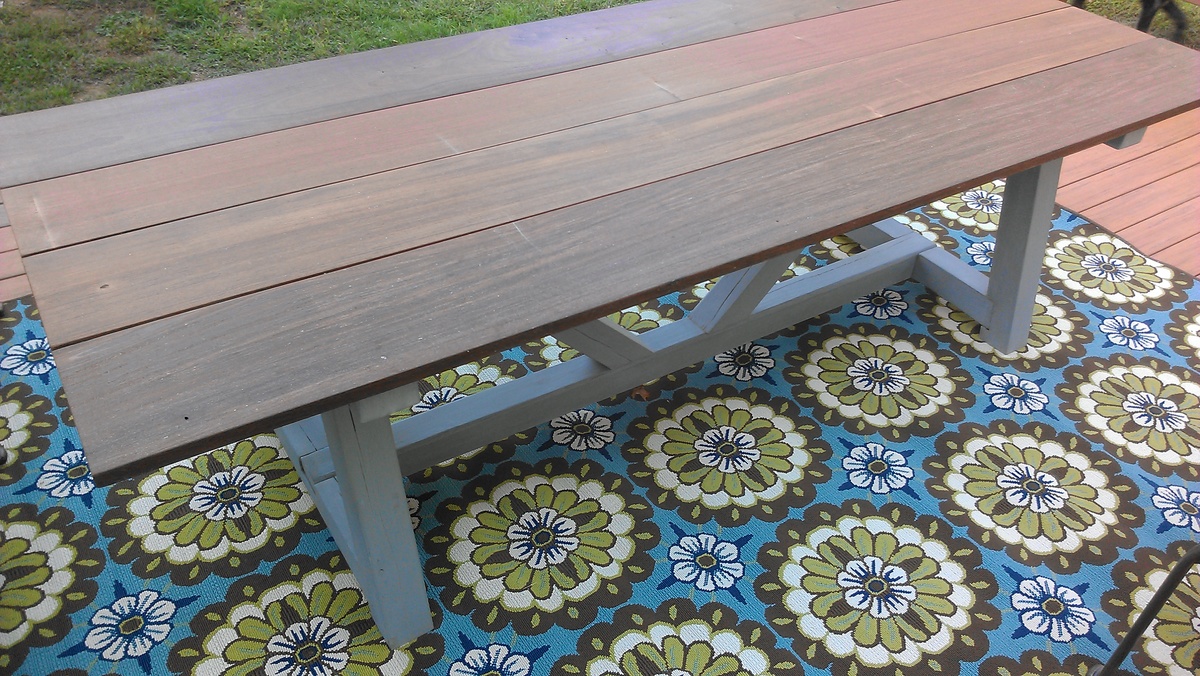
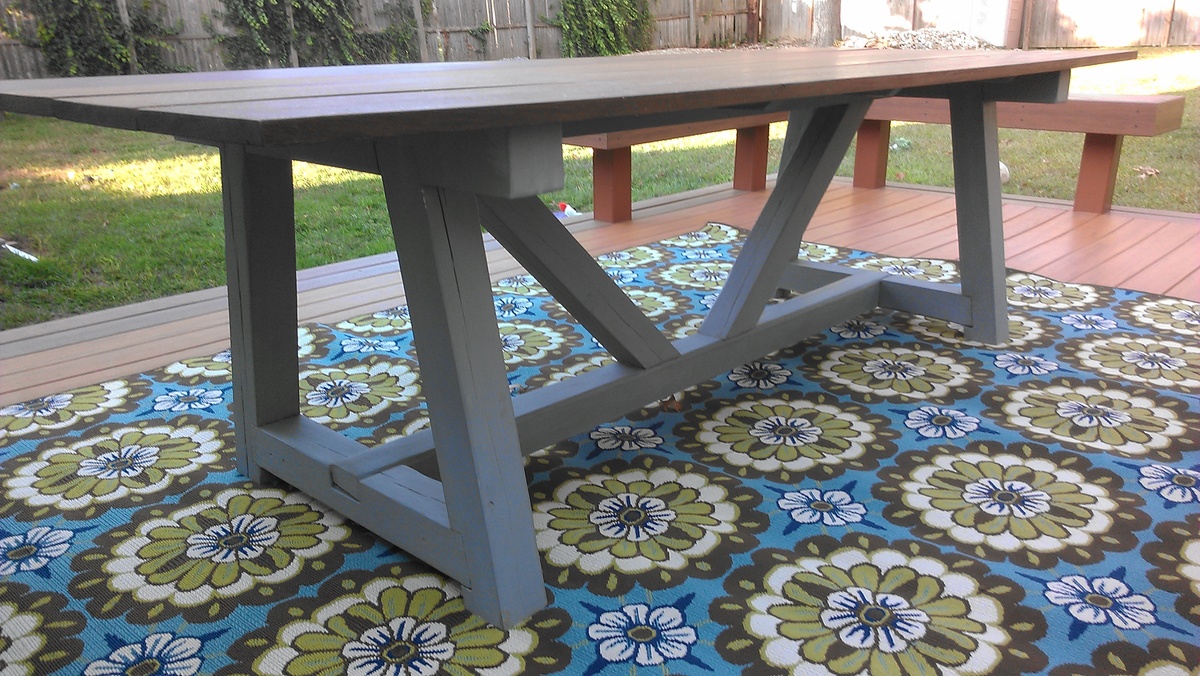
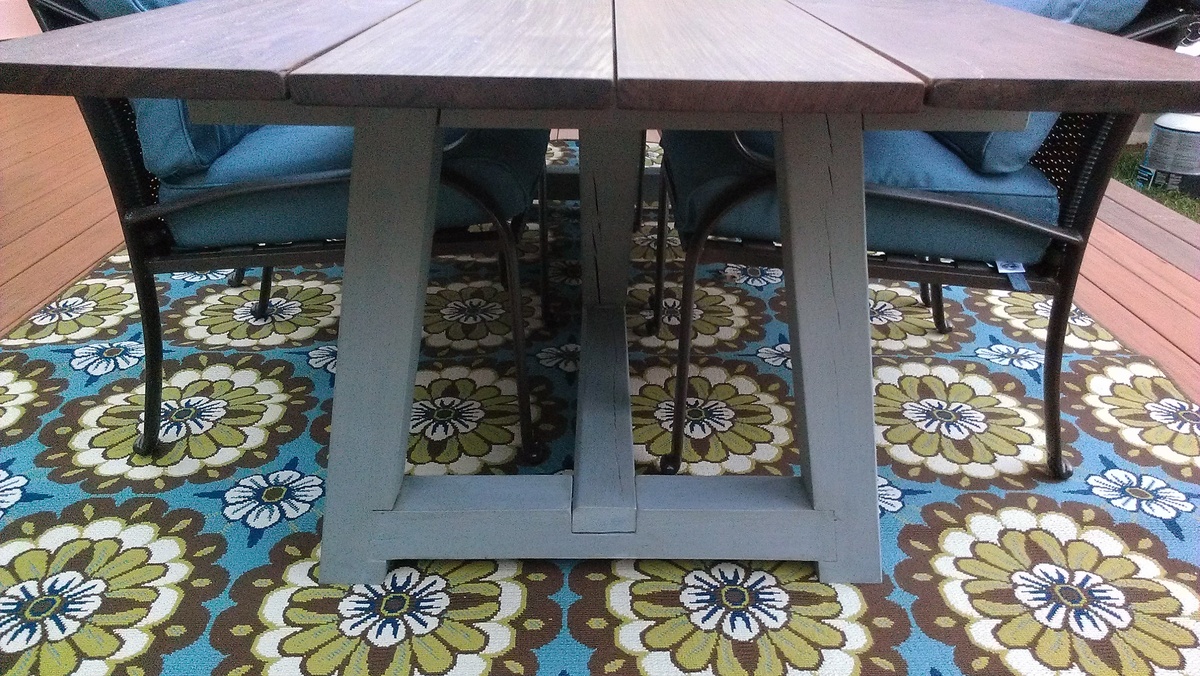
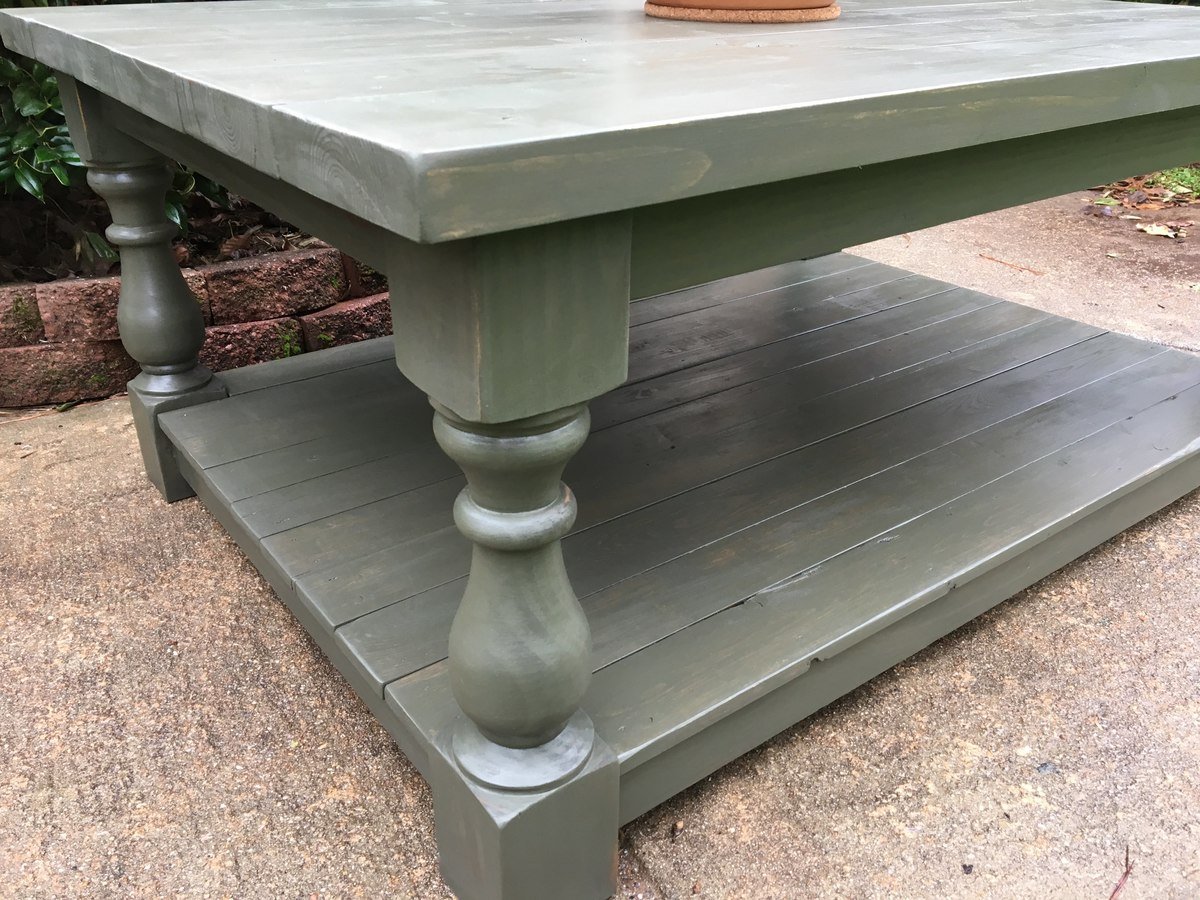
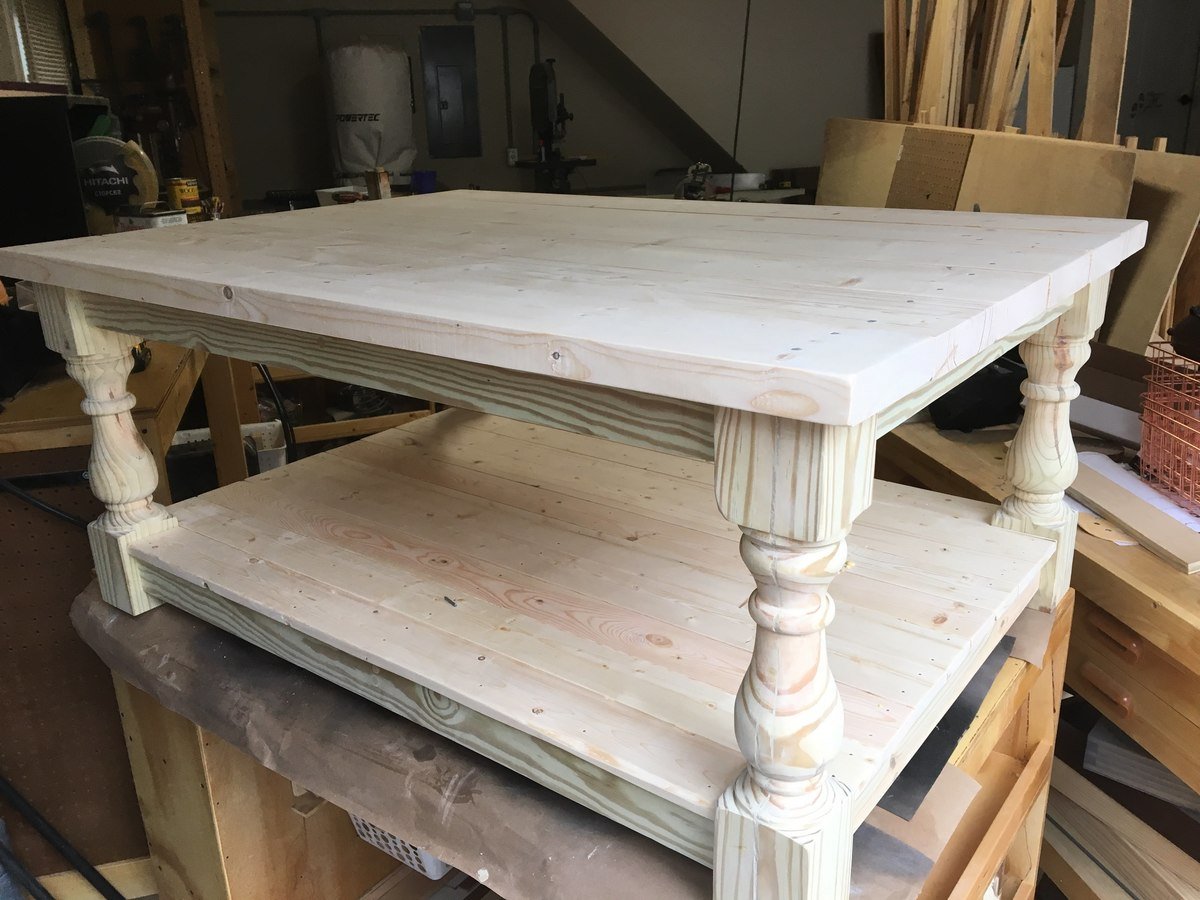
I turned my legs (woot woot!) but you could buy legs that are 3x3" @ 18".  This was a simple build using pocketholes + glue joinery and using glue + nails for the shelf and tops.  To allow for seasonal expansion of wood I spaced the wood on shelf and top slightly because I built it in the dry winter.


I used a Dark Walnut stain first and went back over with a light coat ("dry brushing") of a sage green paint.  Lightly distressed edges.


I have more pictures and details on my website: http://www.theprojectlady.com/2018/02/diy-tutorial-chunky-coffee-table-…


Happy building everyone!  It's so rewarding, right!??

Estimated Cost
$50 for wood
$20 for finish
$5 for screws/nails
Estimated Time Investment
Day Project (6-9 Hours)
Finish Used
Dark Walnut Stain
Behr Premium Plus Indoor Paint
Recommended Skill Level
Beginner

Art Table!

Submitted by Jess1221 on Sat, 06/04/2011 - 09:50

I used the plans for the craft desk and modified it a little. I made the top like a lid that just sits on top so I can take it apart easier. I also put on full extension drawer glides and made the drawer larger. This took me quite a long time because I was working on it and studying for finals! Well worth it though!

Estimated Time Investment
Week Long Project (20 Hours or More)
Finish Used
High Gloss black paint with Jamaican Aqua accent color
Recommended Skill Level
Beginner

Tall Bedroom Dresser

Had a blast with this project and am getting more confident with drawer slides. I built a matching dresser that is much shorter and wider. It can be found here: http://www.ana-white.com/2018/08/DIY_furniture/bedroom-dresser

Estimated Cost
$150-$200
Estimated Time Investment
Weekend Project (10-20 Hours)
Finish Used
Varathane Weathered Wood Accelerator, Varathane Poly
Recommended Skill Level
Advanced

Comments

hutchingslv

Thu, 08/12/2021 - 15:35

Any way to get a copy of these plans? I really like the look and want to give it a shot. Have to make a few of these if all goes well for all my boys.
Thanks

Essential Wood Outdoor Chair Frame for Standard Chair Cushion

Submitted by Anonymous (not verified) on Sat, 11/05/2022 - 14:11

Beginner here and I enjoyed this one quite a bit. I played with the angle of the back and finally perfected it on chair three and four. I put the last bottom slat a little closer to the front to create more of a back angle. I also added a third back support position of the bottom slats are essential for comfort so you’re not sitting on a slat. My cushions need to be a bit thicker because you can definitely feel it. Overall, I enjoyed this project. Longest part was making all the cuts, and then painting because I use the sprayer and had to clean it. Thanks Anna!

Comments

Fireplace with hidden Mantle storage and side bookshelves

Submitted by ibseenu on Thu, 12/01/2022 - 14:30

Thank you Ana for you Fireplace design as it was exactly what I needed! We’ve lived in our house for 3 years now and I’ve wanted a fireplace ever since. Your plan was perfect and with a few modifications I made it come to life. My 9yr daughter as I was almost done building thought there should be a shelf for books and movies below the fire place. It gave me the idea of adding storage on the sides. I had already had the idea of the mantle storage and just used a floating shelf idea and made that. This was a lot of fun!! It took me a little over a week to build. But can’t wait to build something else for our house… like the mudroom!

Amy

Comments

jtemperley

Sun, 01/08/2023 - 19:02

That looks awesome! My husband and I are planning on doing this as well. I do have a question, as I see you have carpet just like us. Did you cut out the carpet where you built out, and if so how did you go about that, or did you just build on top of it?

Oh Christmas Tree

Submitted by Rentzm on Sat, 12/17/2022 - 04:13

What a merry addition to my Christmas decor. I was drawn to this project because I wanted to use my new miter saw and to practice cutting angles & piecing together with great precision. It’s a bonus that I needed a place to hang stockings.

The directions were clear and helpful. It is forgiving if you don’t get boards aligned perfectly. That provided a great confidence boost for this newbie.

The stain is Minwax Austin Field solid. It was my first stain experience and it took me a while to get a smooth and consistent finish. But I love the tone.

Built from Plan(s)

Comments

Adirondack Chairs

Submitted by Anonymous (not verified) on Wed, 12/28/2022 - 16:16

Built these for my Father-in-laws birthday

Comments

Farmhouse bed

Submitted by Anonymous (not verified) on Sun, 01/15/2023 - 18:51

Needed a bed. After looking in town for premade beds, I wasn’t satisfied with the workmanship or price. I thought I could build one much nicer than what I was seeing. With these plans, I was able to make it happen. It turned out way better than expected. After a couple of strikes with paint, I watched a couple of YouTube videos on painting furniture black and that’s all it took to get exactly what I was looking for. Thanks so much for the plans. I also made the mini farmhouse bedside tables. I’ll put pics of it under the tables category

Comments

Extra-Large Wood Pet Kennel End Table

Submitted by Anonymous (not verified) on Sat, 01/02/2016 - 17:24

I followed Ana's plan exactly, but increased the dimensions to the standard XL crate size (42L x 28W). The base is painted gloss white and the top is stained espresso.

Built from Plan(s)
Estimated Time Investment
Week Long Project (20 Hours or More)
Finish Used
Gloss latex for the base and Minwax espresso stain on the top.
Recommended Skill Level
Intermediate

Outdoor Providence Table

Submitted by splout on Thu, 10/17/2013 - 20:11

This was my first attempt at building a piece of furniture. It's an outdoor table based on the providence table plans. I used old 4x4 pressure treated posts from part of my fence that was no longer needed for the base. The posts were fit together using lap joints and secured using fastenlok screws. The base was then painted with french grey chalk paint (first time experimenting with chalk paint) and then covered with a thin coat of brown briwax. The top is made of 8 foot by 1 inch ipe boards that are 4 different widths but the overall width is about 42 inches. The ipe was purchased rough sawn and needed to be planed to uniform thickness. I used a natural stain meant specifically for ipe and other tropical hardwoods.

Built from Plan(s)
Estimated Cost
$220 for me - 200 for ipe boards, 20 for paint, 4x4 posts free
Estimated Time Investment
Weekend Project (10-20 Hours)
Finish Used
French grey chalk paint and briwax for base. Natural tropical hardwood stain for top.
Recommended Skill Level
Beginner

My daughters platform bed

Submitted by Anonymous (not verified) on Sun, 03/24/2019 - 05:33

I’m in love with how well this bed turned out. Modified by using a 2x4 for middle support and 1x4’s for slats. It was less money and felt better for support. 

Built from Plan(s)
Estimated Cost
$150
Estimated Time Investment
Weekend Project (10-20 Hours)
Finish Used
Early American stain & matte poly
Recommended Skill Level
Beginner

Pantry Shelf

Submitted by Anonymous (not verified) on Sat, 03/04/2023 - 13:03

I have a small kitchen. I found this plan on Ana's site to turn it into a pantry shelf. Initially, I was going to have wheels. That way, I could roll it to sweep. I took measurements to match the height of my upper cabinets and width so my door would clear. I put this shelf up to the side on my fridge. I didn't account for the height difference adding wheels. I still can add wheels if I change my mind. I did differing spacing, considering spices and cereal boxes and items between. I haven't quite figured out the end placement for items. I also am considering appliances to be placed on the bottom. I purchased baskets and spice drawers so I can visually organize and see what works. I used odd and end prices of wood and adjusted the measurements to fit my space. I love my corner 2x4s! They are dark and once planes, have these dark brown ribbons revealing the growth rings. We think they might be brown treated boards. Some of the shelves have a darker brown edge, 5 total. I purposely wanted the dark edge facing out. But I didn't have enough so I used different looking boards (same thickness) and played around with assign them their spot. My friend had copper pipes laying around, so I used those in the back to stop my items from falling off the backside. I polyurethaned to keep the natural wood colors. I really love it and am excited to do more projects!!

Built from Plan(s)

Comments

Cup tree inspired by Anna’s plans

Submitted by Anonymous (not verified) on Sun, 03/12/2023 - 14:17

Used Anna’s cup tree plans for this project. Thank you Anna!

I’ve also successfully built a few of your beds. Your plans are always straightforward and easy to follow.

What you do is so appreciated!!!

Angel

Built from Plan(s)

Comments

Modern Outdoor Chair and Sofa

We built the chairs first using the Modern Outdoor Chair Plans found here on Ana White. We then modified the plans to make a 75" couch that fits 3-25" cushions. Both were super easy to build. We are very happy with them. We built the couch on the porch because it is very heavy when finished. Everyone loves them!

Estimated Cost
Wood and screws for chair around $30 each. Wood and screws for sofa around $60. We already had the paint and cushions.
Estimated Time Investment
Afternoon Project (3-6 Hours)
Finish Used
Satin Exterior Paint
Recommended Skill Level
Beginner

Christmas Kitchen Set

Submitted by Fuchsia on Mon, 12/26/2011 - 10:44

My father in law and I built this kitchen set for my two daughters, ages 3 yrs and 9 months. It was so fun to work with my father in law. I have built a few things before (table, chairs, doll bed, etc.) but nothing of this quality or magnitude. He is a great woodworker and knows how to do all the neat finishing touches that just make the project look really professional. I learned a ton working with him and had a blast!
I was inspired by Ana's kitchen sets and used a combo of then and the Lowes plans and I was very happy with how it turned out. I changed a few things: put two doors under the sink, made "gas" burners instead of "electric", used half the sink cabinet top for the sink and left the other half for counter space, added a clock to the stove, made the oven door open down.
The sink is a food service warming pan 1/4 size and the faucet came from Wal-Mart for $10. I will probably replace it with a nicer one from the ReStore when I get a chance
Break down of costs:
Lumber: $100
Hinges and pulls: $40
Paint and primer: $45
Burners: $20
Sink: $24

Estimated Cost
$230
Estimated Time Investment
Week Long Project (20 Hours or More)
Finish Used
Exterior: Glidden Red Delicious high gloss enamel
Interior: White
Oven: grey stone textured spray paint
Recommended Skill Level
Intermediate

Comments

Cindy from Indiana (not verified)

Mon, 12/26/2011 - 13:09

Holy cow! Fantastic job! You guys really pulled it together and I really love the creative use of hardware, etc.

Fuchsia

Wed, 02/29/2012 - 10:03

Sorry I didn't see your comment sooner - I made the burners with craft wood circles and squares and 1/2 inch pieces of wood. I notched the ends over the circle with a chisel.

Reclaimed Wood Bedside Table

Submitted by Ktosaka on Fri, 11/22/2013 - 07:31

I had inherited some bed frame wood from our local Re-store and have been working it into projects here and there. We needed some actual night stands and I loved the look of the Reclaimed Look Wood Nightstand, but they were a little too tall for our bed. The height of the original plan is 28" and I ended up taking out one drawer for a total height of 20". I also found two sets of drawer slides at the Re-store and decided that an open shelf on the bottom would better suit our needs, so I crossed the reclaimed plan with the farmhouse plan to create a shelf on the bottom. The bottom is built the same way that the sides are, but attached so that the 2x2 is on the underside.

I didn't have enough wood from the bed frame to make two full tables, so I used Douglas fir 2x2's for the legs (the best the local big box home improvement had that day for my price) and white board for the table tops and every other board for the sides and shelves. This was my second real building project, so they were really easy to put together, but it was a lesson in making everything super square because of the drawer slides. The finish I used also goes great with a 130 year old dresser that you can see a bit of next to the finish table. The wood only needed one coat to reach the color closest to that dresser and it hid the fact that I used three different types of wood in this project. Overall they are just what we needed in this space. The bed frame is IKEA, but I am thinking about making the Reclaimed Look Bed Frame to match the tables in the future.

Estimated Cost
$75 for two side tables
Estimated Time Investment
Day Project (6-9 Hours)
Finish Used
One coat Minwax Provincial stain with two coats of Minwax Wipe-on Poly. I like the look of the wipe-on, but this is the first time I've used it so I'm hoping two coats is enough. For the application, I went with old cotton socks.
Recommended Skill Level
Beginner

Rustic 3 X Hall Tree with 3 Hooks

Submitted by Anonymous (not verified) on Fri, 05/26/2023 - 07:42

I started with the Rustic X Hall Tree plan and modified it to 43" width to fix the space. All X's are half laps cut on the miter saw.

Built from Plan(s)

Comments

Ana White Admin

Fri, 05/26/2023 - 19:38

Thank you for sharing! If you uploaded a brag post of 2 end tables, I was working on fixing the sideways photo and accidentally deleted it. If that was yours please reupload!:) Sorry!