Community Brag Posts

Wedding Arbour

Submitted by Anonymous (not verified) on Mon, 10/04/2021 - 13:43

Hi, I built this wedding Arbour for my daughters wedding a while ago and unfortunately, I have no plans as I built from my head. It now sits in pride of place within thier garden as arch for thier garden.
I built this with a drop saw, hand saw, router, drill and hammer only.
I follow Ana's plans every release and save her plans for when I retire in two years to build for our house as well as try to run a small business from my shed.
Thank you Ana for you continued plans and wonderful advice.

Built from Plan(s)

Comments

My 3rd build off this site

Submitted by psilver on Fri, 04/03/2015 - 08:13

I modified the dimensions slightly and opted to not mount the fold down doors as I figured they would always be open anyway.  I built this mostly from solid red oak save for the bottom panel and the middle panel, which are plywood.  I crafted the top out of 5 pieces tongue and grooved with mitred corners on the front.  I also tongue and grooved the doors with glass insets.  I finished it in Minwax red cedar under poly.

Built from Plan(s)
Estimated Time Investment
Week Long Project (20 Hours or More)
Finish Used
Minwax red cedar
Recommended Skill Level
Intermediate

DIY Jr. Camp Loft Bed with Curtain

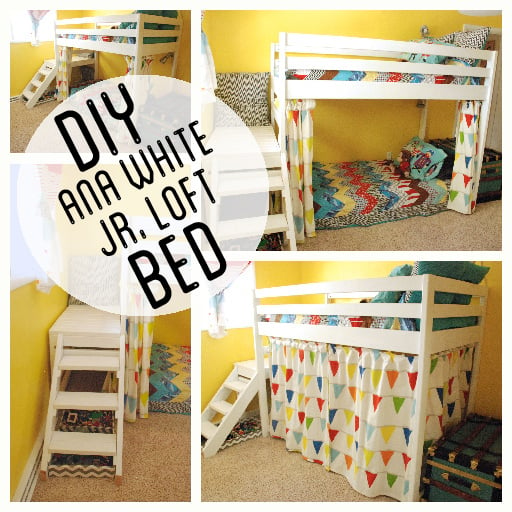
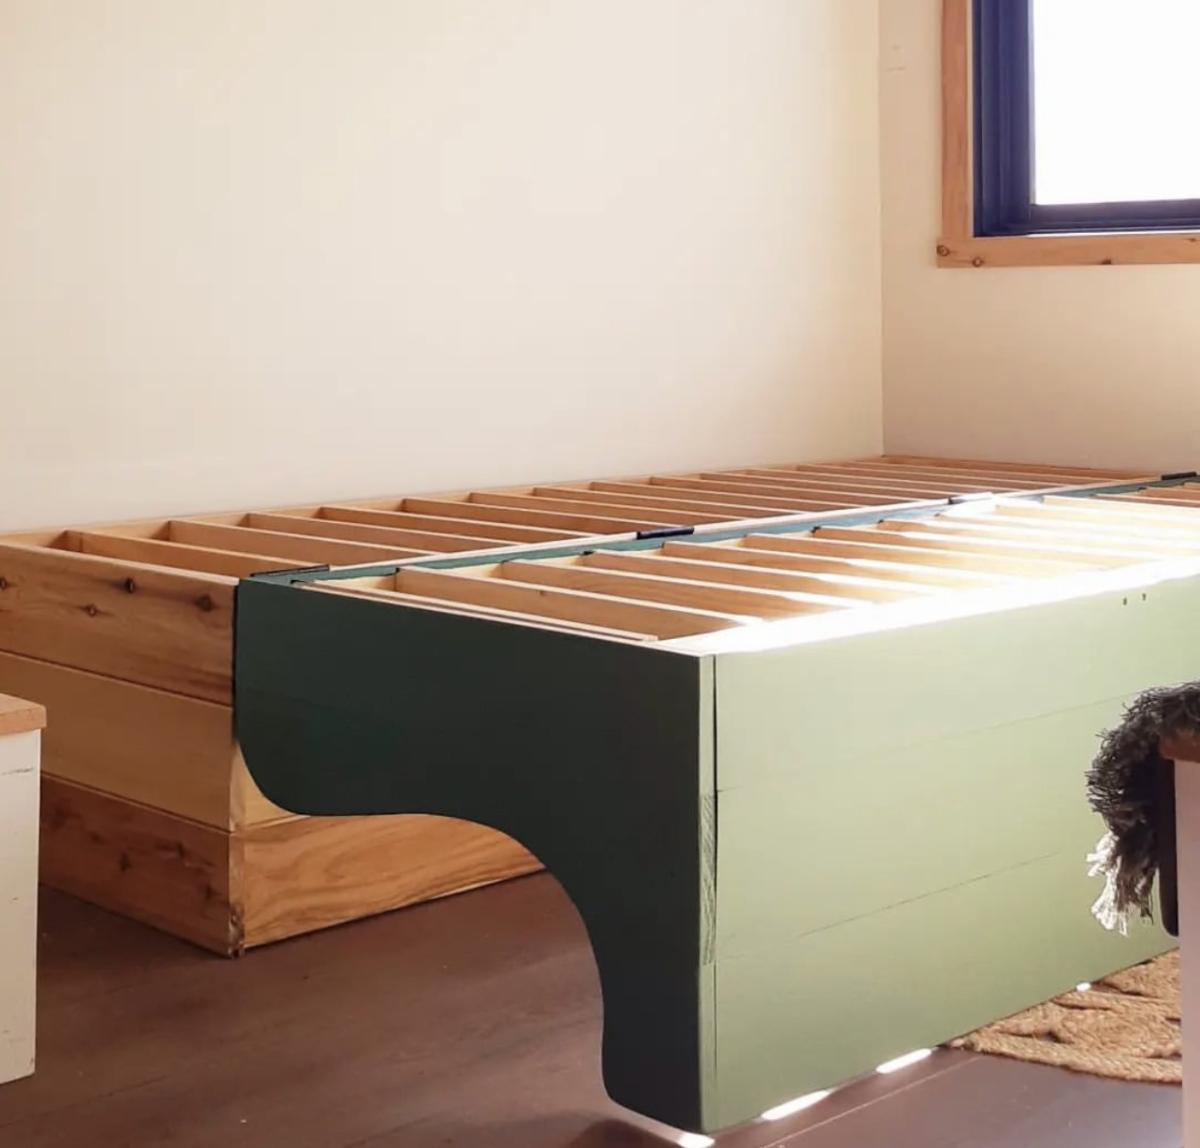
Check out the details about how we build the bed on my blog: http://www.brightgreendoor.com/2013/05/diy-ana-white-jr-loft-bed.html

Although nothing about it was difficult, it was time consuming, and consumed the greater part of two weekends.

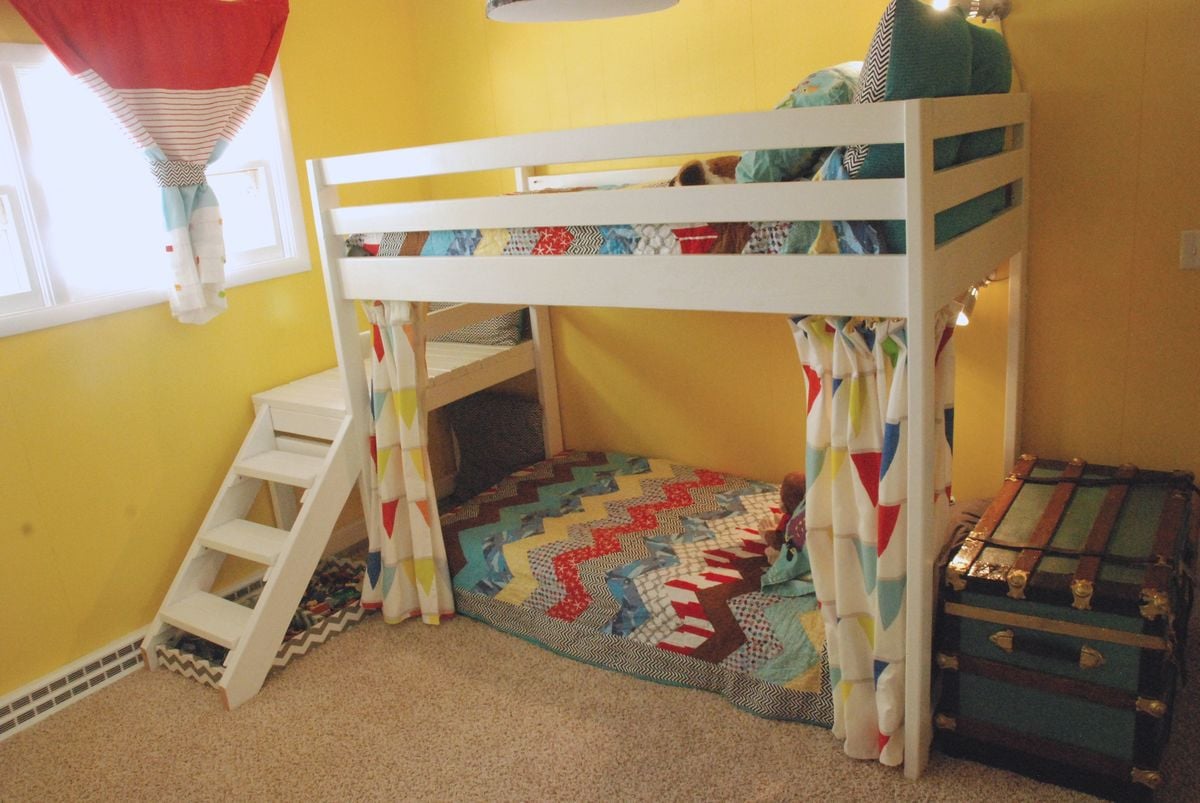
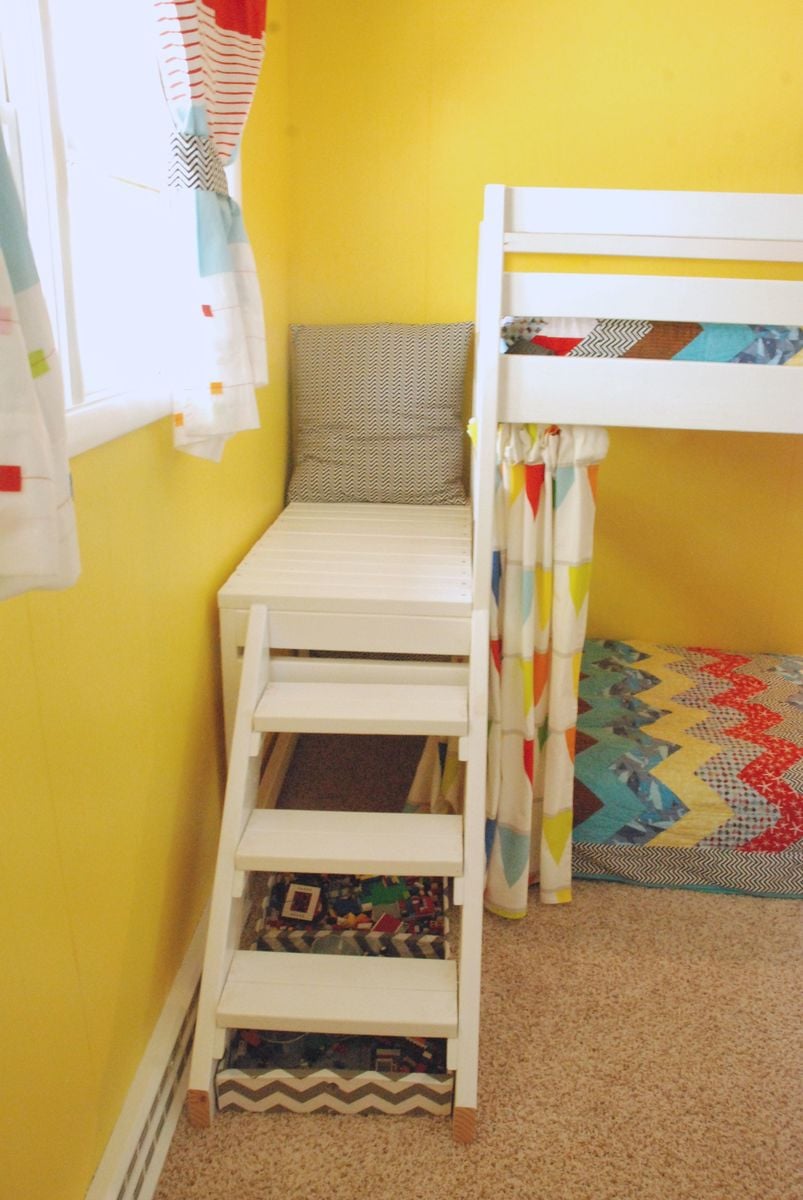
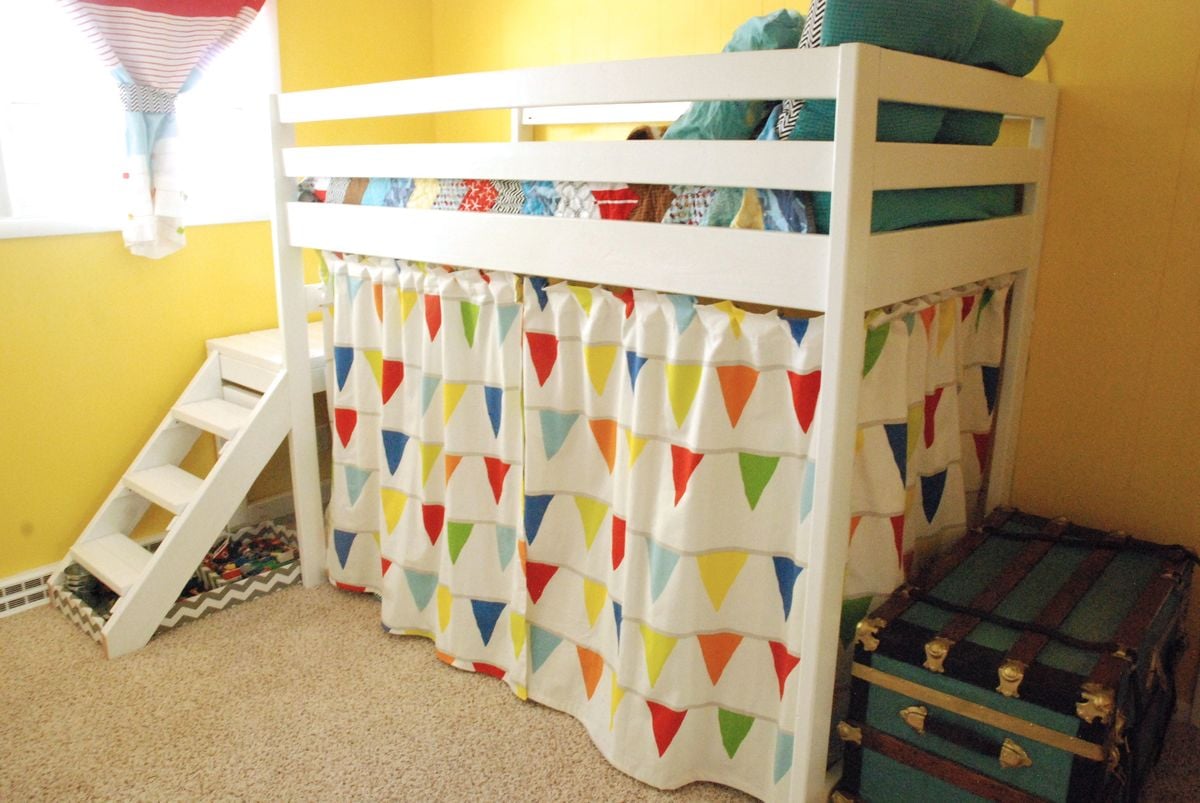
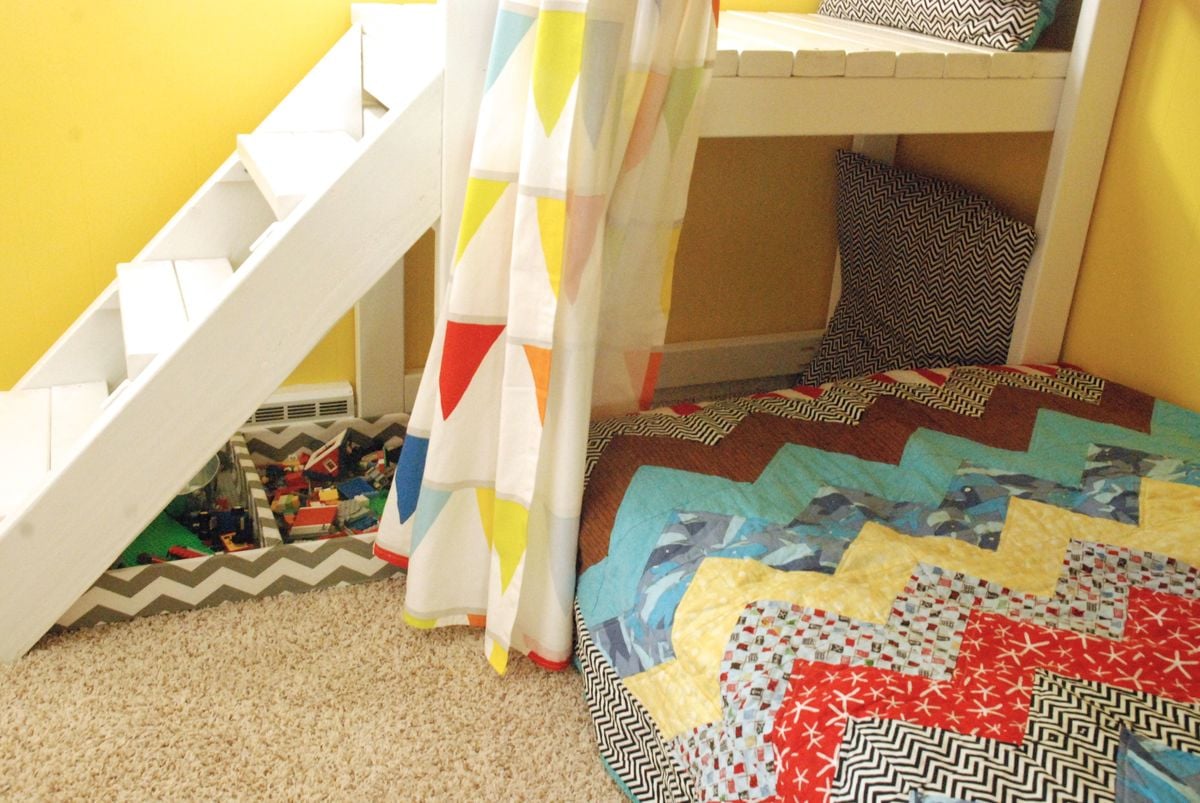
We followed the plans on Ana White’s blog pretty close, other than narrowing up the stairs by a few inches due to a furnace vent that would have been in the way.

We bought all of our boards at Menards which came in just under $100 including the large piece of plywood. I spent chunks of time throughout the week getting all of the boards sanded. Then we spent a Saturday getting all the boards cut to the proper size. Then it was a week full of giving all the wood 2 coats of Bulls Eye primer and a top coat of high gloss cabinet paint.

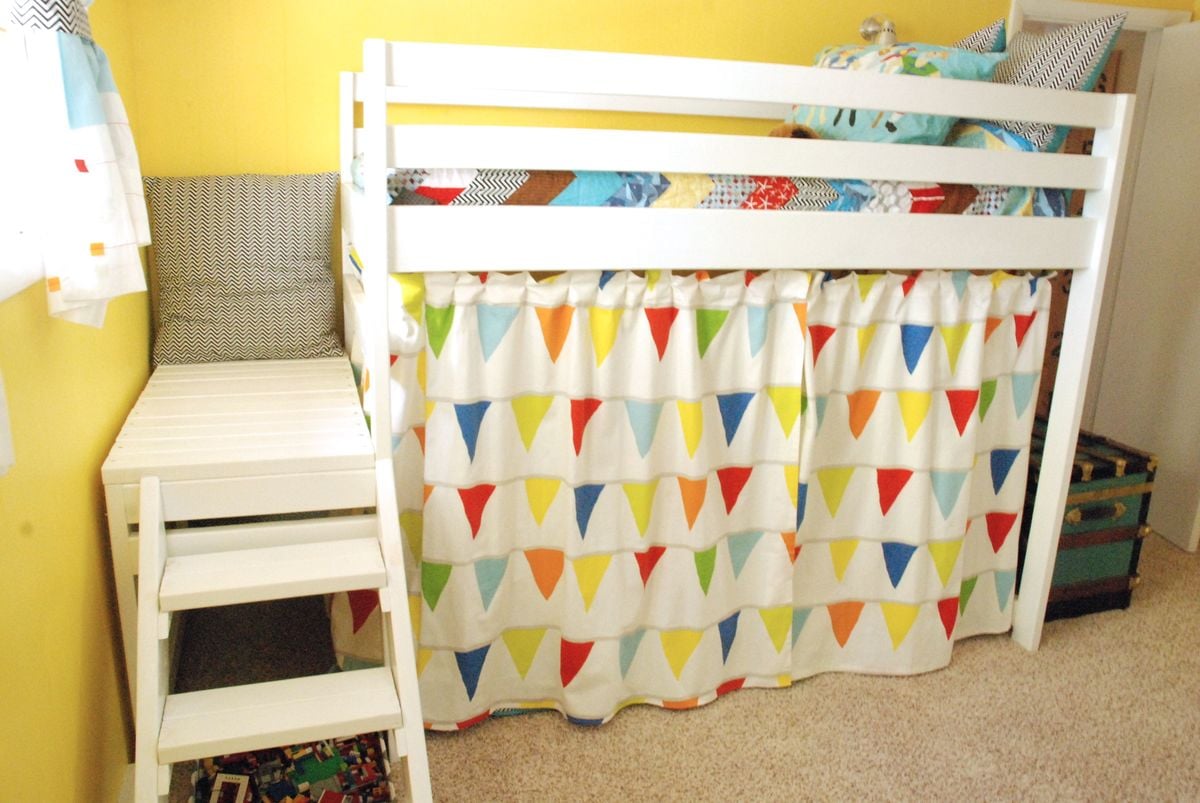
I also installed the Ikea Kvartal track system around the inside of the bottom bunk. I used leveler clips from Ace to hang Ikea curtains that I altered.

My boys were SO excited the whole time we were building it and love it. My little one calls the whole bed his “top bunk”, even though he sleeps on the bottom. They also have dubbed the area under the platform the “hideout” and think they are invisible when they are hiding in there.

Estimated Cost
$100 for bed, $50 for curtain and track
Estimated Time Investment
Weekend Project (10-20 Hours)
Finish Used
Two coats of Zinsser Bulls Eye 1-2-3 Primer and one coat of Ace Cabinet Paint in Bright White. Painted all wood before assembly.
Recommended Skill Level
Beginner

Comments

AmandaAK

Fri, 06/21/2013 - 18:46

These are awesome and I think it's so smart you stained them after you cut them and before you drilled them! Thanks for that time saver! Question? Is the bottom bunk raised or did you raise the height of the planned bed? I want to make ours a bunkbed too, but don't want it to be too tall.
Thanks

Becca trunk

Submitted by bzhayes on Mon, 04/06/2015 - 06:42

I adjusted the measurements to make it longer and wider. I also looked the original Pottery Barn trunk and tried to copy the multi color finish. I had so much fun building this!

Built from Plan(s)
Estimated Time Investment
Weekend Project (10-20 Hours)
Finish Used
stain and paint
Recommended Skill Level
Beginner

Comments

Linda7

Tue, 04/07/2015 - 21:21

This is indeed beautiful! Would you mind sharing where you found your handles? Any words of wisdom on the finish? Thank you!

In reply to by Linda7

bzhayes

Tue, 04/28/2015 - 12:07

The handles are from Ace hardware--I had to spray them antique bronze since they only had them in silver. I stained the trunk is dark walnut from minwax and then used diluted paint in barn red and teal to spread some color here and there. Finished with some polyurethane in satin (spray). That's it!

Linda7

Wed, 05/06/2015 - 17:39

Hi Beverly,

I just sent you another email, and then found your comments here. (I forgot we had communicated before. Old-timers disease! lol) Just checking on the hinges. Thanks, Linda

saomkinar

Tue, 12/25/2018 - 19:42

I don't know if you will check the comments on this brag post since you posted almost 3 years ago, but I'm also curious about the hinges to use. I have watched some youtube videos that show how to chisel out a space for the hinge, but I know there must be an easier way and an easier hinge to put on this box. 

Thanks so much ,

Apryl

Farmhouse King Bed

Submitted by Tdunlap33 on Tue, 04/07/2015 - 17:48

First project my husband and me attempted- turned out awesome! Very sturdy bed. The metal frame and box springs are not attached, it just sits inside the wood rails, headboard and footboard. We worked on this a few hours at a time on Saturdays and Sundays for one month since we work full time. Definitely more projects to come! 

Estimated Cost
$200
Estimated Time Investment
Weekend Project (10-20 Hours)
Finish Used
Latex primer and latex white from Sherwin Williams
Recommended Skill Level
Starter Project

Comments

Y Truss Round Table

Submitted by Gcomfort on Tue, 05/26/2015 - 05:33

Using the "Y Truss Round Table" plans, I created a 48" table with metal accents.

Built from Plan(s)
Estimated Time Investment
Weekend Project (10-20 Hours)
Recommended Skill Level
Intermediate

Comments

Gcomfort

Fri, 06/05/2015 - 08:11

The table top is 1.5 inches thick made up of 2 layers of 3/4 inch think plywood. The top layer of the table top is hickory plywood (the top and bottom layers of the plywood are hickory). The base layer of the table top is 3/4 inch general plywood from Home Depot.

Thanks, again.

bcolligen

Sat, 09/19/2015 - 11:18

I actually looked at the hardware stores for something similar before you answered by comment.  I wasn't able to find anything that I thought would work.  Do you remember what the aluminum is used for in other jobs?  Or what area you found it in?  

A family member suggested using the metal stips that hold down the end of carpet, but it's not long enough for the table.

Thank you!

Modish Adirondack Chair

Submitted by imatt86 on Sun, 04/17/2011 - 09:07

I built this in an afternoon and painted the next day. It was quite fun. BIG TIP!!! Paint BEFORE you build!

Built from Plan(s)
Estimated Cost
$60
Estimated Time Investment
Afternoon Project (3-6 Hours)
Finish Used
Primer + Paint all in one
Recommended Skill Level
Beginner

Our new pantry

We bought a vacation home that has such a small kitchen. I knew we needed more storage. So I checked out Ana's plans and made this bad boy based on the Simplest Armoire plans.

The home is in the mountain/lakes area of northern New Hampshire, so I wanted to bring the outside colors in. I used Valspar Cabin Red paint and the Valspar Antiquing glaze over the top after distressing it a bit.

Built from Plan(s)
Estimated Cost
$200 +
Estimated Time Investment
Weekend Project (10-20 Hours)
Finish Used
Valspar Cabin Red paint
Valspar Antiquing glaze
Recommended Skill Level
Beginner

Printmaker Sideboard

I purchased the Restoration Hardware Printmaker Sideboard but unfortunately we had issues with the delivered product so returned it. We then came across your plans online and my husband decided to build it for me instead. Our sideboard is all simple pine from Lowes, basic drawer slides and antique brass handles from Lee Valley. My husband adjusted Anna's plans and created 12 drawers more like the Restoration Hardware piece as we really like drawers for storage. We built it over about 5 weekends. It was a very ambitious project for our first but my husband was truly the brains and Braun of the process.

Built from Plan(s)
Estimated Cost
$450
Estimated Time Investment
Week Long Project (20 Hours or More)
Finish Used
Light sanding (wanted a rough finish), 80 grit then 120 grit, only enough to smooth splinters etc.
1 coat Old Masters Provincial Gel Stain applied with sponge brush
Saman Dead Flat Clearcoat
Recommended Skill Level
Intermediate

Comments

dmcarwin

Mon, 07/15/2013 - 10:45

I am super impressed!! Way to go! I have always love this piece!

MWarder

Wed, 10/02/2013 - 14:43

LOVE LOVE LOVE this console! You did an amazing job! I'm going to have my husband help build us something similar. Wondering what size antique brass handles you used? Thanks:)

Storage console designed by a 5 year old

Last year I built a "Cara Storage Console" and matching bookcase for my 12 year old granddaughter. Her 5 year old sister decided she needed one too, but a little bigger so she could store all her "ponies" on it. She and her mother planned it all out over a period of a few weeks and what ended up being built was 5' wide and 7'3" tall. It is 20" deep. Anna's plan was scaled up a bit and then had to be broken down in to two sections, upper and lower, so it could be brought in to the house. The sides and shelves are all 1x12 pine boards put together with glue and Kreg screws. The back took most of 2 sheets of 1/4" plywood. 1x2's were added for support under the front and back of the shelves.

Fortunately her other grandmother is really good at painting, so it was given a couple coats of semigloss pink along with pink heart wall paper. The grandbaby and her little brother started loading it up before Granny could even finish the sides.

The good part is that all her toys will fit on these shelves. The bad part is she won't pick up all her toys and put them on these shelves.

Built from Plan(s)
Estimated Time Investment
Week Long Project (20 Hours or More)
Finish Used
Semigloss paint, pink. Pink heart wall paper.
Recommended Skill Level
Intermediate

Fancy X Farmhouse Table and Benches

I LOVE my new patio table and benches. They came out great, and I hope they hold up for several years with the waterproofing stain I used.

Estimated Time Investment
Week Long Project (20 Hours or More)
Finish Used
Behr Waterproofing Stain in semitransparent Navajo White
Recommended Skill Level
Intermediate

Cedar Boxes

Submitted by drowland on Sat, 07/09/2011 - 07:18

We built these before we saw these plans, but they are pretty much the same... We added the chicken wire to keep the rabbits (and our dog) out of the garden. We added the owl to keep the birds out. We've gotten a ton of tomatoes, onions, and bell peppers so far. Next year, we'll add a few more beds. We also added the verticle garden to take up less space, but its not deep enough. We'll make the next one deeper.

Estimated Cost
$30
Estimated Time Investment
An Hour or Two (0-2 Hours)
Finish Used
none
Recommended Skill Level
Starter Project

Comments

KatieO (not verified)

Sat, 07/09/2011 - 20:11

Wow! LOVE IT! I love the taller posts so you can incorporate the chicken wire! I SOOOO needed to do something like that this year. Also, the vertical garden boxes are BRILLIANT! LOVE IT!

drowland

Thu, 11/17/2011 - 07:59

We ended up getting a ton of tomoatoes and green peppers from the garden boxes. We've actually built a couple more. We'll probably double again before next spring. We're looking at adding more veggies.

We now have ton of stuff planted for the fall...

Guest (not verified)

Tue, 03/13/2012 - 10:46

How did you build the upright planter boxes? Do you mind explaining the building process/design? I really want to plant this in my yard!

colton's mom (not verified)

Tue, 04/03/2012 - 06:19

i love the vertical boxes. I am just trying my hand at the world with a green thumb and could use as much advice as possible about how to make as well as to line the boxes or not to line them. All advice appreciated!

berman (not verified)

Fri, 11/23/2012 - 21:53

Hi, my name is berman. I found you pin from my pinterest and your box garden is so great. I am a newbie in this field and so interested to build garden in my house. If i can ask you some question, could you please to answer that?

cheers,
berman

Seasonal And Holiday

Double Inset Bookshelf Doors

Submitted by dholubar on Wed, 08/21/2013 - 07:08

You made this project look so simple that I just had to try it. However, to suit my needs I had to make a few alterations to the plans. I had a set of bi-fold doors that were in need of replacement and I thought inset bookshelf doors would be the perfect way to replace them. This project was easy enough for me to do it myself and I am really new to the DIY game but I did have some help. I really love the way they turned out. You can read all about my my adventure at http://heresalittletmi.blogspot.com/2013/08/bookshelf-doors.html

Built from Plan(s)
Estimated Cost
$120.00
Recommended Skill Level
Beginner

Best Lounger Ever

Submitted by teeninyg on Sun, 08/21/2011 - 13:37

This was my second project from the site. I wanted somewhere to read my book on the back deck. This chair is perfect. When I get tired of reading I can lay it down and take a nap. It is very sturdy and easy to put together. I do recommend using pocket holes to assemble it. I found it much easier.

Estimated Cost
$70.00
Estimated Time Investment
Day Project (6-9 Hours)
Finish Used
I sanded the seat and sides of the chair. Then stained it with oak and finished it with polyurethane.
Recommended Skill Level
Beginner

entry cubbies

custom size entry cubbies x 2, open top locker section with small basket, bench base portion with two baskets

Estimated Cost
$220 ($110 each)
Estimated Time Investment
Day Project (6-9 Hours)
Finish Used
1. one coat primer
2. two coats semi gloss white
on bench
1. one coat Minwax dark walnut stain
2. three coats satin poly
Recommended Skill Level
Intermediate

Comments

SingleMomThriving

Mon, 09/12/2011 - 11:20

I read your blog and all your modifications and love the changes that you made. I have a very small area with a bench and a coat tree that could benefit from this solution. Thanks for posting.

jaimecostiglio

Mon, 09/12/2011 - 12:37

Just stopped by your profile - guess you already got out your tools! Love that RED ladder shelf and creative use of steel sheets for the sides on that planter. PS - Can I borrow your miter saw, I'm dying, dying to get one. Someday.

JES

Mon, 09/12/2011 - 17:03

LOVE this. White with a rich deep wood top is my absolute favorite! Love that you flanked the door on each side with matching ones. Looks like it's right out of a design magazine. Also liked that your blog shows details on how you attached the tops to the bottoms. I want to swipe these for my house! ;) J

Stephan (not verified)

Sat, 11/05/2011 - 12:57

That looks great. It's inspired me, and I'm going to attempt to build it as well. Was on the Pottery Barn website and placed an order, but they are on back order until December 15th. Just hope it does not take that long for me to build it!!

Window seat built in

Submitted by daliae on Sat, 09/17/2011 - 20:19

I made this two years ago in my daughter's room, before I got to know Ana's site. This was my ever first carpentry project. It took me 4 whole days to finish. The whole wall is like a bay wall so I had to custom make the built in. Also – I did that when my husband was out of town so in order for me to be able to lift all the pieces from the basement to the second floor, I made it of 4 pieces. When my husband came back home he thought I paid someone to built it.

I made it out of 2x4’s and plywood. I trimmed the bottom with a trim.

One day I will add drawers and the cushions are in the making.

Estimated Cost
100 $
Estimated Time Investment
Week Long Project (20 Hours or More)
Finish Used
Primer and two coats of Valspar high gloos White Dove from Lowe's.
Recommended Skill Level
Beginner

Comments

nhoffer

Thu, 06/11/2015 - 20:20

Do you have more pics of the finished product...especially where it meets the angled wall? I don't have a table saw (yet) so I'm trying to figure out if I can handle this without one. :(

Above Toilet Cabinet

Submitted by Smokeydog on Thu, 12/24/2015 - 12:58

I built this above toilet cabinet for my son and his wife for Christmas. They moved into a new house and wanted this additional storage space.  Turned out pretty good!

Built from Plan(s)
Estimated Cost
$135.00
Estimated Time Investment
Weekend Project (10-20 Hours)
Finish Used
BEHR Satin Paint with primer
Recommended Skill Level
Intermediate

Modern Farm Bench

Submitted by jackkatie on Mon, 11/28/2011 - 11:52

I was looking to make my foyer a bit more kid friendly while still being coze and practical. I came across the modern farm bench plans, and I knew it was the perfect fit!

I have done a few other plans, but all with help. This project I started around 9 pm (after bedtime) one night, and by 11:30, it was completely built and stained. My son was climbing all over it by the next morning :)

I love it - I think it adds the perfect bit of rustic charm to my foyer, while still giving my little guy a sturdy spot to get his shoes/coat on. I have since added baskets underneath for winter storage.

This will definitely not be my last build! Thanks Ana!

Built from Plan(s)
Estimated Time Investment
Afternoon Project (3-6 Hours)
Finish Used
I stained using a mixture of both Kona and Dark Walnut stain from Rustoleum. It definitely wasn't a science - just slopped a little of each on, waited about 3 minutes, and wiped off.

I love the finish - rustic, but not too "country". The dark Kona stain definitely highlights the knots and grooves of the wood!
Recommended Skill Level
Beginner