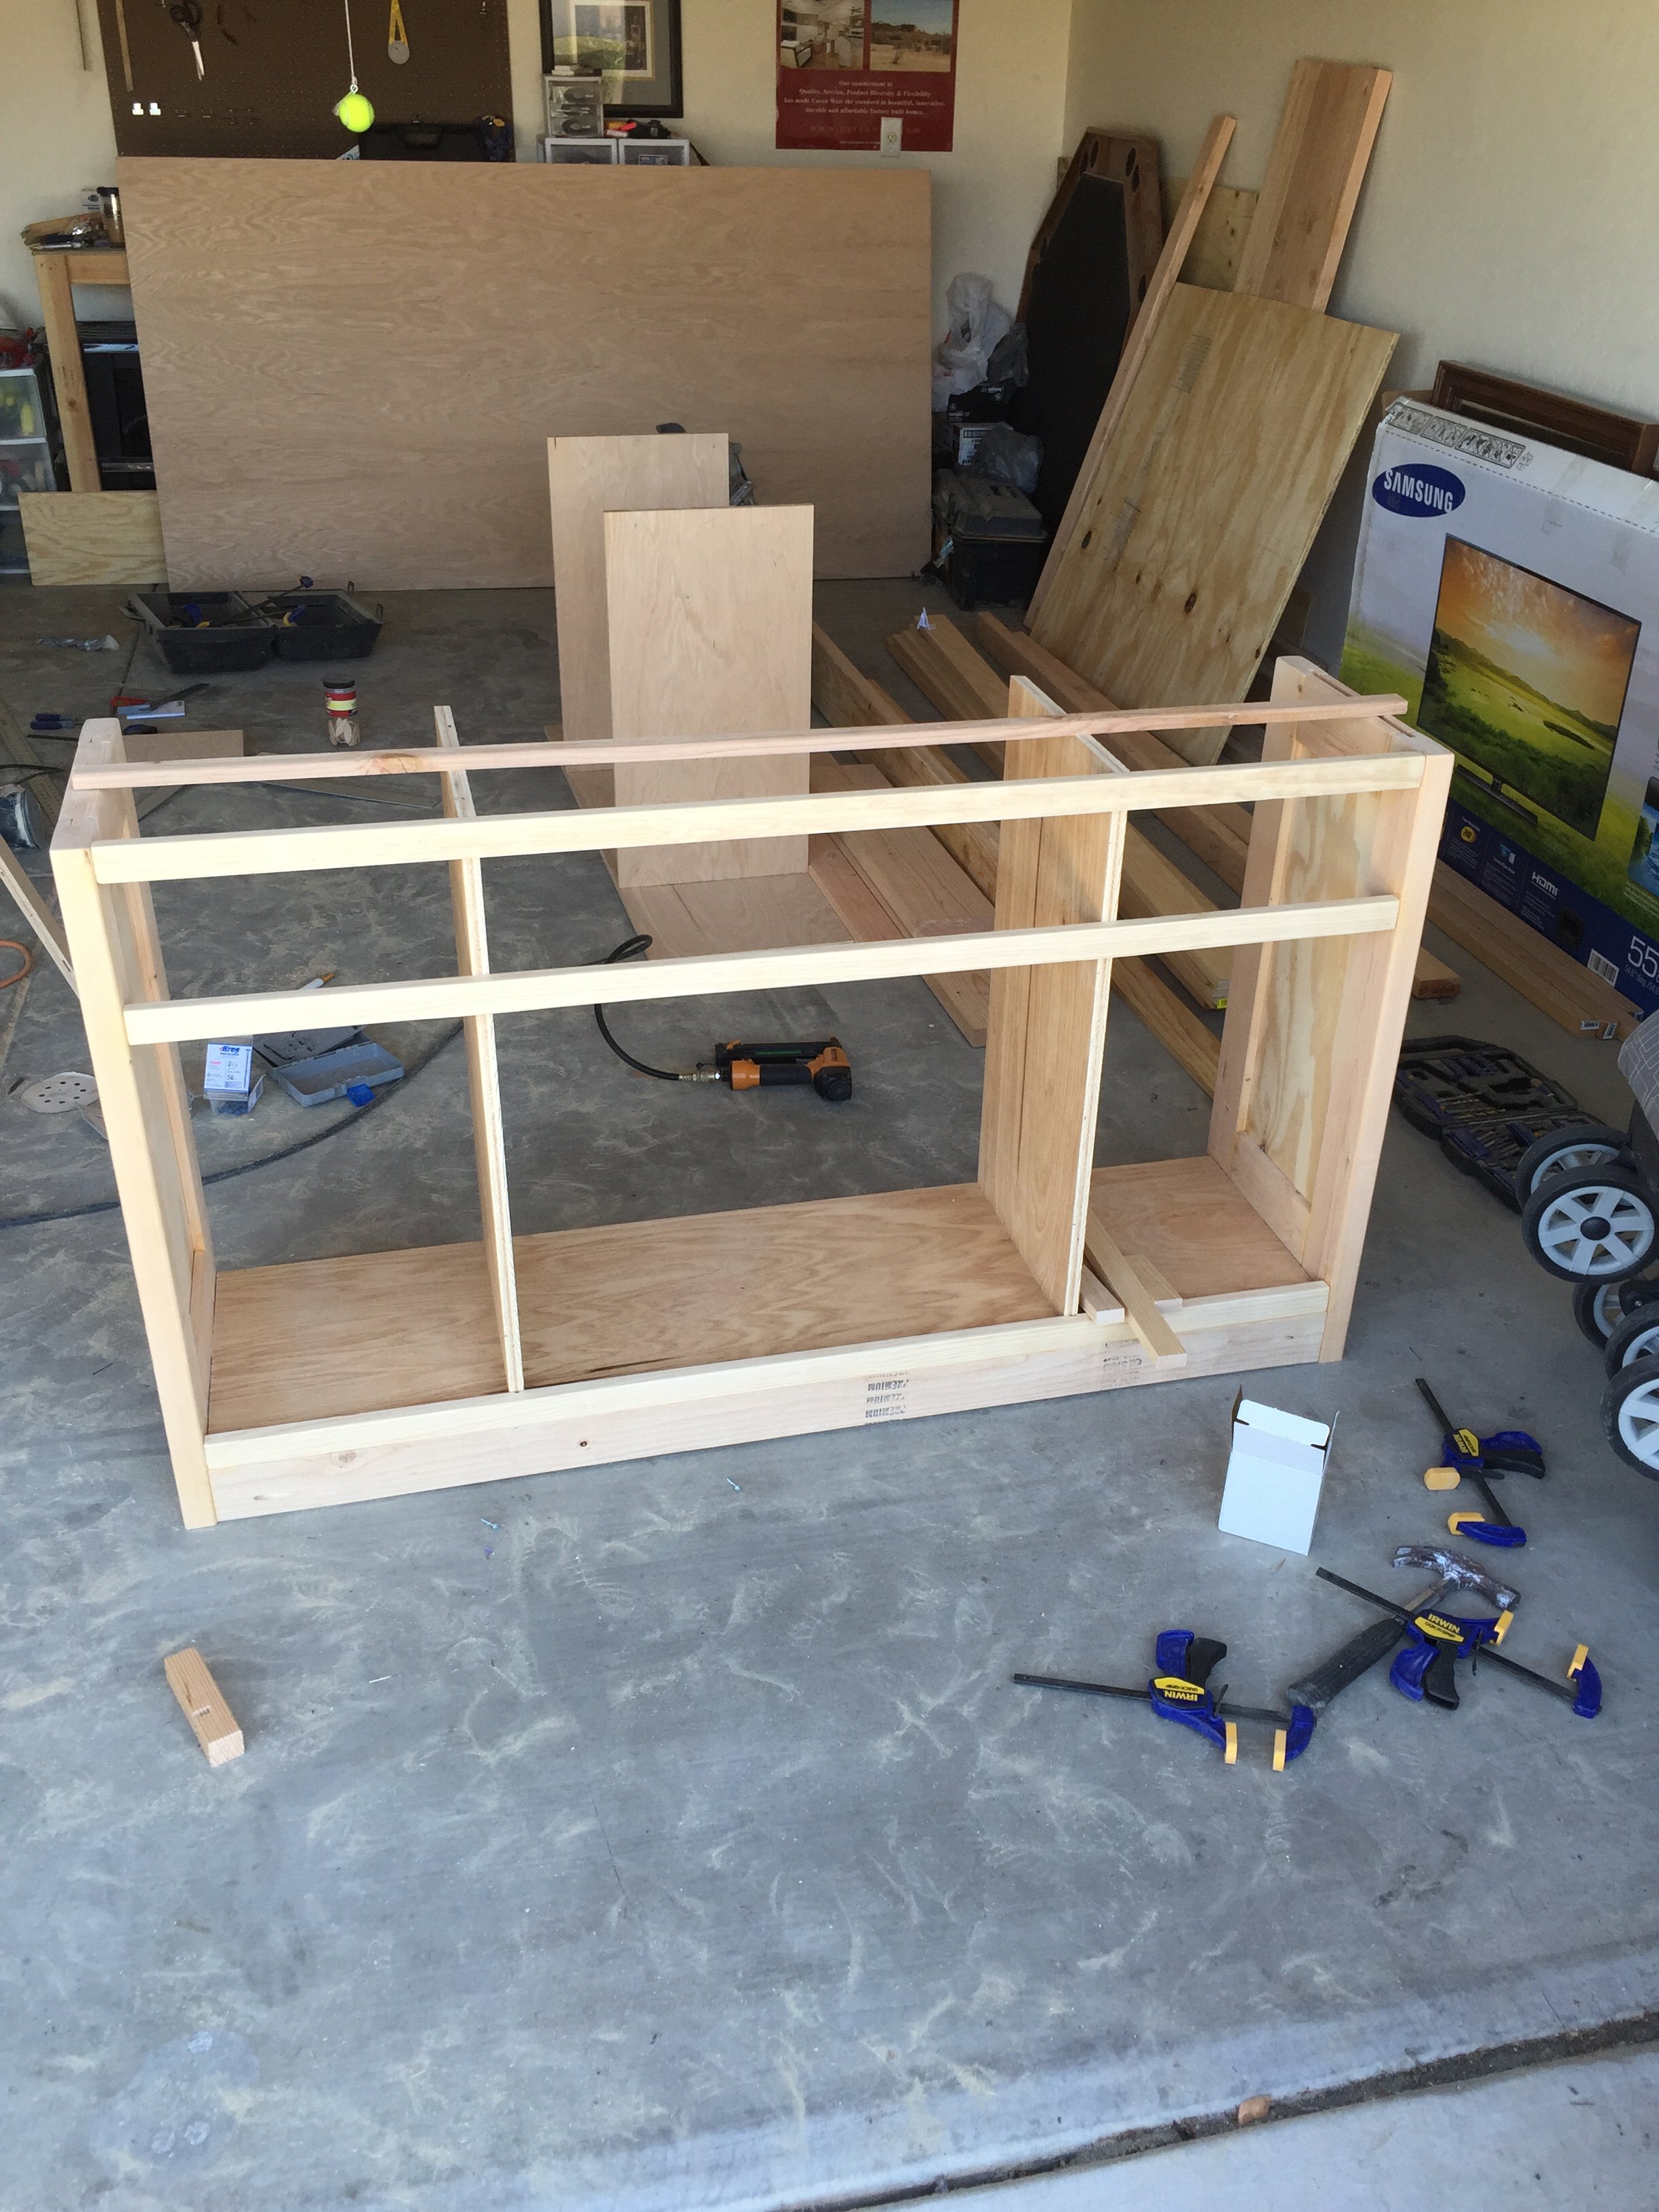
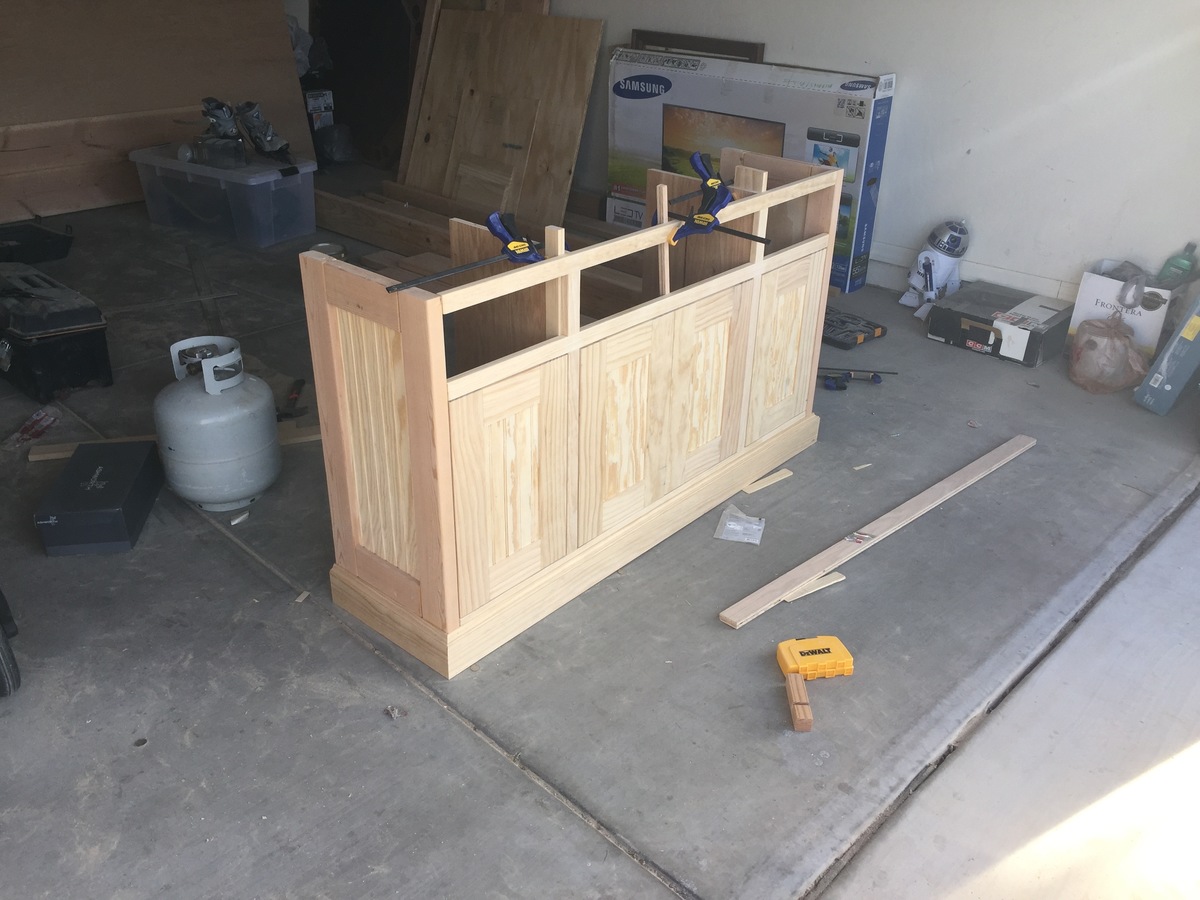
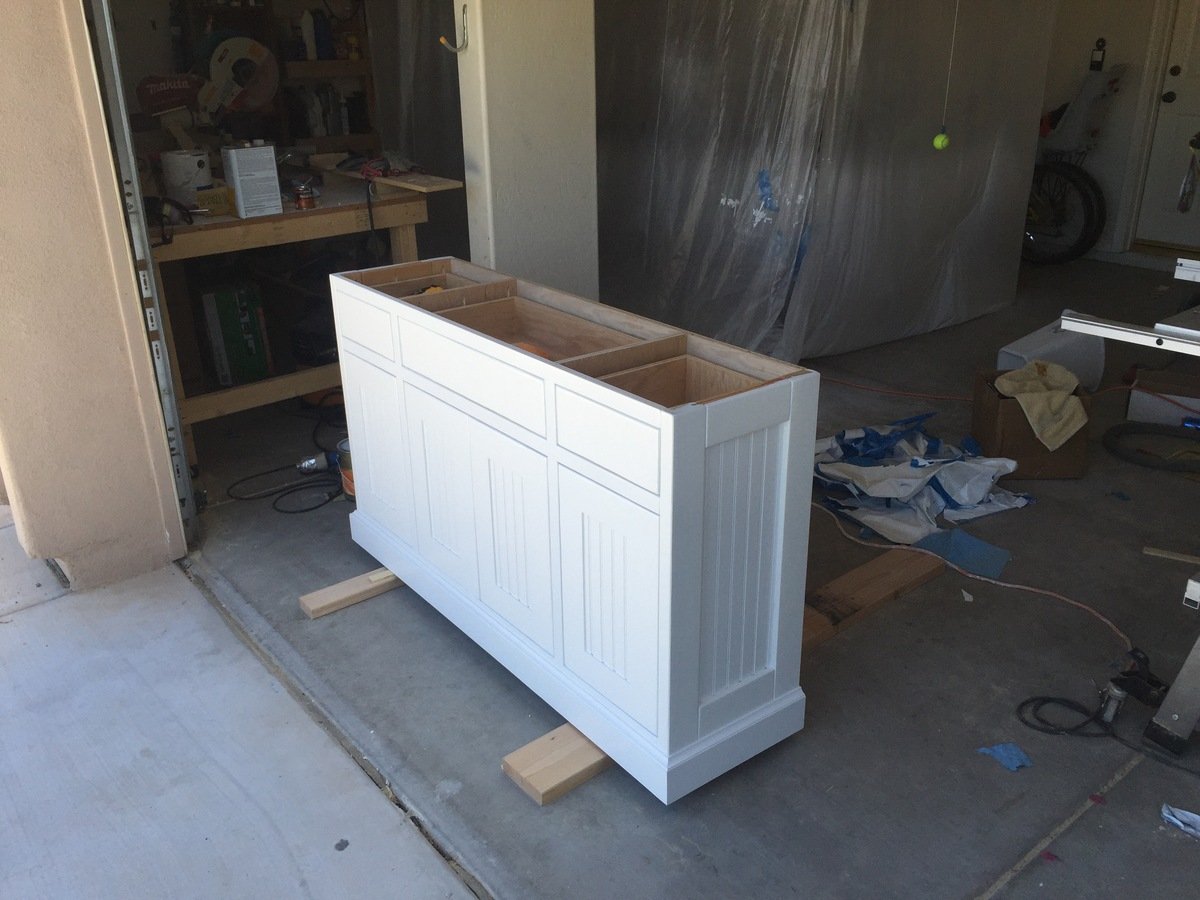
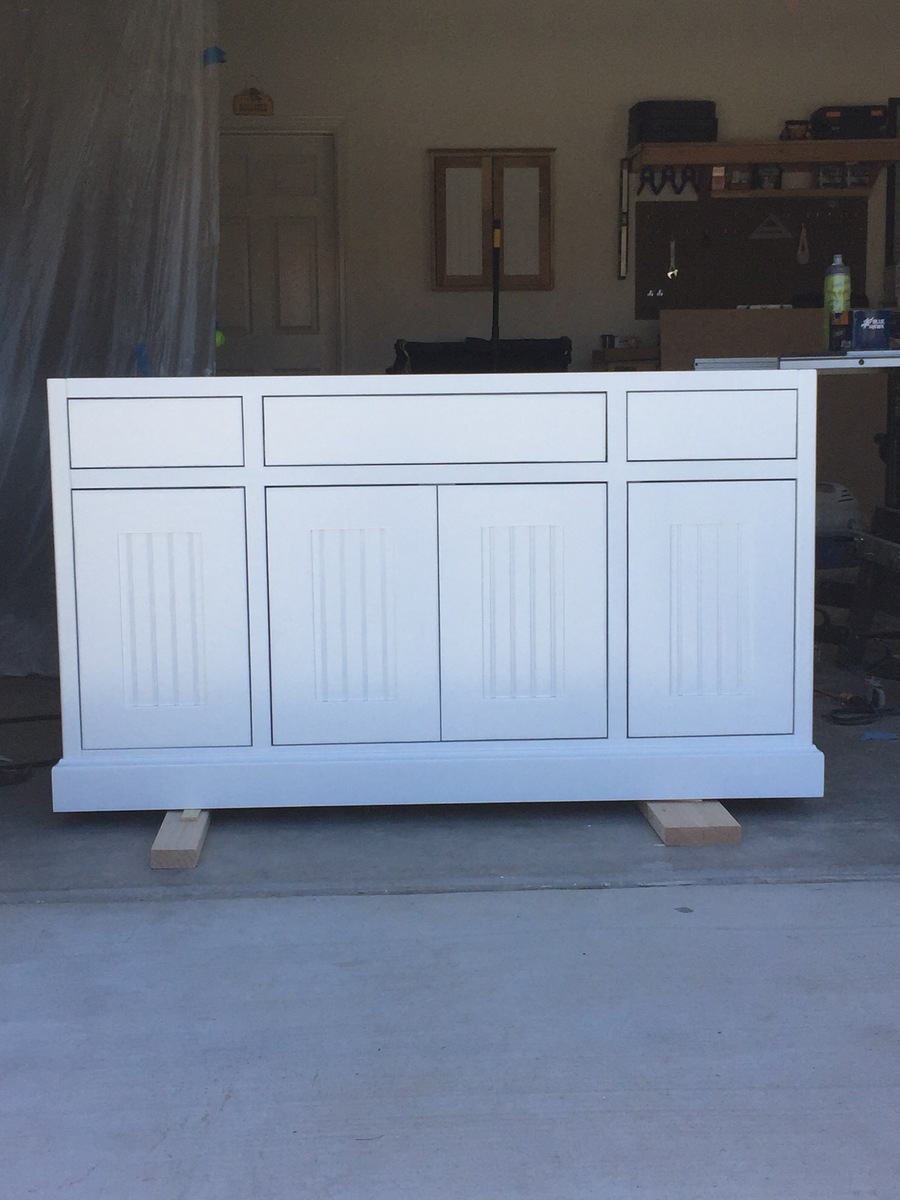
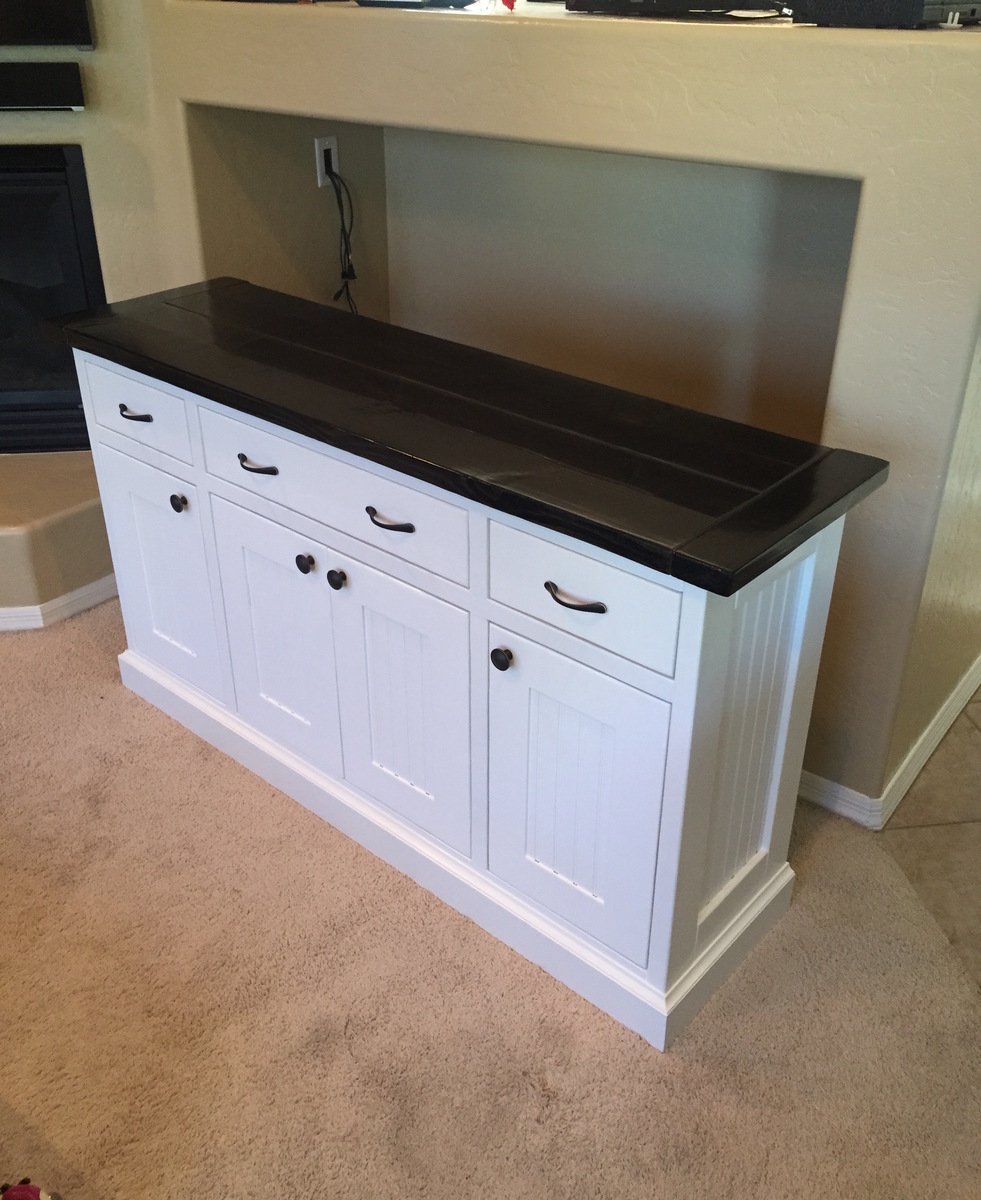
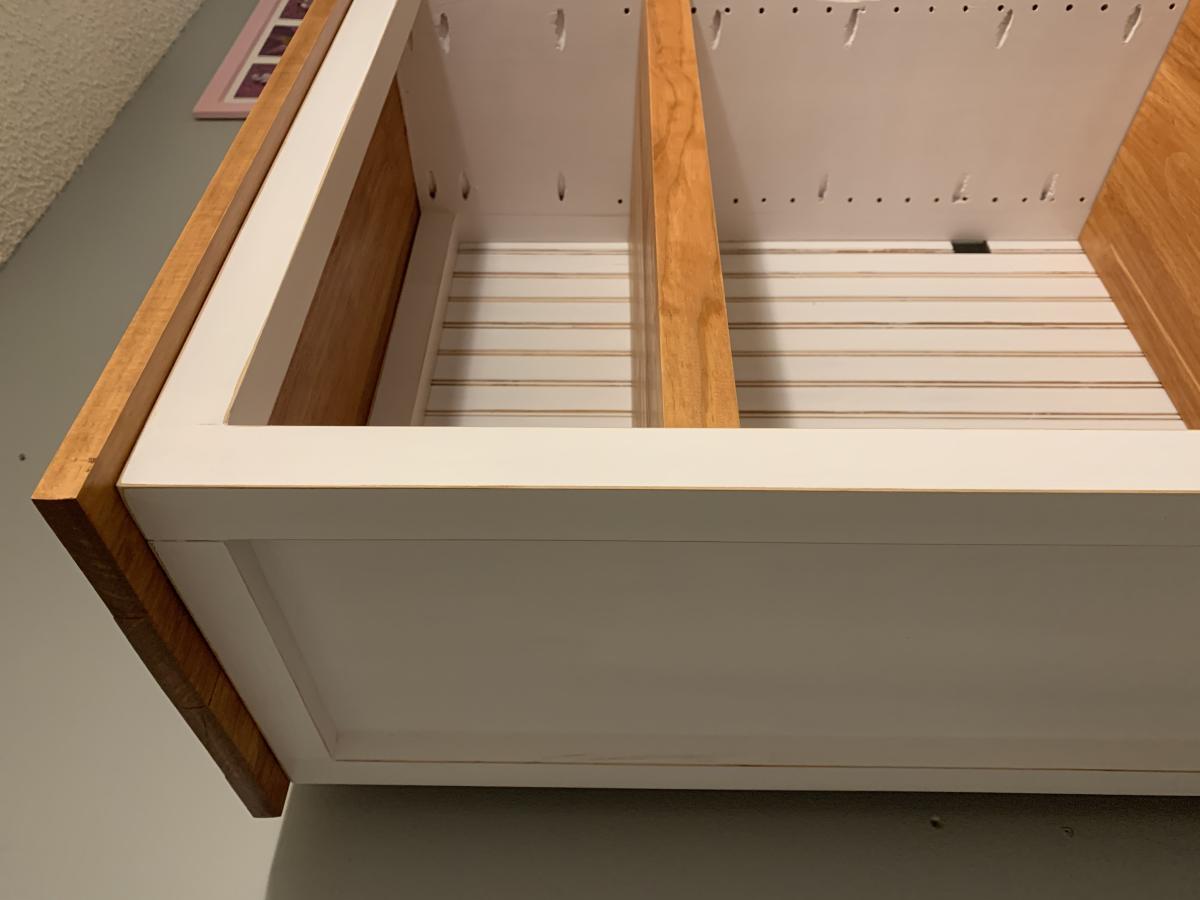
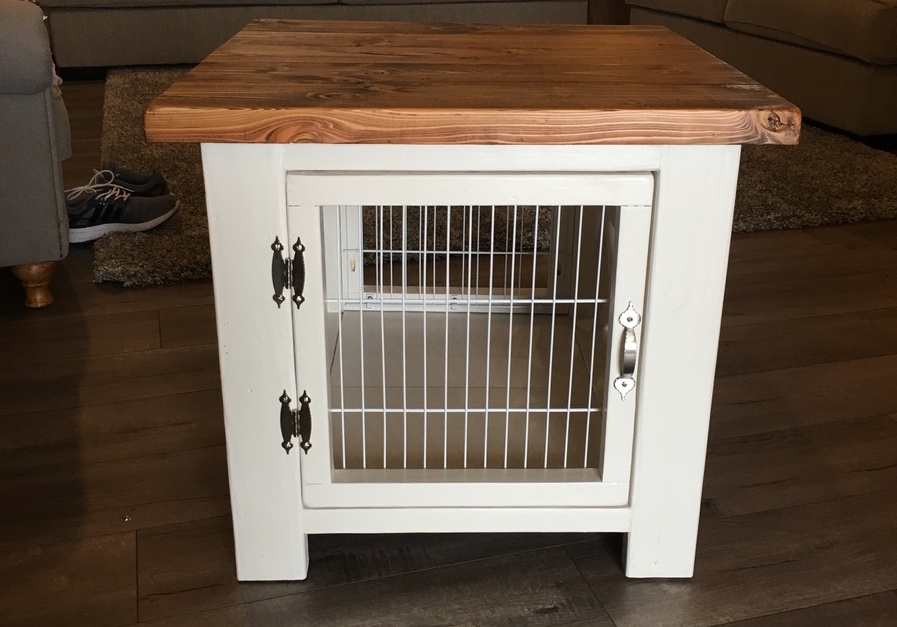
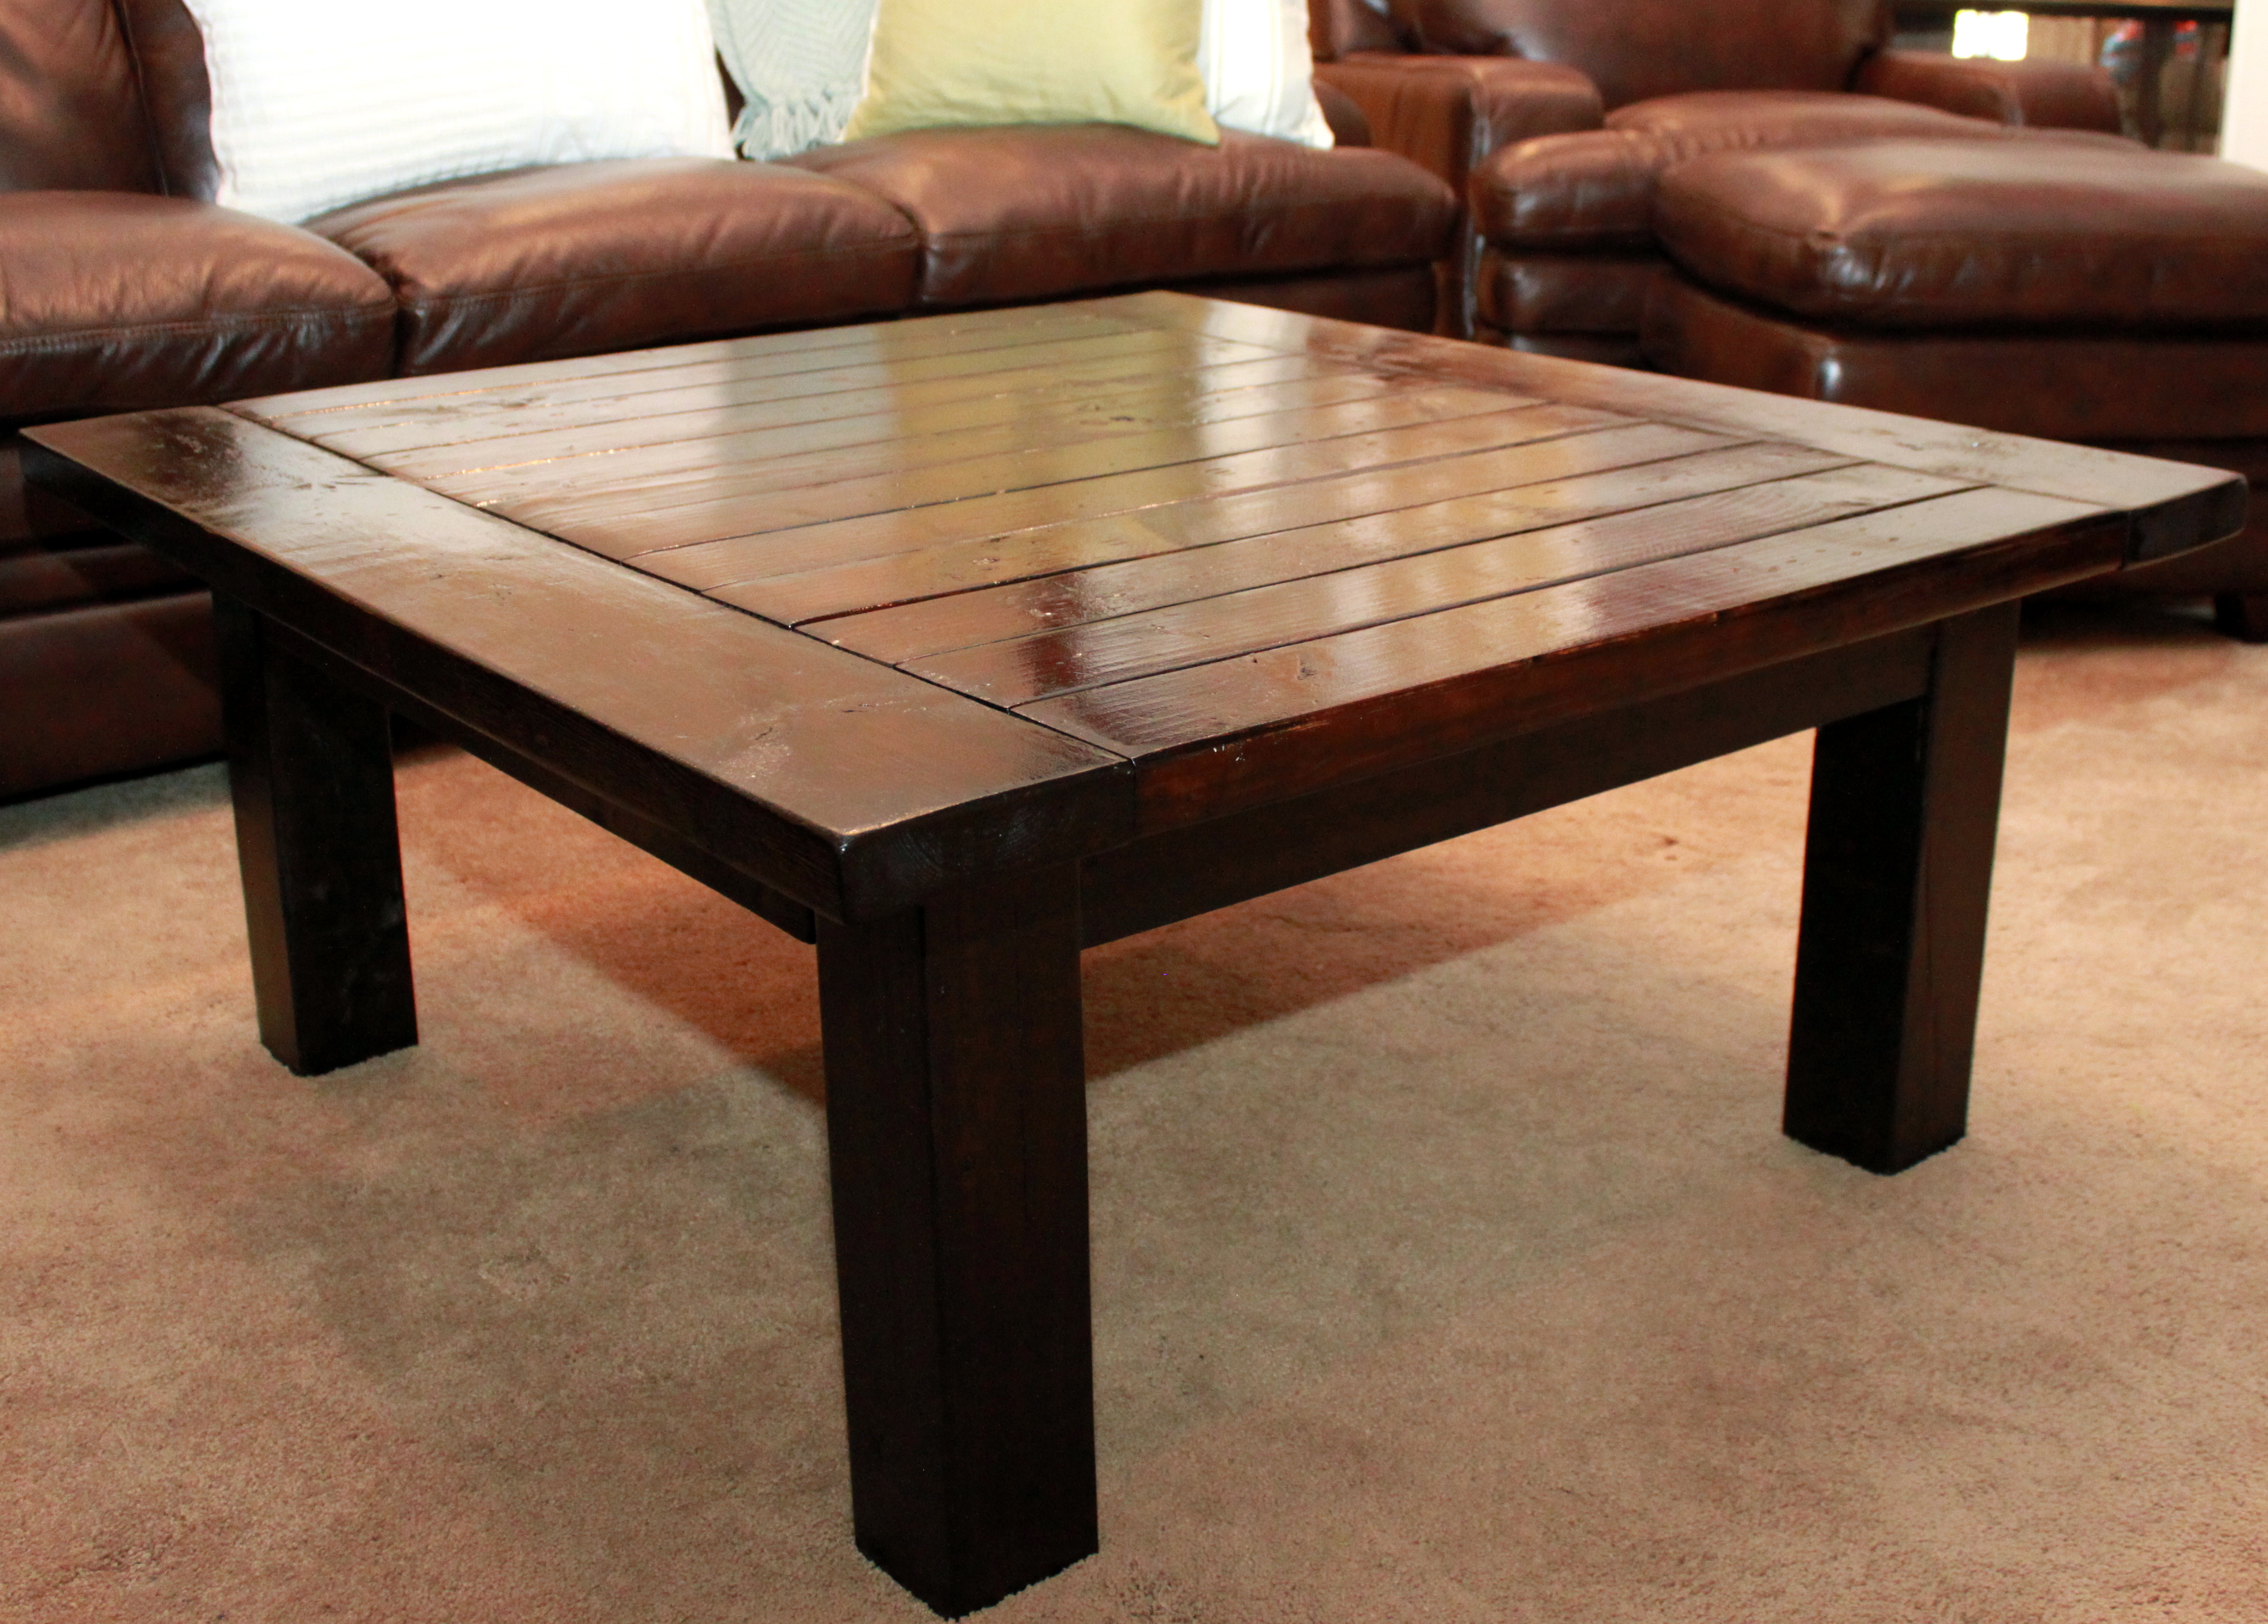
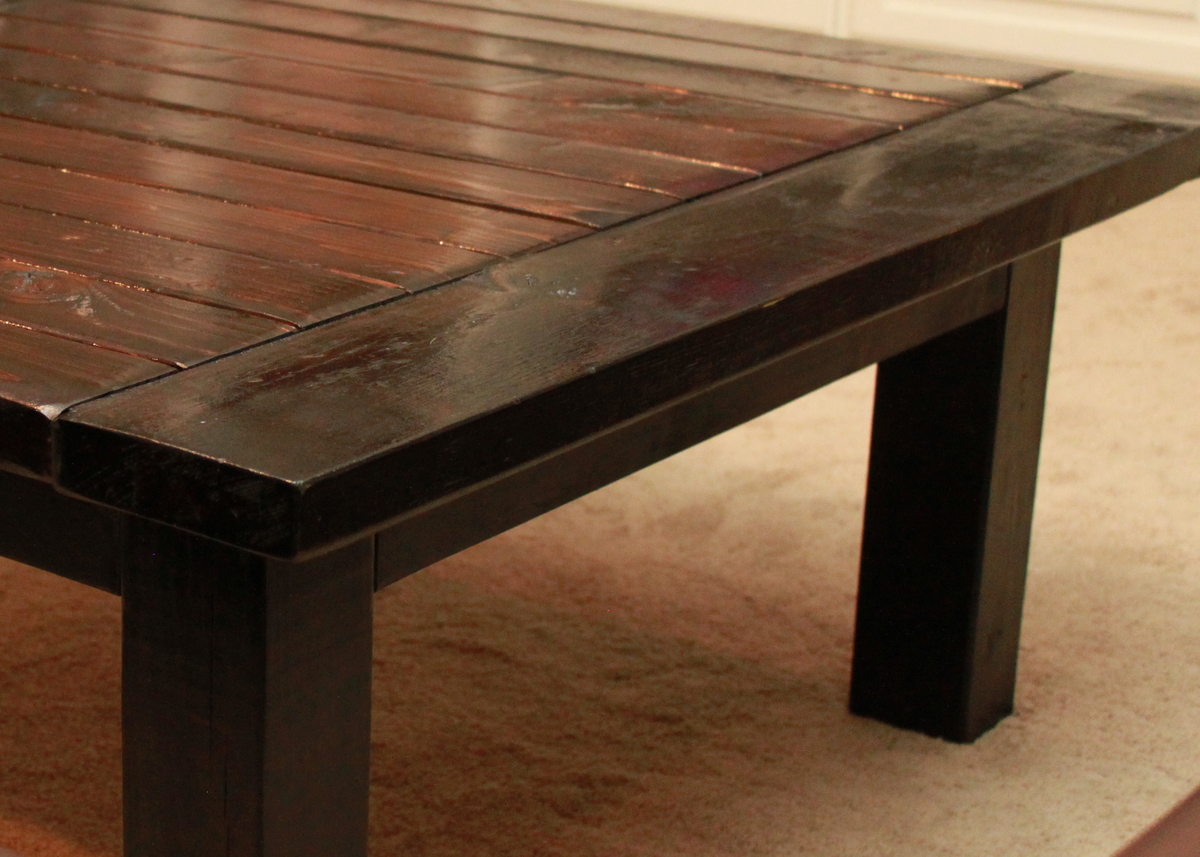
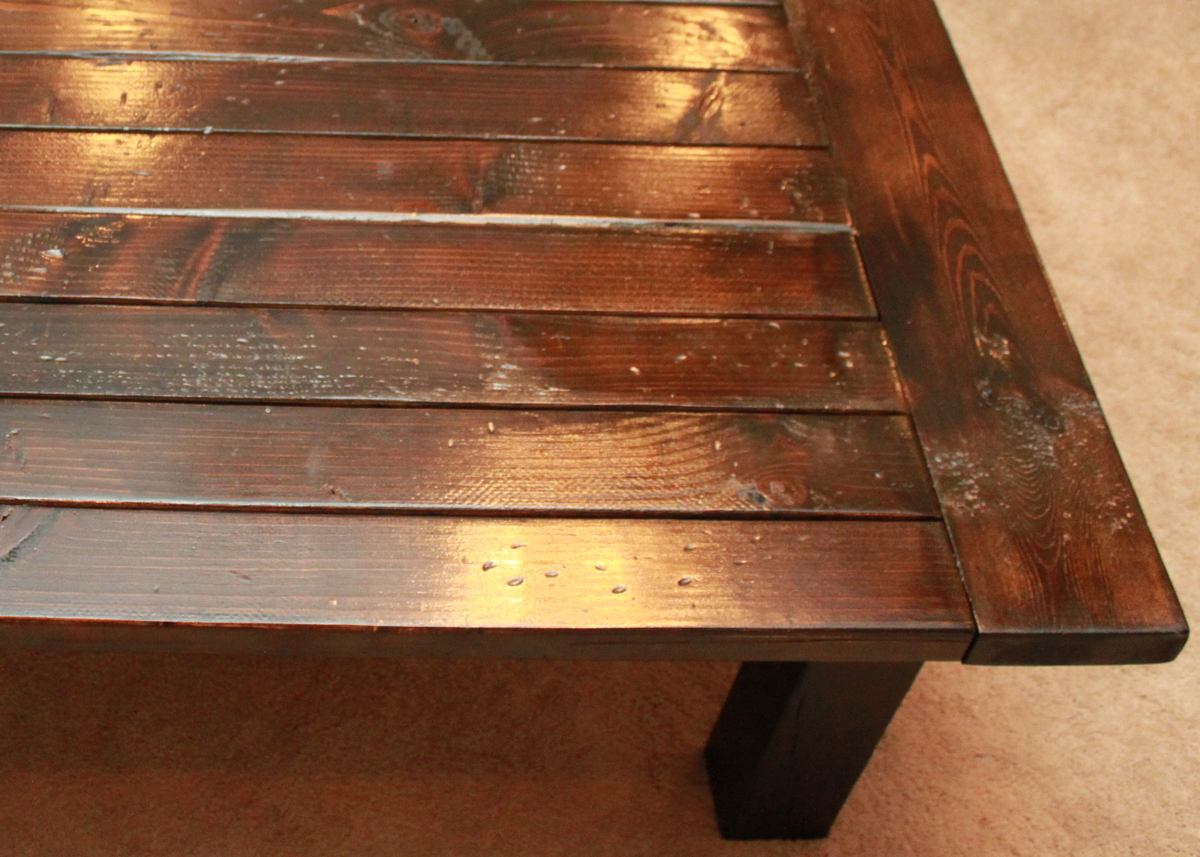
Community Brag Posts

Rustic Computer desk with Shou Sugi Ban and Epoxy Top

Submitted by Anonymous (not verified) on Tue, 03/14/2023 - 14:16

I slightly modified the Rustic X Desk plan to make my L shaped computer desk with a monitor platform! The desk surface is Shou Sugi Ban with an epoxy finish. All made from stock lumber and a lot of pocket hole screws. Thanks for posting your plan Ana to give me the idea! Construct for around $200.

Built from Plan(s)

Comments

Apothecary Media Console

I know we've all seen this piece done a lot, but I knew I had to have it as soon as I saw it. I finally got around to making mine. I altered the plans slightly to allow for 4 doors. I also omitted the upper portion of the backing to allow for easy access to component wires. The piece fits perfectly in my space.

Built from Plan(s)
Estimated Cost
$100
Estimated Time Investment
Week Long Project (20 Hours or More)
Finish Used
High gloss Behr White Paint and walnut stain with high gloss finish.
Recommended Skill Level
Intermediate

Comments

Cindy from Indiana (not verified)

Wed, 11/30/2011 - 13:29

That turned out great! It looks fantastic!

Guest (not verified)

Thu, 12/01/2011 - 10:23

That's gorgeous!

4 x 4 Truss Beam Table

Submitted by Wilson1022 on Tue, 10/29/2013 - 11:43

We recently built a new home, which left us with a lot of empty rooms and not enough furniture to fill them. Loving the look of pottery barn and restoration hardware, we started looking around for ideas. This truss beam table is exactly what we had envisioned for our modern farmhouse dining room. Mike (my hubs) did the building, which took only about 4-5 hours total. Then I did the finishing, which is what took the bulk of the time. We are super happy with our table and it is finished just in time for the upcoming holidays!! Thanks Ana White and Shabby 2 Chic for the inspiration and free plan!

Built from Plan(s)
Estimated Cost
$100
Estimated Time Investment
Weekend Project (10-20 Hours)
Finish Used
I started out by applying Minwax pre-stain wood conditioner, to ensure that I got a nice even finish. I then applied one coat of Minwax weathered oak stain. This stain is very sheer, and I wanted something warmer and darker, so I applied a coat of Minwax special walnut with a paintbrush. I let it sit for about 8 minutes and then wiped it off. Then to warm up the color and add some depth, I used a rag to apply a light coat of dark walnut, which I pretty much wiped right off with a clean,dry cloth. Then I finished it all with a coat of wipe on poly!!
Recommended Skill Level
Beginner

Wagon for Birthday Boy

Submitted by Anonymous (not verified) on Sat, 01/16/2016 - 03:15

I made this for my grandson's 2 nd birthday. I followed the plans to a T. It did cost quite a bit more than was stated, the wheels alone were $60 but should last a lifetime!

Estimated Cost
$100
Estimated Time Investment
Weekend Project (10-20 Hours)
Finish Used
Minwax honey stain
Recommended Skill Level
Beginner

Patio renovation

Submitted by Tia P on Wed, 05/29/2019 - 19:25

Built these pieces in one day.  I made the chair first and decided to modify plans to do the loveseats for lounging.  The stain is Honey by Minwax and used an outdoor polyurethane.  The seat cushions are 24x24 from Wal-Mart and I waited for a sale at At Home Store for the rest of the cushions. 

Estimated Cost
Just benches were about $100. Total amount of cushions were probably 3x that.
Estimated Time Investment
Weekend Project (10-20 Hours)
Finish Used
Minwax Honey stain with outdoor polyurethan
Recommended Skill Level
Starter Project

Our new barn door

Submitted by Anonymous (not verified) on Mon, 03/20/2023 - 07:49

We had an open pantry that was an eye sore in our updated kitchen. Im 75 years old and I always liked to take on new projects so I thought about building a barn door from scratch. It was a bigger opening than one would think of as a pantry goes (at least I thought as much) . The opening measured 50 x 60 approximately so the door was made 56 x 65. Plenty of door to cover the eye sore. The door was built more or less on our garage floor and up on four saw horses! I had no idea if it was was going to be successful and the staining was yet to come (Gulp) As Ana said just do it. Well the build came out pretty good Squared and level. And I totally suprised myself staining the wood to the color we were looking for. Self help videos are very helpful so Id consider it before starting out. Everything was a process and I took my time. As with some things I have attempted in the past rushing sometimes ended with disastrous results. Oh boy, not to mention a waste of time, materials and money. What I hadnt bargined for with this project was the final weight to this barn door. IT WAS HEAVY. In any event I purchased the hardware for the railing and handles and pretty satisfied the way it came out. I had no plans to work from but settled on a build that I saw from several websites on barn doors.

Built from Plan(s)

Comments

Storage for my Classroom

I am a teacher and my school is a brand new school leasing out an old school building for us to use. The classrooms were completely empty and I needed storage solutions. I didn't have cubbies for the kids to put their belongings in, nor did I have any storage for my own supplies and things for the kids/classroom. So I decided to build "lockers" for them with the additional storage, plus some bookcases to store supplies on. One of my fellow teachers loved them so much, she asked me to build her some - so I did. My classroom has the BLACK "lockers" and bookcases, the Honey colored are my fellow teacher's bookcases.

Estimated Cost
about $350
Estimated Time Investment
Weekend Project (10-20 Hours)
Finish Used
black glossy paint
Recommended Skill Level
Intermediate

Comments

spiceylg

Sun, 12/04/2011 - 02:27

These are great! You have some very fortunate students to have such a gifted and generous teacher!

sgilly02 (not verified)

Tue, 12/06/2011 - 21:55

I'm surprised the district hasn't hired you to create storage for all the classrooms! These are really nice. What lucky kids - and coworkers.

Guest (not verified)

Sat, 03/24/2012 - 06:59

Hi, was the $350 price tag for just this main piece pictured or for everything including all the lockers? I'd love dimensions on this main storage piece! Are there plans anywhere?! Thanks!

In reply to by Guest (not verified)

marlaandwilliam

Fri, 08/01/2014 - 15:39

the $350 cost was for everything in the pictures. the plans I used are linked - the main storage is just 2 of the bookcases stacked one on top of the other.

Action Figure playset

Submitted by Anonymous (not verified) on Tue, 01/19/2016 - 11:03

Action figure playset built from firehouse playset plans.

Built from Plan(s)
Estimated Cost
$30 Canadian
Estimated Time Investment
Afternoon Project (3-6 Hours)
Recommended Skill Level
Beginner

Farmhouse Coffee Table [Beginner/Under $40]

Submitted by Anonymous (not verified) on Sat, 03/25/2023 - 03:46

Than you Ana, My first time ever that I have made anything - my coffee table taking pride of place. Looking forward to making my next project from your plans.

Comments

Distressed Barnwood Frames

Submitted by cdswhite on Sun, 12/11/2011 - 19:56

My bigger version of the barnwood frames. They are about 35x31 inches. I used a nail gun for the first time and it sure did make this go faster! I found it was best to build the inside square first and then I cute each piece of the outside square as I went to the fit was as "perfect" as possible.

Estimated Cost
$11 for two (had all materials but the furring strips and black spray paint)
Estimated Time Investment
An Hour or Two (0-2 Hours)
Finish Used
Black spray paint, two coats of Behr Swiss Coffee, sanded and one coat of water-based poly.
Recommended Skill Level
Beginner

coffee table

This coffee table is huge. will be finishing once I build the console table, the last piece of the rustic x furniture I have to build.

Built from Plan(s)
Estimated Cost
$60
Estimated Time Investment
Day Project (6-9 Hours)
Finish Used
will be using Minwax dark walnut
Recommended Skill Level
Beginner

Great Hall Tree Plan!

Our first major furniture build so the great plan really helped out. Positive feedback from everyone who sees it. We ended up building the "3-drawer open shelf simple entry console" next and modified the design to match this hall tree. We couldn't find baskets that we liked so made the custom crates for storage. On the entry console we built drawers with the crate design on the front.

Built from Plan(s)
Estimated Cost
$340
Estimated Time Investment
Week Long Project (20 Hours or More)
Finish Used
Min wax aged oak gel stain with tung oil
Recommended Skill Level
Intermediate

Adirondack Stool or End Table

Submitted by Clang on Wed, 06/19/2019 - 19:45

I love making this table, my take on the Patriotic theme. Sanding and Painting always add time, this is a fairly easy project.

Built from Plan(s)
Estimated Cost
$10
Estimated Time Investment
Weekend Project (10-20 Hours)
Finish Used
Rustoleum Latex Paint
Recommended Skill Level
Beginner

Comments

Dining Room Table

Submitted by Anonymous (not verified) on Tue, 04/04/2023 - 06:31

This table was made out of Pecan. The legs are pine. I think the basic plan was from Ana-White.com but I am not sure.

Built from Plan(s)

Comments

Adirondack Chairs

This took me 2 solid weekends of work - one weekend to measure, cut, sand, prime, and paint both chairs and another to assemble and finish them. I had a small amount of trouble (wood split) with 2'' deck screws on the seat slats and ended up using 1.25'' screws there, which seem to have fastened the pieces adequately. The stringers were the most challenging part, but they don't have to be precise, as long as they are the same size. These are very good plans; I built these two chairs as a gift for my parents. I hope they'll get years and years of use at the cottage 'Up North' in Michigan. Thanks!

Built from Plan(s)
Estimated Time Investment
Week Long Project (20 Hours or More)
Finish Used
Exterior primer/sealer, exterior flat white paint
Recommended Skill Level
Beginner

Entry Table

This way our first project! It took about two hours to complete the table and an additional two hours for sanding and staining. My husband and I had a great time making it and are already planning our next project.

Estimated Cost
$85.00 with stain
Estimated Time Investment
Afternoon Project (3-6 Hours)
Finish Used
We used pine to make the table and Minwax dark walnut stain. One coat.
Recommended Skill Level
Starter Project

Comments

Play Vanity

Submitted by tcalford on Fri, 01/22/2016 - 13:59

Last year I was fortunate enough to stumble upon Ana White's website when researching play kitchens as a Christmas gift for our little girls. I had never built anything previously, but the plans seemed simple enough, I enjoyed making their gift, and they love playing with the kitchen set. I looked for something to continue the Christmas gift tradition this year and found the play vanity plans shared from That's My Letter. It turned out great and was again simple for someone who doesn't have many tools or experience. The girls have enjoyed playing with vanity very much, much more than I imagined. I look forward to finding something to continue the tradition for next Christmas, and hopefully to have time for a few other projects in between! Thanks for all share these plans.

Built from Plan(s)
Estimated Time Investment
Weekend Project (10-20 Hours)
Recommended Skill Level
Beginner

Rebuilt outdoor bench

Found a bench on a second hand site for $5. The wood was rotting and the metal was rusted. Brought it home, took it apart, cleaned the metal parts and cut pine 1x3s to size. With some black Rustoleum paint for the metal, stain I had on hand, and an oil based top coat, I have a beautiful new bench for my front porch. 

Estimated Cost
$20
Estimated Time Investment
Afternoon Project (3-6 Hours)
Recommended Skill Level
Beginner

Comments

New bed for my youngest

Submitted by Anonymous (not verified) on Mon, 04/10/2023 - 15:45

Moved into a new house after a fire destroyed almost everything, rather than buying new beds for my kids, we decided to build! They turned out beautifully, and the kids love them! Decided to modify the camp loft bed, removing the stairs and using the foot of the bed a ladder style.

Comments