Updated Pantry
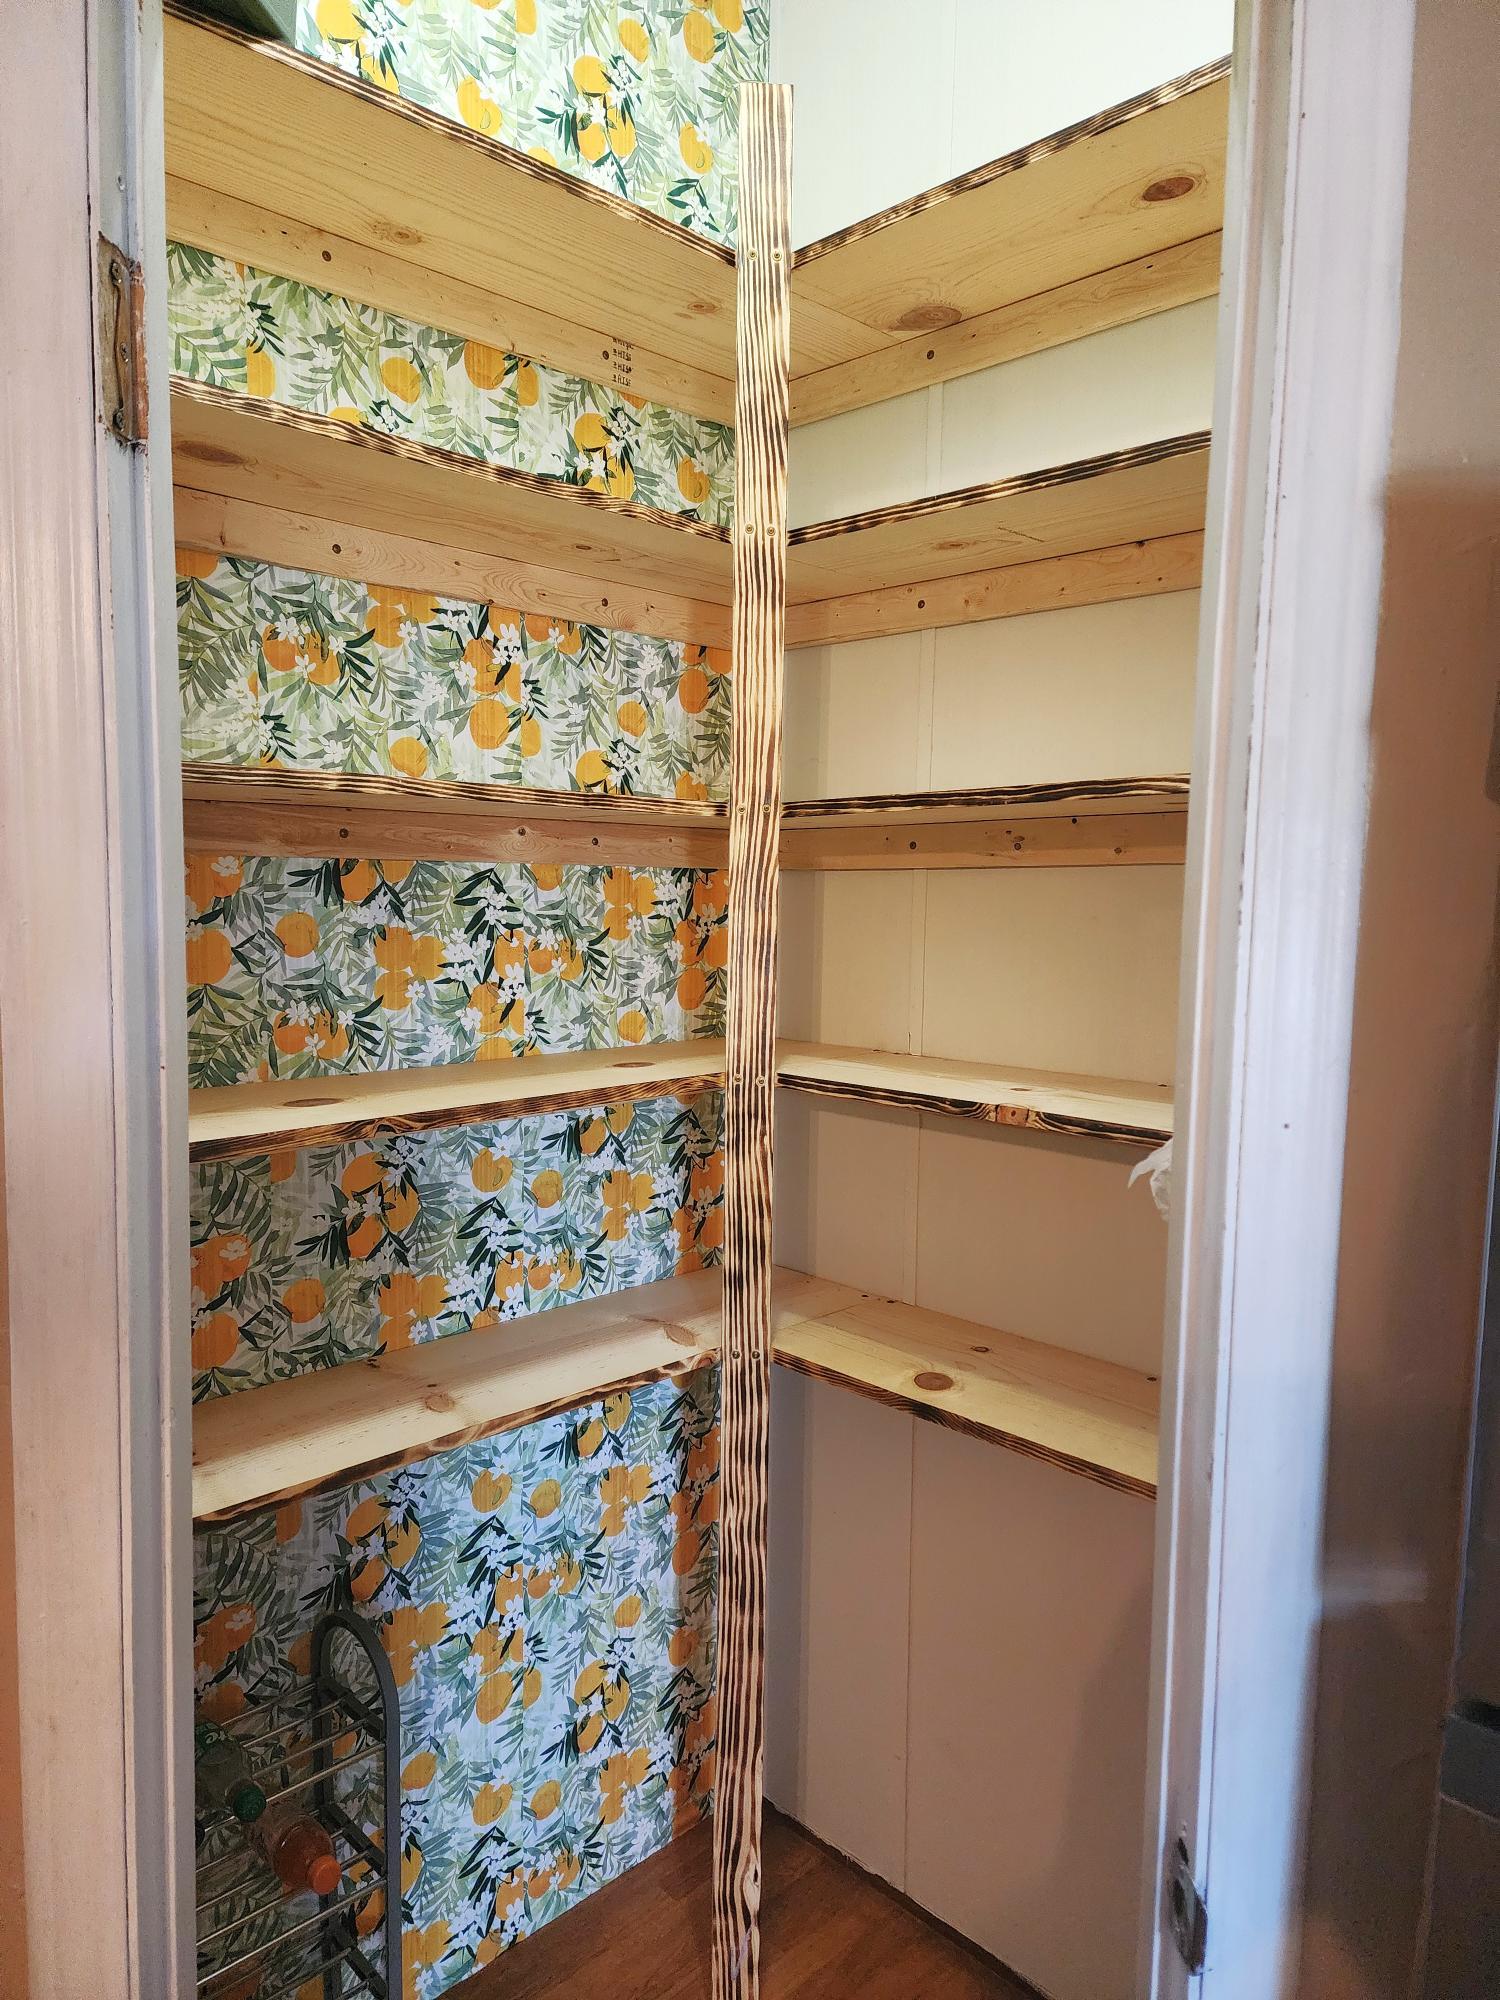
Replaced our wire metal shelving with this easy to follow plan. My first time doing a project like this and it turned out amazing!
Lindsey

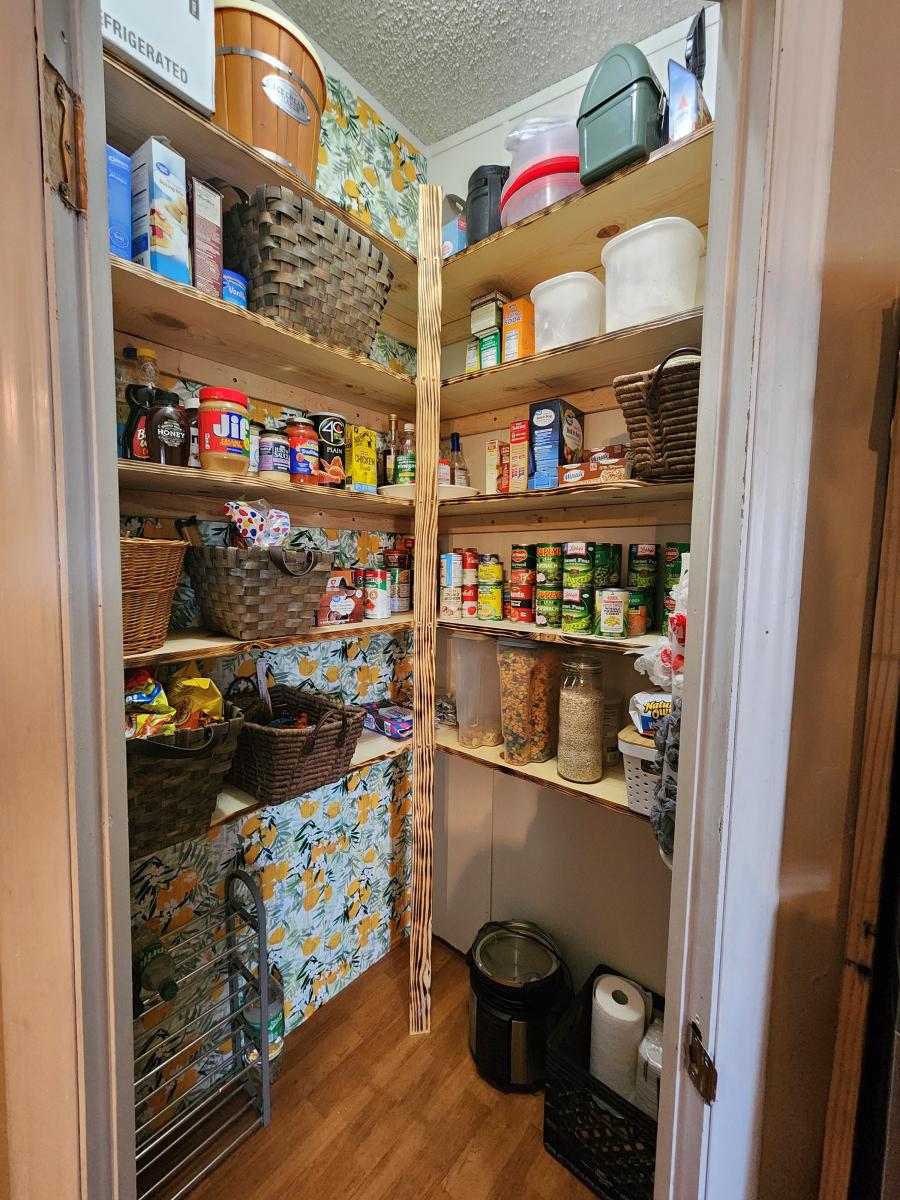
Built from Plan(s)
Replaced our wire metal shelving with this easy to follow plan. My first time doing a project like this and it turned out amazing!
Lindsey
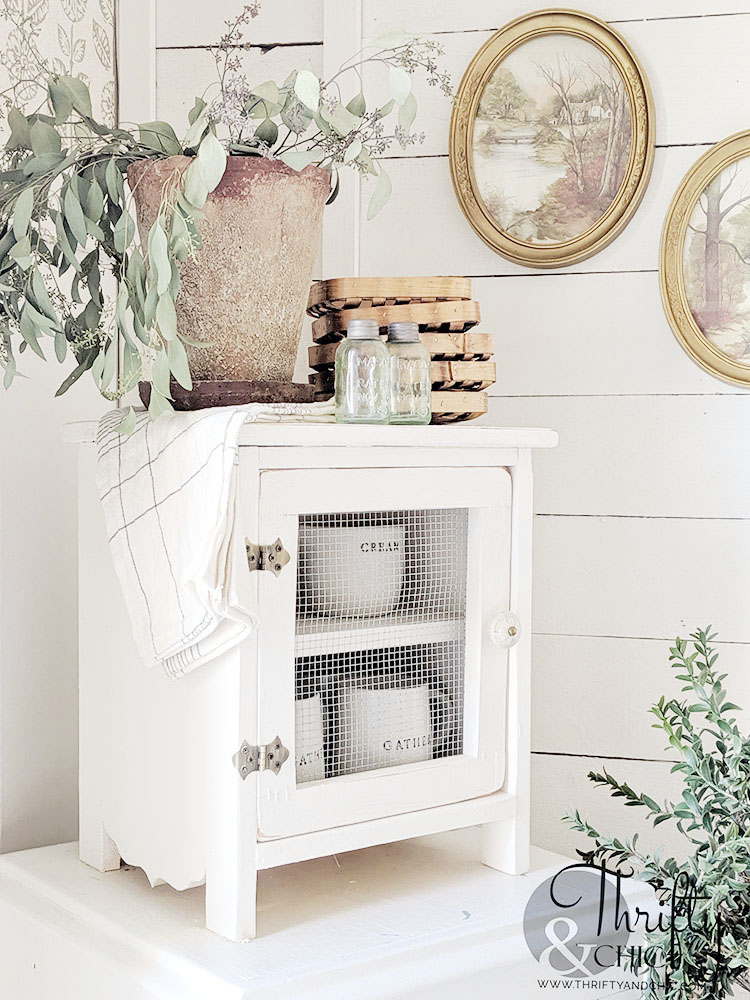
Making pie safes have apparently become a hobby 😂 these things are just so cute! They can be made from pretty much just scrap wood you have lying around, some glue and nails. I’ve painted mine and have stained them. This time around I added the cute design to the side bottom and bead board to the back.
Visit Thrifty and Chic for the full tutorial with modifications!
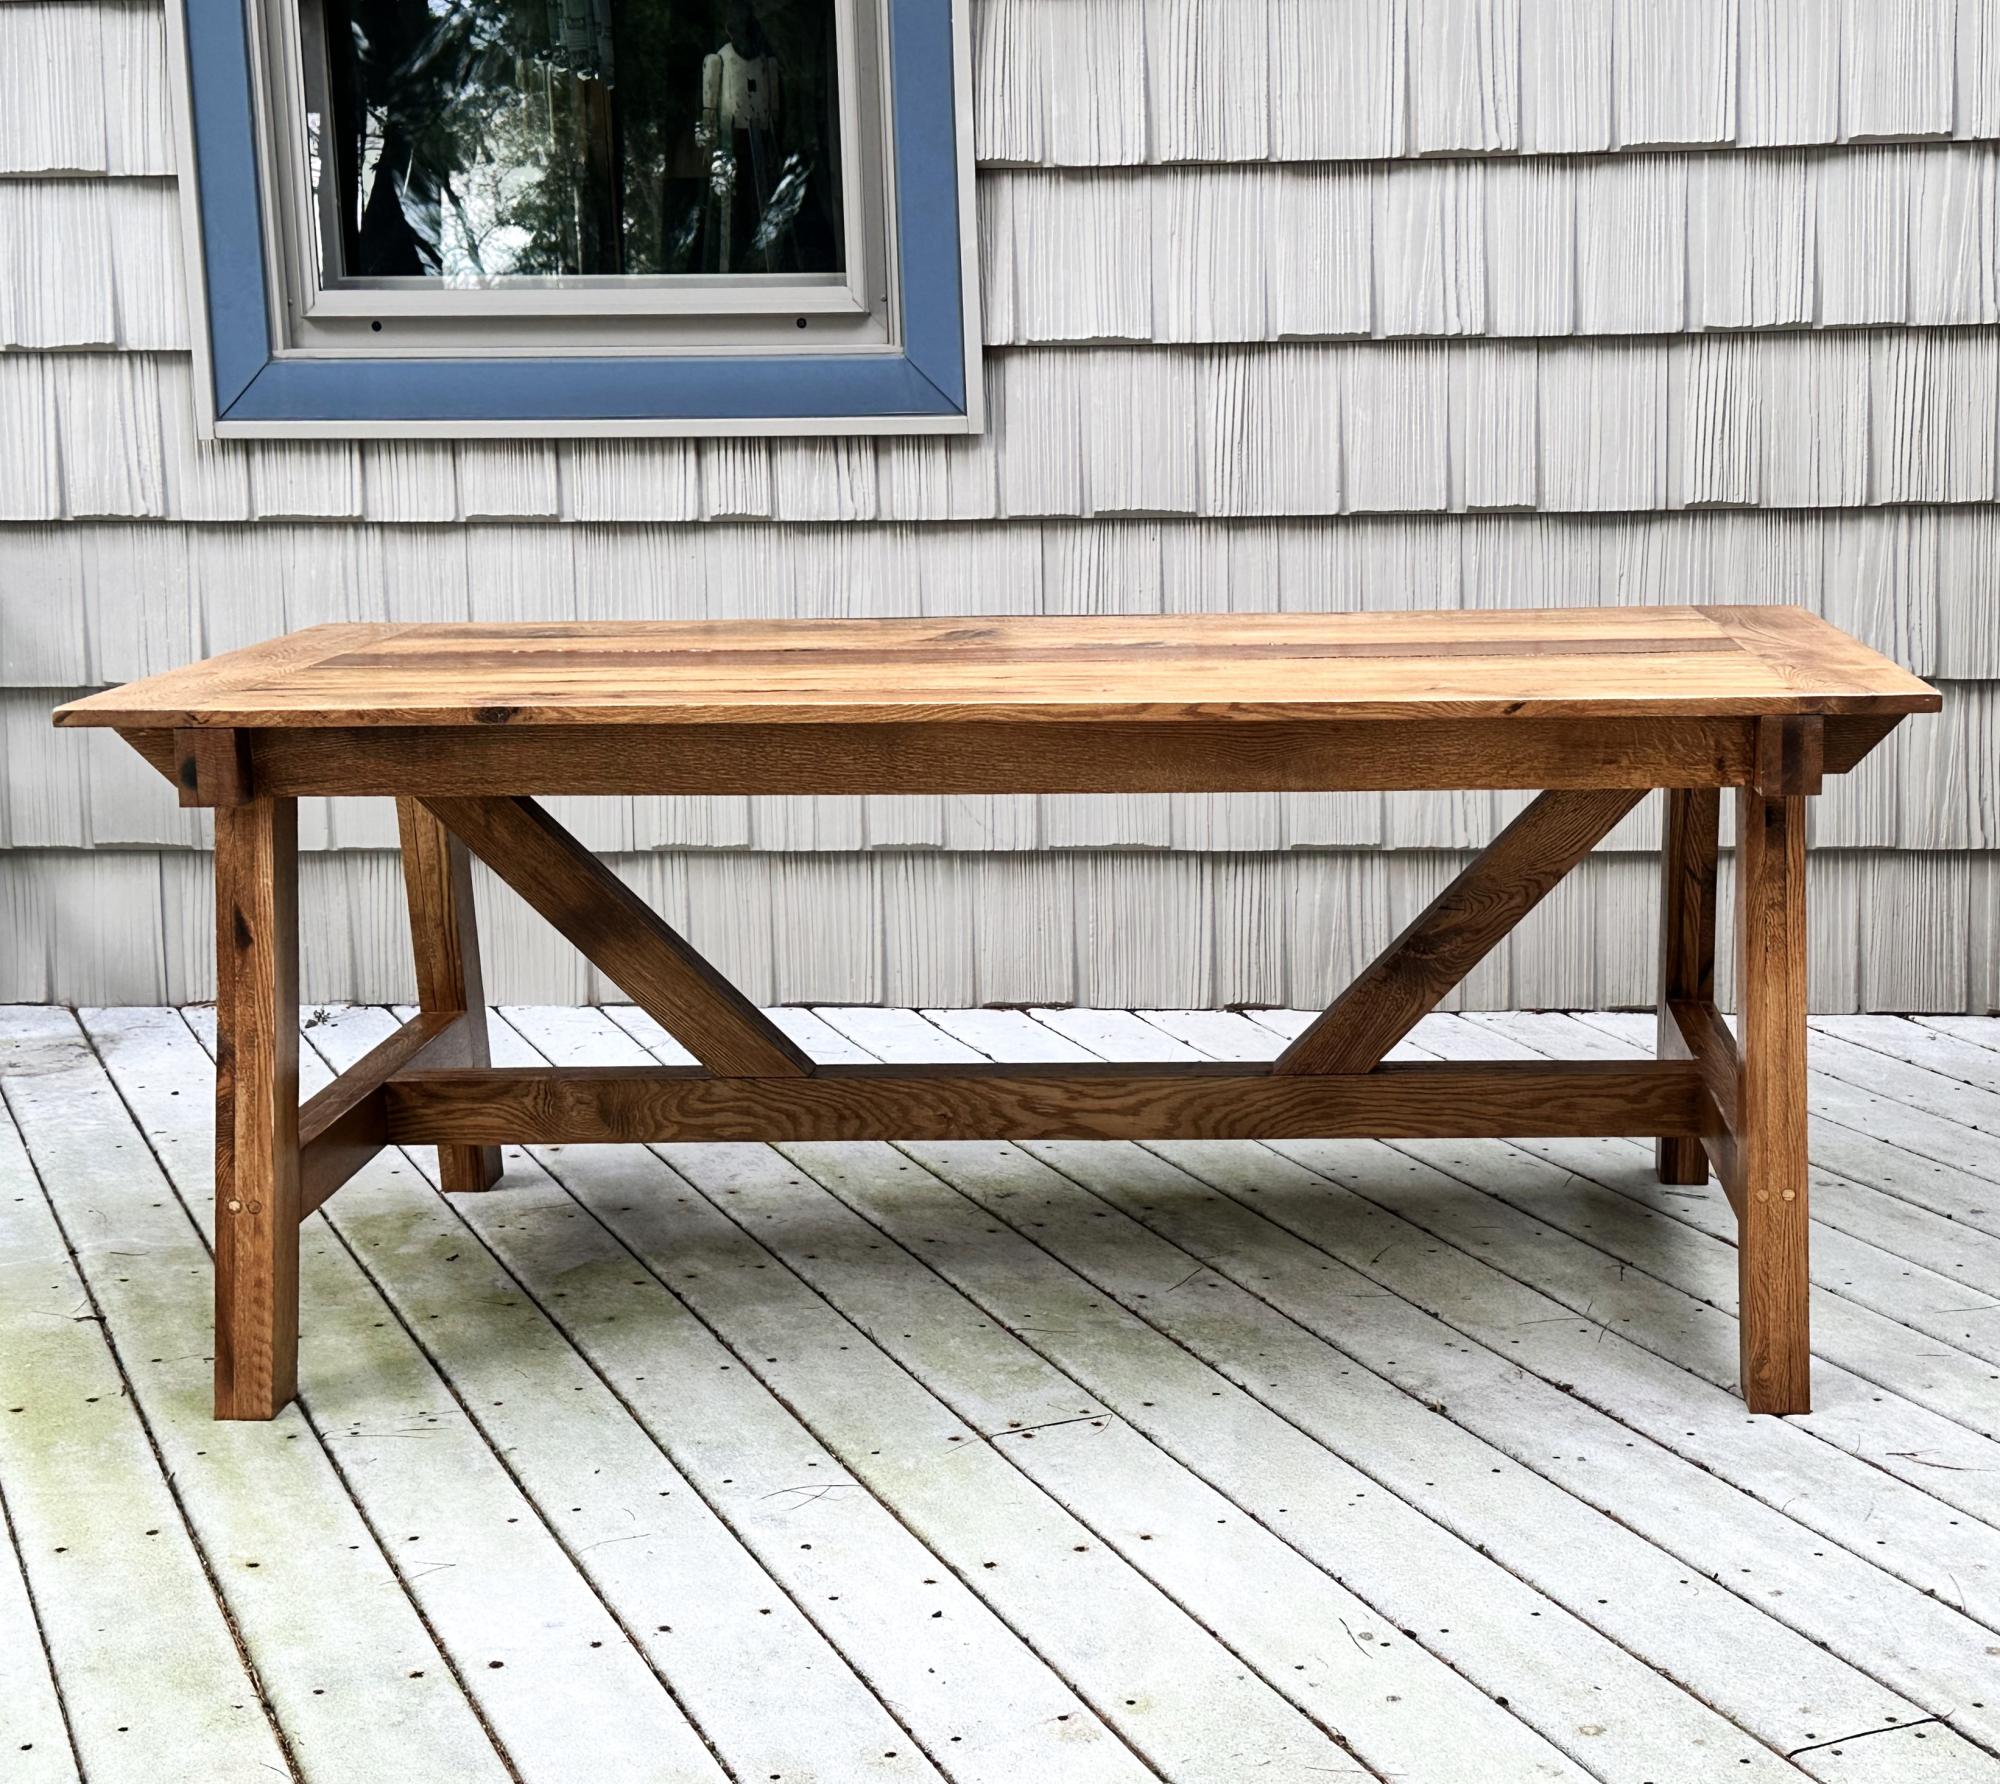
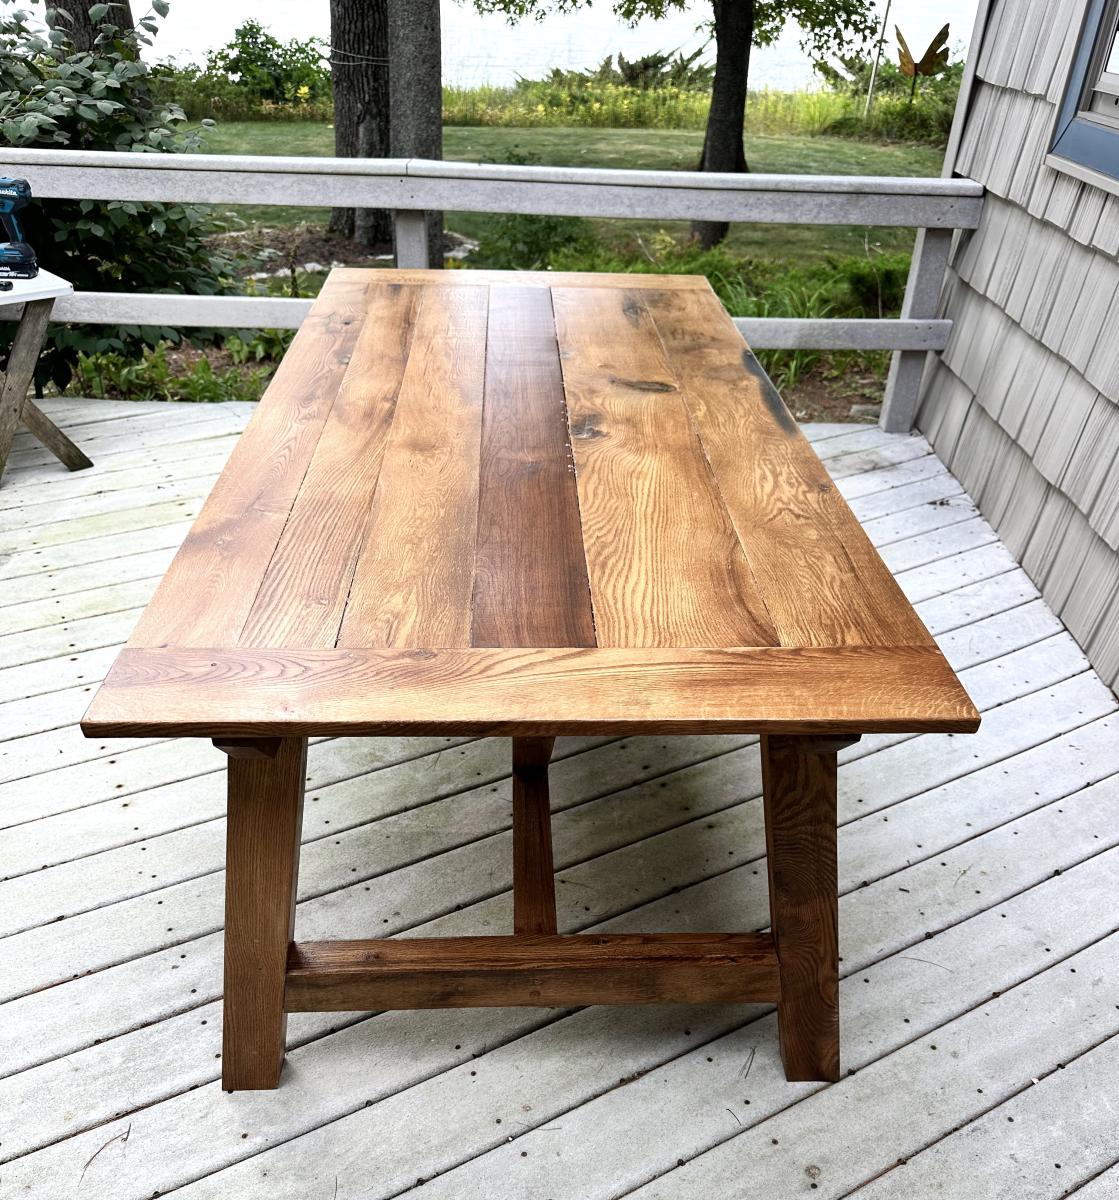
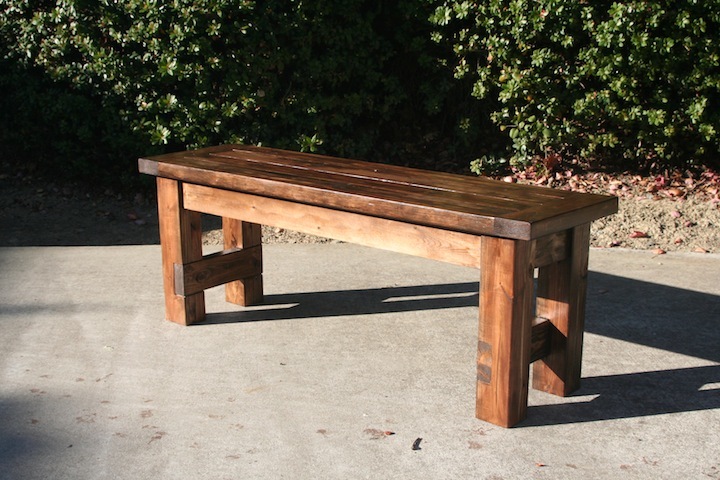
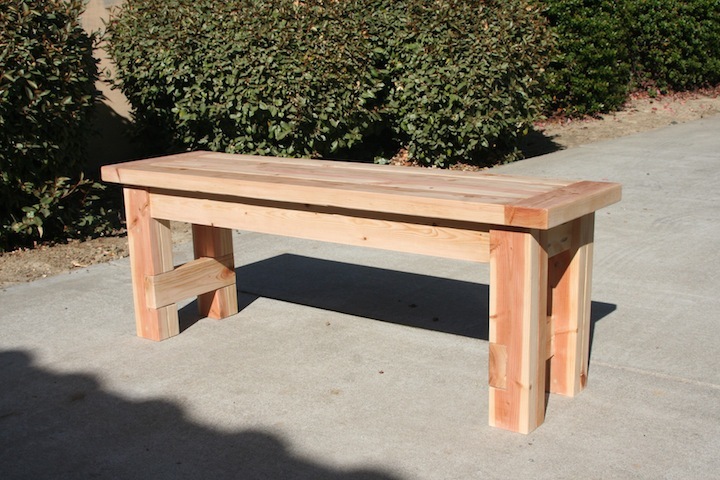
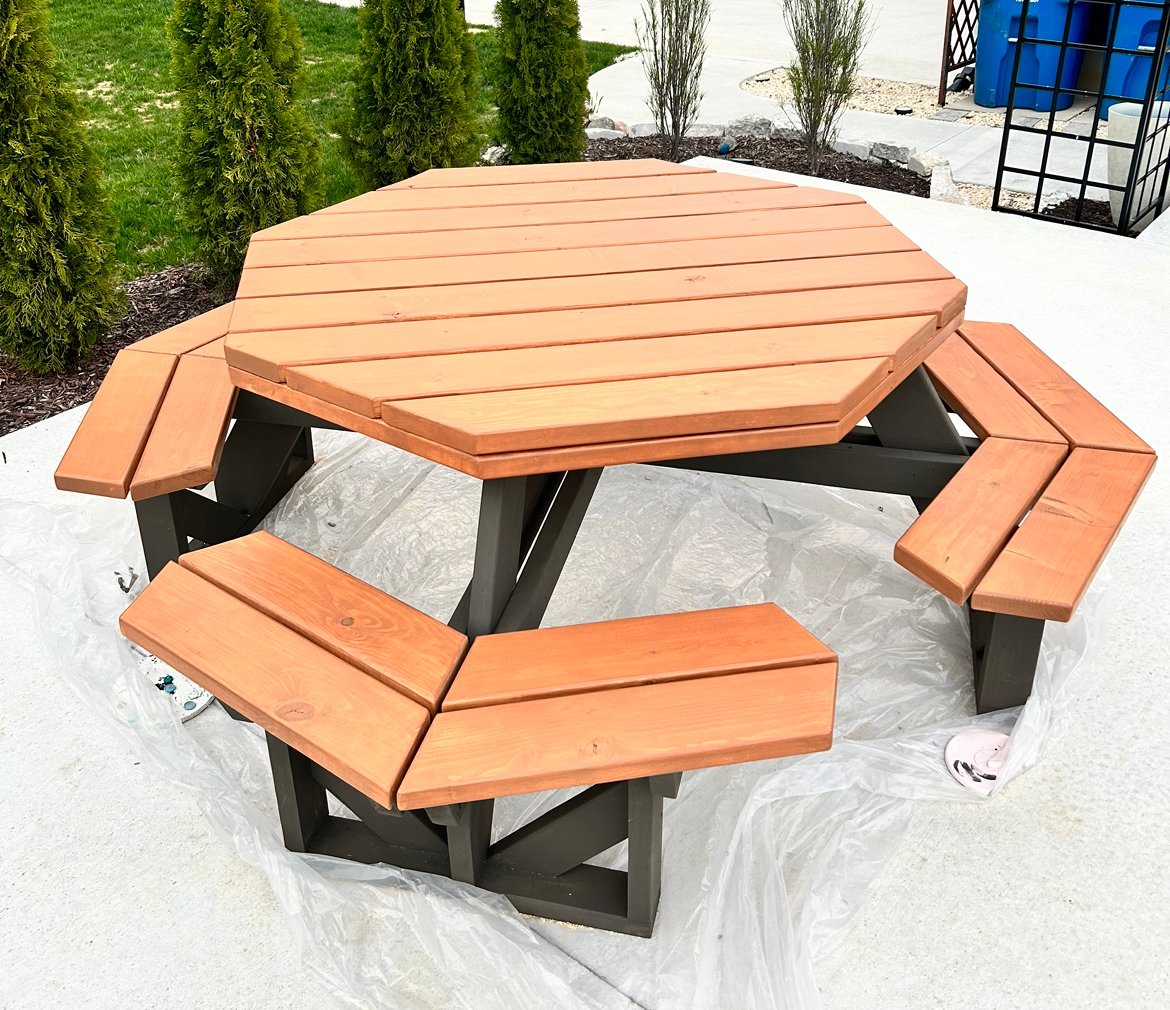
Modified 4x4 Farmhouse table, my first picnic table project.. We used rough sawn oak planks from a tree cut down 20 years ago that were sitting in a garage waiting for a special build. All framing is built from 3/4” x 3” boards glued up to create the legs and supports. For character the water spots were sanded down but not out to bring out some different hues after staining. The benches follow the same design plan and when the outdoor poly sets up they will be added to the set. Great plans from Ana White! - by "Grandpa Can Fix It"

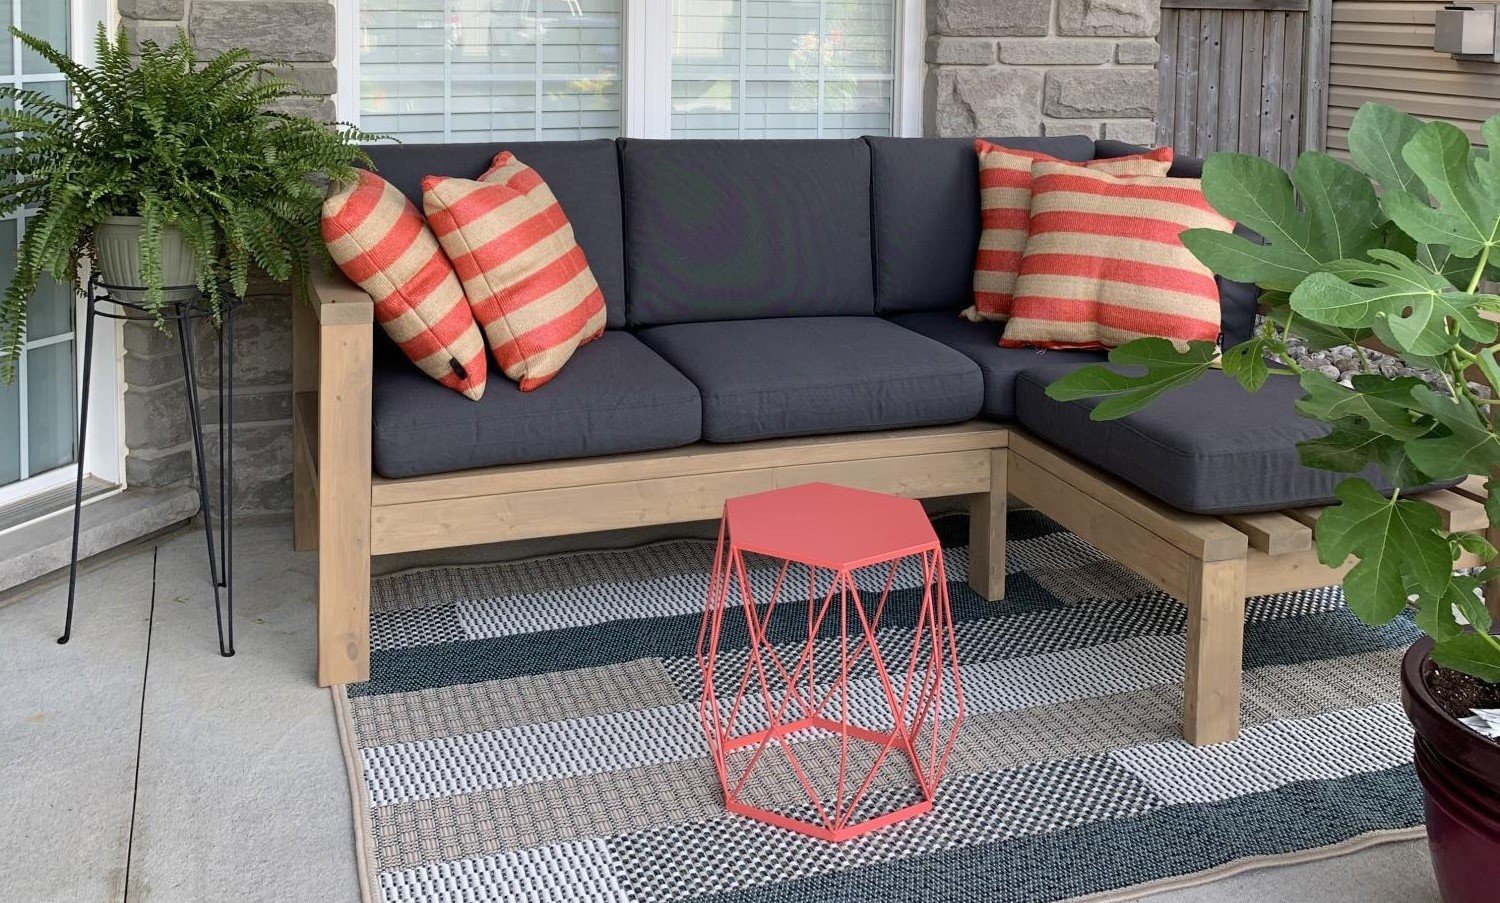
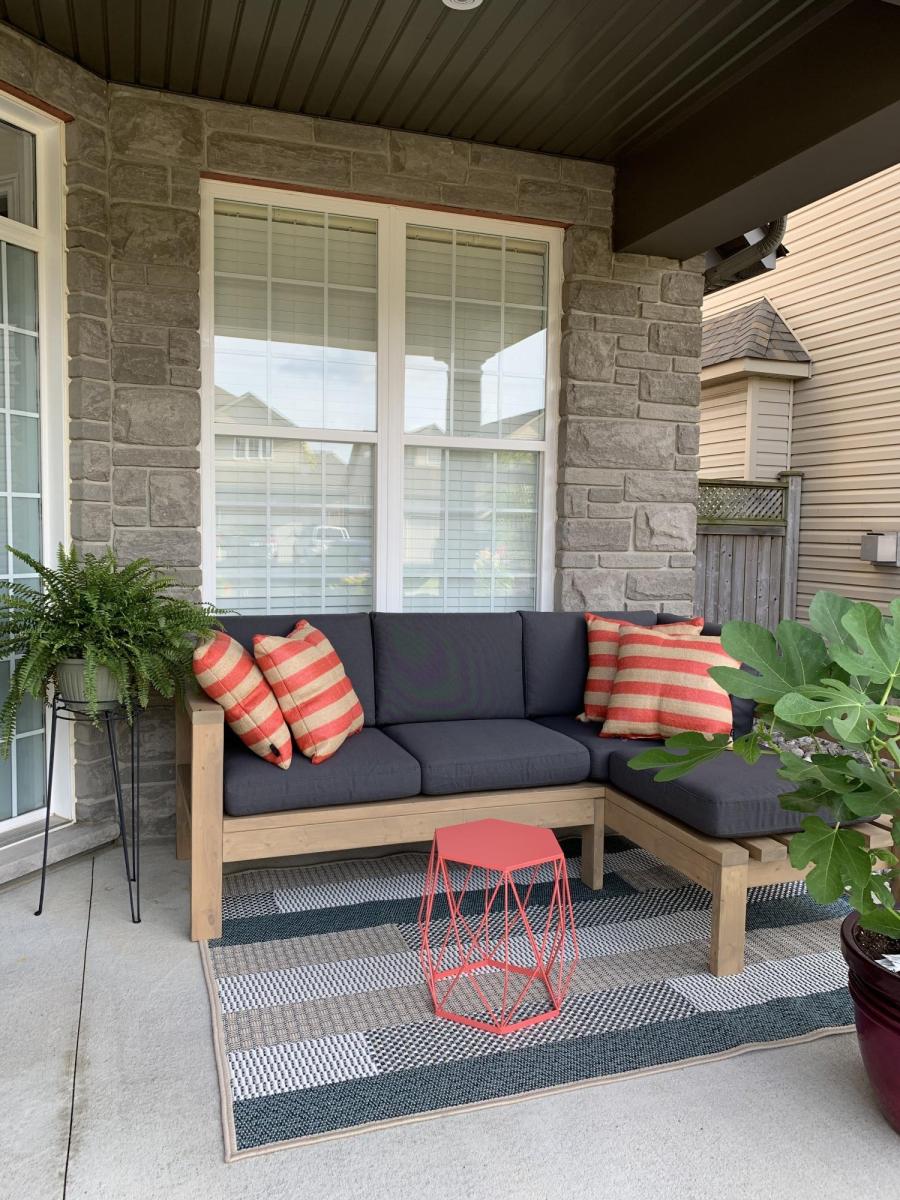
This project was quite easy and did not require many tools. The plan allowed me to adjust the measurements easily so it could fit in that space. I used regular 2x4’s and treated the wood with Mountain Ash colour in a semi-transparent stain from Sherwin Williams, I just love the colour! I build 2 - 2 seaters exactly the same. The one side has no arm, as I wanted it to look like a lounge chair. I love to sit in the corner and stretch my legs 😊. I bought the cushion covers from IKEA, and got good quality foam.
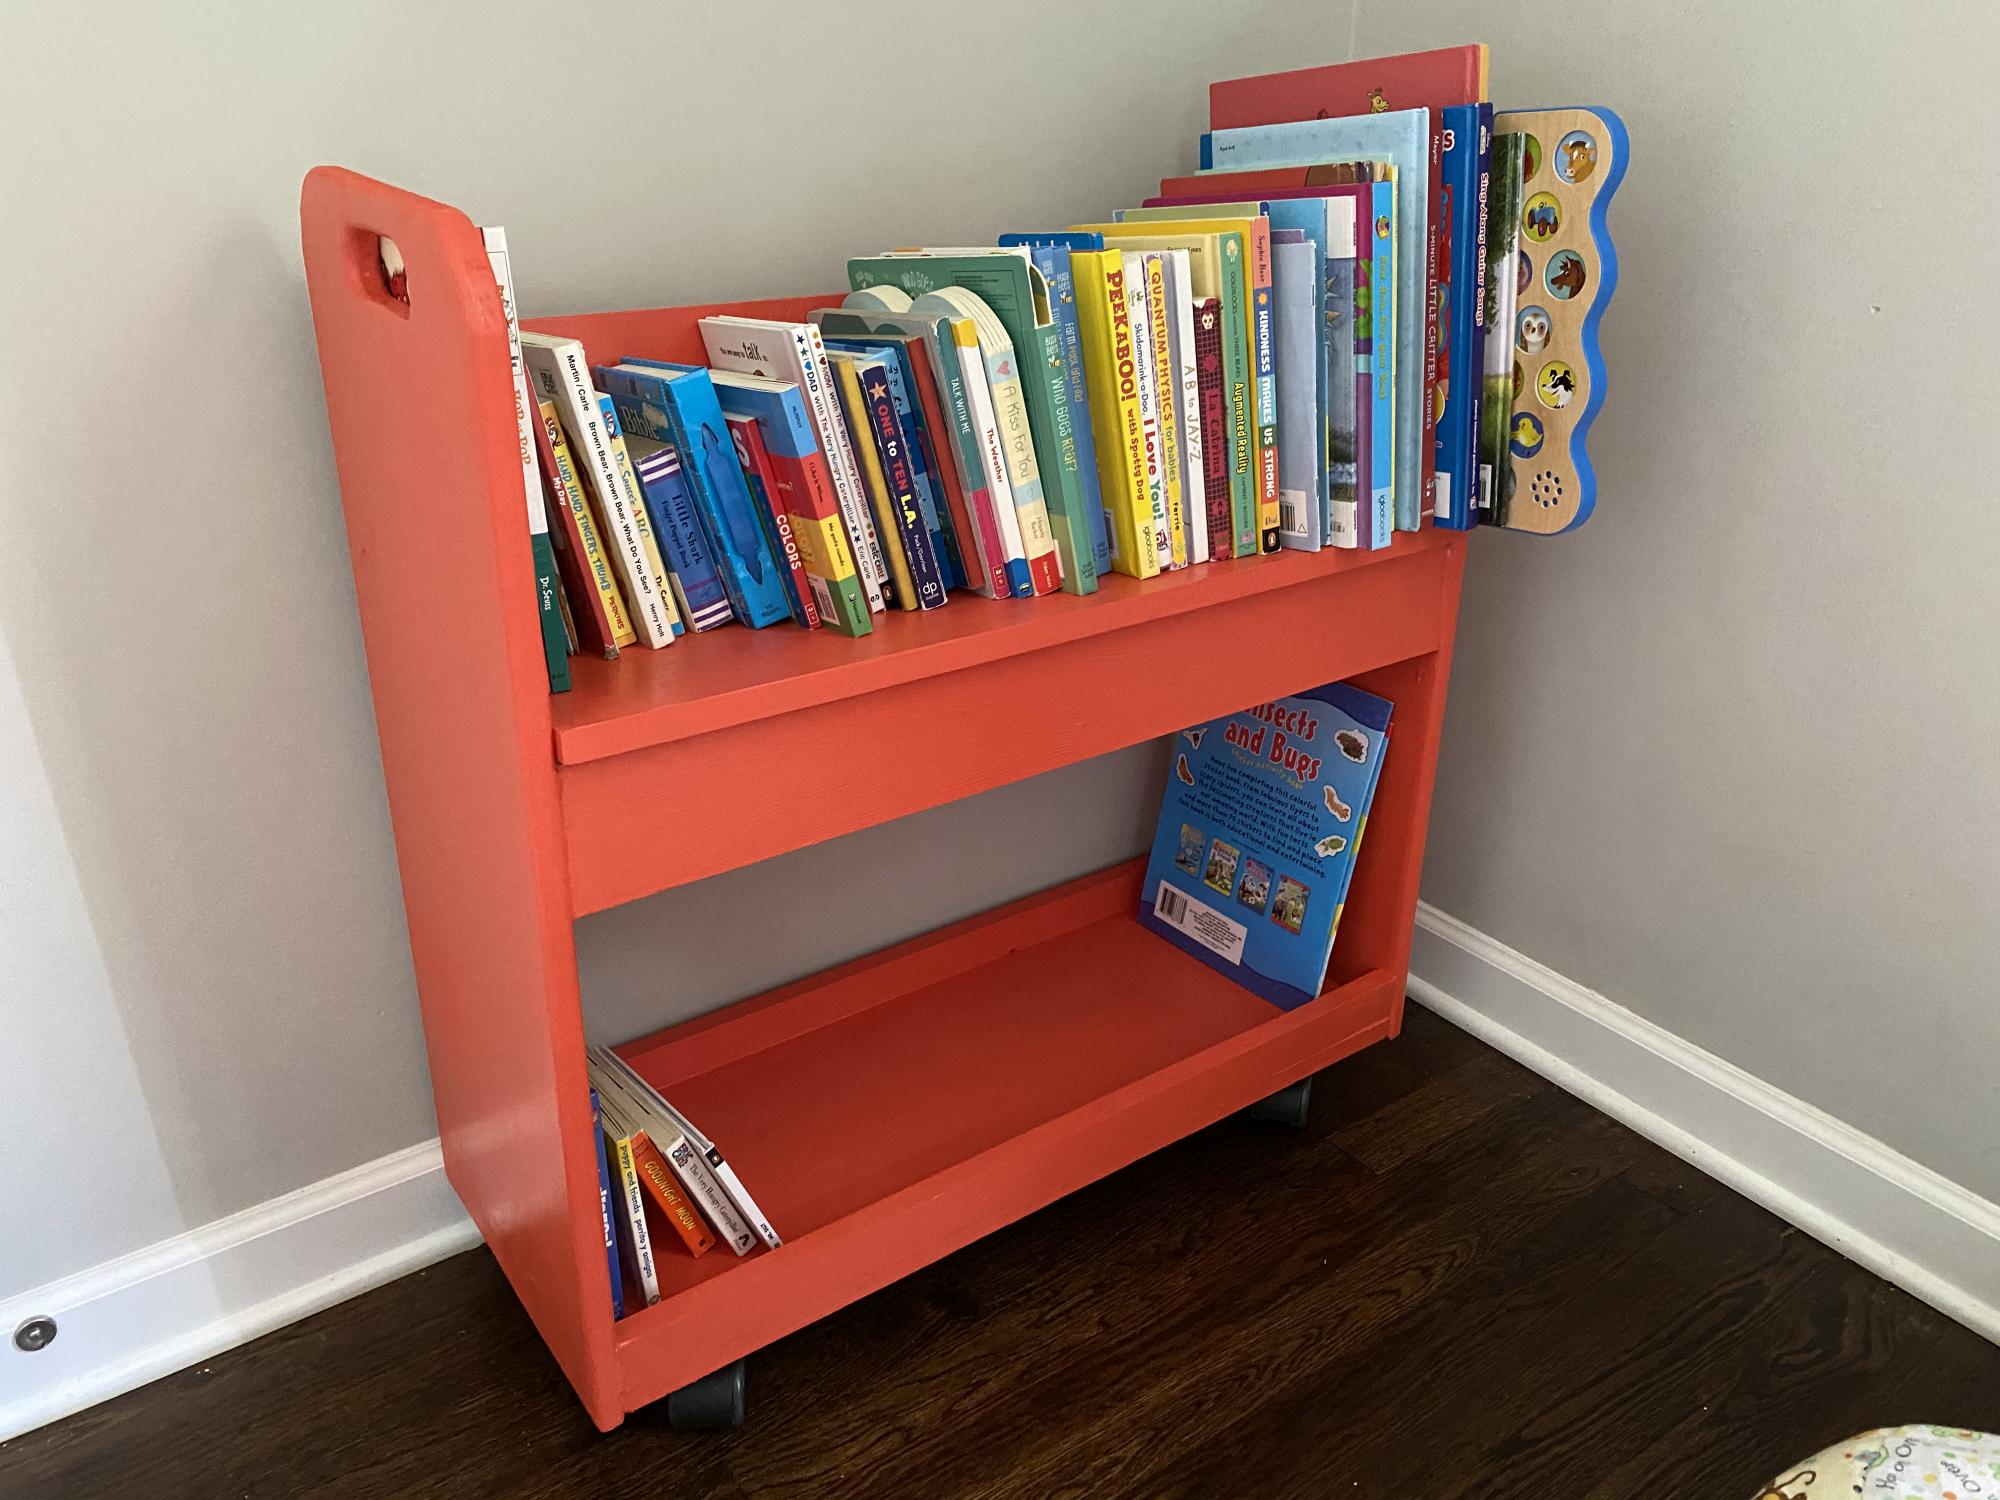
This was really easy once I finally got the top and handles on the side pieces complete. I still haven’t master my jigsaw yet :( Any tips would be helpful. The tearout I get when I use my jigsaw makes it impossible to follow any lines I draw. But I think the curves came out pretty okay.
Mon, 06/28/2021 - 20:09
It looks awesome, love the color choice! The jig saw just takes practice, but it looks like you did a wonderful job on that aspect as well!
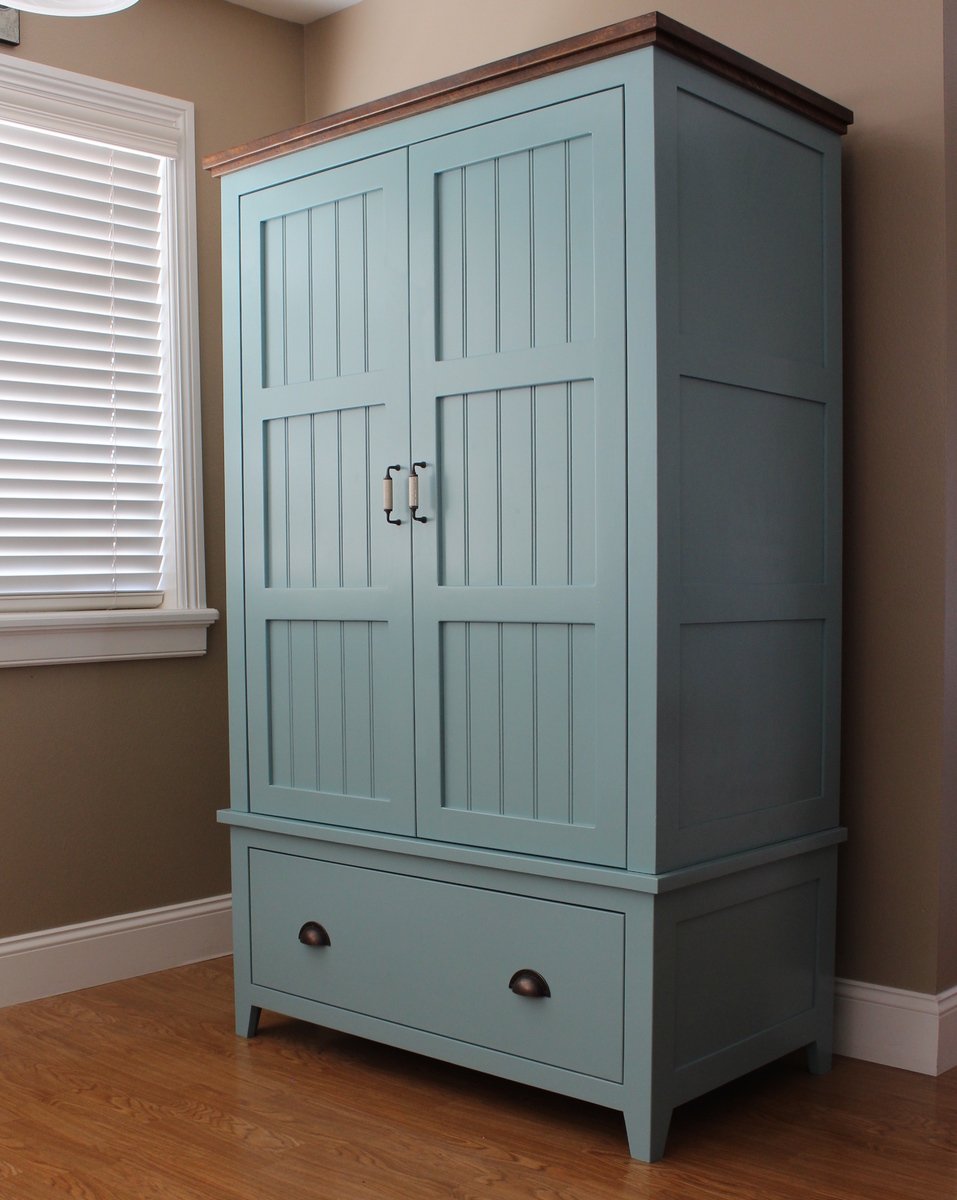
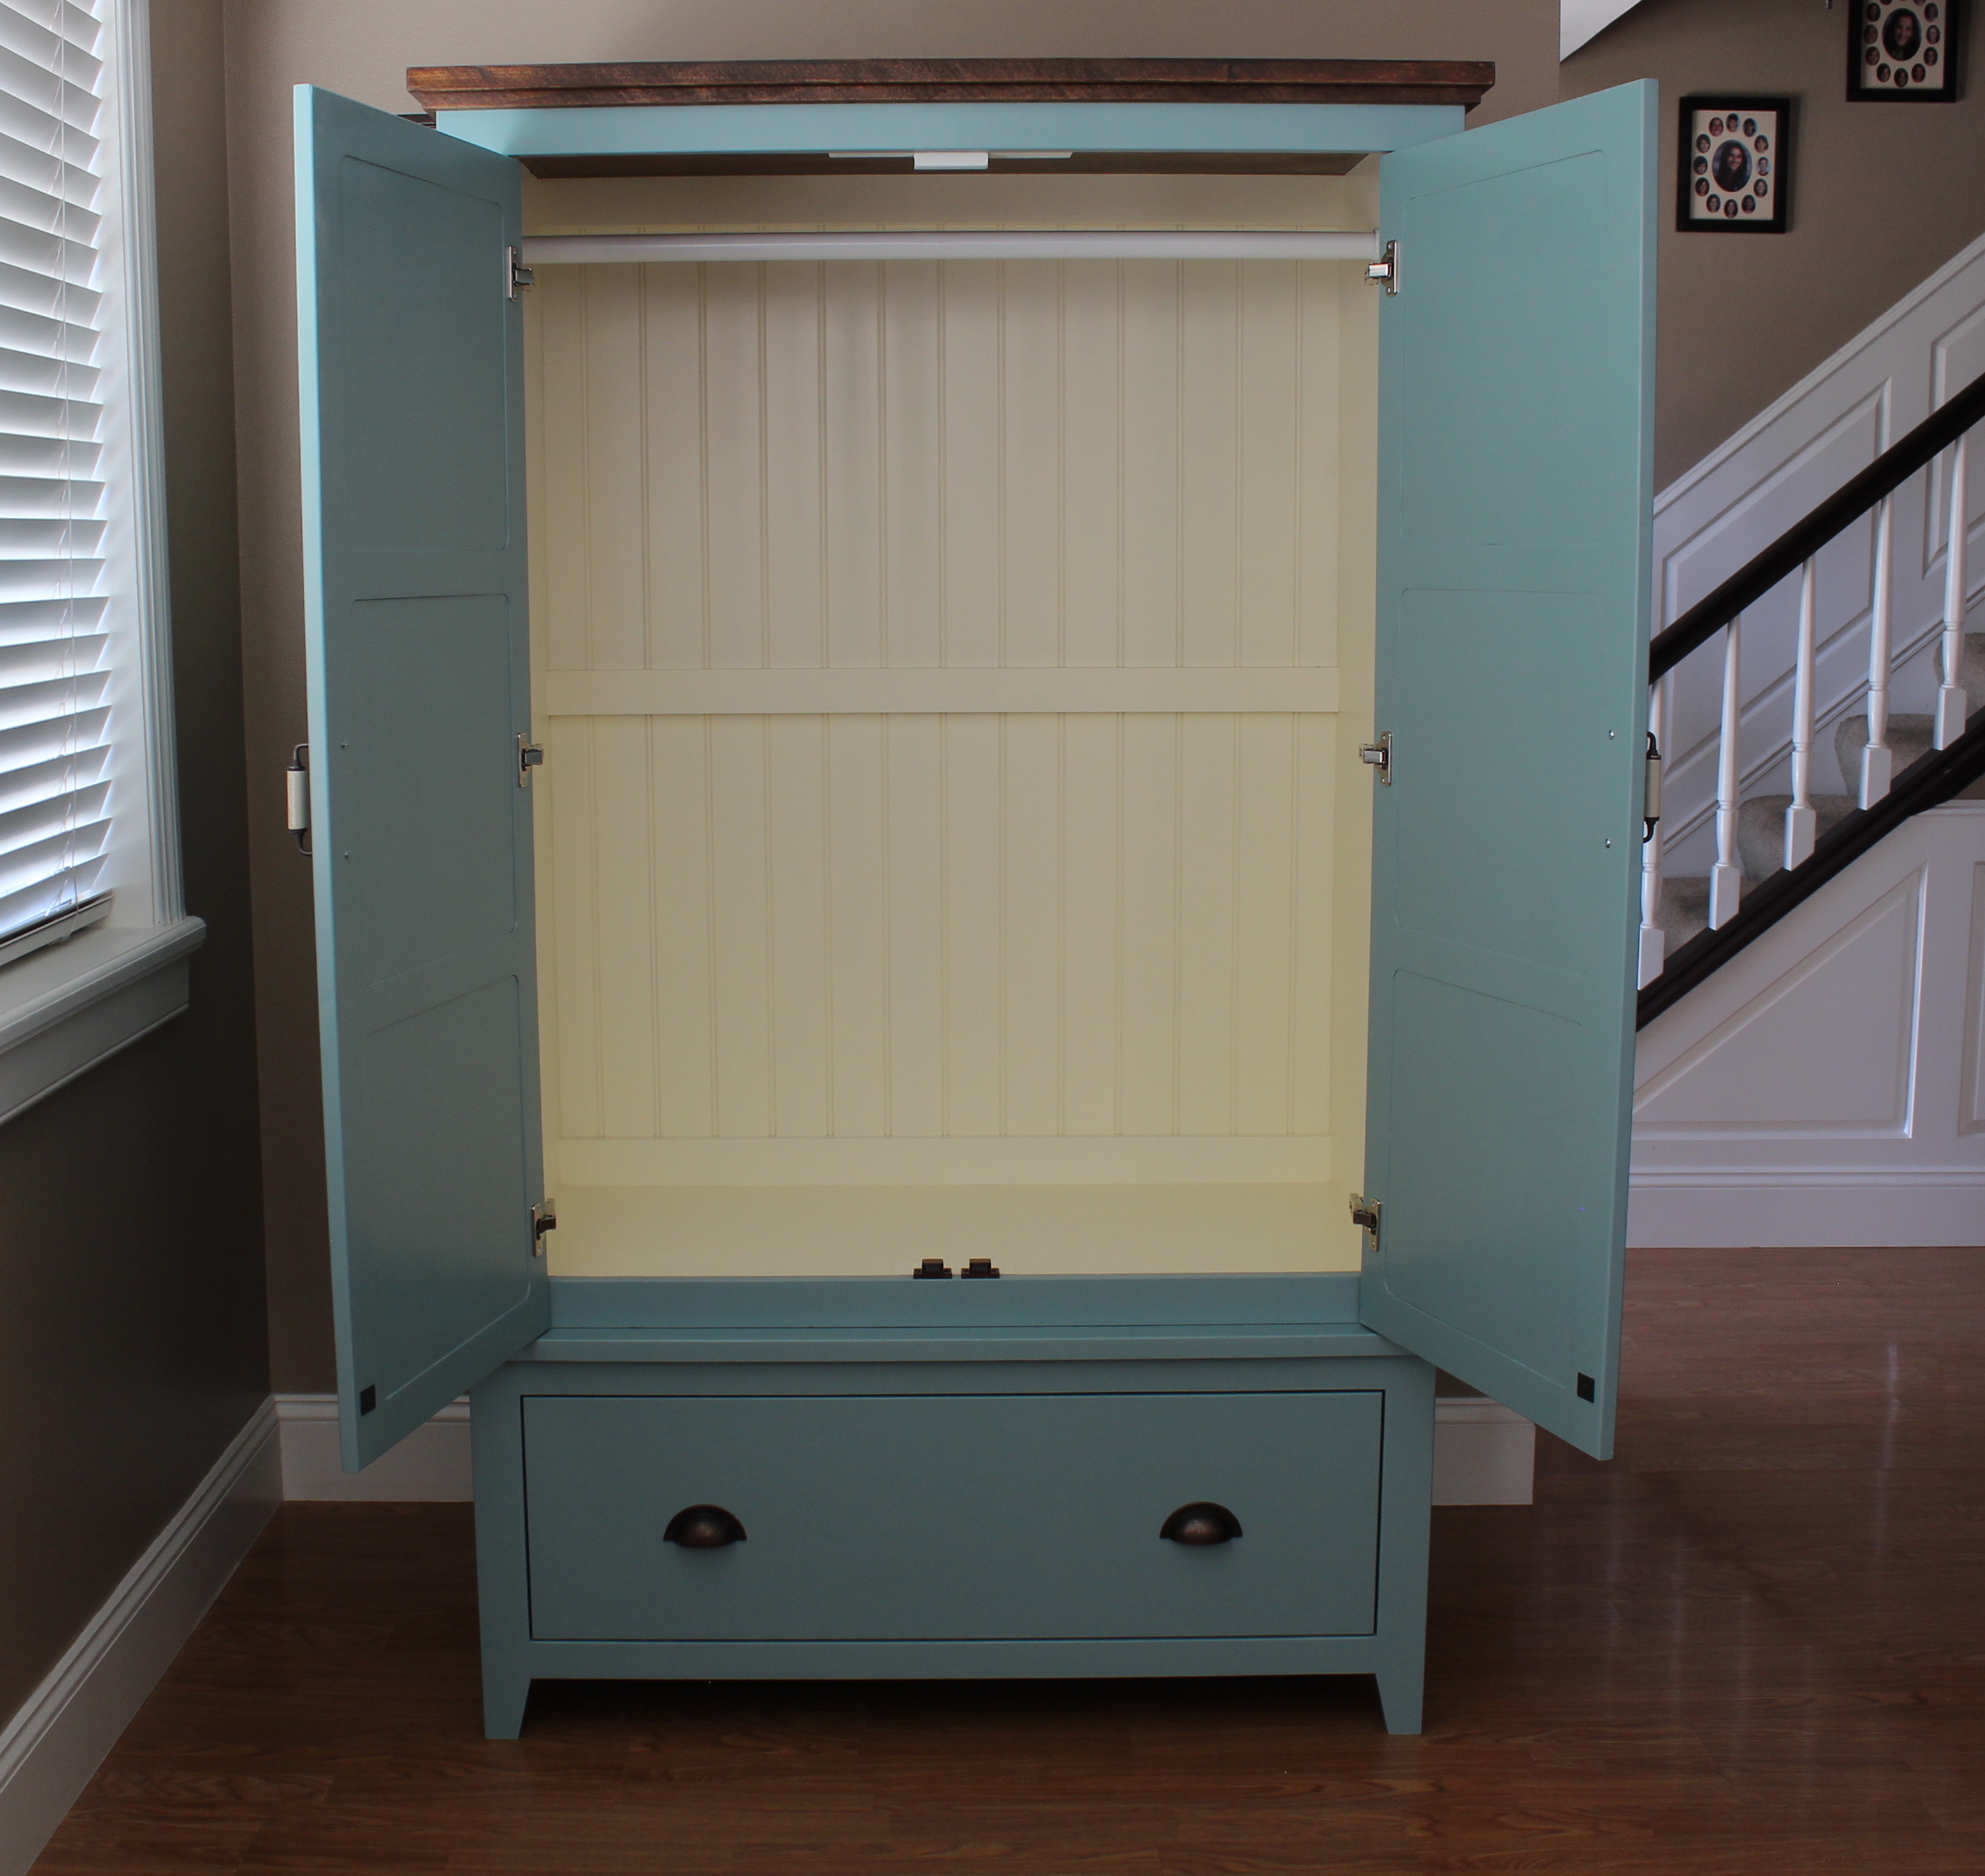
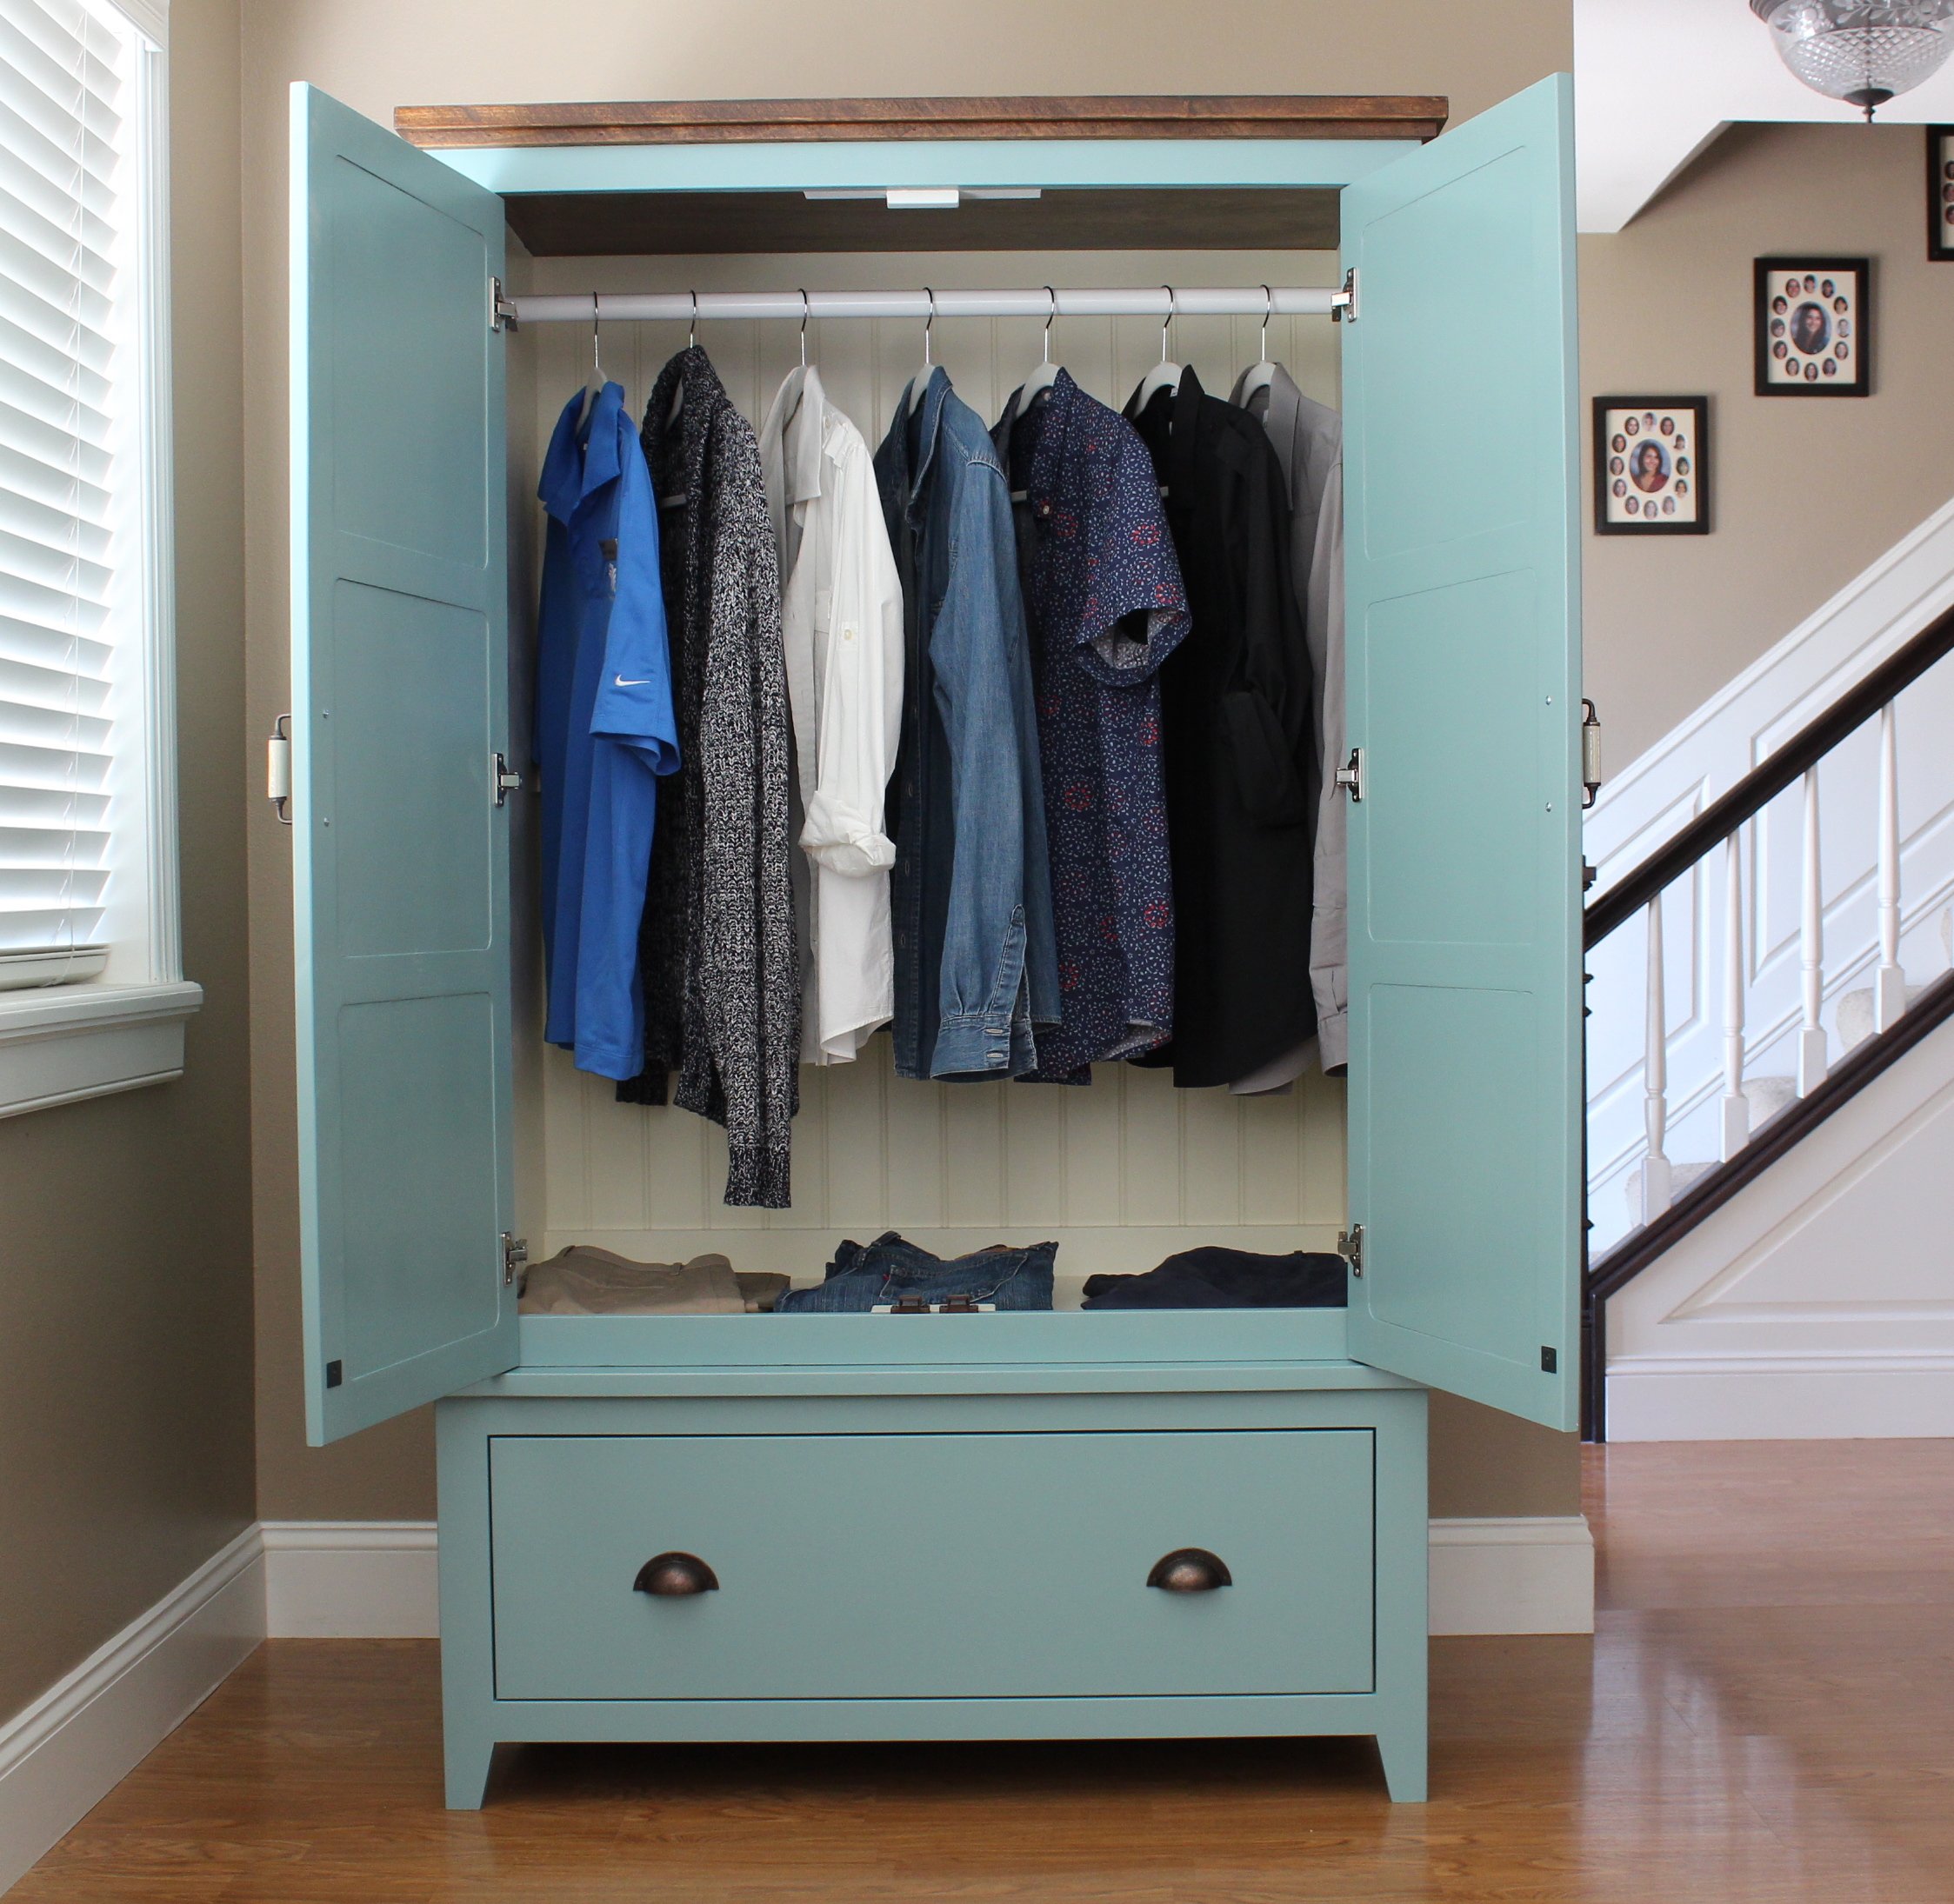
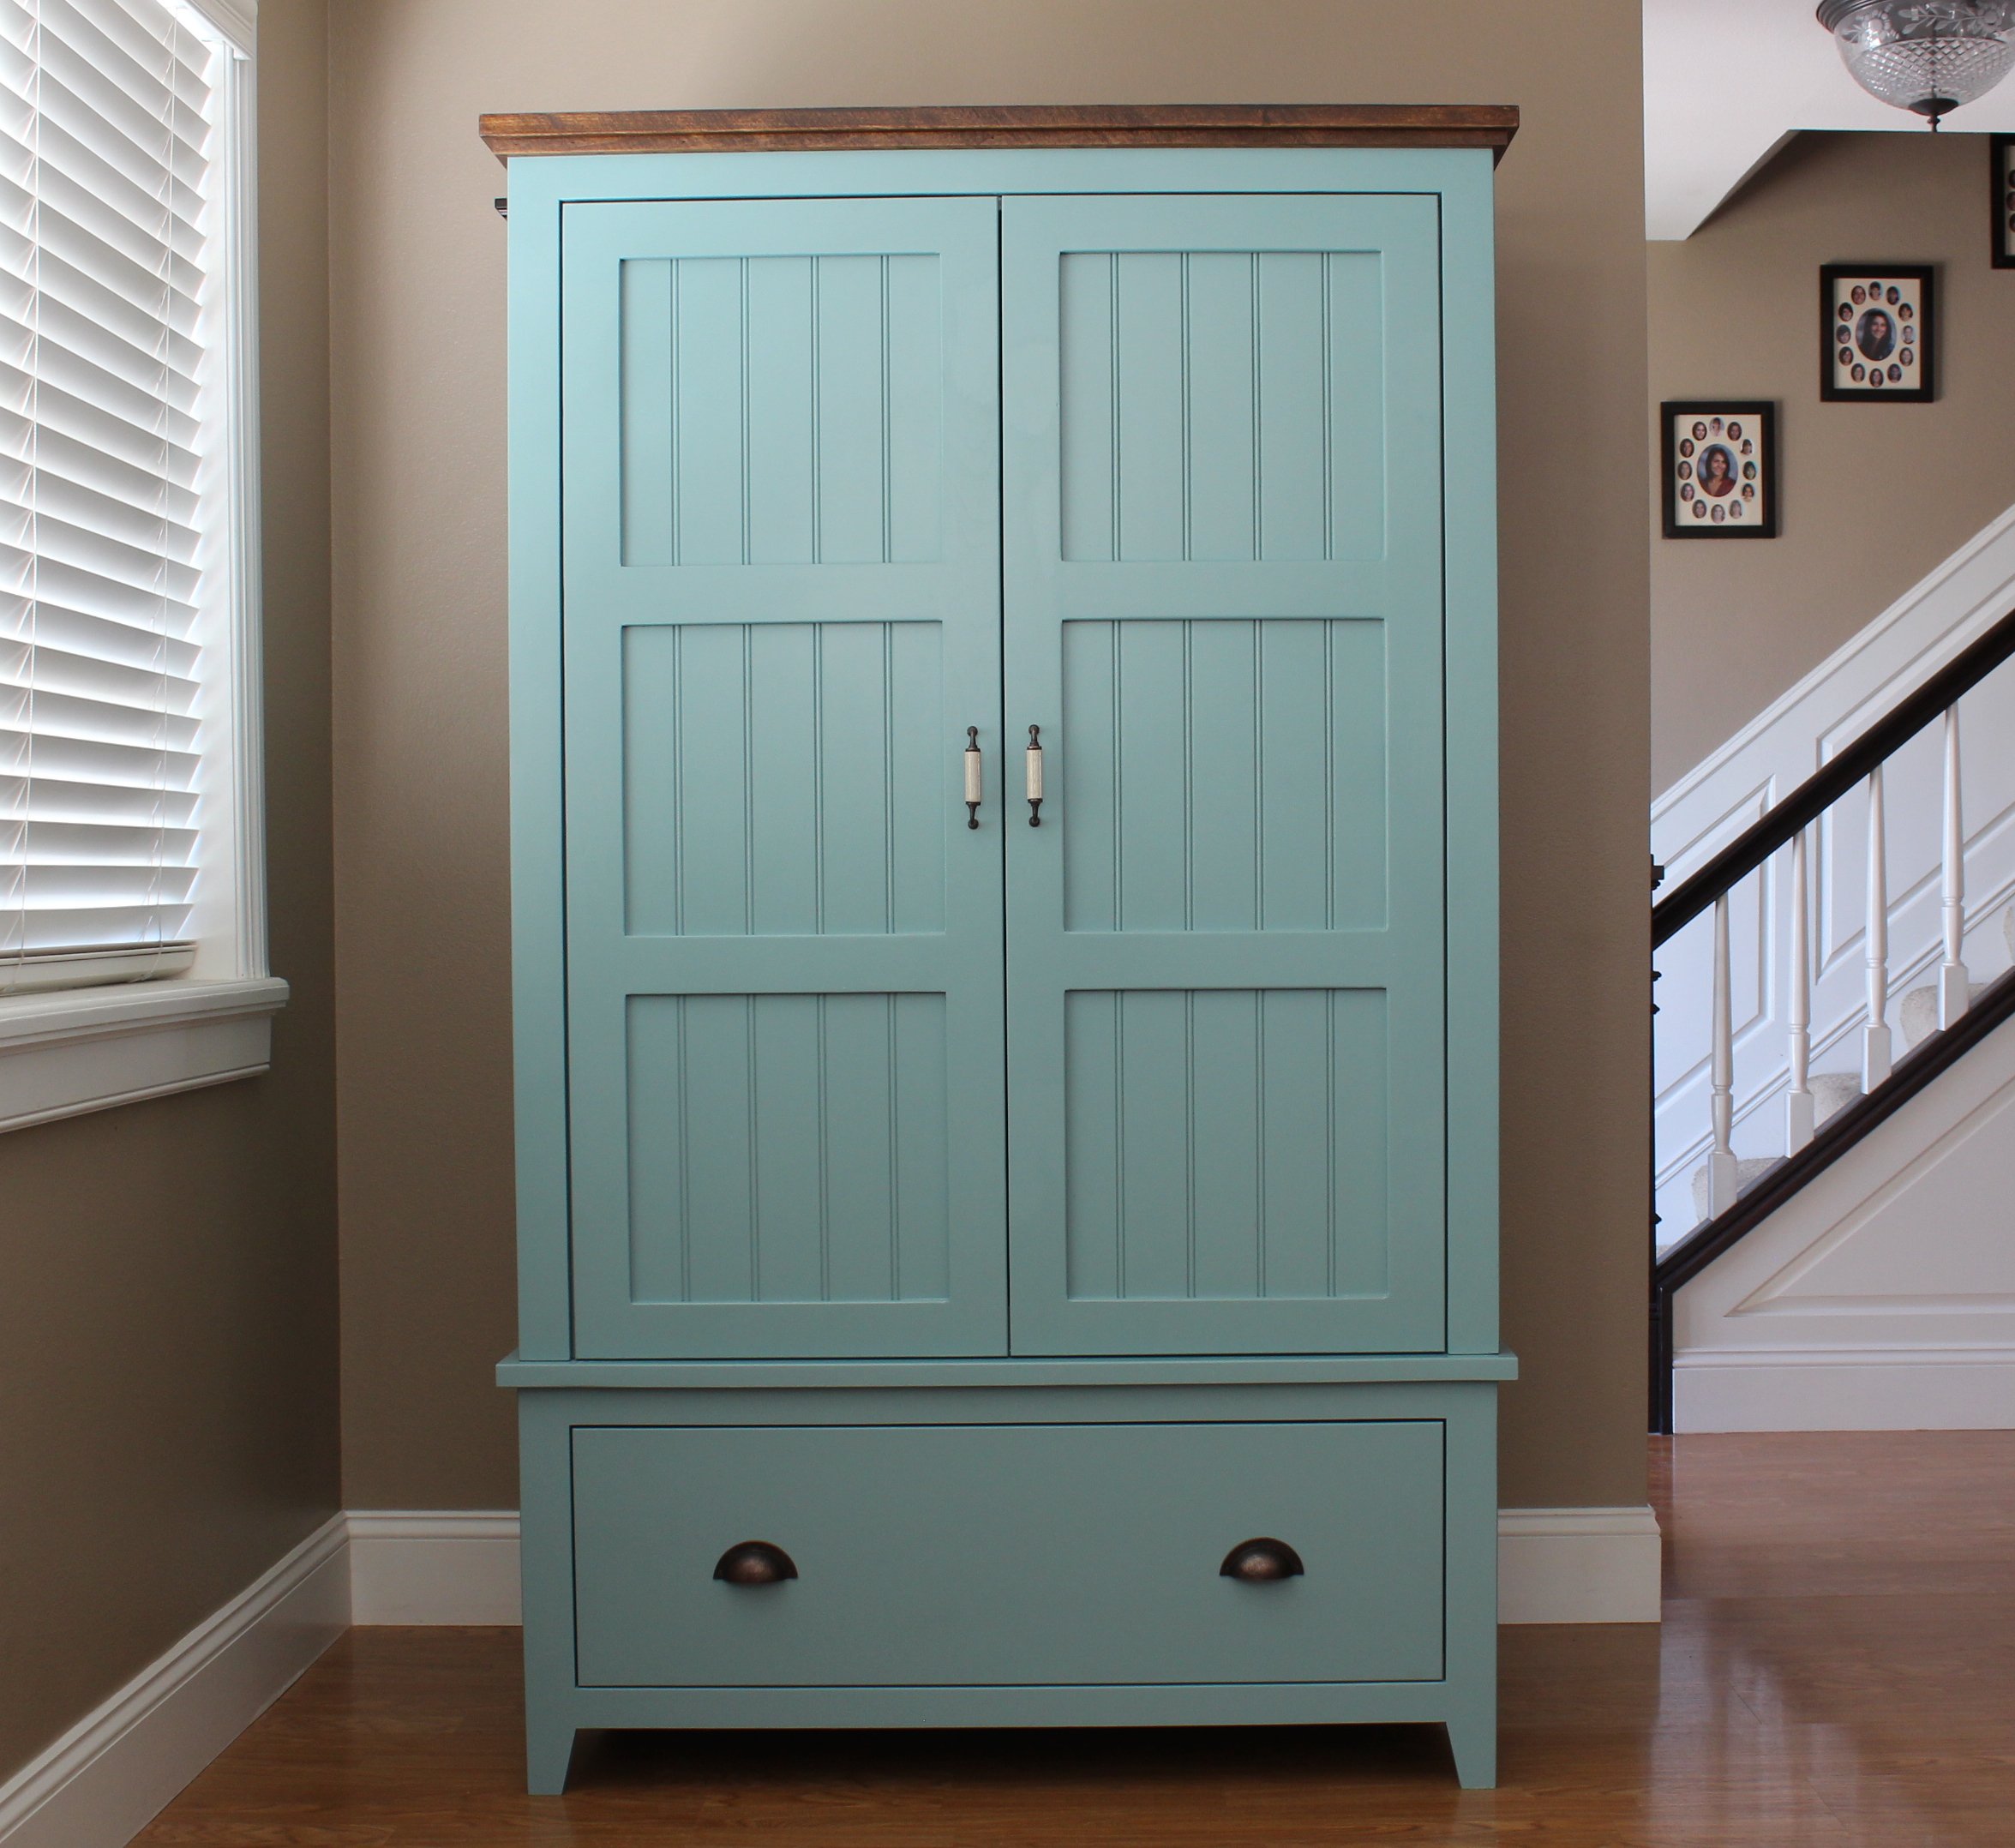
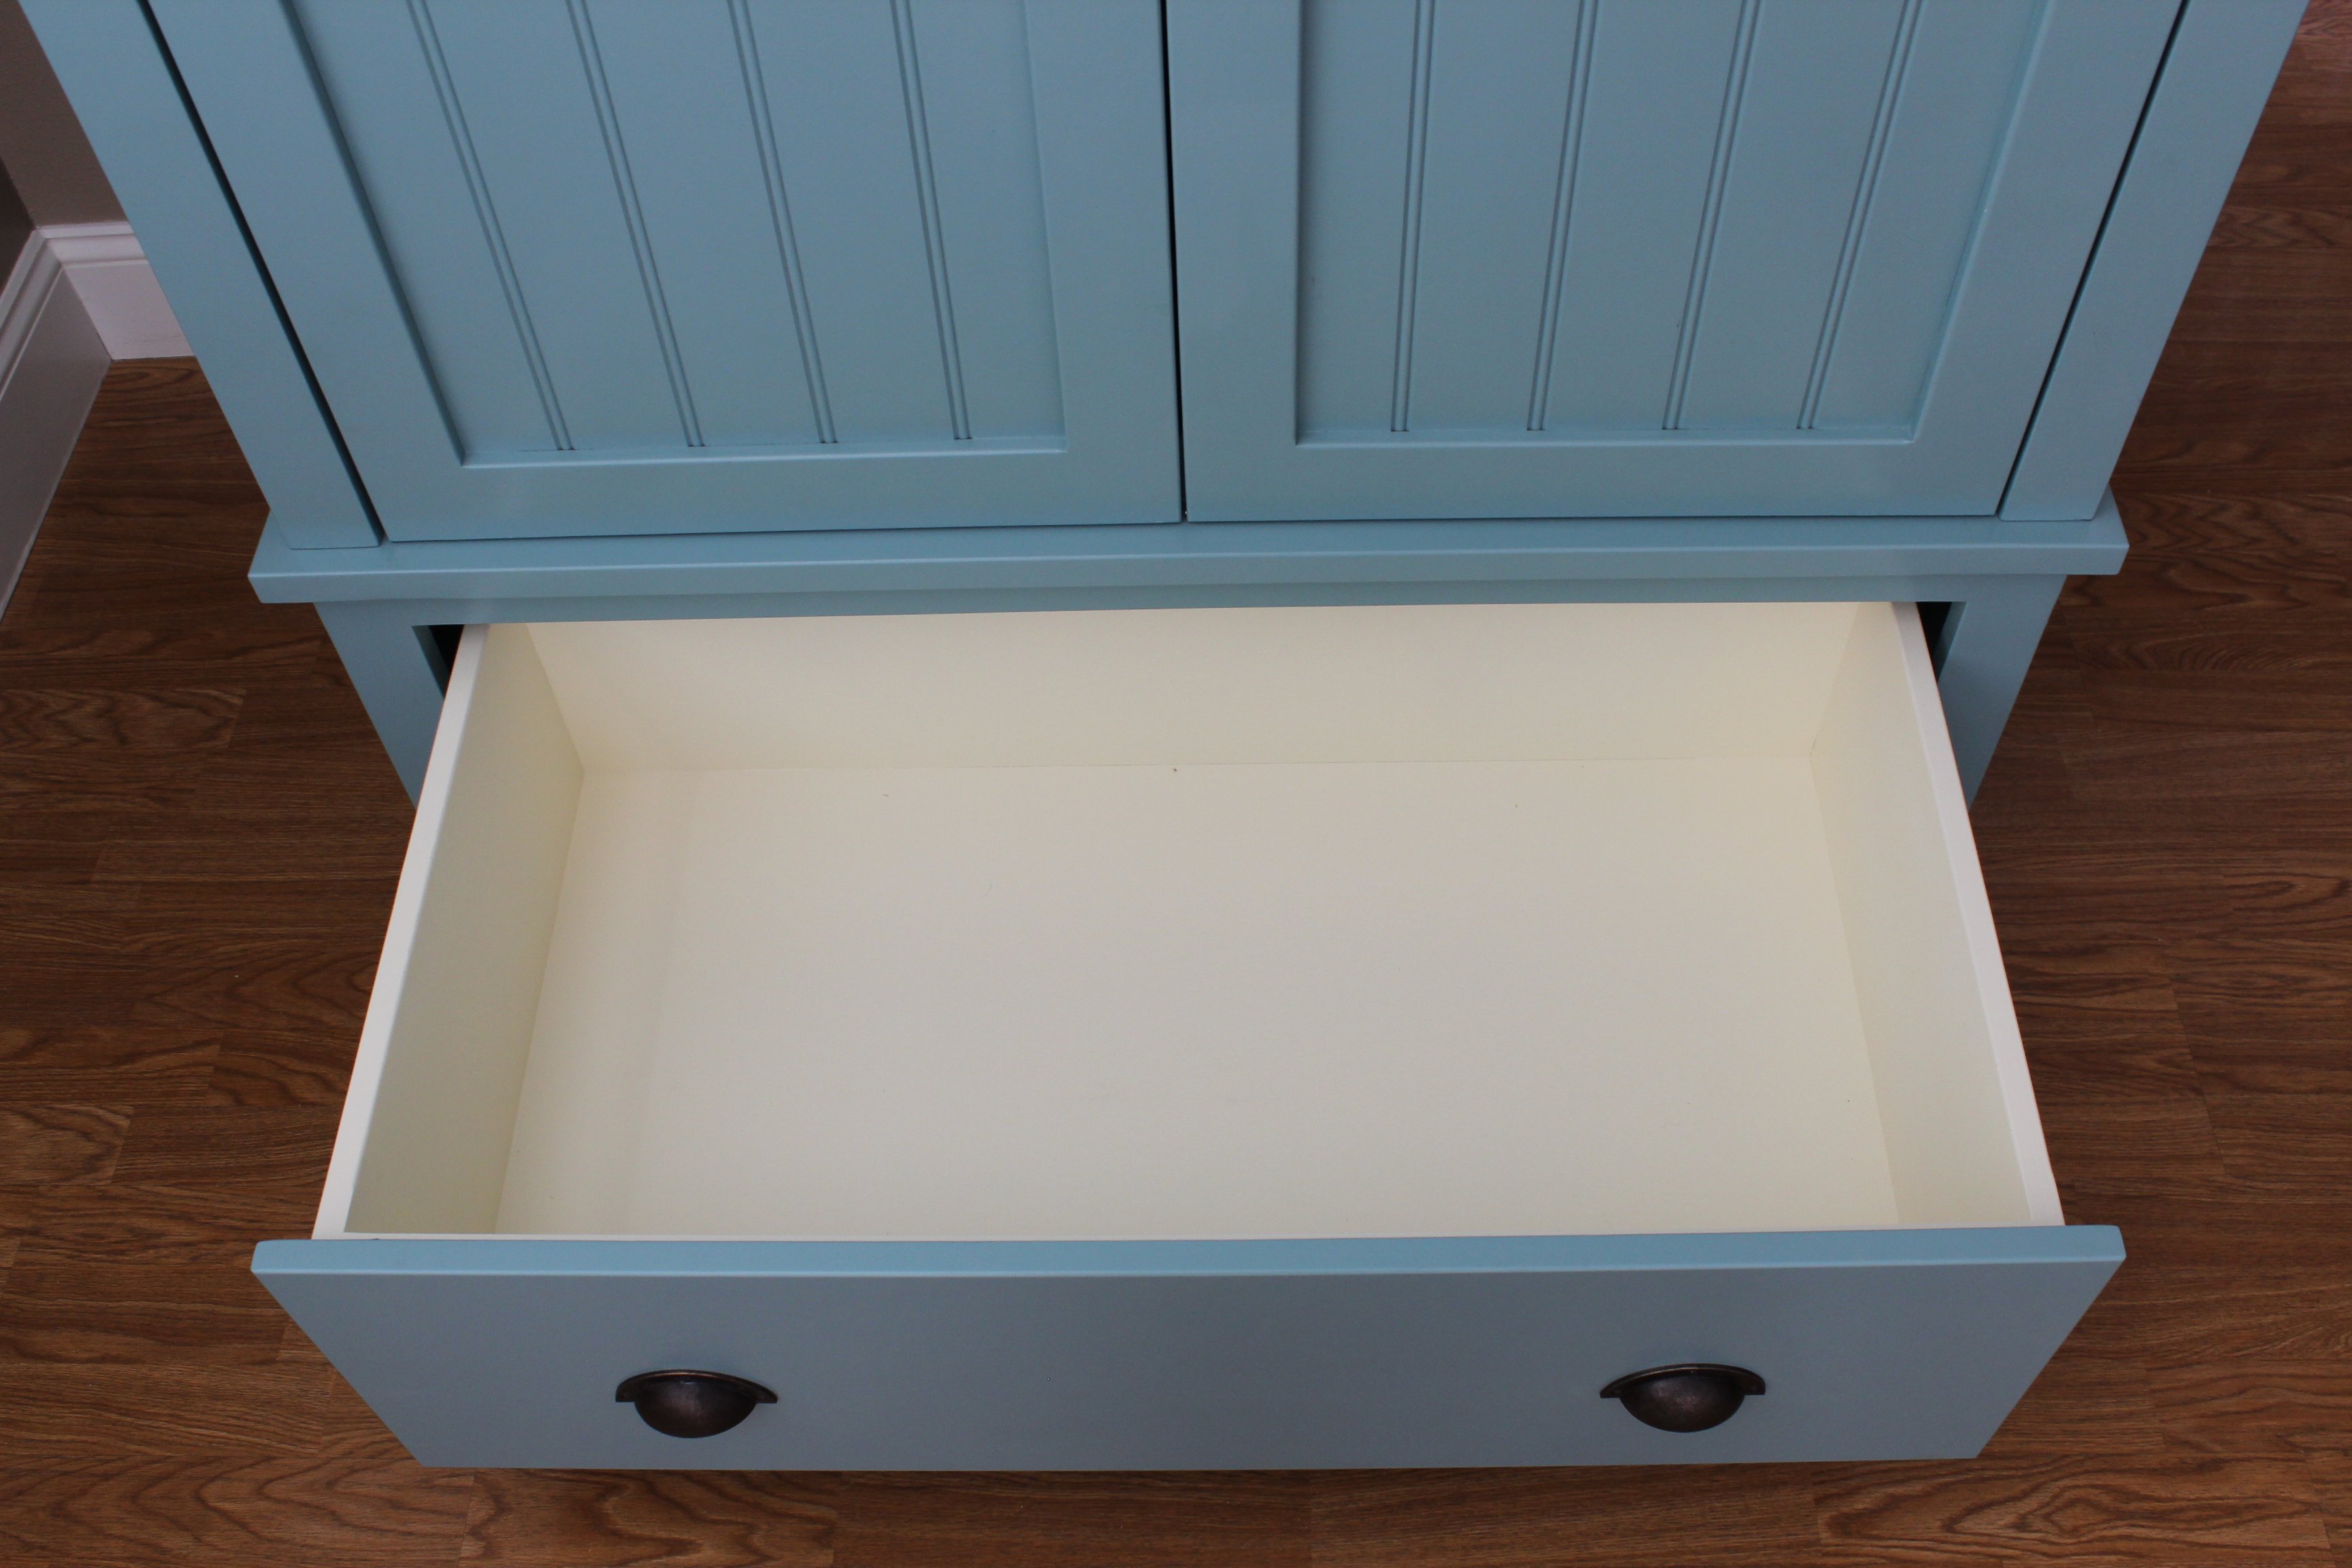
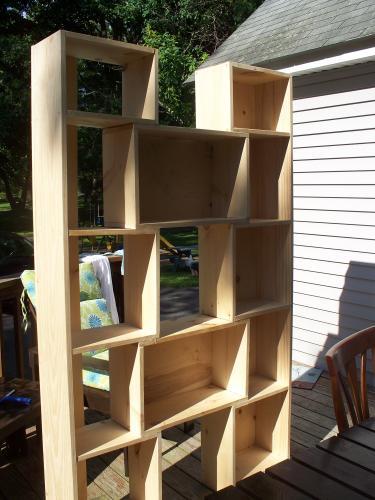
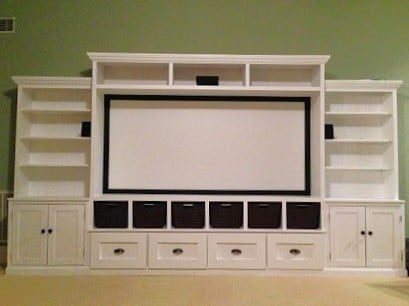
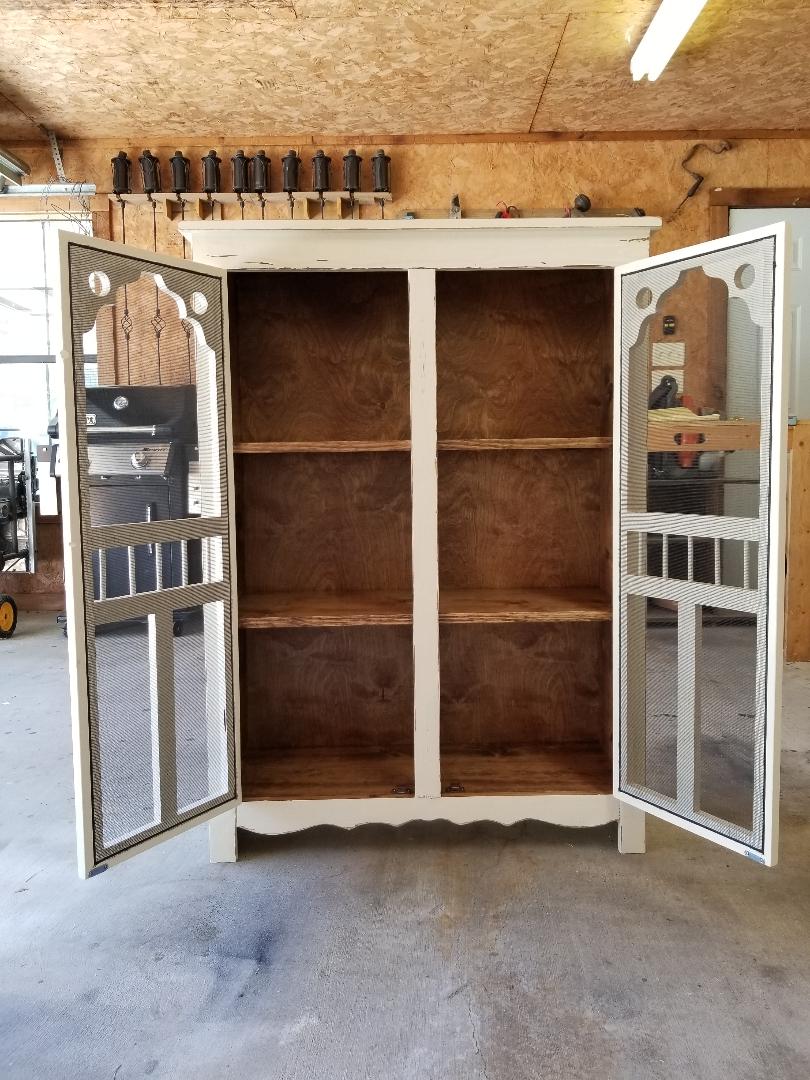
This is probably one of my favorite pieces I have built. Challenging but fun. I built it as two separate sections, an upper and lower cabinet to make it easier to carry indoors. I added a full-extension drawer below for storage. The two-toned paint combination did take a lot of extra time. Because I used an airless spraying to paint I had to tape and cover each section separately.


Fri, 03/06/2015 - 10:43
WOW it looks awesome the extra time spent on the painting was more than worth it looks spectacular. I bet you also could make a great profit selling this Wardrobe either on line or in a consignment shop, if I had the need for one and the money I would defiantly buy one!!

Sat, 03/07/2015 - 18:55
I love all the attention to detail. Great job! I especially love the color selection. How did you achieve the look of the top stained piece?
In reply to I love all the attention to by handmadewithash
Mon, 03/09/2015 - 22:01
Hi Ashley,
The top was built separate, stained, varnished and then attached to the painted wardrobe. :)
- Brad
Sun, 03/08/2015 - 07:36
This looks awesome! I love the the paint finish and it your profession work

Mon, 03/09/2015 - 17:30
I agree this is your best so far...which is hard to say b/c all your projects are amazing! I love the style, the paint colors, the stained top, and the hardware!
In reply to Beyond Beautiful by TwoCuteKids
Mon, 03/09/2015 - 22:02
Thank you so much! :)
Sat, 03/19/2016 - 15:06
It looks really great!
I have fallen in love with it the second I saw it and somehow I am now convinced that I need a new wardrobe ;)
I guess you don't have plans for the wardrobe laying around - but would you mind doing a fast sketch (just a simple one on paper) with all the measurements noted? I would be thrilled to try building it myself in the summer.
Greetings from Germany!
Sat, 03/19/2016 - 15:07
It looks really great!
I have fallen in love with it the second I saw it and somehow I am now convinced that I need a new wardrobe ;)
I guess you don't have plans for the wardrobe laying around - but would you mind doing a fast sketch (just a simple one on paper) with all the measurements noted? I would be thrilled to try building it myself in the summer.
Greetings from Germany!
Tue, 07/18/2017 - 05:43
Are there plans used for this beautiful piece? I do not see any links. Help please!! I absolutely need to make this armoire :) :)

Fri, 01/03/2020 - 08:09
Anyway I can get plans for this beautiful piece?
Mon, 01/03/2022 - 05:53
Love this wardrobe! Are there plans available to build it?
Thank you.
I had to adjust the height and width of this project to fit on my wall in this corner. But I just LOVE how it came out. It's one of my favorite pieces of furniture in my whole house!
Thanks for the great plans!! Finally got this monster put together.

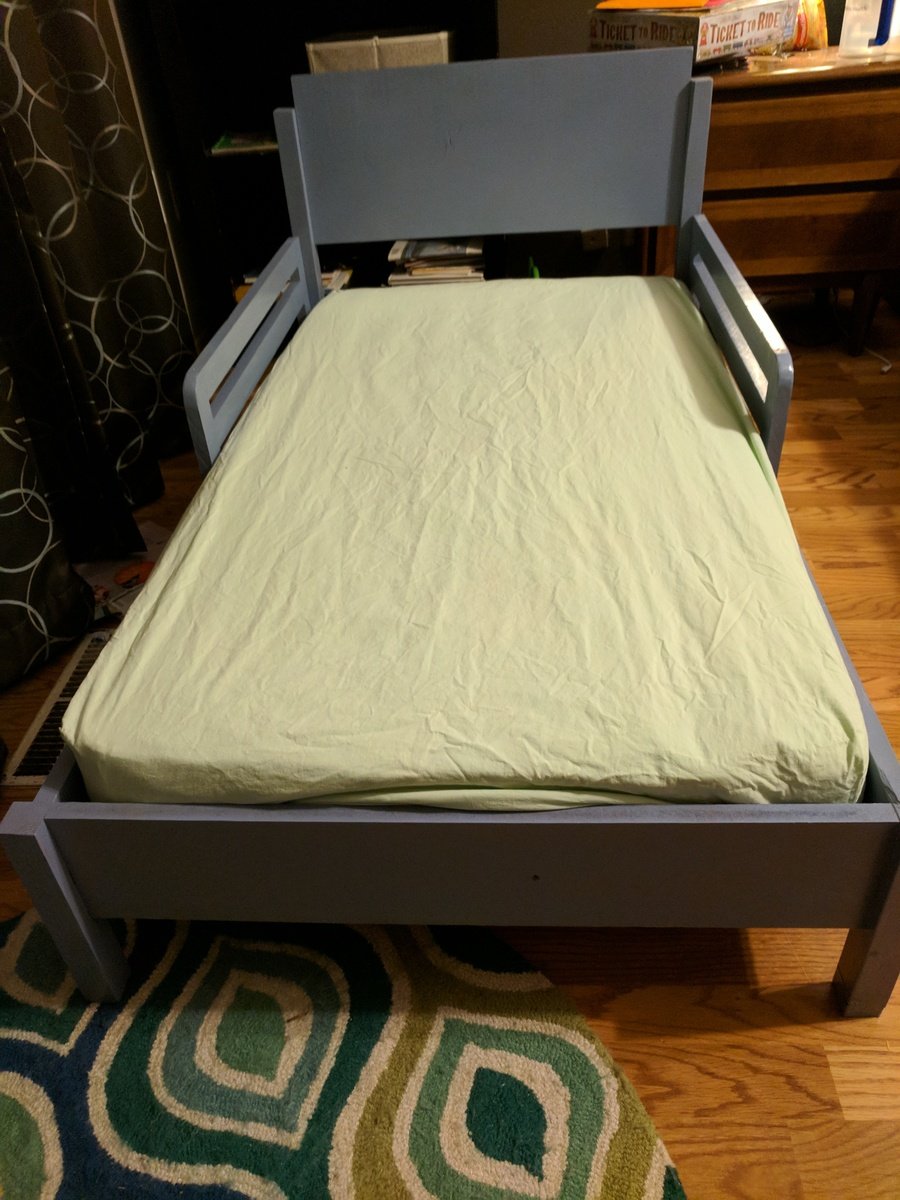
I made a loft bed for my 4-year-old son using Ana's Chelsea Loft plans. When I finished, I was able to build this toddler bed for my 1-year-old using almost entirely scraps left over from the loft (save for the 1x6 runners). I skipped the curved headboard design and went with a solid piece of 1x12. I was going to round the top edges or cut a more rounded design, but my wife said she liked the squared off look better (she has lots of ideas for painting various designs on it, apparently). Since we were going to use paint and not stain, I ripped some leftover MDF board for the 1x6 footers. The whole project took a single afternoon, including cutting, assembly, woodfill and sanding. The end result is pretty sturdy. My wife laid on it with both our small children and the slats hardly bowed at all.
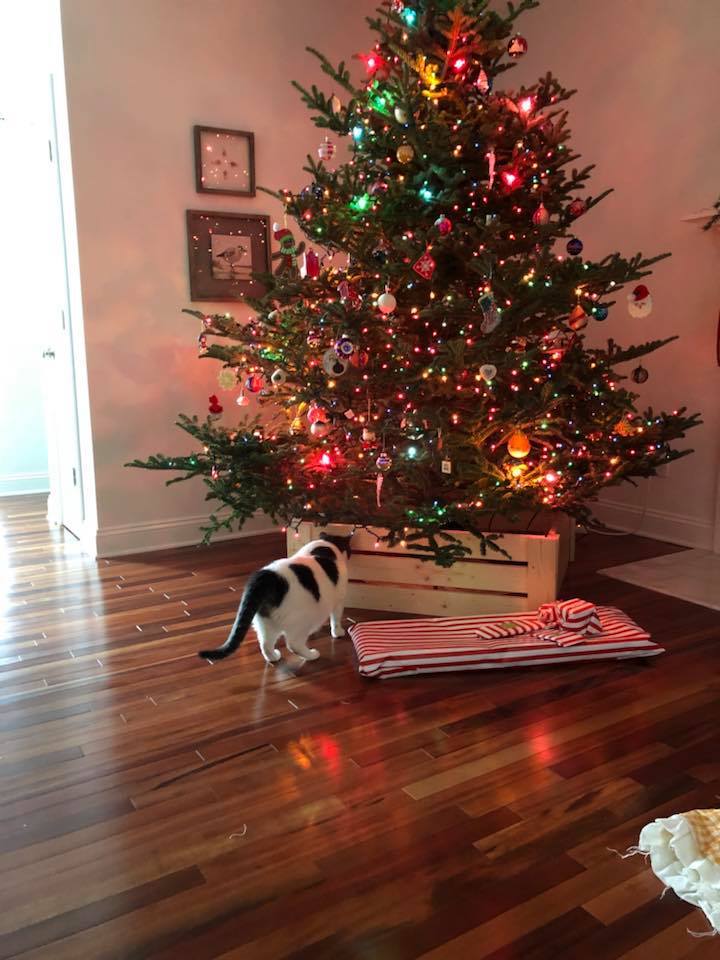
Thank you for these plans Ana! Had to make mine 36" wide to accomodate the tree stand tripod. Added bonus: kitty cannot drink the tree water! YES! Still have to stain and going to add hinges to one side to access water bucket easily.

Thu, 12/14/2017 - 09:56
That was fast! Looks great, love that it keeps the cat away too!
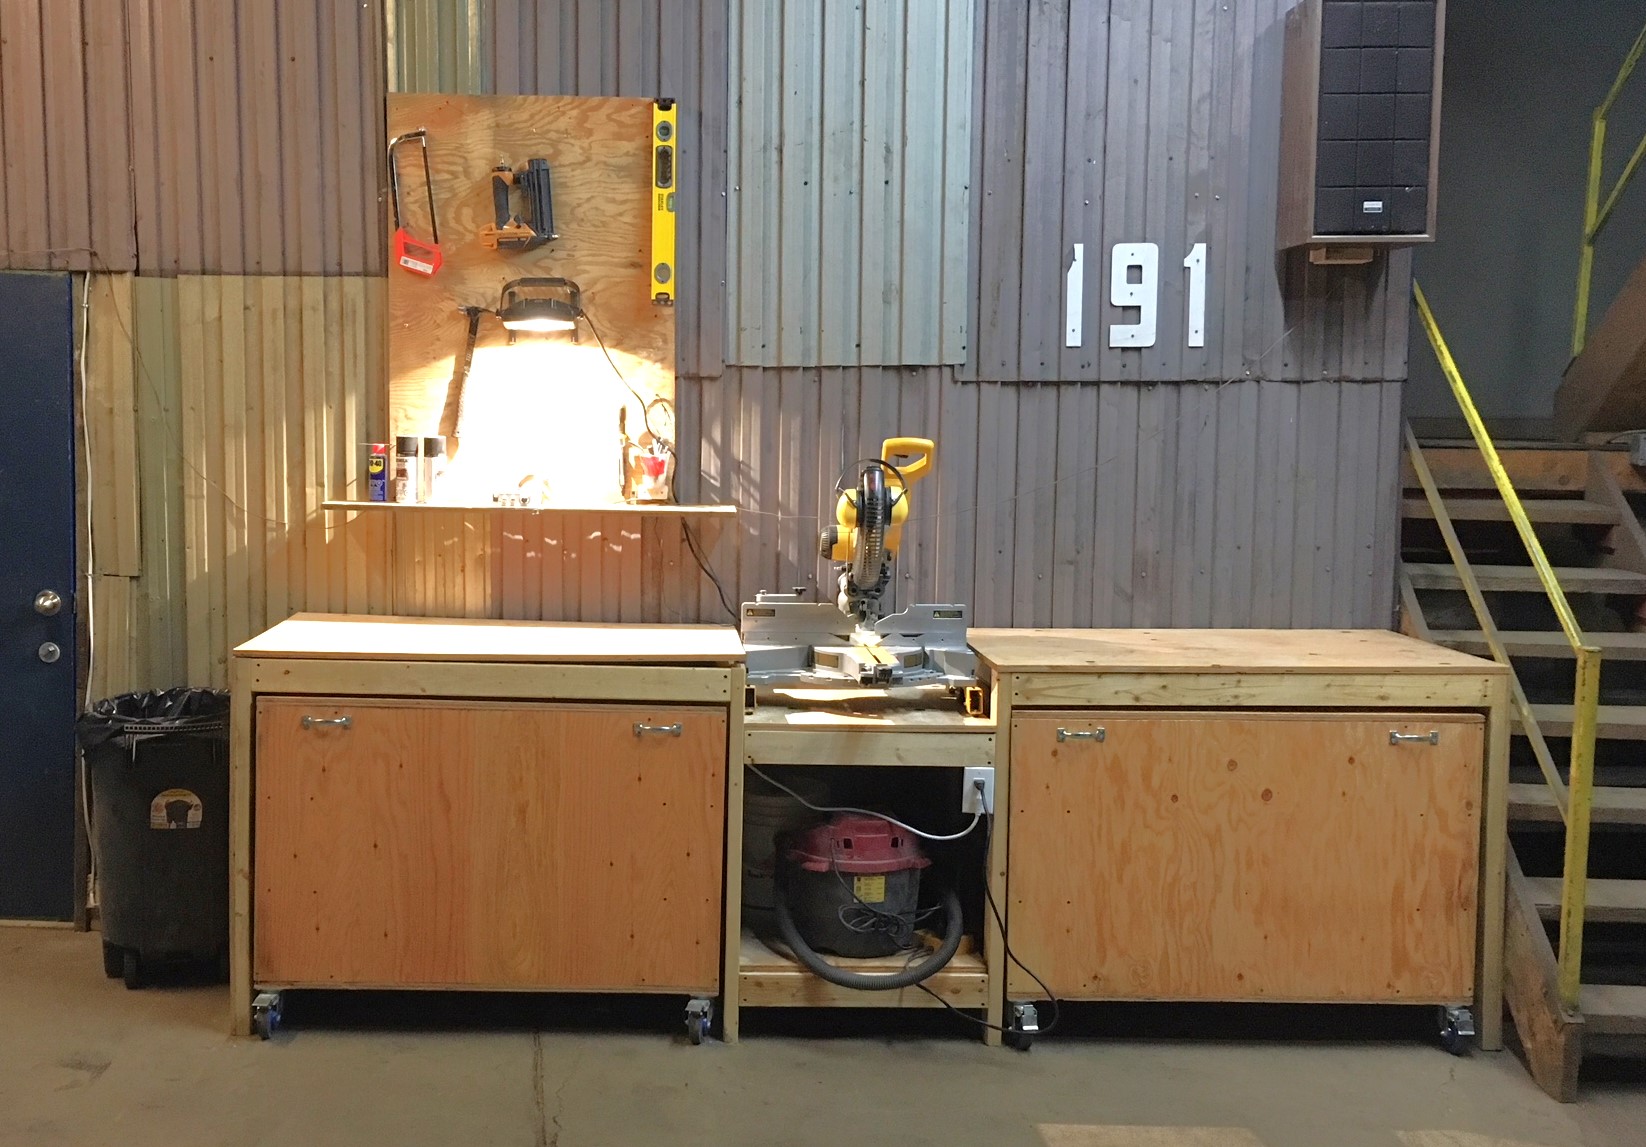
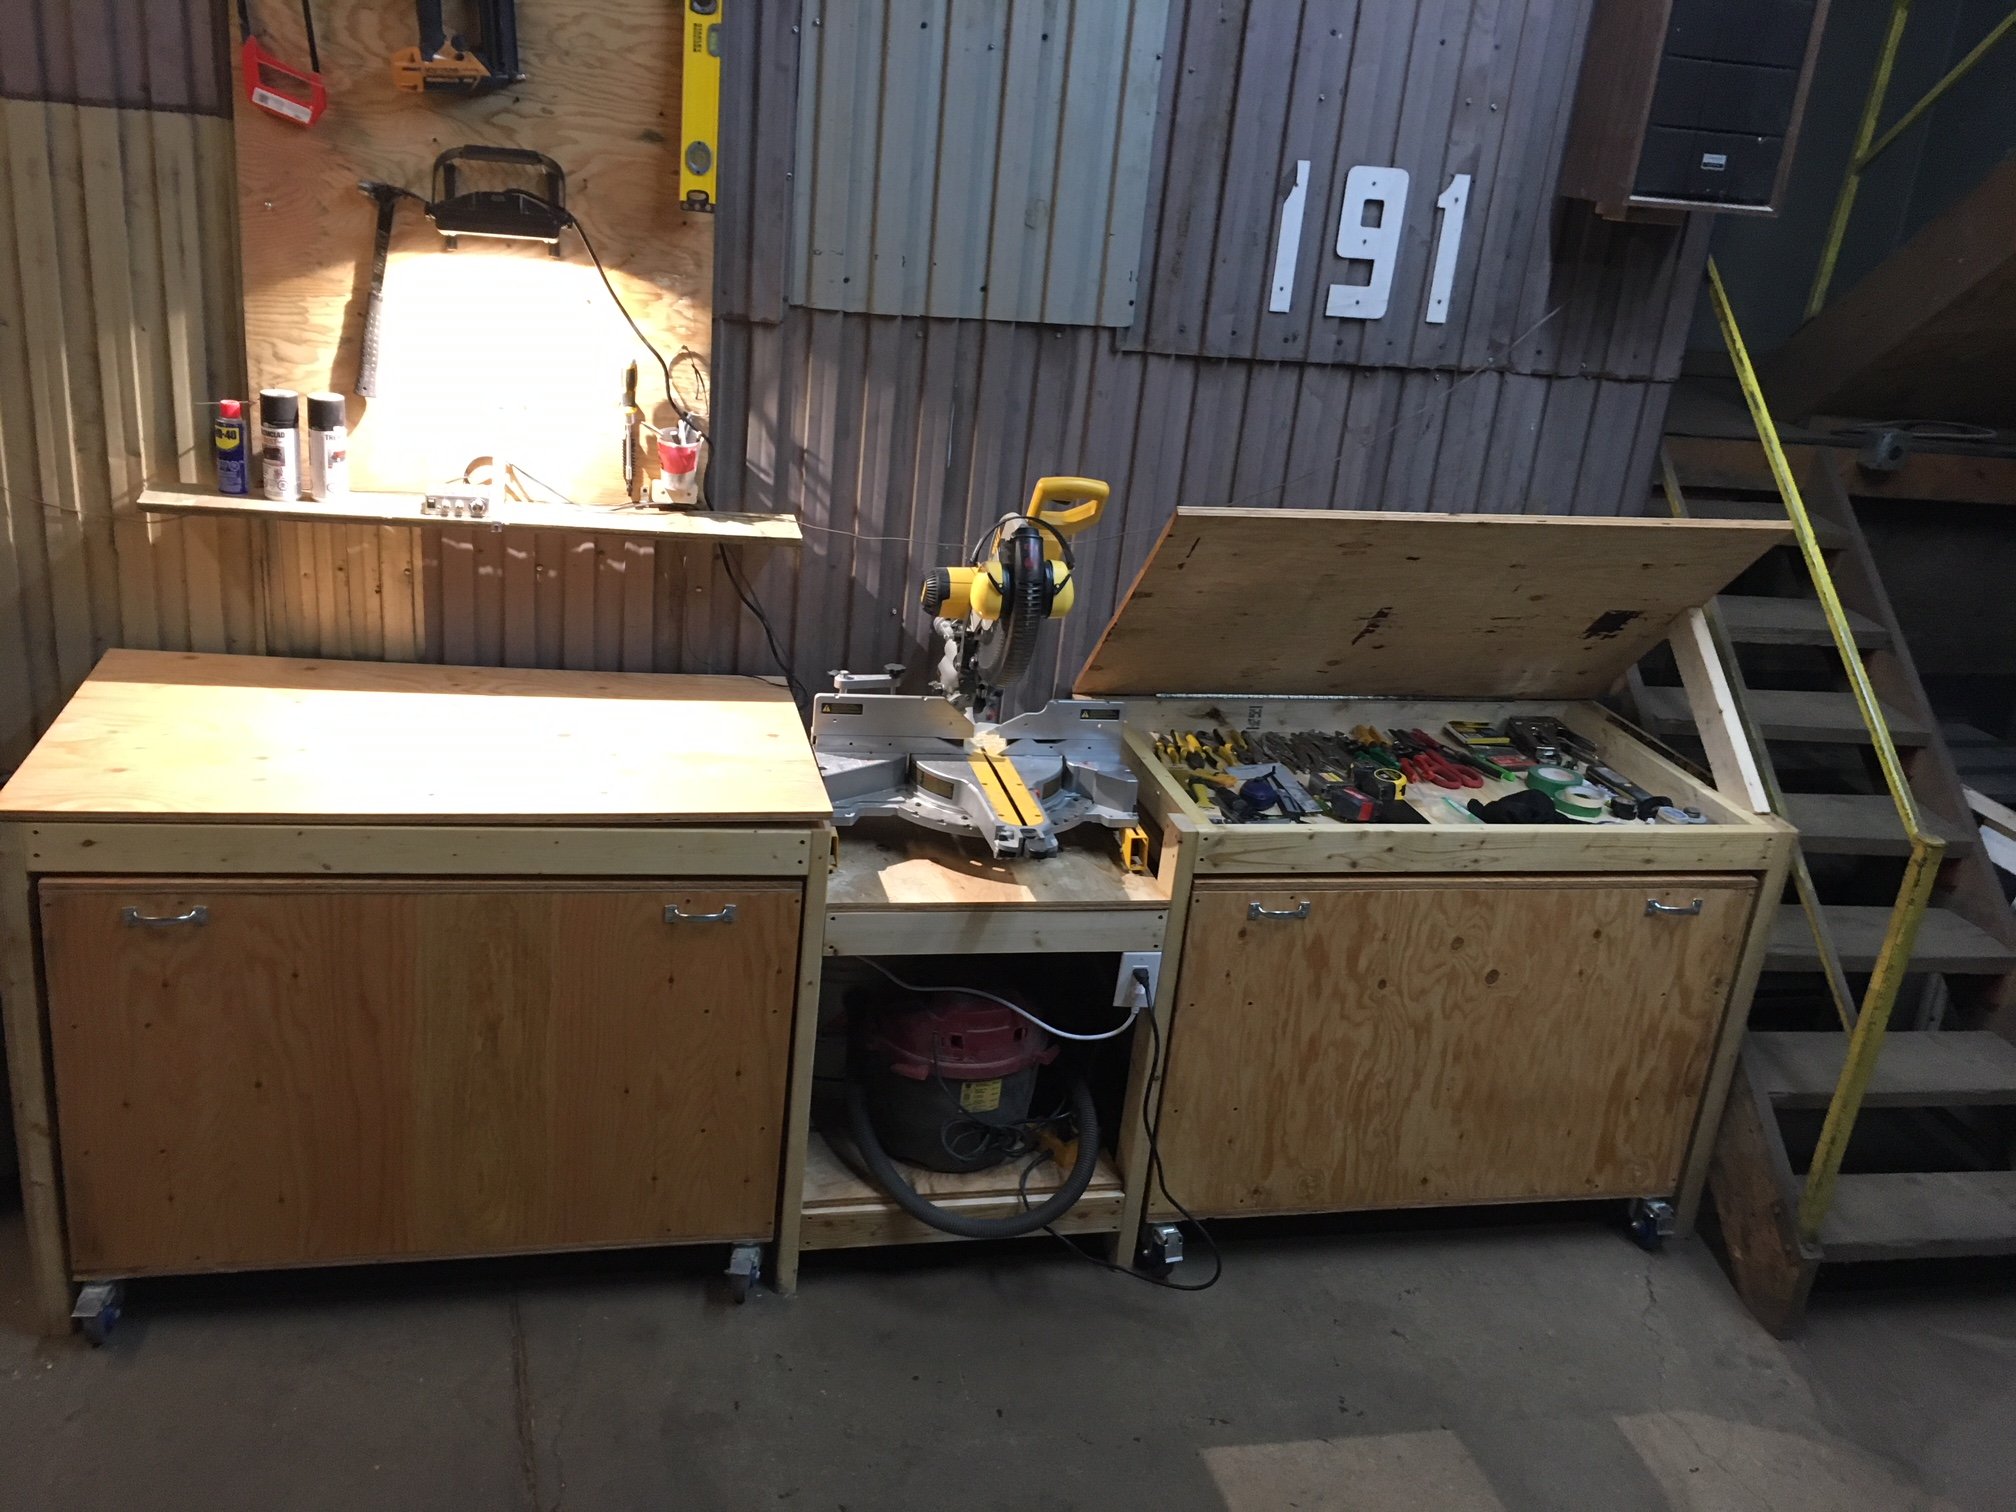
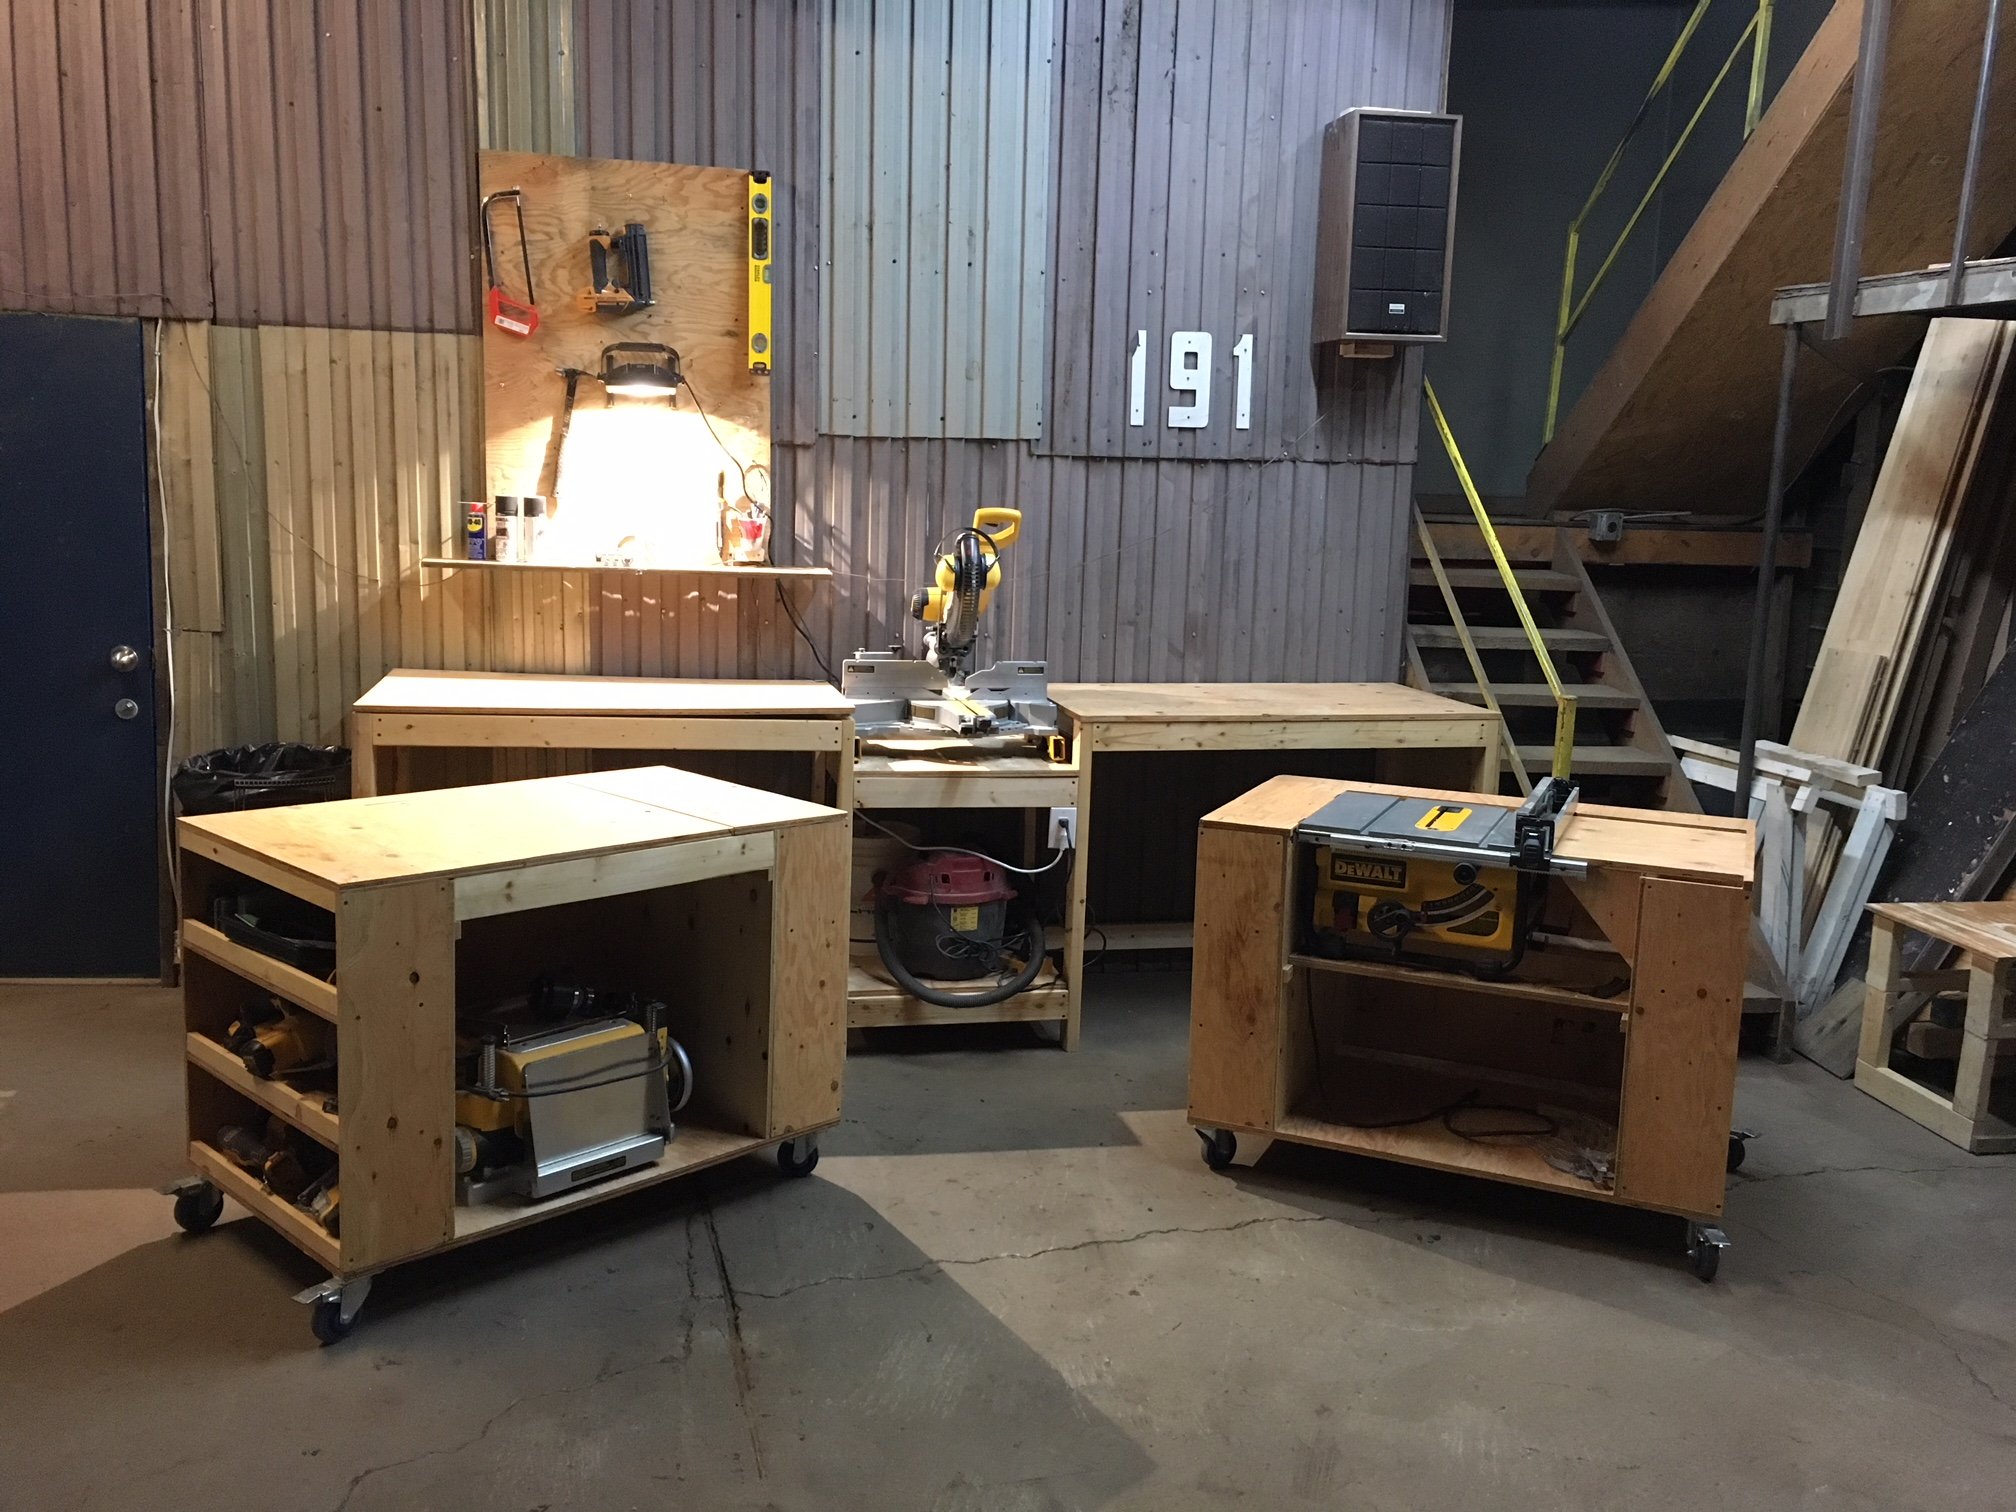
This is the perfect workbench for my needs.
I upgraded the casters to bigger ones as my shop's floor is in rough shape.
I also added storage under the two work surface next to the miter saw. This was just a matter of closing under the 2X4 frame and making the two sections on casters a little shorter. The only downside for that mod is that the plywood can bend a bit since it is not screwed to the frame. I don't mind since it falls flat as soon as there is weight on it. Also, this mod makes it hard to include fence system (it would need to be removable, like fixed with dowels only, no glue) and almost impossible to include a precise fence system since it would need to be removable. In my case, I do rough, non-repetitive cuts, so there is no need.
TIP : Pay a little extra for smooth plywood. I lost a lot of time sanding mine :(
Tue, 02/04/2020 - 08:21
Awesome! Do you have pictures/info for the cart that has the Dewalt table saw? I have the same one and would love to build the cart for it.
I love, love how this turned out. I was originally going to build it exactly as the plans are written, but somehow a screen doors came into the design. Thanks again Ana for sharing!!
Thu, 01/06/2022 - 20:06
Wow, that is gorgeous! Thank you so much for sharing.:)

Once I saw the plans posted I knew my daughter would love it and she does!! Every time she goes to bed she has to put her babies in bed too. This was a simple build but very rewarding. THanks Ana!!
As Ana mentioned in her video, this project could be made with scraps. That’s just what I used. I used a lot of scraps and cut offs for this project.
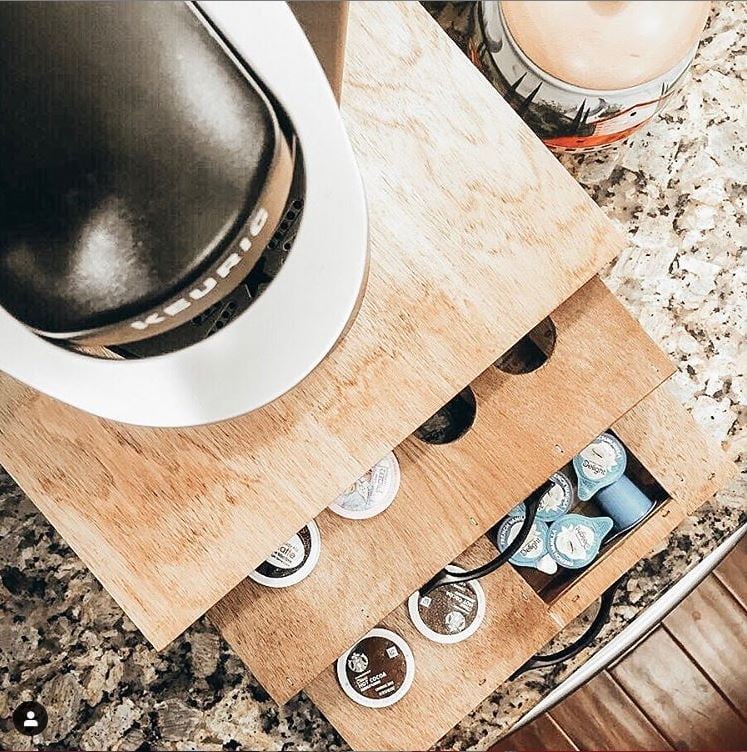
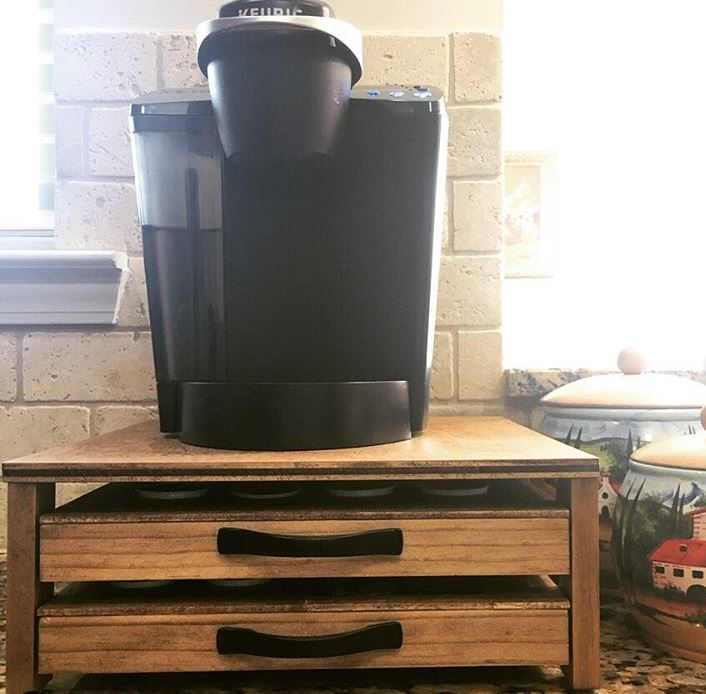
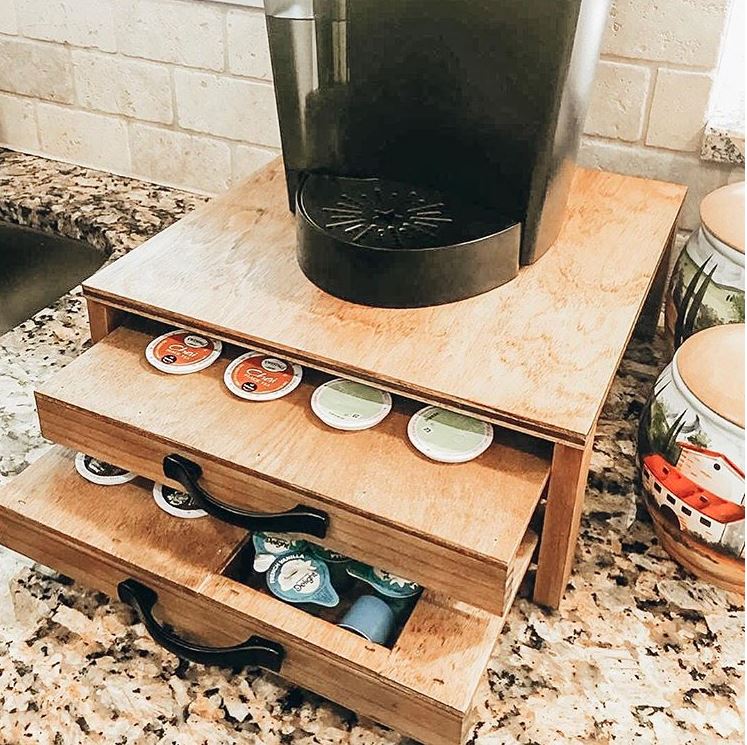
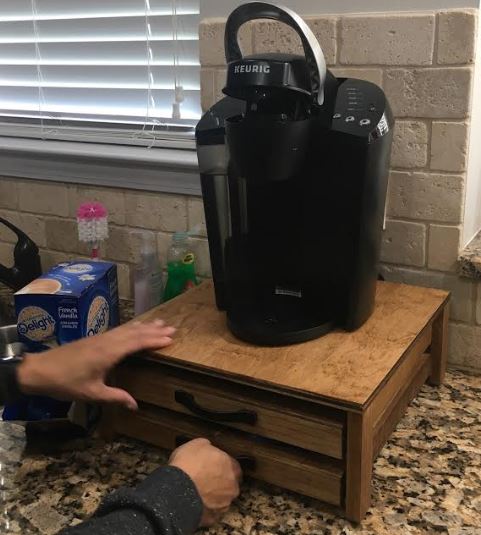
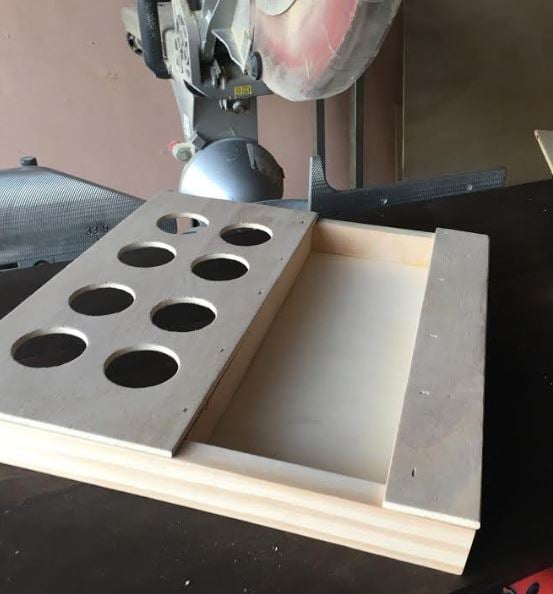
I needed to make a K cup holder but also space to hold tea in addition to other coffee "toppings" if you well. In the pictures you can see mini creamers.
This modification was made by adding a small drawer in addition to the holes that would hold the K cups. The small drawer was made with 1/2” plywood (even more scraps) ripped just shy of 1-1/2”. I did this to make sure we did not see the plys of the drawer as I planned to add 1/4” plywood to the top all around. I wanted this to make it all uniform with the K cup area.
I added little rubber feet’s to the bottom as this will be on a granite countertop which could results in slipping and sliding.
Thu, 06/25/2020 - 06:53
Made this for my mother in law. She loves it, thank you for the plans. I cant figure out how to add the pics of the one I did for her hit it was awesome and my very first wooden build EVER

This King Size Farmhouse Bed turned out better than I could've imagined! It did take a lot of patience, time, and even left a few bruises but, a few months out, I think I would do it all over again!
We chose the Farmhouse King Bed Plans by Ana White and I read everything I could about it. This would be the biggest project I'd ever done. Through reading comments, I found the DIY Farmhouse Bed - King Version by Ed Hart. He had a few modifications I liked so I bought his plan.
Then, I set to work!
We have a Naturepedic mattress and built this bed to its specifications, including bed slats no more than two inches apart.
Check out this post to see the modifications we made to the Ana White Farmhouse Bed: https://sunshineandrainydays.com/king-size-farmhouse-bed/
Thank you, Ana, for the inspiration to build!
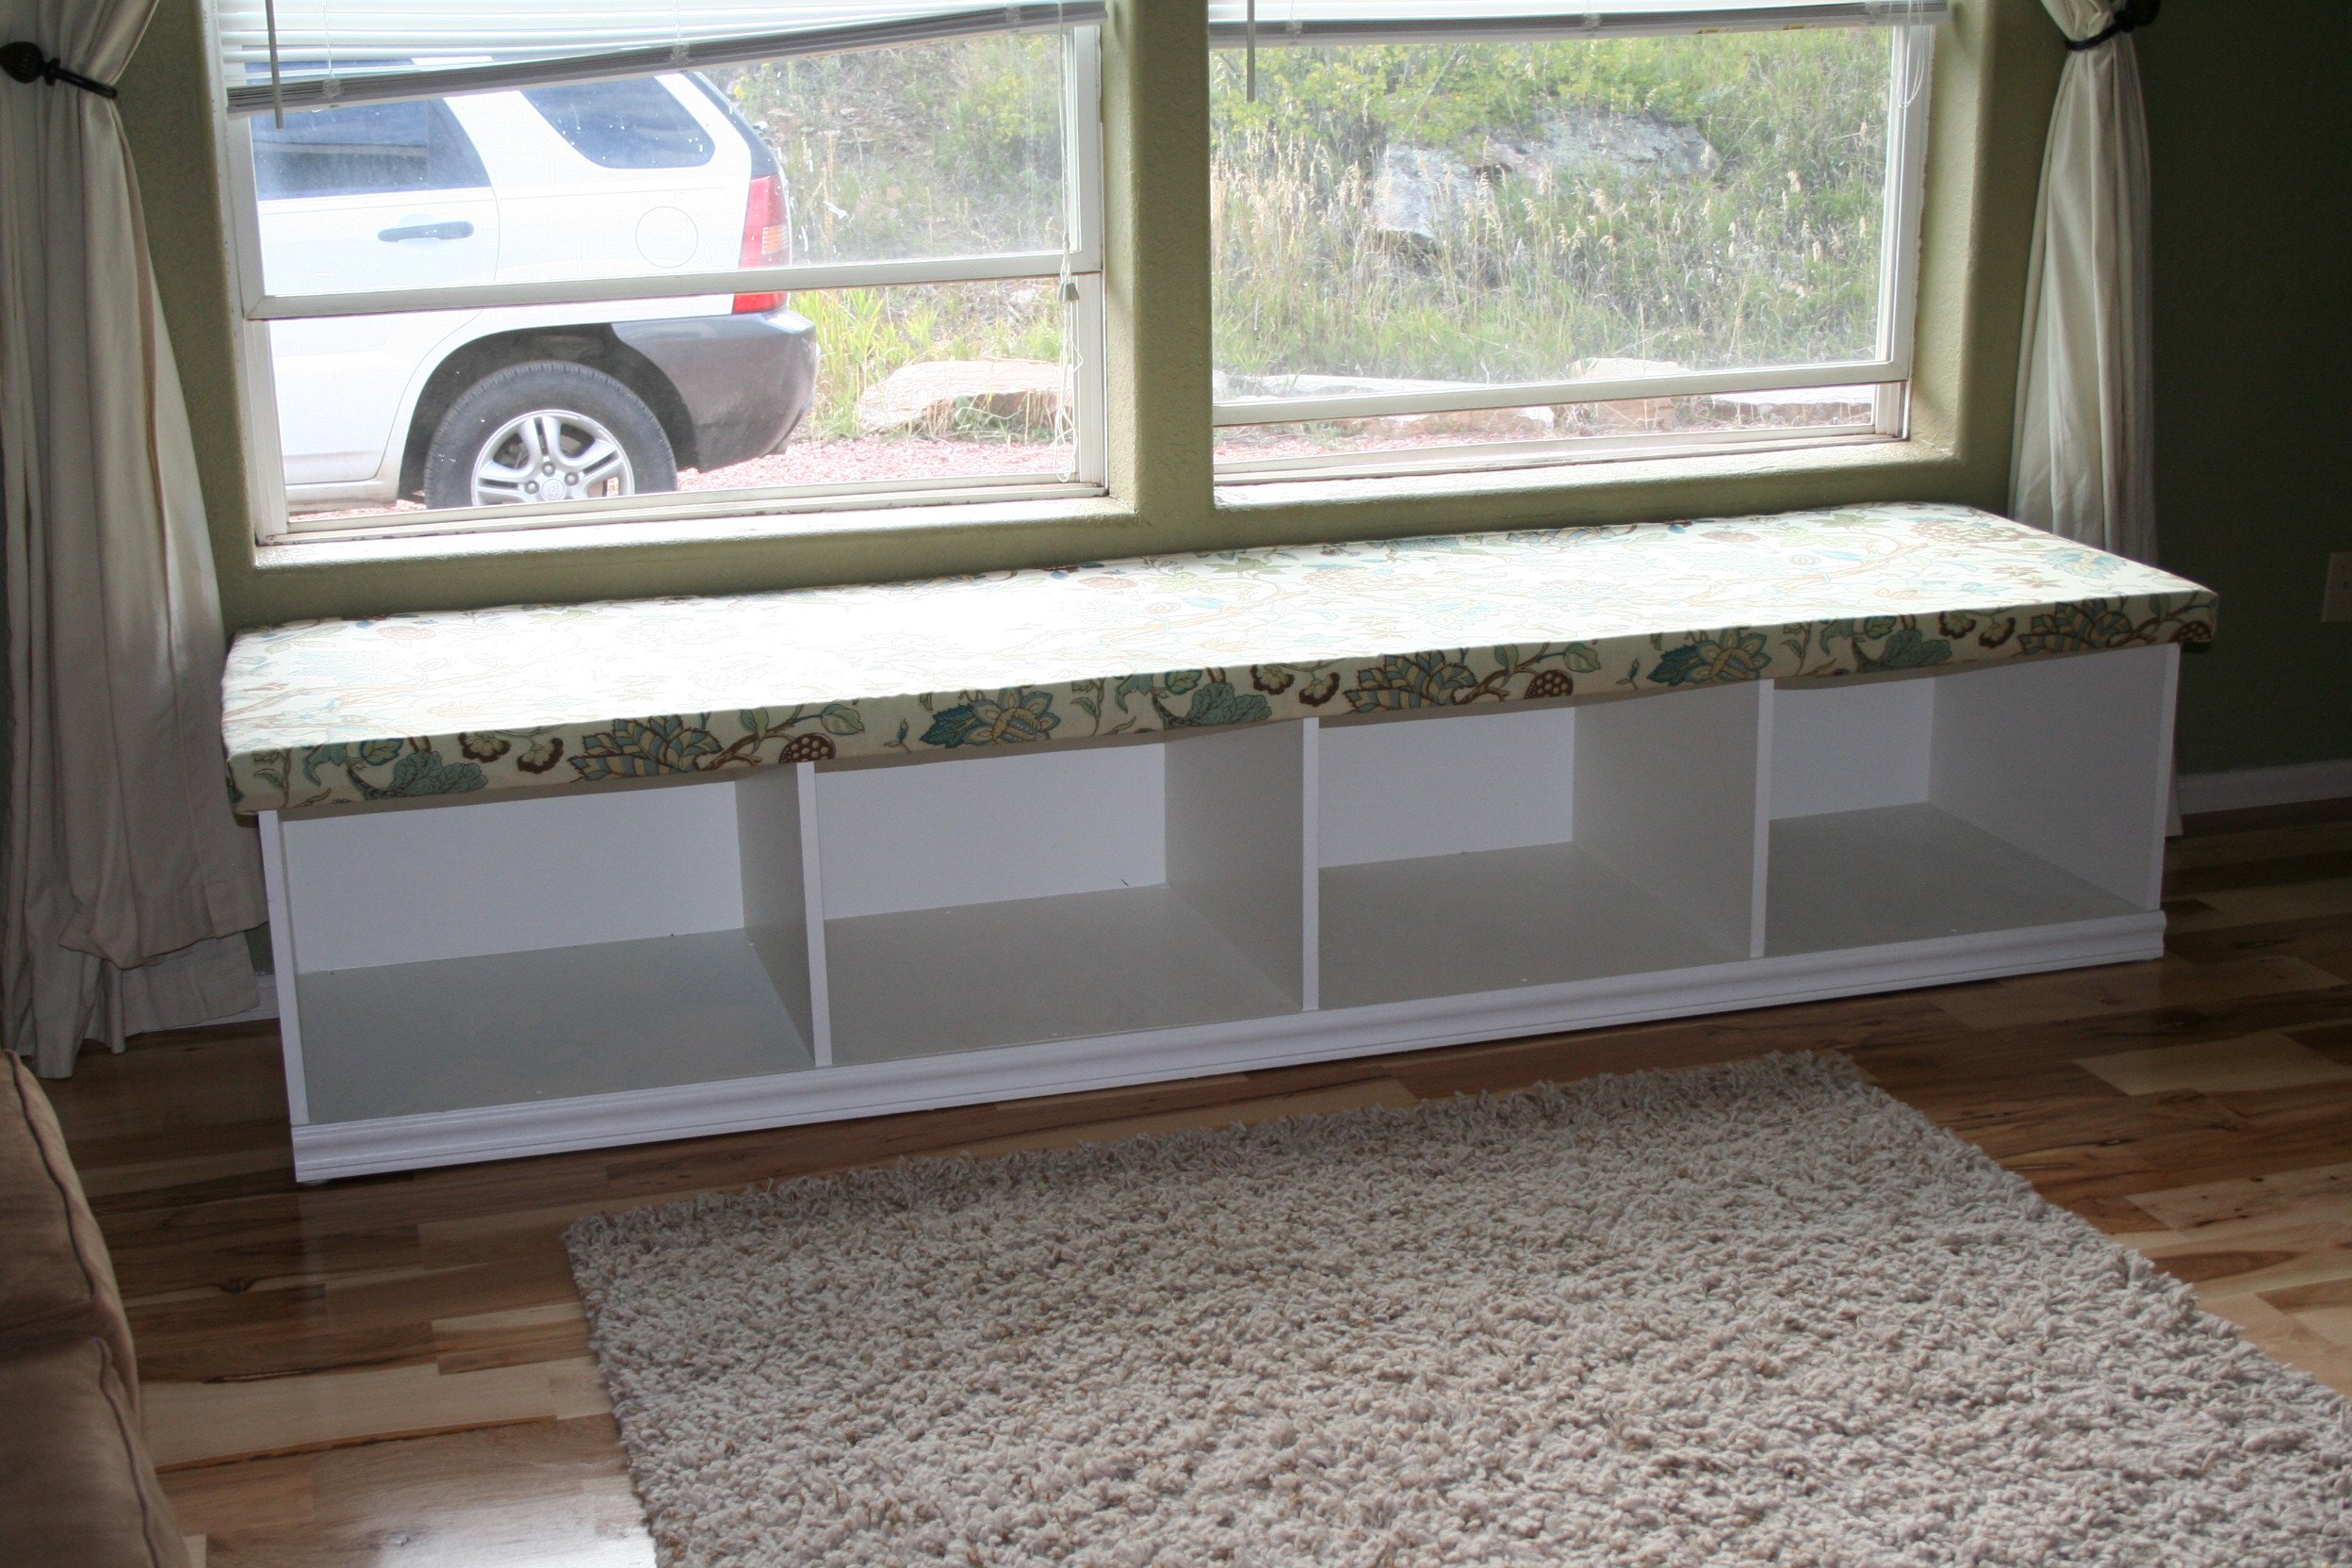
I wanted a window seat that would fit my window. There was no way I could afford to buy anything. Ana's site inspired me to modify her plans to create what I wanted. My husband and I worked on this during the weekends and between my son's nap. The piece is so large that 2 people were needed just to pick up the wood. The finished piece is 8' long, 2' deep and 18" tall. If we ever move, it might have to stay with the house.

Mon, 01/23/2012 - 16:47
Working on a plan for my own window seat ... attached to a book shelf to hug my big window. This is inspiring.
Dona
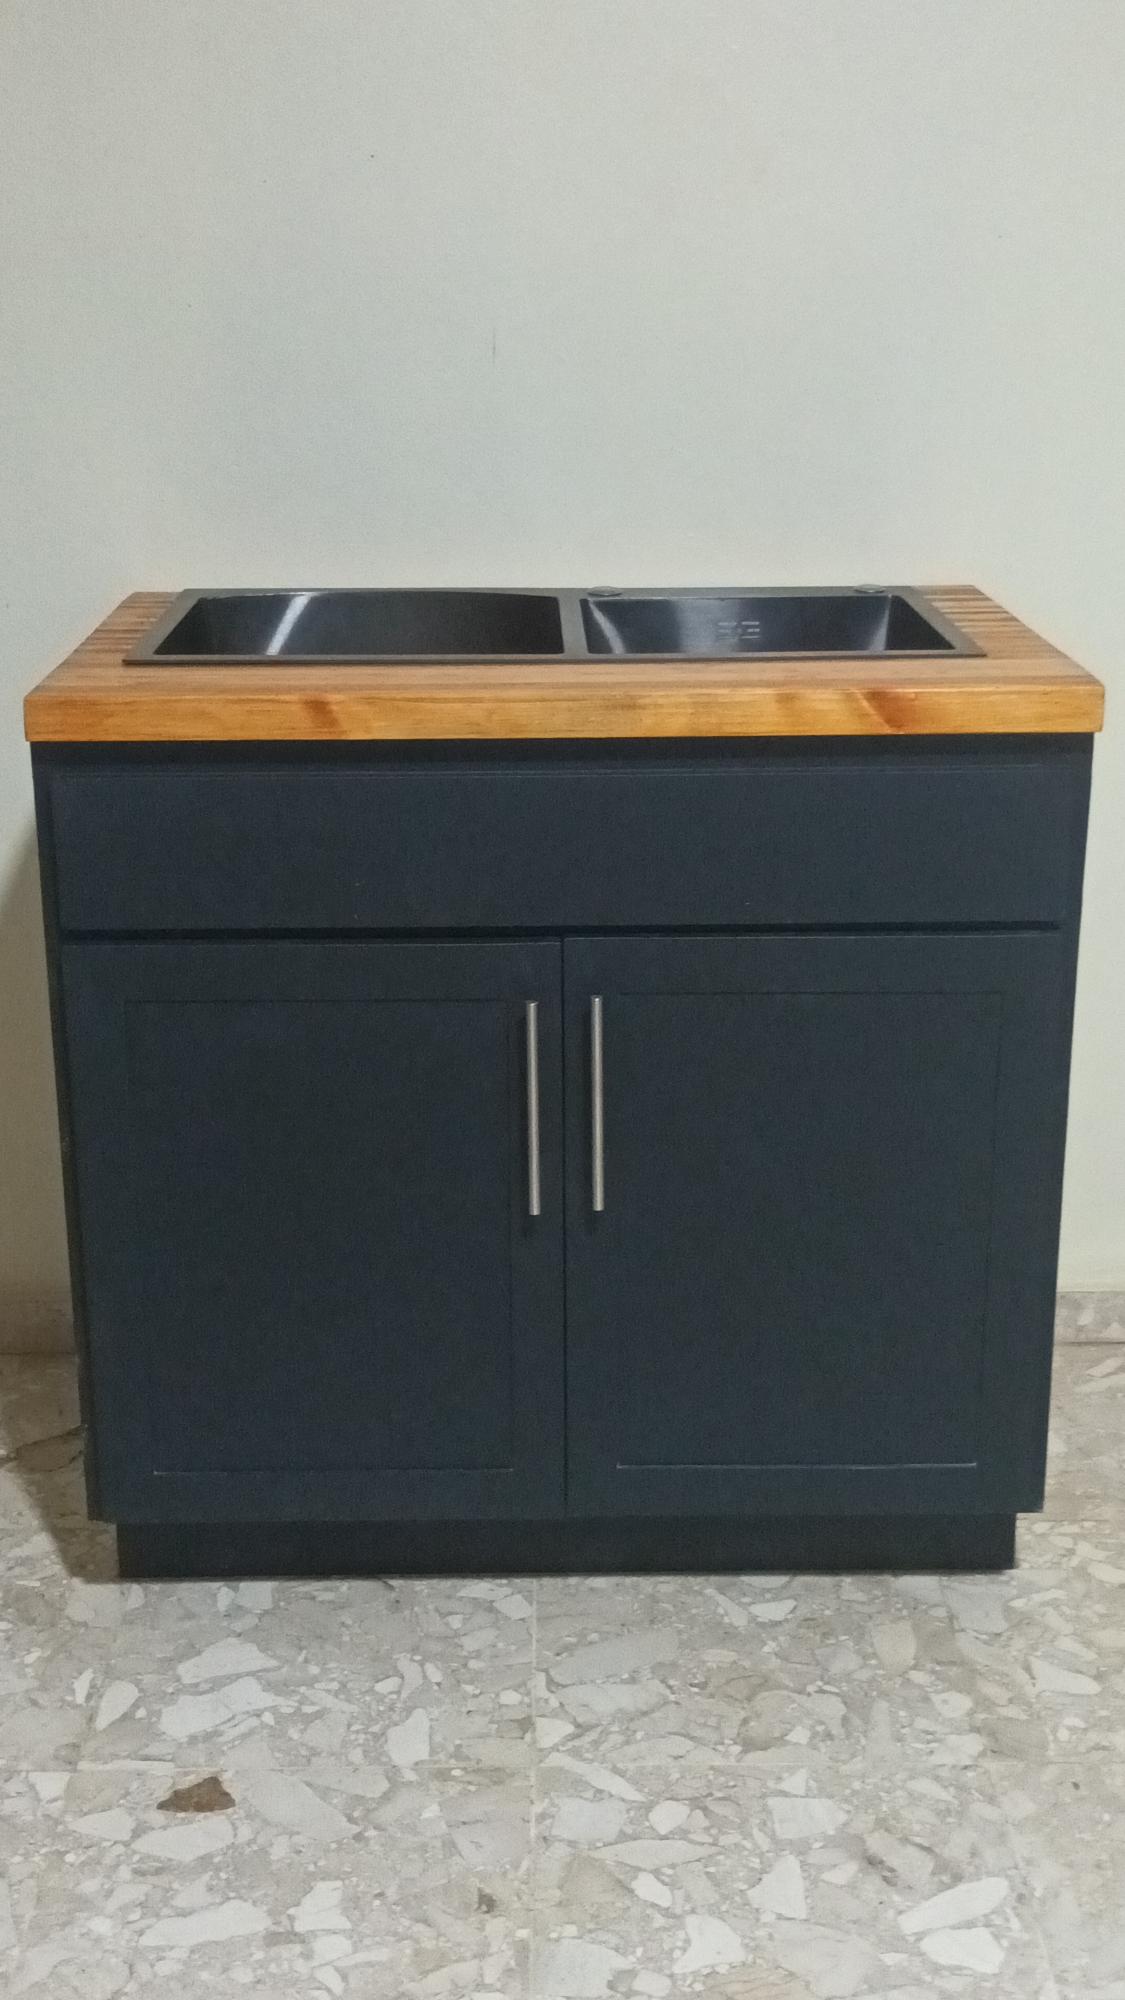
This was a build to convince my wife that I should do the cabinets in our new house...now I have to do them all. I should have just said, Sure, go to Ikea!"
Mon, 02/20/2023 - 10:36
Looks amazing, fantastic work! Thank you for sharing and happy building!
First time building furniture. This turned out much better than I thought. After this I probably could've build the farmhouse table myself instead of paying way too much for my wood dining table. Only if I have found Ana's site sooner. :)
Having a Kreg jig also made the whole process much easier.
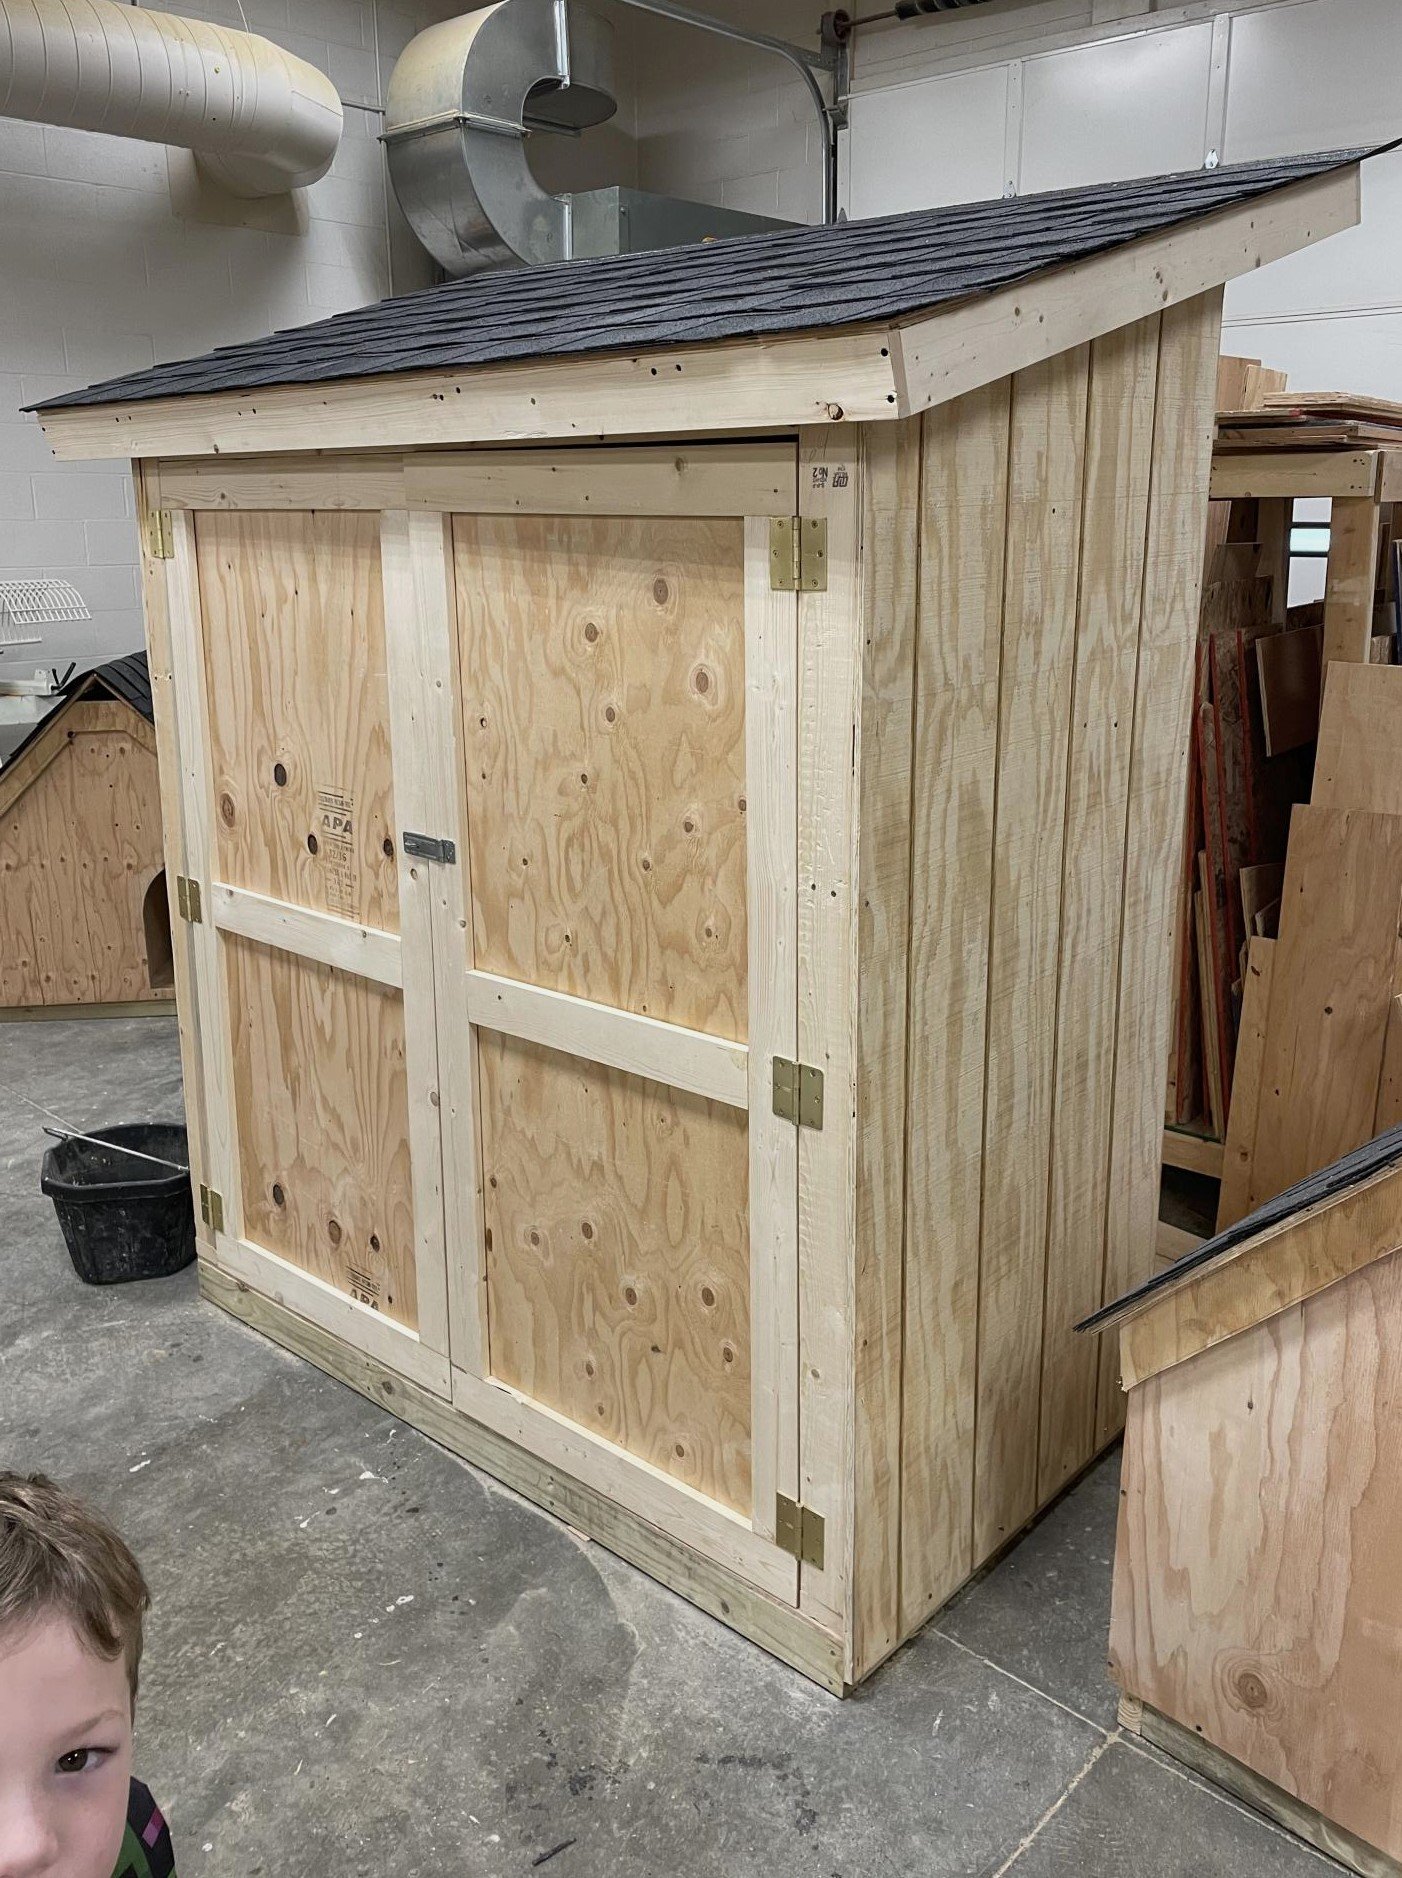
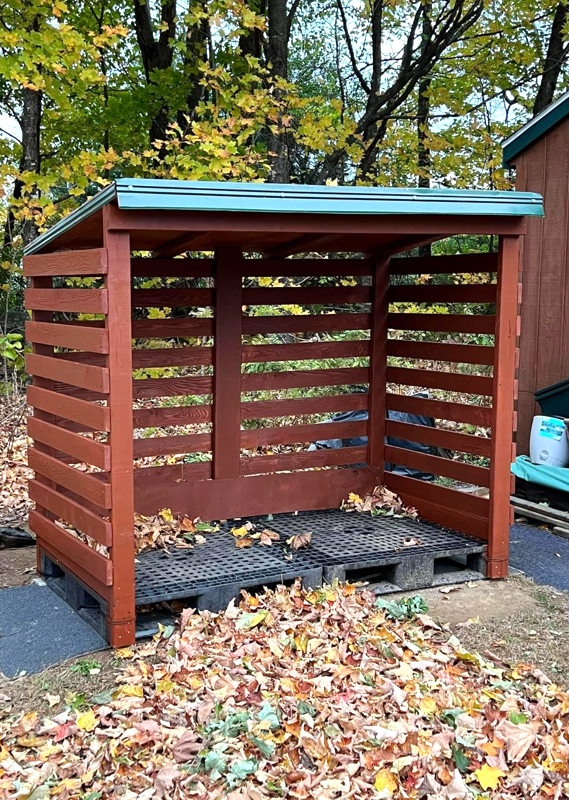
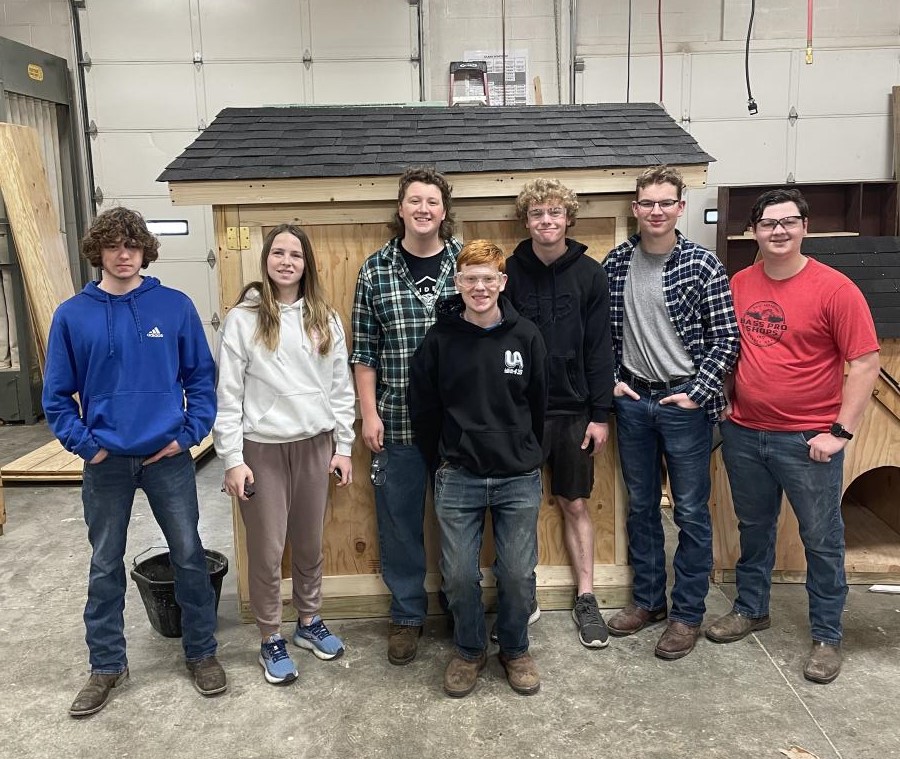
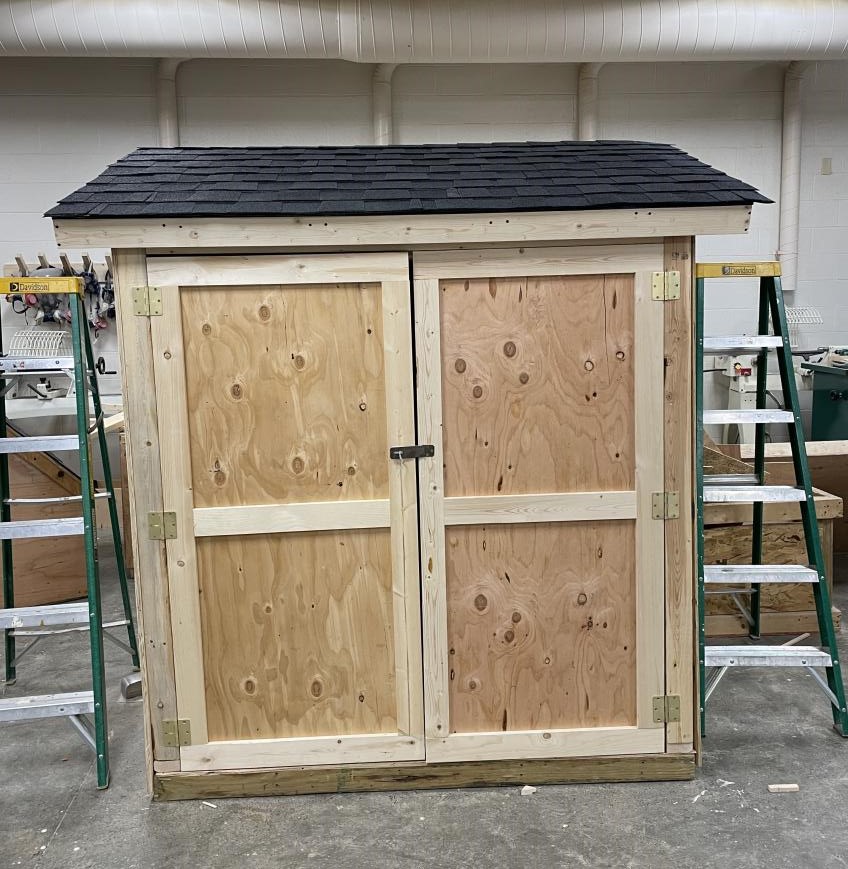
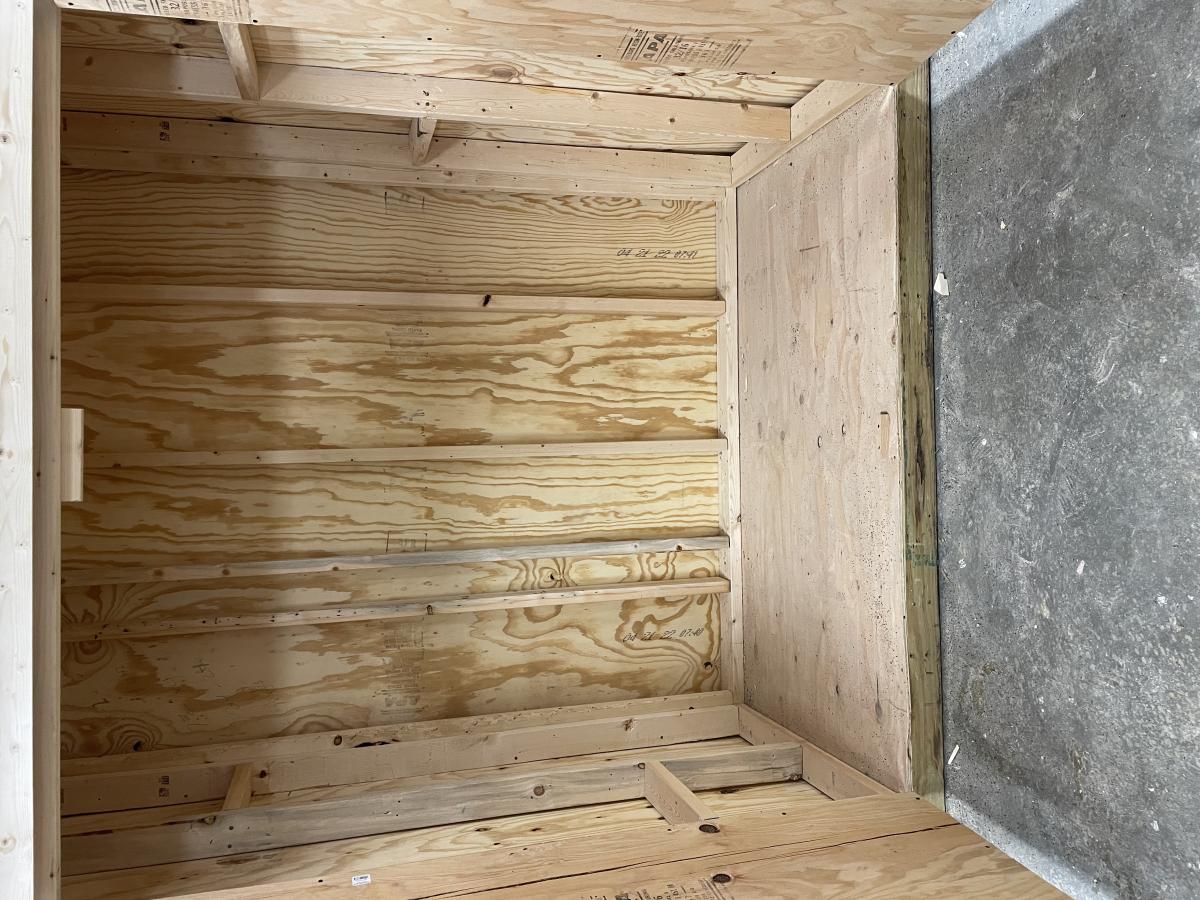
I’m a first year teacher of construction class at Waterloo High School in Illinois. We recently used your Small Cedar shed instructions with some modifications for a class project. It’s a bear getting cedar right now, so we used T1-11 for the outside and 2x4 for the frame.
Sat, 03/25/2023 - 09:14
Very fun and job well done! Thank you for sharing.
Great plans and easy to follow!