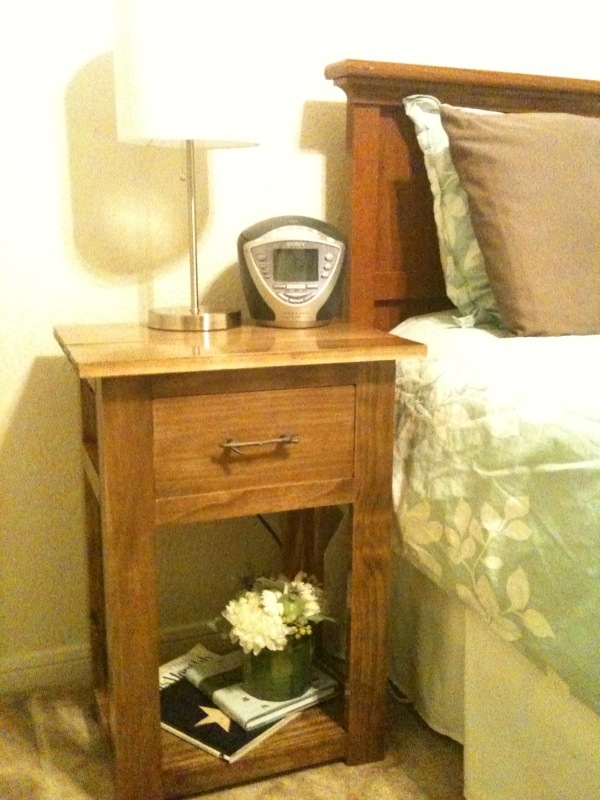
Community Brag Posts
DIY Home Gym Storage
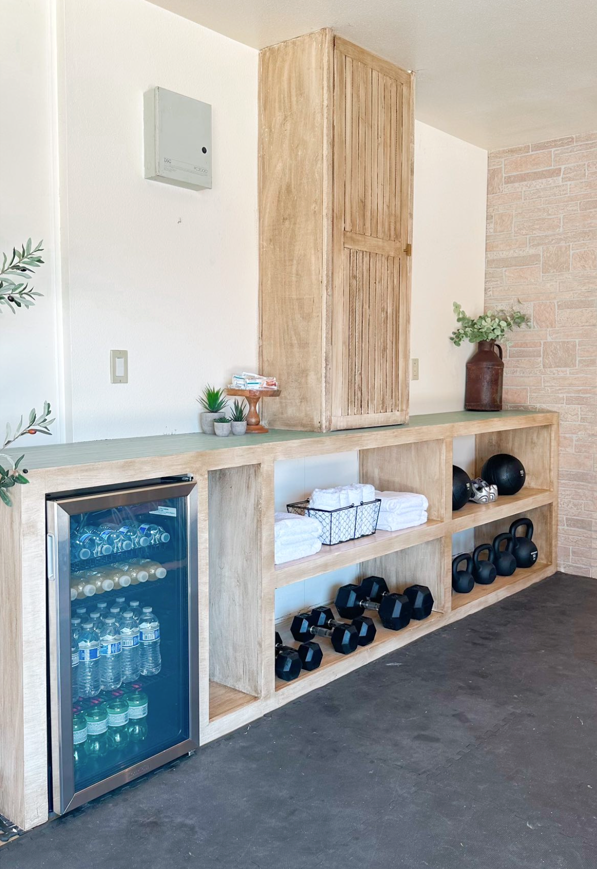
Fabulous home gym by Nailgun Nelly!
*Incorporated and modified the grand waterfall console plan
Built from Plan(s)
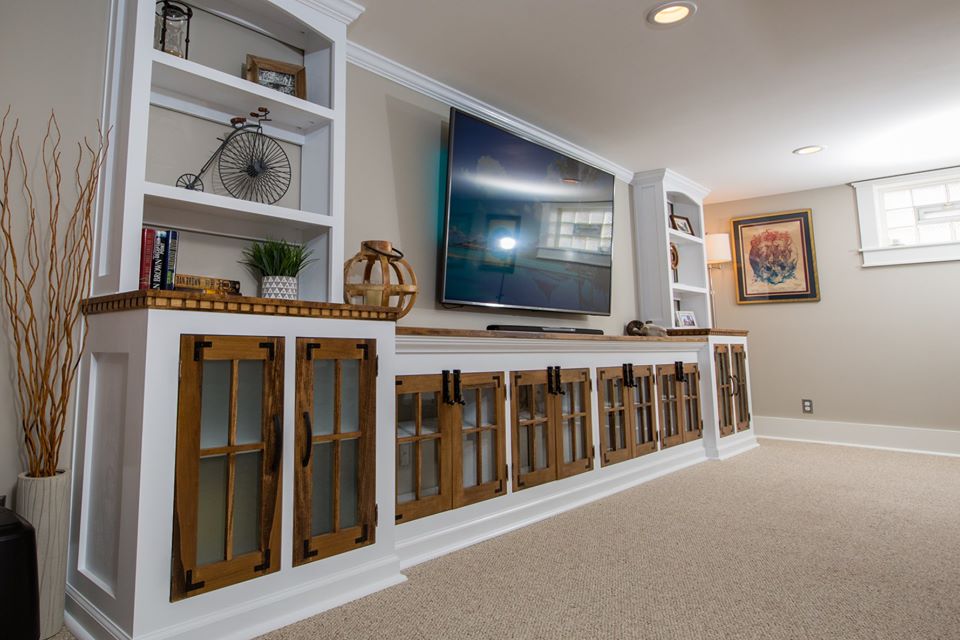
Farmhouse Media Cabinet (wall unit)
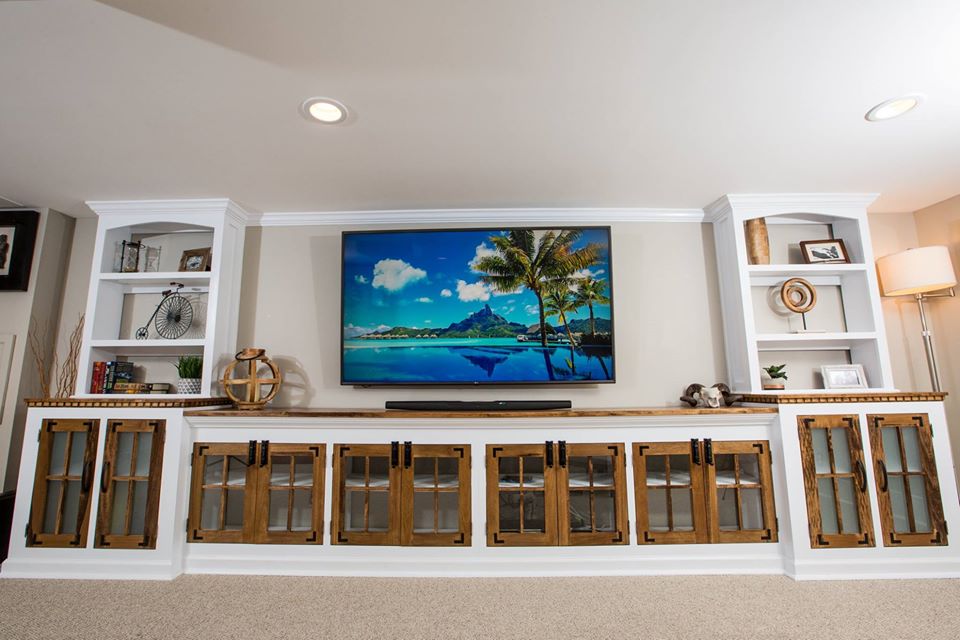
This project started as an idea to build a single Farmhouse Media Cabinet with a "42 tv mounted above it. I quickly realized that this space deserved so much more. Fast forward through weeks of debate and scouring the internet for inspiration, before finally settling on what you see pictured above. The first decision we made was to buy a monstrous 75", then everything else fell in to place from there. The tight stairwell leading to the basement forced me to build this unit in 6 sections (2 farmhouse media cabinets, 2 flanking cabinets, and 2 bookshelves.) It ended up sprawling 17' long when it was all said and done, but it fills the space so beautifully. It was by far the largest project I've ever tackled, but it was totally worth the hard work. Big shout out to Ana White for the inspiration!!
Built from Plan(s)
Estimated Cost
$1200-$1500
Estimated Time Investment
Week Long Project (20 Hours or More)
Finish Used
Minwax(Early American), and Behr Premium Plus Ultra (Maui Mist)
Recommended Skill Level
Intermediate
Comments
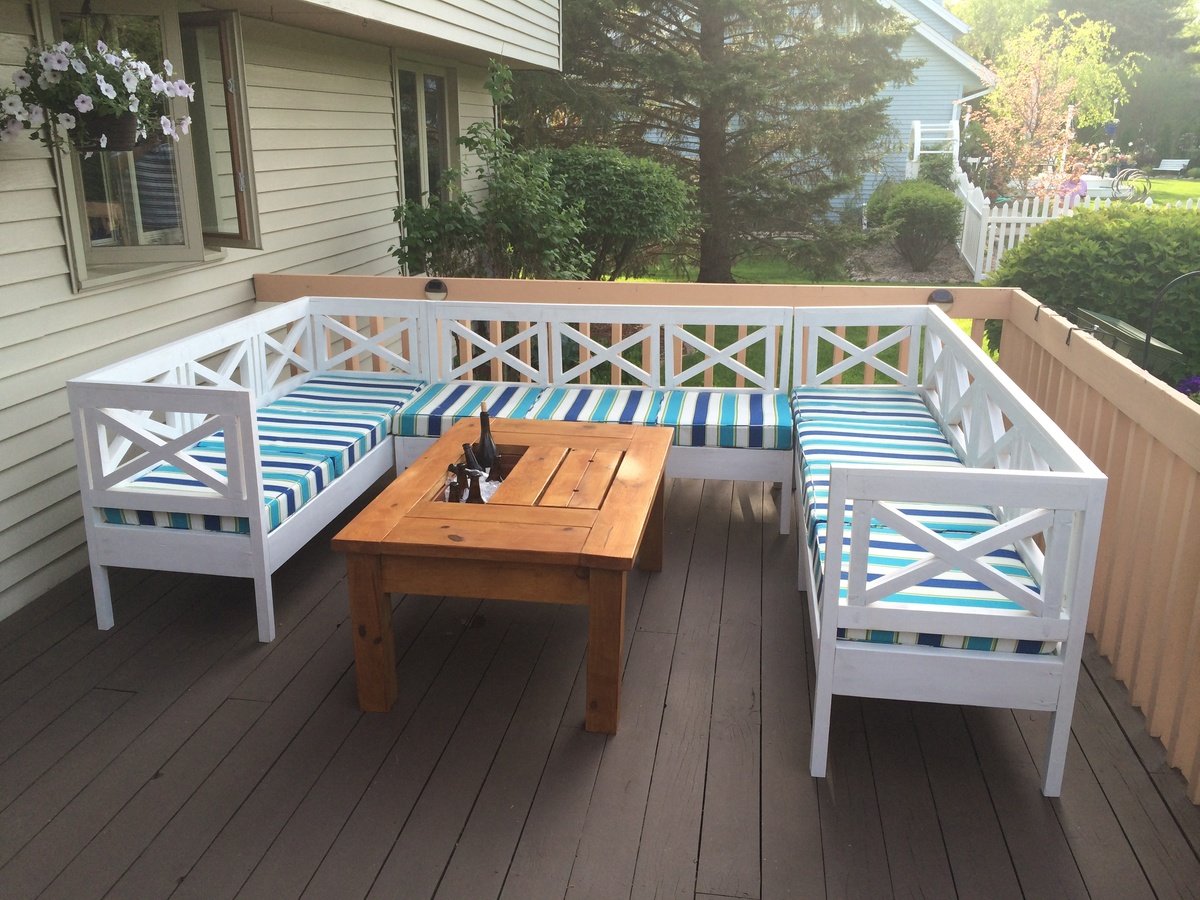
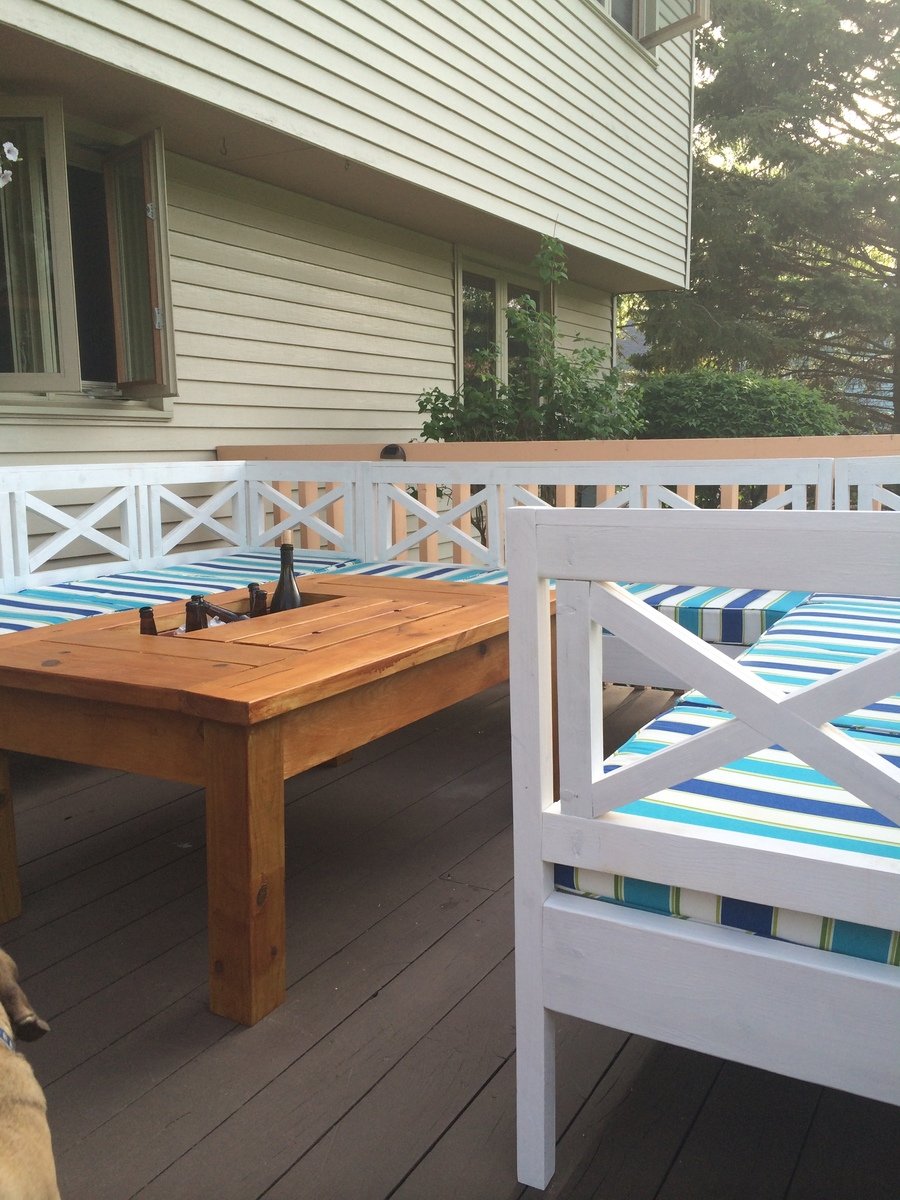
Outdoor Sectional
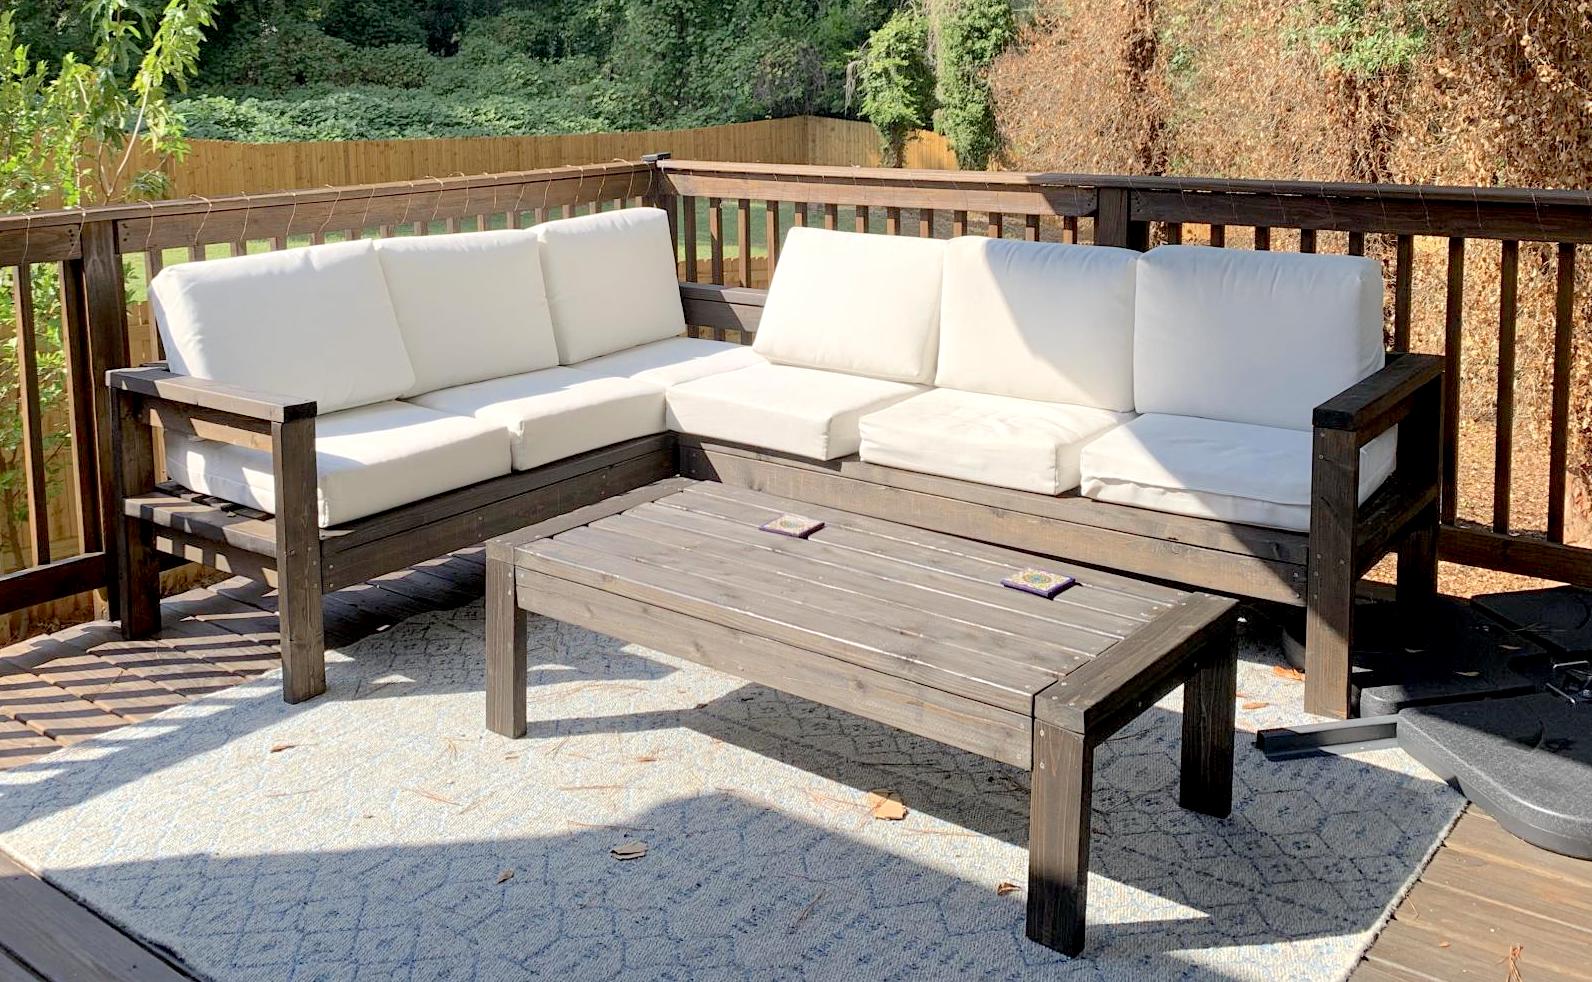
This was my first real woodworking project and was so much fun! I use my deck much more now and am excited to build more!
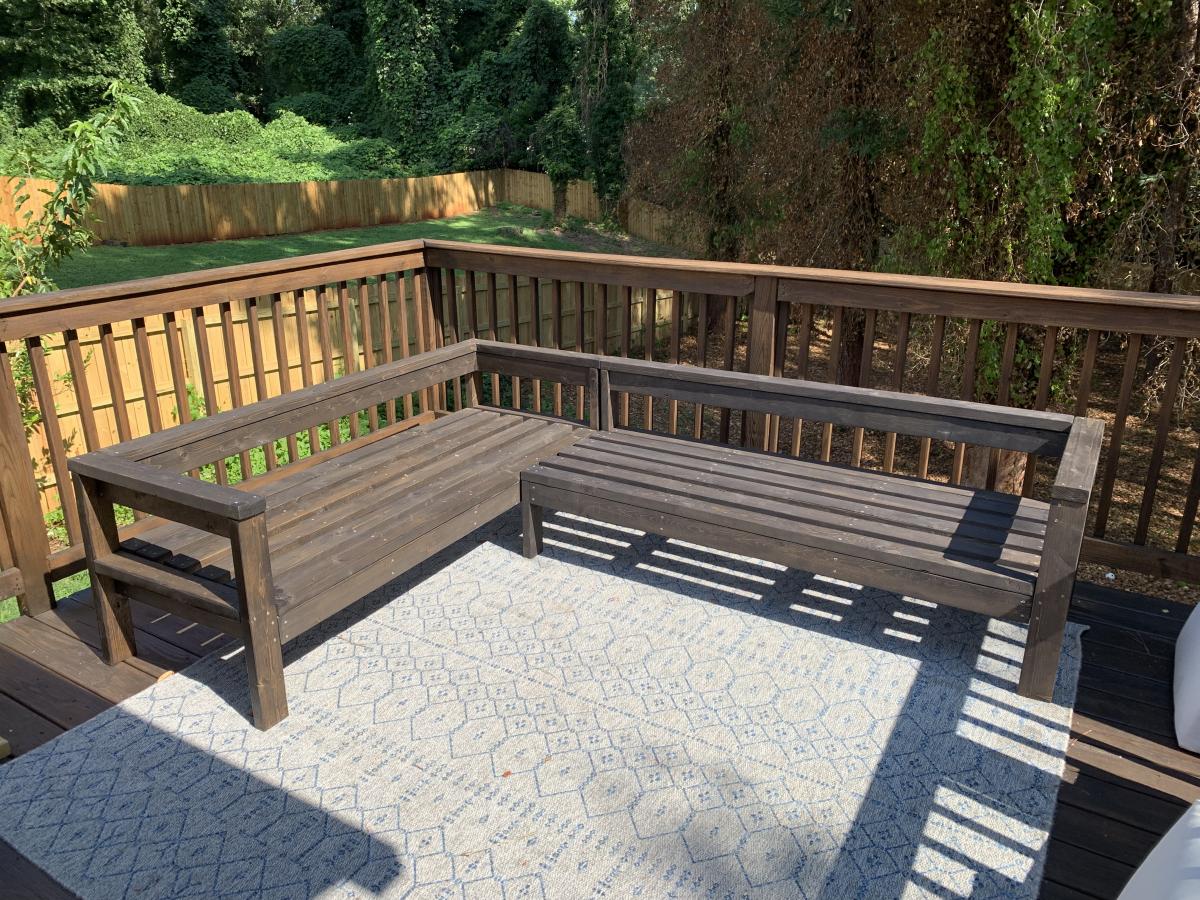
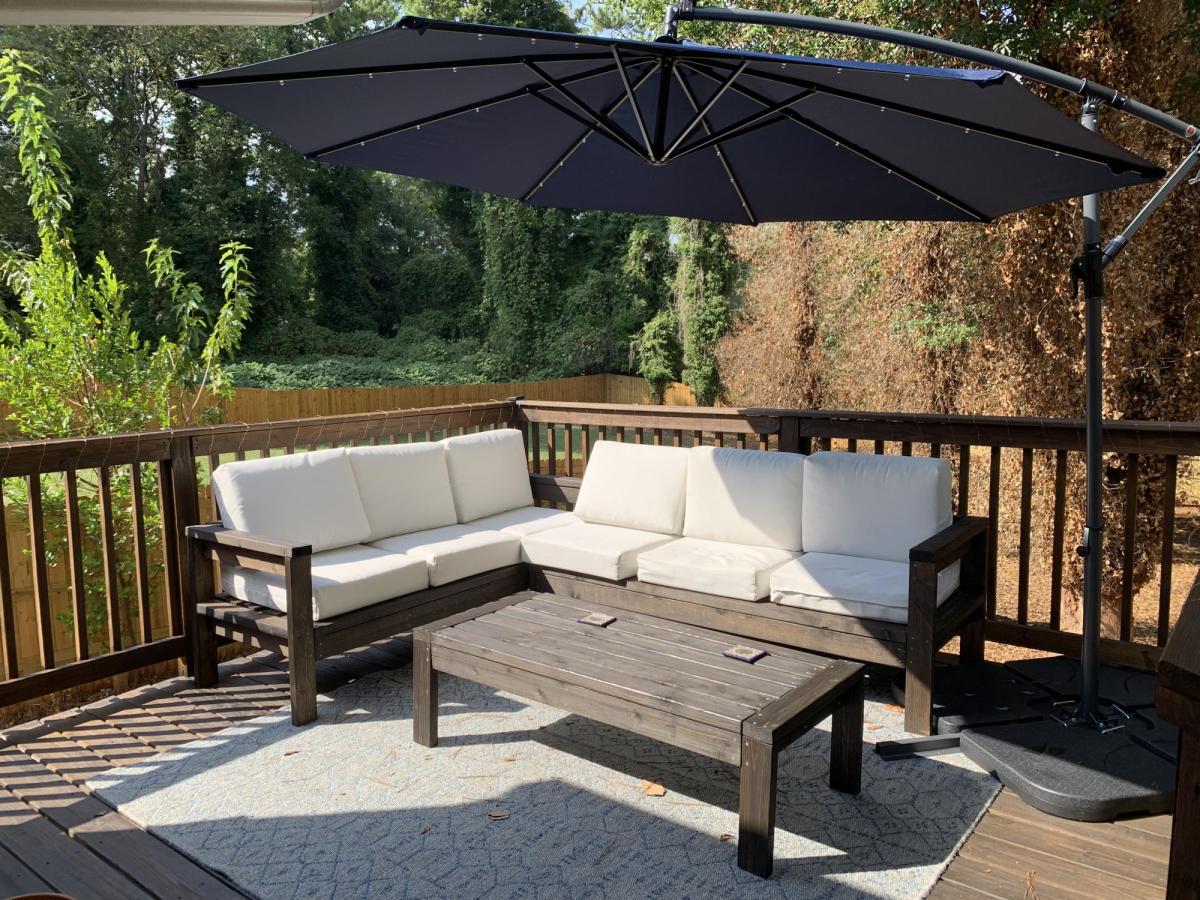
Built from Plan(s)
Estimated Cost
$500 (with cushions)
Estimated Time Investment
Week Long Project (20 Hours or More)
Finish Used
Varathane Jacobean stain
Recommended Skill Level
Beginner

Cabin Farmhouse Bed
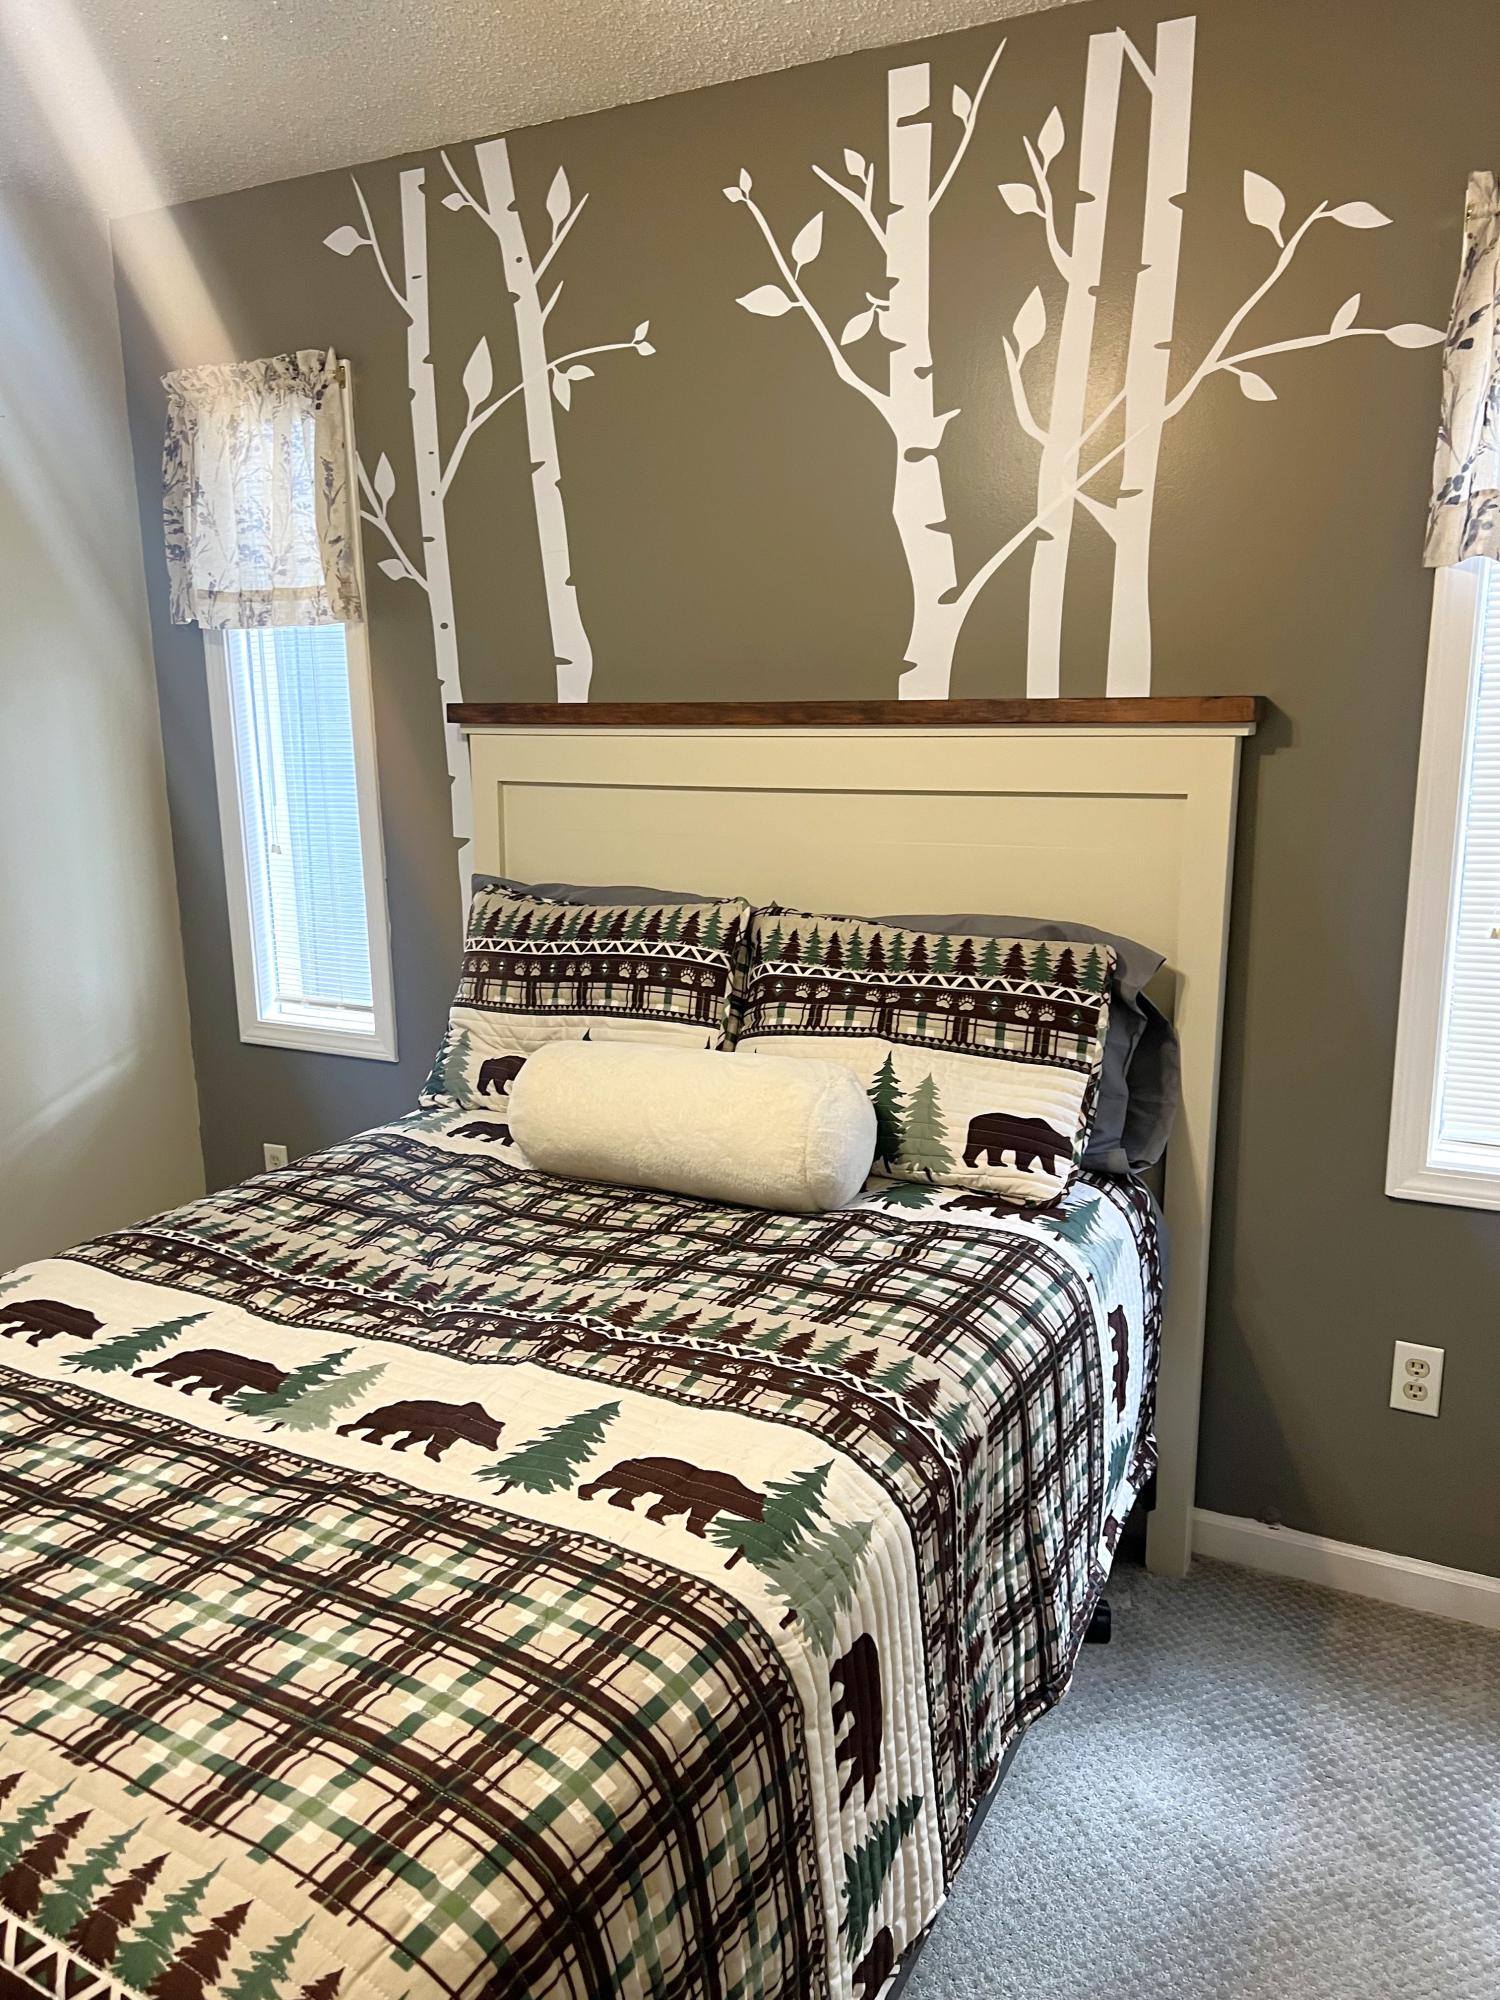
This project was so easy and fun to make. Love the way the instructions are laid out.
David Van Dyk
Built from Plan(s)
Garage shelves
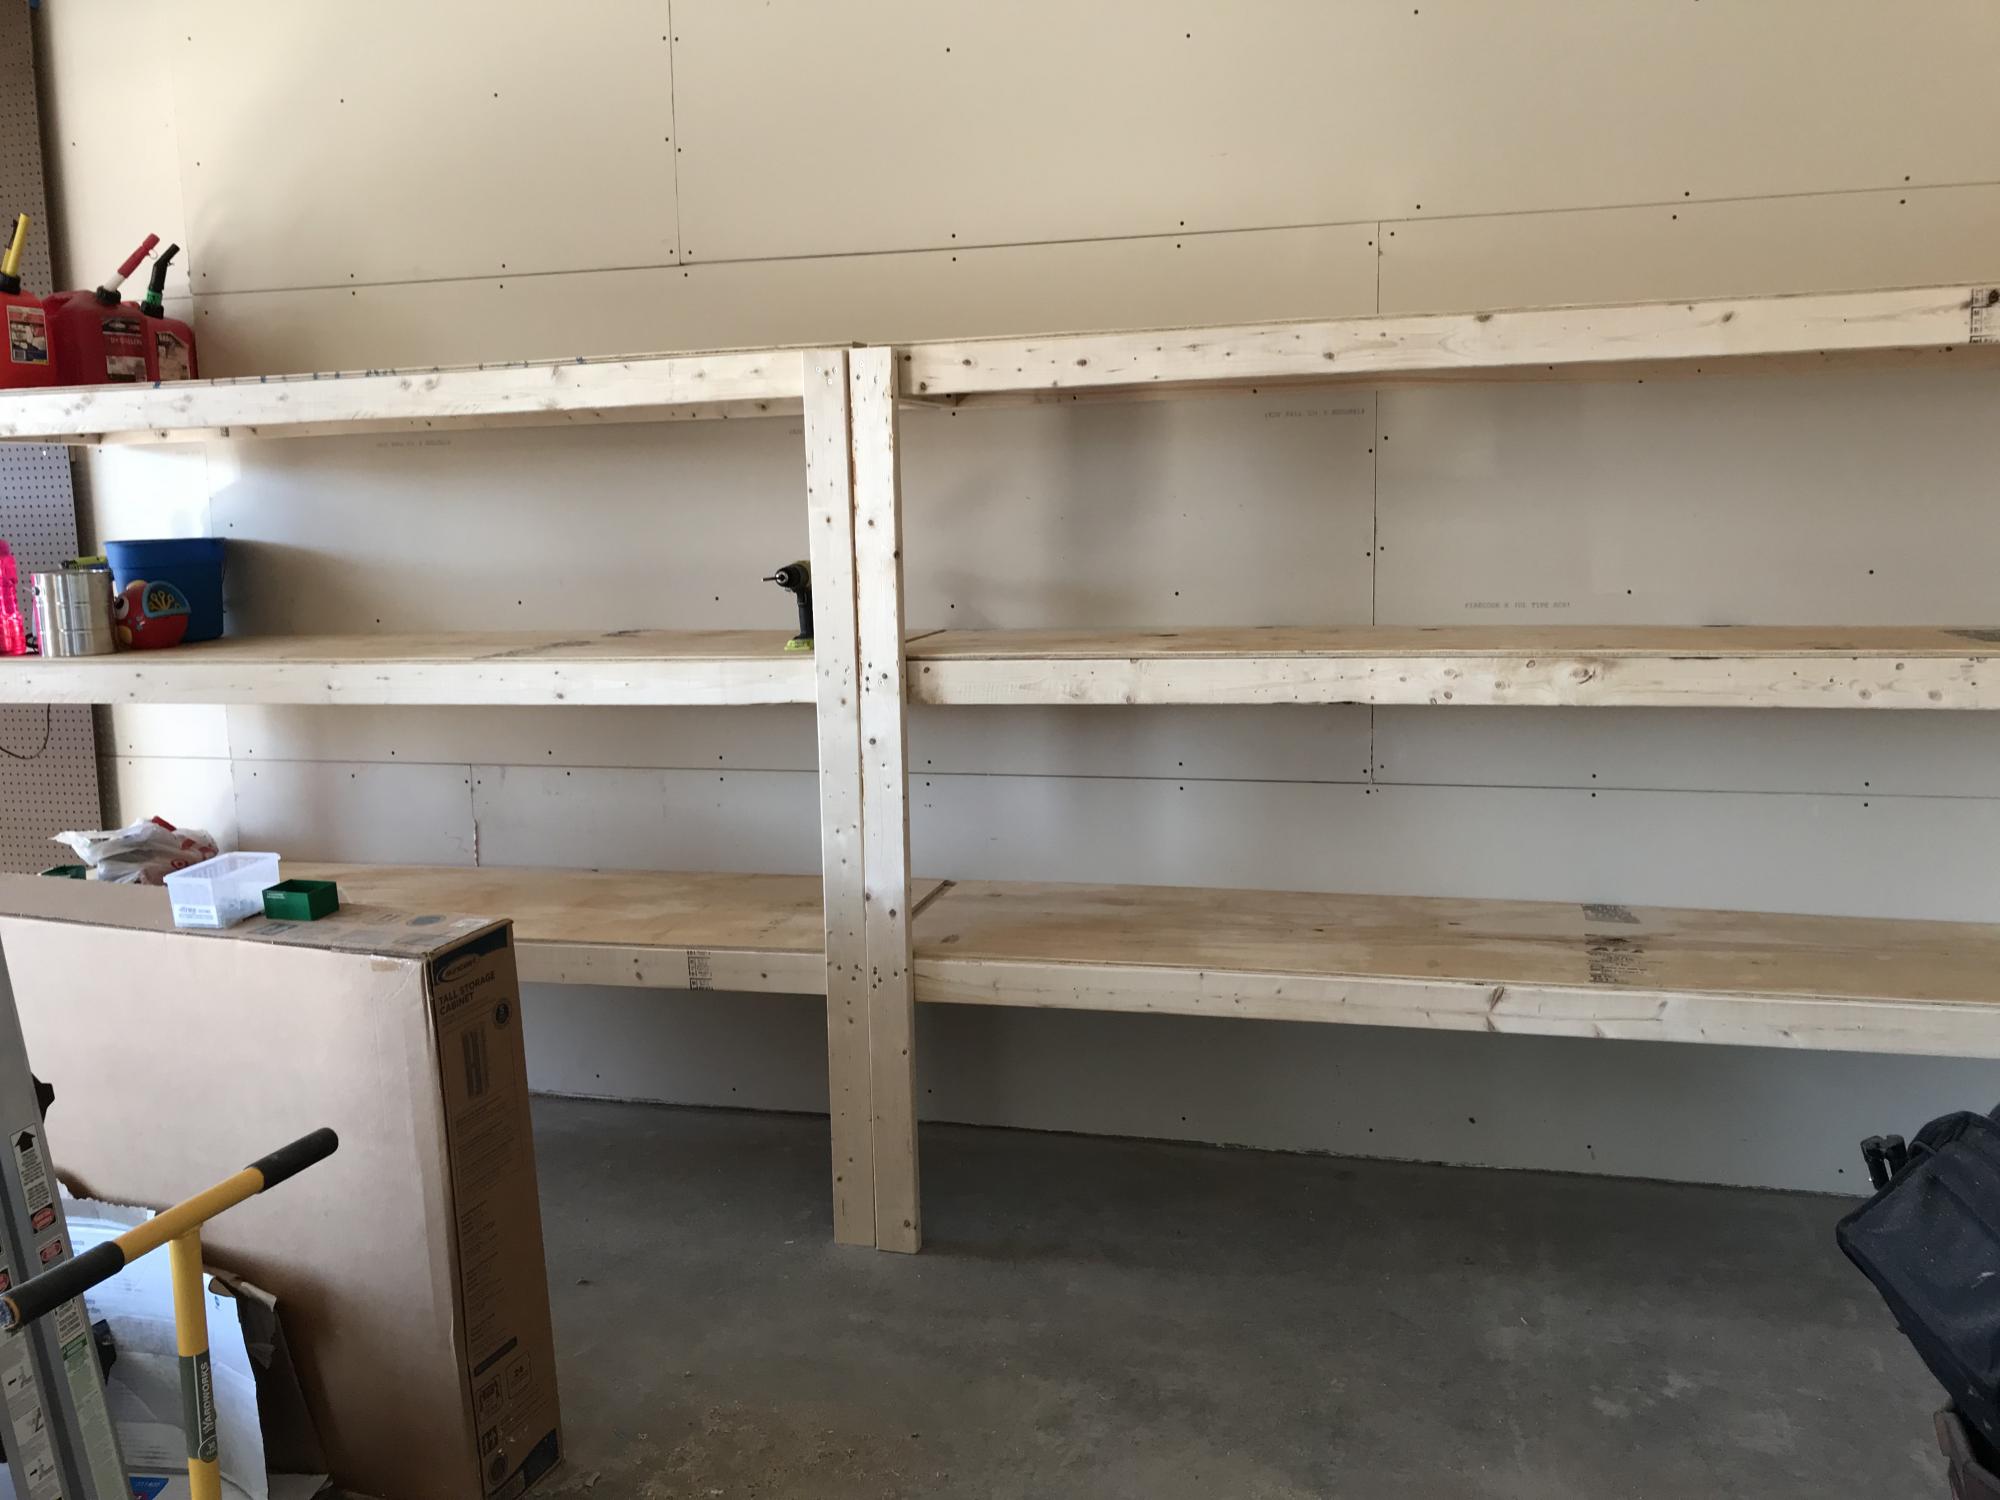
Easy, quick garage shelves!
Built from Plan(s)
Estimated Cost
40
Estimated Time Investment
An Hour or Two (0-2 Hours)
Finish Used
None
Recommended Skill Level
Starter Project
Barn Door Bookcase/ Side Pantry
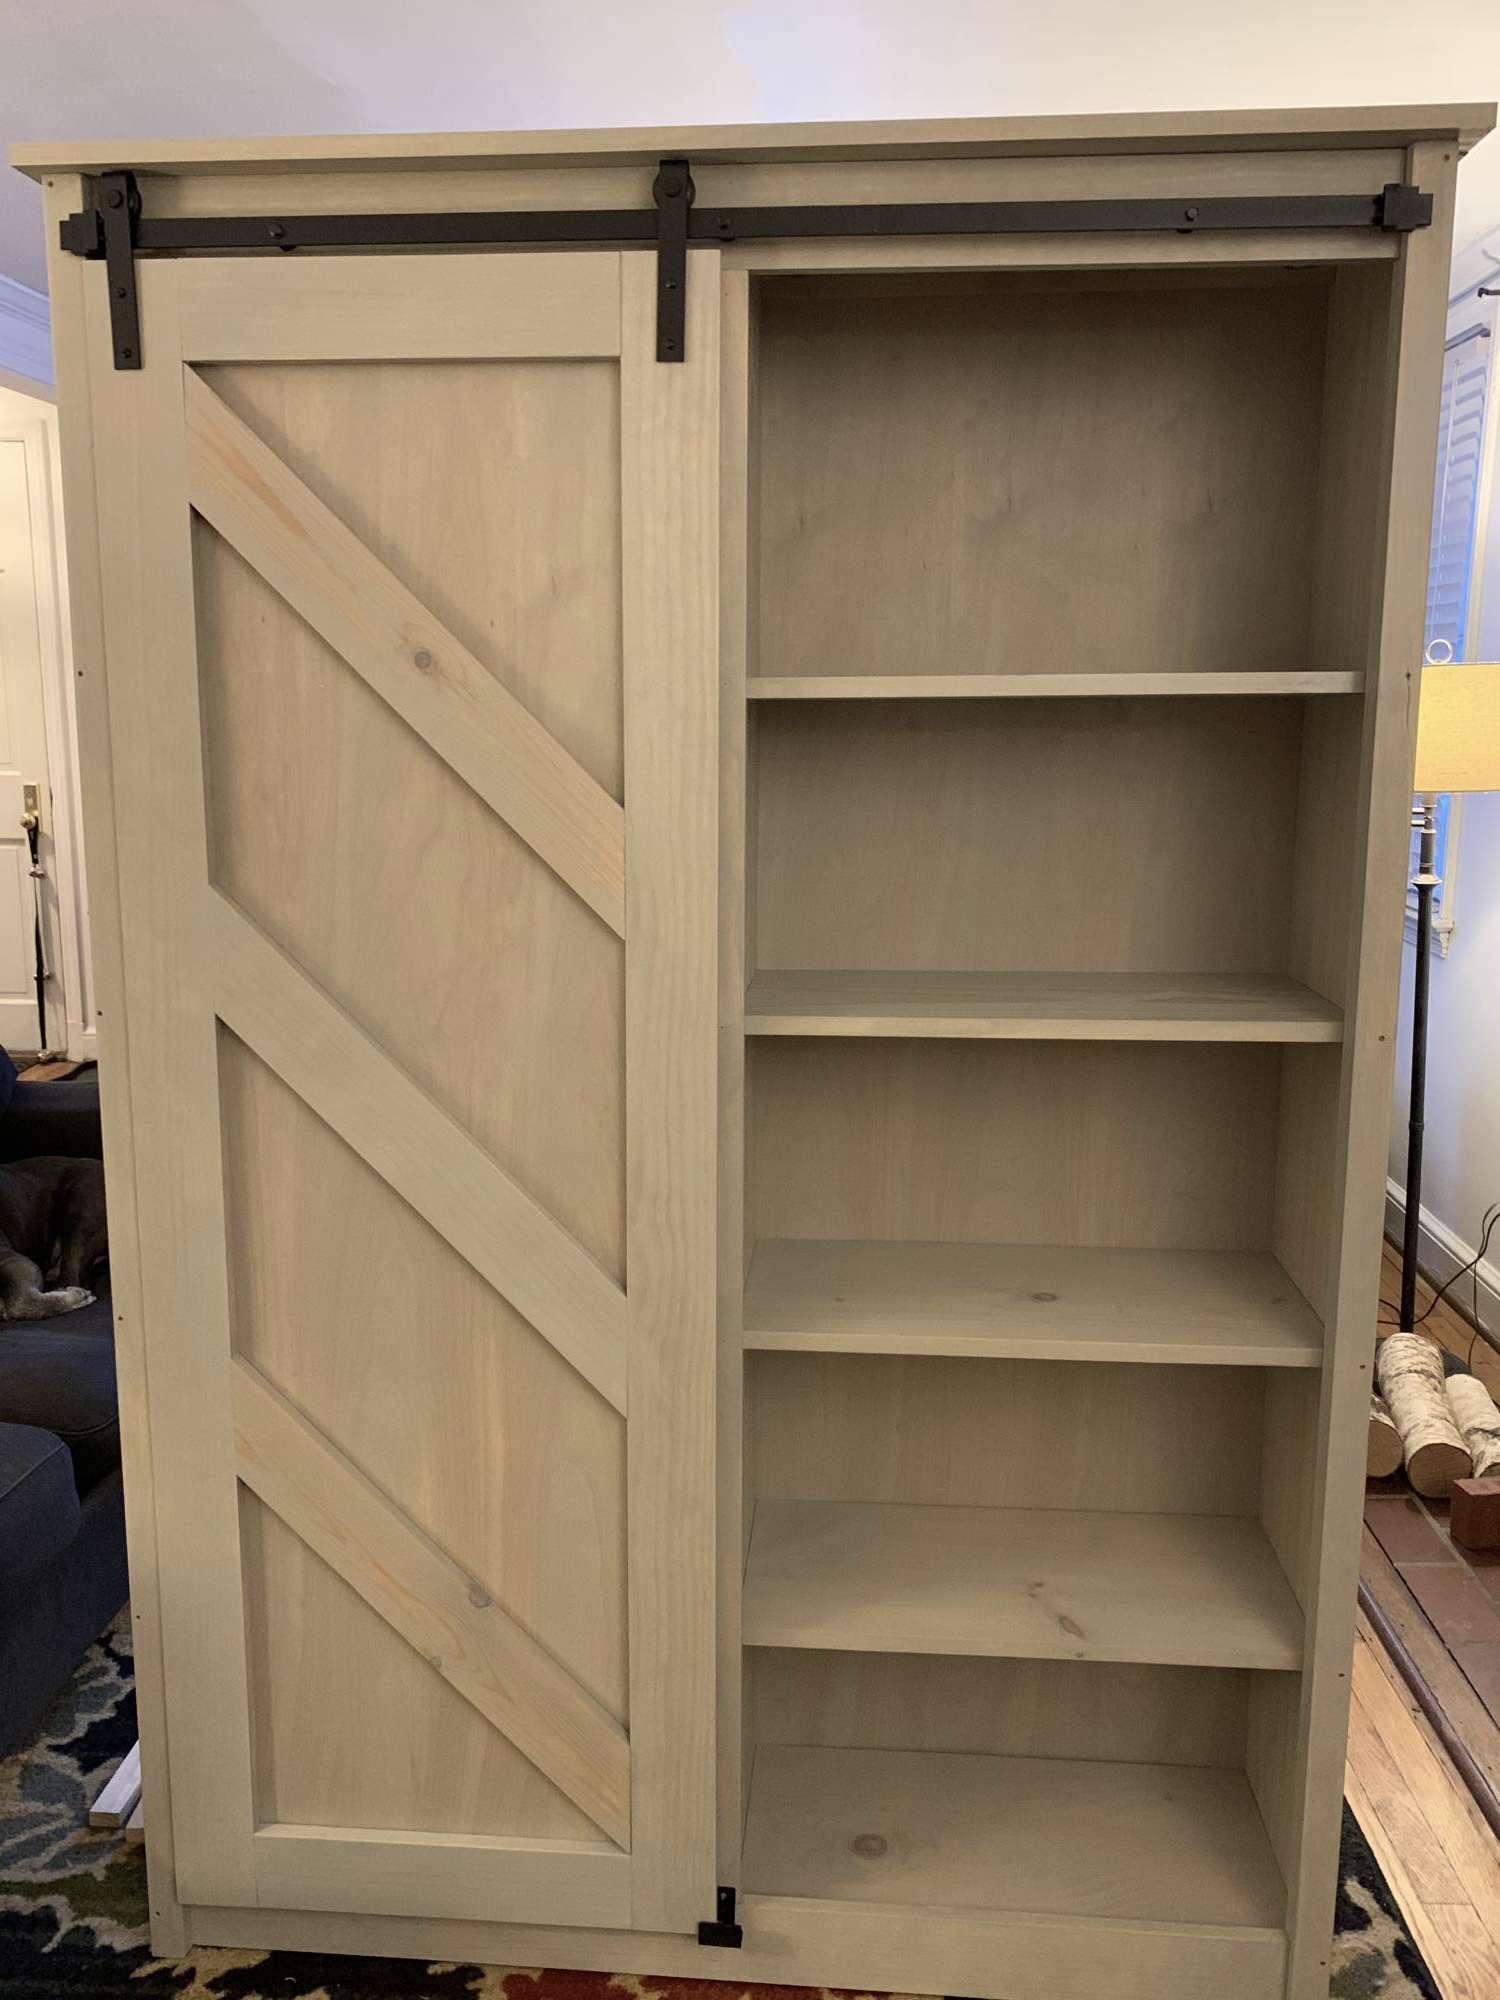
This took a lot of time and money but I like the way it looks. We have 4 kitchen cabinets and one drawer and no room for more so storage is tight.
Built from Plan(s)
Estimated Cost
400
Estimated Time Investment
Week Long Project (20 Hours or More)
Finish Used
Same as Ana’s
Recommended Skill Level
Advanced
Comments

Outdoor Sofa Mash-up

My wife loves the X pattern of the Weatherly Sofa, but wanted the tilted back from the Simple White Outdoor Sofa. This was our best of both worlds effort!
Built from Plan(s)
Estimated Cost
$85 for lumber and materials without cushions.
Estimated Time Investment
Afternoon Project (3-6 Hours)
Finish Used
Primer and outdoor paint.
Recommended Skill Level
Beginner
Comments

Tue, 06/11/2019 - 05:25
Can you share where you got…
Can you share where you got your cushions please?
Garden cutie
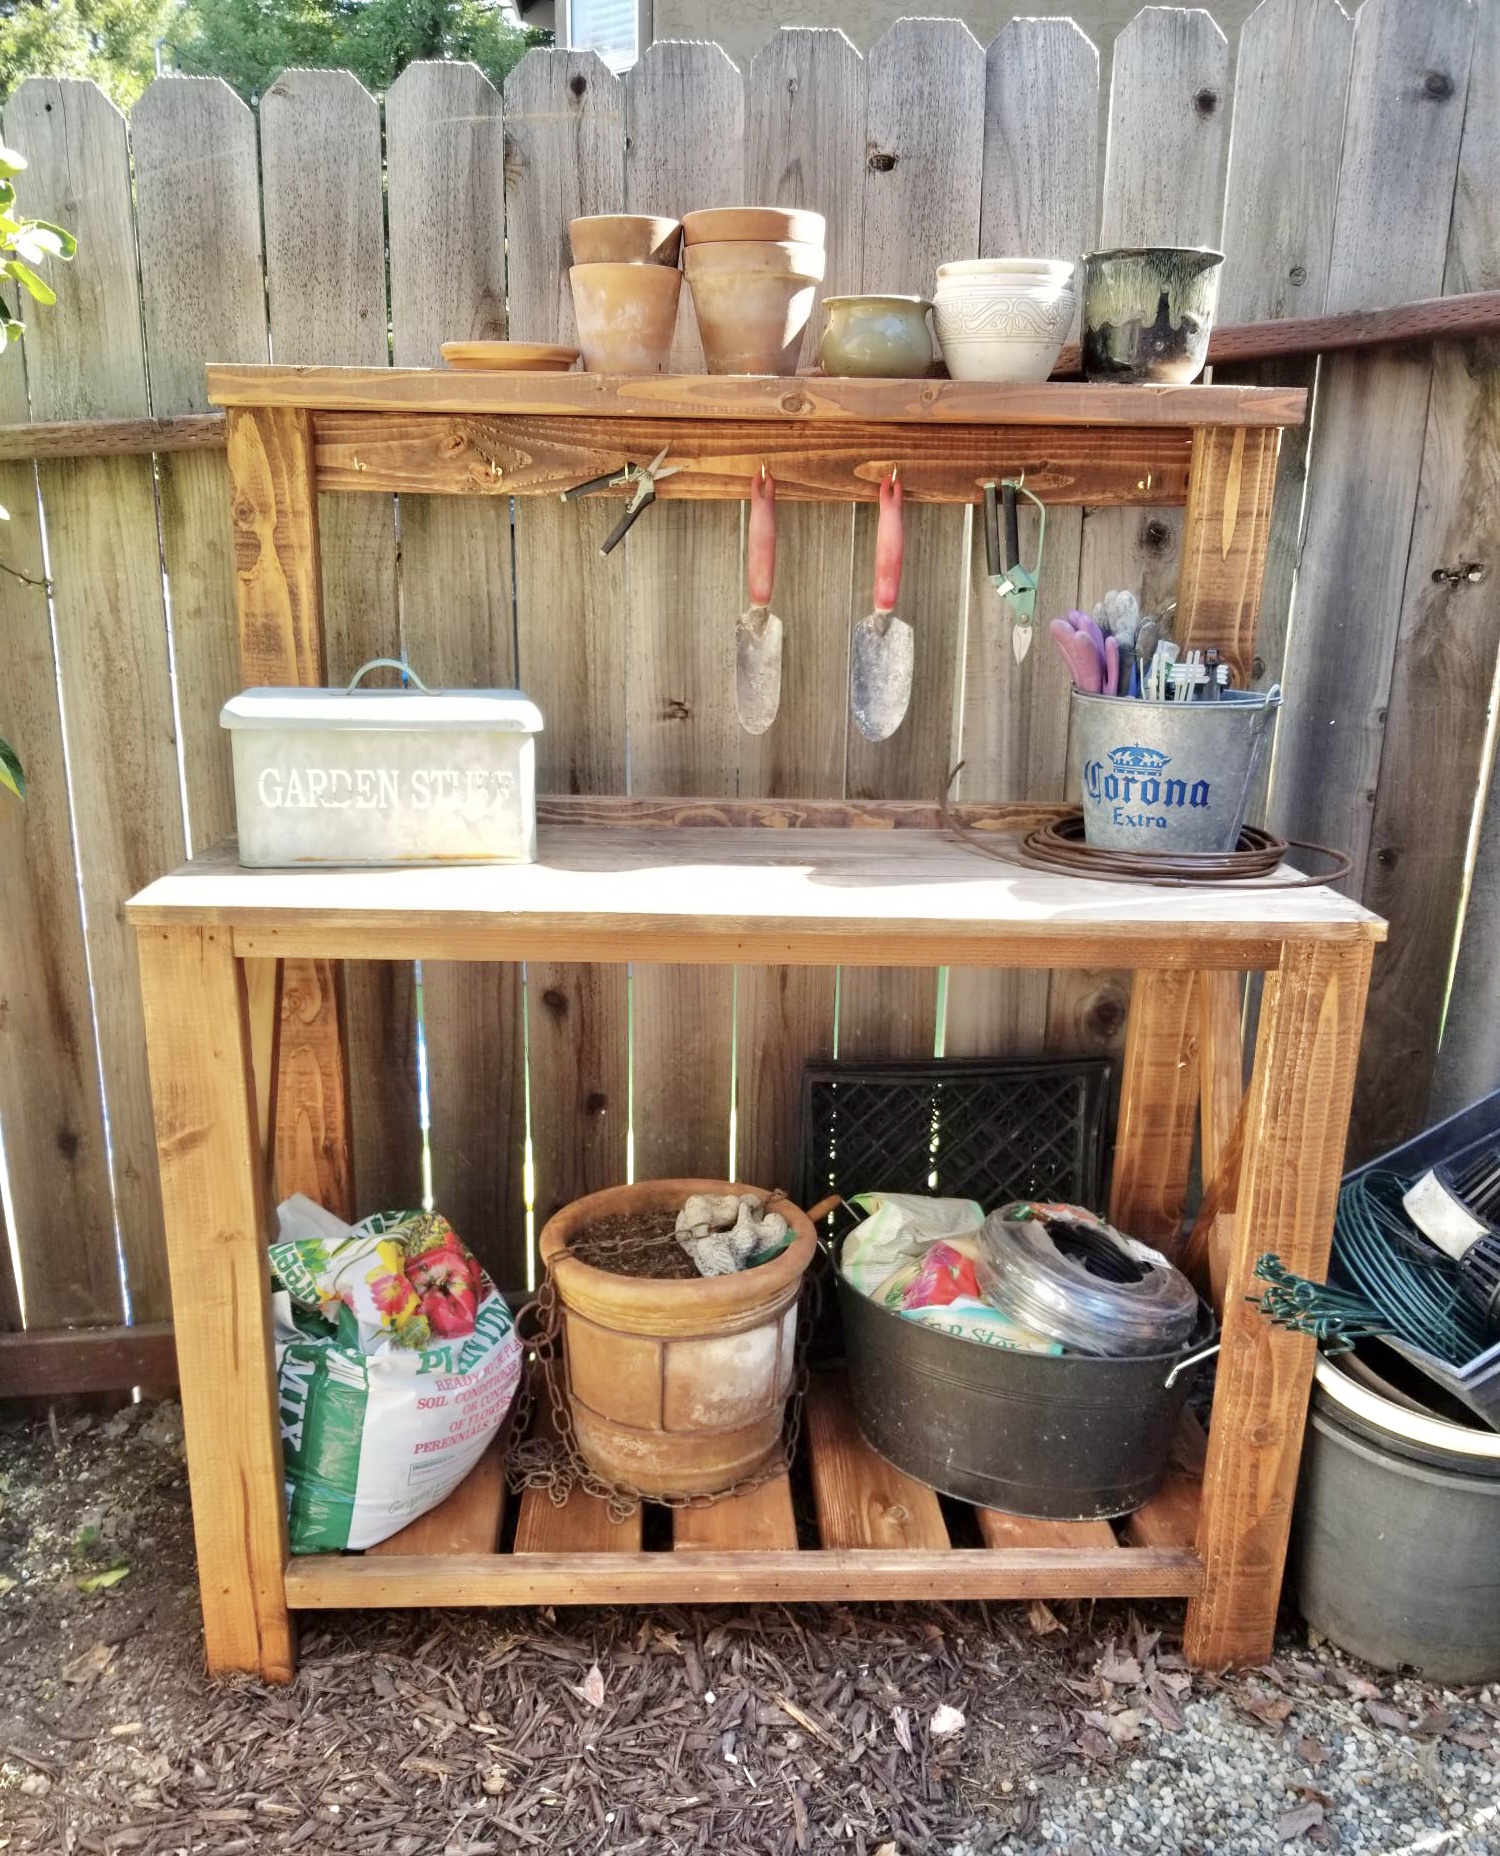
My honey built this farmhouse potting bench in a few hours. I needed it to store all the junk that was laying on the ground. It's so cute!
Built from Plan(s)
Estimated Cost
$100
Estimated Time Investment
Afternoon Project (3-6 Hours)
Finish Used
Early American minwax
Recommended Skill Level
Beginner
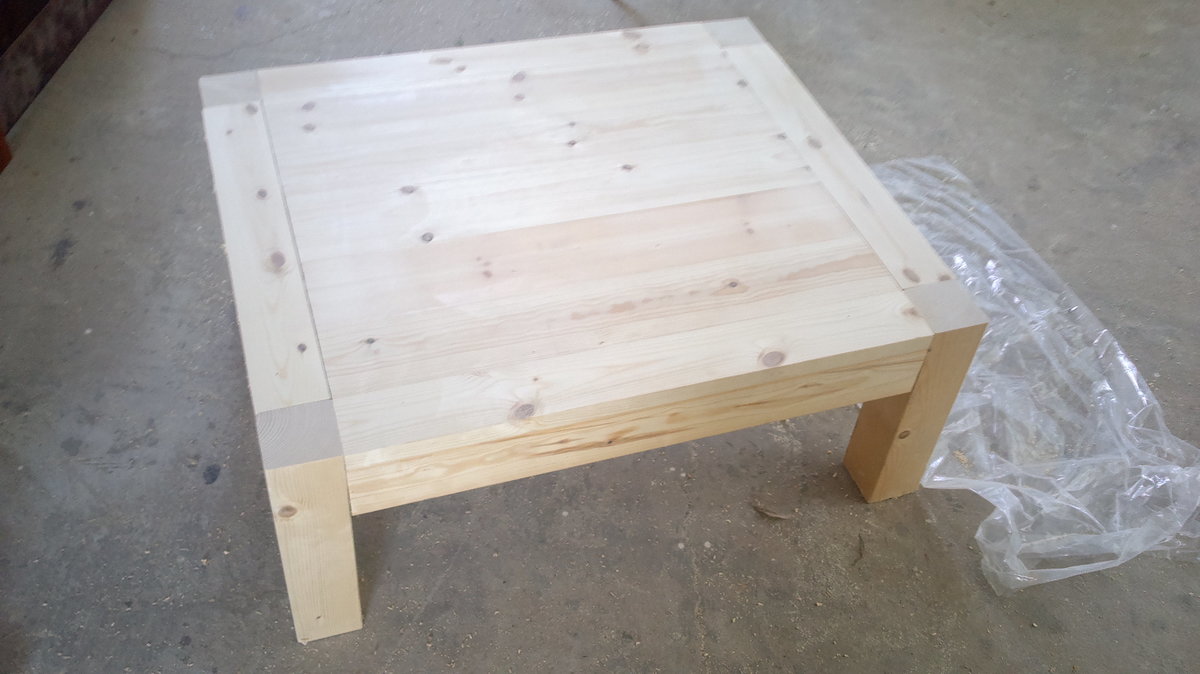
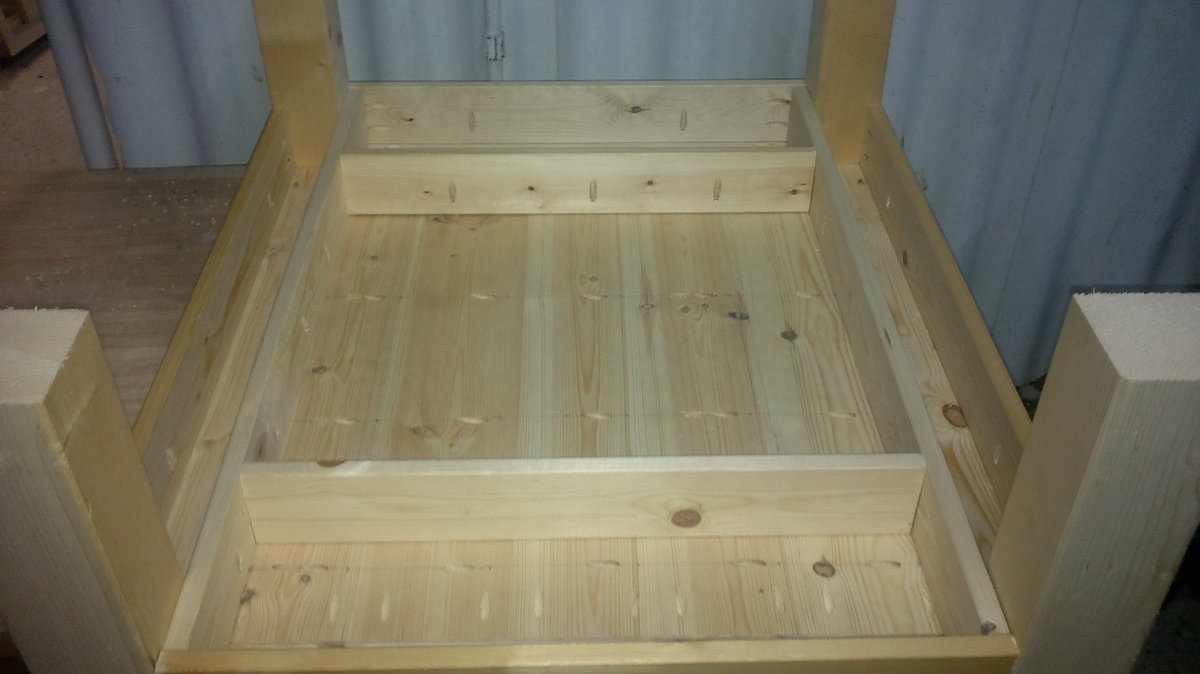
iTable
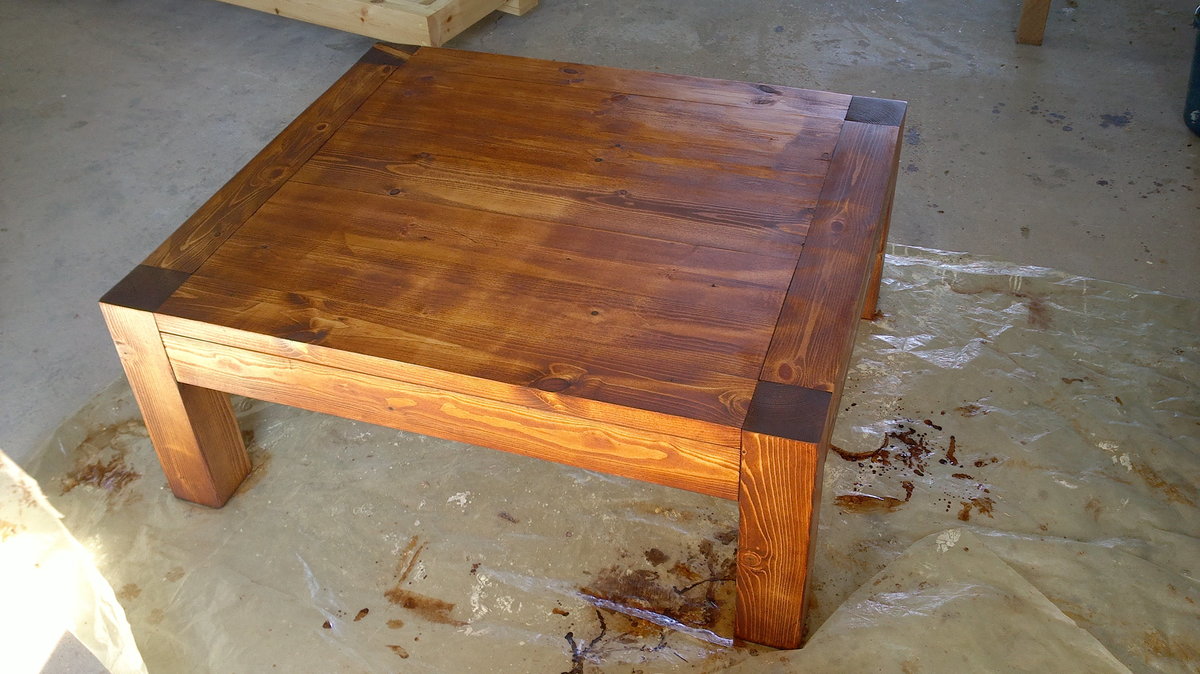
Easy build. Great and sturdy results.
Great build for beginners and for some learning experience with a Kreg Jig. Table looks great and bulky.
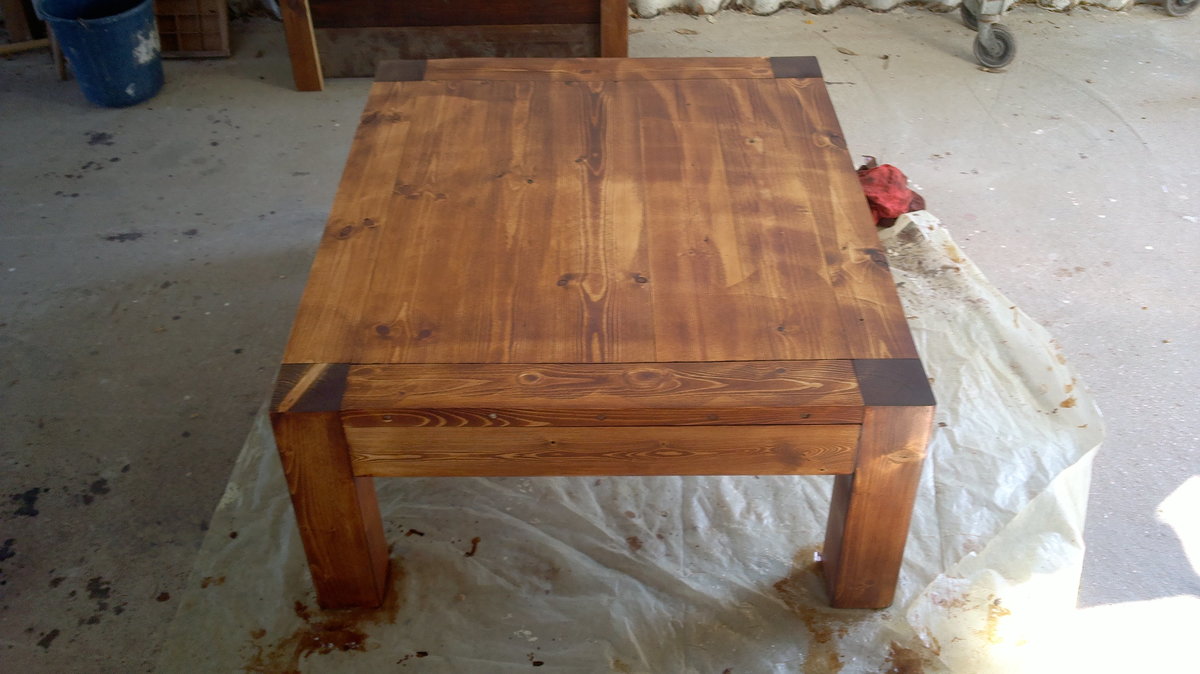
Built from Plan(s)
Estimated Time Investment
Day Project (6-9 Hours)
Recommended Skill Level
Beginner
Comments
Sun, 08/11/2013 - 21:15
I was wondering the same
I was wondering the same thing myself about the 4x4's. Where I live the treated ones are about $7 and the untreated about $30. Also I have heard that you may have trouble staining or painting your treated 4x4's. I want to make a coffee table from one of your plans but I do not want to spend that much just on a 4x4. :/ Beautiful table though!
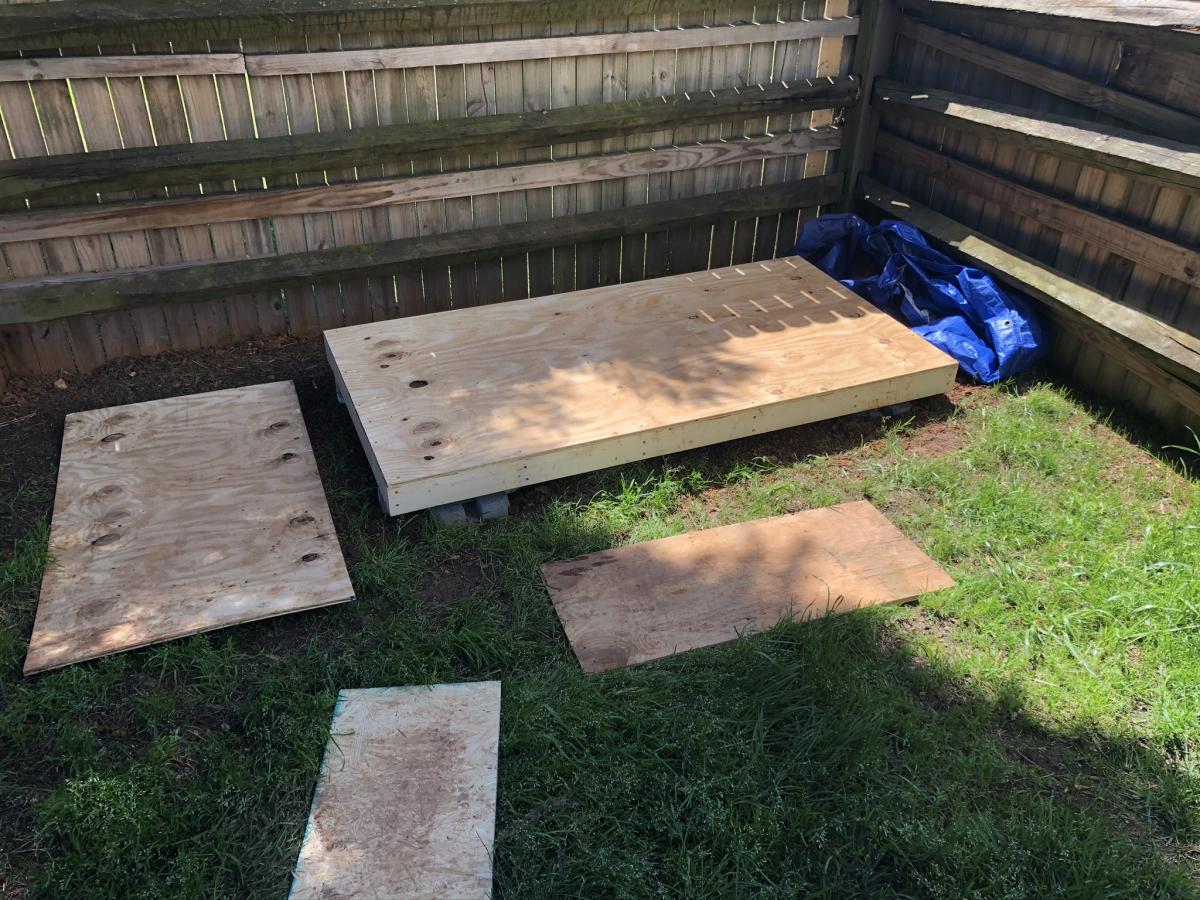
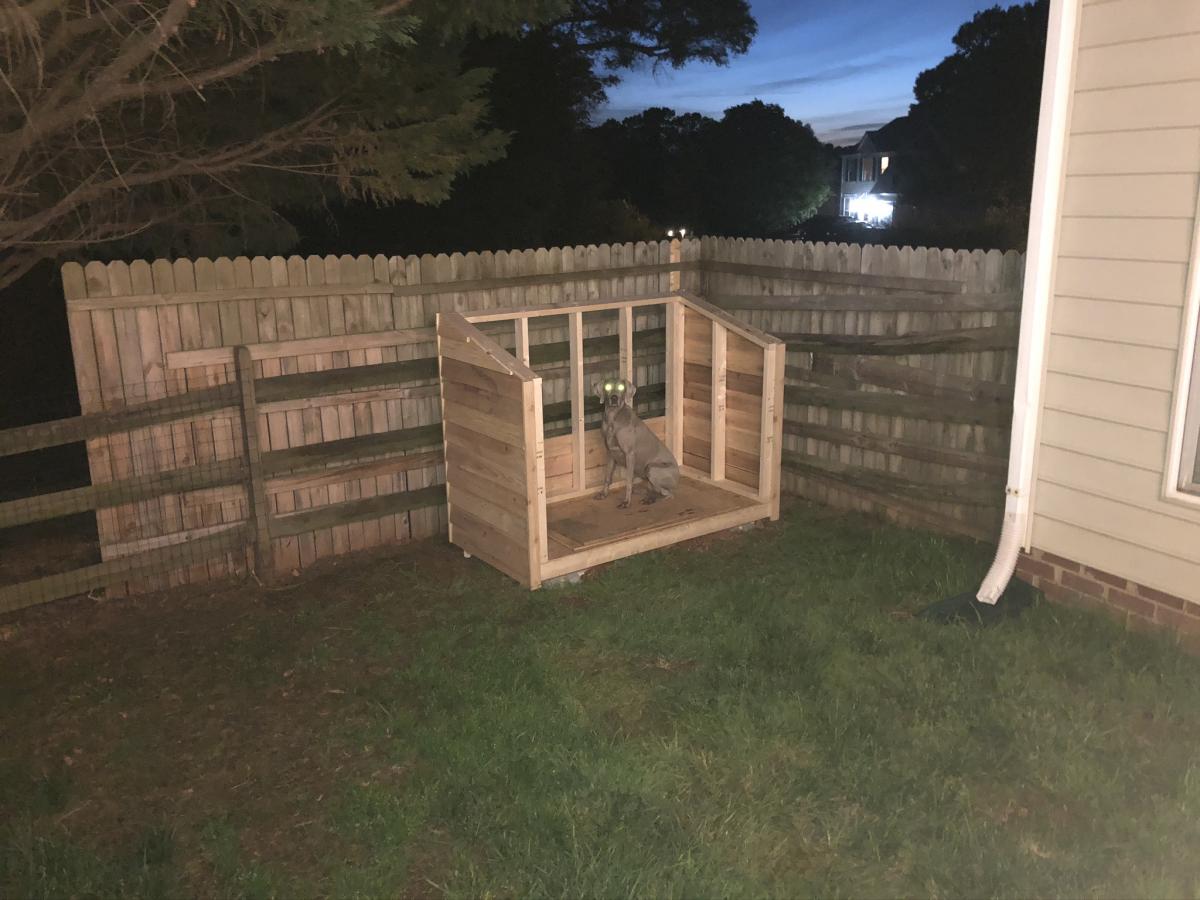
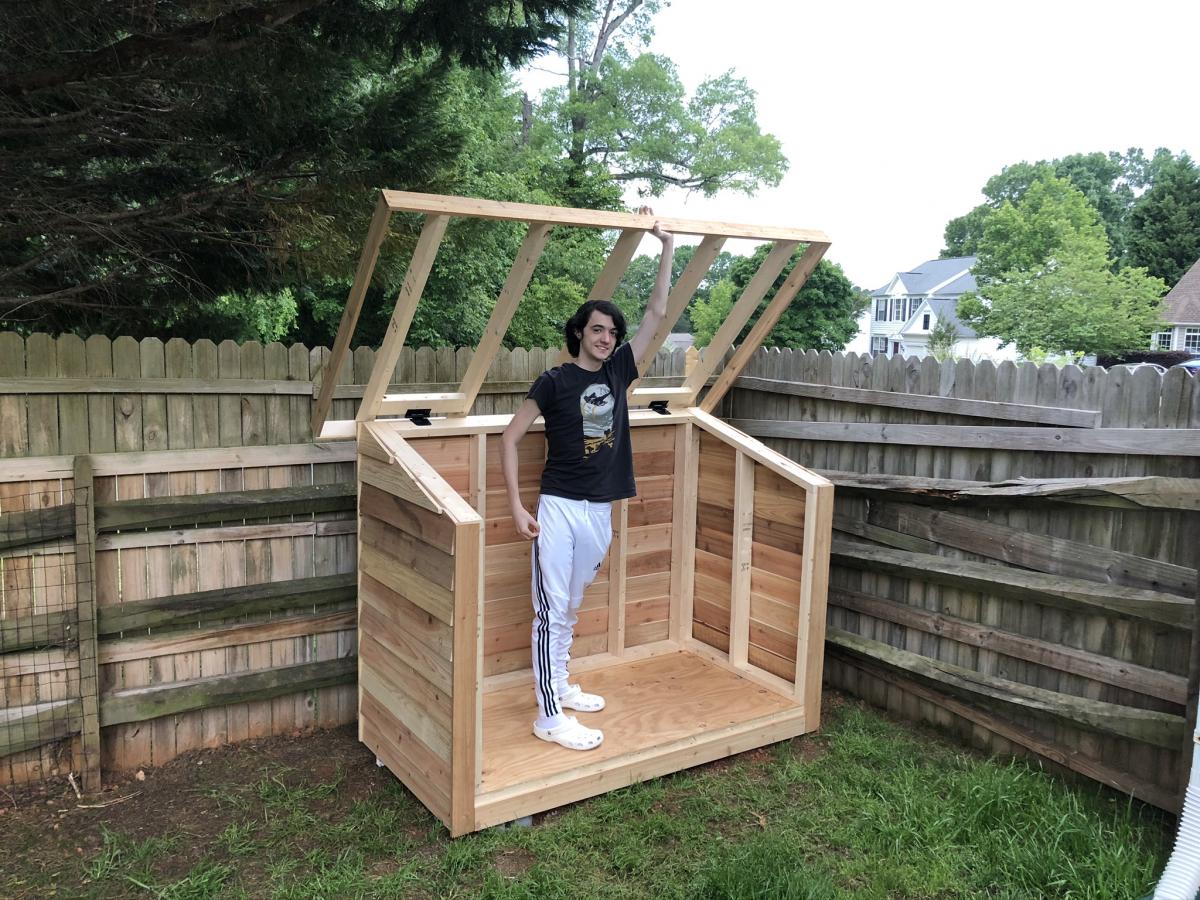
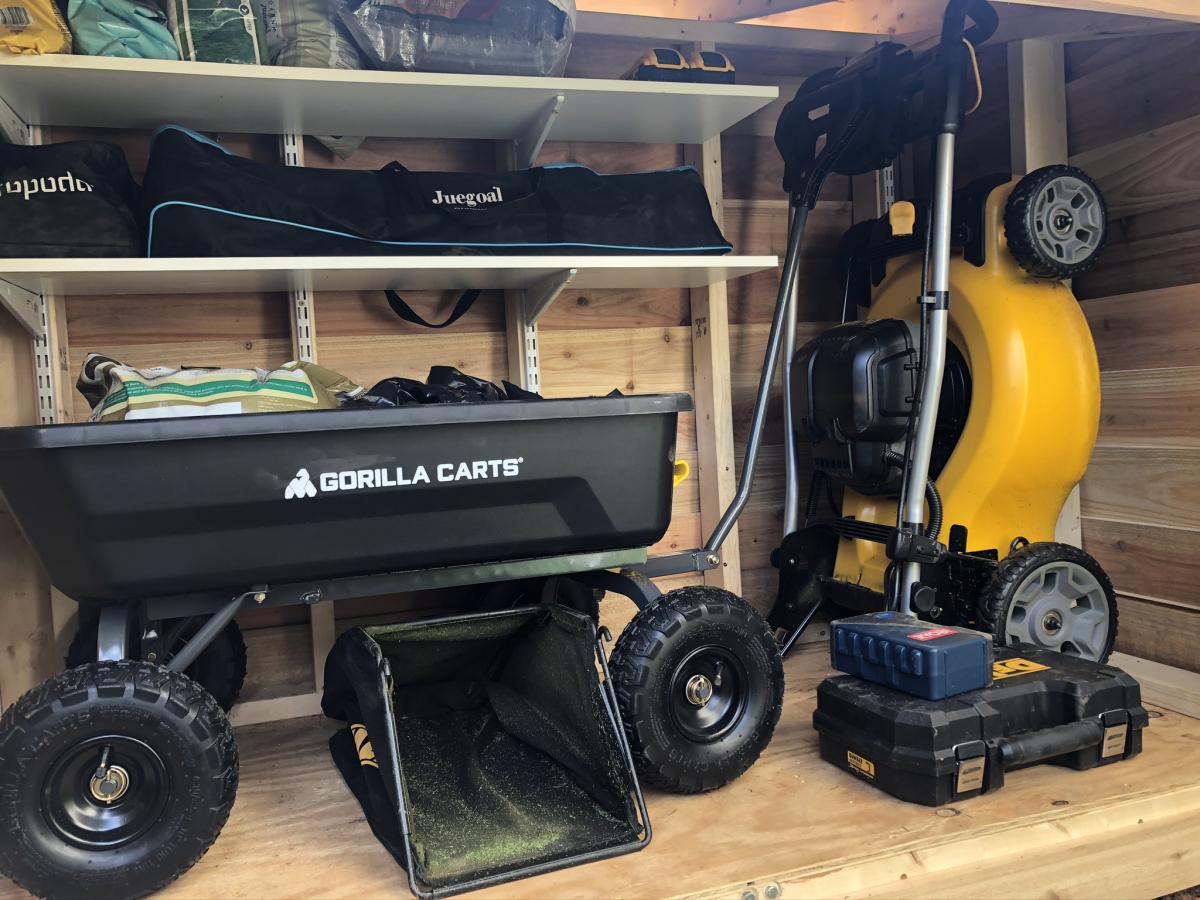
Short version of cedar shed
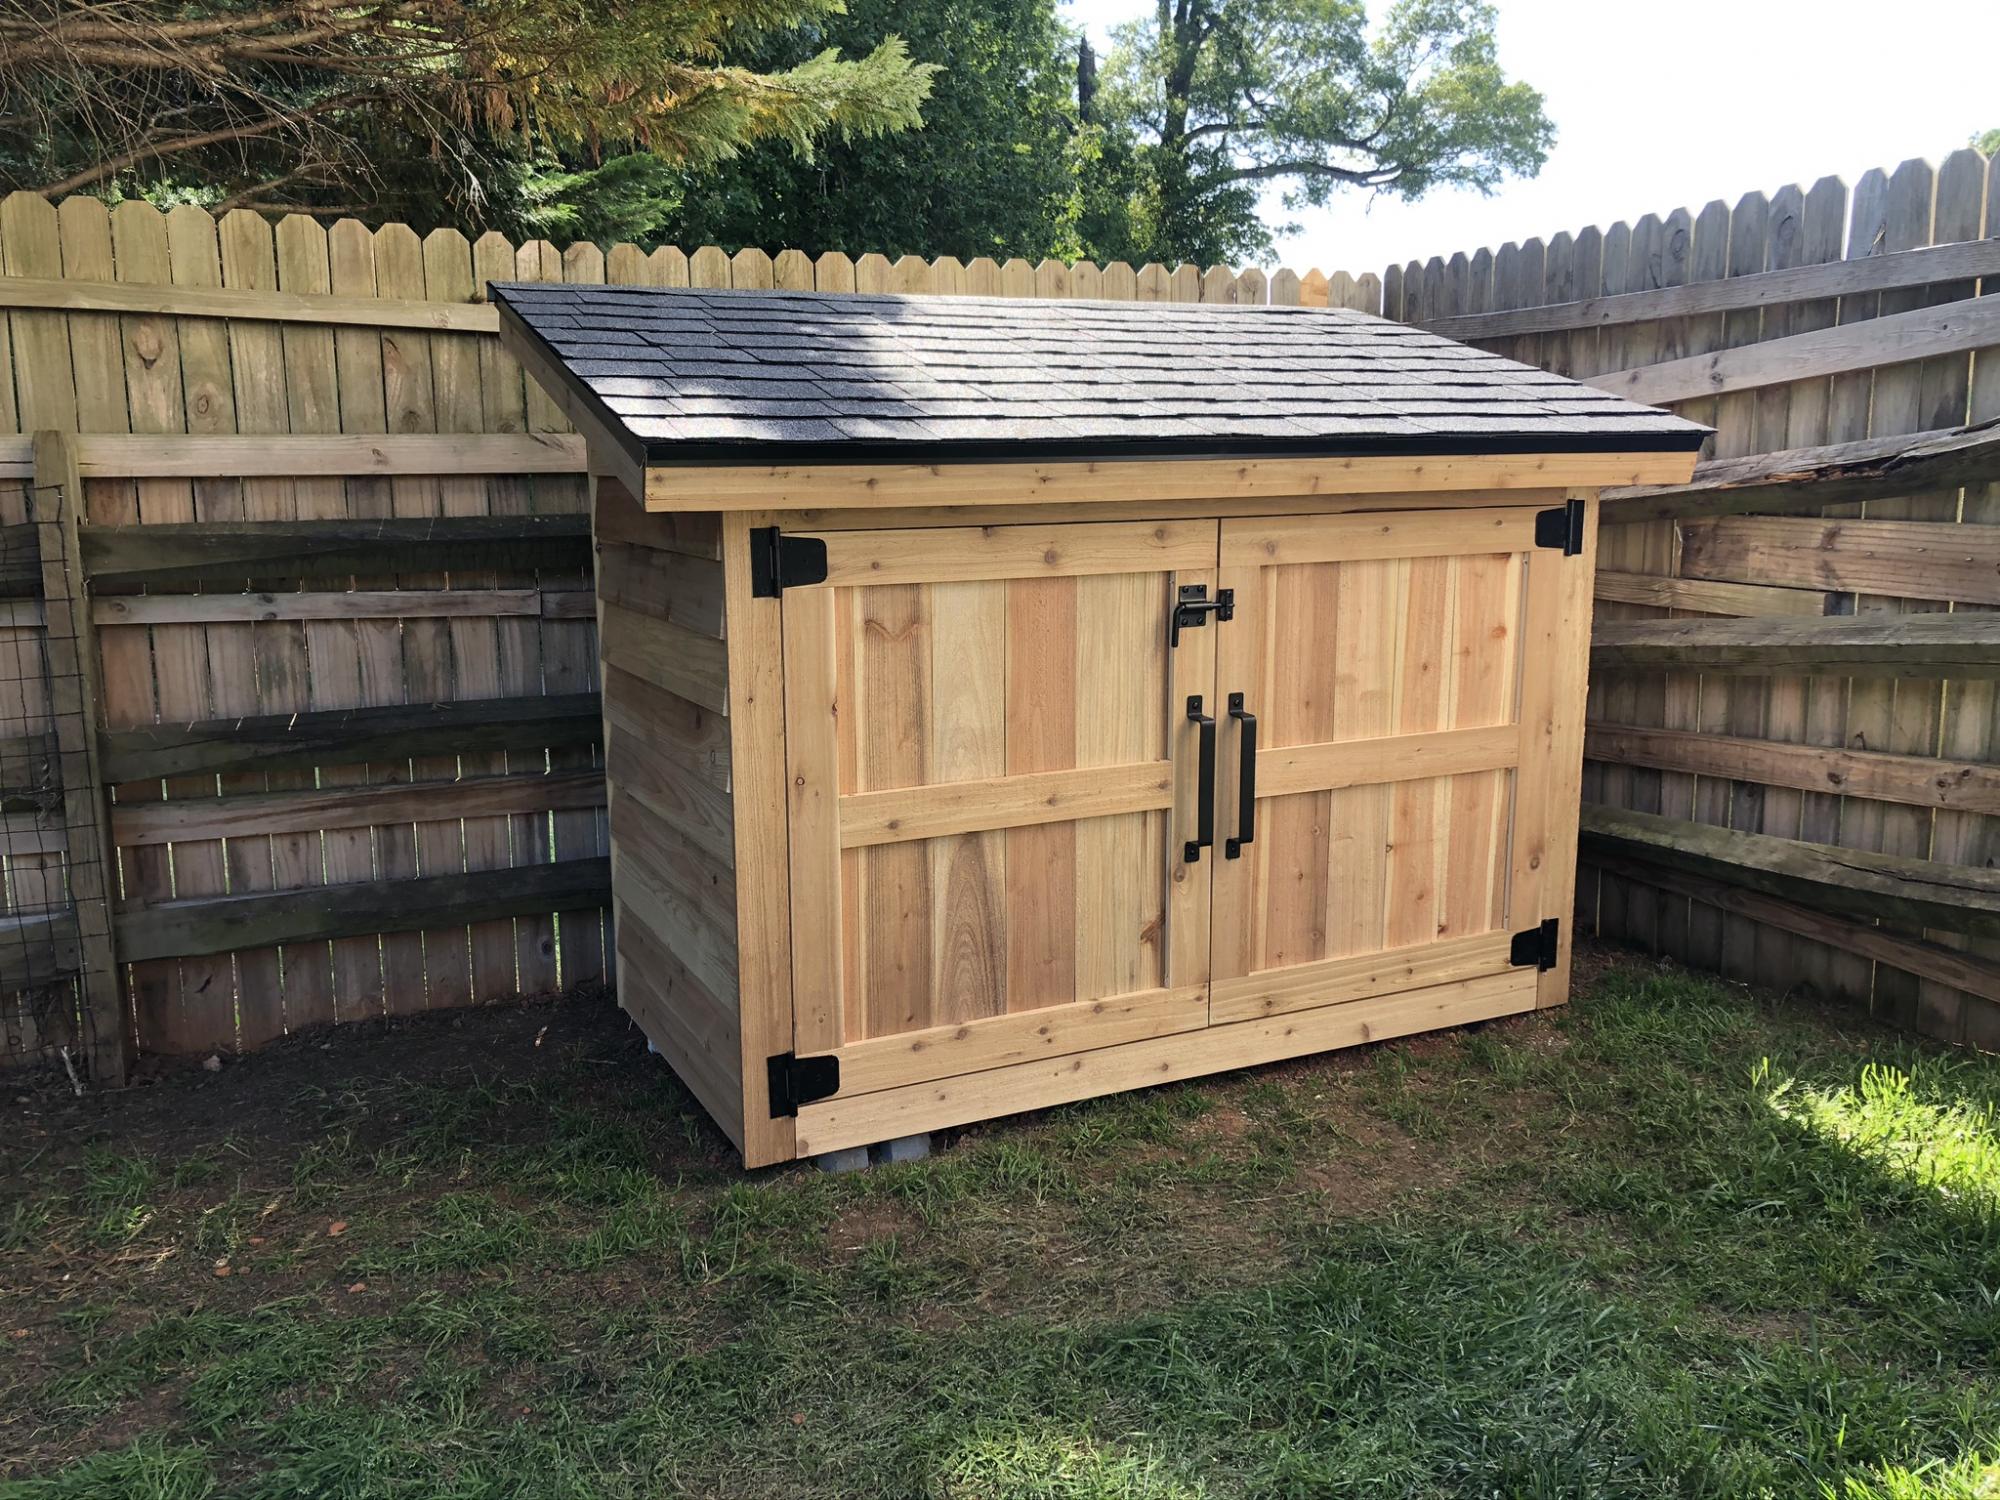
We wanted a shorter version, so that it would hide behind this fence. I just needed somewhere to store lawnmower, wheelbarrow, and a few yard supplies. I started putting the roof on hinges, but the gas struts couldn't support the 170 pound roof. So it's fixed in place (stronger structure anyway). That's why I went with 2x4's for the framed walls instead of 2x2's.
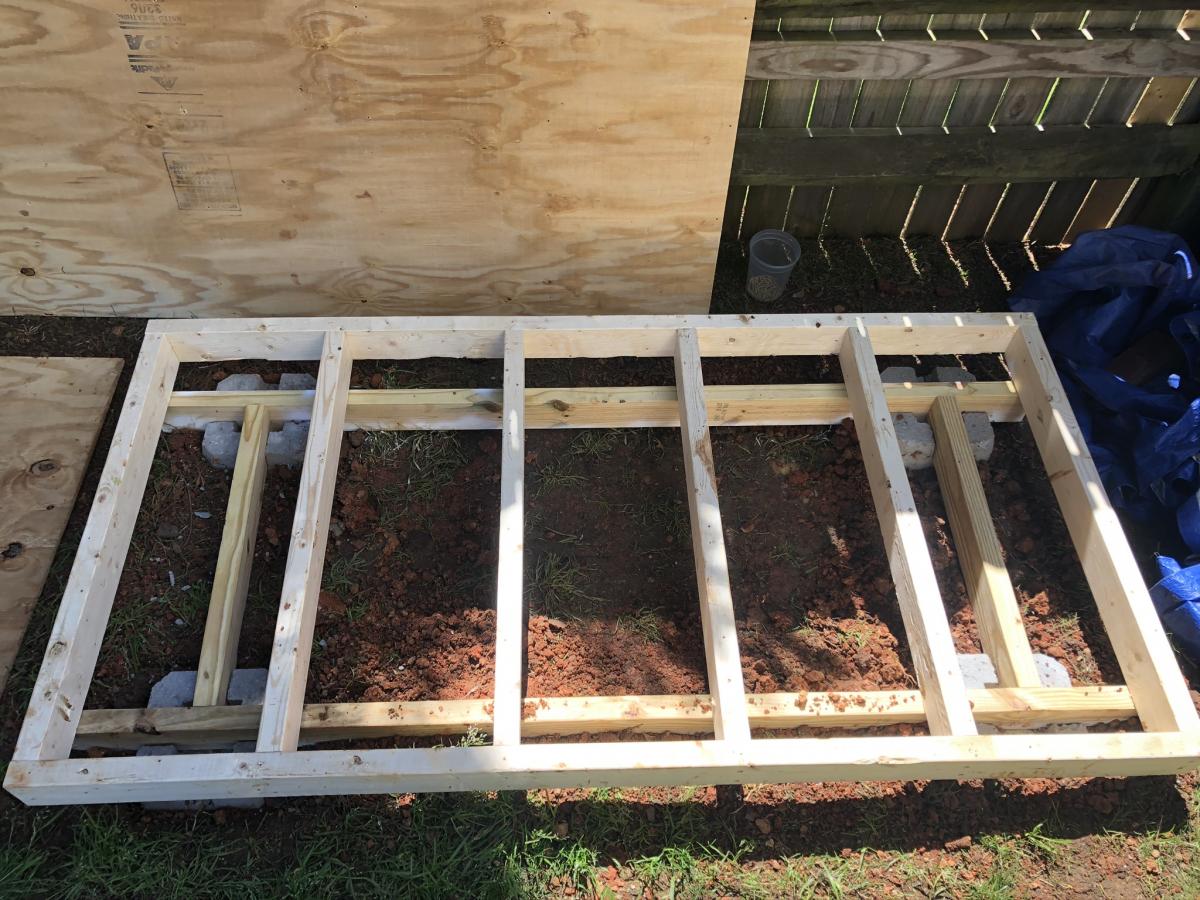
Built from Plan(s)
Estimated Cost
600
Estimated Time Investment
Weekend Project (10-20 Hours)
Finish Used
Not yet finished, will get to that.
Recommended Skill Level
Intermediate
Comments

Thu, 06/11/2020 - 17:15
Very Nice modification. Two…
Very Nice modification. Two thumbs up! May I please ask you for the dimensions of the shed?
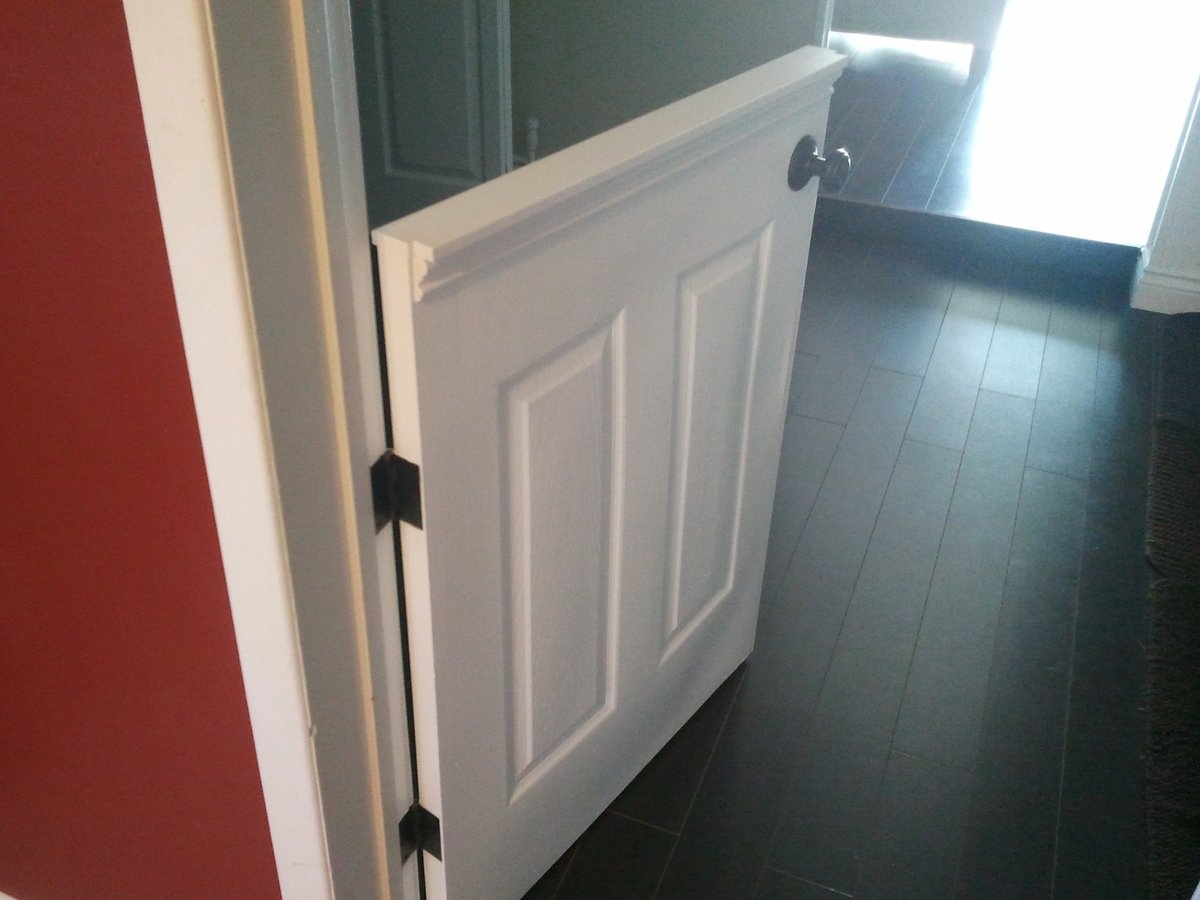
Doggy Door or Baby Gate
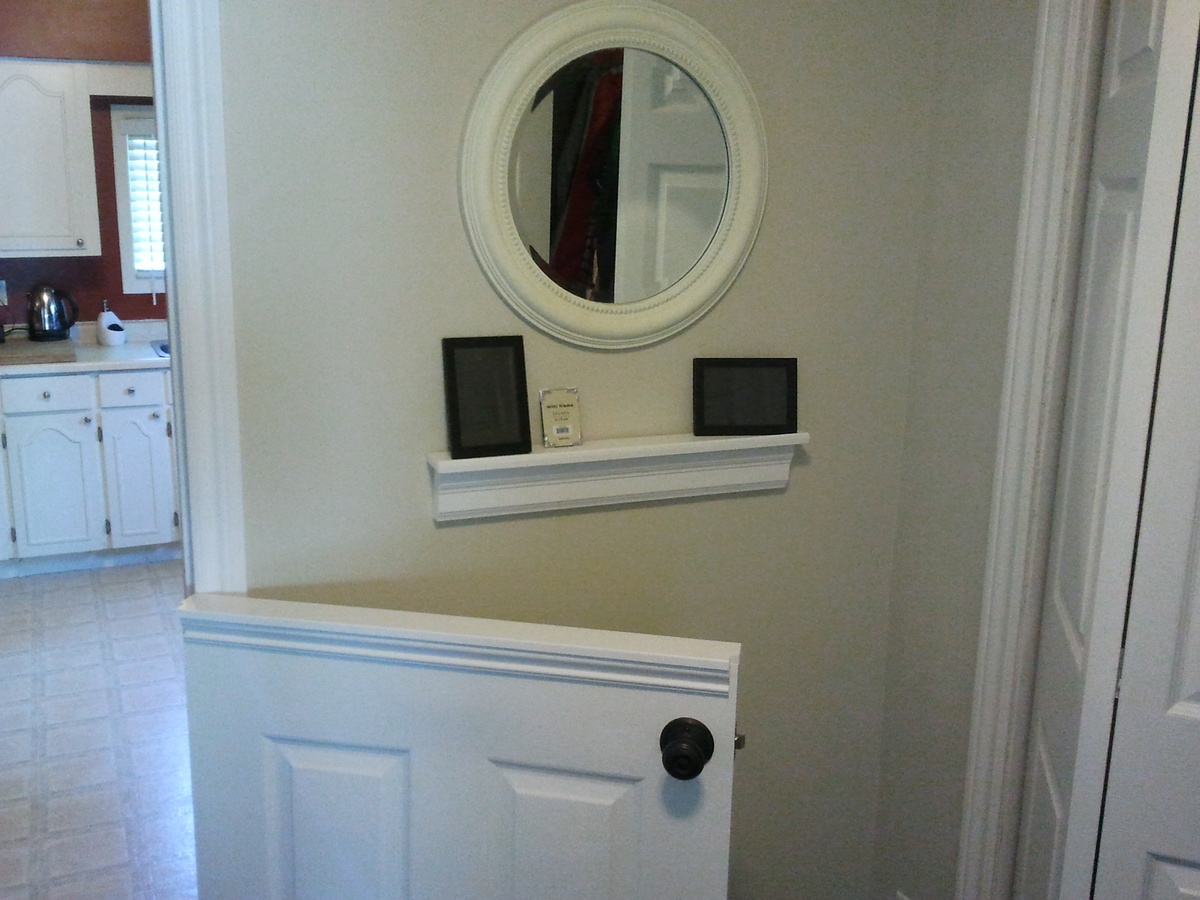
I installed a half door to isolate our dog from the laminate flooring when he sleeps at night.
It was only $25 for the hollow core 6 panel door from HD, which got cut in half.
$25 for the passage knob.
$10 for top plate and trim
Less than $5 for the hinges.
Not having to replace the laminate flooring priceless!
Some Tips:
The $25 door is not prehung. Buy the $14 dollar irwin door jig to install the door "http://www.homedepot.ca/product/door-lock-installation-kit-carbon/904157" It will come in handy if you are remodeling and installing new doors to replace those old flat panel doors. You will also have to chisel out the hinges.
When installing and marking the hinge locations in the door frame shim the door a 1/4" off the floor.
Estimated Cost
$65 materials + $15 jig = $80
Estimated Time Investment
Day Project (6-9 Hours)
Finish Used
White paint
Recommended Skill Level
Intermediate
Comments

Modern Adirondack Chair
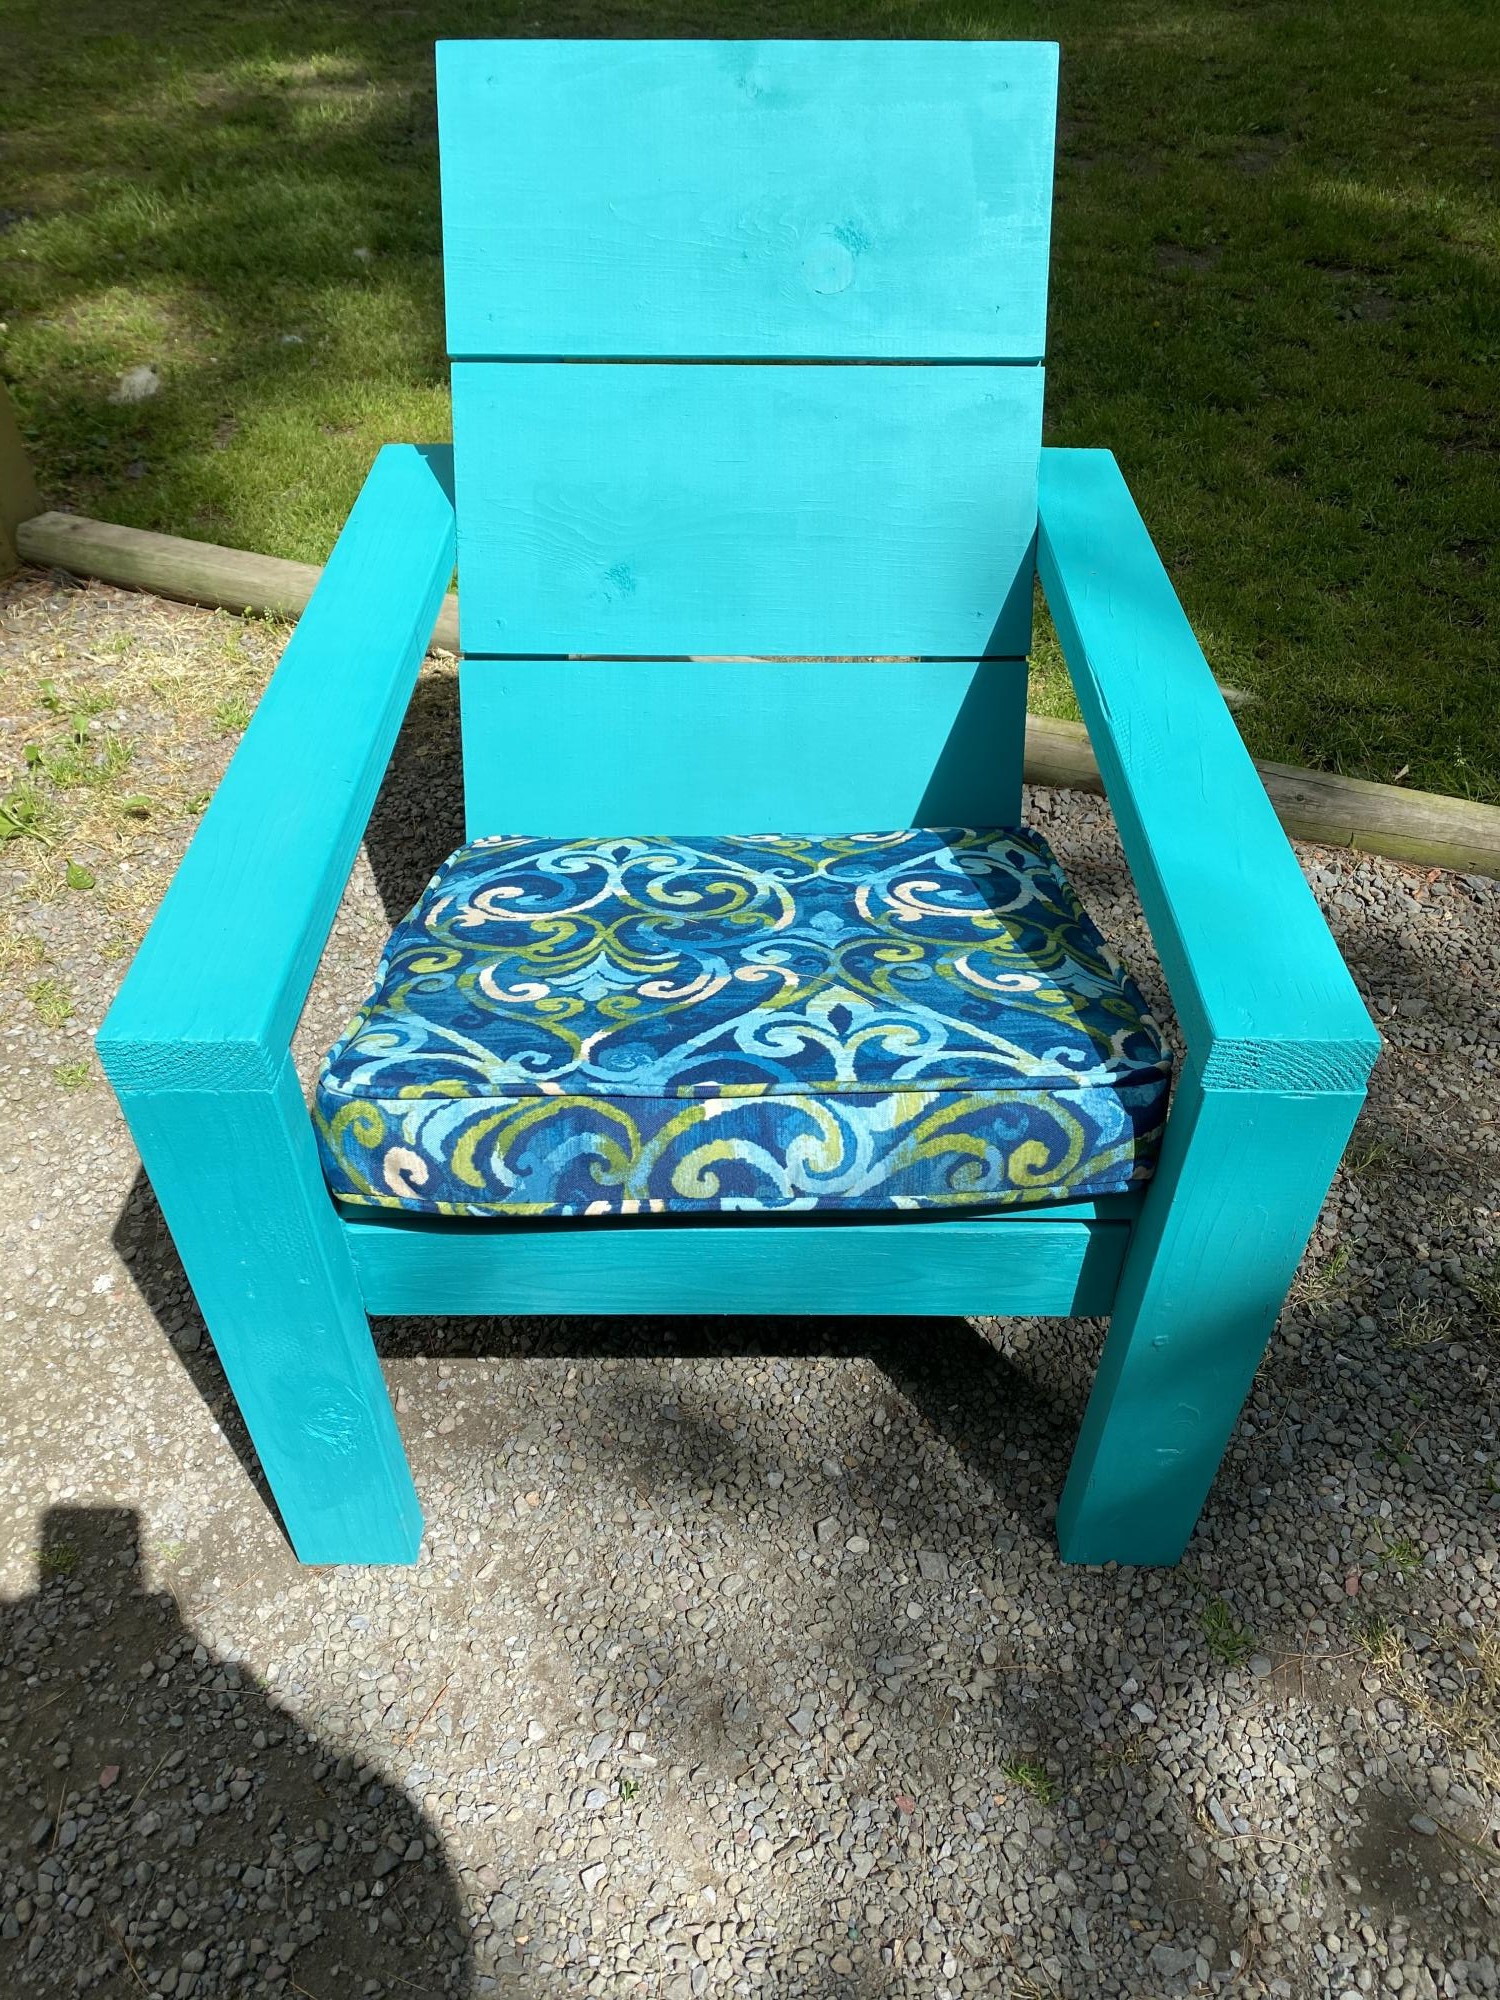
Just made a set of your modern Adirondack Chairs. Fun and easy project. Finished with Benjamin Moore Arborcoat solid stain in Aruba Blue for a nice beachy look and weather protection. Added a cushion from Lowe’s and enjoy. Thanks for the great plans.
Estimated Cost
$50 with cushion
Estimated Time Investment
Afternoon Project (3-6 Hours)
Finish Used
Benjamin Moore Arborcoat solid deck stain
Recommended Skill Level
Intermediate
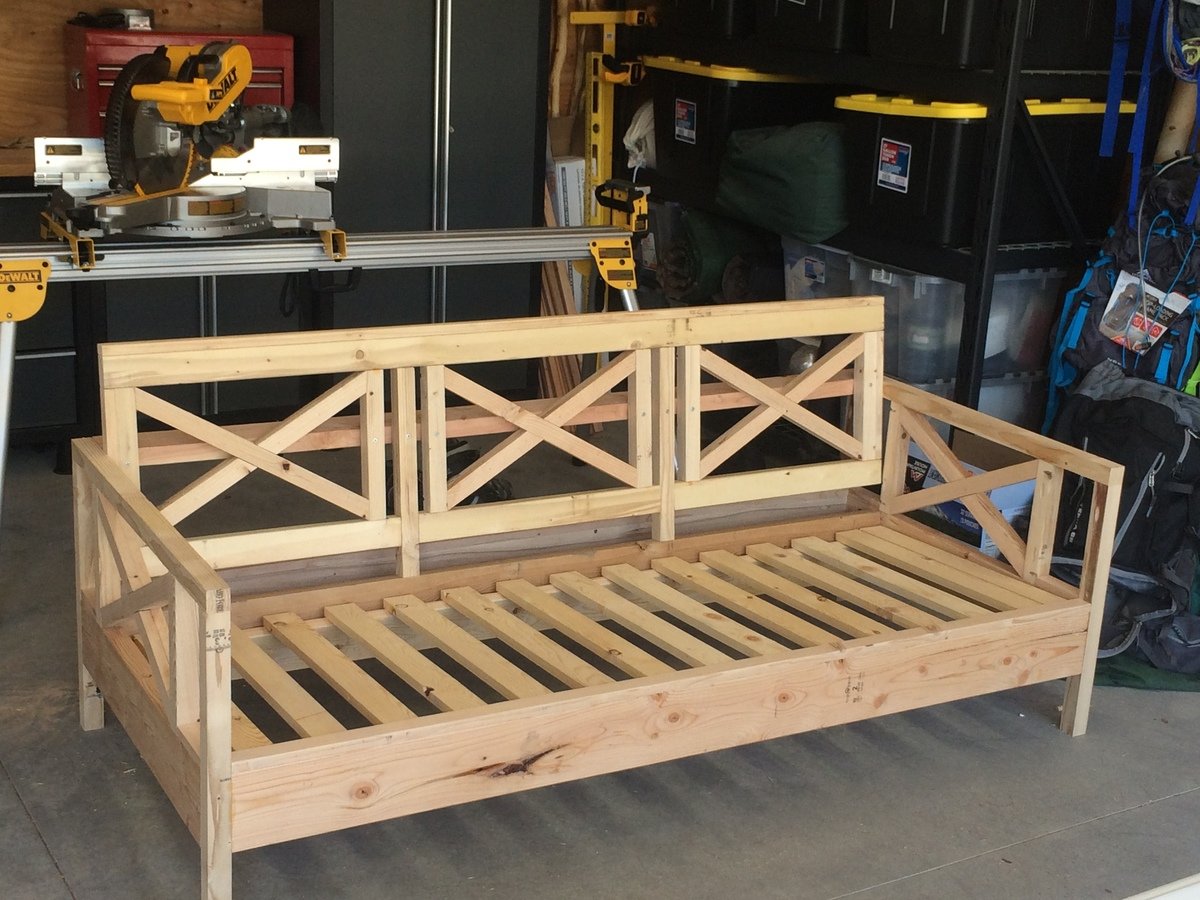
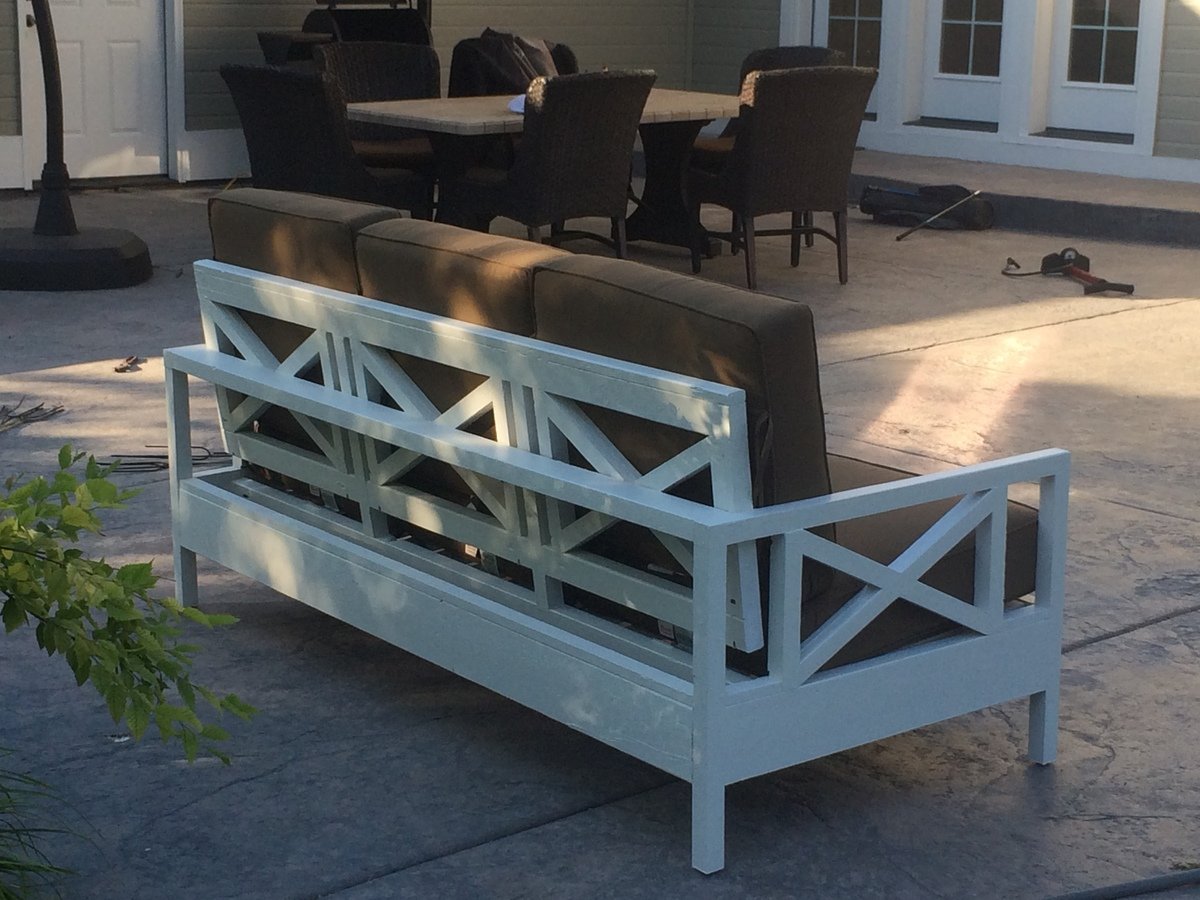
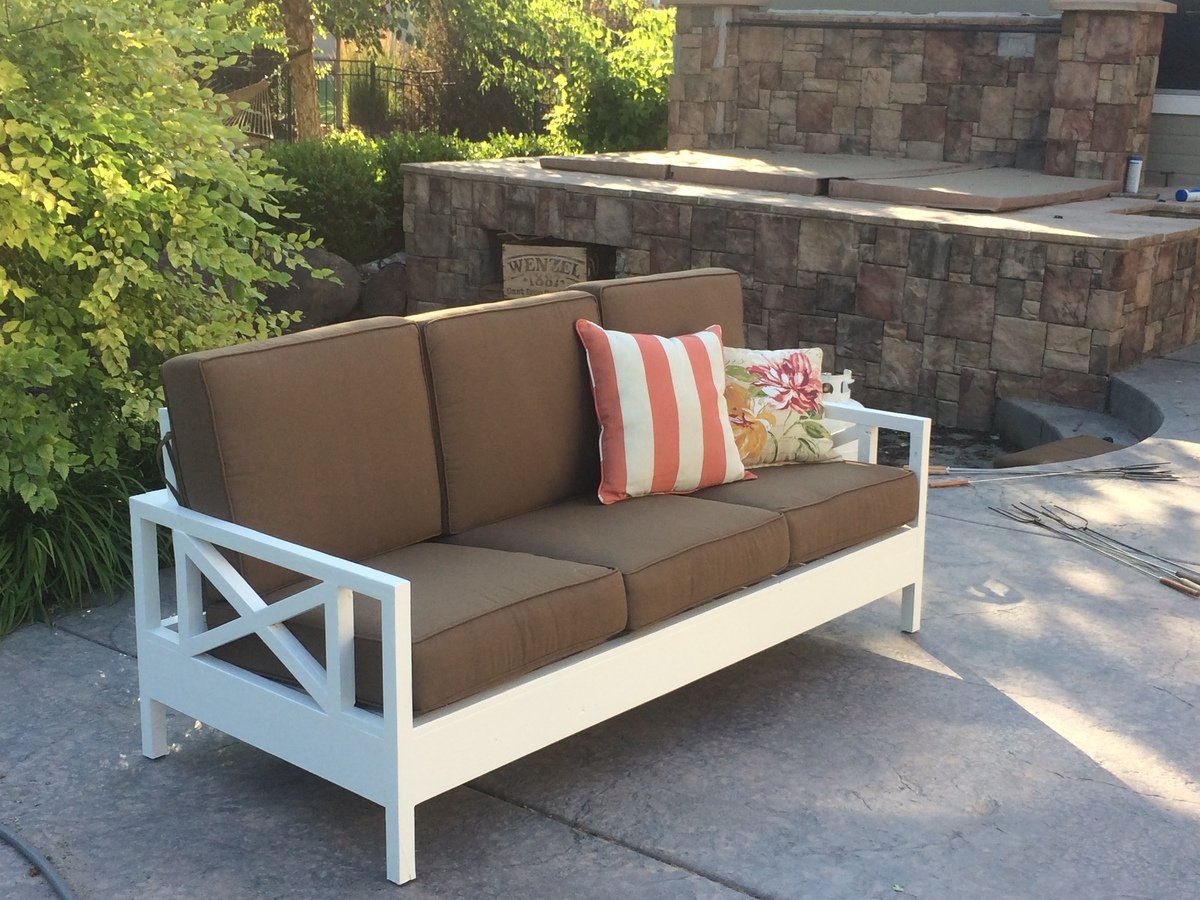
Weatherly Sectional
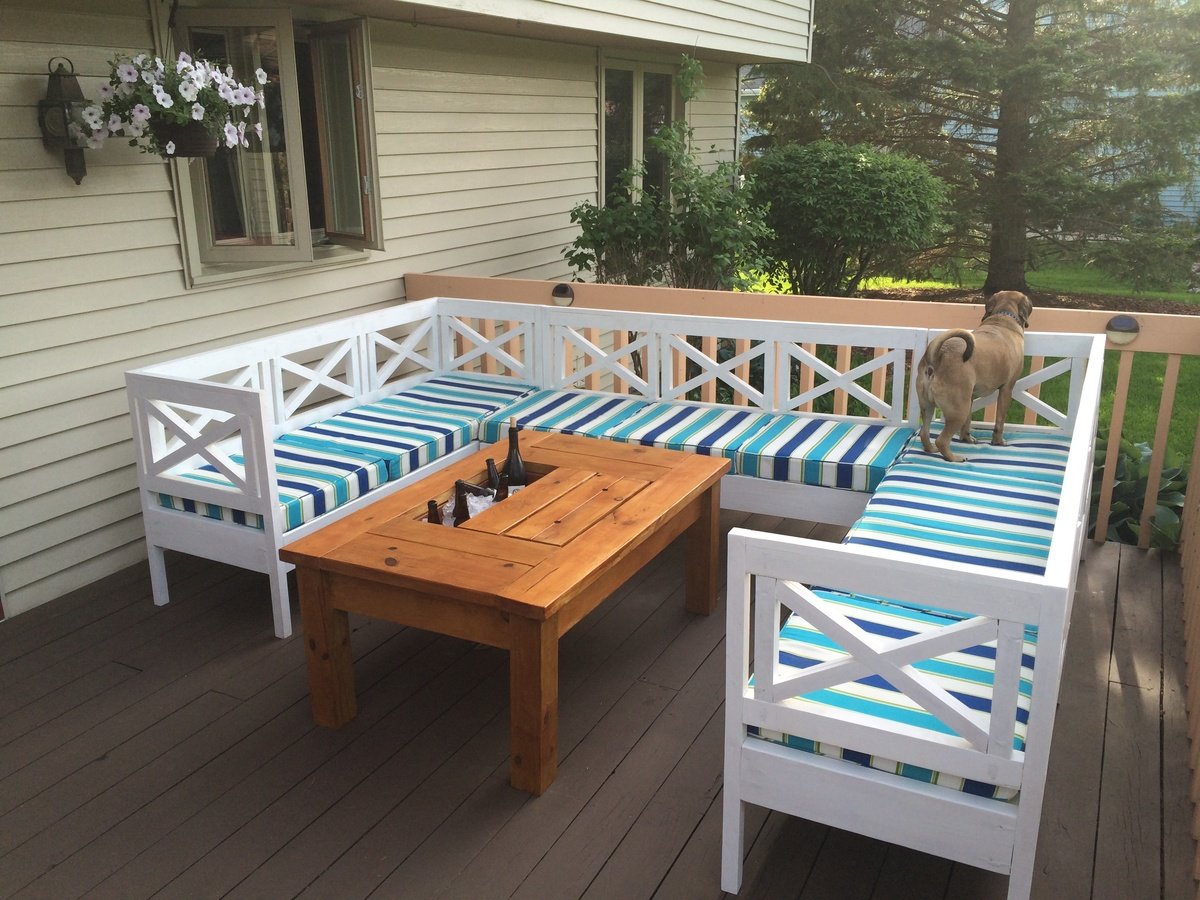
For whatever reason, right before spring, Pier One had these $45 cushions on clearance for $11.13. It took us trips to 4 different stores to collect all the cushions, but we had a new patio set for our new house (minus the sofas). As such, I modified Ana's plans to accommodate the smaller size of the cushions (22x22). Then, I used the savings from the cushions to justify buying a new table saw. It took a while to buy and cut all the lumber, kreg-jig everything together, fill all the holes, sand, seal all the wood, etc., but the work was well worth it. Nearing completion of this project, I built the pictured modified cooler coffee table to ensure that no guest ever has to get up from their seat for any reason during a summer barbeque.

Built from Plan(s)
Estimated Cost
Lost track, but probably about $200-$250, including clearance cushions
Estimated Time Investment
Week Long Project (20 Hours or More)
Finish Used
Behr Solid Color Waterproofing Wood Stain in White
Recommended Skill Level
Advanced
Comments
Tue, 06/10/2014 - 08:01
Thanks!
Thanks ILoveDIYing! It's funny because I noticed the modified rectangles daybed project that you posted last night, and based on your awesome job, I wondered to myself whether I tackled the right project. All the "X" cuts on the back of the weatherly couch get a little tedious, but it is well worth it after you finish. One piece of advice (which I picked up from other commenters) if you do build the weatherly (which I forgot to mention above) is to create a slight slope for slats underneath the seat cushions from front to back. Otherwise, the couch is a little too upright for comfort.
Tue, 07/15/2014 - 02:07
I built a similar version of this sectional.. Can I post pics?
I actually built (2) 45" love seats similar to this design, a 90" daybed with same backrest design and a two-seat bench with table in between to create an outdoor sectional... Would love to share the pics but I don't see a way to attach the file?
Tue, 07/15/2014 - 02:10
Pics for brags
I couldn't see how to add pics for brags so I made my profile pic the pic of the sectional I wanted to share... If I'm missing something on how to share the project pics can someone, heeeelp lol
Wed, 07/16/2014 - 13:40
Brag posts
Jose, from the small picture you posted, your new white weatherly's look great! To post a brag, way down on the right-hand column, near your account info, there is a link to "Contribute a brag post." When you follow the link, there is a form that allows you to enter info about the project, link to the plans, attach photos, etc. Good luck!
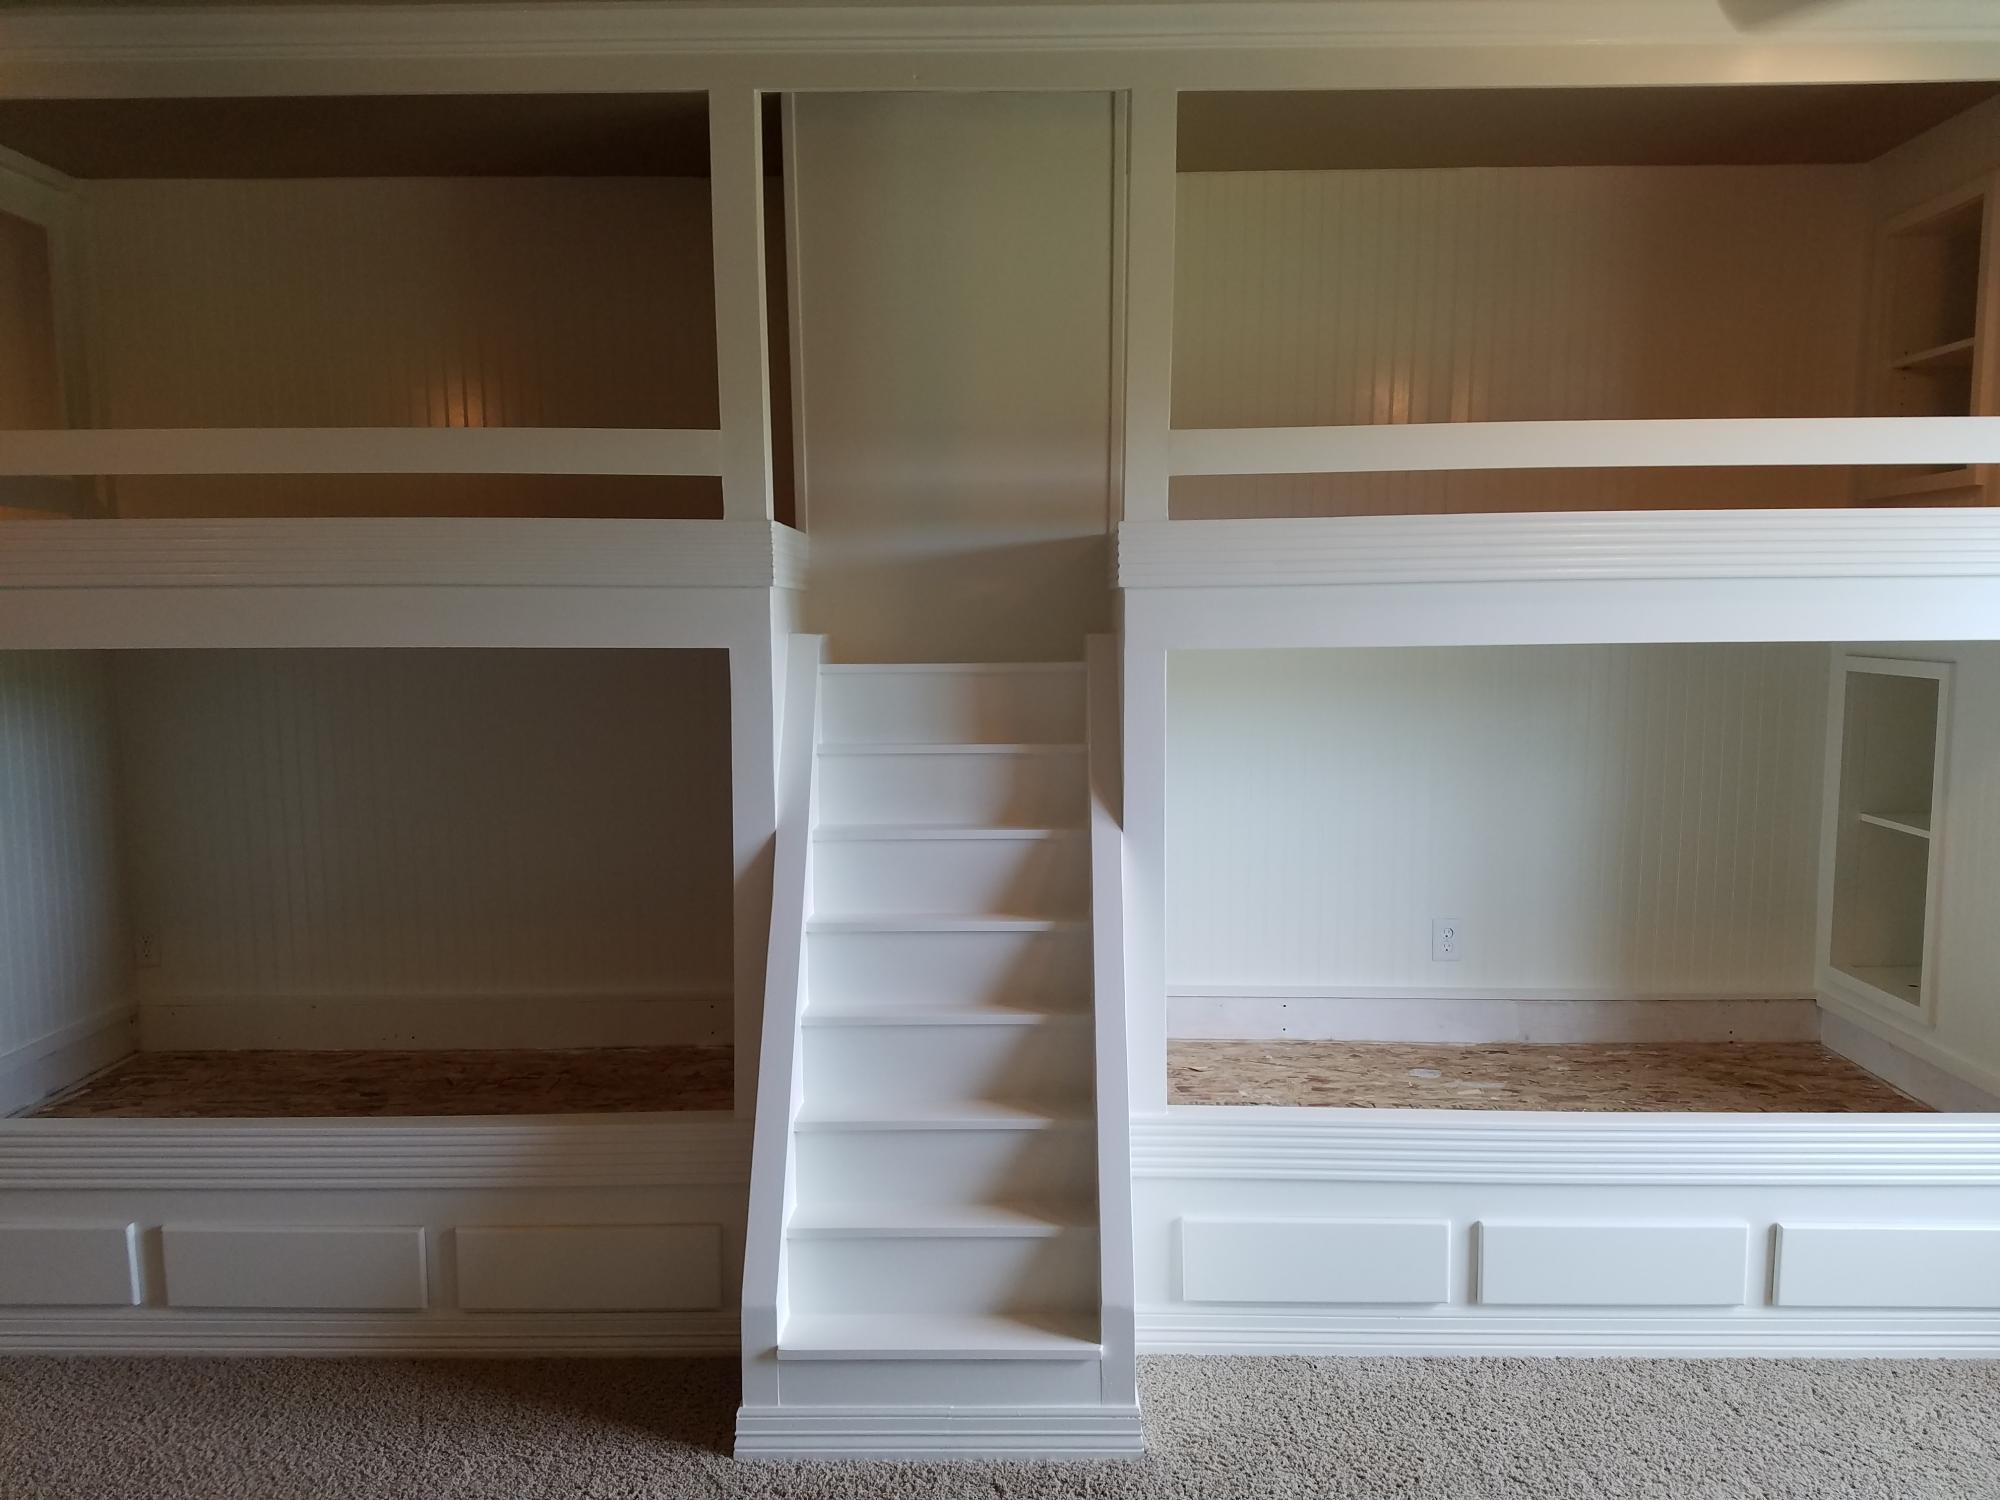
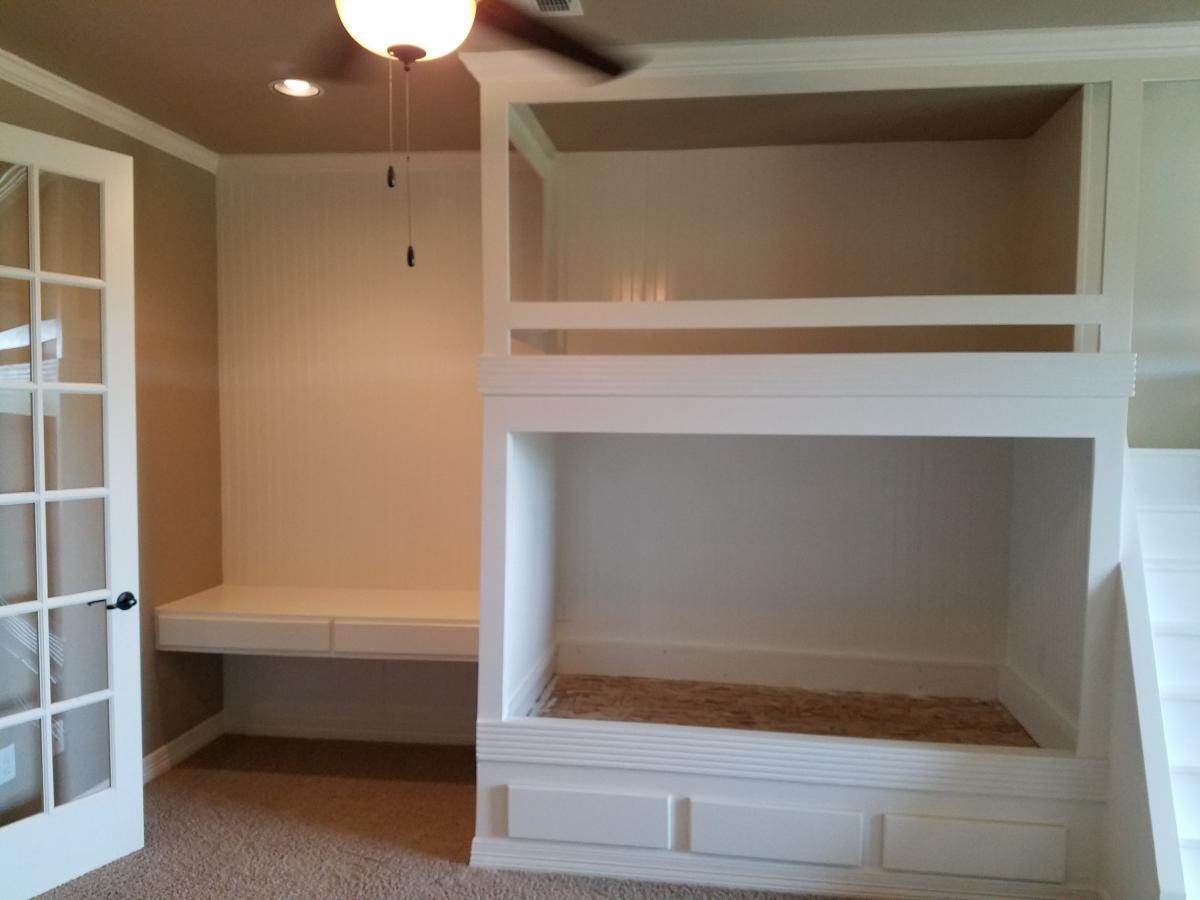
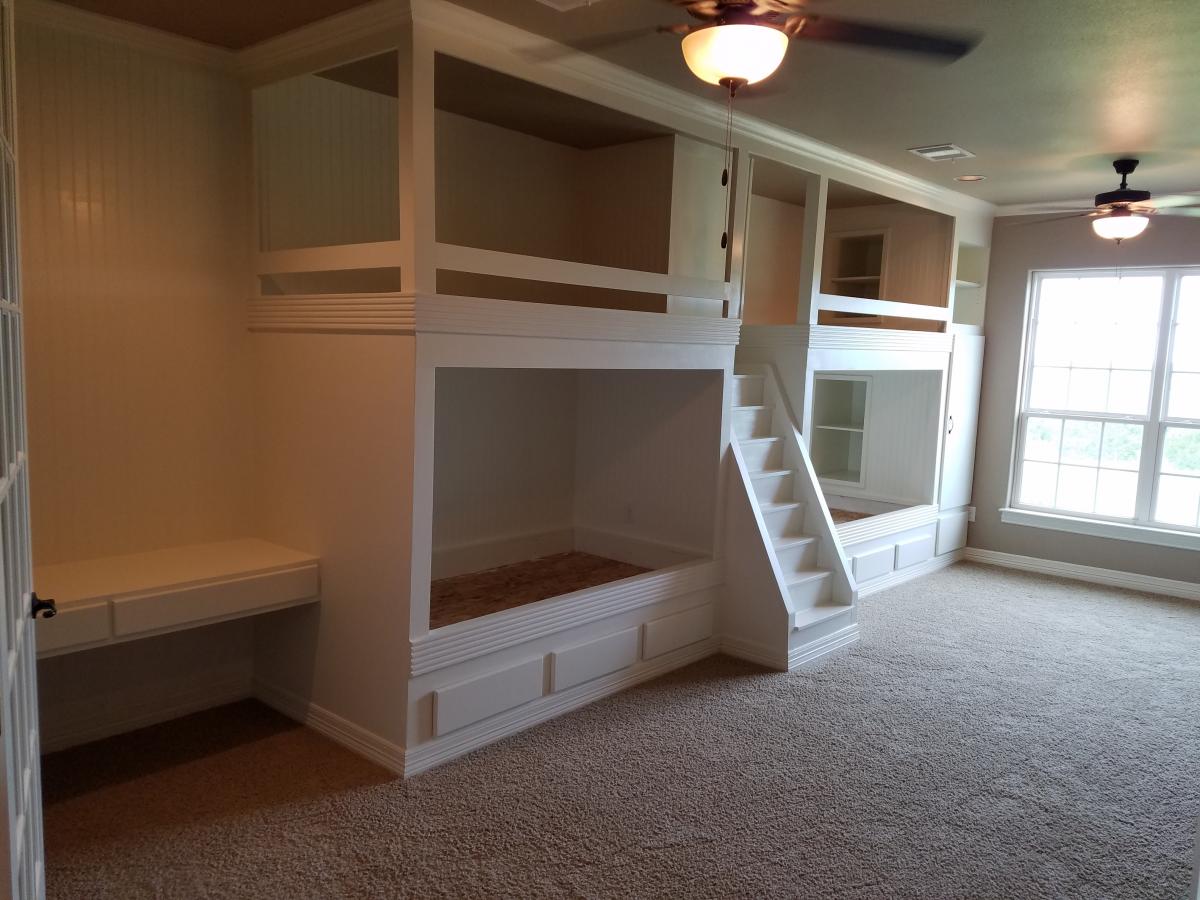
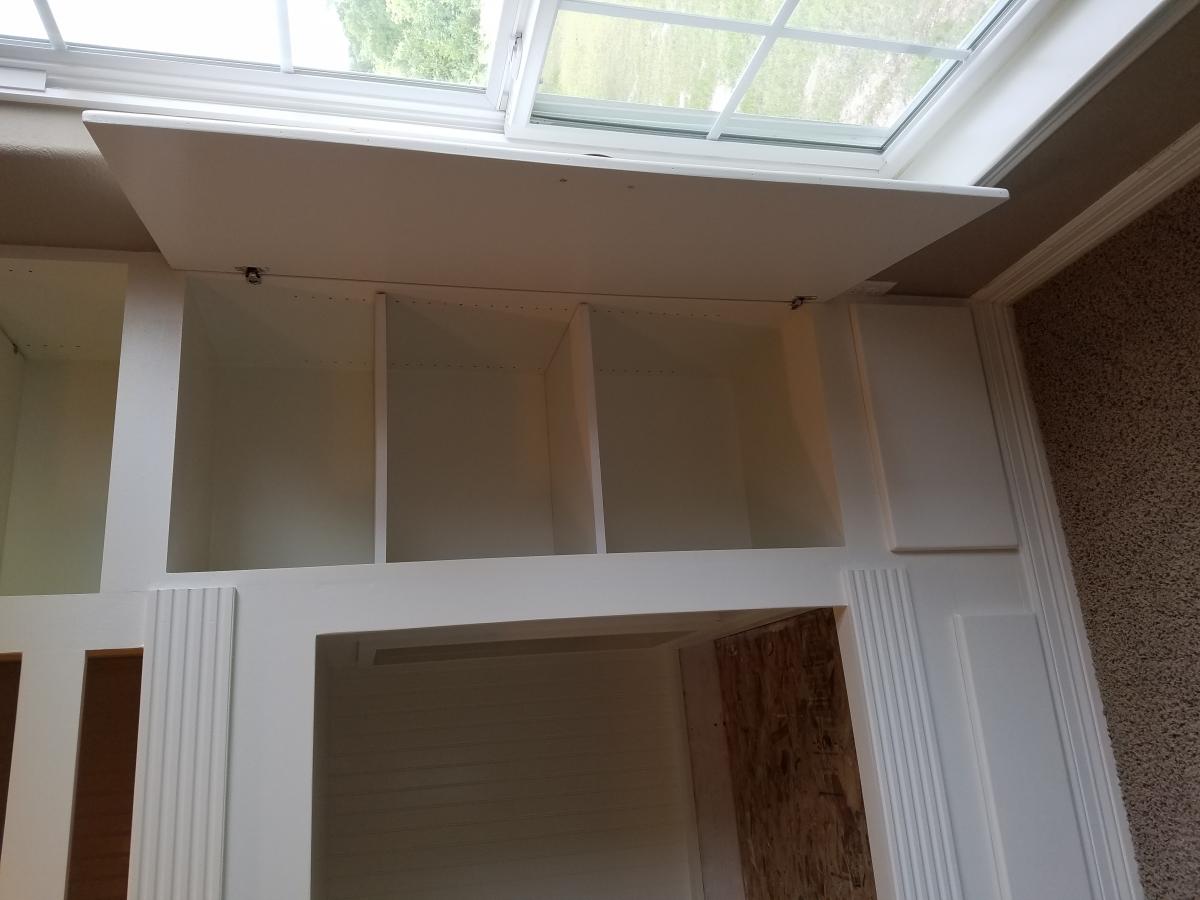
We built our kitchen cabinets and hood!

It took us awhile but we built these white cabinets from scratch. It turned out great and looks better in person. Thank you for your articles!

Estimated Time Investment
Week Long Project (20 Hours or More)
Finish Used
White acrylic latex.
Recommended Skill Level
Advanced
Comments
$40 Funky X Desk
Building the desk was pretty straightforward. I actually saved a little money going with the 2x6s (4 of them was under half the price of a pine project panel) rather than the panel which I actually brought home first. I went with the 2x6s instead because it felt sturdier, and the straightest panel I could find was a little warped (which I didn't want to force).
My biggest piece of advice is, if you don't have a wood planer, DO NOT use a Kreg Jig to assemble the top first. 2xWhatevers just don't seem to "lay" the way you want them to if they're all connected together. I built the legs, added supports and then used glue and 2" finish nails to secure the top, butting them up as close as I could (there's only very minimal gaps, ~1/16 or less) It is SOLID. I filled in the nail holes with Elmer's stainable wood filler. After staining, I used a tiny artist brush with the stain on the filler so it could penetrate a little longer. Worked like a charm!
We decided to go with a color stain on top because it's going in a craft room/office so we wanted it to be bright and fun to get our creative juices flowing. The walls are a light gray so we figured we could afford some color :)
Built from Plan(s)
Estimated Cost
$40 for wood
Estimated Time Investment
Afternoon Project (3-6 Hours)
Finish Used
TOP STAIN - Minwax water based stain in Botanical (on the can it says not to let it penetrate for more than three minutes but that's too long, IMO. I had much better results using a rag and rubbing it in, leaving a wet edge while wiping excess off immediately to avoid blotchiness.)
TOP TOPCOAT: Safecoat Acrylacq in Gloss (LOVE this stuff - and water based, though you can use it over oil based too, after 24 hours)
LEGS STAIN: Minwax oil-based in Dark Walnut
LEGS TOPCOAT: Rustoleum Polyurethane in Matte (like used in Shanty2Chic's post)
TOP TOPCOAT: Safecoat Acrylacq in Gloss (LOVE this stuff - and water based, though you can use it over oil based too, after 24 hours)
LEGS STAIN: Minwax oil-based in Dark Walnut
LEGS TOPCOAT: Rustoleum Polyurethane in Matte (like used in Shanty2Chic's post)
Recommended Skill Level
Beginner
Comments
Tue, 10/21/2014 - 09:08
Pocket Holes for top
I did use pocket hole screws for the top. It wasn't ideal but it worked. I had to use long pipe clamps and two pieces of 3/4in wood strips under the pipes to create flat pressure on the top across the seam. I found that if I din't use the brace the top with the pocket hole screws in the middle would cause it to bow in the center with the ends upward as if I were over tightening. Once I prevented the bowing with clamps and flat boards it came together smooth and flat.
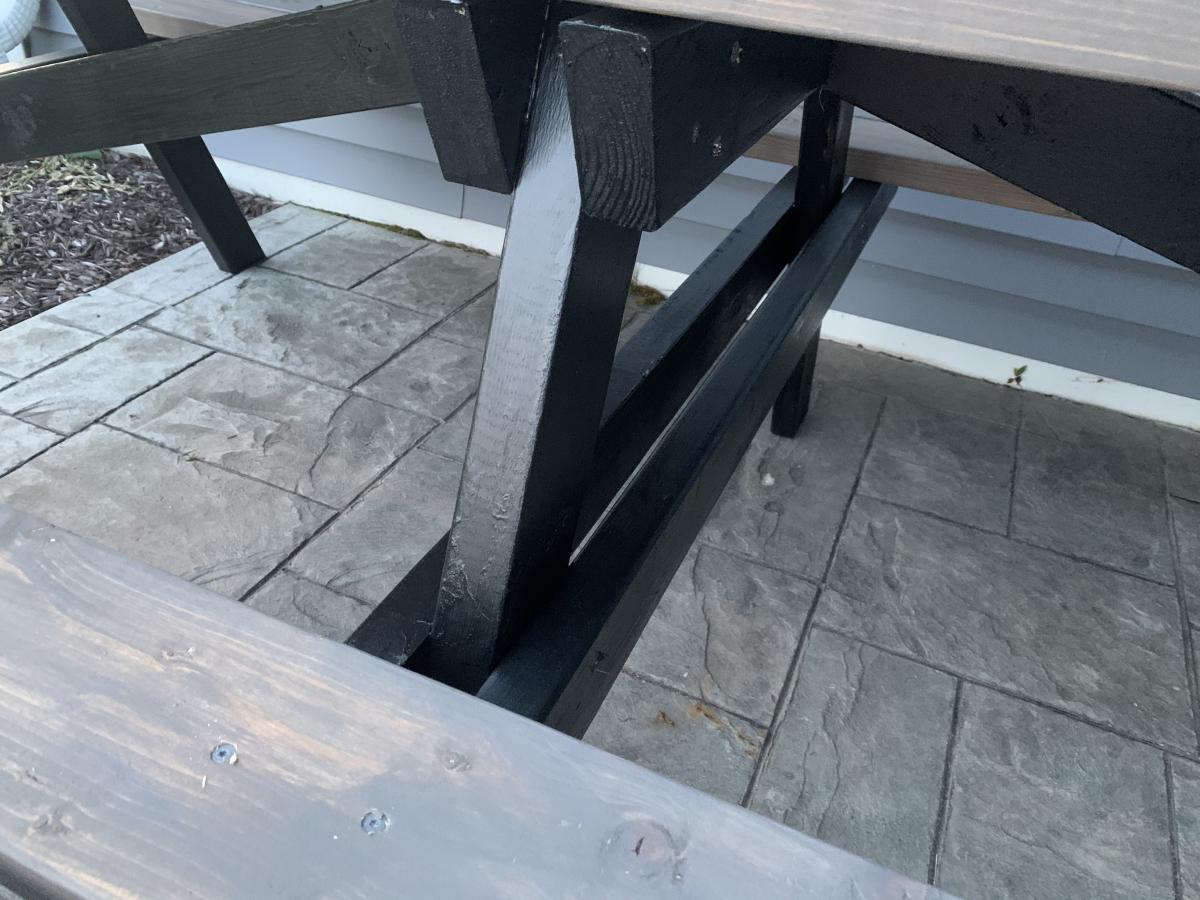
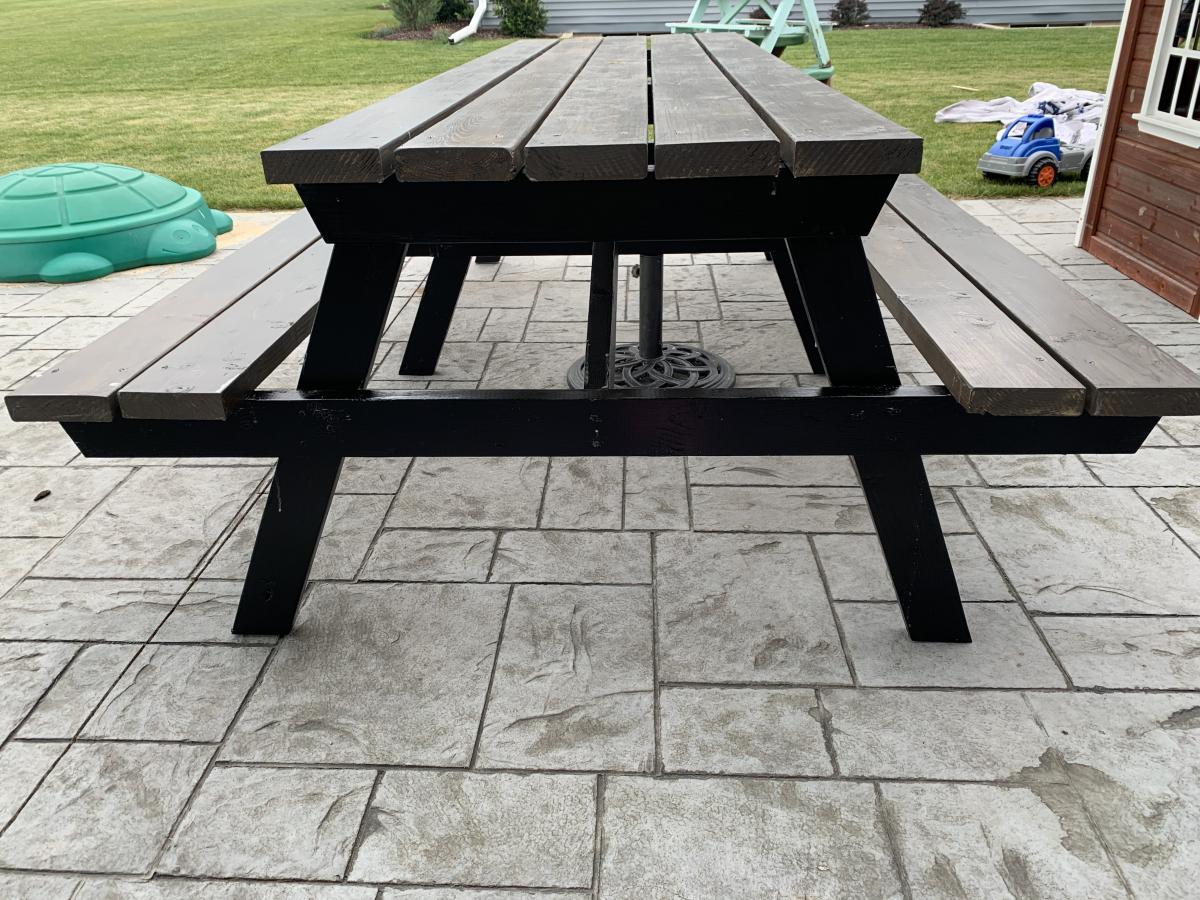
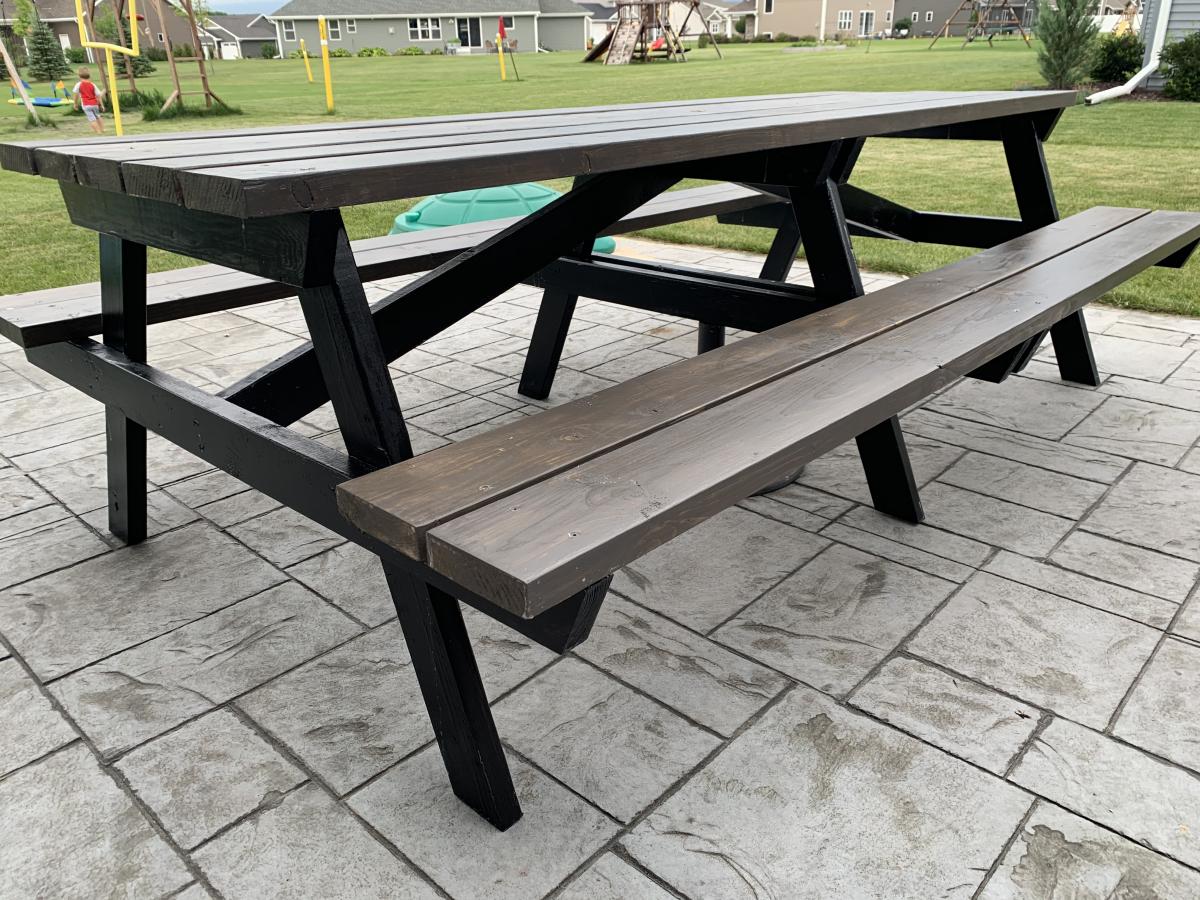
8 foot picnic table
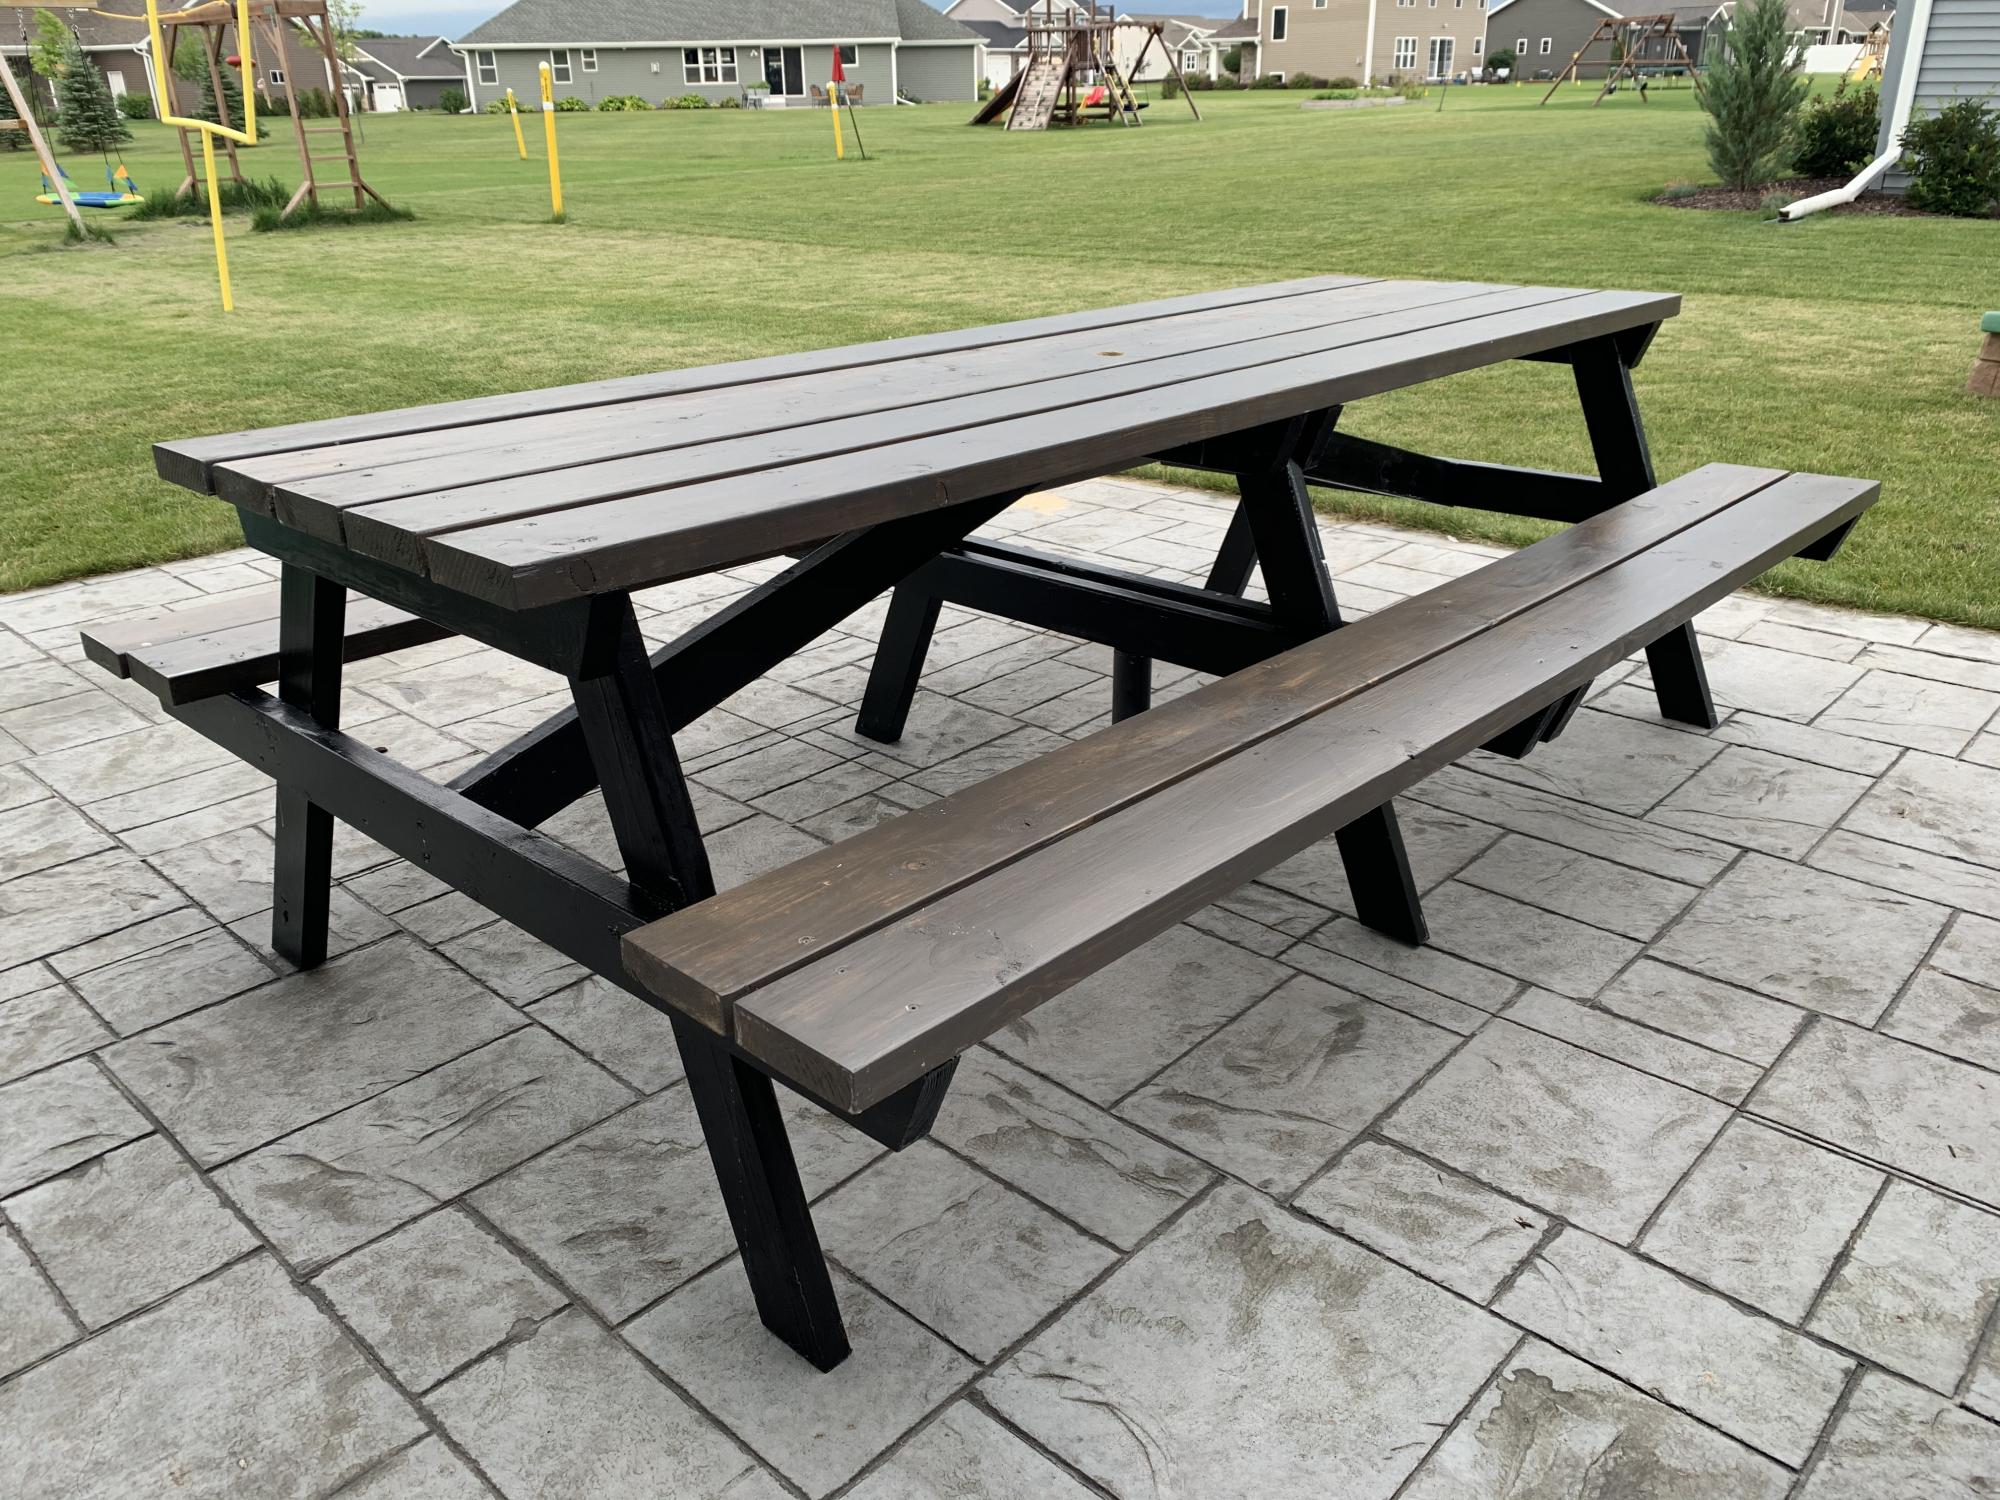
This picnic table was a quick build and turned out amazing. I modified the center base support by adding an extra table top support and seat support board to the opposite side of the center legs to give the table symmetry to accommodate an umbrella hole. I also shortened both cross supports by an inch to make sure the base wouldn’t be longer than the top boards. The space between the center table support boards and seat support boards is the perfect size to fit a standard umbrella. I used a 1 3/4” hole saw to make the umbrella hole. The build and stain/paint took me about 5 hours but additional time is needed to properly seal the table. I used untreated pine. Treated pine may give the table longevity but it would also add a lot of weight to an already heavy table. This was a relatively easy and quick build and is a great size to fit my whole family plus a couple guests! I’m happy with how it turned out and would recommend this build to anyone looking for a budget friendly and simple patio table.
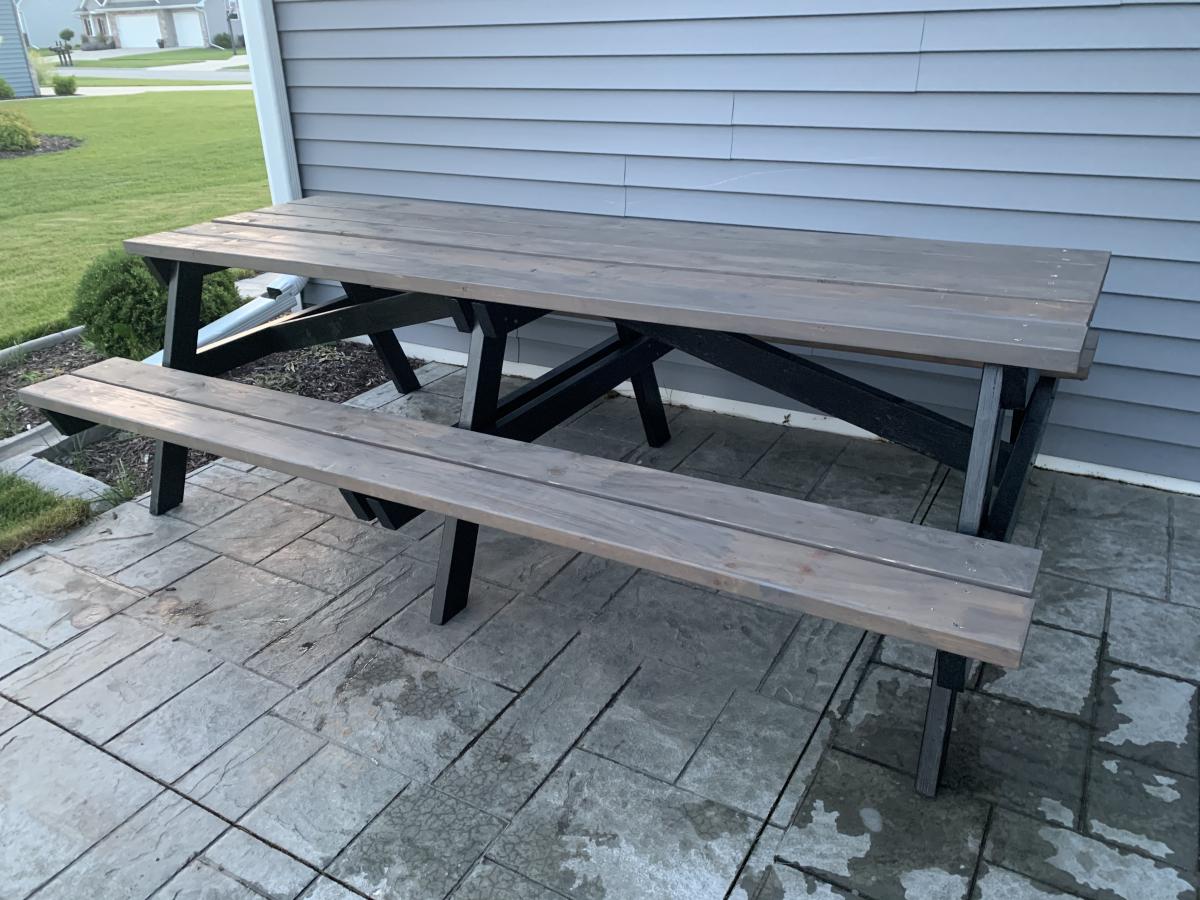
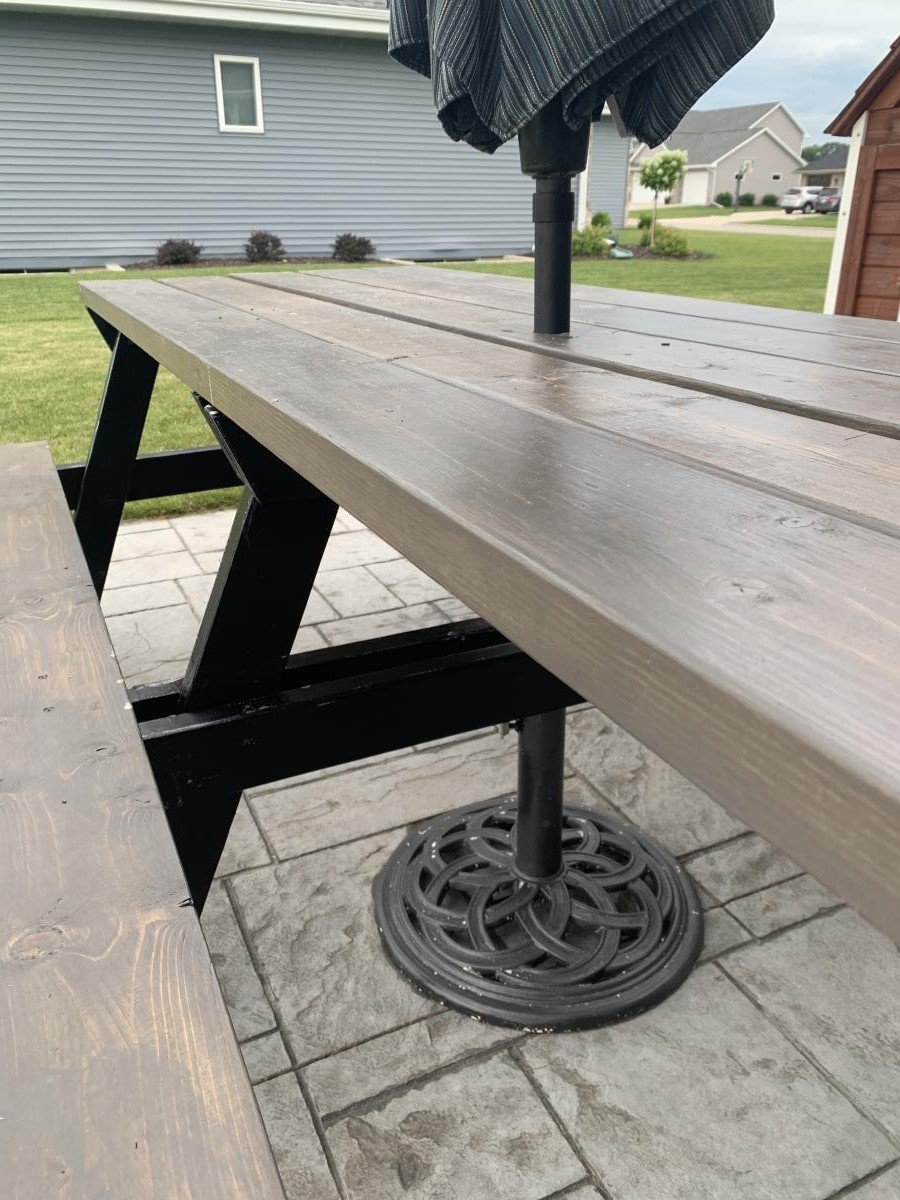
Built from Plan(s)
Estimated Cost
$75
Estimated Time Investment
Day Project (6-9 Hours)
Finish Used
Varathane Briarsmoke for the top and Rustoleum Canyon Black Satin for the base. Sealed with 2 coats of Varathane Helmsman Spar Urethane
Recommended Skill Level
Beginner
Comments

Sat, 07/18/2020 - 13:17
Thank you Abby!!! Your…
Thank you Abby!!! Your picnic table turned out amazing, I love the added umbrella modification!
Doll Bunkbed mattresses
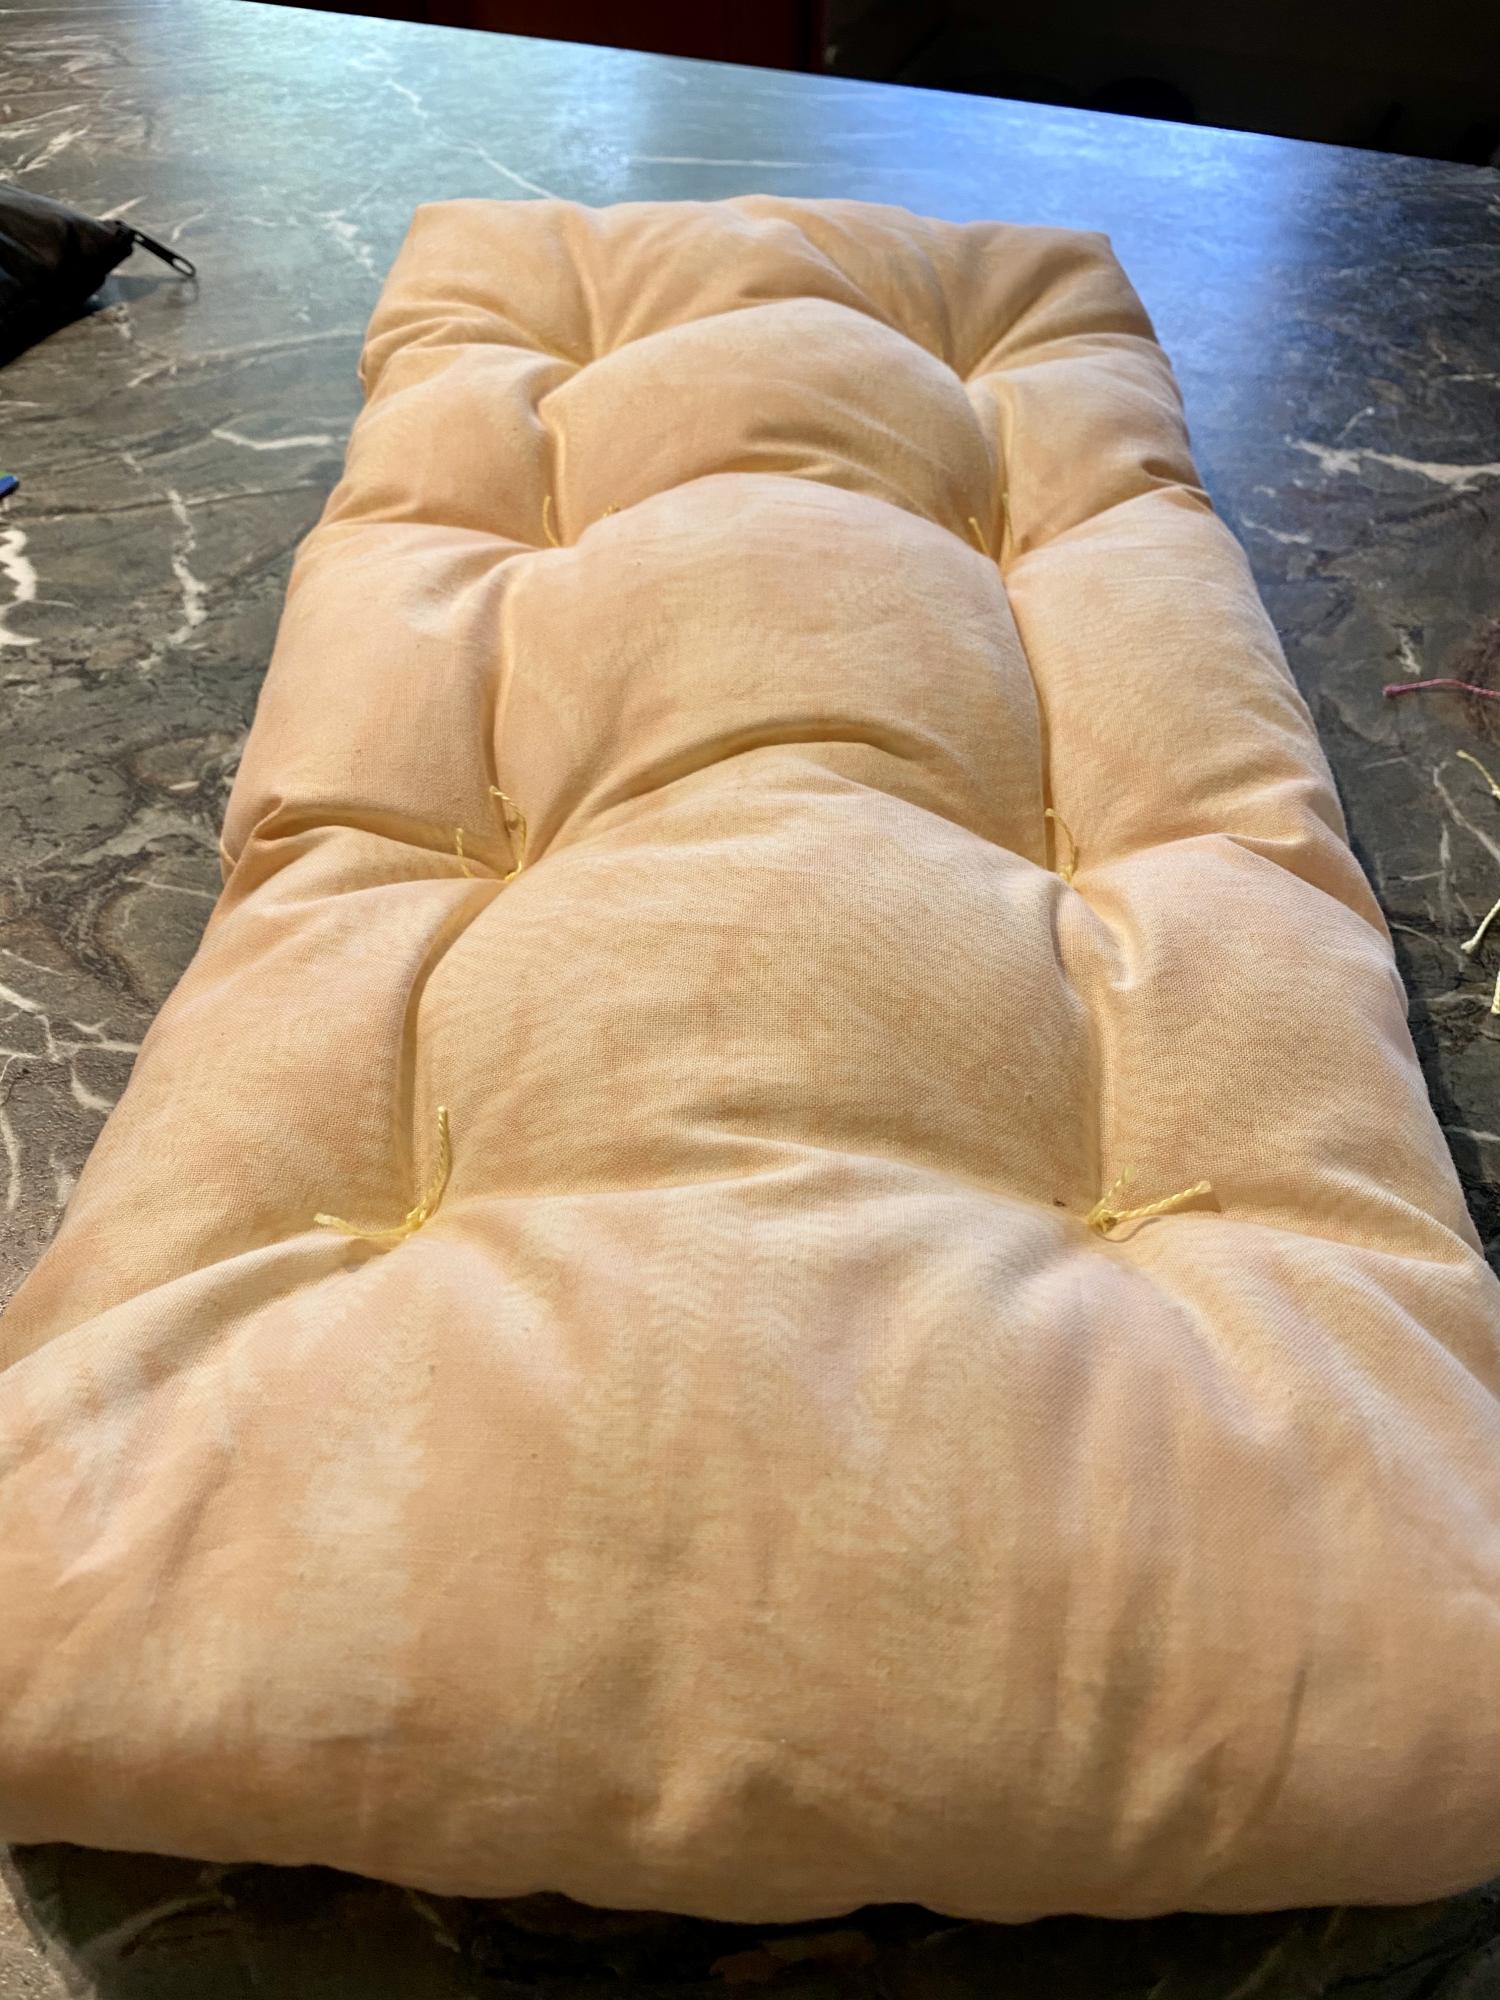
Not a great pic. Made two to go on Bunkbed. Plans were perfect. I did not use buttons as there is a 13 month old eating machine in the house, but instead used heavy craft thread and sewed an X in eight spots, leaving a small tuft of cut thread. Worked just fine.
Built from Plan(s)
Estimated Cost
Zero - already owned materials
Estimated Time Investment
An Hour or Two (0-2 Hours)
Finish Used
n/a
Recommended Skill Level
Starter Project
Kid's Storage Step Stool
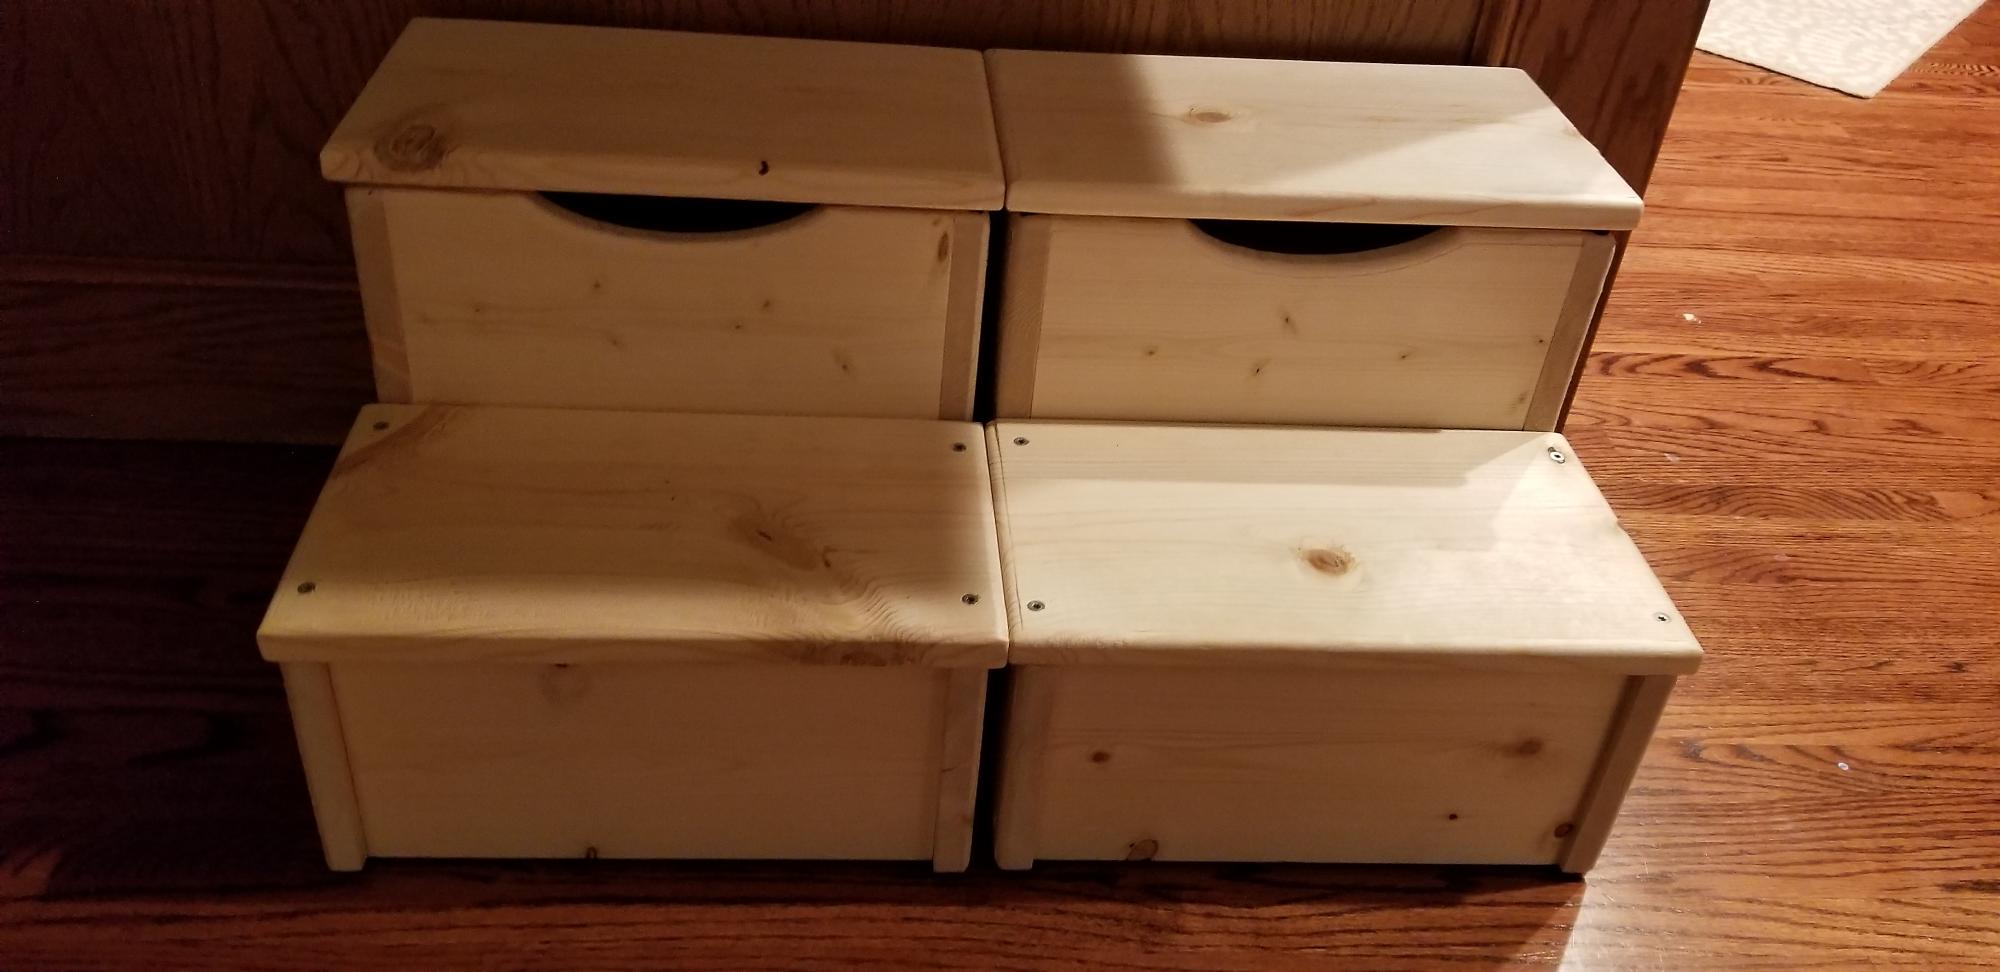
I'm a beginning wood worker enthusiast. I've been slowly collecting plans, tools, supplies and I'm certainly not efficient when it comes to projects- even "beginner" projects like this.
While there's still more finishing to do, I cranked these out over the weekend with a myriad of interruptions - so it's hard to say how long these would really take. I didn't have 12" boards, so glued 1 x 6" pieces together into the shape I needed. Then assembled each with 1 1/4" screws, routed the sides, sanded and cleaned them. The kids will paint them their favorite colors and then I'll put a clear coat on top to finish them up. Once painted and ready, I'll add hands to each side as well as rubber runners to the bottom for stability. These are really nice for toddlers to use while they put on or take off their shoes and put into the storage bin.
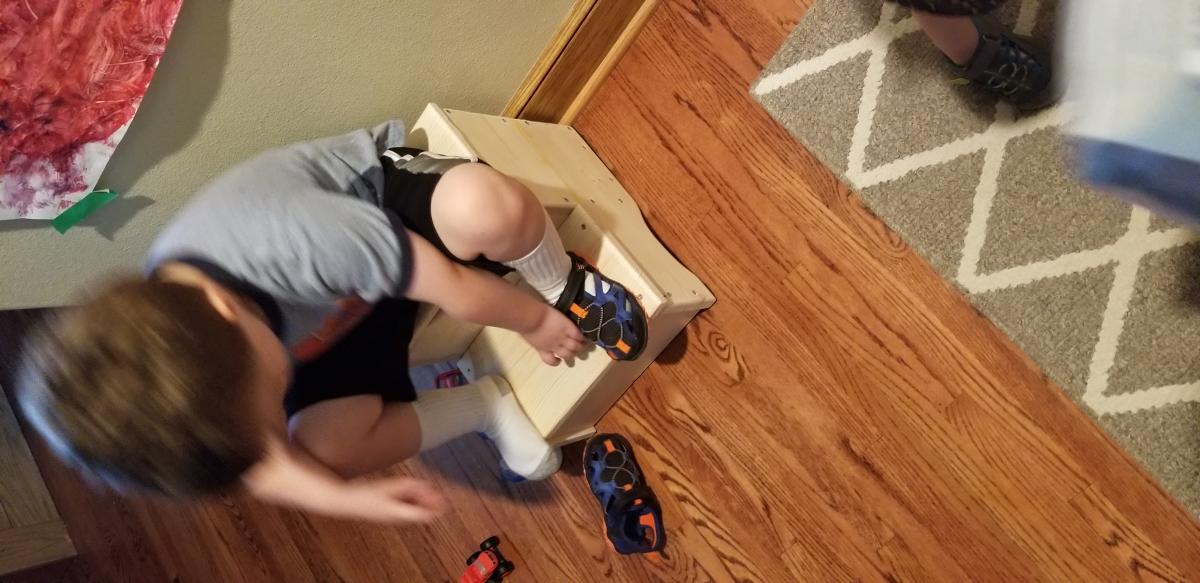
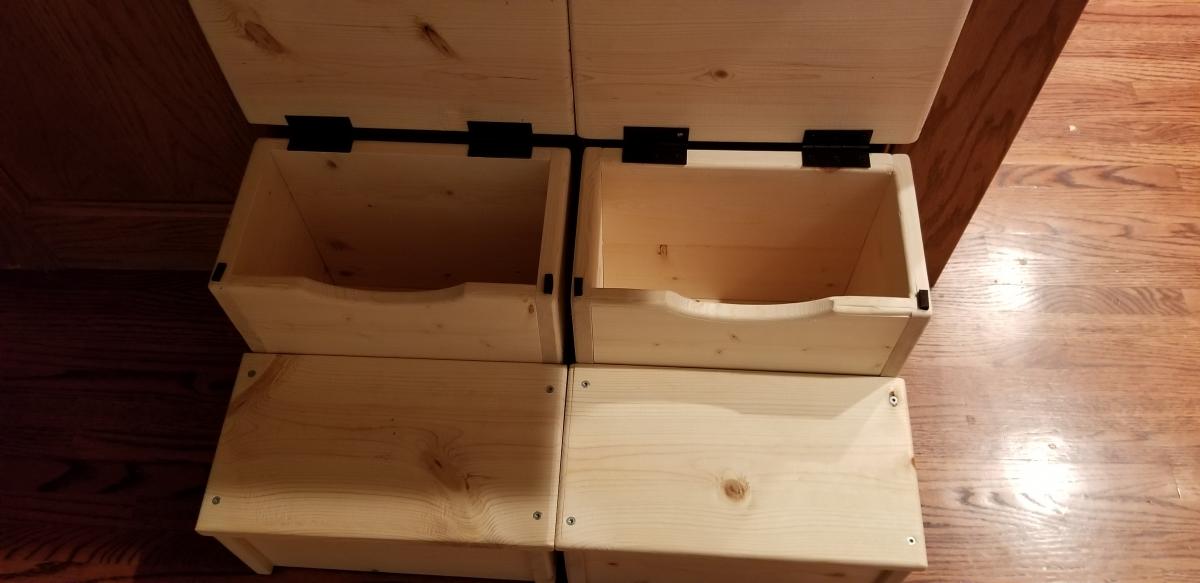
Built from Plan(s)
Estimated Cost
~ $30/stool
Estimated Time Investment
Weekend Project (10-20 Hours)
Finish Used
A few things:
1) Assembly of the stool- I assembled mine by fitting them together and using 24" clamps to hold them in place, adjusting each part so it was square to the other parts (sides to front/back pieces, etc. then pre-drilled and assembled with 1 1/4" screws placed at even intervals. Many of the brag posts look like people glued them together. Wood gluing is great which is often stronger than screws- the wood itself will give way before the glue does, I've seen proof of it. At the time of my construction, I needed to assemble them and use them right away so I opted for screws instead.
2) Adding the hinge- Duct-taping it to test out the best fit works really well, but there are at least 3 ways to attach this:
a) hinge on the inside of both the stool and top step
i) non-flush - allows for a felt stopper to minimize wood to wood noise when closing.
ii) flush - mortise or rout out the 1/8" (or whatever the depth of your hinge is) space for the hinge by tracing the hinge location and using a short depth mortise bit OR using a set of wood chisels- not everyone has a router (I had to borrow one from the in-laws...)
b) hinge on the back side- no mortise needed, but be aware of how far back you want the step lid to be able to go, full or 90 degrees from the start.
c) hinge on the inside of one side- i.e.: have the hinge on the outside of the stool and the inside of the step or vice versa.
3) The finish- Mine is still a work in progress- My kids are going to do a family project day with me and paint them their favorite colors. Once they finish painting (with touch-ups by Dad) I'll finish it with a top coat to seal/protect the paint.
Recommended Skill Level
Beginner
Outdoor Chair with Shou Sugi Ban Finish
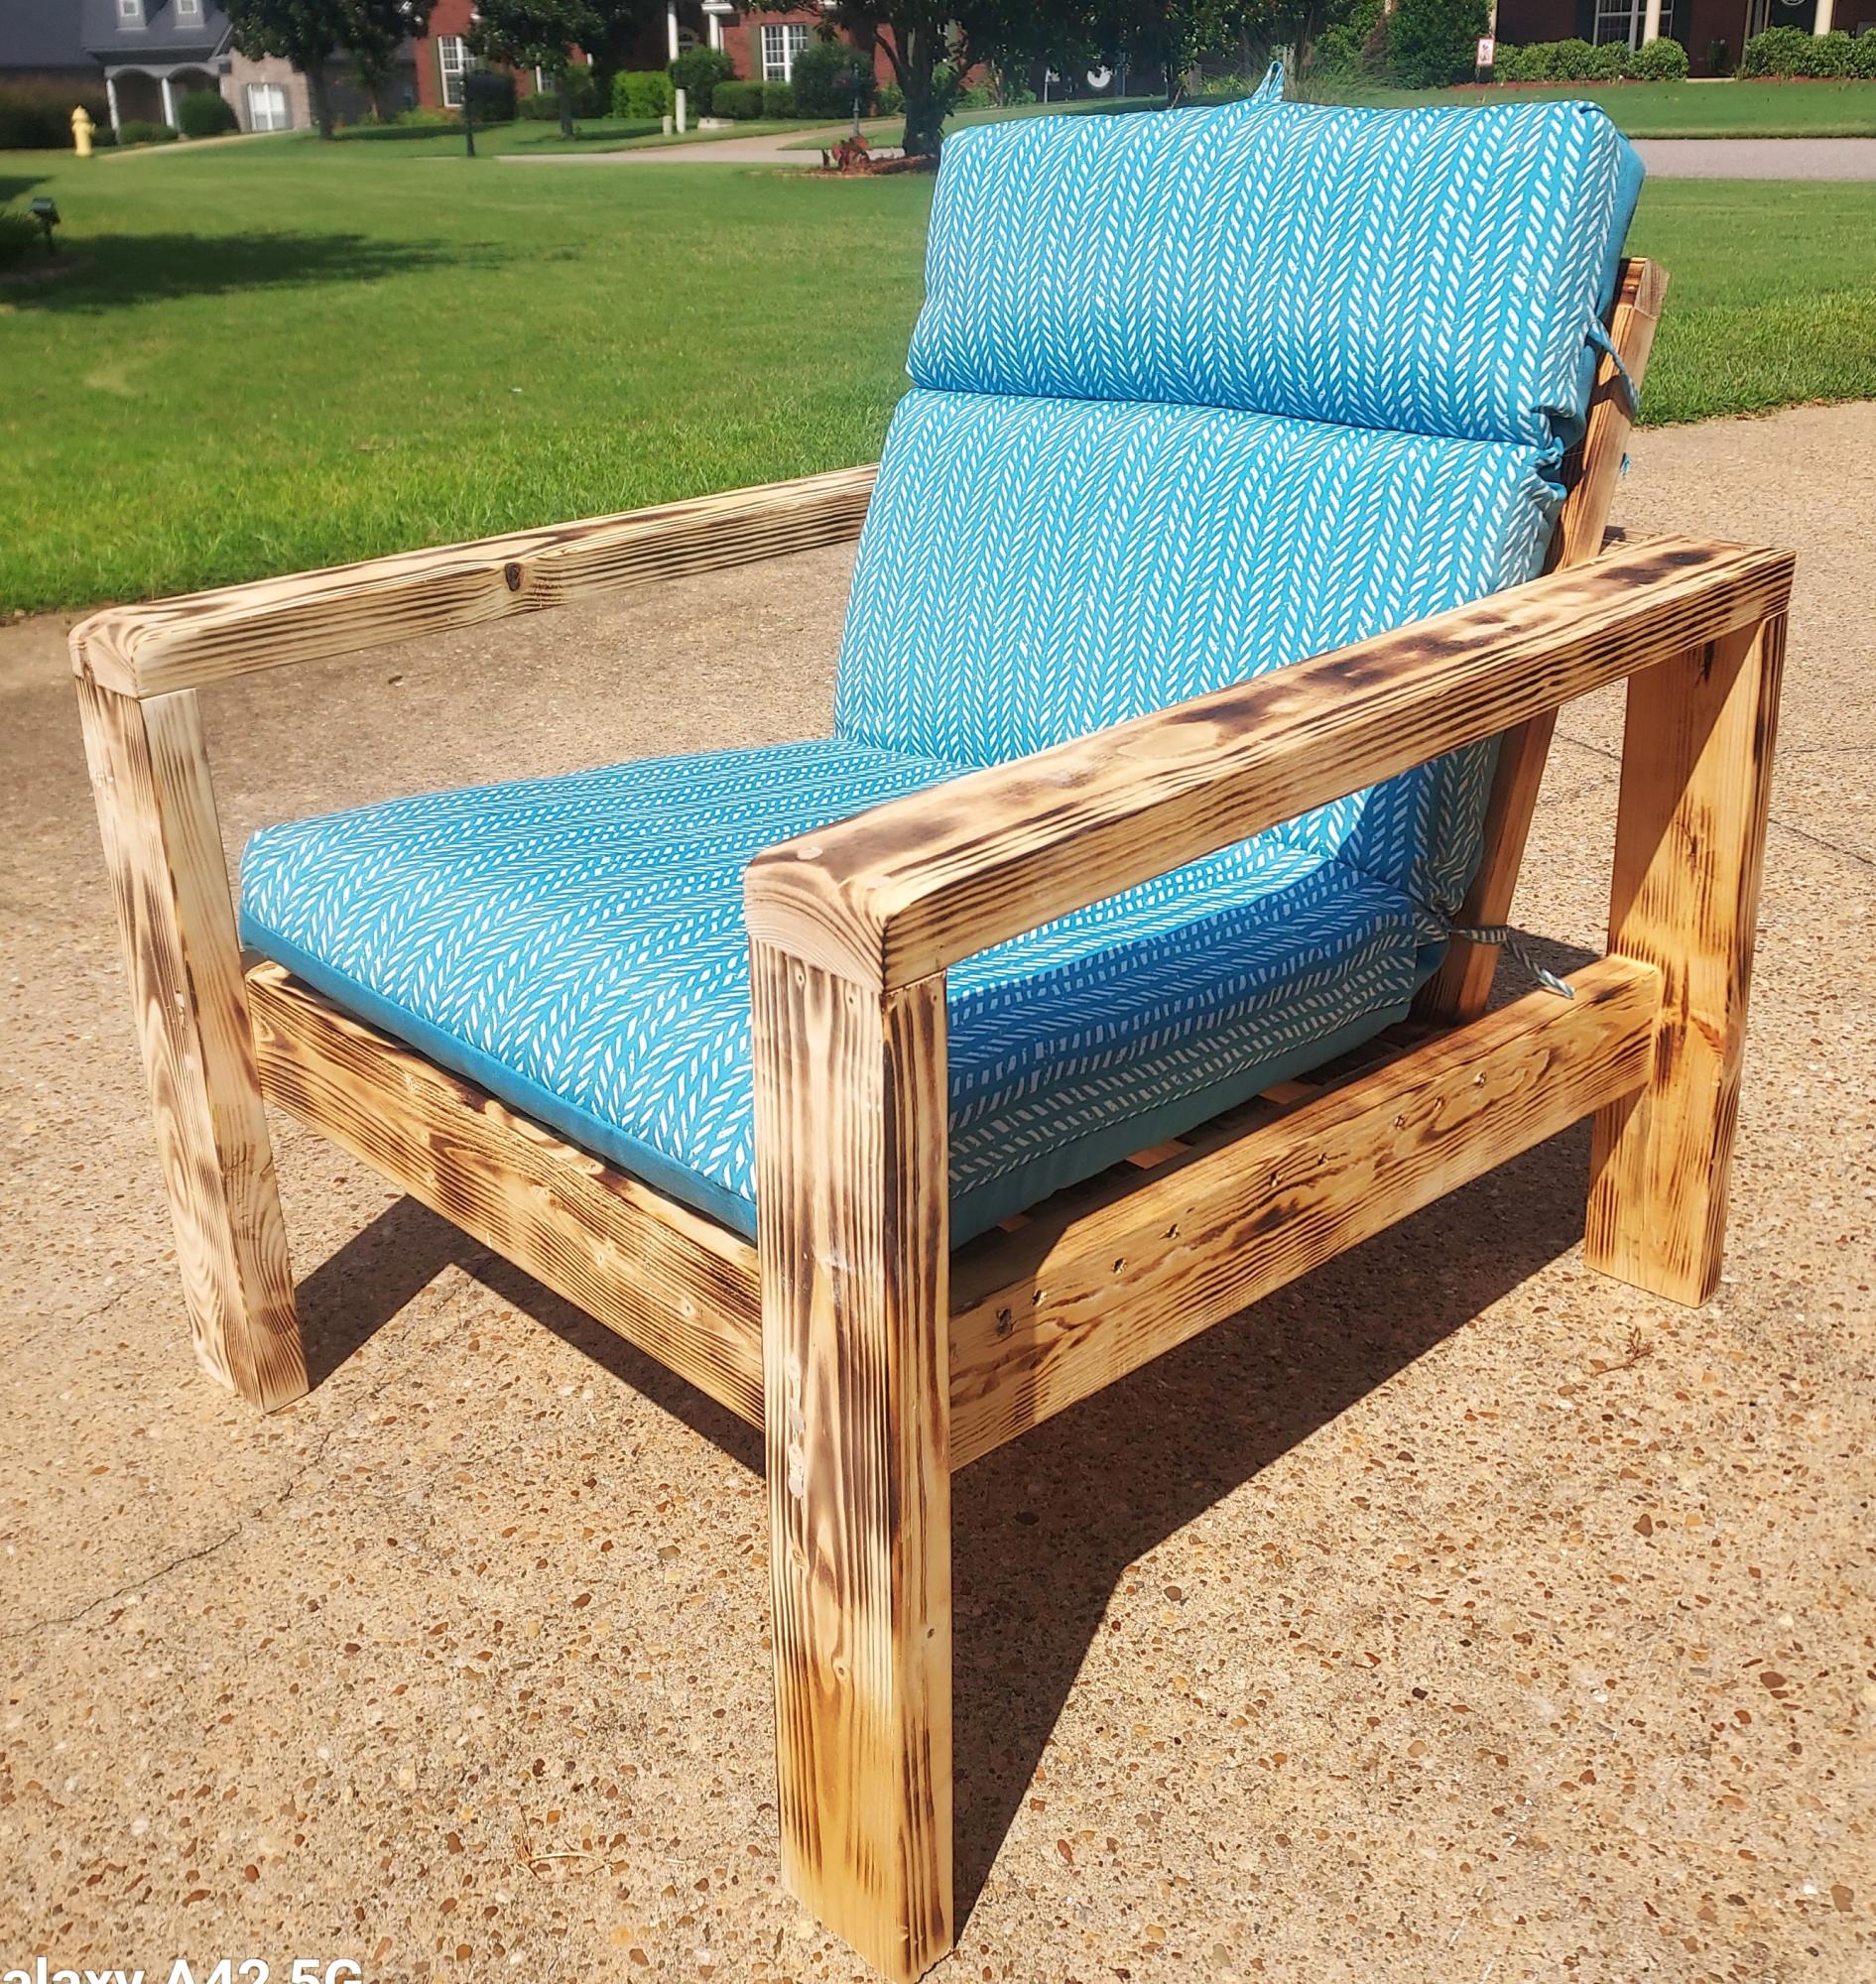
Outdoor patio chair from your collection with torched and polyurethane finish.
Built from Plan(s)
Comments
nscott22
Mon, 03/13/2023 - 18:24
Great Job
Great Job