Community Brag Posts
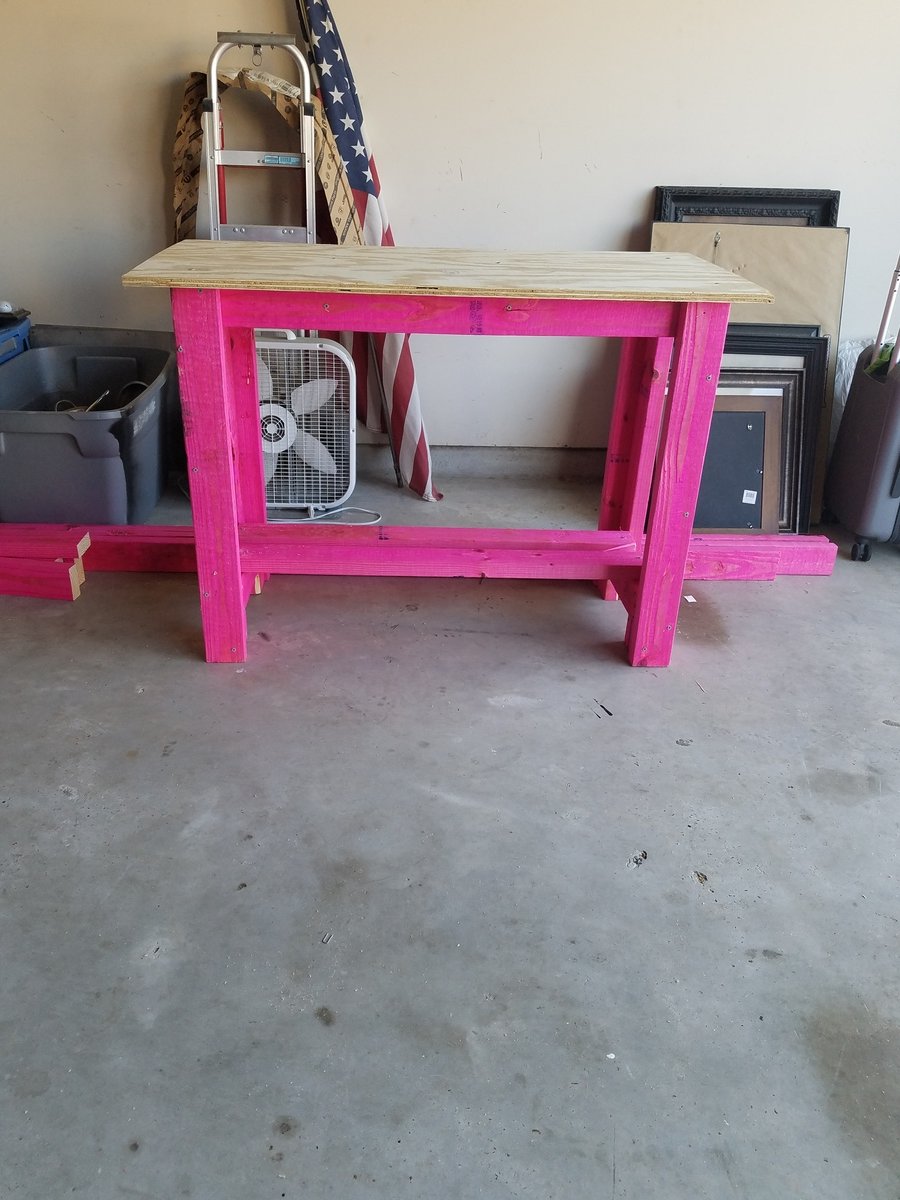
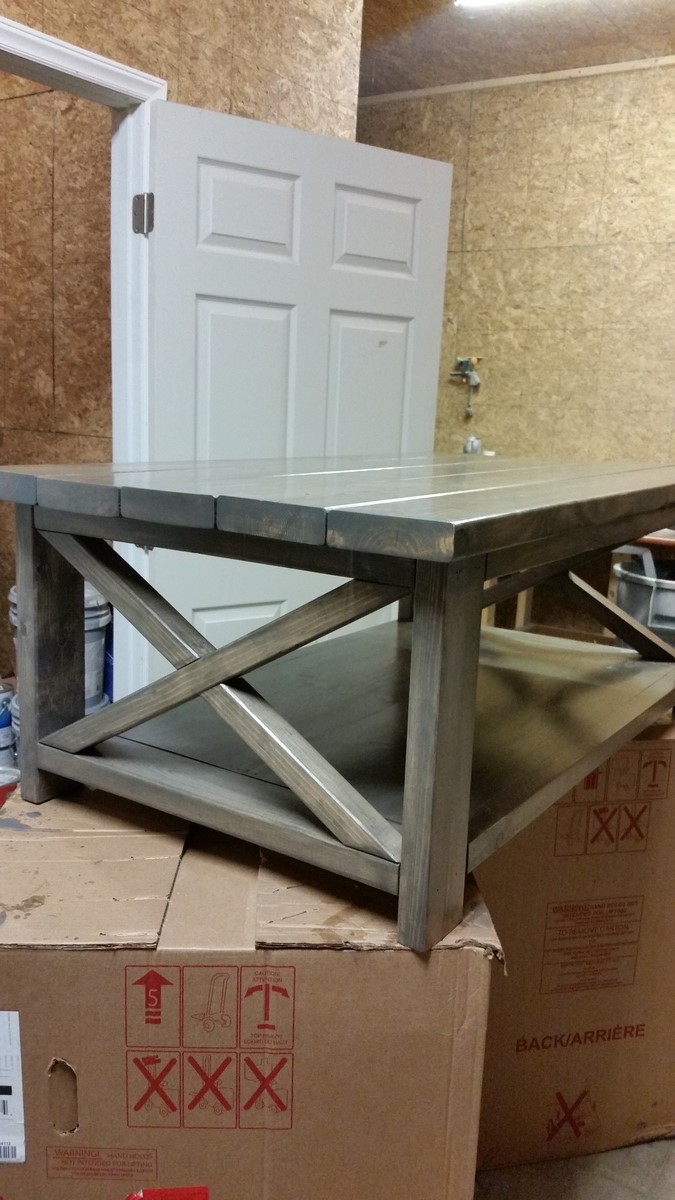
Farm house 4x4 table & bench
I loved making this, I’m totally in love with the color it turn into. Thanks Ana
Built from Plan(s)
Comments
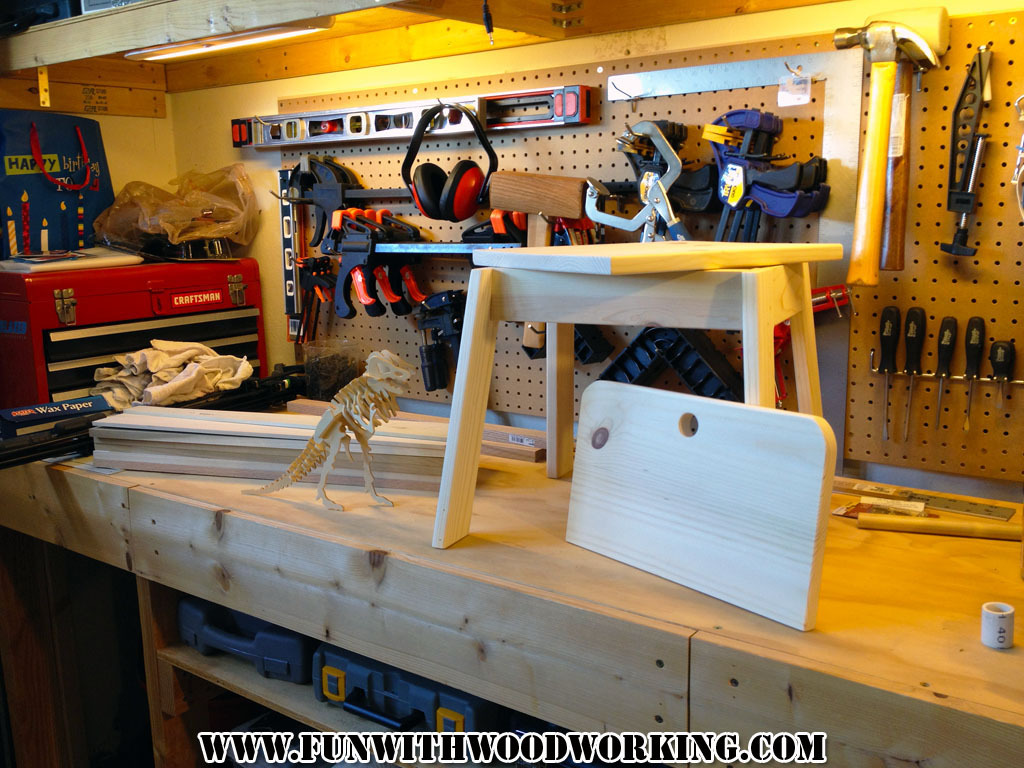
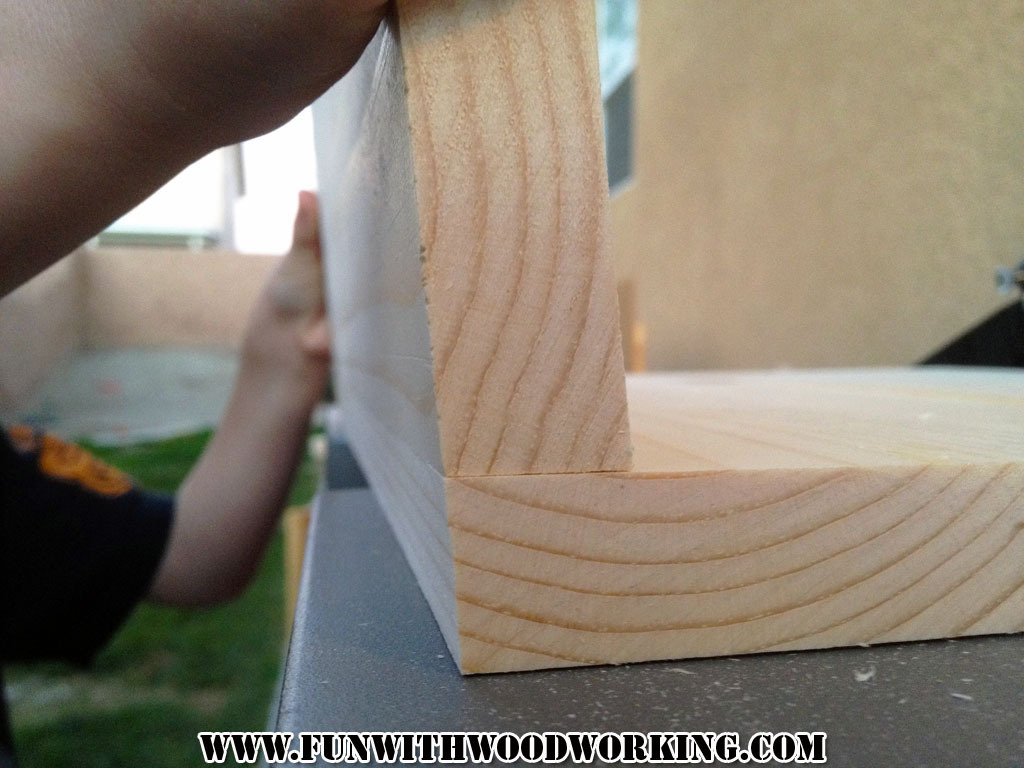
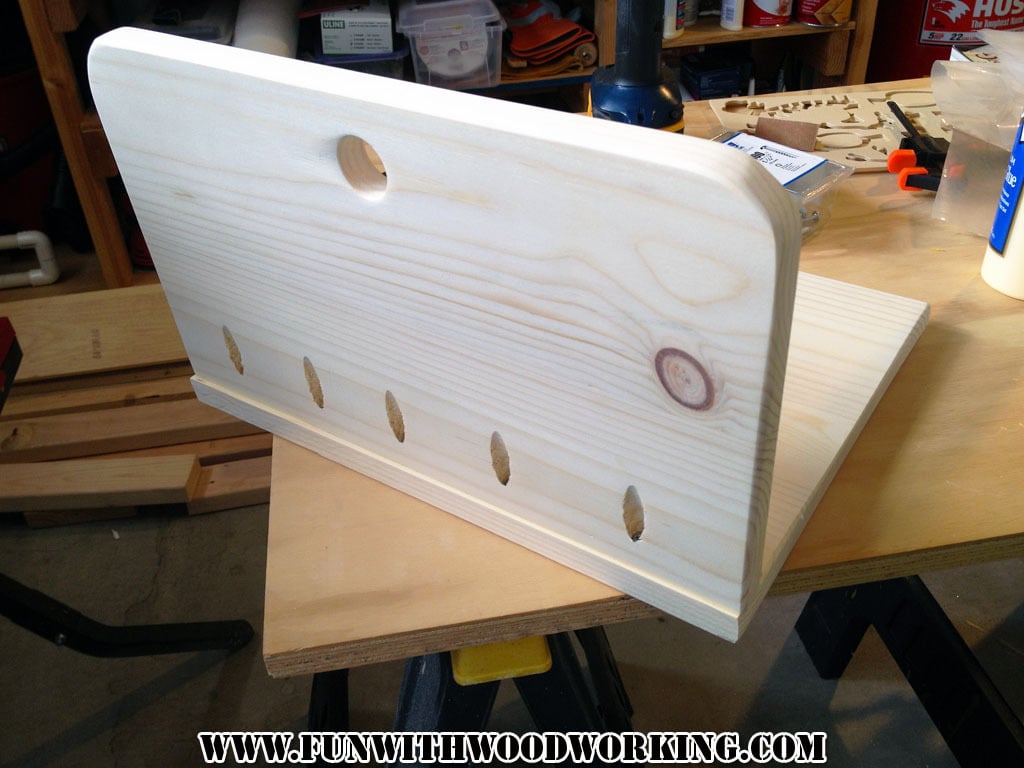
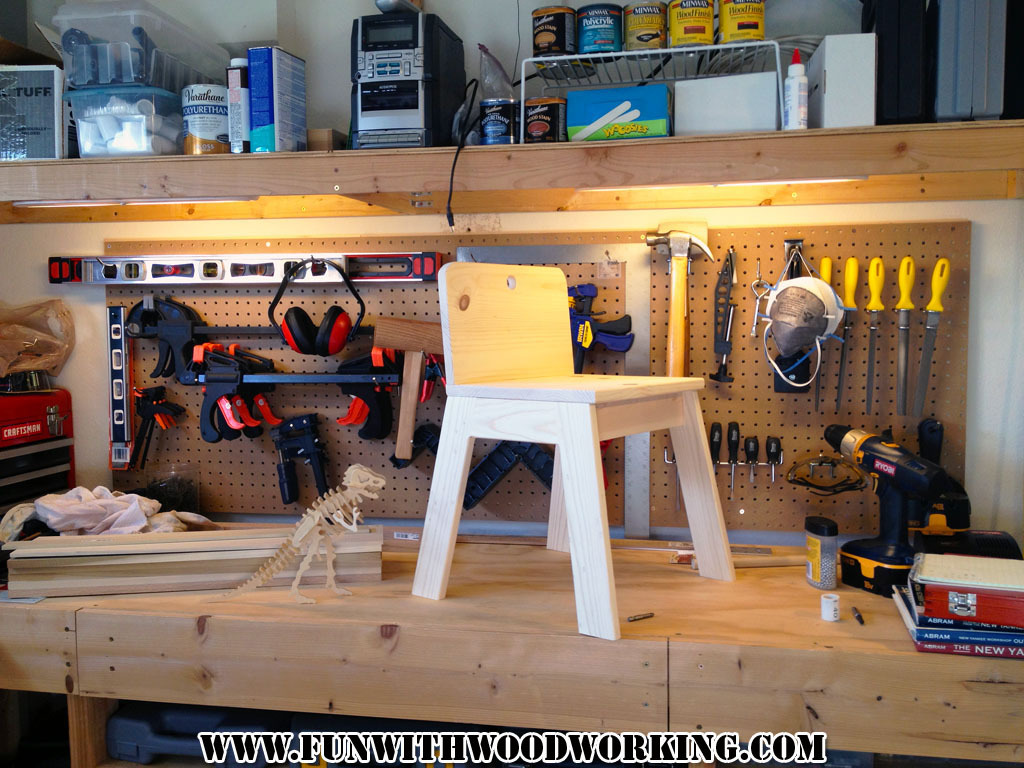
Thumb Chair
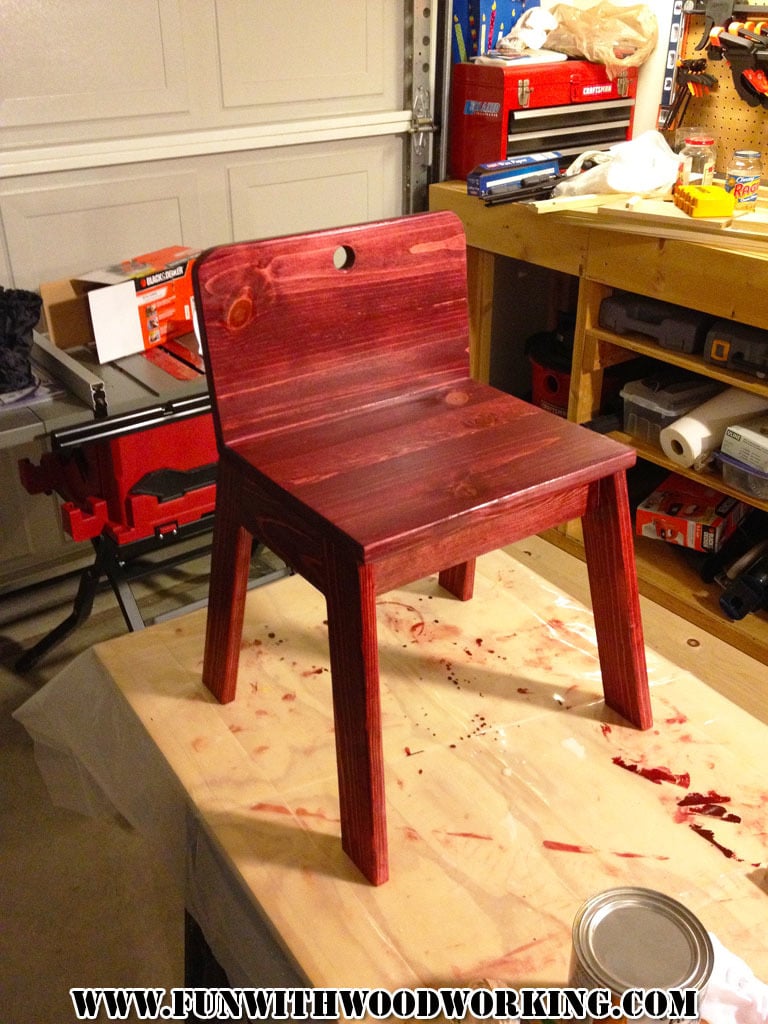
I found this plan on your site and fell in love with it. I followed all the directions but added a bevel to the rear of the seat match the the seat back and I rounded over all the edges on my router table. I also stained it and gave it 3 coats of polyurethane. My 6 year old son loves his chair and he is going to help me make one for his 3 year old brother.
You can follow the build on my blog at :
http://funwithwoodworkingtoo.blogspot.com/2013/01/lets-make-thumb-chair…
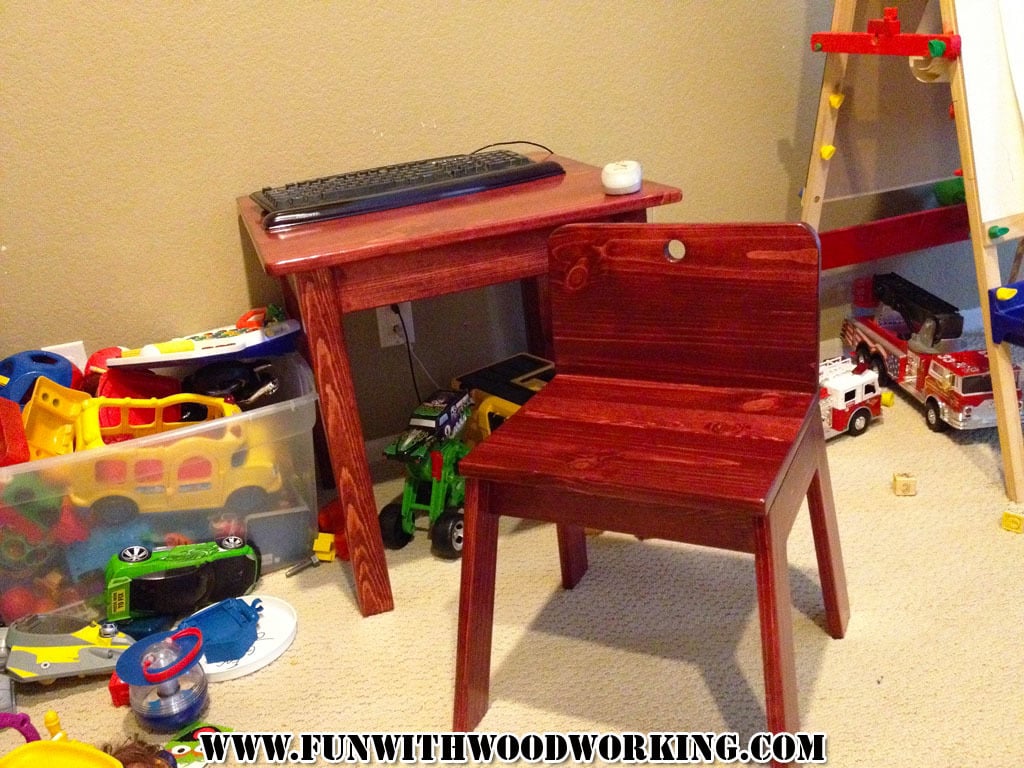
Built from Plan(s)
Estimated Cost
$10
Estimated Time Investment
Afternoon Project (3-6 Hours)
Finish Used
1 coat of Varathane stain applied with a rag and allowed to dry over night. 3 coats of Varathane water based polyurethane applied to entire project top and bottom with a light sanding between each coat with 220 grit sandpaper.
Recommended Skill Level
Beginner
Emerson Console
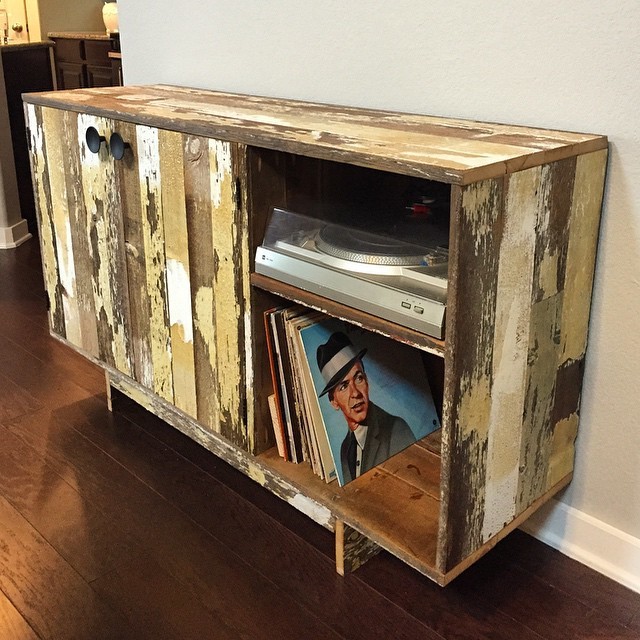
Slightly modified the plans to fit our record player and albums below. Wood is reclaimed from a barn. Bought off Craigslist. The wood was originally planned to go in a restaruant but when they sprayed it with poly the white paint turned yellow. The owners no longer liked it so I was able to buy it off of them.
Built from Plan(s)
Estimated Time Investment
Week Long Project (20 Hours or More)
Finish Used
Sanded and used finishing wax.
Recommended Skill Level
Intermediate
Comments
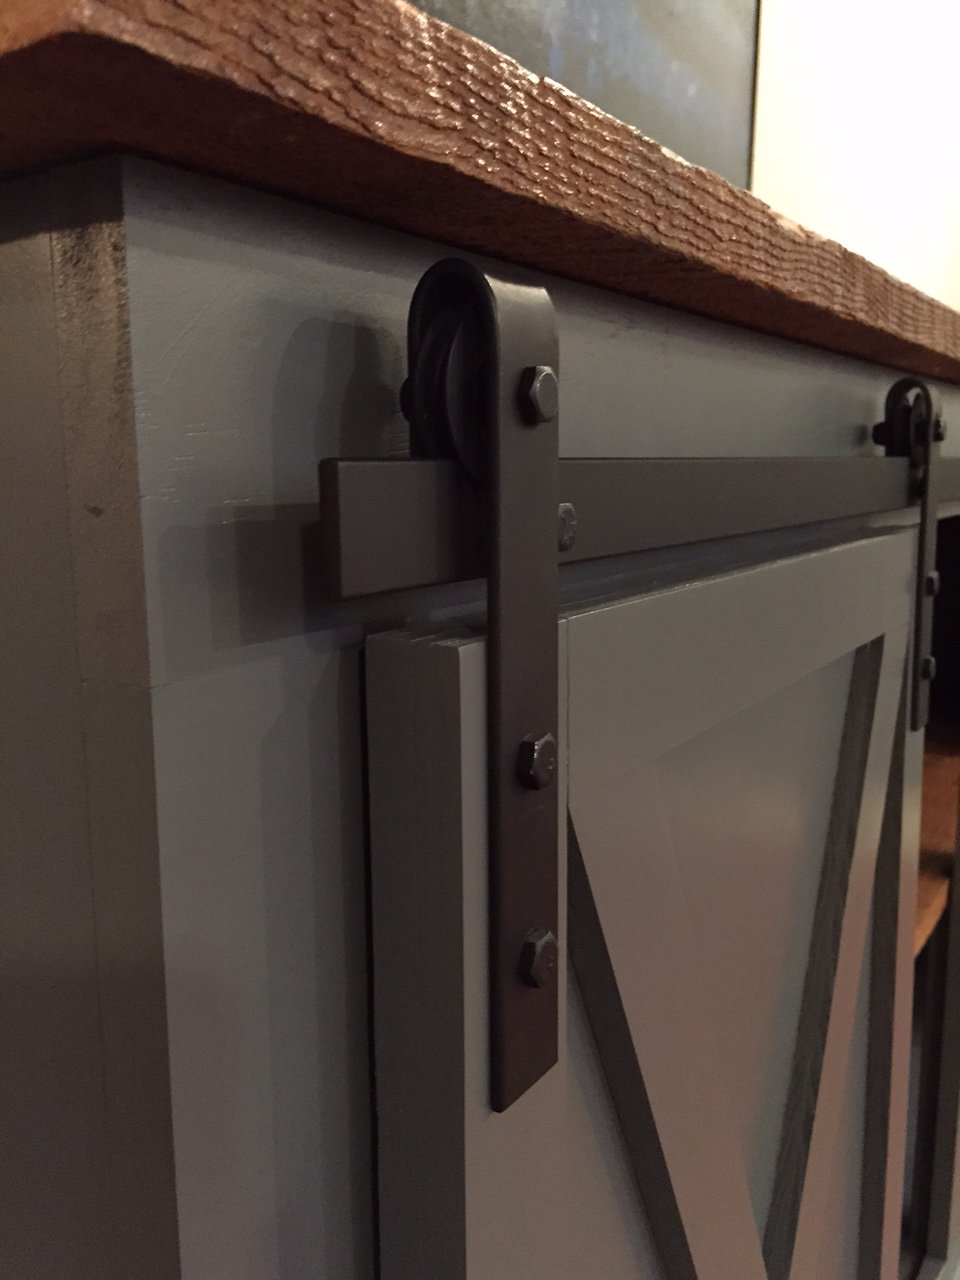
Sliding door buffet with real barnwood

Built the buffet and doors in one day...spent two days making the hardware....1" flat bar (1/8" for mounting wheels and 3/16" for track). For the wheels I used screen door sliding wheels.. materials for sliding hardware totaled $30. Barnwood was obtained from a CL guy tearing his barn. Donated this buffet to my local high school Booster club for their auction.
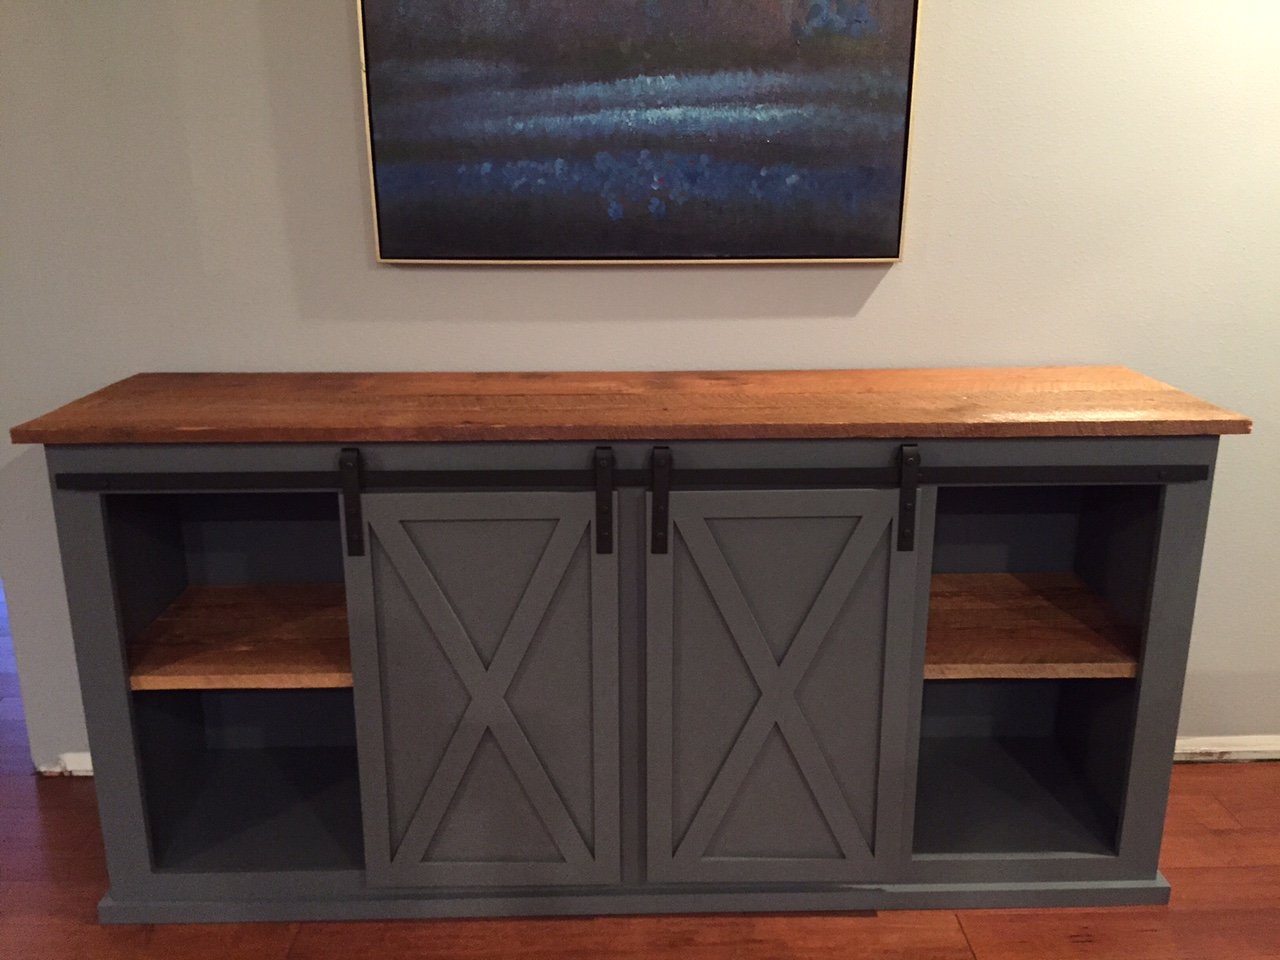
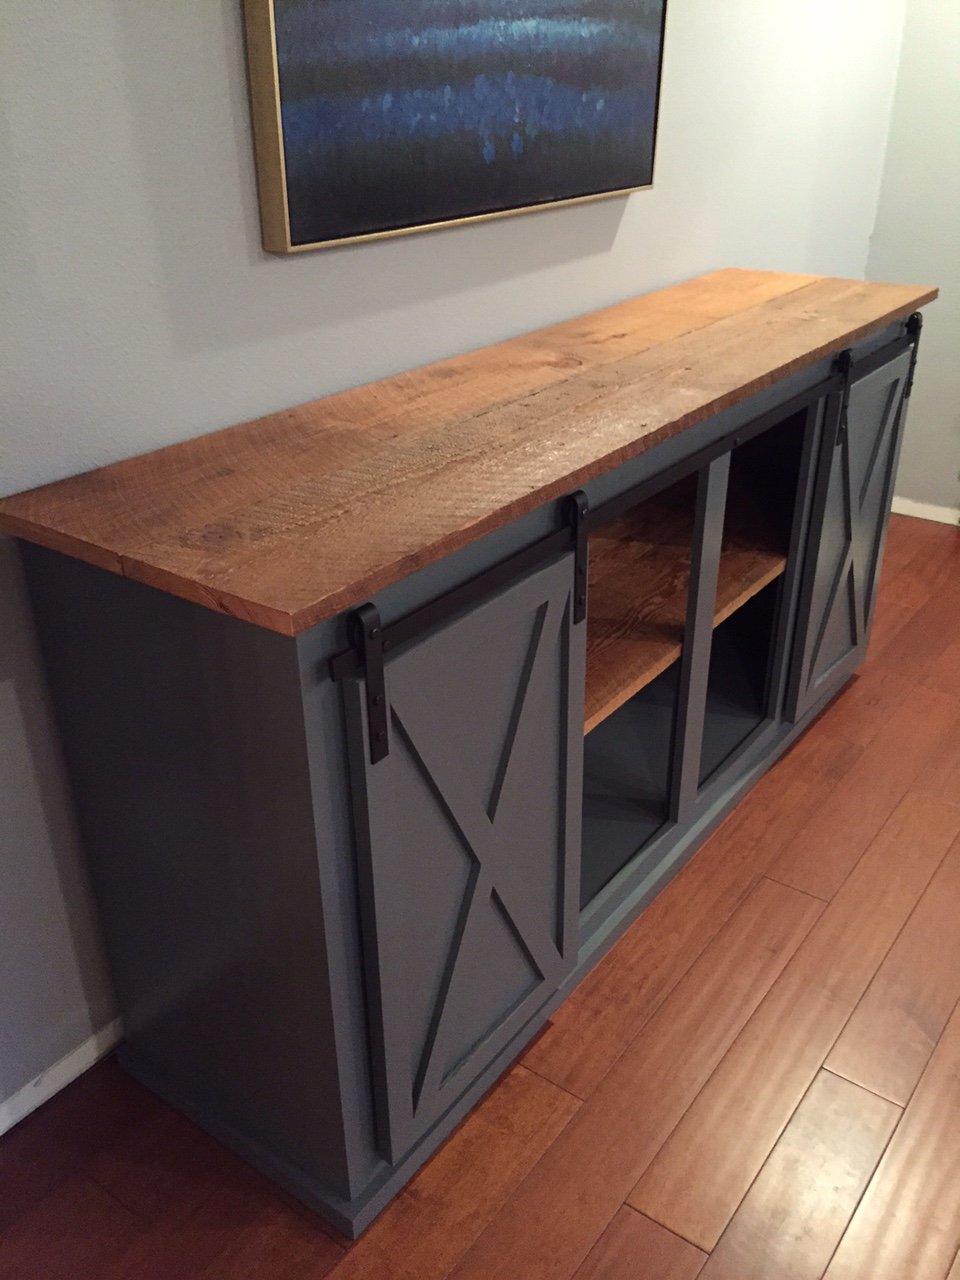

Built from Plan(s)
Estimated Cost
$200
Estimated Time Investment
Weekend Project (10-20 Hours)
Finish Used
Sherwin Williams Web Gray semi gloss
Kilz 2 primer
Sprayed with Fuji MiniMate 4
minwax water based polyurethane for barnwood
Kilz 2 primer
Sprayed with Fuji MiniMate 4
minwax water based polyurethane for barnwood
Recommended Skill Level
Intermediate
My Faux fireplace
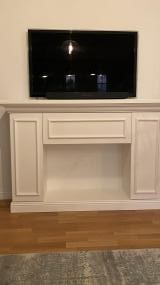
I am so satisfied I managed myself. Thank you Ana for the inspiration!
Estimated Cost
290 Eur
Estimated Time Investment
Week Long Project (20 Hours or More)
Finish Used
I followed the plans od Ana and one movie on YouTube and adapted them to my vision.
Recommended Skill Level
Intermediate
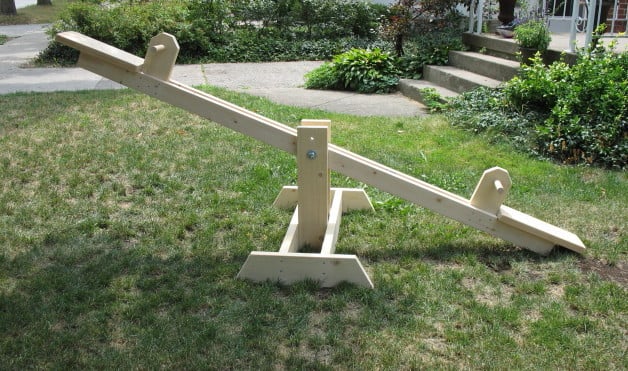
birthday see saw
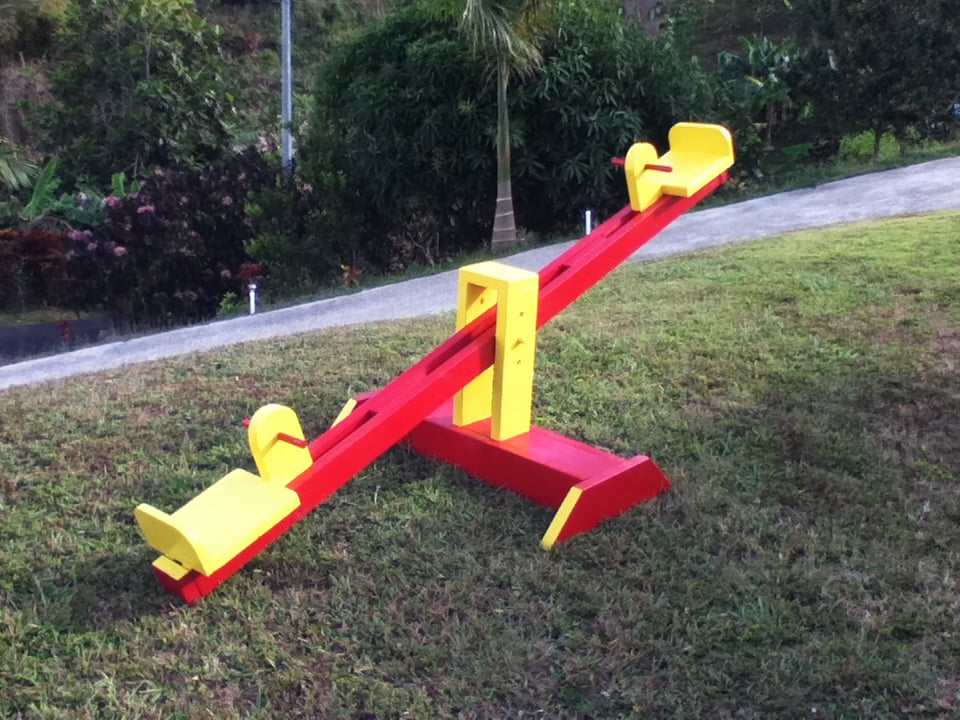
had lots of fun building this project for my grandauther, she's only a year and a half old and I'm pretty sure she will enjoy this see saw for a long time.
Built from Plan(s)
Estimated Time Investment
Day Project (6-9 Hours)
Finish Used
paint
Recommended Skill Level
Beginner
Chevron simple 1x10 single step stool
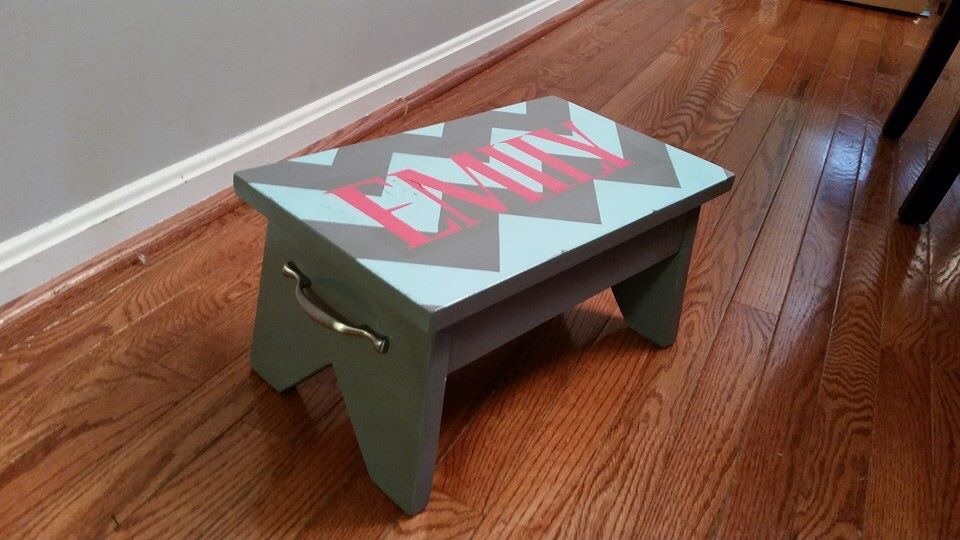
I built this stool for my niece's first birthday! It was super easy to build. The painting process was another story. In hindsight I should have just stained it but I wanted something fun and bright. I'm happy with how it turned out and I will definitely be making one for my nephew for his first birthday! Overall it took me about 2 hours to cut and put it together.
Built from Plan(s)
Estimated Time Investment
An Hour or Two (0-2 Hours)
Finish Used
Spray paint and spray clear coat
Recommended Skill Level
Beginner
Comments
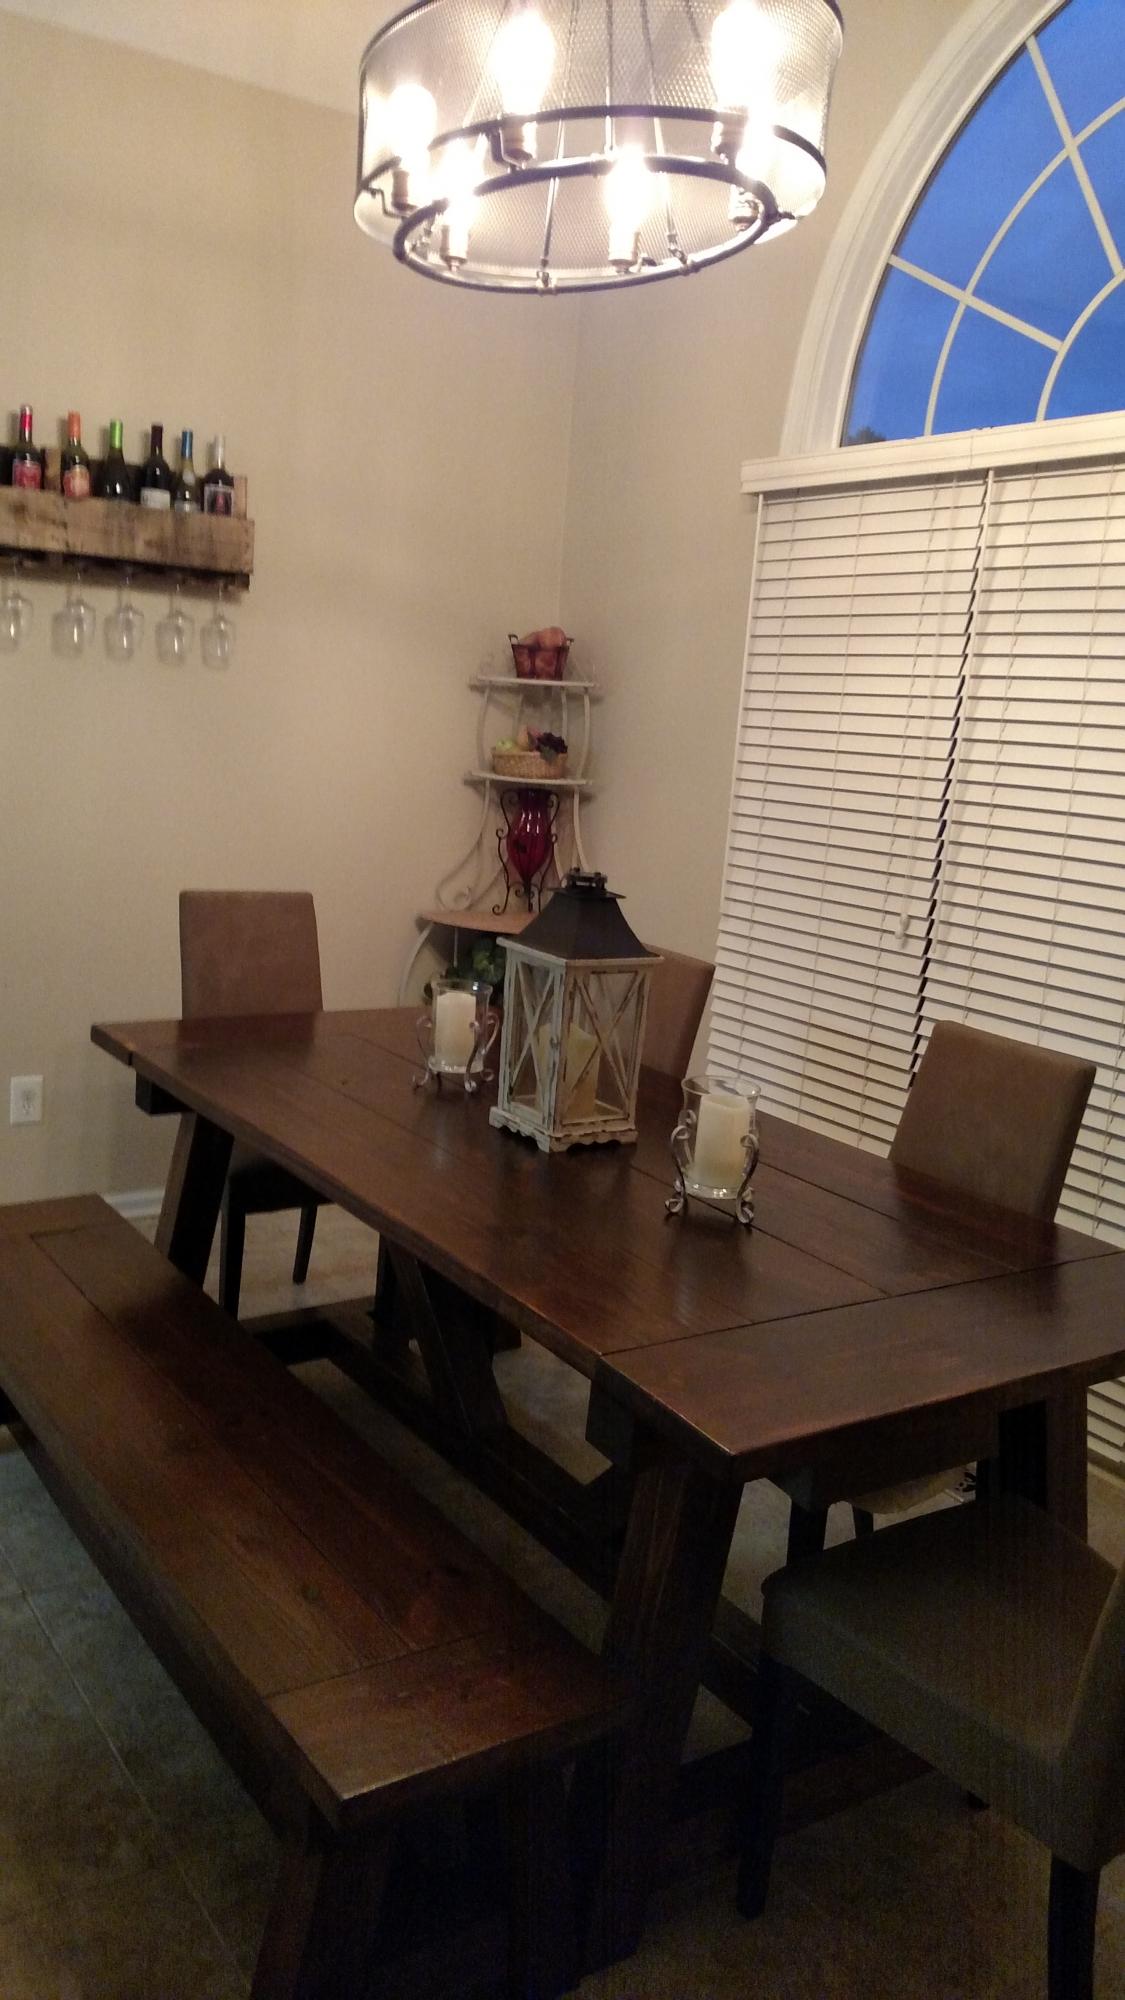
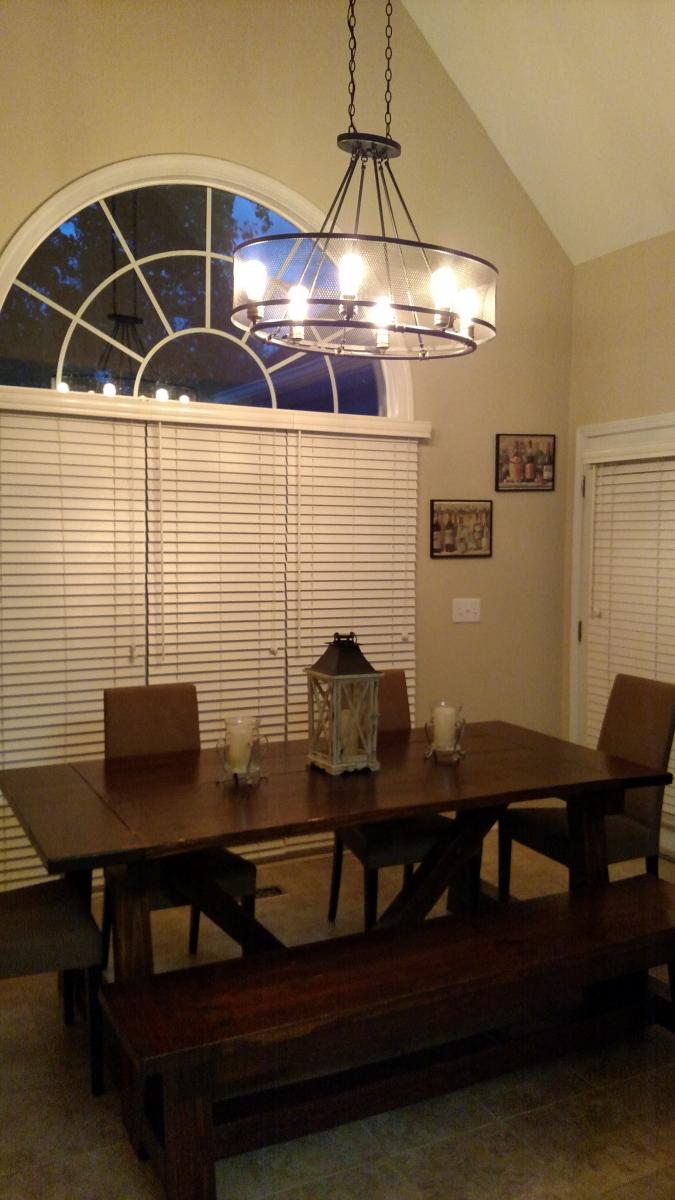
Gorgeous and easy
My hubby built the table and I stained it. It's GORGEOUS in our living room. Next weekend we're building the side and console tables.
Estimated Cost
$60
Estimated Time Investment
Day Project (6-9 Hours)
Finish Used
Minwax 80% Gray and 20% Jacobean , 2 coats polyurethane and 1 coat polycrylic
Recommended Skill Level
Intermediate
Family Project & Entertainment Center
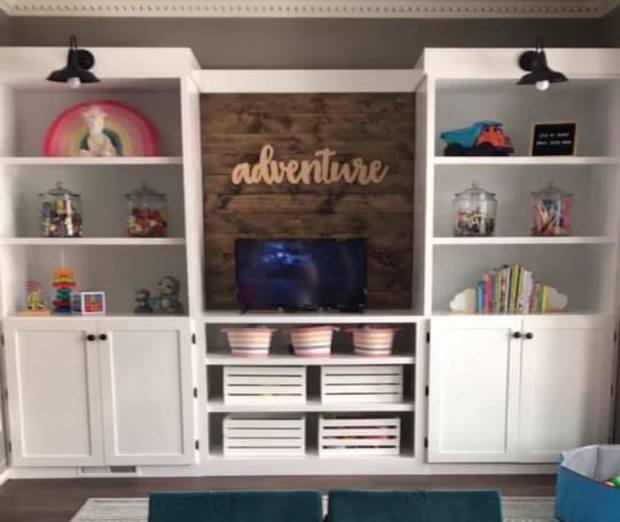
My son and daughter in law had an unpurposed room in their home and wanted to turn it into a play area for their three kids. She came to me with an idea and it turned into their Christmas present. 8' tall and 140" wide. Now the kids don't want to come out of the room. Papa and Mimi helping them make memories
Comments
Fairies Do Ride Teeter-Totters
This was a very quick project. Only took 5.5 hours from start to finish, including dragging out and putting all the tools away afterwards!
I left the teeter-totter unfinished, not sure how it will make it through the winter. I may decide to paint it this summer.
I used a length of copper pipe for the bolt to ride through, along with some washers between all the pivot points. This should help keep the boards from wearing away over time.
This has been the BEST outdoor toy around! It gets used EVERY day in the nice weather.
Thanks Ana for the great plans!
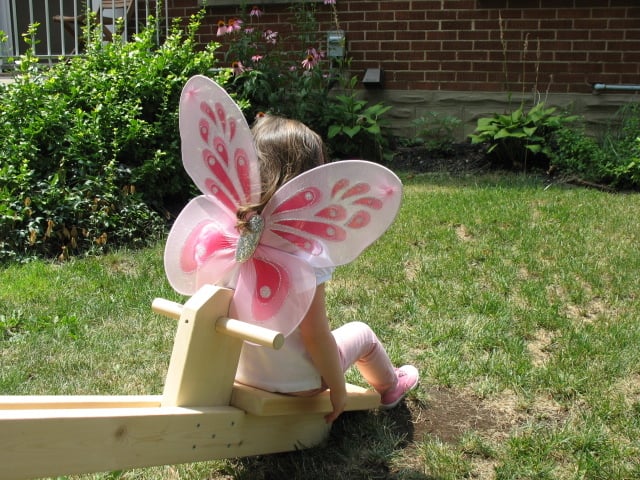
Built from Plan(s)
Estimated Cost
Total of $20.52 without screws ($14.20 for wood, $6.32 for washers, bolt, and nut)
Estimated Time Investment
Afternoon Project (3-6 Hours)
Recommended Skill Level
Beginner
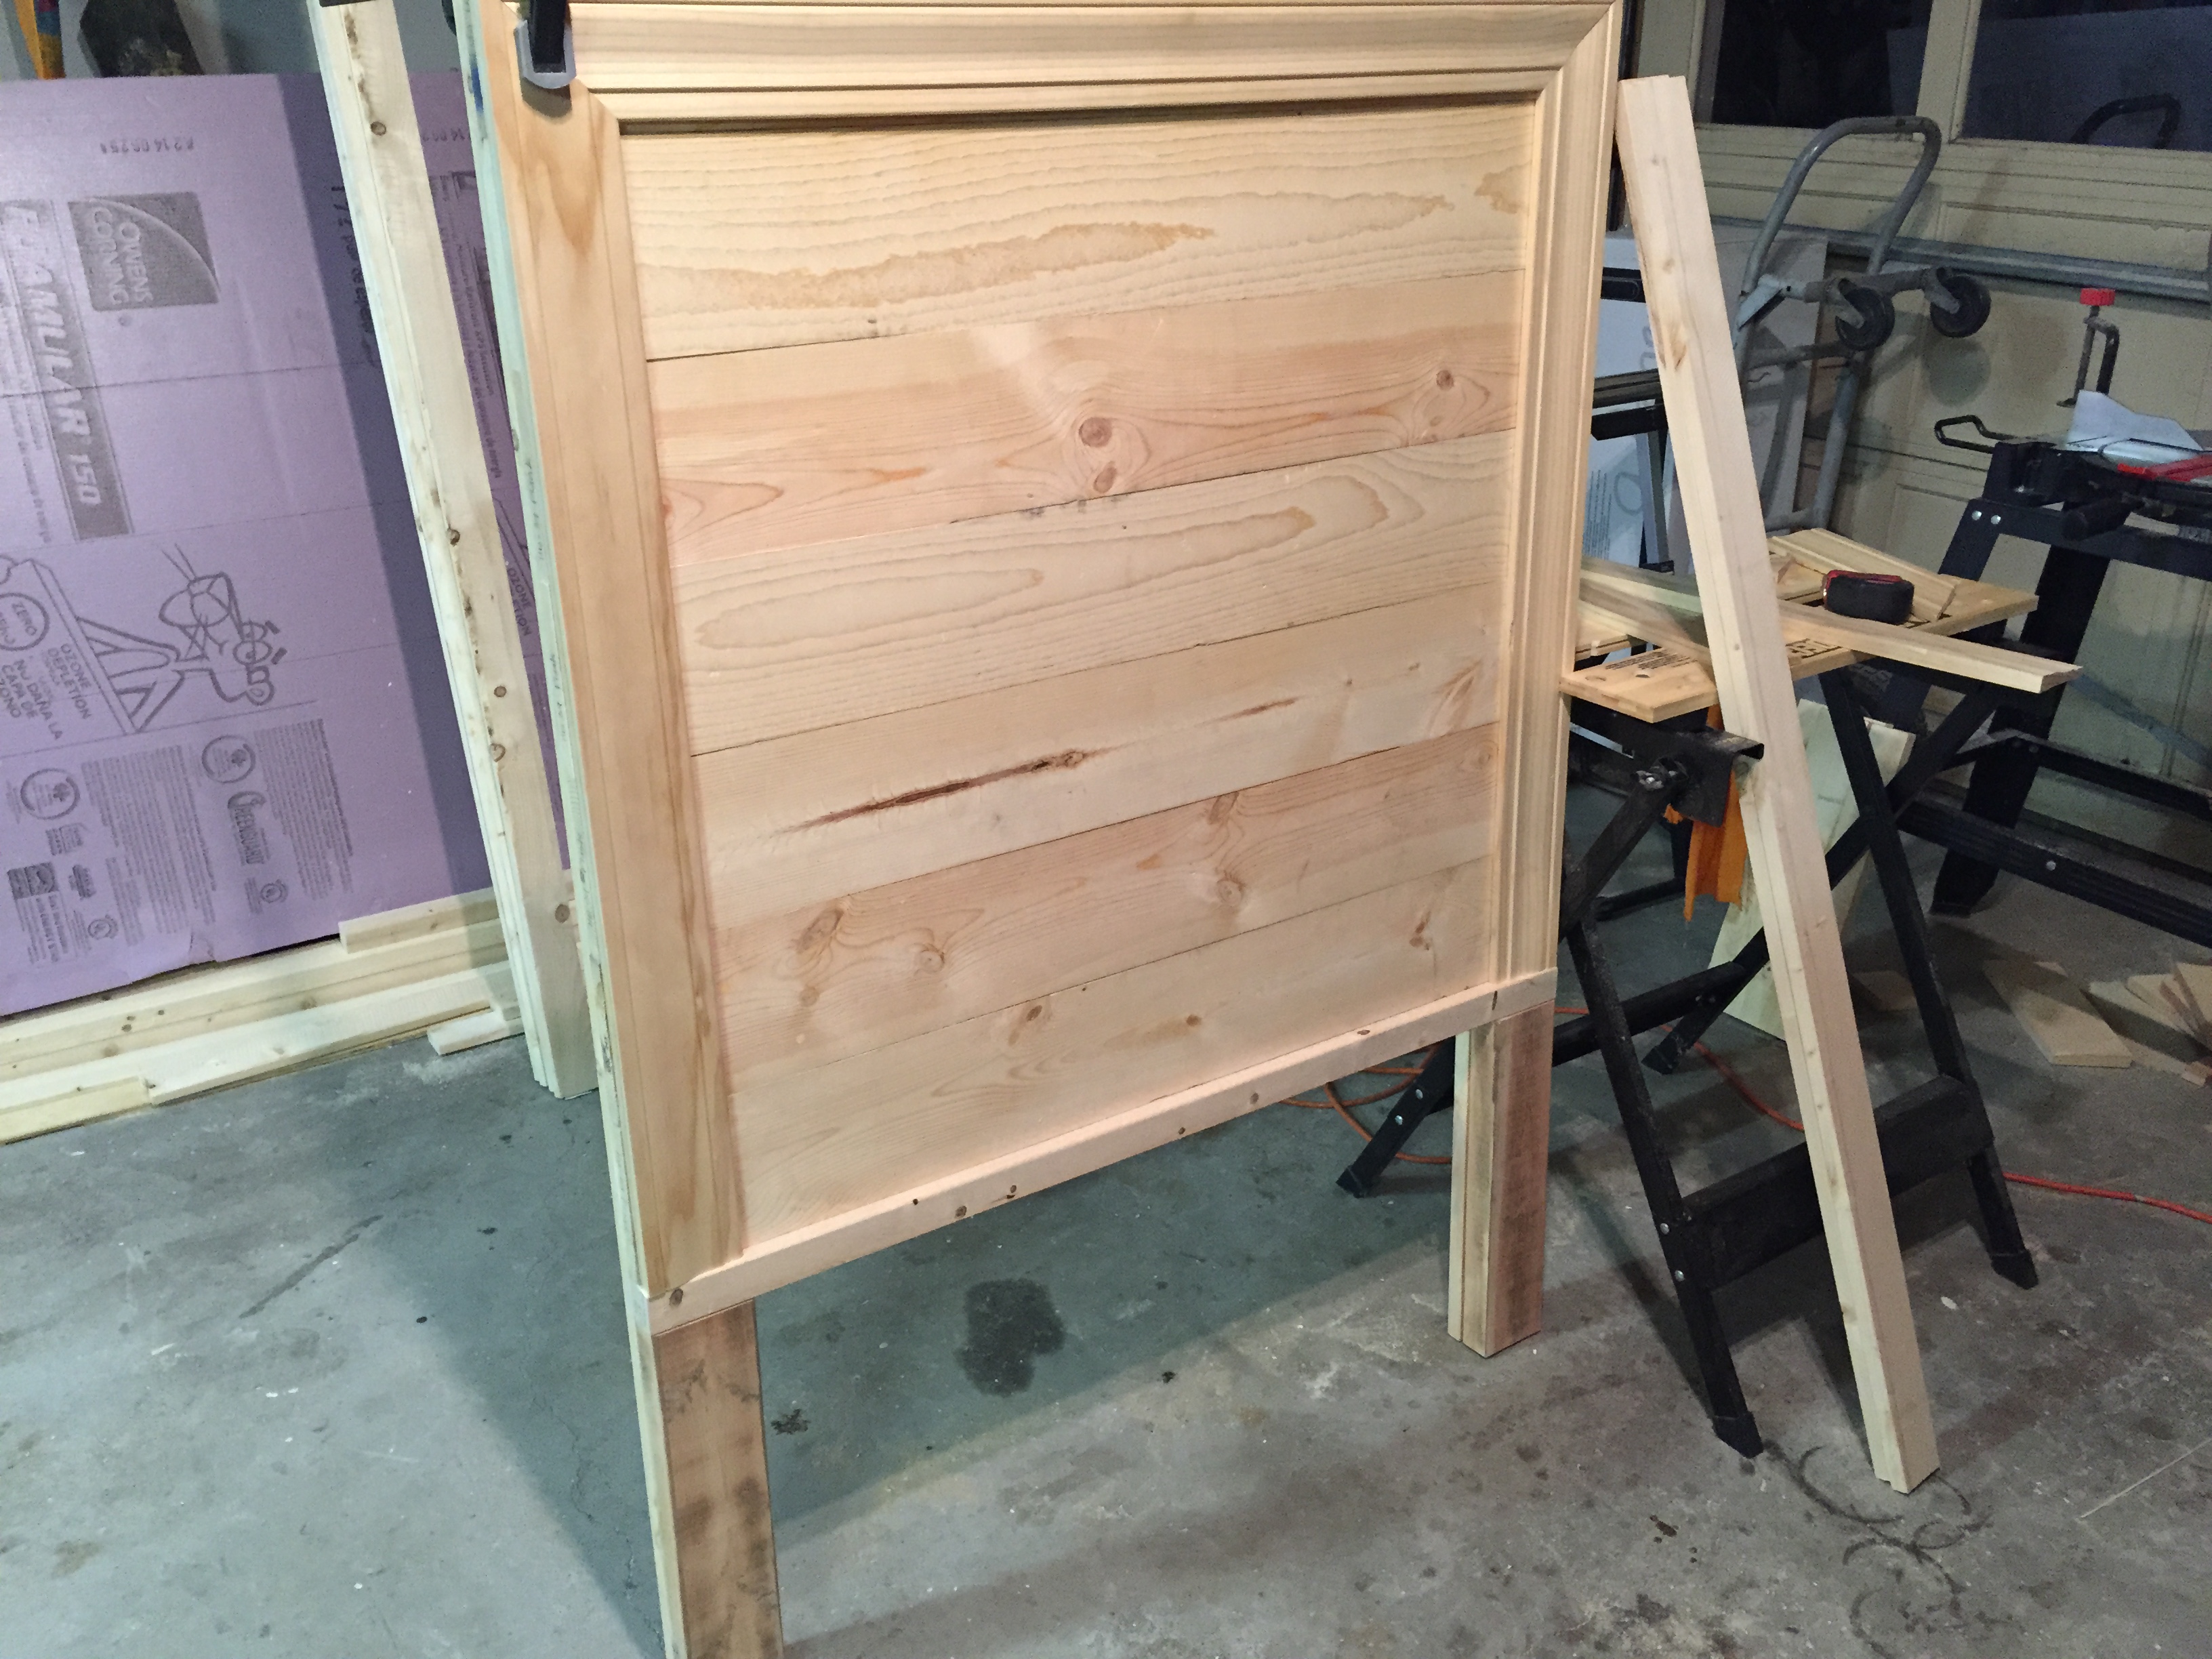
"Big Boy" headboard
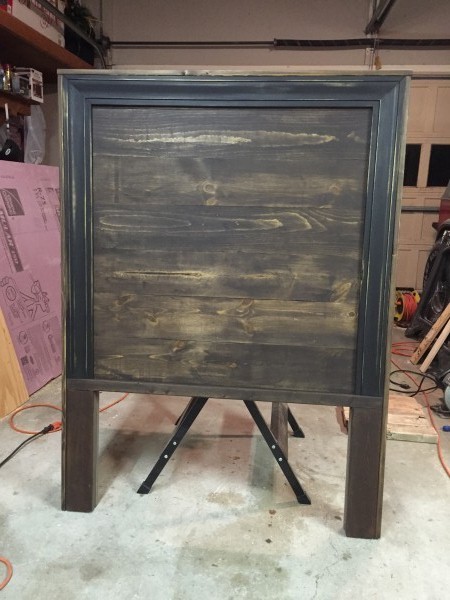
I built my son his first "big boy" bed and we needed a headboard so my wife loved this one, and now my son does too!
With pocket holes this was pretty easy to do, great plans, I had to modify the dimensions a bit since we didn't build the Hailey bed. We built a twin version of the Captain's Storage bed, so this matched up with it with only a few minor adjustments. Thanks for the plans and the great site.
Estimated Cost
35
Estimated Time Investment
Afternoon Project (3-6 Hours)
Finish Used
Milk paint (typewriter color with curio color) distressed, sealed with Hemp Oil
Recommended Skill Level
Intermediate
Comments
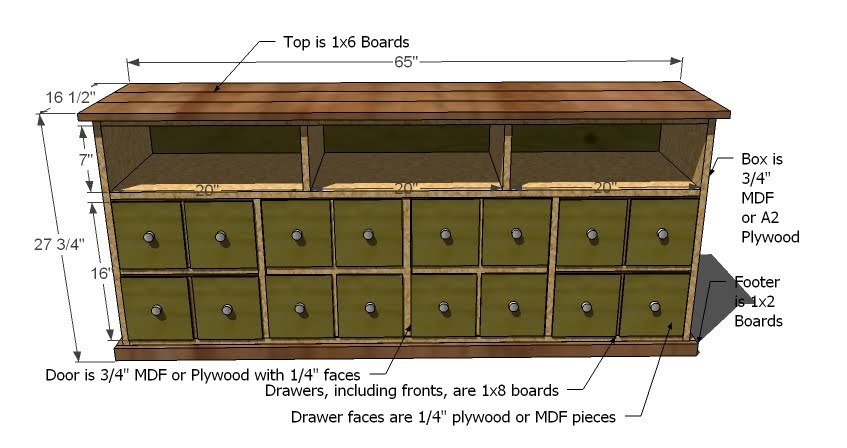
Garbage Can
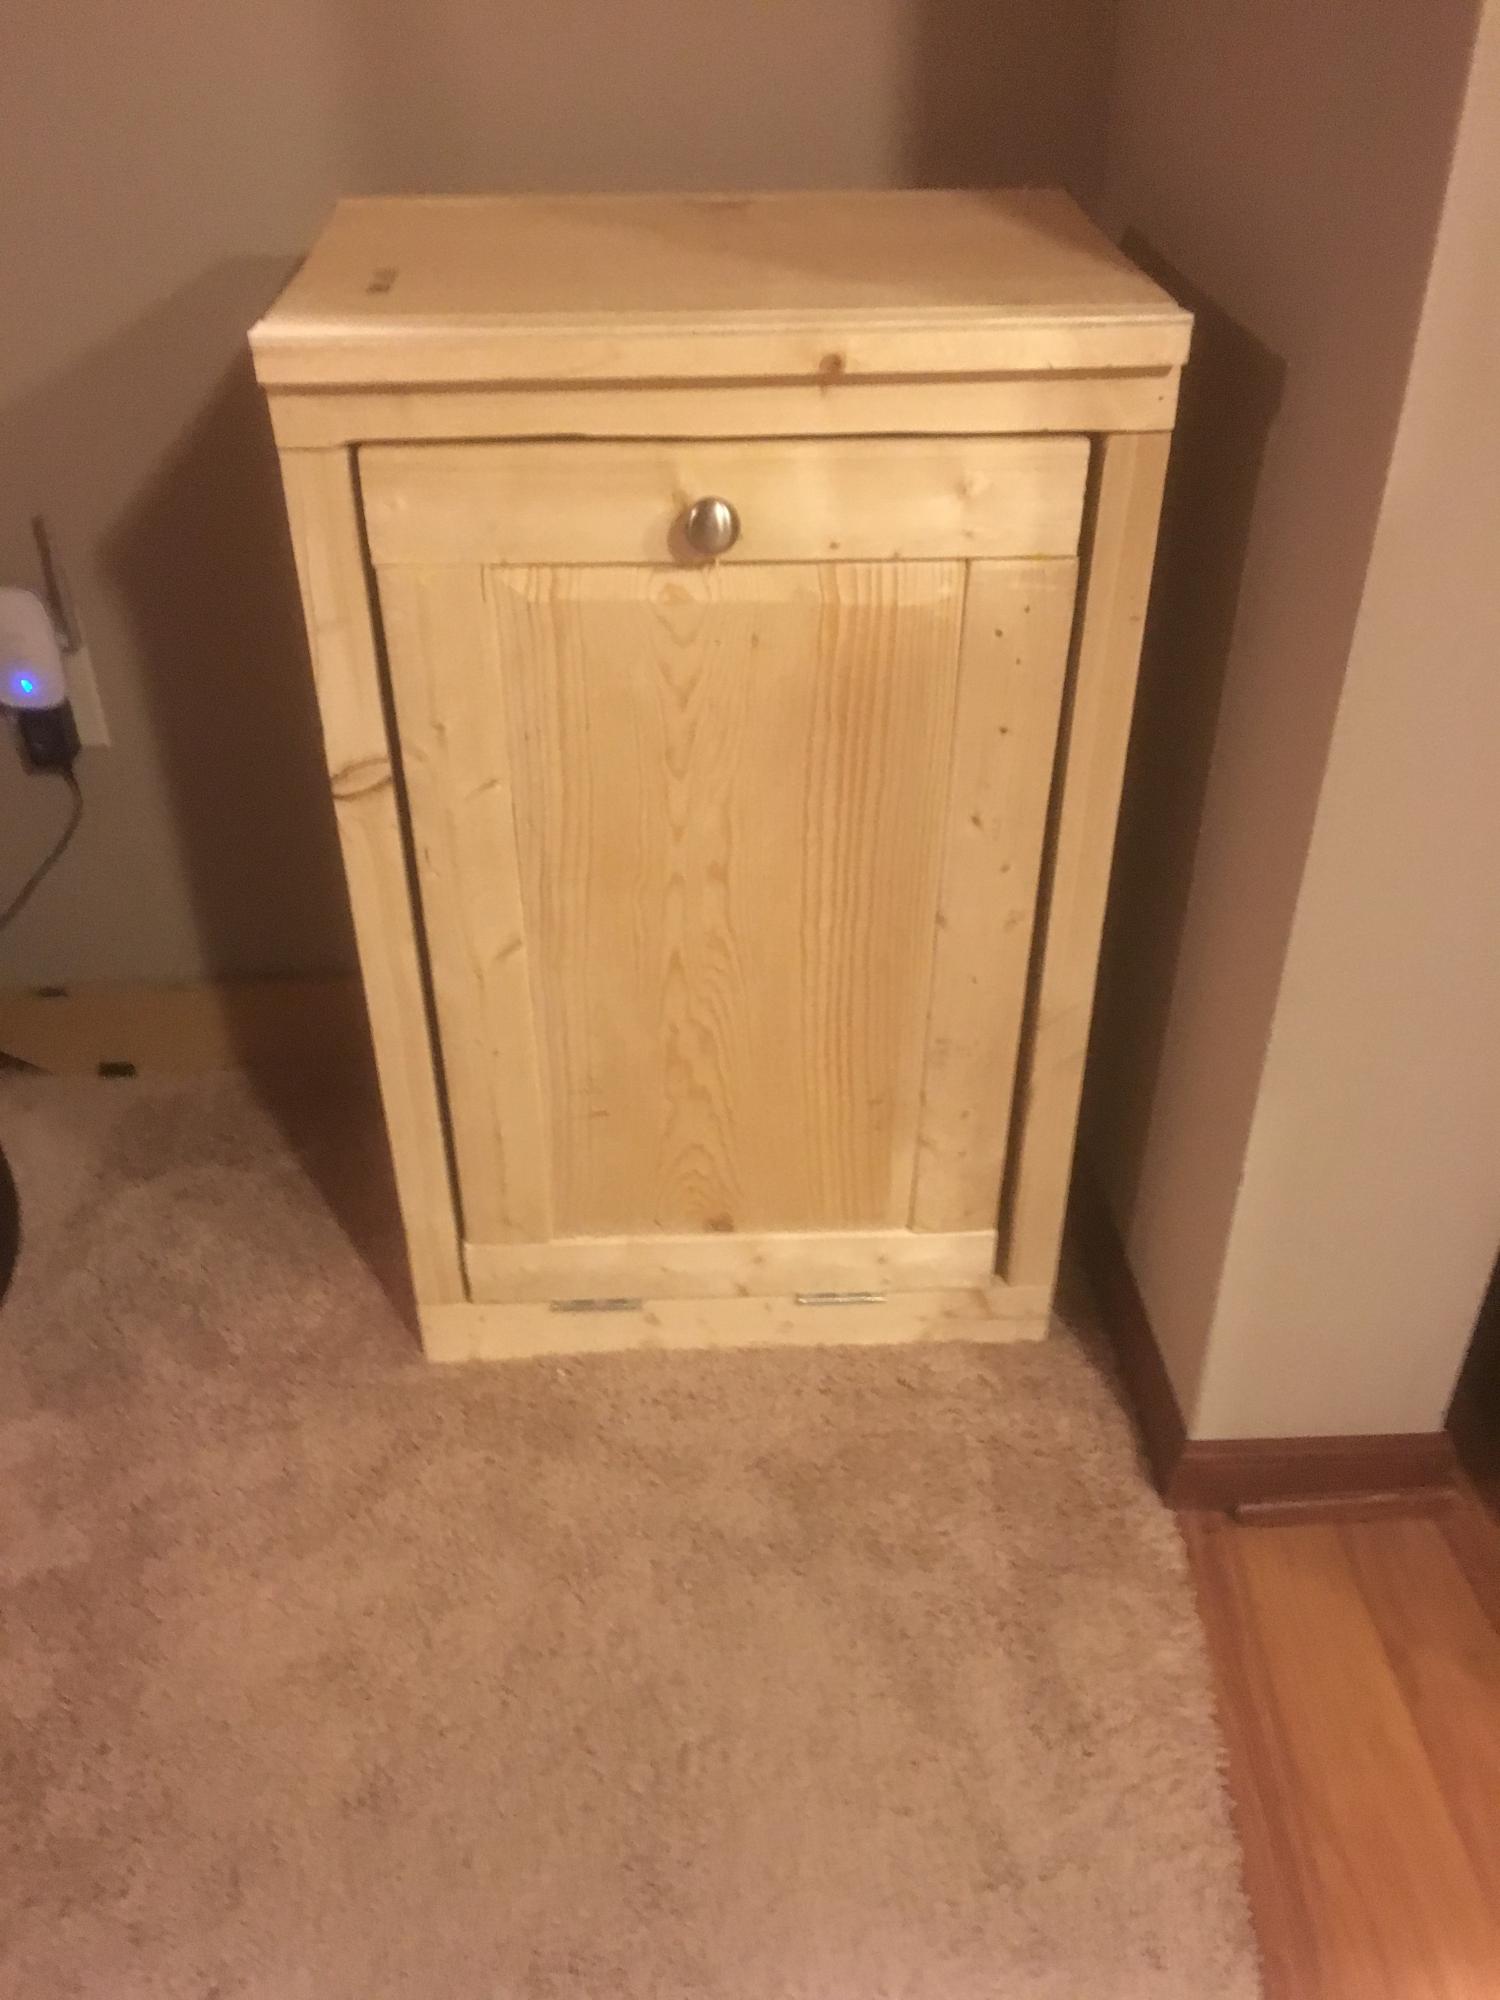
Still need to choose a color or stain but we love having the garbage hidden
Built from Plan(s)
Estimated Cost
$15
Estimated Time Investment
Afternoon Project (3-6 Hours)
Recommended Skill Level
Beginner
My take on "Lady Goats" cedar shed
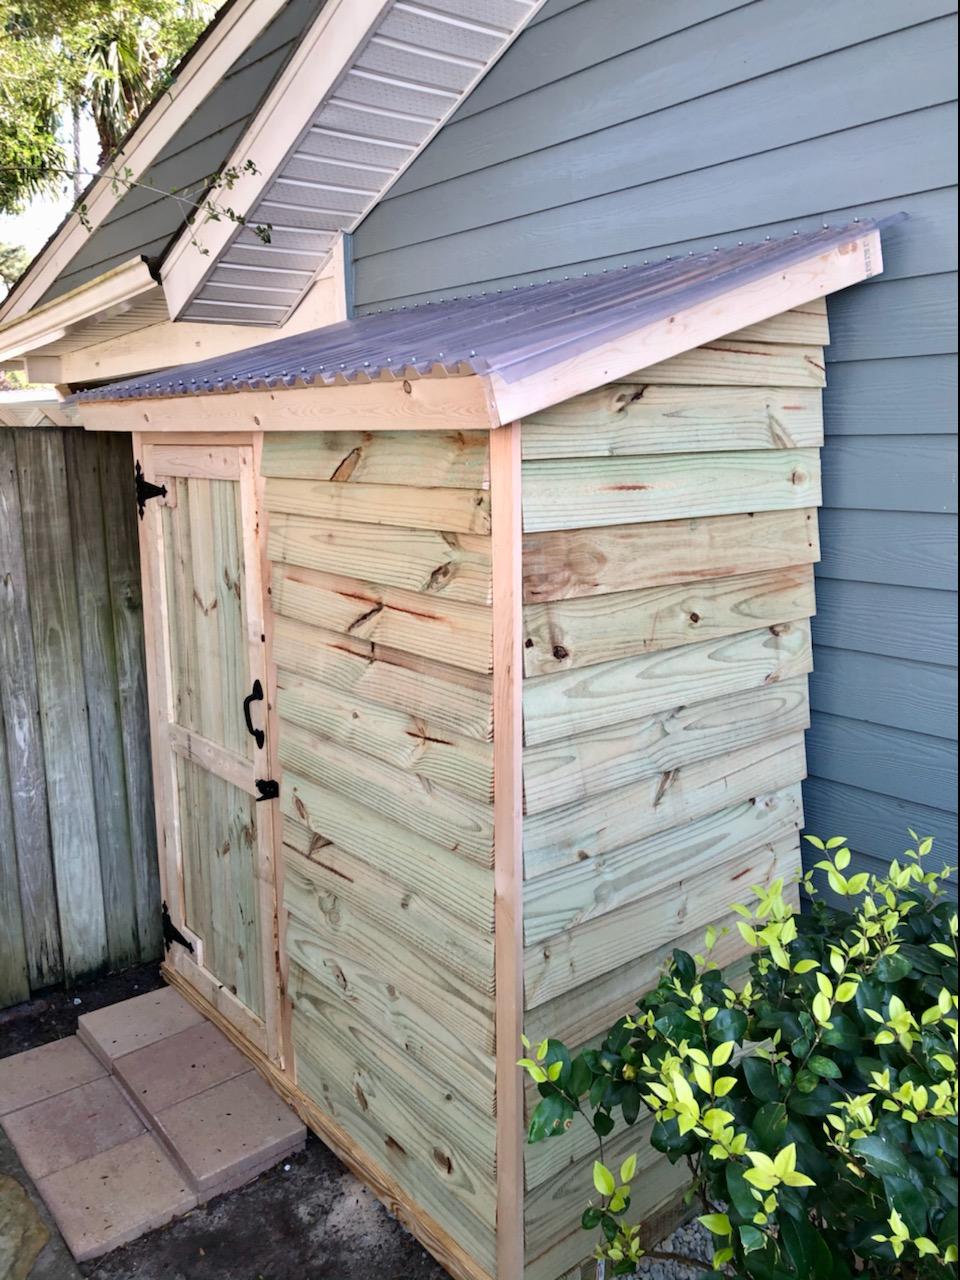
I absolutely loved these plans for this shed. I'm new to the site but I've been using your plans for things here at home... love it. I went with just one door to give me more places for shelves and I also went with a clear corrugated roof since it's shaded on that side of our house.
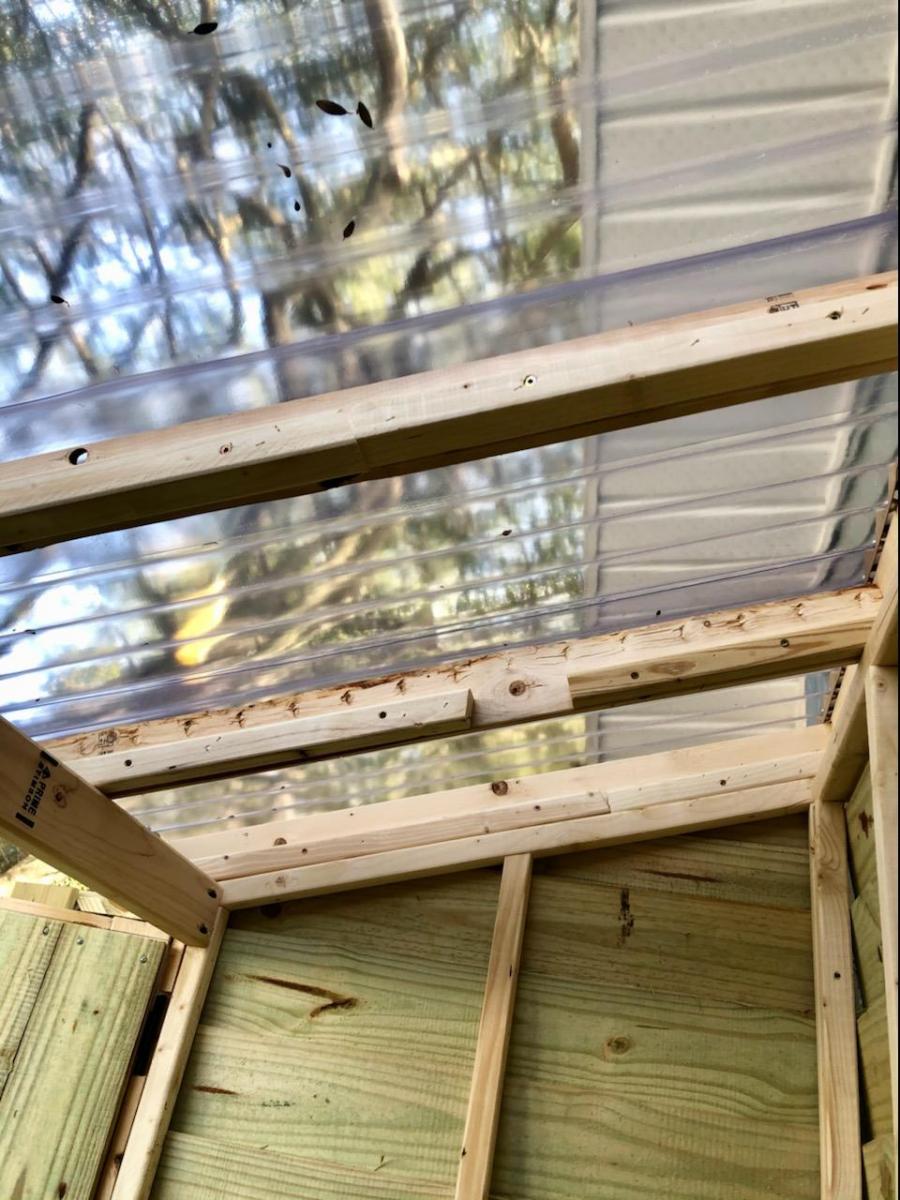
Built from Plan(s)
Estimated Cost
$300ish
Estimated Time Investment
Weekend Project (10-20 Hours)
Finish Used
No finish yet. I haven't made up my mind
Recommended Skill Level
Intermediate
Comments
Mon, 03/15/2021 - 11:47
Wonderful storage!
It's always nice to have additional storage options, thanks for sharing!
Our Rustic End Table
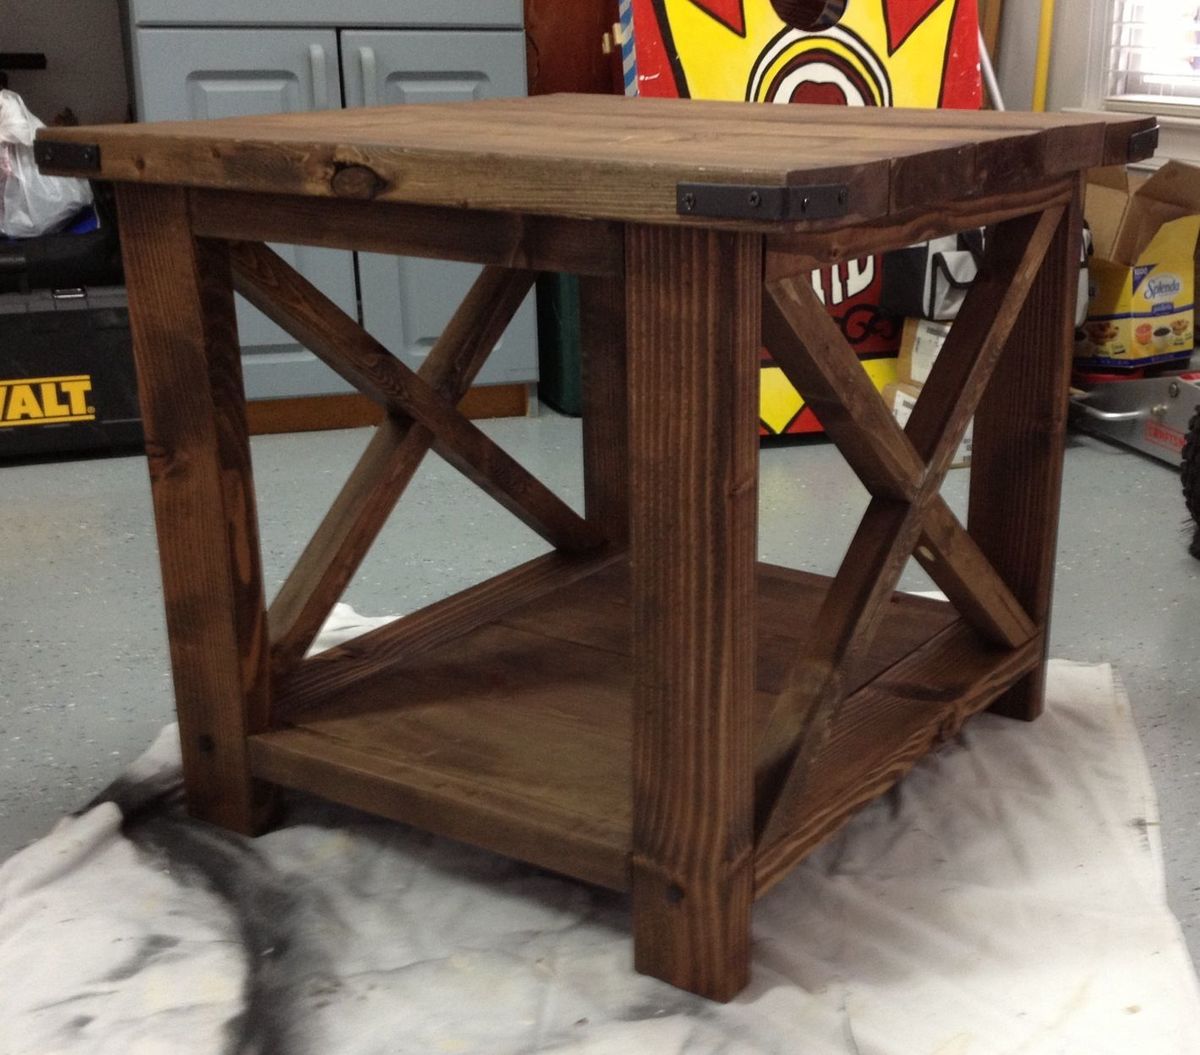
This was our first furniture project together. It was not as simple as we thought it would be, but we are very pleased with how it came out. We are planning on making the sofa table to match next!
Built from Plan(s)
Estimated Time Investment
Day Project (6-9 Hours)
Finish Used
Minwax Dark Walnut
Recommended Skill Level
Beginner
Comments

Fri, 03/08/2013 - 14:51
Hey jbayer80 - you could just
Hey jbayer80 - you could just go to your local orange or other hardware store and get braces and paint them whatever color you like. It would probably be a cheaper alternative to buying painted decorator hardware. Here is a link to some on orange.
http://www.homedepot.com/p/t/202033908?catalogId=10053&langId=-1&storeI…
Erik
Night Stands custom sized and finished
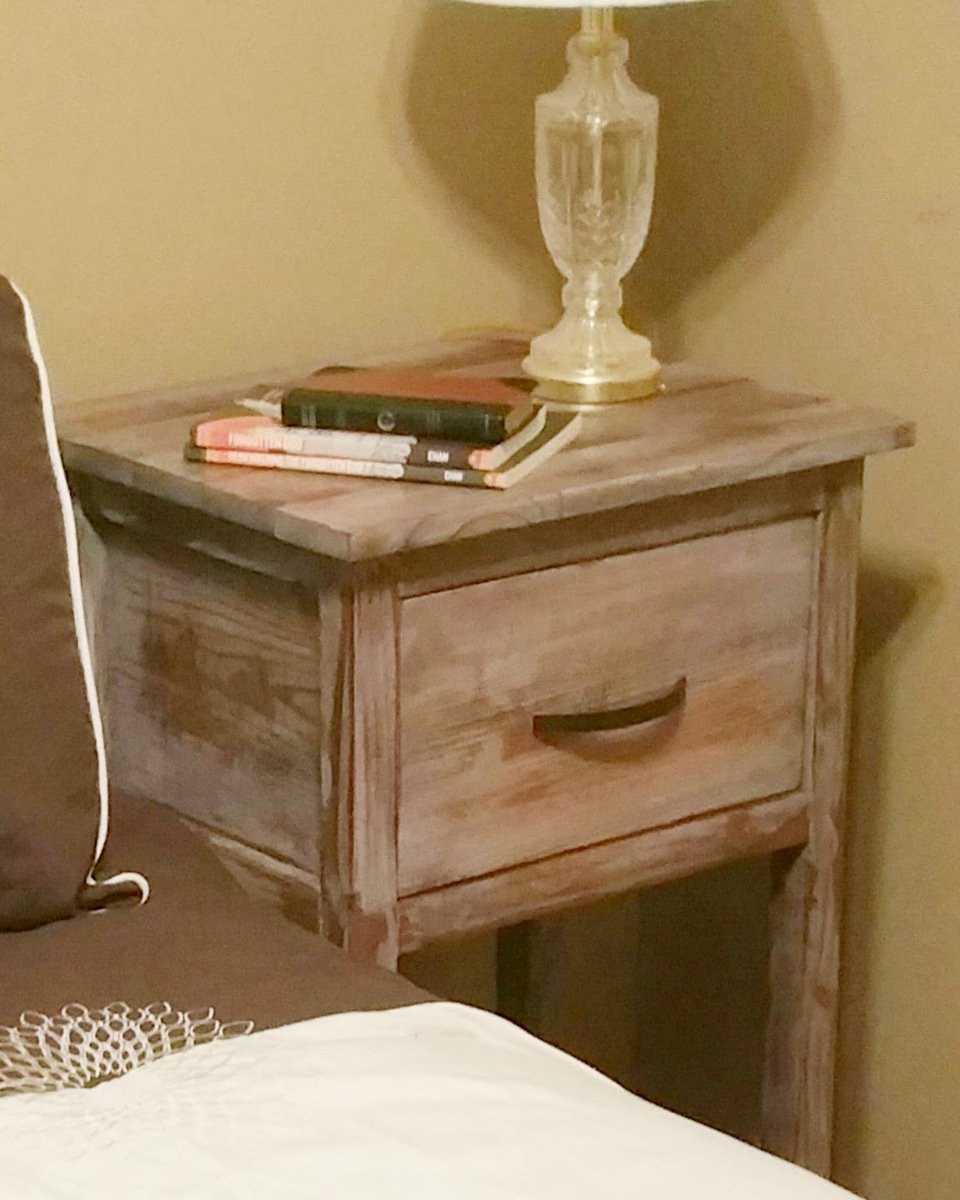
Night Stands custom sized and finished per customer building new home based Ana White's Farm House collection #anawhite
Intentional distressing per customer request with guidance from Ana White plans. Finish contains a mix of paint, removing of paint, staining and restraining. Now to move to a purposeful Mud Room Locker for a new home suited for family.
http://ana-white.com/users/pondrider/
#anawhite #Stain #CustomFurniture #Paint


Built from Plan(s)
Estimated Time Investment
Weekend Project (10-20 Hours)
Finish Used
Finish contains a mix of paint, removing of paint, staining and restraining.
Recommended Skill Level
Intermediate
Love it! But when the washer is on spin it shakes the whole pedestal and dryer! Help!
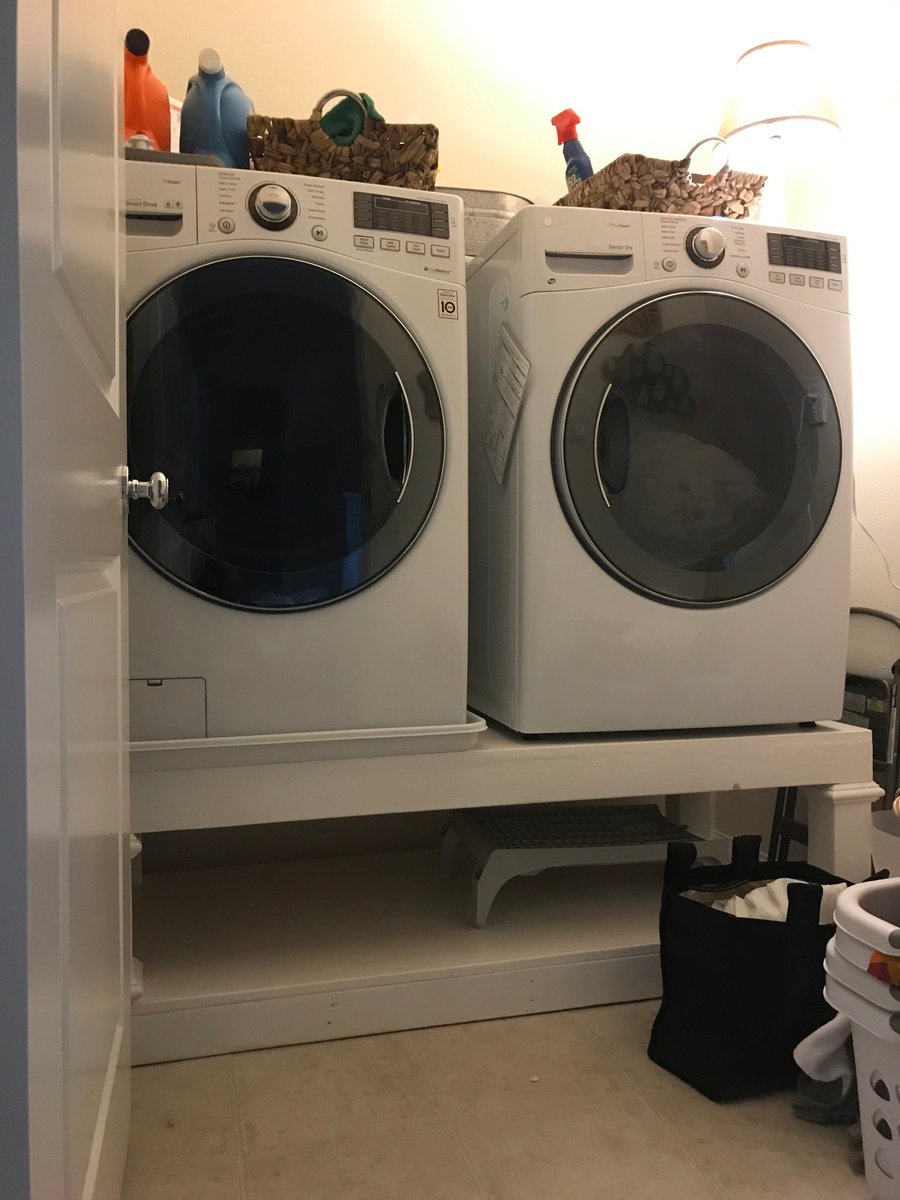
The build was pretty easy. Husband did it in a day. But after the paint dried and we out it in our laundry room and I did some laundry we realized that the washer now shakes the entire pedestal violently to the point where the dryer is being shaken so much that it's banging against the wall. We have brand new LG washer and dryer and this wasn't a problem before our diy pedestal. Do you have any modification suggestions? We really love the project- but we will have to take it out if we can't find a solution for the shaking.
Built from Plan(s)
Estimated Cost
$120
Estimated Time Investment
Day Project (6-9 Hours)
Finish Used
White paint.
Recommended Skill Level
Intermediate
Comments

Mon, 07/08/2019 - 10:47
I'm sorry to hear. A quick…
I'm sorry to hear. A quick fix would be to add some cross bracing to the back.
Small Console Table
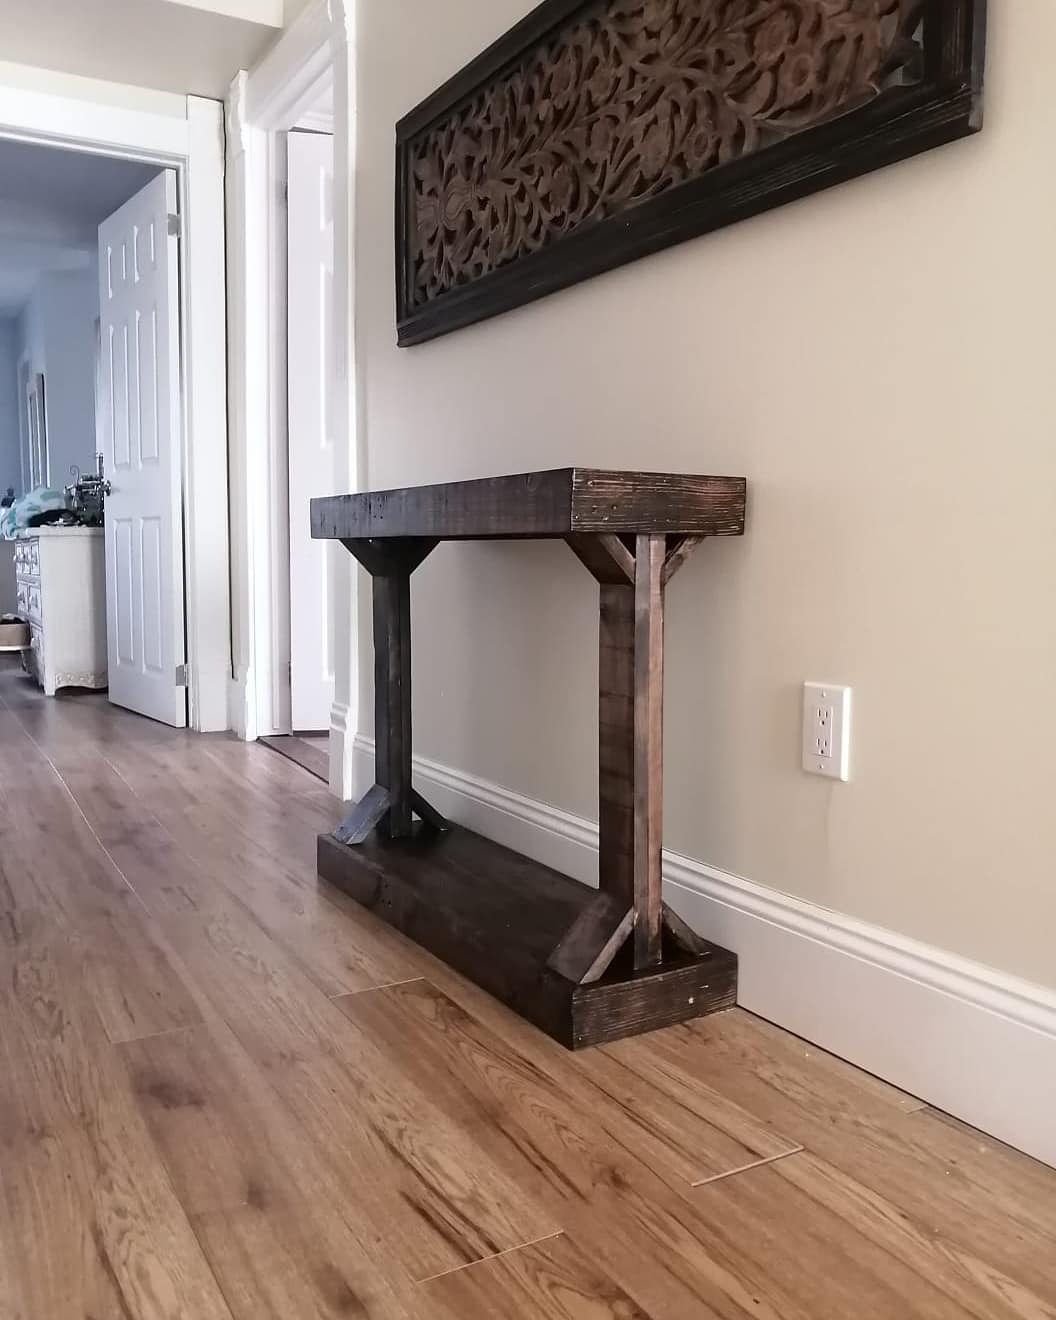
I made this table completely out of pallet wood. We have true 1x4 pallet wood which is hardwood. for the legs, I doubled up 2 pieces of pallet wood for strength. Every piece of wood is a 1x4. It turned out perfectly as I needed a narrow table for our 2nd-floor hallway. This took us a little longer than with cut lumber as there was a lot of planing and sanding since it was pallet wood. If we had used lumber it would have taken a few hours less.
Built from Plan(s)
Estimated Cost
20.00
Estimated Time Investment
Weekend Project (10-20 Hours)
Finish Used
We used Jacobean Mini Wax stain and the one coat satin polyurethane. It was the first time I had used the 1 coat but it is a lot thicker than the average polyurethane.
Recommended Skill Level
Intermediate
Comments
Parson Bookcase
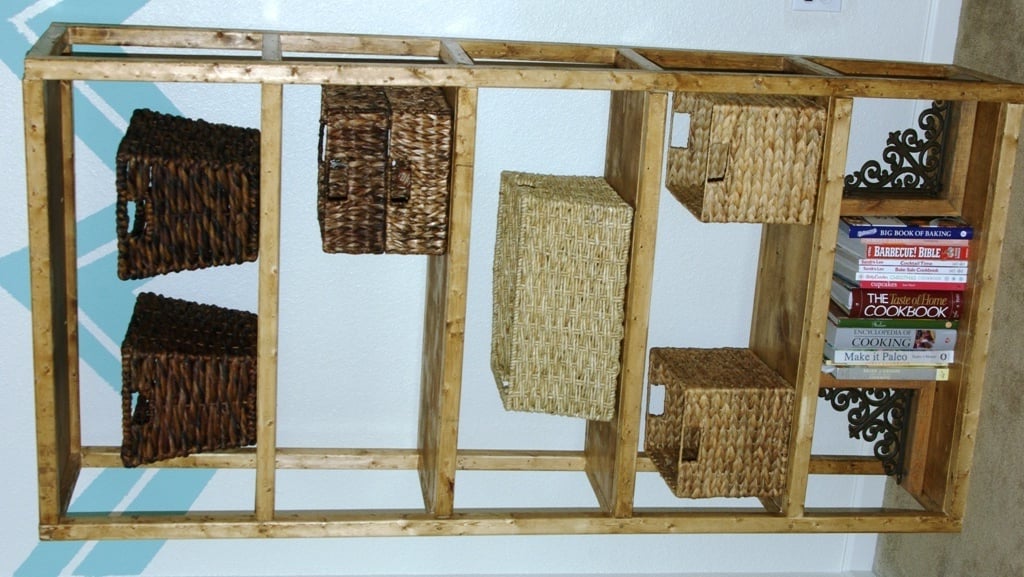
I made the taller version of this plan. 2x2's are my arch nemesis! Never again will I build something primarily using 2x2's because they are SO wonky! I tried to find the straightest boards possible but still it didn't make for a very good bookcase. I would recommend building this if you have a table saw & you can cut your own 2x2's! It will suffice for storage in my craft room, but I am not sure if it will hold up during all of our moves, because my husband is in the Army!
Built from Plan(s)
Estimated Cost
$50-$60
Estimated Time Investment
Day Project (6-9 Hours)
Finish Used
Early American Stain & Poly
Recommended Skill Level
Intermediate
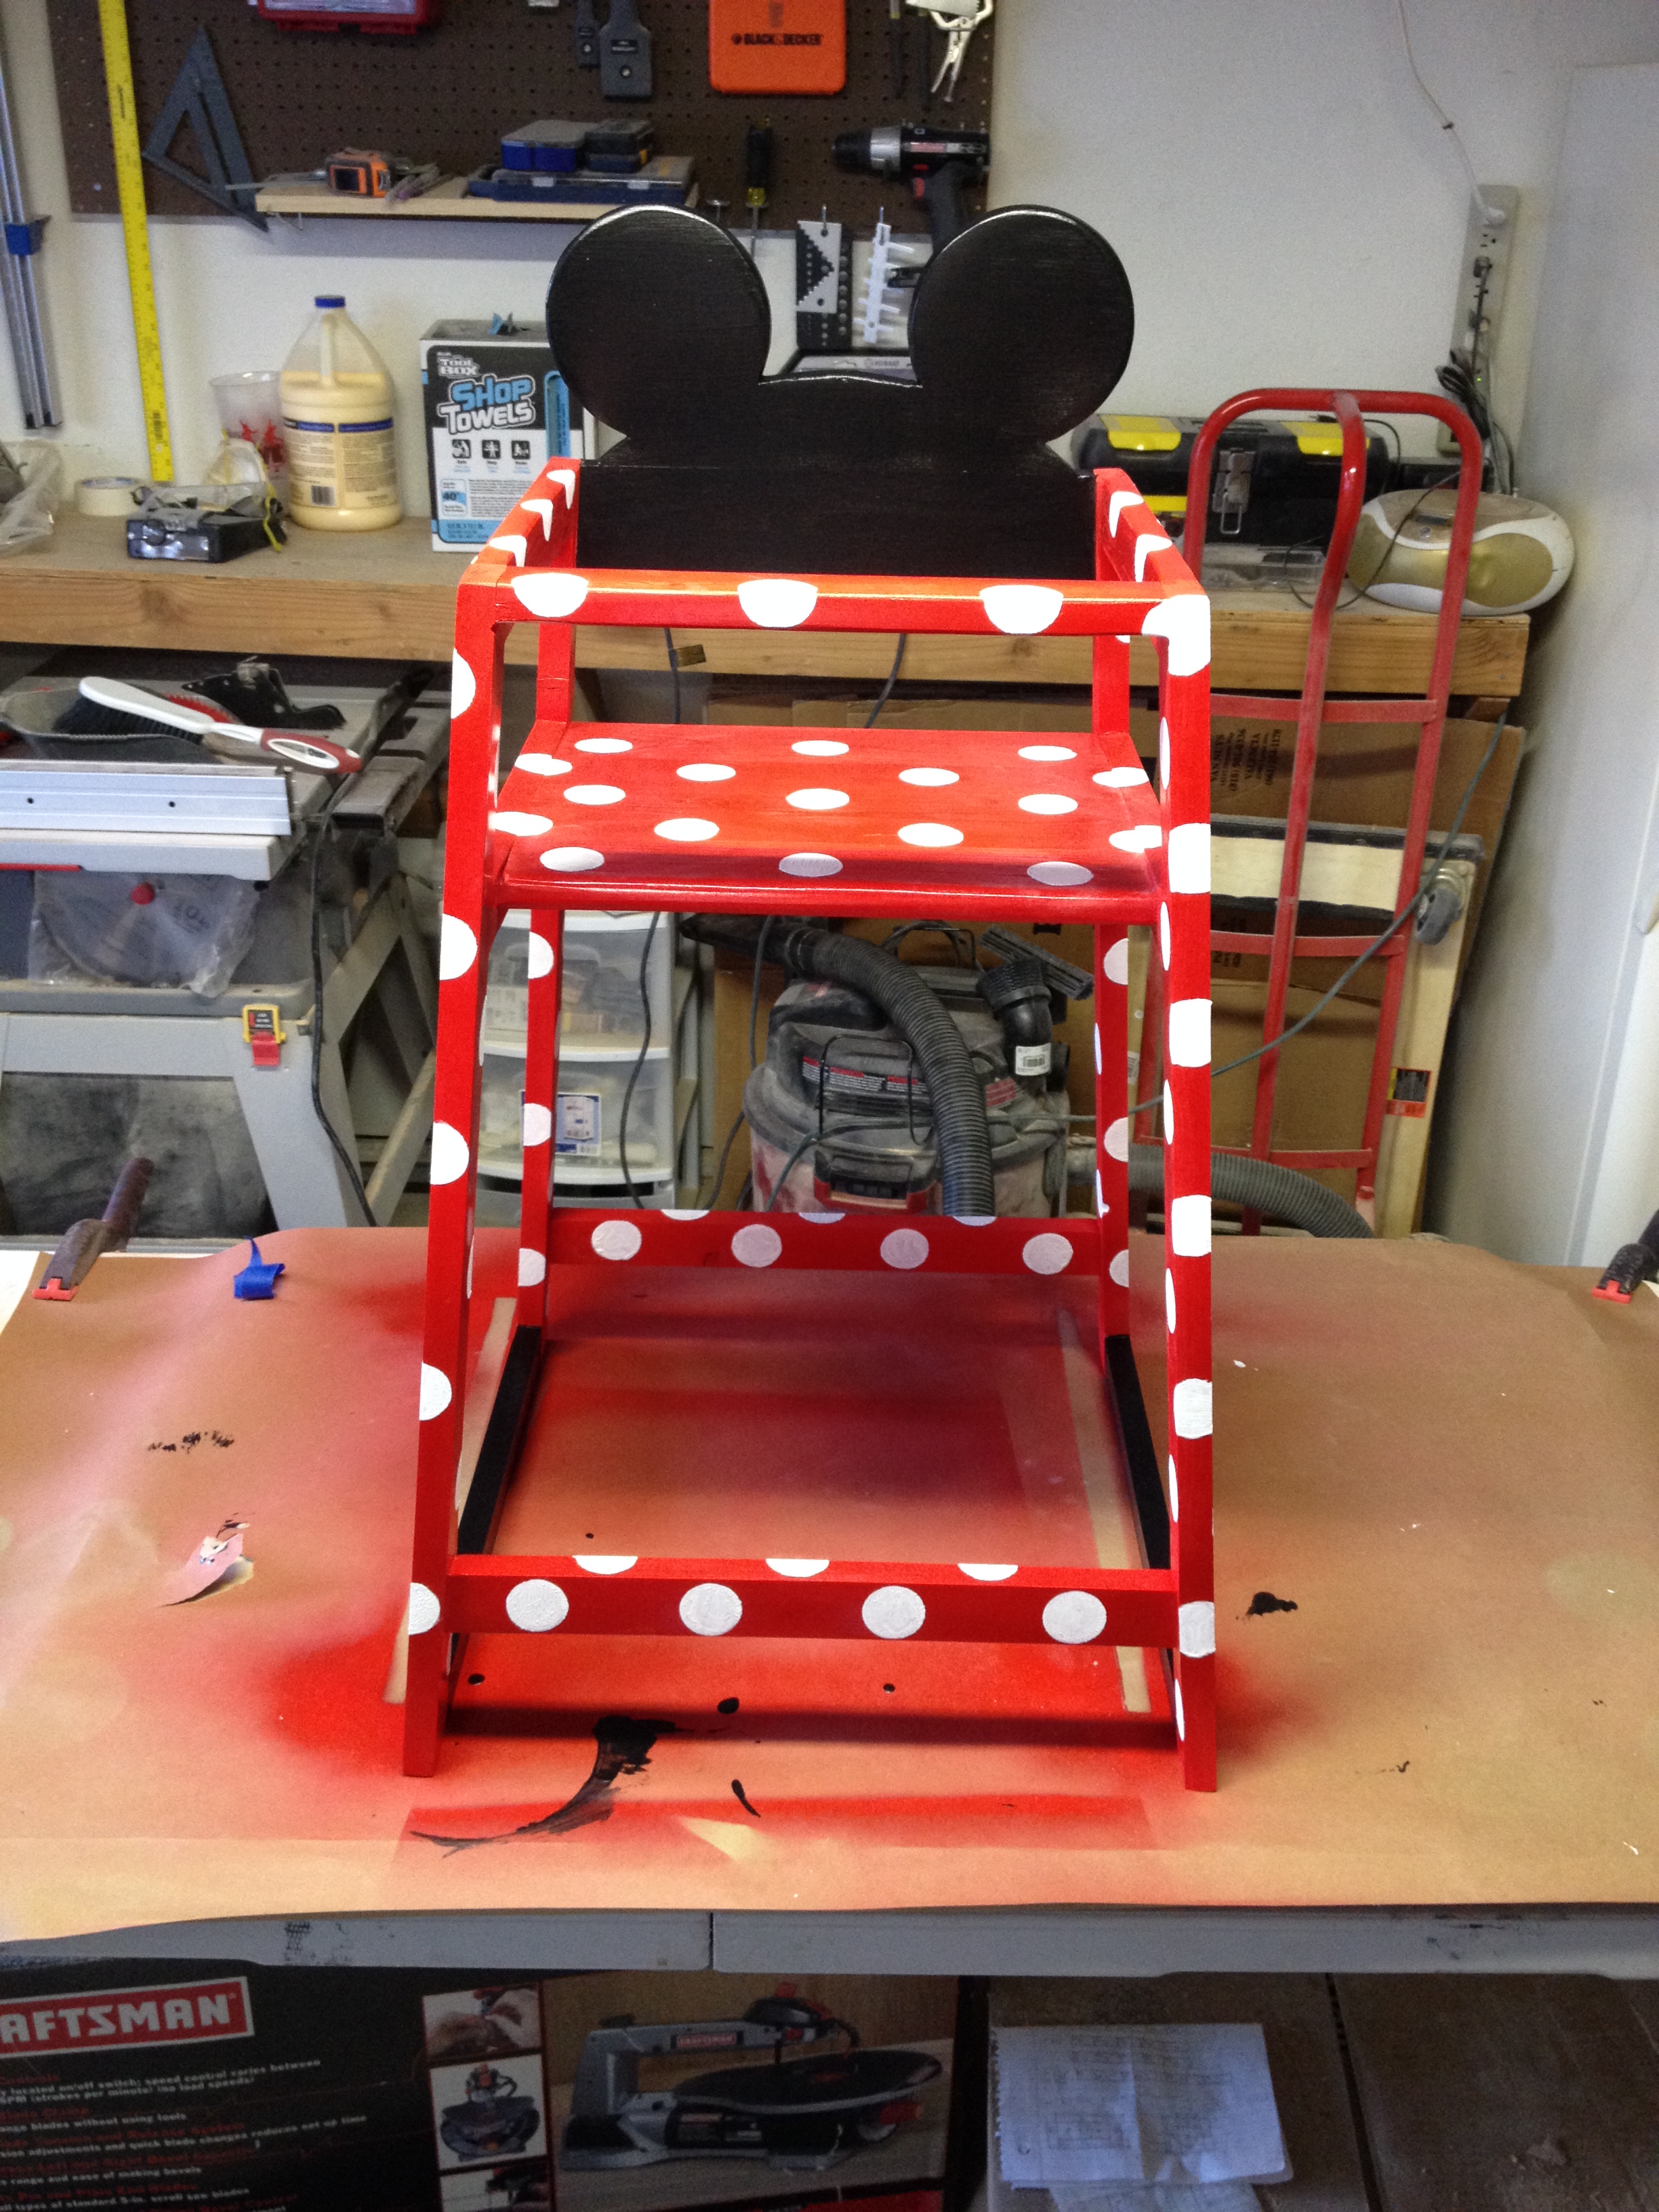
Restaurant High Chair with an add-on
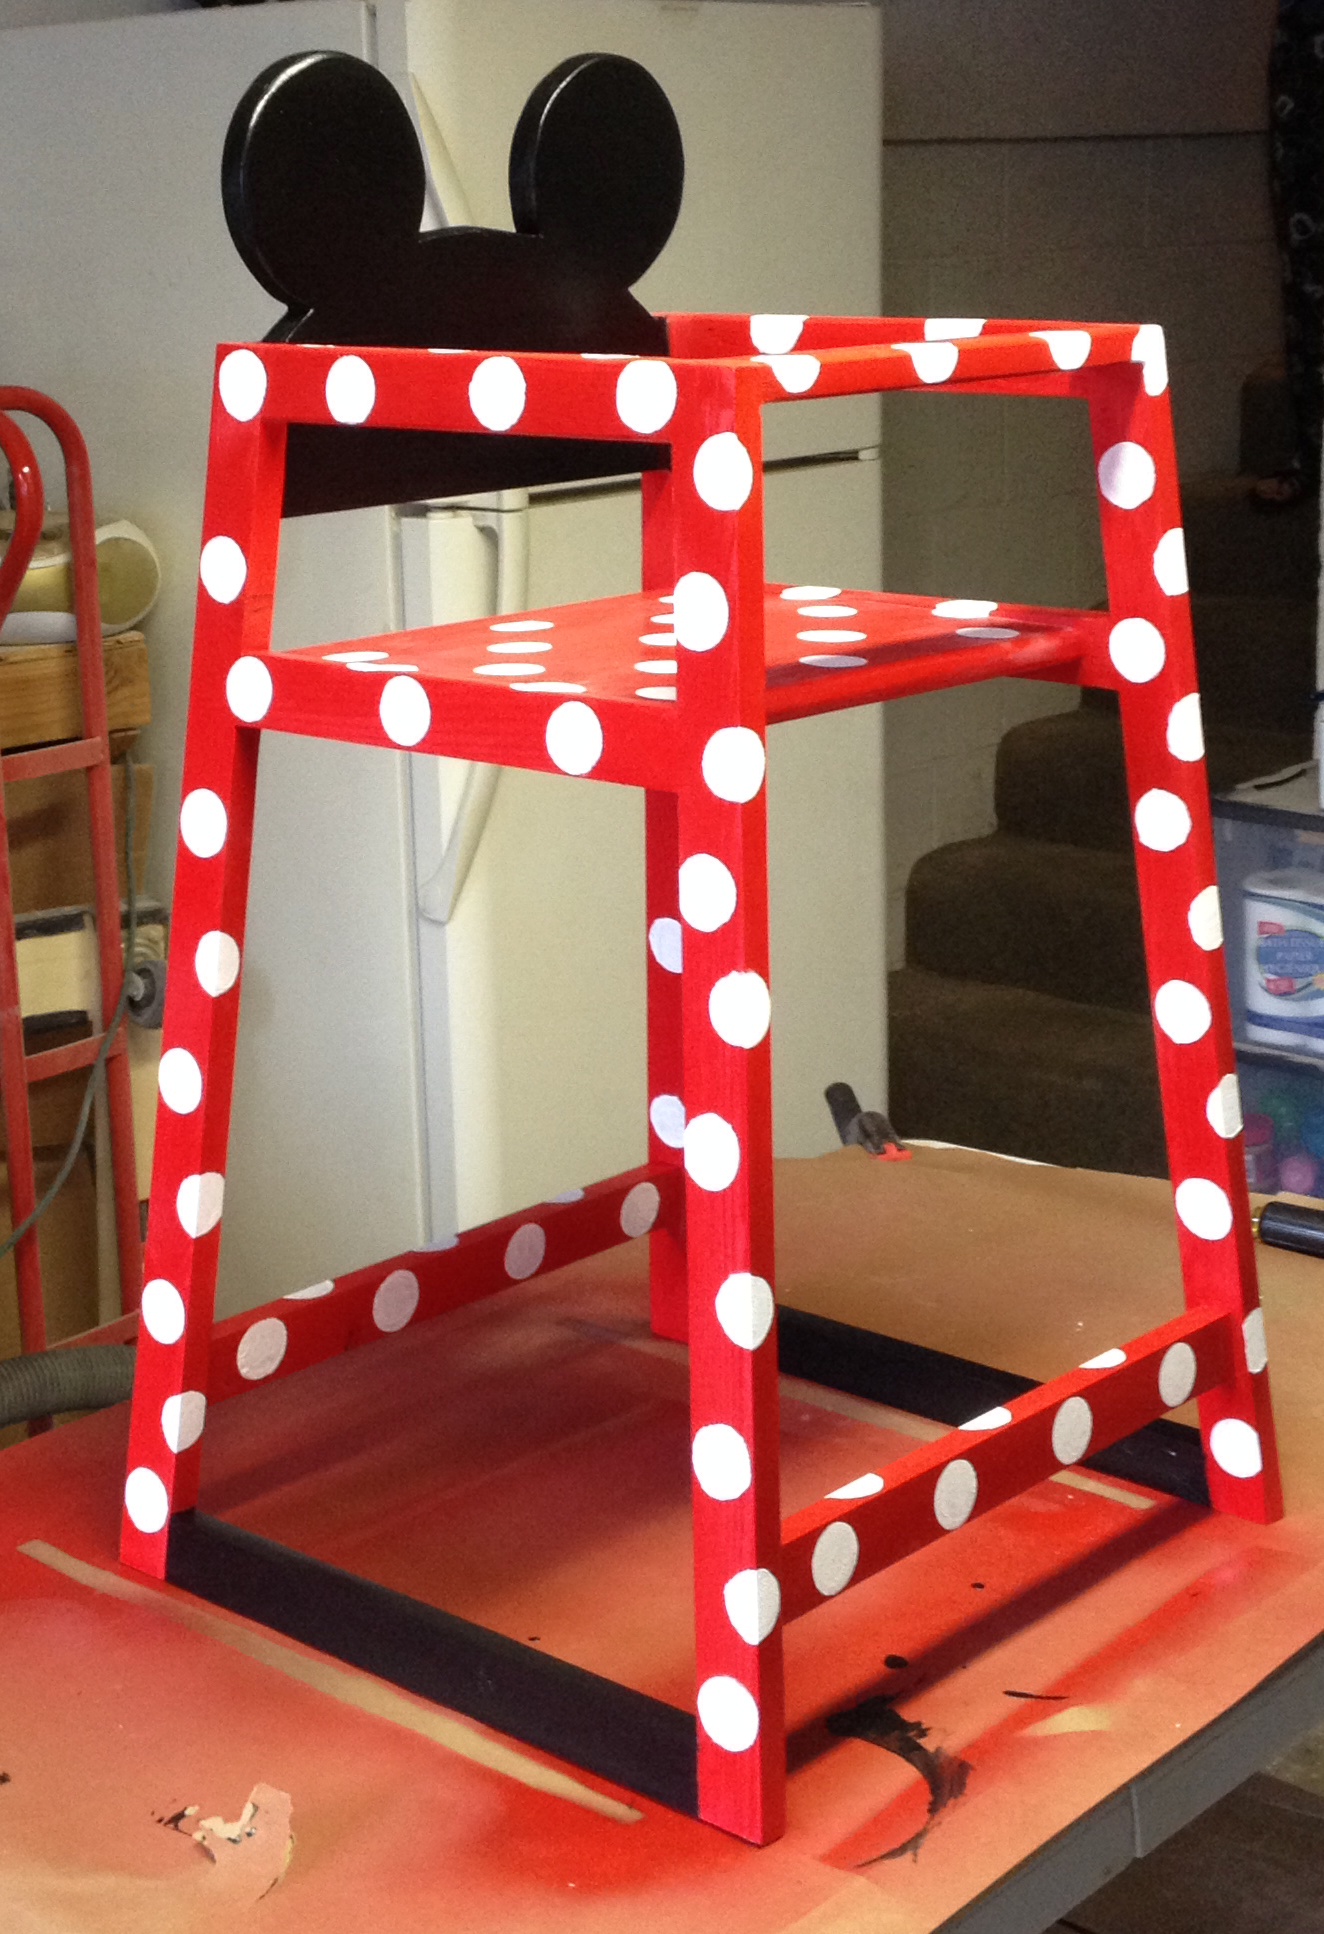
After my 6-month old daughter outgrew, or just got tired of sitting in her bouncy seat on the table while Mommy and Daddy ate, I decided to build her a high chair. I loved the plans and it looked pretty easy. It took me longer than expected, but I was using scraps and trying to be efficient with my cuts and waste. After making the chair, my wife said it'd be nice if we painted it Minnie Mouse themed, so I cut the ears using the jigsaw and attached them with pocket holes. I could have just made them as part of the chair (the back piece) but the idea didn't come until after the chair was complete. To make the ears, I just used a compass and quite a bit of an eraser. I used grid lines and tried and retried and retried and retried until it looked almost Minnie Mouse-ish. I was going to try a bow, but didn't want to to ruin it. I'd also like to try to inlay a bow, but that would mean not being able to paint it so that was a no go. I haven't added the safety straps yet, but I have them and will be putting them on before she sits in it--so no need to call social services.
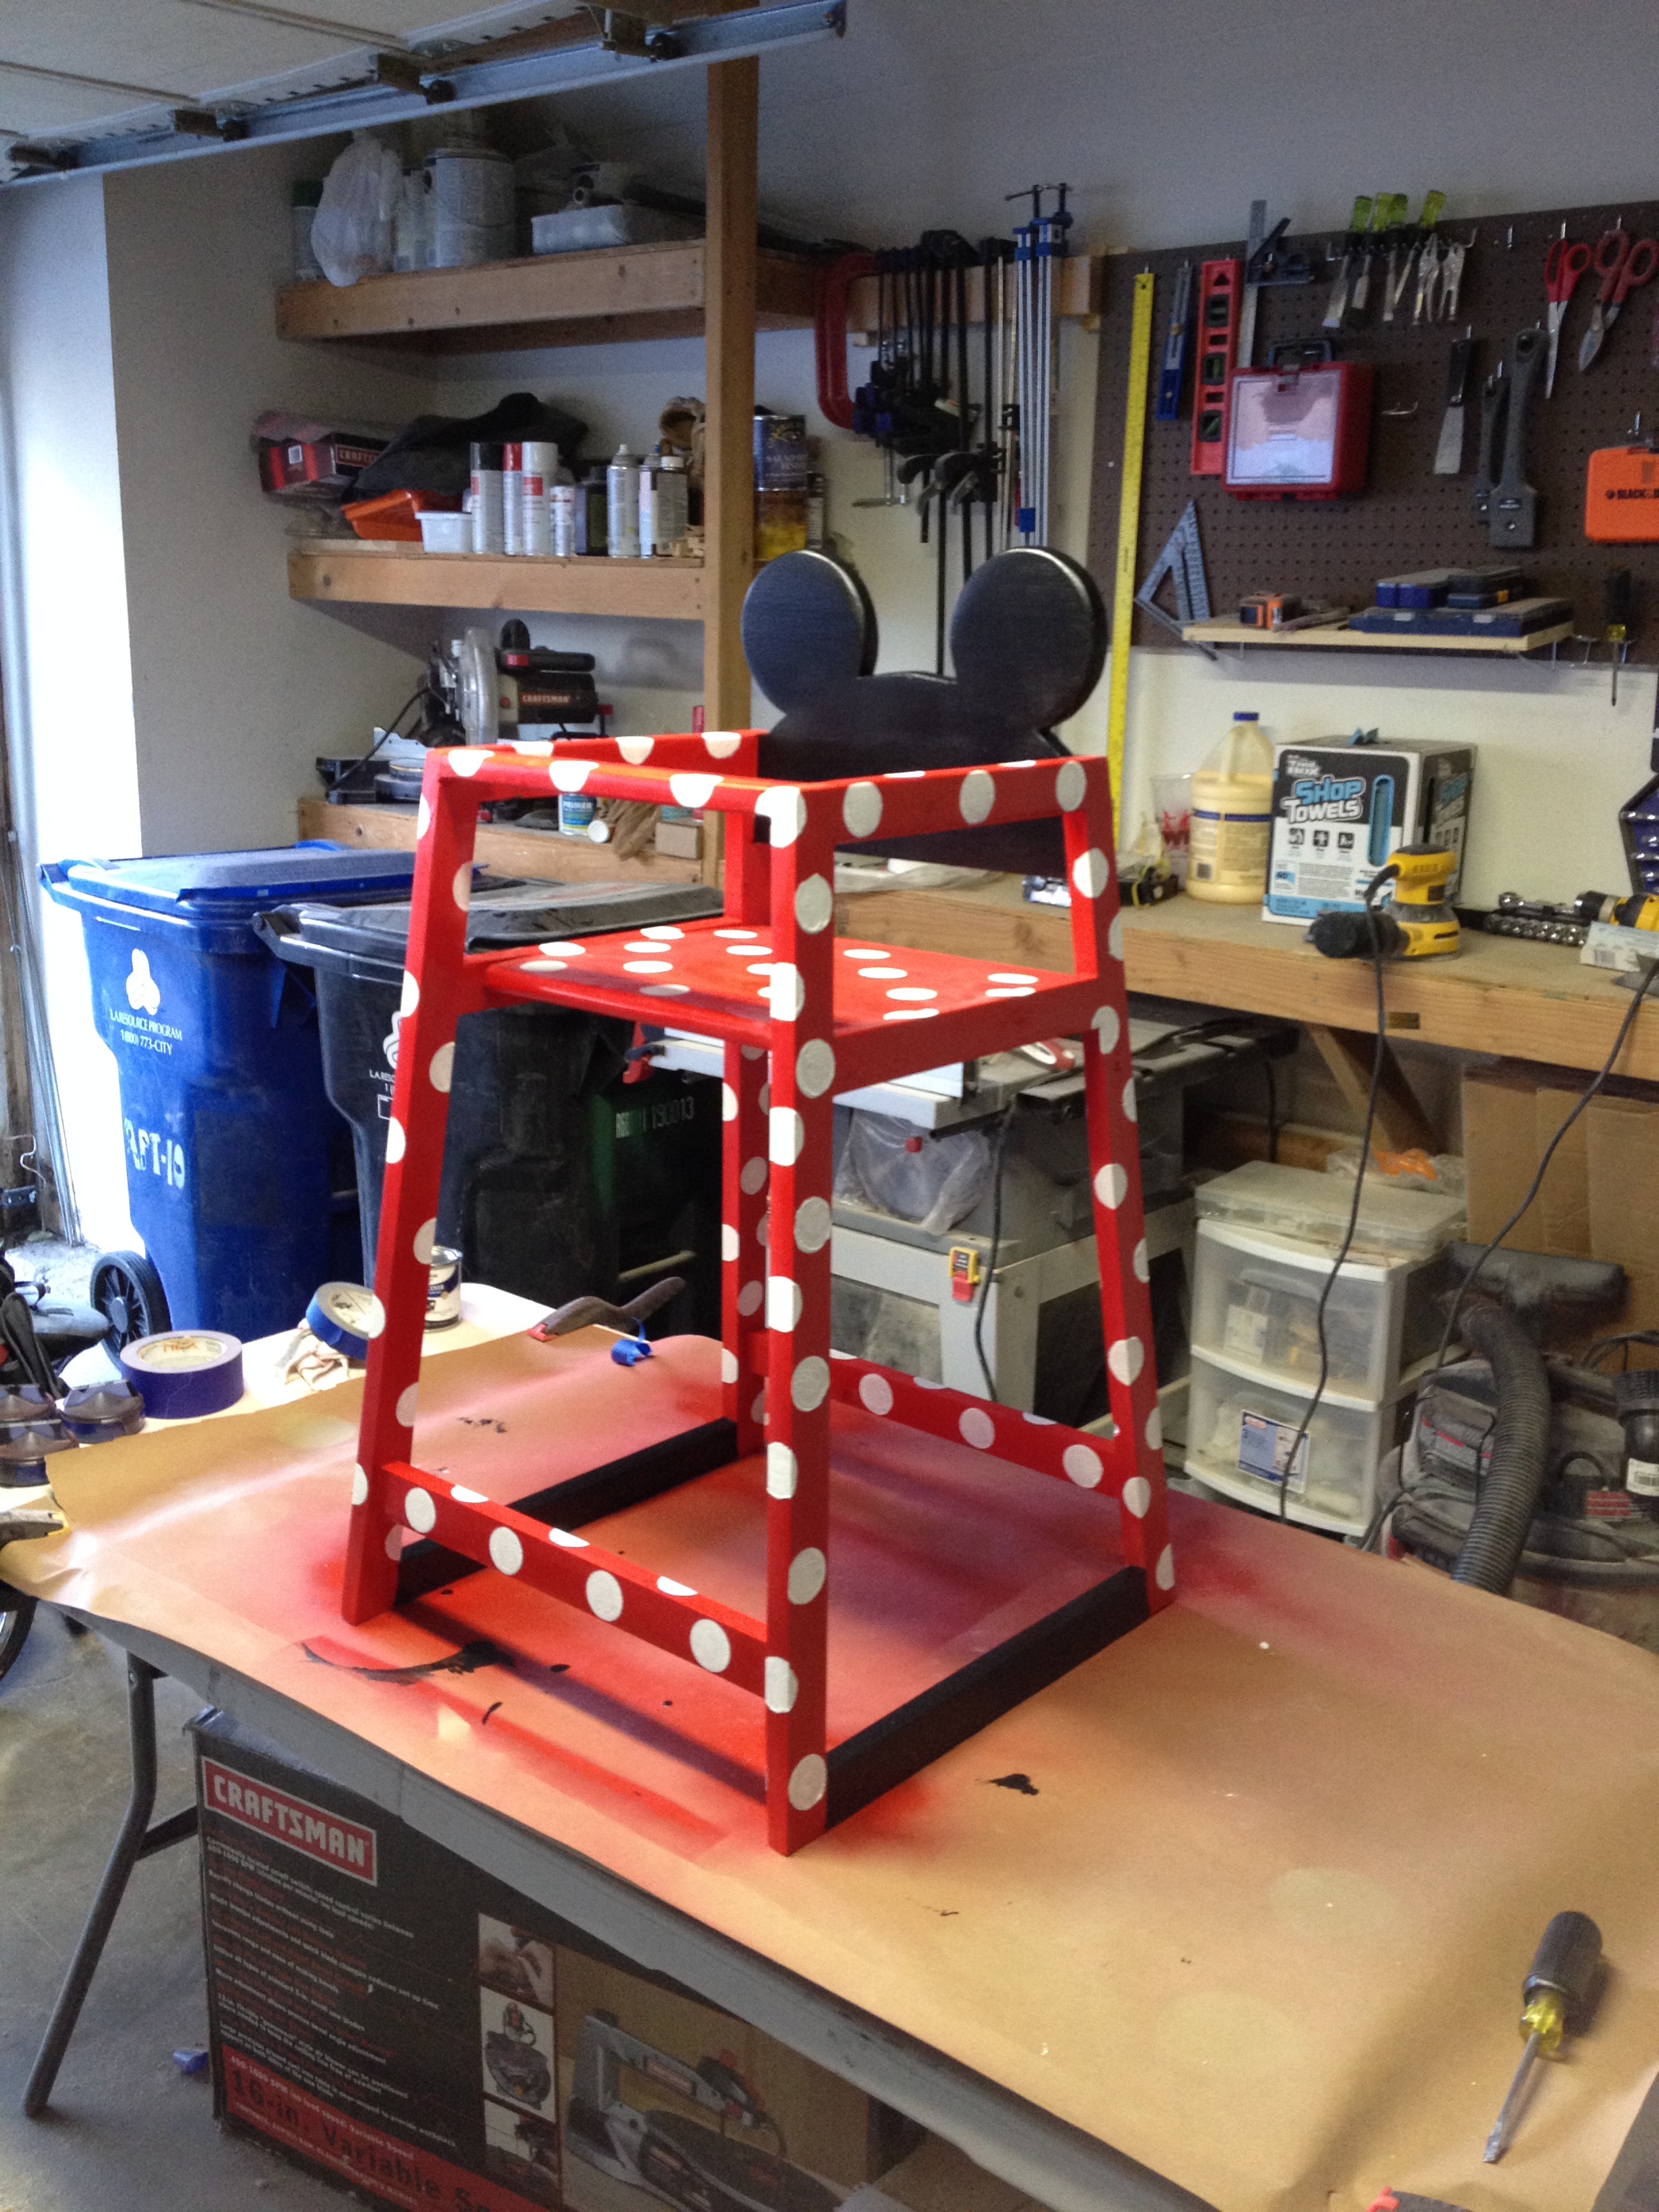
Built from Plan(s)
Estimated Cost
Around $30-40 including paint
Estimated Time Investment
Weekend Project (10-20 Hours)
Finish Used
I taped off the ears and lower stretchers and spray painted the body of the chair. Then I used a brush and brushed on two coats of the black for the ears and bottom stretchers. Lastly, I used a circular sponge brush from a hobby store to make the polka dots. I'm not very good with the sponge brush so I had to fill in with a small detail brush. I don't like the brush lines so I'm going to try and sand with 350 or 400 grit to get rid of the brush strokes. Then, I'll probably sand up to 600 grit to get a smooth finish.
Recommended Skill Level
Beginner
Comments
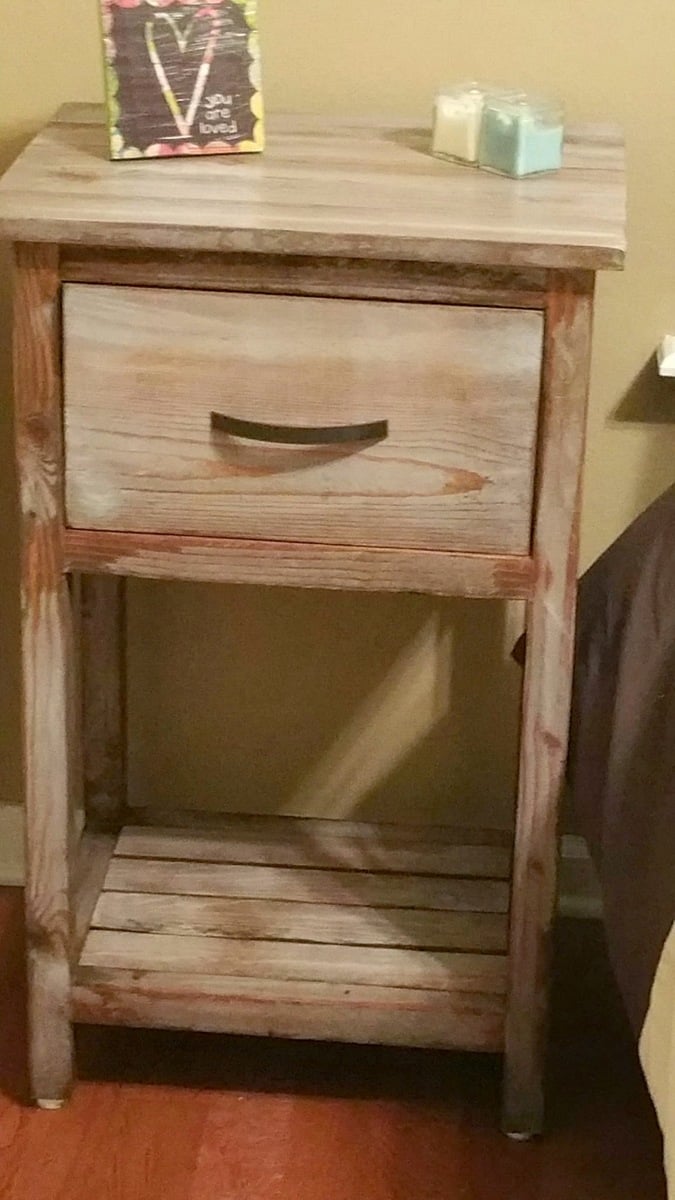
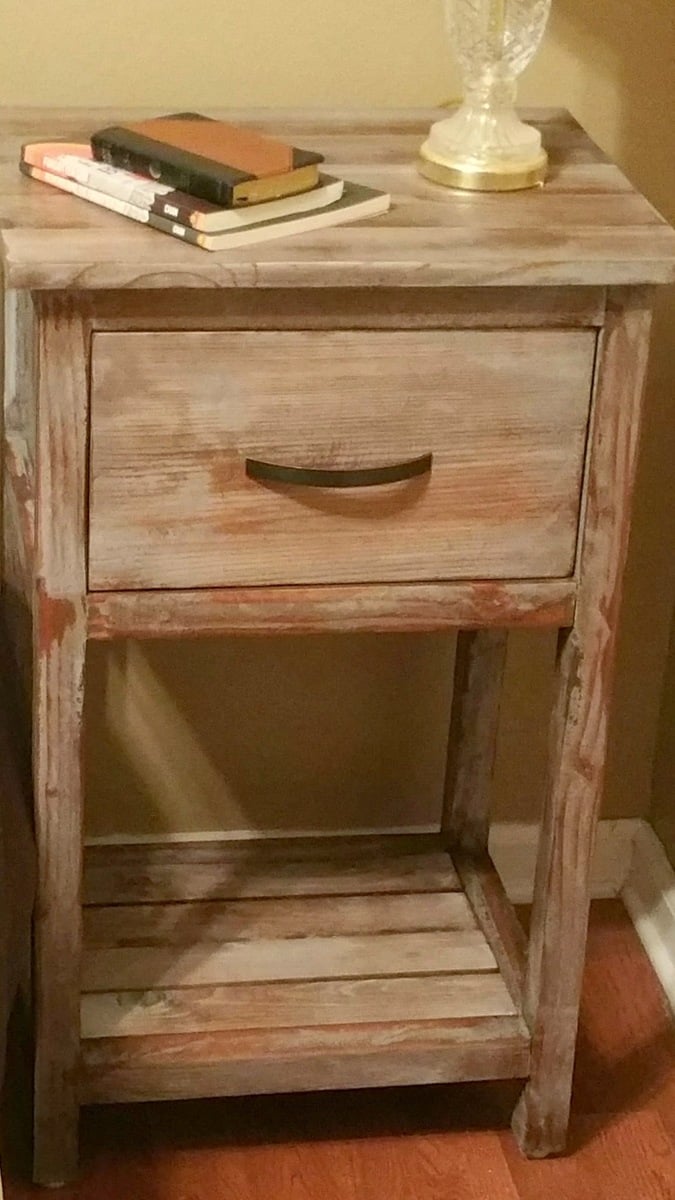
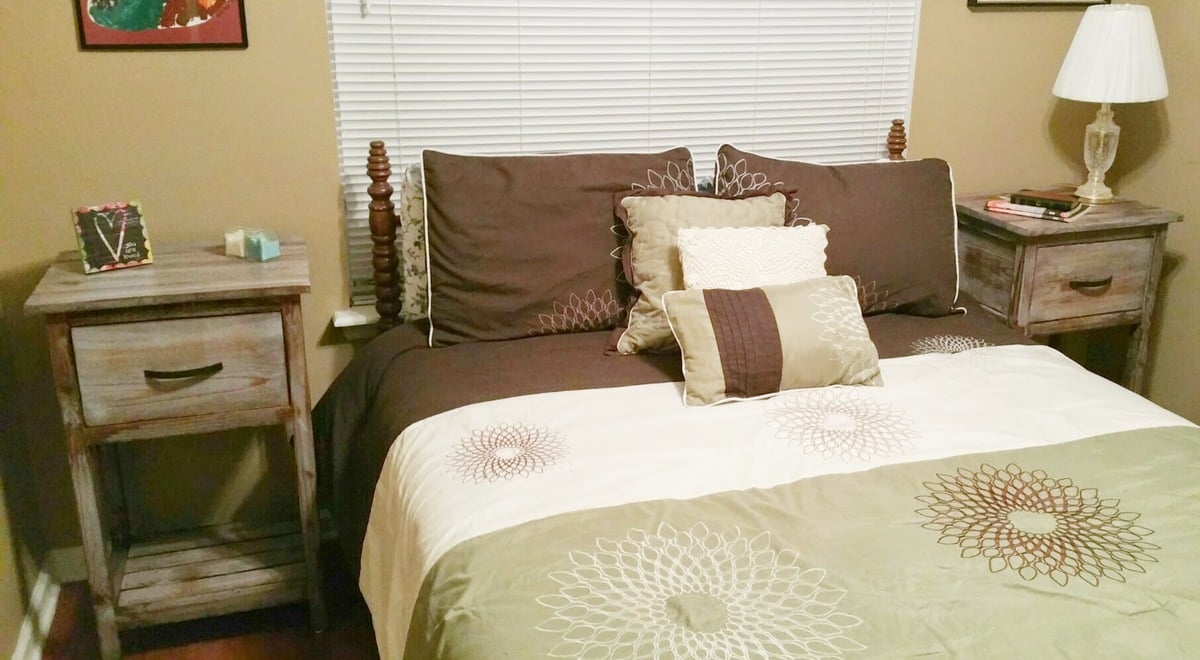
Oak mini farmhouse bedside tables
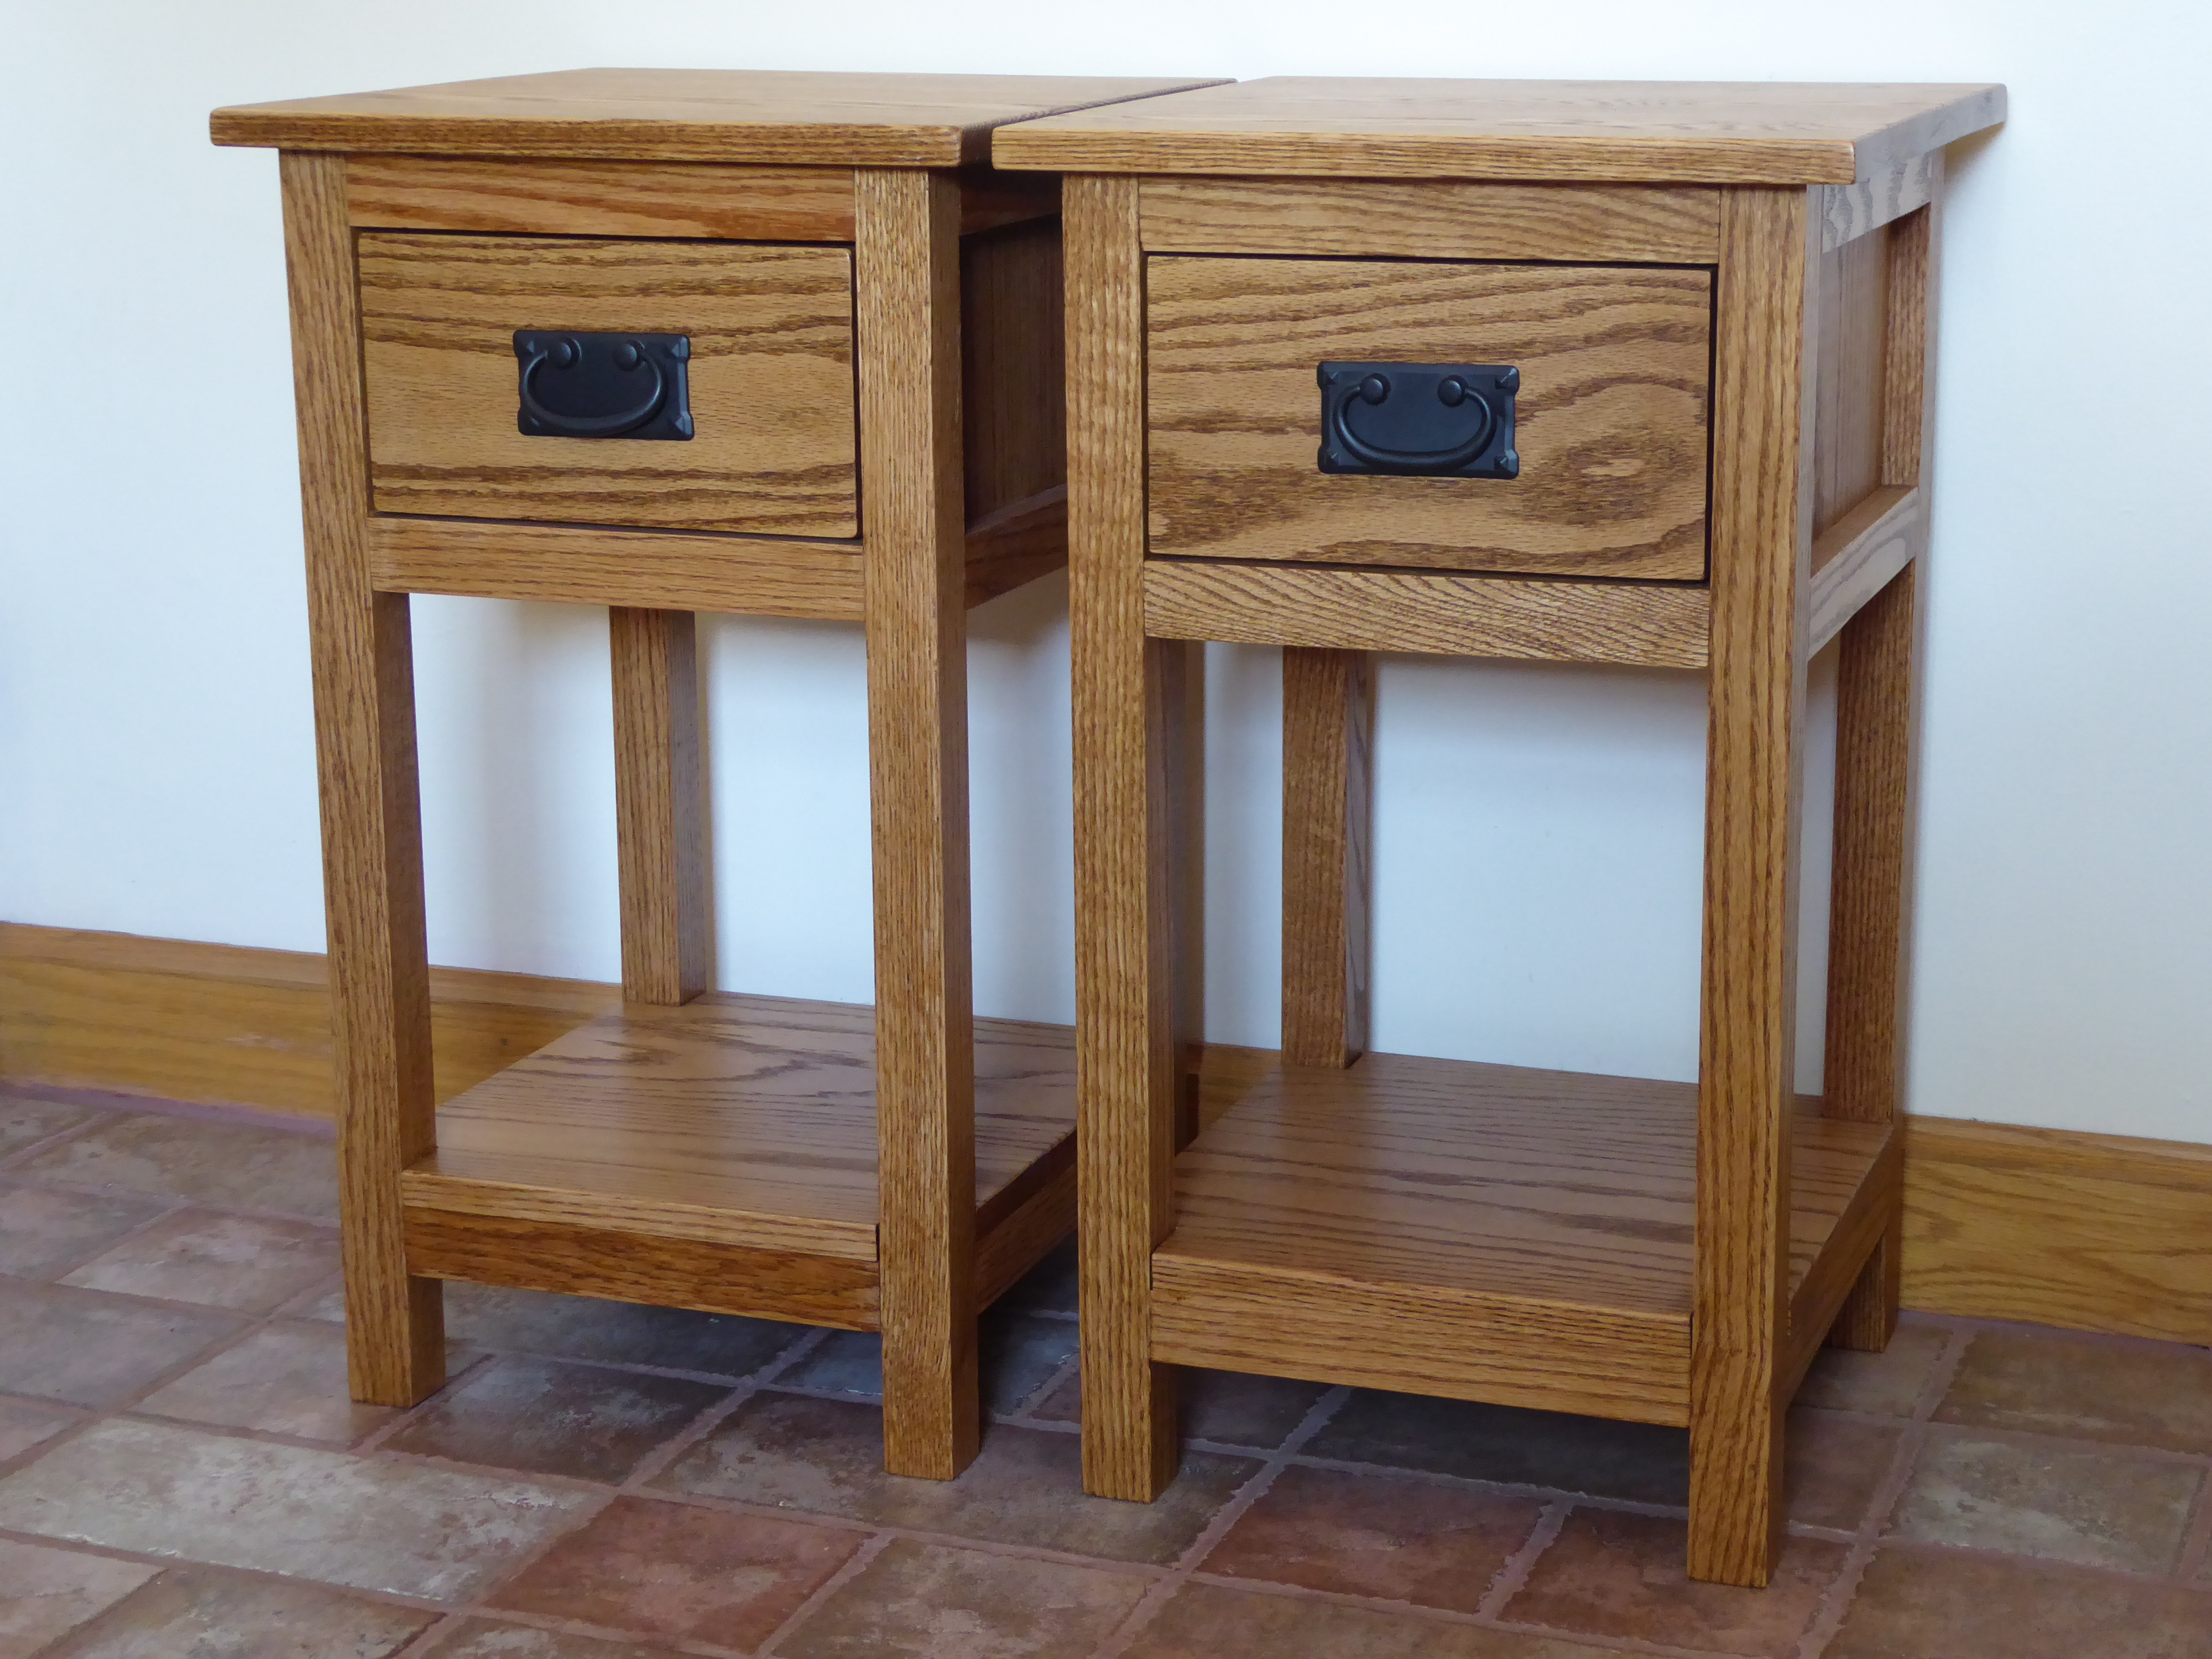
I have an Amish made oak bedroom set but needed a pair of bedside tables. Due to my limited space, the plans were what I was looking for with size and appearance. I bought a pair of drawer handles to match the rest of my bedroom set. Oak is expensive but it's worth it to me. I used poplar as the secondary wood for the inside of the drawers.
Built from Plan(s)
Estimated Cost
120 each
Estimated Time Investment
Day Project (6-9 Hours)
Finish Used
two coats of minwax puritan pine stain and two coats of minwax fast drying polyurethane spray.
Recommended Skill Level
Beginner