Community Brag Posts

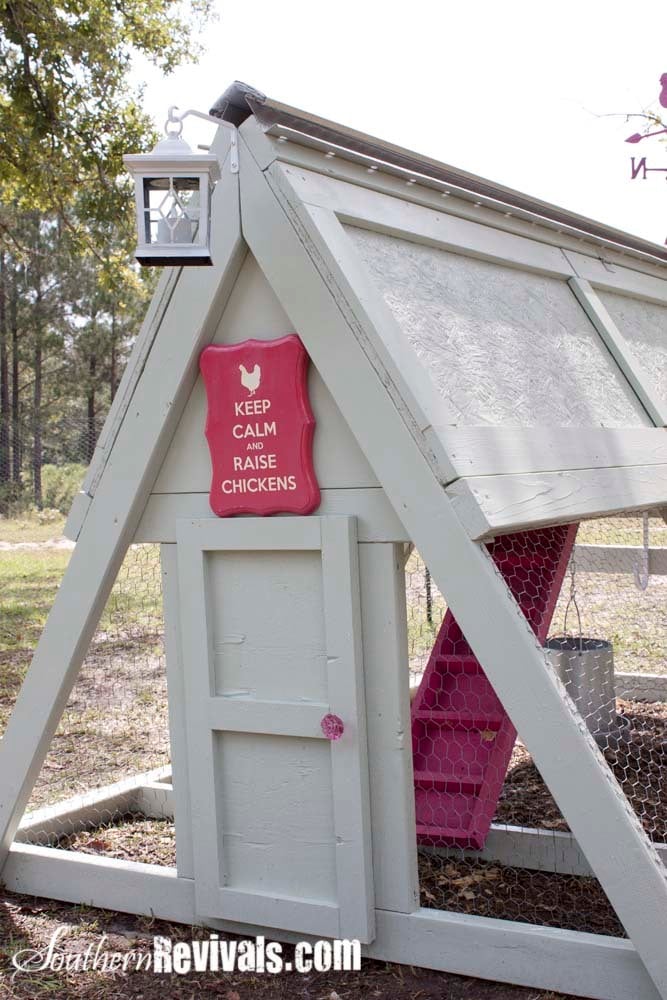
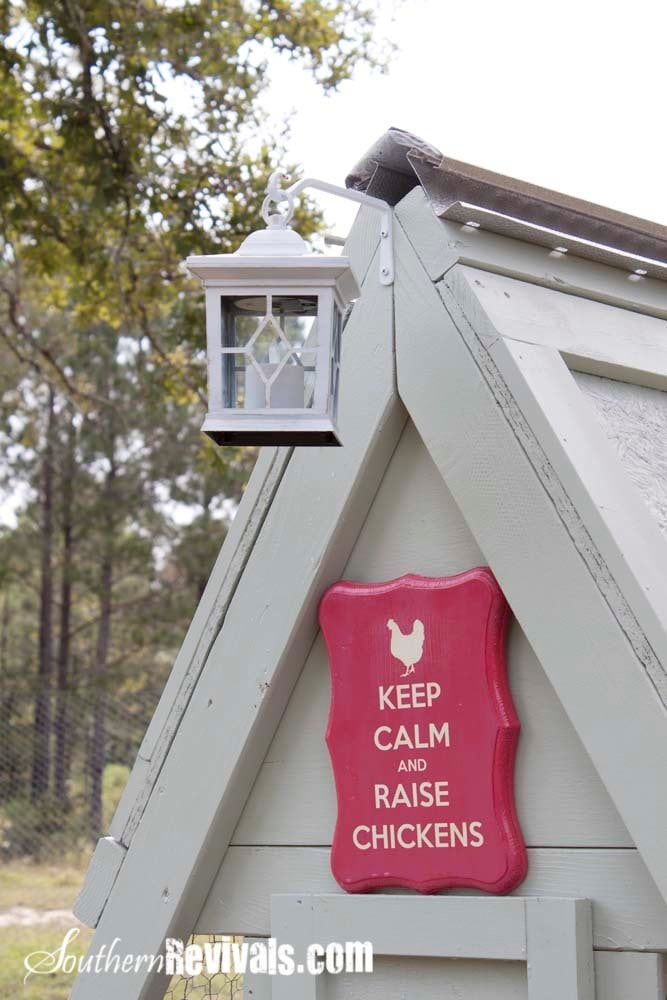
A-Frame Chicken Coop

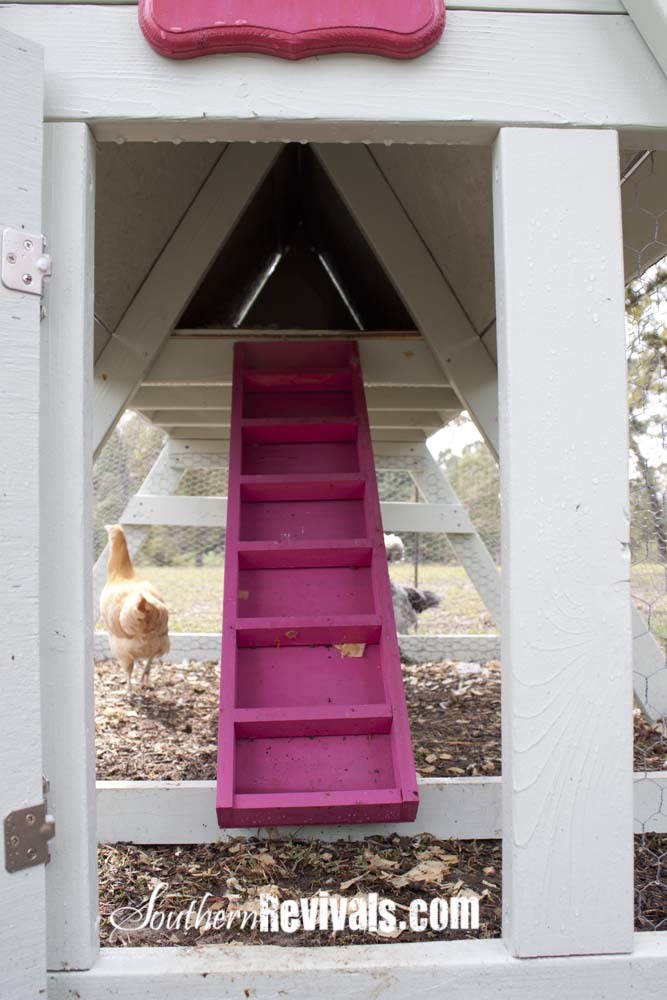
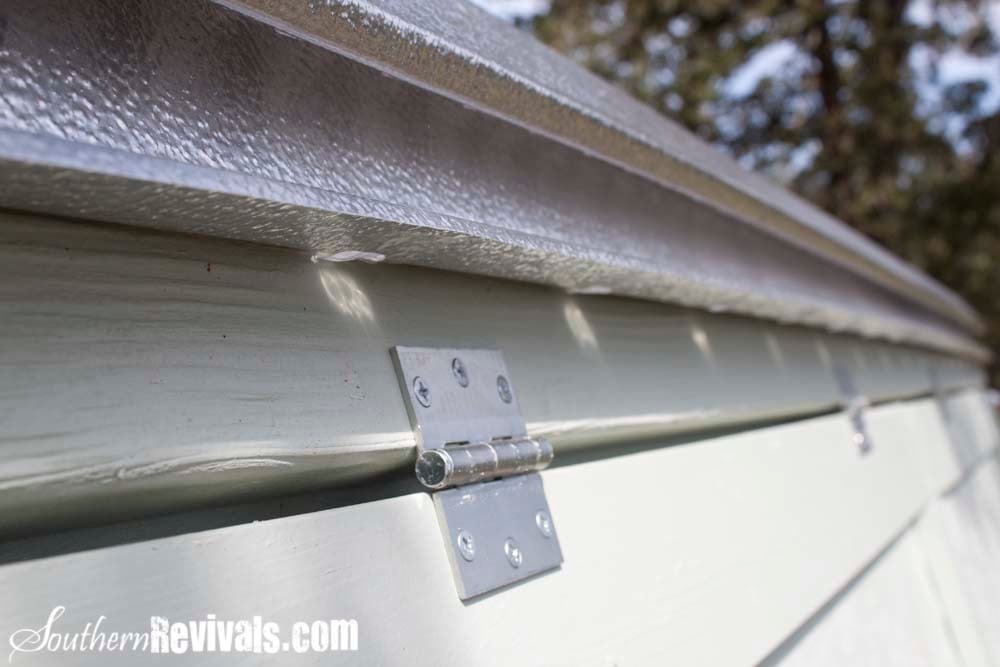
We took Ana's original coop plans and diva'd it up a bit to suit our needs and our climate. We added a pop door and decided to split the roof panels into four, three of which open up. We put the hinges on the top of the roof panels so we could easily prop them open. We also added a brace across the bottom of our ladder for support. Since we added a door I believe our ladder is a bit more steep than in the original plans.

Because we put our hinges on top we added lattice strips inside on the top of the door panels that go just under the 2x4 of the roof peak to keep the rain out. We also used a roof cap for the same reason. We went back and added silicone to the strategic places to prevent water leaking into the nesting box while also being careful not to affect the necessary ventilation.

We used OSB for our roof panels instead of T111 because it's what we had on hand and also because we were going to be painting it.

Finally I added handles to each of the hinged panels to make opening easy. And cute!

Built from Plan(s)
Estimated Time Investment
Weekend Project (10-20 Hours)
Finish Used
I used a no VOC exterior paint from Valspar (green) that I found in the mistinted section at Lowe's. The pink (ladder) is Very Berry by Valspar and is not an exterior paint.
Recommended Skill Level
Intermediate

Comments

anniejw17

Wed, 02/27/2013 - 11:11

Love your coop! It's so cute! I need to find a weather vane. We ended up adding a roof cap of sorts - just aluminum flashing really. It does still leak in the nest box, though, which just encourages me to change out the bedding for fresh straw, which is a good thing I guess!

Southern Revivals

Wed, 02/27/2013 - 13:24

Yes mine leaked, too. We added the roof cap and some silicone but that still didn't stop it. So I finally went in and added some screen molding behind the panels in the nesting box. It still isn't quite "leak proof" but it is better. I will share if I figure out how to make it leak proof! Thank You!

billd333

Mon, 01/13/2014 - 09:45

These were great plans, thanks for sharing!
I'm new to having chickens so since it's cold now is Massachusetts I'm holding off on getting a couple of hens. The 2 main questions I have are where did you end up mounting the roost? And where did you end up putting the nesting box? I only put a floor on half so was thinking the roost board could be suspended above the ground on the open side. That leaves the 1/2 floor to hold the nest box?? Please any comments on the roost, nest box, watering and feeding systems are welcome.
thx..Bill

Southern Revivals

Mon, 01/13/2014 - 10:03

Hi Bill,

I am actually in the process of writing another blog post about this coop. I have gotten so many questions about the modifications we did and have lived with it long enough to know what I would have done differently. You doing the 1/2 is great and is one of the things I would do differently if we had it to do over again.

I will post an update here as soon as that post is live. In the meantime, feel free to contact me directly at Jamie @ Southern Revivals.com

Thanks!
Jamie

Revised Dog Crate

Submitted by mecoda on Mon, 08/04/2014 - 09:26

First project made from scratch....took me a while but glad it is finished! Will try to do one more of a larger size for my other dog.

Estimated Time Investment
Week Long Project (20 Hours or More)
Finish Used
SafeCoat Durostain (birch and walnut)
Vermont Natural Coatings for the topcoat
Recommended Skill Level
Starter Project

Comments

Outdoor Modern Sofa

Submitted by Anonymous (not verified) on Sat, 08/08/2020 - 07:31

This was my first time DIYing furniture, so I definitely came up with a very easy design!

The dimensions for this sofa are modern as it sits low to the ground and has a squarish appearance.

Free detailed plan on Blog: www.MinimalistFarmStyle.com

Estimated Cost
$100
Estimated Time Investment
Day Project (6-9 Hours)
Finish Used
Watered down Varathane Water-based Java Bean.
Recommended Skill Level
Beginner

$10 Ledge for the Bathroom

Submitted by hmagnani on Tue, 08/19/2014 - 12:14

I built a ledge from some scrap wood laying around but had to buy a 1X6X8 for the bottom. It took about an hour to build from cutting to finish and then another couple hours to paint. I needed this in our bathroom because we have no bathroom storage and I needed to get medicines and such up away from busy little hands. Awesome plans, great little shelf!! Thanks, Ana!

Built from Plan(s)
Estimated Cost
$15
Estimated Time Investment
Afternoon Project (3-6 Hours)
Finish Used
One coat of primer and then two coats of semi-gloss white interior latex paint.
Recommended Skill Level
Starter Project

Vegetable Bin

Submitted by Anonymous (not verified) on Fri, 10/16/2020 - 07:02

My first Anna White build. Easy and fun. I made this for my Grandmother for Mother's Day 2019. She absolutely loved it.

Built from Plan(s)
Estimated Time Investment
Weekend Project (10-20 Hours)
Recommended Skill Level
Beginner

Tall Secretary Cabinet with Mail Slots - Tilt out Trash/Recycling

Submitted by Anonymous (not verified) on Wed, 10/28/2020 - 08:55

First "real" wood-working project in the books. I combined two of your plans so that we would have space in our kitchen for recycling and trash, as well as shelving for pots/pans and all the mail that piles up. We had a narrow section, so made this out of 10" boards, instead of 12". I will possibly add the secretary door at some point, if for no other reason than to hide all the snacks! Thanks for having so many amazing plans available, they keep me dreaming of endless possibilities.

Estimated Cost
$160
Finish Used
Dark blue paint to match kitchen base cabinets.

Comments

Light Wash Balustrade Coffee Table

Inspired by the RH Balustrade Salvaged Wood Coffee Table.

Built from Plan(s)
Estimated Cost
250
Estimated Time Investment
Day Project (6-9 Hours)
Finish Used
General Finish Milk Paint (color: Linen) custom wash. Finished with glaze in Van Dyke Brown.
Recommended Skill Level
Beginner

Farm House Table

Submitted by Anonymous (not verified) on Mon, 02/13/2017 - 13:42

I am not a carpenter, I do not even have a tape measure. I got tasked by my leadership dothan class to build a farmhouse table for the academic dream room which is part of the Bright Key Program. Which is being renovated at Honeysuckle Middle School. Found your plans and got inspired. One glitch they wanted this table to be able to sit fourteen chairs. So I had to make a few adjustments like increasing the main boards to twelve foot. Because of your plans, many urban middle schoolers will have a place to get tutored considering cafeteria tables are so expensive. I am a believer of your plans. The positive feedback I received was well worth my time and would not of been a sucess without your plans. I did mine with pocket holes as well. 

Estimated Cost
146.37
Estimated Time Investment
Weekend Project (10-20 Hours)
Finish Used
American 230 and the middle a bluish grey.

Spent an hour picking out lumber. All boards are not the same length. Ran through a planer and I found it eliminates the need to sand. But remember not to plane them to different heights. Pocket holes are great but I found some really nice table joints at Lowes that looked classy with the kreg screws.
Recommended Skill Level
Beginner

Comments

Loft bed with stairs

Submitted by donk on Tue, 11/24/2020 - 15:14

I started planning this project this spring when we bought and moved into our new house. I knew with the room size a loft bed would make the most of the room. My daughter is scared of heights a little bit so I was worried about using a ladder. I stumbled on this site and these plans and knew this is exactly what I was going to build. Ever since we finished painting it and getting her room done she has been glued to it!

Comments

2x4 (and 2x6) Modern Adirondack Chair

Submitted by HR Dad on Mon, 12/28/2020 - 15:43

Been wanting to make some Adirondack chairs for years; have about 10 different plans saved that one day I could get to. These 2x4 modern plans made getting them done quickly possible due to simplicity of the cut list and cheap cost of materials. The only real change I made was to use 2x6 for the arms; I cut a taper along outside edge and increased the length of the arms by about an inch and a half to overhang the front legs a bit. Since I just used basic framing lumber, I milled all of the boards first with table saw and planer to make square consistent edges. And, I chose to use pocket screws in as many joints as I could so I wouldn't have screw holes on any visible faces. Add in a lucky find at the big box store paint return; scored this blue exterior paint for $2.00 a quart, and my weekend project turned out pretty good. Now I've got two neighbors that want 'em.

Estimated Time Investment
Weekend Project (10-20 Hours)
Finish Used
1 qrt Glidden Exterior Semi-Gloss; got it so cheap, I used the whole quart. Multiple coats.
Recommended Skill Level
Beginner

Penney's Sewing Table

Built the sewing table for my wife Penney. It has a work surface that is 36" x 60" and is 32" high.

Used 3/4" Baltic Birch and used premium pine to add edge banding. Used 1/4" plywood for a back to the sewing table to add strength and I think helps the look of the table. My Kreg Jig was used everywhere possible when assembling the case. Used full length piano hinges with #6 x 5/8" screws to attach the leaves to the table. Made the doors using premium pine with a plywood panel. For the legs, I used folding, locking leg brackets from Lee Valley to attach the 1-1/2" square poplar legs. The casters are 3" double-locking from Woodcraft. 

Went a little over budget, but it turned out very nice and she loves it. 

Thank you for the easy to follow plans. 

Built from Plan(s)
Estimated Cost
$275
Estimated Time Investment
Week Long Project (20 Hours or More)
Finish Used
Benjamin Moore Advance Paint semi-gloss. Sprayed 3 coats using HVLP sprayer of both white and green. Used Benjamin Moore Fresh Start Primer - 2 coats sanding between the coats.
Recommended Skill Level
Intermediate

Comments

Cedar Fence Picket Raised Garden Beds

I made these for my 81 year-old Grandma, and I will be making some for my own front yard soon. I followed the plans and ripped the fence boards instead of buying the optional 1x2s. My awesome dad showed me how to use the table saw, but the rest I did all by myself! We decided to leave them unfinished for a natural look. It took me about 7 hours total broken up to make all three, but this is my first project and I was slow. Thanks Ana, for inspiring this working Mom to pick up a hammer and get stuff done!

Estimated Cost
$13 per bed in fence boards
Estimated Time Investment
Afternoon Project (3-6 Hours)
Finish Used
Left unfinished
Recommended Skill Level
Beginner
Seasonal And Holiday

Ukrainian Sand box with built-in seats

Submitted by Anonymous (not verified) on Tue, 05/30/2017 - 05:28

 I live in Lviv Ukraine and painted it in he national colors of Ukraine.

The wood came from a old pallet.

Built from Plan(s)
Estimated Time Investment
Weekend Project (10-20 Hours)
Finish Used
Outdoor enamel paint
Recommended Skill Level
Intermediate

Cedar Outdoor Stools from bench

Submitted by sylvialh on Fri, 08/27/2021 - 05:21

one of my first ana white plans was a cedar outdoor table and chairs that I was never 100% happy with but never the less lasted ten years before yesterday when I decided to undo all the screws (I didn't use glue on this one and it wasn't a kreg project - probably why I wasn't happy with it!).

I transformed those simple benches and table into four stools (varying heights for various members of the family) as well as a cedar planter. So the wood was 100% from the previous project so there is a lot of variance in the stain.

I sort of merged the adirondack stool and the farmhouse counter stool patterns as I didn't do both a bevel and a mitre cut I just a 5 degree mitre for the legs.

I used 1x3 and 1x4 for the legs and joined them together to make an L (I saw this on another brag post on the site) because I wanted to reuse the wood that I had leftover from the bench.

I put together the entire project using glues and brad nails but I will be adding some extra screws for longevity.

for the top, I took a 1x4 and traced a slight angle out of the top based on that of another stool I had and cut it out with a jig saw, to make the seat a bit more comfortable than the flat seat on the farmhouse stools. They are very comfortable and this was such an easy mod!

Comments

The Greenhouse Gets a Custom Door Window!

Submitted by Anonymous (not verified) on Sun, 09/05/2021 - 06:00

I knew I wanted an unusual window in our new greenhouse door. It took a lot of looking, but finally found what I was looking for!

Built from Plan(s)

Comments

Patio Table w/Built in Beer/Wine Cooler

Submitted by RoyBoy on Sat, 05/18/2013 - 06:58

After seeing the patio table with beer/wine cooler, I wanted to build this for my brother and wife who recently bought a house. I asked them if they were interested and of course they said yes. I modified the original plans by adding a 2x4 on each side of the cooler to make the table wider. I also made the legs out of 4x4 vs the 2x4s that were originally called for. I used redwood and then stained it and used a varnish for the final coating. I probably wouldn't use the varnish again for an outdoor table, because it looks like it should be an indoor table vs outdoor. Overall, I'm pleased with the results and the best part about it, I get to enjoy it every time I go over for a BBQ.

Estimated Cost
$225-250
Estimated Time Investment
Week Long Project (20 Hours or More)
Finish Used
Olympic Redwood Naturaltone Toner Exterior Stain
Cabot Spar Varnish Semi-Gloss
Recommended Skill Level
Beginner

Comments

Msharp1211

Wed, 07/03/2013 - 13:04

Awesome table, do you happen to have the measurements you used. I'd like to make the same table but I need the lumber yard to make the cuts.

Simple Square Outdoor Table

Submitted by hannant on Mon, 08/07/2017 - 15:10

Inspired by Finn's Dad's table, we decided to copy it since we wanted to build a table that would seat 8 comfortably. The most difficult part of this project was finding clear cedar for the top. It had to be ordered through our local lumber yard and we were not able to match boards. We built the frame out of treated pine and the 4 x 4 legs from average greade cedar found at Lowe's. We finished it with four coats of polyurethane. 

Built from Plan(s)
Estimated Cost
$300-$450
Estimated Time Investment
Week Long Project (20 Hours or More)
Finish Used
Zak Polyruethane marine satin
Recommended Skill Level
Beginner

Rustic X Console

Submitted by srodge1 on Mon, 10/04/2021 - 19:47

Built this for some dear friends ... turned out so pretty.

Built from Plan(s)

Comments

DIY Folding Workbench

Submitted by suzeet305 on Mon, 10/18/2021 - 18:32

I'm a beginner DIYer and I knew one day I was going to have to make a workbench. I made mine 24x48 so I wanted a little more support to hold up the drop down leaf. I searched your site and found another plan with these gatelegs and knew this is what I wanted. I love the way it came out. What do you think?

Built from Plan(s)

Comments