Wishing well projects
Started these wishing wells as only having fun and for family it seems now that it is going to be a little more than I thought now taking orders from family friends
Great project! Thank you Ana!
1 thing though, it was 6-2×6×8' boards!
Cheers!
Tue, 04/28/2020 - 09:21
Beautiful job! Thanks for tip on boards, I'll double check the shopping list.
I took this opportunity while quarantined to make this set. I think it came out really beautifully!
I found this plan for the fancy farmhouse table on Pinterest and decided to tweak it to work as a console table.
Mon, 07/02/2012 - 14:46
Absolutely gorgeous. And what a great idea to make it a console. I am trying to figure out if I can fit it anywhere in my house. I really want to know about the top. Did you cover it in metal. I would love to hear what you did.
Sat, 10/20/2012 - 20:49
I would really love the measurements for this console table if that's possible.I'm also doing the farmhouse kitchen table and this goes great with it & my open floor plan :)If I'm unable to get the measurements from you can you provide me with someone who has them or another link maybe... Thanks
In reply to DIY Farmhouse Console Table by HeatherM3569 (not verified)
Sun, 10/21/2012 - 15:42
If you click over to her blog (link provided above), she has a lot of additional information. In the post, it says, "We needed a table 55"w x 19"d x 30"h."
Mon, 07/27/2015 - 06:54
Console table looks great! What is the top made out of and how did you do the fabrication/install?
This was a new project idea my wife wanted me to do. It was relatively simple to follow. I felt it turned out pretty good. I've always felt that Ana's plans were well thought out and simple to follow. Even for a beginner like me.
Robert Gilliam
I recently had a workshop built and I have been trying to now work on the furniture for it. My first project was this workbench inspired by the plans "garage workshop workbench". I added drawers on each side and will probably end up adding a shelf in the open area as well after letting my kids finish decorating the top. It's already a nice addition and I may build a smaller version for my garage. I added casters and have the option to roll the table around or have it stationary.
Tonie
We needed a new TV stand, so me and my boyfriend picked out this plan. We worked on it together. It took us about a week. Barn door hardware is pricey, so we made our own hardware with steel stock and garage door pulleys.
We wanted our chickens to have plenty of room for when we ere not home and could not let them free range in the yard. One of the six was a rooster-- and long story-- but we don't have him any more-- so 5 chickens now enjoy this coop/run. It cost about $300 in supplies. It is 16 feet long.
I used red mahogany 225 minimax stain along with 3 coats of diamond wood finish I gave it a very quick sanding with 600 grit sand paper right before the last coat of the diamond finish and it came out silky smooth and the color really pops. I am just a beginner and I thought this project was gonna be quick and easy because I'm used to having to plain all my wood and get it all ready before putting it together I slapped this together in no time but finishing it without a spray gun after it was all together was a very lengthy process.
I was so excited to build this outdoor patio set! My husband and I looked high and low to find an affordable,“tall and sturdy people” outdoor patio set. The sturdy pieces we found were in the $600-$1000s... and I’m sorry.... we’re not paying that. Especially, since most of those sets were not built to hold up in the Florida rain and humidity. So my husband suggested... “ just build it!” I modified the leg length to 28 1/4”, since I have tall family. The cushions were found at Pier1 for a steal since they’re going out of business, so the chairs were modified to fit the cushion size 22”x 22”.
I built this table for a friend who wanted a rustic, plank-top kitchen table. She wanted a square table with 4x4 legs. Since I don't have clamps, I used pocket holes and wood glue for the table top. Also, I only have a 7&1/4" miter saw, which means the 4x4s were too thick to cut. So I made one cut in the legs, then flipped them and made another. It worked! :) I sanded down the sides of the table top with 80 grit. They needed to be evened up since some of the planks were a little longer than others. I back braced underneathe the top with (3) 1x3s. Then, I sanded all over with 120, vacuumed, then wiped it down with a damp towel. Fun build!!
The legs and trim were made from 2x4 that I cut down to size with the table saw. Plywood from a chicken coup I made from Ana''s chicken coup plan was used for the shelf base.
For anyone who is interested in building their own glass-top vanity with pull-out drawers :)
Sun, 11/29/2020 - 01:27
Hi Ana, where can I find the instructions for this project?
This table filled two needs at once for us: we needed a dumbbell or free-weight rack ($50 and up retail), and we needed some kind of desk-like surface for our home gym area that could withstand us two jump-roping fiends (um, maybe that's just my husband). Basically, it needed to be able to hold a lot (a Lot) of heavy metal stuff and take a beating while NOT Falling Over. The trestle desk was my biggest inspiration, and I guess I just stole the metal stretcher idea from that Pottery Barn dining table. It doesn't even really seem to need the metal stretcher, though...this table is beyond-my-wildest-dreams sturdy, even though it is standard counter height. The metal bar was about $17, so that's a big savings, if you leave it out. You MUST use a compound miter saw for this project. OR...you must be flexible about working with irregular cuts and joints. Also, I'm not sure I'd attempt butt-jointed 2x4's without pocket holes (or biscuit joints, I guess?), but that might just be me. I think this project could have taken only a single day if I hadn't screwed up just about every step of the way. I'm not the only one, right? You can read about a lot of those lovely embarrassments on my blog :) If you'd like the SketchUp model, it is available in the 3D Warehouse as "Dumbbell Table".
We made this in just over 2.5 hours with the kids "helping." We made it a bit taller, with the seat at 19 inches, so the leg pieces were 25.25 inches instead of 18.25. Because of this, we will probably add two supports across each side as it seems a bit wobbly when the kids all wiggle on it. Now we finally have a seat where all 3 kids can sit together to play on the computer. Thanks for the plans!
We used carraige bolts to make the legs removable. Very happy with the results!
Thu, 02/07/2013 - 04:36
You did an amazing job on this. I love it! Which plans did you follow for the chairs?
Thu, 02/07/2013 - 05:12
I used Ana White's plans for Vintage Bar Chairs. I think I modified the chair backs a little to make sure little arms wouldn't get stuck.
Thu, 02/07/2013 - 05:05
Your work deserves a lot of kudos. Really great work and the stain is professional.
Thu, 02/07/2013 - 05:16
Jake,
Thanks so much! I spent about two months working evenings and weekends as weather permitted, to complete this project. My daughter chose two stain colors and we mixed them together. I'm happy with the way the color came out.
Thu, 11/21/2013 - 18:27
I made the same 30" tall bar stools. I love the whole look of your set. Did you adjust the height of the table for the chairs? Or is the table high enough for these chairs? Also, did you make the table top smaller?
You did a great job!
Sat, 11/23/2013 - 18:13
Debbie,
Thanks so much for the compliments! My daughter didn't like the "plank" version of the table top so I used oak plywood and framed it with oak 1X4s. I believe the measurements of the table are 48" by 48". I don't think I adjusted the chair height but I did add a foot at the bottom of the table legs. That may have added an inch or so to the overall height of the table.
Tue, 02/10/2015 - 13:22
I really like how you added the foot and removable legs to this table! I would like to make mine with removable legs as well. How did you modify the table to use the bolts?
Tue, 07/14/2015 - 06:31
Hello! This plan is EXACTLY what I am looking for except there is a huge difference.......it will be the ritual platform for a traditional Tibetan Sand Painting. I am seeking a plan just like this for a square table that is 6' square and 3 1/2' high......is it possible to purchase a plan of that dimension or does anyone have a recommendation where I can find that. THIS would be truly lovely in this design. THANKS for any help!!!
Thu, 07/16/2015 - 12:08
I really just followed the Ana White plans for the Pub Table but used one solid piece of plywood instead of the 1x4s for the top. Since plywood comes in 4x8 foot sheets, you might need to get creative to get it to 6 feet. Good luck, and don't forget to post pictures when you finish!
Hey all my DIY friends!
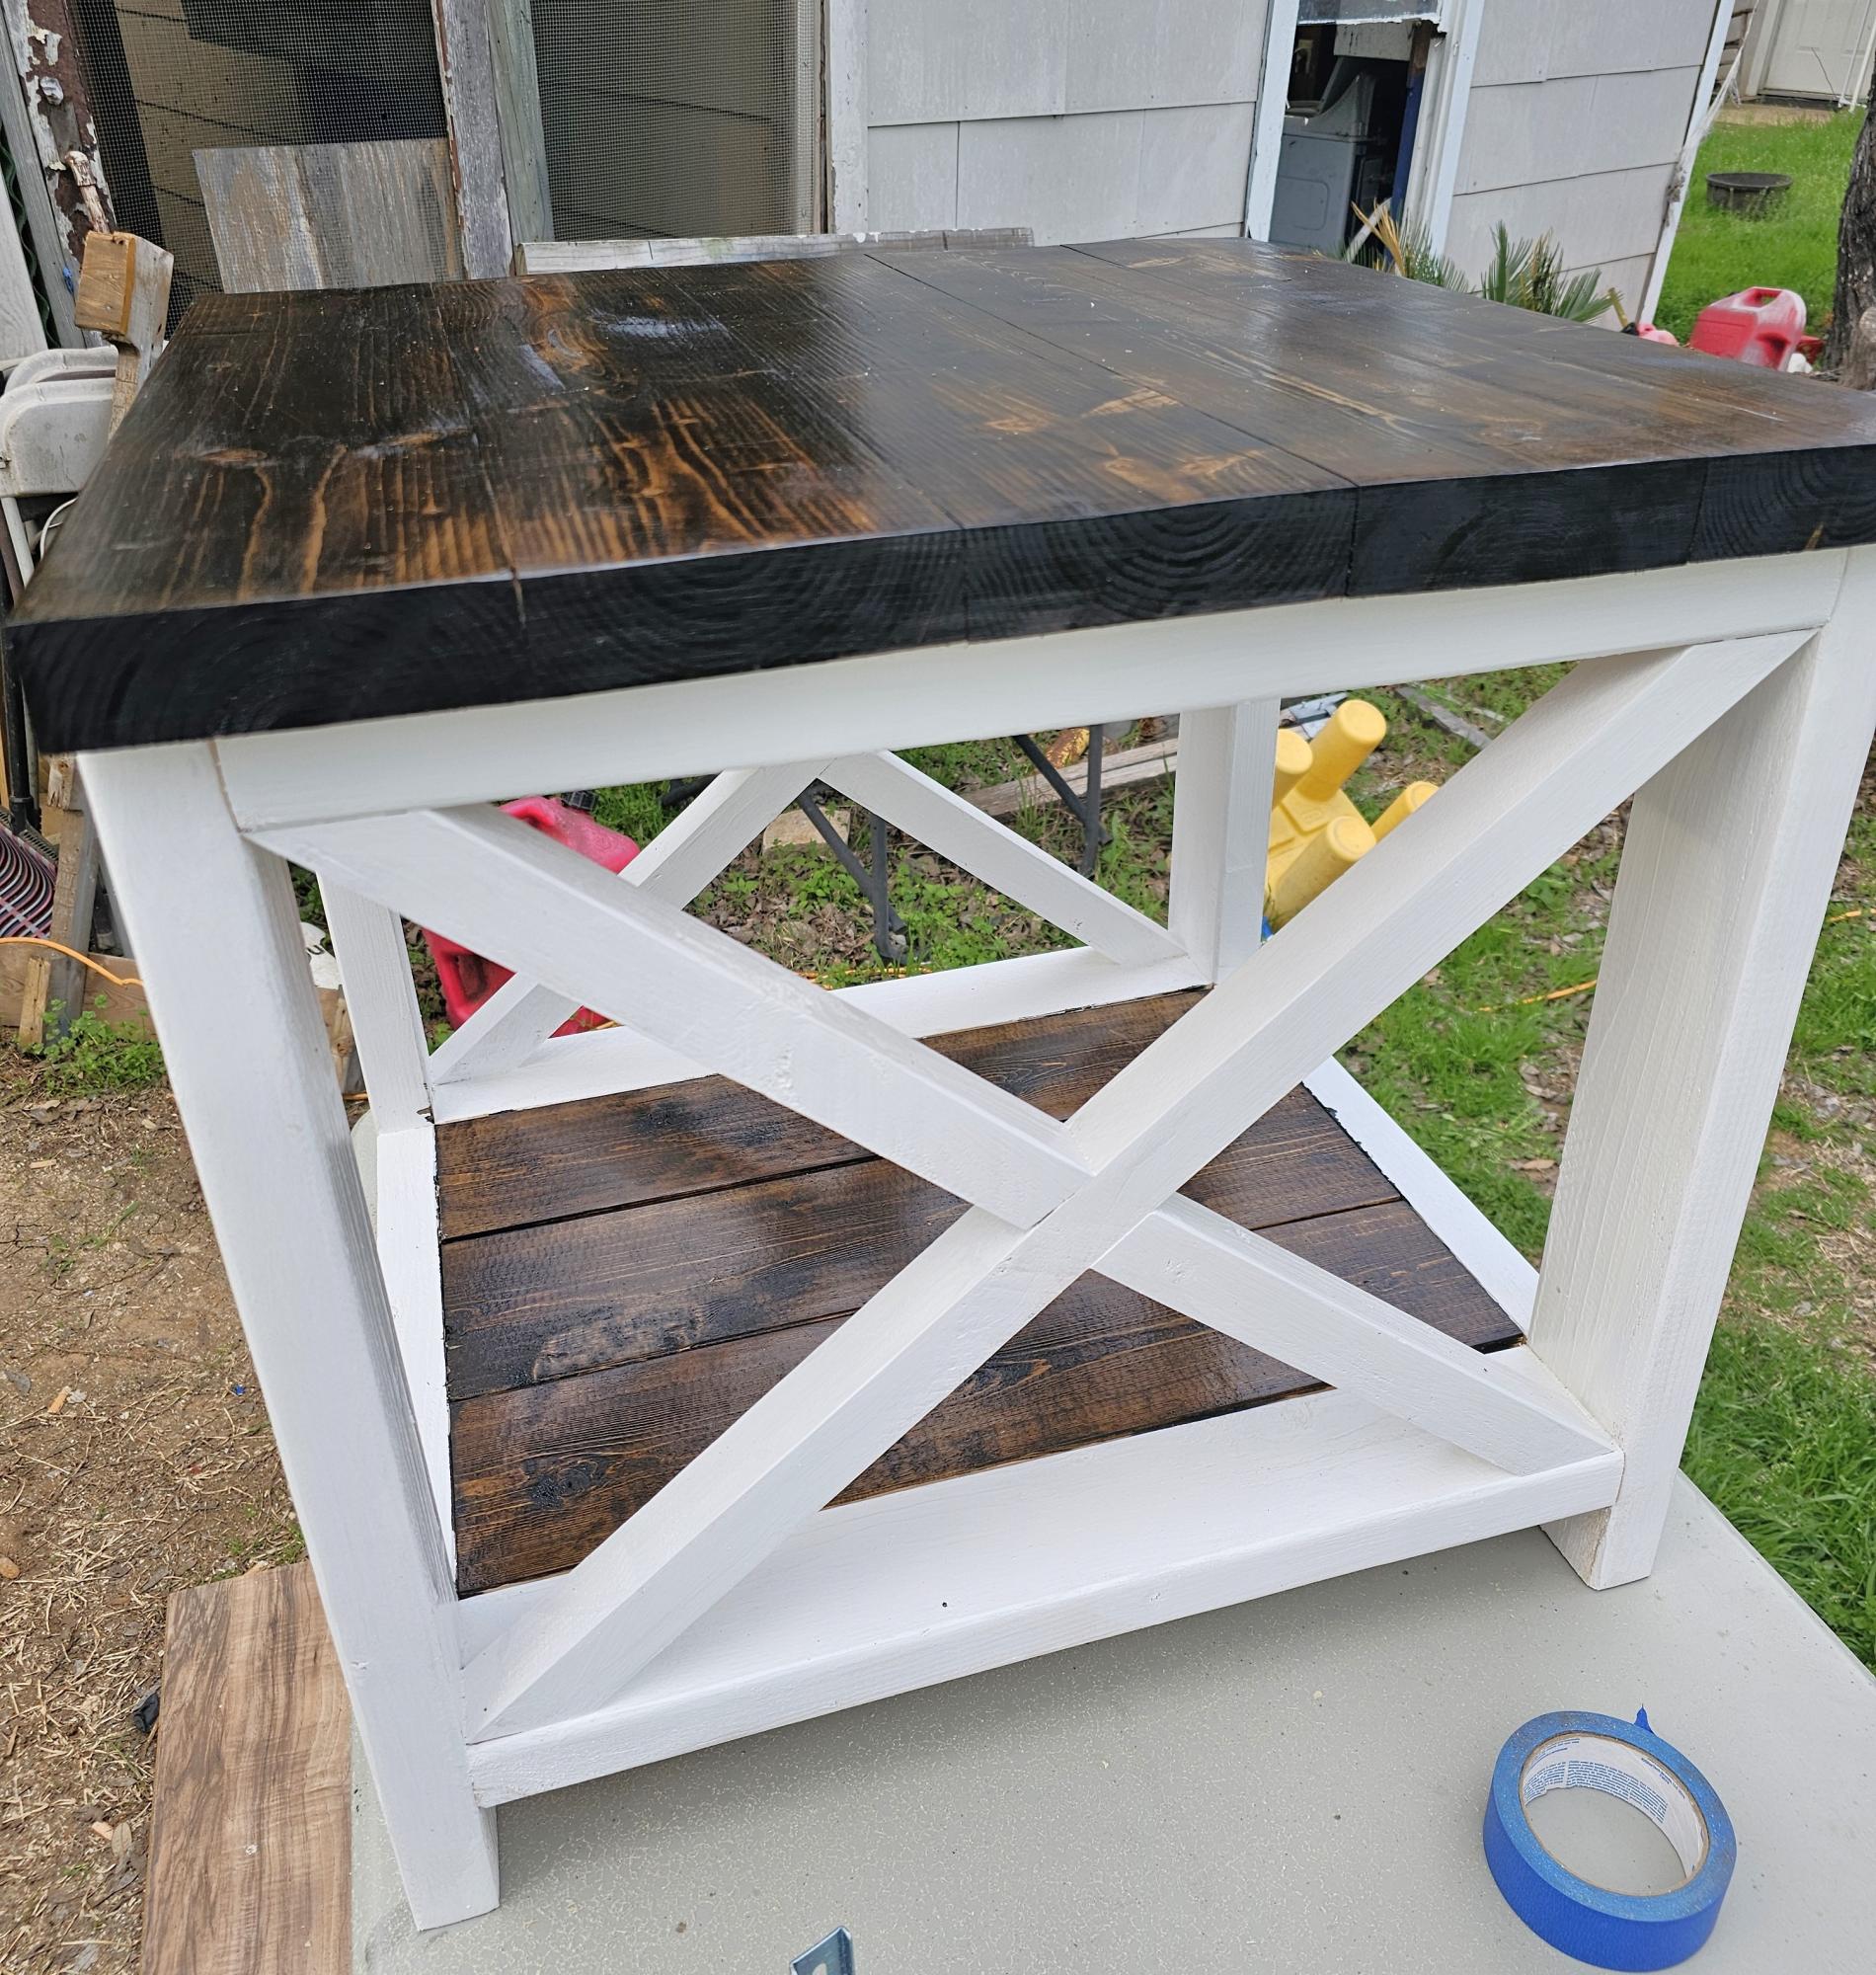
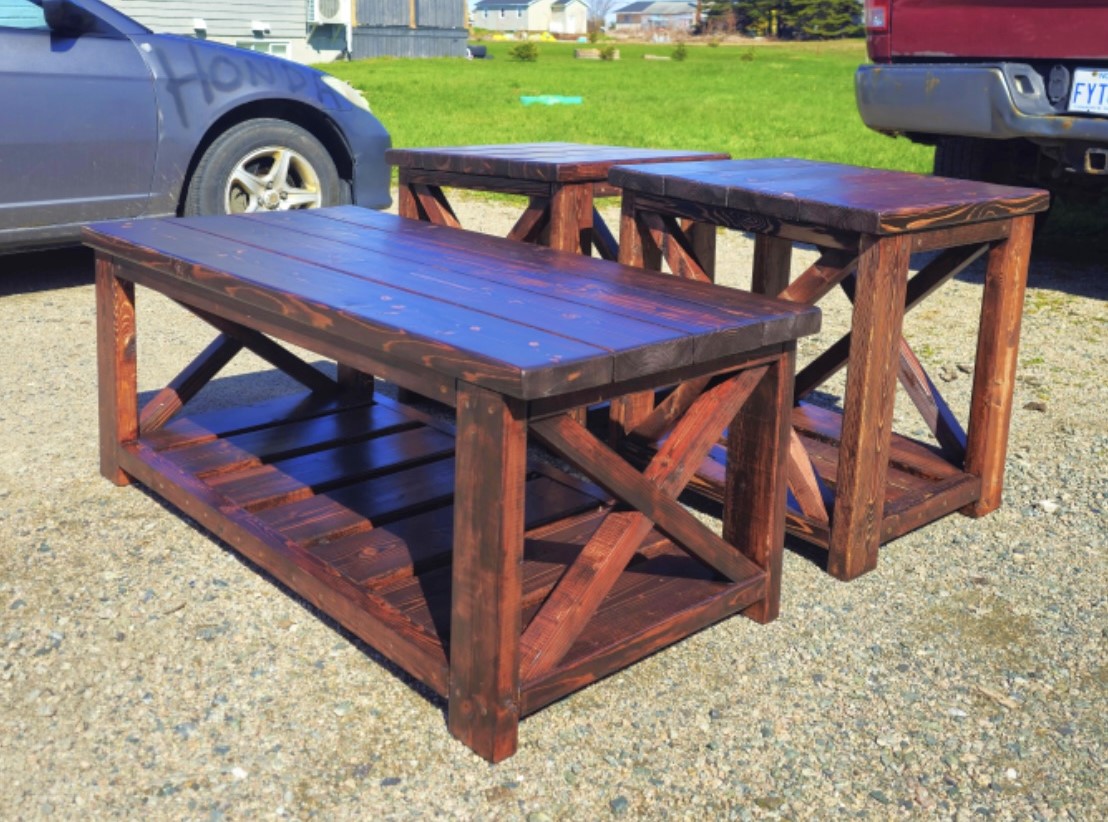
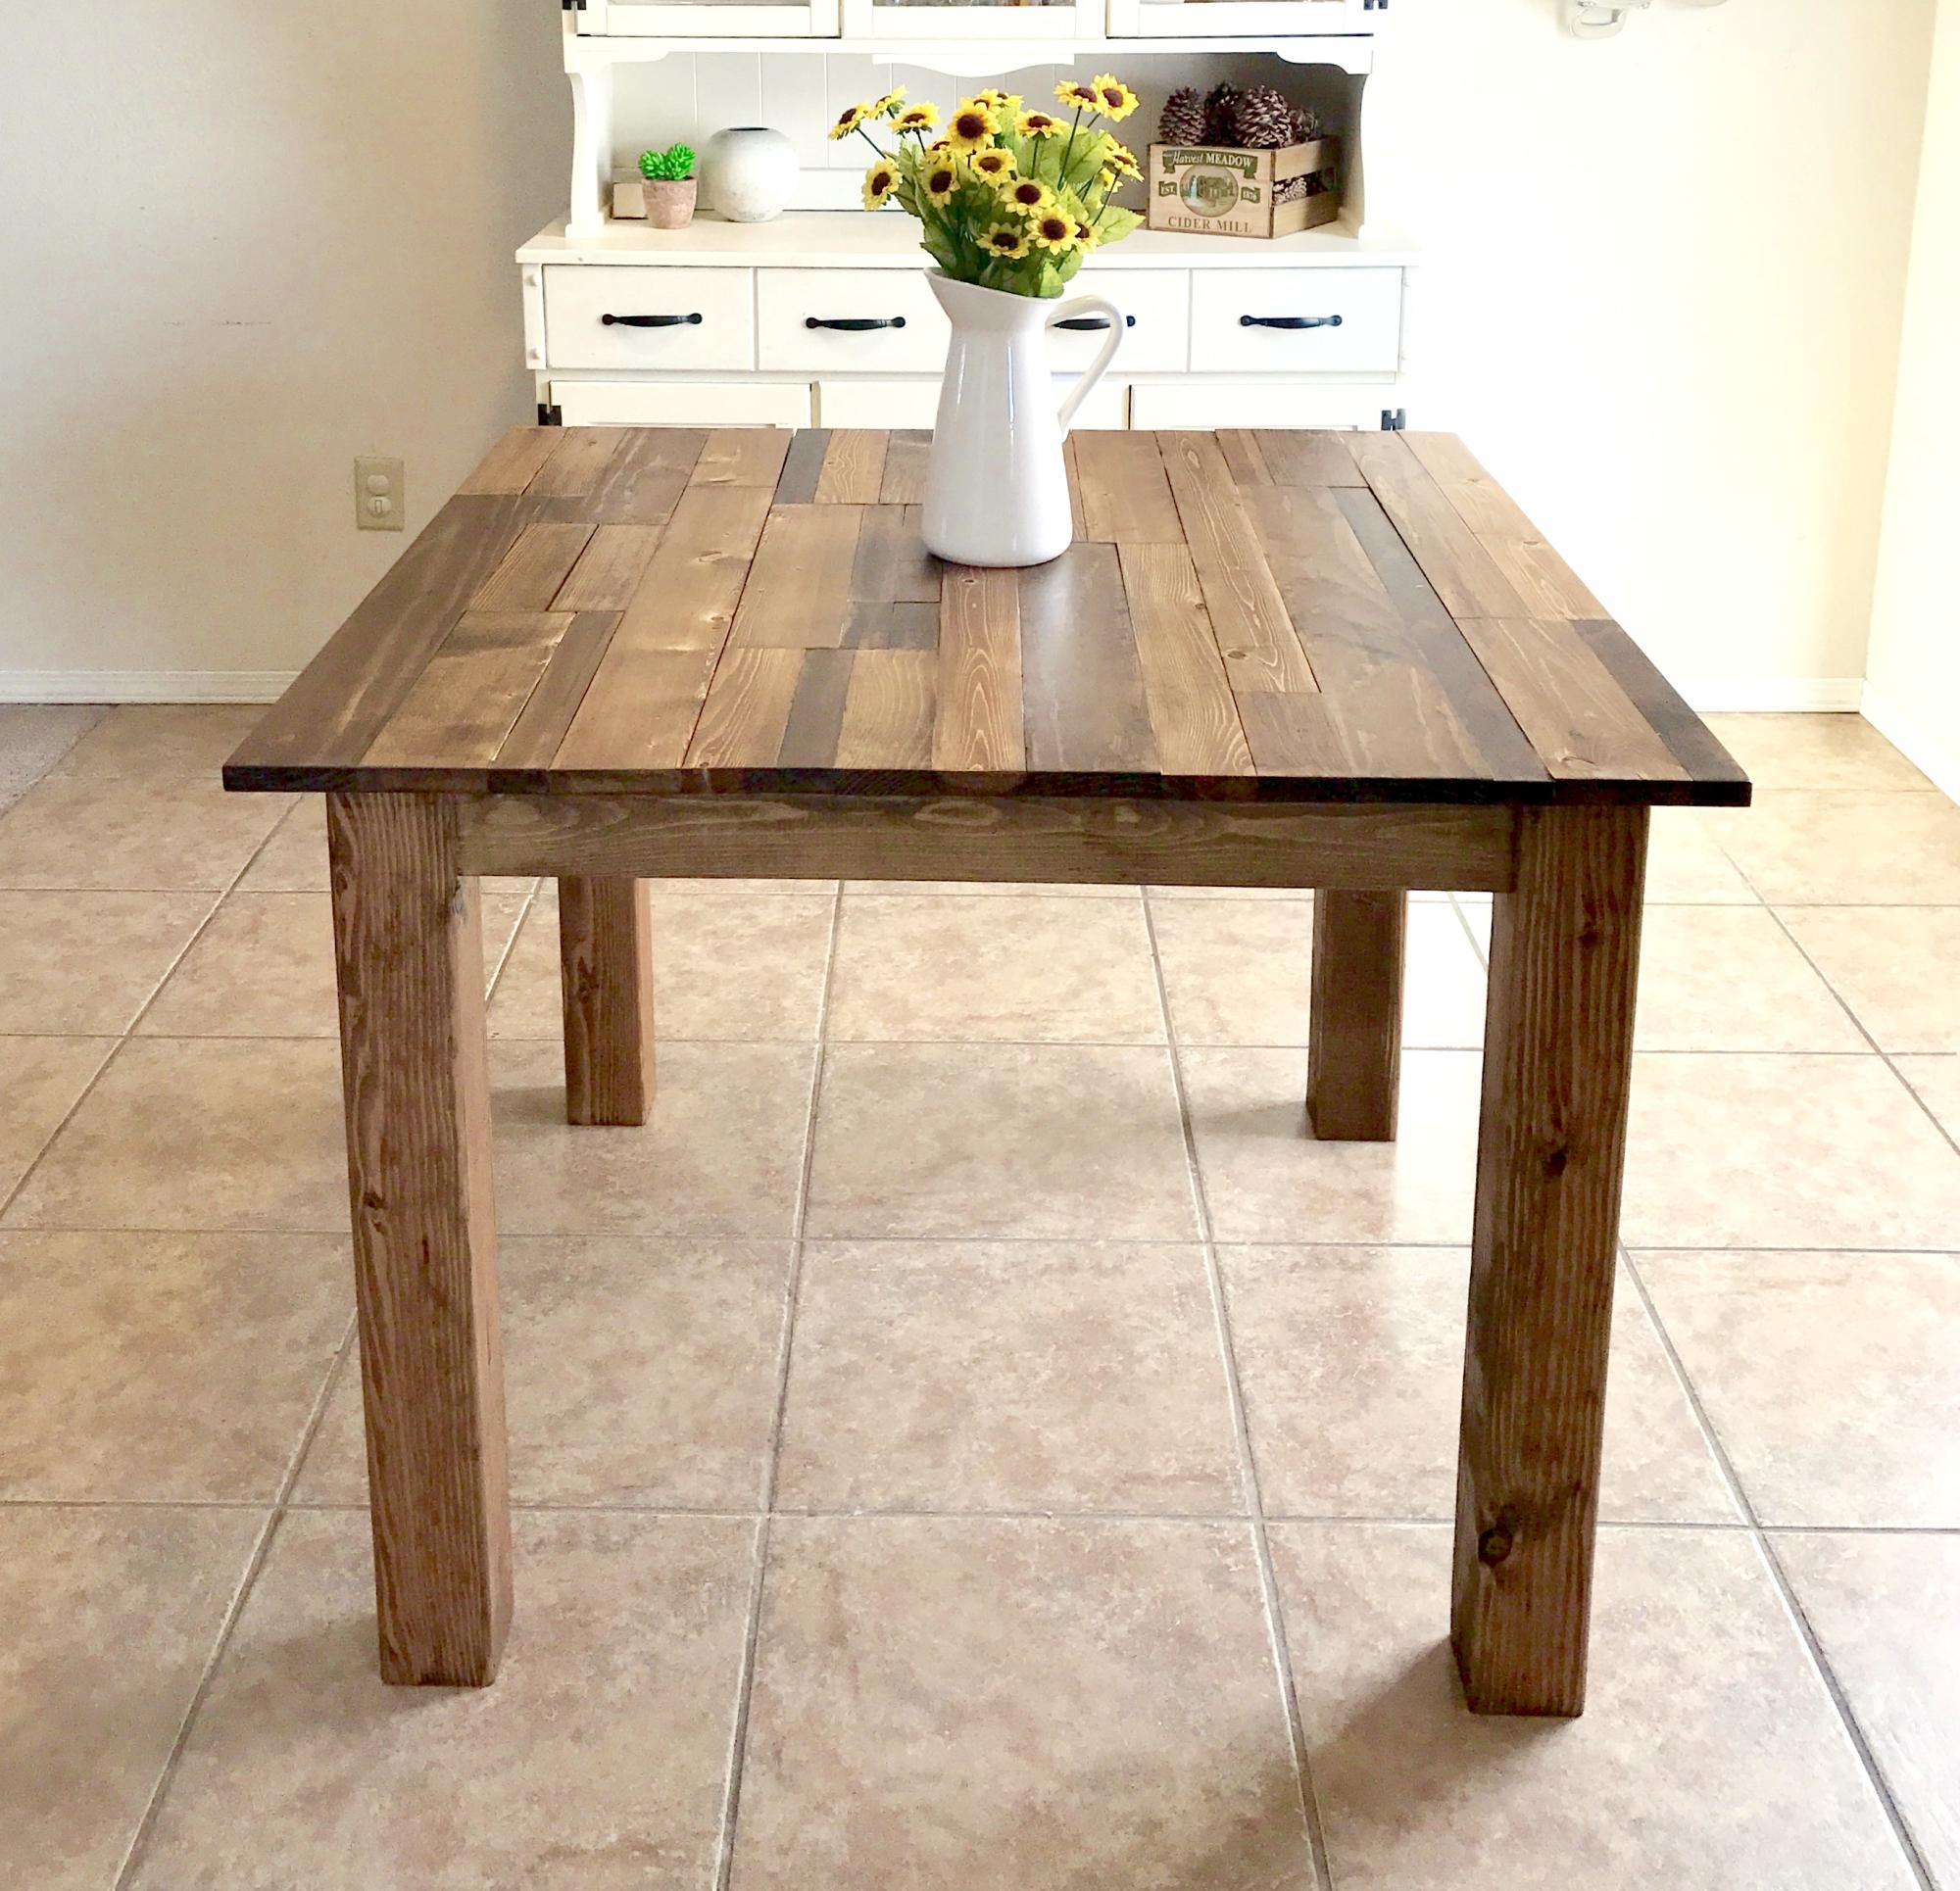
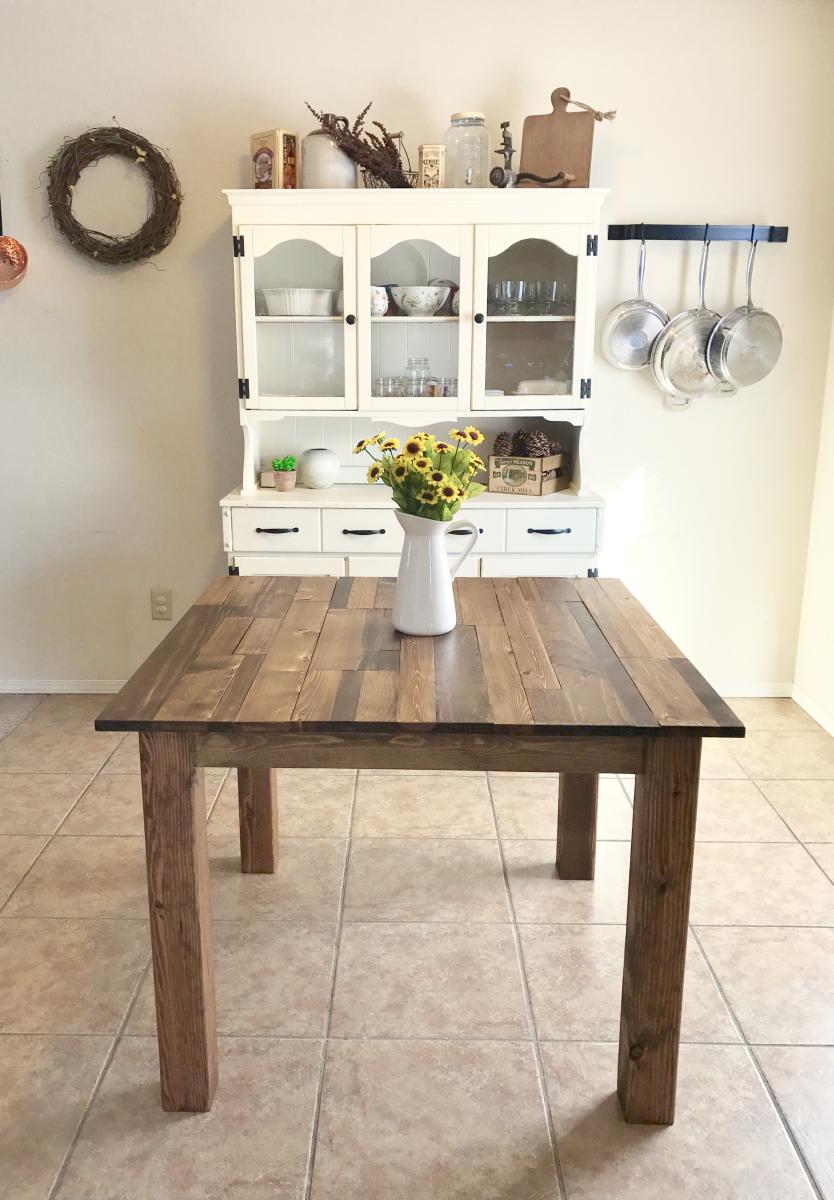
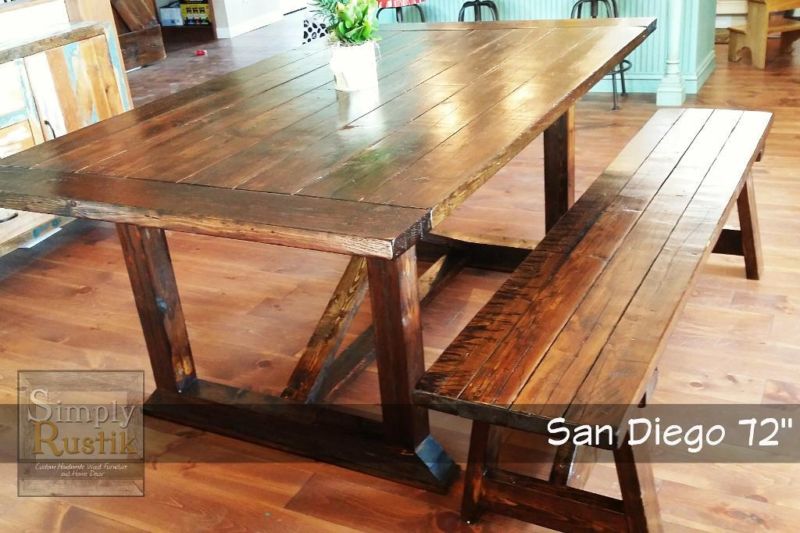
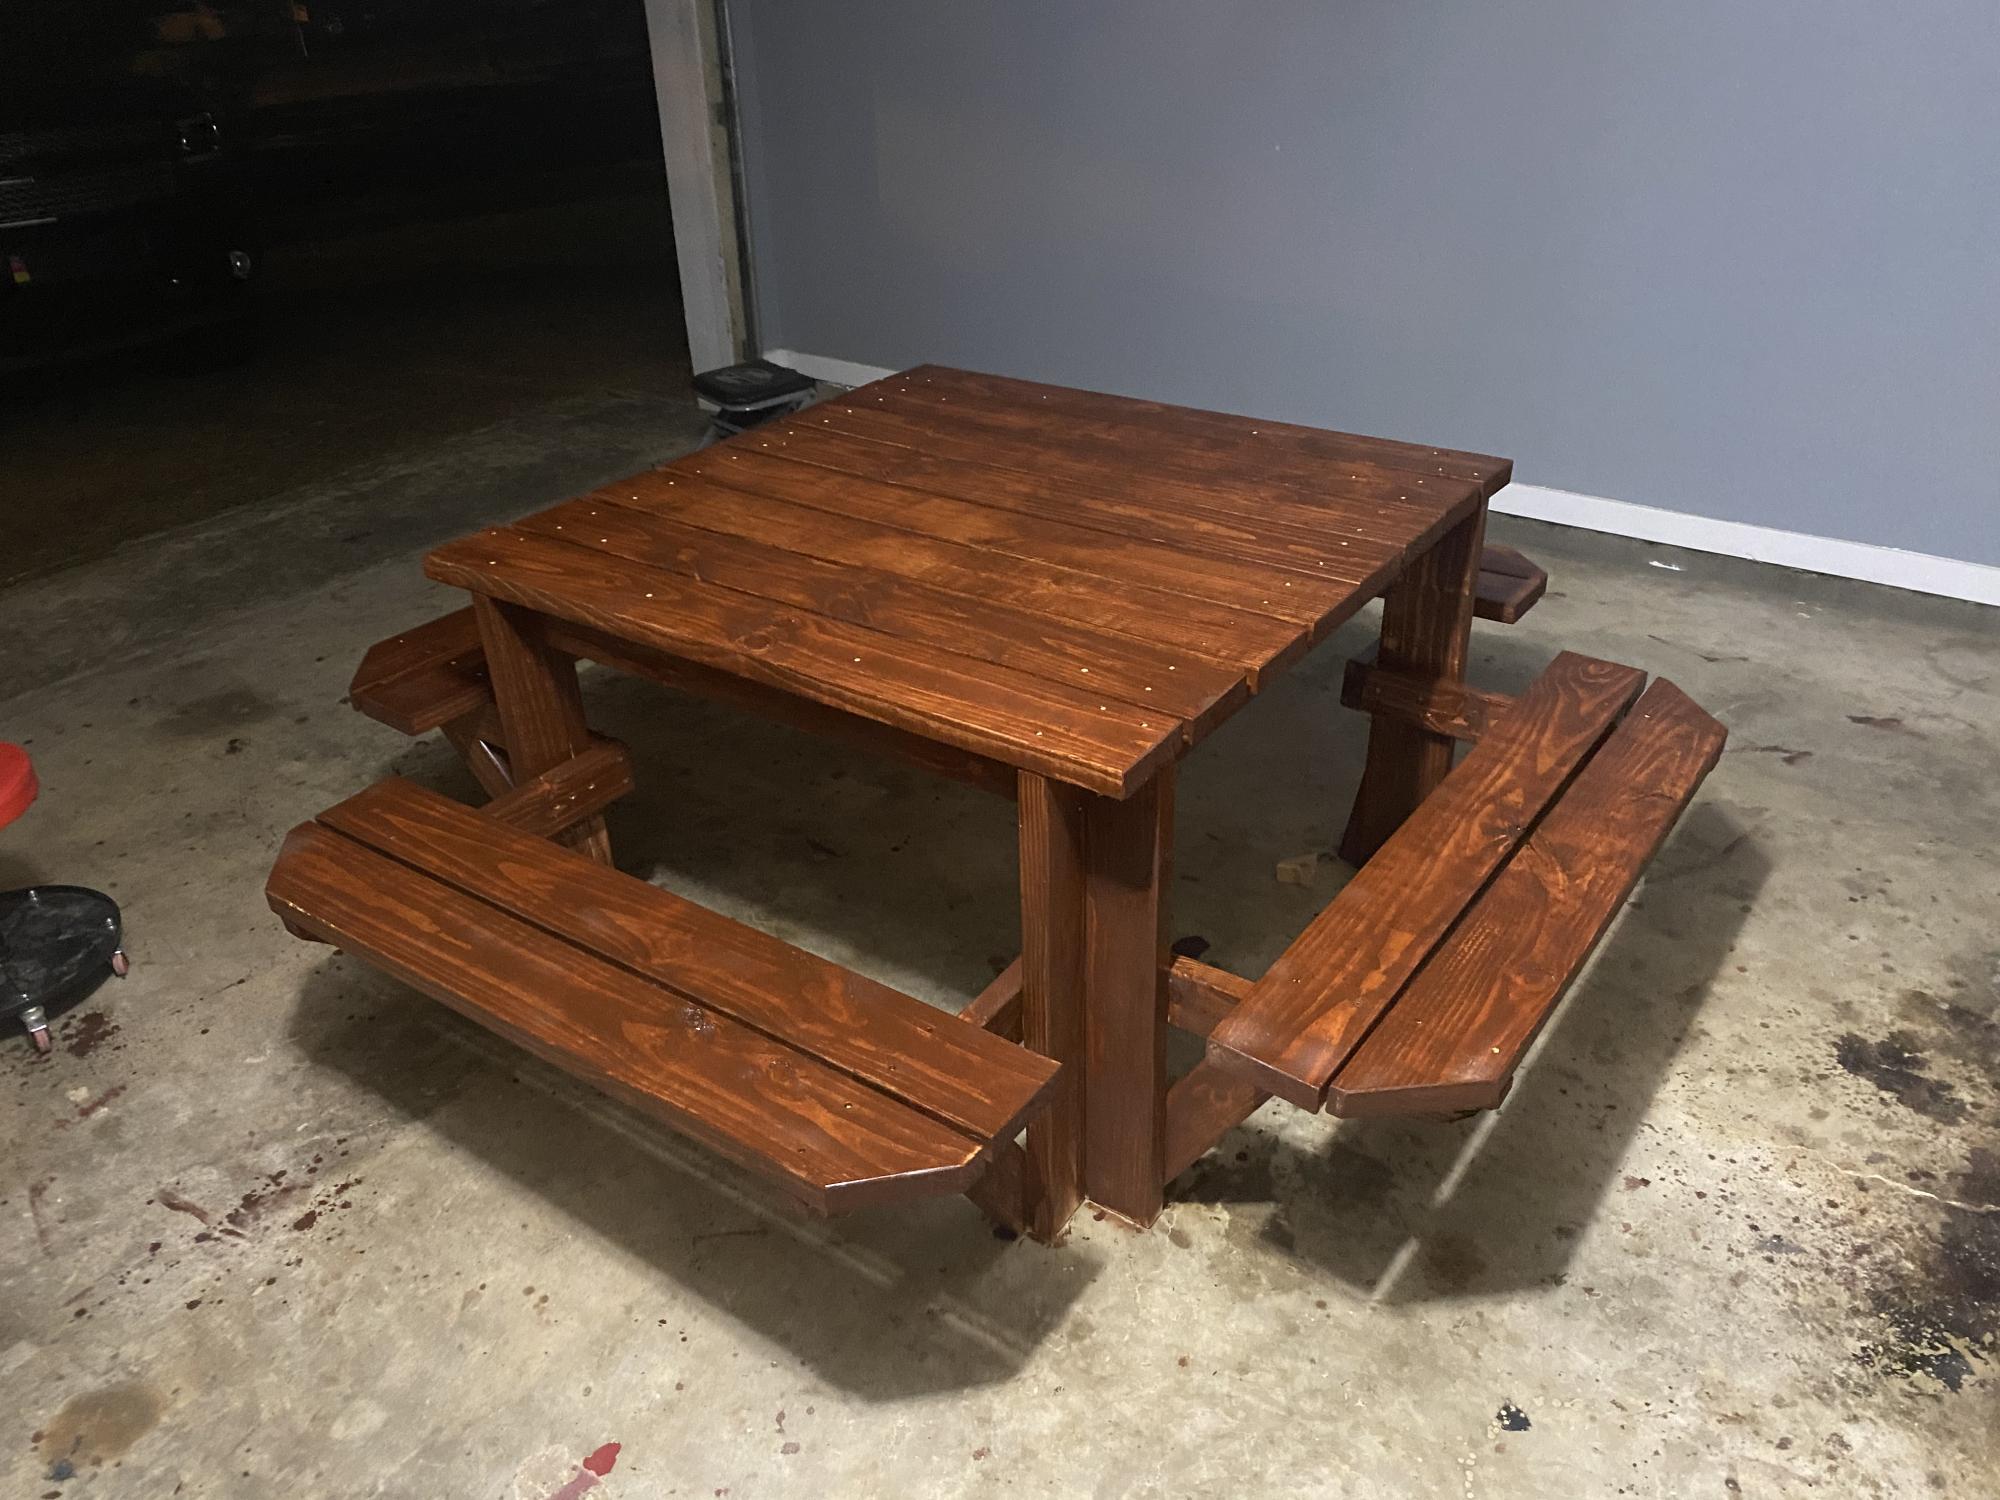
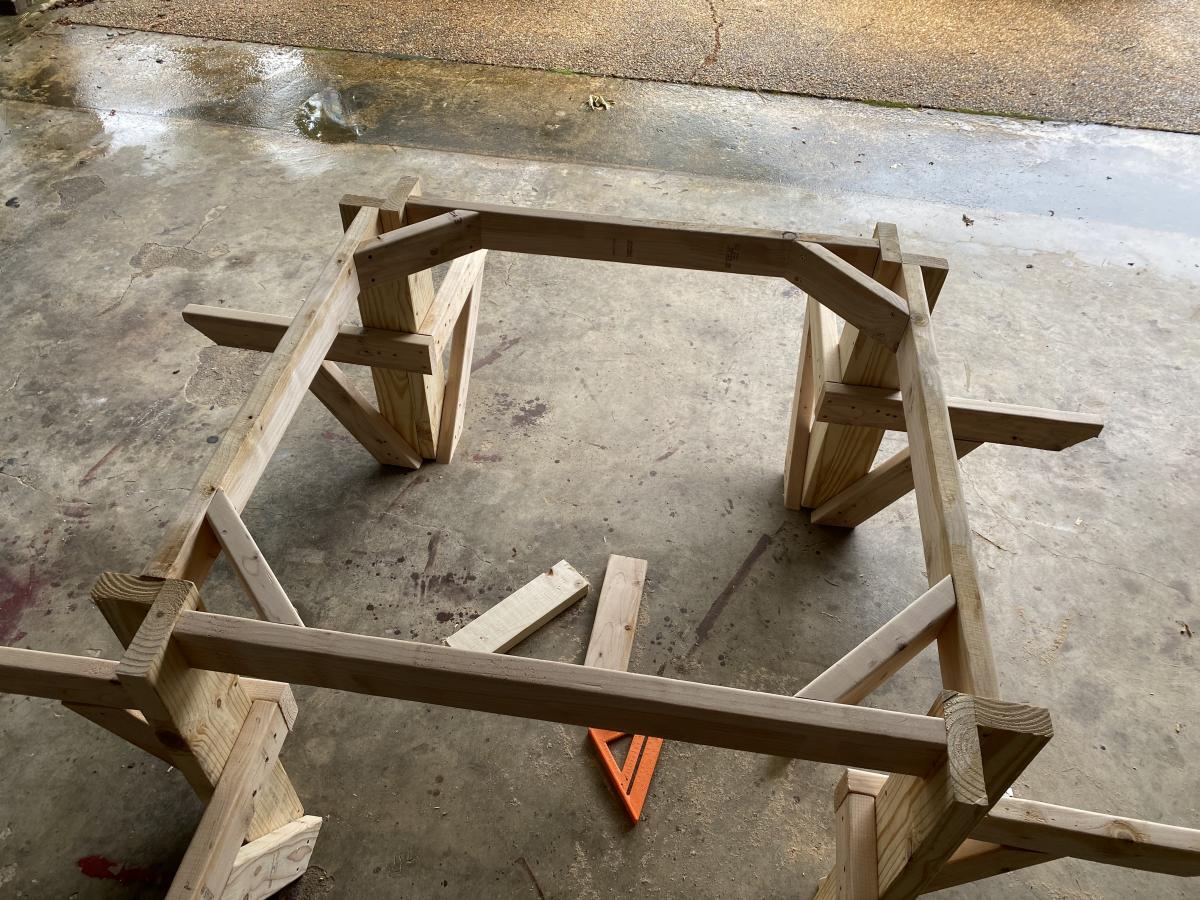
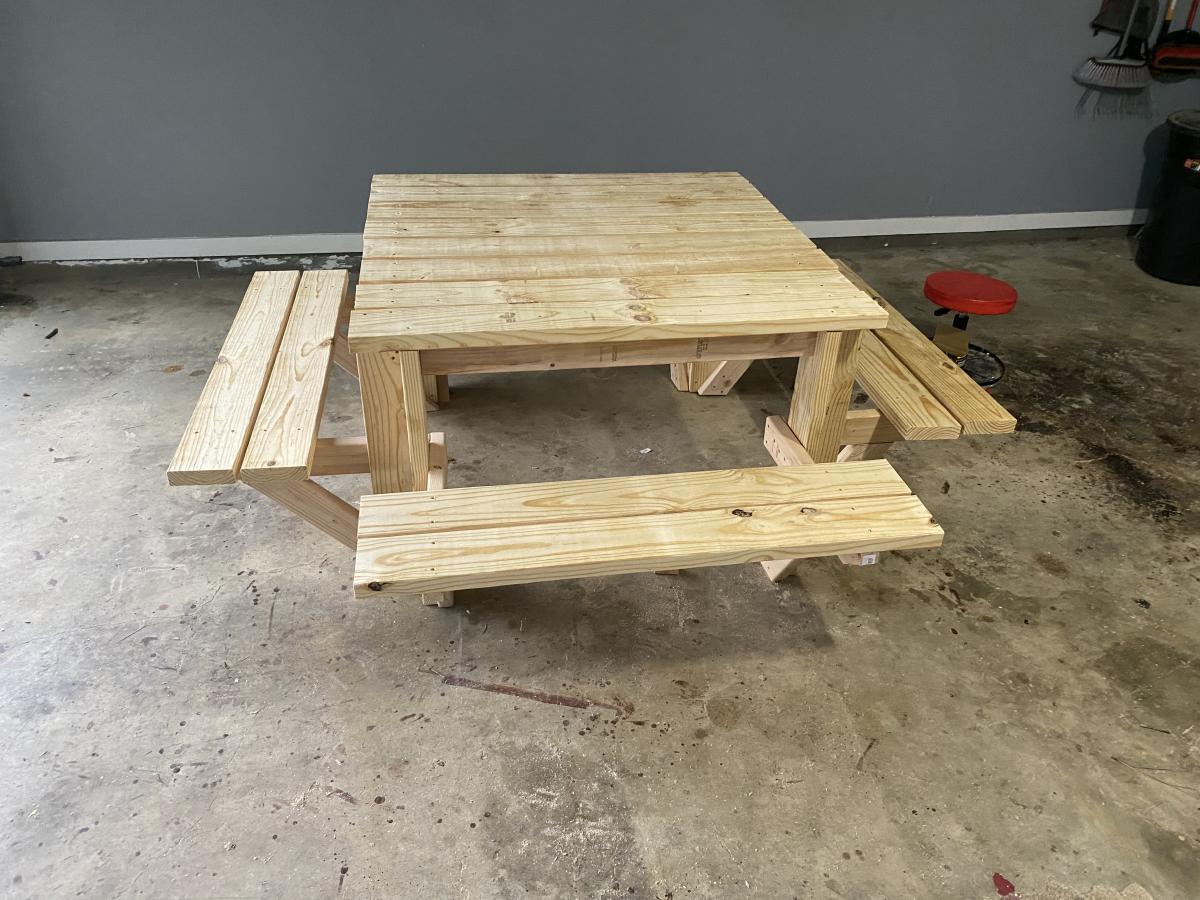
This is my first build of the Rekourt Dining Table. Big thanks goes out to Ana and Jen for providing these awesome plans.
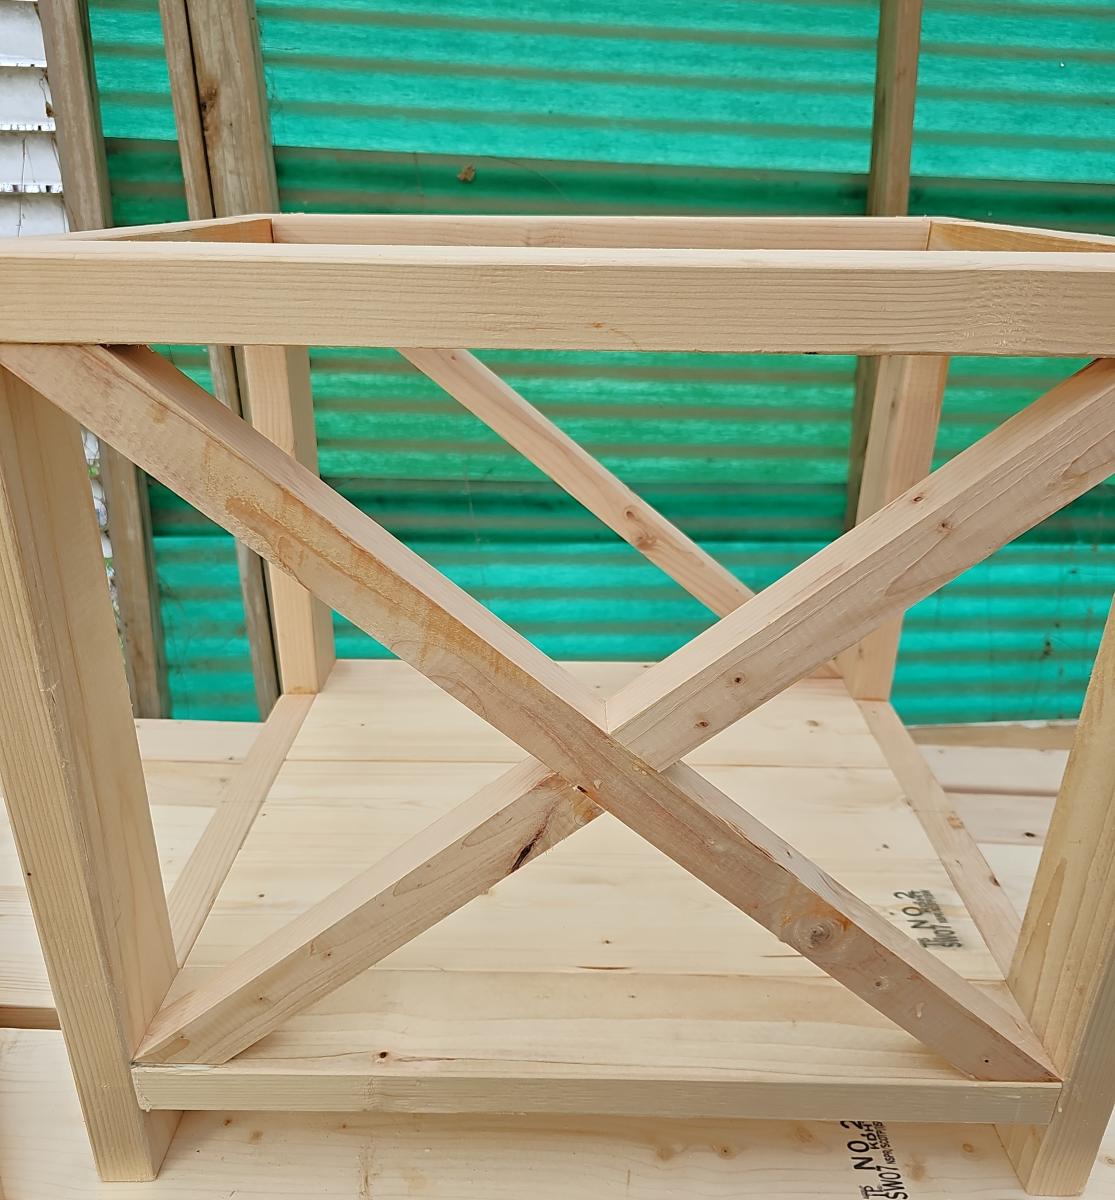
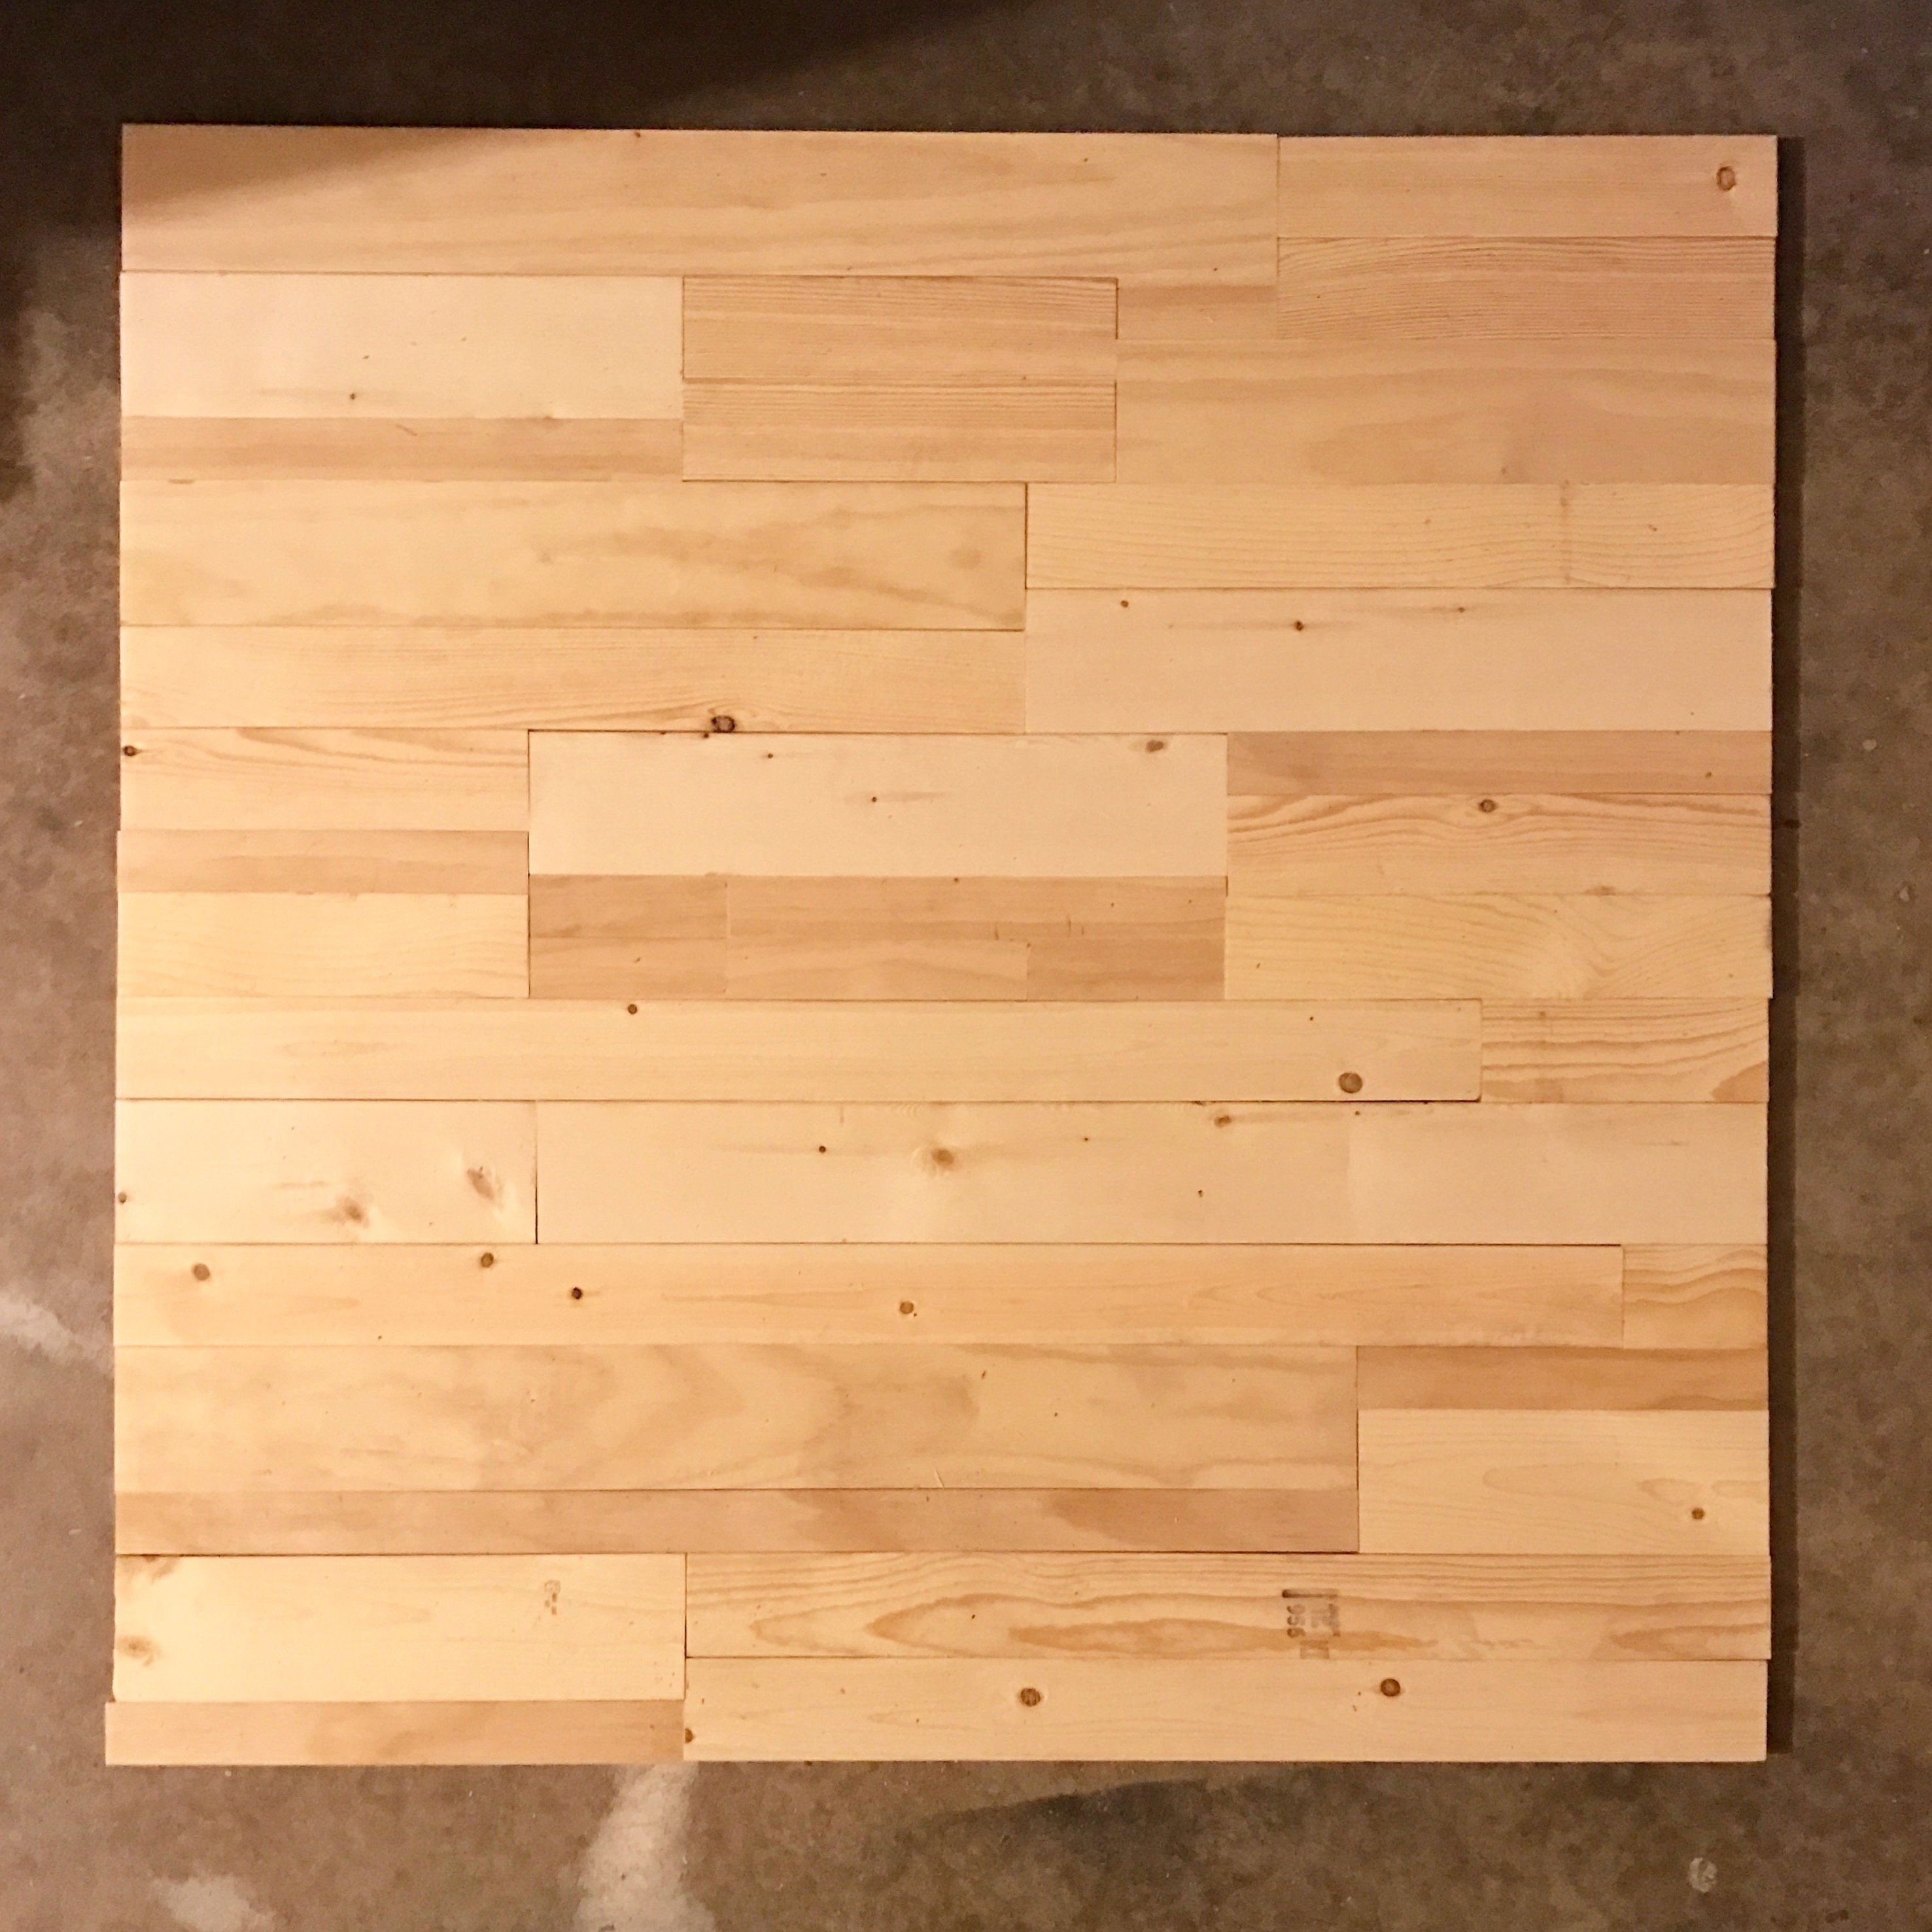
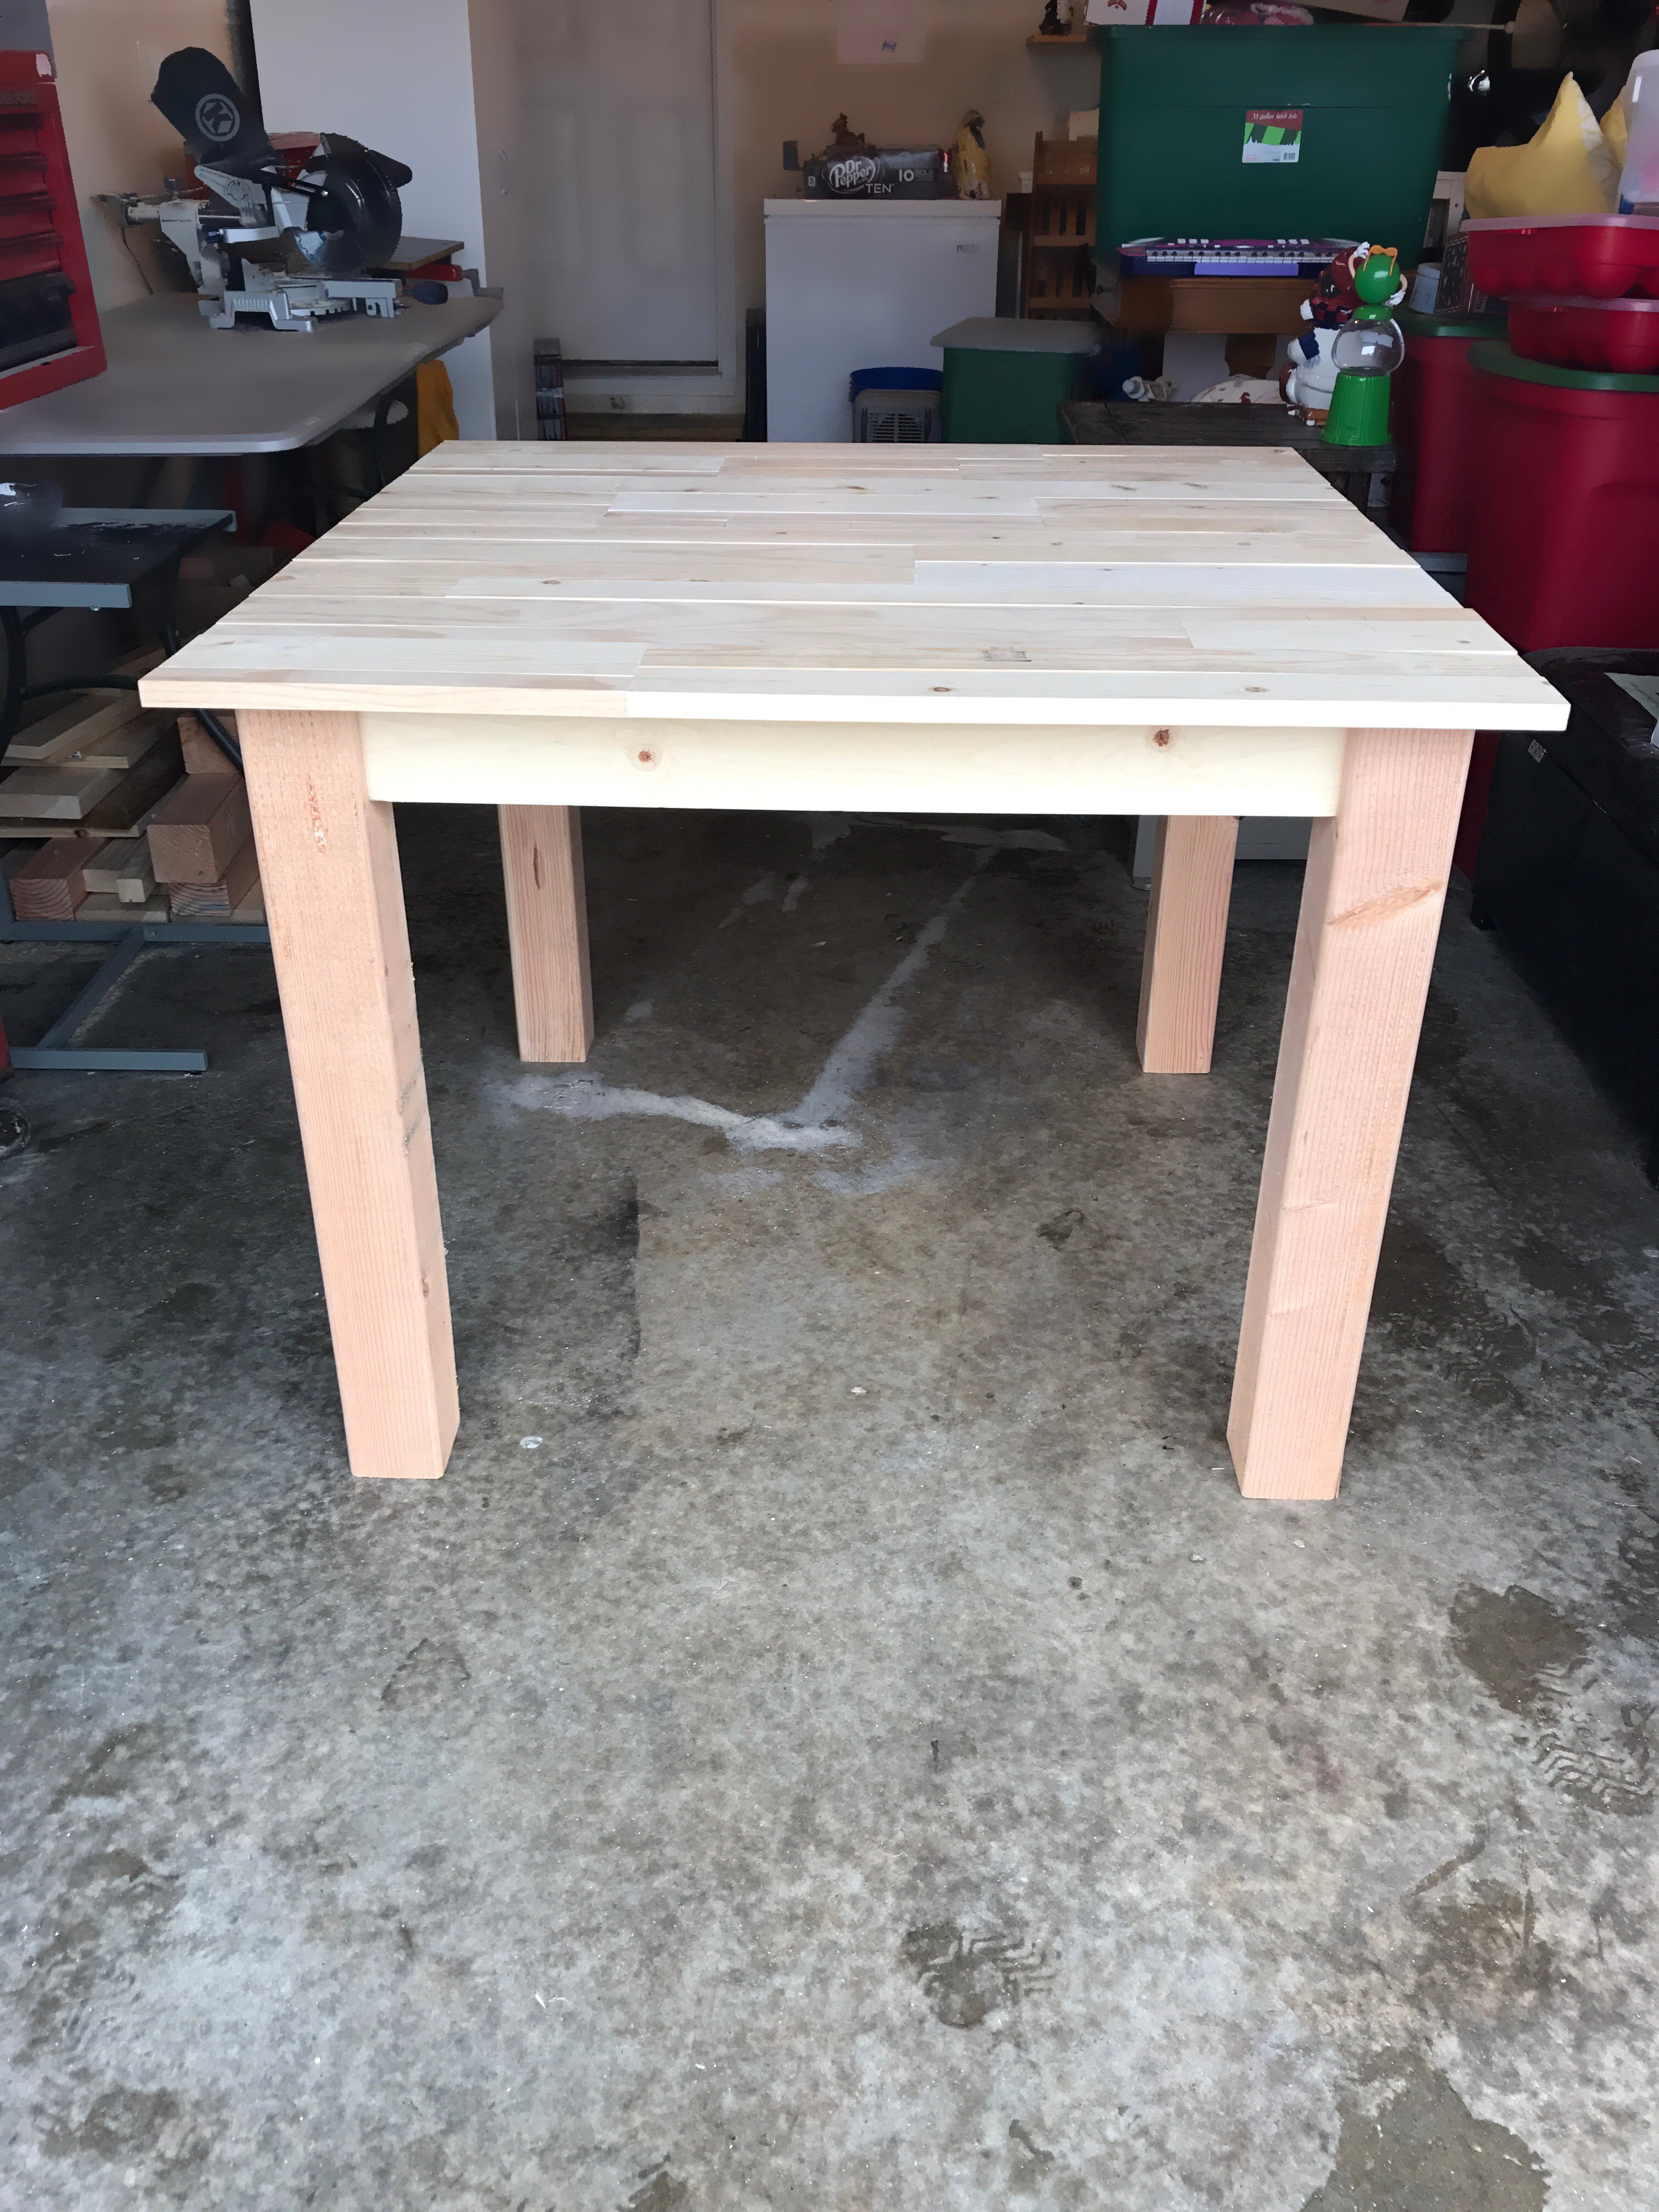
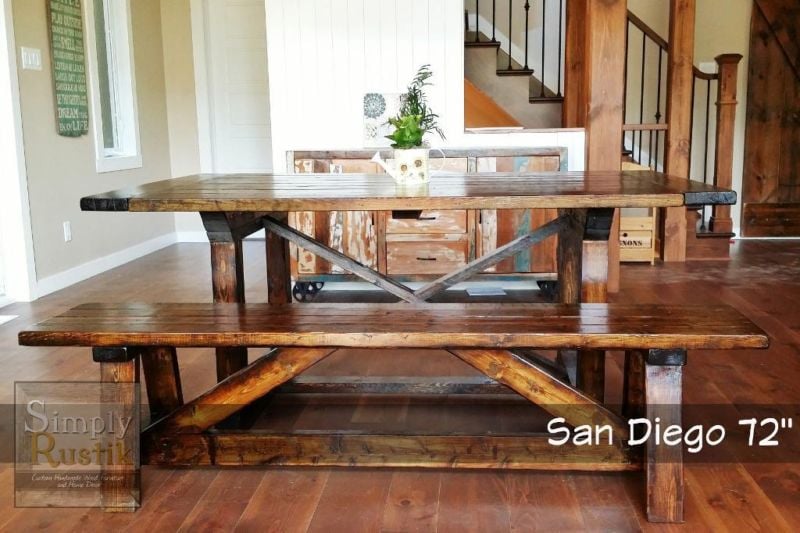
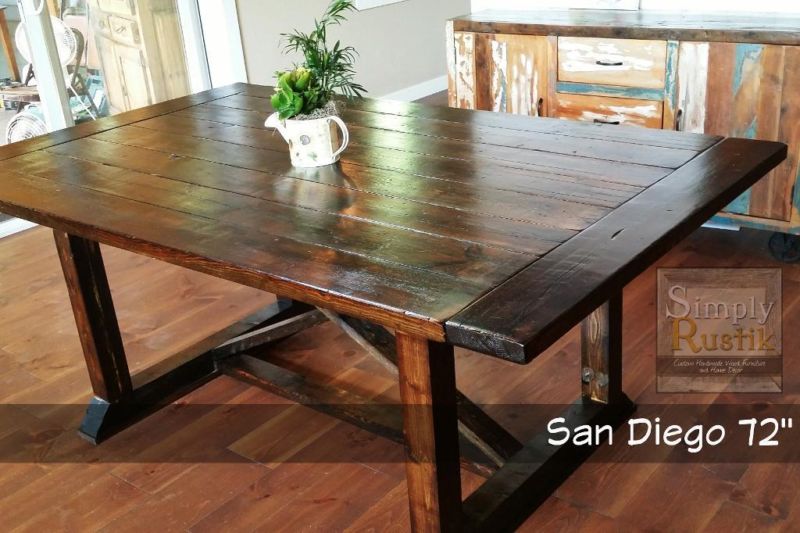
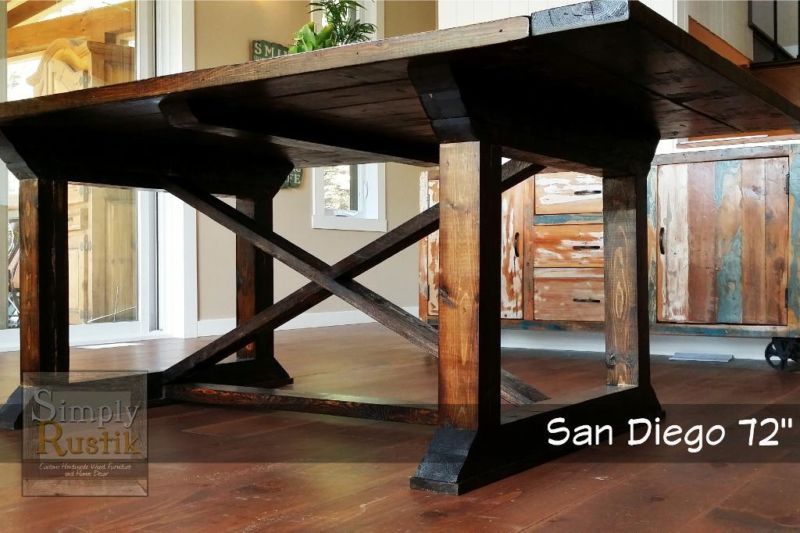
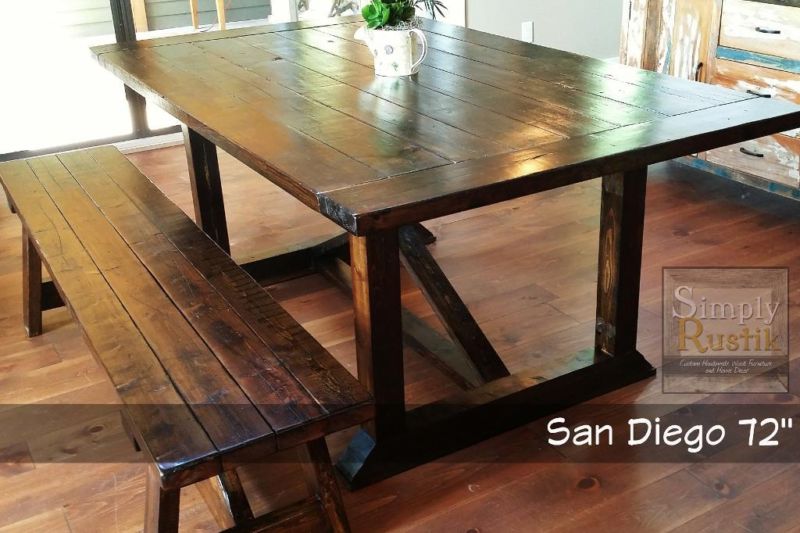
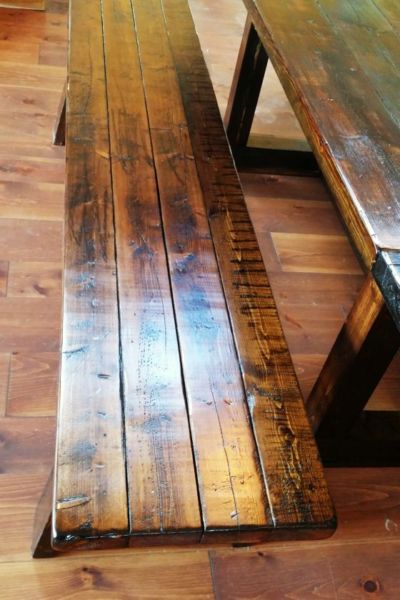
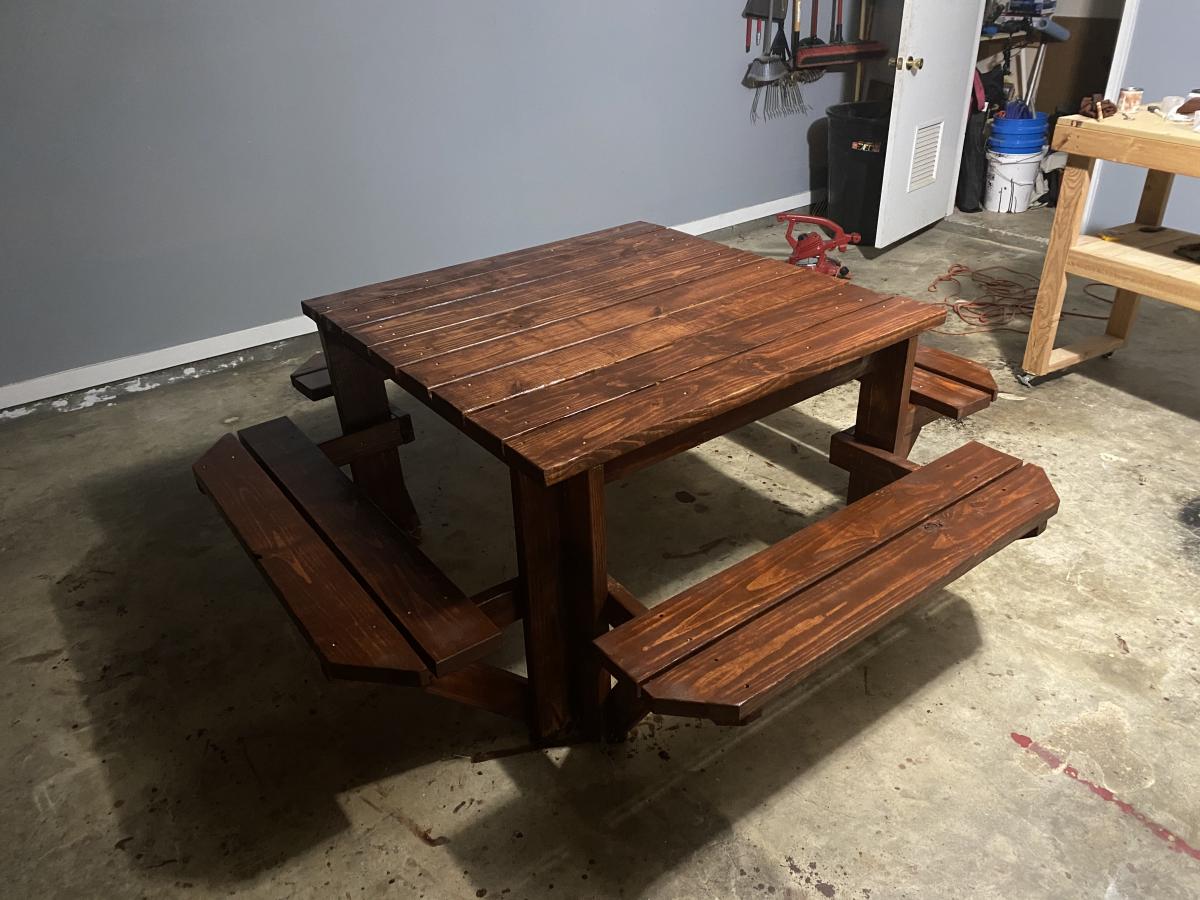
I think I achieved this table quite well, except for a minor detail where I forgot to sand two pot holes. It actually created a very rustik look to this table. I decided to try the steel wool and vinegar solution combined with the black tea for the finish of this table. I realized it adds so much richness to the wood, it's incredible. The stain is Minwax's Dark Walnut and I topped it off with a Satin Oil-based Polyurethane. The top and legs were also physically distressed using a variety of tools I found in my tool chest. Those included screw drivers, lag bolts, worm hole puch I created out of a leftover 2x4, chains, sanding disc, knife, hammer and much more! That part, although tedious, was fun as it gave me the permission to bang stuff up intentionally :)
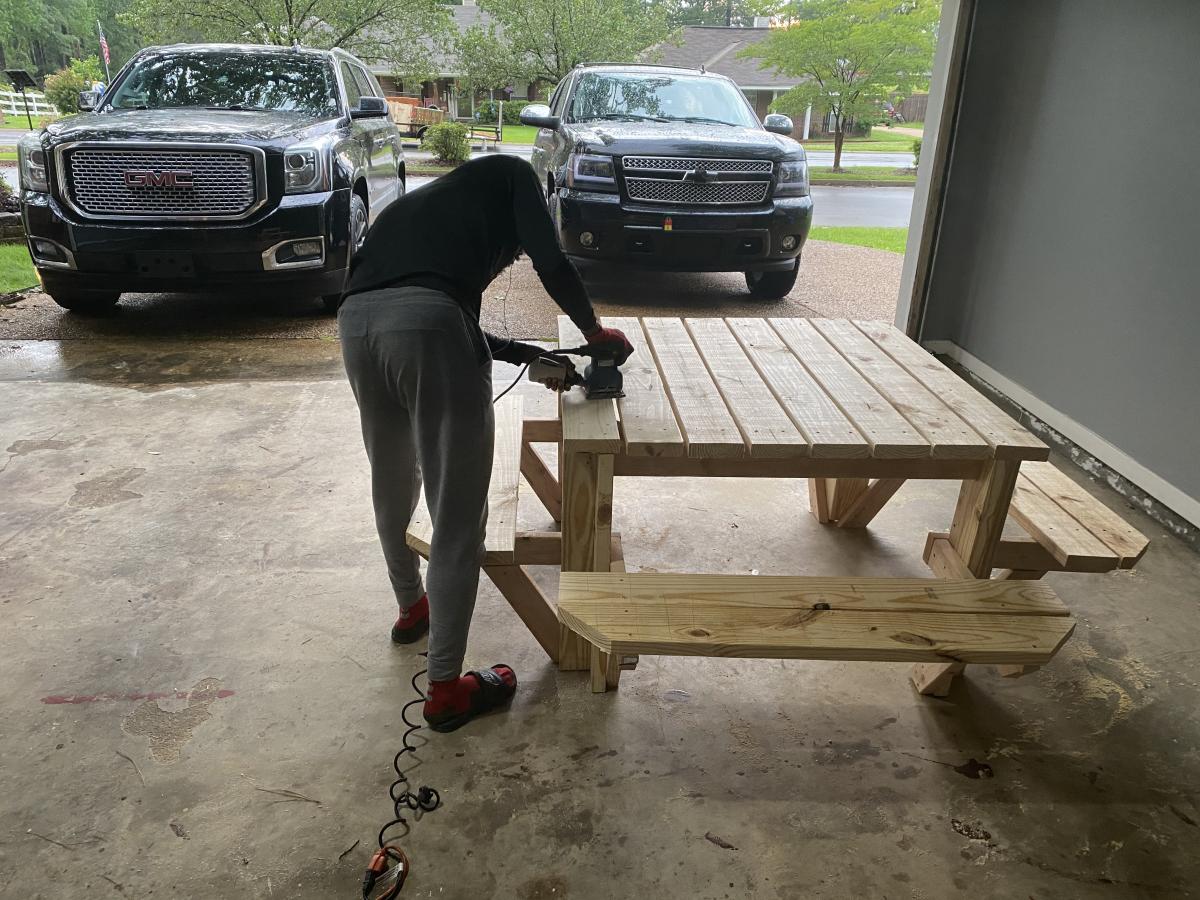
For the finish, I first started off by sanding very well, talking hours for the entire table. I then went out and distressed the tops in a very random fashion, trying to not repeat any patterns. As I was doing this, I was waiting for my black tea to seep and be ready for application. I poured boiling water in a large Mason jar and added 4-5 bags of black orange pekoe tea bags. I waited about 2 hours before applying it with a foam brush, very liberally. I allowed the tea to dry overnight and the following day, I applied the steel wool and white vinegar solution. My solution had been sitting for about 5 days, enough to start seeing a bit of rust in the Mason jar. The rusty solution ended up giving the wood an orangy/redish tone, which when seen under the dark walnut, added lots of depth and richness to the color. Once dry and the wood had turned greyish/orangy/redish, I stained it using Minwax's Dark Walnut stain. I did section by section, leaving the stain no more than 3 minutes before wiping dry. I followed this (once the stain was dry) with two coats of oil-based polyurethane in satin (Varathane (Canada's version of the Rust-Oleum poly). I sanded the poly in between coats with 220-grit sandpaper using my orbital sander.
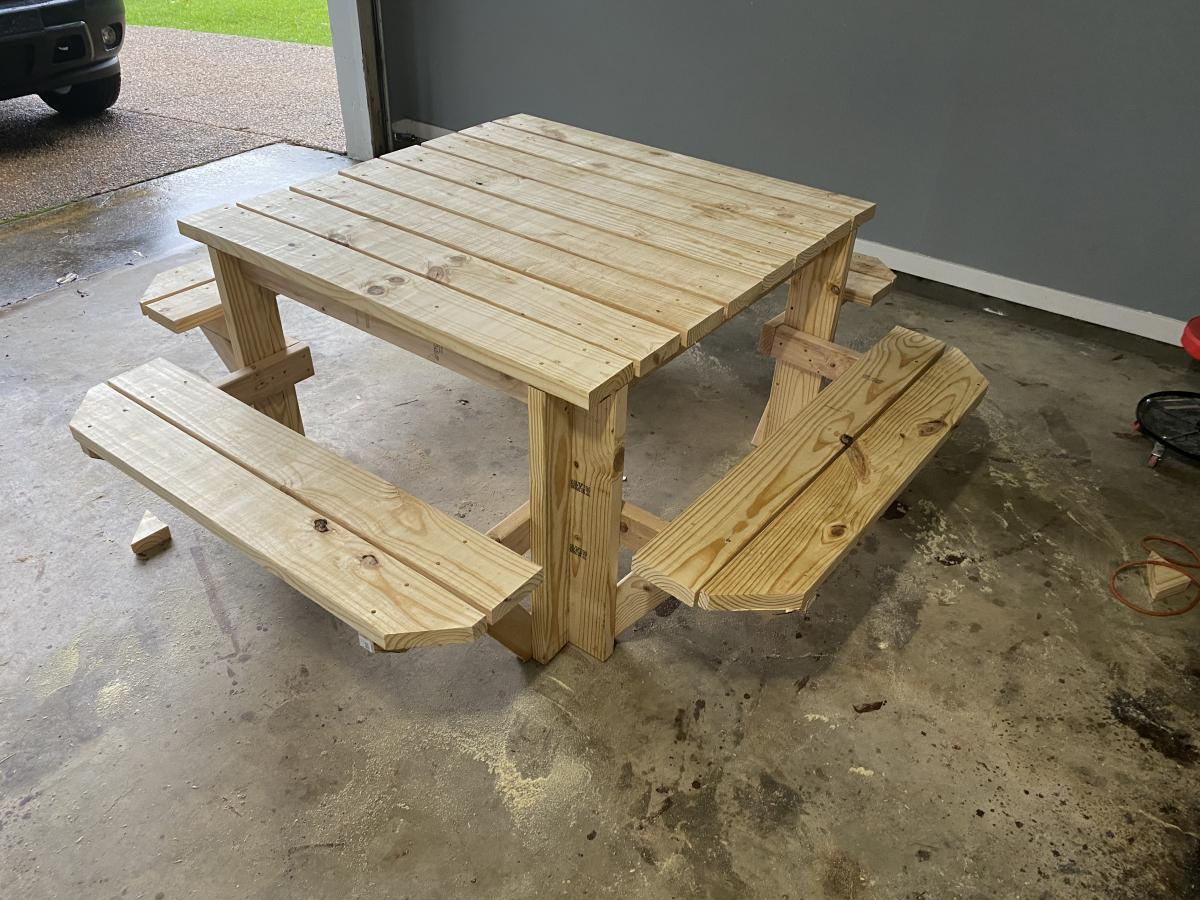
Since then, I have gone out to build about five of these, all in different lengths and sizes, including some with removable bases. The angles in the X's are a little tricky when you don't have plans for a specific size, but I have noted these down based on spacing between legs. If any of you need andgles for specific table lengths, let me know and I may be able to help :)
Let me know what you think and happy building!
Tue, 12/16/2014 - 12:22
I just clicked on your other images, boy would we love to see the turquoise island and that amazing rolling console up close:)!!!!
In reply to One more thing! by Ana White Admin
Tue, 12/16/2014 - 12:31
Thanks Ana! Can I post pictures in these replies?
My son and daughter in law had an unpurposed room in their home and wanted to turn it into a play area for their three kids. She came to me with an idea and it turned into their Christmas present. 8' tall and 140" wide. Now the kids don't want to come out of the room. Papa and Mimi helping them make memories
This is a wishing well I made for my sister for her wedding. It will be used during the wedding for people to drop "wish you well" cards into and afterward she can use it as a planter in her yard.
I followed ideas from multiple plans here on Ana-White.com, but I didn't follow any specific plan. Mostly I followed tips and instructions for cutting angles, drilling pocket holes and some finishing tips. This is the first "big" project I've done and I"m quite proud of it.
With everything, it measures 44.5 inches high. The well measures 21 inches across and 15 inches high. The roof measures 22.75 inches by 23.75 inches.
I hope y'all like it. I worked hard on this! :)
Thank you, Ana and everyone who contributes to this site. It's been so much fun and I've got lots of ideas for more stuff. If I was any good at all at Google Sketchup I'd put up the plans but I'm not. If anyone could help me with that, that would great. :)
Have a great day!
Mon, 07/21/2014 - 20:04
Anyway you can please tell me the angle for the boards ont the walls. I reallly like your well, and would like to build this for my wife but im not sure on what angles to use thank you
In reply to wishing well by bellows86
Sun, 07/10/2016 - 17:10
The 8 sided wishing well is going to be 22.5 degrees all the way around. hopes this helps
I built this picnic table for my mom’s Mother’s Day/Birthday gift. With the price of lumber being as high as it is I figured this table would be her gift this year. Fairly simple design. Ana was right about pre-sanding and staining. Would’ve made it a lot easier. I applied to coats of external poly for durability. Keep plans coming Ana!
Comments
Jason48
Thu, 04/03/2014 - 08:04
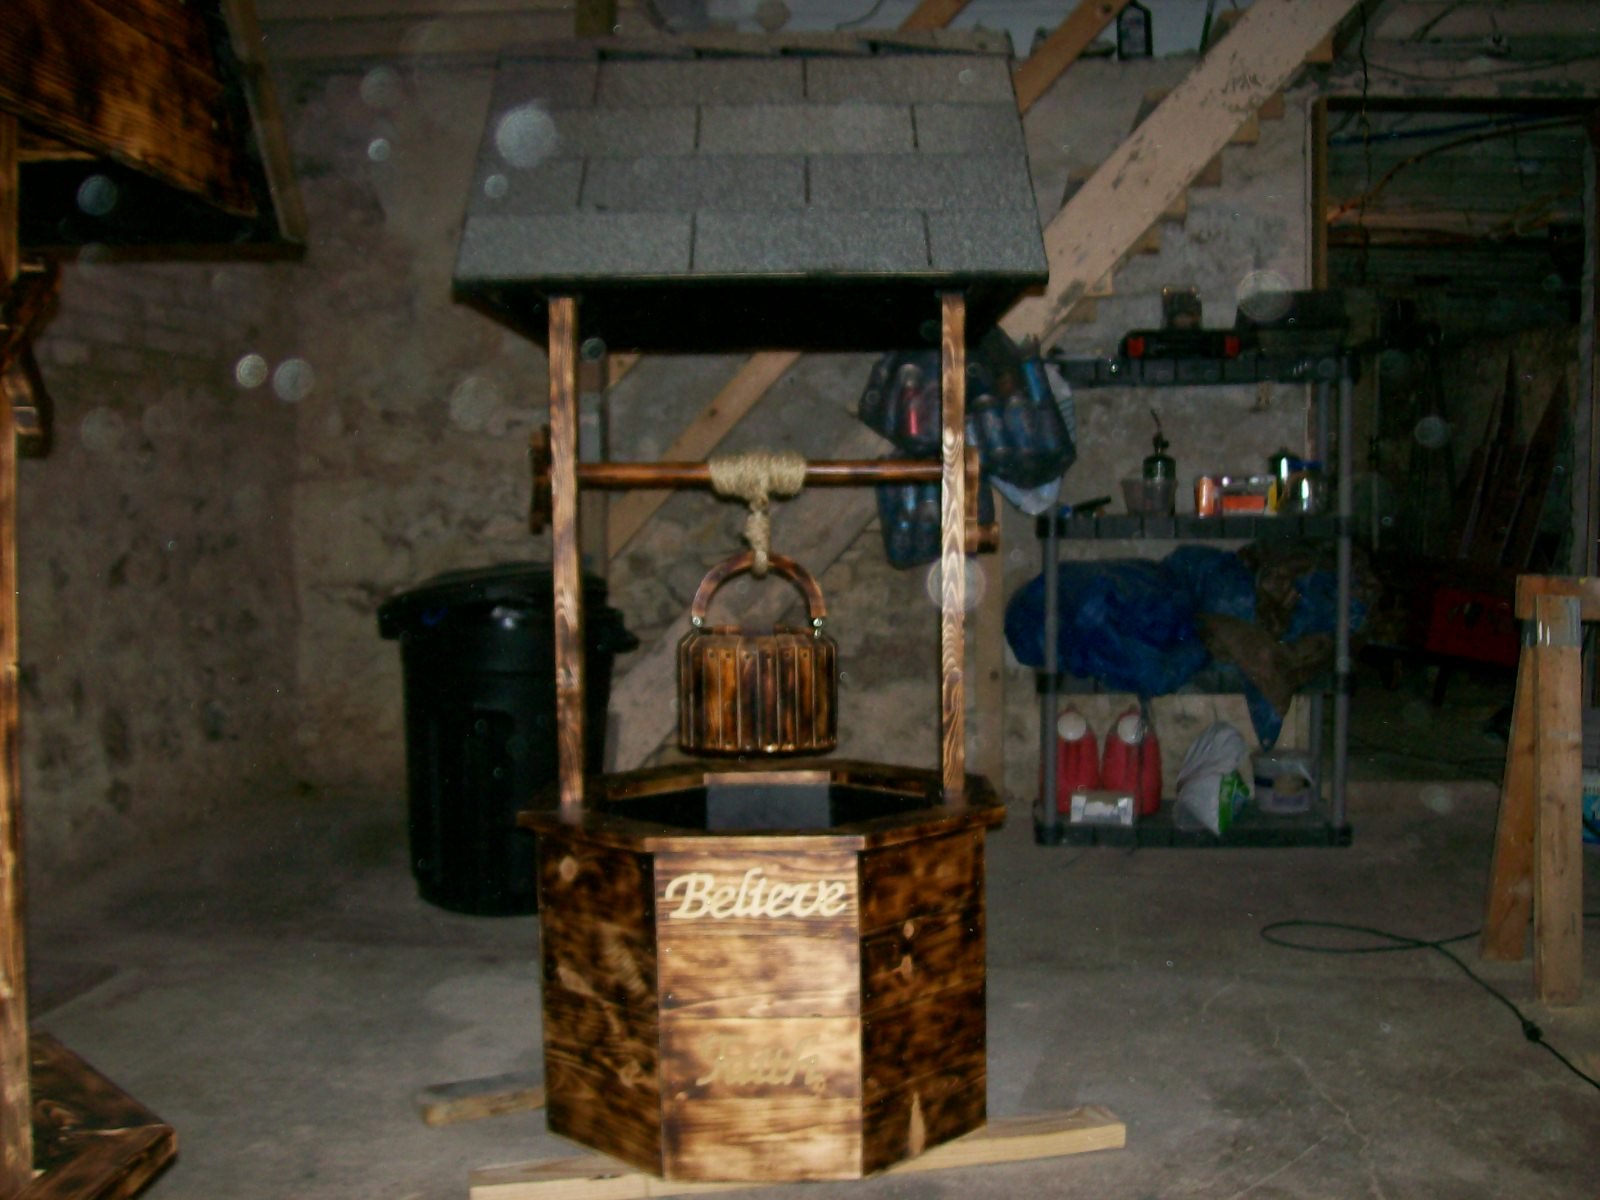
Wishing wells
I truly enjoy comments good or bad
In reply to Wishing wells by Jason48
crafty_love
Tue, 11/19/2019 - 07:33
Wishing Wells
I love the wishing wells, but I can;t find a plan. My mom has wanted one of these forever! She now has stage 4 squamous cell carcinoma Stage 4 and I would love to build her one before it is too late.
stacynabby
Fri, 04/04/2014 - 08:49
Good or bad? I can't imagine
Good or bad? I can't imagine anyone would say anything bad! This is awesome! Looks great!
In reply to Good or bad? I can't imagine by stacynabby
Jason48
Tue, 04/15/2014 - 07:23
Thank you
Thank you for the compliment
harley2014
Fri, 04/03/2020 - 17:24
Can I ask where you got this…
Can I ask where you got this plan from.Would love to make one.