Community Brag Posts

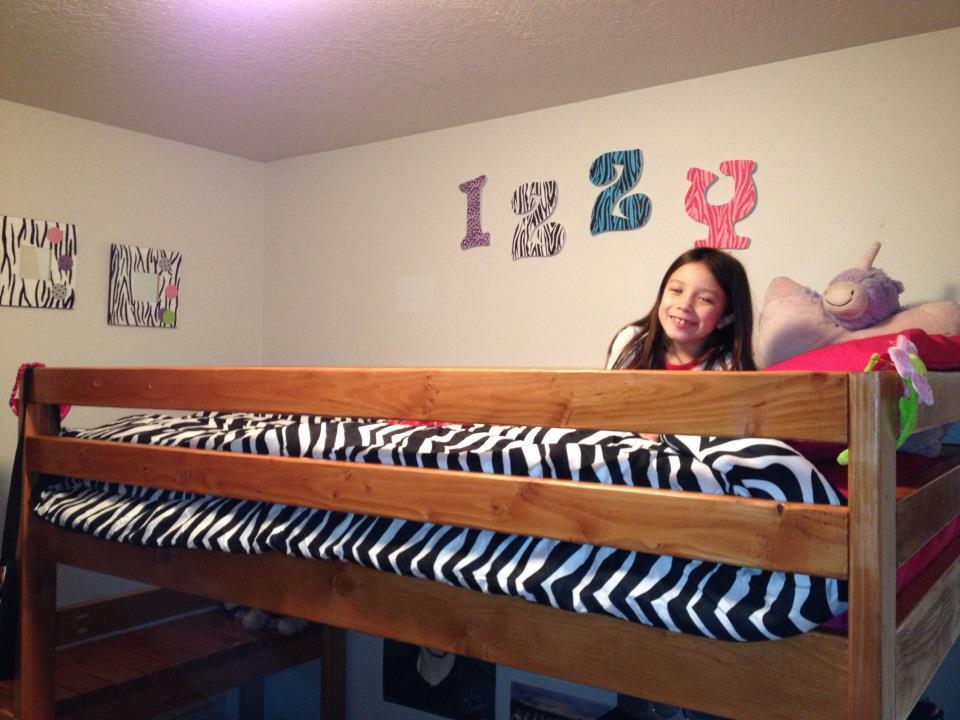
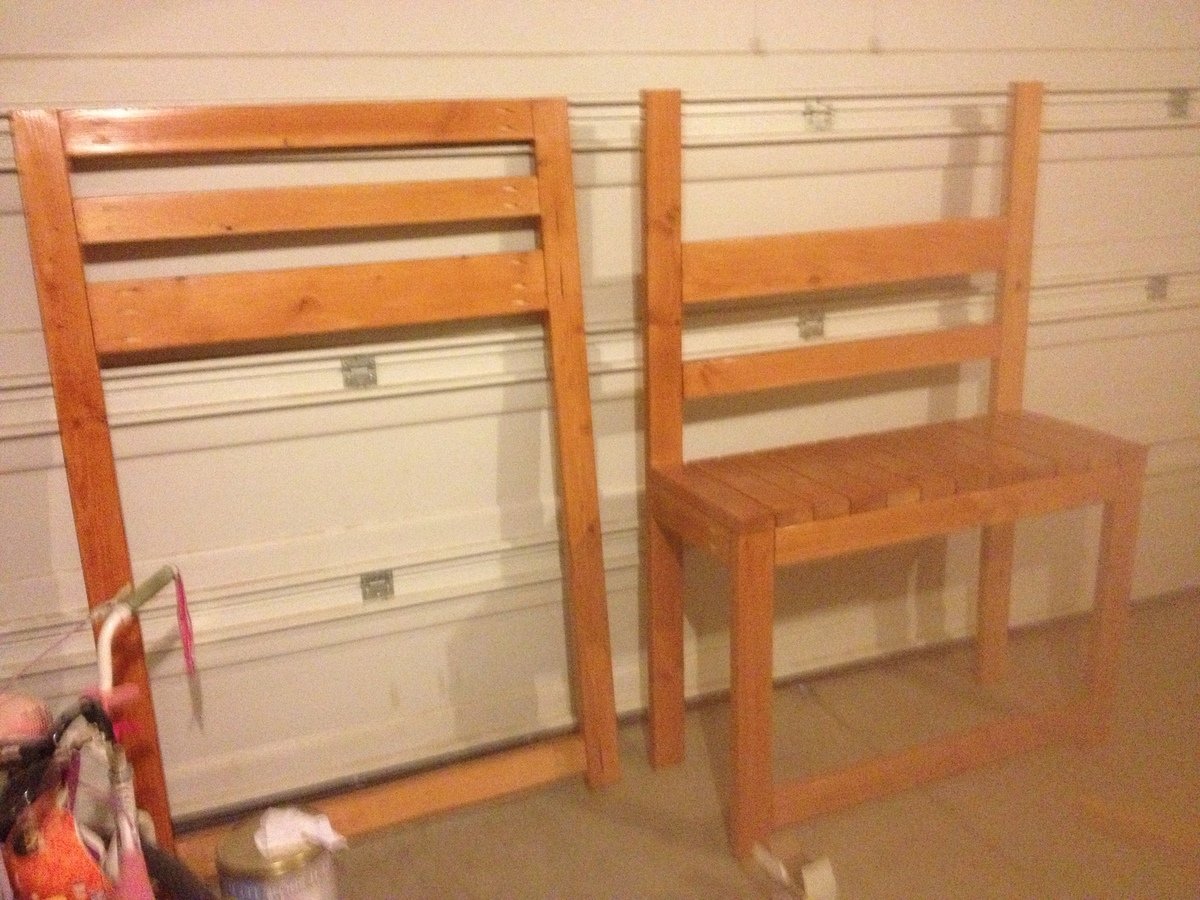
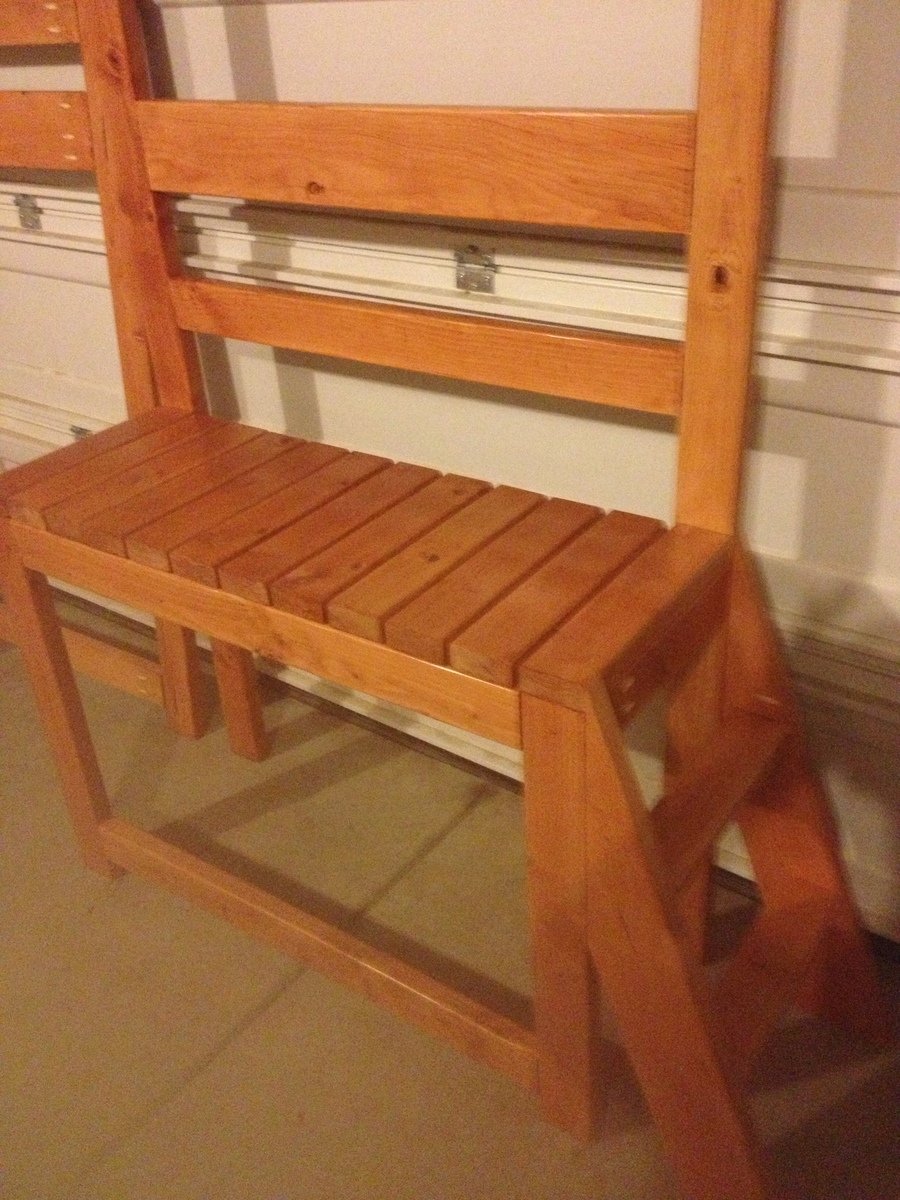
Camp Loft Bed with Ladder and Landing

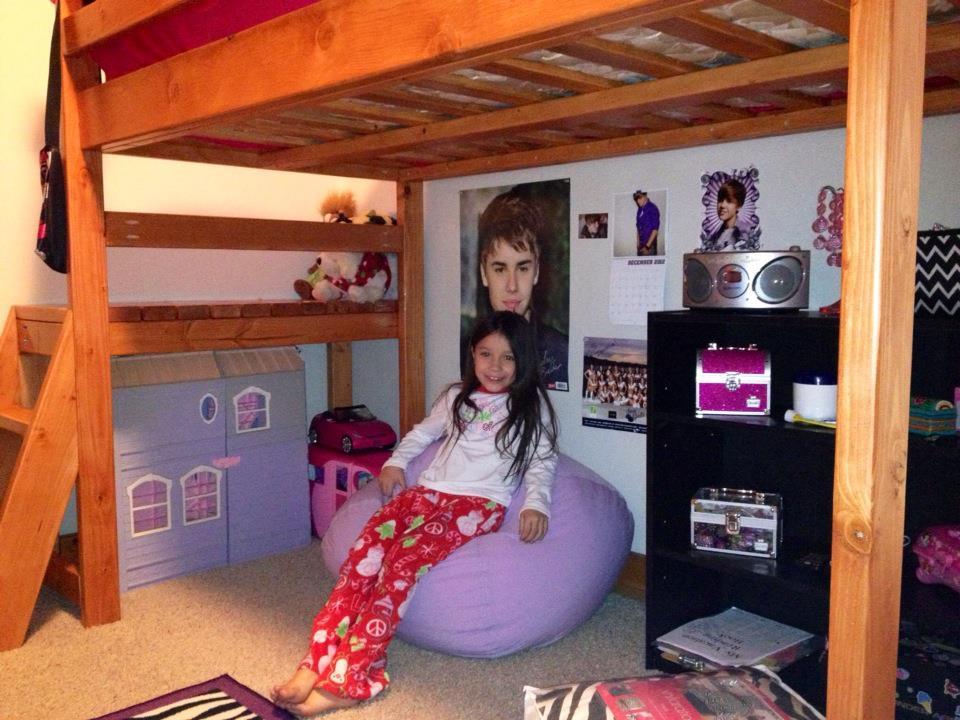
We built this bed for the lil neighbor girl as a gift for Christmas. It turned out better than I expected! The Plans were amazing and easy to follow... It is the first project that I used my Kreg Jig! I am so excited to build another one for my daughter now! We decided to pre-finish all the parts after we cut them to ensure proper sealing of all the ends, just in case of any sap or what not. Special thanks to Ana for all of these plans and Ideas! You truely rock!

Estimated Cost
$75-100 Dollars
Estimated Time Investment
Weekend Project (10-20 Hours)
Finish Used
Minwax Polyshades Classic Oak
Recommended Skill Level
Beginner

Great shelving, easy to do

Very easy garage shelving

Recommended Skill Level
Beginner

Comments

Fancy Jewelry Box

Submitted by mmihelcic on Thu, 12/25/2014 - 21:18

My first real wood project with no help from my father. I wanted to make this for my mother for christmas and I got it done 2 hours before church. I recently purchased a kreg jig r 3 and put it to good use. I made a few changes to the plan that helped me achieve the look that I desired. First, through trial and error I adjusted the kreg jig to be able to drill pocket holes to secure the shelves without the need to go back and wood putty the scrww heads that normal would have been exposed on the outer walls. There is a picture of this set up that I uploaded. Also, when byielding the drawers I made two changes. From what I could tell, the plans called for 1/4 inch plywood for the bottoms of the shelves and that is the way I made them at the beginning. However I was not happy with the appearance of the plywood on the nice face boards I was using for the drawers. So I decided to rip down the two side pieces and the back piece of the drawers ( should be 1 - 5 1/2 inch back piece and 2 - 5 3/4 inch pieces ) but I left the face Plate the full inch and a half that way the plywood wous not show from the front. The last change I made on the drawers was I made 2 pocket holes on each side piece to attach the face to the drawers that way the nail holes would not be showing from the front view. While these steps might not have be necessary , it worked for me. Thank
you very much for the plan my mom cried when she opened the box for the first time.

Built from Plan(s)
Finish Used
Minwax early American
Recommended Skill Level
Intermediate

Comments

JoanneS

Fri, 12/26/2014 - 16:25

Great job! What a lovely gift for your Mom! It turned out beautiful!

Plant Corner

Submitted by Anonymous (not verified) on Tue, 02/23/2021 - 08:35

This was my first piece of furniture to make all on my own and the Corner Cupboard plans were soooo helpful! I needed more space for plants and had already built shelves in every window of my house, so I decided it was time to make a larger space to house my plants and add supplemental lighting so I could put it anywhere I wanted. This corner was dark and I don't love lamp light, so I thought a pop of color + plants + daylight grow lights would be perfect for the space! I've been taking on more carpentry projects and also wanted something that was a bit more challenging. This plan was perfect! I'm more of a napkin planner myself, so it was nice having the structure provided in Ana's plans and the cut list was super helpful. I had to make some modifications to fit things into my car, but it all came together nicely! This being a plant hutch with grow lights was the plan all along, but I gotta tell ya, when it came to having to drill 3/4" holes in the back of my newly built beautiful hutch, it took me a minute to work up the courage! I really love how it all came together - thanks for sharing your plans, Ana!

Built from Plan(s)
Estimated Cost
$100
Estimated Time Investment
Weekend Project (10-20 Hours)
Finish Used
Kilz primer + Behr orange flambe paint
Recommended Skill Level
Intermediate

Comments

Outdoor Cedar Higher Chair

Submitted by Tea Granny on Wed, 03/06/2013 - 06:29

I used cedar deck boards and rails to make this chair - A little more costly, but definitely worth it!

The seat and back rest were made using 5/4 x 6" boards. I cut them 1/2" to 3/4" longer so that they would overhang the supports - for a more finished look. The 2x2 rails came with an angled cut, so I decided to use that to my advantage on the back supports - I made them a bit longer so they would sit higher on the back rest, and I think the angled cut looks a little more "friendly". All screws were left exposed, since this is an outdoor cedar chair.

The table in the photo is an original picnic table from the 1920's, complete with the original paint. It folds flat for storage. I hope to measure it someday and make a plan to build a reproduction - If that ever happens, I will post it on Ana's site.

Thanks Ana for the great plans!

Built from Plan(s)
Estimated Cost
approx. $20 to $23
Estimated Time Investment
Afternoon Project (3-6 Hours)
Finish Used
Left unfinished.
Recommended Skill Level
Beginner

Comments

Guest Bathroom Remodel with Board and Battten

This project was actually completed last year, but I am late getting it posted. I had been asking for a board and batten bathroom, and then luckily Ana posted pictures of one, giving the handy hubby a better idea of what I was wanting.

The cabinets, built-in medicine cabinets, mirror frame, and toilet paper niche are all custom designed and built by the hubby. The counter top and sink were custom ordered through Home Depot to fit the space.

The bathroom didn't originally have a shower head, so after removing the 70s gold flecked tiles covering the walls up to chair rail height and repairing/replacing drywall we purchased shower walls and then he tiled around and above.

This was a major, months-long undertaking that included gutting the entire room, and then the building began. Everything in the room from the popcorn ceiling down to the yellow linoleum flooring save for the toilet and tub had to be replaced,the toilet we had bought since we moved in and the tub is metal and was in great condition.

Estimated Cost
about $3500
Estimated Time Investment
Week Long Project (20 Hours or More)
Finish Used
Watco Danish Oil in Cherry
Recommended Skill Level
Intermediate

Flip down kids table

Submitted by EDanido on Thu, 03/21/2013 - 04:22

I saw this plan a couple of months ago, and knew right away that this is what we need for our kids - their old table was always filled with papers, crayons and they never had enough space to store whatever they did.

I made the table longer so that it would be enough for both of them, and added foldable legs to support the table top.
Since I didn't find the right hinges for the legs, I used a piece of 1x1 with wood dowels which are attached to the inner side of the legs when unfolded.

Built from Plan(s)
Estimated Cost
$ 40 - but I had to buy the wood for the table top twice...
Estimated Time Investment
Weekend Project (10-20 Hours)
Finish Used
Walnut stain
Recommended Skill Level
Beginner

Comments

sawdust

Fri, 03/22/2013 - 16:08

Well, I now know what I'm doing tomorrow! I'm going to make a small hinged one to go in our entryway because we have nowhere to put stuff while we're getting our shoes on. Yours looks great!

Benchwright Coffee Table

This is a replica of the Pottery Barn benchwright coffee table.  I altered Ana's plans slightly by changing the design of the legs to be 2.25" by 2". I added full extension drawer slides.  The finish is a combination of transtint shellac base coat, gel stain, transtint dye, and poly. 


Built from Plan(s)
Estimated Cost
$250.00
Estimated Time Investment
Week Long Project (20 Hours or More)
Recommended Skill Level
Intermediate

Comments

coloradonp

Sun, 01/31/2016 - 18:56

Hi! The finish is absolutely gorgeous. I was wondering if you could give a little bit more detail on which products you used for the finish. I've only used oil based stains and I'm not quite sure what the transtint dye is. Thanks!

Bookcase/ laundry and cleaning storage

Submitted by Anonymous (not verified) on Wed, 06/02/2021 - 08:26

We mainly followed the plan but made some adjustments because we wanted the “ugly” side to be able to house brooms and mops and we cut the width down just a tad. We absolutely love how it turned out!! And we definitely needed this in our space!

Built from Plan(s)
Estimated Cost
400
Estimated Time Investment
Weekend Project (10-20 Hours)
Finish Used
Chalk paint
Recommended Skill Level
Intermediate

Comments

Outdoor Sectional

Submitted by jwhipp on Thu, 04/11/2013 - 11:38

We followed the outdoor sectional plan from Ana Whites blog to create this outdoor sectional. First we bought the cushions and custom built this sectional to fit the cushions. We used 2x4's and the kreg jig for pocket screws, then covered the base in beadboard and some pine trim, gave it a good sanding and a nice paint job.

Estimated Cost
900
Estimated Time Investment
Week Long Project (20 Hours or More)
Finish Used
bead board and pine trim
Recommended Skill Level
Intermediate

Comments

Juanita_r

Thu, 04/11/2013 - 15:12

I just want to curl up there with a book and spend the day on that lounge, so pretty & inviting. where did you get the base and back cushions, they are a great colour?

jwhipp

Fri, 04/12/2013 - 05:46

Thanks! We built the frame according to Ana's design (customized dimensions for our cushions) and then covered the base in bead board and used pine trim around the edges. The cushions are from the Frontgate Outlet in Cincinnati.

Console Sofa Table

Submitted by naomi on Fri, 06/23/2017 - 06:51

Made from the modified Ana White Rustic X-Console Table.

I made this console table to fit the length of my sons couch. It's about 6 foot long.

It was really easy to make. My only tip is to sand all your timber before assembling. Getting into the tight spots with a sander is quite difficult. I hae now made 4 of these tables and sanding first saves so much time and headaches. The other 3 I have made were painted white and had stained tops. 

Estimated Cost
About $50
Estimated Time Investment
Afternoon Project (3-6 Hours)
Finish Used
Walnut Stain
Recommended Skill Level
Beginner

Comments

kgoss5

Tue, 06/18/2019 - 08:46

Any way you could share your material list/plans ? Thanks 

Tall TV Cabinet Built-in and Fireplace Board and Batten

Submitted by anb80 on Tue, 03/31/2015 - 12:00

See the before/after pic for the difference.    My daughter was pulling everything off our open TV stand so it had to go!  I designed this to give us the toy storage we need as well.  The niche was over two feet deep so I wanted something to utilize all the space.  I also wanted the fireplace to stand out so added the board and batten treatment.

Estimated Time Investment
Weekend Project (10-20 Hours)
Recommended Skill Level
Intermediate

Comments

Our Thanksgiving Family Project

Submitted by loniwolfe on Wed, 03/09/2011 - 16:50

My husband, step father and I built these Thanksgiving weekend (2010) and my mom got us a half bushel of oysters to snack on and made awesome steamed mussels with bread for dinner. This was a very fun family weekend.

I modifyed the plans a little to make the arms angle in a bit instead of being straight boards and also created the curved front. Then after building the first chair, Pat decided to make the second chair's back rest taller and cut angles to match the arms.

I picked intermediate because of needing a miter saw for all the different angles needed for getting the front right.
Also, It took one day for each chair

Built from Plan(s)
Estimated Time Investment
Weekend Project (10-20 Hours)
Finish Used
To my knowledge, Pat has not yet stained them, but once he does I will take more pics and find out what he used!
Recommended Skill Level
Intermediate

Custom Closet

Submitted by Anonymous (not verified) on Wed, 10/06/2021 - 06:59

This is a guest bedroom. The closet had 6 panel, colonial bypass doors. The bypass doors leave the center unusable. To save room, I built a dresser in the center. The bypass doors are getting converted to swing doors. I used shelf help to design the project.

Built from Plan(s)

Comments

My corner desk

Submitted by chach2667 on Wed, 11/03/2021 - 04:02

I wanted to convert my craft shed to my office after I accepted a new job and would be working from home full time. My shed is only 10x8, so I needed something smallish and functional. I modified the plans slightly and I did make a few mistakes. In the end, I think it turned out great for a 50 something grandma who likes to work with her hands!

Built from Plan(s)

Comments

Our Chicken Coop (Aka Dollywood)

When we became accidental chicken owners, we had to build a coop fast. I found the plans for Ana’s replica of the Williams Sonoma chicken coop and got to work. They were very easy to follow and easy to modify to fit our own needs and aesthetic. We decided to enlarge the coop and remove the planter in the original plans to accommodate more chickens while keeping the original footprint. Instead of plywood, we used cedar reclaimed from an old fence we had recently replaced. We also enlarged the rear door to make clean-out as easy as possible. I cut pieces of polycarbonate to fit inside the door and windows to winterize the coop when temps drop below freezing. The run is designed to follow the shape of the coop and is large enough to give our 5 chickens plenty of space to roam when they aren’t free ranging in the yard. The planter box runs the length of the chicken run, providing plants to munch on inside and shady vines that will eventually cover the outside.

Comments

Washer and Dryer Pedestal

Submitted by Brittney W on Tue, 07/09/2013 - 20:10

This was one of the first big DIY projects for my husband and I in our new home. It took us one weekend to complete. The $150 cost includes all supplies: even paint, rollers, wood filler, etc. My husband wanted to get pedestals for our front loaders because he is so tall, but after pricing it out, it would have cost around $550 with tax to get the red LG pedestals. The $150 was definitely worth it and I feel more confident that we can tackle more DIY projects like benches for the deck :) It's not perfectly made, but it's perfect for us.

Estimated Cost
$150
Estimated Time Investment
Weekend Project (10-20 Hours)
Finish Used
1 coat of Latex primer, 2 coats of latex semigloss Valspar paint. We used old filler to fill screws and imperfections. The thinner the coat of wood filler, the faster in dries. The wood filler dried in a few hours. We sanded the piece using medium sand paper on really rough edges and finer sandpaper on the wood filler. We applied the primer and waited for it to dry-only took an hour or two. Then we applied the 2 coats of paint. We waited a few hours between each coat. I chose a semigloss because an online article suggested to use it on plywood, but glossy paint always leaves a "tacky" feel so I sort of wished we could have stained the piece instead. Although stain would have shown wood filler from all of our beginner imperfections.
Recommended Skill Level
Beginner

Using Ana White’s Garage Cabinet Plans

Submitted by Anonymous (not verified) on Wed, 04/20/2022 - 09:23

Thank you so much for the two videos we watched of you and your husband explaining and demonstrating how to build garage shelves. We used your plans as a guide. We chose to add shaker style doors to create cabinet shelves. We absolutely love them. We are not handy as you can see we had a living room lamp for a work light and a lifetime table as a work bench. Thank you!
The Paulsons

Comments

Storage Bin

I love this storage bin from plans at morelikehome.net, and it was easy to build, too! It's nice and big, about 21"W x 21"D x 18"H. I selected 3-6 hours as the time spent, but to say closer to six would be about right. I need a large work surface in my sewing room (I'll be building the storage table as well),and a place to store my "stuff".This should be a pretty good start!

Estimated Cost
About $20
Estimated Time Investment
Afternoon Project (3-6 Hours)
Finish Used
Two coats of Early American by Minwax, and one of Varathane's Diamond Finish topcoat, all applied with a rag.
Recommended Skill Level
Beginner

I couldn't be more happy about a garbage can!

Submitted by hoffer5353 on Mon, 08/01/2011 - 12:29

I started this project thinking that I would put in a rental home we were working on. But after I completed it I couldn't part with it.

I found the plans to be easy to follow! I watched the videos and tackled the raised panel doors. I wanted to add some height so added a few inches just in-case. I couldn’t bear the thought of completing this project and my garbage can not fitting. So I did use 1x6 for the rails and found it didn't look too bad.

I put a lot of thought about what color and finish I wanted. I thought about distressing it but couldn’t decide on the color or technique. So I decided on Color Place paint that I had left over from another project. I am going to find a spray paint that matches and do the inside.

I choose an oil rubbed bronze knob that I had left over from a kitchen remodel, added a magnetic closure as well as a door safety chain. I have lots of little hands and toes that I don’t want getting smashed. I like the idea that if I want to open it all the way for cleaning all I have to do is unhook the safety chain.

Over all I am so pleased with how it turned out. It keeps the garbage and smell in and curious fingers out! My kids love to put stuff in the garbage now!

I spent a weekend with a visiting friend and made one as well as completed two more for Christmas gifts.

Thanks Ana

Estimated Cost
$30-35
Estimated Time Investment
Afternoon Project (3-6 Hours)
Finish Used
2-3 coats-ColorPlace-Redwood semi-gloss exterior
1 coat-Minwax-Polyurethane-Semi Gloss
Recommended Skill Level
Intermediate