Community Brag Posts

18” Doll Bunkbed

Submitted by ewebrat on Fri, 07/24/2020 - 13:12

Awesome plans, Ana. Had to fight with not being able to get nice straight 1”x2” boards, and refused to go buy anything bigger to rip from. But overall, it turned out super nice and my granddaughter loved it. Already have a request for another one from her cousins 😊

Estimated Cost
$65
Estimated Time Investment
Afternoon Project (3-6 Hours)
Finish Used
CIL Semi Gloss - Vintage White
Recommended Skill Level
Beginner

Stain & Paint Finish

Submitted by ajstormy85 on Sun, 08/24/2014 - 18:19

Did the multi-finish on the step stool. On the steps, I used the Minwax Pre-Stain Conditioner, followed by Minwax 'Early American' stain and then Minwax clear gloss polyurethane. The rest of the stool was painted with DIY chalk paint. The paint is 1 cup flat paint (Valspar Jungle Thicket) mixed with 1/3 cup plaster of paris and 1/3 cup water. The chalk paint portion was finished with the Minwax Finishing Paste Wax and gave the flat paint look a nice sheen.

Finish Used
Minwax products (pre-stain conditioner, Early American stain, clear gloss polyurethane; DIY chalk paint (1 cup flat paint, 1/3 cup plaster of paris, 1/3 cup water); Minwax finishing paste wax on chalk paint part
Recommended Skill Level
Beginner

Tilt-Out Kitchen Trash Can Cabinet

Submitted by Fritz Lane on Sat, 10/10/2020 - 11:32

Here's my take on Ana's 'Wood Tilt-Out Trash or Recycling Cabinet.' It's made from lumber salvaged from pallets found locally. Two changes made from the original plans:

- Raised panel on the door
- Used two stop blocks inside the cabinet to limit motion on the door (instead of chains)

The only items that were purchased were the trash can, hinges, door pull and Kreg screws.

Links for techniques and finishes used in this project:

Raised panels:
https://www.finehomebuilding.com/2006/03/01/making-raised-panel-doors-o…

Milk paint finish:
http://toolmakingart.com/2008/06/16/two-layer-milk-paint/

Topcoat on cabinet:
https://sawsonskates.com/bobs-miracle-finish/

Estimated Cost
Approximately $30
Estimated Time Investment
Week Long Project (20 Hours or More)
Finish Used
For the cabinet, a two-layer milk paint formulation. The red tint was obtained using Sakrete powdered cement color, a product made for adding color to concrete. A link is shown in the Summary section (above).

Topcoat on the cabinet is a mix of spar varnish, paint thinner and boiled linseed oil. A formulation for the finish can be found in a link in the Summary section (above).

Finish on the top was a product called "Maxithane" from Sico. It's a combination of stain and polyurethane. The color is Cedar. I happened to find a can of this product at a dollar store that specializes in closeout deals and haven't seen it in any stores since.
Recommended Skill Level
Intermediate

Coffee Bar

This is my second project. It's a coffee bar to free up space in my kitchen countertop. It has quite a few imperfections but I am very proud of the finished product. Can't wait for my next project!

Built from Plan(s)
Estimated Cost
About $140
Estimated Time Investment
Weekend Project (10-20 Hours)
Finish Used
Pre finish stain conditioner, 2 coats of Varathane Kona stain, and 3 coats of water based polyurethane.
Recommended Skill Level
Beginner

Comments

Small Kitchen Island

Submitted by stacynabby on Sun, 11/09/2014 - 10:15

I built this for my mom to replace her small, rolling butcher block. I wanted to add in the tilt out trash cabinet, so I built off the back of it to give her some storage and a bigger work surface. I had a local countertop business custom fabricate the top out of a piece of scrap quartz (that was the spendy part of the project).

Estimated Cost
$40 for the wood and $480 for the quartz top
Estimated Time Investment
Day Project (6-9 Hours)
Finish Used
Minwax Polyshades natural
Recommended Skill Level
Intermediate

Comments

Rustic Table and Bench

I basically stuck to the plans, but I shortened the length of the table just a touch, and lengthened the bench to fit just inside the legs. I also used 2x4s for the legs, tapered them for aesthetics (similar to some other posters), and reinforced them with "L" brackets to reduce the wobble. We finished it with Semigloss white paint, Minwax Honey stain, and Minwax Gloss Polyurethane.

If I can make this table, just about anyone can.

Estimated Cost
150.00 for lumber,
Estimated Time Investment
Afternoon Project (3-6 Hours)
Finish Used
Minwax Honey Stain, Minwax Gloss Polyurethane, and Semigloss White Paint
Recommended Skill Level
Beginner

Comments

shelbyautumn

Mon, 11/07/2016 - 11:29

Your table is beautiful!

Do you remember how you tapered your legs? I'm trying to figure out if I can do it without a table saw.

Thank you!

Farmhouse Indoor Playhouse - I May have gone a little overboard...

Submitted by Anonymous (not verified) on Fri, 01/08/2021 - 19:38

Thanks for your amazing Farmhouse Indoor Playhouse plans!
So easy to follow your directions! I may have gone a little overboard.
I used some scrap wood from recent Renos and wood from an old boxspring my parents had.
The kitchen was originally from Ikea with some updates.
The shrubs are silk plants from Ikea and scrap wood.
The only real cost was Paint $30 ish.

Built from Plan(s)
Estimated Cost
50
Estimated Time Investment
Weekend Project (10-20 Hours)
Recommended Skill Level
Beginner

Comments

Seasonal And Holiday

Brook Laundry Basket Dresser

Submitted by krochelle on Thu, 01/01/2015 - 15:42

Used square laundry baskets instead of regular rectangular baskets. The square ones aren't as deep but are a bit taller so I had to modify the plans. I added a backsplash and some wooden tags to the baskets to designate them for certain colors. I also added some decorative trim and finished the bottom in a gray stain and used white chalk paint for the top.

Estimated Cost
$70
Estimated Time Investment
Day Project (6-9 Hours)
Finish Used
Weathered gray stain
White chalk paint
Recommended Skill Level
Beginner

My spin on the Counter Height Farmhouse Table from Amazon White’s free plans!

Submitted by Anonymous (not verified) on Sat, 03/20/2021 - 06:52

The counter height farmhouse table plans were so helpful! Thank you Ana White! I replaced plywood on top with 2x8s and added a shelf underneath the table for some kitchen storage! I am in love thanks again😍 Follow me on Instagram @abbbclark_homeee for more home renovations, decor and DIY!

Estimated Cost
$200
Estimated Time Investment
Day Project (6-9 Hours)
Finish Used
Weathered oak oil based stain
Recommended Skill Level
Beginner

Comments

2x4 Outdoor Chairs and Side Table

I built the 2 chairs and side table using Ana's plans. Wood in the UK is perhaps not as cheap and ubiquitous, so I managed to get hold of some rough siberian larch to build them. After what seemed like a lot of sanding I started cutting. I've used stainless steel screws and have used a plug cutter on a mahogany board I had to plug the screw holes. I really liked the contrast and neatness that this has given the project. I also used some rubber feet to raise it off the ground and try and reduce any water damage. The side table is reduced in size from the 2 foot version in the plans, this was easy enough once I'd worked out the impact on all of the other measurements. My wife has commented that I should have used less wood in my next project as they are very heavy, they certainly aren't going anywhere! My wife did produce the lovely grey cushions that you see in the pictures.

Estimated Cost
120
Estimated Time Investment
Weekend Project (10-20 Hours)
Finish Used
Used a wood preserver followed by a coat of stain to obtain the light finish seen
Recommended Skill Level
Intermediate

Comments

My first project!

Submitted by J_Weeks13 on Sat, 03/07/2015 - 10:26

Thanks for the awesome, easy to follow plans!! All that's left to do is stain it and build another one- I'm going to have 2 on my back patio! A successful first project! Thanks!!

Estimated Cost
$130.00
Estimated Time Investment
Day Project (6-9 Hours)
Recommended Skill Level
Beginner

Comments

thecityalaskan

Sat, 03/07/2015 - 12:27

So awesome!!! Especially for your first project! Super inspiring for those of us who would like to attempt a project like this! Thank you for sharing!

Produce Stand

I really enjoyed this project!  It was very easy and inexpensive.  I used Weathered Oak stain to make the pine look aged.  I also countersunk all of the screws and used oak button dowels to give it a finished look.  I learned how to create the wording and images through YouTube.  Search: how to transfer an inkjet photo to wood.  Cool trick.

Estimated Cost
$35
Estimated Time Investment
Afternoon Project (3-6 Hours)
Finish Used
Weathered Oak
Recommended Skill Level
Beginner

Comments

Debbie742

Tue, 12/01/2015 - 04:50

My sister in law would like one of these and I'm wondering what angle cut you used for your support boards?  I like the idea of going corner to corner vs trying to get each one centered and not making a mistake. I'm also wondering about spacing and if you kept the measurements the same as "Over The Big Moon" ?  Thanks so much!!!


Debora Cadene

Danielle's Shoe Crates

Submitted by zigmommy on Wed, 03/09/2011 - 14:54

We went a little crazy bringing pallets home once I got the idea that we could build something so cool and functional out of only a small amount of new lumber! We've had these about 6 months now and they still look great and serve our family in a very real and functional way! My boys have been WONDERFUL about keeping all their shoes in their crates!

Estimated Cost
About $10 per cart
Estimated Time Investment
An Hour or Two (0-2 Hours)
Finish Used
Just lots of sanding and Mod Podge to seal the customizations!
Recommended Skill Level
Starter Project

Wood Toy Box

This is a great beginners project. I wanted something that would match my living room and still be functional for my daughter to get her toys out . We have a full tutorial at our blog.... www.Ahouse-2-Home.com Also , if you have any questions please feel free to leave us a comment! Thanks!

Built from Plan(s)
Estimated Time Investment
An Hour or Two (0-2 Hours)
Finish Used
Chestnut stain
Recommended Skill Level
Beginner

Comments

ImTheNana

Sun, 01/25/2015 - 07:15

Is there another source for the plans? The linked site is down.

Becca Trunk

Submitted by DMax2010 on Sat, 04/25/2015 - 17:44

Love this trunk! It was my first attempt at moulding and I probably should have practiced on scrap wood first (recommend)! But it turned out great and one of my favorite pieces (because it's filled with toys).

Built from Plan(s)
Estimated Cost
Not sure, I purchased the purebond plywood and the moulding but pretty much had the rest already
Estimated Time Investment
Day Project (6-9 Hours)
Finish Used
Body of trunk:
Minwax Express Color in Walnut (base)
Behr Premium Plus Flat in Juniper Ash
Rustoleum Soft Touch Matte Poly

Top:
Minwax Express Color in Walnut
Rustoleum Soft Touch Matte Poly
Recommended Skill Level
Intermediate

Kids Country Bench Modified: First Build

Submitted by EllenFitz on Sun, 03/13/2011 - 19:20

My husband and I put this together to fit a spot that was just slightly off of what standard furniture would accomodate. Looking for something simple as a first build, we went with the Kids Country Bench and made some changes along the way.
We made 3 cubbies on the bottom shelf for extra storage and a little extra stability, since our boards were more bowed than we preferred. We also removed the front and back aprons. In the front we just attached a 1x2 that we ripped into a 1x1 as a trim piece. In the back, we centered a 1x2 to give a slight lip in the back.
I don't have a jigsaw, so we used my FIL's Scroll Saw. That was interesting ... but the sides turned out ok. Not perfect, but ok.
I was hoping to finish this with a high gloss product, but since the boards we ended up with more 'rustic' than I anticipated, I decided to embrace that and go with a distressed finish. I used a spray primer, and then one coat of Sherwin Williams yellow, covered with a dry brush of Sherwin Williams blue. I then sanded the corners and edges and finished with a spray top coat.
We had lots of fun, although it took us a long time. We were only working in small shifts, in between naps. If we had managed to get, say, 3 straight hours to build, I think we could have finished in in that time period.
This was a great starter project, and it's nice to know that we can make MINOR modifications to a plan and not have it fall apart on us :)
Thanks for the inspiration Ana!

Built from Plan(s)
Estimated Cost
$50
Estimated Time Investment
Afternoon Project (3-6 Hours)
Finish Used
Distressed/Dry Brush paint
Recommended Skill Level
Starter Project

Little Kids Picnic Table

Submitted by Cassie1686 on Tue, 04/12/2011 - 23:35

Thanks to LoriInVegas for her help with the legs on this project!  My legs were so wobbly, even thought I was super careful to cut them evenly.  So, I unscrewed all the screws besides one, in each leg, and then re-screwed everything in one by one, being sure it was steady after each screw.  I built this for my 3 year old and 1 year old daughters.  The table was a bit smaller than I had imagined, but it's sooooo cute!  It will fit them both for now, but definitely no more than one child on each side, and I assume my 3 year old won't be able to fit comfortably much longer.  I plan to build the Bigger Kids Picnic Table this weekend!  I painted the entire table in chalkboard paint so that the kids could go crazy decorating it.  I plan on putting a cute little basket in the middle of the table to hold their chalks.

Built from Plan(s)
Estimated Cost
$15
Estimated Time Investment
Afternoon Project (3-6 Hours)
Finish Used
Behr Paint, mix 1 cup paint with 2 tablespoons unsanded grout. Paint and let dry. Prime the surface for chalk by coloring entire surface with chalk and wiping clean with damp cloth before using.
Recommended Skill Level
Beginner

My First woodworking Project!

Submitted by minhnguyen on Mon, 06/08/2015 - 11:39

I really wanted to build something for our first home so 3 months after moving in (and 7-8 months pregnant) I started on our dining table. To fit our dining room, the measurements were modified to have a 7ft-table, with the bench just long enough to slide all the way under the table. The legs are made of 4x4s of Douglas Fir and everything else is pine. I also removed the stretchers underneath because I wanted to be able to have chairs on the ends. The table seats 8 people very comfortably. It took me a little longer than anticipated, since I couldn't do any of the lifting until my husband came home, and he stained it with 2 coats of Rustoleum Weathered Grey stain and 2 coats of poly (with my light sanding in between each coat).

Estimated Cost
$100
Estimated Time Investment
Week Long Project (20 Hours or More)
Finish Used
Rustoleum Weathered Grey Stain
Minwax Fast-Drying Semi-Gloss Polyurethane
Recommended Skill Level
Beginner

Comments

Reclaimed wood loveseat - in-work pictures

Submitted by JoanneS on Mon, 06/22/2015 - 19:08

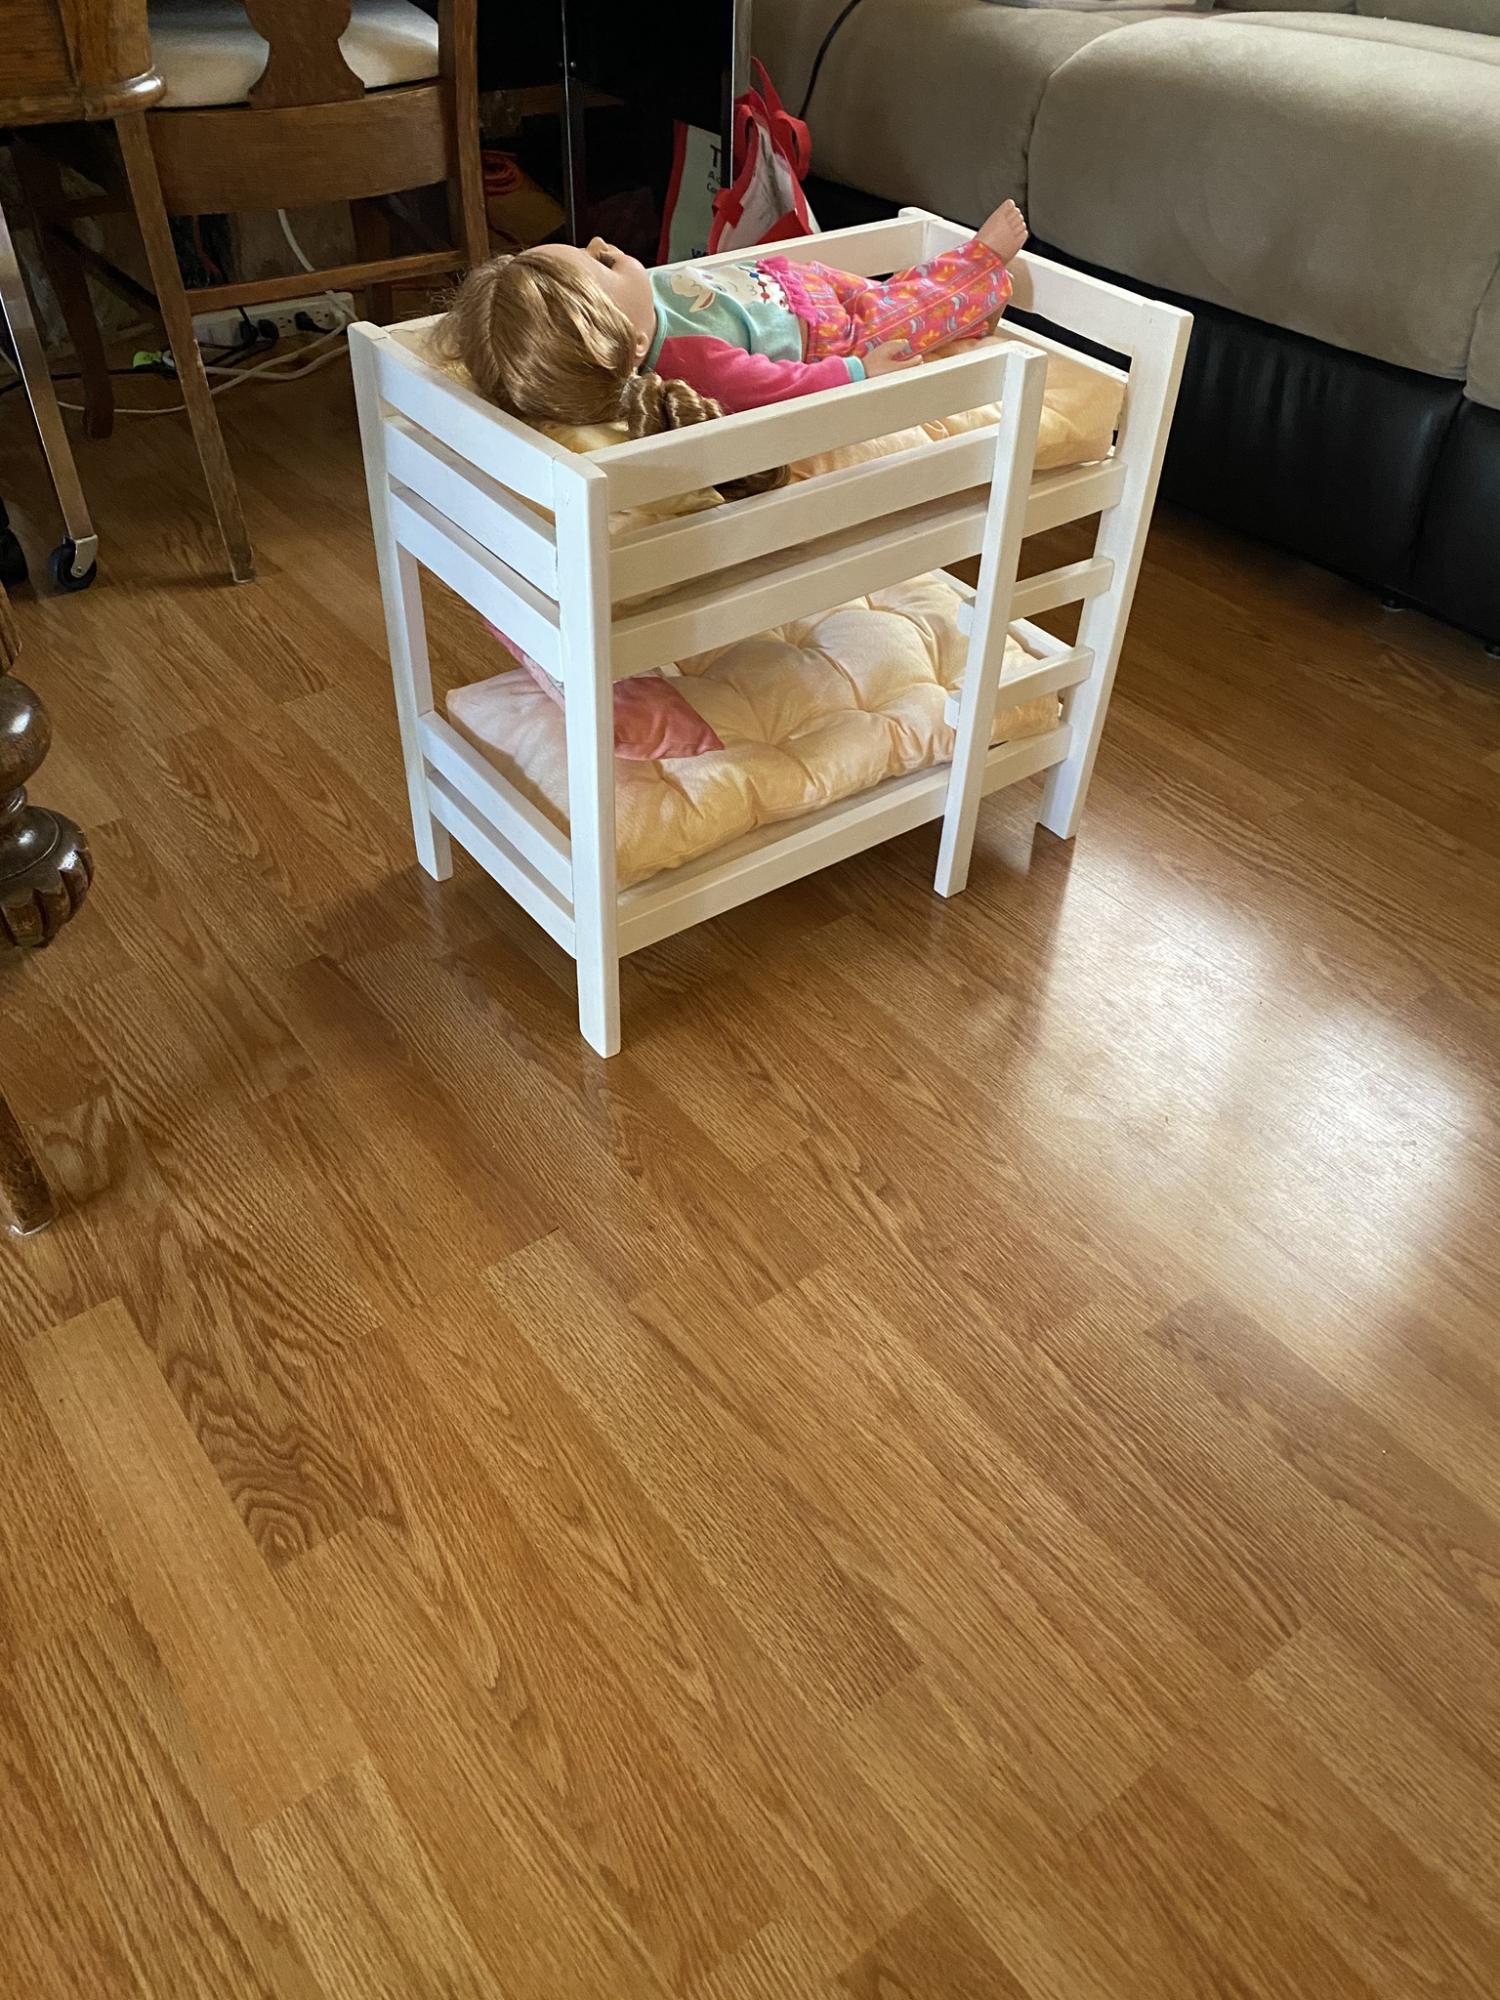
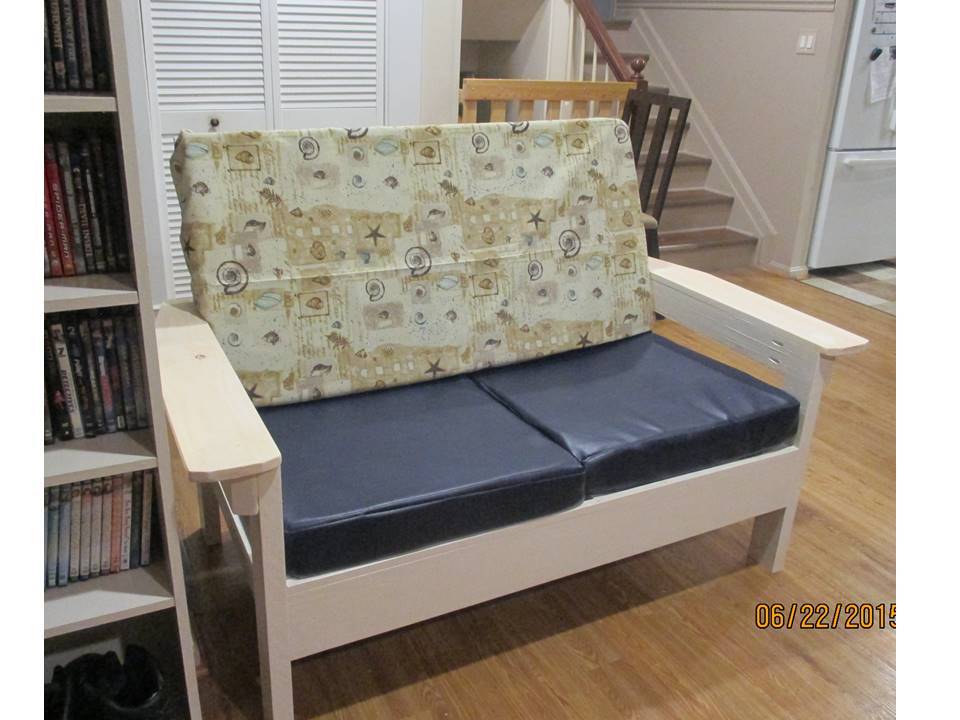
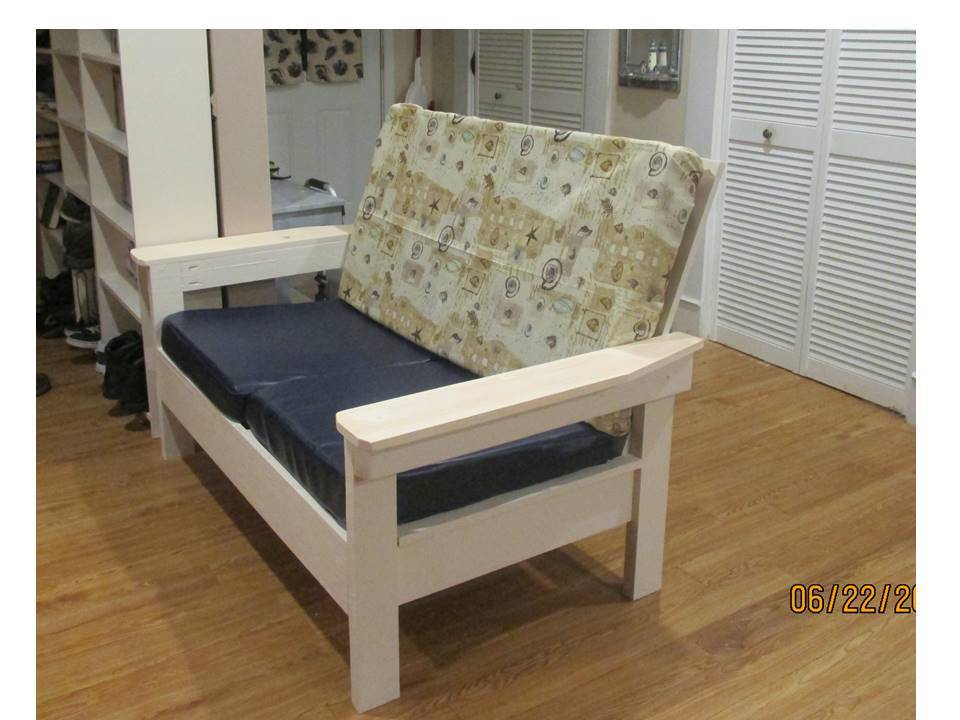
Couldn’t wait to share this one. I’ll post the finished pics on here once the painting is finished and the cushion is sewed.

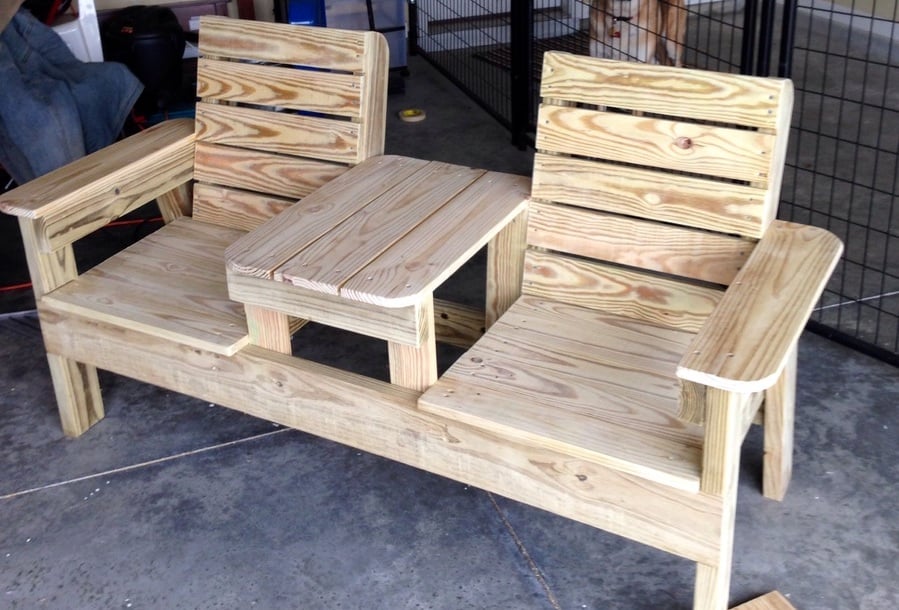
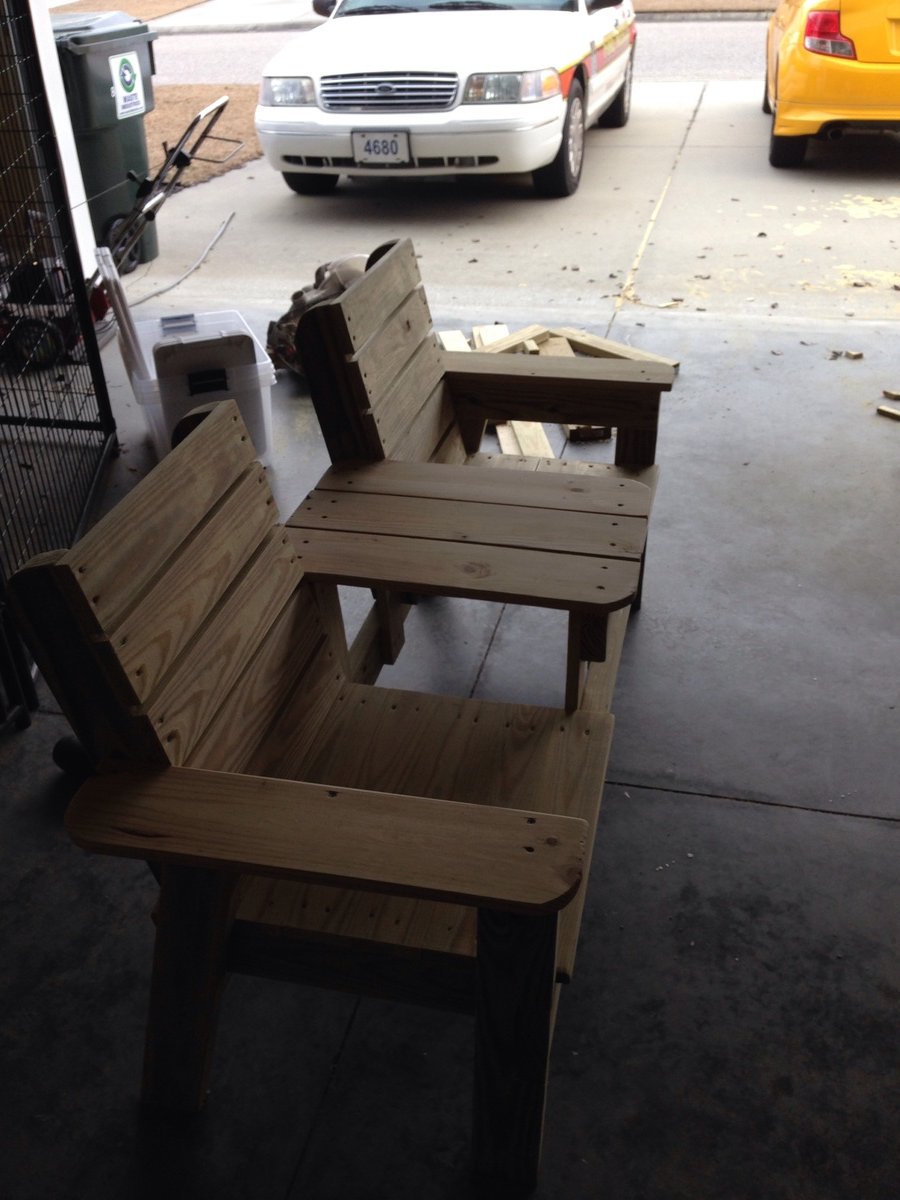
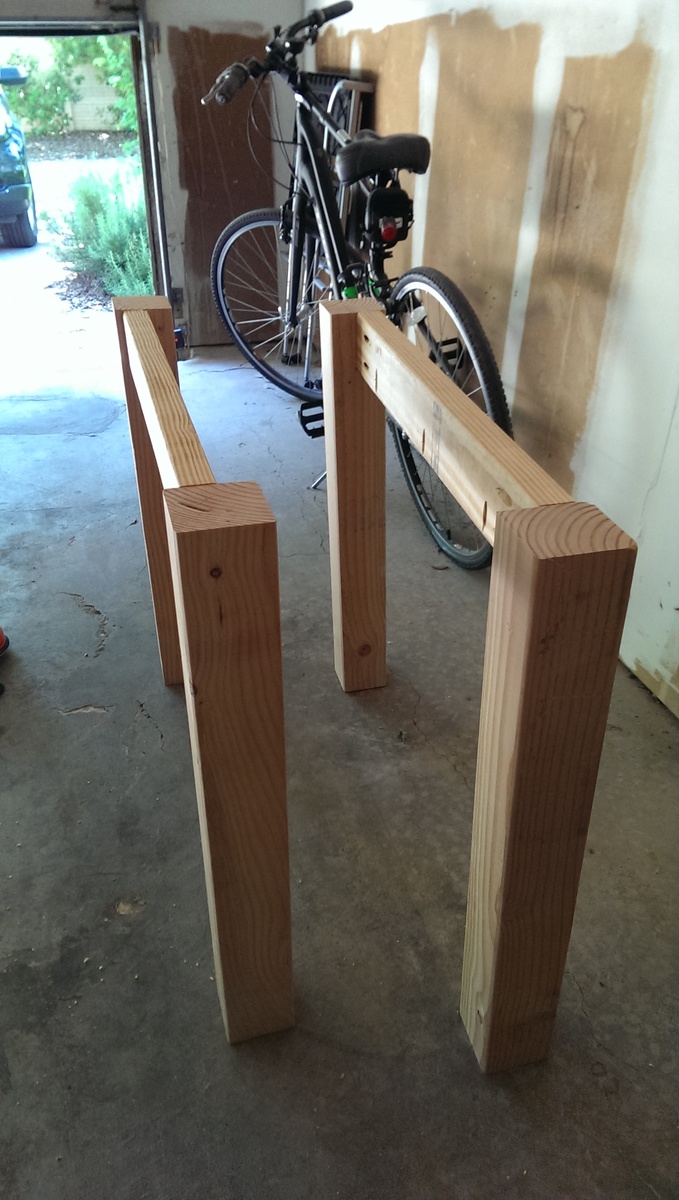
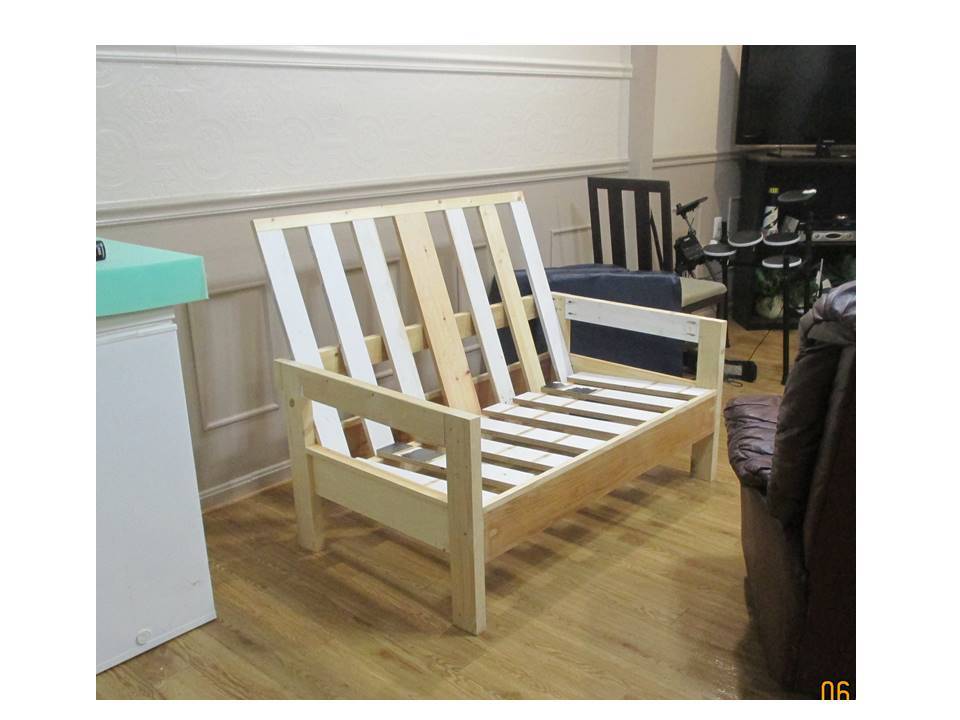
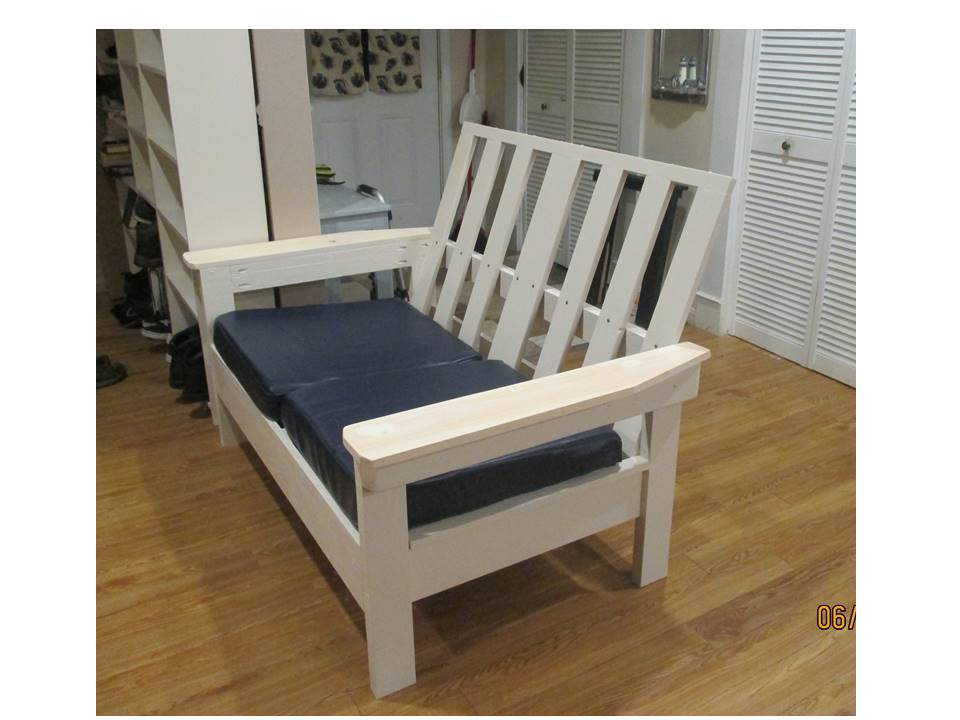
This build is a reclaimed wood version of Ana’s Simple White Outdoor Loveseat. We’ll be using this inside. This started as a way to repurpose those blue vinyl cushions (which I made 11 years ago for a hot tub bench – these had been stored in the garage for a few years). Using reclaimed wood on hand – reclaimed 2x4 studs, an oak 1x12 shelf and some pine 1x12 scrap ripped to 1x6 for the aprons, plywood from an old entertainment center ripped to 1x4 size, some 1x4 that used to be trim, a left-over 1x2 and S4S, and some left-over 1x6, constructed the frame and back. After I got that together, Hubby suggested we add some wide arms so it wouldn’t need to have a side table. That was the only wood I had to purchase on this one – a 1x6x6 for the arms, and a 2x4 for bracing the arms.

So far this has been a weekend project, including re-sizing the plan to fit my 24” x 24” x 4” cushions, doing the math to use 1x4 size instead of 1x3 size for slats and rails, and sizing to use the 2x4 frame on their ends rather than flat, to save a tiny bit of space in the footprint. Originally there were going to be 8 1x4 rails for the back, but I was 1 piece short, so instead of having 8 rails in 1x4, I have 6 1x4’s plus the 1x6 in the center (now I have 1 piece of the 1x4 left over). And it’s very comfortable for sitting!

Still left to do: sand the filled screw holes on the arms and paint the arms, and sew the cushion. I got that high density foam with a 60% off coupon at JoAnn Fabrics. Also the fabric was 30% off (right now it’s just draped around the cushion for the photo). The fabric and foam was only $90, and I’ll have enough fabric left over for a few accents. Hopefully I’ll get to that during the week, if not, on the weekend.

Estimated Cost
Total spent: about $100 for foam, fabric, and 2 boards.
Estimated Time Investment
Weekend Project (10-20 Hours)
Finish Used
The bottom and back frame is painted with 2 coats of semi-gloss Clark & Kensington Paint + Primer in Crushed Peanut (my absolute favorite cream color). Once I get those filled screw holes sanded, the arms will be painted with that as well. Paint was already on hand.
Recommended Skill Level
Beginner

My take on the chicken coop design

Submitted by Anonymous (not verified) on Thu, 12/30/2021 - 13:01

When we became accidental chicken owners, we had to build a coop fast. I found the plans for Ana’s replica of the Williams Sonoma chicken coop and got to work. They were very easy to follow and easy to modify to fit our own needs and aesthetic. We decided to enlarge the coop and remove the planter in the original plans do we could accommodate more chickens while keeping the original footprint. Instead of plywood, we used cedar reclaimed from an old fence we had recently replaced. We also enlarged the rear door to make clean out as easy as possible. I cut pieces of corrugated plastic that fit inside the door and windows to winterize the coop when temps drop below freezing. The run is designed to follow the shape of the coop and is large enough to give our 5 chickens plenty of space. The planter box runs the length of the chicken run, providing some plants to munch on inside and shady vines that will eventually cover the outside. Thanks for the awesome plans!

Comments

Pottery Barn Benches with X Table...Modified

Submitted by AJW on Thu, 05/19/2011 - 13:18

Pottery Barn Bench: Length Modified and utilized 2-1x6s for seat. X Table: Length Modified, utilized a 6x6 for the stretcher and drilled a hole through both the 1 top material and 6x6 stretcher beam. Holds the Pottery Barn umbrella real well. All made of Cedar and painted for good measure. Everything counter sunk and plugged, sanded to high heavy and ready to last.

Estimated Cost
$350
Estimated Time Investment
Week Long Project (20 Hours or More)
Finish Used
Oil based primer with 2 coats of acrylic over top.
Recommended Skill Level
Intermediate