medicine cabinet
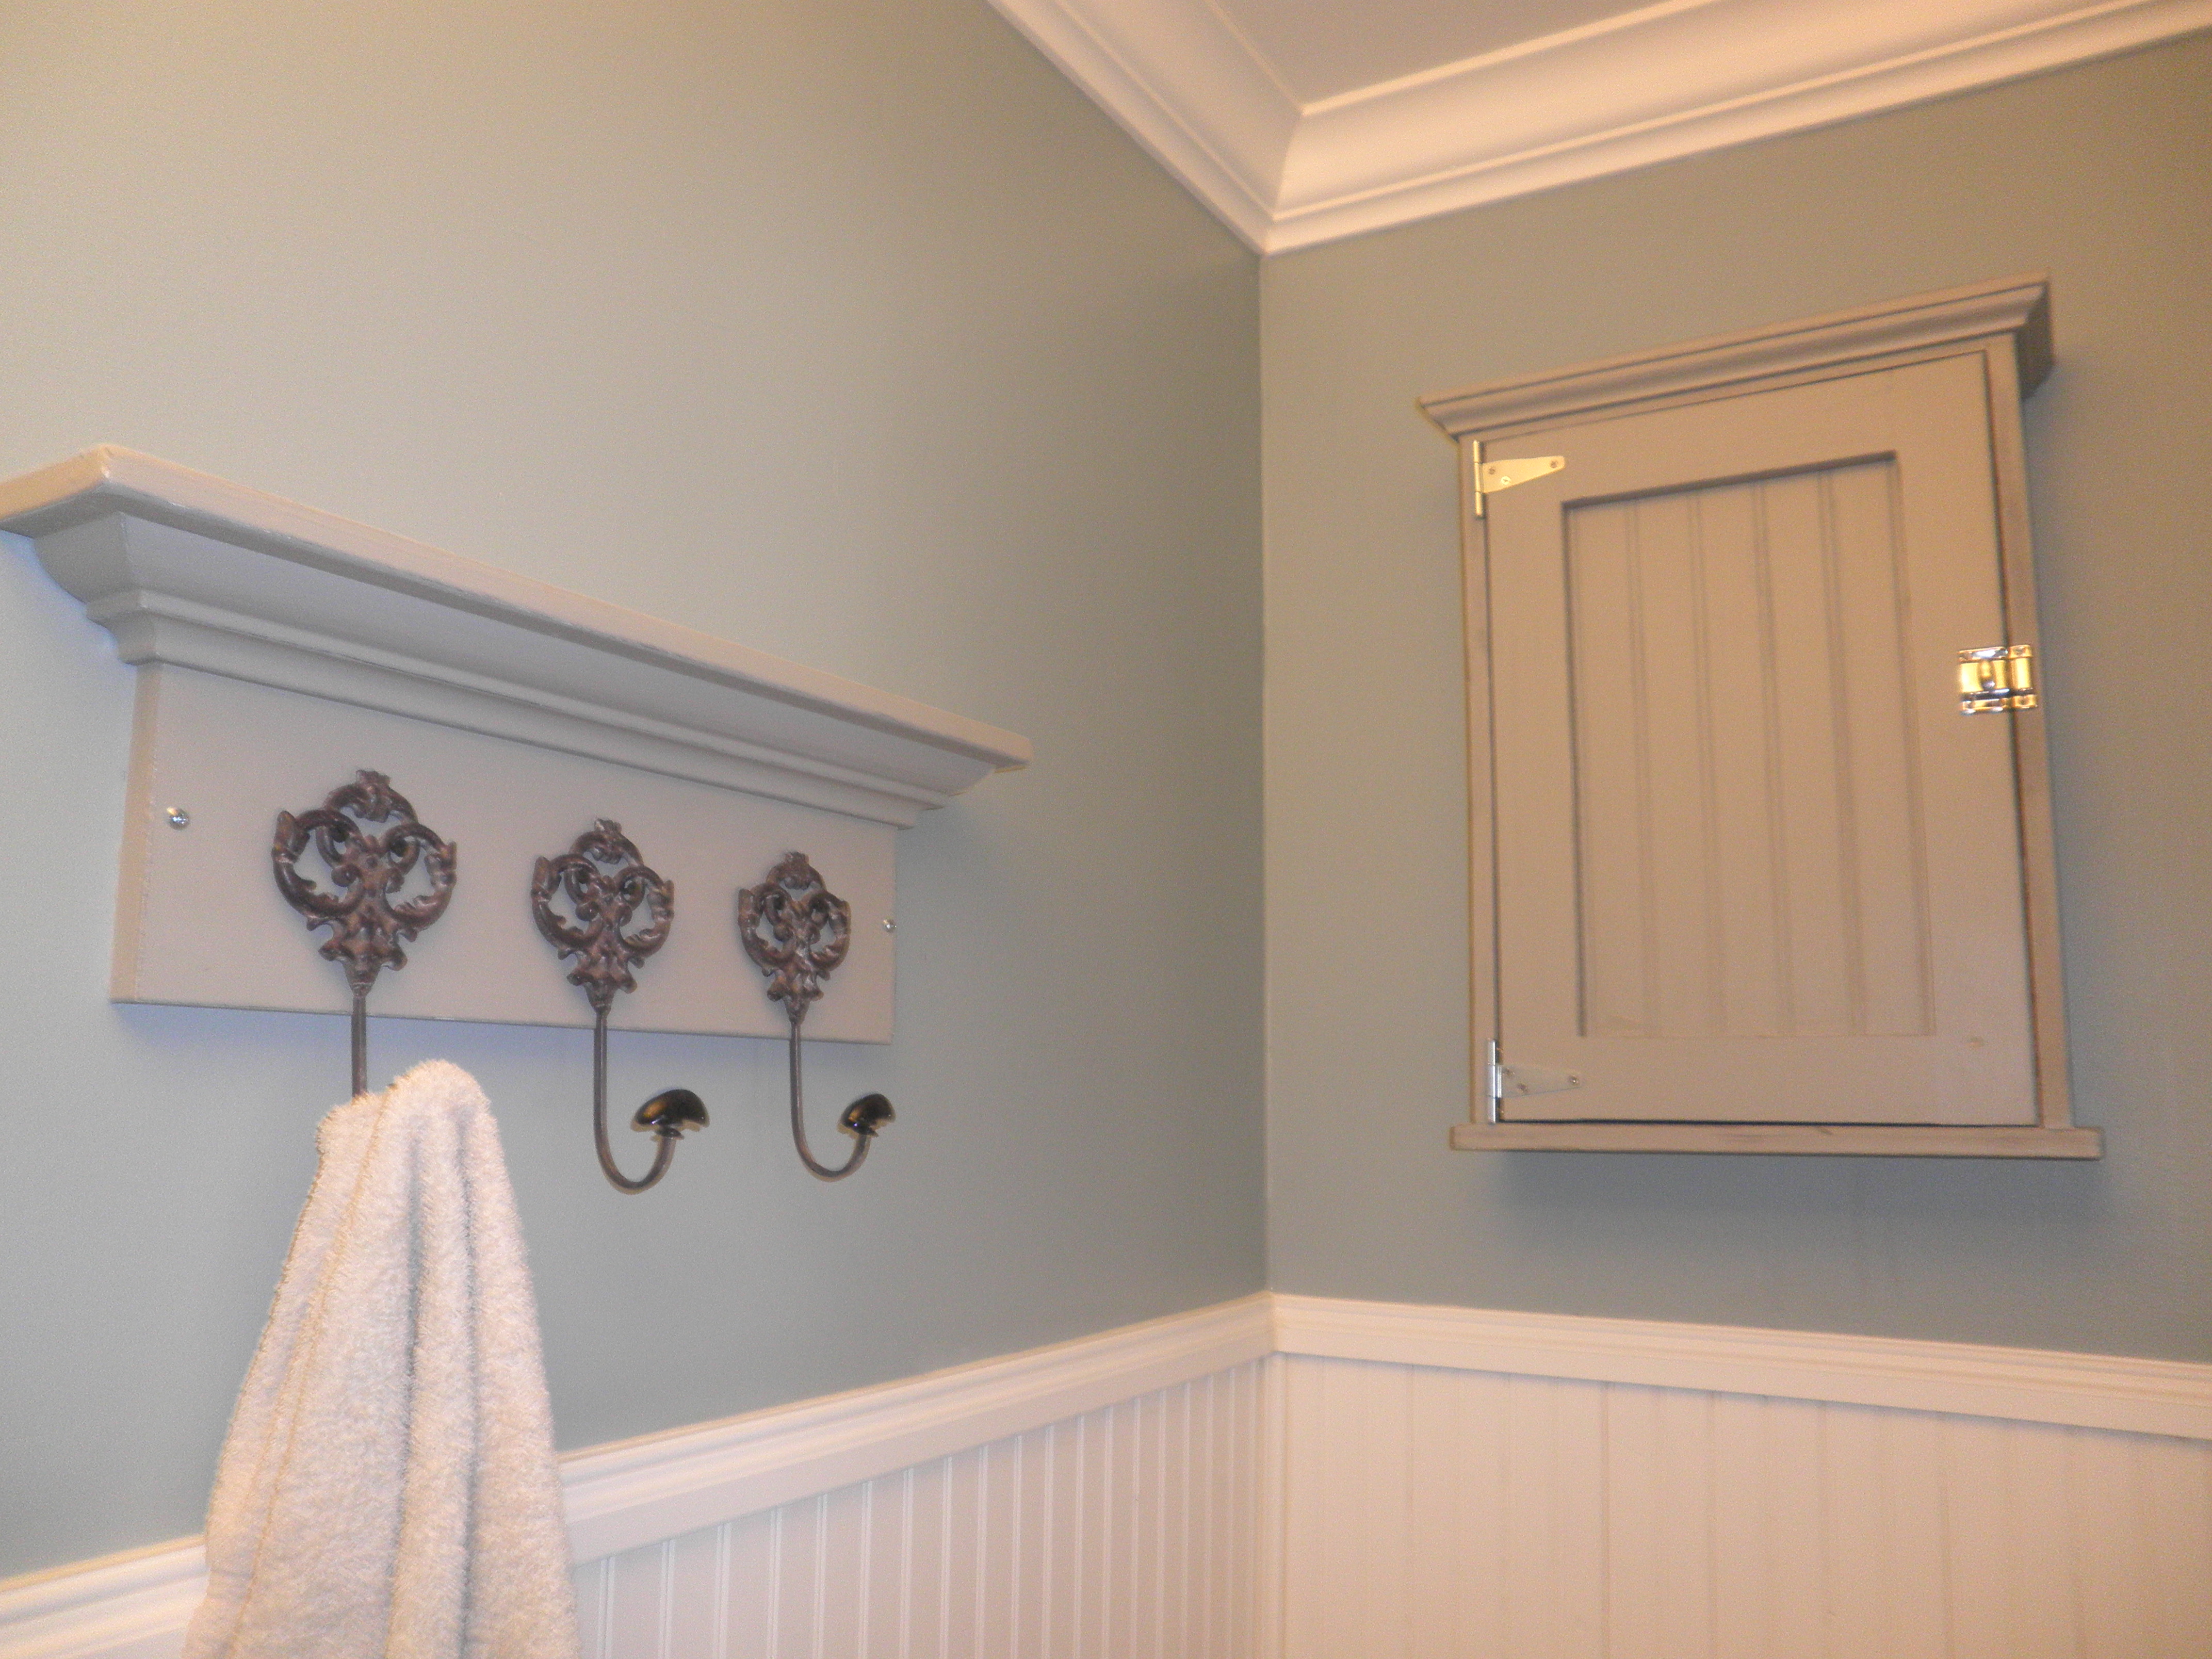
I used the jewelry cabinet as inspiration by adding crown moulding to the top and b-board to the door and changing the measurements.
We built this table over one weekend and did the finish work another weekend. We are in the middle of building our home so the table project took a back seat for awhile but we are happy with the result in the end! Could be done all in one weekend without an issue.
You can read about it and see lot's more photos here:
http://letsjustbuildahouse.blogspot.com/2012/12/diy-rustic-farmhouse-ta…
and I'm sure I will be posting more photos with hopefully a bench soon too on:
http://letsjustbuildahouse.blogspot.com/
thanks for the plans can't wait to see what I can talk my husband into next from Ana's site!
I just used up some pallet wood and scrap wood for this. My painting skills obviously need to be tuned but it came out adorable anyway! Thanks Ana and Killer B!
Sat, 10/04/2014 - 12:16
Soo adorable! And your painting skills look great to me!
I took part of your built in dining bench idea and made my own custom bench. I made a farm house dining table for a family and once it was built and delivered she asked if I could build her a banquet. I had never done anything like it before, let alone install it permanently in some ones house. Because of the way I made the table I couldn't use a straight front face bench, I had to put an angle on it to allow for the table to be up close to the bench. This bench is 10' long, has two USB electrical outlets built in, and two 43" storage compartments. I enclosed the two ends of the bench for the wiring of the outlets so that no wires were exposed.
Fri, 10/23/2020 - 13:30
Love the look, added storage and electrical possibilities, thanks for sharing!
After building myself a Christmas Tree shelf for 2019, friends and family wanted me to build them one for 2020. Three people wanted a smaller tree so I scaled down the plans and used 1x4's ripped to 3 inches. I also included cup hooks (3 or 4) and an aluminum french cleat hanger I found on Amazon for about $5 each when you buy three.
Mon, 11/09/2020 - 10:16
Love all the varieties of sizes and finishes!
This was built mainly as a place to bring our pond plants in for the winter. After looking at various kits we decided this was the best option for us and much cheaper.
The size was increased to 12 X 12 and the walls/ceiling were increased another 15" in height over the original plans. An entryway was added to block the cold wind as our original barnstyle door wasn't tight enough and ended up being too drafty. Also added an RV type autoswitching propane system and blue flame heater for backup. For the winter months we insulated the lower portion of the interior walls with spun fiberglass and 6 mil film stapled over it.
This is a very utilitarian version that serves our needs well. Great original plans and easy to build.
Tue, 11/11/2014 - 14:34
We didn't change the angle from the plans. 22 degrees I believe was the cut.
Tue, 11/11/2014 - 16:04
Wow, this looks awesome! I love the arctic entryway (thats what we call them up here in Alaska) and all the mods! Thanks so much for sharing!
I completed these chairs about 3yrs ago. It was a great project and I learned a lot. I really appreciate this site and have made a sofa and 2 benches as well. Thank you Ana for the site and I wish HGTV or another station would pick up your DIY show!
I built two of Ana's "Modern Outdoor Chairs" and adjusted the plans to accommodate 24" in cushions. We're pleased with how they turned out and have gotten great use out of them. Thanks for the plans, Ana!
Porch bench for my parents’ new house.
Intermediate project. It is not specified how to attach the top but I would recommend using the Kreg Jigg on the outside ends. Beautiful and spacious amount of storage.
Rather than buying beds for two of our daughters, I wanted to take the opportunity to build them. I really had a great time doing. I used the plans from the Captains Storage beds, but modified it a little.
We ripped two 3/4 inch finished ply into 12in pieces.
That gave us all the sides, ends, and dividers.
The platforms are 12x12 3/4x
The ends are the same only sorter.
Rather than using slats for the middle support I just used the remain ply.
We finished the front with 6ft sections of 1x2 inch furring strips. A good sanding and clean up, and we are good to go!
Thanks for posting the plans! We really enjoyed building the beds and our girls love them!
Fri, 09/20/2013 - 13:14
LOVE this! was looking for something other than the slats that would TRULY hold my polynesian kids, thank you for sharing! :-)
Click the blog link for a full description of this project. Thanks for looking! - Clint
Thank you for the inspiration and plans to build the highly functional and stylish storage + seating solution! You used it for tiny house and I used it in children’s playhouse - it’s been excellent for toy storage! I also love that each piece is on wheels (even the stools that double as coffee table) - very smart and functional. I actually built another one for my garage and use that one for tool and hardware storage. Bravo Ana! Thanks again 😊
This is my DIY for a farmhouse bed. Inspired by Anna white and Pottery Barn. I wanted a sturdy look and used 4 x 4 posts and decided to make a king!
Check out my blog:
http://www.woodworkingfourdummies.com/blog/king-farmhouse-bed-diy
Cheers,
Ian
Ana White 4x4 truss table with matching bench.
My Father built this amazing dollhouse for my daughter as a Christmas present. I loved the tall open look of this design and knew it would be perfect for my four year old! Instead of leaving the doorways open, we added dollhouse windows and doors to make this "bookcase" more into an actual dollhouse. The adorable mice and furniture are from the Danish toy company, Maileg. We hid the dollhouse in the home office on Christmas morning and had my daughter find it as her last present. She fell in love with it and immediately started playing! She has one talented Grandpa and I am so glad to have something like this in our family to be cherished for generations.
Sun, 01/01/2017 - 09:53
I really like what you do, this job is beautiful, congratulations. Happy 2017
Great idea for a quick project and it'll definitely make the grandkids happy.
Hand-made vegetable cupboard. Fun and easy project.
My wife and I built the 4x4 Truss Beam Table and 4x4 Truss Bench. We used Rustoleum Dark Walnut Stain and Satin Polyurethane. The only difference from the plans jointing the edges. We didn't like how simply screwing the 2x10s together left cracks due to the rounded edges. We ran the 2x10s (and 2x8s for the bench) through the jointer 3 times on each edge. This eliminated the cracks for a nice smooth table top finish. We distressed it with a hammer, screws and a file, then put one coat of stain and 3 coats of poly on it. We bough IKEA chairs. My wife reupholstered the smaller chairs and made the covers for the end chairs. Enjoy!
Tue, 03/03/2015 - 16:13
Thanks! We just used #2 yellow pine for the 4x4s, the 2x10s for the table top, and the 2x8s for the bench top. This is just the standard construction type material. The only place we could find non-pressure treated 4x4s in our local area was Lowes. Hope this helps!
A quality table big enough for the whole family without costing a fortune! I was able to tailor this to be the perfect size for our family’s house in the country.
This is my 2nd table built from plans on the site. I built the pocket hole farm table originally and our family used it for 2 years and then I sold it to another family to enjoy! I built this one a full foot longer and used a 2×10 in the center to widen it. We host large gatherings so I wanted the additional space. The dark walnut came out beautiful if darker than the plan table. We love it!
Sat, 08/28/2021 - 09:07
Thank you for sharing, it looks like a wonderful gathering place!