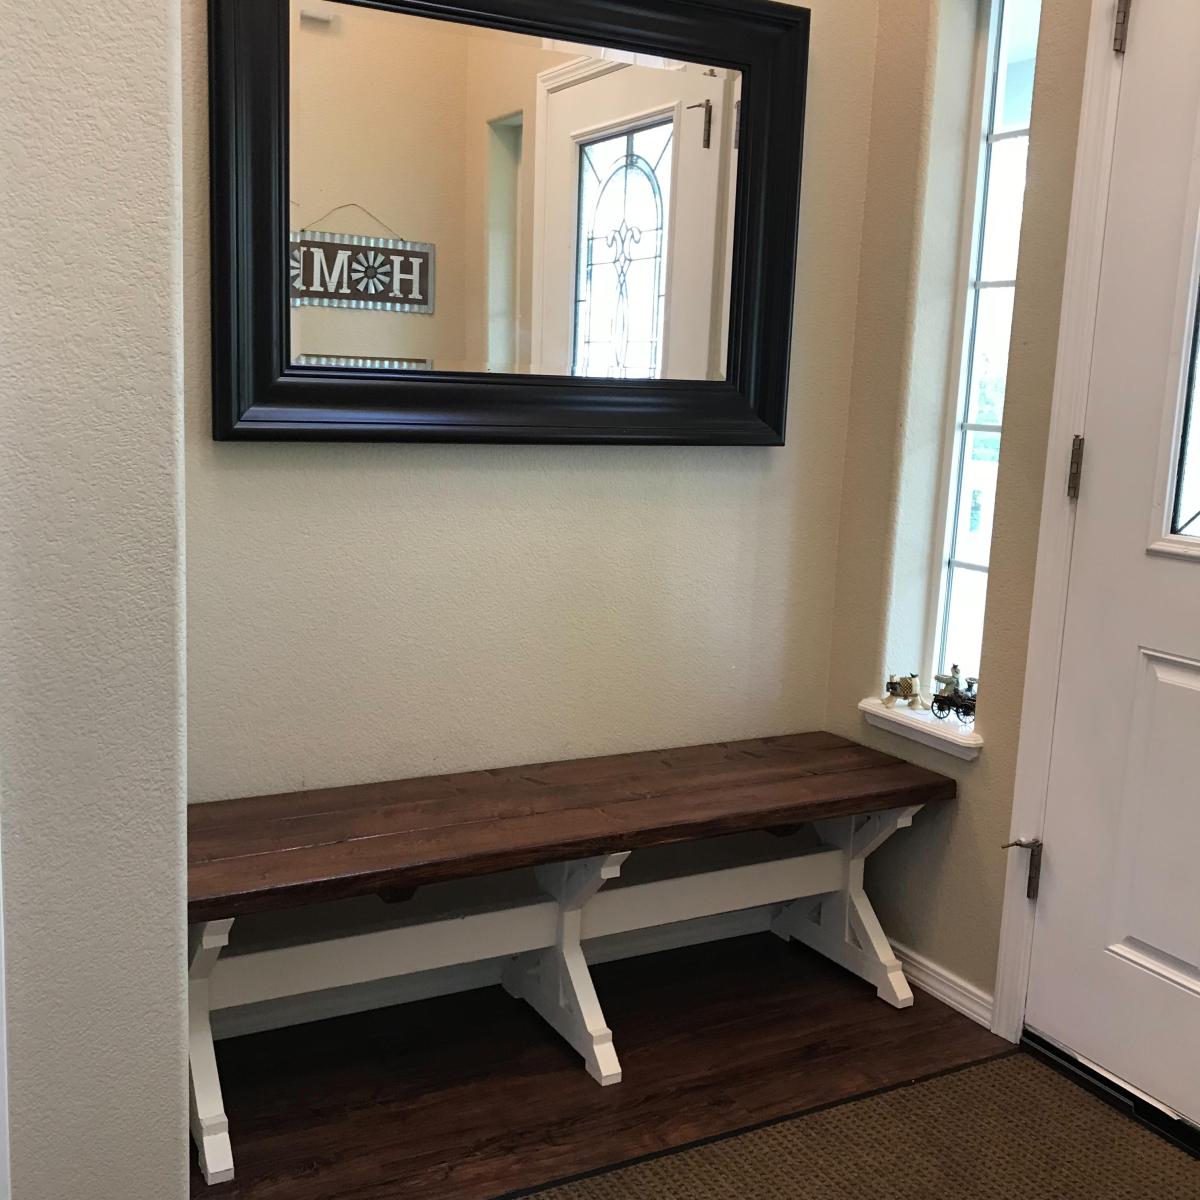
Convertible benches
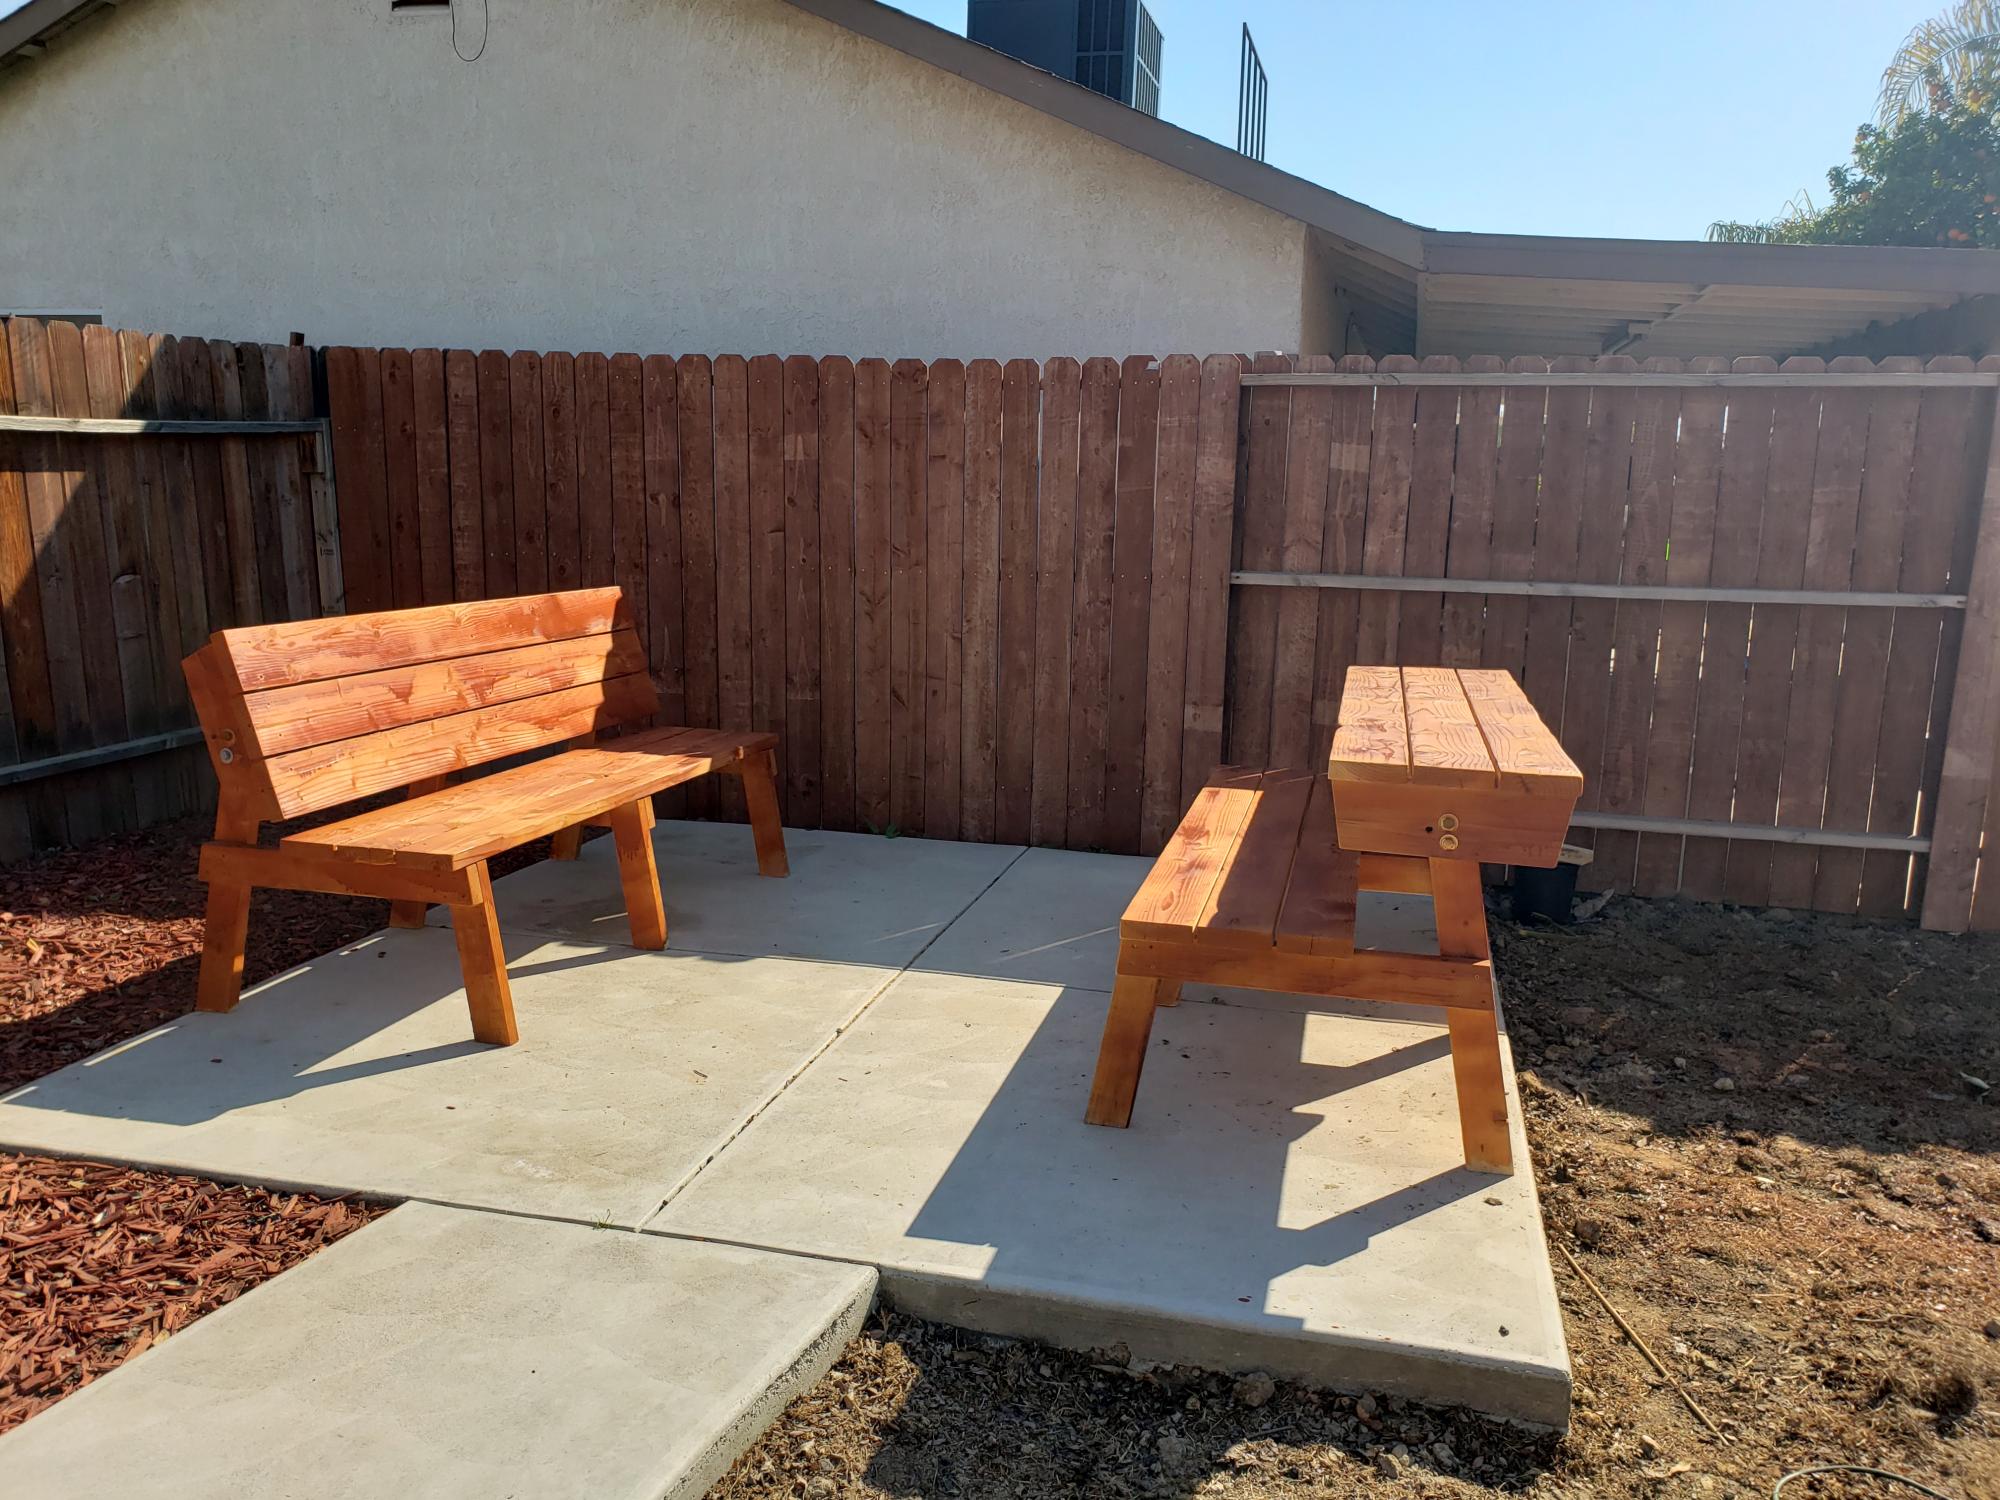
We love these benches! We actually just leave one of them in bench form and the other in table form for everyday use.
Built from Plan(s)
We love these benches! We actually just leave one of them in bench form and the other in table form for everyday use.
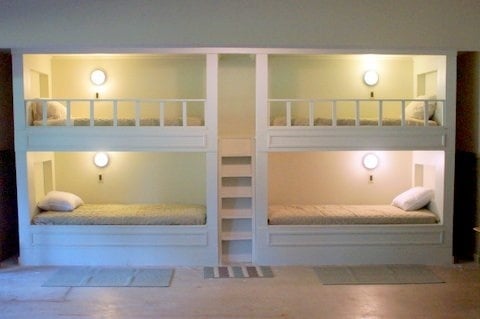
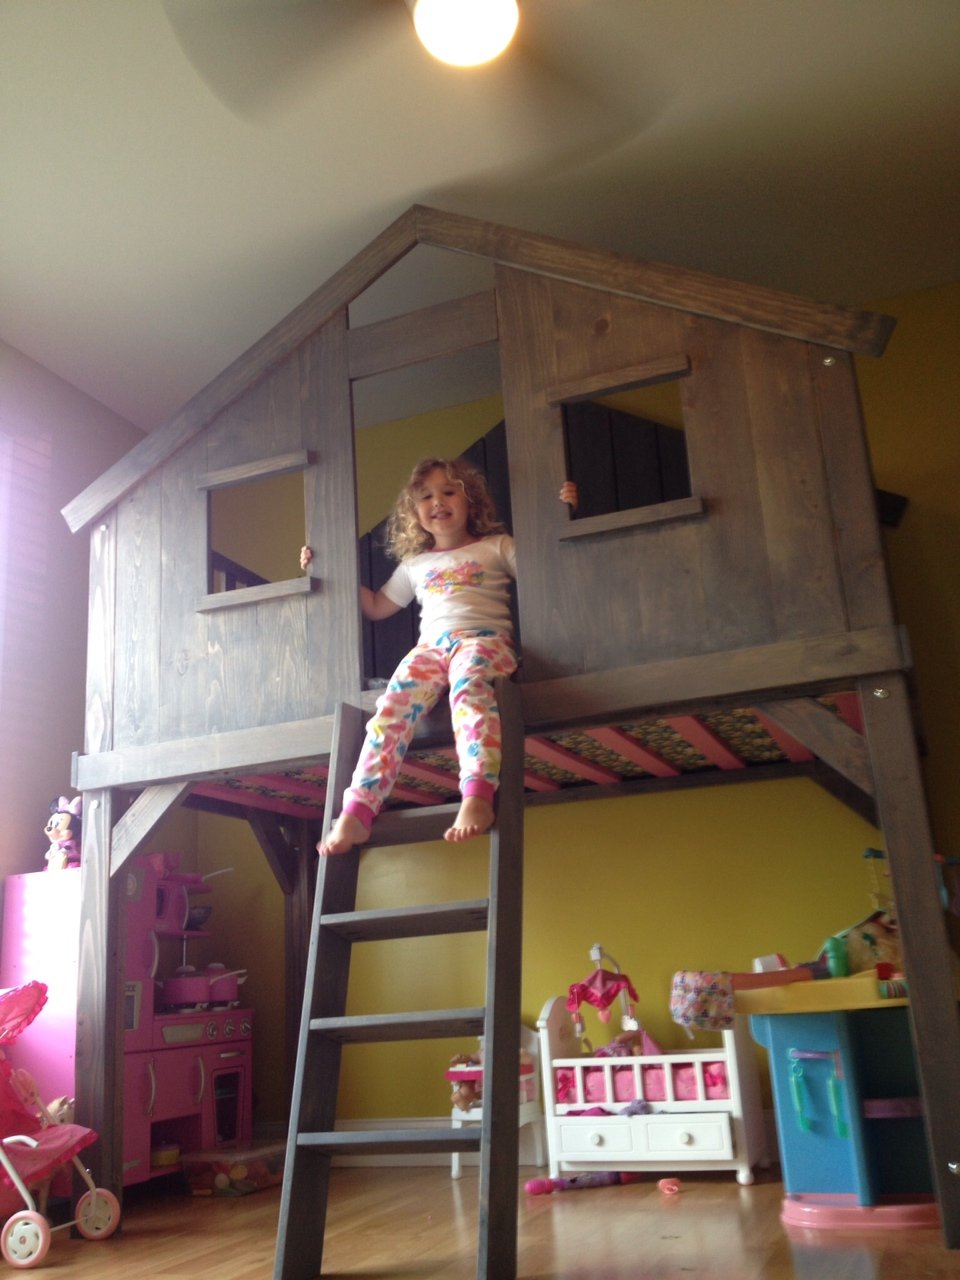
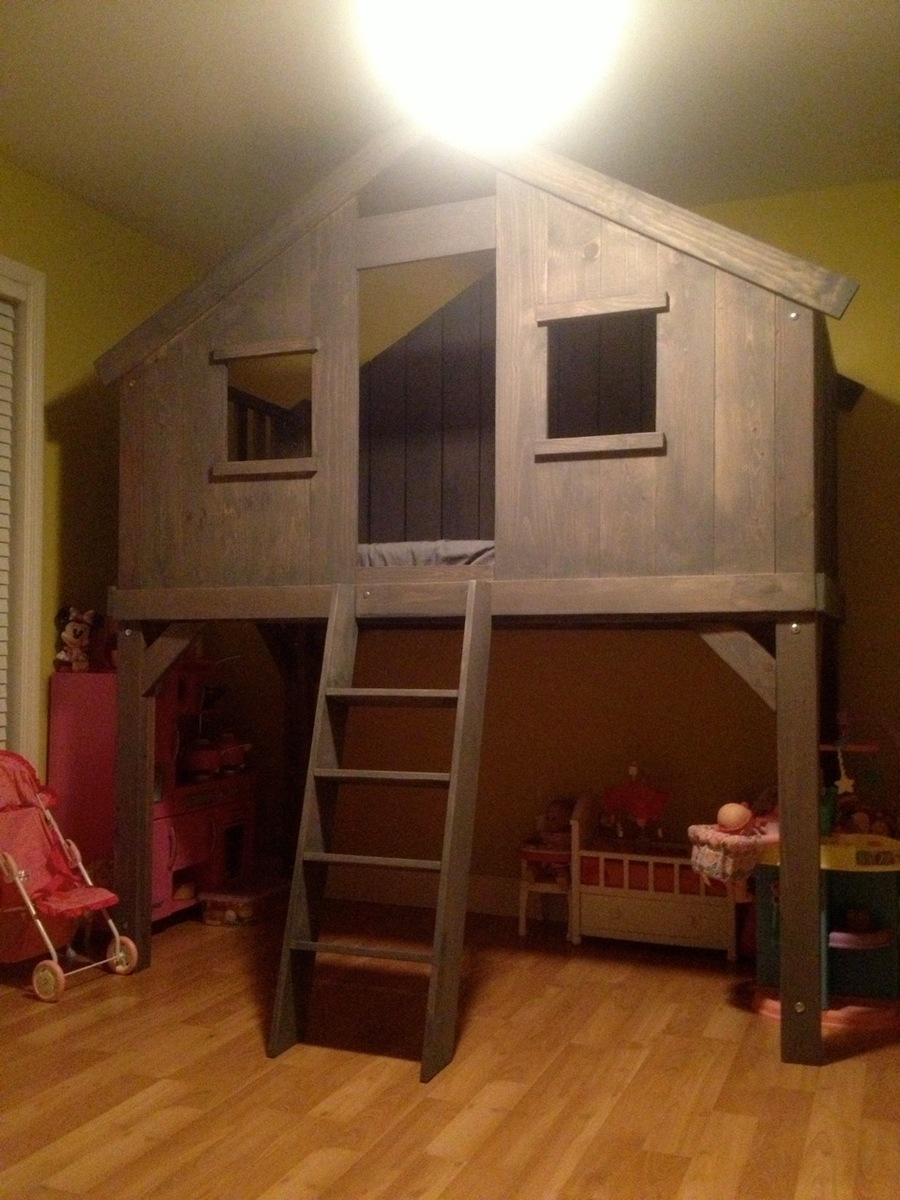
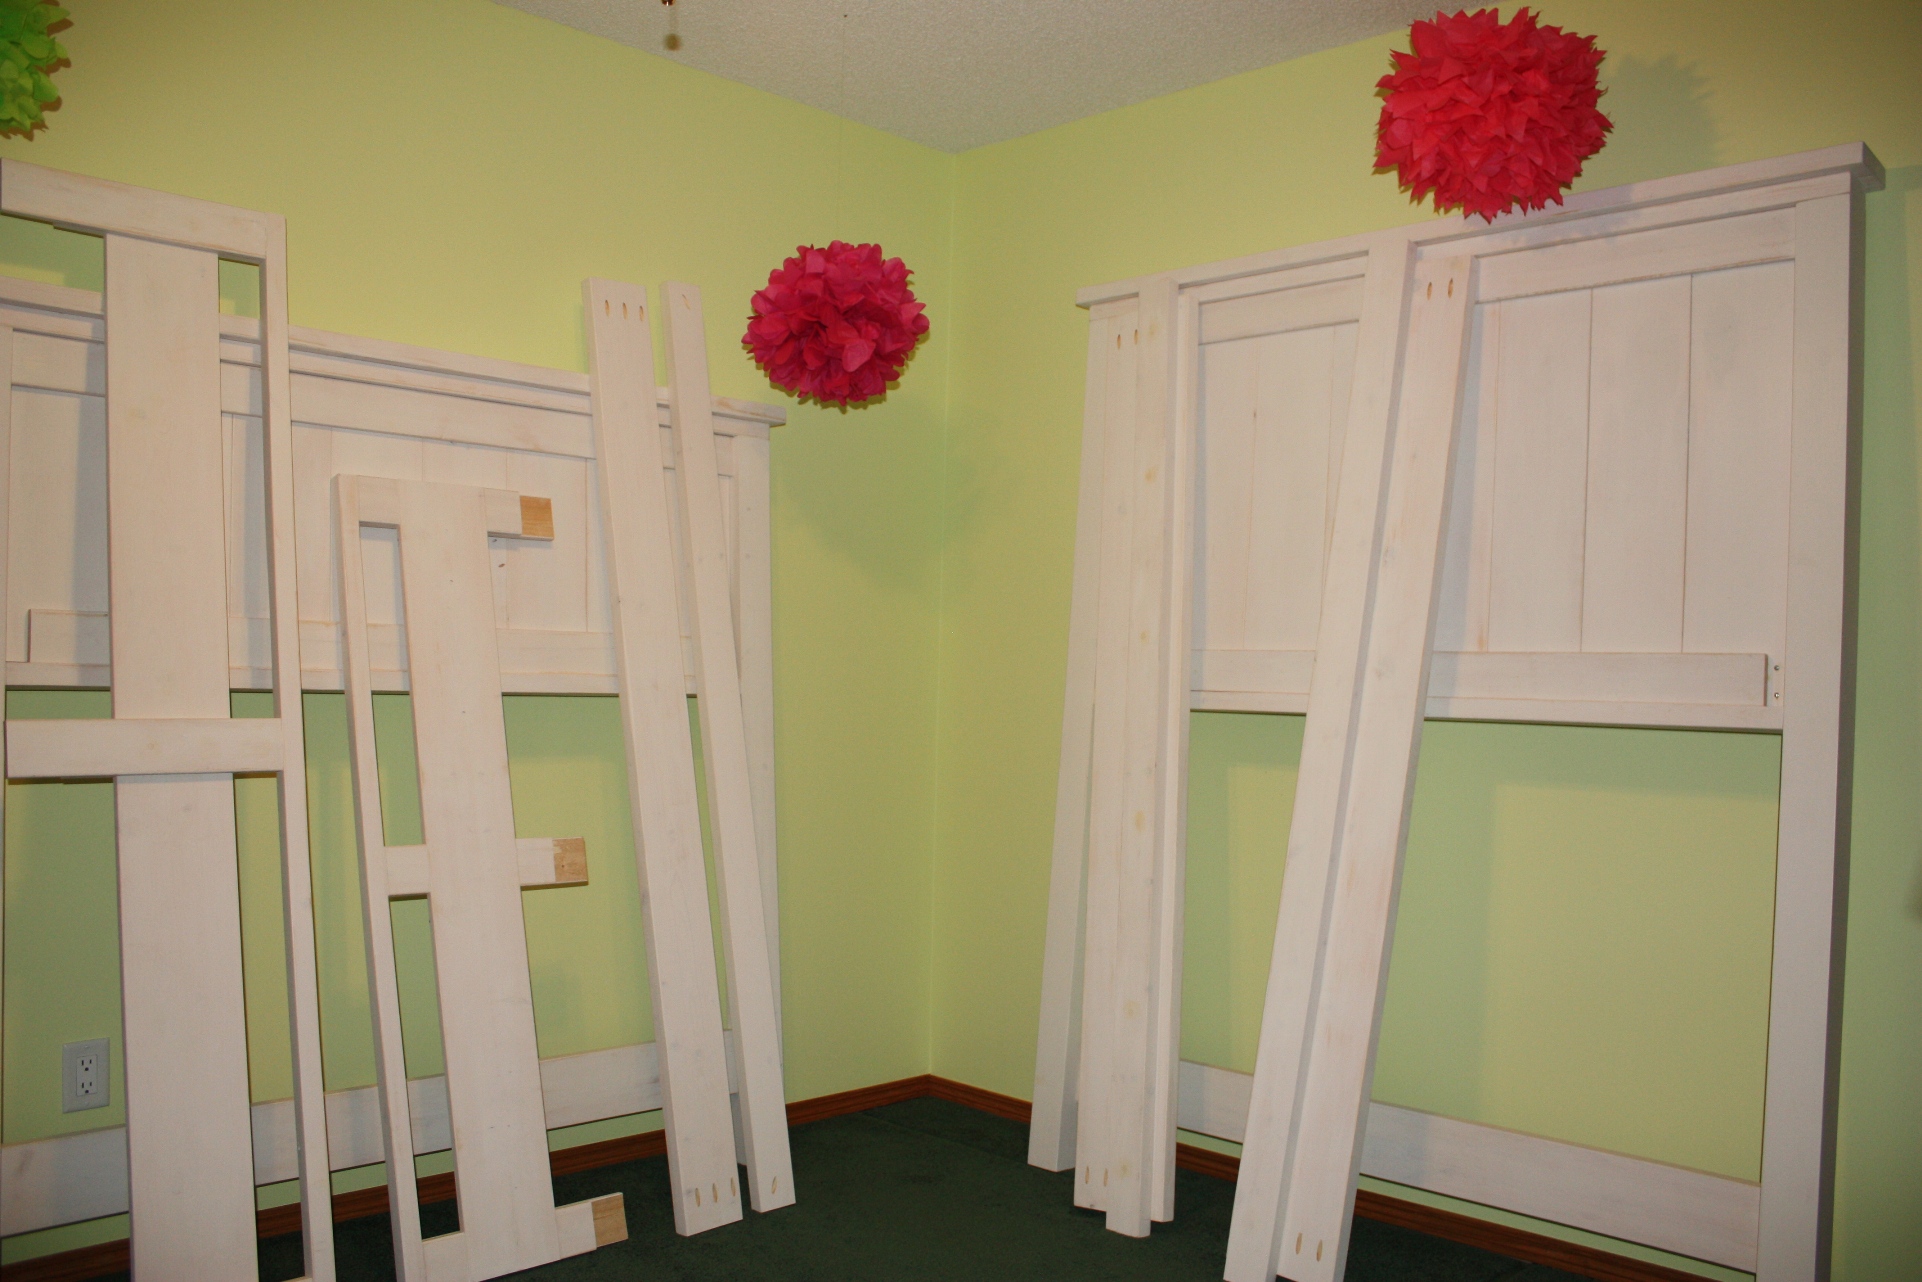
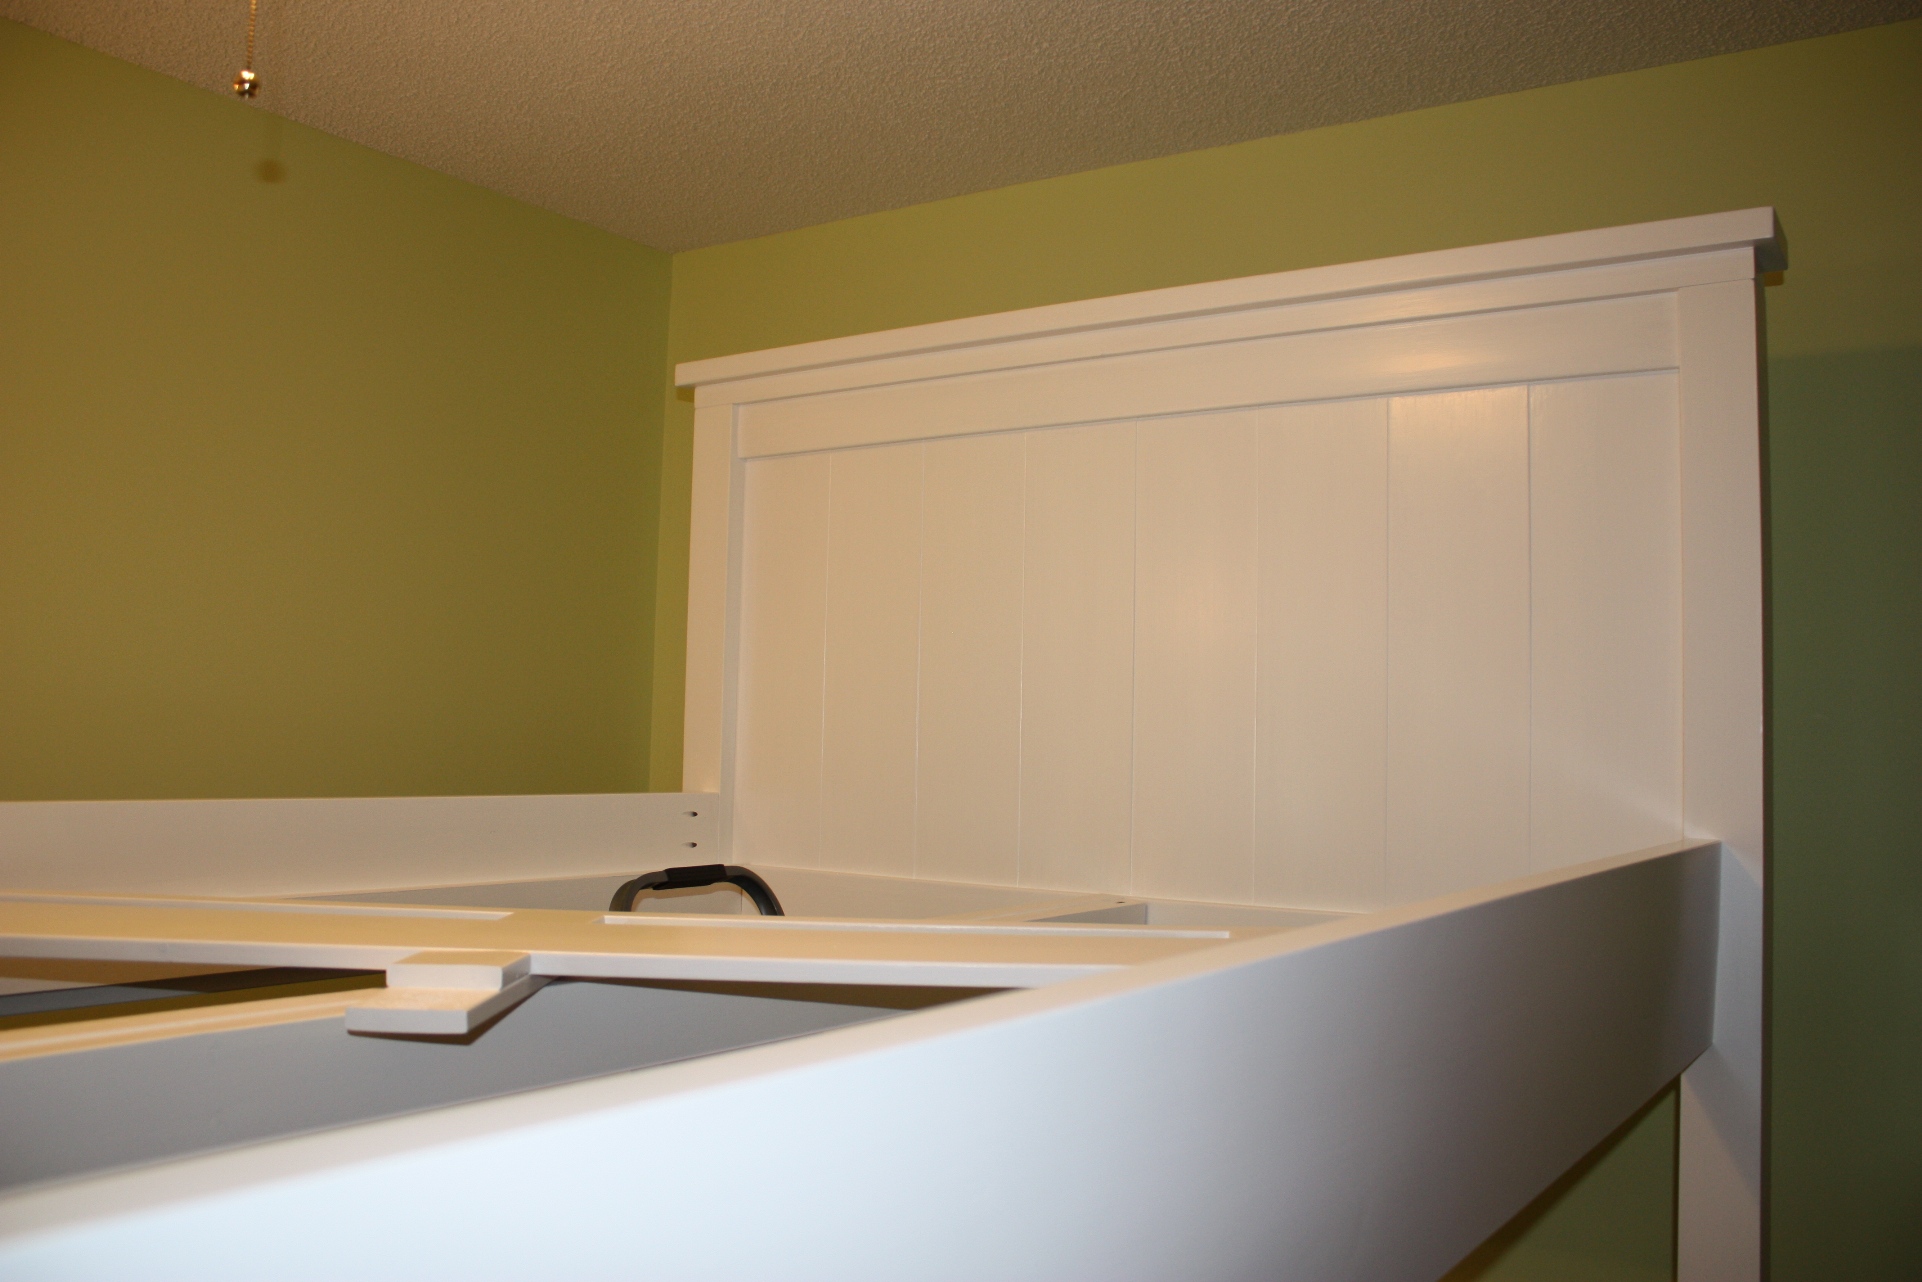
This is a set of bunk beds that I made for my daughter Alicia for their getaway home at Canadian Lakes, MI. Now their children can invite their friends and have a fun place to sleep.

Fri, 07/19/2013 - 02:37
Wow! This looks absolutely amazing! I like the light and shelf in each bunk too. Spectacular!

Fri, 07/19/2013 - 04:45
Newfey, these are awesome! I've seen pics of this type of bunk over the years, but never anybody attempting them as a DIY from a non-professional, unless you are one? Either way, they certainly look professionally done. Love, love, love!
Fri, 07/19/2013 - 07:56
I am not a professional by any means and have a limited tool supply. My daughter sent me a picture and asked if I could make them for her. It was a big project as their getaway home is 165 miles from where I live. It took quite a few weekends to complete.
Fri, 07/19/2013 - 09:24
That was one of the problems, I had no plans, only the picture as a reference. It was a design as I went along and needless to say I gave a sigh of relief once that I saw the mattresses fit into their places.
Fri, 08/30/2013 - 06:48
I've been viewing pictures of these style bunkbeds for a while. I'm almost certain I could come up with something but most definitely lose my sanity along the way. This would be great in my girls room and you did an awesome job!
Sat, 07/25/2015 - 20:25
Ana I am looking to see if you have actual plans for a quad bunk bed? Also what about a quad corner bunk bed? We are trying to put our 4 girls in one large room and this would really help make it work!
Mon, 07/27/2015 - 21:11
I have been looking for plans for corner (L shaped) bunks. And haven't had much luck. I haven't purchased the following plans so I can't vouch for them but I am considering them:
http://stonebreakerbuilders.com/product/built-in-bunk-bed-plans-4-bed-c…
It’s been a couple years, but here a some projects that I made from your plans!
So much fun!
by Shawna

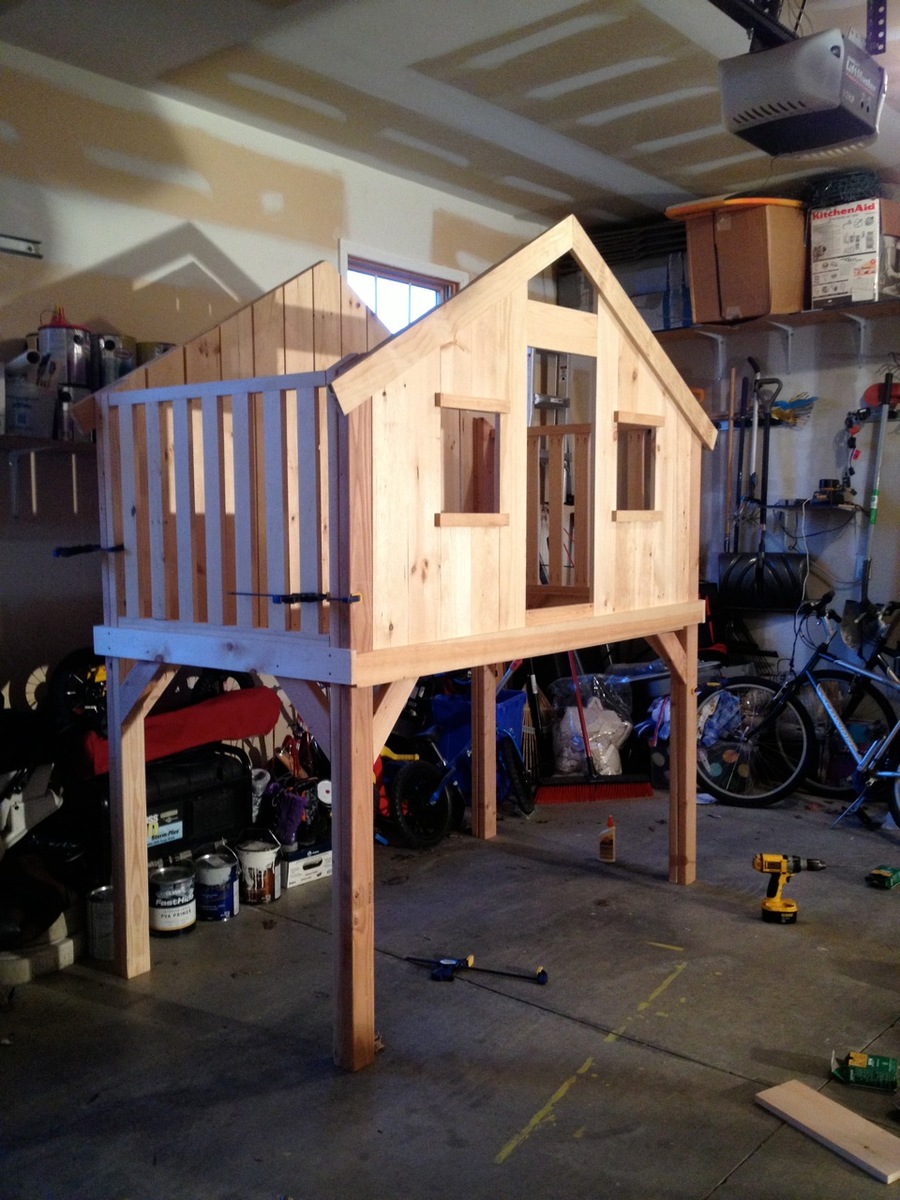
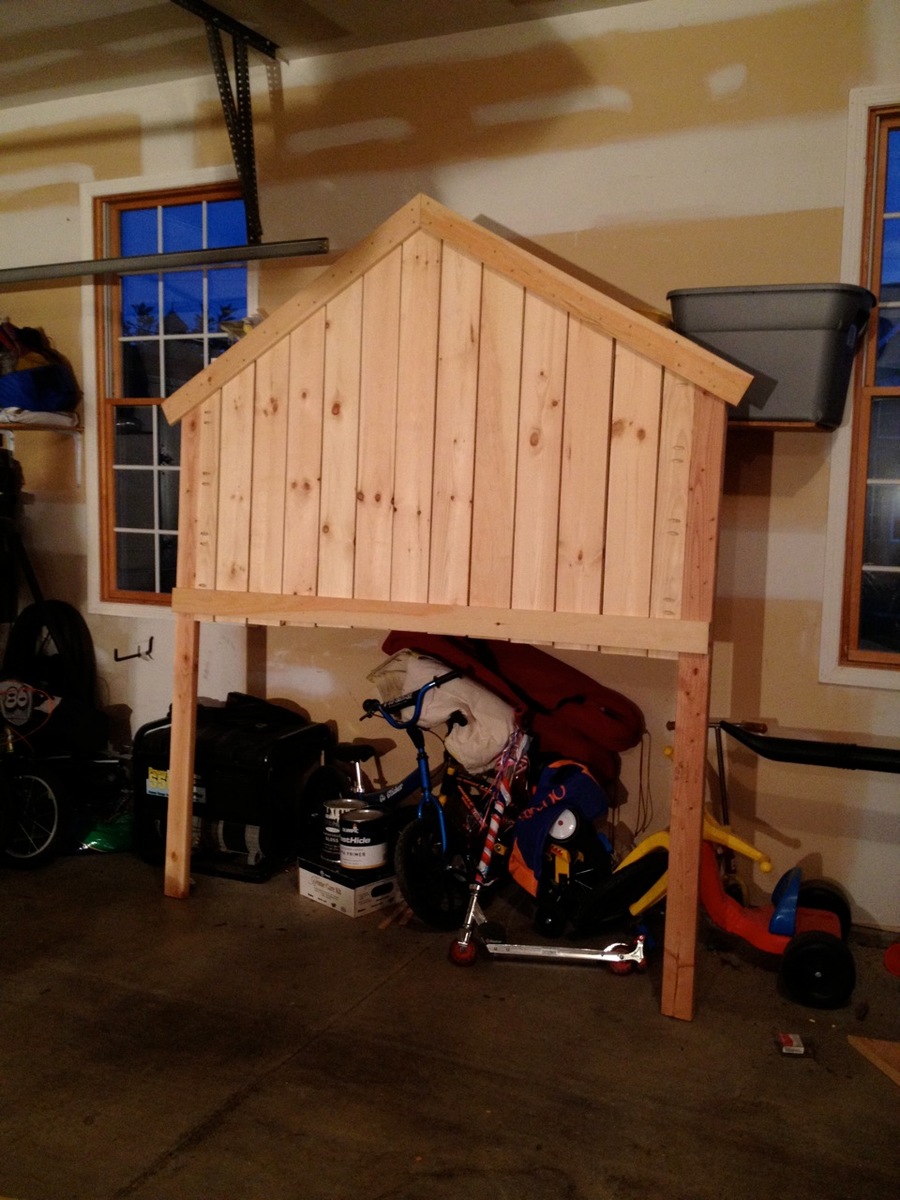
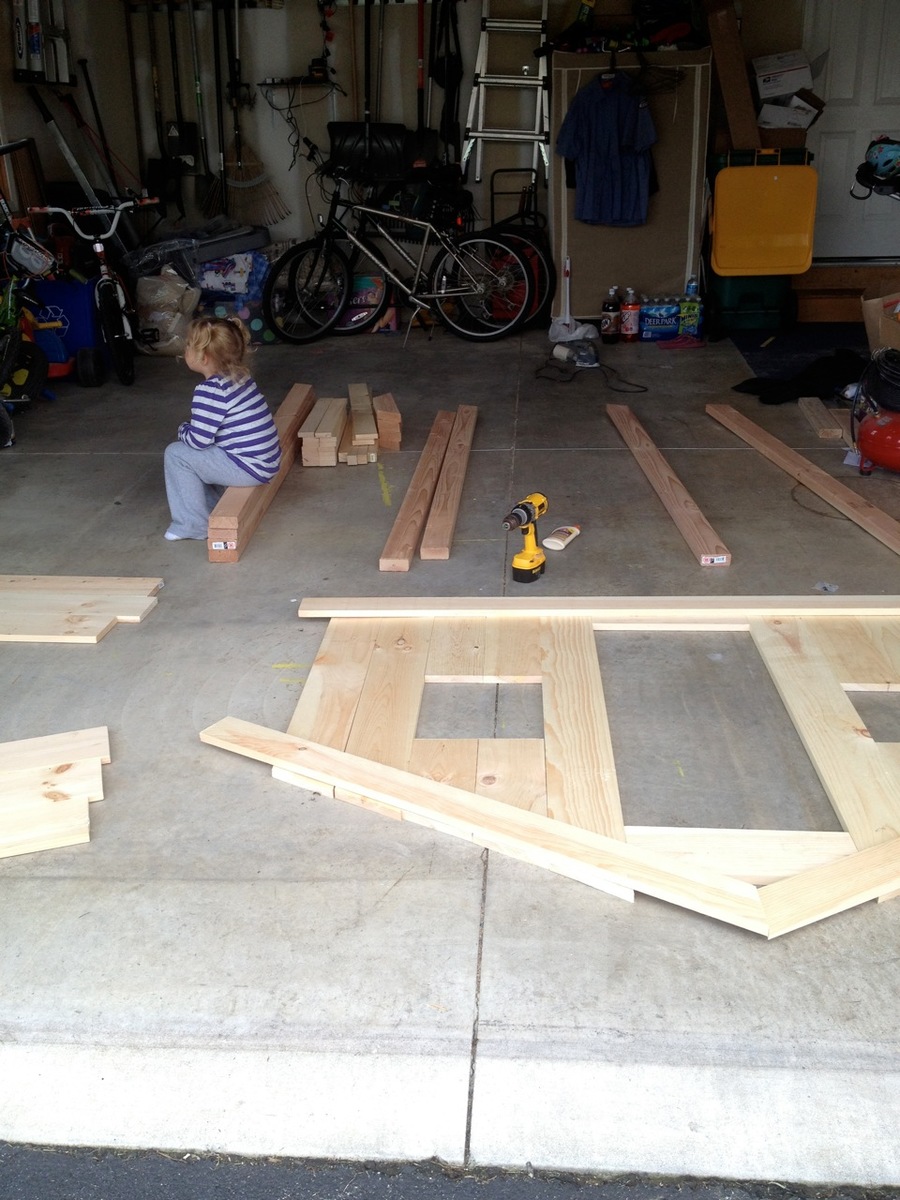
My kiddos LOVE this clubhouse. We use it in the playroom, but also could be an extra bed.

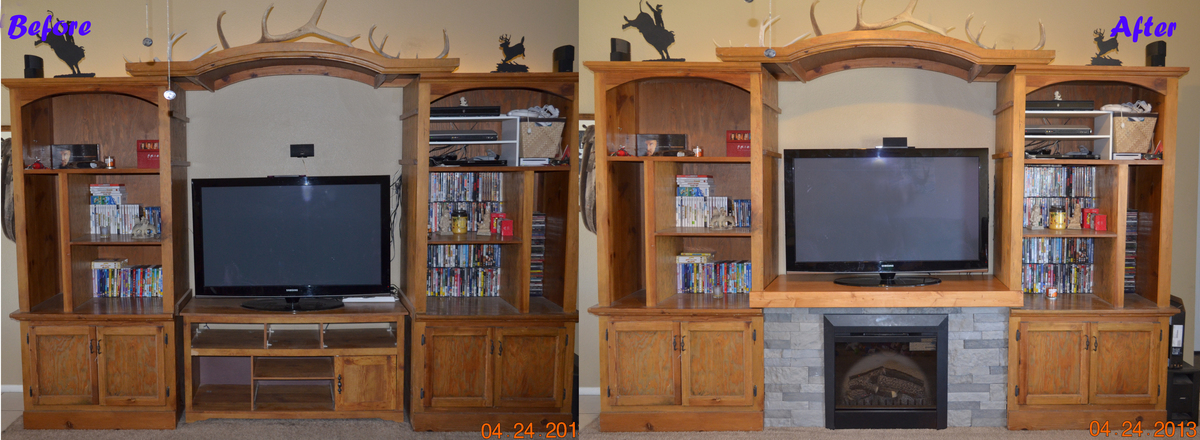
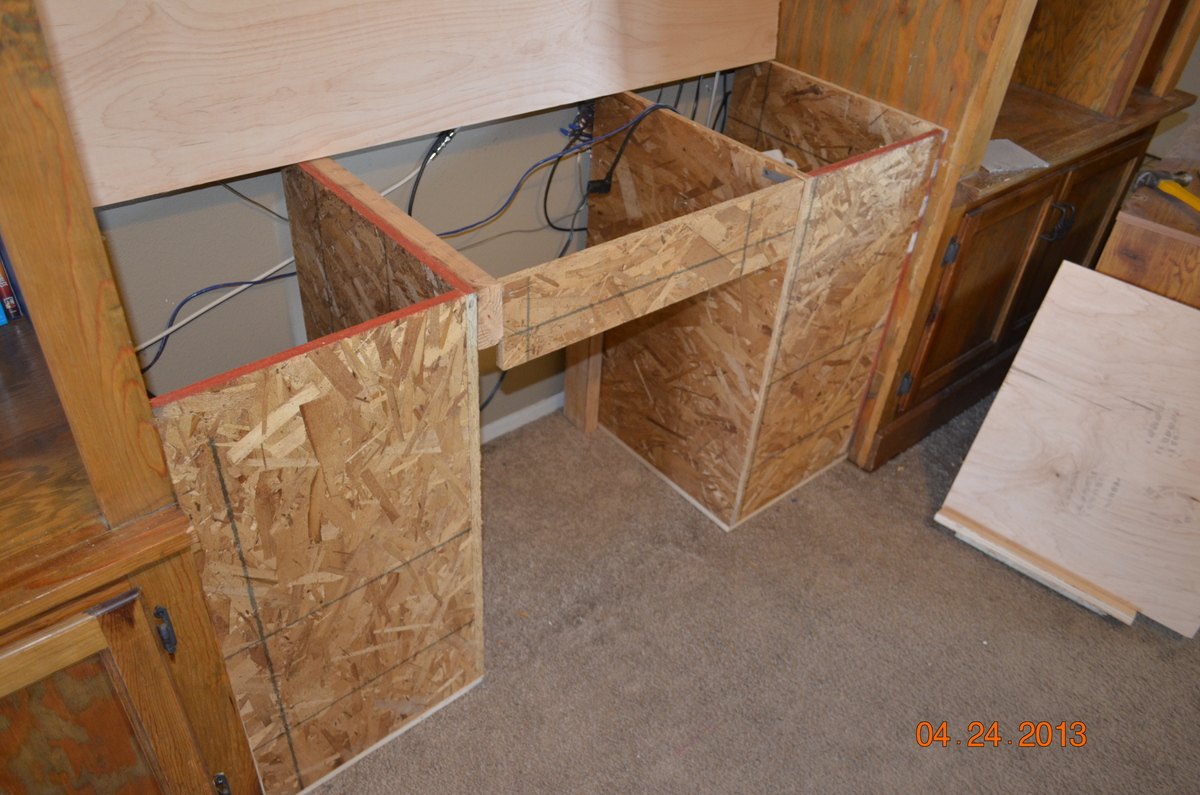
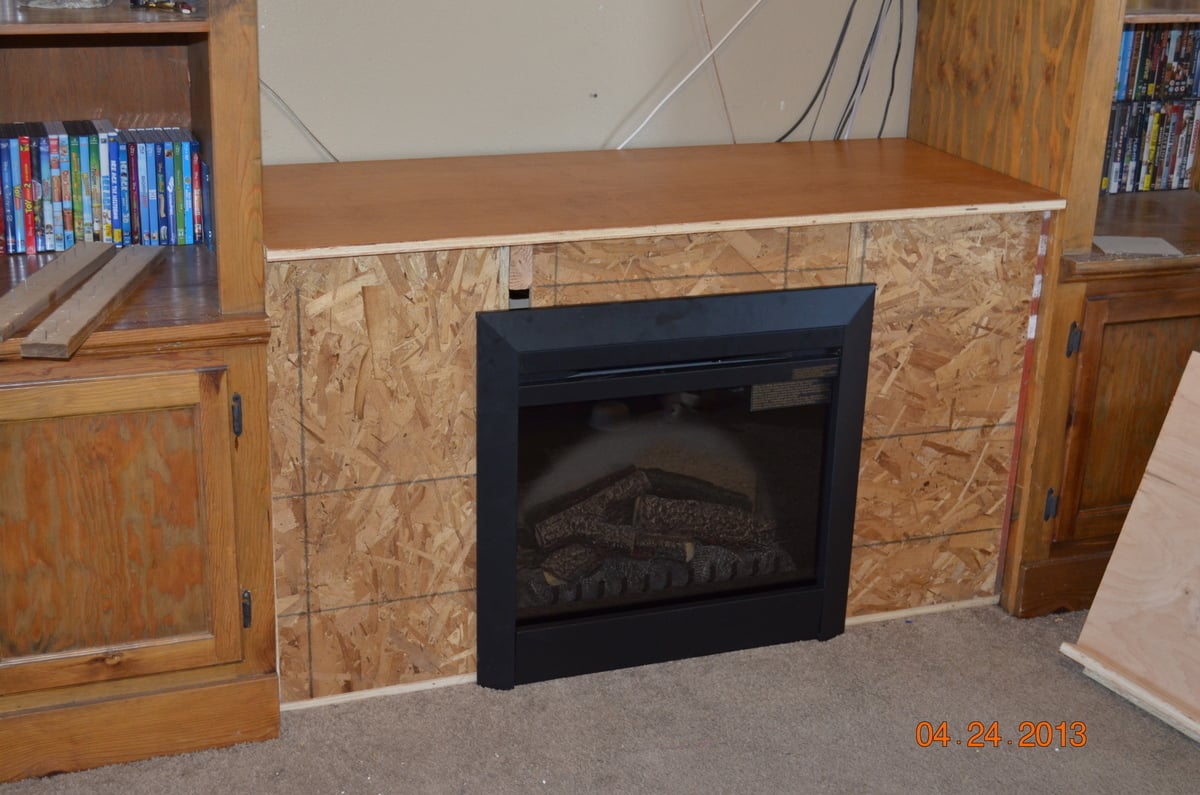
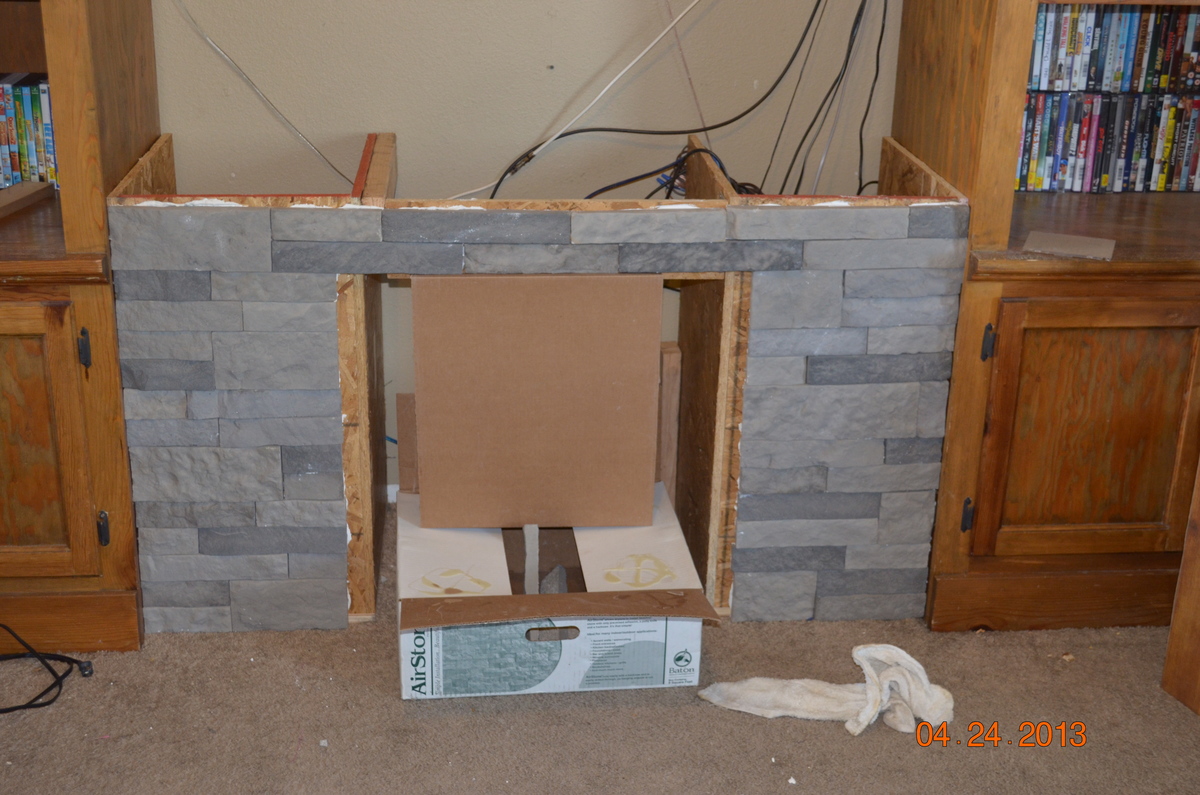
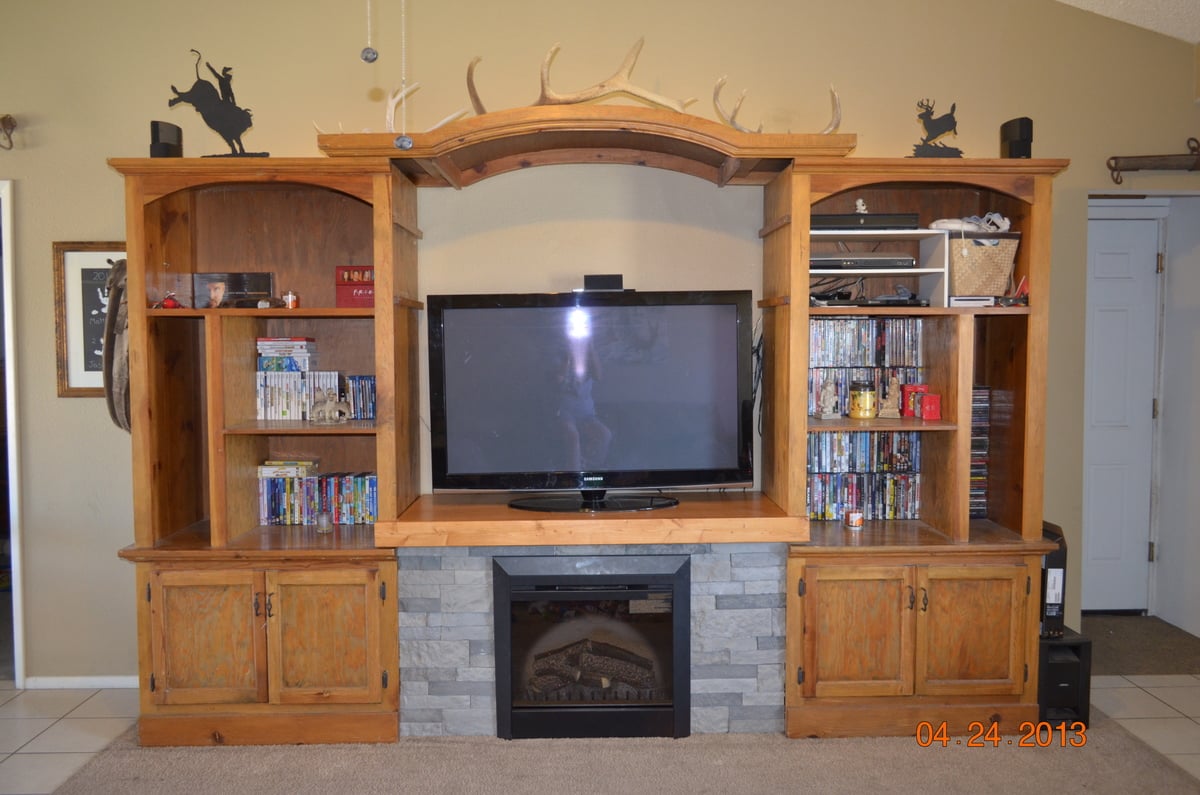
I have always wanted a fireplace, however I couldn't justify spending $600 or more for a flimsy electric TV stand. Not to mention, I have checked out the displays of these pieces at Lowes, and they are made from cheap materials that I do not want to sit my expensive TV on. We found the entertainment center on Craigslist for $100, because they got rid of their big projection screen TV (which many are doing these days). I looked for fireplace TV stands for months, and just couldn't find a piece that wouldn't look like a separate piece of furniture stuck in the middle. I found a new electric insert on Criagslist for $100 (normally about $250), and purchased the materials from Lowes where a nice employee cut it all for me. I glued and nailed the frame together, applied the AirStone, attached the mantle (a 2x4), and slid the insert into place. Overall, the project took about 4 hours to complete, and cost about $200 to build. (It could have been done for a bit cheaper, but I went with 3/4" plywood for strength and stability.)
Wed, 08/14/2013 - 10:28
I have an electric fireplace that is made with cheap materials. I've contemplated building a new surround for it, and your finished product and the pictures have made it seem more doable! Thanks for posting.
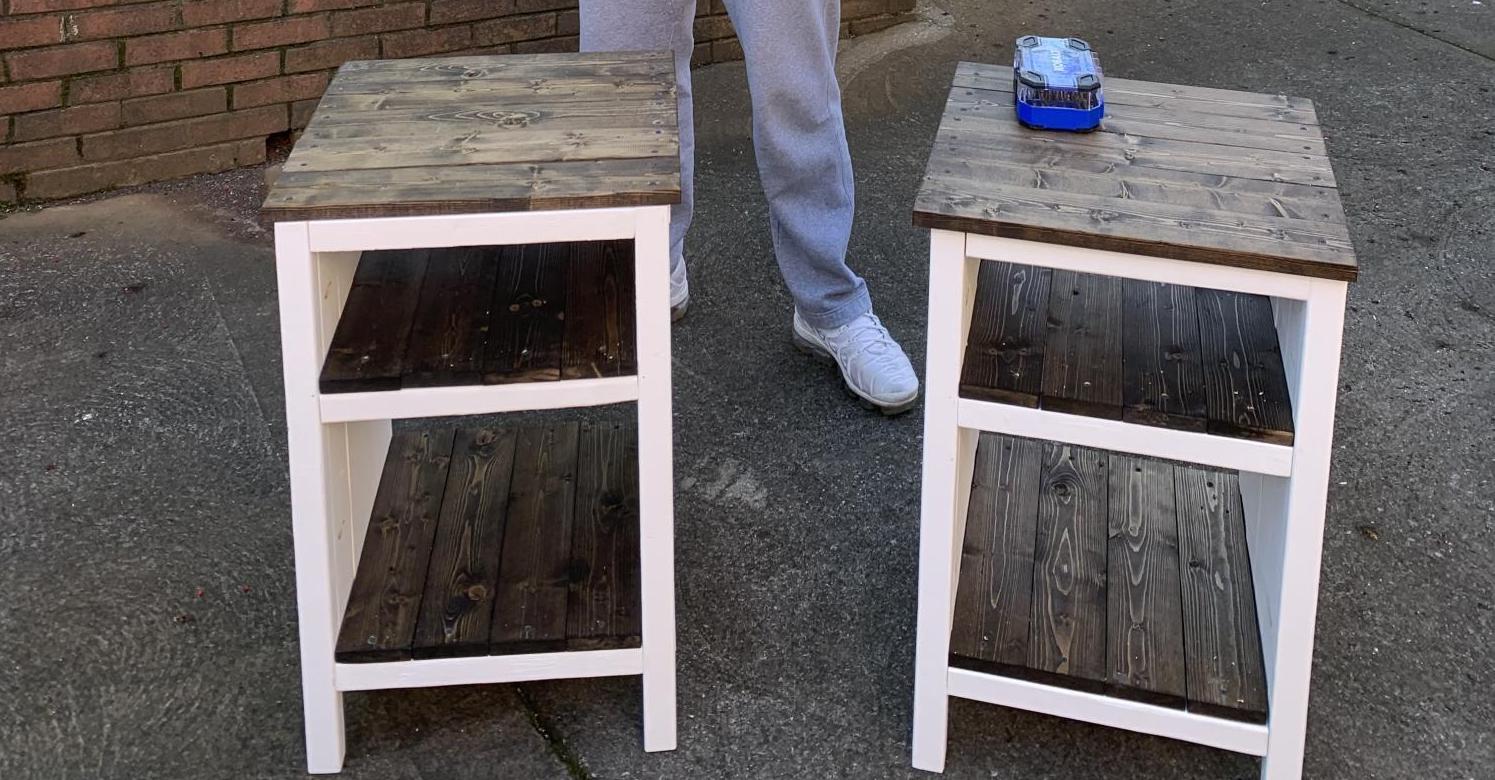
My son moved out and needed bedside tables. I have been hounding him to learn how to build and this was the first project he did! He was super proud of himself and how they turned out. Not bad for a first build! #mompride

Built this for our dining room. Added two feet to the length. Neighbors started talking and now I've been commisioned to build a table and bench!
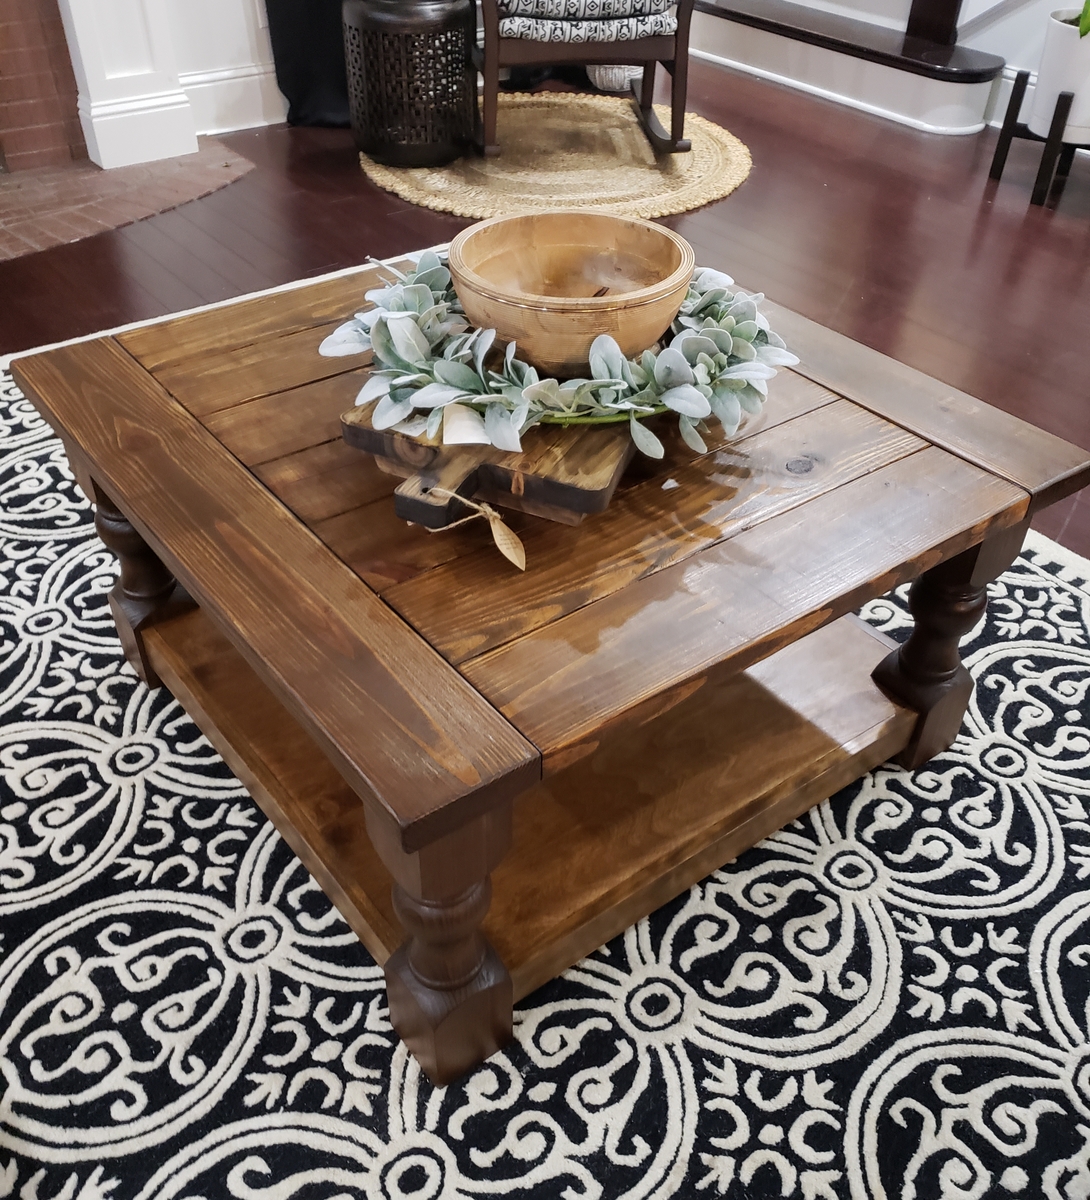
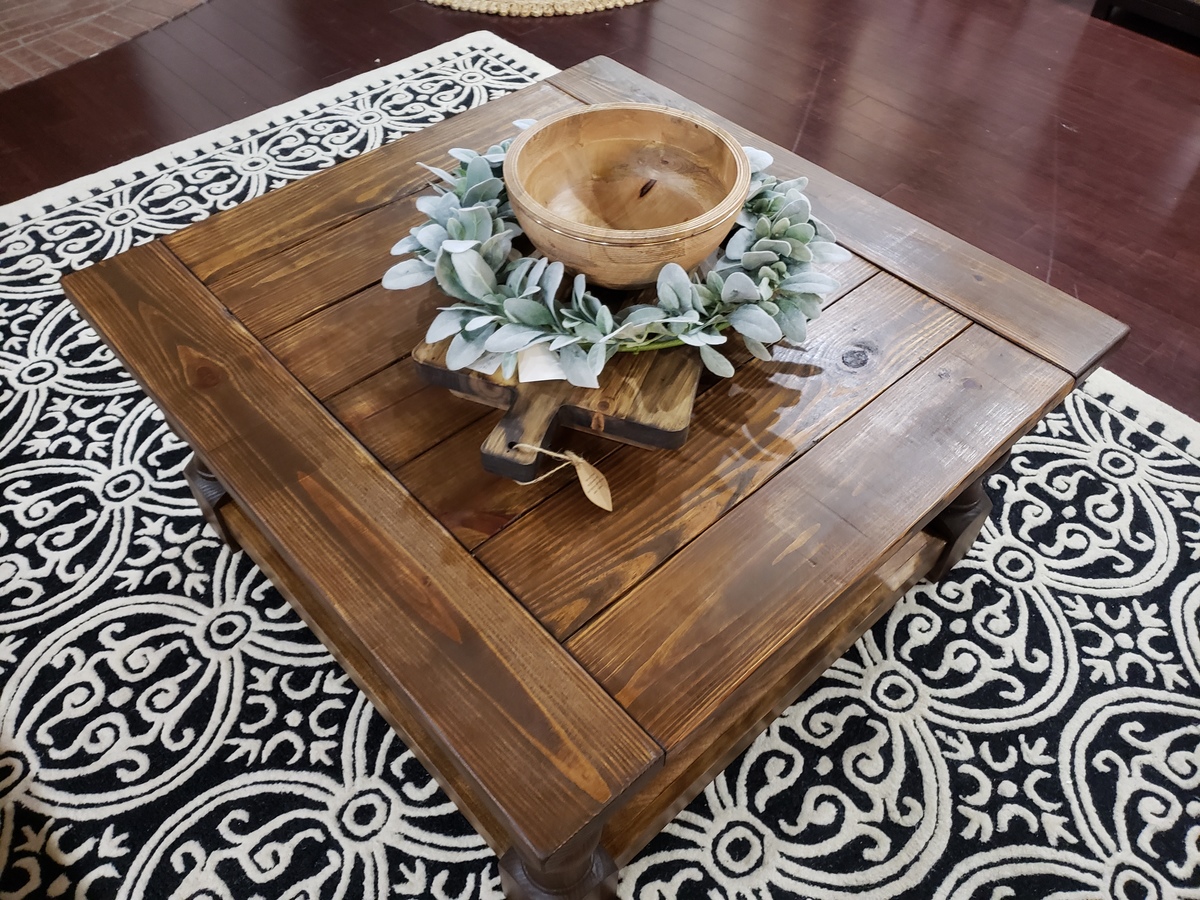
Turned leg coffee table from pine. I also built matching end tables (shown in another post). :)

Wed, 12/26/2018 - 13:47
This is gorgeous!!! LOVE! Thanks so much for bragging.
Sat, 12/29/2018 - 05:56
Thank you! I had stained it with varathane dark walnut and I wasn't happy with the color. I sanded lightly and went back over with the golden oak that I had from another project. I love how it warmed up.
Thu, 12/27/2018 - 09:04
Did you turn the legs yourself, or order them from somewhere? They look great, as does the entire piece.
Sat, 12/29/2018 - 05:54
Thank you so much! I ordered the legs from Osborne Wood products. They are the Shanty legs.
In reply to Thank you so much! I ordered by kwildman
Sat, 12/29/2018 - 06:10
I'm actually familiar with Osborne, I basically drove past them going from ATL to CLT this week... They do have some nice legs at a good price.
Wed, 01/02/2019 - 10:13
Yes if you click on the plan, there is a link to the exact legs from Osborne.
Mon, 01/07/2019 - 09:15
Thank you! That is so sweet. I am very happy with it. :)
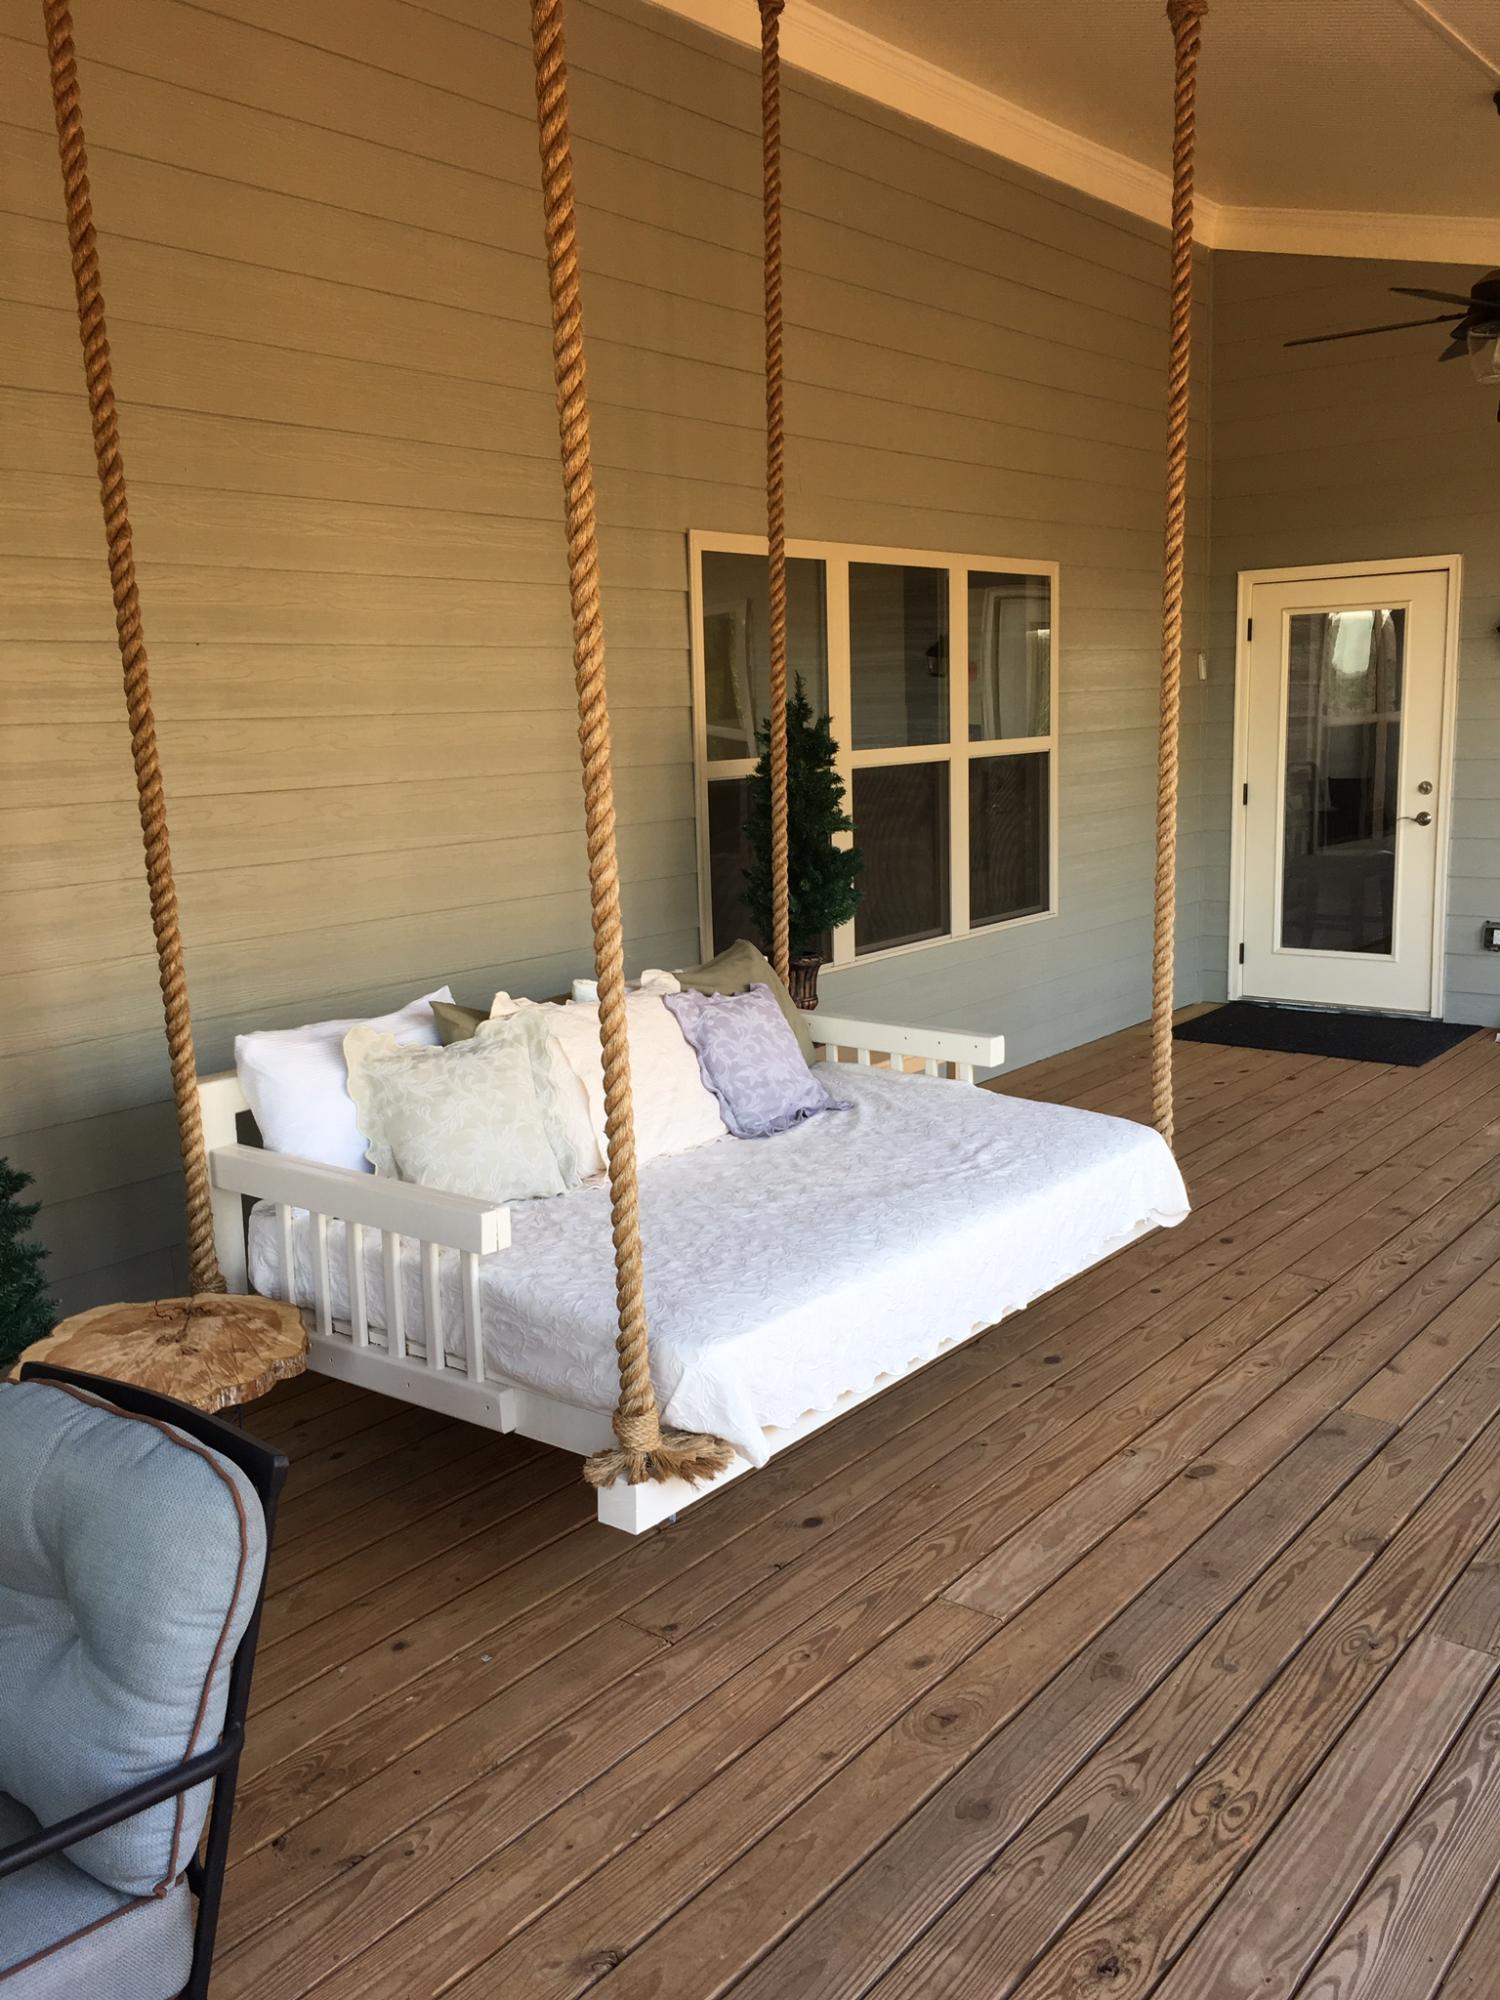
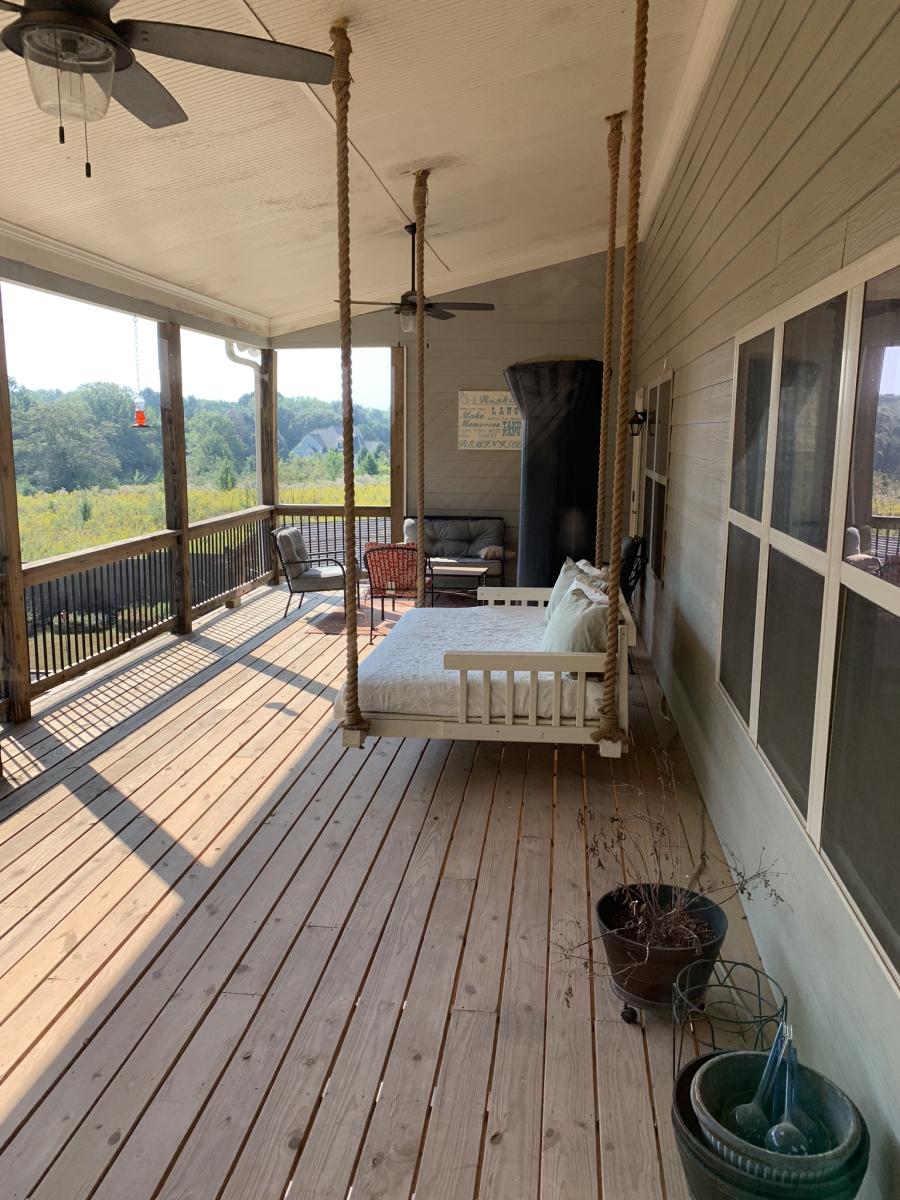
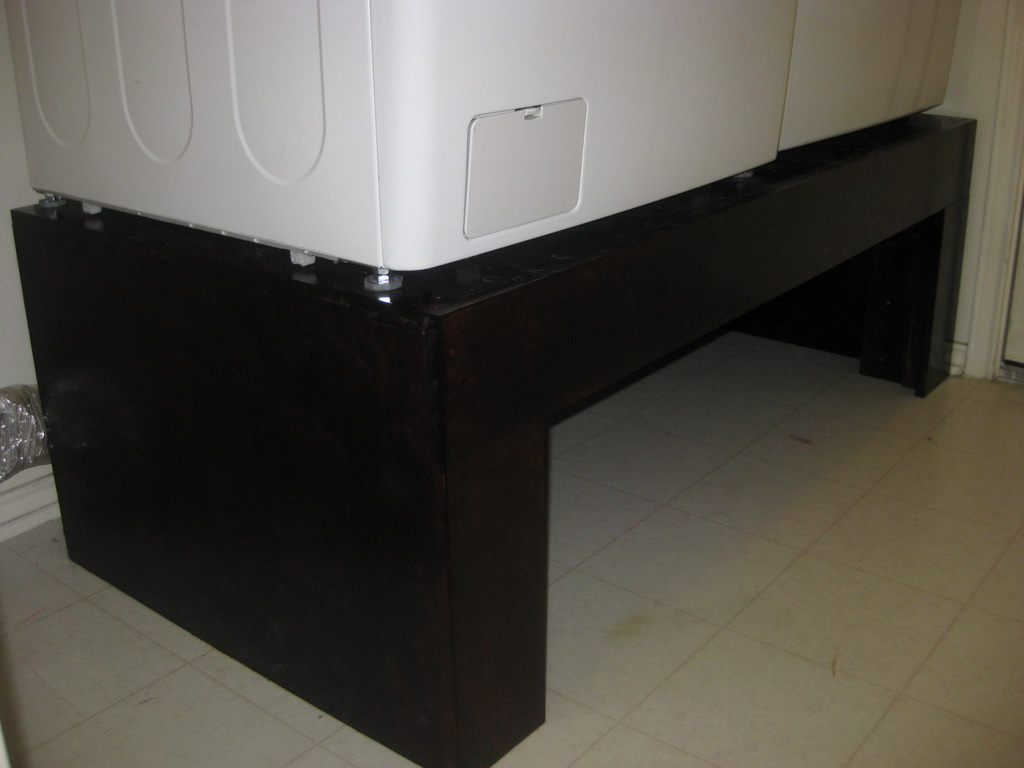
I built 3/4 OD ply base on 4x4’s. Rope had 3/16 steel cable inside it attached to ceiling hardware for strength. Rest was 2x4 painted. Little overbuilt but it was my first.
Sat, 09/03/2022 - 13:25
This is amazing, great job and thank you for sharing!
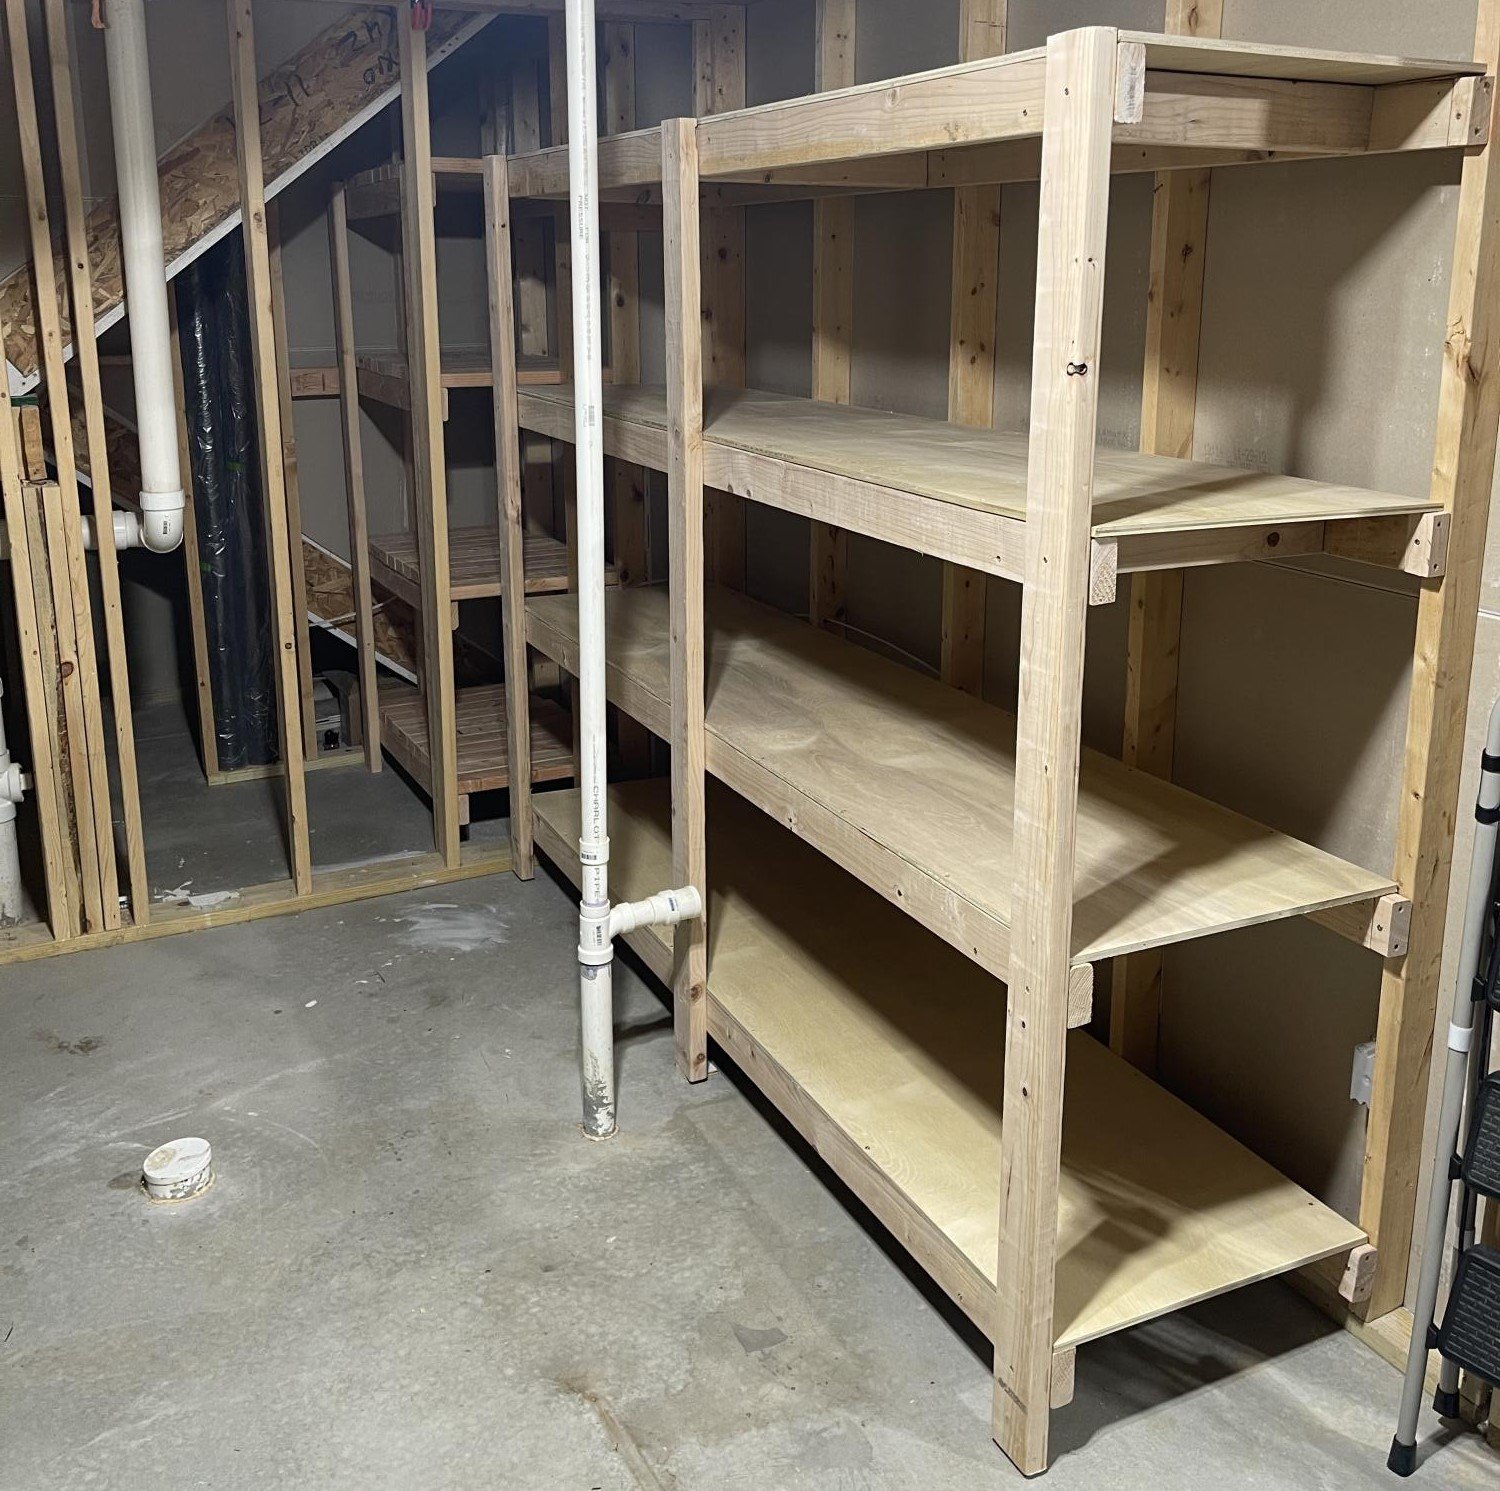
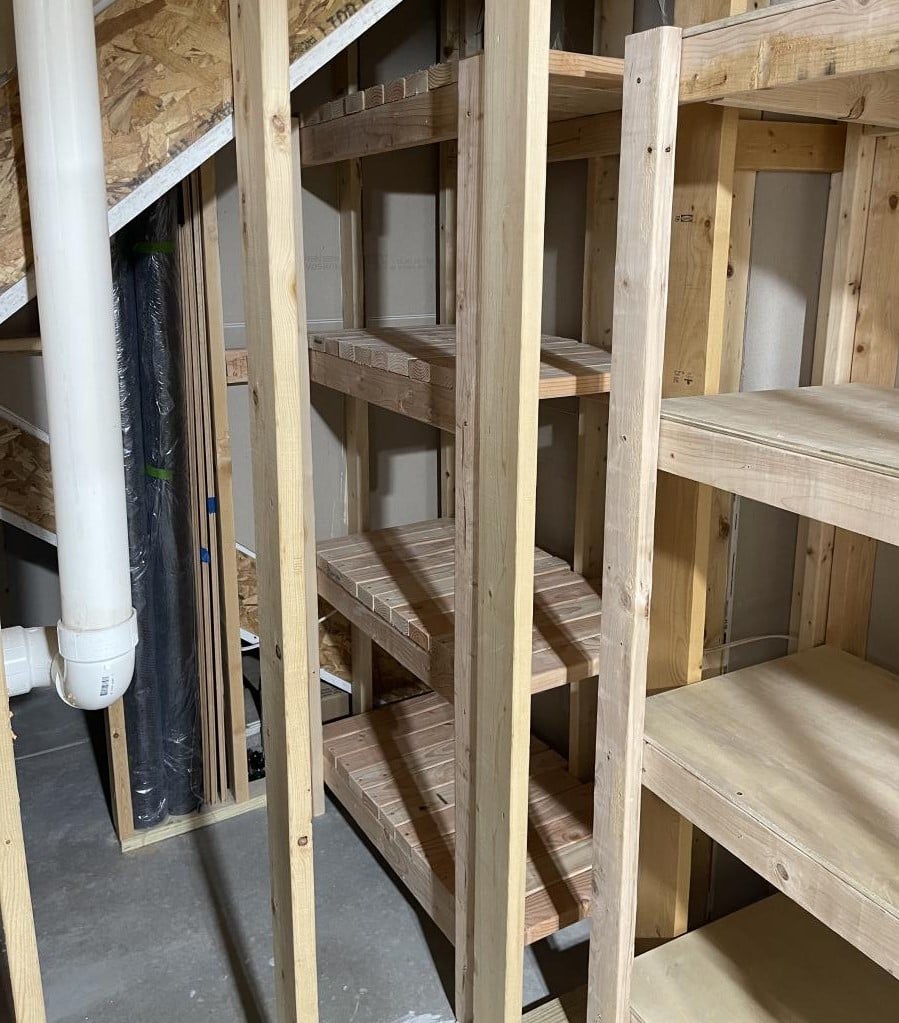
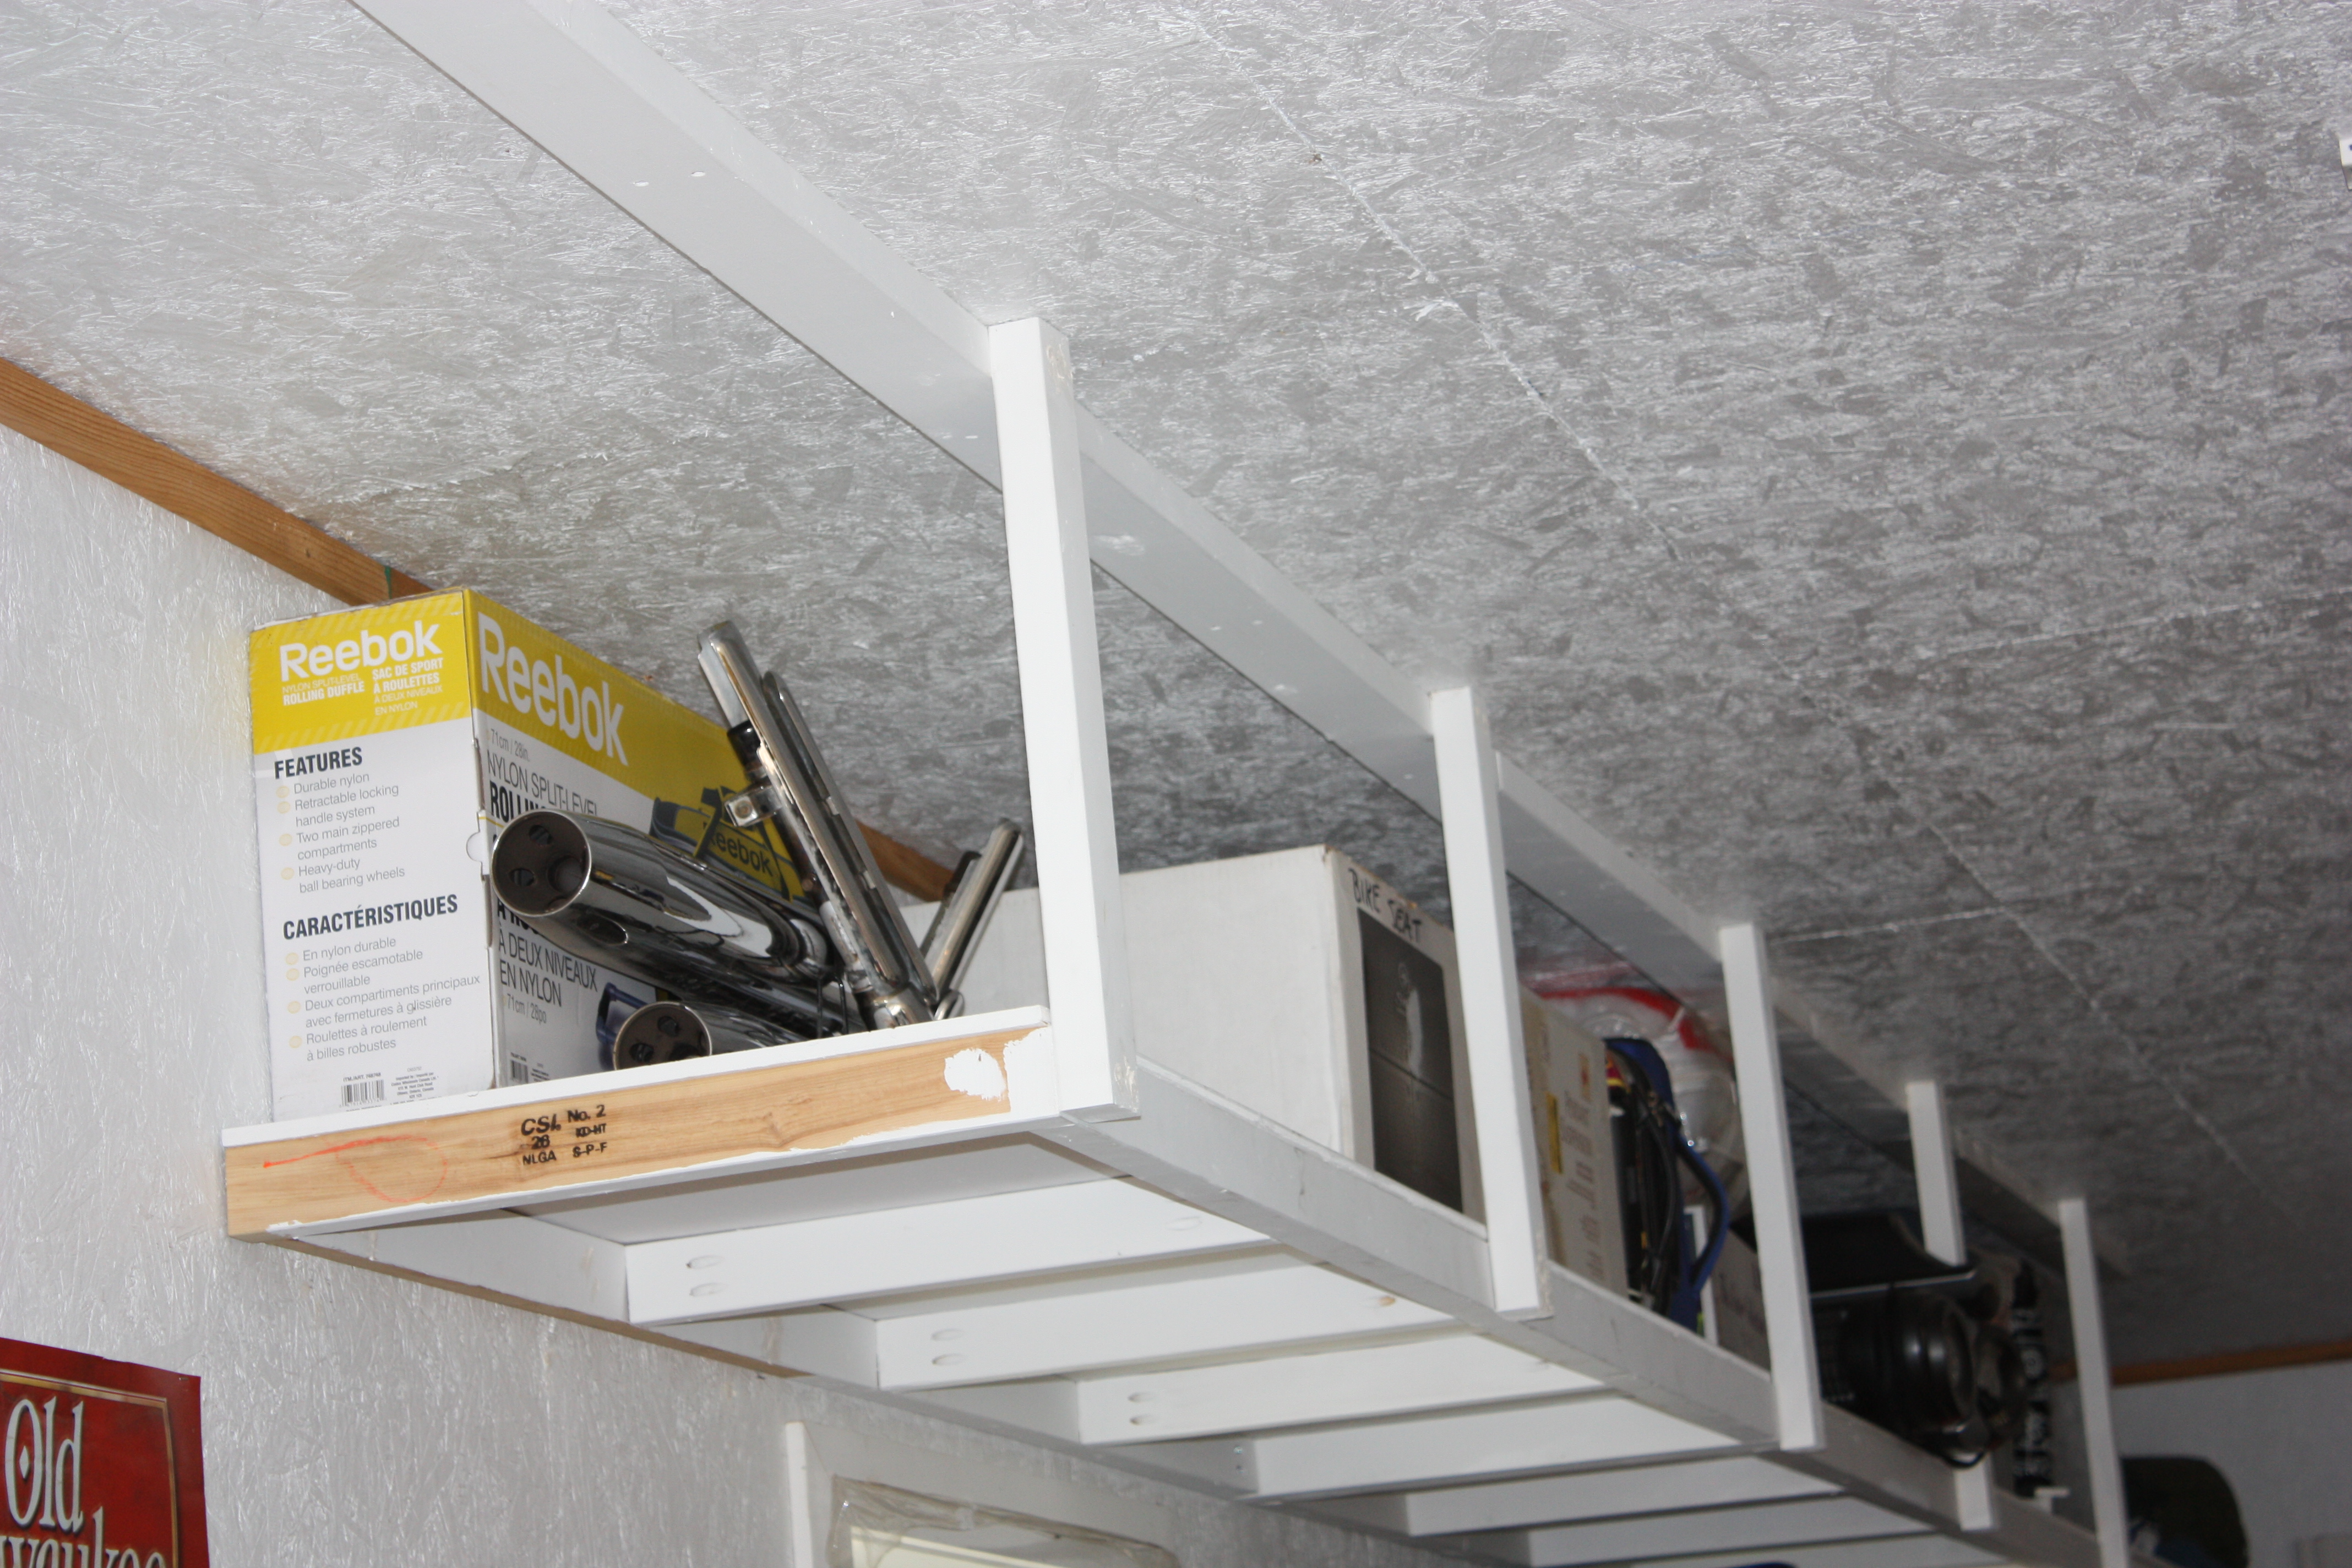
Using the guidelines for the “BEST DIY Garage Shelves (Attached to Walls), I added this to our unfinished basement area for additional storage. I plan to replicate it in our actual garage as well and build the freestanding shelves also!
As a bonus, I used this plan as inspiration and built directly beside it, which is an unused space under stairs, a wine/liquor storage shelving replacing the plywood with cut 2x4s for added weight capacity/stability.
Couldn’t have been easier!

Wed, 10/19/2022 - 09:14
Thank you!! I am so thankful for Ana White and team! These projects are helping me build a lot of confidence to continue endeavoring more challenging projects each step of the way :-)
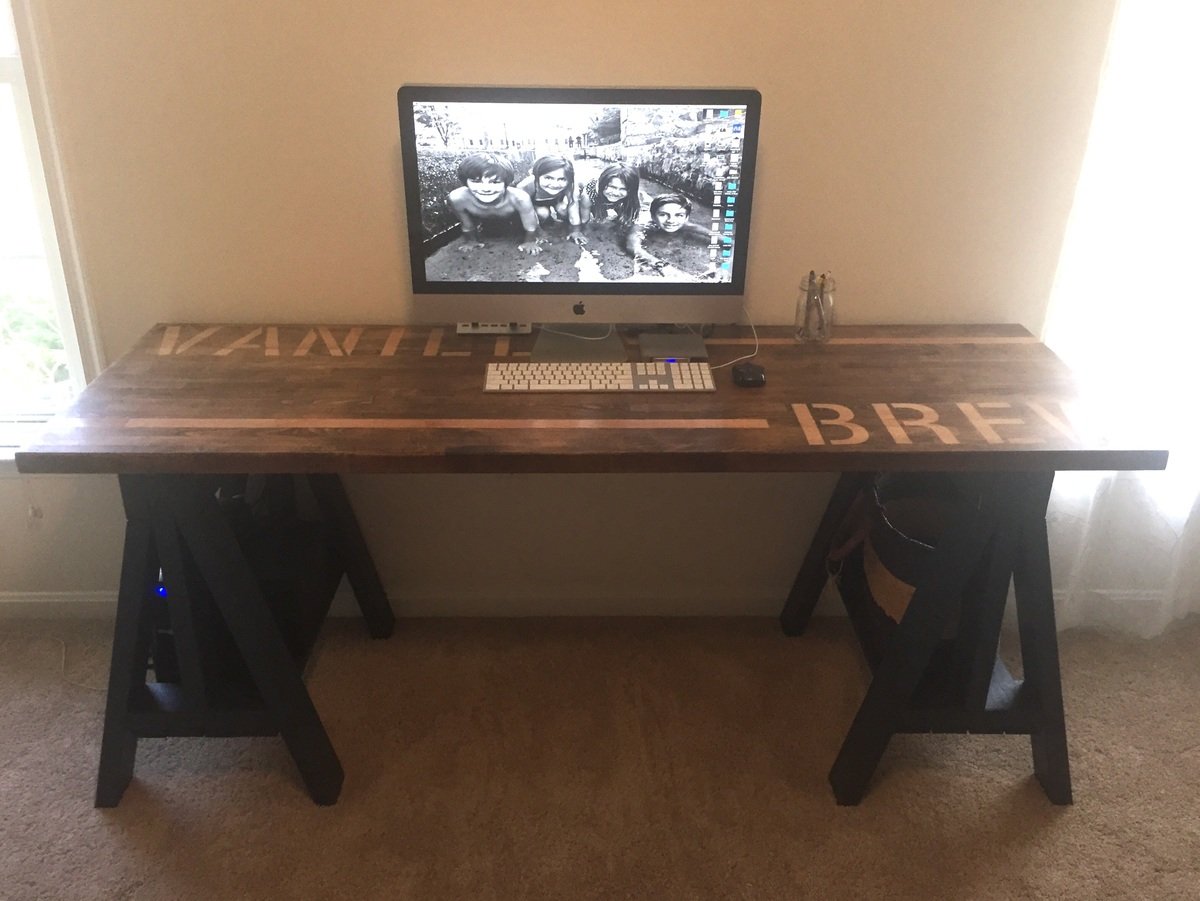
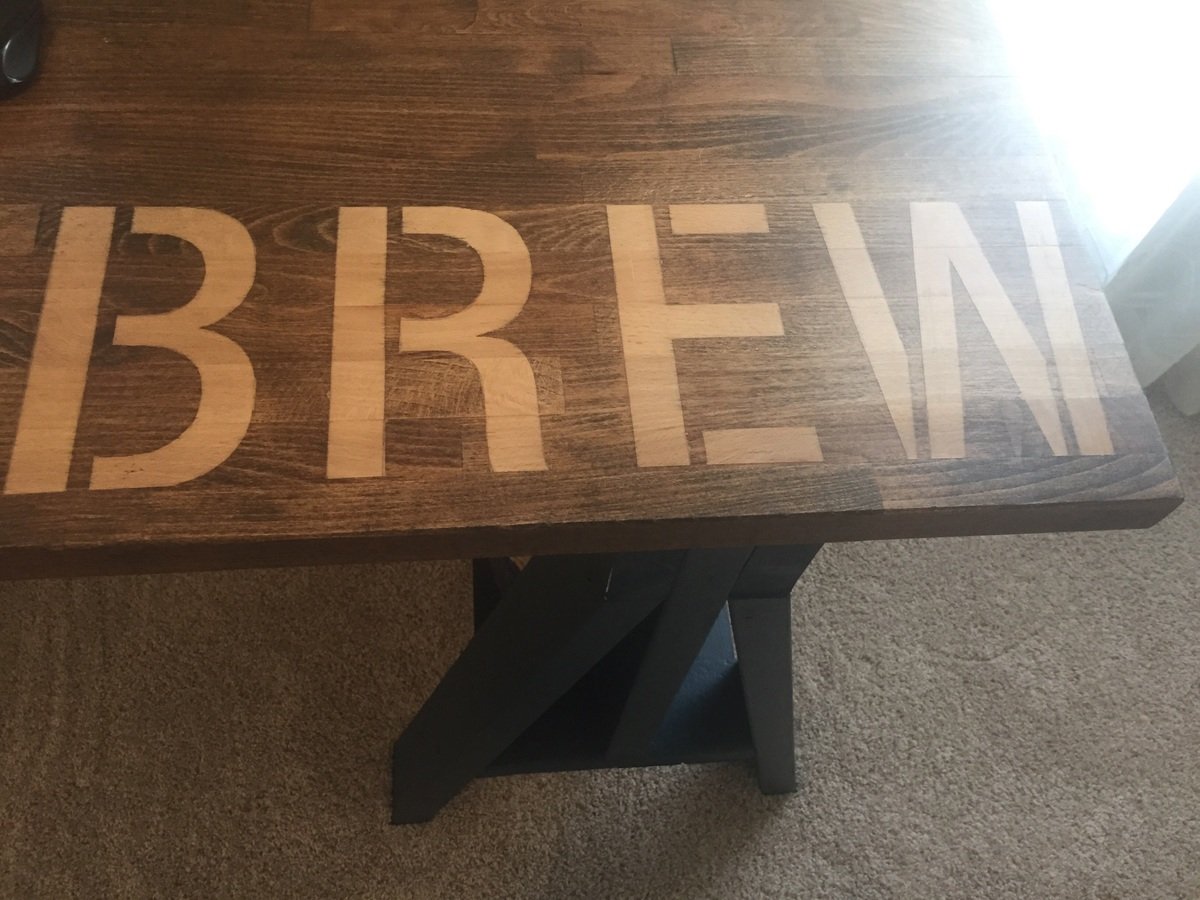
I build these from the plan for Heavy Duty Sawhorses. I preferred these for the thickness to match my butcher block desktop.
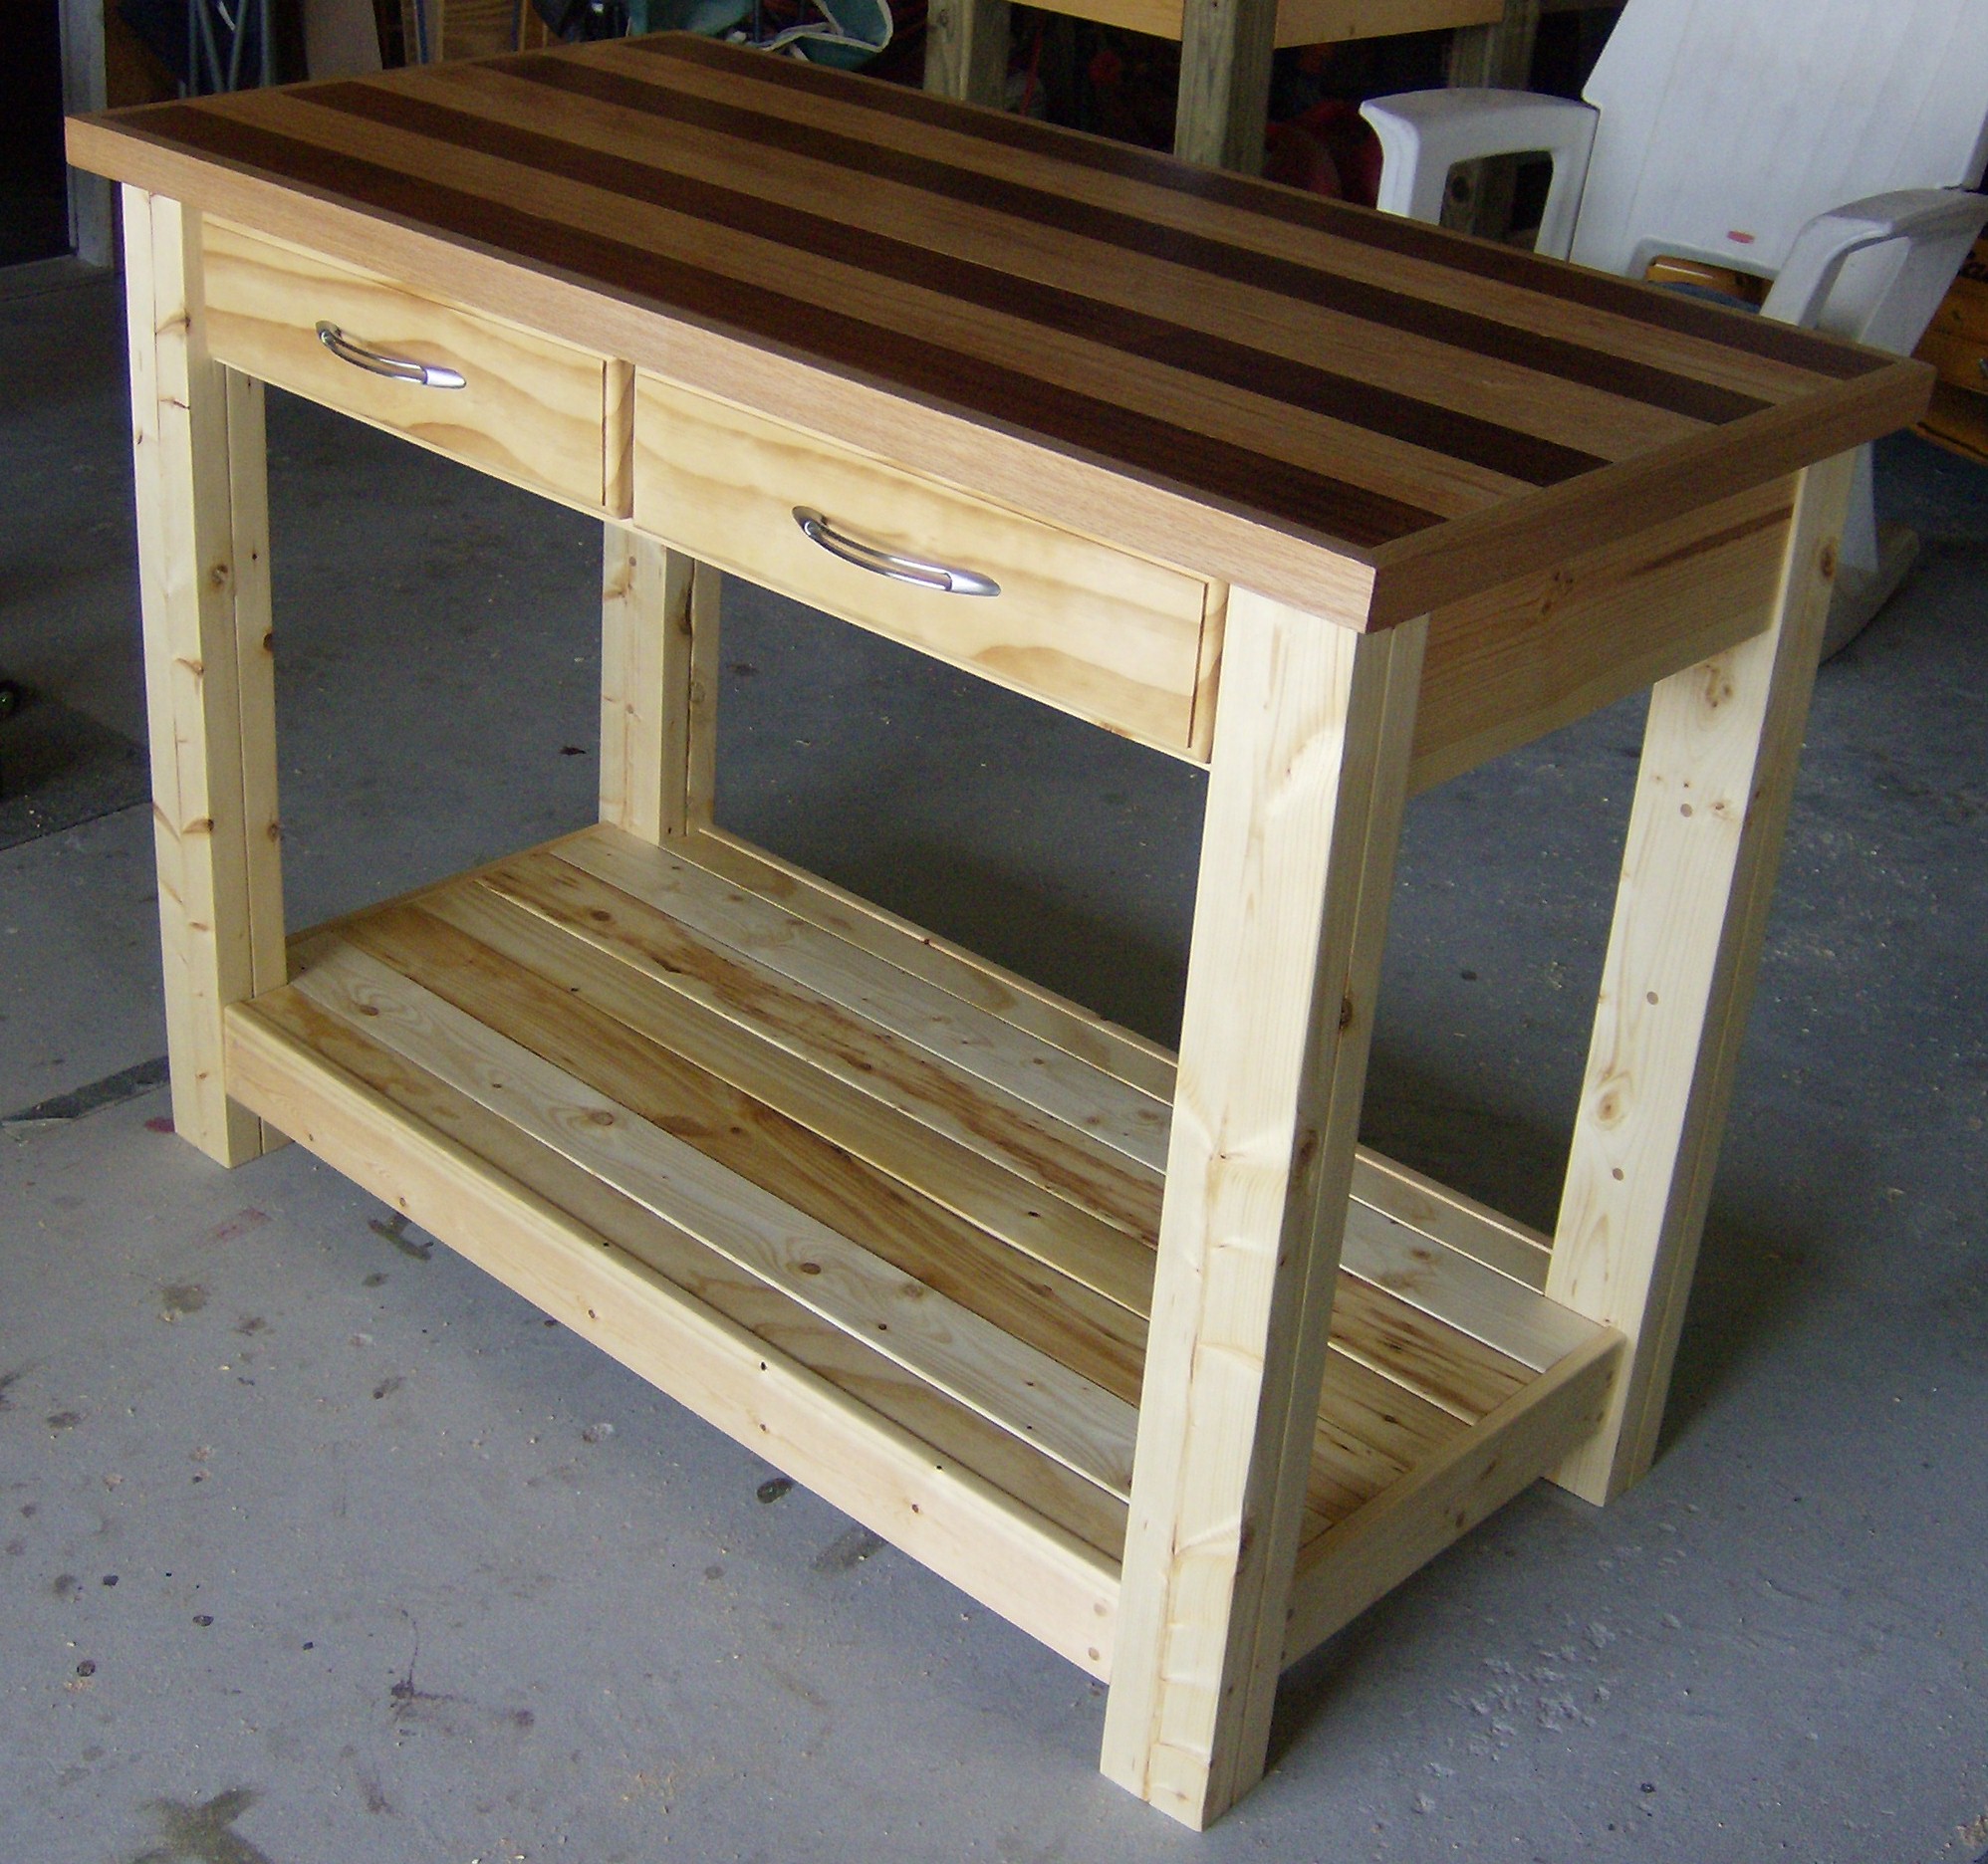
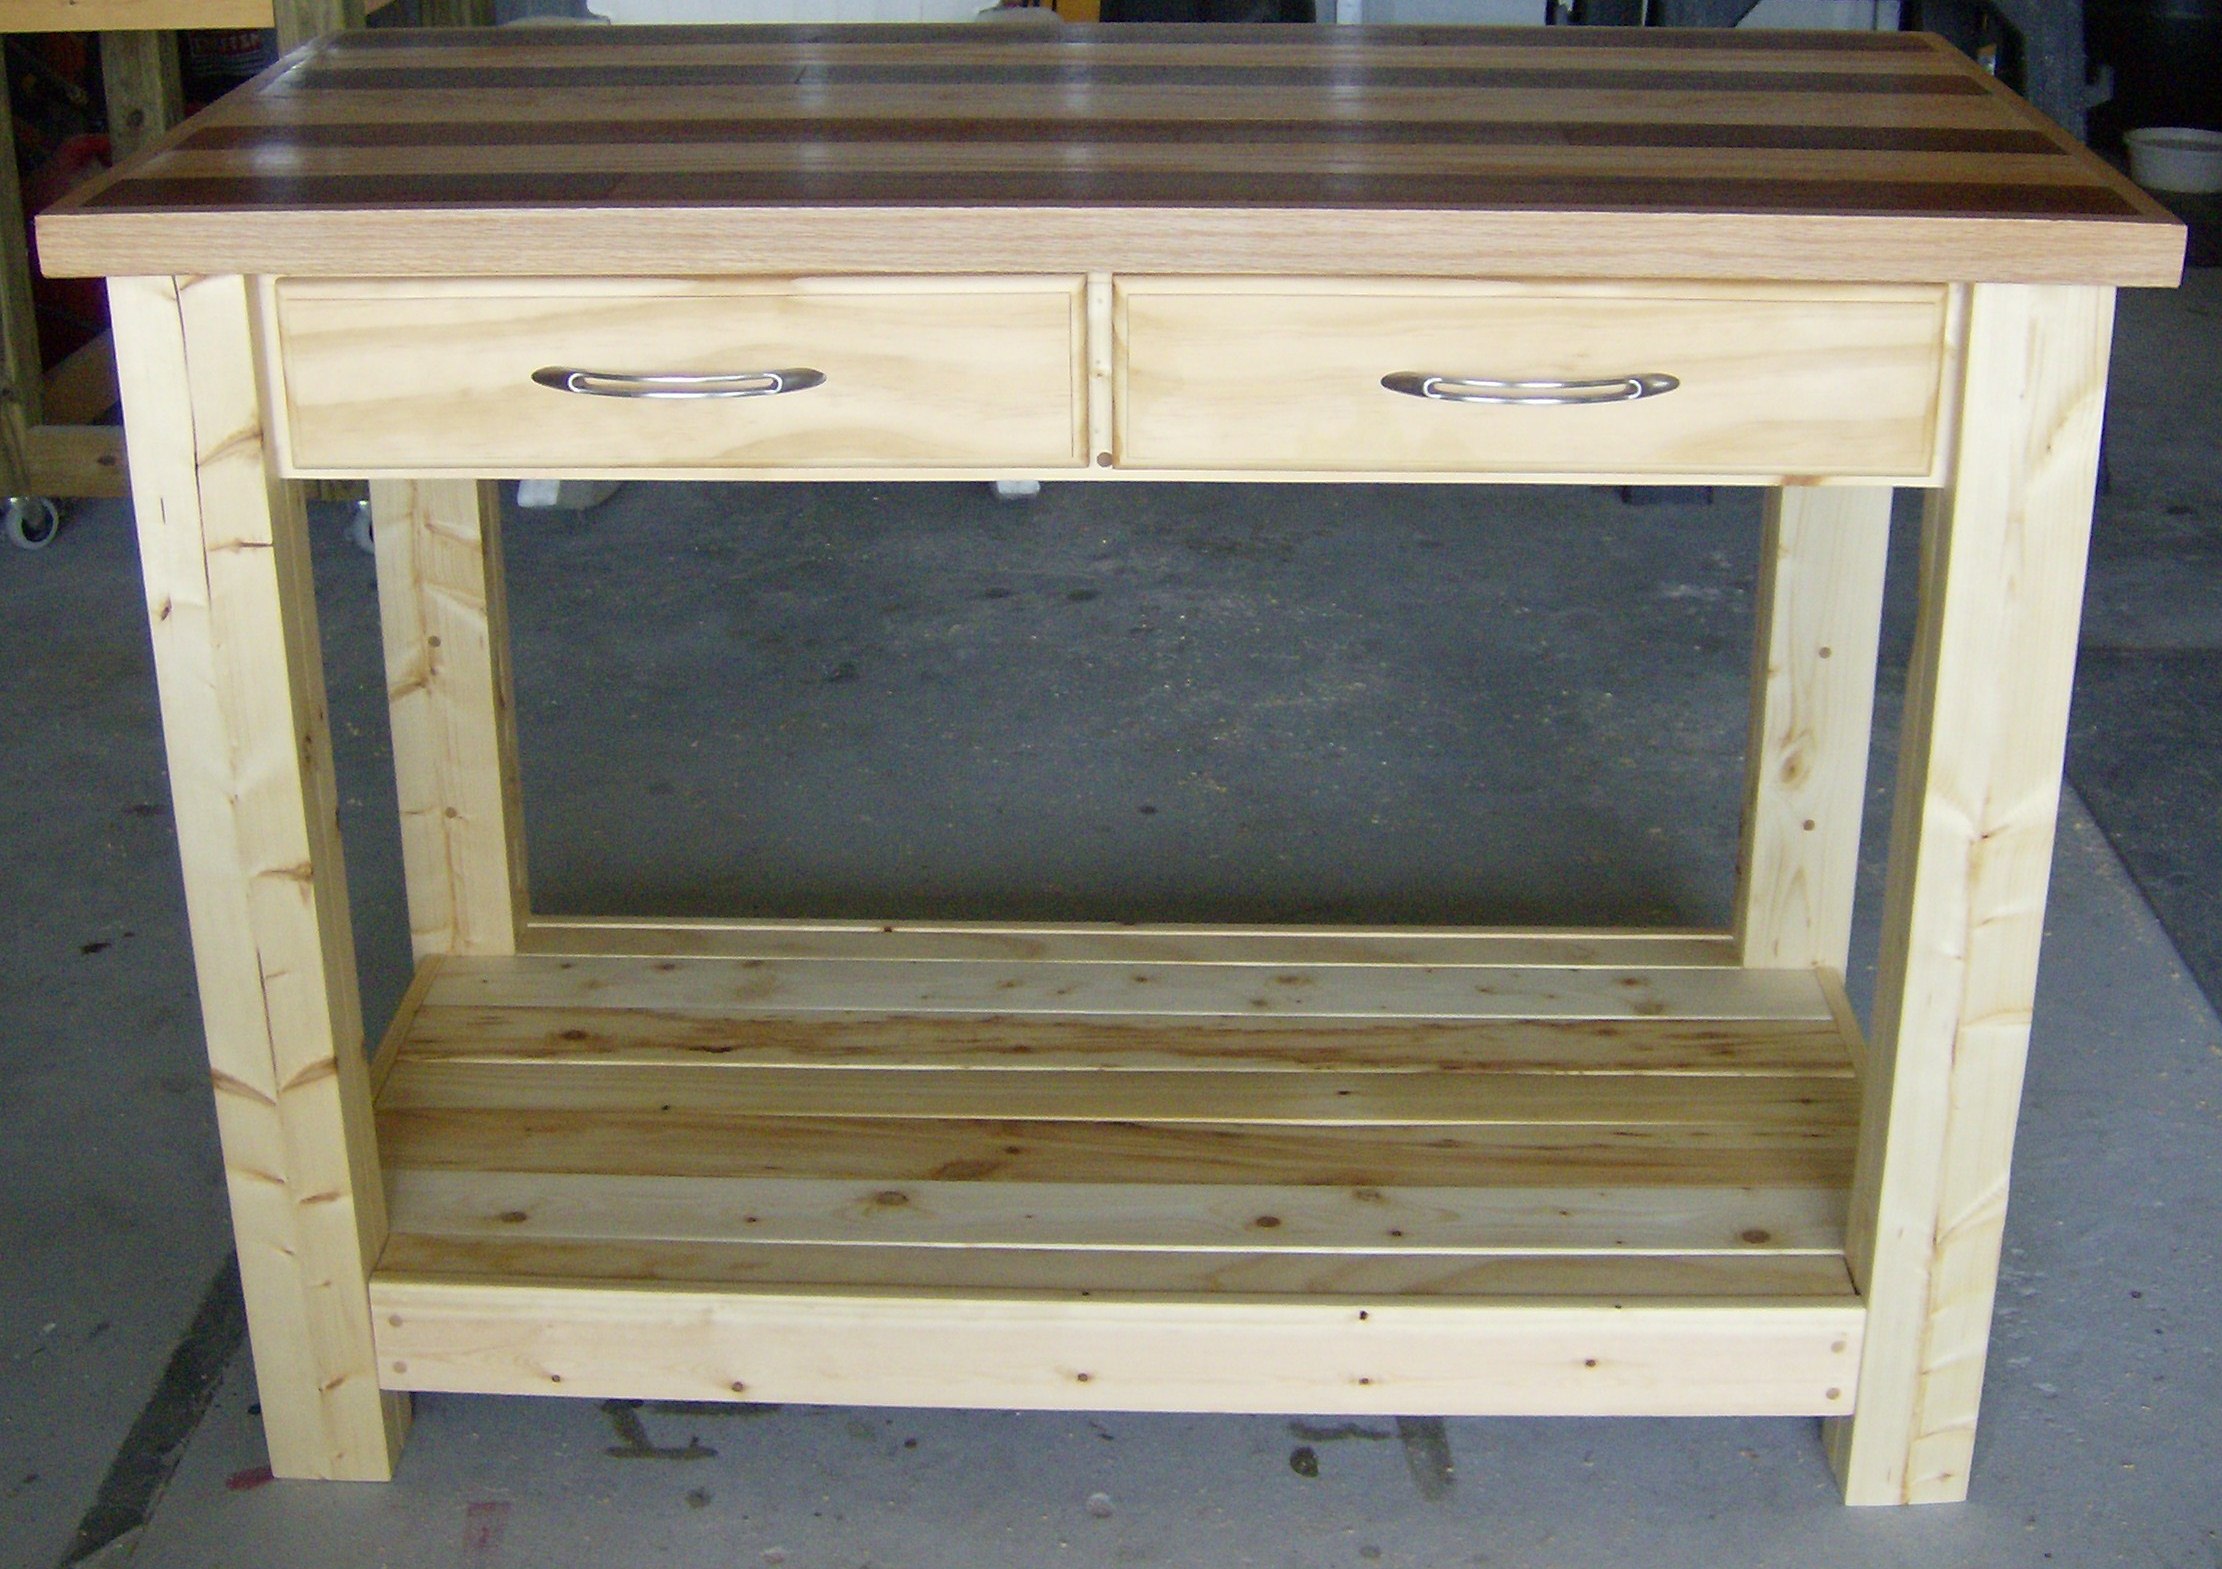
Our daughter asked for a kitchen island so my first stop was Ana's website to see what plans I could find. I built the base while my husband was out of town one week. This was a zero trip to Lowe's project as I raided our wood rack and scrap bins. My husband came home and built the countertop.
Mon, 09/19/2011 - 20:48
I have to say I'm so jealous. Absolutely beautiful! Words can't even say. Great job!
Tue, 11/01/2011 - 09:10
How did you build the butcher block top? Any recommendations, additional resources or anyting?
Fun to build altered the doll plan a bit with a spare peice of plywood to match the toddler bed better.

I love working from these plans!

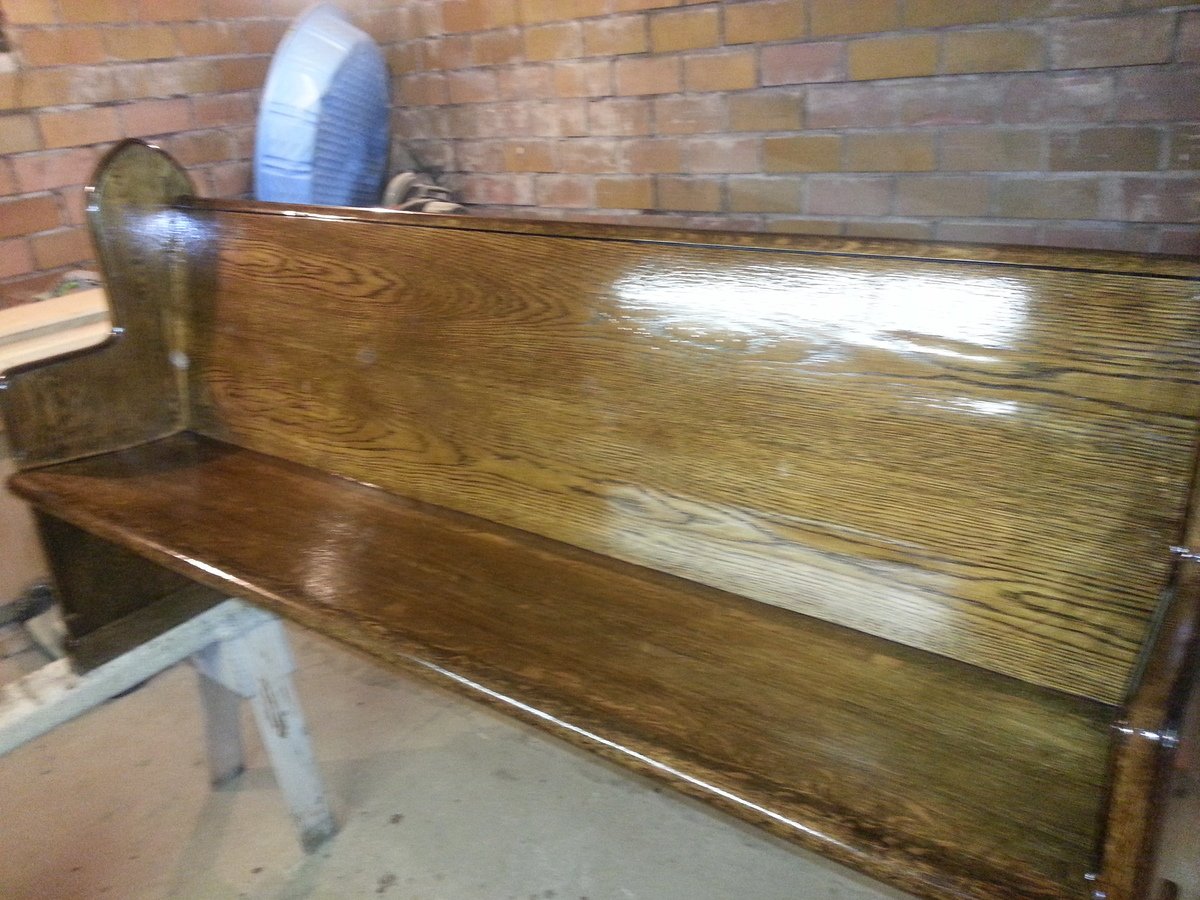
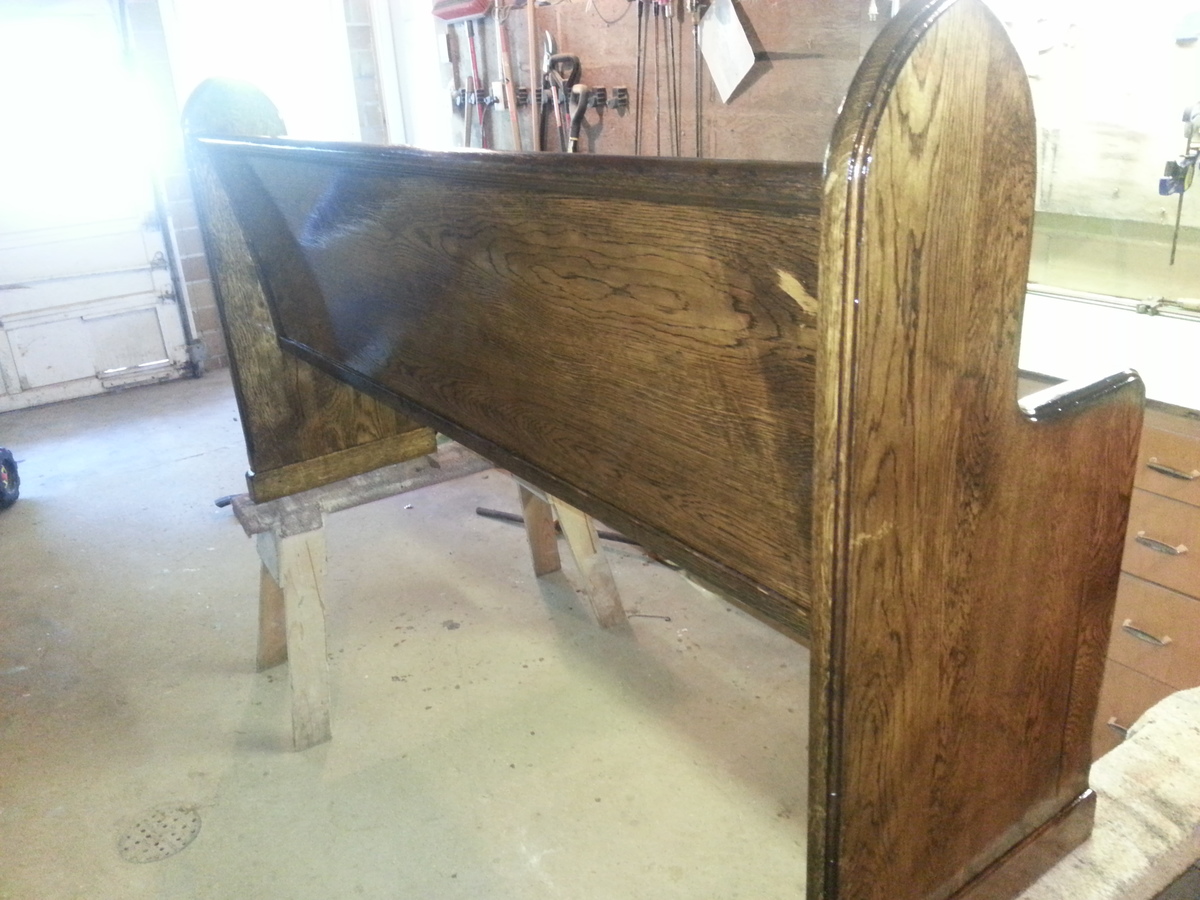
I redid a very old church pew fro one of my friends. It's origins is from one of the original churches in our home town. (There was SO much lacquer on it) This church pew was in bad shape, I had to take it totally apart and re-glue and pocket hole jig every wooden piece together because it was falling apart.
This project was born out of desperation for some way to organize our garage. It is not difficult to build, and it went pretty quickly with two of us. It probably didn't take more than four hours tops for each section. I've seen the prices for garage storage components and some of them are staggering! We have removed a tall chrome shelf, and moved a ton of stuff onto these shelves, creating a hundred square feet of floor space! And for only $25! Come on over and check it out on my blog! Val

In reply to Awesome! This is just what I by moosmani
Thu, 10/24/2013 - 20:17
Glad you like them! They've been a real sanity-saver!

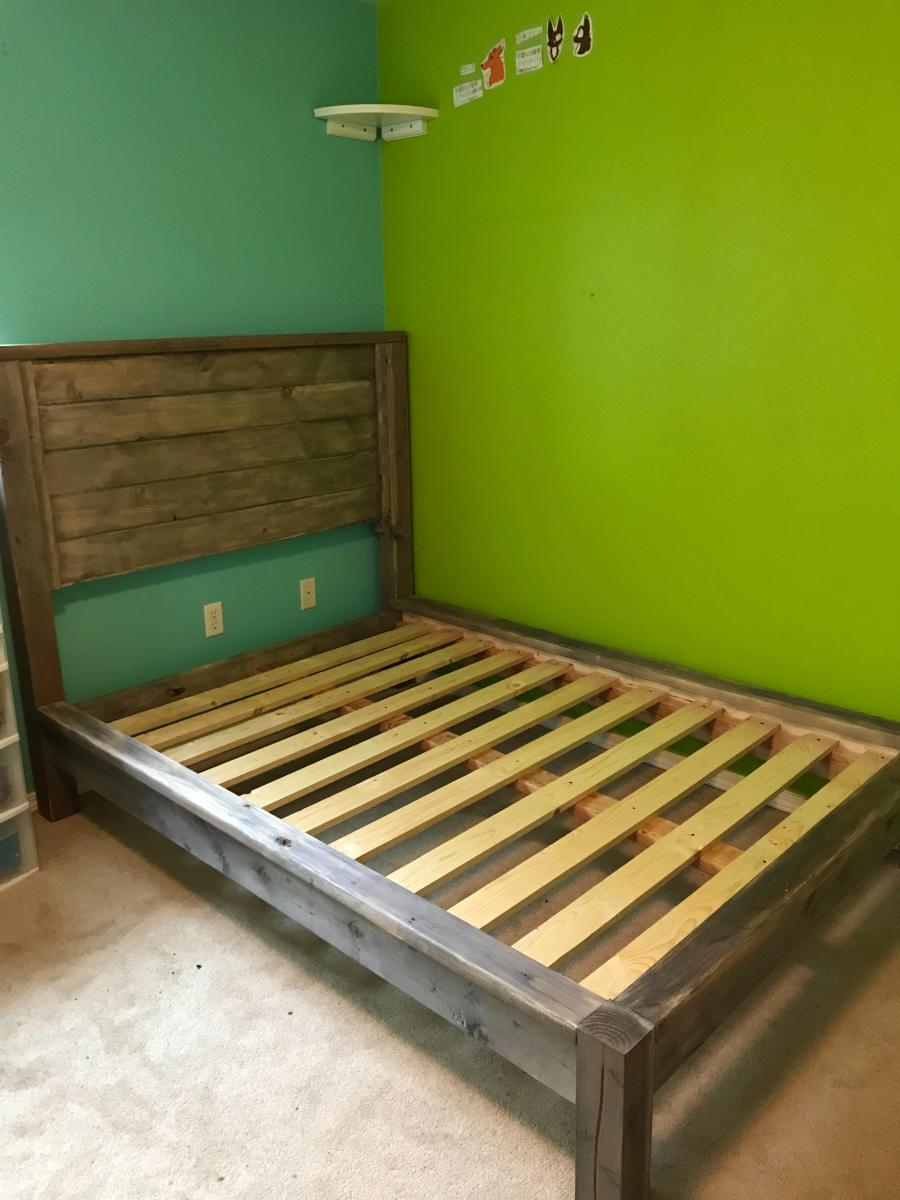
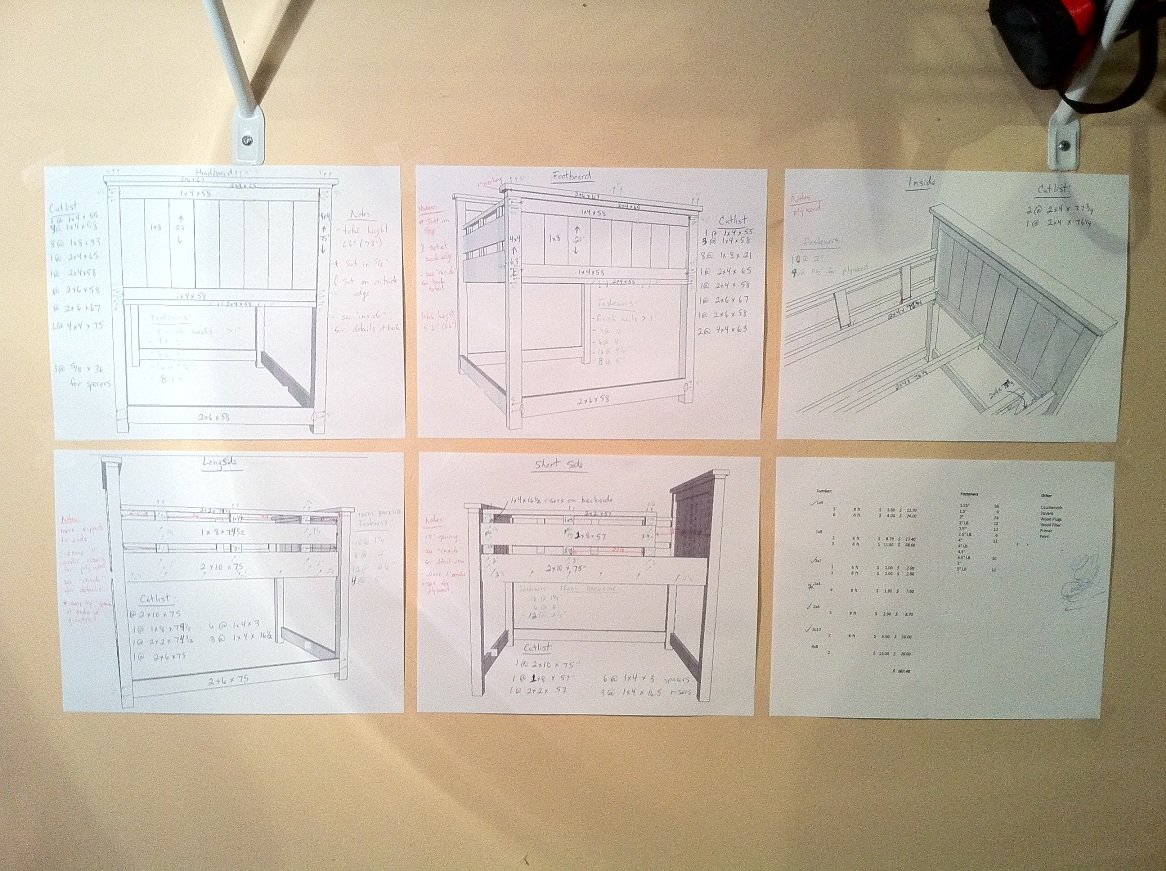
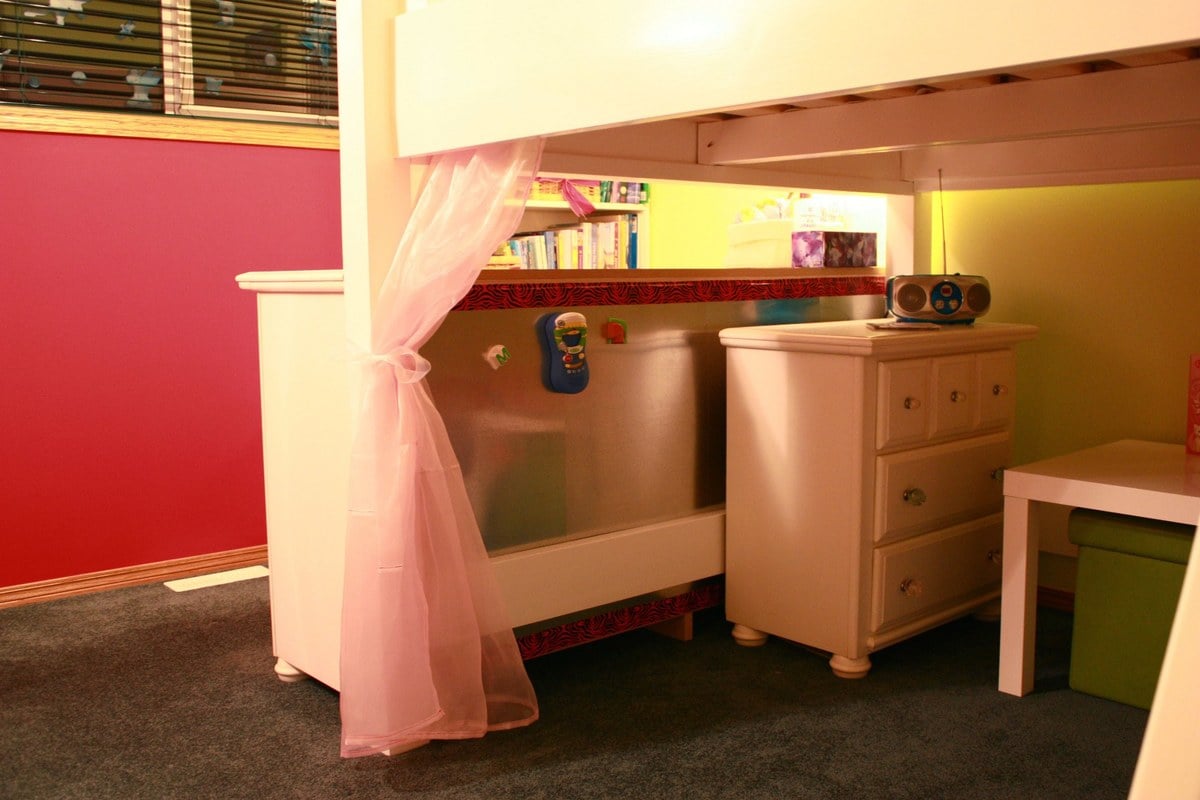
We couldn't find a mid-height, double loft bed for our daughter that we liked that wasn't ridiculously expensive, so we decided to build one ourselves! I found some awesome plans on this website and played around with a few until I created exactly what we wanted. I mostly used the Full Size Farmhouse Bed plan but also used some aspects from the loft bed plan for the guardrails and the bottom rails. Then we went out and bought the wood and started building! This is really the first thing that I have ever built (my husband has never built anything either) and it turned out so well. I think it is gorgeous and I am so proud of it! This is my first brag post so forgive me if I am doing it wrong! Lots of instructions on how I built it below, so scroll down if you just want to see the pictures.
I used Google Sketch-Up to build the bed first and to tweak the plans. Below I will explain some of the changes that I made.
- I actually did not trim anything off of the ends of the head board or foot board as shown in the Full sized bed plans. I just built the bed to be as wide as 8 x 1x8s and adjusted the plan accordingly. I figured that if I had to climb up there to change the sheets, the extra room around the mattress would be appreciated. The 1x8s that I used were 7 1/4" wide.
- I bolted a 2x4 to the 4x4 posts right under the foot board and headboard panels for the side rail supports to sit on. I wanted it to be extra strong as the bed was going to be up high and I figured the bed would take a lot of abuse from the kids.
- The siderails were made from a 2x10 glued and screwed to a 2x4. The 2x4 sits on top of the 2x4s at the bottom of the headboard and footboard panels and is screwed into the 4x4 posts. The 2x10s are also screwed into the 4x4 posts.
- Since the mattress would be sitting up higher on the headboard and footboard than in the original plans, I added 3" to the length of the 1x8s used in the panels.
- I had planned to make a slatted base out of 1x4s to support the mattress so I also placed 2 x 2x4s on edge lengthwise down the middle of the bed to support the slats. Those 2x4s are also supported on top of the 2x4s at the bottom of the head and foot boards. The inexpensive 1x4s here are very rough on the one side which I did not want touching the mattress or for the kids to get splinters from while playing under the bed. The nice ones were super expensive at around $18 for a 14' board. It turned out to be less expensive and much less work to buy a queen sized slatted bed base from the big Blue and Yellow inexpensive furniture store here and trim the ends of the boards to length with my mitre saw. n even bigger bonus is that the wood is already finished and didn't require anything further than screwing it down to the supports.
- I made the height of the area under the bed 45" (just tall enough for DD to stand under for now) and adjusted the length of the 4x4 posts accordingly.
- I assembled the bed into different large pieces before bringing it inside. The headboard and footboard are 2 solid sections that cannot be taken apart. The side pieces are made to be able to come off if we ever need to move the bed.
- I couldn't find any really good instructions anywhere on how to build a ladder or to change ladder plans to suit our needs so I built it after the bed was built. I found it easier to envision this way and to figure out the angles. I build the ladder out of 2x3s.
I have the Google Sketch-Up plans for the bed (minus the ladder) if anyone is interested, but as I said before, I am not an experienced builder so I do not think I should post them here. Maybe someone can use them as a base to create their own plan with though. I found Sketch-up to be a very valuable tool as I actually "built" the bed virtually before ever touching the wood. It helped me figure out what order to put things together in and also allowed me to perfect my design before making any cuts. It still took many trips to and discussions with people at my local Orange store to figure out what kind of fasteners to use and where to use each type. I brought printouts of my plans so that they would be able to help me better.
A couple of finishing touches that I did:
- I sewed some pretty curtains and hung them from aircraft cable and eye hooks under the bed.
- The back of her dresser was exposed under the bed and did not look very nice so I created a magnetic wall by screwing some inexpensive metal sheets meant for ducts to the back of it. I have temporarily covered all of the exposed edges with pink patterned duct tape but plan to trim it out at some point.
Hope you like it!

Thu, 12/01/2011 - 05:27
I can not believe you tackled this for your very first project! You should be so proud as it came out beautiful! Your daughter must be thrilled!!!
Fri, 05/03/2019 - 04:15
Hello DirtSquirt,
My granddaughter just asked me to loft her queen bed and loves your plan. Is it still possible to get the plans you made up so I can modify for queen. Thank you
tomjnc5
Sun, 12/11/2011 - 01:34
I have been googling some many website for a full size loft bed and came across this one at 4am Sunday. Can you please send me the mesurements and plan for this bed. I would love to build it just the way you did.
Fri, 01/05/2018 - 21:53
hi I know this is a old post but can I get the plans? My husband needs the direct directions. [email protected] also look into we transfer, you can upload big documents up there and just post the link then people don’t have to bug you all the time they can just download it. Hope that helps you.
thanks for your time.
Thu, 12/29/2011 - 14:34
I LOVE this bed. I do not know how to use google sketch-up but we are wanting to build the farmhouse into a twin loft bed and the plans you used would definitely help us figure out how. If you could send me your plans Id really appreciate it and Ill somehow figure out how google sketch-up works. Thank you so much for sharing!
Fri, 05/11/2012 - 15:04
Can you please send me your plans we are trying to do almost this exact thing for our twins!!!
Thu, 05/24/2012 - 16:22
Could I get a copy of the plans. This will give him more space without having to get a smaller bed. [email protected]
Fri, 12/30/2011 - 06:44
Will you please send me a copy of the plans as well? email is [email protected]. Thanks
Fri, 12/30/2011 - 11:48
This is wonderful! Can you send me the plans? Thank you sooo much!
Wed, 01/04/2012 - 13:15
I love your project!! Could I get a copy of the plans as well? Thanks!
Wed, 01/04/2012 - 13:17
Could I get a copy of the plans as well? Thanks! Sorry forgot to include email address it's: on3003in2002yahoo.com

Thu, 01/05/2012 - 21:53
I did send plans to those who included an address, but I'm not sure how to get them to the rest of you!
Fri, 03/02/2012 - 21:15
Sun, 03/25/2012 - 18:28
Hi,
Could you please send me the google sketch up plans? I.m looking to build a loft bed for my 11 year old daughter. Please email it to [email protected].
Tue, 06/26/2012 - 11:10
Hi DirtSquirt,
I'm digging your bed and would like the plans if you would be willing to send them.
Thank you in advance!

In reply to Plans Sent by DirtSquirt
Wed, 05/20/2015 - 00:18
Please send the plans i am dying to try this bed.
Thu, 01/19/2012 - 10:27
Any chance I could get your Google Sketchup plans too? We are moving soon and want to do something like this for both of our kids. Thank you! [email protected]
Wed, 01/25/2012 - 08:22
I LOVE THIS!! Can i please get the plans sent to me as well?
[email protected]
Thank goodness for your post on here, we are planning to start building on Friday and I couldnt have found it at a better time! =)
Sat, 02/04/2012 - 17:36
Could you please send us your plans? Our email is [email protected]
You did amazing, thank you for sharing what you've done! Our daughter is SO excited!! :)
Sat, 02/04/2012 - 17:37
Could you please send us your plans? Our email is [email protected]
You did amazing, thank you for sharing what you've done! Our daughter is SO excited!! :)
Sat, 02/04/2012 - 17:49
Could you please send us your plans? Our email is [email protected]
You did amazing, thank you for sharing what you've done! Our daughter is SO excited!! :)
Sat, 02/04/2012 - 20:05
What an awesome bed! I am trying to build something like this for my 8 year old. Could you sen d me the plans? [email protected] Thanks,
Mon, 02/06/2012 - 06:50
Could you please send these plans to
[email protected] ?
I love it!. I have been looking for loft bed plans that are of mid height for a while.
Thanks!
Mon, 02/06/2012 - 21:15
Congrats on your project! It looks like something that would cost $1000 ++ at any store. I too would like a copy of the plans. I'm envisioning a distressed and stained version for my son. Thanks! [email protected]
Wed, 02/15/2012 - 16:19
Actually just purchased a floor sample loft bed for our son today...having 2nd thoughts because it seems cheap...so I browsed Ana's site...and WOW! This is WAY better - love the design. Am hoping you could please send the plans our way too...we are all so envious! Thanks! [email protected]
Mon, 03/26/2012 - 16:16
THANK YOU SO MUCH for sending the plans so quick. We ended up building the bed, but in twin size for our son....took us about 3 weekends to finish....and it's incredible! I don't know how to post a pic here, but thx so much Marcie....we ended up building a forward facing bookshelf too bc once we got this huge bed in, there was not enough room for his standard bookshelf
Wed, 06/27/2012 - 07:44
I'd like to get the plans for this bed, but DirtSquirt seems to have closed their account or something. I'd appreciate it! [email protected]
Mon, 01/26/2015 - 08:28
im trying to get the plans for this bed, but I guess since this post is so old.. she is no longer looking at the comments!! can you email them to me?? [email protected]
Mon, 01/26/2015 - 08:28
im trying to get the plans for this bed, but I guess since this post is so old.. she is no longer looking at the comments!! can you email them to me?? [email protected]
Mon, 01/26/2015 - 08:28
im trying to get the plans for this bed, but I guess since this post is so old.. she is no longer looking at the comments!! can you email them to me?? [email protected]
Mon, 01/26/2015 - 08:28
im trying to get the plans for this bed, but I guess since this post is so old.. she is no longer looking at the comments!! can you email them to me?? [email protected]
Mon, 12/03/2018 - 08:02
If anyone has these plans, can you please, PLEASE, please message me to email them?! I desperately need these plans for my daughter. Thank You!
Wed, 02/15/2012 - 20:09
This is so beautiful! Can you please send me a copy of the plans? [email protected]
Thanks!
Fri, 02/17/2012 - 10:10
Holy crap! Could I please get the plans sent to me? The bed is nothing short of AMAZING.
Mon, 02/20/2012 - 15:40
This bed is so beautiful, it is exactly what I was looking for. My husband and I have never built anything before, but with the right directions I think that we could totally manage this project. Could I please get a copy of your plans so that we can make this bed for our 13 year old for her birthday. Thank you so much.
Brandi
Mon, 02/20/2012 - 15:46
I would love to have a copy of your plans. This bed would be perfect for my daughter. Thanks so much
Brandi
Mon, 02/20/2012 - 19:47
I have sent the Sketch-Up files to all those who have supplied some way to contact them. I'm sorry that I can't send them to those with no contact info. :( I feel badly if you are waiting for them...
In reply to I have sent the Sketch-Up by Guest (not verified)
Tue, 05/19/2015 - 01:40
Hello,
I am looking for the plans to this bed as well. I created a comment on your post but i am not sure if you received it as the post seems quite old.
I am new to this and there is no way I could build that bed without the plans and instructions.
I am also new to google sketchup I am shocked that you were able to do this plan up in it. I downloaded it and couldn't even draw a line never mind a 3d bed plan?
In reply to I have sent the Sketch-Up by Guest (not verified)
Wed, 05/20/2015 - 00:21
Please send the google sketch plans for the farmhouse loft plans I understand dirt squirt is no longer replying and I desperately want to build the bed for my son
Tue, 02/21/2012 - 07:17
HI-
Your bed is beautiful. If you don't mind, could you send me a copy of your plans? My email address is [email protected].
Thanks!
Not as easy at it seems... but also, this was one of my very first woodworking projects.
Tue, 06/11/2019 - 09:25
This is an amazing first project! I love how it fits perfect in your space and the color. What a beautiful floor too.

Moved into a new house after a fire destroyed almost everything, rather than buying new beds for my kids, we decided to build! They turned out beautifully, and the kids love them! Decided to modify the camp loft bed, removing the stairs and using the foot of the bed a ladder style.


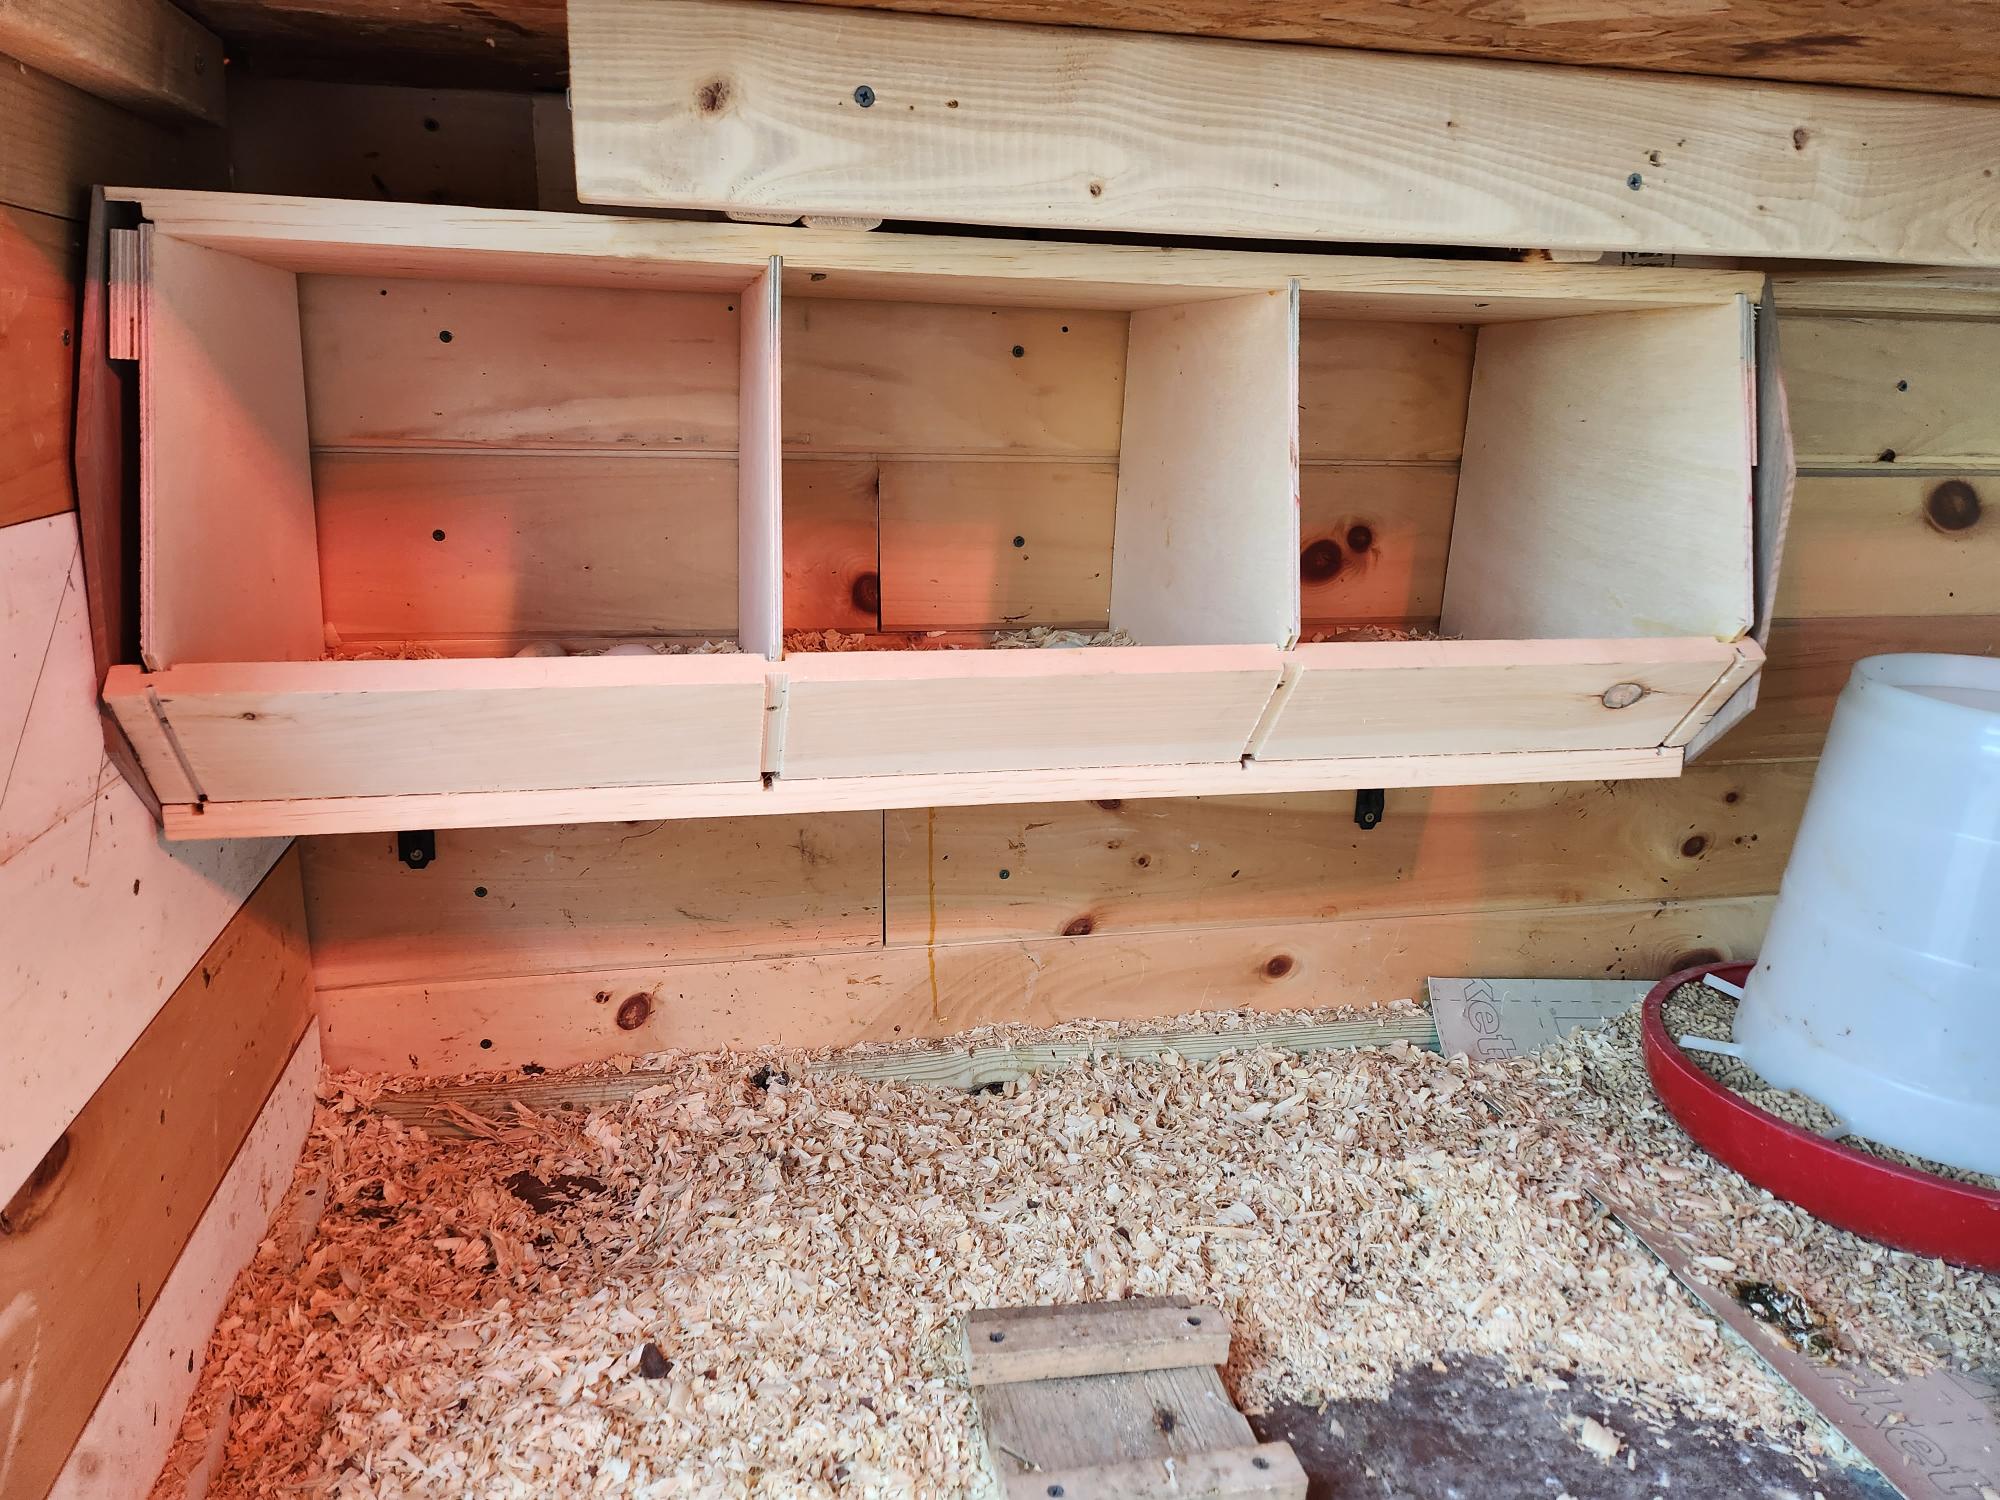
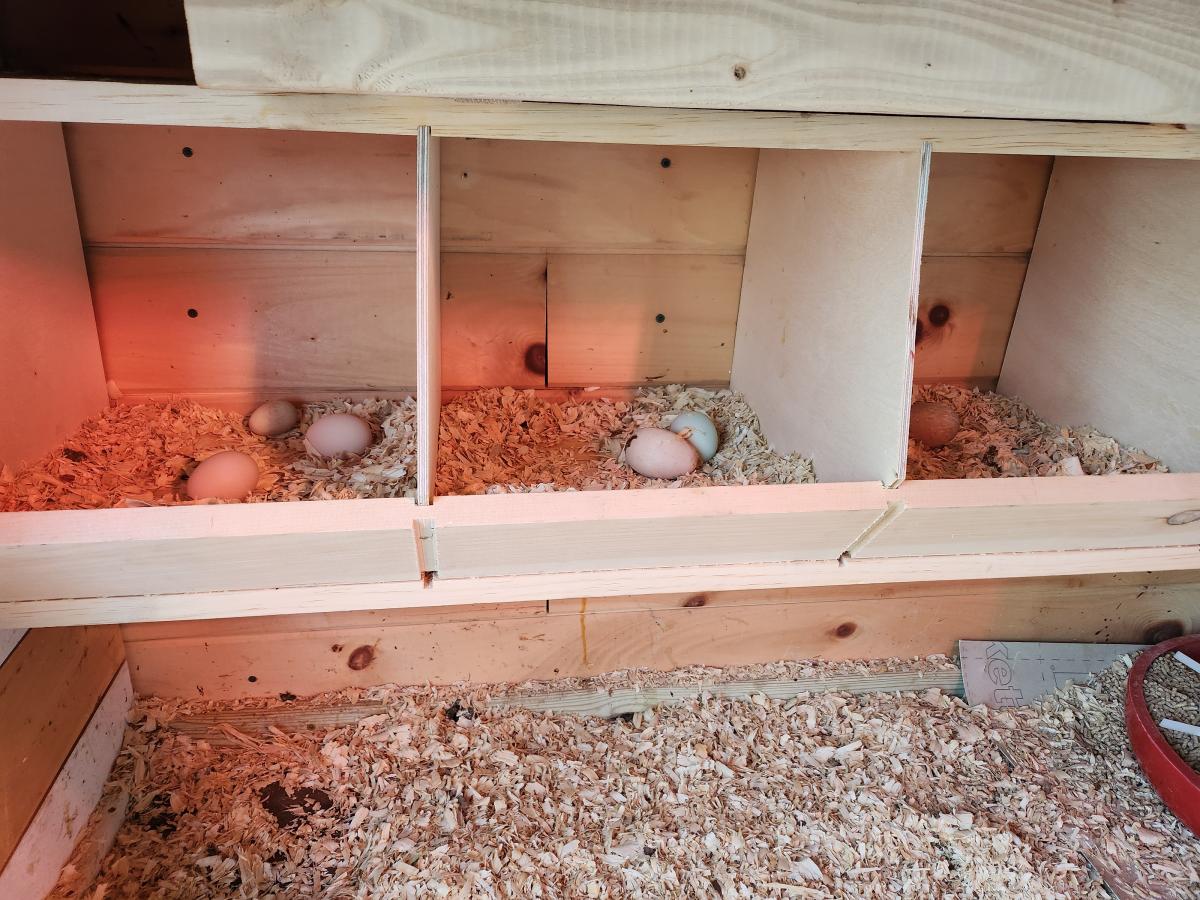
I have tried all sorts of nest boxes. No one ever used them. I decided to make the one from Anna White's site. I used joinery to attach the various pieces. The best thing of all: I find girls sitting in the boxes and take eggs from them. It really is awesome. I got a photo with real eggs and you can also see the wooden eggs to entice them to try it out. Thank you so much! I will build another one for the other side of the the wall.
Fri, 04/21/2023 - 10:18
Love the fresh eggs, looks like a win to me! Thanks for sharing.
I modified Sausha's design, taking out the bottom shelf, adding a back brace, and putting fascia boards on. I also put in a 2x4 between the underframe and each back leg at a forty-five degree angle as braces. My legs are a bit different too. I used three 2x4's. The first leg piece goes from the plywood top to the ground. I put four screws between it and the frame. Then I took two 2x4's and placed them butted at a ninety degree angle around it flush with the frame above.
Mon, 01/23/2012 - 13:08
I have been drooling over the original pedestal plans since they posted. When I showed them to my dad the first thing has said we could have more clearance without the bottom plat form. I am going to copy your plans this week end thank you very much.
I did want to ask do you have any vibration issue without the bottom plat form?
Thank you for sharing, great sketch –up!

Comments
Ana White Admin
Fri, 02/18/2022 - 12:58
Perfect!
Those look awesome, thank you for sharing!