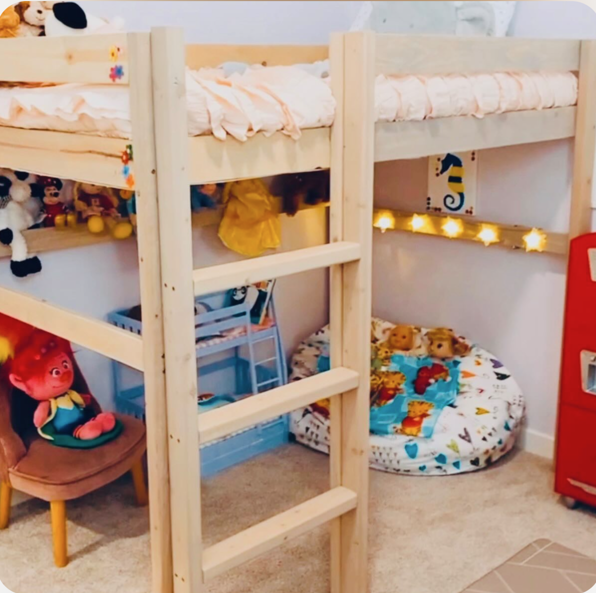
Playroom Loft Bed
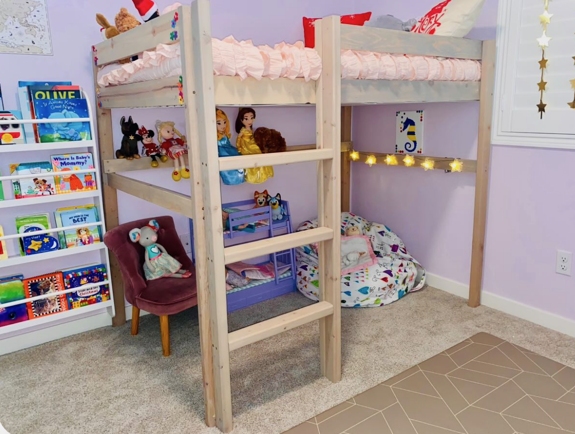
Built this loft bed for my girls playroom! They love it.
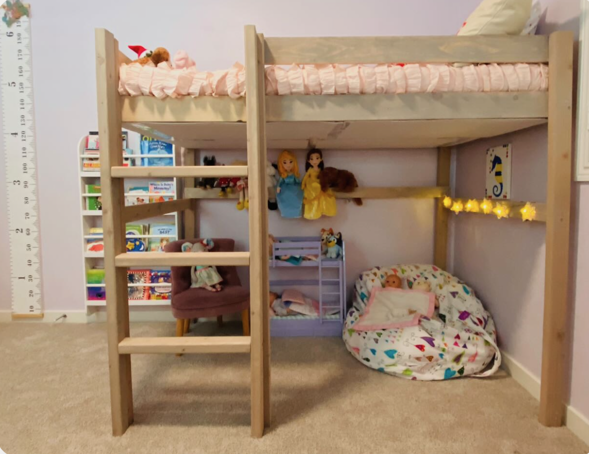
Built from Plan(s)
Built this loft bed for my girls playroom! They love it.

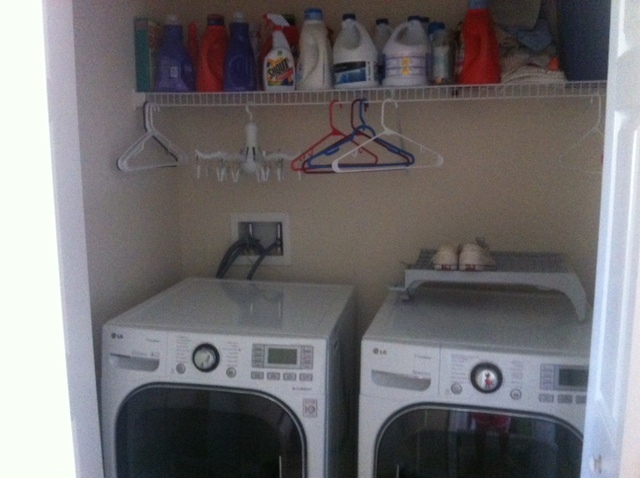
Laundry closet makeover. I was tired of having only the one wire shelf to store laundry supplies. So I added a cabinet, hanging rod, and counter-top over the washer/dryer for folding clothes. Also, behind the curtain on the left is a built-in garbage can for lit. Recovered small ironing board in same fabric as curtain and hung it up so save space.


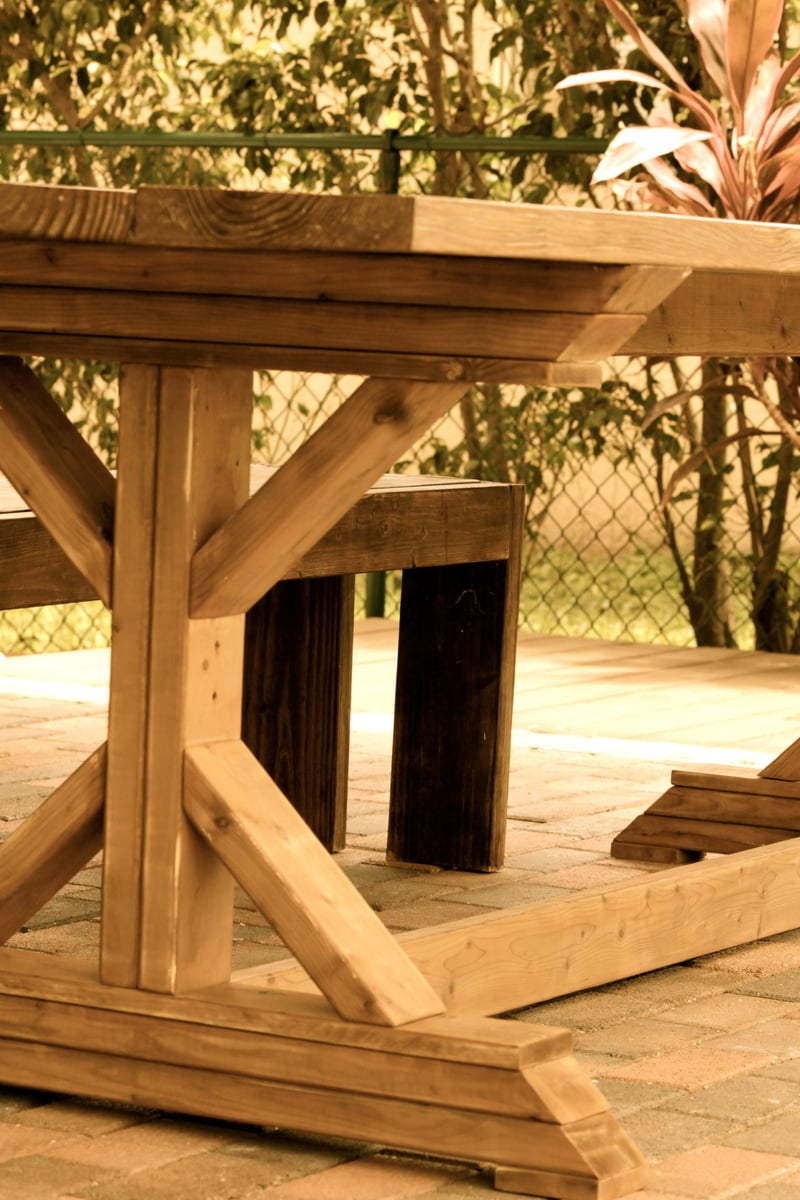
I built this for my wife for an anniversary present. She had wanted a garden bench for some time but the ones that she wanted were between $500-$700 which is ridiculous for this type of bench. So, I did a search on here for garden benches but there weren't really any plans for them and the few brag plans were not really the type of bench I was looking for. I printed off a few pictures of benches that I liked and got to work. The front and back legs a 2x6 and a 1x6 glued together and then cut to be straight. I wanted something thicker then just a plain old 2x6. If I had to do this again though, I would have just glued 3 1X6's together. The reason being, is that 1x6's usually do not have a rounded edge and a 2X6 does. So needless to say when you glue them together you have a nice little gap on either side. Without a table saw to take this off, its pretty difficult to get a straight cut. But I ended up getting it right after sweating for a few hours in the garage. The bench stands 36 inches high, 48inches wide and about 18 inches deep. The seat height is right at 18in also.
In the unfinished pictures I actually had the depth being 24 inches. After sitting on it though it was just way to deep. So I pulled it apart, made the adjustments and its now much more comfortable to sit in.
If anyone has any questions or wants more details feel free to drop me a line!
Thanks!


Fri, 06/19/2015 - 13:32
Yes I think thats what they came out to be. yes the cross pieces are 2x4 and the slats are 1x4's

In reply to back legs by smz1919
Fri, 06/19/2015 - 13:34
I glued a 2x6 and a 1x6 together to get the thickness. Now that i have a table saw and a jointer this entire process would have been much easier but after getting it to look like one solid piece i just outlined the slant i wanted and cut it using a jig saw.
Fri, 06/19/2015 - 20:17
So the back slats are just glued in place right? I wonder if it would be easier to use a biscuit joiner or not
Sun, 10/23/2016 - 17:46
Wed, 05/26/2021 - 08:32
Hi Nathan
Love the look of the bench. Would you have a list of material requirements. I intend to make a bench like this and would like to know the measurements of the top back spar (the shaped one).
Here in the Uk our timber yards do not always supply the same cuts as the US so I need to have some idea of the pieces I need
Many thanks
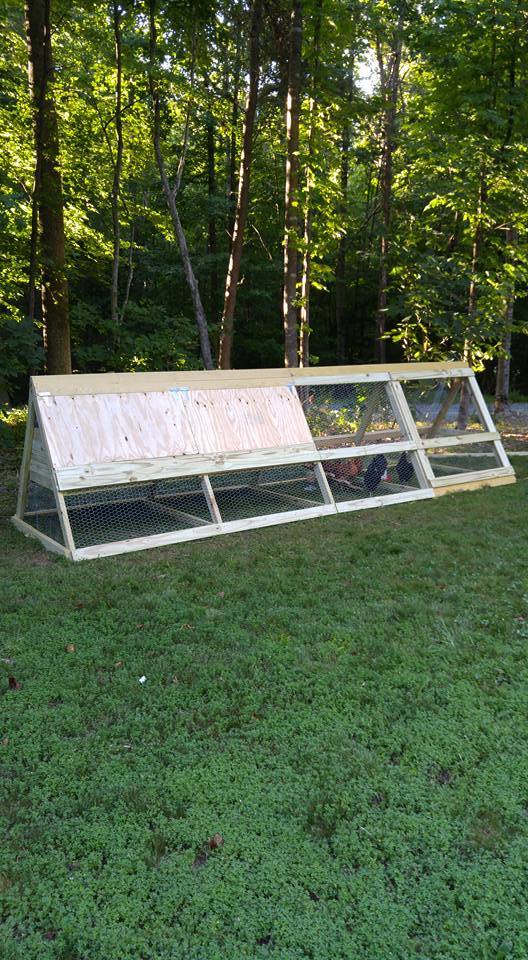
We wanted our chickens to have plenty of room for when we ere not home and could not let them free range in the yard. One of the six was a rooster-- and long story-- but we don't have him any more-- so 5 chickens now enjoy this coop/run. It cost about $300 in supplies. It is 16 feet long.
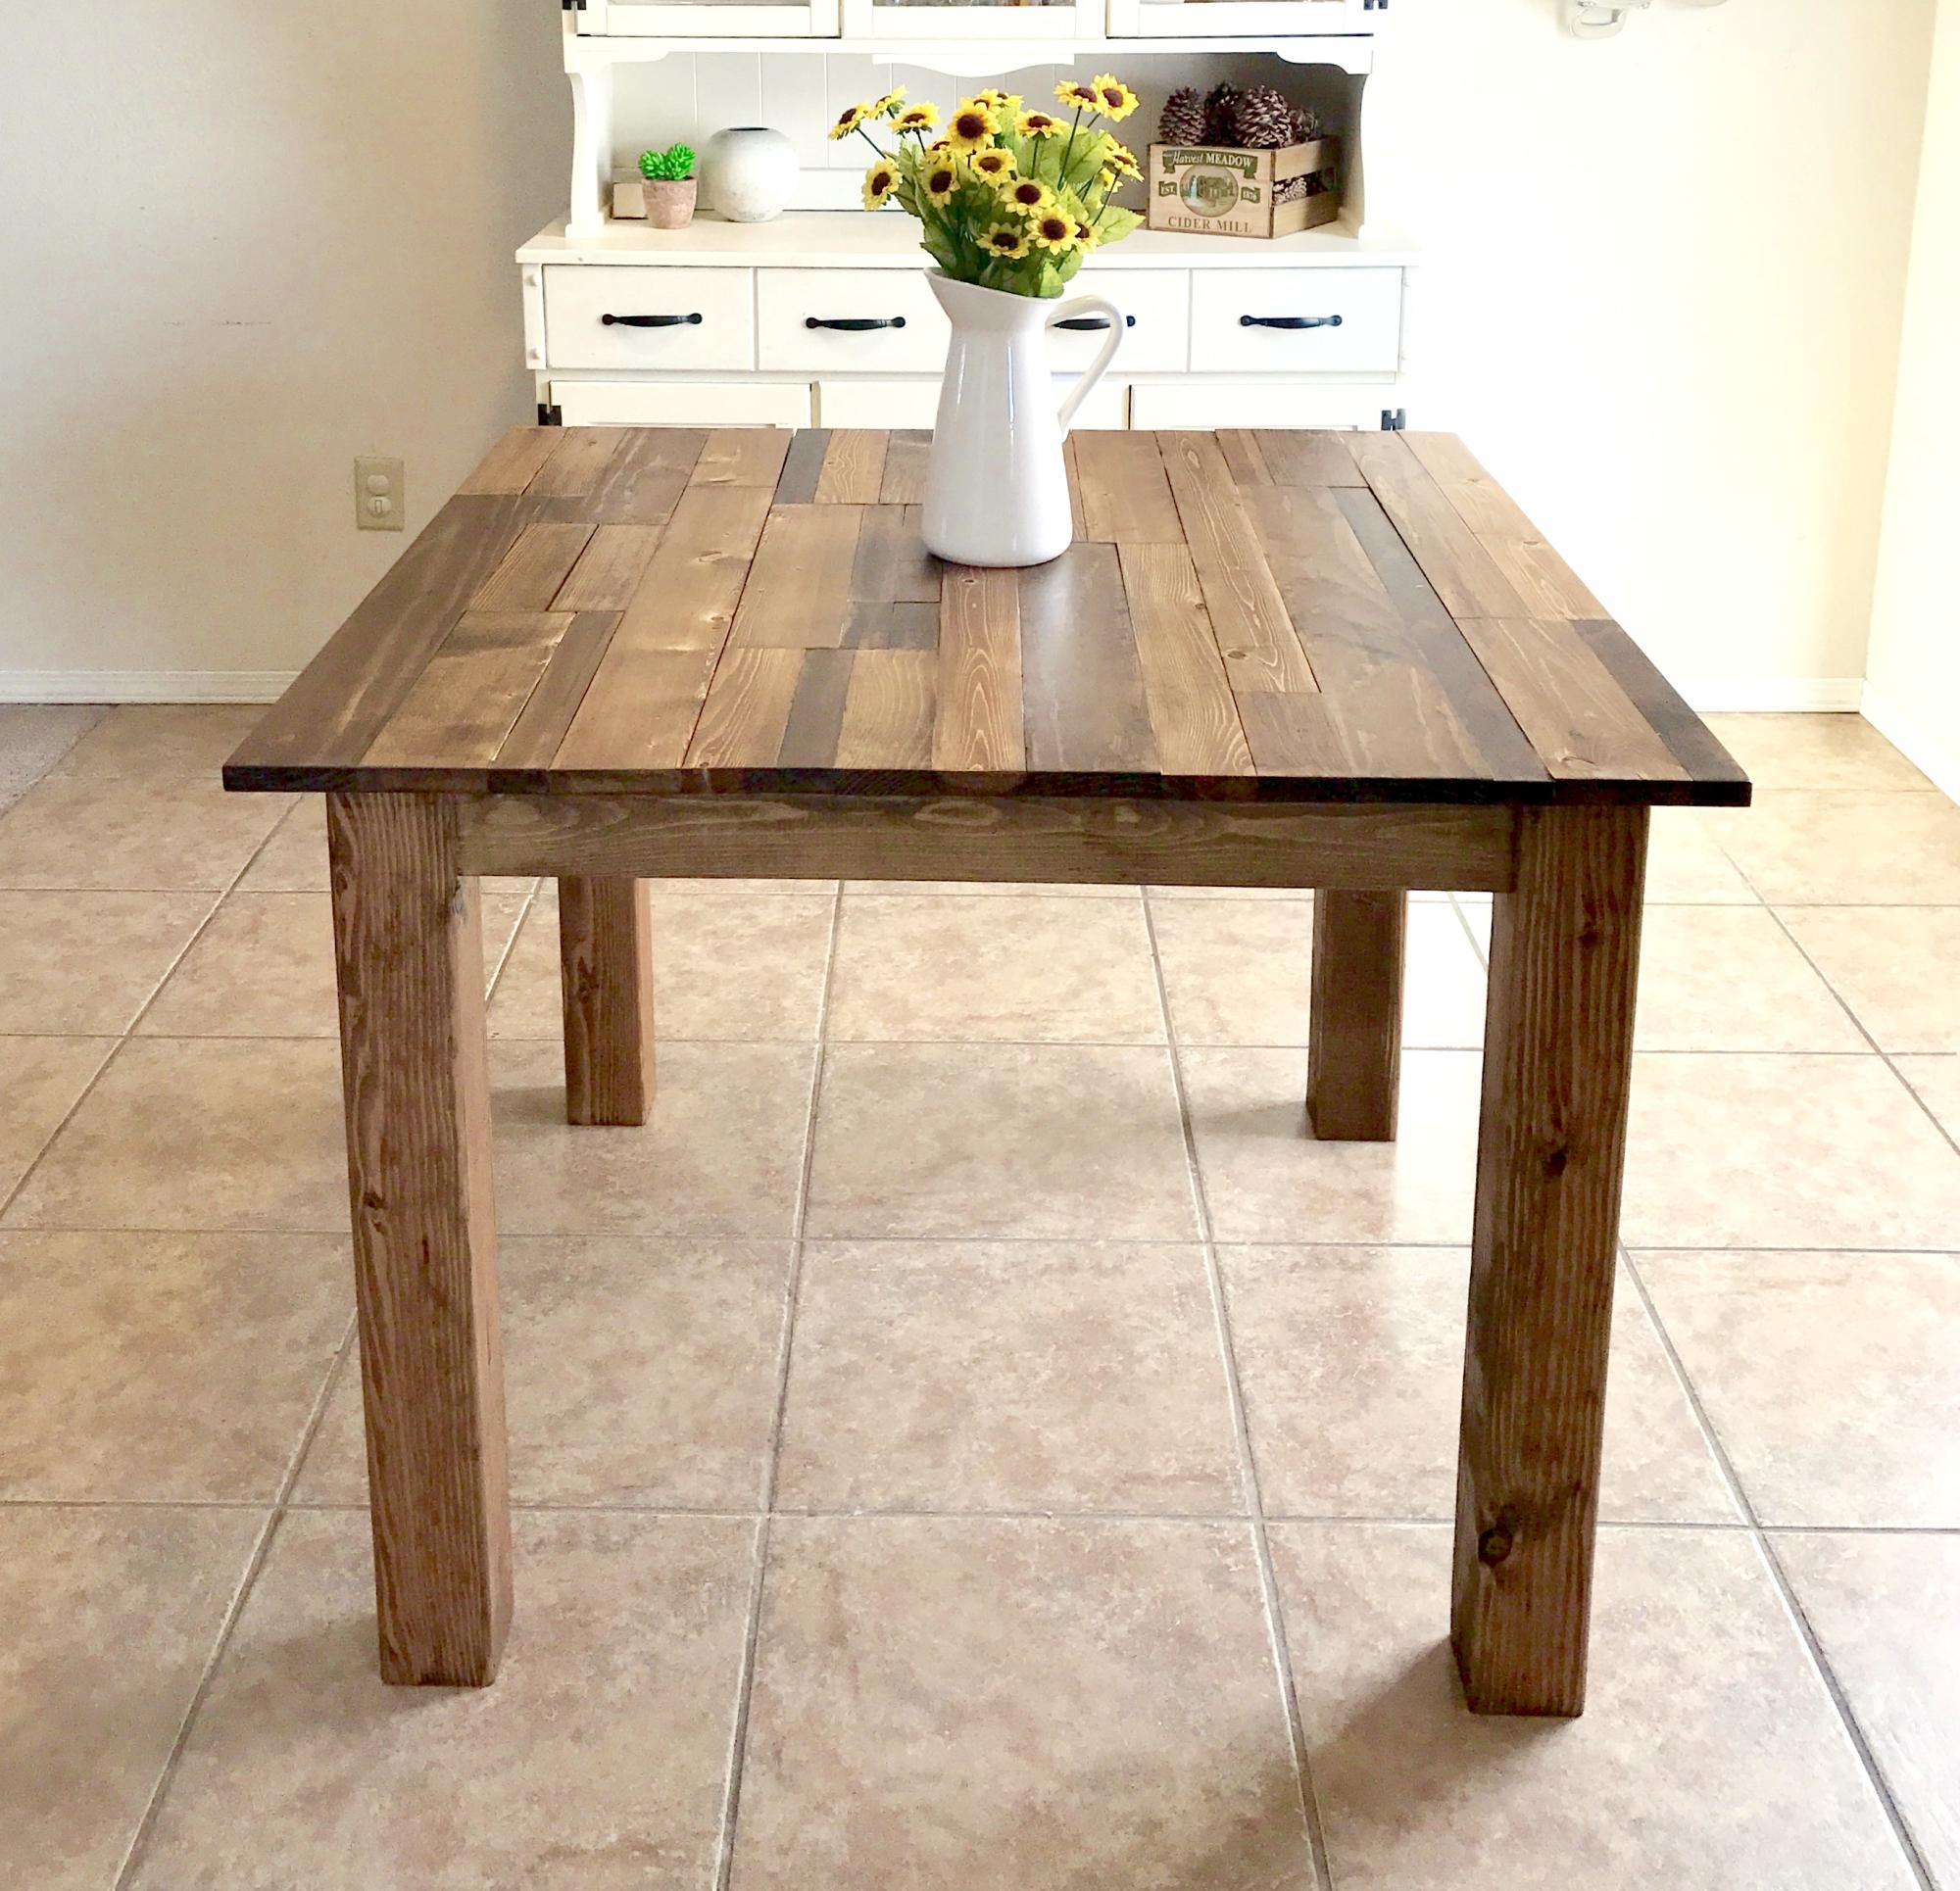
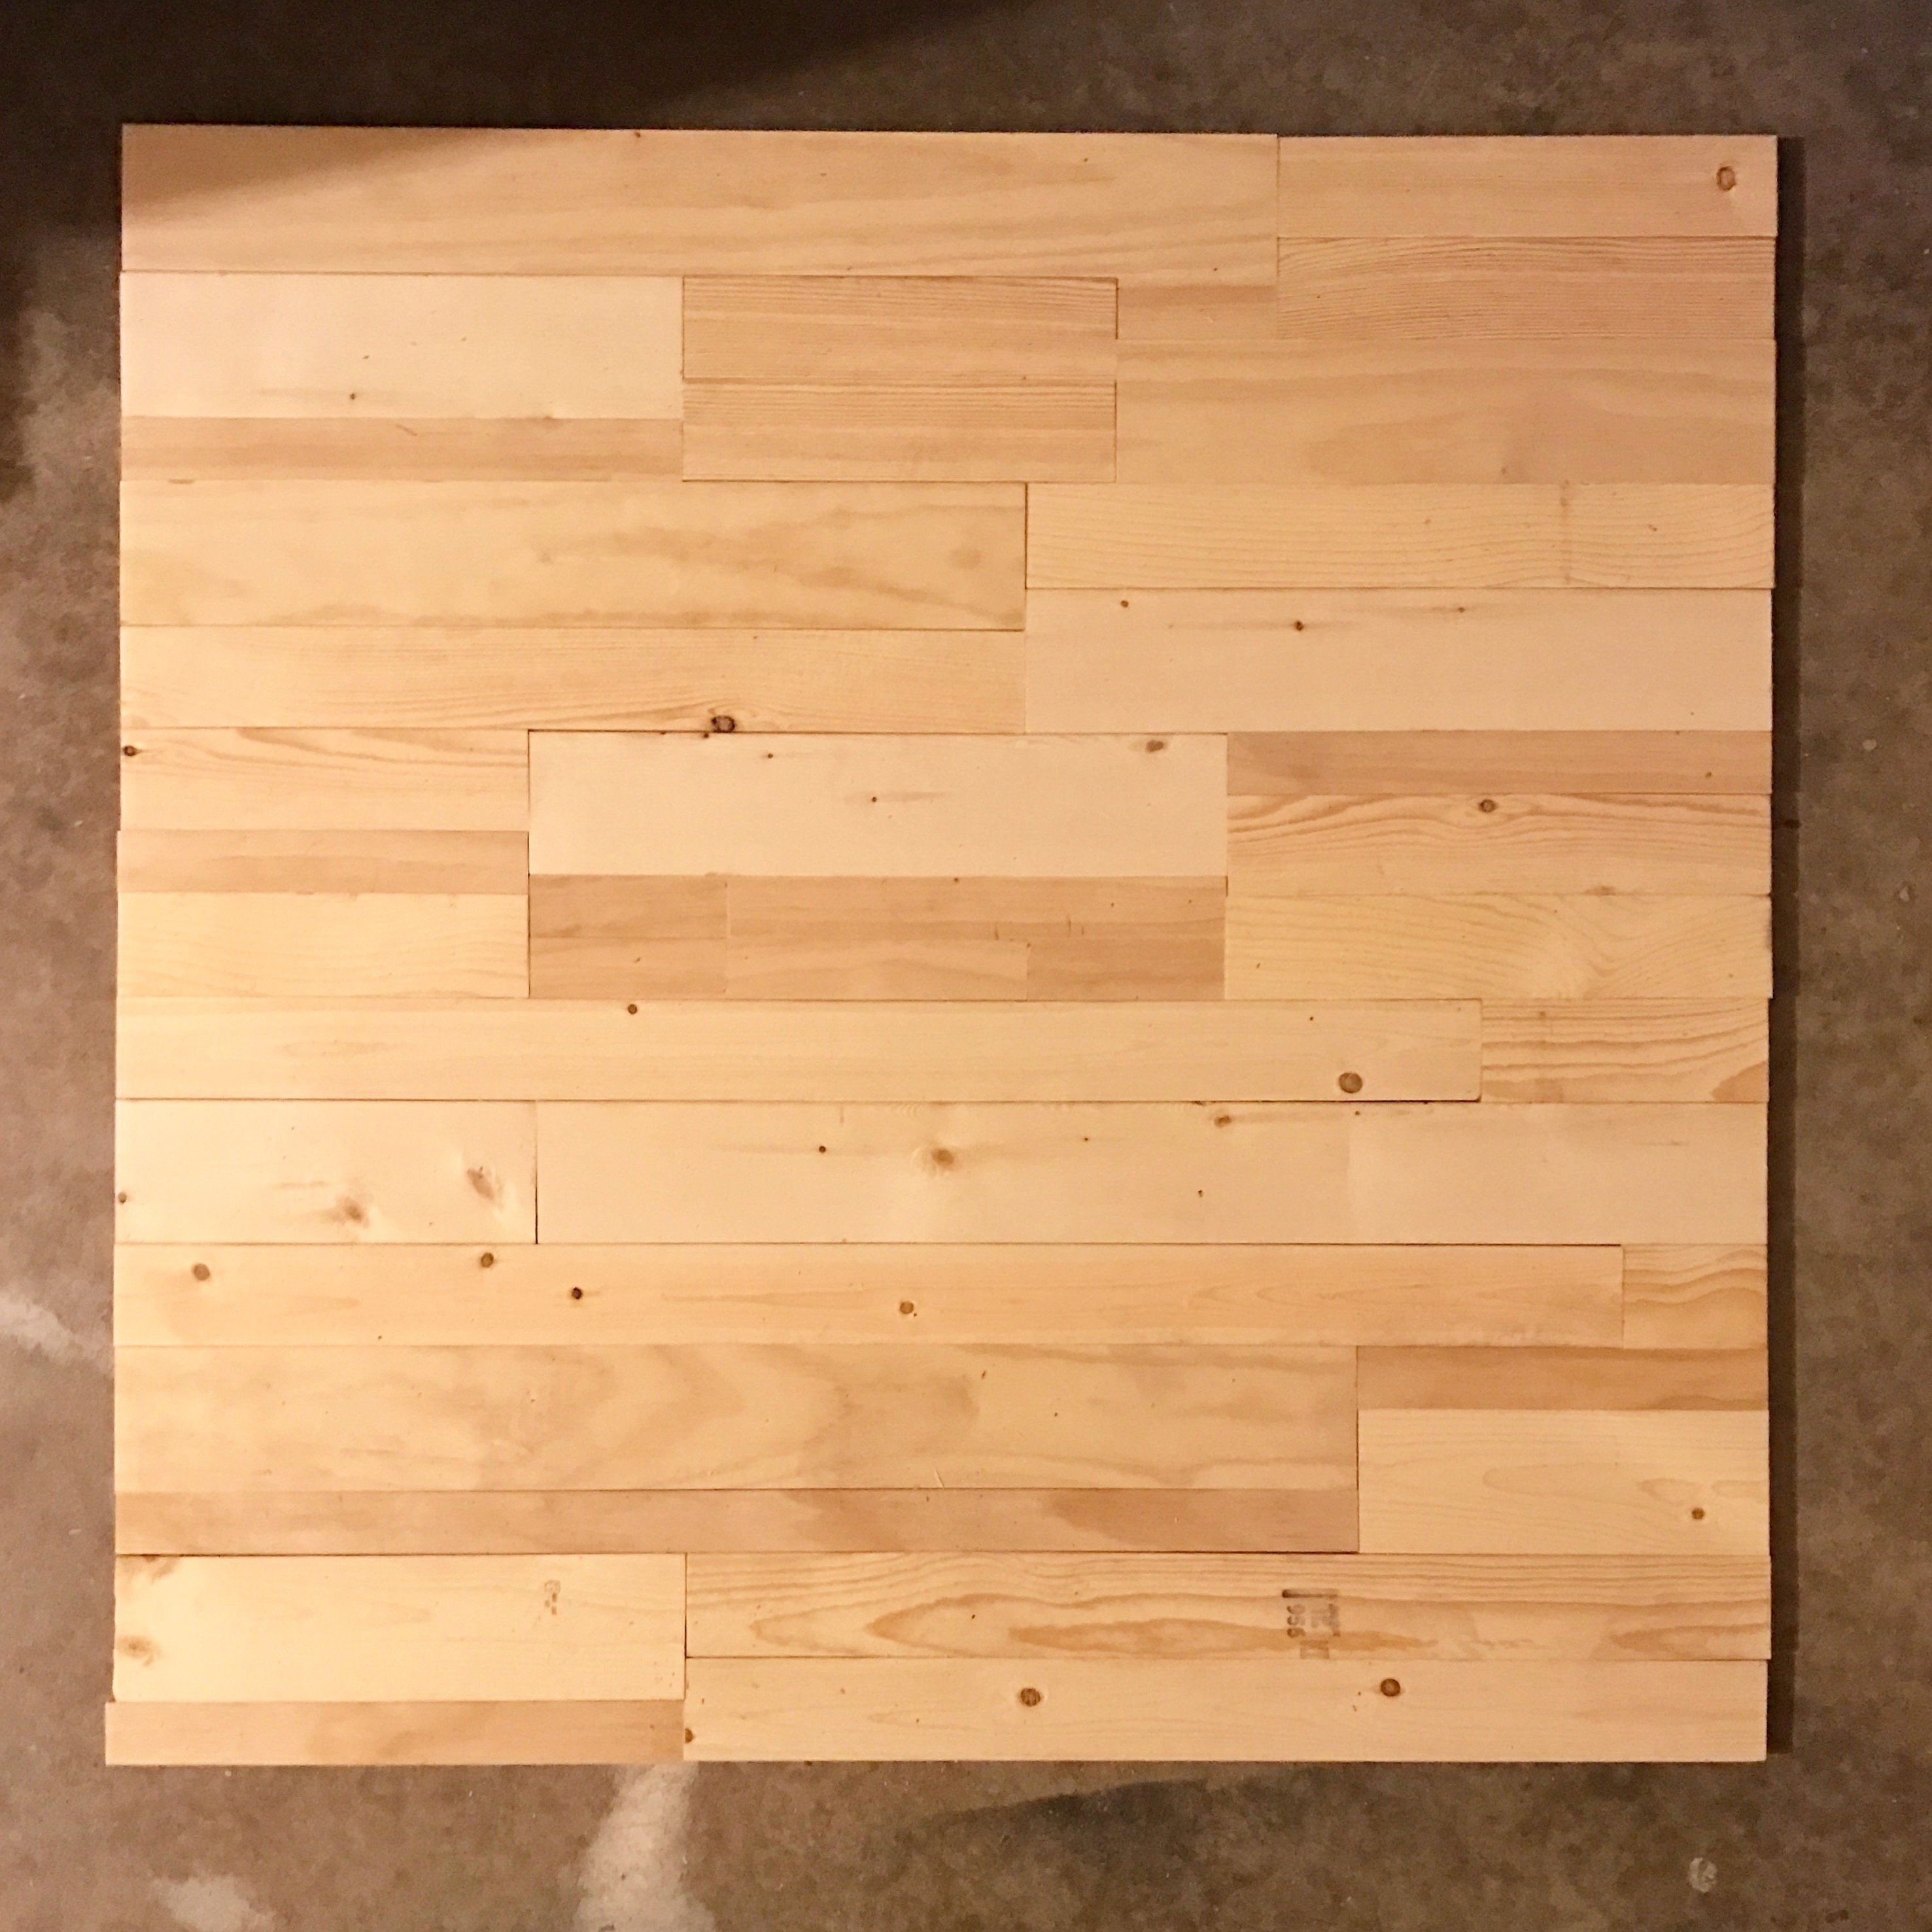
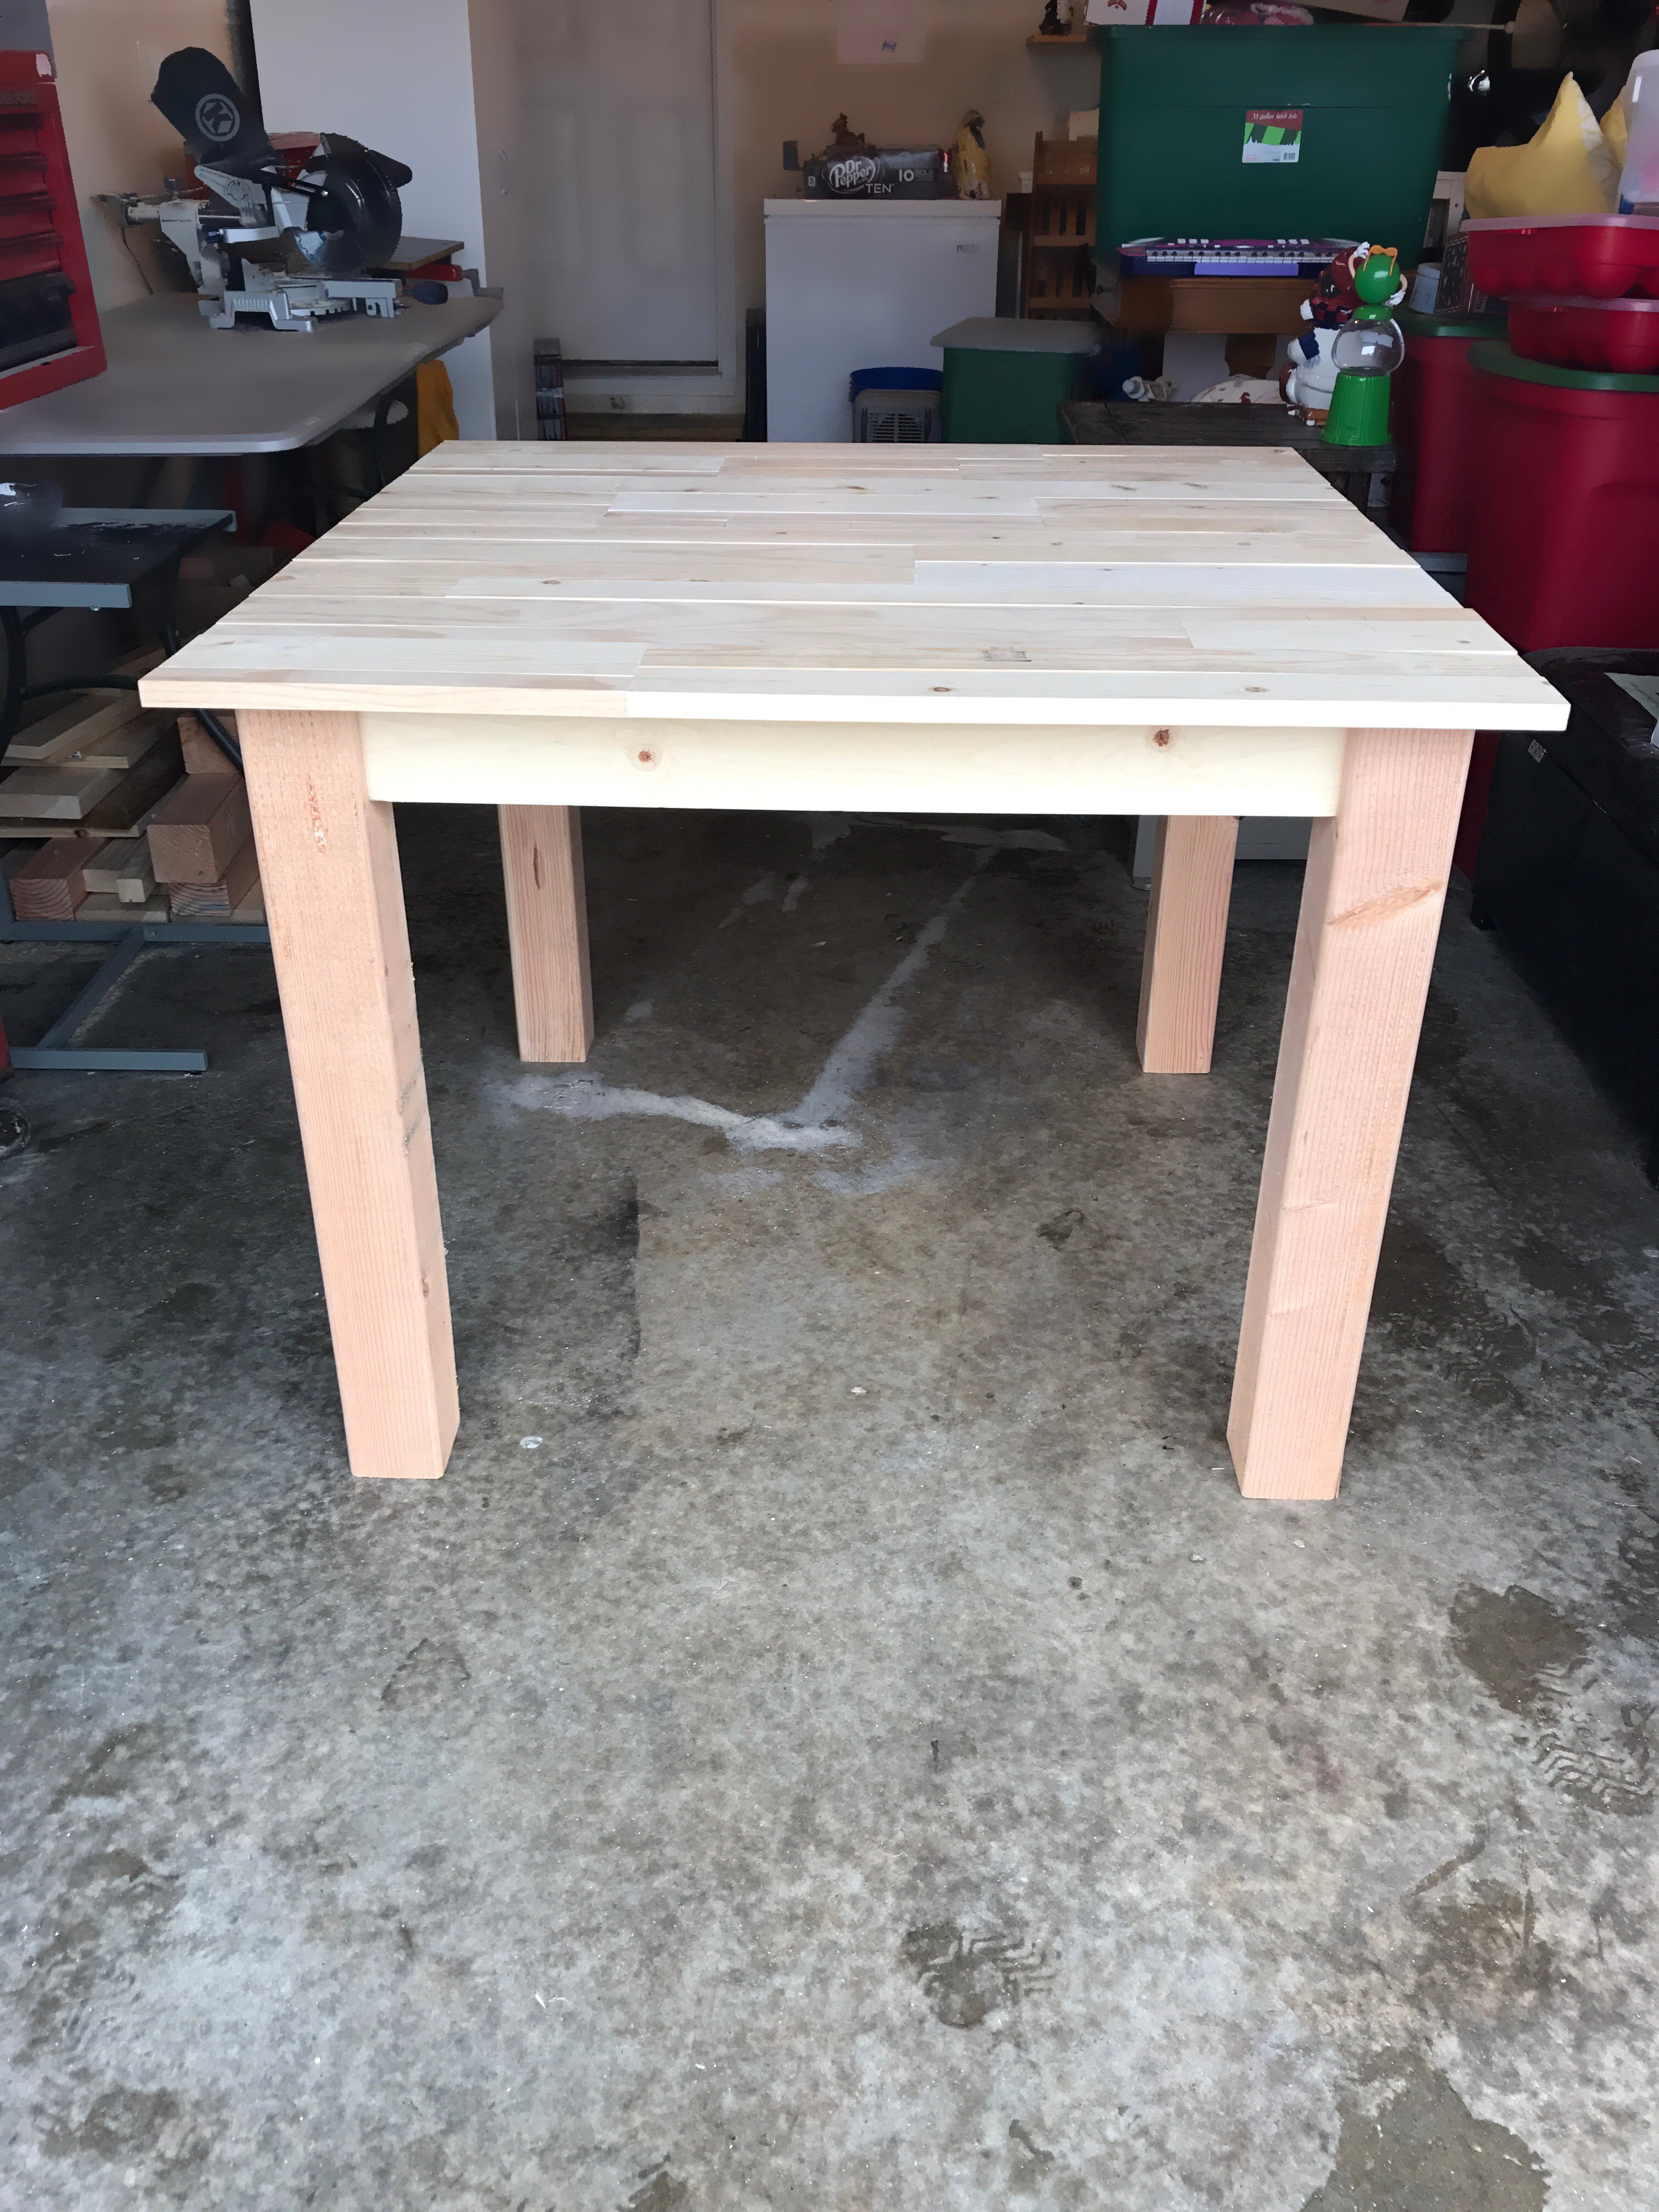
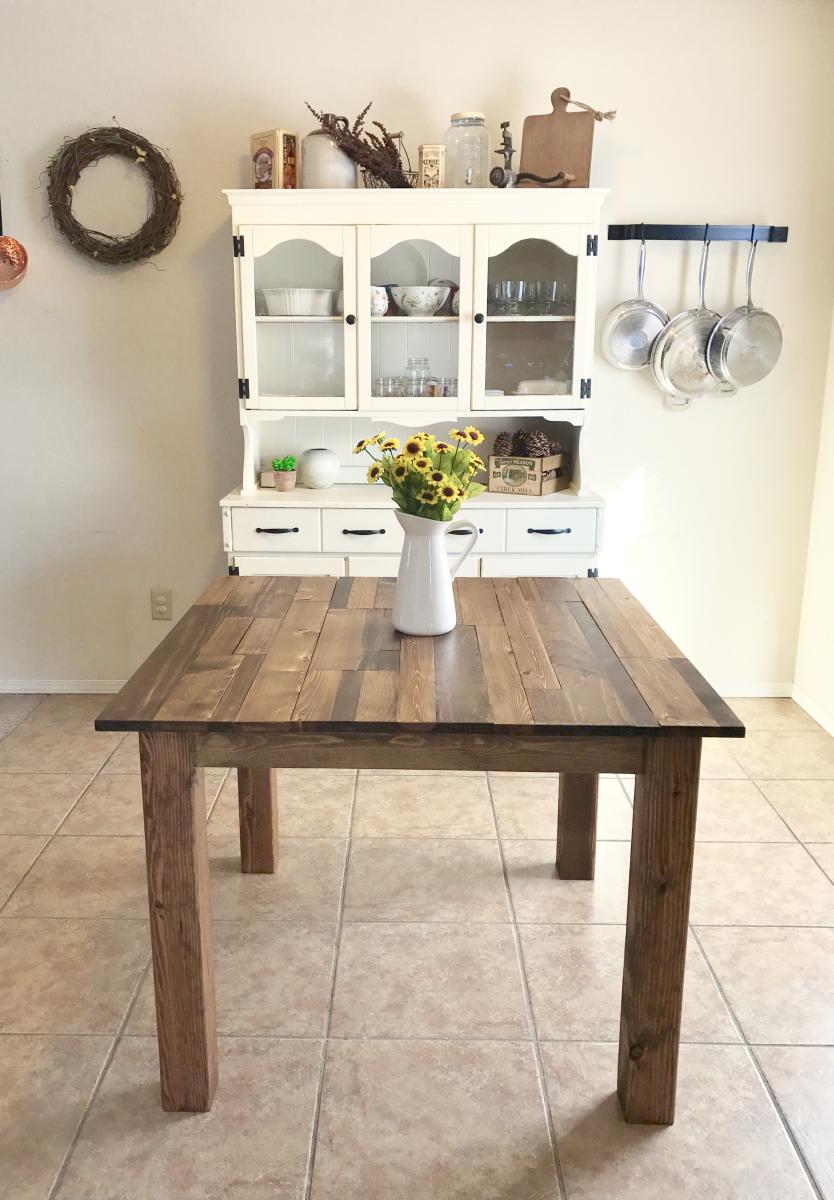
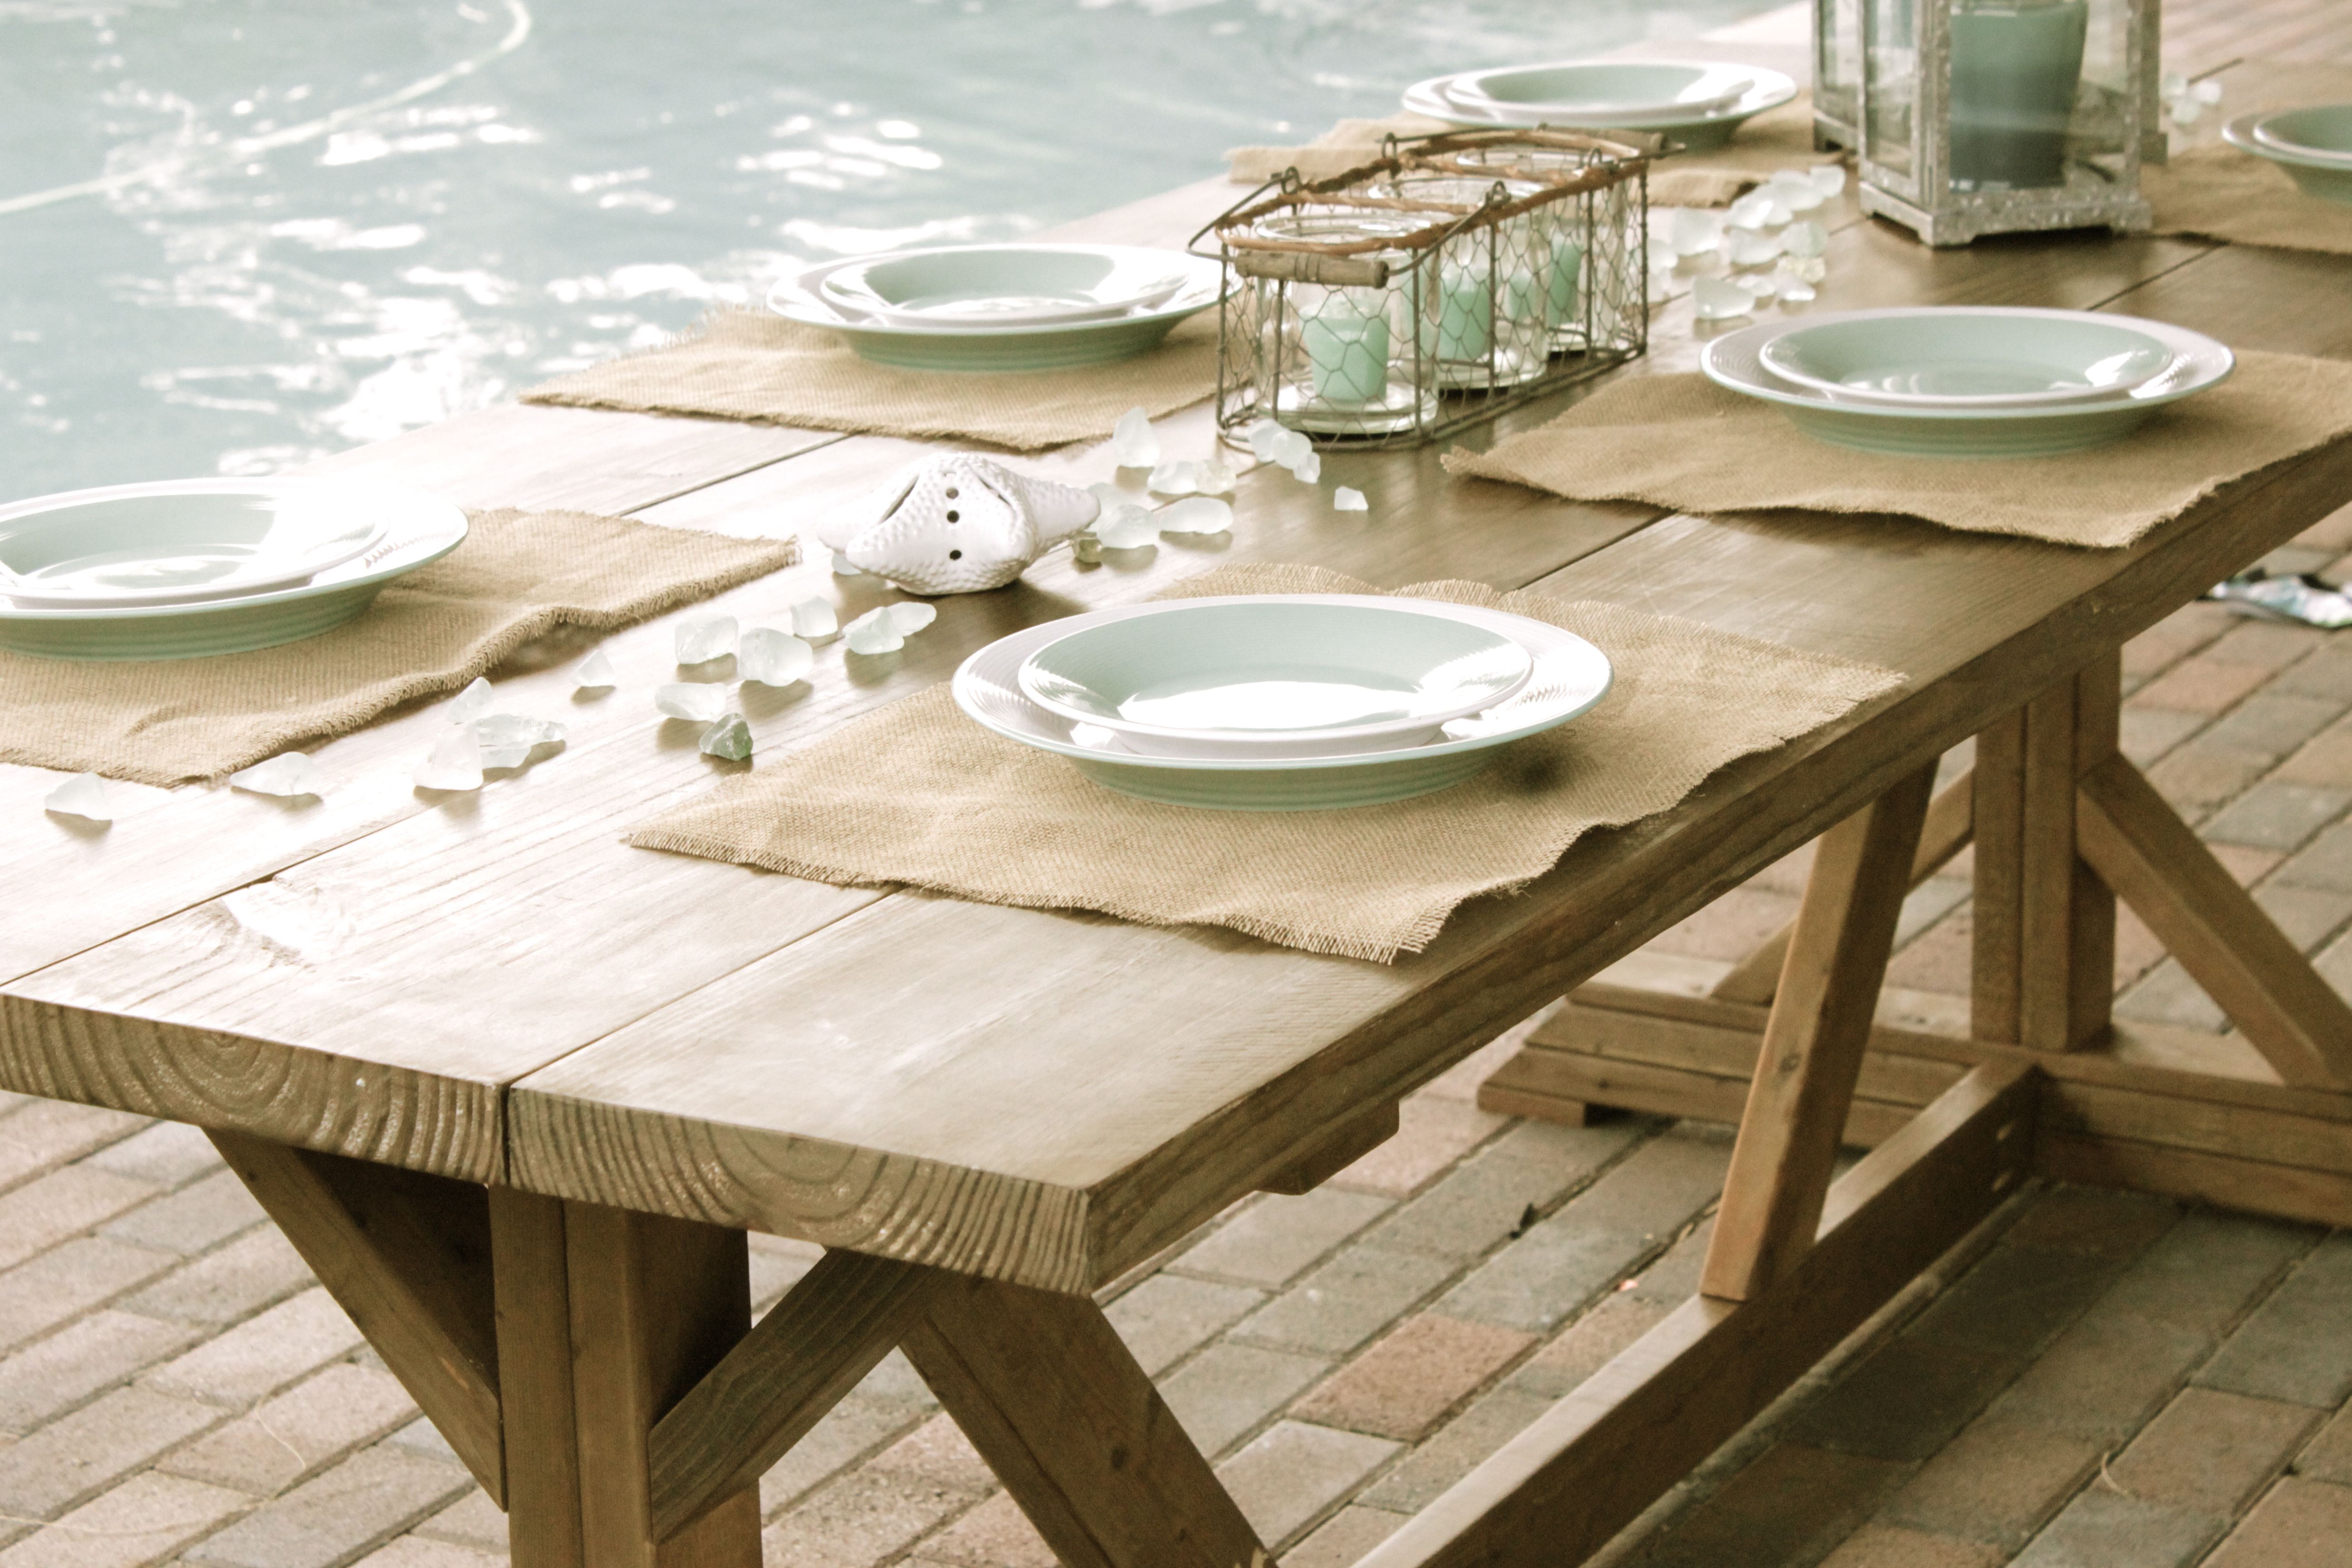
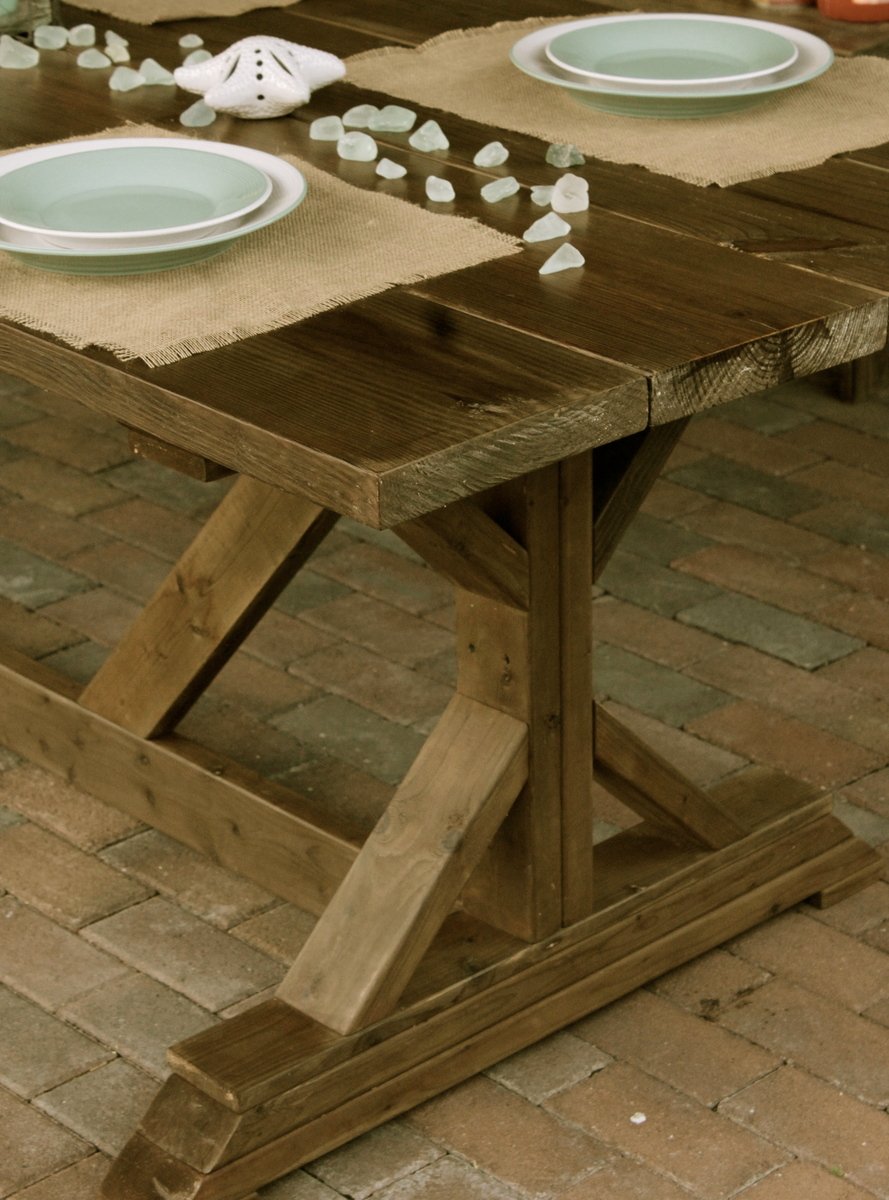
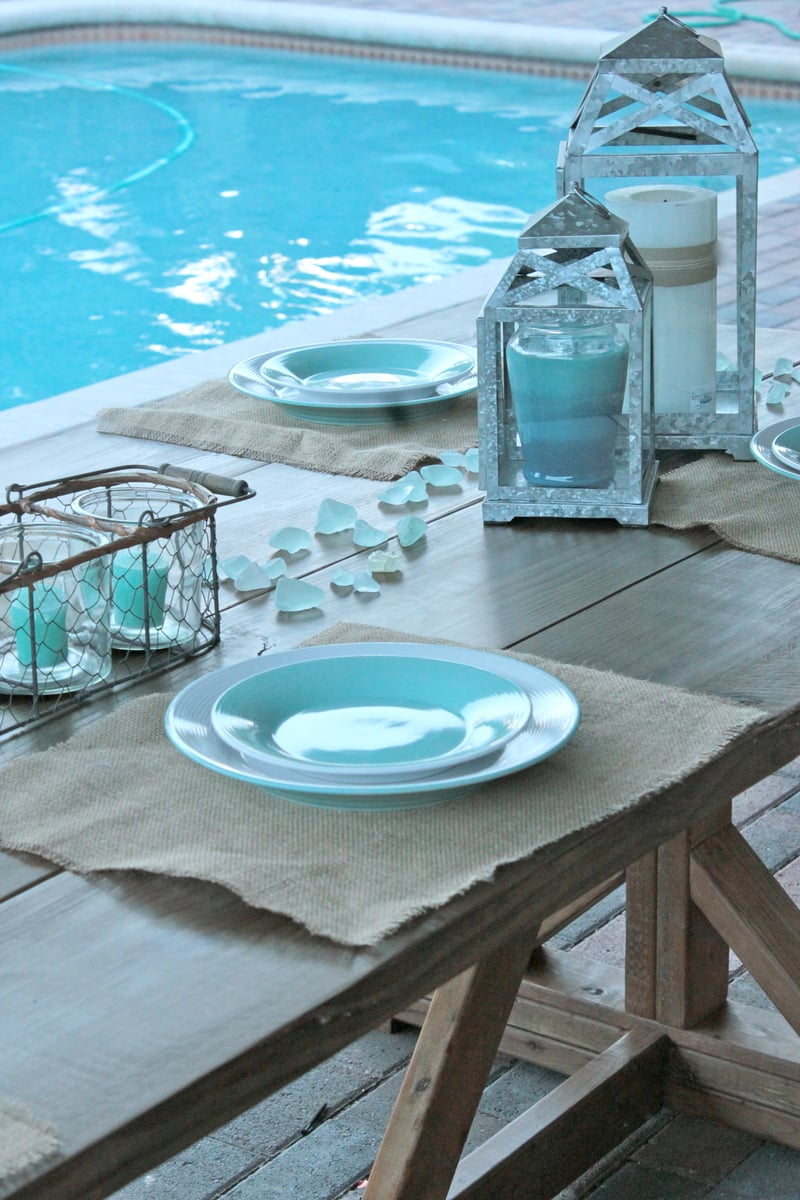
I built this table for a friend who wanted a rustic, plank-top kitchen table. She wanted a square table with 4x4 legs. Since I don't have clamps, I used pocket holes and wood glue for the table top. Also, I only have a 7&1/4" miter saw, which means the 4x4s were too thick to cut. So I made one cut in the legs, then flipped them and made another. It worked! :) I sanded down the sides of the table top with 80 grit. They needed to be evened up since some of the planks were a little longer than others. I back braced underneathe the top with (3) 1x3s. Then, I sanded all over with 120, vacuumed, then wiped it down with a damp towel. Fun build!!
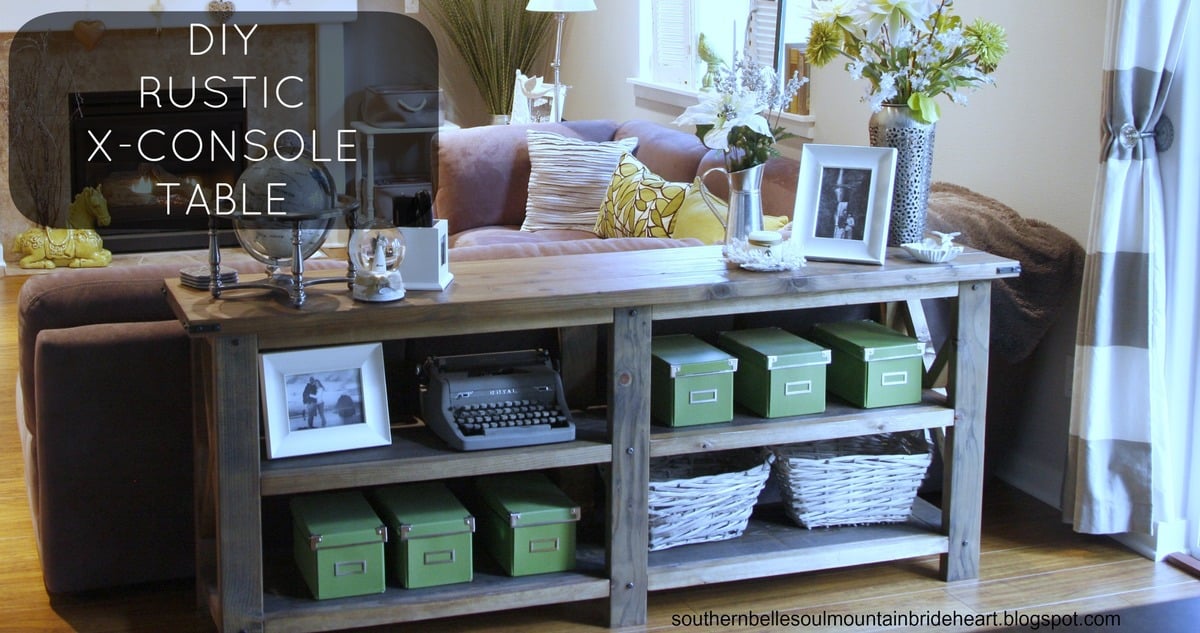
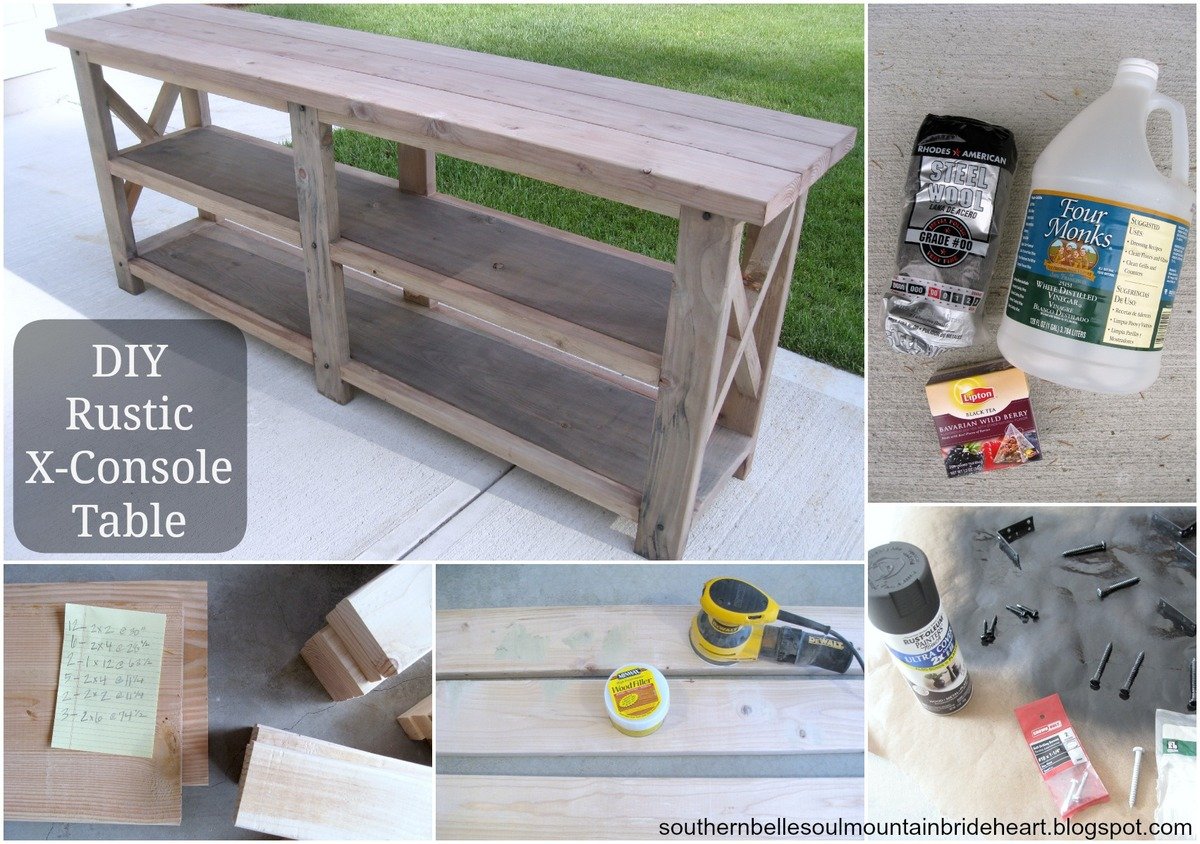
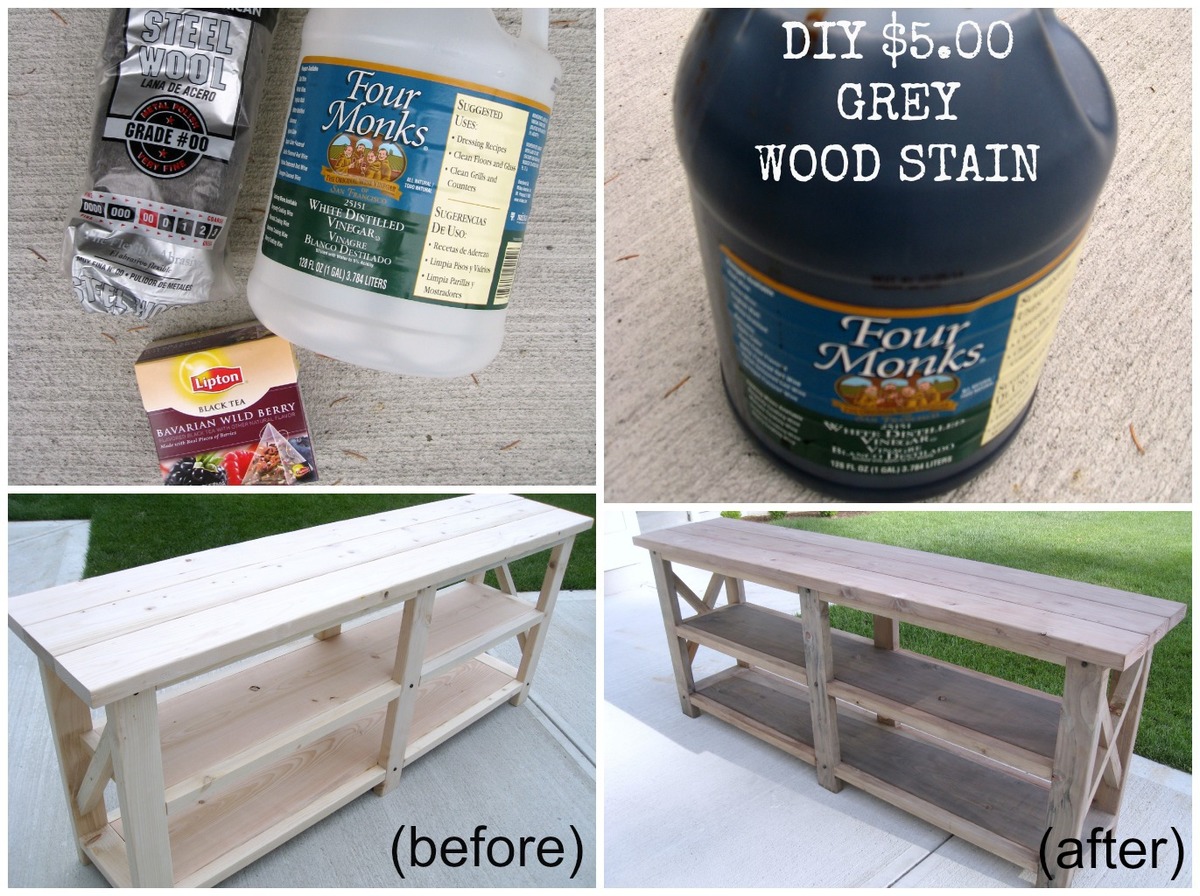
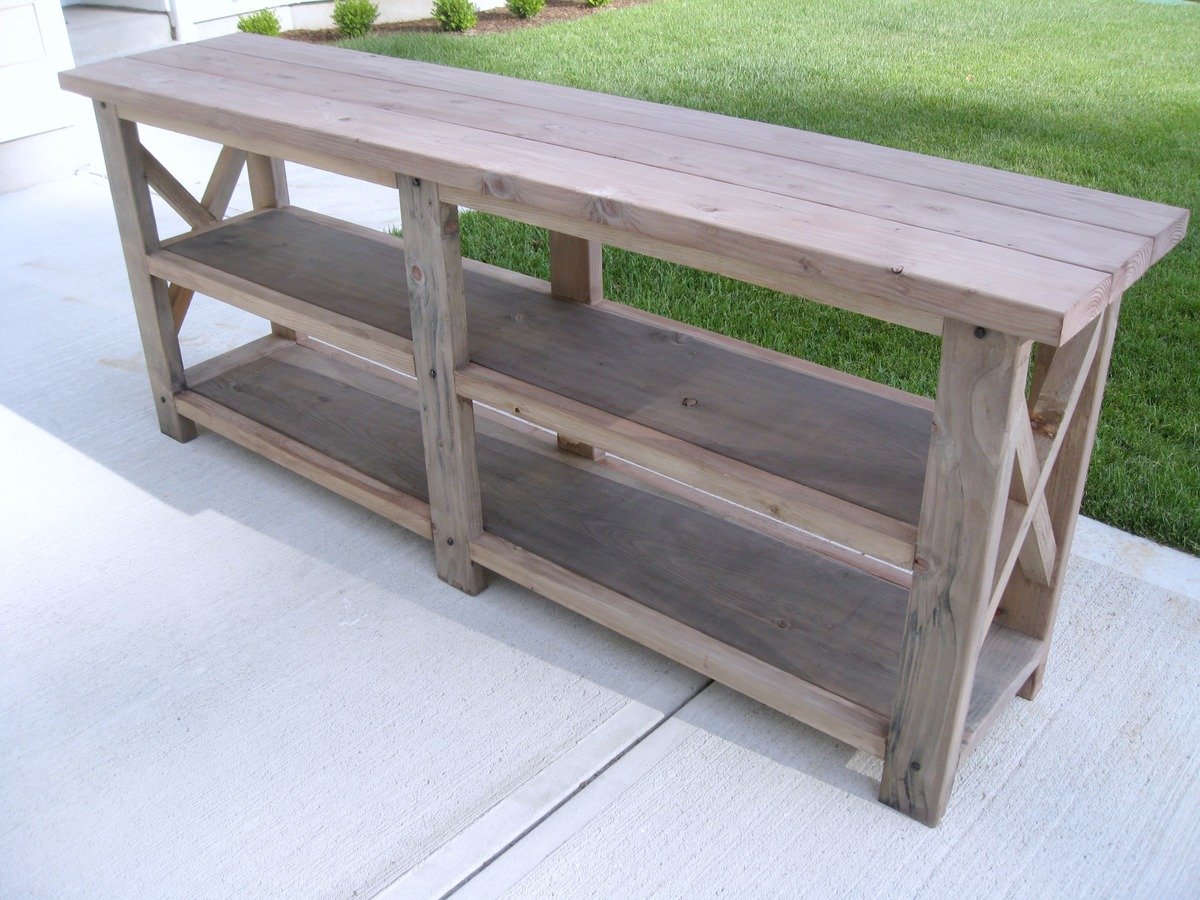
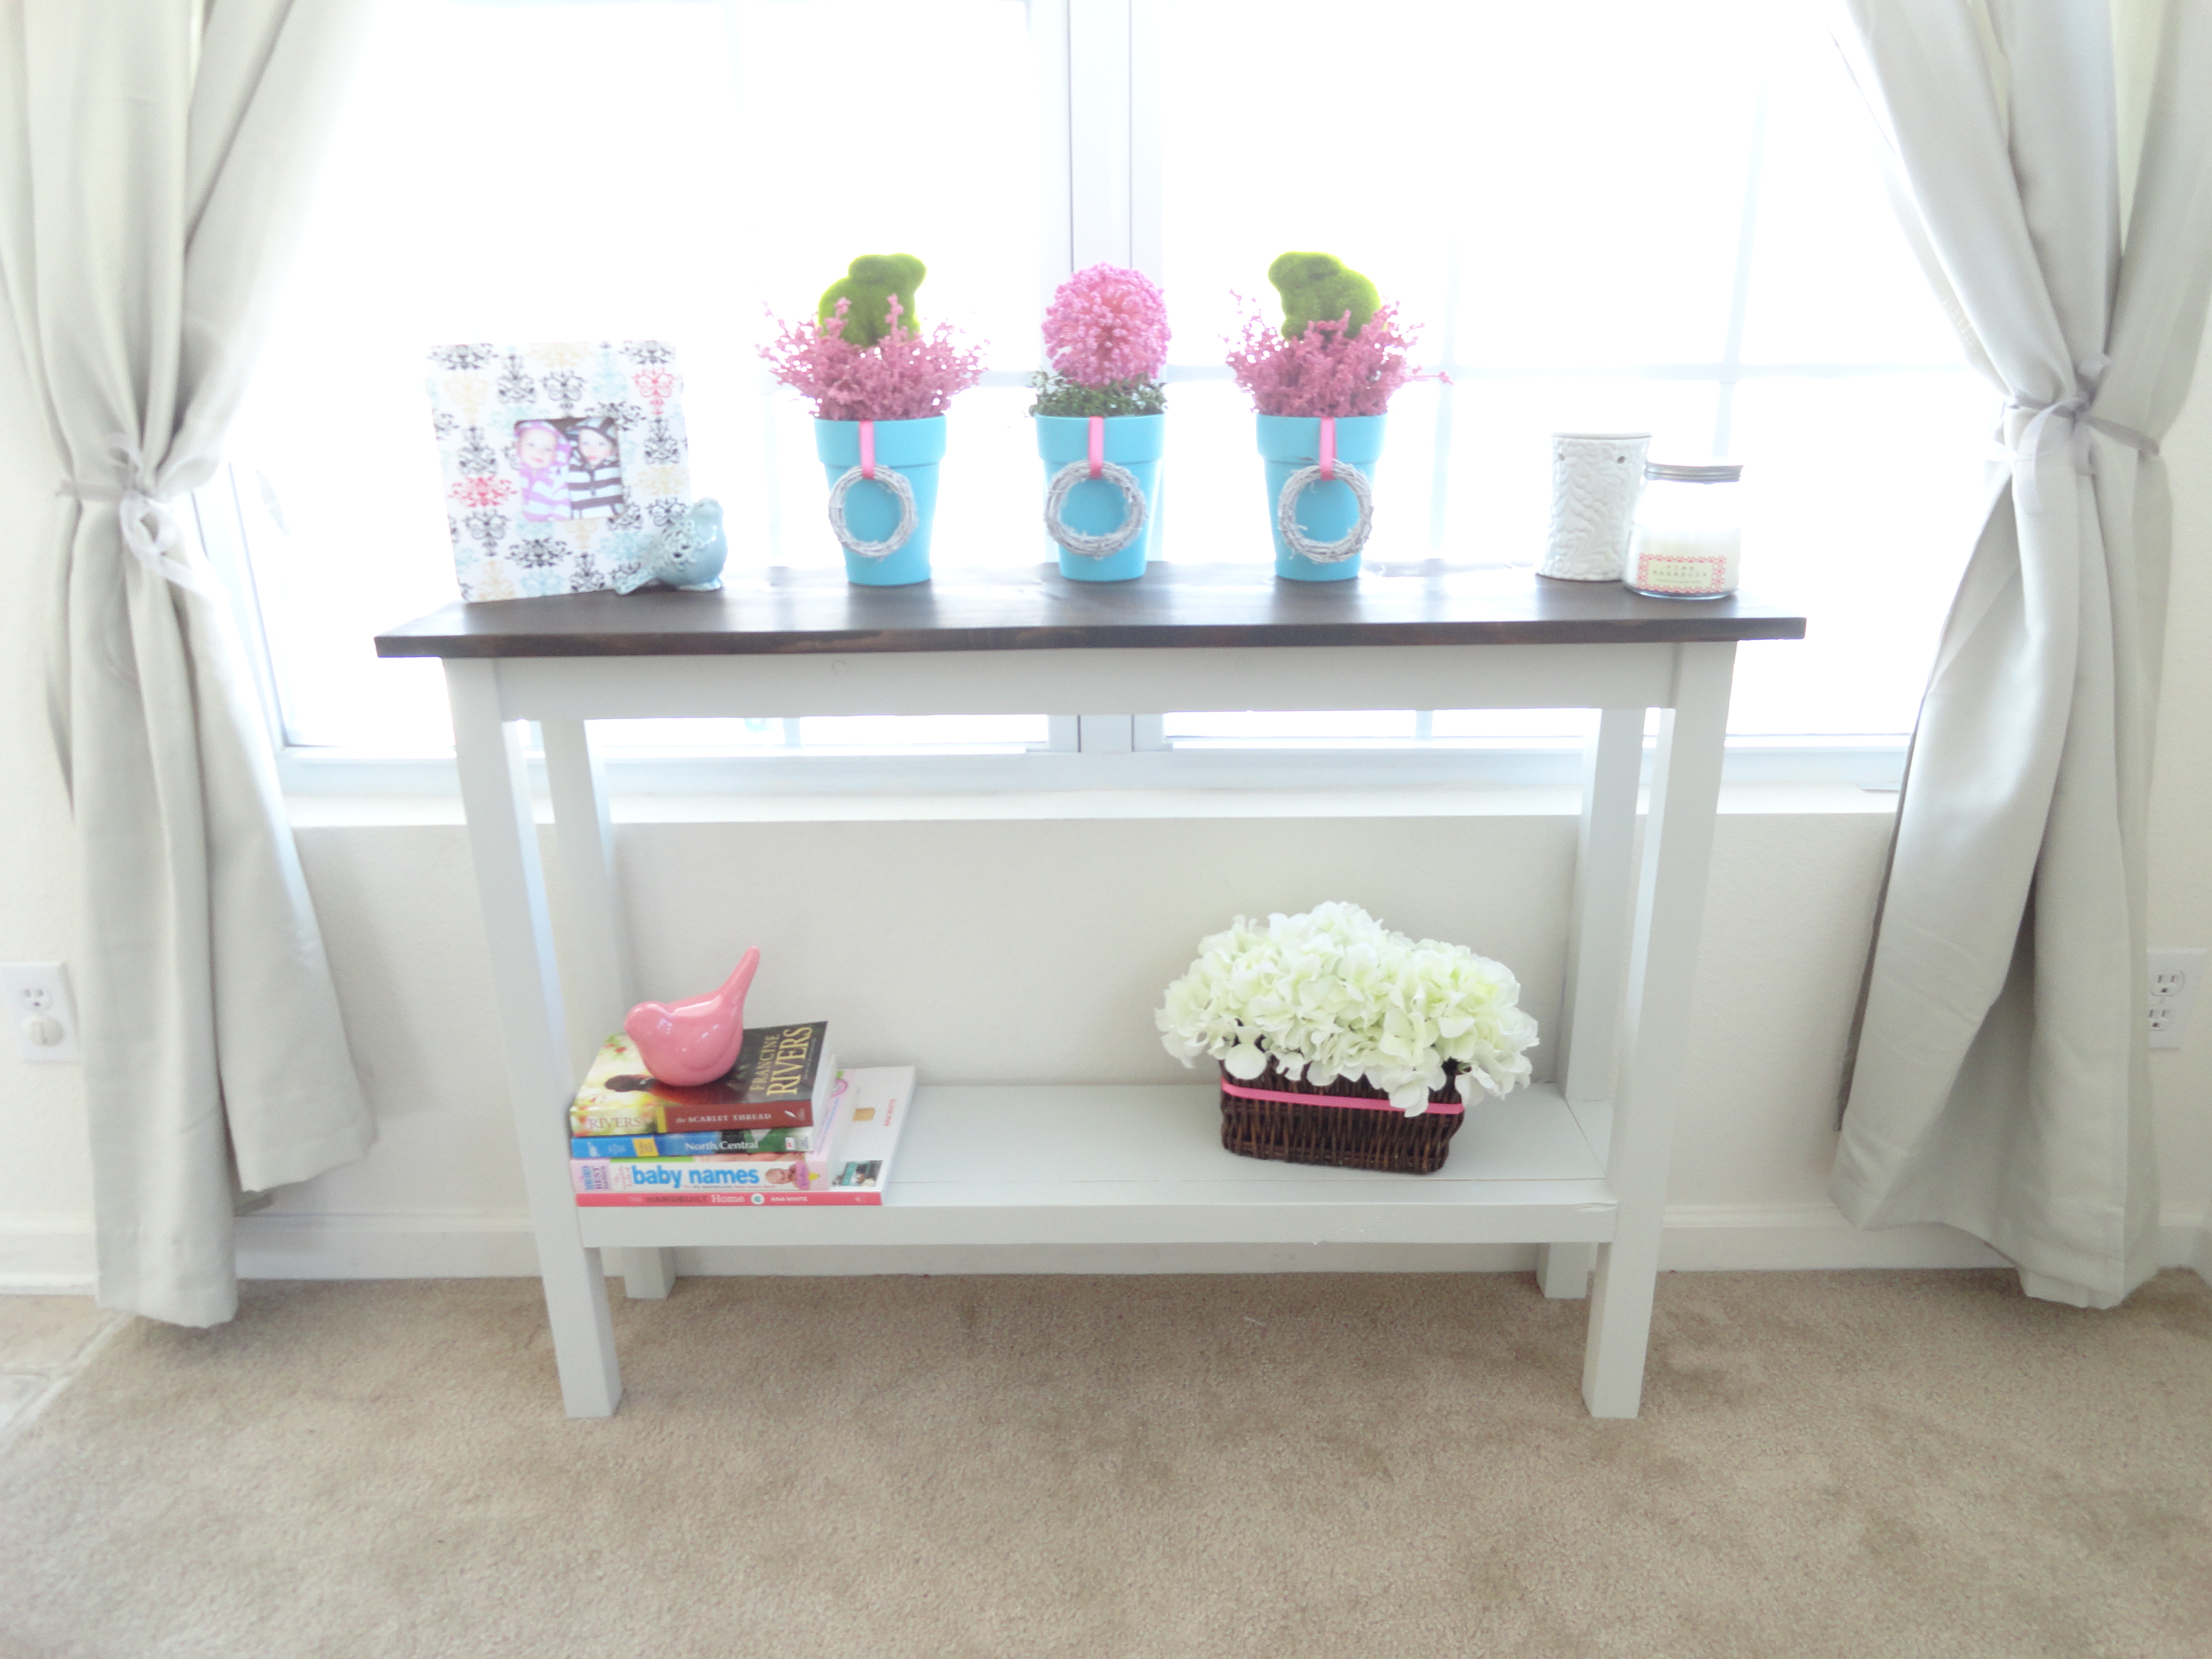
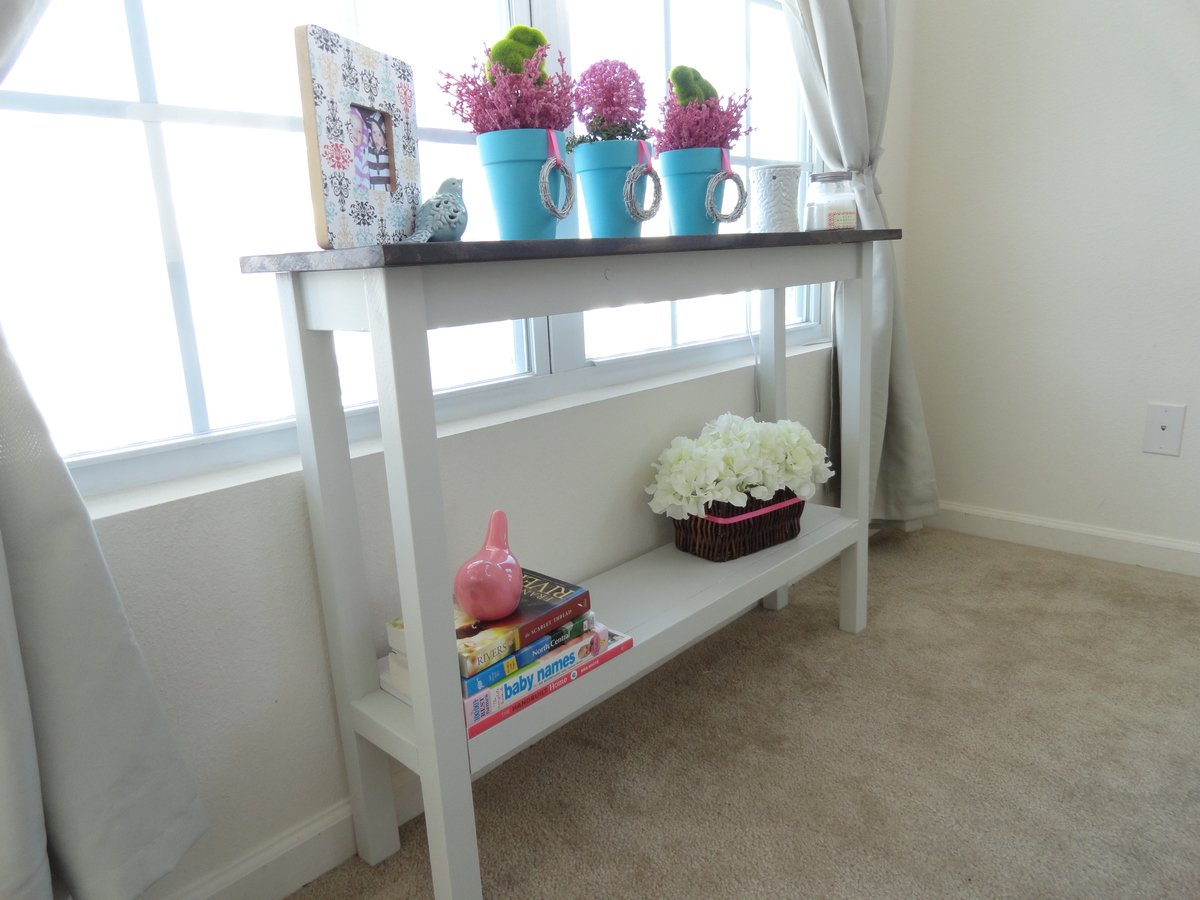
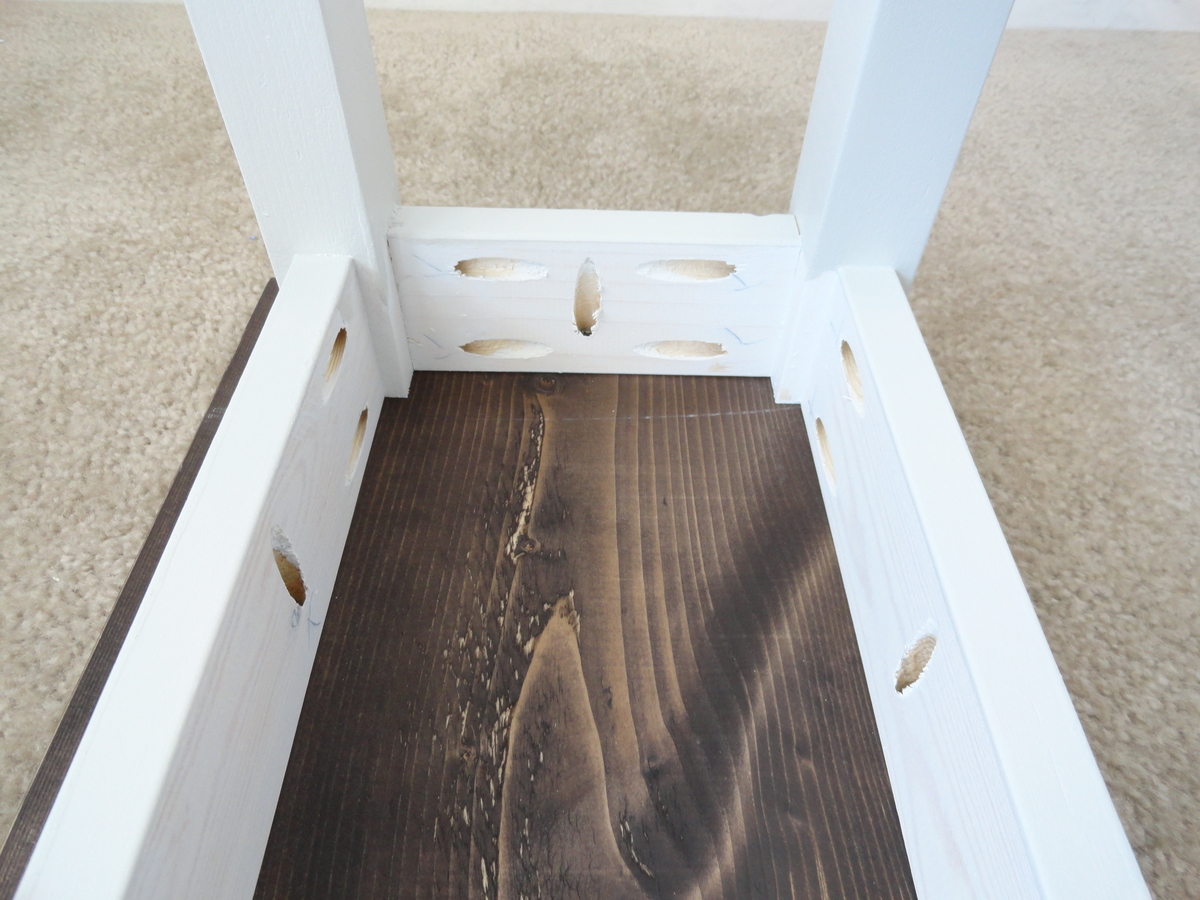
There was a large hole in our living room. A large hole between our couch and the kitchen! I have always been obsessed with console tables, but never in a million years thought of ever building one!
And so, with the help of my sweet Blake, we were able to create this amazing, rustic, industrial, shabby chic, yadda yadda yadda PERFECT FARMHOUSE X-CONSOLE TABLE!!!
And no, we can't take all of the credit. We found this unbelievable plan on Ana White's Website here! She gives a perfect step-by-step-tutorial. All together, this project cost us roughly $75 and two days worth of time, but I can assure you, buying a solid wood console table at a store would cost nearly $500! Not to mention, WE made it, together...and so forever this will be ours. :)
Thanks Ana, we love ours! :)


This was an easy project to complete in an afternoon that does not require any advance woodworking skills


Wed, 11/26/2014 - 12:19
This project looks even better than mine! I love look with paint! Well done!
Wed, 12/10/2014 - 09:41
This is my second completed project with plans and ideas from your website. Thanks for your good work!
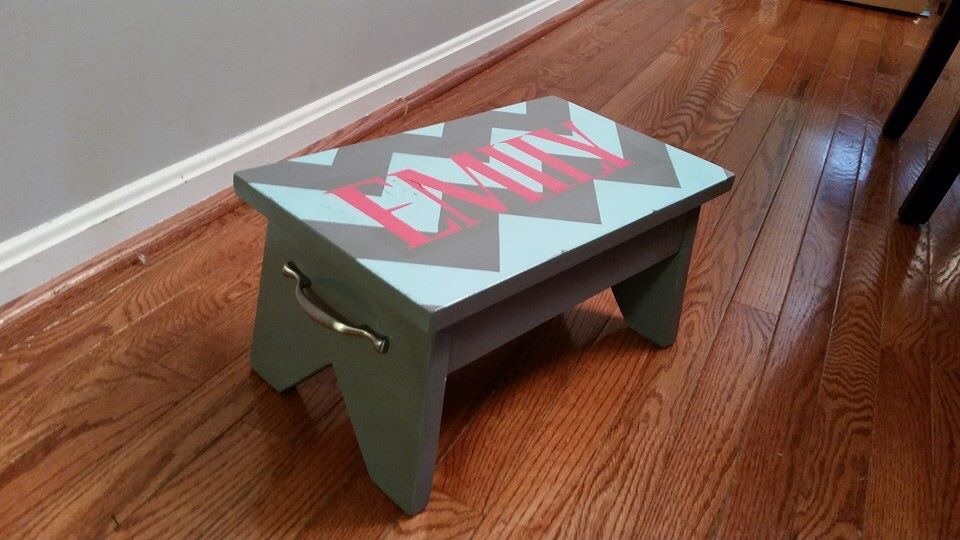
I built this stool for my niece's first birthday! It was super easy to build. The painting process was another story. In hindsight I should have just stained it but I wanted something fun and bright. I'm happy with how it turned out and I will definitely be making one for my nephew for his first birthday! Overall it took me about 2 hours to cut and put it together.
I built this table after seeing a similar one on your site. Mine is built with 2x2 legs, a shelf, and just one piece of 1x12 for the top. I was wanting something for in front of my window but this one is to small so I will eventually build a bigger one for in front of my window and move this one. Thanks for the inspiration!!

Mon, 01/31/2022 - 03:53
Would you have the plans/dimensions you used to build this table? It looks just the right size I need. Thank you!
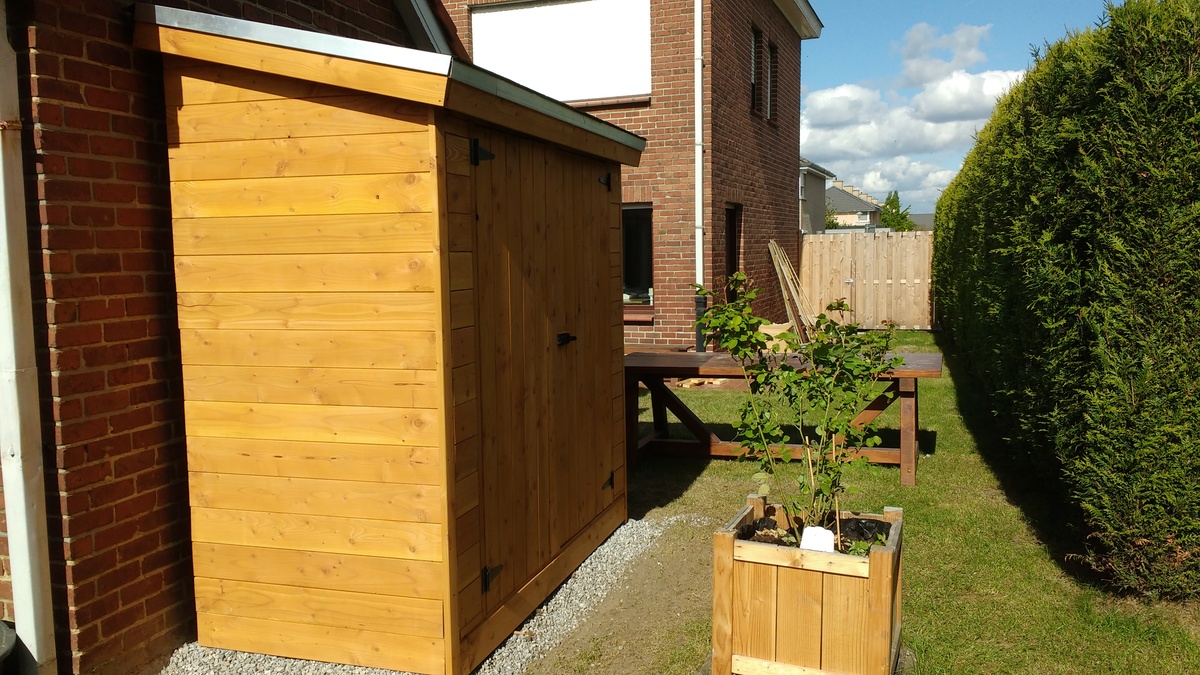
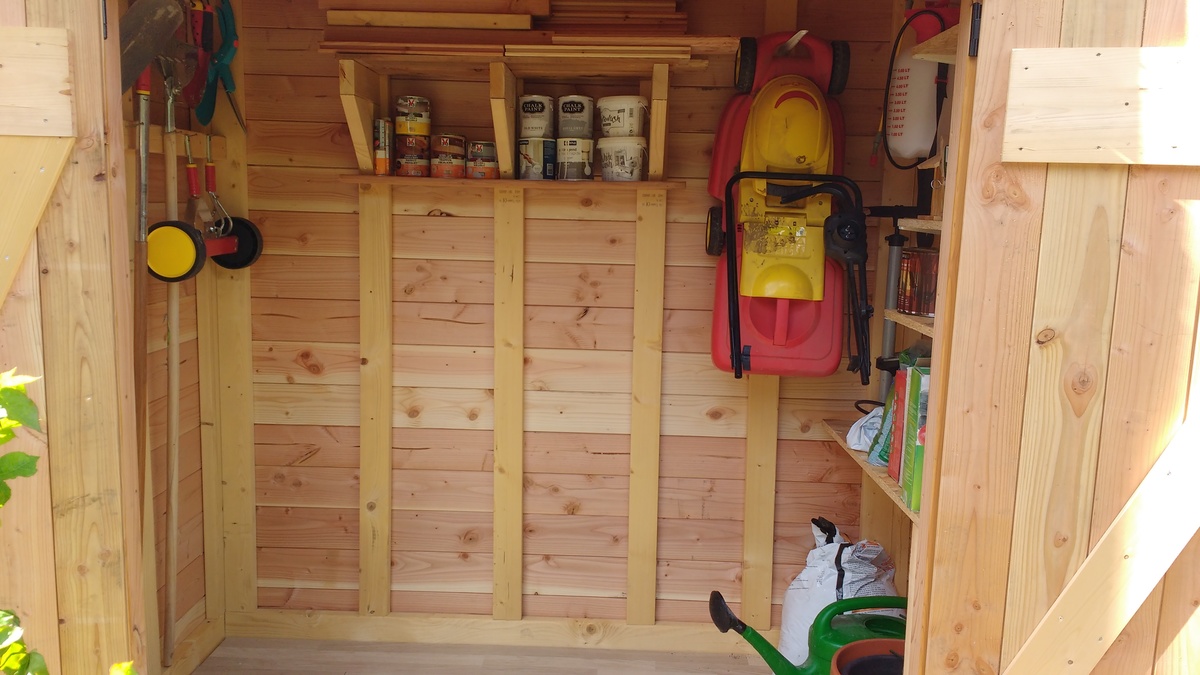
Garden Shed out of douglas wood
i added wooden floor .

Thu, 06/15/2017 - 12:48
Greetings, I like your workmanship - It looks great! I have a couple questions if you would be so kind as to answer them. I like how you turned the studs sideways. How did you attach the studs to the 2x4 plate that you have turned on its 1 1/2" edge both top and bottom. I am thinking of toenailing or driving 3 1/4" GRK screws through the 1 1/2" sides of the 2x4's and into the 1 1/2" edge of the top and bottom plate. I know that Kreg has a jig out that uses oversize screws-it is specifically designed for 1 1/2" and larger (up to 3 1/2").
How did you secure the bottom plate to the wooden floor. I am thinking that you may have used 1/4" or 5/16" lag bolts down through the 2x4 and on into the frame of your wooden floor.
Thanks for your reply,
Cliveous (Reggie) Ogg
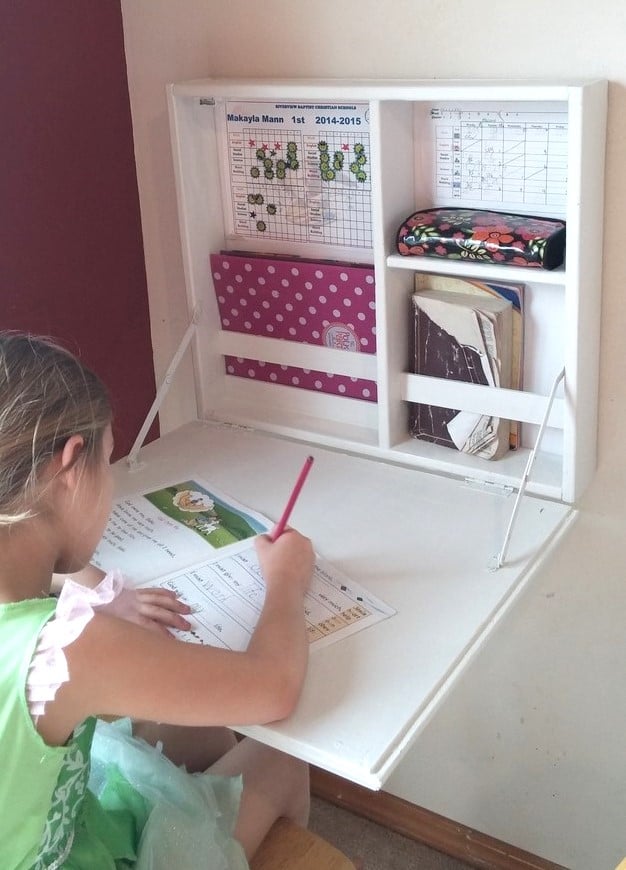
This was just what I needed! My daughter started homeschooling and we needed a place to neatlly contain her school stuff. I had her working at the kitchen table next to me, but it still felt like it lacked the school atomosphere. I removed the area for the paper holder and instead added a few support scraps to hold her folders and books upright.
It did take me awhile to get the support hinges placed correctly (I almost gave up and went with a rope or chain) but I finally got them placed correctly after placing a pencil mark on where they could lie correctly open and closed - seriously this took me awhile because just when I thought I had it, the brackets when closed would be to deep for the desk or when I placed it it correctly inside when open it wasn't 90 degrees.
The only thing I wish was that I had made it slightly shorter, because when it is open it is a little hard for her to reach the top shelf, but its not to bad and that is the height my scrap bead board was and I was to lazy to cut it =)
I had a magnetic clasp left over from another project and that has worked well to keep it closed nice and tight, I also used some foam board I had lying around for the back so that her things were not tapped/pinned on my wall. I choose the bead board on the front because A: it is what I had lying around and B: it is in my dining room so I wanted it looking a little nicer.
I had everything on hand excpet for the support brackets which cost me 2 something each at Lowes. YAY for projects under $10 bucks! Thank you so much Ana!

Thu, 08/15/2019 - 12:45
What a beautiful desk! I'm so glad you got the brackets to work, they look awesome!
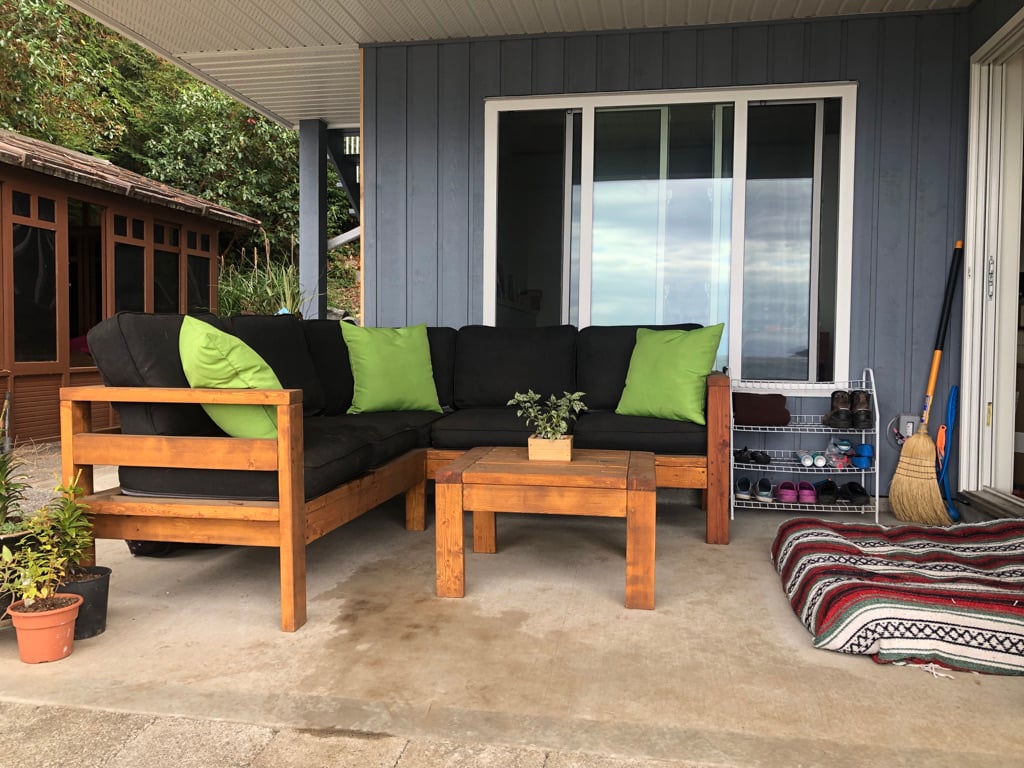
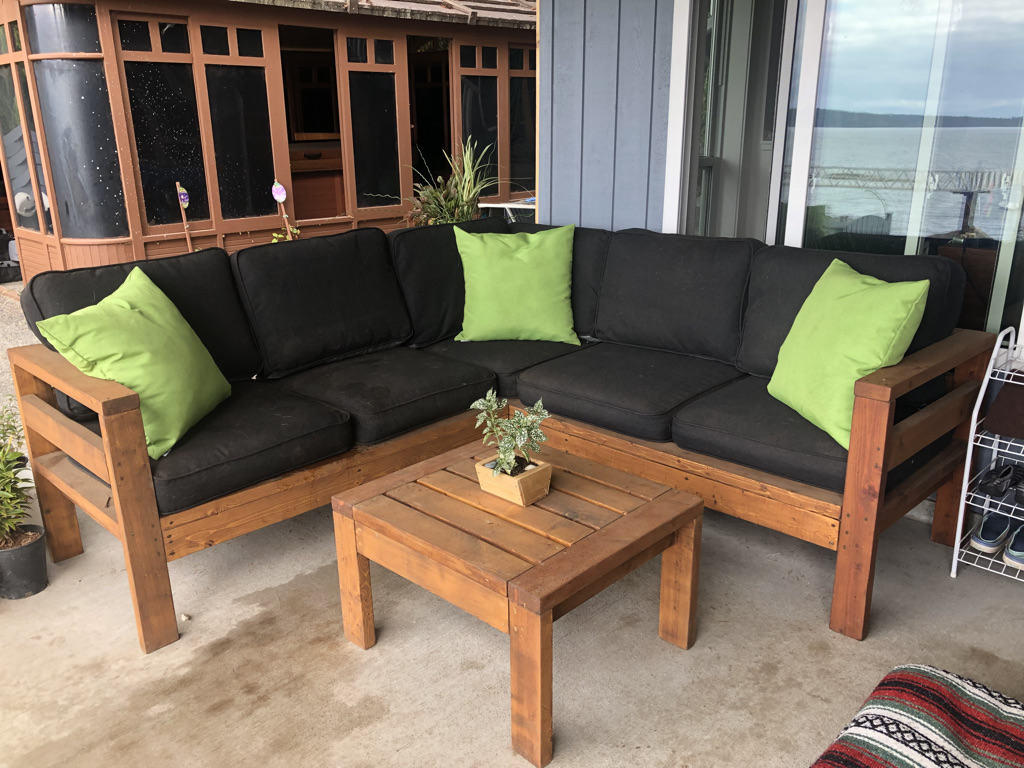
My daughter and I built this out of the old framing that was pulled out of the house (fir) and some leftover wood from a friend's house build a few years back. If the cushions are lifted up you will see the old electrical wire holes! I shortened the set by one seat so it would fit the patio space. The cushions are from Ikea and fit perfectly. I also modified the coffee table so it was the similar proportion to the full sized set. Thanks for the very approachable plans Ana! Excuse the water all over the area in the pics. We have water dogs and they seem to like the sectional too!
This my first real project built in my shop! I have long admired the projects that I have seen on this site and I could not wait to post a brag picture!
Thu, 10/06/2022 - 13:59
WOW, way to go, such a beautiful build! Thank you so much for sharing:)

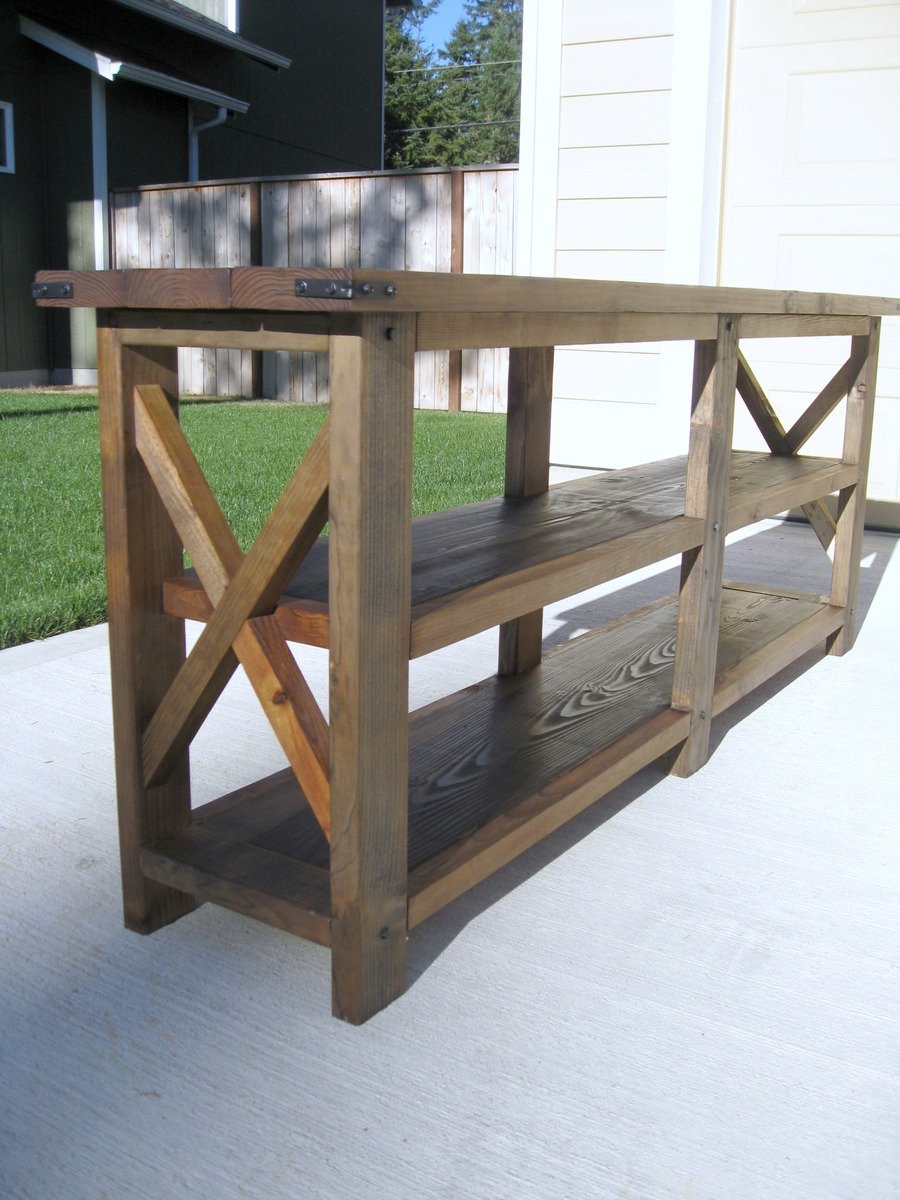
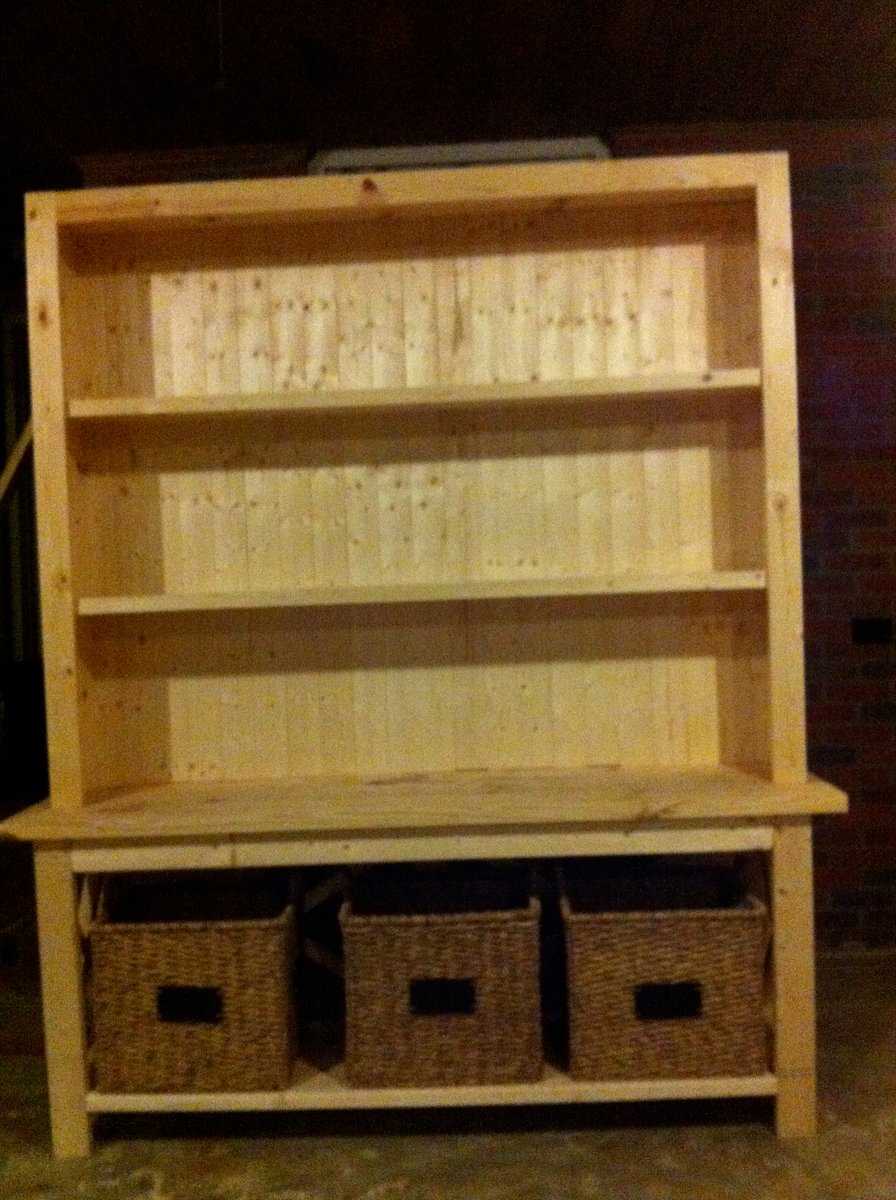
I have been dreaming about this piece of furniture for 3 yrs....I used Ana's plans for the rustic x console but took out the front middle support and made it a little deeper I also turned the 2x4 vertically and added an extra 2x4 behind it to add extra strength.....because I wanted to fit 3 baskets from Target underneath...the hutch i just winged!....Thank you so much Ana for giving me a place to start!...I am in love!......


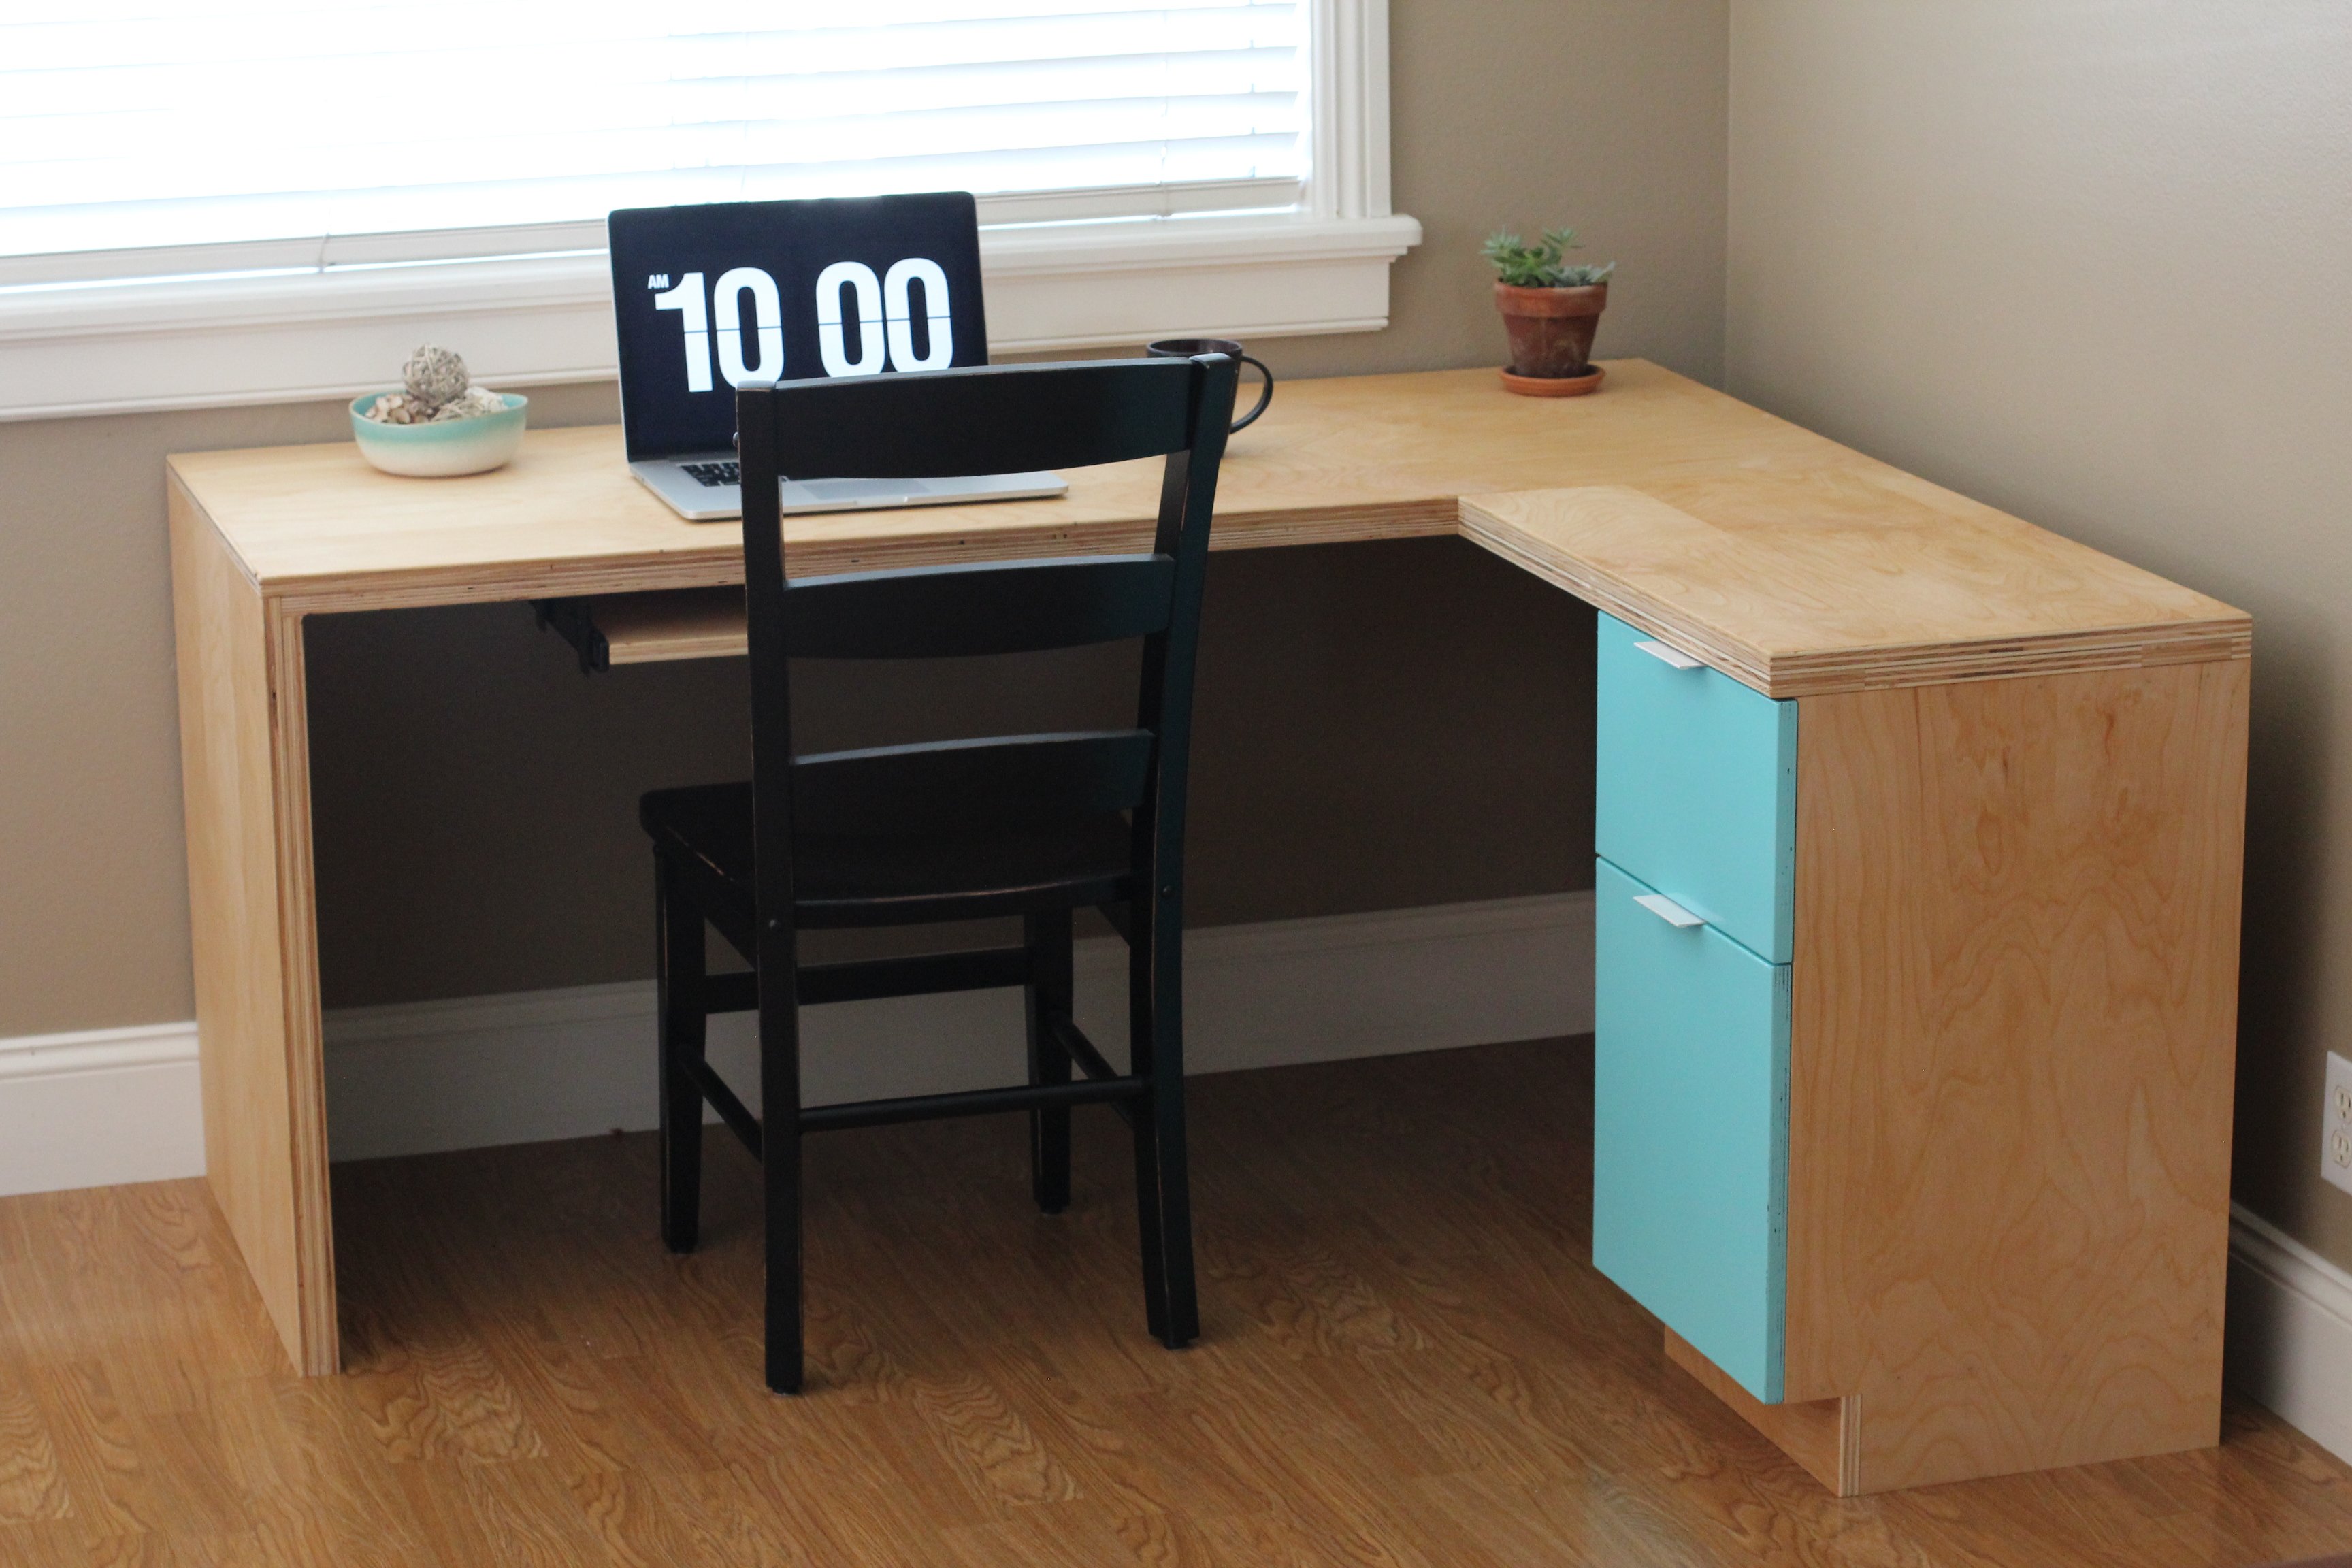
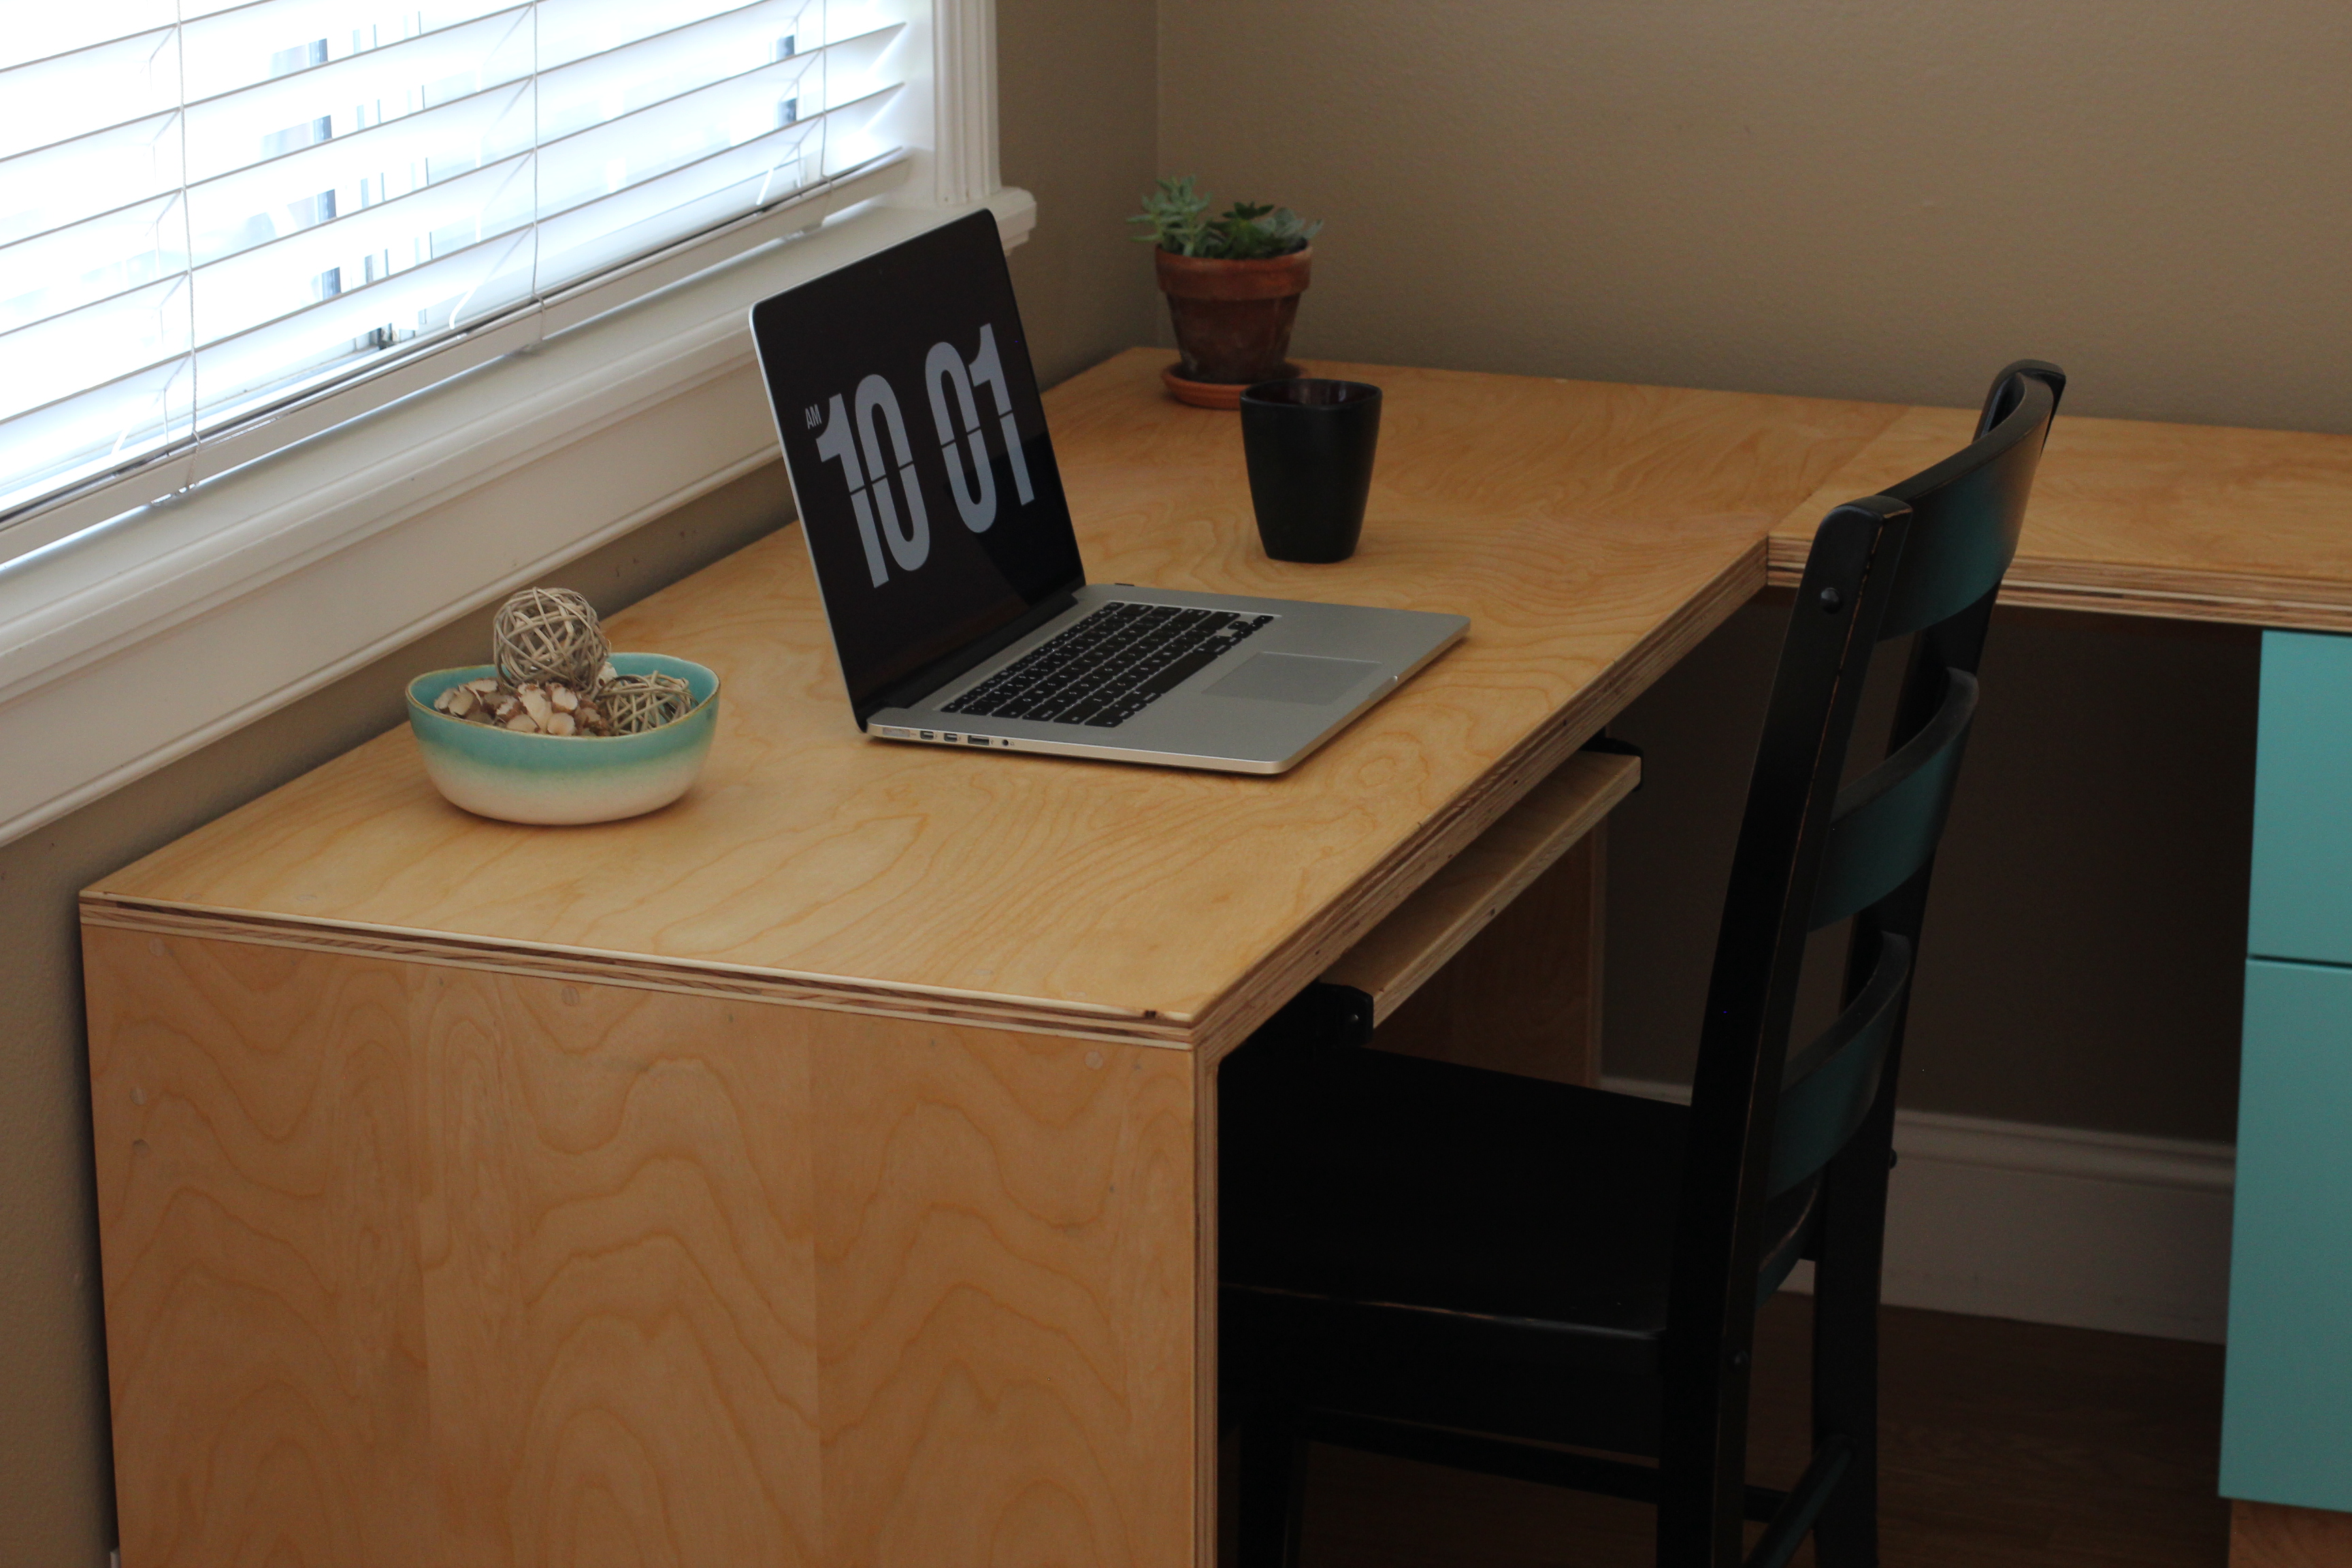
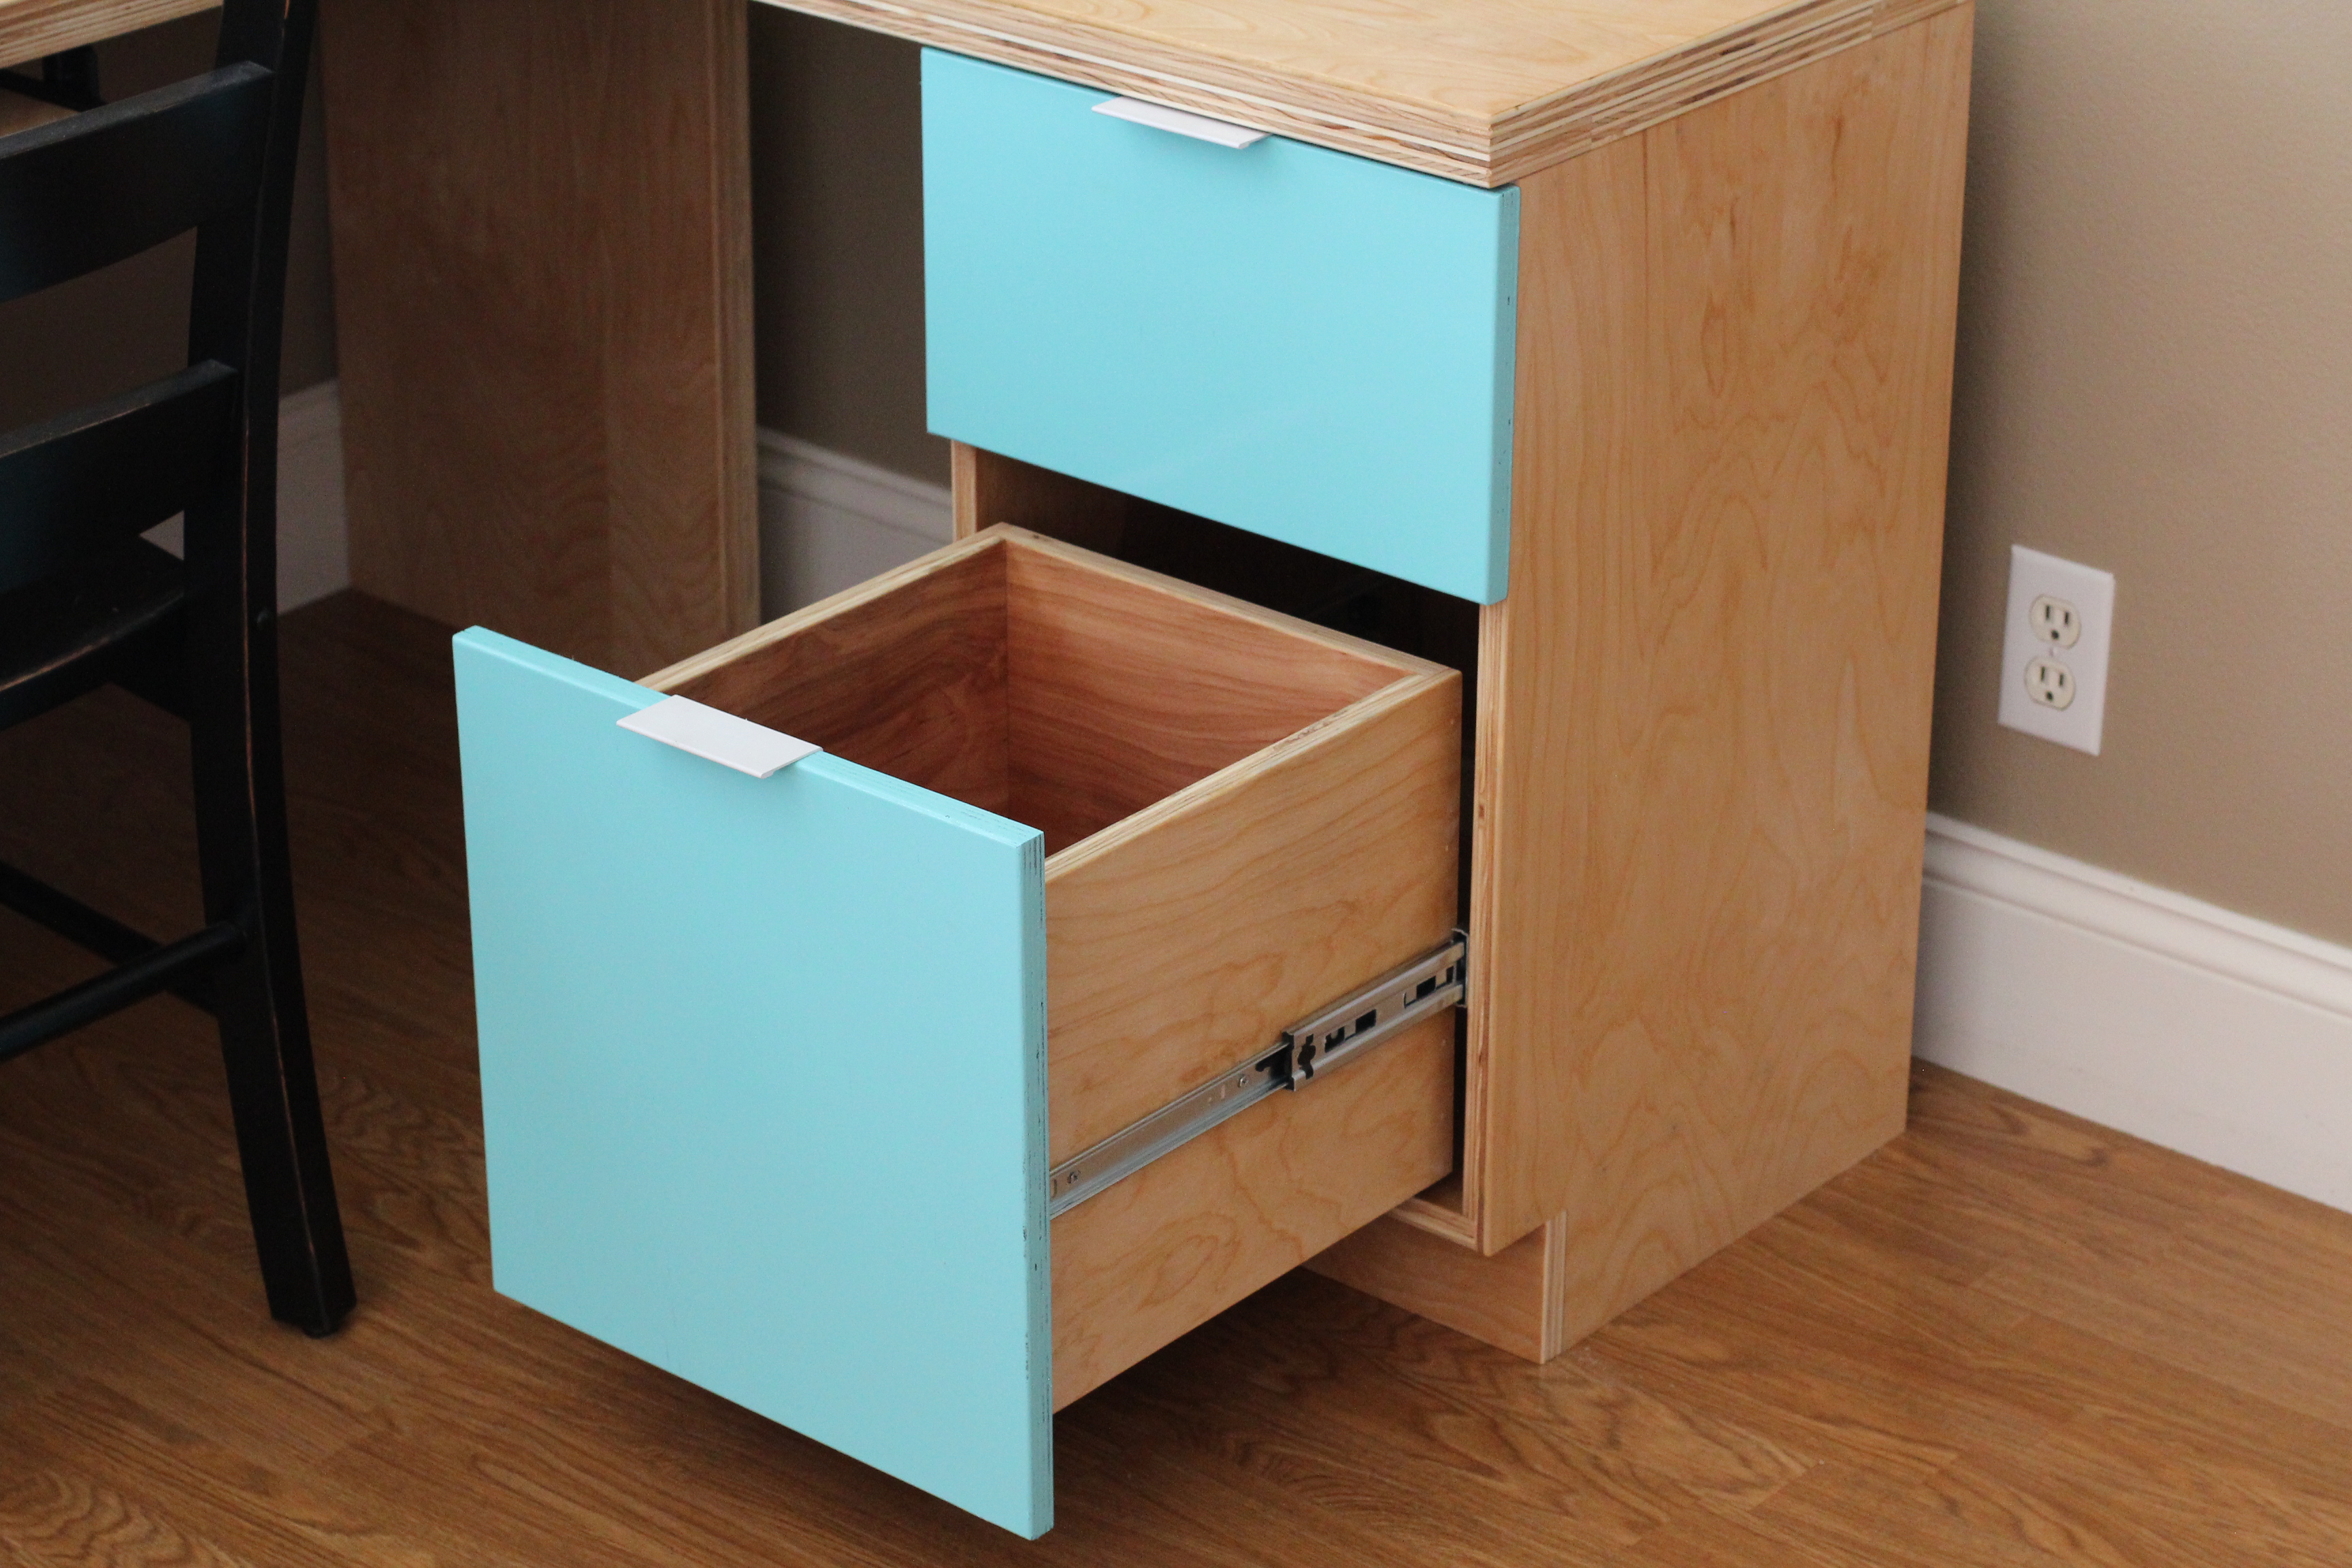
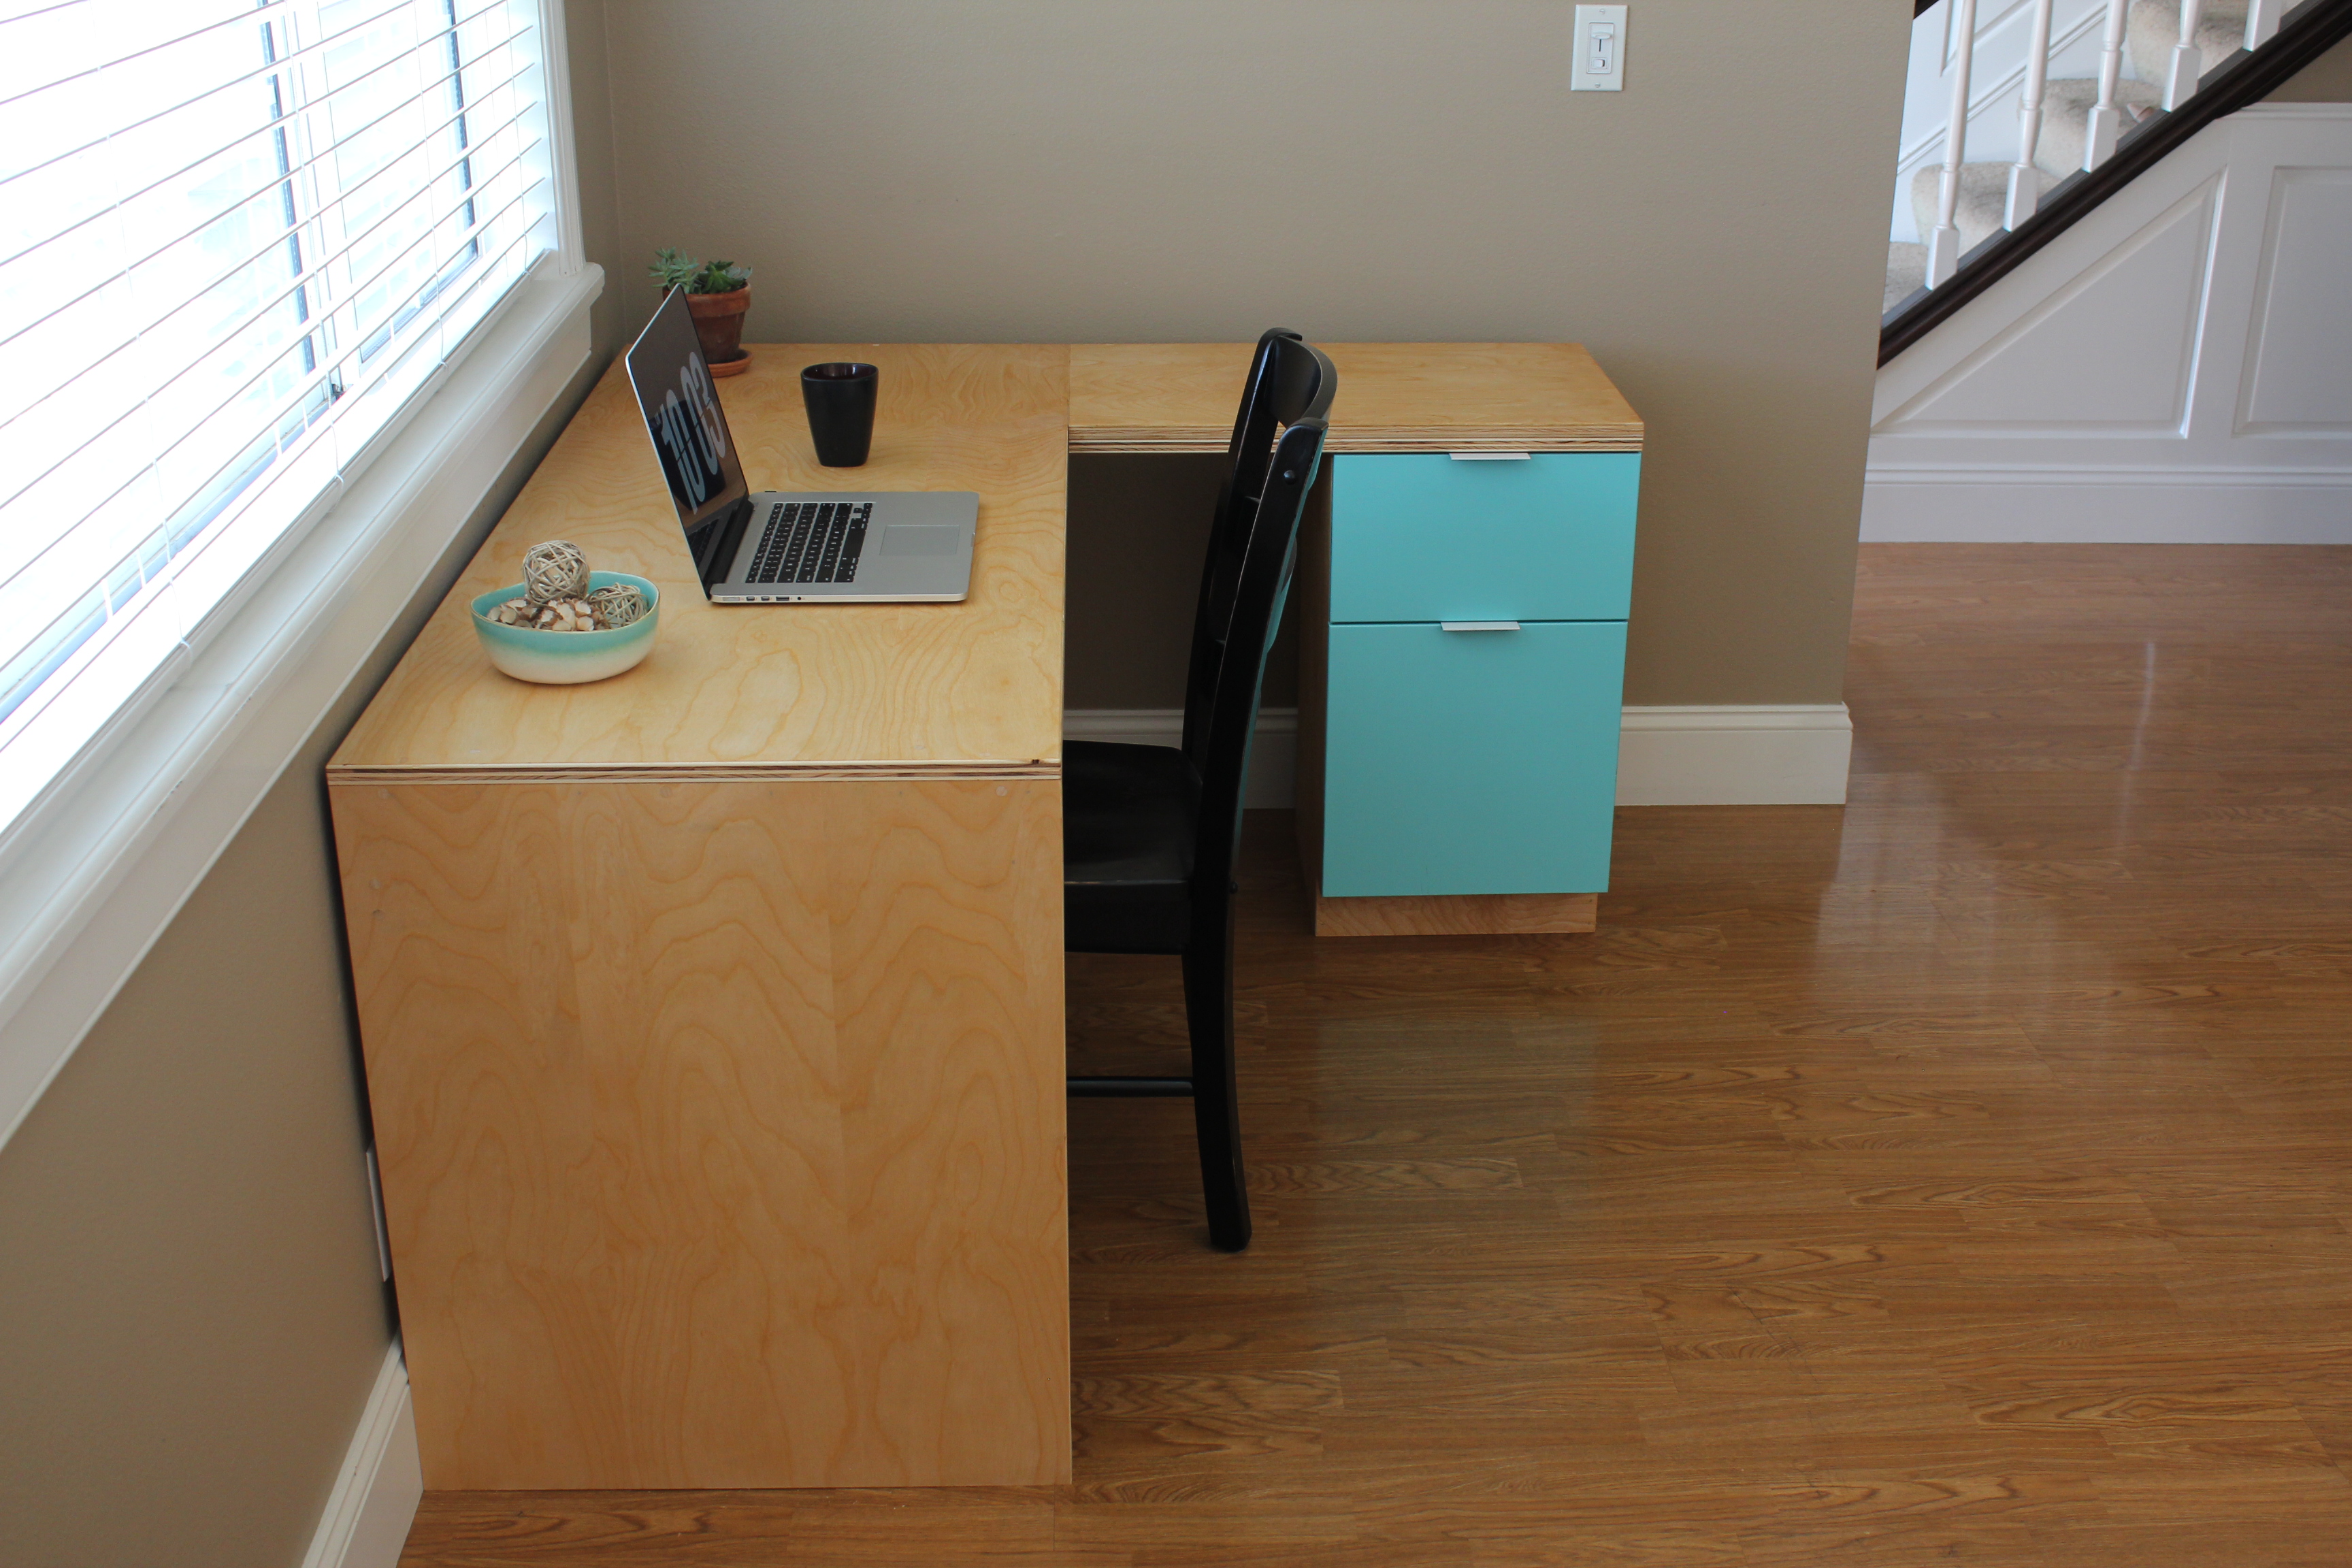
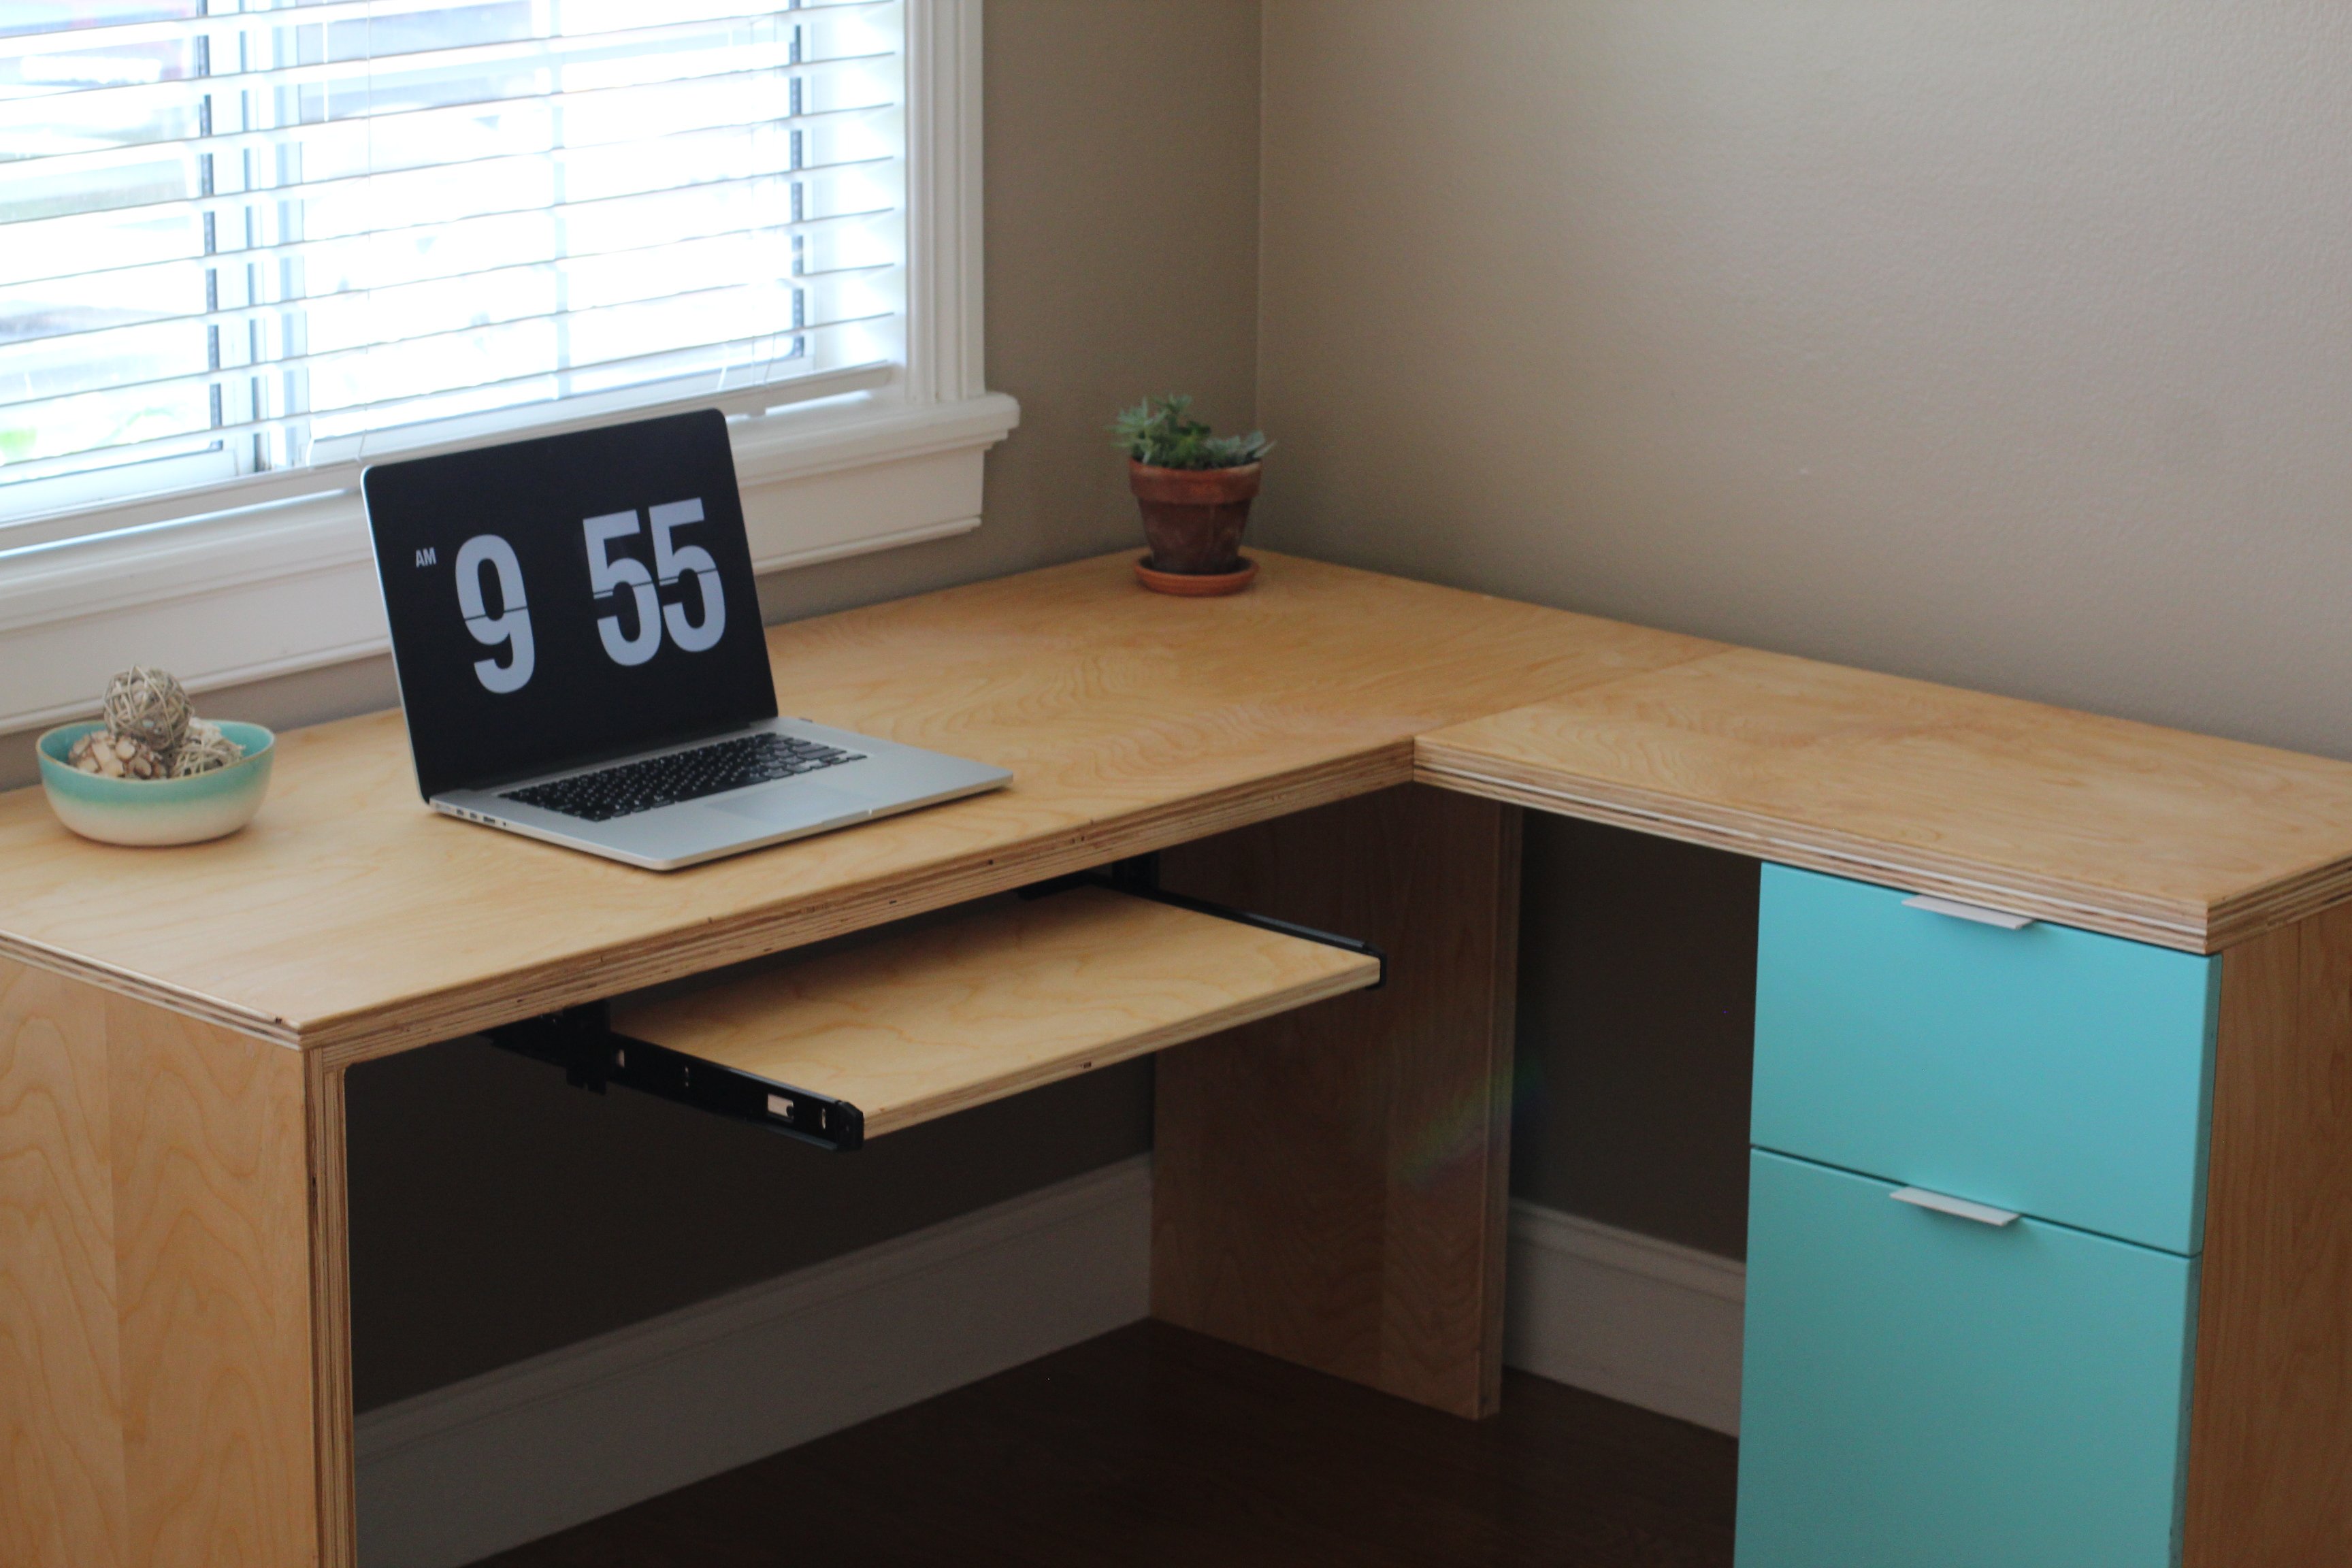
I constructed this desk all from birch plywood. It features a pull out keyboard tray, modern drawer finger pulls, and full extension drawer slides. The plywood was finished with a hand-rubbed danish oil for a natural wood appearance.
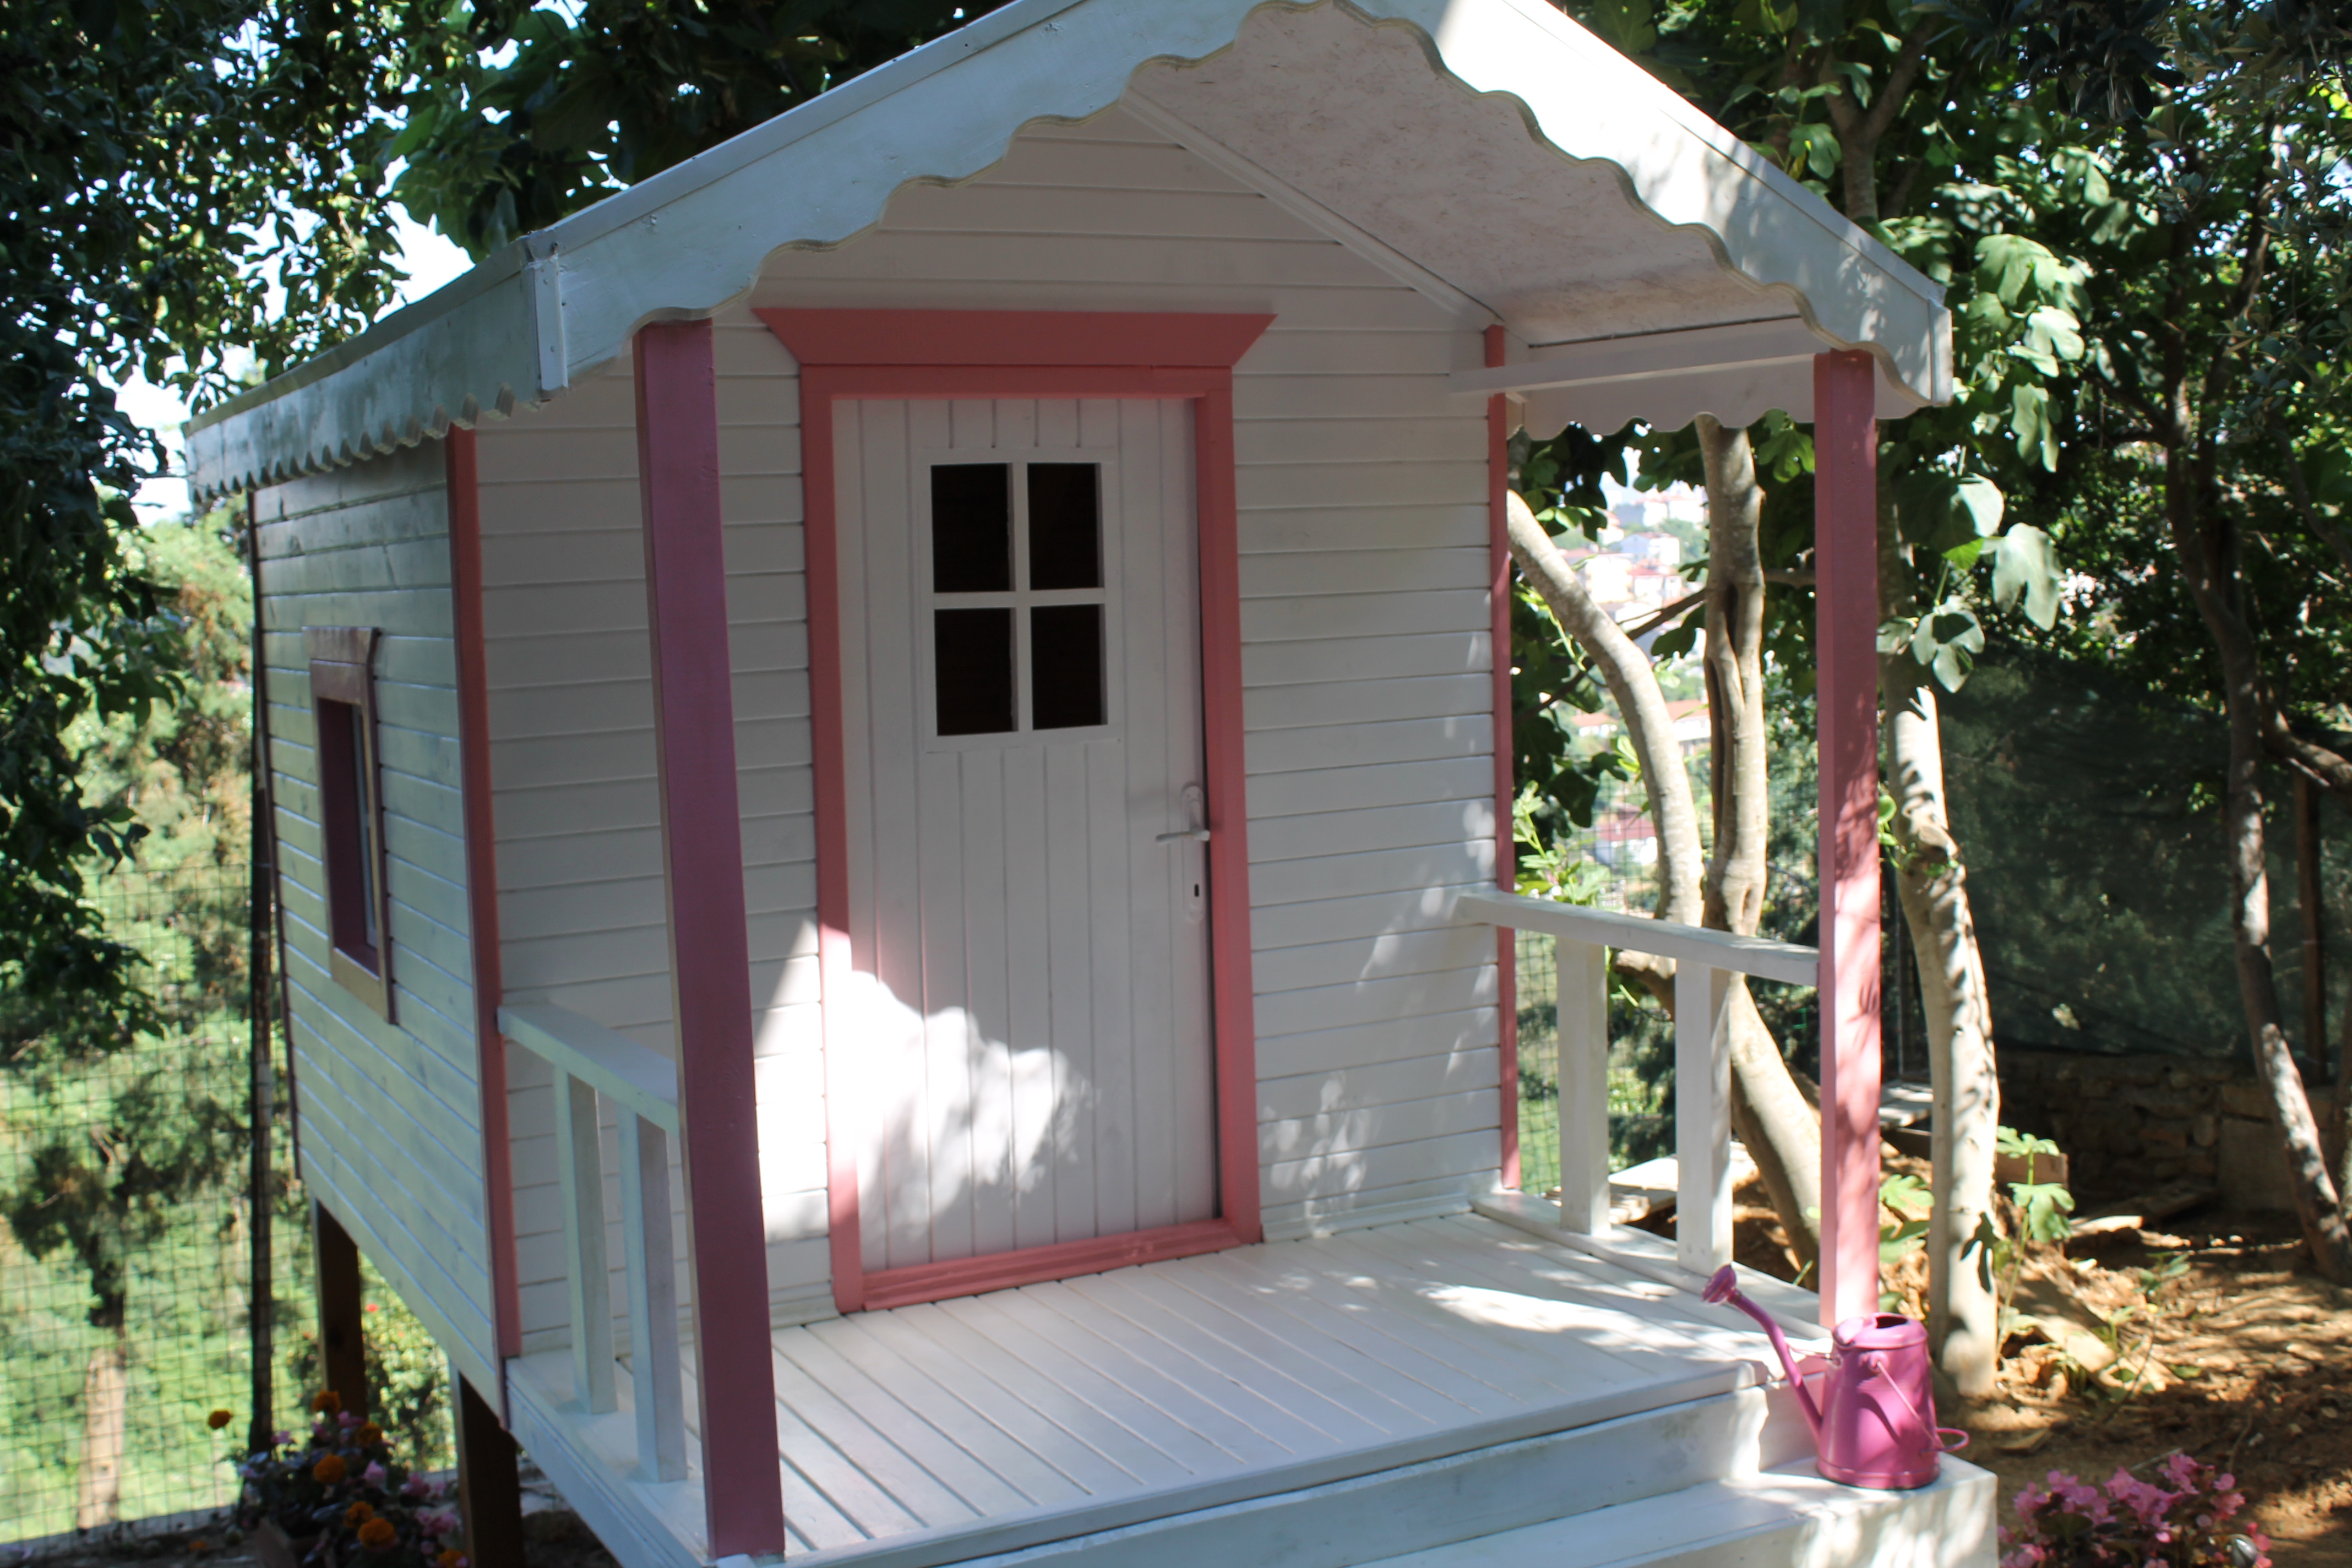
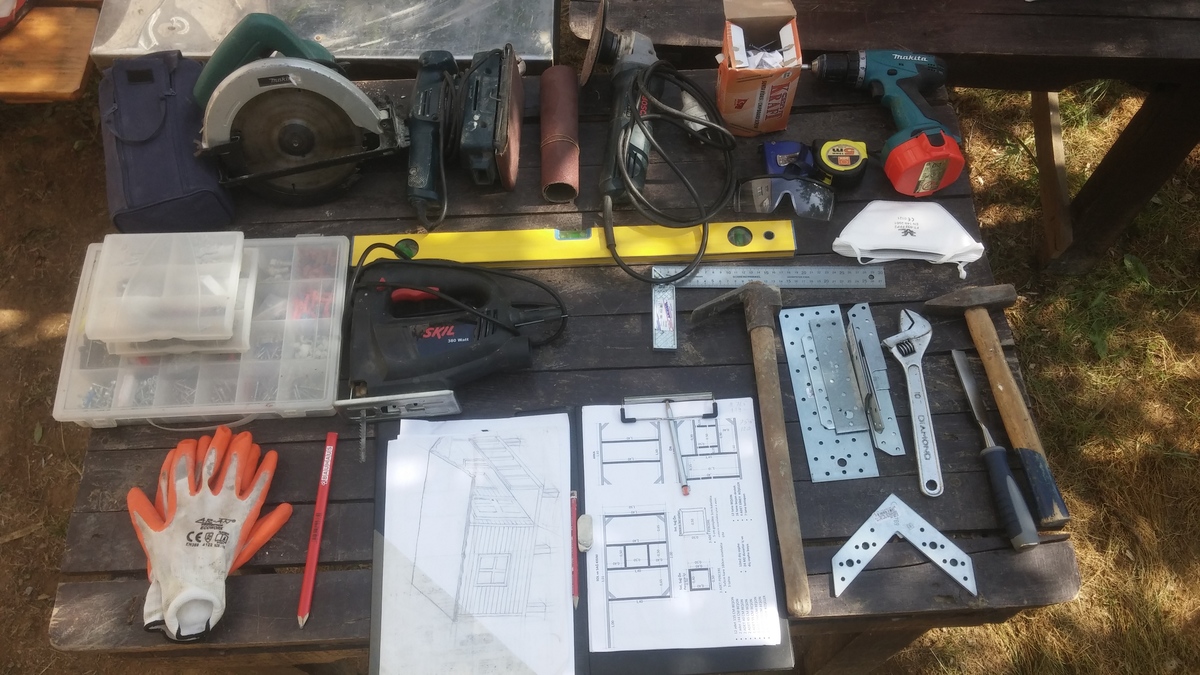
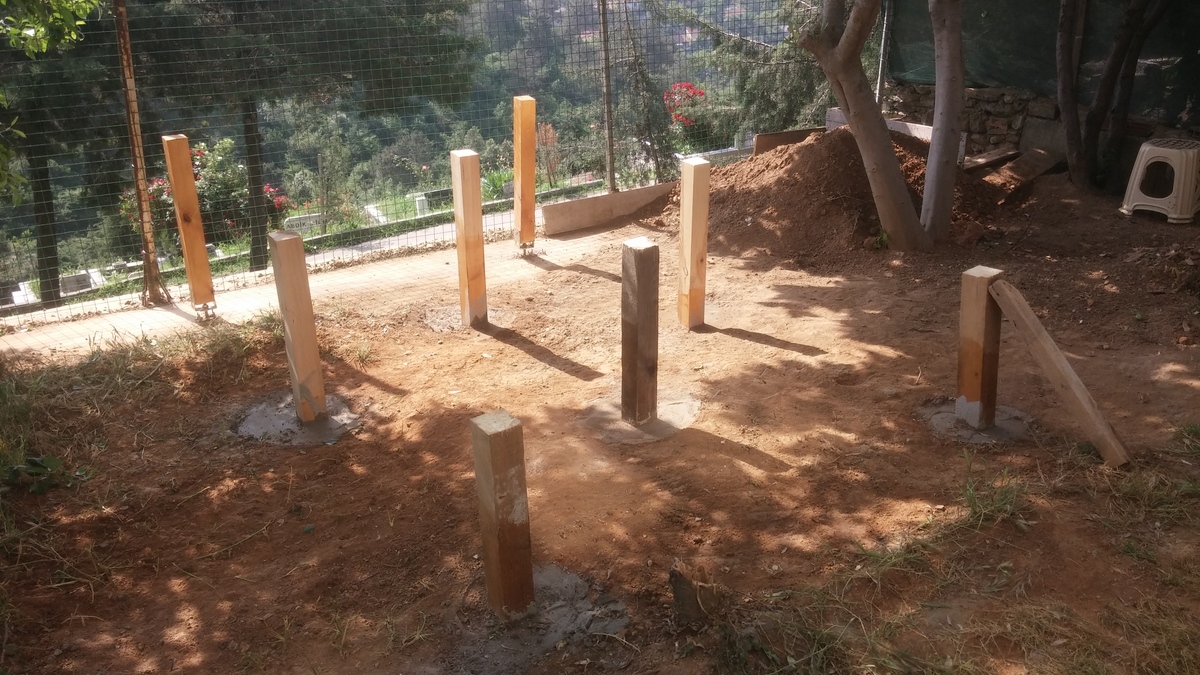
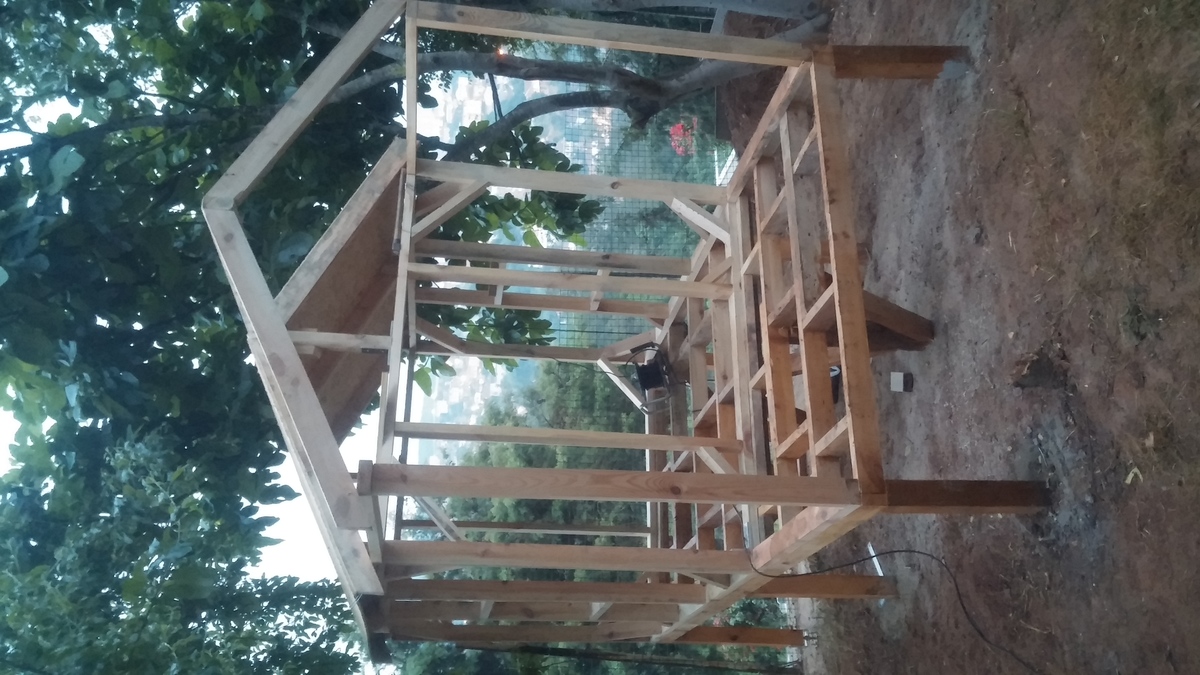
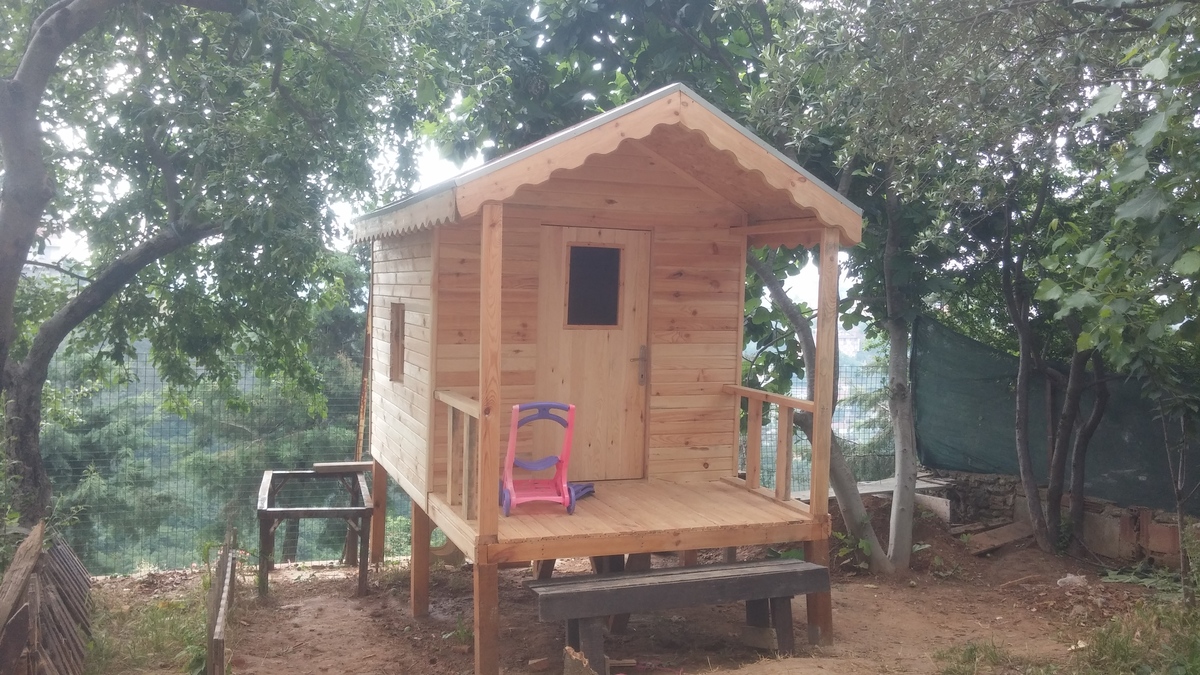
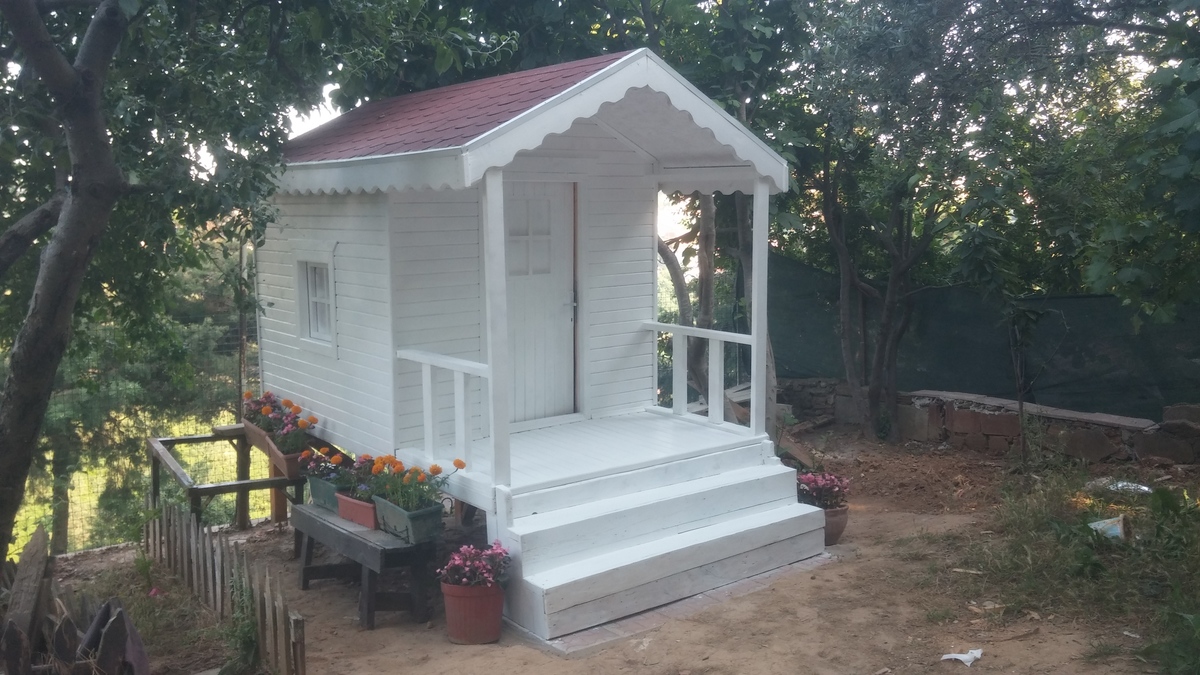
Hi, My name is Ibrahim I am a Project management Unit Manager in an Information technologies. I have two daughters, 3 and 8 years old. We have garden around 150m2. I want to do play house in our garden to play. First of all I searched how can do it in internet. Than I did preliminary work. I provided equipment and materials. And I take a holiday my company as a week. I started my first project which is wooden house.
My daughter and all around me was liked wooden house. I hope you like it:)
Sorry my English :)
.

Fri, 06/26/2015 - 19:37
This is too cute, I bet your little girls love it :)
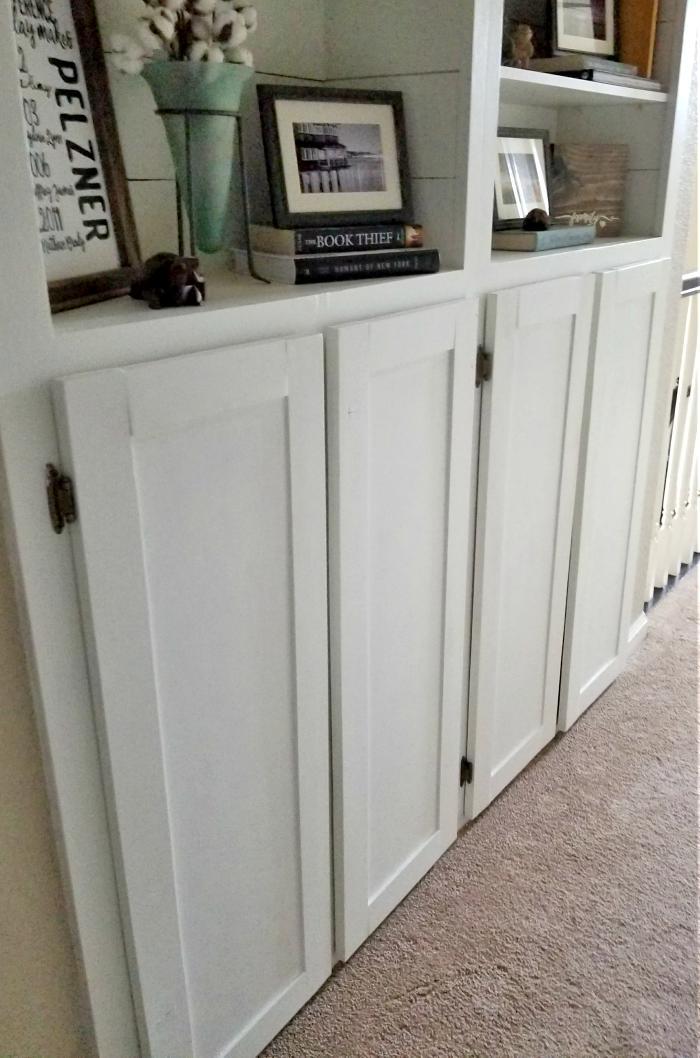
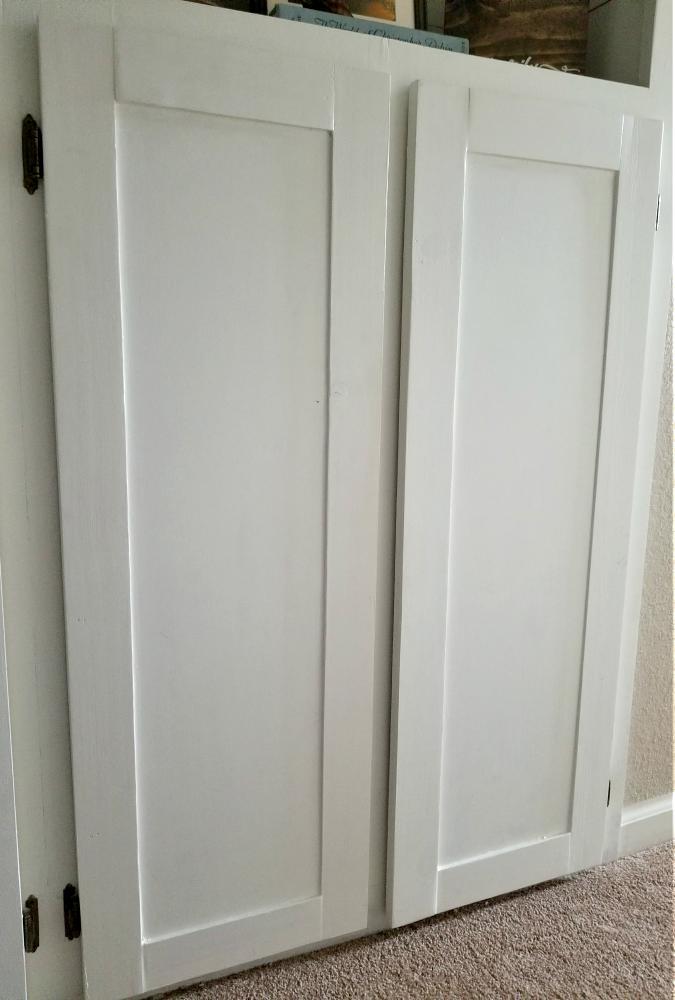
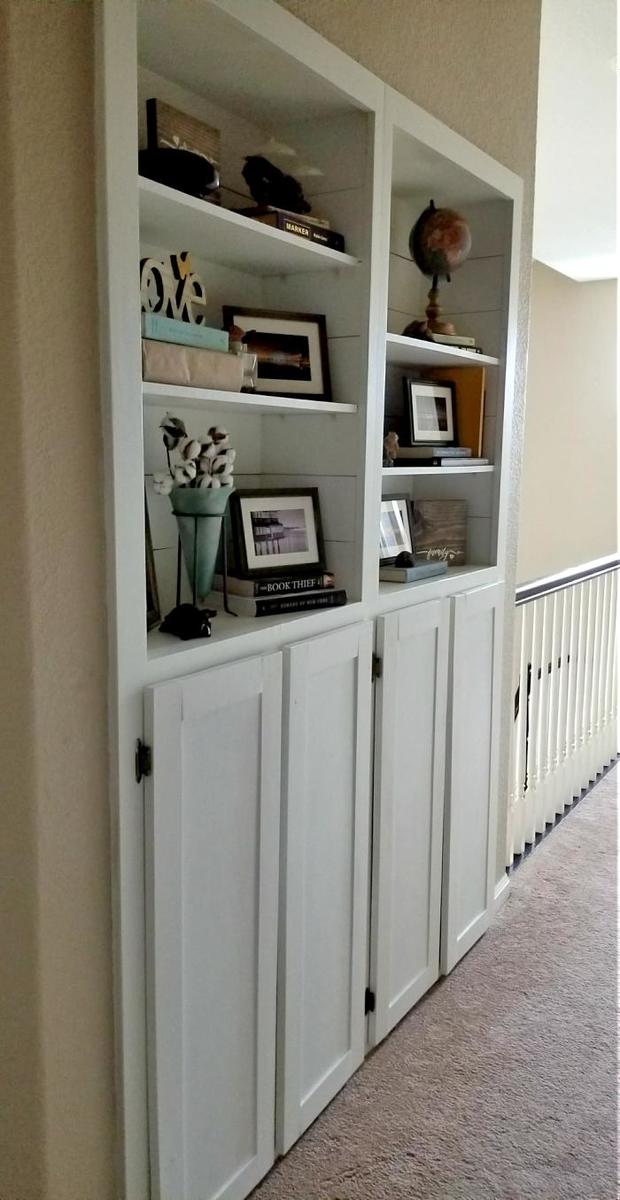
I used the easy frame and panel doors instructions to build 4 new large cabinet doors for my hallway cabinets! I painted them Sherwin Williams Alabaster. You can find my full blog post about them here: http://www.leapoffaithcrafting.com/make-shaker-cabinet-doors/
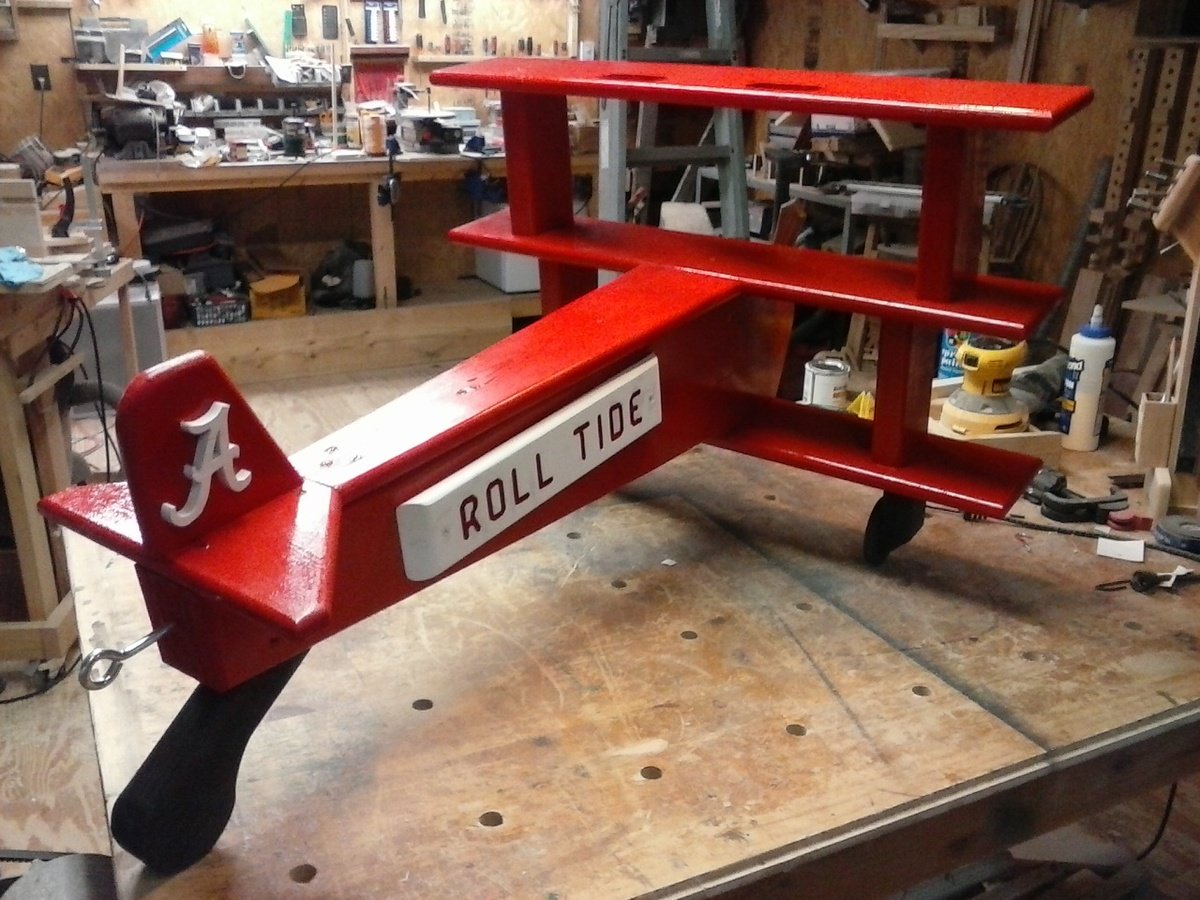
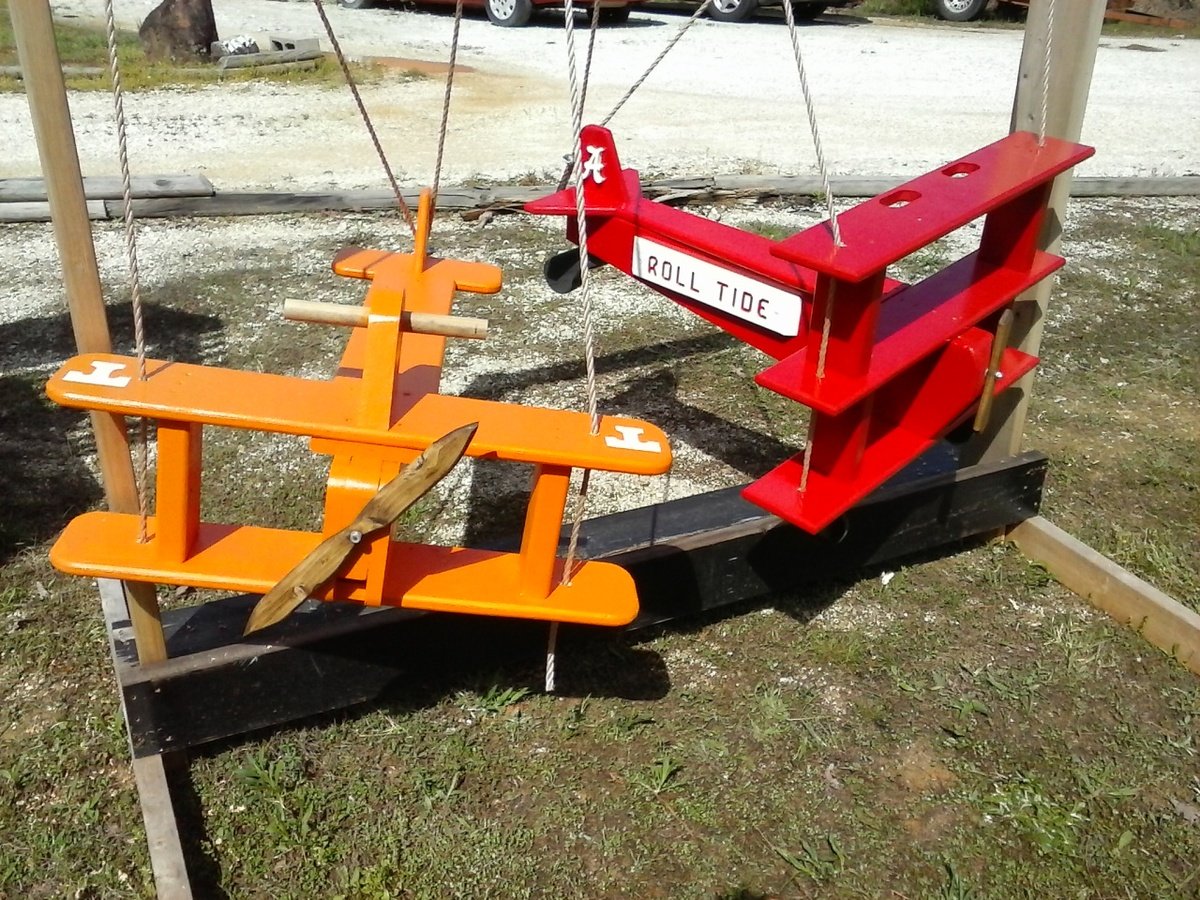
Built in an afternoon. I built them from a picture on Ana White website and modified a bit with both planes. Roll Tide was routed into a piece of wood and glued to the sides of the plane. The "A" was cut out on the band saw and finished on the scroll saw. The "T" on the orange plane was painted on The tri plane is the favorite. Roll Tide !
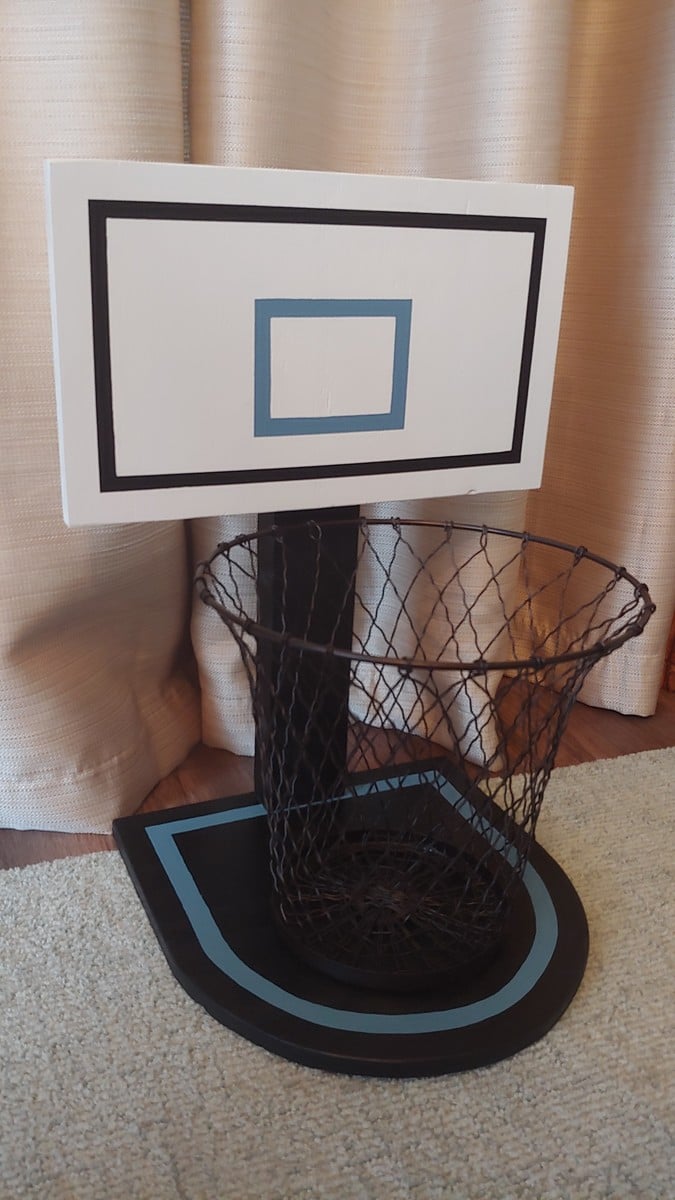
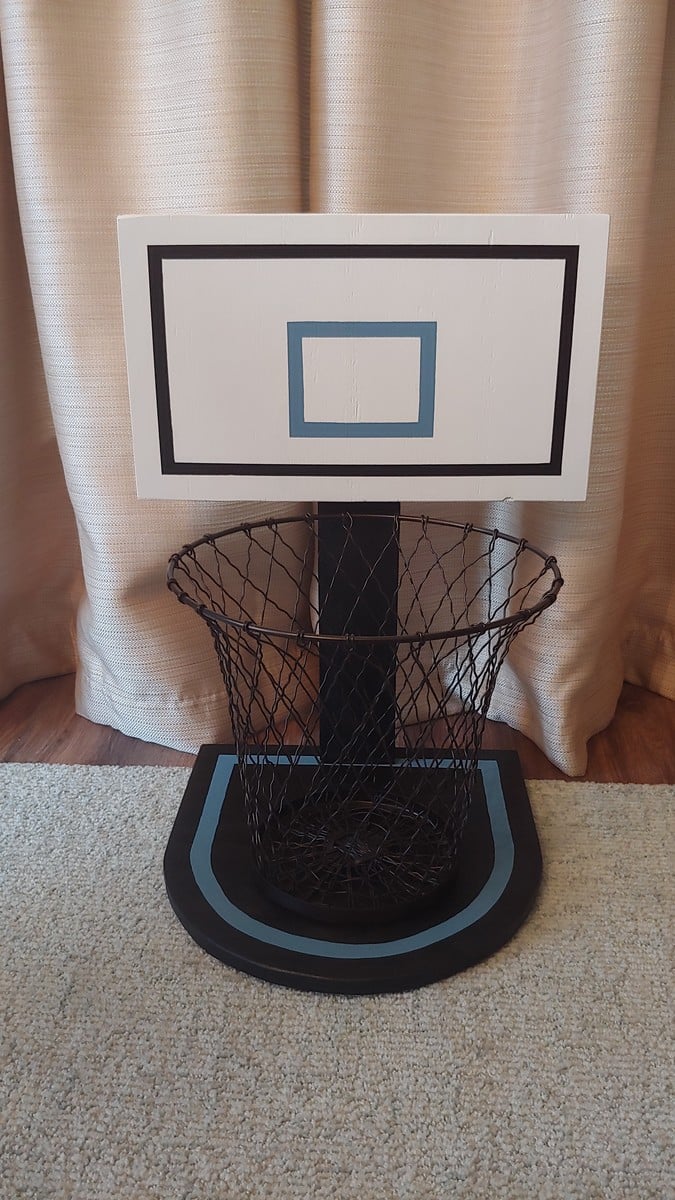
My family is doing a home made Christmas this year. I fell in love with this plan the first time I saw it. While out shopping, I happened upon this trash can on sale which reminded me of a basketball net and knew I had to build this project. We used leftover plywood which necessitated using paint to hide blemishes. The size was modified a bit to fit this trash can. I think it is really cute!
I built this table a year ago just never got the chance to post pics. It was an easy build.

Sat, 09/07/2013 - 17:16
Your table looks beautiful! Love the finish, and the way you arranged and photographed it is wonderful, great job!
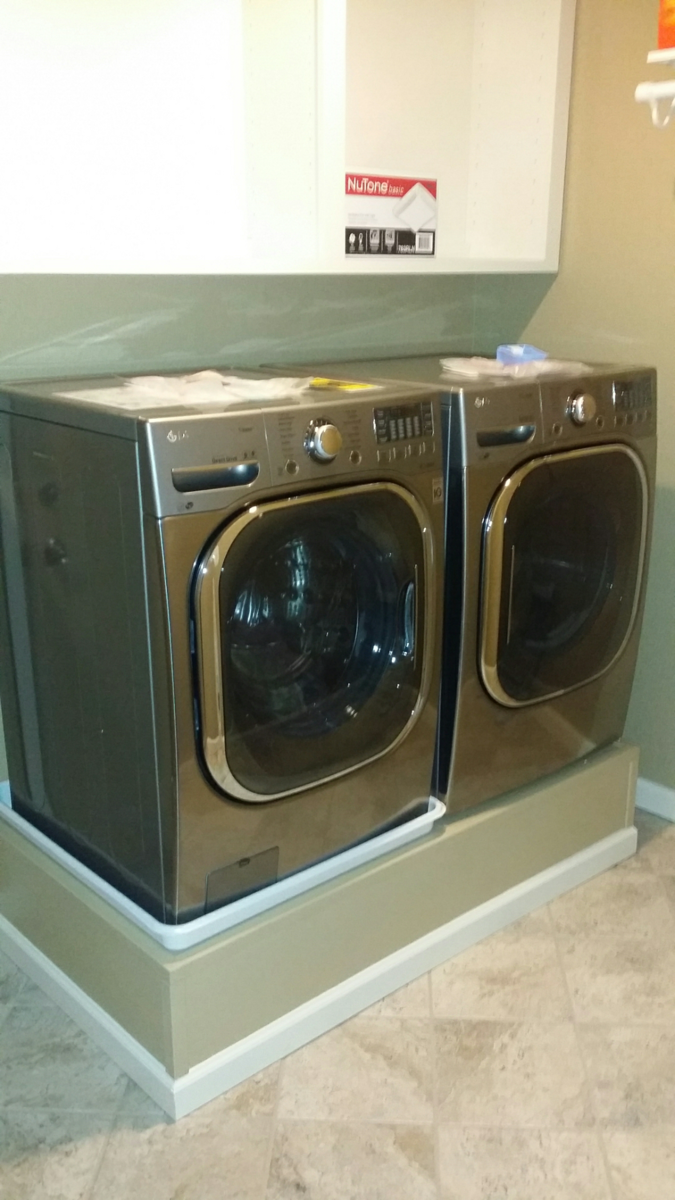
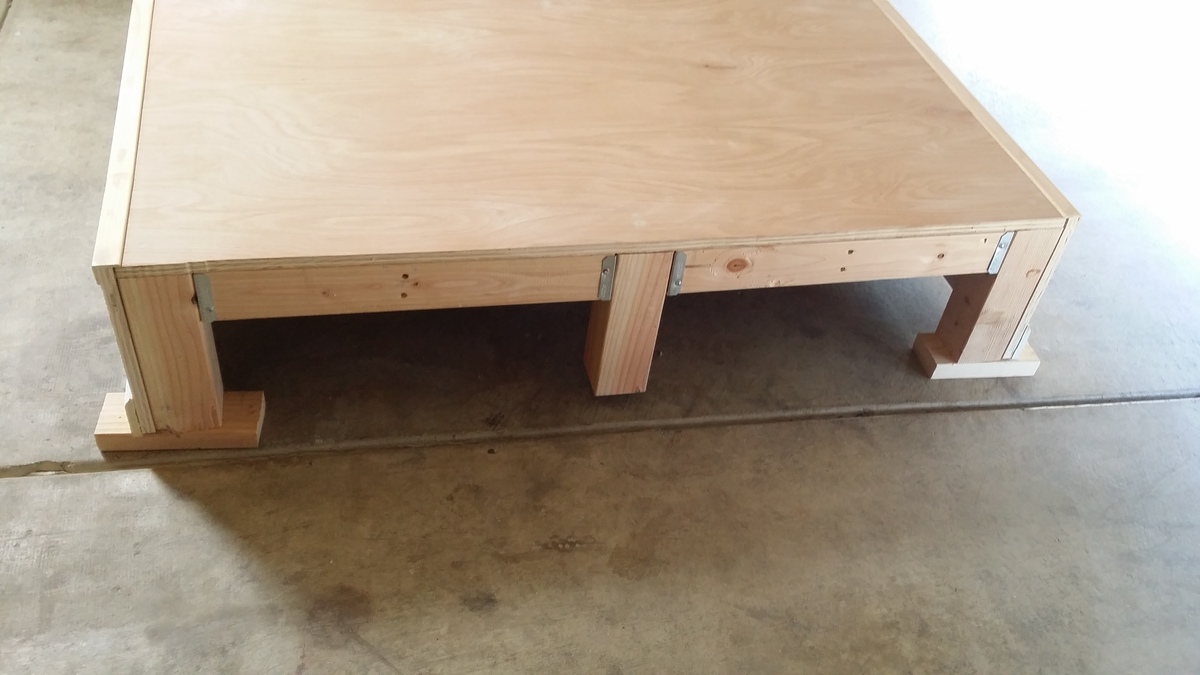
I got this Idea from Sausha's washer dryer pedestal post. Before then i didnt know people even built pedestals for their washer and dryer. Just purchased new front load washer and dryer and they wanted 250 bucks extra for each pedestal. That is 500 bucks and is absolutely rediculous. So i opted out of those and thought to myself maybe I can build something instead. So I began my search online and stumbled across this post which seems to be the most popular pedestal build on the web. I think sausha's build is fantastic and absolutely beautiful though I went another way with mine.
I tend to like to overbuild things. Especially in this case, seeing as the washer weighs a beastly 200 pounds by itself. I figured with clothes and water it would be about 235 pounds just for the washer. I noticed that with the aluminum drawer pedestals that you can purchse with the washer and dryer the support is only where the legs from the washer and dryer will sit. That was all I needed to get on my way. Purchased some regular old douglas fir 2x4's, 4x4's, and a 4'x8' sheet of 3/4 inch plywood. I opted to use fence post brackets to tie everything together because I didnt feel like driller pocket holes in each 2x4 when you were not going to see them once its all said and done. The fence brackets are not structural so they lack ridgidity untill you tie everything together with the legs, slats, and top. Cut the top from the 3/4 plywood sheet and used the left over plywood to cover the front and the sides. I left the back open as it is not seen anyway.
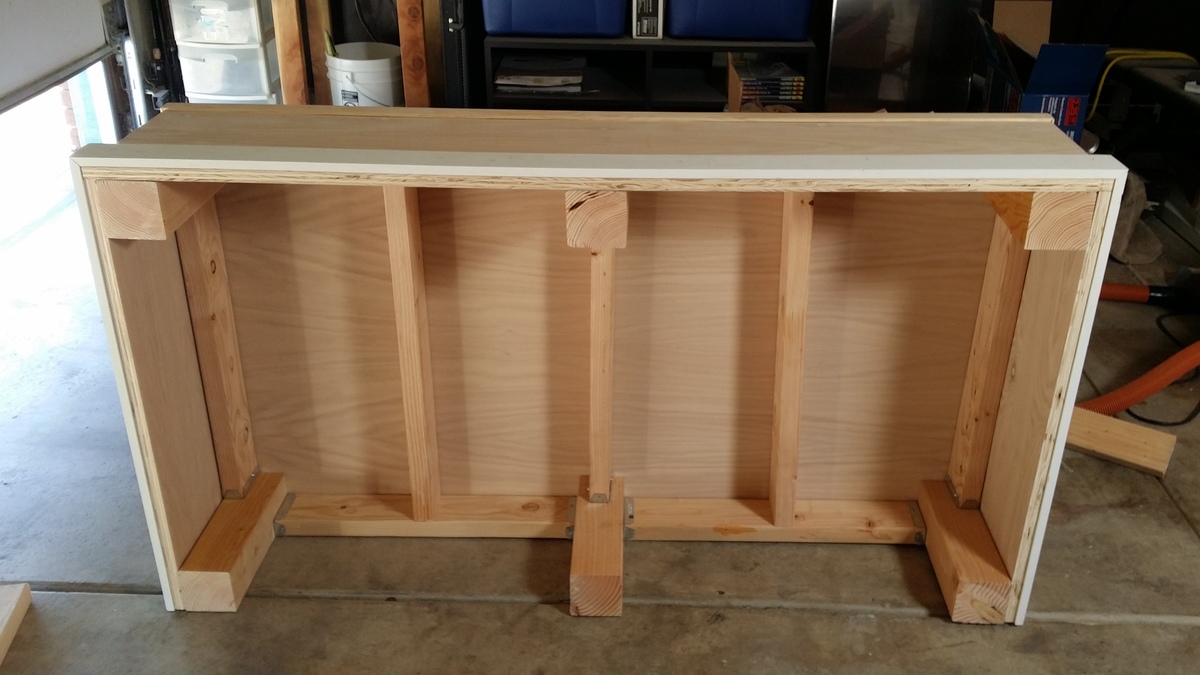
Total size of the pedestal is 56" wide x 31" deep x 12 3/4 inches tall, but you can build it as wide, deep or as tall as you need it. When i was done putting it together. I tested it by jumping up and down on it and I weigh 230 pounds. So this thing is quite strong. I finished it up by covering the edges where the plywood meet with Edge moulding and the bottom with baseboard to match my laundry room. I used Behr premium plus ultra paint on most of it and, behr alkyd paint for the baseboards. Gave the top a couple coats of General Finishes High Performance Polyurethane. Which isnt neccessary but I opted to do so because of the weight of the washer and dryer and the General Finishes High performance dries harder than most other polys that I have used. I only used it on the top though.
Taking into account that I used the paint and baseboards left over from renovating my laundry room. This project cost about 150 bucks. 200 if you have to purchase the paint and moulding. Quite easy to do and though I made the cutes I needed with my table saw. This can be done with a circular saw and a drill. No exotic tools are needed. Will post finished pictures when my washing machine and dryer are delivered on friday and they are sitting on top of the pedestal.