Community Brag Posts

Porch Swing

Submitted by jcole32010 on Tue, 10/18/2016 - 11:58

Loved building this one.

Estimated Cost
100
Estimated Time Investment
Afternoon Project (3-6 Hours)
Finish Used
Custom stain, dove white paint, general finishes flat out flat, and chunky rope.
Recommended Skill Level
Beginner

Breakfast Bar inspired makeup vanity

I built this makeup vanity to fit a 40" wall. I was inspired by the design of the DIY breakfast bar. The hutch sits on the top and has plenty of storage. The front drawer fronts are hinged at the bottom, this storage space holds a hairdryer and iron or makeup with a cord pass through at the back. The stain is a mixture of three colours.

Estimated Cost
300$ approx.
Estimated Time Investment
Week Long Project (20 Hours or More)
Recommended Skill Level
Intermediate

Comments

whancock

Sat, 11/05/2016 - 07:47

Can you link to the plans you based your inspiration off of? I can't seem to find it on the site. Thank you!

Floating Corner Entertainment Stand

This is a corner entertainment stand. I didn't have a plan to follow so I made it up as I went. The dimensions are 40" L xW and 27" tall. It has a base hidden underneath it help support the weight and is also screwed into wall studs to prevent tipping. The angle for the front cross section is 22.5 degrees. I made this for a friend. She is going to paint it unfortunately. Materials cost only around $120. 3 sheets 3/4" plywood, some 1x2s and a couple hinges and cabinet knobs.

Estimated Cost
$130
Estimated Time Investment
Weekend Project (10-20 Hours)
Recommended Skill Level
Intermediate

Comments

Justin G (not verified)

Sun, 01/06/2013 - 04:49

This is REALLY a nice looking corner unit. In our living room, the ONLY place for the tv is in the corner. I have a prebuilt unit now that cost me quite a bit, and we hate it. Its all modern with glass shelves. This corner cabinet is EXACTLY what I want to build. I have a 1 year old so having doors to hide the electronics is a must.

I would VERY much like to build this. Are there any more detailed pictures or a plan I could download? Ive been searching for the last few days an just cant seem to find anything that catches my eye like this one.

Looks great!!

Wounded Marine

Sun, 01/06/2013 - 06:18

The shelves are made out of premium plywood. For the top, bottom, and the middle shelf, I measured and cut out on pieces of plywood. Then used plywood for the "walls" of the unit. I trimmed it with 1x2s. The doors are also plywood. I just rabbit jointed nice wood for the frame of the doors. Underneath the the TV stand is a 2x4 set back a little bit to give it that floating looking. It is anchored to the wall on the inside of the unit with screws going into the studs of the wall. I hope this makes since.

arod718

Thu, 09/05/2013 - 19:13

Is it possible to get dimensions of the stand and what you based the base from. I would like to build the Ana version for my wife because of the storage it has. Thank you, best site ever.

Full size storage bed with trundle

Submitted by ellehcim88 on Fri, 08/14/2020 - 15:14

Full size storage bed with trundle. Three drawers and a trundle on one side and four drawers on the other. I started with the farmhouse design (headboard and footboard) and modified it to make it not so heavy and I designed the rest using SketchUp. See more photos in blog link.

Built from Plan(s)
Estimated Cost
$1000
Estimated Time Investment
Week Long Project (20 Hours or More)
Finish Used
White satin finish latex paint
Recommended Skill Level
Intermediate

Modern Farmhouse Bed

Submitted by pcarroll on Mon, 08/17/2020 - 05:21

King size bed. Aged the maple headboad per the plan, but then sanded to lighten the effect and sealed with a finishing wax. Trim is white milk paint.

Built from Plan(s)
Estimated Cost
$200
Estimated Time Investment
Day Project (6-9 Hours)
Finish Used
Aging product per the plan for the maple, followed by a light sanding and then finishing wax.
Recommended Skill Level
Beginner

DIY Octagon Table

Why an octagon shape? I wanted a round table and my husband wanted square, so we met in the middle and built this! Very easy and fun to build!

Estimated Cost
$100
Estimated Time Investment
Afternoon Project (3-6 Hours)
Finish Used
Stain color Dark Walnut and polyurethane in matte finish. I applied one coat of stain with a sponge applicator and worked it in with a cotton cloth. I applied 4 coats of poly on the top and 2 coats on the base and legs.
Recommended Skill Level
Intermediate

Comments

booksnotbombs

Thu, 08/21/2014 - 07:40

Thank you for the reply! We have a beautiful old solid wood turned-leg farmhouse table (and matching chairs) that has been in my family since the 60's that needs to be refinished, but it just isn't our style. So we're thinking of building our own in our more modern style but would have to get chairs to accompany it. I LOVE these, so I think we've found our new chairs! I hope our table turns out as beautiful as yours.

I still have plans to refinish the old table and pass it along to someone who will show it as much love (aka abuse) as it received in my childhood...

Bed swing

Submitted by ltodd on Fri, 08/22/2014 - 20:11

Don't get in this bed swing unless you have time for a nap. This is a modified version of the "large modern porch swing". Very comfortable to lie down and swing. The mattresses are 2 baby crib mattresses that I found really cheap at a yard sale and on Craig's list. I probably should have shortened it several inches to fit the crib mattresses, had I known in the beginning that was what I was going to use. I made the swing myself, but had help with the A-frame. My friends are envious.

Built from Plan(s)
Estimated Cost
$200
Estimated Time Investment
Week Long Project (20 Hours or More)
Finish Used
Painted with rustoleum white.
Recommended Skill Level
Beginner

Double-wide Chicken Coop

Submitted by Anonymous (not verified) on Sat, 09/12/2020 - 10:13

This was a fun build, though it took me quite a while because I decided to paint the interior. I ended up making it twice as wide to accommodate our six chickens. It took some planning but in the end I had essentially two coops side by side with no dividing wall between them. I also doubled the size of the run.

I cheaped out on the plywood and went with 1/2" - there was a big difference in cost as plywood was hard to find at the start of the pandemic. Using 1/2" turned out to be a big mistake. The 1/2" plywood warped quite a bit after I had painted it making it difficult to use the doors. I may have to replace the doors eventually with 3/4".

Overall I'm very happy with the end result. It's been easy to clean and maintain and the girls seems quite happy in it. This is one of the best looking coops I've come across. Thank you for these fantastic plans!

Estimated Cost
$1200
Estimated Time Investment
Week Long Project (20 Hours or More)
Finish Used
Exterior Benjamin Moore Aura/Regal leftover paint from previous projects.
Recommended Skill Level
Intermediate

Comments

Ana White Admin

Sun, 09/13/2020 - 11:25

Love the double wide modification plus the extra work on finishing it, is the cherry on top! Thanks for sharing!

Camp Loft Bed

Submitted by carongirls on Sat, 09/27/2014 - 15:48

I extended the landing and added rails. 

Estimated Cost
$200
Recommended Skill Level
Beginner

Comments

wrigleysmama

Mon, 06/01/2015 - 12:06

I love your modifications with extending the landing. Do you have more pictures that show the whole thing? Did you by chance write down any notes with what you did differently? We are building this bed next week and would love to make a "deck" like you did.

In reply to by wrigleysmama

Ana White

Sun, 01/22/2017 - 10:39

Hi, Ana here!  I might suggest something like this -

[[{"type":"media","view_mode":"media_original","fid":"3154931926","attributes":{"alt":"","class":"media-image","height":"834","typeof":"foaf:Image","width":"891"}}]]

Basically just increase the length of the side pieces first to however long you would like the deck to be.

Then, if you need extra support, add legs on the inside of the platform where needed.  On the front side if you are doing railing you could even extend the front leg up so it is part of the railing too.


You may need to add additional supports for the deck boards, shown in green above, but this should be easy enough to do.


Hope this helps!

DIY Glass Top Vanity

For anyone who is interested in building their own glass-top vanity with pull-out drawers :)

Estimated Cost
$150
Estimated Time Investment
Weekend Project (10-20 Hours)
Finish Used
Valspar Ultra White
Recommended Skill Level
Intermediate

Comments

Shoe Dresser

Submitted by Anonymous (not verified) on Sun, 10/25/2020 - 07:57

I've been wanting to make this for so long! I still have a couple blemishes to touch up but I'm super pleased with how this turned out. Easy construction and tons of customization options! THANK YOU ANA!!!

Built from Plan(s)
Estimated Cost
$150.00
Estimated Time Investment
Weekend Project (10-20 Hours)
Finish Used
Minwax Polycrylic. Semi-gloss.
Recommended Skill Level
Intermediate

Comments

Planter bench

I built this bench for a Christmas present. She loves to work in her garden and I thought this would be the perfect touch. The plans were easy to follow. I made a few minor adjustments to fit the lumber I had on hand. The center bench is only 4 foot wide so I could conserve on the amount of 2x4 I had to buy. I thought the bench turned out great!

Estimated Cost
$130
Estimated Time Investment
Weekend Project (10-20 Hours)
Finish Used
Golden oak stain
Recommended Skill Level
Beginner

Comments

Big Kids Picnic Table

Submitted by JoeP on Thu, 11/13/2014 - 16:44

Our kids love this table.  Everyone had to put their handprints on it!

Built from Plan(s)
Estimated Time Investment
Afternoon Project (3-6 Hours)
Finish Used
Orange left over paint, finger paint for the hand prints and satin polyurethane.
Recommended Skill Level
Beginner

PIrate ship for my sons pirate party

Submitted by Uberhandy on Mon, 01/28/2013 - 21:36

I made this for my sons pirate party. It has an entrace under the plank to the pirateships "basement"

Estimated Time Investment
Week Long Project (20 Hours or More)
Recommended Skill Level
Intermediate

Comments

My first dining table and chairs project

Submitted by Javata on Wed, 02/06/2013 - 17:19

We used carraige bolts to make the legs removable. Very happy with the results!

Built from Plan(s)
Recommended Skill Level
Beginner

Comments

Javata

Thu, 02/07/2013 - 05:16

Jake,
Thanks so much! I spent about two months working evenings and weekends as weather permitted, to complete this project. My daughter chose two stain colors and we mixed them together. I'm happy with the way the color came out.

Debbie440

Thu, 11/21/2013 - 18:27

I made the same 30" tall bar stools. I love the whole look of your set. Did you adjust the height of the table for the chairs? Or is the table high enough for these chairs? Also, did you make the table top smaller?

You did a great job!

Javata

Sat, 11/23/2013 - 18:13

Debbie,
Thanks so much for the compliments! My daughter didn't like the "plank" version of the table top so I used oak plywood and framed it with oak 1X4s. I believe the measurements of the table are 48" by 48". I don't think I adjusted the chair height but I did add a foot at the bottom of the table legs. That may have added an inch or so to the overall height of the table.

Chris22

Tue, 02/10/2015 - 13:22

I really like how you added the foot and removable legs to this table! I would like to make mine with removable legs as well. How did you modify the table to use the bolts?

velvetechos

Tue, 07/14/2015 - 06:31

Hello! This plan is EXACTLY what I am looking for except there is a huge difference.......it will be the ritual platform for a traditional Tibetan Sand Painting.  I am seeking a plan just like this for a square table that is 6' square and 3 1/2' high......is it possible to purchase a plan of that dimension or does anyone have a recommendation where I can find that.  THIS would be truly lovely in this design.  THANKS for any help!!!  

Javata

Thu, 07/16/2015 - 12:08

I really just followed the Ana White plans for the Pub Table but used one solid piece of plywood instead of the 1x4s for the top. Since plywood comes in 4x8 foot sheets, you might need to get creative to get it to 6 feet. Good luck, and don't forget to post pictures when you finish!

Crayola2

Sun, 06/21/2020 - 11:52

I really want to make there chairs too! Please post the link to the plans.

Planked Headboard / Waterbed Build

I don't have photos of the build but I did acquire some pictures of the assembly.
 
What we added to the shopping list for a king was 3 1x6x8's (he bought 6 total instead of 1x6x10's) and 1 1x4x8. To build it in a king or California king just take a measurement of the top or bottom of the bed frame to find the length to all of the horizontal boards. This takes care of the headboard. For the frame we simply built it to fit out of four 2x10x10's. 
 
I also used my Kreg Jig to attach all of the center horizontal boards together with pocket holes instead of adding supports to the back.
Built from Plan(s)
Estimated Cost
$150.00 for the entire bed.
Estimated Time Investment
Weekend Project (10-20 Hours)
Finish Used
Rust-Oleum English Chestnut
Recommended Skill Level
Beginner

Double square X pedestal dining table

Submitted by eklein21 on Wed, 12/31/2014 - 11:44

Thanks for the great plans. I modified them slightly by building a 60x40 farmhouse style top and a double pedastel. The other change is that I made the side 4x4s into 2x4s. 

Estimated Cost
~$200
Estimated Time Investment
Week Long Project (20 Hours or More)
Finish Used
General finishes gel stain in brown mahogony (https://generalfinishes.com/retail-products/oil-base-wood-stains-sealers/oilbase-gel-stains#.VKRQ2ivF9UM) and finished using general finishes arm-r-seal in satin (https://generalfinishes.com/retail-products/oil-base-top-coats/arm-r-seal-urethane-topcoat#.VKRRDyvF9UM) ... sealer is so strong it was harder to drill through then the wood when attaching the top to the bootom. Started with the pre-stain conditioner as well (https://generalfinishes.com/retail-products/oil-base-top-coats/pre-stain-wood-conditioner#.VKRRmyvF9UM)
Recommended Skill Level
Intermediate

Comments

traciw25

Fri, 08/12/2016 - 12:58

Your table looks great!  Love the farmhouse top and your revisions.


Would you mind sharing what dimensions you went for the table top and what width you went on the doubt pedestal length?


THanks so much!!! I hope I get to have one like yours someday soon :)

Farmhouse Storage Bed with Storage Drawers

Submitted by Anonymous (not verified) on Wed, 03/29/2017 - 12:17

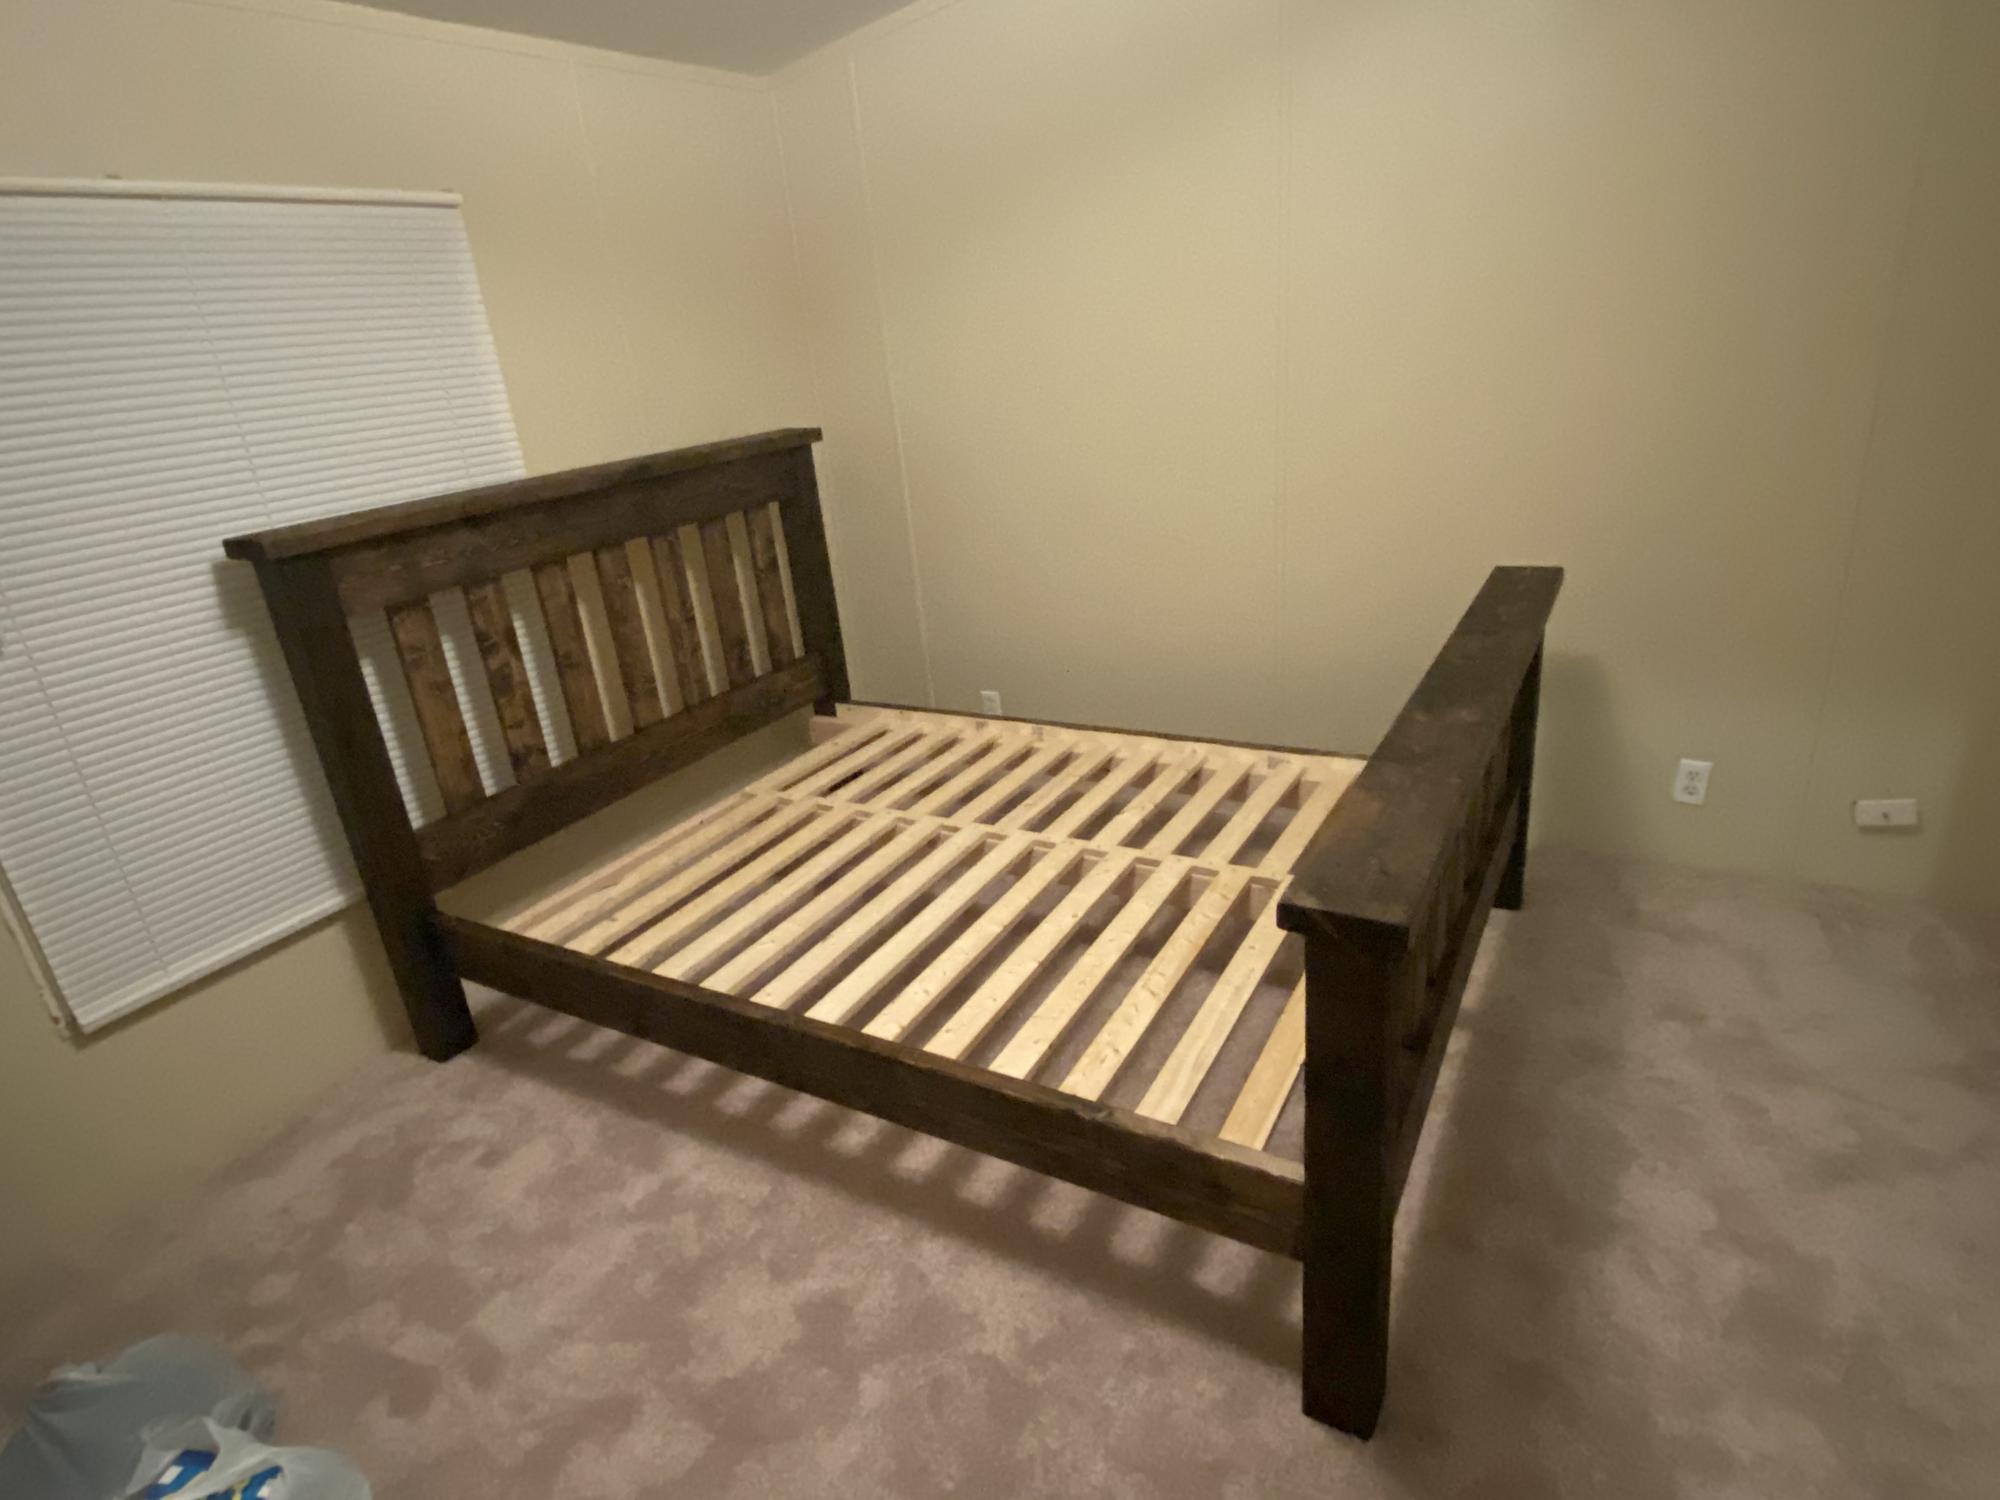
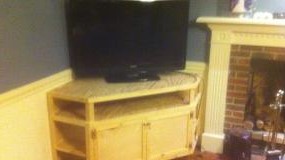
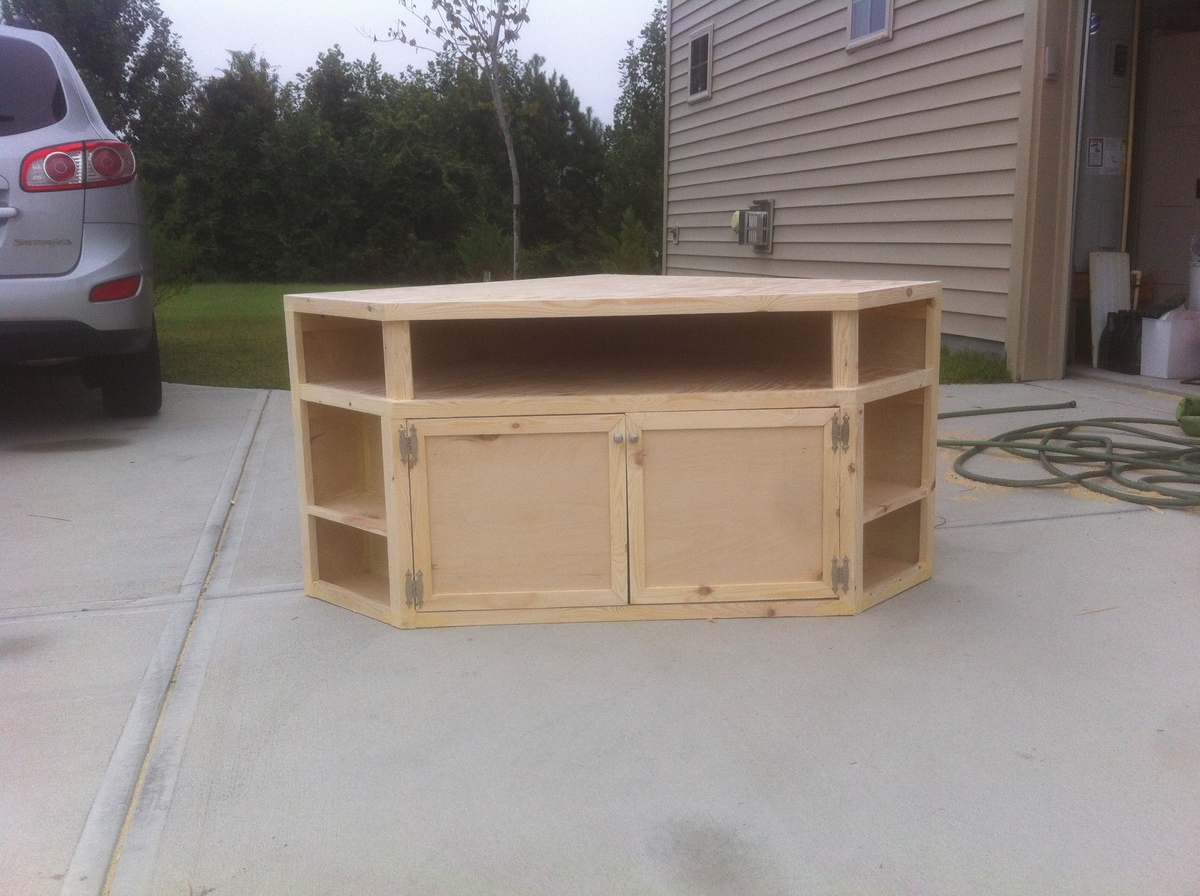
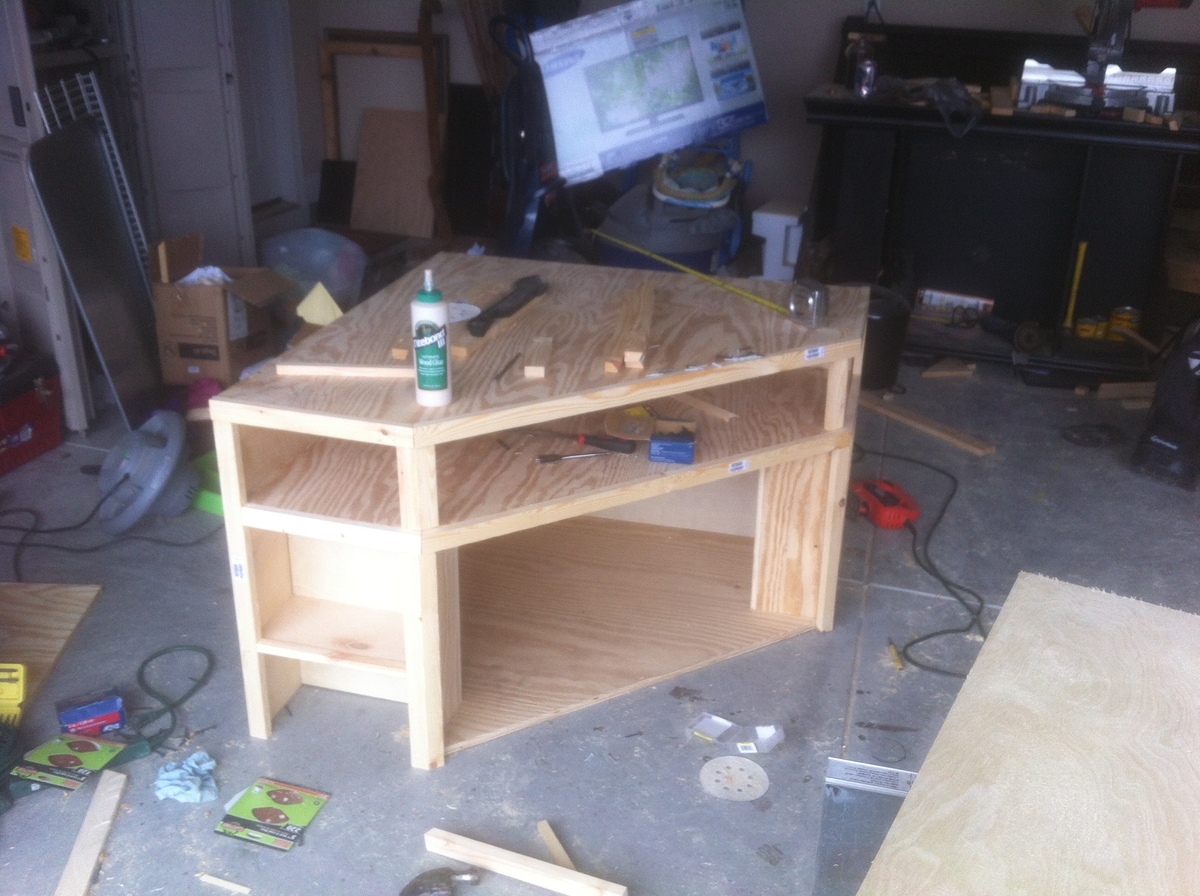
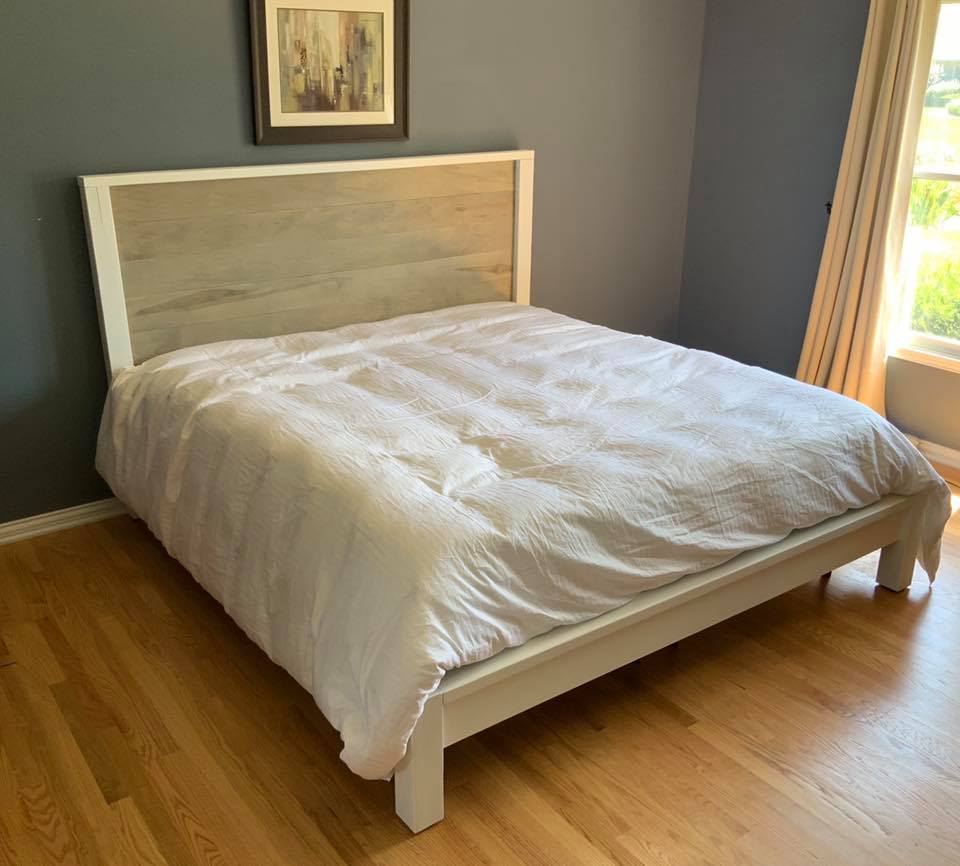
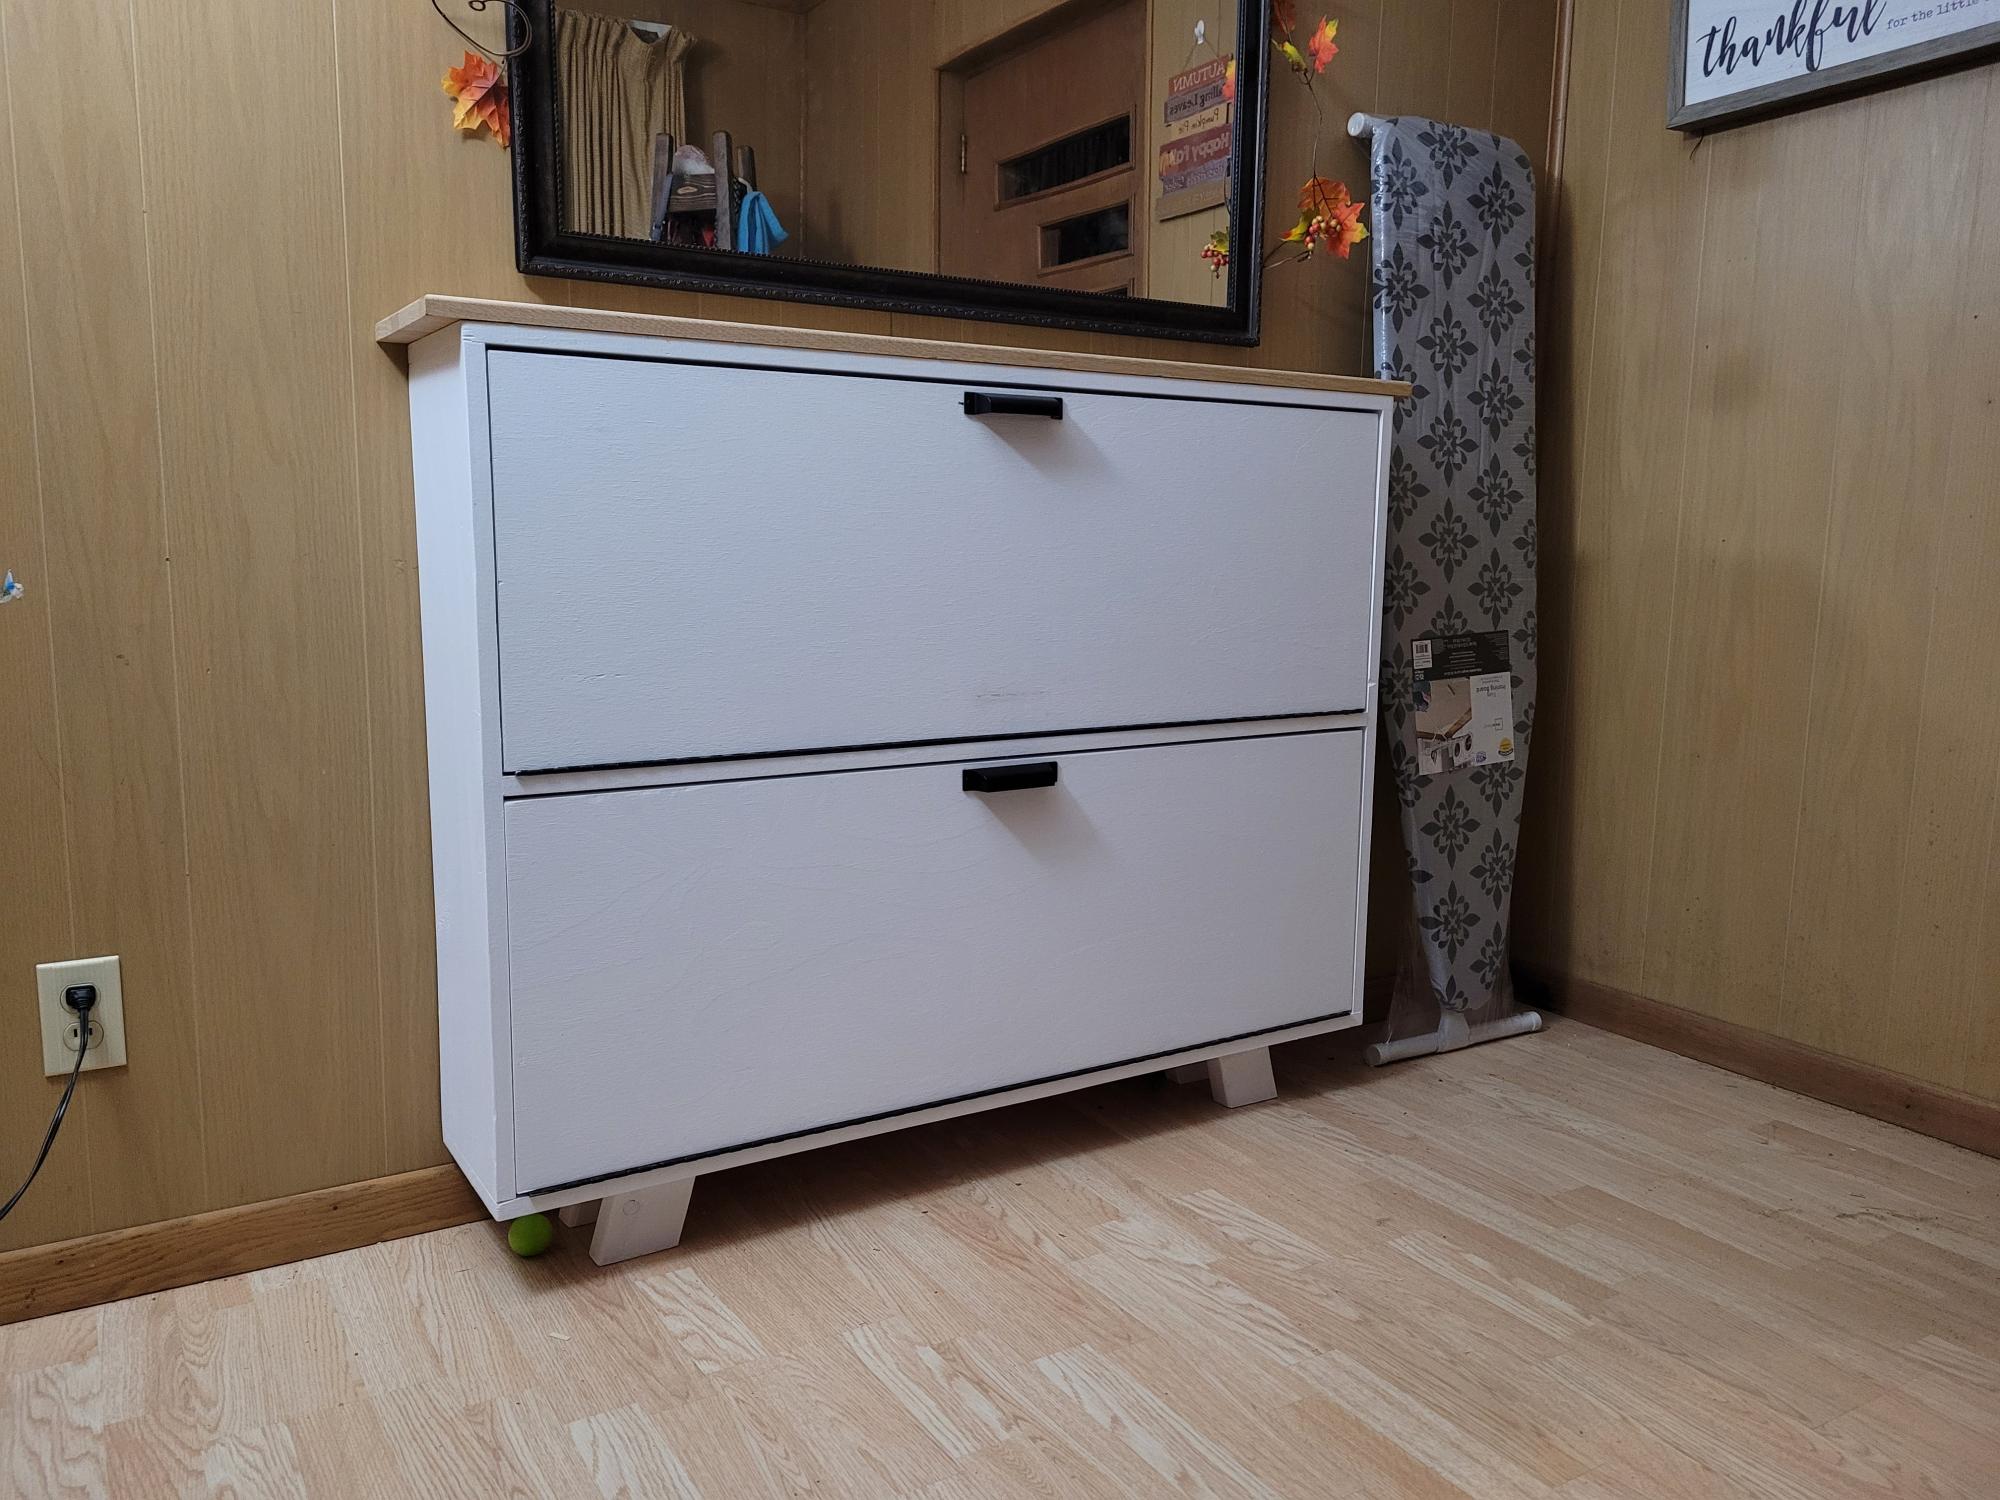
I accidentally found these plans on Anna's website when I was looking for deals on mattress sets.


After mulling it over a while, I decided to give it a try.  It just so happend that it was our anniversary coming up, and I thought hey, better than dinner and a movie.


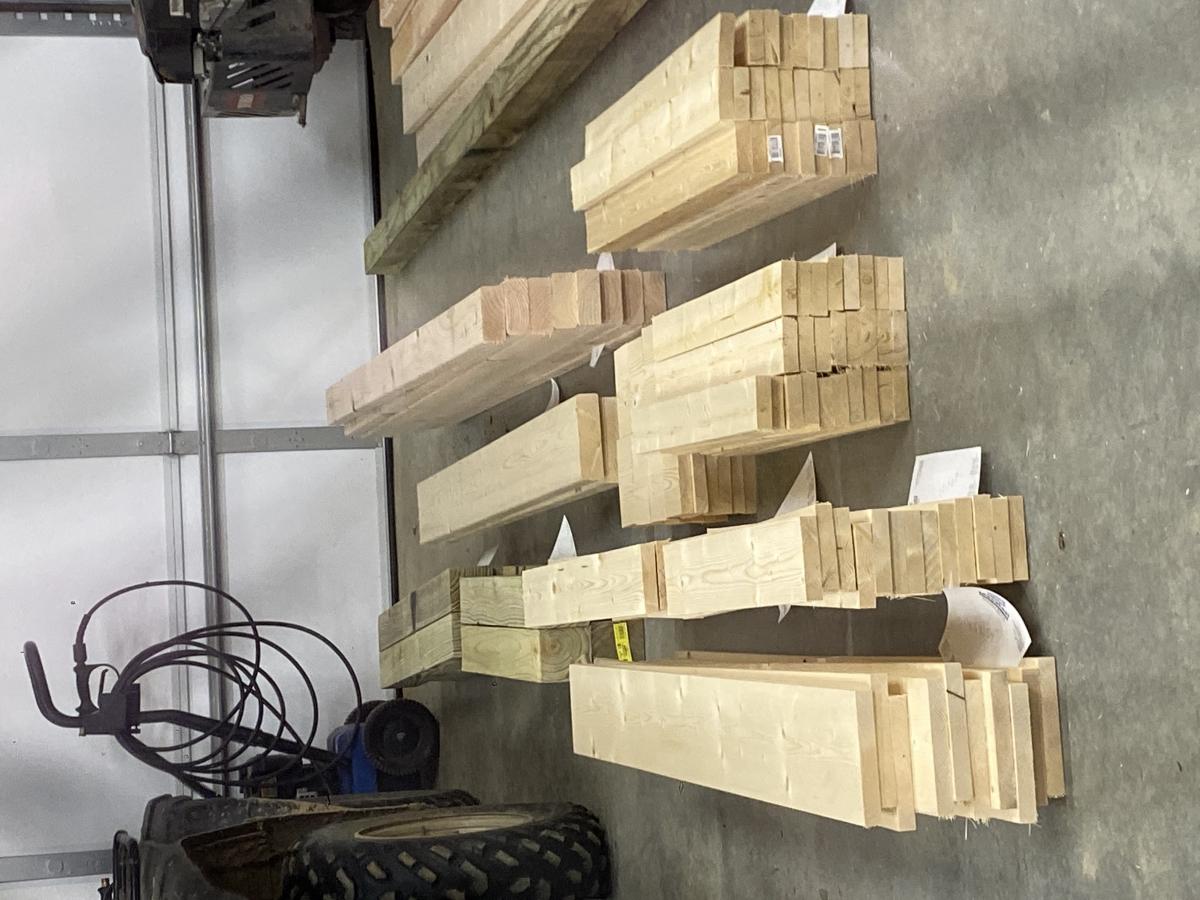
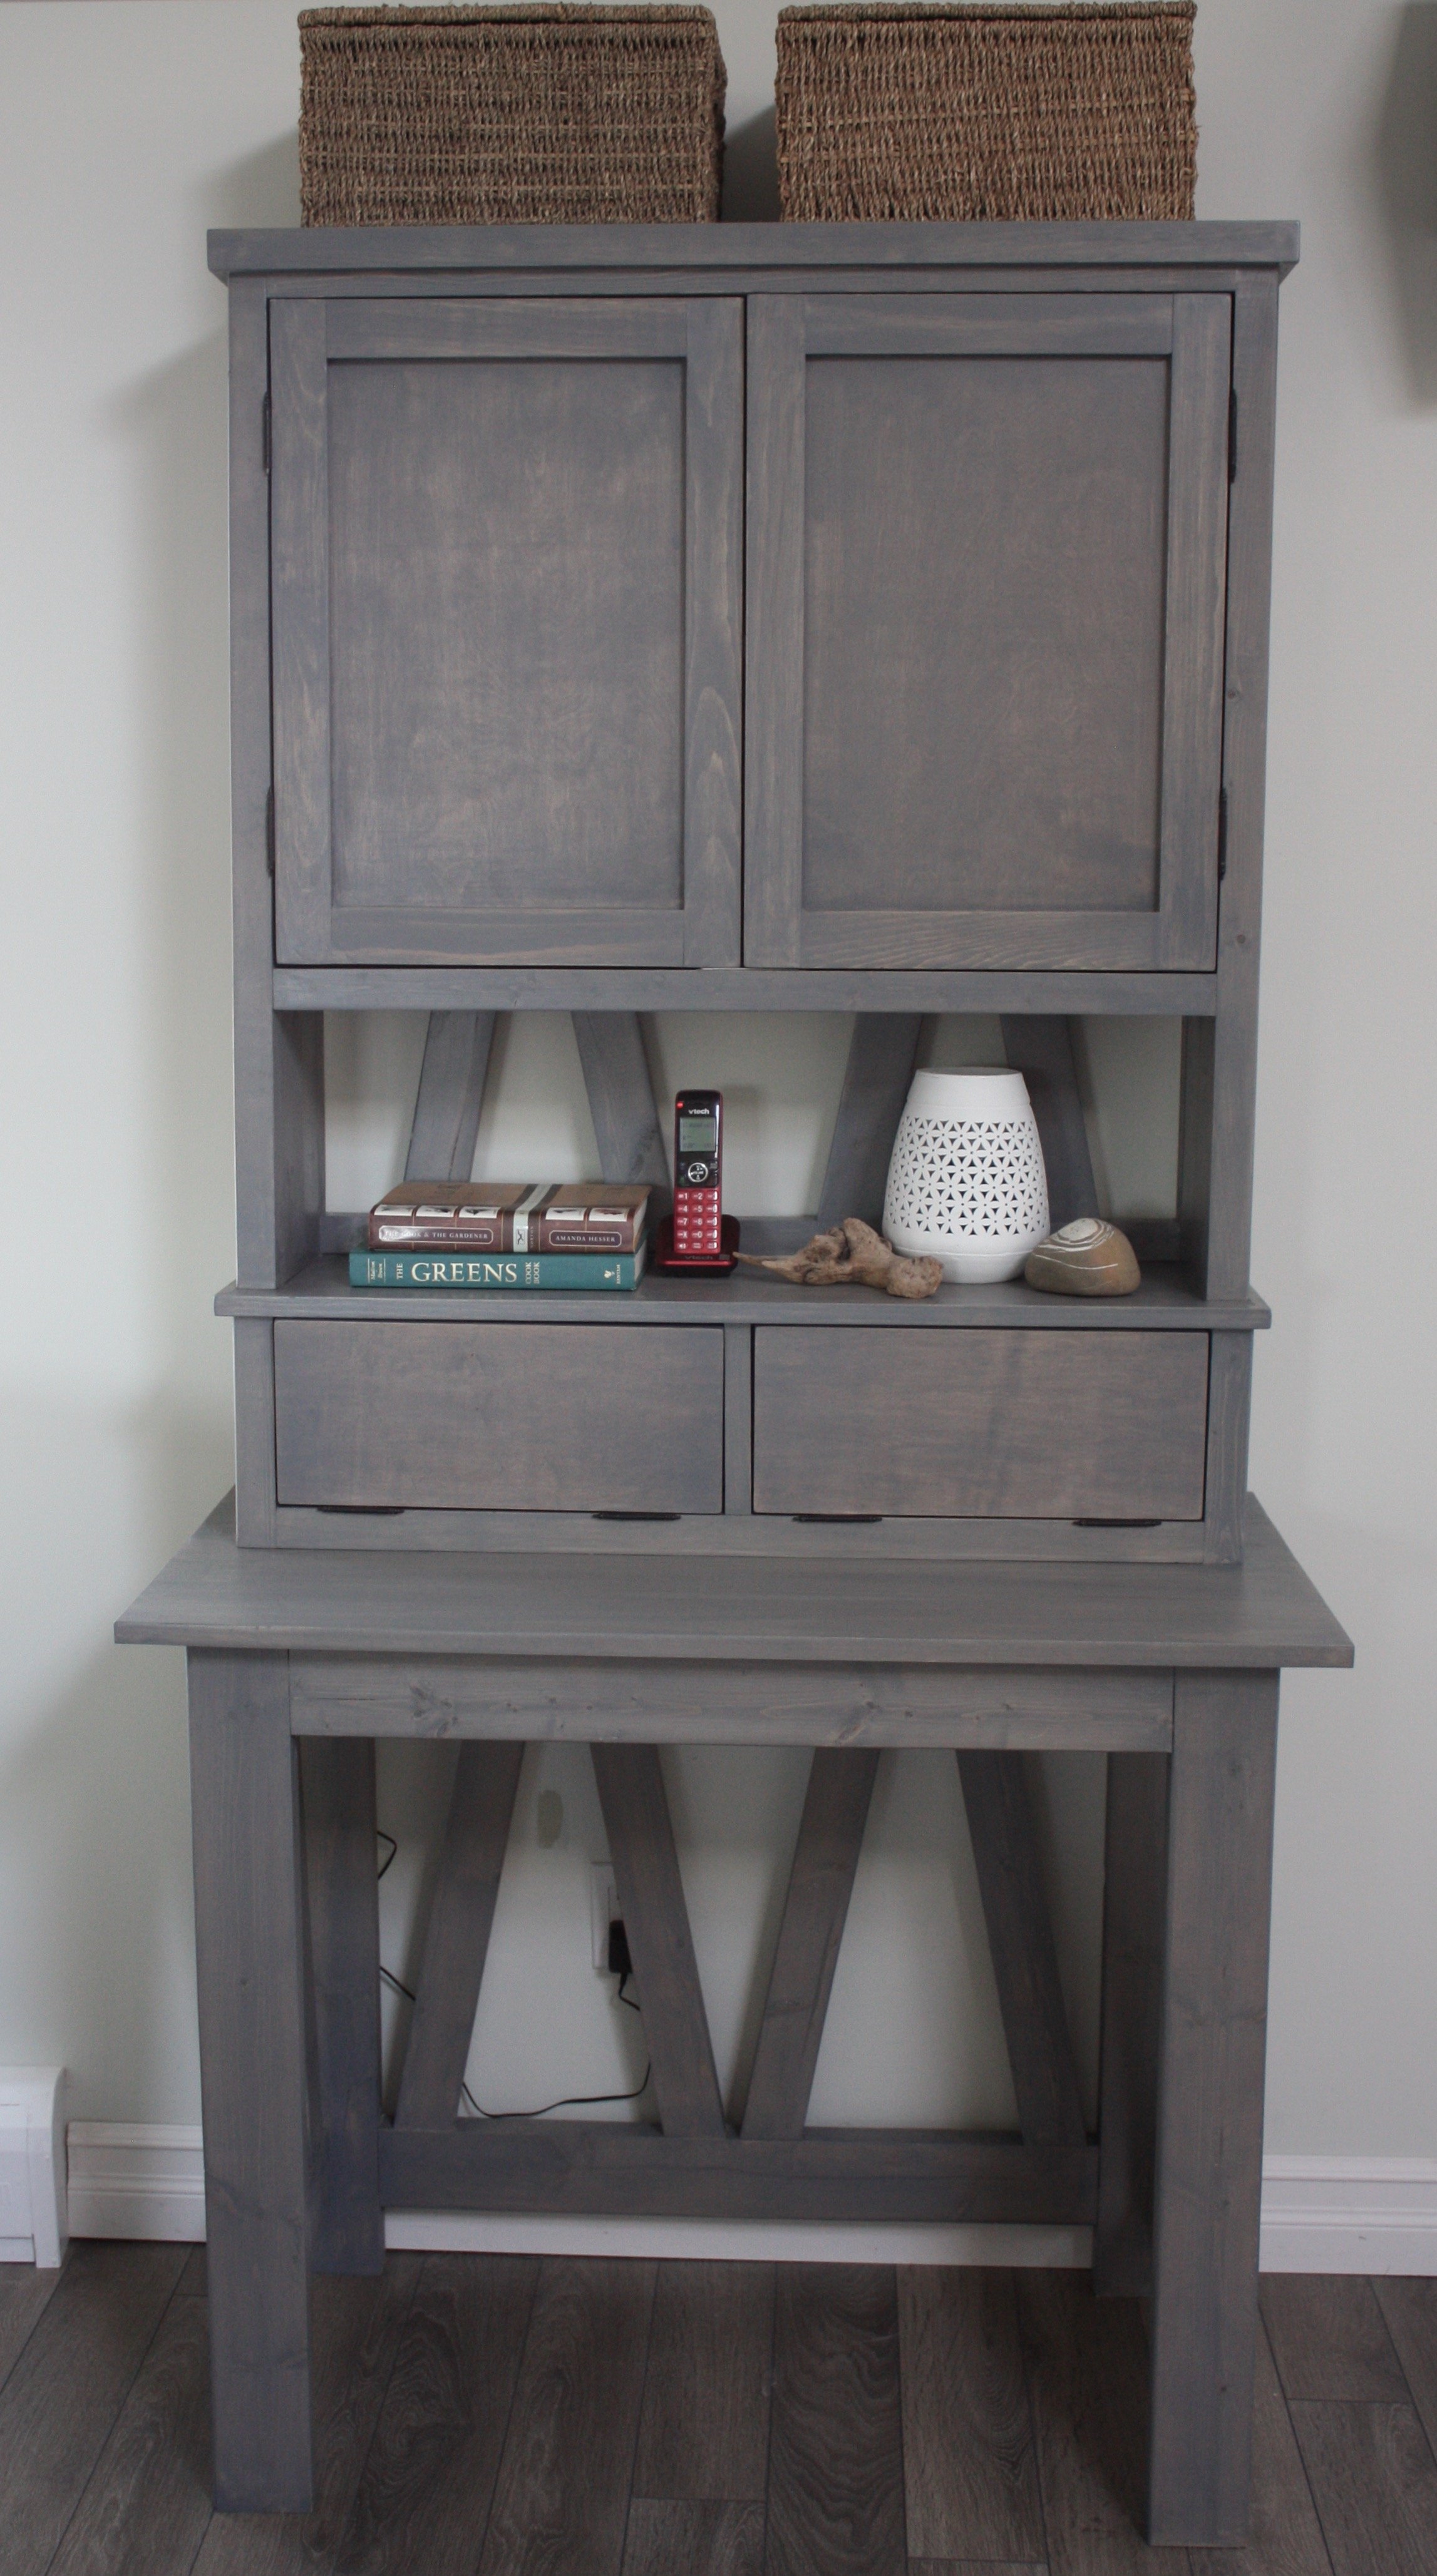
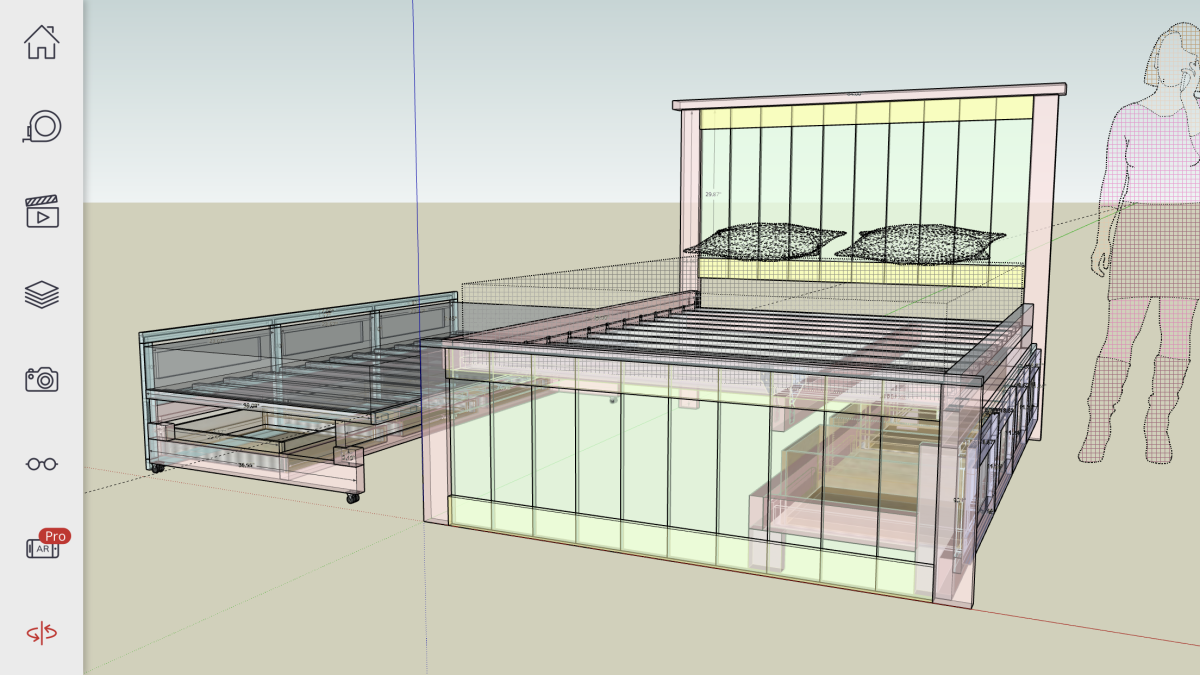
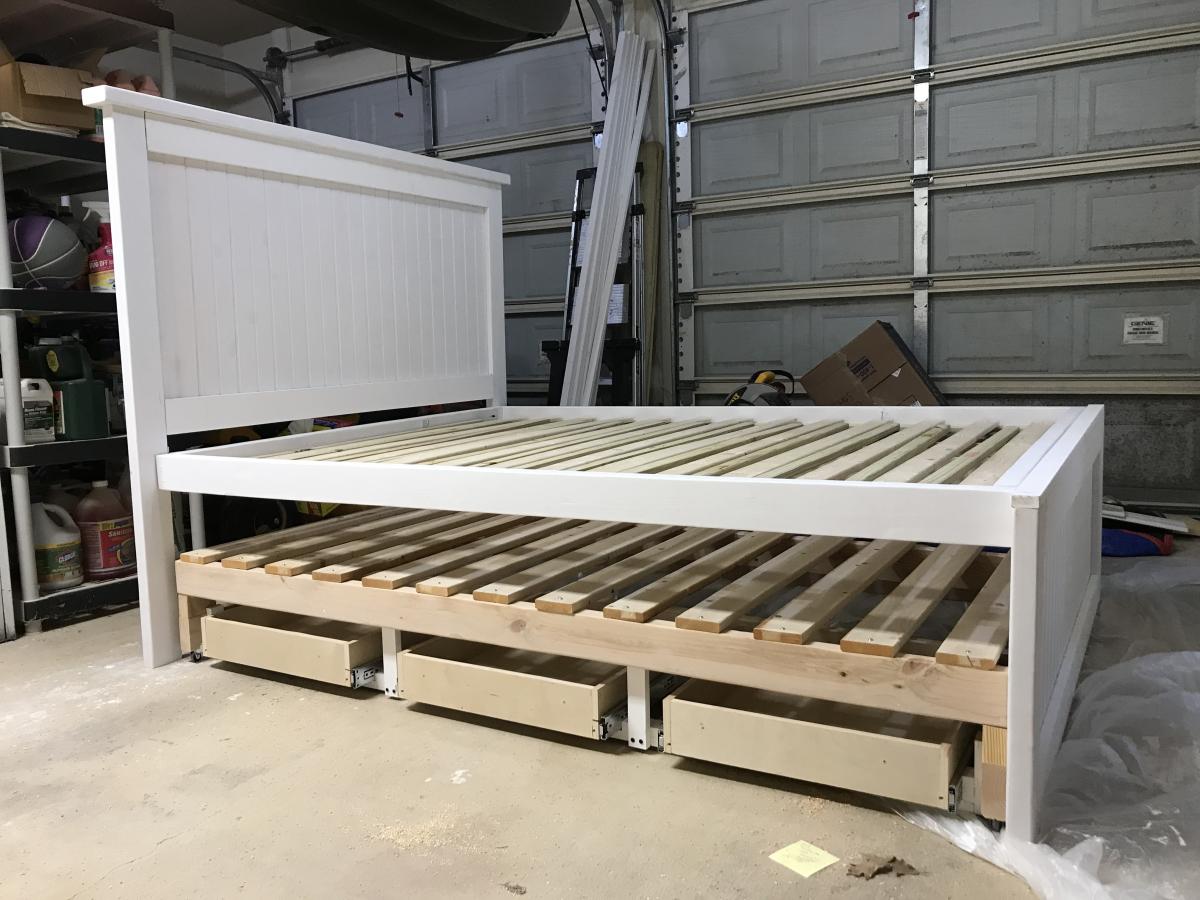
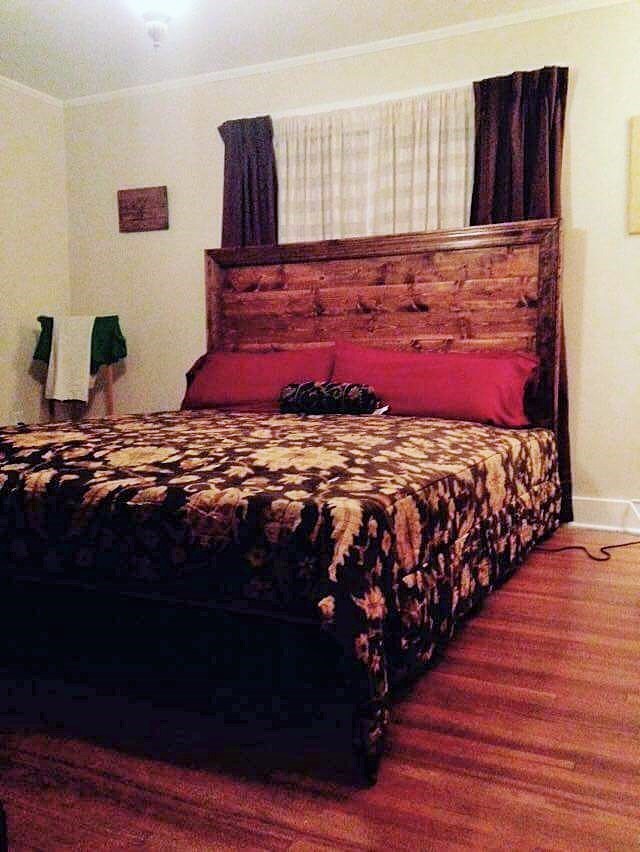
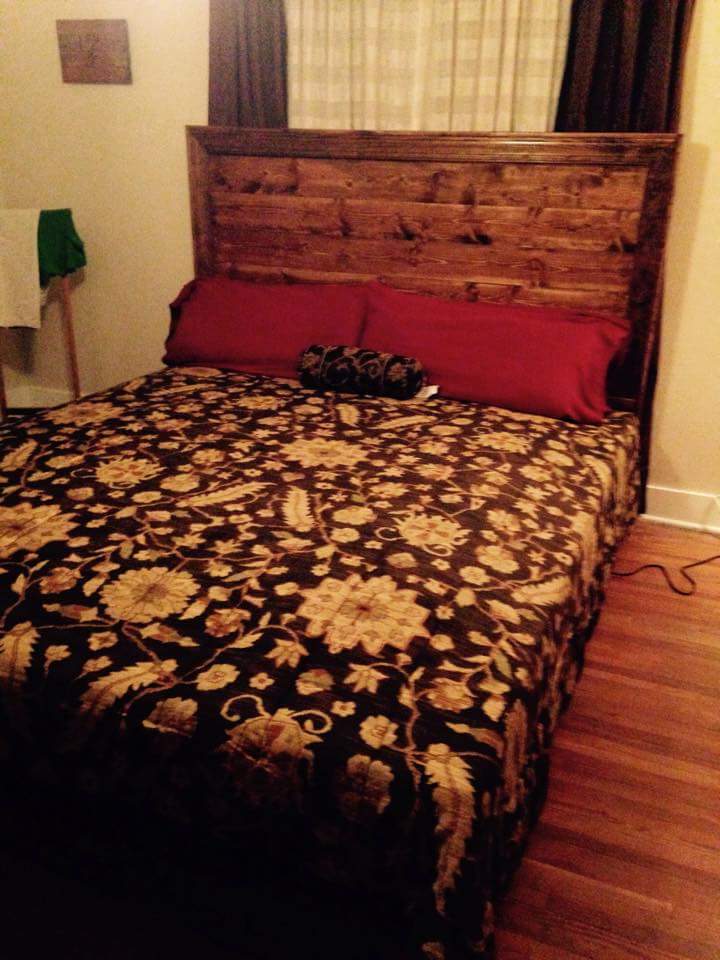
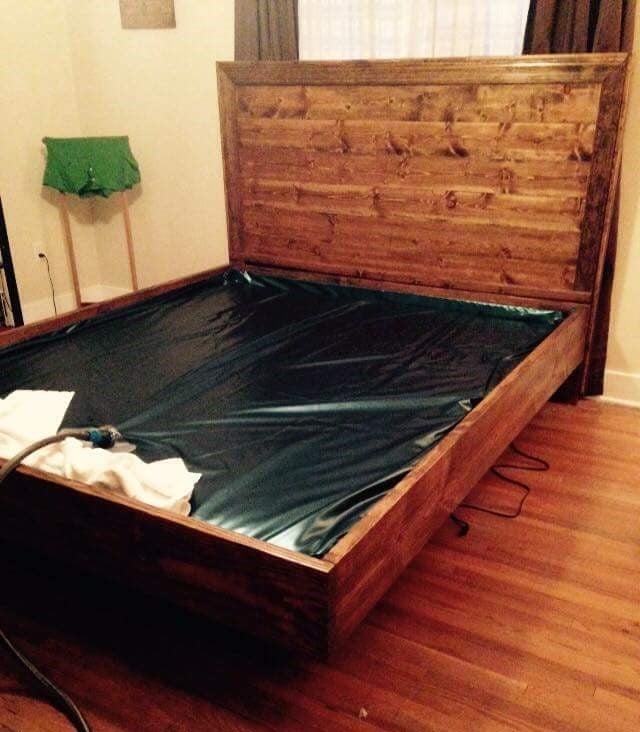
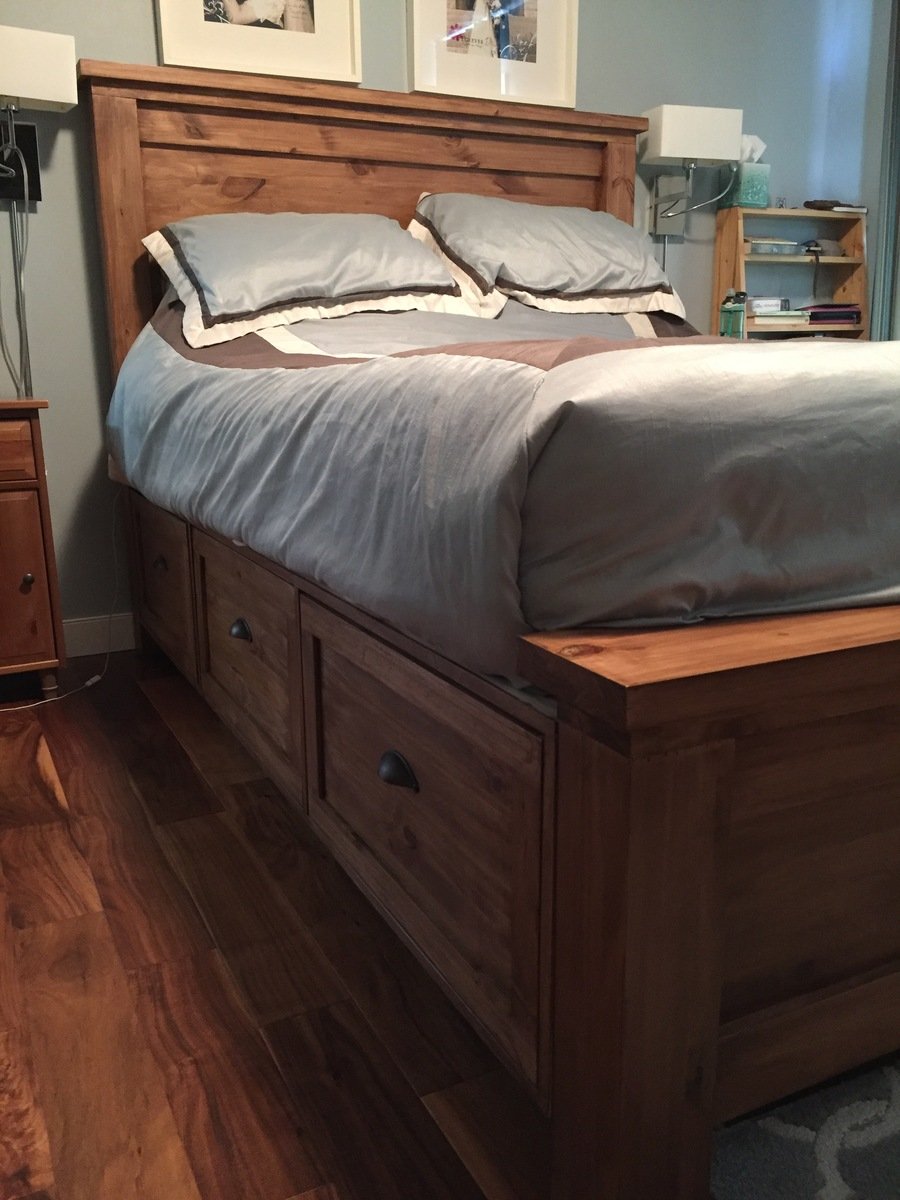
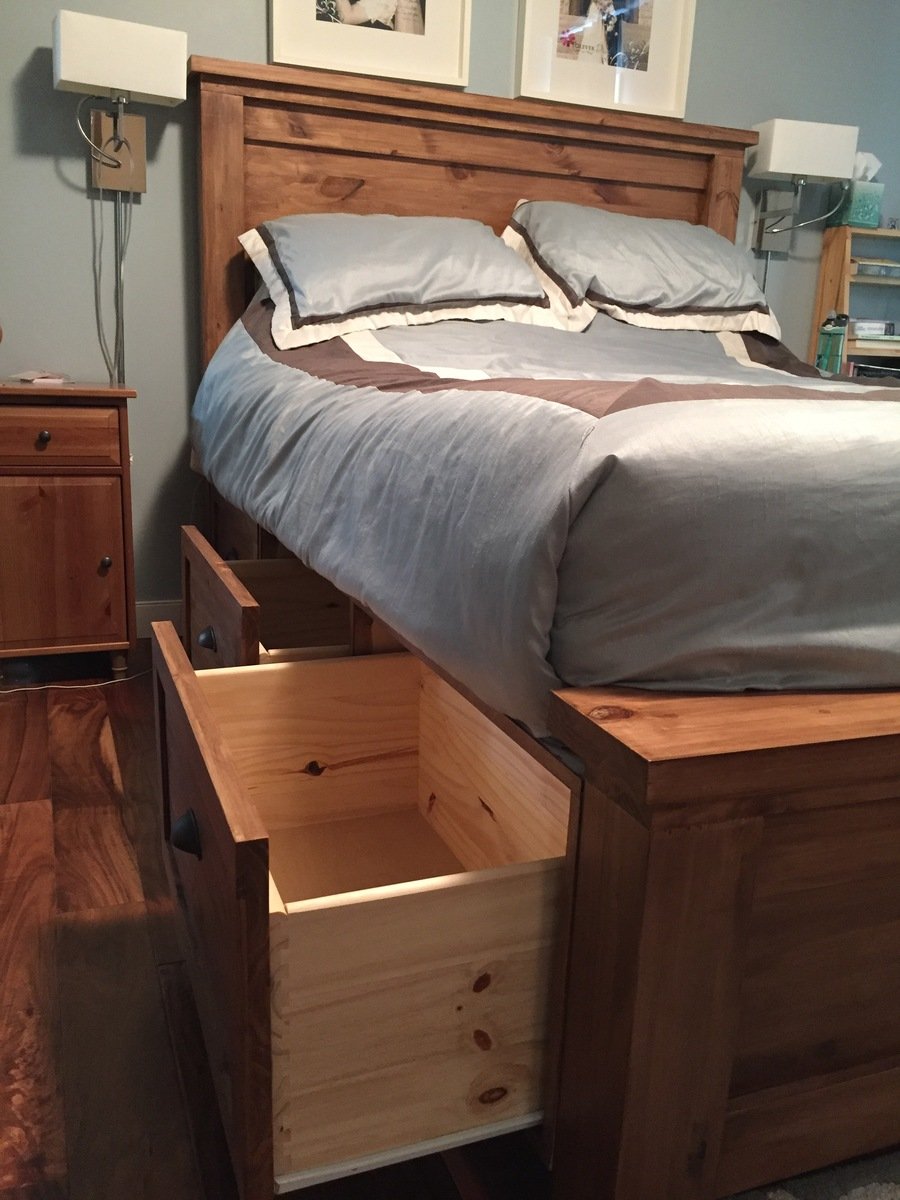
I reviewed the plans, and upgraded the wood to entirely knotty pine. Even the posts.  Since I couldn't buy what the plans called for in knotty pine, I bought cheap pine shelving and milled the pine, then laminated for the posts, 2x4s, 2x6s and drawers.  Easier to work with than plywood.


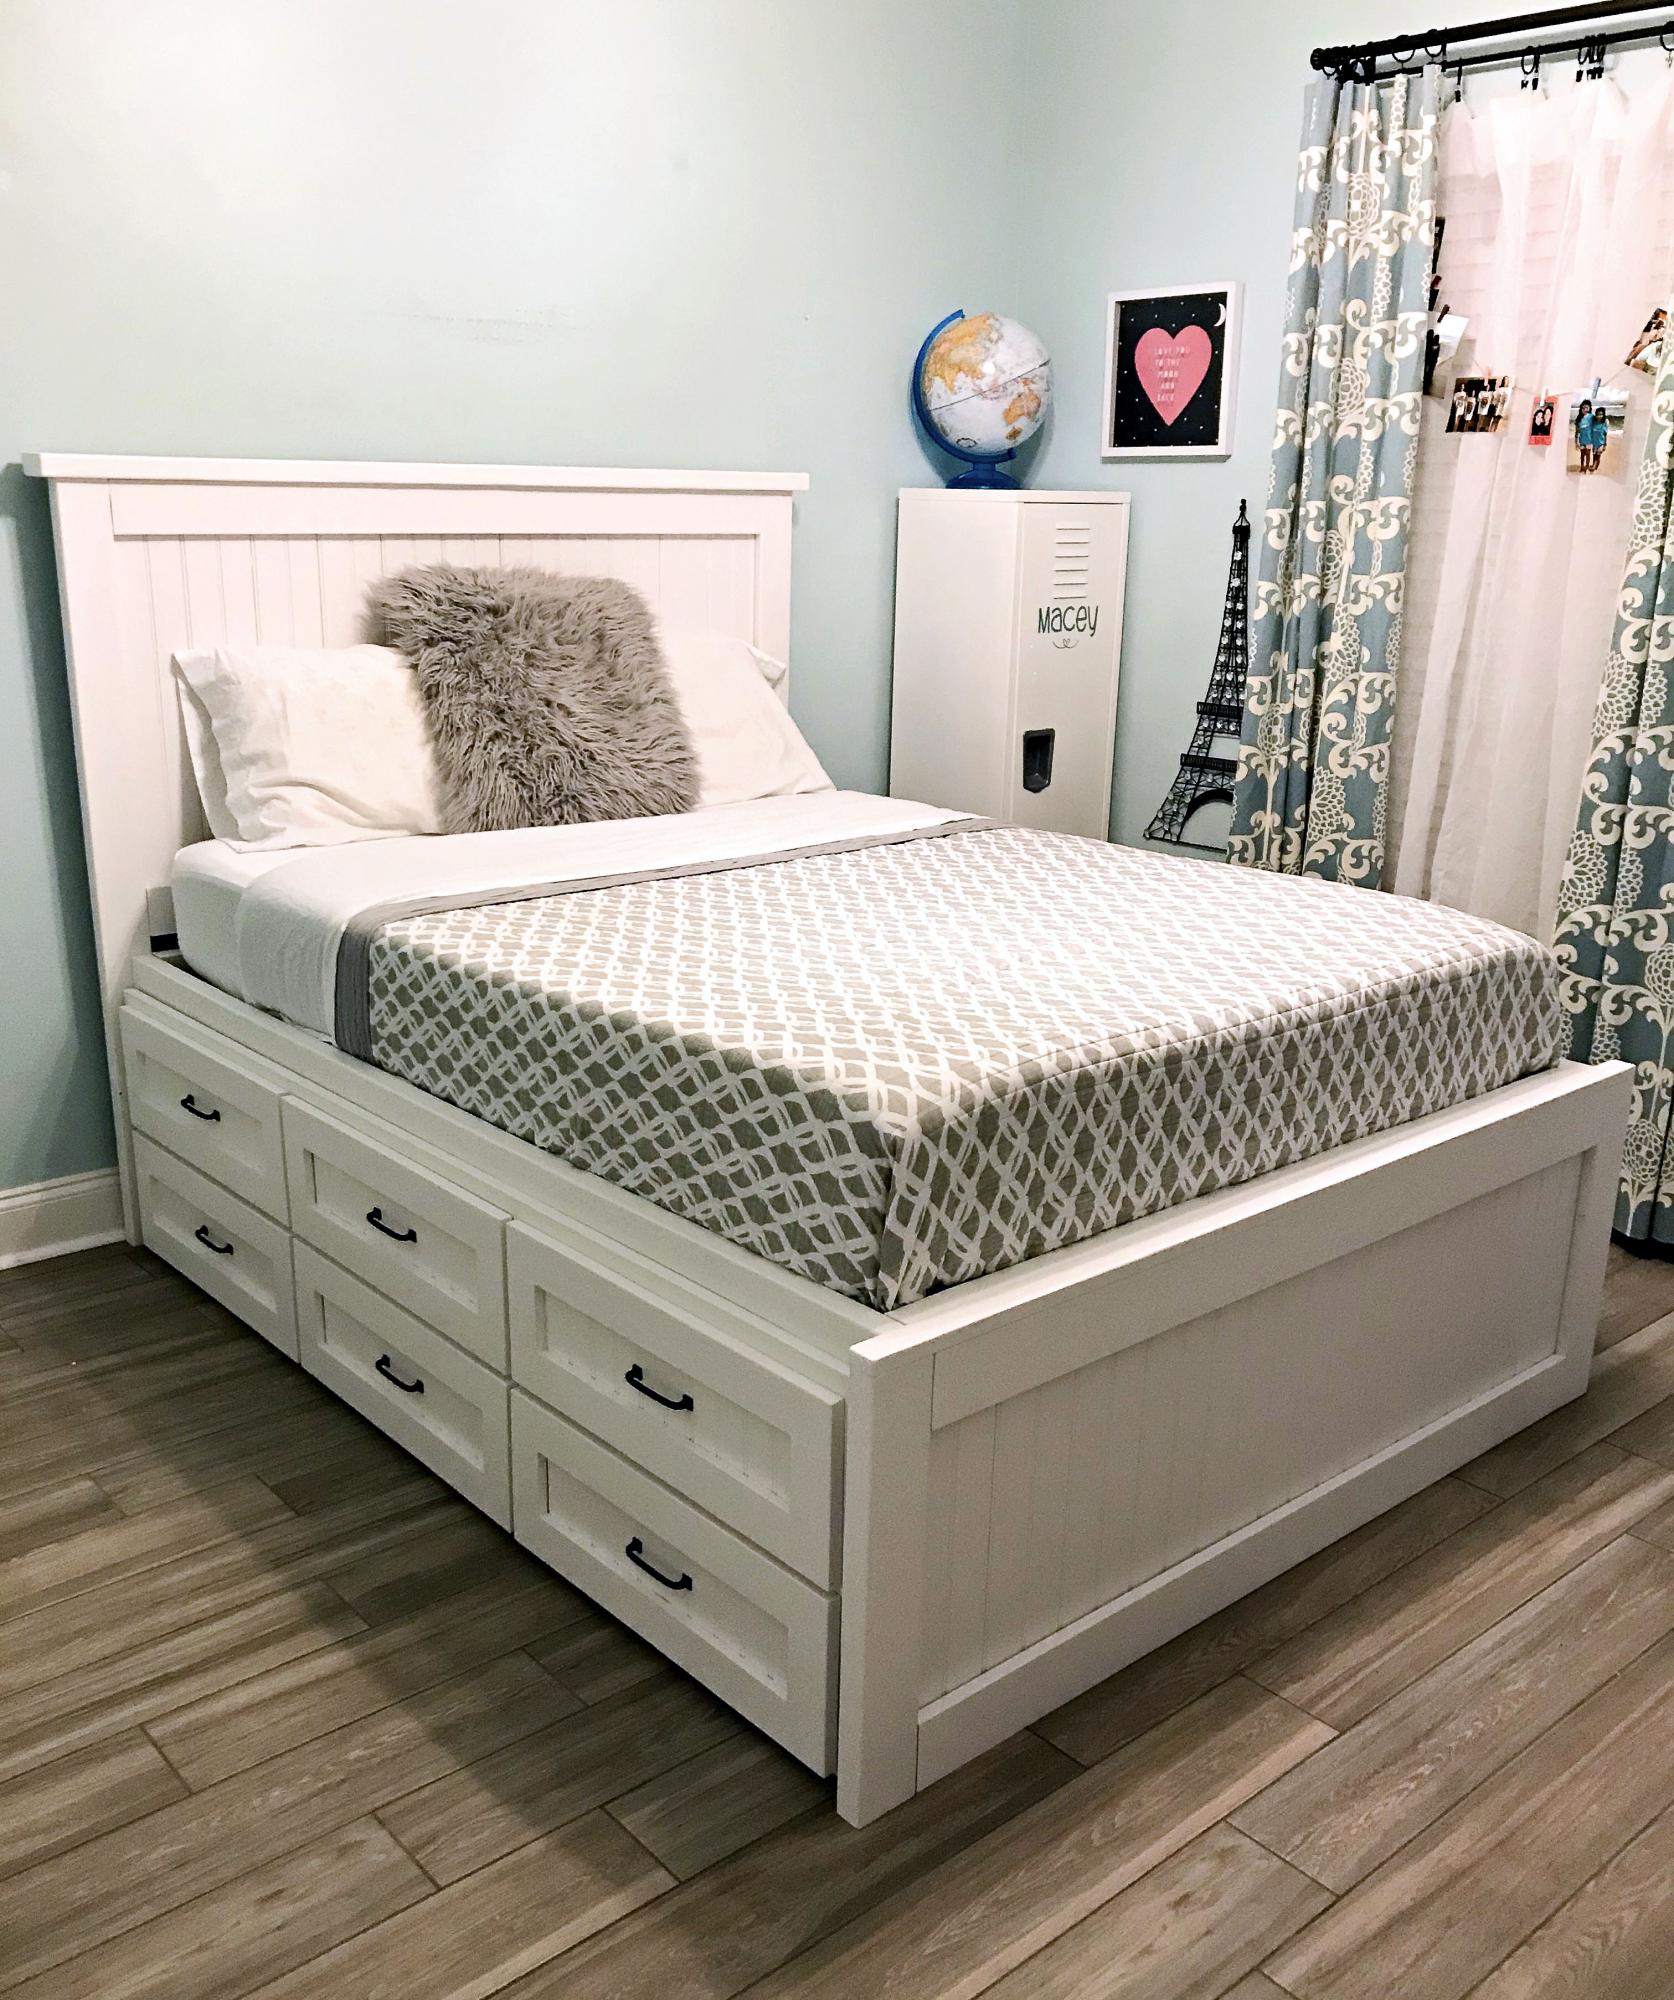
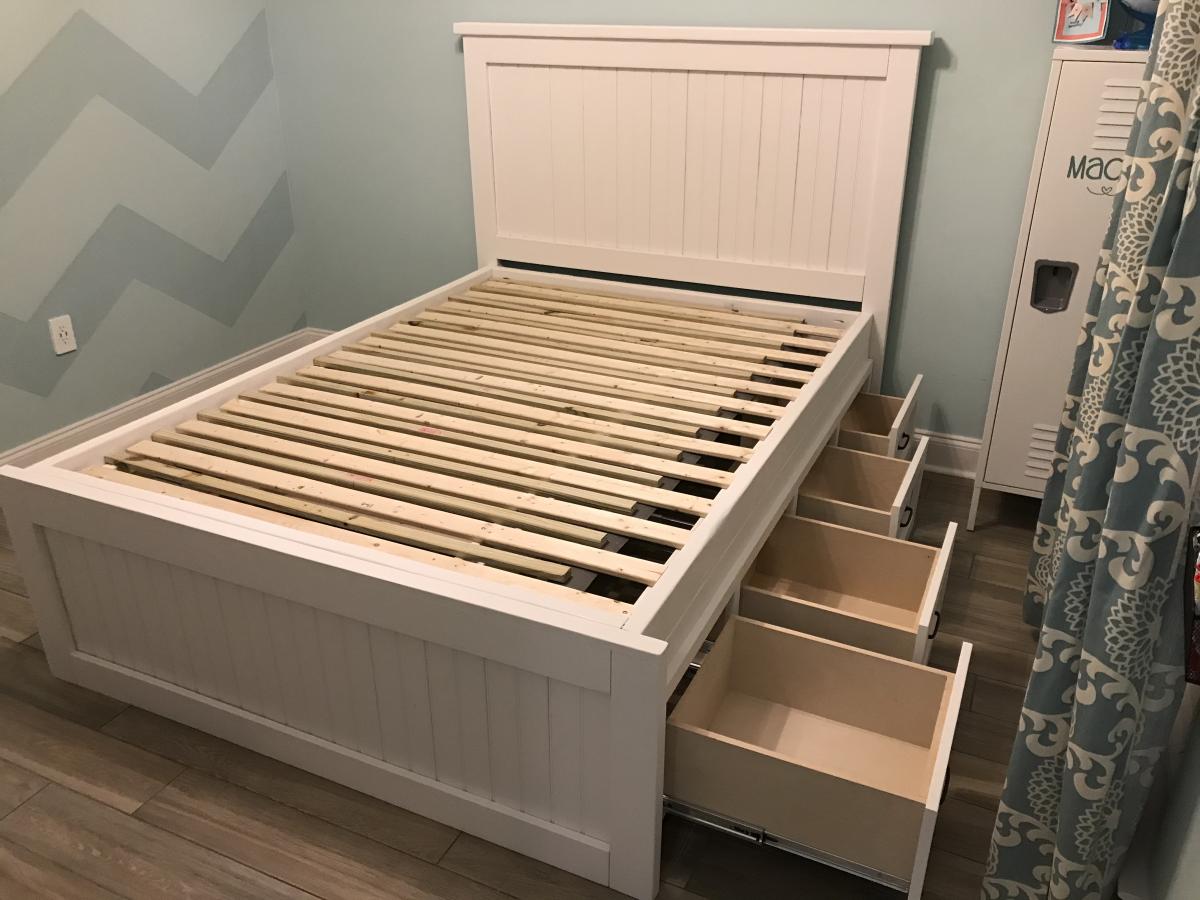
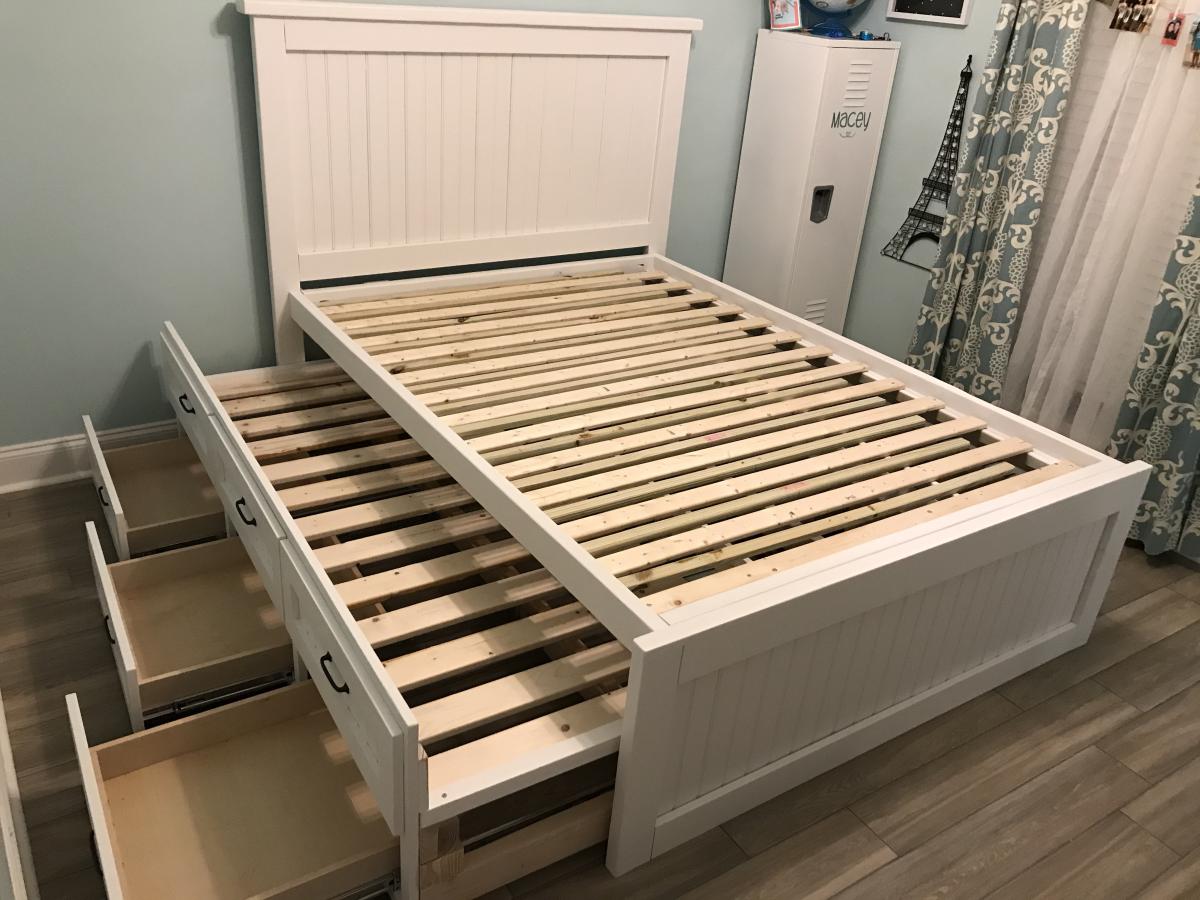
About 35 hours later, I finished the pieces and parts with Polyshades Royal Walnut, and voila!!! 

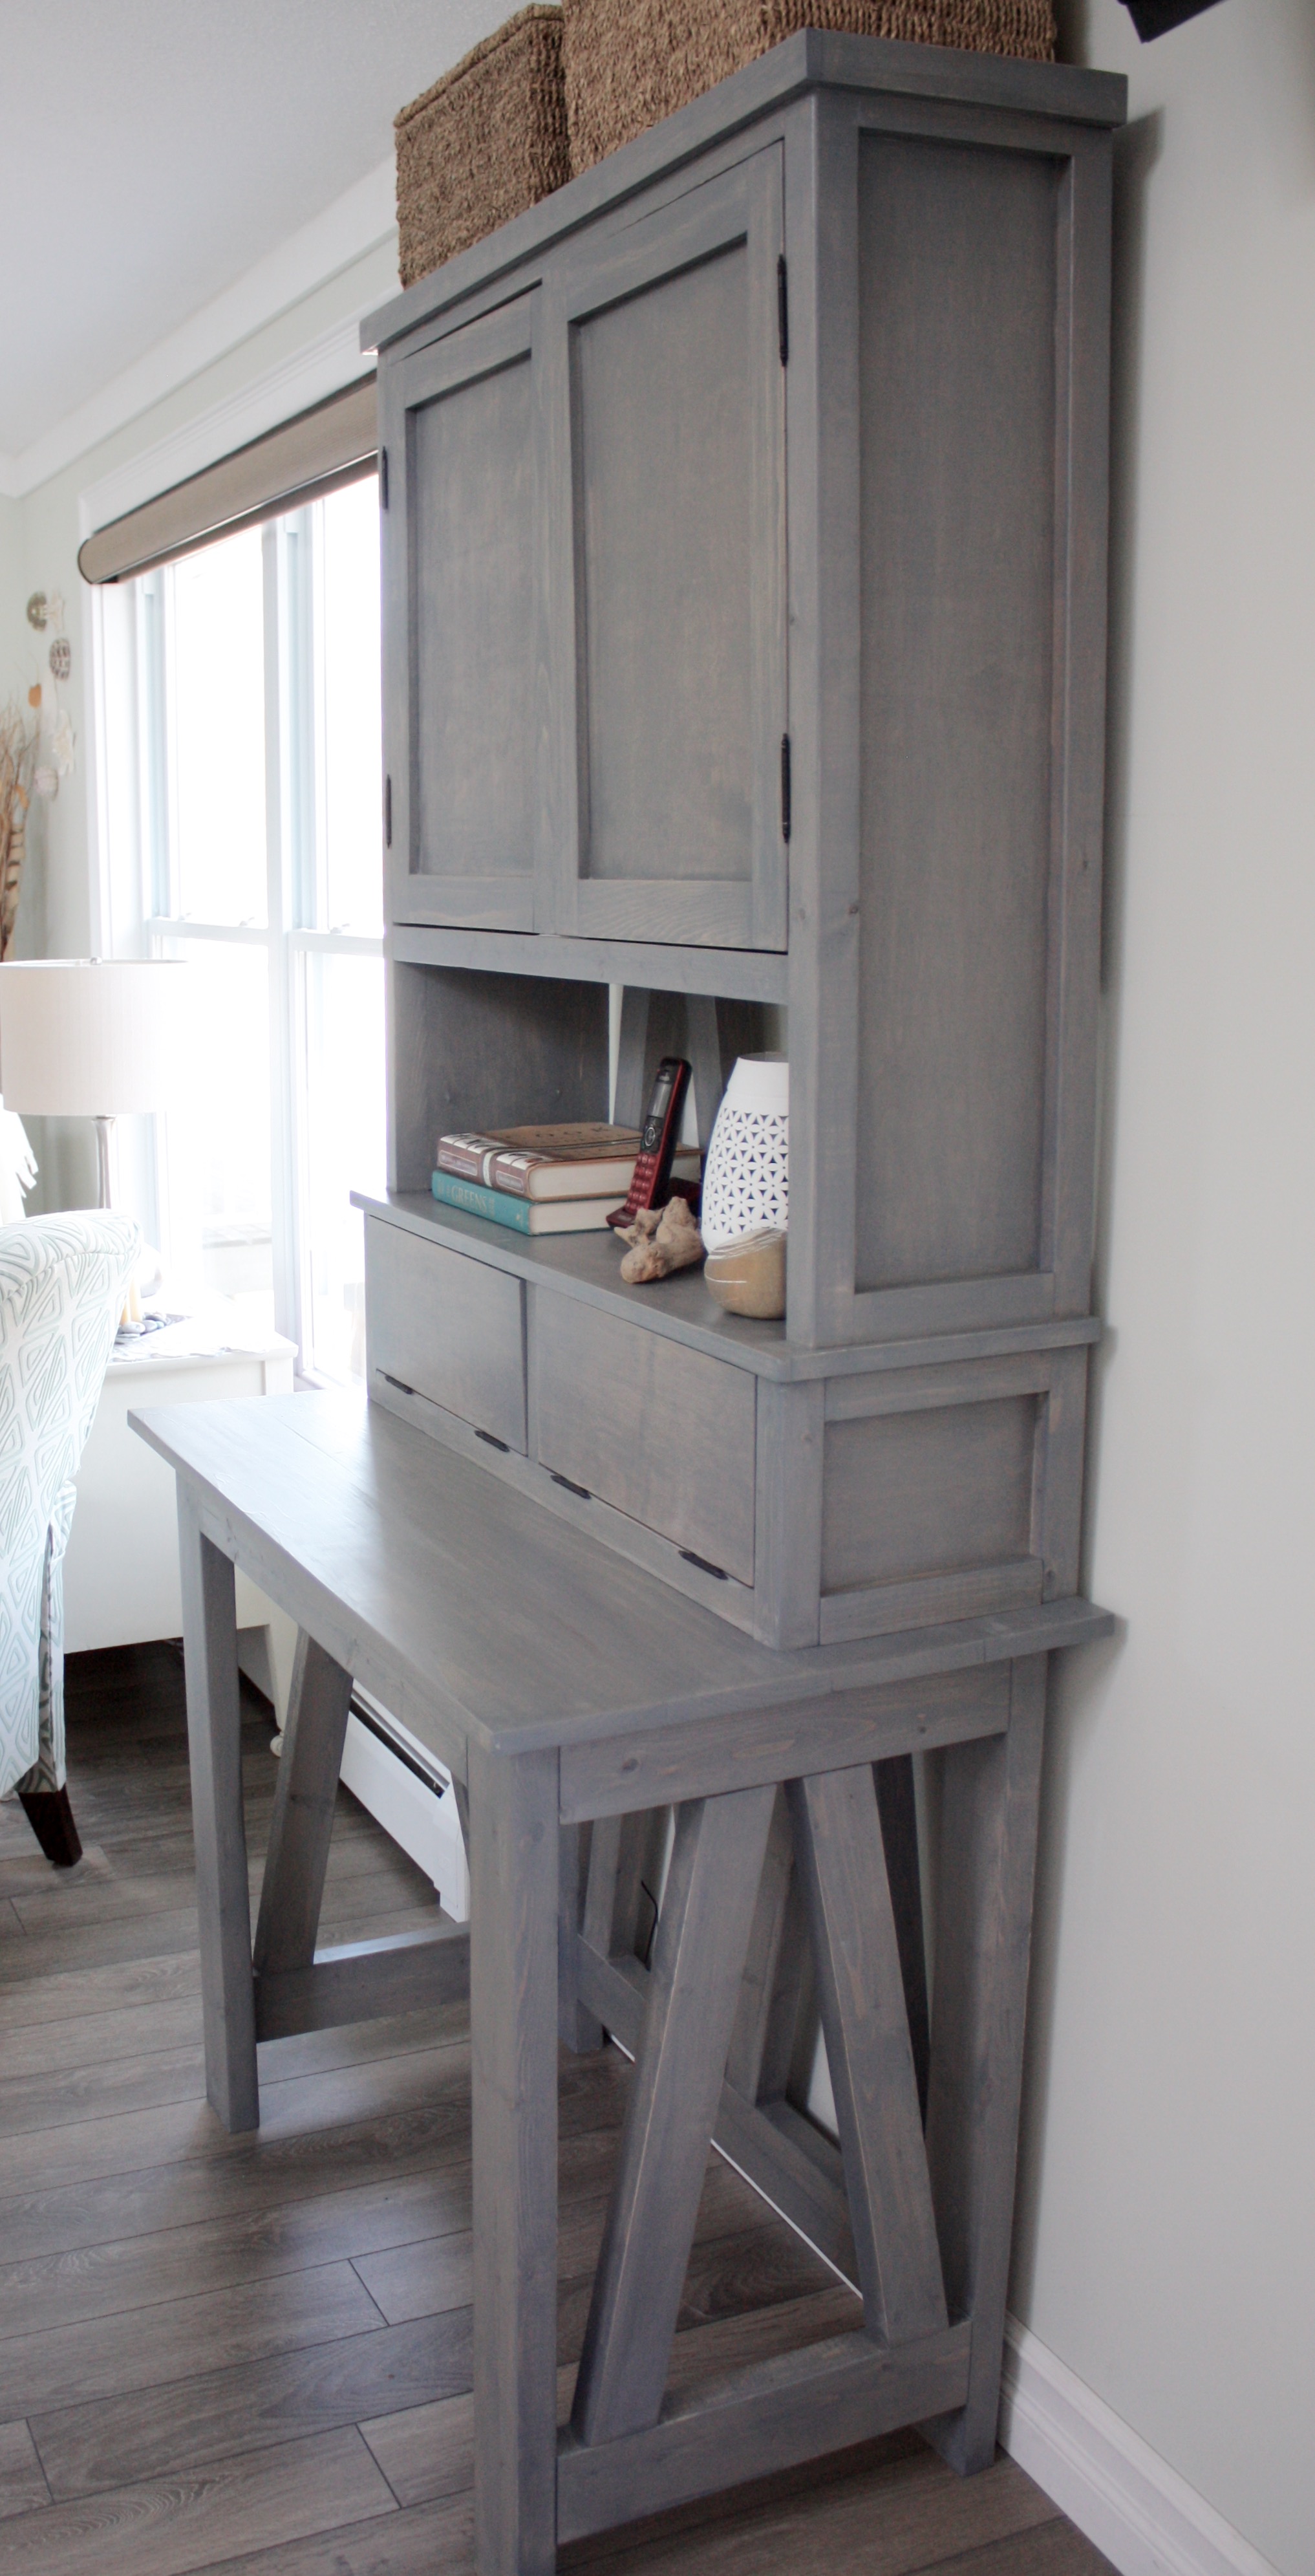
My wife absolutely loves the bed, and now she even has a place to store more shoes!


Estimated Cost
Home Depot
$600 - Pine shelves
$50 - drawers slides
$20 - screws
$40 - stain
Grand Total $700
Estimated Time Investment
Week Long Project (20 Hours or More)
Finish Used
Polyshades- Royal Walnut
Recommended Skill Level
Intermediate

Children's play cafe

Submitted by Markb25 on Fri, 04/23/2021 - 23:15

With another total lockdown happening here in Cyrpus, right at the same time as my Daughter will be on Easter holidays, I'm trying to knock up as much outdoor play kit as I can to keep her entertained and off the iPad.

The design of this was very simple, a 2x2 frame clad with T&G; the countertop, shelves, and roof are from marine grade baltic birch (the roof also has additional levels of water prof membranes, root barriers, etc to support the living roof).

Finish-wise, for the pinks and blues, I've used wood aqua by Kraft paints, and for the counter, shelves, and picnic bench, high protection wood stain in walnut by V33.

Estimated Cost
500
Estimated Time Investment
Weekend Project (10-20 Hours)
Finish Used
wood aqua by Kraft paints and high protection wood stain by V33.
Recommended Skill Level
Beginner

Comments

Ana White Admin

Sat, 04/24/2021 - 06:54

It's all in the details, looks like you're making a little girls dream come true! Thank you for sharing!