Community Brag Posts

Cornhole Boards

Submitted by SaraLodise on Fri, 09/23/2016 - 13:15

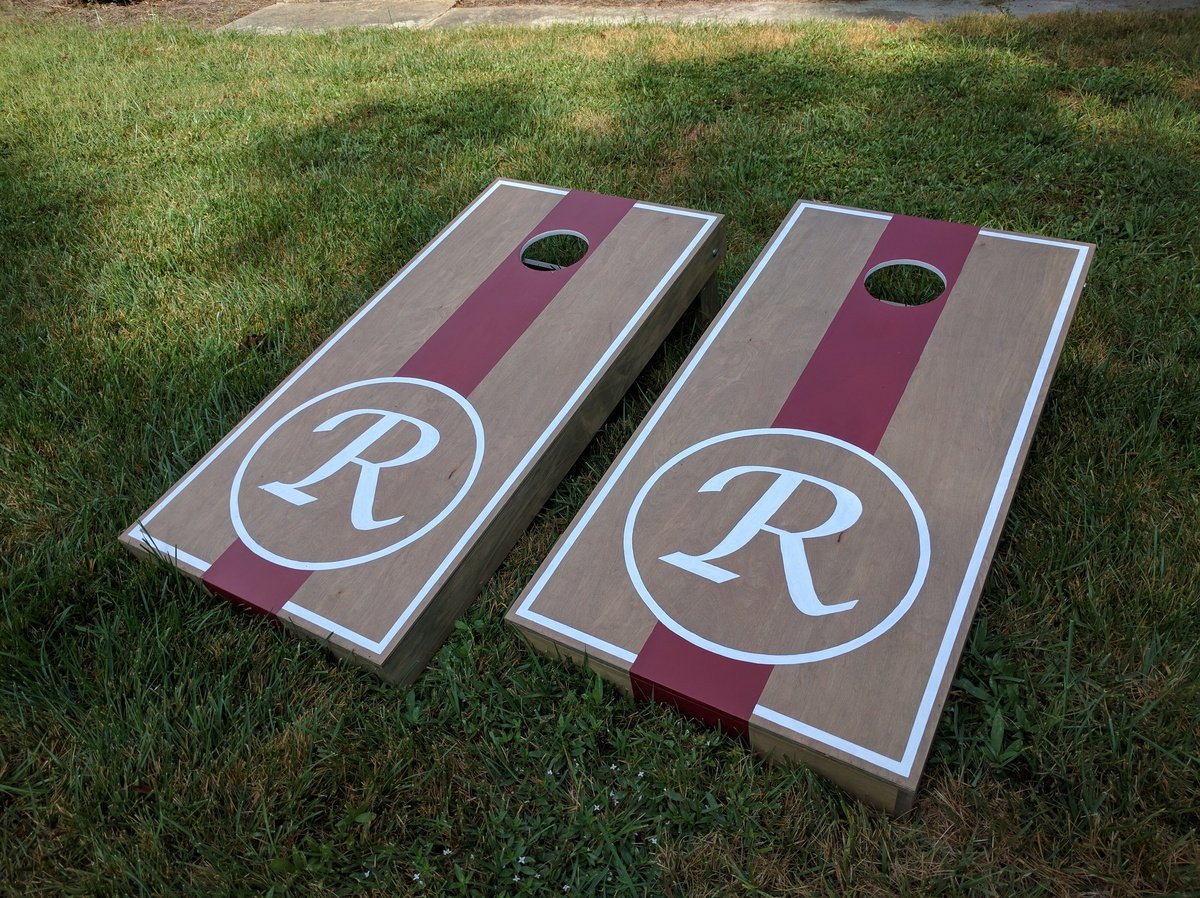
Cornhole boards for friends and family :)       Used 1x4s for framing and legs, 1/2" ply for top.


"R" set:  Birch plywood tops w/ (2) coats of Miniwax Weathered Oak oil stain. Red stripe is Behr 'Cherry Cola.'  (3) coats of Polycrylic finish.


"AW" set:  Regular plywood tops w/ (1) coat of Miniwax Special Walnut oil stain & Glidden 'Clemson Orange' stripe.   (3) coats of Polycrylic finish.

Estimated Cost
$100/set (2 boards)
Estimated Time Investment
Weekend Project (10-20 Hours)
Finish Used
(see description)
Recommended Skill Level
Intermediate

Comments

Seasonal And Holiday

Train Table with drawers and flippable top

Submitted by kcobbuofa on Fri, 10/12/2012 - 13:50

When I built the Mom's Train Table, I wanted the top to flip to look like an actual painted train table. That meant while the kiddo was playing trains, he wouldn't be able to access the storage below the plywood. To solve that problem, I used almost the entire storage space for two drawers, one for trains, one for track. The drawers were built on wooden slides, using 1x4" pieces for the sides and backs. The slides were waxed to slide better. Since the drawers allow access to the inside of the table, I also decided not to add the "access hole" to the center of the plywood top.

Built from Plan(s)
Estimated Cost
$175
Estimated Time Investment
Weekend Project (10-20 Hours)
Finish Used
Stained with pecan color and a high gloss top coat. Sanded again with high grit after two coats and then a third coat was applied.
Recommended Skill Level
Intermediate

Comments

My version of the Small Chicken Coop with Planter, Clean Out Tray and Nesting Box -with the addition of a chicken run

I loved the design that Lady Goats and Ana had created but it wasn't quite right for me, so I used the 'essence' of the coop and tweaked it.

I had some leftover metal roofing sheets from a tool storage area I'd made so used this on the roof, and also made the roof a pent shape. I moved the doors to the side, and also reduced the size of the planter. Next to the planter I've made a lift up hatch so that I can more easily replace the water and feeders.
I've added in a 2m x 1.8m (approx. 6.5ft by 6 ft) run so that the little chicks are safe and can run about from their coop.

The whole coop is covered in stainless steel rodent mesh so not only can foxes not get in (our main predator in the UK) but also rats and mice won't be able to get in to take their food and bring their disease.

I undercoated all the wood and then double-coated in exterior weather-proof gloss. Inside the coop I triple coated (I wanted to be thorough!) and also sealed every single joint in the whole build to avoid water penetration as well as mites setting up camp. It's already very easy to clean and hopefully should last a long time.

Hope that you like what I've done here. I'm so pleased with the results but pretty tricky to do by myself.
I'm learning, learning, learning though :-)

P.S. Sorry that the pics below aren't the correct way up -I don't know how to make them appear in the right direction.....

Estimated Cost
£500
Estimated Time Investment
Week Long Project (20 Hours or More)
Finish Used
I sanded all the wood to within an inch of it's life (!) then undercoated all the wood with an exterior weathertight product (Zinnser BIN primer sealer) and then double coated all the non-inside areas with Sandtex Exterior white gloss.
The areas inside the coop were tripled coated and every joint was sealed with exterior caulk and then repainted.

It should hopefully be washable, mite-proof and last a long time now!
Recommended Skill Level
Advanced

Comments

Chicken shed

Submitted by diegaeb on Wed, 10/07/2020 - 08:32

I had started this project last year in September and finished it finally 2020 in March because I get my chicken then.
I did modify the chicken coop a little bit due to the material I got.
The instructions and most of all the cutting list I like best!

Antje

Built from Plan(s)
Estimated Time Investment
Week Long Project (20 Hours or More)

Comments

Simple 2x4 Potting Bench modified with inset tote for potting soil or water

Submitted by SusanStory on Thu, 04/15/2021 - 10:10

Made this for a friend who does cuttings of her plants for others. I used the Simple 2x4 potting bench plan and modified it to hold an inset 7 gal. Commander tote box with snapping lid with two 2x4 @ 22" braces to support the tote on each side attached to the front and back aprons. She wanted something that would hold a medium size bag of potting soil with a lid to keep snakes and other critters out since she lives in the country. There are plenty of hooks to hang tools and other items.

Estimated Cost
$224.00
Estimated Time Investment
Afternoon Project (3-6 Hours)
Finish Used
Thompson Water sealer
Recommended Skill Level
Beginner

Comments

Square picnic table

Submitted by Anonymous (not verified) on Sat, 05/08/2021 - 14:13

Followed Anna White’s plans except I beveled all the edges and flooded the table leg bottoms with penetrating epoxy sealer. The table looks great!

Built from Plan(s)
Estimated Cost
$425
Estimated Time Investment
Weekend Project (10-20 Hours)
Finish Used
2 coats exterior semi-transparent sealer (Padre)
Recommended Skill Level
Intermediate

Comments

Tiered Planter

Submitted by Anonymous (not verified) on Mon, 05/31/2021 - 16:24

Great planter plan. very easy to build

Comments

Seasonal And Holiday

Rustic X Bookshelves

Submitted by hnick78 on Tue, 10/05/2021 - 06:22

I was commissioned to build these bookshelves to go along with the “Rustic X” consoles table. The finish is distressed white and True Browns stain.

Built from Plan(s)

Comments

Tilt Out Garbage Bin

Submitted by stephie_00 on Thu, 04/23/2015 - 19:16

Modified the plan to use pallet wood and stained it classic grey for a weathered look.

Estimated Cost
$50
Estimated Time Investment
Weekend Project (10-20 Hours)
Finish Used
Min wax Classic Gray oil-based stain
Recommended Skill Level
Intermediate

Comments

The Boy Cave

It was time to upgrade my boy's toddler beds to big boy beds. They wanted bunk beds but I was afraid they'd take turns jumping off the top bunk. When I came across the Sweet Pea bunk bed plans I was so excited because the design wouldn't allow them to jump off the top bunk.

I was inspired by someone else on this feed who built doors. I also tweaked the pergola a bit. I also added extra support to the rear panel framing by adding another vertical post from the top of the horizontal post to the top bunk horizontal post and then another from the top bunk to the bottom bunk horizontal post, both directly down the middle. Probably overkill but felt that was a long run for the rear panel sections. I made my roof out of plywood siding panel and framed it on the back side to keep it from bowing and added support. A few more added elements are a dedicated fan for each bunk, reading lights, and led light strips that flash and fade into different colors. 

I had a lot of fun building this and since it's been completed, I've had even more fun building much smaller projects. 

Thank you Jenny for sharing your plans on Anna White's website and thank you Anna White for sharing all of your wonderful plans as well! 

Estimated Cost
$800
Estimated Time Investment
Week Long Project (20 Hours or More)
Finish Used
Minwax Water Based Stain in Slate and American Walnut. Mute with watered down antique white latex paint then lightly feather antique white paint for the final touch to get the distressed streaks. Finshed with Minwax Water based satin polyurethane.
Used onyx black latex paint on the roof and antique white on all of the trim.
Recommended Skill Level
Intermediate

Twin Farmhouse Bed with Trundle

Took the farmhouse plan and added a Trundle.   Was initially going to build two farmhouse beds for my two girls, but thought adding the Trundle would free up some much needed floor space.  The girls love it!

Estimated Cost
$150
Estimated Time Investment
Day Project (6-9 Hours)
Finish Used
Latex paint
Recommended Skill Level
Intermediate

Fortnite Battle Bus boys bedroom loft

Submitted by bbcarey on Mon, 10/15/2018 - 08:31

We remodelled my son's room and what better theme than Fortnite for an 8 year old... and what better loft than the Battle Bus!!

Estimated Time Investment
Week Long Project (20 Hours or More)
Finish Used
Latex paint
Recommended Skill Level
Intermediate

American Girl Dollhouse with Farmhouse Bed, Bunk Bed, and Furniture

Submitted by Anonymous (not verified) on Tue, 01/08/2019 - 08:46

I've been building Ana White American Girl doll furniture for my two daughters for the last three years, culminating with my biggest build of all - a modified version of Ana's dollhouse.

My wife kept telling me it would end up being huge, and she was right.  The great news is that it doubles as storage when the girls aren't playing!  2 Bedrooms, kitchen, living room, bathroom, and upstairs bonus room for dance and gymnastics.  78" tall x 76" wide, mounted to the wall studs for safety.   Lots of joy in our home on Christmas day.  Thanks Ana!

Estimated Cost
$300
Estimated Time Investment
Week Long Project (20 Hours or More)
Recommended Skill Level
Intermediate

Comments

Beachy Storage Sofa

I love my new sofa! It is ten times more comfy than our old one. We live on an island and it was definitely cheaper to build my own sofa than to ship one in and pay duty on it. Thank you Ana for making this possible! Never thought I'd be building my own sofa, but we are so thankful for it. We even threw together our own little ottoman/toy box to go along with it from scraps...added bonus!


Built from Plan(s)
Estimated Cost
Total for everything probably about $500 ( a little higher costs for the wood here on the island, in addition to the other materials)
Estimated Time Investment
Weekend Project (10-20 Hours)
Finish Used
Clear Satin Poly finish on the parts of the wood that are still visible after the fabric goes on.
Recommended Skill Level
Intermediate

Comments

Jan (not verified)

Sat, 07/21/2012 - 09:56

this is so amazing! We go through so many sofas, mainly because we buy used, and you never know if they are going to last. This one looks really sturdy, and it could be recovered if the fabric got old, or you just wanted to update. Definitely considering this before we buy another one. And the storage hidden inside makes it even more desirable!! Love the fabric you chose as well.

Fire Pit Bench

Submitted by docfin02 on Mon, 02/15/2016 - 09:18

Modified the plans slightly to make a bigger bench, especially on one end. Added rope lights underneath for a cool effect.

Estimated Cost
$225, including rope lighting underneath and having to buy screws and glue
Estimated Time Investment
Weekend Project (10-20 Hours)
Recommended Skill Level
Intermediate

Comments

Simple Play Kitchen

Submitted by Anonymous (not verified) on Sun, 06/04/2023 - 13:03

I made this play kitchen as a Christmas present for my kids, and it’s been a big hit! It’s built mostly from leftover hardwood plywood, and a couple of 1x12 pine boards. The oven knobs and faucet were cut from redwood scraps and attached with 1/2” dowels to freely rotate. The vertical surfaces were painted with leftover house paint and sealed with water-based polycrylic. It was a fun build, and I learned some new skills (like installing hinges)! Thanks for the plans!

Comments

Coen's Cabin Bed

Submitted by Anonymous (not verified) on Mon, 02/29/2016 - 15:28

This is a fairly easy build. It did take some time with three little ones running around, but the finished product is well worth it! My three-year-old doesn't want to get out of bed in the morning (win!).

Built from Plan(s)
Estimated Cost
$250-$300
Estimated Time Investment
Week Long Project (20 Hours or More)
Finish Used
Minwax weathered oak stain
Recommended Skill Level
Intermediate

Comments

Ana White Admin

Tue, 03/01/2016 - 12:19

You did an amazing job on this, I wouldn't want to get out of bed either! Thanks for sharing:)